

Page 1
USER’S MANUAL
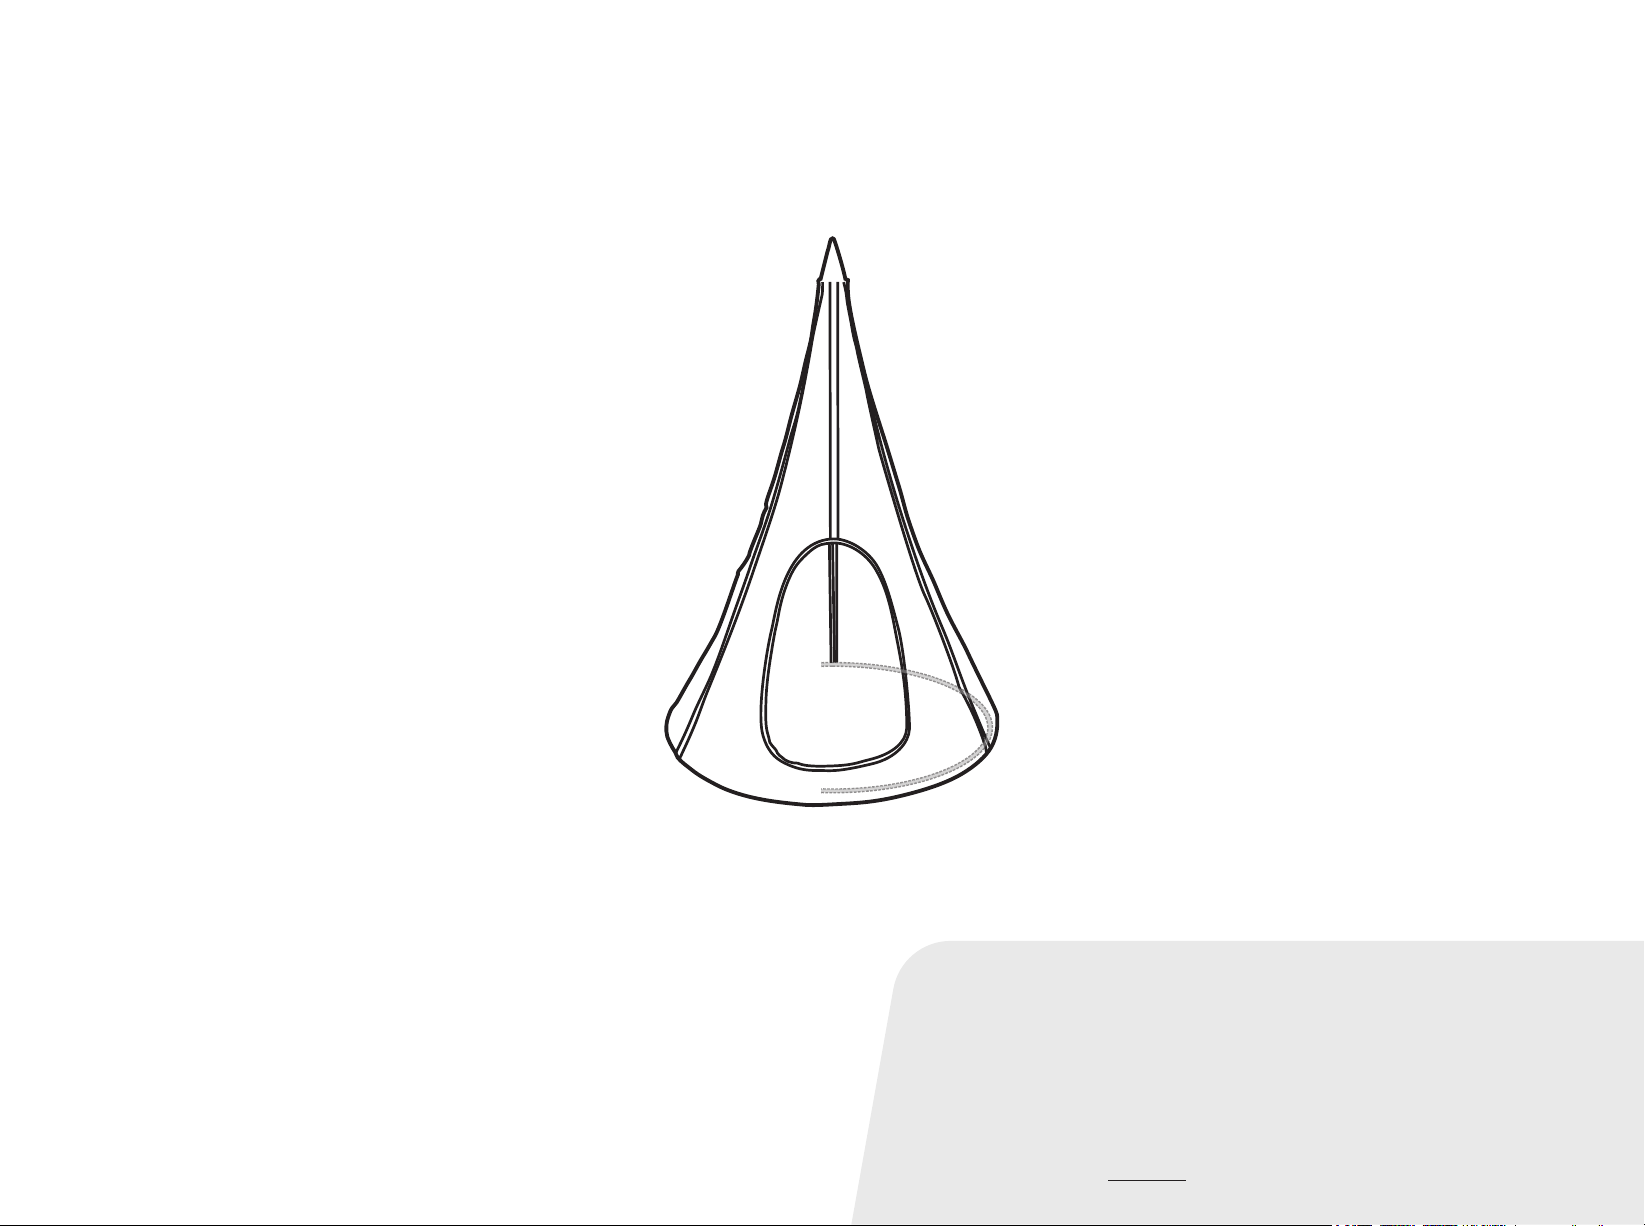
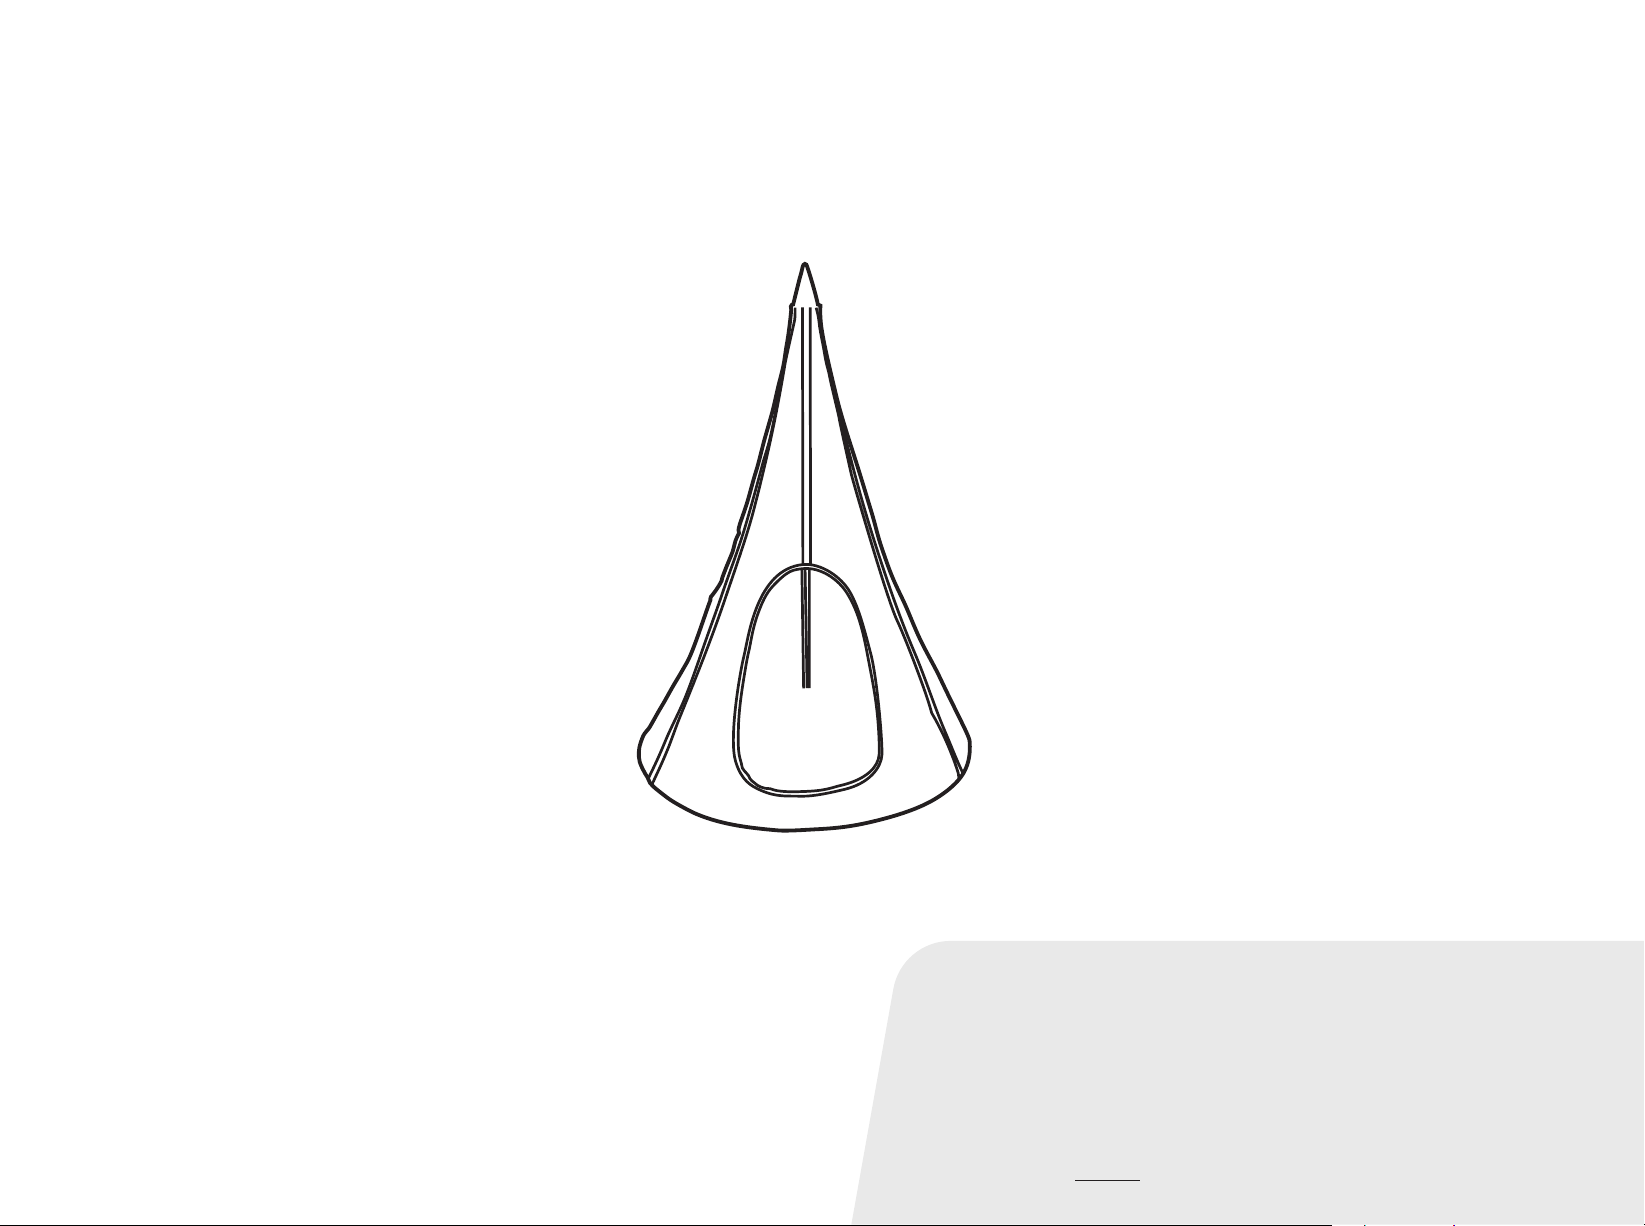
Kids Swing Hammock
THIS INSTRUCTION BOOKLET CONTAINS IMPORTANT SAFETY INFORMATION. PLEASE READ AND KEEP FOR FUTURE REFERENCE.
Page 2
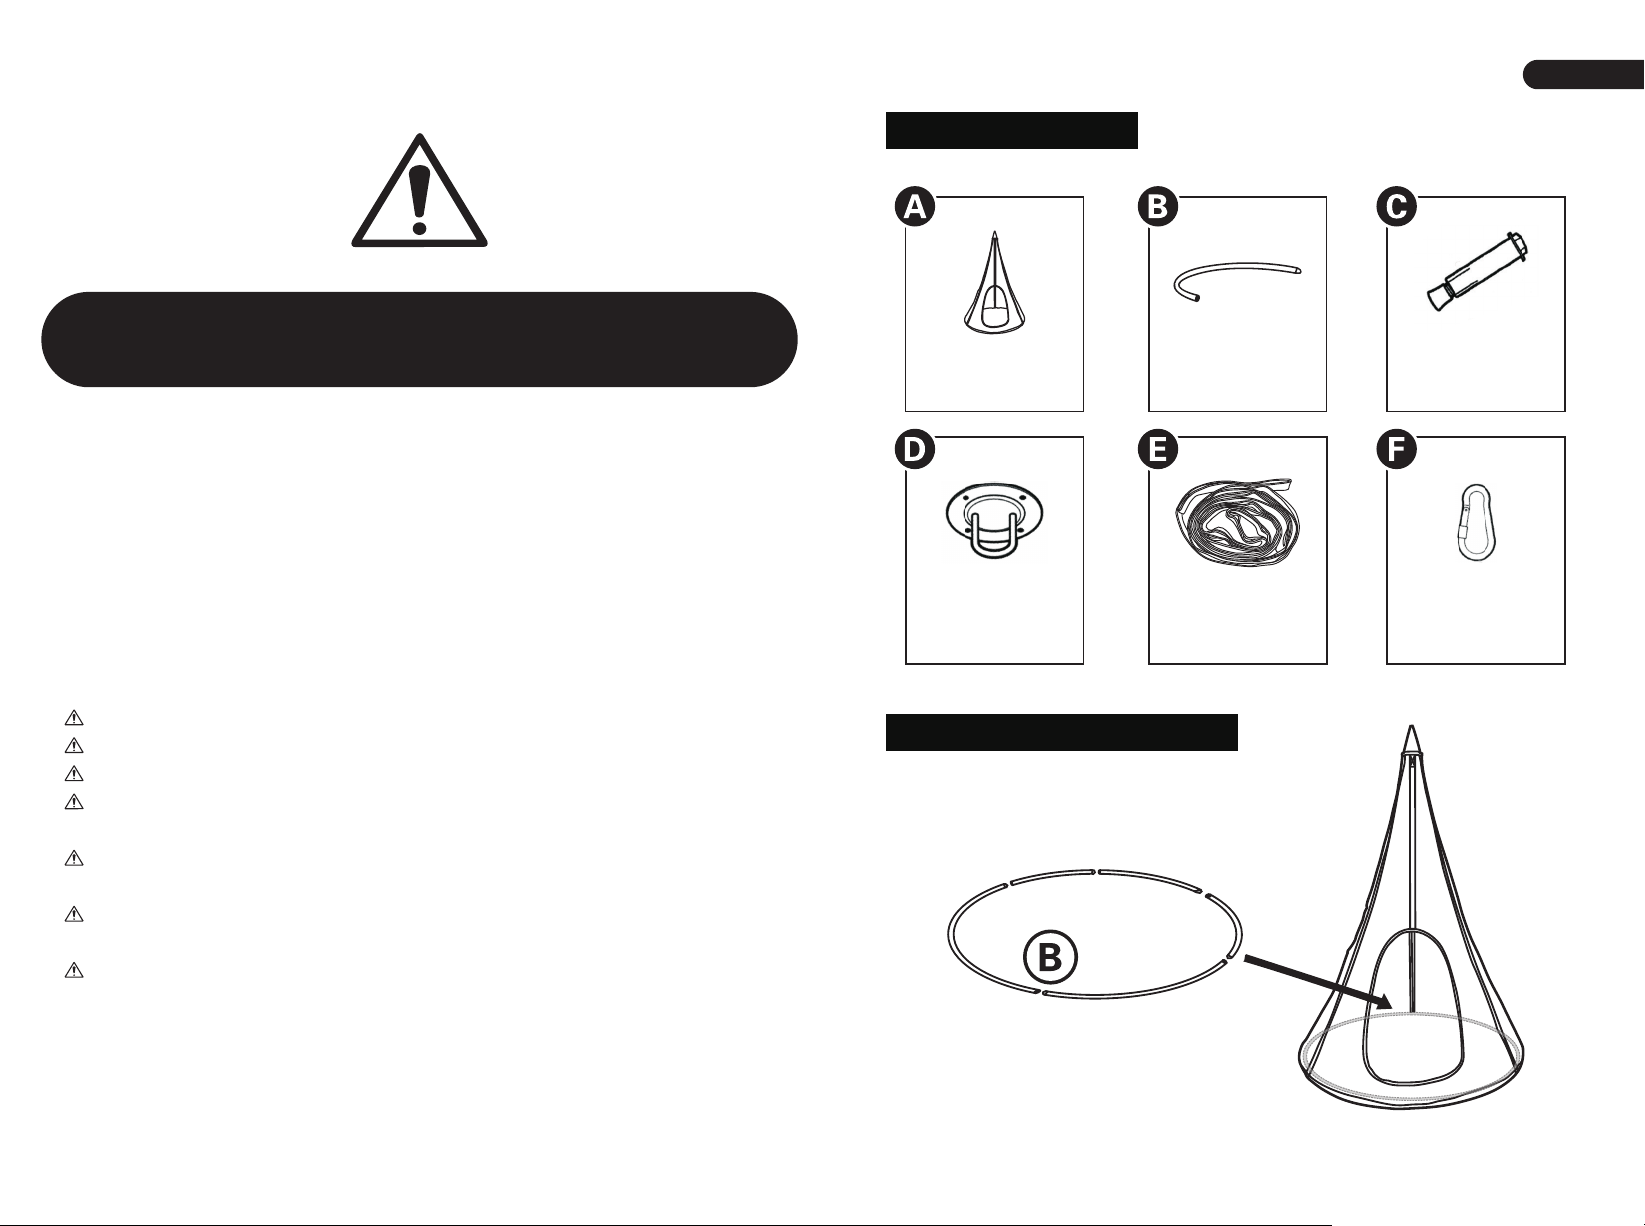
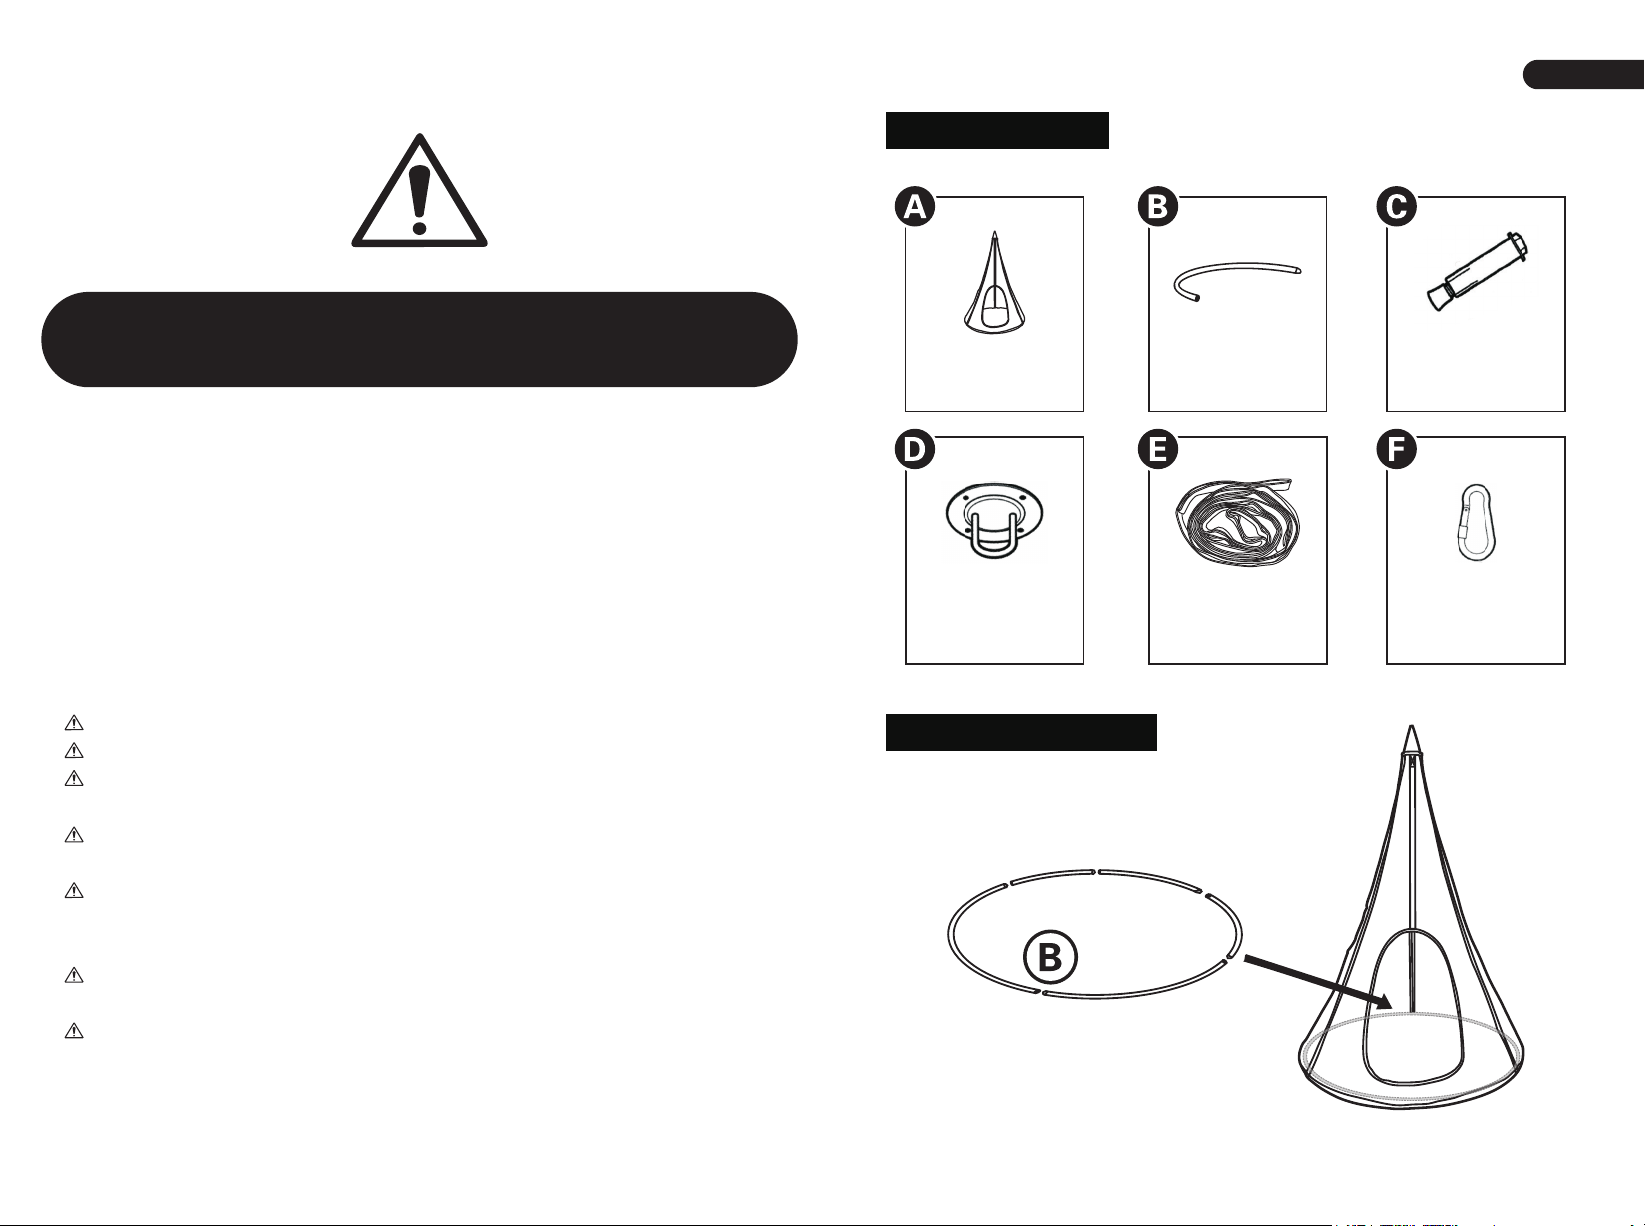
PARTS LIST
EN
Before You Start
Please read all instructions carefully and keep it for future reference.
Warnings:
Attention: For home use only.
Attention: The product is not suitable for the children under 3 years
Danger: Keep all small parts and packaging materials for this product away from babies
and children, otherwise they may pose a choking hazard.
Danger: Lack of attachment may cause a risk of tipping or falling hazard.
General Warnings:
The product must be installed and used under the supervision of an adult.
Read through each step carefully and follow the proper order.
Remove all packaging, separate and count all parts and hardware.
Please ensure that all parts are correctly installed, incorrect installation can lead to a
danger.
We recommend that, where possible, all items are assembled near the area in
which they will be placed in use, to avoid moving the product unnecessarily once
assembled.
Ensure a secure surface during installation, and place the product always on a flat,
steady and stable surface.
Please check and maintain it regularly, and the most important part needs to be
suspended, fixed, or anchored to the ground.
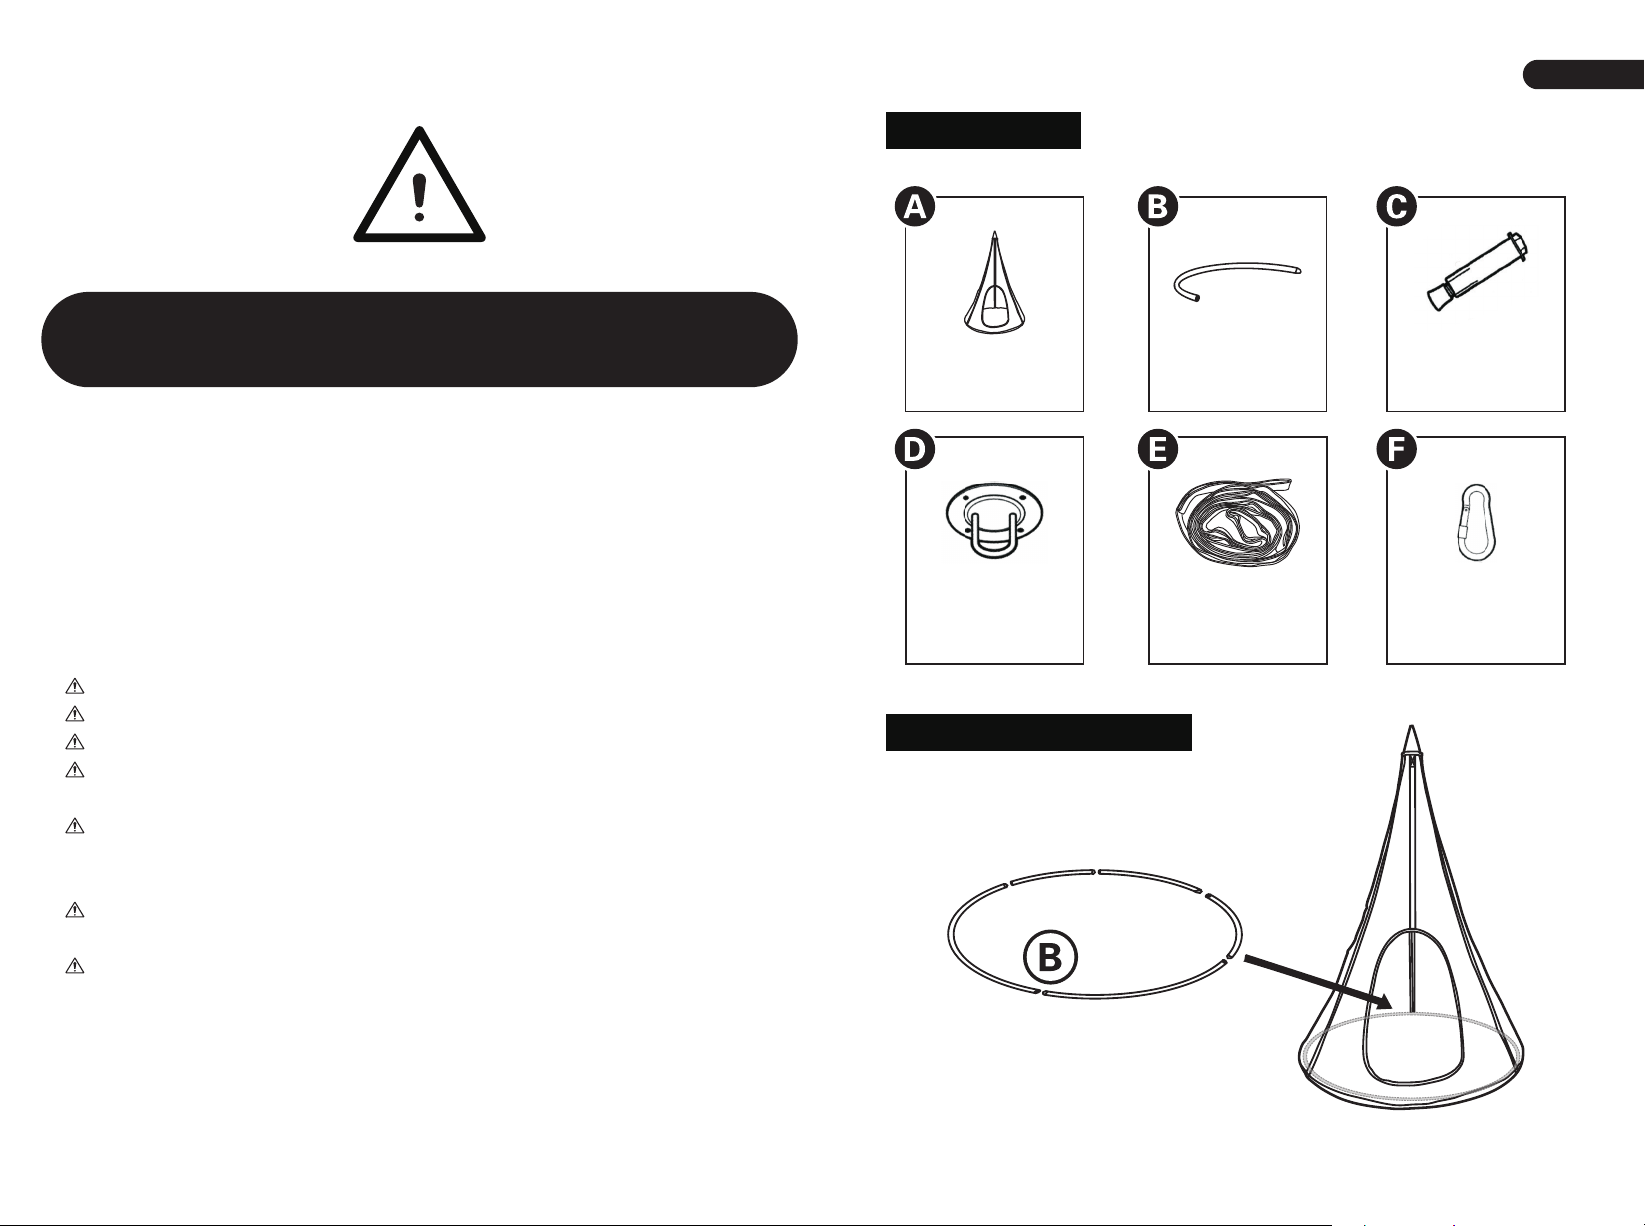
Tent Cover
1 PC
Four-hole
Disc
1 PC
Product Installation
x 5
Steel Tube
5 PCS
Connecting
Rope
1 PC
Expansion
Screw
4 PCS
Spring Hook
2 PCS
02 03
Page 3
EN
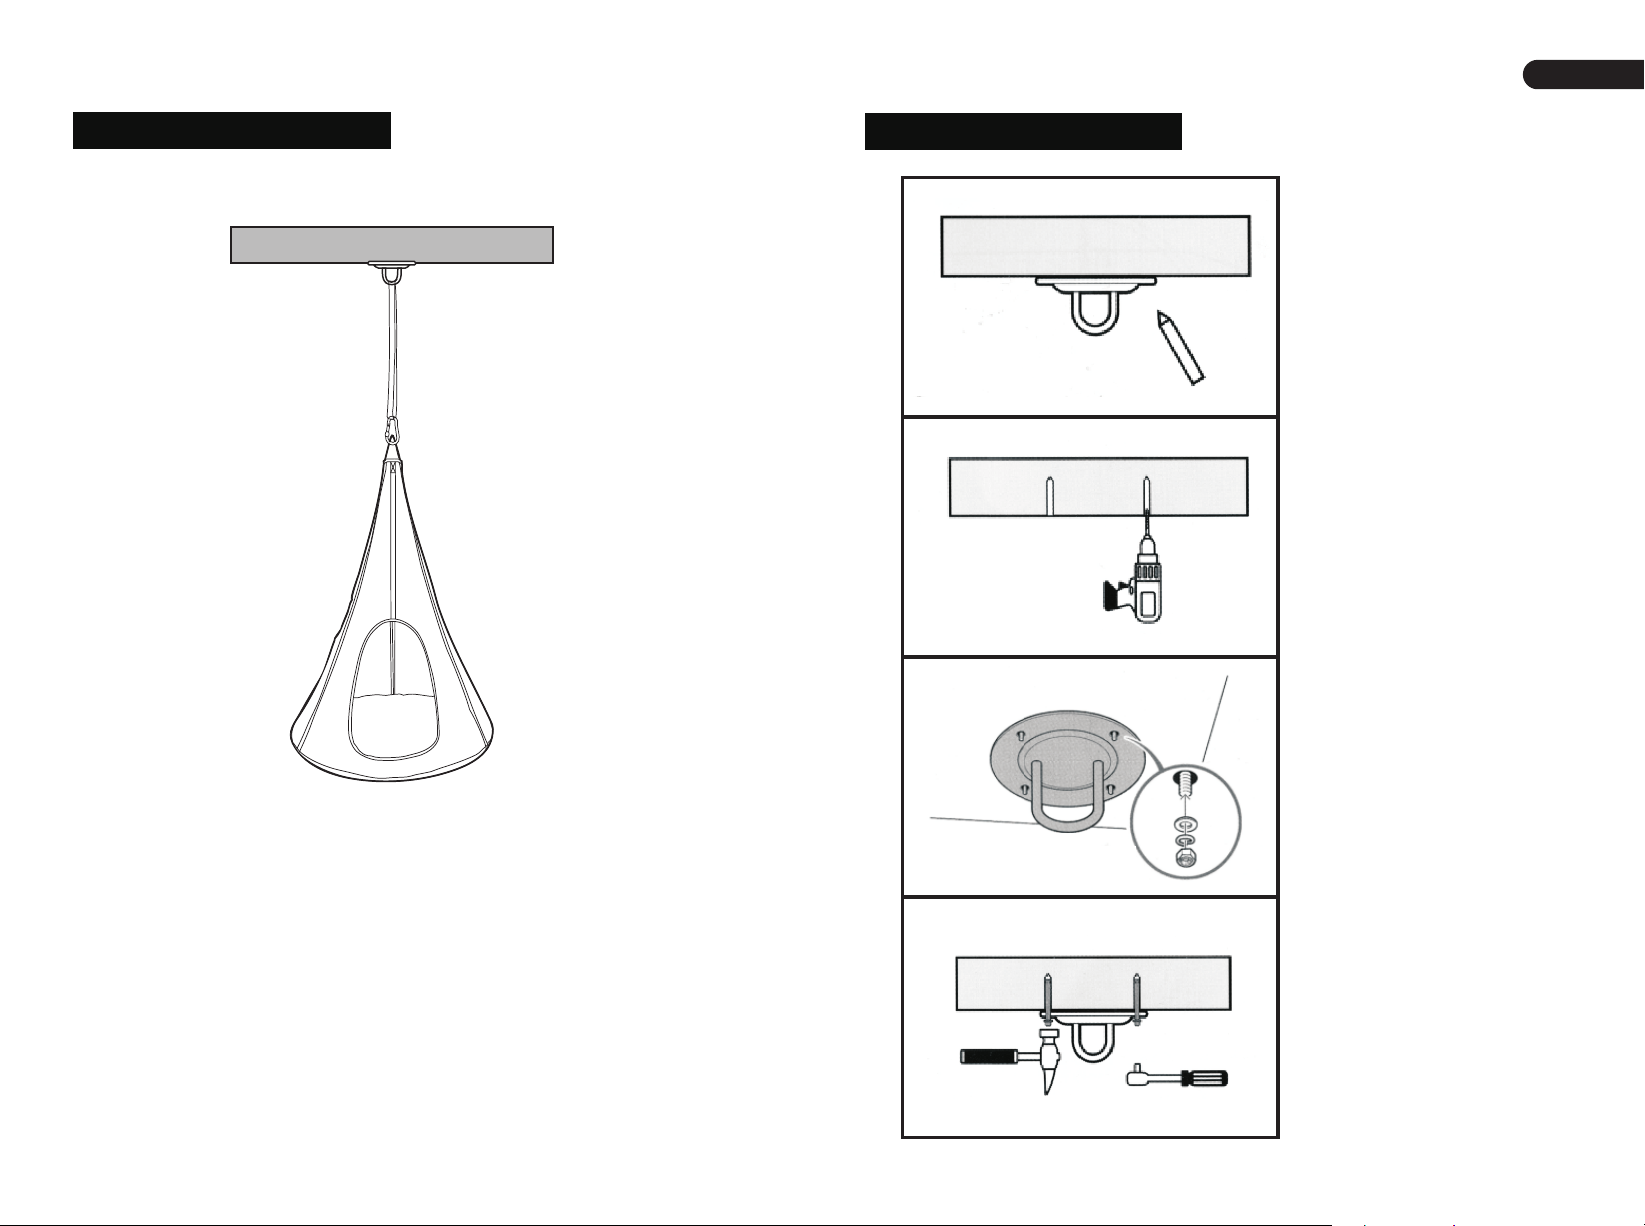
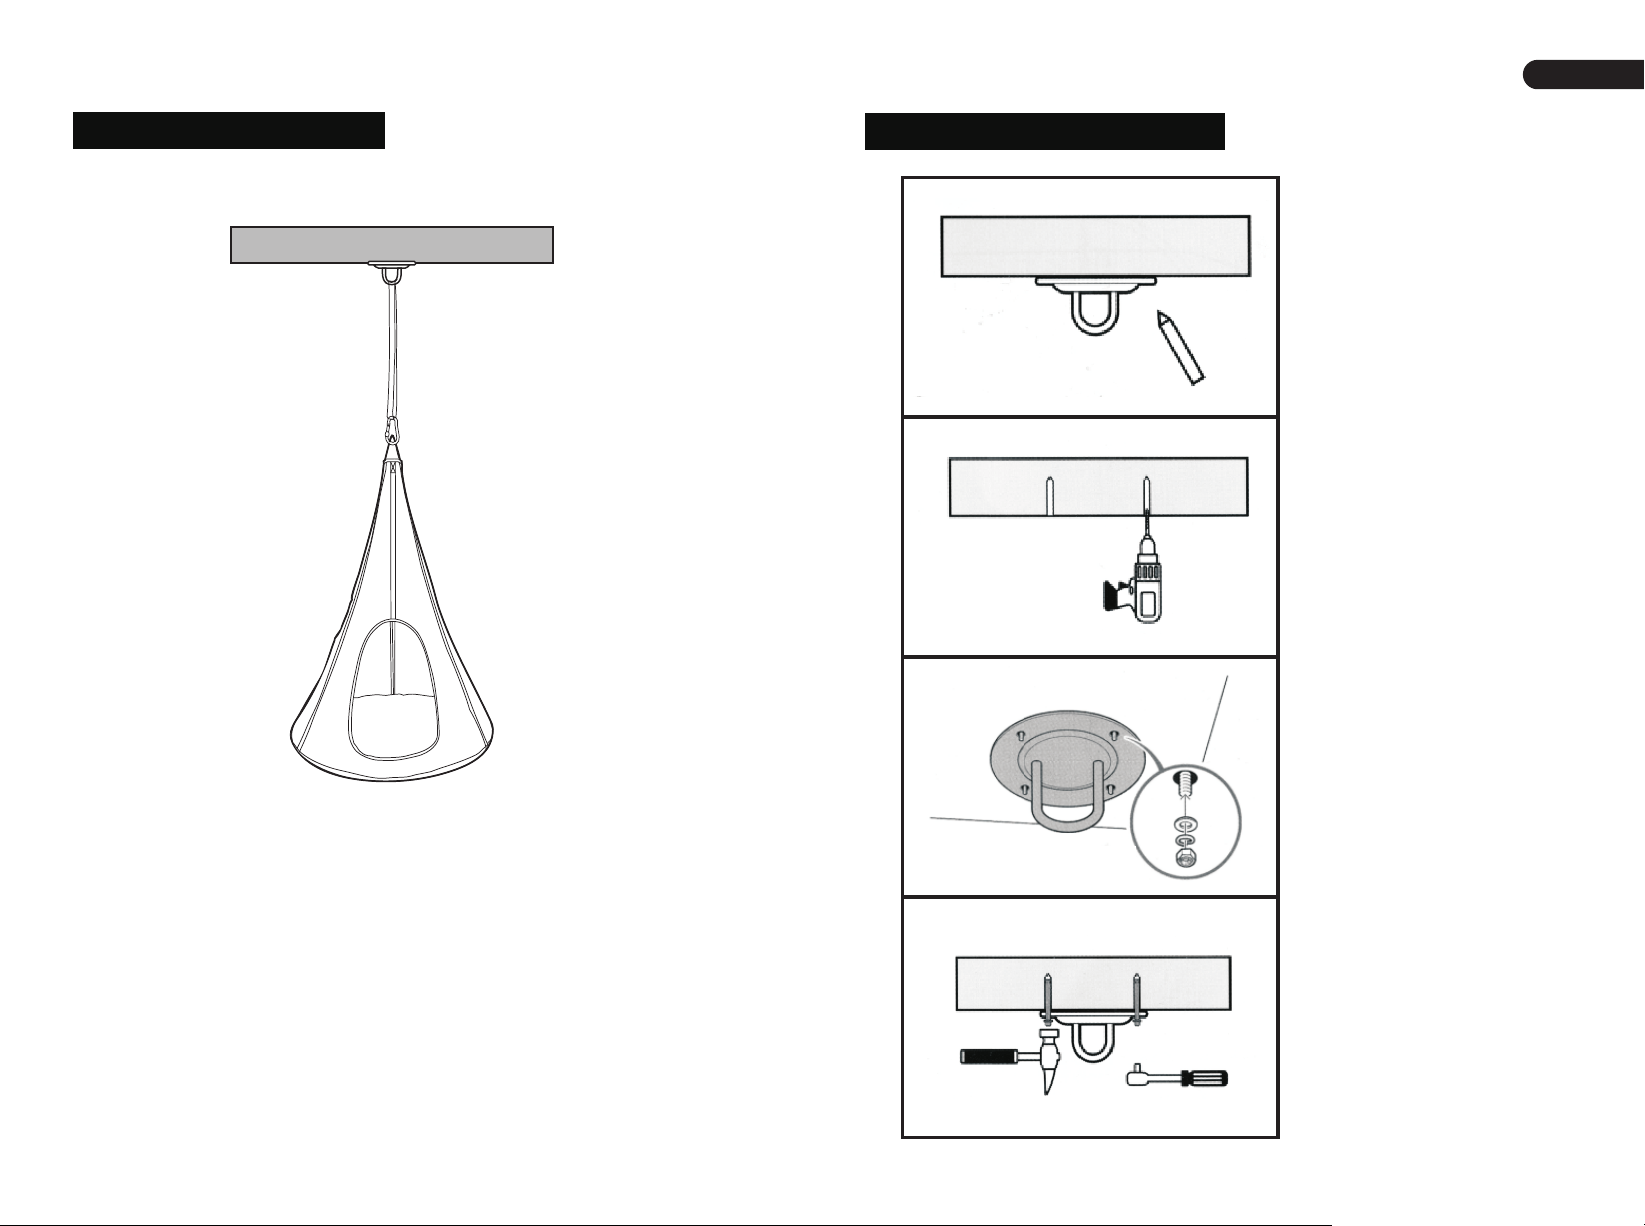
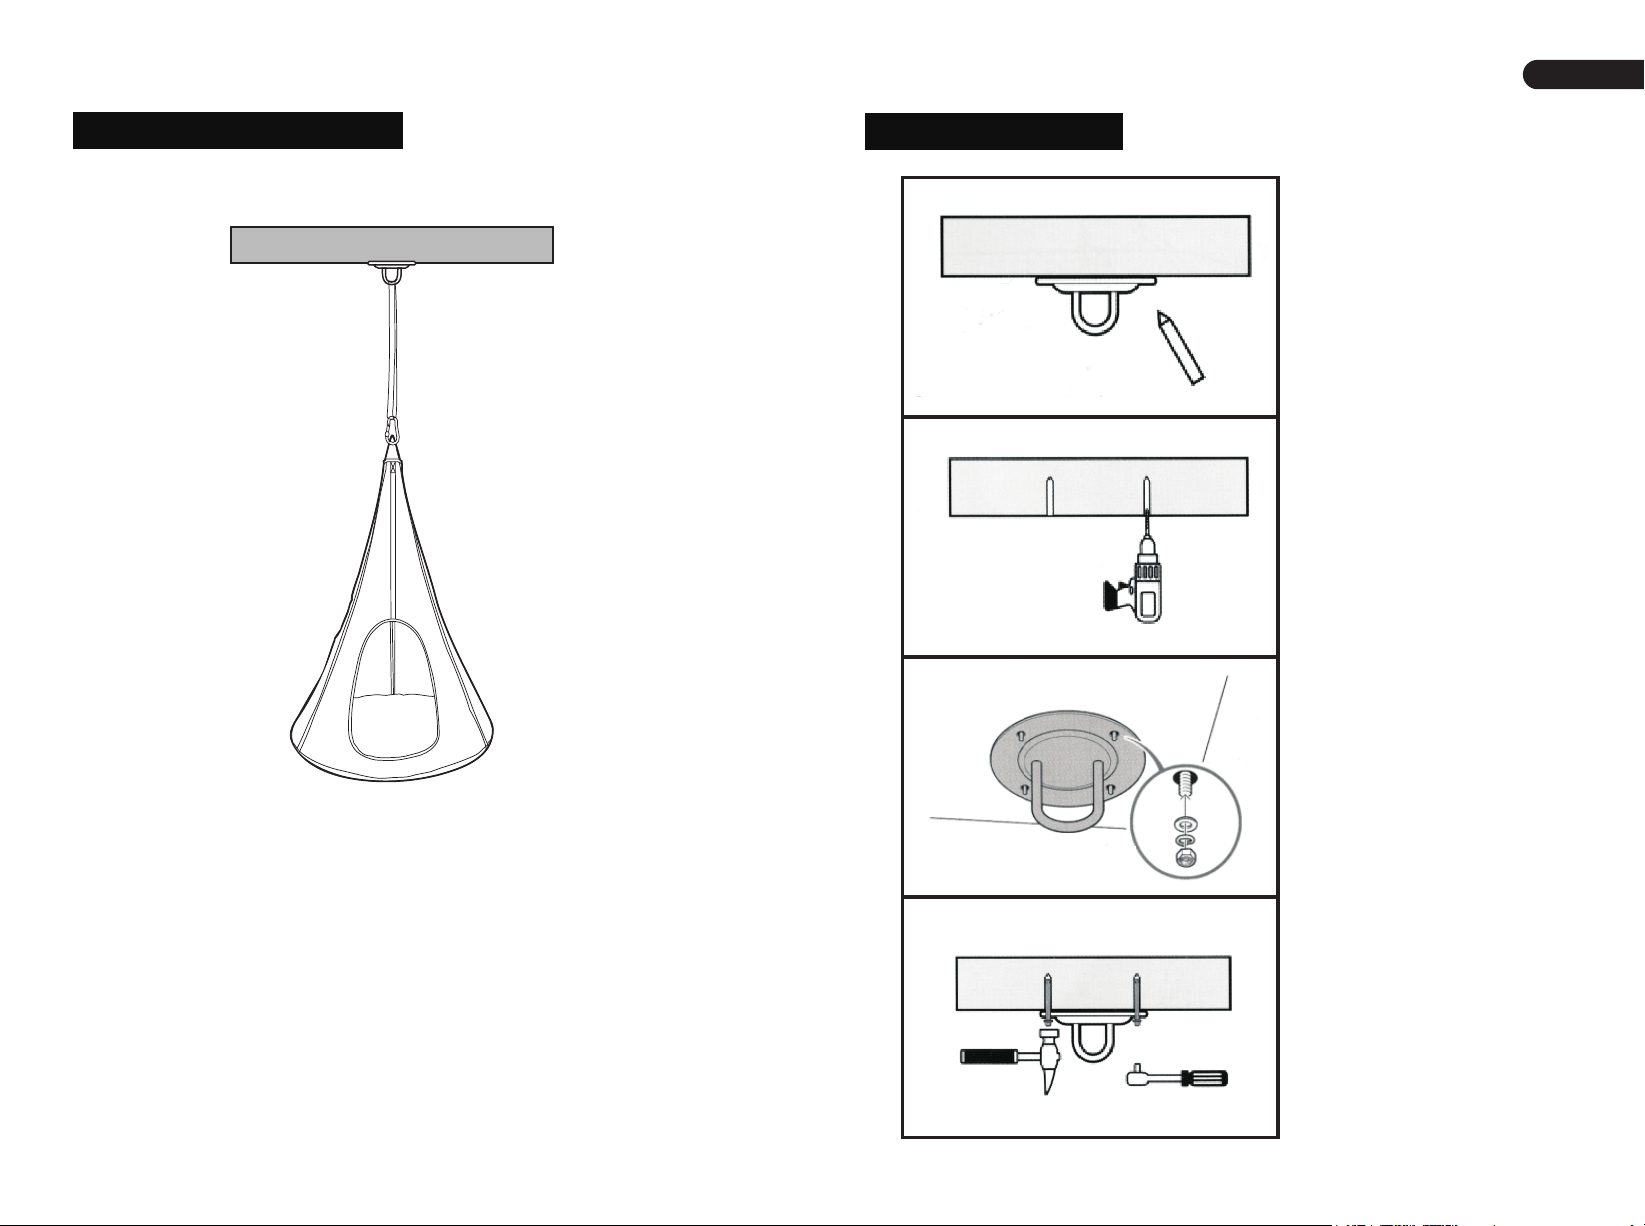
Hanging on the Roof
Concrete Wall
Installation process
1.Use a pencil to mark
the locations that need
to be punched. (Cannot
be installed to the
ceiling, hollow wall)
2.Use a 12MM drill bit
and use an Impact drill
to make holes. The
depth of the hole is not
less than the length of
the expansion screw.
3.Install the expansion
screws correctly as
shown in the figure.
Note: Try to avoid hanging the swing too high. It
is normal for children to be a little scared when
they just start playing. In order to ensure a good
gaming experience, the distance between the
bottom of the swing and the ground is controlled
between 12”-18” (30cm-45 cm). If the swing
rope is not long enough, please use the equipped
connecting rope.
4.Insert the expansion
screw into the hole,
screw it in gently with
a tool, and finally
tighten the nut with
maximum force.
04 05
Page 4
EN
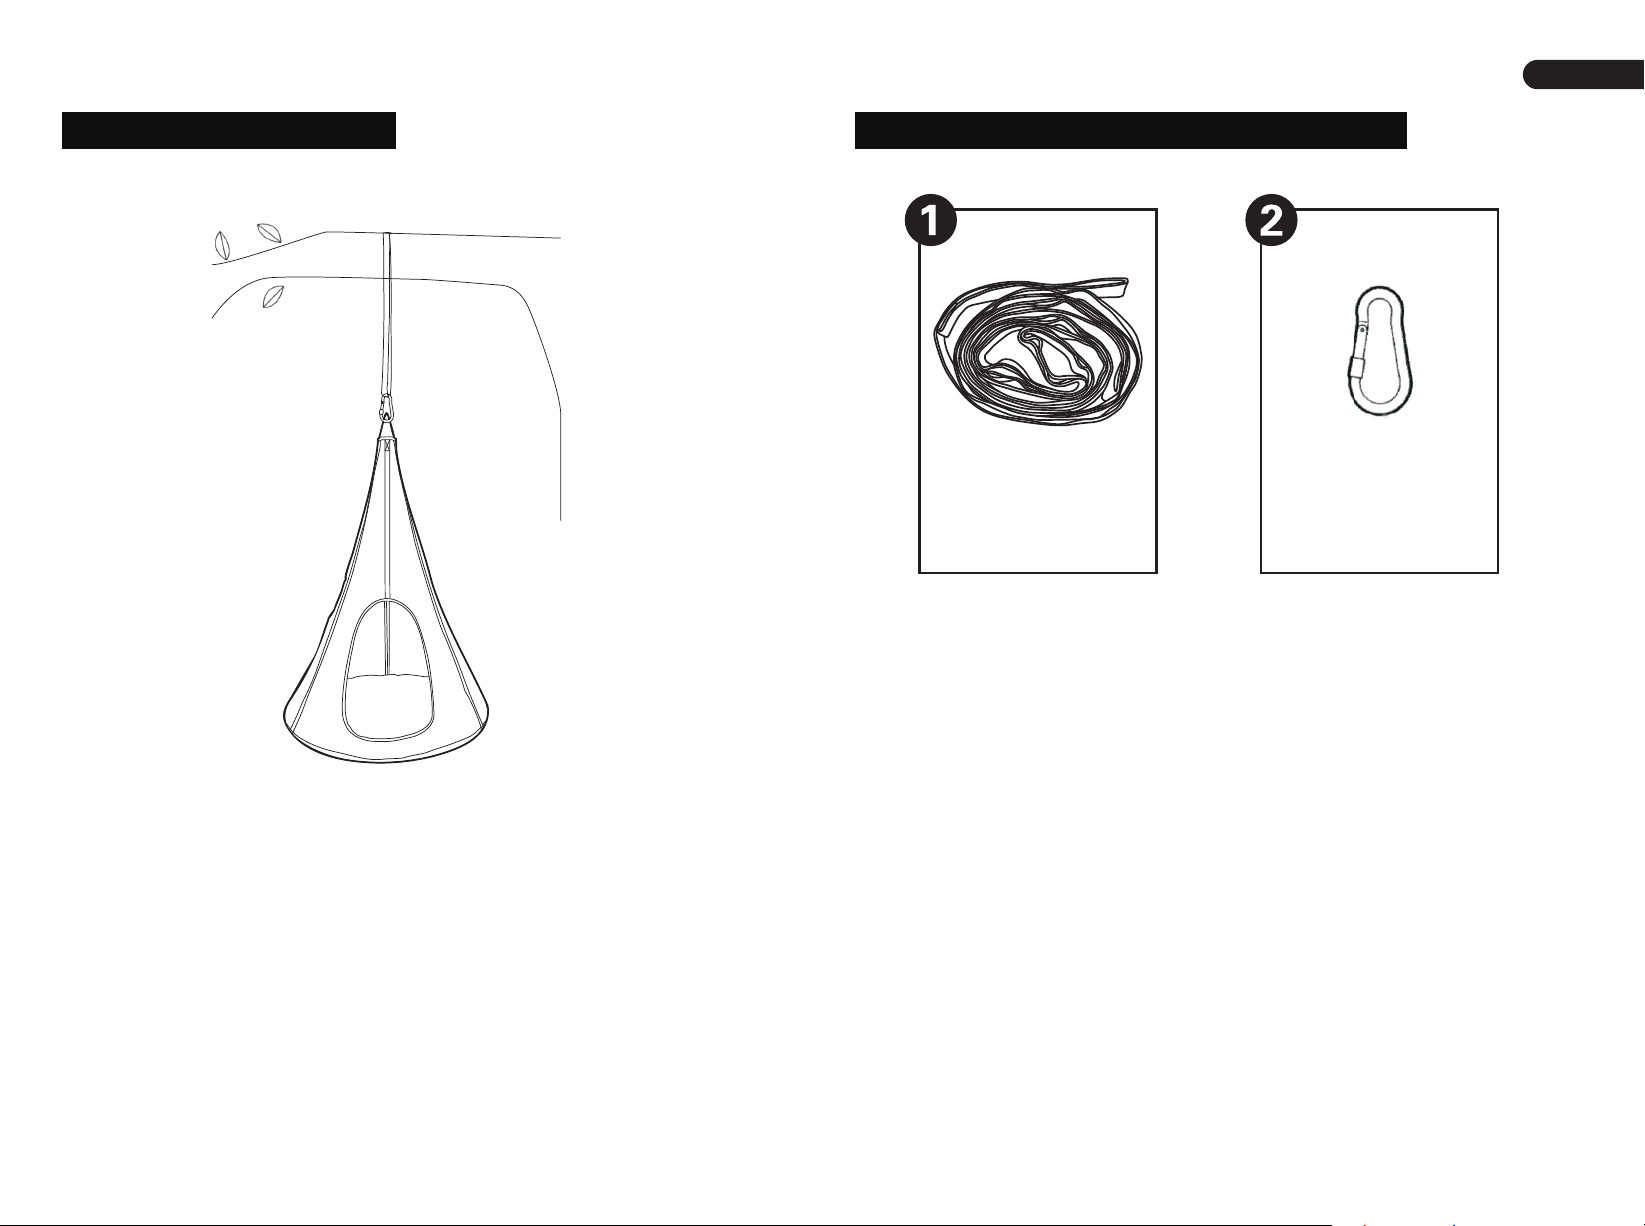
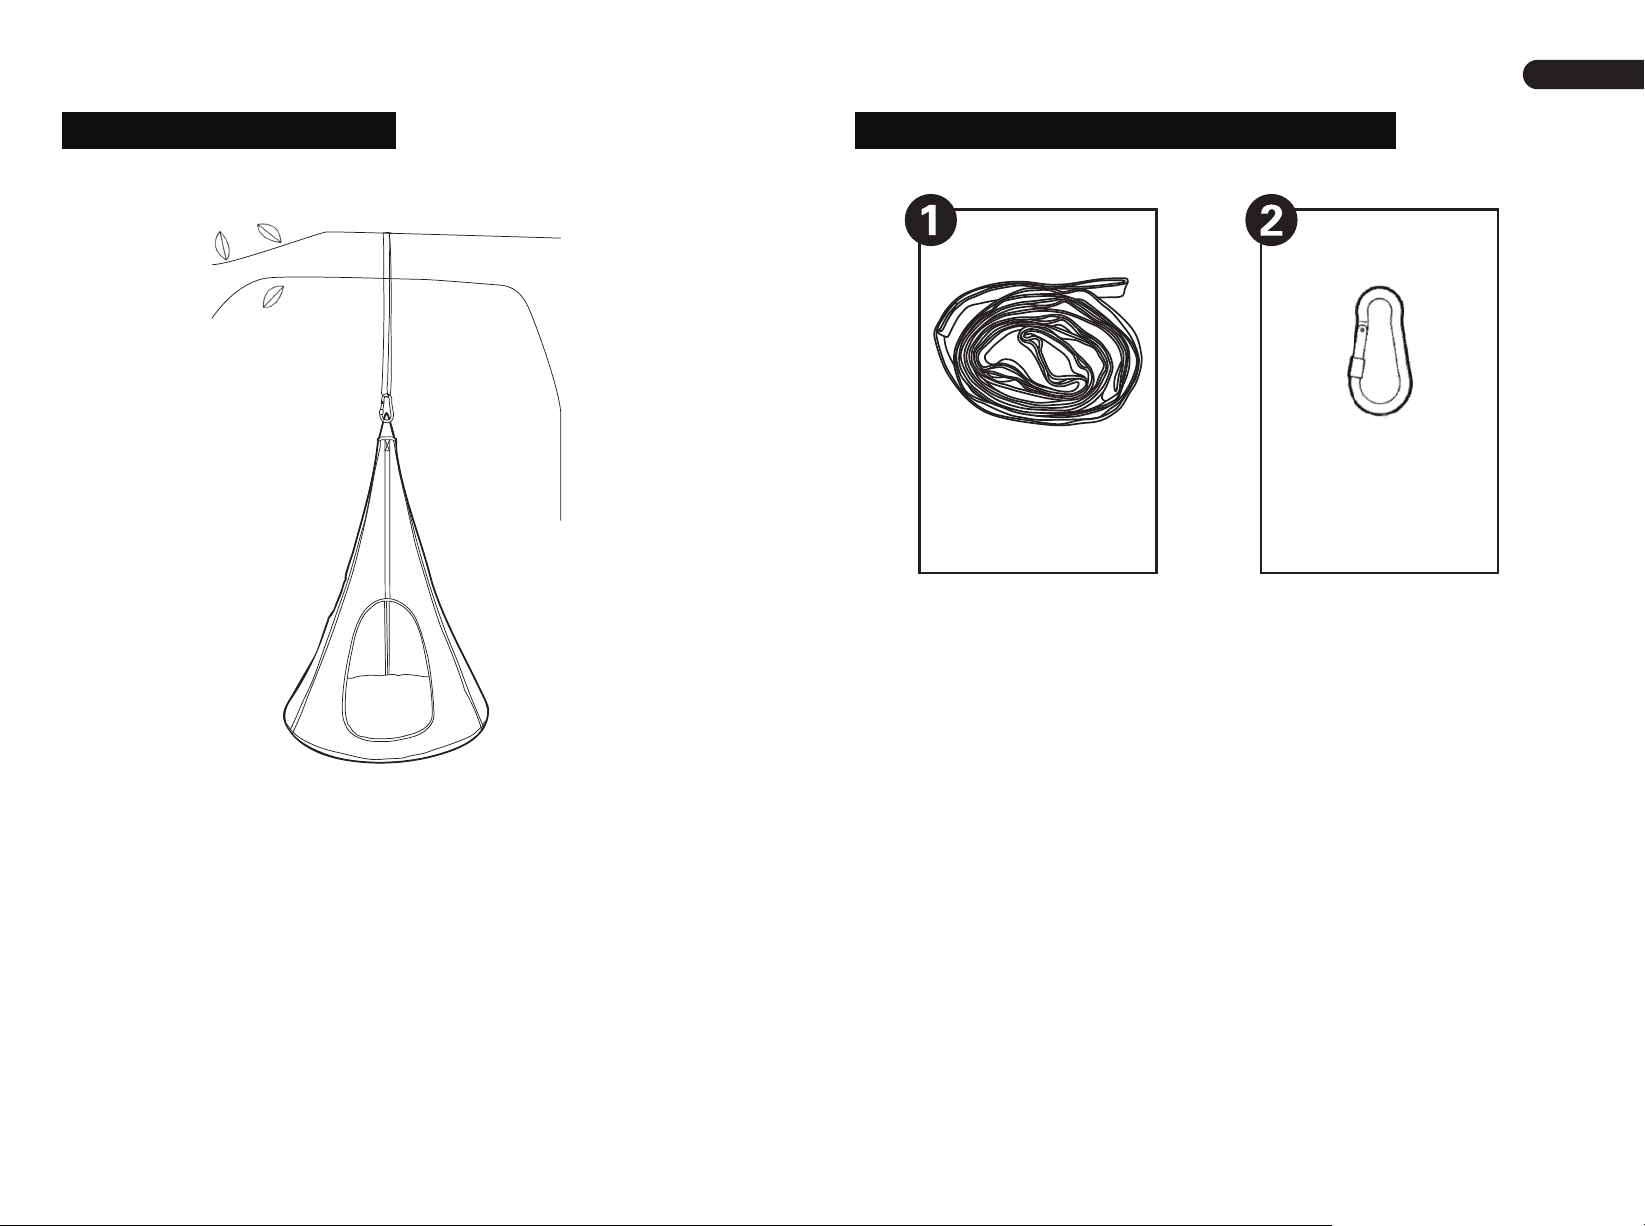
Hanging on the Tree
Accessories Required for Installation
Connecting
Rope
1 PC
Spring Hook
2 PCS
Note: You should choose branches with a
diameter greater than 10” (25cm) to hang the
swing hammock. To ensure safety, please make
sure that the adjustment rope is installed correctly
after hanging, and then an adult must test its
firmness by pulling down the swing hammock. In
addition, the distance between the bottom of the
swing and the ground should be controlled
between 12”-18” (30cm-45cm).
06 07
Page 5
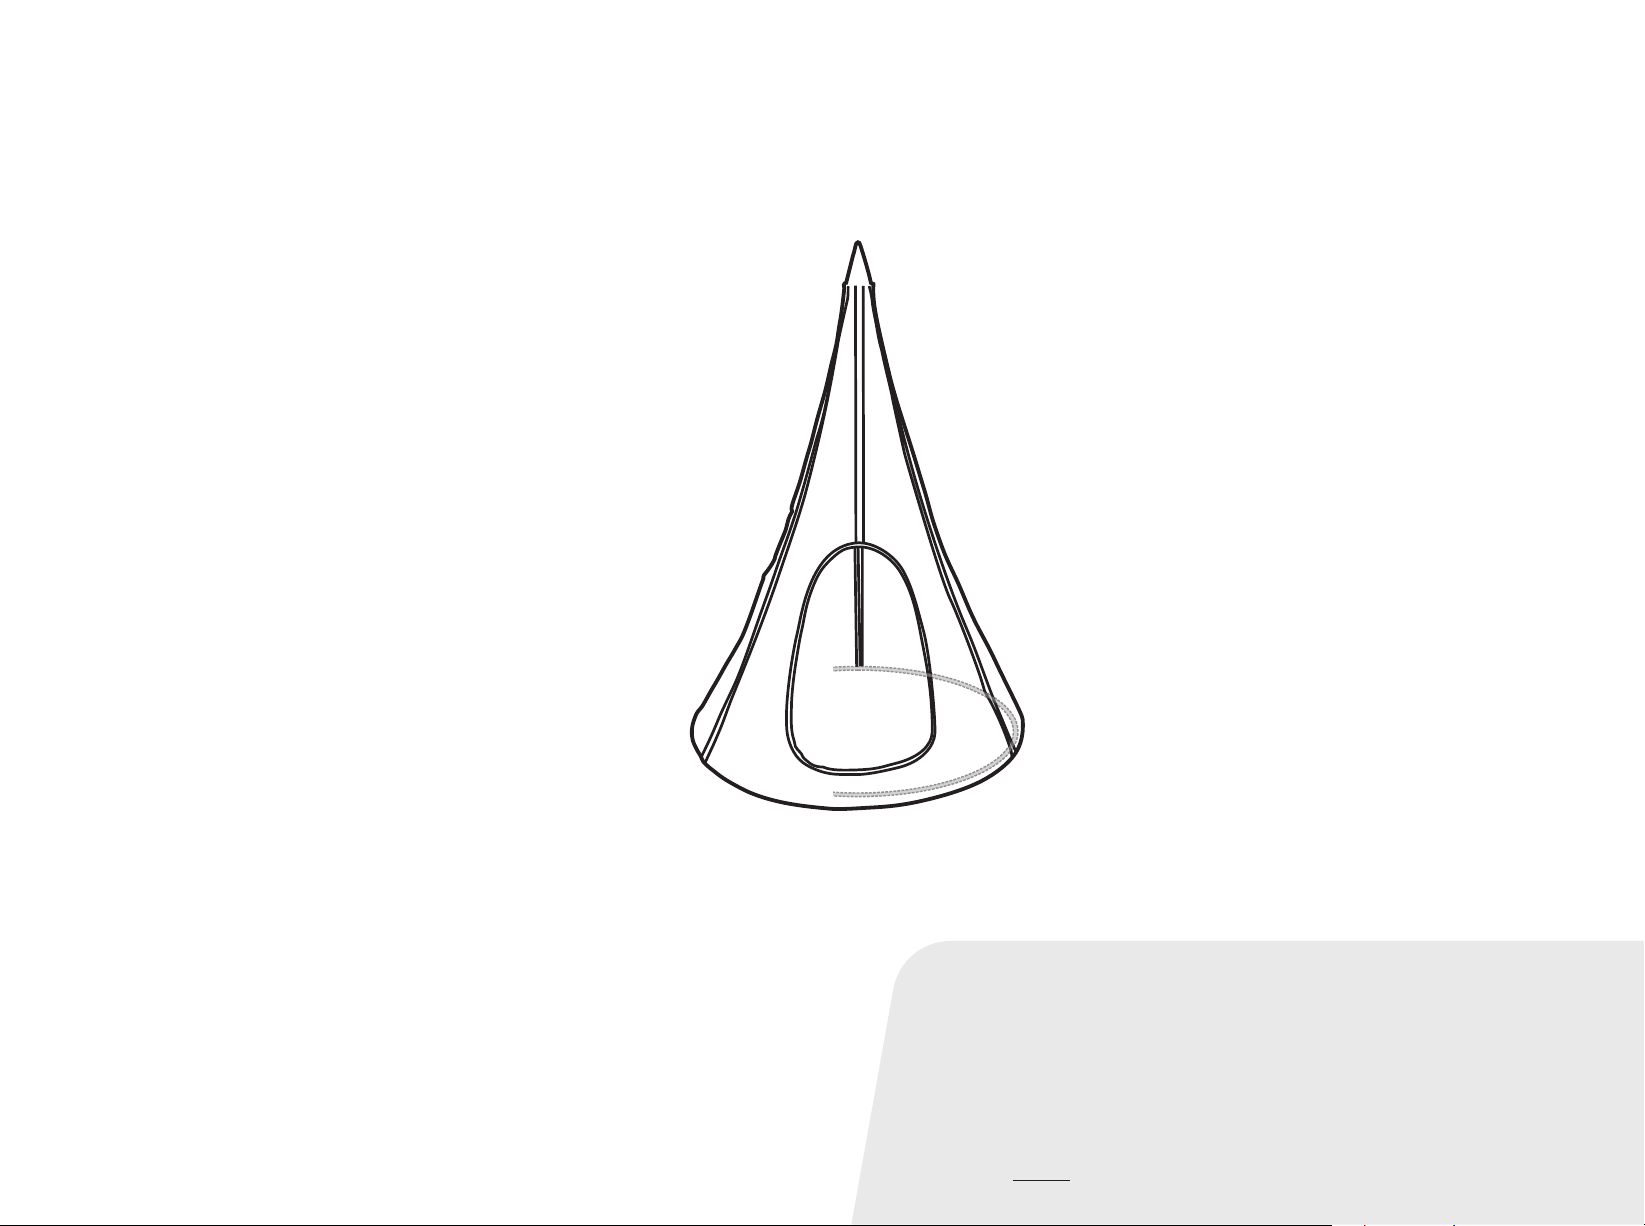
HANDBUCH
Zelt für Nestschaukel
DIESE ANLEITUNG ENTHÄLT WICHTIGE SICHERHEITSINFORMATIONEN. BITTE SORGFÄLTIG LESEN UND ZUM SPÄTEREN NACHSCHLAGEN AUFBEWAHREN.
Page 6
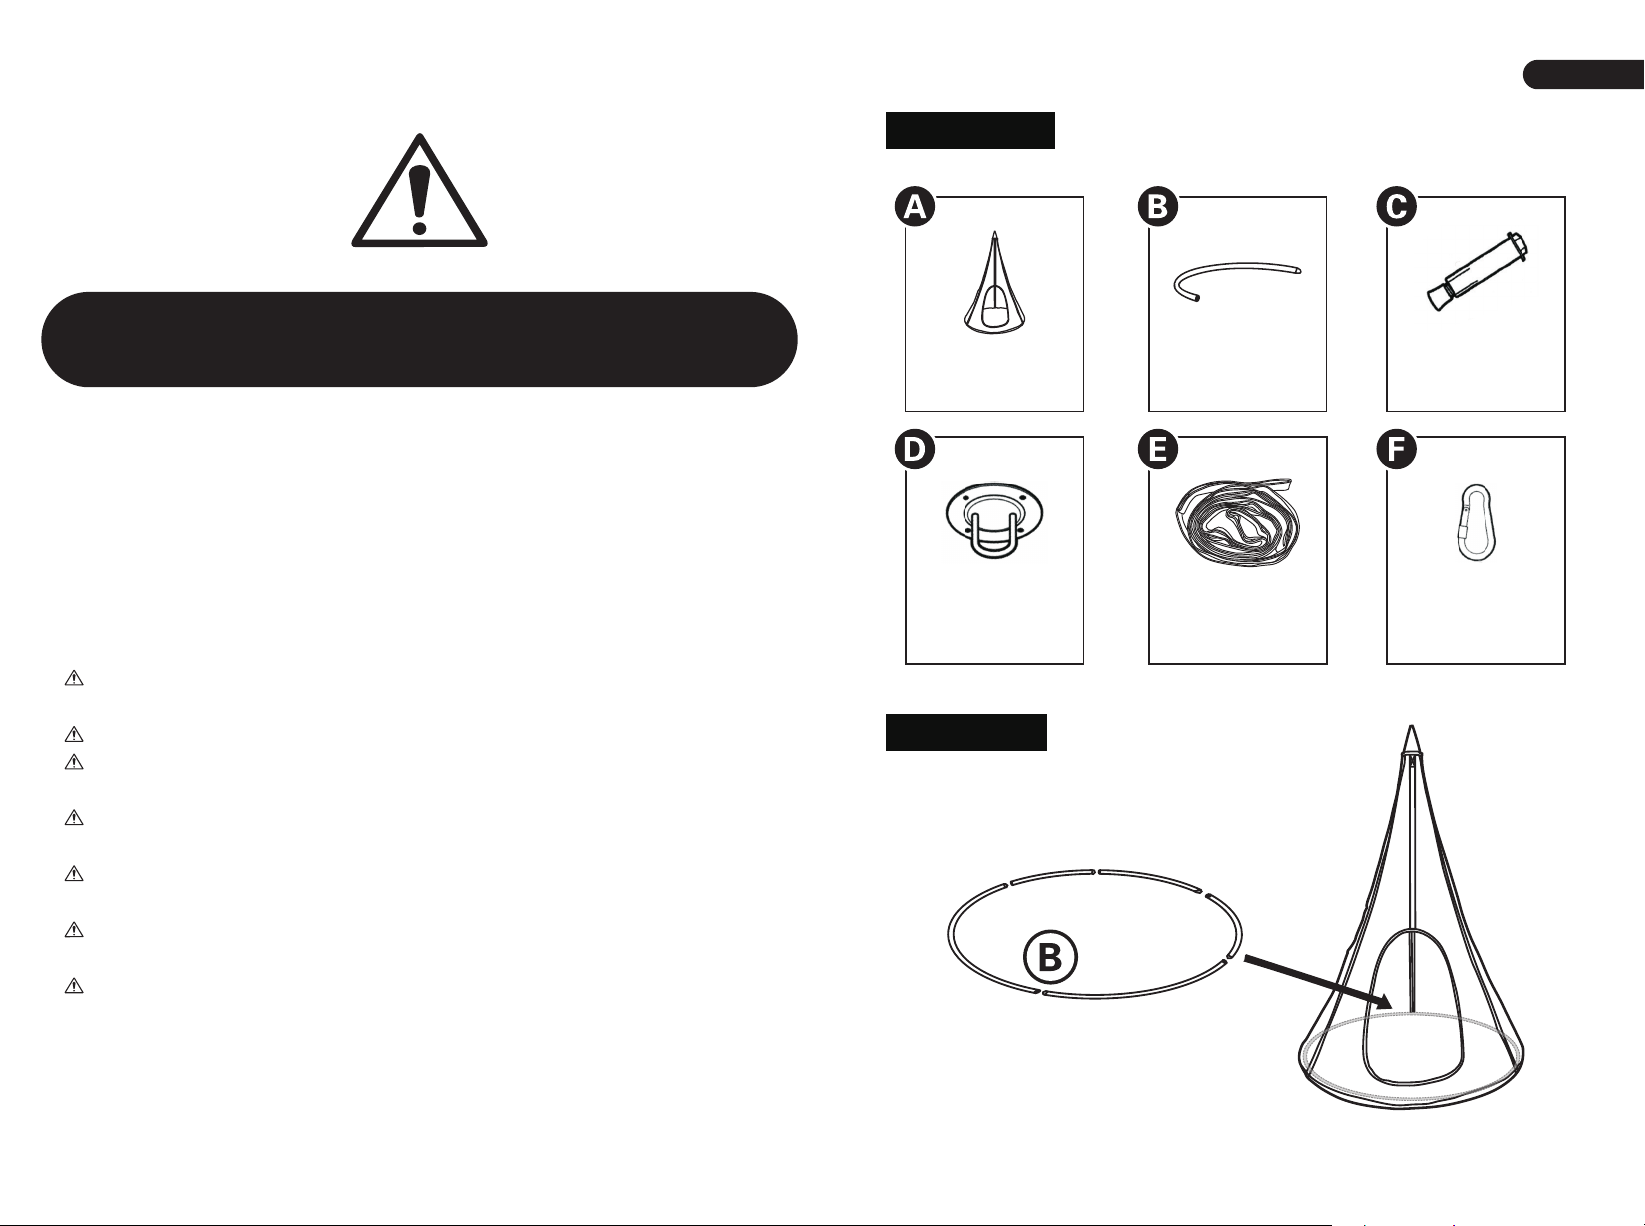
Teileliste
DE
Bevor Sie beginnen
Bitte sorgfältig lesen und zum späteren Nachschlagen aufbewahren.
Warnung!
Achtung! Nur für den Hausgebrauch.
Warnung: Der Artikel ist nicht für Kinder unter 3 Jahren geeignet.
Warnung: Halten Sie alle Kleinteile und Verpackungsmaterialien, die verschluckt
werden können, von Babys und Kindern fern.
Warnung: Unsachgemäße Montage kann zu Kippgefahr führen.
Allgemeine Warnhinweise
Der Artikel muss unter der Aufsicht eines Erwachsenen montiert und benutzt
werden.
Lesen Sie jeden Schritt sorgfältig durch und befolgen Sie die richtige Reihenfolge.
Entfernen Sie alle Verpackungen, Überprüfen Sie, ob alle Teile und Zubehörteile
vorhanden sind.
Bitte stellen Sie sicher, dass alle Teile richtig montiert sind, eine falsche Montage
kann zu einer Gefahr führen.
Wir empfehlen, alle Teile möglichst in der Nähe des Aufstellungsortes zu
montieren, um unnötige Bewegungen nach der Montage zu vermeiden.
Achten Sie bei der Montage auf einen sicheren Untergrund und stellen Sie den
Artikel immer auf eine ebene, feste und stabile Fläche.
Bitte überprüfen und warten Sie regelmäßig die wichtigsten Teile zur Aufhängung,
Befestigung, Verankerung am Boden.
Zeltabdeckung
1 PC
Fix-Scheibe
1 PC
Montage
x 5
Stahlrohr
5 PCS
Verbindungsseil
1 PC
Dehnschraube
4 PCS
Karabinerhaken
2 PCS
10 11
Page 7
DE
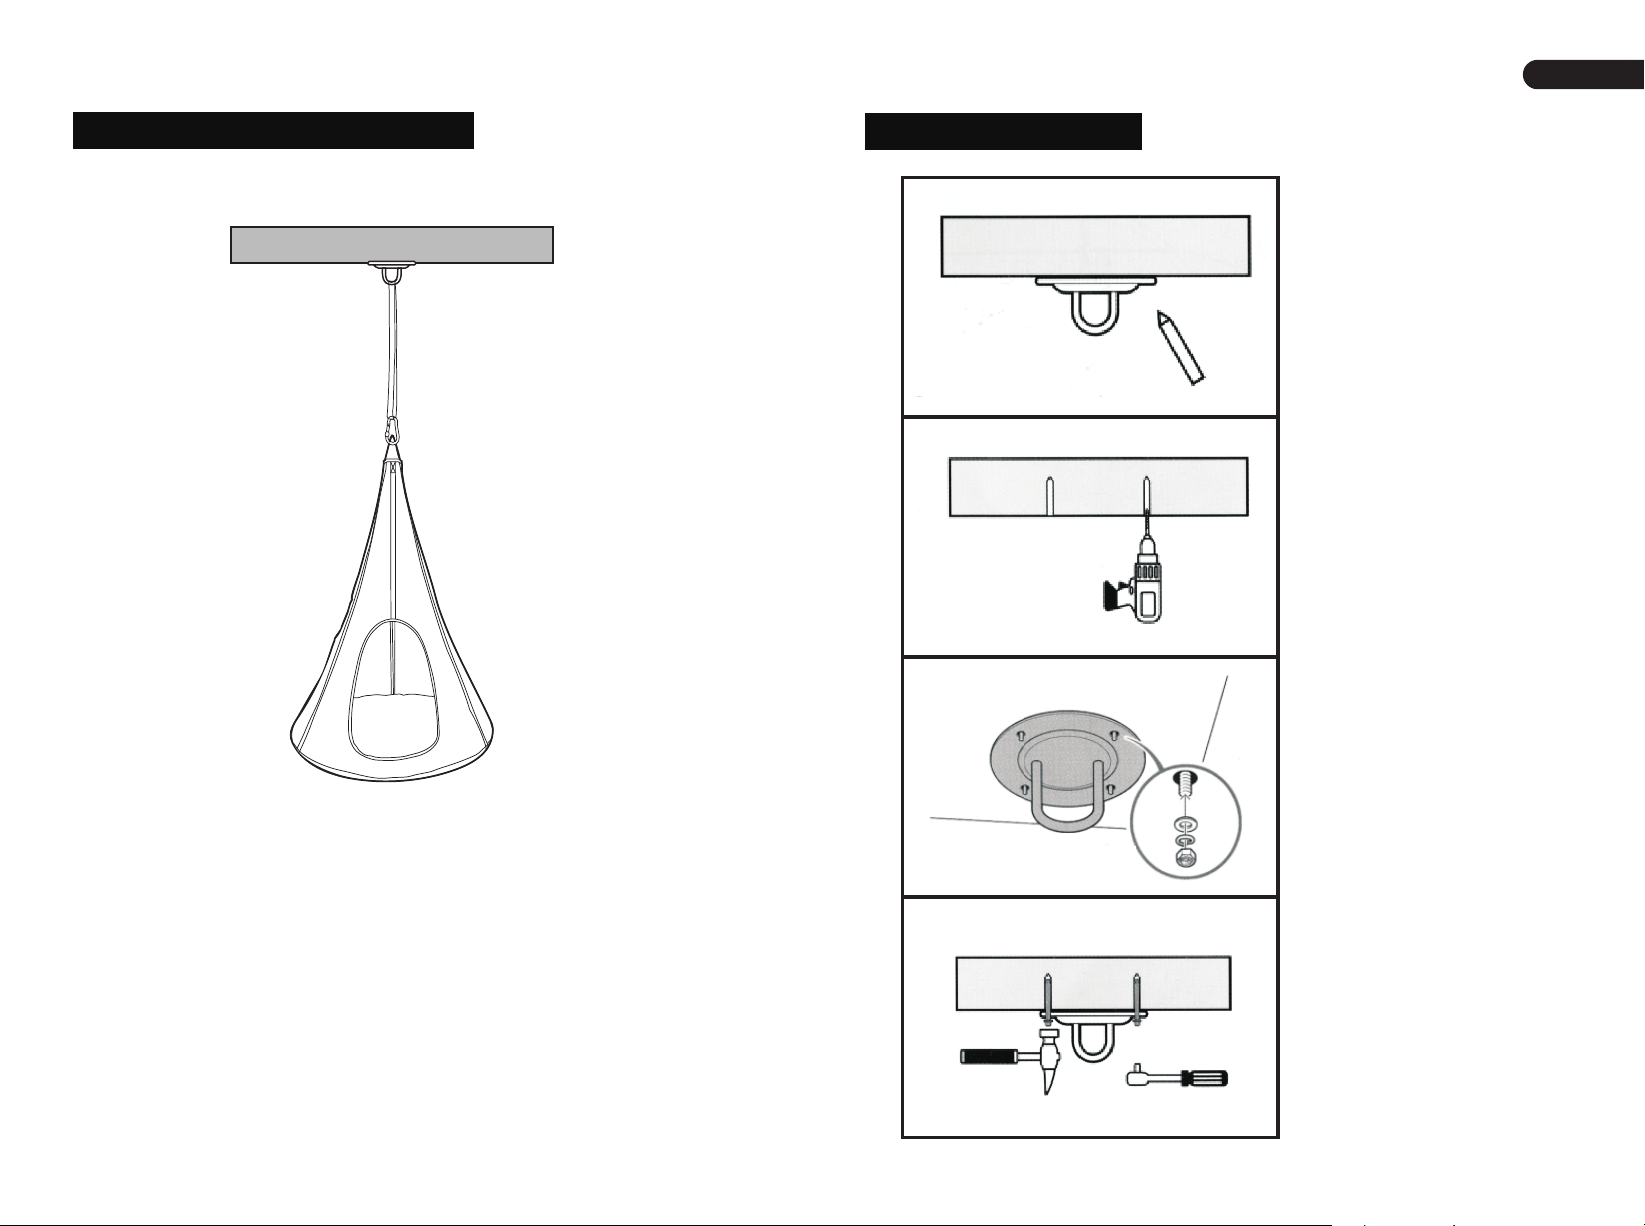
Aufhängung auf dem Dach
Betonwand
Montagevorgang
1. Markieren Sie mit
einem Bleistift die
Stellen, die
durchgestanzt werden
müssen. (Kann nicht an
der Decke oder einer
hohlen Wand installiert
werden)
2. Verwenden Sie einen
12-mm-Bohrer und eine
Schlagbohrmaschine, um
Löcher zu bohren. Die
Tiefe des Lochs ist nicht
geringer als die Länge
der Dehnschraube.
3. Bringen Sie die
Dehnschrauben korrekt
an, wie in der Abbildung
gezeigt.
Hinweis: Versuchen Sie, die Schaukel nicht zu
hoch aufzuhängen. Es ist normal, dass Kinder ein
wenig Angst haben, wenn sie gerade erst
anfangen zu spielen. Um ein gutes Spielerlebnis
zu gewährleisten, sollte der Abstand zwischen der
Unterseite der Schaukel und dem Boden zwischen
30 cm und 45 cm liegen. Wenn das Schaukelseil
nicht lang genug ist, verwenden Sie bitte das
mitgelieferte Verbindungsseil.
4. Führen Sie die
Dehnschraube in das
Loch ein, schrauben Sie
sie vorsichtig mit einem
Werkzeug ein und ziehen
Sie die Mutter mit
maximaler Kraft an.
12 13
Page 8
DE
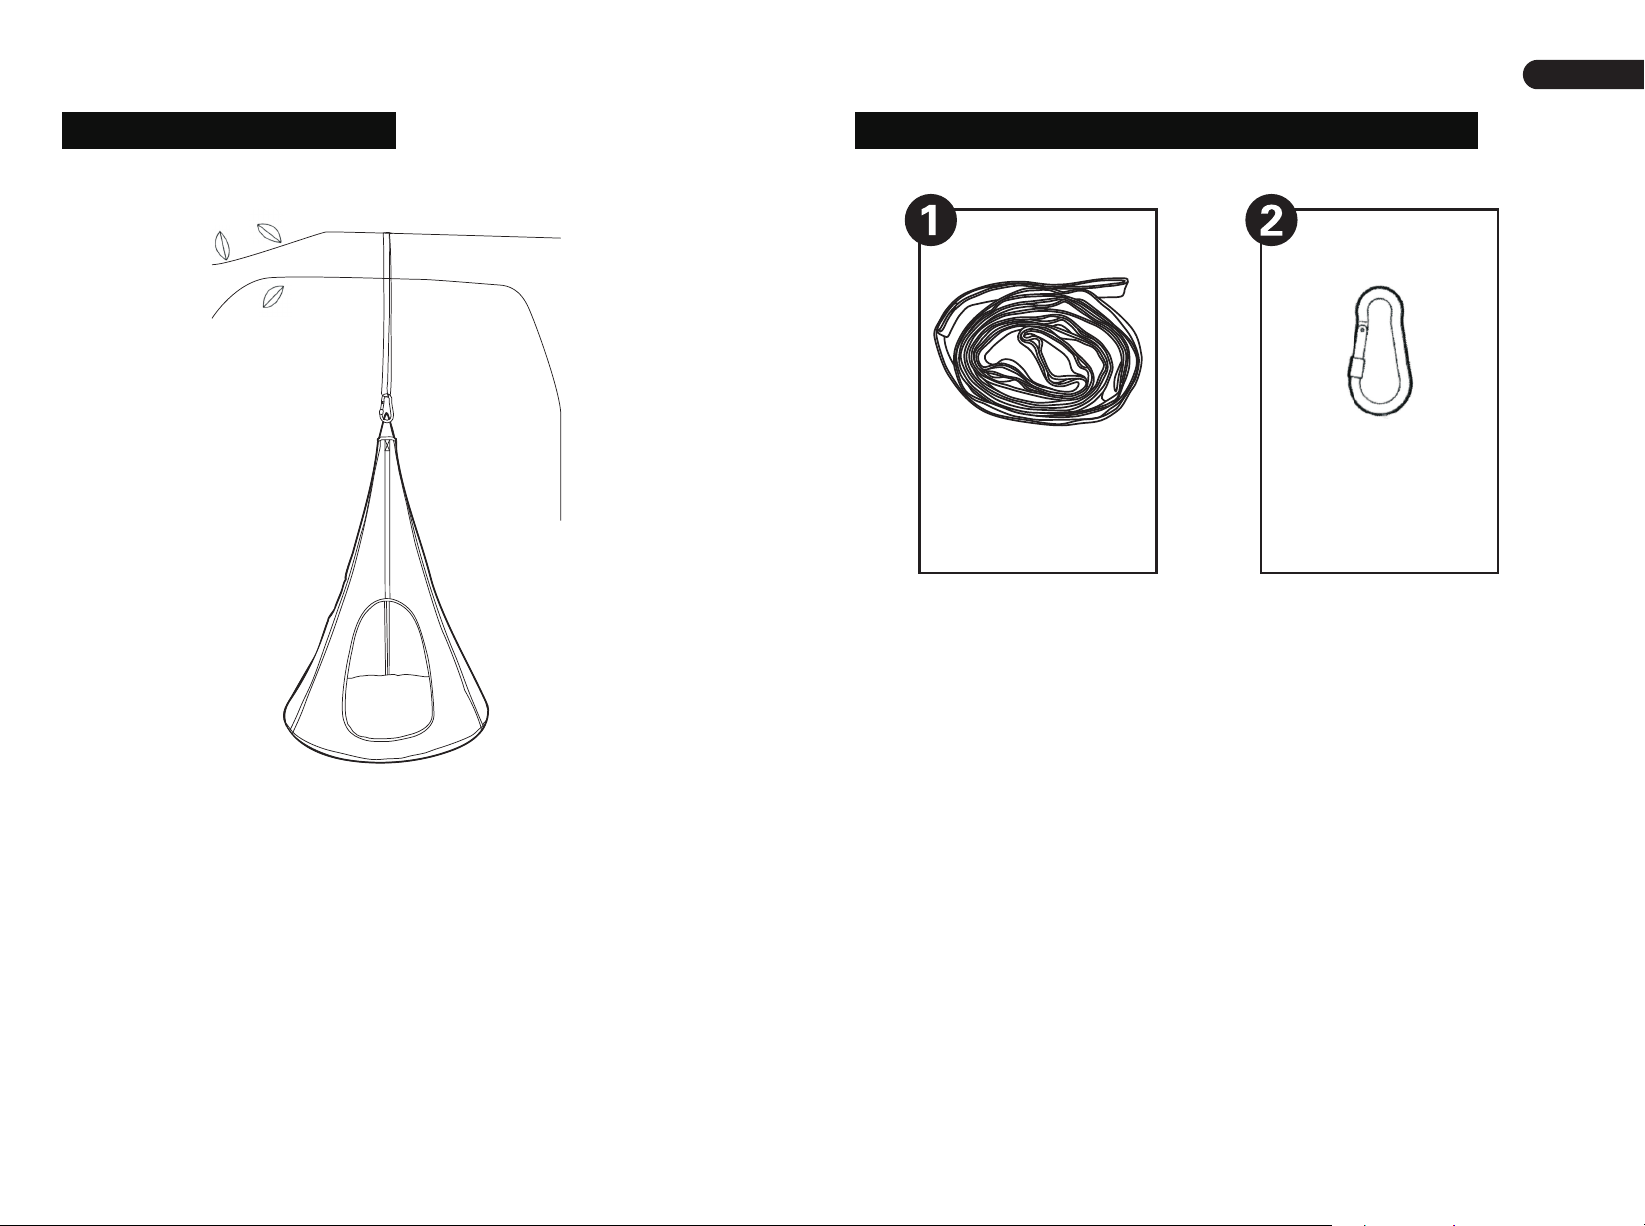
Aufhängen am Baum
Erforderliches Zubehör für die Installation
Verbindungsseil
1 PC
Karabinerhaken
2 PCS
Hinweis: Sie sollten Äste mit einem Durchmesser
von mehr als 25 cm wählen, um die Hängematte
aufzuhängen. Um die Sicherheit zu gewährleisten,
vergewissern Sie sich bitte, dass das Verstellseil
nach dem Aufhängen korrekt angebracht ist. Ein
Erwachsener muss dann die Festigkeit der
Hängematte durch Herunterziehen überprüfen.
Außerdem sollte der Abstand zwischen der
Unterseite der Schaukel und dem Boden zwischen
30 cm und 45 cm liegen.
14 15
Page 9
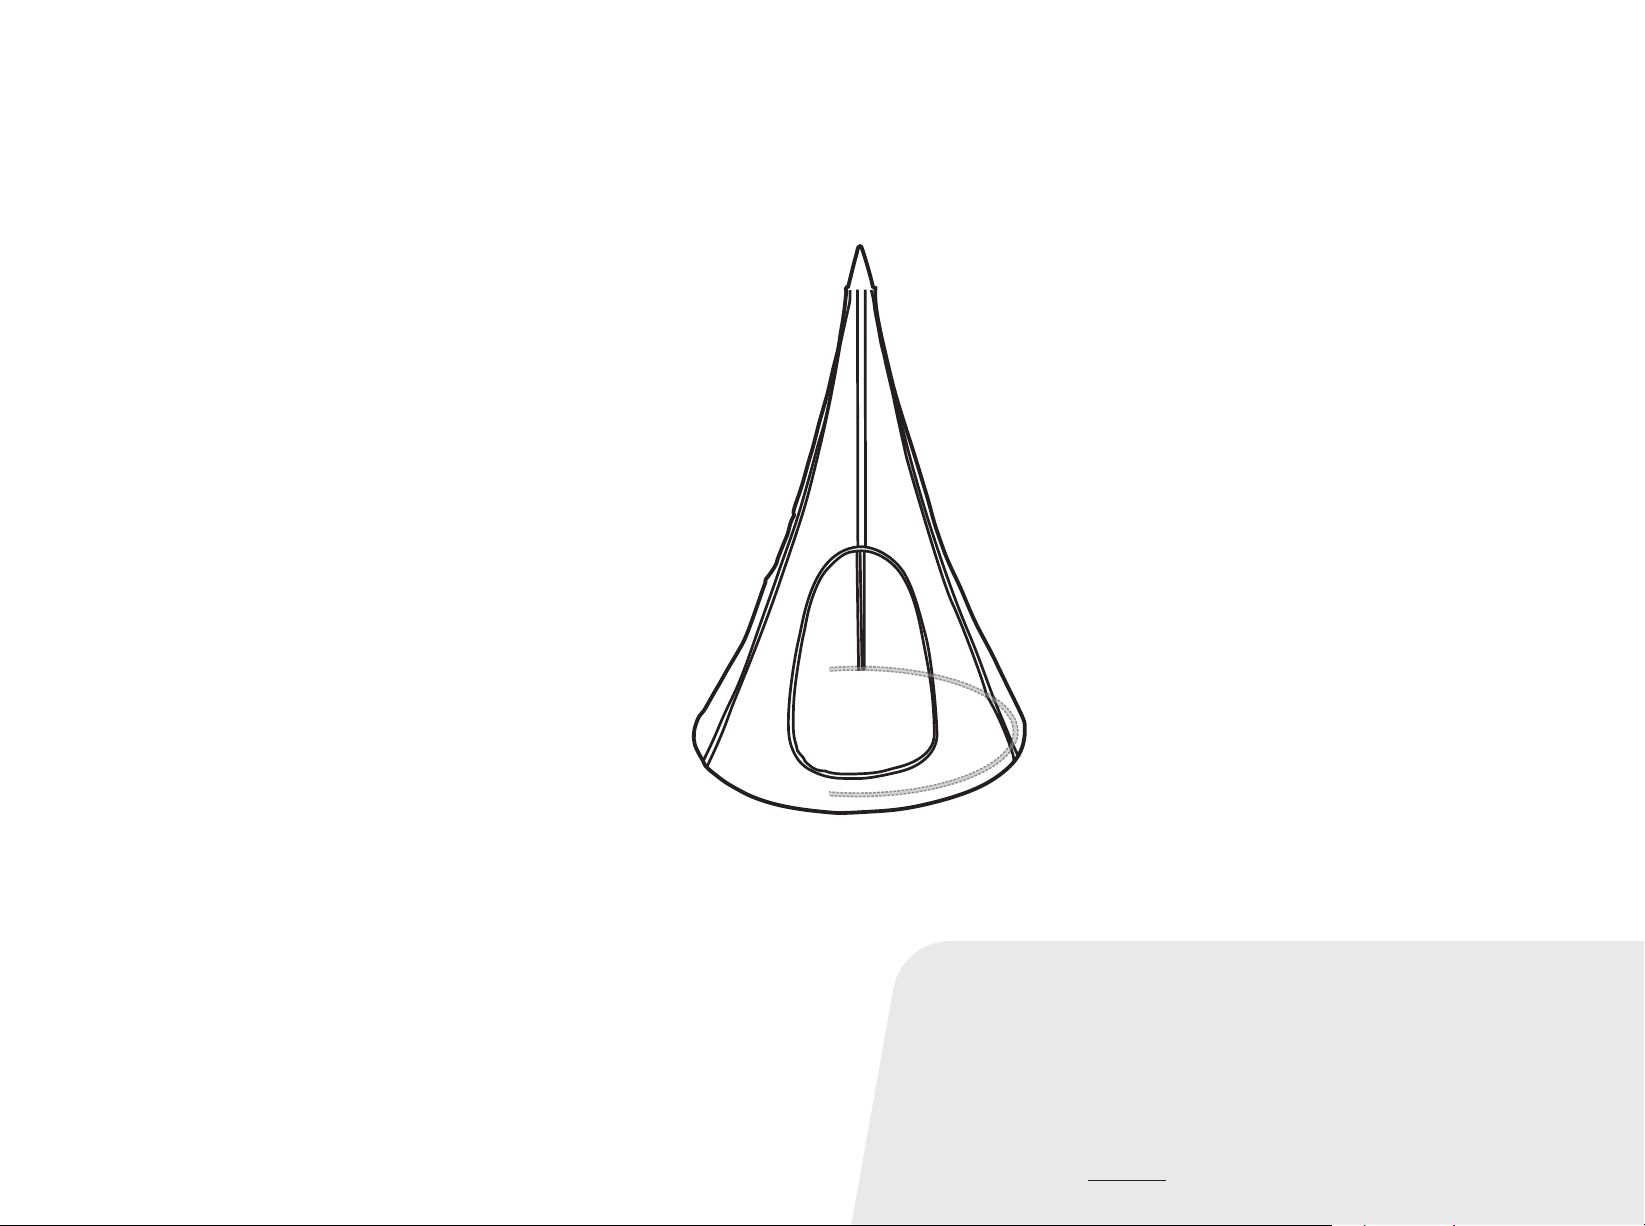
MANUEL DE L’UTILISATEUR
Siège Suspendu
CE MANUEL CONTIENT DES INFORMATIONS IMPORTANTES SUR LA SÉCURITÉ. VEUILLEZ LE LIRE ET LE CONSERVER POUR TOUTE RÉFÉRENCE FUTURE.
Page 10
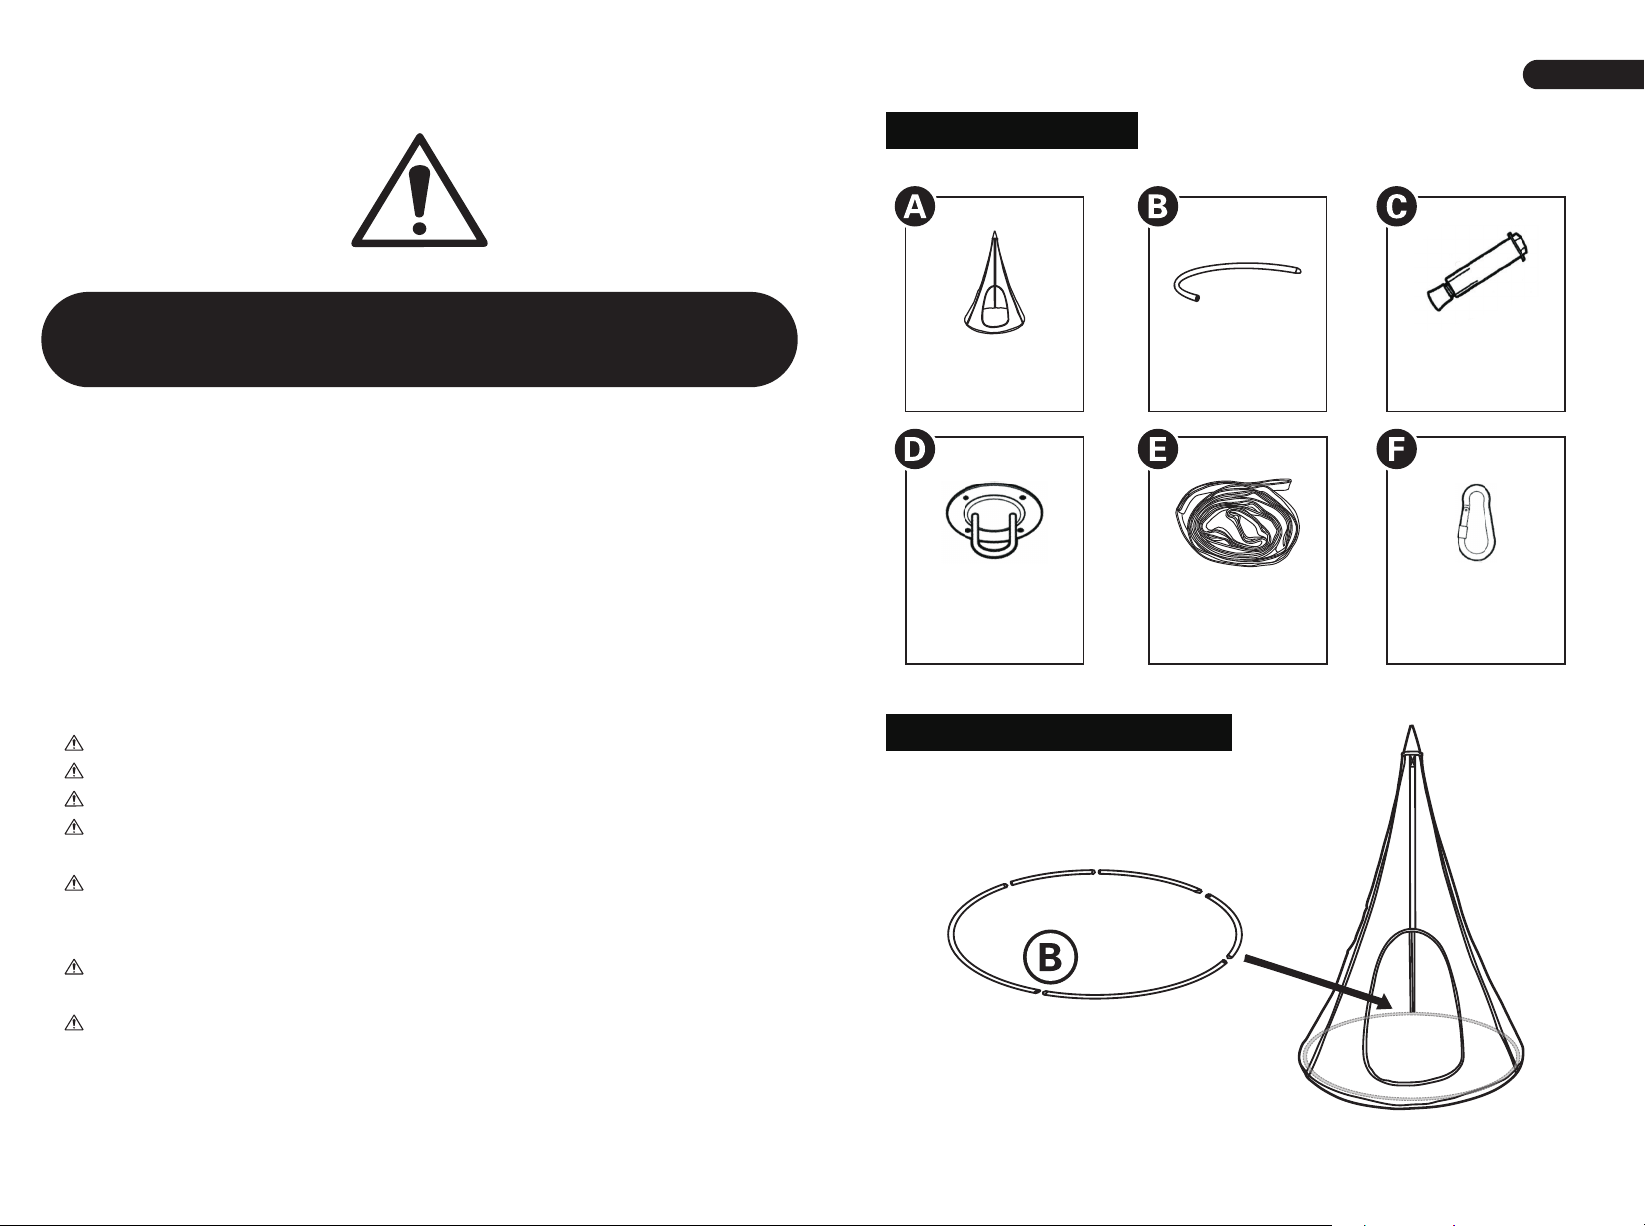
Liste des pièces
FR
Avant de Commencer
Veuillez lire attentivement toutes les instructions et les conserver pour la référence
ultérieure.
Avertissements :
Attention : Pour l’usage domestique seulement.
Attention : Le produit ne convient pas aux enfants de moins de 3 ans
Danger : Gardez toutes les petites pièces et les matériaux d’emballage de ce produit
hors de portée des bébés et des enfants pour éviter un risque d’étouffement.
Danger : La manque de la fixation pourrait entraîner un risque de basculement ou de
chute.
Avertissements Généraux :
Le produit doit être installé et utilisé sous la surveillance d’un adulte.
Lisez attentivement chaque étape et suivez l’ordre correct.
Retirez tous les emballages, séparez et comptez toutes les pièces et le matériel.
Veuillez vous assurer que toutes les pièces soient correctement installées, une
installation incorrecte peut entraîner un danger.
Nous recommandons que, dans la mesure du possible, tous les articles soient
assemblés à proximité de la zone dans laquelle ils seront utilisés, afin d’éviter de
déplacer inutilement le produit une fois assemblé.
Assurez-vous que la surface soit solide pendant l’assemblage et placez toujours le
produit sur une surface plane et stable.
Veuillez vérifier et entretenir régulièrement les pièces les plus importantes pour la
suspension, la fixation, l’ancrage au sol.
Couverture
Tube en acier
x 1
Disque à quatre
trous
x 1
Installation du produit
x 5
x 5
Corde
x 1
Cheville murale
x 4
Crochet
x 2
18 19
Page 11
FR
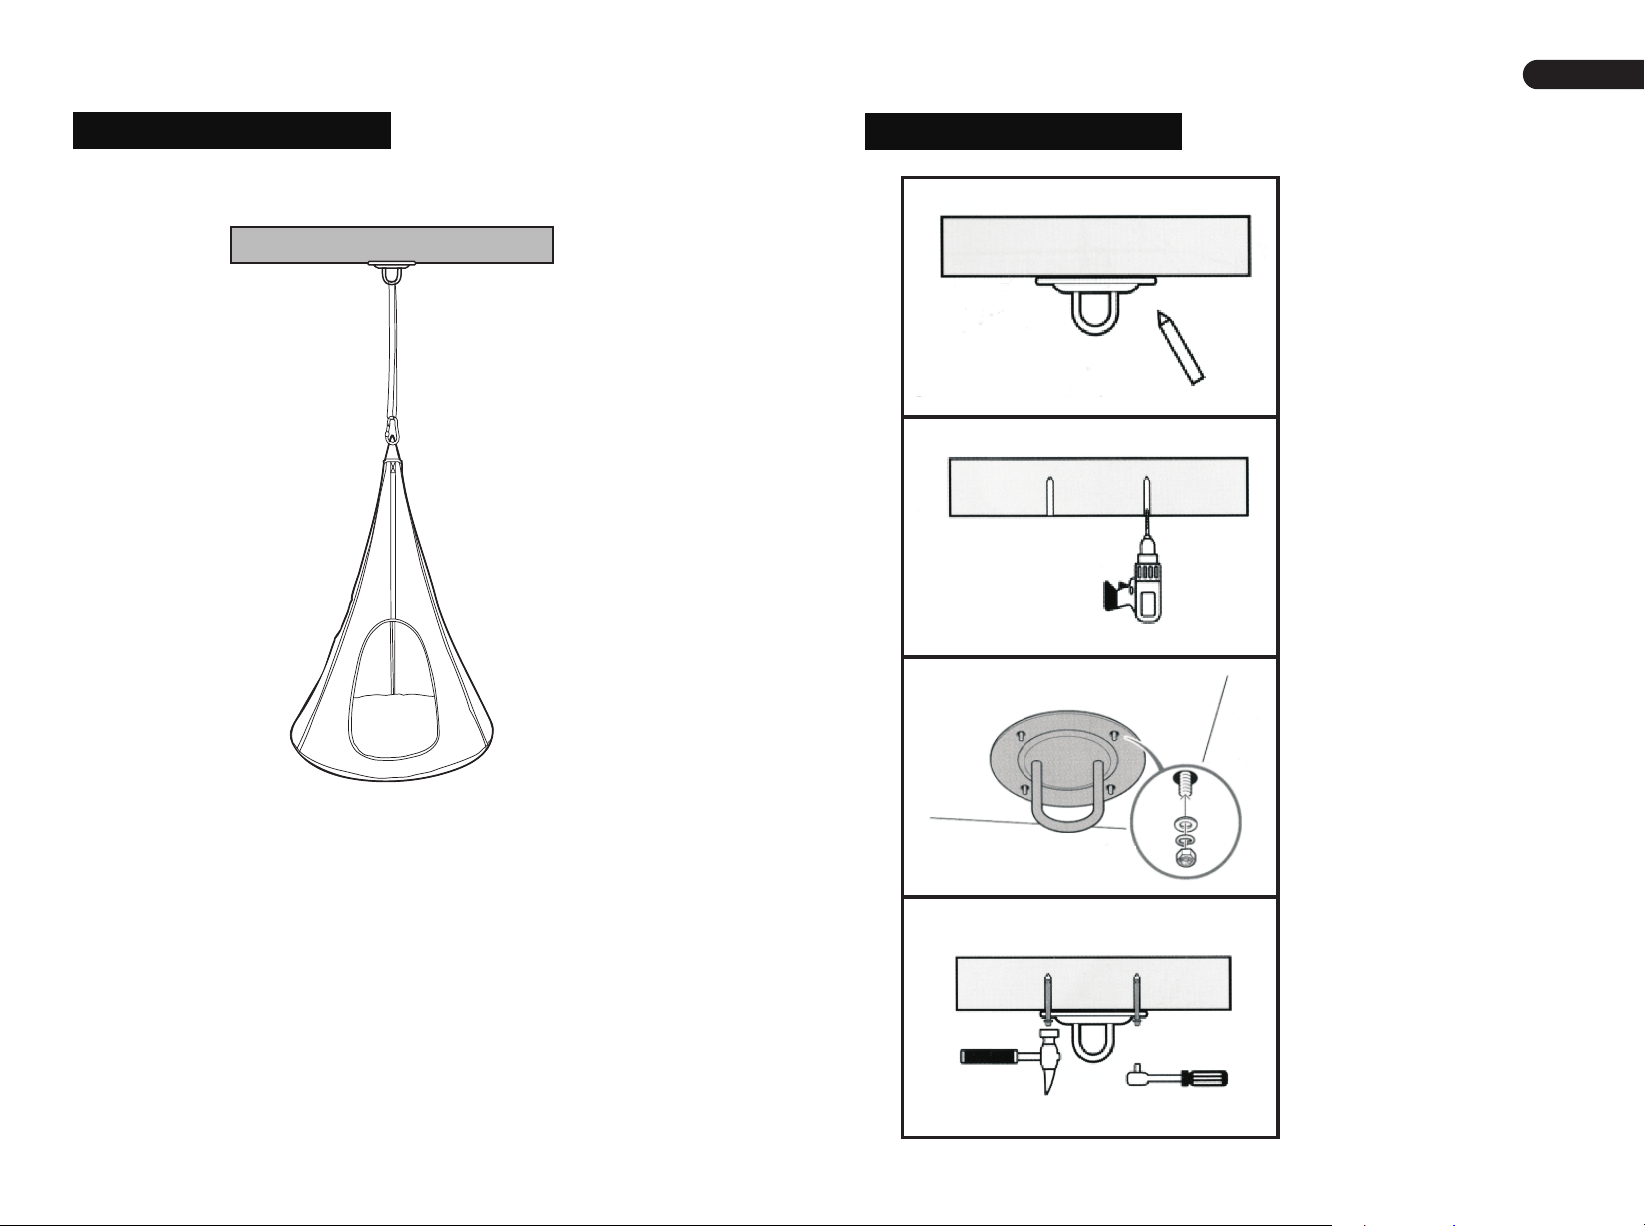
Suspendu sur le toit
Mur en béton
Étapes d’installation
1. Utilisez un crayon
pour marquer les
emplacements qui
doivent être perforés.
(Ce produit ne peut pas
être installé au plafond
ou sur un mur creux).
2. Utilisez une perceuse
à percussion avec une
mèche de 12 MM pour
percer les trous. La
profondeur du trou n’est
pas inférieure à la
longueur de la cheville
murale.
3. Montez les chevilles
murales correctement
comme indiqué sur la
figure.
Remarque: Essayez d’éviter de suspendre le
siège dans la position trop haute. Il est normal
que les enfants aient un peu peur lorsqu'ils
commencent à jouer. Afin d'assurer une bonne
expérience de jeu, la distance entre le bas de
siège et le sol est contrôlée entre 30cm-45 cm. Si
la corde de siège n’est pas assez longue, veuillez
utiliser la corde de connexion fournie.
4. Insérez la cheville
murale dans le trou,
vissez-la doucement
avec un outil, et enfin
serrez l’écrou avec la
force maximale.
20 21
Page 12
FR
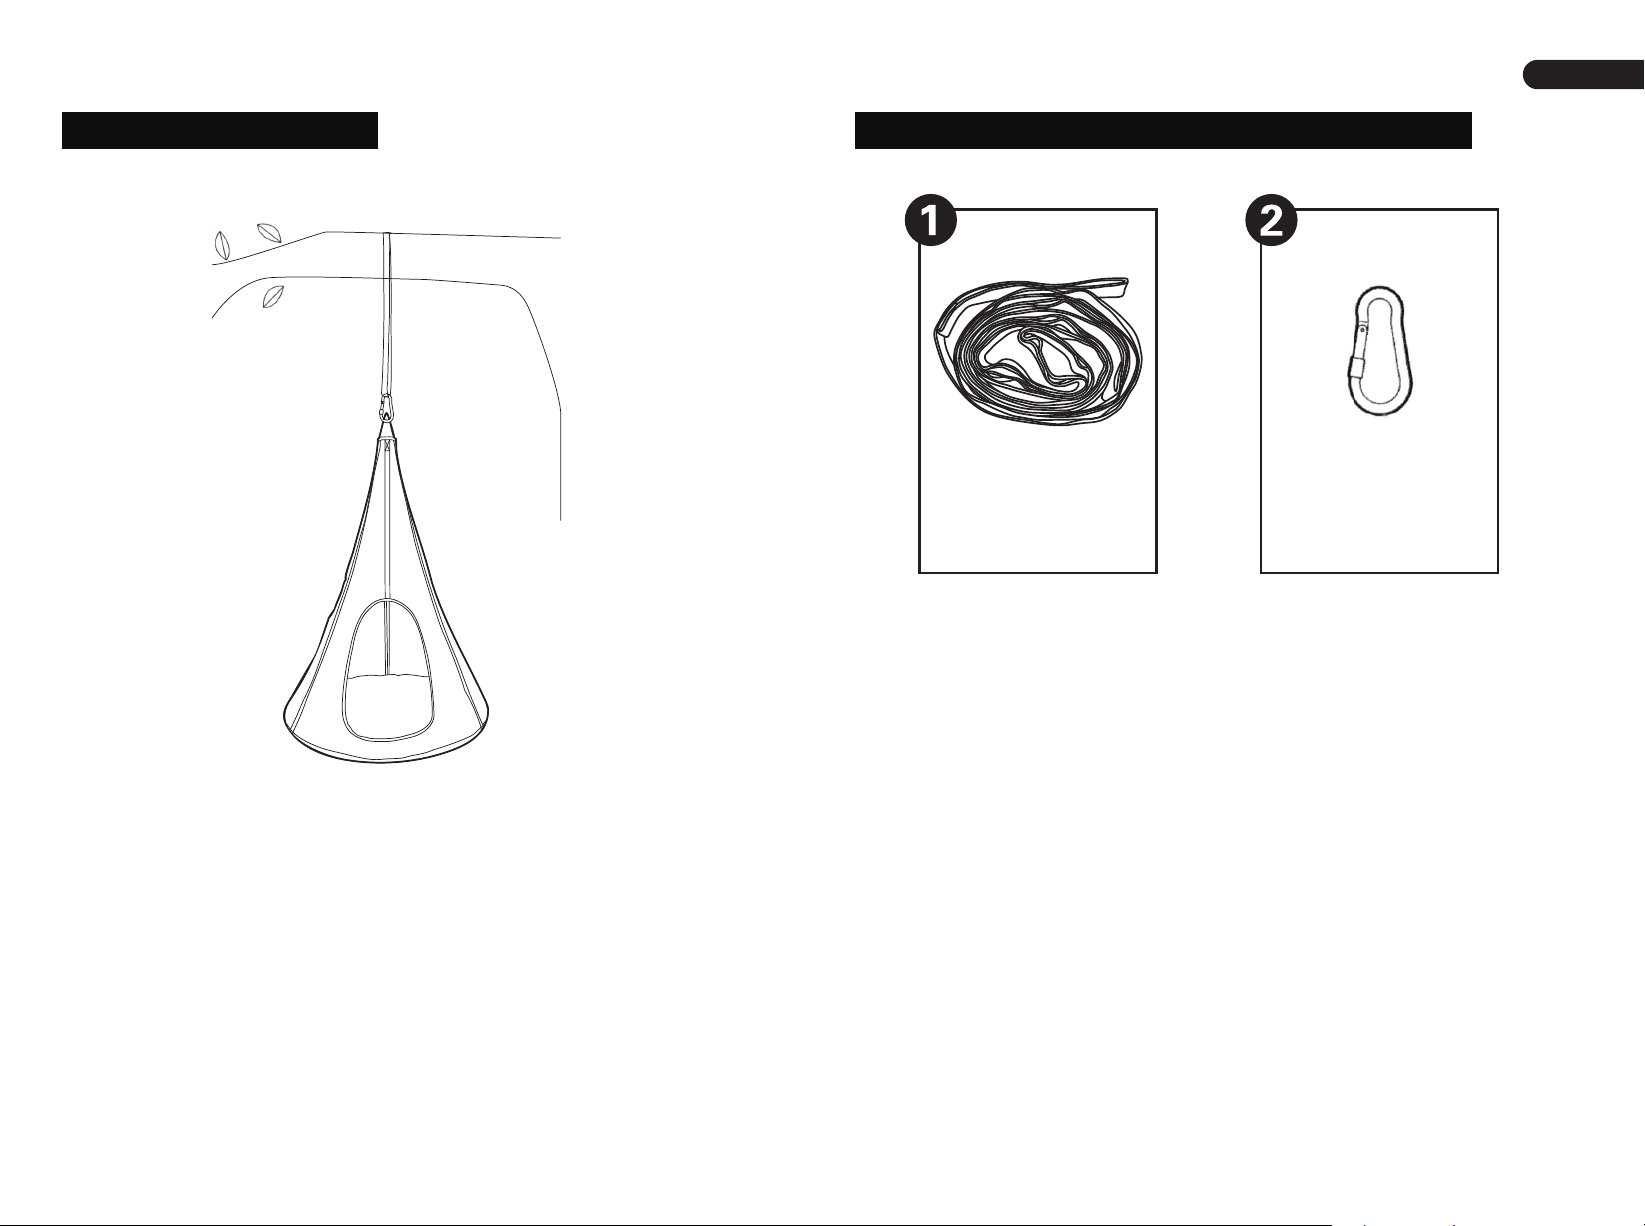
Suspendu à l’arbre
Accessoires nécessaires pour l’installation
Corde
x 1
Crochet
x 2
Remarque: Vous devez choisir des branches d'un
diamètre supérieur à 25 cm pour suspendre le
siège. Pour garantir la sécurité, la corde de
réglage doit être correctement installée après
l’accrochage, puis un adulte doit tester sa fermeté
en tirant sur le siège. En outre, la distance entre le
bas de siège et le sol doit être contrôlée entre
30cm et 45cm.
22 23
Page 13
MANUAL DEL USUARIO
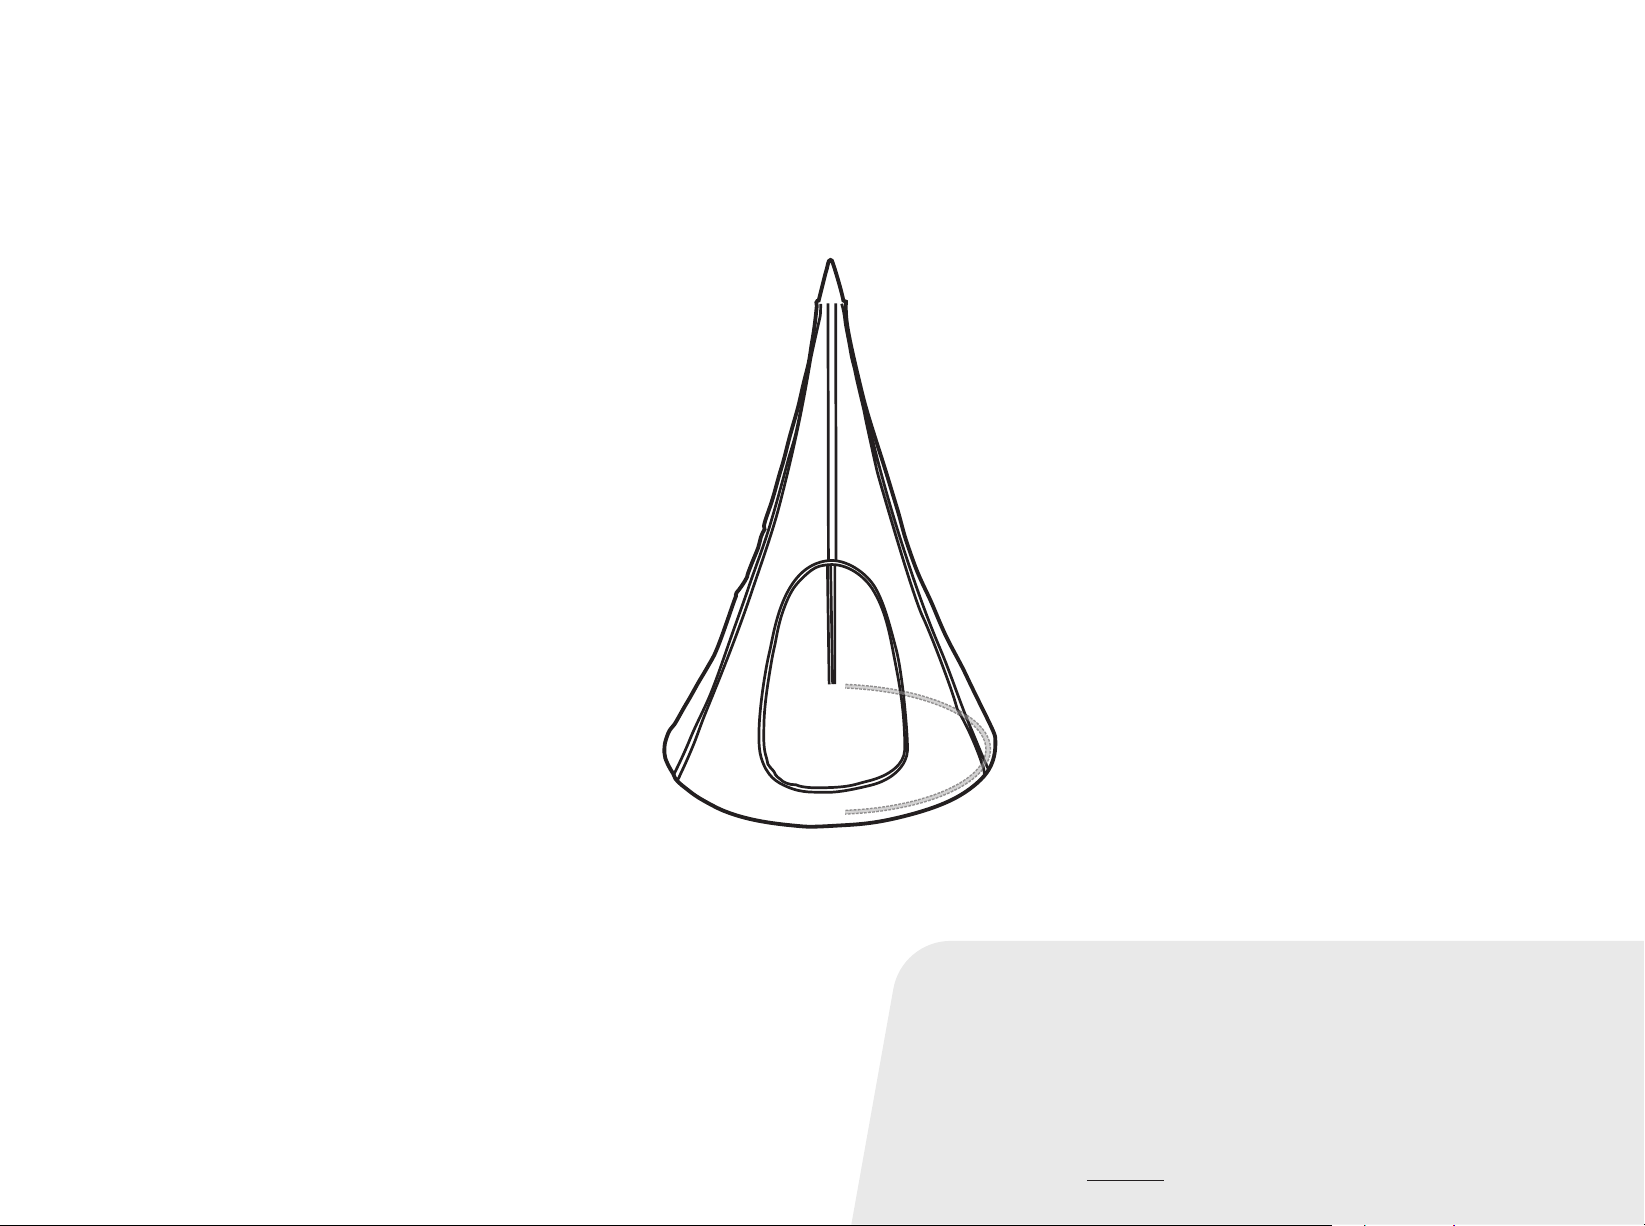
Hamaca para Niños
ESTE MANUAL DE INSTRUCCIONES CONTIENE IMPORTANTES INFORMACIONES DE SEGURIDAD, POR FAVOR, LÉALO Y GUÁRDELO PARA FUTURAS CONSULTAS.
Page 14
LISTA DE PIEZAS
ES
Antes de Empezar
Lea todas las instrucciones detenidamente y guárdelas para futuras referencias.
Advertencias:
Atención: Solo para uso doméstico.
Atención: El producto no es adecuado para los niños menores de 3 años.
Peligro: Mantenga todas las piezas pequeñas y los materiales de embalaje de este
producto fuera del alcance de los bebés y los niños, ya que, de lo contrario, pueden
suponer un peligro de asfixia.
Peligro: La falta de fijación puede provocar un riesgo de vuelco o de caída.
Advertencias Generales:
El producto debe instalarse y usarse bajo la supervisión de un adulto.
Lea detenidamente cada paso y siga el orden correcto.
Quite todo el embalaje, separe y cuente todas las piezas y los accesorios.
Asegúrese de que todas las piezas estén instaladas correctamente, una instalación
incorrecta puede provocar un peligro.
Recomendamos que, siempre que sea posible, todos los elementos se monten cerca
de la zona en la que se van a utilizar, para evitar mover el producto innecesariamente
una vez montado.
Asegure una superficie segura durante el montaje, y coloque el producto siempre
sobre una superficie plana, firme y estable.
Por favor, revise y mantenga regularmente las piezas más importantes para la
suspensión, la fijación y el anclaje al suelo.
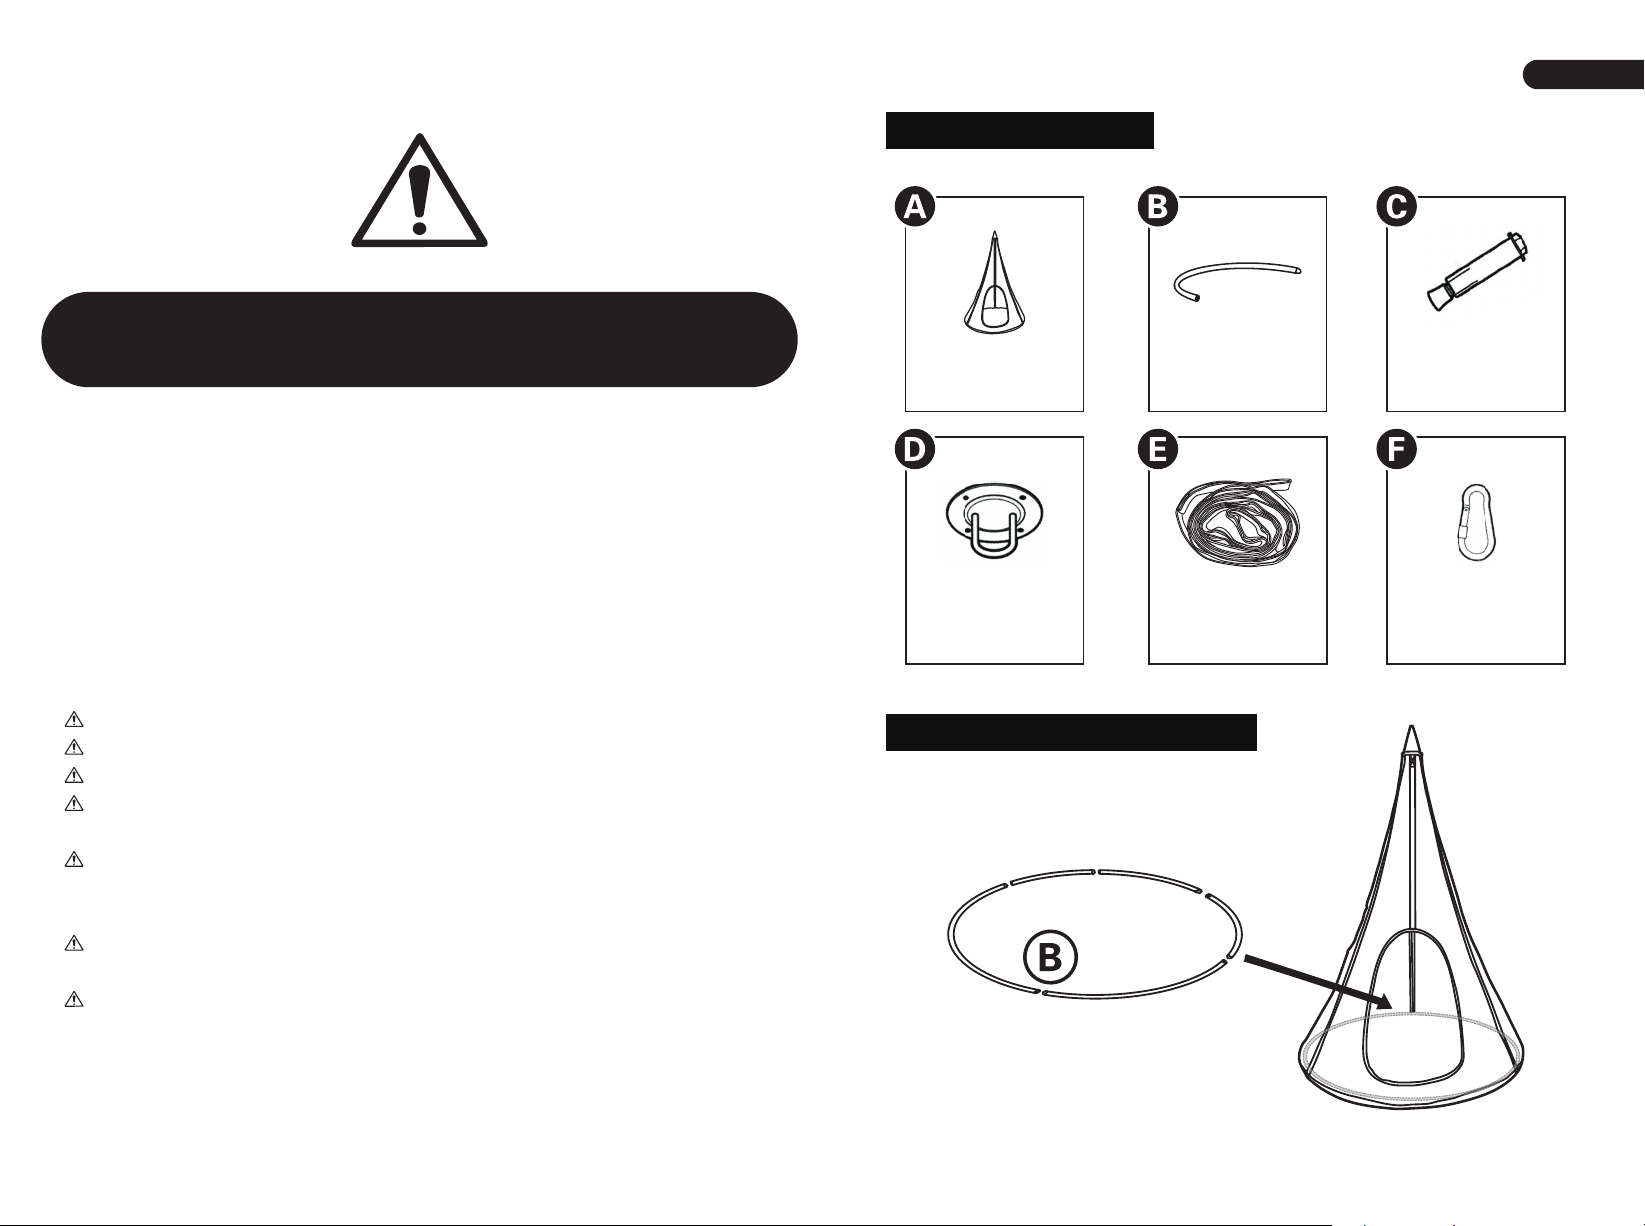
Cobertura
Tubo de acero
x 1
Cuerda de
Pieza de fijación
conexión
x 1
Instalación del Producto
x 5
x 5
x 1
Taco de pared
x 4
Gancho
x 2
26 27
Page 15
ES
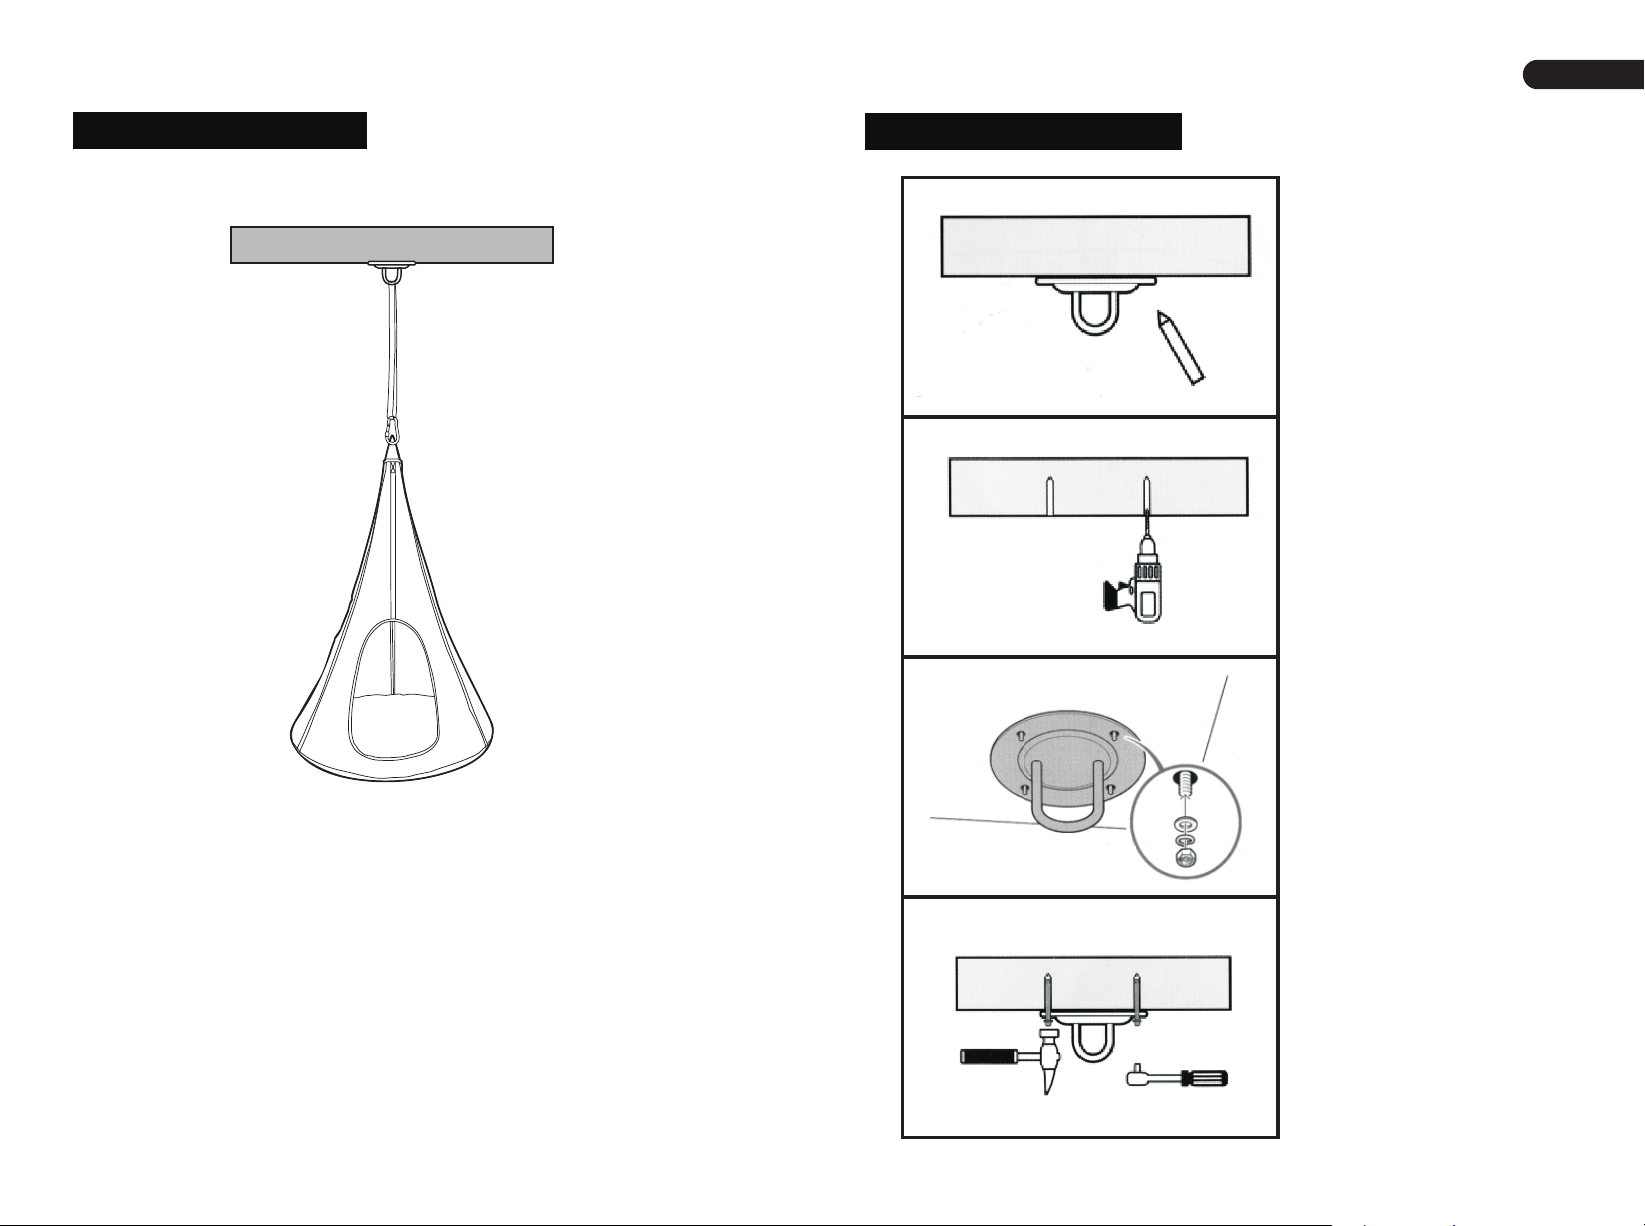
Colgar en la pared
Pared de hormigón
Pasos de Instalación
1. Utilice un lápiz para
marcar las posiciones
que deben ser
perforadas. (No se
puede instalar en el
techo ni en la pared
hueca).
2. Utilice una broca de
12MM y un taladro de
impacto para hacer los
agujeros. La
profundidad del
agujero no es menor
que la longitud del taco
de pared.
3. Instale los tacos de
pared correctamente
como se muestra en la
figura.
Nota: Intente evitar colgar la hamaca en una
posición demasiado alta. Es normal que los niños
se asusten un poco cuando empiezan a jugar.
Para garantizar una buena experiencia de juego,
la distancia entre la parte inferior de la hamaca y
el suelo debe ser controlada entre 30cm-45cm. Si
la cuerda de la hamaca no es lo suficientemente
larga, utilice la cuerda de conexión equipada.
4. Introduzca el taco
de pared en el agujero,
atorníllelo suavemente
con una herramienta y,
finalmente, apriete la
tuerca con la máxima
fuerza.
28 29
Page 16
ES
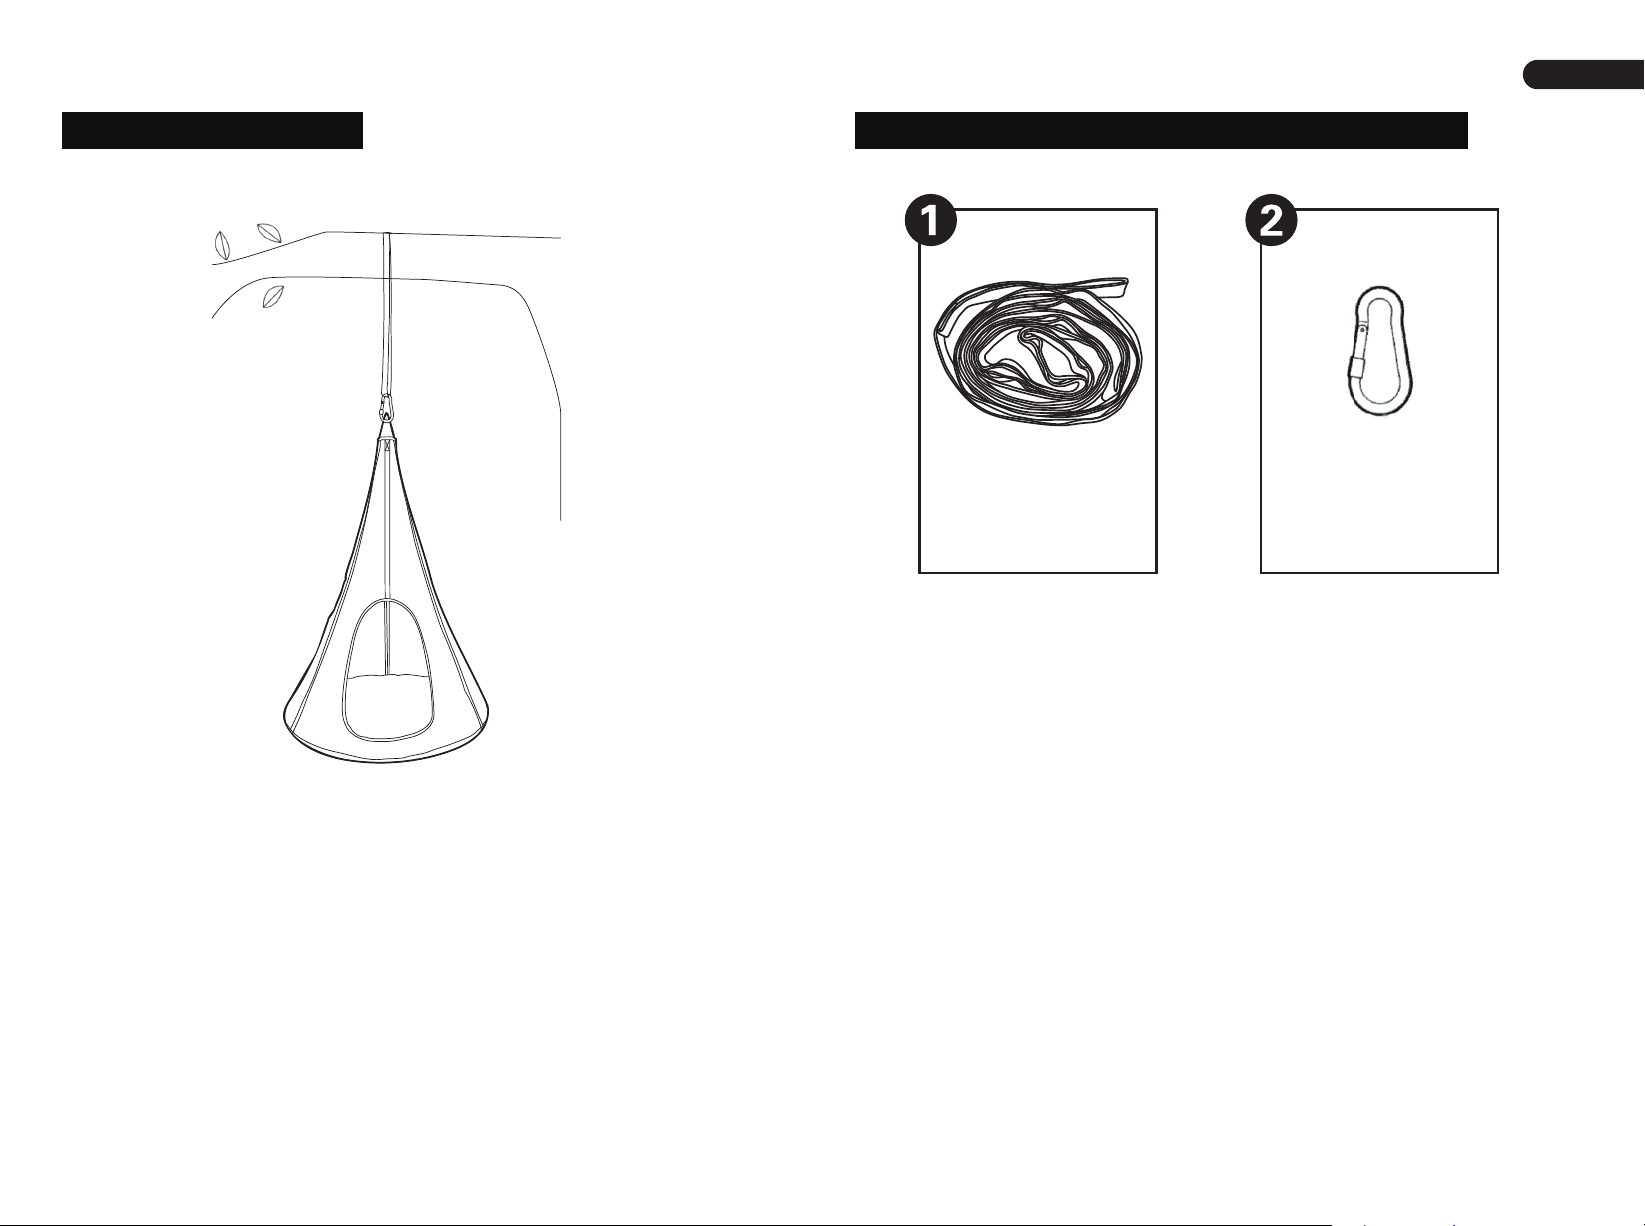
Colgar en el árbol
Accesorios Necesarios para la Instalación
Cuerda de
conexión
x1
Gancho
x2
Nota: Debe elegir ramas con un diámetro superior
a 25 cm para colgar la hamaca colgante. Para
garantizar la seguridad, asegúrese de que la
cuerda de ajuste esté instalada correctamente
después de colgarla, y luego un adulto debe
comprobar su firmeza tirando de la hamaca
colgante hacia abajo. Además, la distancia entre la
parte inferior de la hamaca y el suelo debe ser
controlada entre 30cm-45cm.
30 31
Page 17
MANUALE UTENTE
Altalena Sospesa per Bambini
QUESTO MANUALE DI ISTRUZIONI CONTIENE IMPORTANTI INFORMAZIONI SULLA SICUREZZA. SI PREGA DI LEGGERE E CONSERVARE PER RIFERIMENTO FUTURO.
Page 18
Lista delle Parti
IT
Prima di iniziare
Si prega di leggere attentamente tutte le istruzioni e conservarle per riferimento futuro.
Avvertenza:
Attenzione: solo per uso domestico.
Attenzione: Il prodotto non è adatto ai bambini sotto i 3 anni.
Pericolo: Tenere tutte le piccole parti e i materiali di imballaggio di questo prodotto
lontano da neonati e bambini, altrimenti potrebbero rappresentare un rischio di
soffocamento.
Pericolo: La mancanza di accessorio può causare un rischio di ribaltamento.
Avvertenze:
Il prodotto deve essere installato e utilizzato sotto la supervisione di un adulto.
Leggere attentamente ogni passo e seguire l'ordine corretto.
Rimuovere tutti gli imballaggi, separare e contare tutte le parti e tutti gli accessori.
Si prega di assicurarsi che tutte le parti siano installate correttamente,
un'installazione errata può portare a un pericolo.
Si consiglia, ove possibile, di montare tutti gli articoli vicino alla zona in cui verranno
posti in uso, per evitare di spostare inutilmente il prodotto una volta assemblato.
Garantire una superficie sicura durante il montaggio e posizionare il prodotto sempre
su una superficie piana, stabile.
Si prega di controllare e manutenere regolarmente, le parti più importanti per la
sospensione, il fissaggio, l'ancoraggio a terra.
Copertura della
tenda
Tubo di acciaio
x 1
Accessorio per il
fissaggio
Cavo di
collegamento
x 1
Montaggio del Prodotto
x 5
x 5
x 1
Tassello
x 4
Gancio
x 2
34 35
Page 19
IT
Appendere sul tetto
Parete di cemento
Istruzioni di Montaggio
1. Usare una matita
per segnare le posizioni
che devono essere
perforate. (Non
installabile a soffitto,
parete cava)
2. Utilizzare una punta
da trapano da 12 mm e
utilizzare un trapano a
percussione per
praticare i fori. La
profondità del foro non
è inferiore alla
lunghezza del tassello
3. Installare
correttamente il
tassello come mostrato
nella figura.
Note: Cercare di evitare di appendere il prodotto
troppo in alto. È normale che i bambini abbiano
un po' di paura quando iniziano a giocare. Per
garantire una buona esperienza di gioco, la
distanza tra il fondo dell'altalena e il suolo è
controllata tra 30 cm-45 cm. Se la fune
dell'oscillazione non è sufficientemente lunga,
utilizzare la fune di collegamento in dotazione.
36 37
4. Inserire il tassello
nel foro, avvitarlo
delicatamente con
l’utensile e infine
serrare il dado con la
massima forza.
Page 20
IT
Appendere all'albero
Accessori necessari per il montaggio
Fune di collegamento
x 1
Gancio
x 2
Note: Scegliere i tronchi con diametro maggiore di
25 cm per appendere il prodotto.
Per garantire la sicurezza, si prega di assicurarsi
che la fune di regolazione sia installata
correttamente dopo l'appensione, e poi un adulto
deve testare la sua fermezza tirando giù il
prodotto. Inoltre, la distanza tra la parte inferiore
dell'altalena e il suolo dovrebbe essere controllata
tra 30 cm e 45 cm.
38 39
Page 21
INSTRUKCJA OBSŁUGI
Fotel wiszący dla dzieci
NINIEJSZA INSTRUKCJA ZAWIERA IS TOTNE INFORMACJE DOTYCZĄCE BEZPIECZEŃSTWA. PROSIMY O ZAPOZNANIE SIĘ Z NIĄ I ZACHOWANIE JEJ DO WGLĄDU W PRZYSZŁOŚCI.
Page 22
LISTA CZĘŚCI
PL
Zanim Zaczniesz
Przeczytaj uważnie wszystkie instrukcje i zachowaj je na przyszłość.
Uwaga!
Uwaga: Produkt wyłącznie do użytku domowego
Uwaga: Produkt nie jest odpowiedni dla dzieci poniżej 3 lat
Niebezpieczeństwo: Trzymaj wszystkie małe części i opakowania tego produktu z dala
od niemowląt i dzieci - w przeciwnym razie mogą stwarzać ryzyko zadławienia.
Niebezpieczeństwo: Brak mocowania może spowodować ryzyko przewrócenia lub
upadku.
Ogólne ostrzeżenia:
Produkt musi być złożony i używany pod nadzorem osoby dorosłej.
Przeczytaj uważnie każdy krok i postępuj we właściwej kolejności.
Usuń opakowanie i upewnij się, że zestaw zawiera wszystkie części i elementy
montażowe.
Upewnij się, że wszystkie części są poprawnie połączone, nieprawidłowa instalacja
może prowadzić do wypadku.
Zalecamy, aby w miarę możliwości wszystkie elementy były montowane w pobliżu
miejsca, w którym będą używane, aby uniknąć niepotrzebnego przenoszenia produktu
po złożeniu.
Zapewnij bezpieczną przestrzeń roboczą podczas montażu i upewnij się, że produkt
znajduje się na płaskiej i stabilnej powierzchni.
Należy regularnie sprawdzać i konserwować najważniejsze części produktu takie
jak mocowania czy zakotwiczenie do podłoża.
Tkanina
x 1
Mocowanie
sufitowe
x 1
Montaż produktu
x 5
Stalowa rura
x 5
Lina
przedłużająca
x 1
Śruba rozporowa
x 4
Hak sprężynowy
x 2
42 43
Page 23
PL
Mocowanie na suficie
Betonowa ściana
Proces montażu
1. Za pomocą ołówka
zaznacz miejsca, w
których będziesz
wiercić otwory. (Nie
wolno montować
produktu na sufitach
posiadających pustą
przestrzeń).
2. Użyj wiertła 12 mm i
wiertarki udarowej, aby
wywiercić otwory.
Głębokość otworu musi
odpowiadać długości
śruby rozporowej.
3. Zainstaluj śruby
rozporowe tak, jak
pokazano na rysunku.
Uwaga: Nie zawieszaj fotela zbyt wysoko.
Odpowiednia odległość pomiędzy dnem fotela a
podłożem wynosi od 30 cm do 45 cm. Jeśli lina
jest zbyt krótka, użyj dołączonej do zestawu liny
przedłużającej.
4. Włóż śrubę
rozporową do otworu,
wkręć ją delikatnie, a
następnie dokręć
nakrętkę z
maksymalną siłą.
44 45
Page 24

PL
Mocowanie na gałęzi drzewa
Części potrzebne do montażu
Lina przedłużająca
x 1
Hak sprężynowy
x 2
Uwaga: Do zawieszenia fotela wybierz gałąź o
średnicy co najmniej 25 cm. W celu zapewnienia
maksymalnego bezpieczeństwa, sprawdź, czy lina
jest zamocowana prawidłowo. Pociągając fotel w
dół sprawdź sprężystość liny. Odpowiednia
odległość pomiędzy dnem fotela a podłożem
wynosi od 30 cm do 45 cm.
46 47
 Loading...