

Page 1
Page 2

FCC notice
This equipment has been tested and found to comply with the limits for a Class B
digital device, pursuant to part 15 of the FCC Rules. These limits are designed to
provide reasonable protection against harmful interference in residential installation.
This equipment generates, uses and can radiate radio frequency energy and if not
installed and used in accordance with the instructions, may cause harmful
interference to radio communications. However, there is no guarantee that
interference will not occur in a particular installation. If this equipment does cause
harmful interference to radio or television reception, detectable by turning the
equipment in question off and on, the user is encouraged to try to correct the
interference by one or more of the following measures:
• Reorient or relocate the receiving antenna
• Increase the distance between the equipment and the receiver
• Connect the equipment to an outlet on a different circuit than that which the receiver
is connected to
• Or consult the dealer or an experienced radio/TV technician for help.
This device complies with Part 15 of the FCC Rules. Operation is subject to following
two conditions:
1. This device may not cause harmful interference, and
2. This device must accept any interference that may cause undesired operation.
1
Page 3

Safety instructions
Read all of these instructions before you operate your projector and save for future
reference.
1. Read instructions
All the safety and operating instructions should be read before the appliance is
operated.
2. Notes and warnings
All notes and warnings in the operating instructions should be adhered to.
3. Cleaning
Unplug the projector from the wall socket before cleaning. Use a damp cloth for
cleaning the projector housing. Do not use liquid or aerosol cleaners.
4. Accessories
Do not place this product on an unstable cart, stand, or table. The product may fall,
causing serious damage to the product.
Keep the plastic packing materials (from the projector, accessories and optional
parts) out of the reach of children as these bags may result in death by suffocation.
Be particularly careful around the small children.
5. Ventilation
The projector is equipped with ventilation holes (intake) and ventilation holes
(exhaust).
Do not block or place anything near these slots, or internal heat build-up may
occur, causing picture degradation or damage to the projector.
6. Power sources
Check that the operating voltage of your unit is identical with the voltage of your
local power supply.
7. Servicing
Do not attempt to service this projector yourself. Refer all servicing to qualified
service personnel.
8. Replacement parts
When replacement parts are required, be sure that the replacement parts are
specified by the manufacture. Unauthorized substitutions may result in fire, electric
shock or other hazards.
9. Moisture Condensation
Never operate this projector immediately after moving it from a cold location to a
warm one. When the projector is exposed to such a change in temperature,
moisture may condense on the lens and the crucial internal parts. To prevent the
unit from possible damage, do not use the projector for at least 2 hours when there
is an extreme or sudden change in temperature.
2
Page 4
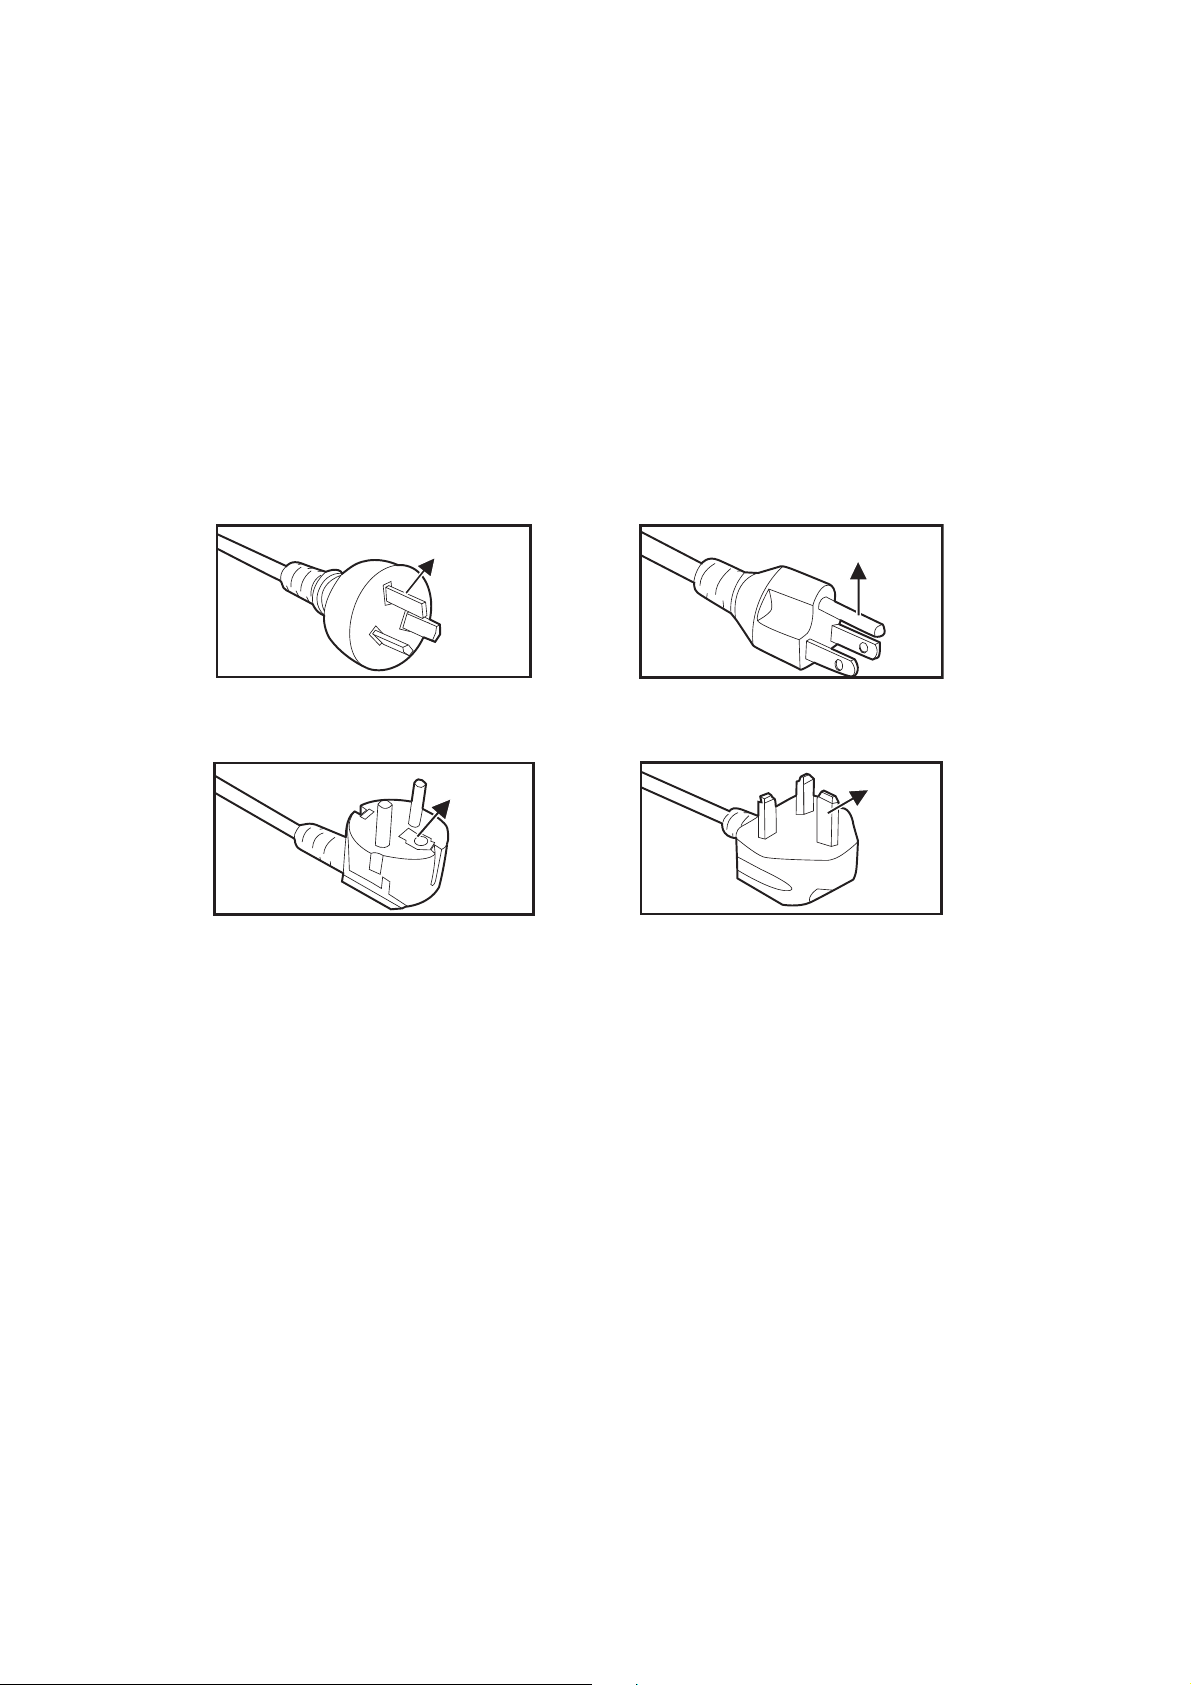
Notes on the AC power cord
AC Power Cord must meet the requirement of countries where you use this projector.
Please confirm your AC plug type with the graphics below and ensure that the proper
AC Power Cord is used. If the supplied AC Power Cord does not match your AC
outlet, please contact your sales dealer. This projector is equipped with a grounding
type AC line plug. Please ensure that your outlet fits the plug. Do not defeat the safety
purpose of this grounding type plug. We highly recommend using a video source
device also equipped with a grounding type AC line plug to prevent signal interference
due to voltage fluctuations.
Ground
For Australia and
Mainland China
Ground
For Continental Europe
Ground
For the U.S.A. and
Canada
Ground
For the U.K.
3
Page 5

Table of contents
Introduction ............................................................................. 5
Projector features ........................................................................................................5
Package contents ........................................................................................................6
Product overview .........................................................................................................7
Installation ............................................................................. 11
Connecting to the Projector .......................................................................................11
Powering on/off the projector ....................................................................................13
Adjusting the projector height ....................................................................................14
Adjusting the projector focus .....................................................................................14
Adjusting projection image size .................................................................................15
User Controls ........................................................................ 17
Control panel & remote control .................................................................................17
Securing the projector ...............................................................................................23
Locking control keys ..................................................................................................24
Setting the presentation timer ...................................................................................25
Using the projector in standby mode .........................................................................26
Adjusting the sound ...................................................................................................26
On-screen display menus .........................................................................................28
Menu tree ..................................................................................................................29
Using network features .............................................................................................44
Maintenance .......................................................................... 50
Cleaning the projector housing .................................................................................50
Specifications ....................................................................... 51
Dimensions ...............................................................................................................52
Ceiling mount installation ..........................................................................................52
Appendices ........................................................................... 53
LED indicator messages ...........................................................................................53
Compatibility Modes ..................................................................................................54
Troubleshooting ........................................................................................................58
RS-232 command and configuration .........................................................................59
4
Page 6

Introduction
Projector features
The projector integrates high-performance optical engine projection and a user - friendly
design to deliver high reliability and ease of use.
The projector offers the following features:
• Laser-phosphor light source free from replacement
• Ultra-short throw (UST) projection lens delivers large images from a short projection
distance
• HDMI x 2 inputs
• 2D keystone for easy horizontal and vertical keystone correction
• Corner Adj. allows you to adjust four corners of the projected image
• Power saving function decreasing the power consumption of the light by up to 30%
when no input signal can be detected for a set period of time.
• Presentation timer for better control of time during presentations
• Blu-Ray 3D function supported
• Selectable quick power off function
• Color Management allowing color adjustments to your liking
• Screen Color correction allowing projection on surfaces of several predefined colors
• Quick auto search speeding up the signal detecting process
• HDMI CEC (Consumer Electronics Control) function allows synchronized power
ON/OFF operation between the projector and a CEC-compatible DVD player device
connected to the HDMI input of the projector
Note
• The information in this manual is subject to change without notices.
• The reproduction, transfer or copy of all or any part of this document is not permitted
without express written consent.
5
Page 7

Package contents
When you unpack the projector, make sure you have all these components:
Projector
VGA cable (D-SUB to D-SUB) CD manual Quick start guide
Remote control (IR) &
batteries (AAA *2 PCS)
AC power cord
Note
• Contact you dealer immediately if any items are missing, appear damaged, or if the unit
does not work
• For maximum protection of the product, please save the original shipping carton and
packing materials and repack your product as it was originally packed at the factory if
you need to ship it.
.
6
Page 8
Product overview
Projector outlook
Front and top
1
5
4
5
1. Focus switch 2. Lens
3. Control panel 4. IR remote control sensor
5. Speaker
Bottom and side
1
2
2
3
3
3
1
4
1. Adjuster feet 2. Ceiling mount holes
3. Ventilation holes (airflow out) 4. Ventilation holes (airflow in)
7
4
Page 9
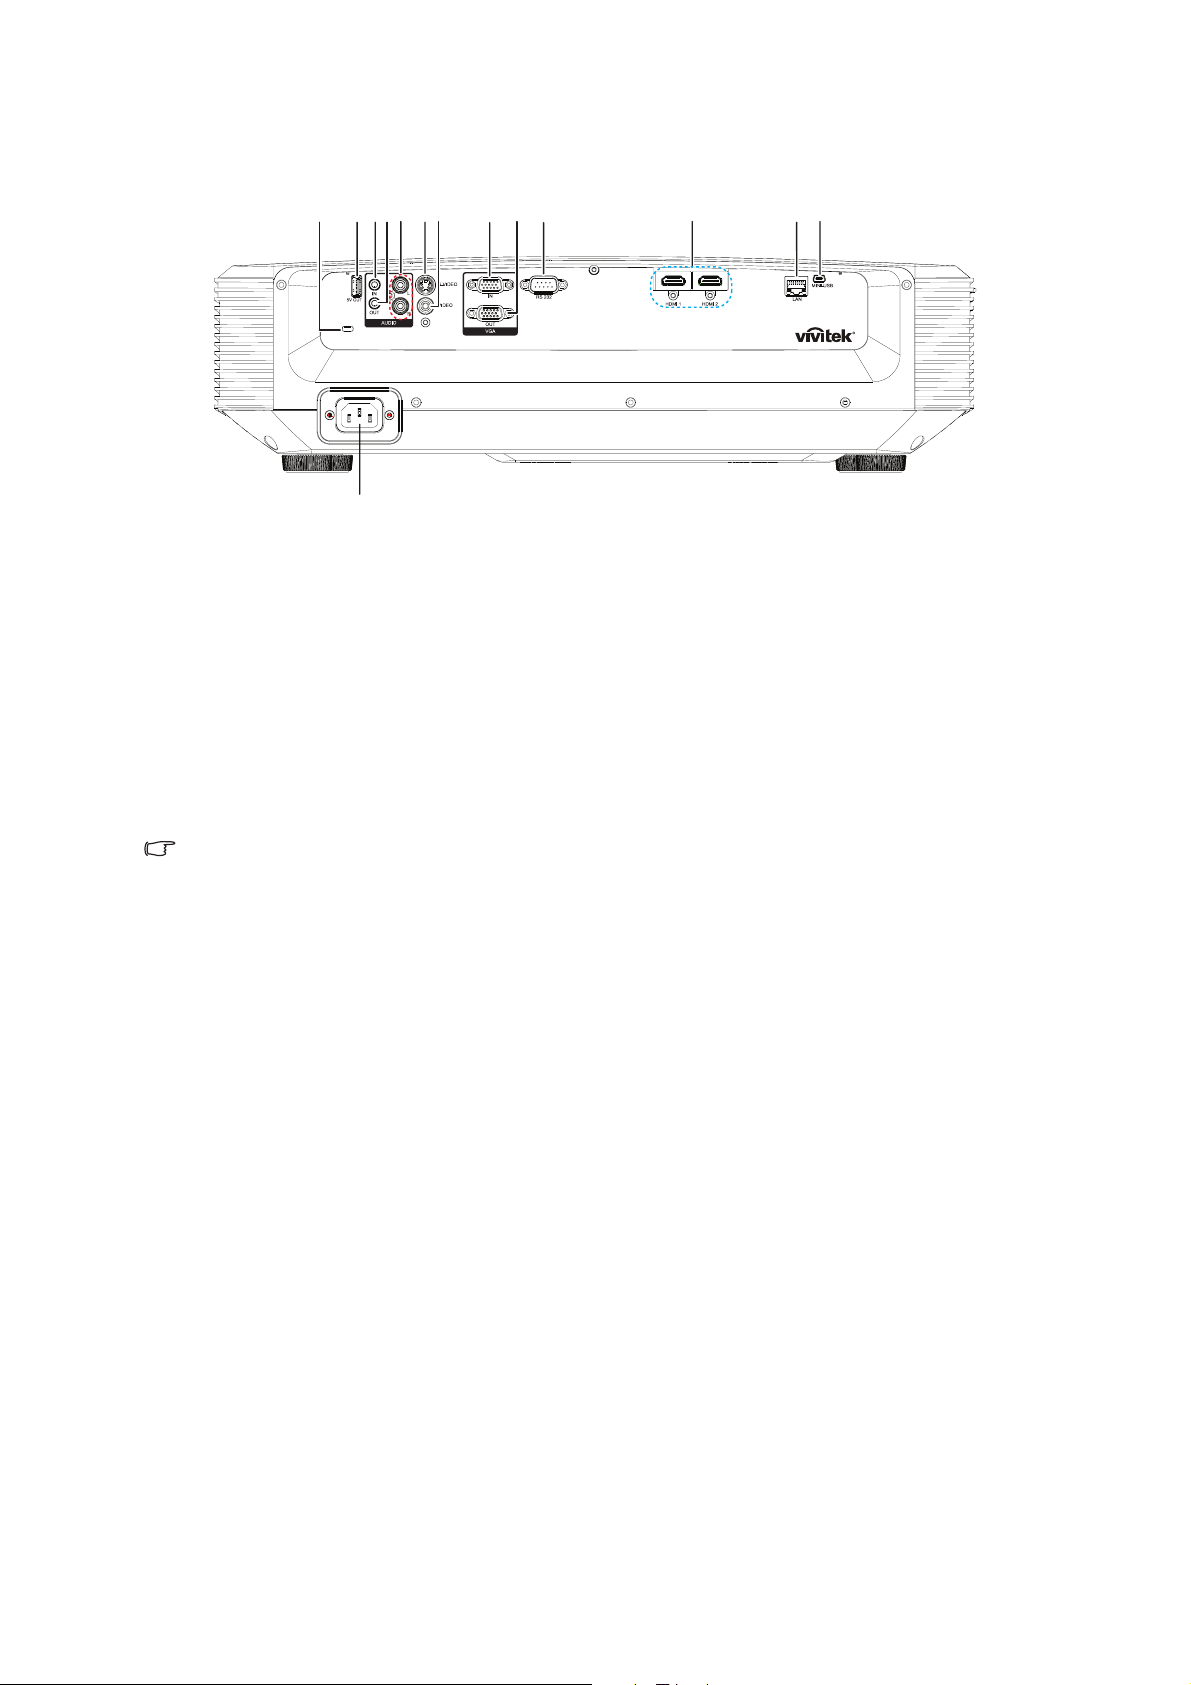
Rear
1234
5
7
6
V
8910
11
12
13
14
1. Kensington anti-theft lock slot 2. 5V output for power charging
3. Audio input jack 4. Audio output jack
5. Audio (L/R) input jack 6. S-Video input jack
7. Video input jack 8. RGB (PC)/Component video (YPbPr)
signal input jack
9. RGB signal output jack 10. RS232 control port
11. HDMI 1/HDMI 2 input jack 12. RJ45 LAN input jack
13. Mini-USB jack for service 14. AC power cord inlet
Note
• This projector can be used with a ceiling mount for support. The ceiling mount is not
included in the package.
• Contact your dealer for information to mount the projector on a ceiling.
8
Page 10
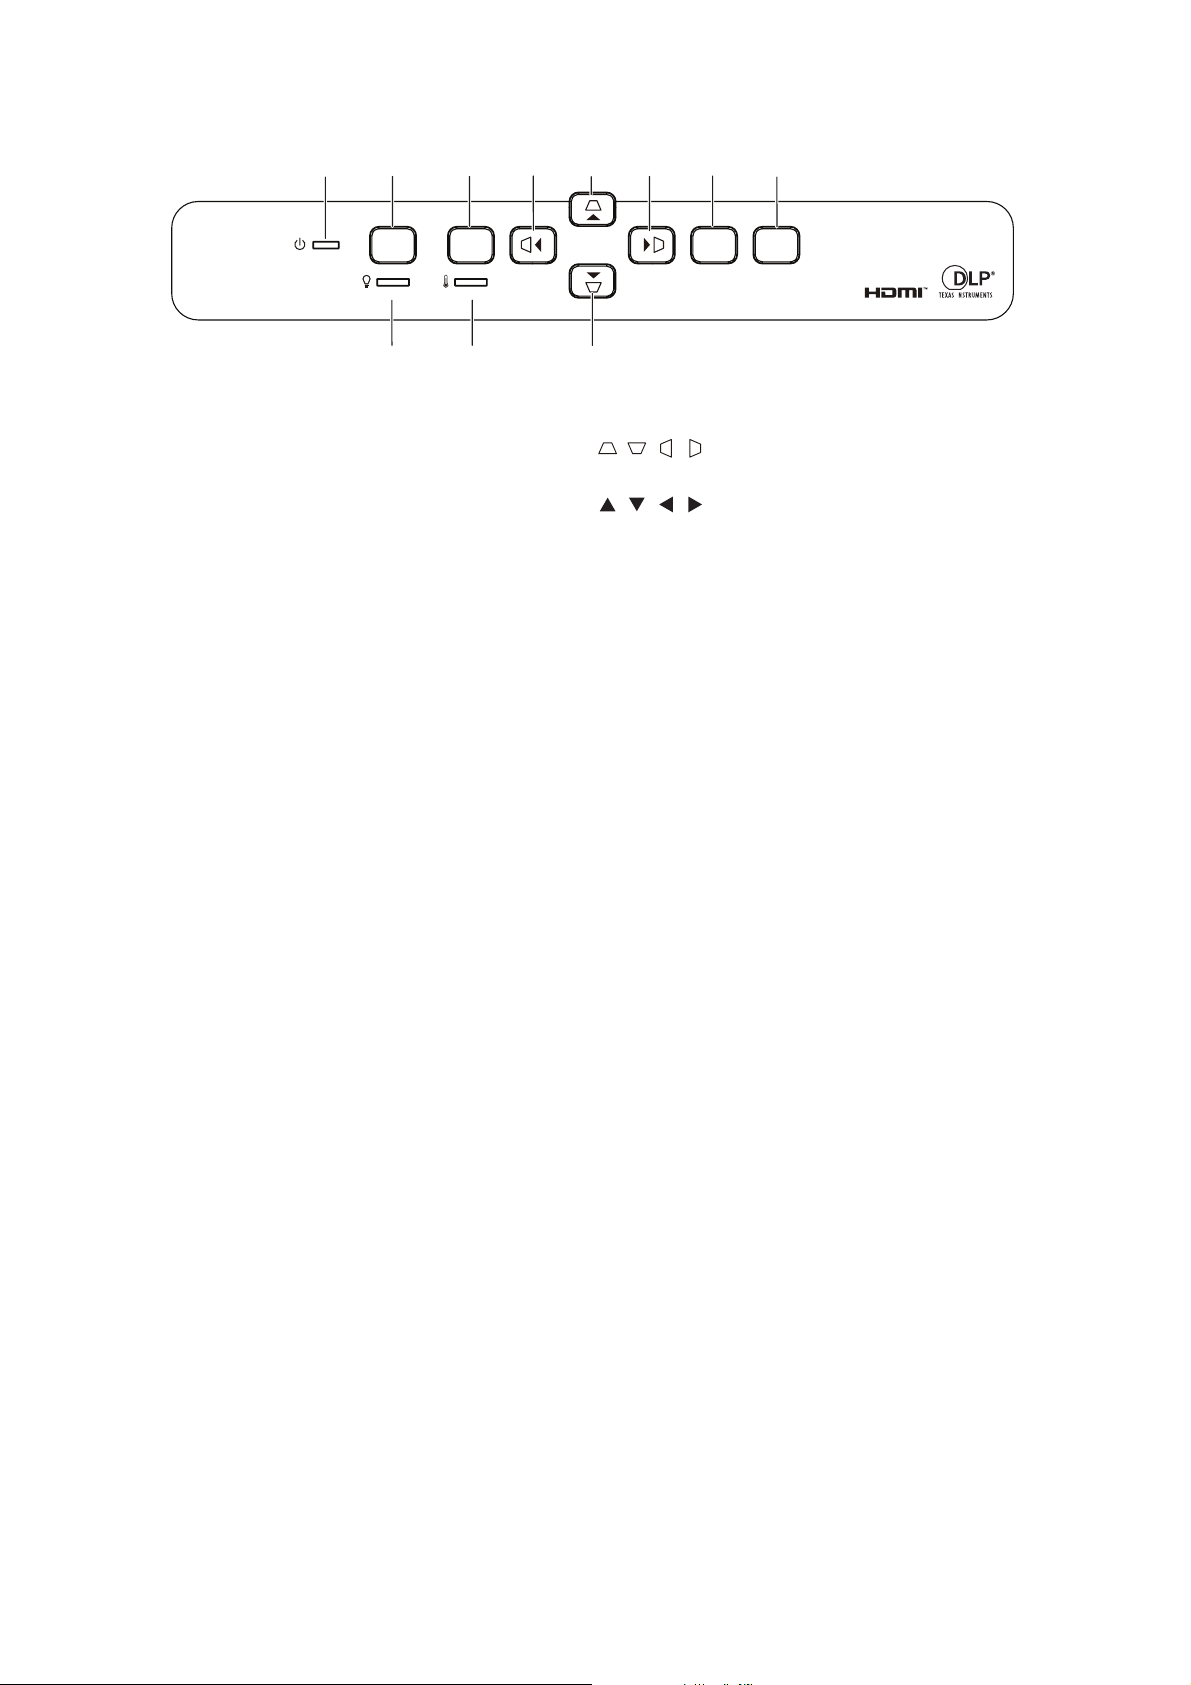
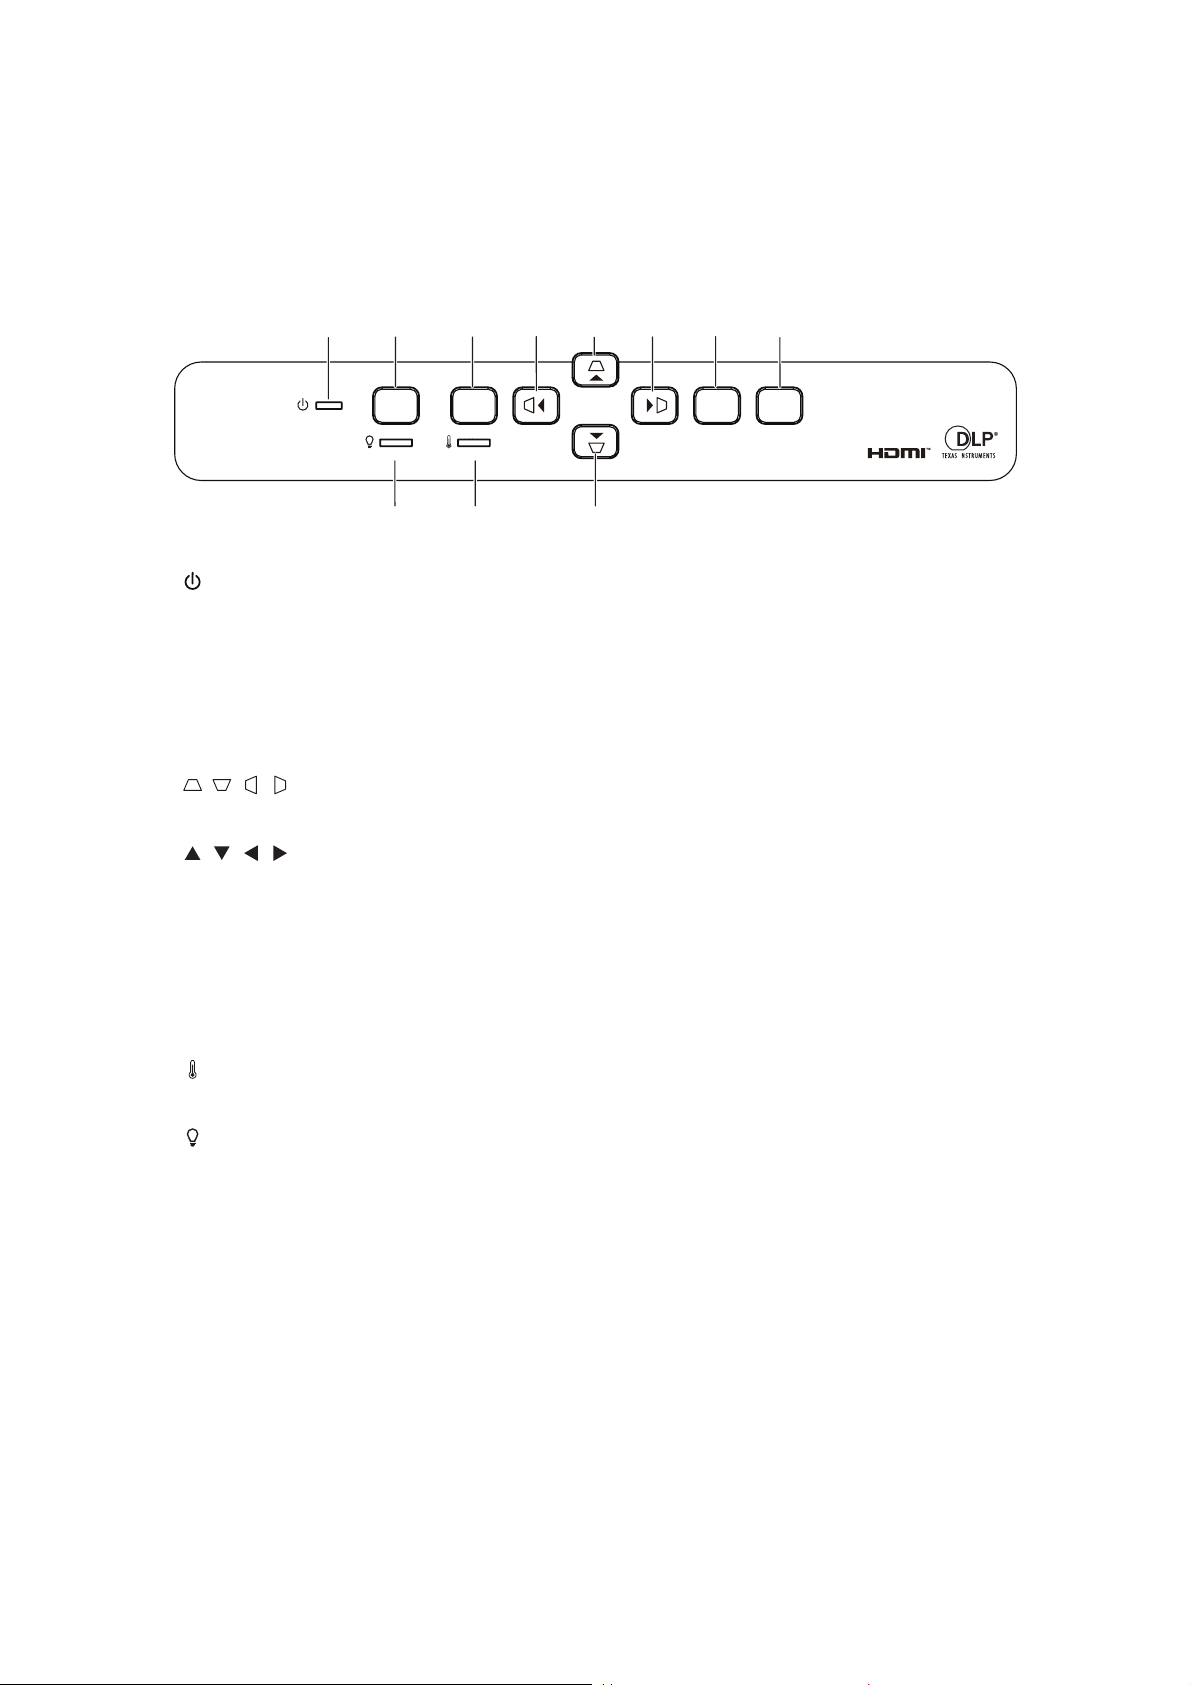
Control panel
1
2
Power
8
3
Menu
4
47
4
4
56
Source
Enter
1. Power LED indicator 2. Power button
3. Menu button
4. / / / Vertical and Horizontal Keystone buttons
/ / / Four directional select buttons
5. Enter button 6. Source button
7. Temperature LED indicator 8. Light LED indicator
9
Page 11

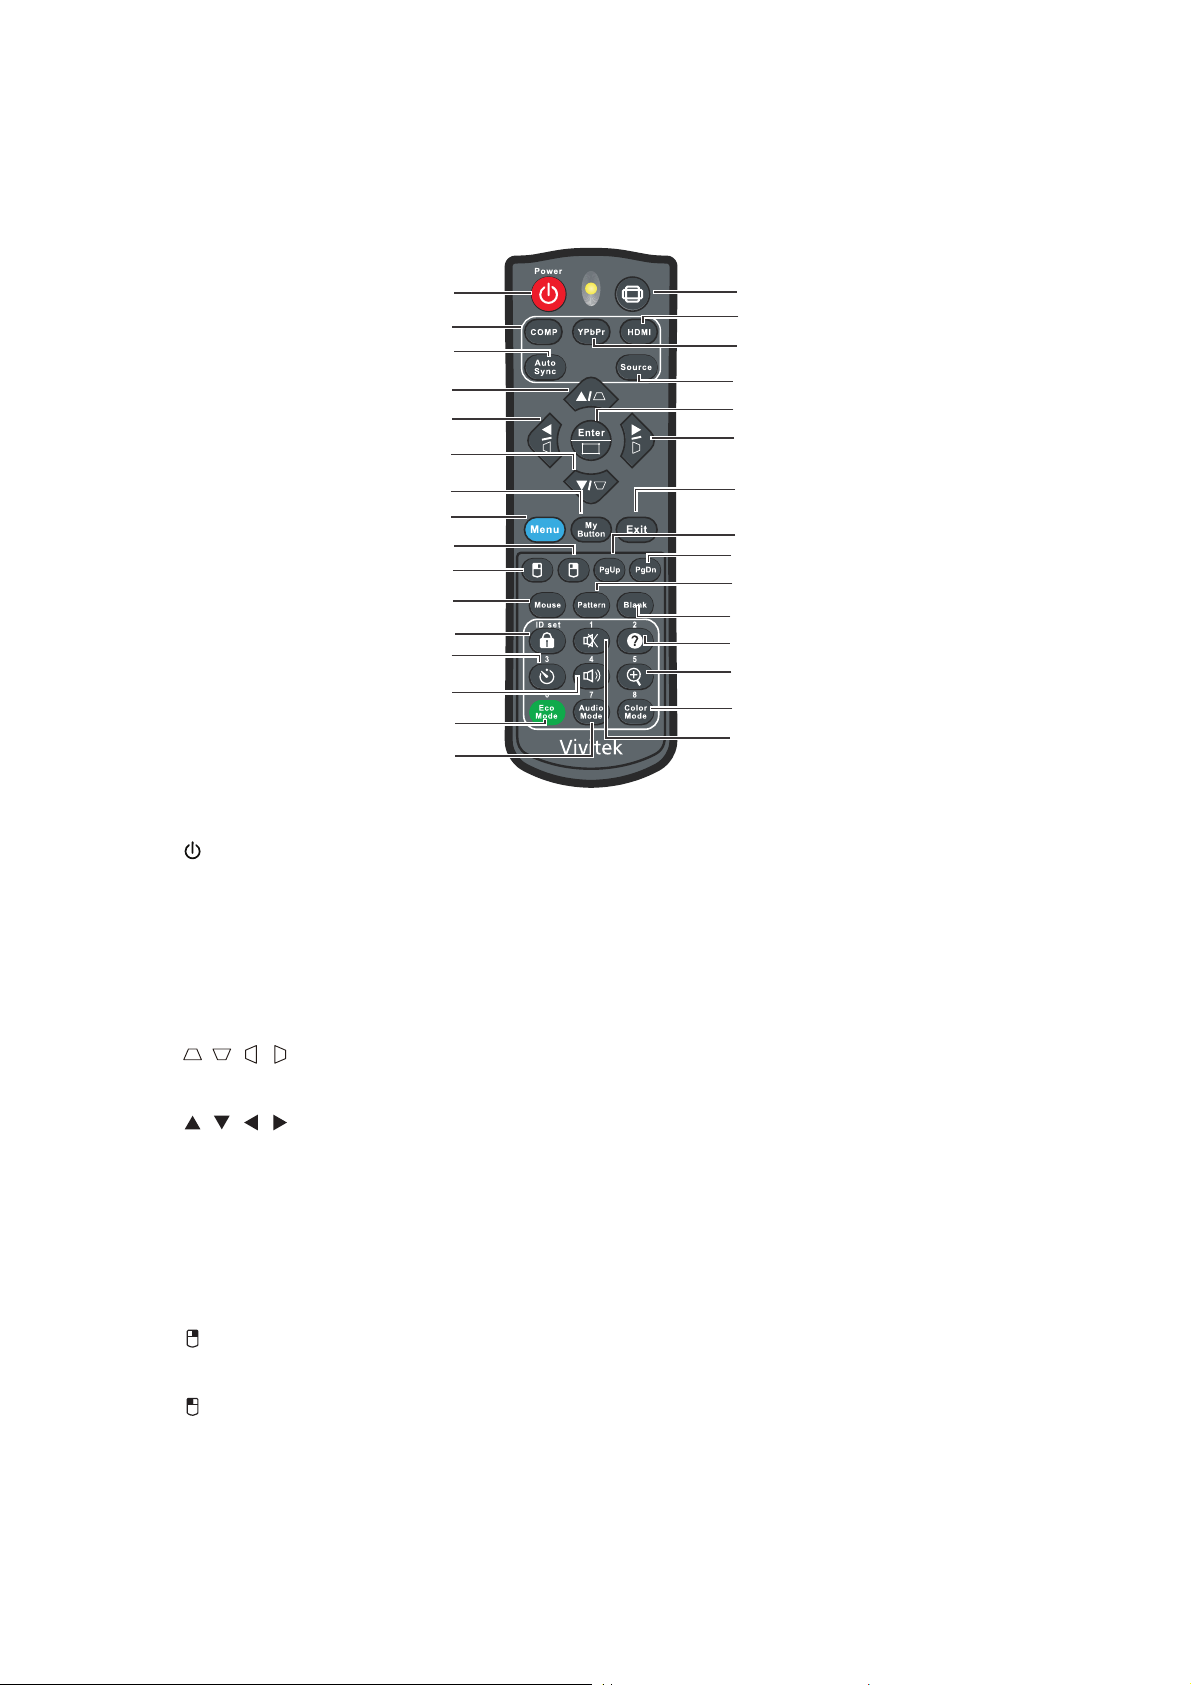
Remote control
1
2
3
4
4
4
5
6
7
8
9
10
11
12
13
14
1. Power 2. Computer
3. Auto Sync
5. My Button 6. Menu
7. Right mouse 8. Left mouse
9. Mouse 10. Lock/ID Set
11. Timer 12. Volume
13. Eco Mode 14. Audio Mode
15. Aspect 16. HDMI
17. YPbPr 18. Source
19. Enter/Corner Adj. 20. Exit
21. Page Up 22. Page Down
23. Pattern 24. Blank
25. Help 26. Magnify
27. Color Mode 28. Mute
4. / / / Vertical and Horizontal Keystone
buttons
/ / / Four directional select buttons
15
16
17
18
19
4
20
21
22
23
24
25
26
27
28
10
Page 12
Installation
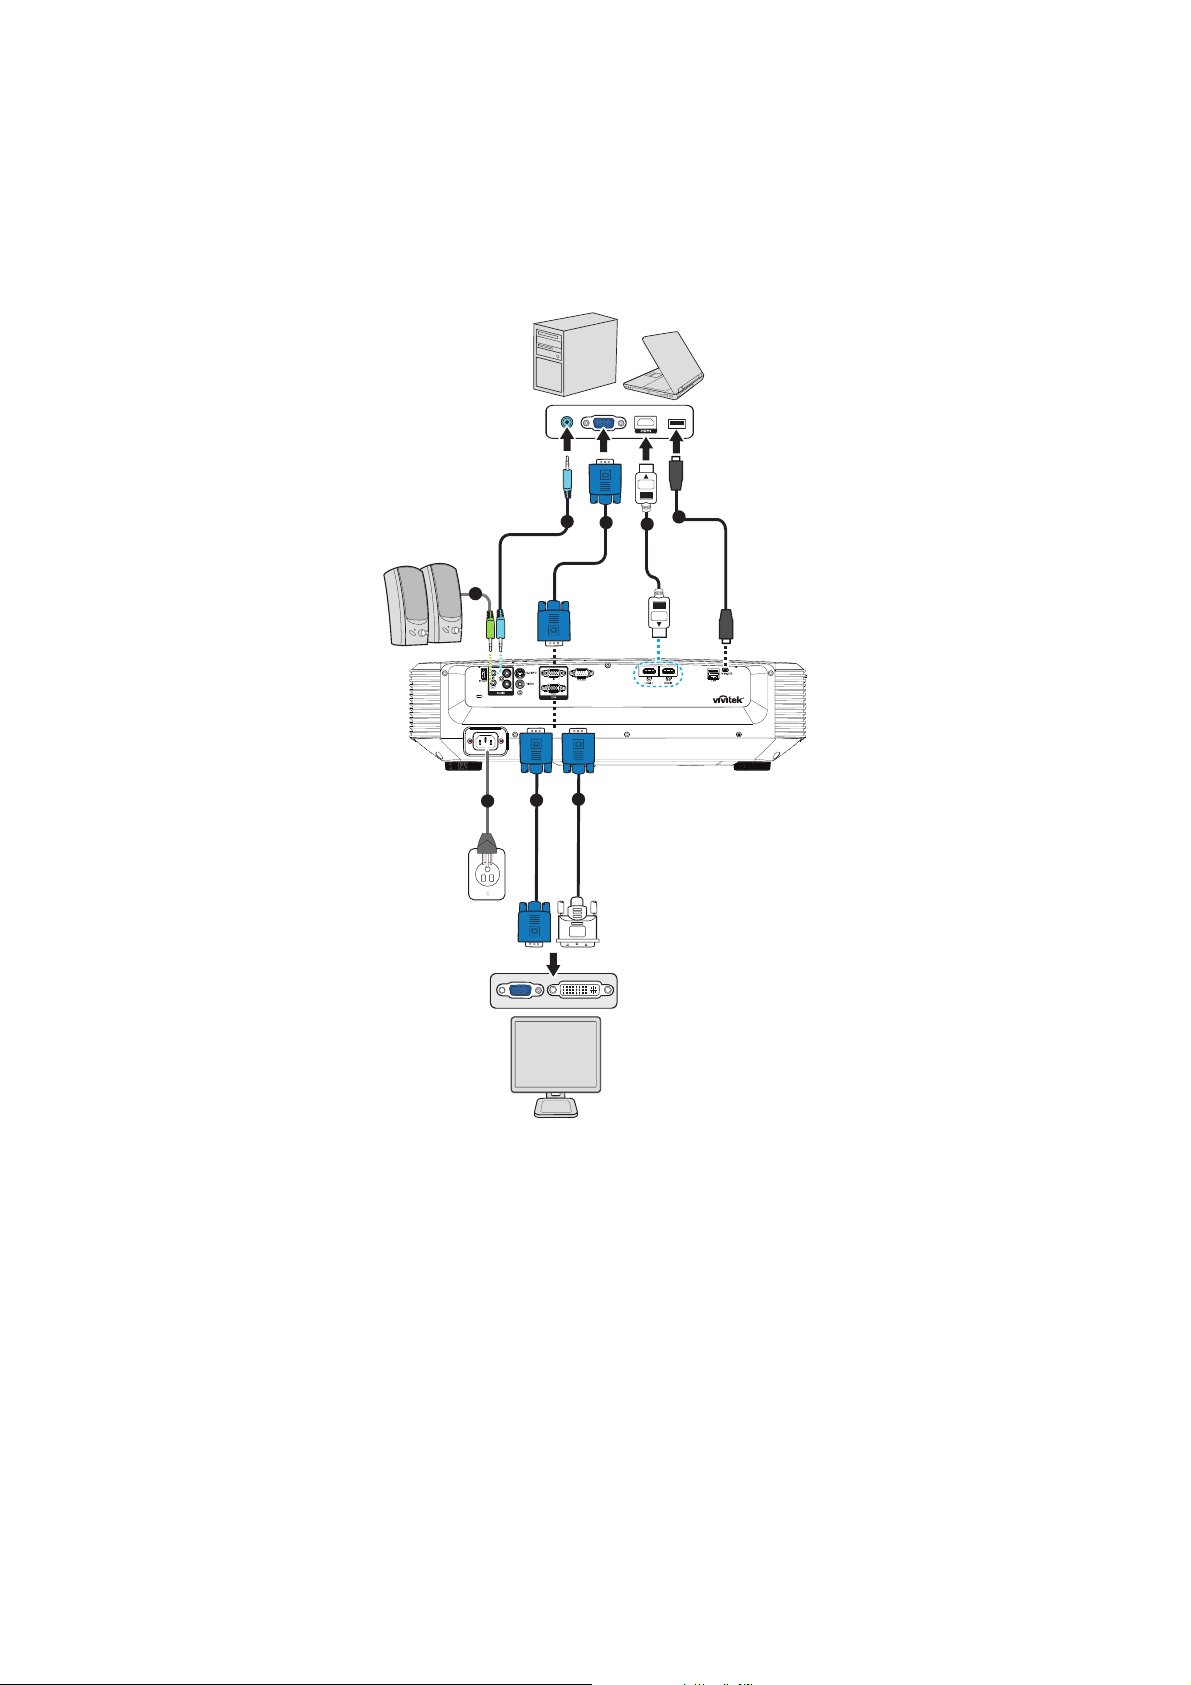
Connecting to the Projector
Connecting a Computer/Notebook
3
4
2
V
7
4
1
6
5
1. Power cord 2. Audio Out cable
3. Audio In cable 4. VGA cable (D-Sub to D-Sub)
5. HDMI cable 6. Mini-USB cable
7. VGA (D-Sub) to HDTV (RCA) cable
11
Page 13
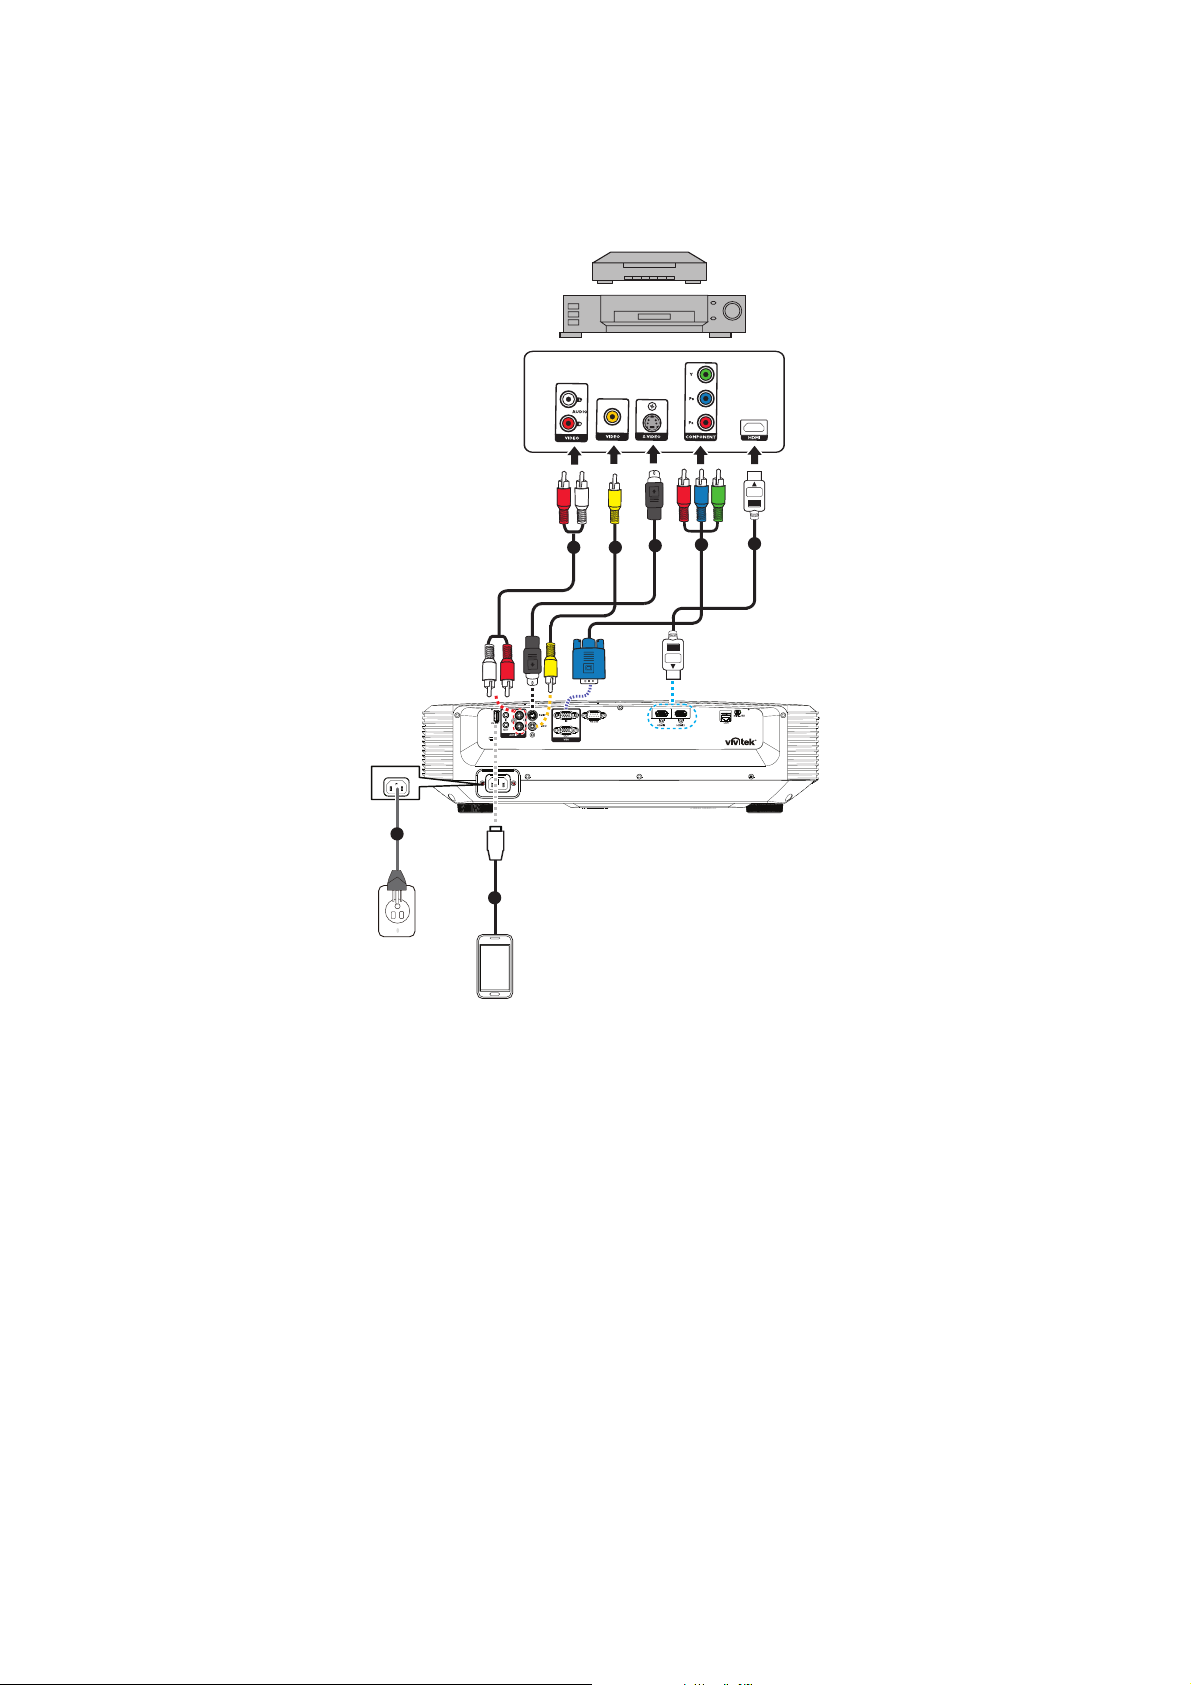
Connecting a Video source
DVD player, Blu-ray player, Set-top box, HDTV receiver
5
2
V
4
3
6
1
7
1. Power cord 2. Audio (L/R) cable
3. Composite Video cable 4. S-Video cable
5. 3 RCA to mini D-sub 15 pin cable 6. HDMI cable
7. USB cable for charging device
12
Page 14

Powering on/off the projector
Powering on the projector:
1. Complete the AC power cord and peripheral signal cable(s) connections.
2. Press to turn on the projector.
The projector takes a minute or so to warm up.
• If the projector is still hot from previous activity, it will run the cooling fan for
approximately 60 seconds before energizing the light.
3. Turn on your source (computer, notebook, DVD, etc.).
• If you are connecting multiple sources to the projector simultaneously, press
Source to select your desired signal or press your desired signal key on the
remote control.
• If the projector doesn't detect a valid signal, the message 'No Signal' will con-
tinue to be displayed.
• Be sure the Auto Source function in the Source menu is On if you want the
projector to automatically search for the signals.
Warning
• Never look into the lens when the light is on. This can damage your eyes.
• This focal point concentrates high temperature. Do not place any object near it to avoid
possible fire hazard.
Powering off the projector:
1. Press to turn off the projector light. You will see a message "Power off? Press
Power again" appear on the screen.
2. Press again to confirm.
• The Power LED begins flashing and the projector will enter standby mode.
• If you want to turn the projector back on, you must wait until the projector has
completed the cooling cycle and has entered standby mode. Once in standby
mode, simply press to restart the projector.
3. Disconnect the AC power cord from the electrical outlet and the projector.
4. Do not turn on the projector right after power off.
13
Page 15
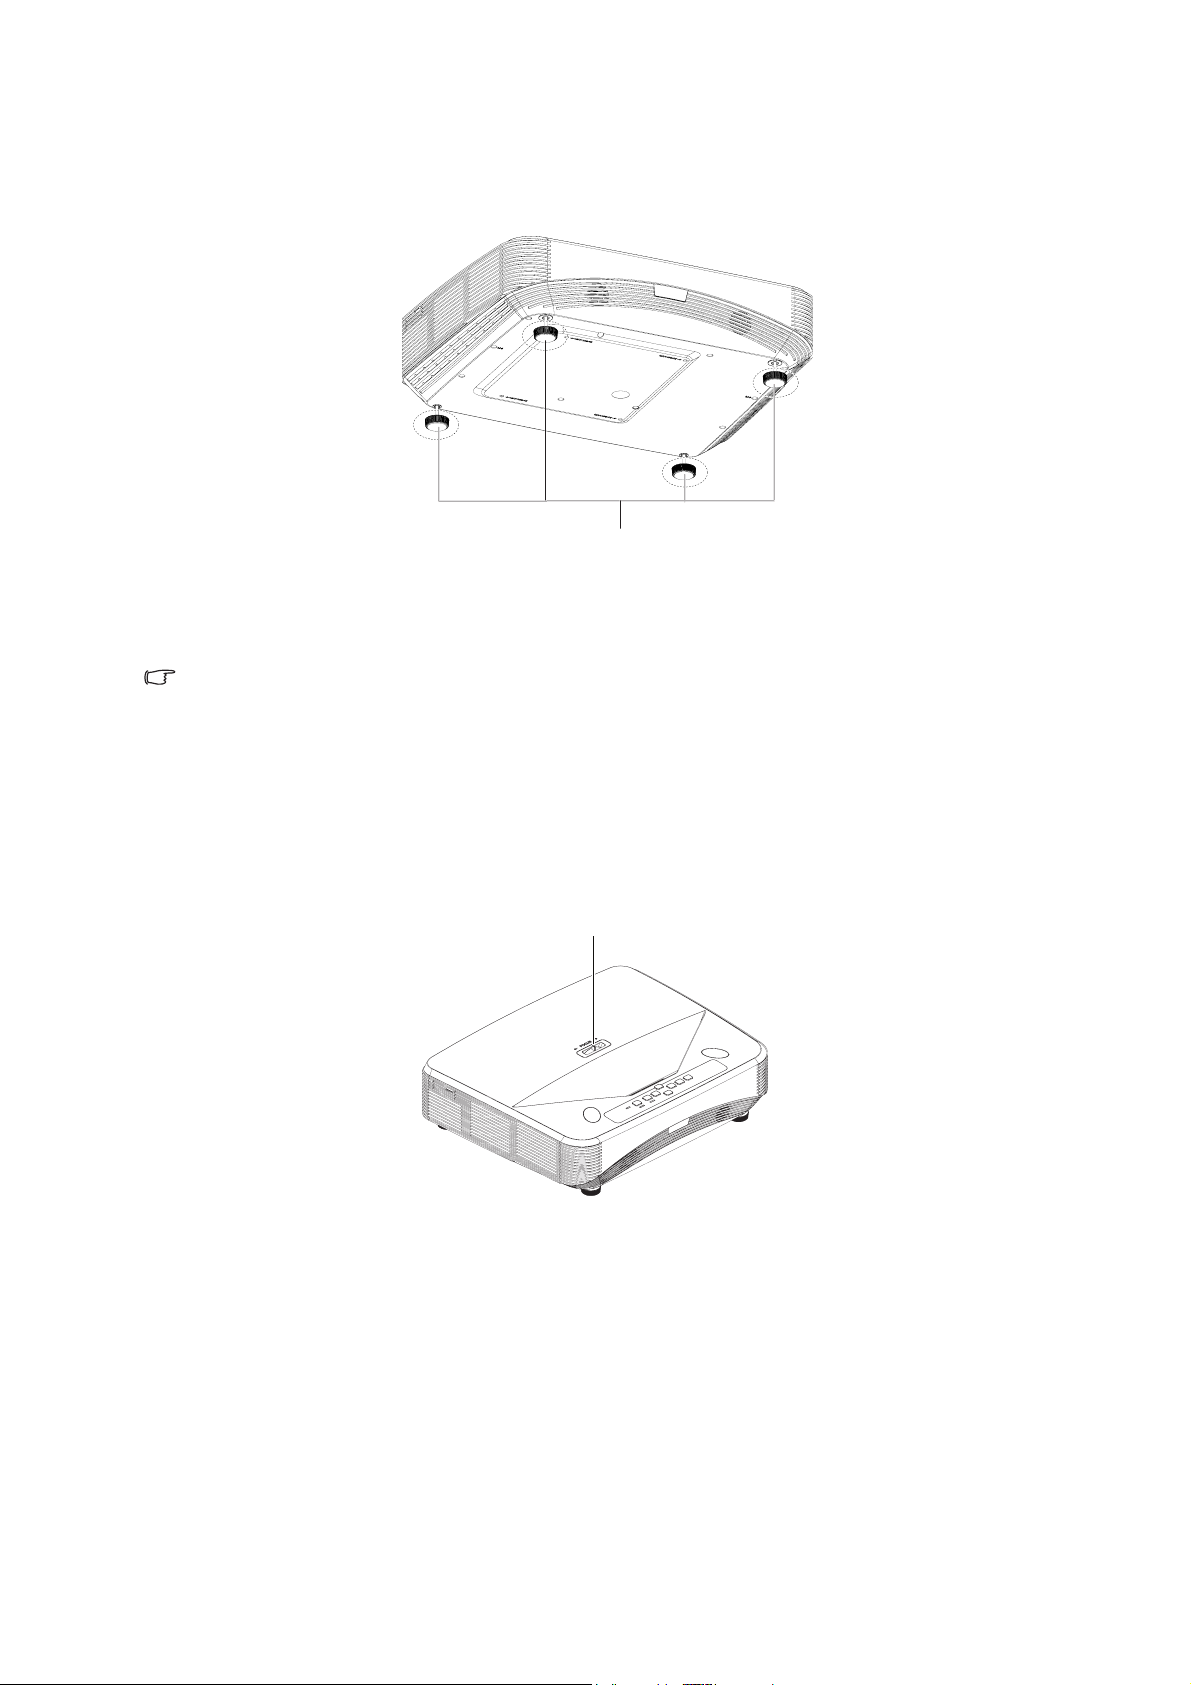
Adjusting the projector height
Adjuster feet
The projector is equipped with 4 adjuster feet to adjust the image height. To raise or
lower the image, turn the adjuster feet to fine-tune the height.
Note
• To avoid damaging the projector, make sure that the adjuster feet are fully retracted
before placing the projector in its carrying case.
Adjusting the projector focus
Focus switch
To focus the image, slide the focus switch until the image is clear.
• Standard throw series (1080p): The projector will focus at distances from 75.1 to
447.7 mm (From a projecting surface to the rear of the unit).
• Standard throw series (WXGA): The projector will focus at distance from 84.9 to
465.5 mm (From a projecting surface to the rear of the unit).
• Standard throw series (XGA): The projector will focus at distance from 66.8 to 451.3
mm (From a projecting surface to the rear of the unit).
14
Page 16
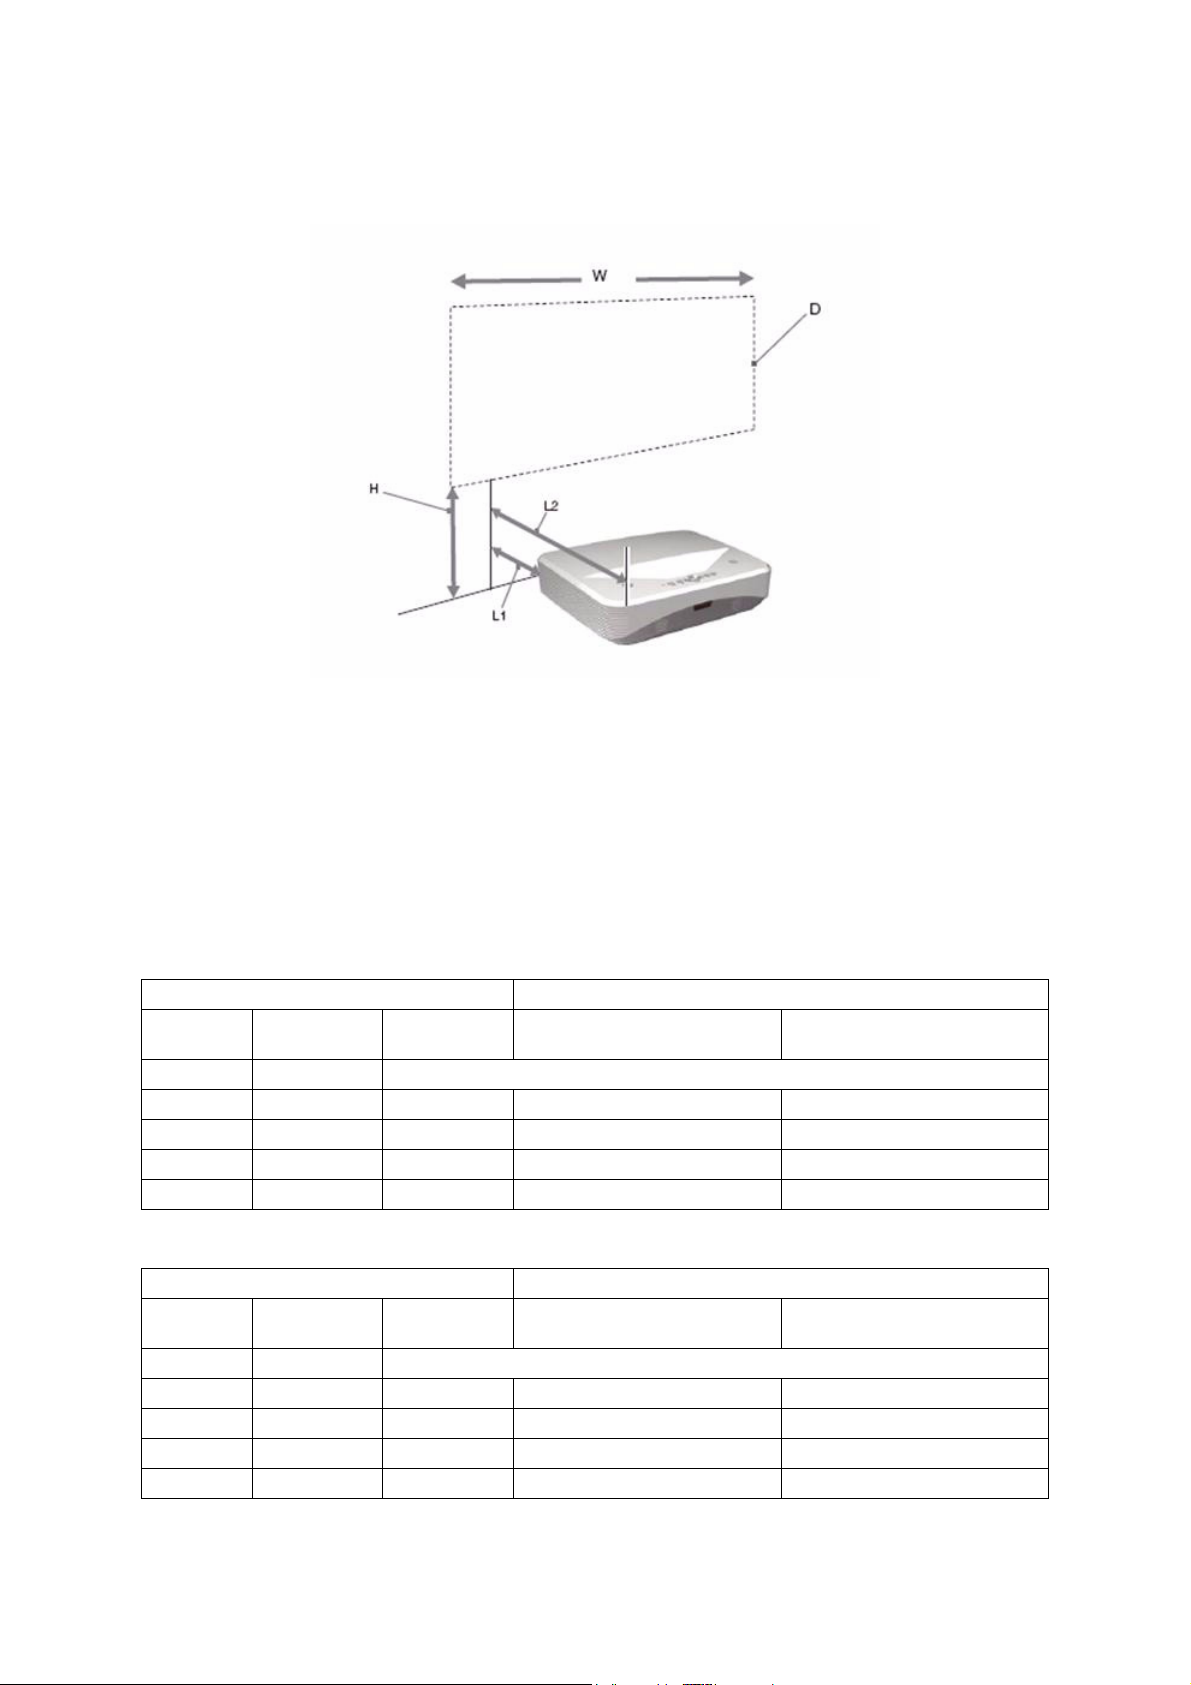
Adjusting projection image size
L1: Distance from a projection surface to the rear of the unit
L2: Distance from a projection surface to the front of the unit
D: Projection image size
H: Distance from a floor to the bottom of a projection image
1080p (16:9)
Projection image size Installation distance
Diagonal
(D)
inch m x m mm
80 1.77 x 0.996 288.5 75.1 465.1
105 2.32 x 1.3 346.9 208.2 598.2
125 2.77 x 1.56 393.6 314.7 704.7
150 3.32 x 1.87 451.9 447.7 837.7
With x
Height
Bottom
height (H)
From a projecting surface
to the rear of the unit L1
From a projecting surface
to the front of the unit L2
WXGA (16:10)
Projection image size Installation distance
Diagonal
(D)
inch m x m mm
80 1.72 x 1.08 263.3 84.9 474.9
105 2.26 x 1.41 313.7 220.8 610.8
125 2.69 x 1.68 354.1 329.6 719.6
150 3.23 x 2.02 404.5 465.5 855.5
With x
Height
Bottom
height (H)
From a projecting surface
to the rear of the unit L1
From a projecting surface
to the front of the unit L2
15
Page 17

XGA (4:3)
Projection image size Installation distance
Diagonal
(D)
inch m x m mm
65 1.32 x 0.99 277.1 66.8 456.8
80 1.63 x 1.2 317.5 162.9 552.9
105 2.13 x 1.6 384.9 323.1 713.1
125 2.54 x 1.91 438.7 451.3 841.3
With x
Height
Bottom
height (H)
From a projecting surface
to the rear of the unit L1
From a projecting surface
to the front of the unit L2
• These tables are for user's reference only.
16
Page 18
User Controls
Control panel & remote control
Control panel
4
1
2
Power
8
3
Menu
4
4
47
56
Source
Enter
1. Power LED indicator
Refer to “LED Indicator Messages”.
2. Power
Turn the projector on or off.
3. Menu
Display or exit the on-screen display menus.
4. / / / Vertical and Horizontal Keystone buttons
Manually corrects distorted images resulting from an angled projection.
/ / / Four directional select buttons
Selects the desired menu items and makes adjustments.
5. Enter
Enacts the selected On-Screen Display (OSD) menu item.
6. Source
Display the source selection bar.
7. Temperature LED indicator
Refer to “LED Indicator Messages”.
8. Light LED indicator
Refer to “LED Indicator Messages”.
17
Page 19
Remote control
1. Power
Turn the projector on or off.
1
2
3
4
4
4
5
6
7
8
9
10
11
12
13
14
15
16
17
18
19
4
20
21
22
23
24
25
26
27
28
2. Computer
Display Computer signal.
3. Auto Sync
Automatically determines the best picture timings for the displayed image.
4. / / / Vertical and Horizontal Keystone buttons
Manually corrects distorted images resulting from an angled projection.
/// Four directional select buttons
Selects the desired menu items and makes adjustments.
5. My Button
User definable key for customized function.
6. Menu
Display on-screen display menus.
7. (Right mouse)
Perform the right button of the mouse when mouse mode is activated.
8. (Left mouse)
Perform the left button of the mouse when mouse mode is activated.
9. Mouse
Switch between the normal and mouse modes.
18
Page 20

10. (Lock/ID Set)
Lock: Activates or disables panel key lock.
ID Set: No function.
11. (Timer)
Activate P-Timer OSD menu.
12. (Volume)
Display Volume adjustable menu.
13. Eco Mode
Switch the light mode between Normal and Eco.
14. Audio Mode
Switch the audio mode from Video, Speech to Entertainment.
15. (Aspect)
Select the display aspect ratio.
16. HDMI
Switch HDMI signal between HDMI1 and HDMI2.
17. YPbPr
No function
18. Source
Display the source selection bar.
19. Enter/ (Corner Adj.)
Enacts the selected On-Screen Display (OSD) menu item.
Displays the Corner Adj. page.
20. Exit
Goes back to previous OSD menu, exits and saves menu settings.
21.
(Page Up)
Perform page up function when mouse mode is activated.
22.
(Page Down)
Perform page down function when mouse mode is activated.
23. Pattern
Display embedded test pattern.
24. Blank
Hide the screen picture.
?
25. (Help)
Display Help menu.
26. (Magnify)
Displays the zoom bar that magnifies or reduces the projected picture size.
27. Color Mode
Select the picture setup mode.
28. (Mute)
Toggles the projector audio between on and off.
19
Page 21

Using the remote mouse control
The capability of operating your computer with the remote control gives you more
flexibility when delivering presentations.
1. Connect the projector to your PC or notebook with a USB cable prior to using the
remote control in place of your computer’s mouse. See "Installation" on page 11
for details.
2. Set the input signal to VGA IN.
3. Press Mouse on the remote control to switch from the normal mode to the mouse
mode. An icon appears on the screen to indicate the activation of the mouse
mode.
4. Perform the desired mouse controls on your remote control.
• To move the cursor on the screen, press / / / .
• To left-click, press .
• To right-click, press .
• To operate your display software program (on a connected PC) which responds
to page up/down commands (like Microsoft PowerPoint), press Page Up/Page
Down.
• To return to the normal mode, press Mouse again or other keys except for the
mouse related multi-function keys.
20
Page 22

Installing the batteries
1. Open the battery cover in the
direction shown.
2. Install batteries as indicated by the
diagram inside the compartment.
3. Close the battery cover into position.
Caution
• Risk of explosion if battery is replaced by an incorrect type.
• Dispose of used batteries according to the instructions.
• Make sure the plus and minus terminals are correctly aligned when loading a battery.
Note
• Keep the battery out of the reach of children.
• Remove batteries from remote control when not using for extended periods.
• Do not recharge the battery or expose the battery to fire or water.
• Do not dispose the used battery along with household waste. Dispose
according to local regulations.
• Danger of explosion may happen if batteries are incorrectly replaced. Replace only with
the same type recommended by the manufacturer.
• Battery should not be in or near to fire or water, keep batteries in a dark, cool and dry
place.
• If suspect battery leakage, wipe out the leakage and then replace a new battery. If the
leakage adheres to your body or clothes, rinse well with water immediately.
used batteries
21
Page 23

Remote control operation
Point the remote control at the infrared remote sensor and press a button.
• Operating the projector from the front.
Note
• The remote control may not operate when there is sunlight or other strong light such as
a fluorescent light shining on the remote sensor.
• Operate the remote control from a position where the remote sensor is visible.
• Do not drop the remote control or jolt it.
• Keep the remote control out of locations with excessively high temperature or humidity.
• Do not get water on the remote control or place wet objects on it.
• Do not disassemble the remote control.
22
Page 24

Securing the projector
Setting a password
1. Open the OSD menu and go to the Settings 2 > Advanced > Security Settings
menu. Press Enter. The Security Settings page displays.
2. Highlight Change Password and press Enter.
3. According to the password you desire to set, press the arrow keys to enter six
digits for the password.
4. Confirm the new password by re-entering the new password.
5. Go back to Settings 2 > Advanced > Security Settings > Power On Lock menu,
and press Enter. You will be asked to input password. Once the password is set,
the OSD menu returns to the Power On Lock. Select On by pressing / .
6. To leave the OSD menu, press Menu/Exit.
Entering the password recall procedure
If the password function is activated, you will be asked to enter the six-digit password
every time you turn on the projector.
1. If you enter an incorrect password 5 times in succession, the projector will display
a coded number on the screen when you press the auto key 3~5 seconds.
2. Write down the number and turn off your projector.
3. Seek help from the local service center to decode the number. You may be
required to provide proof of purchase documentation to verify that you are an
authorized user of the projector.
Changing the password
1. Open the OSD menu and go to the Settings 2 > Advanced > Security Settings >
Change Password menu and press Enter.
2. Enter the old password.
• If the password is correct, another message "INPUT NEW PASSWORD" dis-
plays.
• If the password is incorrect, the password error message displays, and the
message "INPUT CURRENT PASSWORD" displays for your retry. You can
press Menu/Exit to cancel the change or try another password.
3. Enter a new password.
4. Confirm the new password by re-entering the new password.
5. You have successfully assigned a new password to the projector. Remember to
enter the new password next time the projector is started.
6. To leave the OSD menu, press Menu/Exit.
23
Page 25

Disabling the password function
To disable password protection, go back to Settings 2 > Advanced > Security
Settings > Power On Lock menu, and press Enter. You will be asked to input
password. Once the password is set, the OSD menu returns to the Power On Lock.
Select Off by pressing / . To leave the OSD menu, press Menu/Exit.
Locking control keys
With the control keys on the projector locked, you can prevent your projector settings
from being changed accidentally (by children, for example). When the Panel Key
Lock is On, no control keys on the projector will operate except Power.
1. Press Lock on the remote control for 3 seconds.
Press Lock on the remote control, a confirmation
message "Are you sure to lock panel keys?" is
displayed. Select Yes to confirm.
To release panel key lock:
1. Press Lock on the remote control directly. The
Panel keys are unlock.
Important
• If you press Power to turn off the projector without disabling panel key lock, the
projector will still be in locked status the next time it is turned on.
• Keys on the remote control are still functional when panel key lock is enabled.
24
Page 26

Setting the presentation timer
The presentation timer can indicate the presentation time on the screen to help you
achieve better time management when giving presentations. Follow these steps to
utilize this function:
1. Press Timer on the remote control to access the
Presentation Timer menu or go to the Settings 1 >
Advanced > Presentation Timer menu and press
Enter to display the Presentation Timer page.
2. Highlight Timer Period and decide the timer period by
pressing / .
3. Press to highlight Timer Display and choose if you
want the timer to show up on the screen by pressing
/.
Selection Description
Always Displays the timer on screen throughout the presentation time.
1 min/2 min/3 min Displays the timer on screen in the last 1/2/3 minute(s).
Never Hides the timer throughout the presentation time.
4. Press to highlight Timer Position and set the timer position by pressing / .
Top-Left → Bottom-Left → Top-Right → Bottom-Right
5. Press to highlight Timer Counting Direction and select your desired counting
direction by pressing / .
Selection Description
Count Up Increases from 0 to the preset time.
Count Down Decrease from the preset time to 0.
6. Press
by pressing / . If you select On, a double beep sound will be heard at the last
30 seconds of counting down/up, and a triple beep sound will be produced when
the timer is up.
7. To activate the presentation timer, press to highlight Start Counting and select
Yes.
8. To cancel the timer, highlight Start Counting and select No.
to highlight Sound Reminder and select your desired counting direction
25
Page 27

Using the projector in standby mode
Some of the projector functions are available in standby mode (plugged in but not
turned on). To use these functions, be sure you have turned on the corresponding
menus under Source > Standby Settings, and the cable connections are correctly
made. For the connection methods, see the "Installation" on page 11 chapter.
Active VGA out
Selecting On outputs a VGA signal when the VGA IN and VGA OUT sockets are
correctly connected to devices. The projector outputs the signal received only from
VGA IN.
Active Audio out
Selecting On outputs an audio signal when the AUDIO IN socket is correctly
connected to a proper device.
LAN Control
Selecting On allows the projector to provide the network function when it is in standby
mode. See "Using network features" on page 44 for details.
Adjusting the sound
The sound adjustments made as below will have an effect on the projector speaker.
Be sure you have made a correct connection to the projector audio input/output jacks.
See "Installation" on page 11 for more details.
Adjusting the audio mode
1. Open the OSD menu and go to the Settings 2 > Audio Settings > Audio Mode
menu.
2. Press / to select a preferred audio mode.
• If available, you can press Audio Mode on the remote control to select a preferred audio
mode.
Muting the sound
1. Open the OSD menu and go to the Settings 2 > Audio Settings > Mute menu.
2. Press / to select On.
• If available, you can press on the remote control to toggle the projector audio between on
and off.
Adjusting the sound level
1. Open the OSD menu and go to the Settings 2 > Audio Settings > Audio Volume
menu.
2. Press / to select a desired sound level.
• If available, you can press on the remote control to adjust the projector’s sound level.
26
Page 28

Turning off the Power On/Off Ring Tone
1. Open the OSD menu and go to the Settings 2 > Audio Settings > Power On/Off
Ring Tone menu.
2. Press / to select Off.
• The only way to change Power On/Off Ring Tone is setting On or Off here. Setting the sound
mute or changing the sound level will not affect the Power On/Off Ring Tone.
27
Page 29

On-screen display menus
The projector has multilingual on-screen display menus that allow you to make image
adjustments and change a variety of settings.
How to operate
1. Press Menu to open the OSD menu.
2. When OSD is displayed, use / to select any feature in the main menu.
3. After selecting the desired main menu item, press to enter sub-menu for feature
setting.
4. Use / to select the desired item and adjust the settings with / .
5. Press Menu, the screen will return to the main menu or go back to the upper level
of the menu.
6. Press Menu or Exit to leave and save the settings.
28
Page 30

Menu tree
Main Menu Sub Menu Settings
Screen Color Off / Blackboard / Greenboard / Whiteboard
Auto / 4:3 / 16:9 / Panorama / Anamorphic / 2.35:1
/ 16:10 / 16:6
H: -30 - 30
V: -30 - 30
Warm / Normal / Cold
R Gain
G Gain
B Gain
R Offset
G Offset
B Offset
HDMI Format HDMI Timing
HDMI Range Auto / Enhanced / Normal
Tint -50 - 50
Color -50 - 50
Sharpness 0 - 31
Gamma 1 / 2 / 3 / 4 / 5
Brilliant Color
Noise Reduction 0 - 31
Color Manager
Reset / Cancel
Display
Image
Aspect Ratio
Keystone
Corner Adj. Top-Right / Top-Left / Bottom-Left / Bottom-Right
Position
Phase 0 - 31
H. Size -15 - 15
Digital Zoom
Color Mode Bright / Presentation / Movie
Brightness 0 - 100
Contrast -50 - 50
Color
Temperature
Fine Tuning
OverScan Off / 1 / 2 / 3 / 4 / 5
HDMI Settings
Advanced
Reset Color Settings
Auto / RGB /
YUV
Off / 1 / 2 / 3 / 4 / 5 / 6 / 7 / 8 / 9
/ 10
Primary color
R / G / B / C / M
/ Y
Hue -99 - 99
Saturation 0 - 199
Gain 5 - 195
29
Page 31

Source
Auto Source Off / On
Auto
Off
Top-Bottom
Frame Sequential
3D Settings
3D Format
Frame Packing
Side By Side
3D Sync Invert Off / On
Active VGA out Off / On
Standby Settings
Active Audio out Off / On
LAN Control Off / On
Computer Off / On
Auto Power On
CEC Off / On
Direct Power On Off / On
Auto Power Off Disable / 10 / 20 / 30 min
Power Saving
Sleep Timer
Disable / 30 Min / 1 hr / 2 hr / 3
hr / 4 hr / 8 hr / 12 hr
Energy Saving Off / On
Smart Restart Off / On
Quick Power Off Off / On
DHCP DHCP on / Static IP
IP Address
Network
Subnet Mask
Default Gateway
DNS Server
Apply
30
Page 32

Language
Settings 1
Projection
Menu Settings
Blank Timer
Splash Screen
My Button
Advanced
Front Table / Rear Table / Rear
Ceiling / Front Ceiling
Menu Display
Time
Menu Position
5 sec / 10 sec / 15 sec / 20 sec
/ 25 sec / 30 sec
Center / Top-Left / Top-Right /
Bottom-Left / Bottom-Right
Disable / 5 Min / 10 Min / 15
Min / 20 Min / 25 Min / 30 Min
Factory Default / Black / Blue /
Off
Auto / Projection / Menu Position / Color Temperature Fine Tuning / Brightness / Contrast / 3D Settings / Screen Color / Splash Screen / Message /
Auto Source / CEC / Light Mode / Power Saving /
Freeze / Information / Closed Caption / Audio
Mode
Pattern Off / 1
Message On / Off
Timer Period 1~ 240 min
Always / 3 min /
Timer Display
2 min / 1 min /
Never
Top-Left /
Presentation
Timer
Timer Position
Timer Count-
ing Direction
Sound
Reminder
Bottom-Left /
Top-Right /
Bottom-Right
Count Down /
Count Up
On / Off
Start Counting Yes / No
31
Page 33

Settings 2
Information
High Altitude
Mode
Off / On
Audio Mode Video / Speech / Entertainment
Mute Off / On
Audio Settings
Closed Caption
Audio Volume 0 - 20
Power On/Off
Ring Tone
Closed Caption
Enable
On / Off
Off / On
Caption Version CC1 / CC2 / CC3 / CC4
Light Mode Normal / Eco
Light Settings
Reset Light
Hours
Reset / Cancel
Light Hours
Change Password
Advanced
Security Settings
Power On
Lock
Panel Key Lock Off / On
Reset Settings Reset / Cancel
Source
Color Mode
Resolution
Current System
Status
Color System
Light Hours
IP Address
MAC Address
Firmware Version
Off / On
32
Page 34

Display
Screen Color
The Screen Color feature can help correct the projected picture’s colors to prevent
possible color difference between the source and projected pictures.
There are several precalibrated colors to choose from: Whiteboard, Greenboard, and
Blackboard.
Aspect Ratio
Select how the picture fits on the screen:
•Auto:
Scales an image proportionally to fit the projector's native resolution in its horizontal
or vertical width. You want to make most use of the screen without altering the
source image’s aspect ratio.
• 4:3:
Scales an image so that it is displayed in the center of the screen with a 4:3 aspect
ratio, as it displays them without aspect alteration.
• 16:9:
Scales an image so that it is displayed in the center of the screen with a 16:9 aspect
ratio, as it displays them without aspect alteration.
• Panorama
Scales a 4:3 image vertically and horizontally in a non-linear manner so that it fills
the screen.
• Anamorphic:
Scales a 2.35:1 aspect image so that it fills the screen.
• 2.35: 1
Scales an image so that it is displayed in the center of the screen with a 2.35:1
aspect ratio without aspect alteration.
• 16:10:
Scales an image so that it is displayed in the center of the screen with a 16:10
aspect ratio,as it displays them without aspect alteration.
• 16:6:
Scales an image so that it is displayed in the center of the screen with a 16:6 aspect
ratio,as it displays them without aspect alteration.
Keystone
Manually correct distorted images resulting from an angled projection.
Press Keystone / / / on the projector or remote control to display the Keystone
correction page.
Press to correct keystone at the top of the image.
Press to correct keystone at the bottom of the image.
Press to correct keystone at the left of the image.
Press to correct keystone at the right of the image.
33
Page 35

Corner Adj.
Manually adjust four corners of the image by setting the horizontal and vertical values.
1. Press / / / to select one of the four corners and press Enter.
2. Press / to adjust vertical values.
3. Press / to adjust horizontal values.
Position
Displays the position adjusent page. This function is only available when a PC type
input signal is selected.
Phase
Adjusts the clock phase to reduce image distortion. This function is only available
when a PC type input signal is selected.
H. Size
Adjusts the horizontal width of the image. This function is only available when a PC
type input signal is selected.
Digital Zoom
Using the remote control
1. Press on the remote control to display the Zoom bar.
2. Press / to magnify the picture to a desired size.
3. Press repeatedly to magnify the picture to a desired size.
4. To navigate the picture, press Enter to switch to the paning mode and press the
directional arrows ( , , , ) to navigate the picture.
5. To reduce size of the picture, press Enter to switch back to the zoom in/out
functionality, and press Auto Sync to restore the picture to its original size. You
can also press
Using the OSD menu
1. Press Menu and then select Display menu.
2. Press
3. Repeat steps 3-5 in the section of Using the remote control above.
to select Digital Zoom and press Enter. The Zoom bar displays.
repeatedly until it is restored to the original size.
34
Page 36

Image
Color Mode
There are many factory presets optimized for various types of images.
• Bright: Maximizes the brightness of the projected image. This mode is suitable for
environments where extra-high brightness is required.
• Presentation: Is designed for presentations under daylight environment to match
PC and notebook coloring.
• Movie: Switches between high brightness performance and accurate color
performance.
Brightness
Brighten or darken the image.
Contrast
Sets the difference between light and dark areas.
Color Temperature Fine Tuning
Sets a color temperature from Warm, Normal, Neutral and Cool.
• Warm: Makes images appear reddish white.
• Normal: Maintains normal colorings for white.
• Cold: With the highest color temperature, Cool makes the image appear the most
bluish white than other settings.
• R Gain/G Gain/B Gain: Adjusts the contrast levels of Red, Green, and Blue.
• R Offset/G Offset/B Offset: Adjusts the brightness levels of Red, Green, and Blue.
OverScan
OverScan function removes the noise in a video image. Overscan the image to
remove video encoding noise on the edge of video source.
HDMI Settings
HDMI Format
Selects appropriate HDMI timing.
Note
• This function is only available when the HDMI-input port is in use.
35
Page 37

HDMI Range
• Enhanced : The range for HDMI output signal is from 0 - 255.
• Normal: The range for HDMI output signal is from 16 - 235.
Advanced
Tint
Adjusts the red and green color tones of the image.
Color
The higher the value, the more reddish the picture becomes. The lower the value, the
more greenish the picture becomes.
Sharpness
Adjusts the image to make it look sharper or softer.
Gamma
Effect the represent of dark scenery. With greater gamma value, dark scenery will look
brighter.
Brilliant Color
This adjustable item utilizes a new color-processing algorithm and system level
enhancements to enable higher brightness while providing true, more vibrant colors in
picture. The range is from “1” to “10”. If you prefer a stronger enhanced image, adjust
toward the maximum setting. For a smoother, more natural image, adjust toward the
minimum setting.
Noise Reduction
This function reduces electrical image noise caused by different media players. The
higher the setting, the less the noise.
Color Manager
The Color Manager provides six sets (RGBCMY) of colors to be adjusted. When you
select each color, you can independently adjust its hue, saturation and gain according
to your preference.
Reset Color Settings
Reset the Color Mode settings of the current input source to default values.
36
Page 38

Source
Auto Source
Automatically scan through all the input source if the function in the OSD menu is On.
The function will stop the signal auto scan process and fix the signal source you
preferred if you turn Off the Auto Source.
3D Settings
This projector features a 3D function which enables you to enjoy the 3D movies, videos, and sporting events in a more realistic way by presenting the depth of the
images. You need to wear a pair of 3D glasses to view the 3D images.
3D Format
If the projector cannot recognize the 3D format, press / to choose a 3D Format.
3D Sync Invert
When you discover the inversion of the image depth, enable this function to correct
the problem.
Standby Settings
Active VGA out
Set whether the VGA out function works when the projector is in standby (powered off
but connected to AC power). When selecting On, VGA OUT will be output. When
selecting Off, power consuption is under 0.5W.
Active Audio out
Set whether the audio out function works when the projector is in standby (powered
off but connected to AC power). When selecting On, AUDIO IN will be output. AUDIO
OUT port is also active. When selecting Off, power consumption is under 0.5W. When
selecting Off, both AUDIO IN and AUDIO OUT are Off.
LAN Control
Set whether the network function works when the projector is in standby (powered off
but connected to AC power).
Note
• Less than 0.5W power consumption when LAN Control is turned Off.
• When Power Saving is On, the Active VGA out and Active Audio out settings are not
available.
Auto Power On
Computer
Selecting On the projector will turn on automatically when Computer signal is
detected.
37
Page 39

CEC
This projector supports CEC (Consumer Electronics Control) function for synchronized power on/off operation via HDMI connection. That is, if a device that also supports CEC function is connected to the HDMI input of the projector, when the
projector’s power is turned off, the power of the connected device will also be turned
off automatically. When the power of the connected device is turned on, the projector’s
power will be turned on automatically.
Note
• When connected to the HDMI input of the projector via an HDMI cable, and its CEC
function is turned on.
• Depending on the connected device, the CEC function may not work.
• The function can't be enabled when Active VGA out/Active Audio out function is
disabled.
• The projector doesn’t support CEC function when it is in standby mode with power
consuption of 0.5W.
Direct Power On
Selecting On the projector will turn on automatically after the power cord has been
connected and power has been applied.
Power Saving
Auto Power Off
The projector lowers the projector power if no input source is detected after 5 minutes
to prevent unnecessary waste of light life. You can further decide if you would like the
projector to turn off automatically after a set period of time.
When Disable is selected, the projector power will be reduced to 30% after no signal
is detected for 5 minutes.
If you select 10 Min, 20 Min or 30 Min, the projecter power will be reduced to 30%
after no signal is detected for 5 minutes. And when 10 Min, 20 Min or 30 Min is up,
the projector will turn off automatically.
Sleep Timer
This function allows the projector to turn off automatically after a set period of time to
prevent unnecessary waste of light life.
Energy Saving
Selecting On activates this function.
Smart Restart
It takes some time to initate this function. Make sure the projector has been turned on
for more than 4 minutes. If the projector is resumed by using the Smart Restart feature, this function can be executed immediately.
Quick Power Off
• On: Quick power on function speeds up the cooling process when turning off the
projector.
• Off: Turn off with cooling procedure.
38
Page 40

Note
• When Off is selected, the Smart Restart function will be automatically turned Off.
Network
Allow you to configure the wired LAN settings. Refer to page 44.
•DHCP:
• When selecting “DHCP on”, “IP Address”, “Subnet Mask”, "Default Gateway"
and "DNS Server" will be gray out.
• When selecting "Static IP", “IP Address”, “Subnet Mask”, "Default Gateway" and
"DNS Server" will be available.
• IP Address: Numerical address to identify networked computers.
• The IP Address is the number that identifies this projector on the network. You
cannot have two devices with the same IP Address on the same network.
• The IP Address “0.0.0.0” is prohibited.
• Subnet Mask: A numeric value to define the number of bits used for a network
address of a divided network (or subnet) in an IP Address.
• The Subnet Mask “0.0.0.0” is prohibited.
• Default Gateway: A server (or router) to communicate across networks (subnets)
that are divided by Subnet Mask.
• DNS Server: Setup DNS server address when DHCP is disable.
• Apply: Save and execute the wired LAN settings.
39
Page 41

Settings 1
Language
Select the language used by the on-screen menu.
Projection
Adjust the picture to match the orientation of the projector: upright or upside-down, in
front of or behind the screen. Invert or reverse the image accordingly.
Menu Settings
Menu Display Time
Duration of OSD menu display countly starts (at idle state by second).
Menu Position
Choose the menu location on the display screen.
Blank Timer
Sets the image blank time when the Blank Timer feature is activated, once elapsed
the image will return to the screen.
Splash Screen
Allows you to select which logo screen will display during projector start-up.
My Button
Allow user to define a short cut key on the remote control, and the function item is
selected in OSD menu. Available options are: Auto, Projection, Menu Position, Color
Temperature Fine Tuning, Brightness, Contrast, 3D Settings, Screen Color, Splash
Screen, Message, Auto Source, CEC, Light Mode, Power Saving, Freeze,
Information, Closed Caption, Audio Mode.
Advanced
Pattern
Display embedded test pattern.
Message
Enable or disable the message box at the right bottom of the screen.
Presentation Timer
Remind the presenter to finish the presentation within a certain time frame. See "Set-
ting the presentation timer" on page 25.
40
Page 42

Settings 2
High Altitude Mode
Use this function to allow the fans operates at full speed continuously to achieve
proper high altitude cooling of the projector. If the projector is installed a filter cover,
make aure that High Altitude Mode is set to On.
Audio Settings
See "Adjusting the sound" on page 26 for details.
Audio Mode
Press / to select a preferred audio mode.
Mute
Cuts off the sound temporarily.
Audio Volume
Adjusts the projector’s volume level.
Power On/Off Ring Tone
Setting the sound mute or changing the sound level will not affect the Power On/Off
Ring Tone. The only way to change Power On/Off Ring Tone is setting On or Off here.
Closed Caption
Enable or disable closed captions and select CC1 (closed caption1, the most common
channel), CC2, CC3 or CC4 for caption version.
Light Settings
Light Mode
Sets the Light Mode.
• Normal: 100% light power
• Eco: 80% light power
Reset Light Hours
Reset the Light Hour to 0 hours.
Light Hours
Display the light’s elapsed operating time (in hours).
Advanced
Security Settings
• Change Password: Allows you to set or change the password.
• Power On Lock: If you enable this function, you will have to enter the password next
time you turn on the projector.
See "Securing the projector" on page 23 for details.
41
Page 43

Panel Key Lock
Disables or enables all panel key functions except Power on the projector. See
"Locking control keys" on page 24 for details.
Reset Settings
Restore settings to factory default. The following settings will still remain: Keystone,
Language, Projection, High Altitude Mode, Security Settings.
42
Page 44

Information
Current System Status
Shows the currect system status.
Source
Shows the current signal source.
Color Mode
Shows the selected mode in the Color Mode menu.
Resolution
Shows the native resolution of the input signal.
Color System
Shows input system format: RGB or YUV.
Light Hours
Displays the number of hours the light has been used.
IP Address
Display the IP address.
MAC Address
Display the MAC address.
Firmware Version
Shows firmware version.
43
Page 45

Using network features
You can manage and control the projector from one or more remote computers when
they are properly connected to the same local area network.
Internet
IP Router
If you are in a DHCP on environment:
1. Take a RJ45 cable and connect one end to the RJ45 LAN input jack of the
projector and the other end to the RJ45 port on your Ethernet or router.
2. Press Menu and then go to Source > Network menu.
3. Make sure the DHCP is DHCP on.
4. Press to highlight Apply and press Enter.
5. Please wait for around 15 - 20 seconds, and then re-enter the Wired LAN page.
The IP Address, Subnet Mask, Default Gateway and DNS Server settings will
be displayed. Note down the IP address displayed in the IP Address row.
Important
• If the IP Address still does not appear, contact your network administrator.
• If the RJ45 cables are not properly connected, the IP Address, Subnet Mask, Default
Gateway and DNS Server settings will display 0.0.0.0. Make sure the cables are properly
connected and perform the procedures above again.
• If you wish to connect to the projector in its standby mode, be sure you have selected
RJ45 and obtained the IP Address, Subnet Mask, Default Gateway and DNS Server
information when the projector is on.
If you are in a Static IP environment:
1. Repeat steps 1-2 above.
2. Make sure the DHCP is Static IP.
3. Contact your ITS administrator for information on the IP Address, Subnet Mask,
Default Gateway, and DNS Server settings.
4. Press to select the item you want to modify and press Enter.
5. Press / to move the cursor and the enter the value.
6. To save the settings, press Enter. If you do not want to save the settings, press
Exit.
7. Press
to highlight Apply and press Enter.
44
Page 46

Important
• If the RJ45 cables are not properly connected, the IP Address, Subnet Mask, Default
Gateway and DNS Server settings will display 0.0.0.0. Make sure the cables are properly
connected and perform the procedures above again.
• If you wish to connect to the projector in its standby mode, be sure you have selected
RJ45 and obtained the IP Address, Subnet Mask, Default Gateway and DNS Server
information when the projector is on.
Using network control
Once you have the correct IP address for the projector and the projector is on or in
standby mode, you can use any computer that is on the same local area network to
control the projector.
• If you are using Microsoft Internet Explorer, make sure it is version 7.0 or higher.
• The screen shots in this manual are for reference only, and may differ from the actual
design.
1. Enter the address of the projector in the address bar of your browser and press
Enter.
2. The main page of the Network Control appears.
3
4
5
• Accessing to Network Settings or Email Alert page requires Administrator password. The
default password is "0000".
45
Page 47

3. This page allows you to make adjustments to the AMX and SNMP settings. In the
AMX device discover row, when ON is selected, the projector can be detected by
controllers of AMX connected to the same network. For the Details of AMX Device
Discovery, visit the AMX web site at http://www.amx.com/.
4. If your projector is connected to a network which supports Simple Mail Transfer
Protocol (SMTP), you can configure it to alert you via email on significant events.
5. The Crestron (e-Control) page displays the Crestron e-Control user interface. See
"About Crestron e-Control®" on page 47 for details.
Please pay attention to the limitation of input length (including space and other
punctuation keys) in the list blow:
Category Item Input-Length Maximum Number of Characters
DHCP/Manual (N/A)
IP Address XXX.XXX.XXX.XXX
Network
Network Settings
Password
SNMP
Subnet Mask XXX.XXX.XXX.XXX
Gateway XXX.XXX.XXX.XXX
DNS Server XXX.XXX.XXX.XXX
AMX device discovery (N/A)
Administrator (N/A)
New Password 4
Confirm Password 4
SysLocation 22
SysName 22
SysContact 22
46
Page 48

Email Setting
Email Alert
• / > < $ % + \ ' " are prohibited.
SMTP Setting
Alert Condition
To 40
Cc 40
Subject 15
From 40
Server 30
User Name 40
Password 14
Fan Error (N/A)
Lamp Error (N/A)
Temperature Error (N/A)
Submit (N/A)
Issue Test Mail (N/A)
About Crestron e-Control
®
1. The Crestron e-Control® page provides a variety of virtual keys to control the
projector or adjust the projected pictures.
i
ii
i
You can
press / to
i
reveal more
buttons.
i. These buttons function the same as the ones on the OSD menus or remote
control.
ii. To switch input source, click on your desired signal.
Important
• The Menu button can also be used to go back to previous OSD menu, exit and save
menu settings.
• The source list varies according to the connectors available on the projector.
• When you use the projector control panel or remote control to change the OSD menu
settings, it may take a while for the web browser to synchronize these changes with the
projector.
47
Page 49

2. The tools page allows you to manage the projector, configure the Lan control
settings and secure access of remote network operation on this projector.
i
ii
iii
vi
iv
v
i. This section is only used with the Crestron Control System. Please contact
Creston or refer to its user manual for setup information.
ii. You can name the projector, keep track of its location and the person in charge
of it.
iii. You can adjust the Lan control setting.
iv. Once set, access to the remote network operation on this projector has been
password-protected.
v. Once set, access to the tools page has been password-protected.
• To prevent errors, only input the English alphabet and digits on the tools page.
• After making the adjustments, press the Send button and the data will be saved in the projec-
tor.
vi.Press exit to go back to the Crestron remote network operation page.
Please pay attention to the limitation of input length (including space and other
punctuation keys) in the list blow:
Category Item Input-Length Maximum Number of Characters
IP Address 15
Crestron Control
Projector
Network Configuration
User Password
Admin Password
IP ID 2
Port 5
Projector Name 10
Location 9
Assigned To 9
DHCP (Enabled) (N/A)
IP Address 15
Subnet Mask 15
Default Gateway 15
DNS Server 15
Enabled (N/A)
New Password 20
Confirm 2
Enabled (N/A)
New Password 20
Confirm 20
48
Page 50

3. The info page displays the information and status of this projector.
i
i. Press exit to go back to the Crestron remote network operation page.
4. After pressing the button “Contact IT Help”, the HELP DESK window will appear in
the upper right corner of the screen. You will be able to deliver messages to
RoomView™ software administrators/users who connect to the same local area
network.
• For more information, visit http://www.crestron.com & www.crestron.com/getroomview.
Crestron RoomView
On the “Edit Room” page, enter the IP Address (or hostname) as shown on the
projector’s on-screen display (OSD) menu, and “02” for IPID, “41794” for the reserved
Crestron control port.
About Crestron RoomView™ setting and command method, please access below
website to get RoomView™ User Guide and more information: http://
www.crestron.com/products/roomview_connected_embedded_projectors_devices/
resources.asp
49
Page 51

Maintenance
The projector needs proper maintenance. You should keep the lens clean as dust, dirt
or spots will project on the screen and diminish image quality. If any other parts need
replacing, contact your dealer or qualified service personnel. When cleaning any part
of the projector, always switch off and unplug the projector first.
Warning
• Never open any of the covers on the projector. Dangerous electrical voltages inside the
projector can cause severe injury. Do not attempt to service this product yourself. Refer
all servicing to qualified service personnel.
Cleaning the projector housing
Gently wipe with a soft cloth. If dirt and stains are not easily removed, use a soft cloth
damped with water, or water and neutral detergent, and wipe dry with a soft, dry cloth.
Note
• Turn off the projector and remove the AC power cord from the power outlet before
beginning maintenance work.
• Make sure the lens is cool before cleaning.
• Do not use detergents or chemicals other than those noted above. Do not use benzene
or thinners.
• Do not use chemical sprays.
• Use a soft cloth or lens paper only.
50
Page 52

Specifications
Model name DX761Z-UST DW763Z-UST
Dislay system 0.55" S450 XGA 0.65" S450 WXGA 0.65" S600 WXGA
Resolution
Aspect ratio Native 4:3 Native 16:10 Native 16:9
Zoom ratio Fixed
Throw ratio 0.3 0.24 0.233
Image size (Diagonal) 65” - 125” 80” - 150”
Light source Laser Phosphor Display
Input terminal
Output terminal
Control terminal RS-232 x 1, Mini-USB x1 (for service), RJ45 x 1
Speaker 10W x 1
HDTV compatibility 480i, 480p, 576i, 567p, 720p, 1080i, 1080p
Video compatibility
Scanning frequency
Horizontal frequency
Vertical frequency
Environment
Power requirement 100-240 Vac, 50-60 Hz, 5.20A
Power consumption 380W (Max.)
Stand-by power con-
sumption
Dimension
(W x H x D)
Weight 10.5 kg (23.14 lbs)
Note: Design and Specifications are subject to change without prior notice.
(1024 x 768 pixels)
D-Sub 15-pin x 1, HDMI x 2, S-Video x 1, Video x 1, Audio signal input (Mini
D-Sub 15 pin x 1, Audio signal output (Mini jack) x 1, USB power charging (5V/
XGA
jack) x 1, Audio L/R (RCA x 2) x 1
NTSC, PAL, SECAM, SDTV
(480i/576i), EDTV (480p/576p),
HDTV (720p, 1080i/p 60Hz)
Temperature: 0°C to 40°C
Temperature: -20°C to 60°C
508.7 x 144.5 x 390.0 mm
WXGA
(1280 x 800 pixels)
2A) x 1
15 - 102 KHz
23 - 120 Hz
Operating:
Humidity: 10%-90%
Storage:
Humidity:10%-90%
< 0.50W
DH765Z-UST
DH768Z-UST
1080p
(1920 x 1080 pixels)
51
Page 53

Dimensions
508.7 mm (W) x 390.0 mm (D) x 144.5 mm (H)
508.7
390.0
Ceiling mount installation
144.5
217
184.3
Ceiling mount screws:
Max. M4 x 10
Unit: mm
52
Page 54

Appendices
LED indicator messages
LED Type Color Status Meaning
Power LED Amber Flash
Normal power of standby mode .Temp LED Red Off
Light LED Red Off
Power LED Amber Flash
Low power of standby mode. Temp LED Red Off
Light LED Red Off
Power LED Amber Flash
Powering upTem p LED Red Off
Light LED Red Off
Power LED Green Solid
Normal operationTemp LED Red Off
Light LED Red Off
Power LED Green Solid
Powering downTemp LED Red Off
Light LED Red Off
Power LED Amber Solid
Temp LED Red Off
Light LED Red Off
Power LED Amber Solid 1. Temperature is too high. The light will
Temp LED Red Flash
Light LED Red Off
Power LED Amber Flash
Temp LED Red Off
Light LED Red Solid
Power LED Amber Solid
Light LED Red Solid
If the projector system has some problems
with its fans, the projector will shut down.
turn off. The fan motor is cooling the light.
Or
2. The cooling process is not complete after
the projector is shut down and re-started
right away.
The light ignition failed. If temperature is too
high, the fans will cool the light.
Color wheel start failTemp LED Red Solid
53
Page 55

Compatibility Modes
1. VGA Analog
Supported timing for PC input
Resolutio
n
640 x 480
720 x 400
800 x 600
1024 x 768
1152 x 864
1280 x 720
1280 x 768
1280 x 800
1280 x
1024
1280 x 960
1360 x 768
1440 x 900 WXGA+_60 59.887 55.935 106.500
1400 x
1050
1600 x
1200
Timing
VGA_60 59.94 31.469 25.175
VGA_72 72.809 37.861 31.500
VGA_75 75 37.5 31.500
VGA_85 85.008 43.269 36.000
720 x
400_70
SVGA_60 60.317 37.879 40.000
SVGA_72 72.188 48.077 50.000
SVGA_75 75 46.875 49.500
SVGA_85 85.061 53.674 56.250
SVGA_120
(Reduce
Blanking)
XGA_60 60.004 48.363 65.000
XGA_70 70.069 56.476 75.000
XGA_75 75.029 60.023 78.750
XGA_85 84.997 68.667 94.500
XGA_120
(Reduce
Blanking)
115 2 x
864_75
1280 x
720_60
1280 x
720_120
1280 x
768_60
WXGA_60 59.81 49.702 83.500
WXGA_75 74.934 62.795 106.500
WXGA_85 84.88 71.554 122.500
WXGA_120
(Reduce
Blanking)
SXGA_60 60.02 63.981 108.000
SXGA_75 75.025 79.976 135.000
SXGA_85 85.024 91.146 157.500
1280 x
960_60
1280 x
960_85
1360 x
768_60
SXGA+_60 59.978 65.317 121.750
UXGA 60 75 162.000
Horizontal
frequency
(KHz)
70.087 31.469 28.3221
119.854 77.425 83.000
119.989 97.551 115.5
75 67.5 108
60 45 74.250
120 90.000 148.500
59.87 47.776 79.5
119.909 101.563 146.25
60 60 108.000
85.002 85.938 148.500
60.015 47.712 85.5
Vertical
frequenc
y (Hz)
Pixel
Frequency
(MHz)
3D
Field
Sequen
tial
◎◎◎
◎◎◎
◎
◎◎◎
◎
◎◎◎
◎
◎◎◎
◎◎◎
◎
3D top
botto
m
◎◎
◎◎
◎◎
◎◎
◎◎
◎◎
3D
side
by
side
54
Page 56

1680 x
1050
1920 x
1080
1920 x
1200
640 x 480
@67Hz
832 x 624
@75Hz
1024 x 768
@75Hz
1152 x 870
@75Hz
1680 x
1050_60
1920 x
1080_60
(Reduce
Blanking)
1920 x
1200_60
(Reduce
Blanking)
MAC13 66.667 35 30.240
MAC16 74.546 49.722 57.280
MAC19 75.02 60.241 80.000
MAC21 75.06 68.68 100.000
59.954 65.29 146.25
67.5 60 148.5
59.95 74.038 154.000
◎◎
• The timings showing above may not be supported due to EDID file and VGA
graphic card limitations. It is possible that some timings cannot be chosen.
Supported timing for Component-YPbPr input
Horizontal
Timing Resolution
480i 720 x 480 15.73 59.94 13.5
480p 720 x 480 31.47 59.94 27
576i 720 x 576 15.63 50 13.5
576p 720 x 576 31.25 50 27
720/50p 1280 x 720 37.5 50 74.25
720/60p 1280 x 720 45.00 60 74.25
1080/50i 1920 x 1080 28.13 50 74.25
1080/60i 1920 x 1080 33.75 60 74.25
1080/24P 1920 x 1080 27 24 74.25
1080/25P 1920 x 1080 28.13 25 74.25
1080/30P 1920 x 1080 33.75 30 74.25
1080/50P 1920 x 1080 56.25 50 148.5
1080/60P 1920 x 1080 67.5 60 148.5
Frequency
(KHz)
Vertical
Frequency
(Hz)
Pixel Fre-
quency
(MHz)
3D Field
Sequential
◎
◎
◎
2. HDMI Digital
Supported timing for PC input
Horizontal
Resolution Timing
VGA_60 59.94 31.469 25.175
640 x 480
720 x 400
VGA_72 72.809 37.861 31.500
VGA_75 75 37.5 31.500
VGA_85 85.008 43.269 36.000
720 x
400_70
Frequency
(KHz)
70.087 31.469 28.3221
Ver ti cal
Fre-
quency
(Hz)
55
Pixel Fre-
quency
(MHz)
3D Field
Sequen-
tial
◎◎◎
3D
top
bottom
3D
side
by
side
Page 57

800 x 600
1024 x 768
1152 x 864
1280 x 720
1280 x 768
1280 x 800
1280 x
1024
1280 x 960
1360 x 768
1440 x 900
1400 x
1050
1600 x
1200
1680 x
1050
640 x 480
@67Hz
832 x 624
@75Hz
1024 x 768
@75Hz
1152 x 870
@75Hz
1920 x
1080
1920 x
1200
SVGA_60 60.317 37.879 40.000
SVGA_72 72.188 48.077 50.000
SVGA_75 75 46.875 49.500
SVGA_85 85.061 53.674 56.250
SVGA_120
(Reduce
Blanking)
XGA_60 60.004 48.363 65.000
XGA_70 70.069 56.476 75.000
XGA_75 75.029 60.023 78.750
XGA_85 84.997 68.667 94.500
XGA_120
(Reduce
Blanking)
1152 x
864_75
1280 x
720_60
1280 x
768_60
WXGA_60 59.81 49.702 83.500
WXGA_75 74.934 62.795 106.500
WXGA_85 84.88 71.554 122.500
WXGA_12
0(Reduce
Blanking)
SXGA_60 60.02 63.981 108.000
SXGA_75 75.025 79.976 135.000
SXGA_85 85.024 91.146 157.500
1280 x
960_60
1280 x
960_85
1360 x
768_60
WXGA+_6
0
SXGA+_60 59.978 65.317 121.750
UXGA 60 75 162.000
1680 x
1050_60
MAC13 66.667 35 30.240
MAC16 74.546 49.722 57.280
MAC19 75.02 60.241 80.000
MAC21 75.06 68.68 100.000
1920 x
1080_60
(Reduce
Blanking)
1920 x
1200_60
(Reduce
Blanking)
119.854 77.425 83.000
119.989 97.551 115.5
75 67.5 108
60 45 74.250
59.87 47.776 79.5
119.909 101.563 146.25
60 60 108.000
85.002 85.938 148.500
60.015 47.712 85.5
59.887 55.935 106.500
59.954 65.29 146.25
67.5 60 148.5
59.95 74.038 154.000
◎◎◎
◎
◎◎◎
◎
◎◎◎
◎◎◎
◎◎◎
◎
◎◎
◎◎
◎◎
◎◎
◎◎
◎◎
◎◎
56
Page 58

• The timings showing above may not be supported due to EDID file and VGA
graphic card limitations. It is possible that some timings cannot be chosen.
Supported timing for video input
3D Field Sequential
3D Frame Packing
3D Top-Bottom
3D Side by Side
Horizon-
Timing
480i
480p 720 x 480 31.47 59.94 27
576i
576p 720 x 576 31.25 50 27
720/50p 1280 x 720 37.5 50 74.25
720/60p 1280 x 720 45.00 60 74.25
1080/50i
1080/60i
1080/
24P
1080/
25P
1080/
30P
1080/
50P
1080/
60P
Resolu-
tion
720 (1440)
x 480
720 (1440)
x 576
1920 x
1080
1920 x
1080
1920 x
1080
1920 x
1080
1920 x
1080
1920 x
1080
1920 x
1080
tal Fre-
quency
(KHz)
15.73 59.94 27
15.63 50 27
28.13 50 74.25
33.75 60 74.25
27 24 74.25
28.13 25 74.25
33.75 30 74.25
56.25 50 148.5
67.5 60 148.5
Vertical
Fre-
quency
(Hz)
Pixel Fre-
quency
(MHz)
◎
◎
◎◎◎
◎◎◎◎
◎
◎
◎◎◎
◎◎
◎◎
3. Video/S-Video
Supported timing for Video input
Video mode
NTSC 15.73 60 3.58
PAL 15.63 50 4.43
SECAM 15.63 50 4.25 or 4.41
PAL-M 15.73 60 3.58
PAL-N 15.63 50 3.58
PAL-60 15.73 60 4.43
NTSC4.43 15.73 60 4.43
Horizontal Fre-
quency (kHz)
Vertical Frequency (Hz)
Color sub-carrier Frequency
(MHz)
3D Field
Sequential
◎
57
Page 59

Troubleshooting
Refer to the symptoms and measures listed below before sending the projector for
repairs. If the problem persists, contact your local reseller or service center. Please
refer to "LED Indicator Messages" as well.
Start-up problems
If no lights turn on:
•
Be sure that the power cord is securely connected to the projector and the other end
plugged into an outlet with power.
• Press the power button again.
is
Unplug the power cord and wait for a short while, then plug it in and press the power
•
button again.
Image problems
If the searching source is displayed:
•
Press
• Be sure the external source is turned on and connected.
•
For a computer connection, ensure your notebook computer’s external video port is
turned on. Refer to the computer manual.
If the image is out of focus:
•
While displaying the on-screen menu, adjust the focus ring. (The image size should
not change; if it does, you are adjusting the zoom, not the focus.)
• Check the projection lens to see if it needs cleaning.
• If the image is flickering or unstable for a computer connection:
• Press
Remote control problems
Source to select an active input source.
Menu
, go to DISPLAY and adjust Phase or H. Size.
If the remote control does not operate:
• Be sure nothing is blocking the remote control receiver on the front of the projector.
Use the remote control within the effective range.
• Aim the remote control at the screen or at the front of the projector.
•
Move the remote control so it is more directly in front of the projector and
the side.
58
not as far to
Page 60

RS-232 command and configuration
D-Sub 9 pin
11 CD
2RXD
3TXD
4DTR
5GND
6DSR
7RTS
8CTS
9RI
Wire List
SHELL DW SHELL
C1 COLOR C2
1 Black 1
2Brown 3
3Red 2
4 Orange 6
5 Yellow 5
6Green 4
7Blue 8
8Purple 7
9White 9
Baud Rate 115200 bps
Data Length 8 bit
Parity Check None
Stop Bit 1 bit
Flow Control None
59
Page 61

Function Status Action cmd
Write
Power
Read Power status (on/off)
Reset all settings Execute 0x06 0x14 0x00 0x04 0x00 0x34 0x11 0x02 0x00 0x5F
Reset Color
Settings
Write
Splash Screen
Read Splash Screen status
Write
Quick Power Off
Read
Write
High Altitude Mode
Read
Write
Light Mode
Read Light Mode status
Write
Message
Read Message status
Write
Projector Position
Read
Write
3D Sync
Read 3D Sync Status
Write
3D Sync Invert
Read
Write
Contrast
Read Contrast ratio
Power on 0x06 0x14 0x00 0x04 0x00 0x34 0x11 0x00 0x00 0x5D
Power off 0x06 0x14 0x00 0x04 0x00 0x34 0x11 0x01 0x00 0x5E
0x07 0x14 0x00 0x05 0x00 0x34 0x00 0x00 0x11 0x00
0x5E
Execute 0x06 0x14 0x00 0x04 0x00 0x34 0x11 0x2A 0x00 0x87
Splash Screen Black 0x06 0x14 0x00 0x04 0x00 0x34 0x11 0x0A 0x00 0x67
Splash Screen Blue 0x06 0x14 0x00 0x04 0x00 0x34 0x11 0x0A 0x01 0x68
Splash Screen
default
Splash Screen Off 0x06 0x14 0x00 0x04 0x00 0x34 0x11 0x0A 0x04 0x6B
Quick Power Off Off 0x06 0x14 0x00 0x04 0x00 0x34 0x11 0x0B 0x00 0x68
Quick Power Off On 0x06 0x14 0x00 0x04 0x00 0x34 0x11 0x0B 0x01 0x69
Quick Power Off
status
High Altitude Mode
Off
High Altitude Mode
On
High Altitude Mode
status
Normal 0x06 0x14 0x00 0x04 0x00 0x34 0x11 0x10 0x00 0x6D
Economic 0x06 0x14 0x00 0x04 0x00 0x34 0x11 0x10 0x01 0x6E
Message Off 0x06 0x14 0x00 0x04 0x00 0x34 0x11 0x27 0x00 0x84
Message On 0x06 0x14 0x00 0x04 0x00 0x34 0x11 0x27 0x01 0x85
Front Table 0x06 0x14 0x00 0x04 0x00 0x34 0x12 0x00 0x00 0x5E
Rear Table 0x06 0x14 0x00 0x04 0x00 0x34 0x12 0x00 0x01 0x5F
Rear Ceiling 0x06 0x14 0x00 0x04 0x00 0x34 0x12 0x00 0x02 0x60
Front Ceiling 0x06 0x14 0x00 0x04 0x00 0x34 0x12 0x00 0x03 0x61
Projector position
status
OFF 0x06 0x14 0x00 0x04 0x00 0x34 0x12 0x20 0x00 0x7E
Auto 0x06 0x14 0x00 0x04 0x00 0x34 0x12 0x20 0x01 0x7F
Frame Sequential 0x06 0x14 0x00 0x04 0x00 0x34 0x12 0x20 0x02 0x80
Frame Packing 0x06 0x14 0x00 0x04 0x00 0x34 0x12 0x20 0x03 0x81
Top-Bottom 0x06 0x14 0x00 0x04 0x00 0x34 0x12 0x20 0x04 0x82
Side-by-Side 0x06 0x14 0x00 0x04 0x00 0x34 0x12 0x20 0x05 0x83
Off 0x06 0x14 0x00 0x04 0x00 0x34 0x12 0x21 0x00 0x7F
On 0x06 0x14 0x00 0x04 0x00 0x34 0x12 0x21 0x01 0x80
3D Sync Invert
Status
Contrast decrease 0x06 0x14 0x00 0x04 0x00 0x34 0x12 0x02 0x00 0x60
Contrast increase 0x06 0x14 0x00 0x04 0x00 0x34 0x12 0x02 0x01 0x61
0x06 0x14 0x00 0x04 0x00 0x34 0x11 0x0A 0x02 0x69
0x07 0x14 0x00 0x05 0x00 0x34 0x00 0x00 0x11 0x0A
0x68
0x07 0x14 0x00 0x05 0x00 0x34 0x00 0x00 0x11 0x0B
0x69
0x06 0x14 0x00 0x04 0x00 0x34 0x11 0x0C 0x00 0x69
0x06 0x14 0x00 0x04 0x00 0x34 0x11 0x0C 0x01 0x6A
0x07 0x14 0x00 0x05 0x00 0x34 0x00 0x00 0x11 0x0C
0x6A
0x07 0x14 0x00 0x05 0x00 0x34 0x00 0x00 0x11 0x10
0x6E
0x07 0x14 0x00 0x05 0x00 0x34 0x00 0x00 0x11 0x27
0x85
0x07 0x14 0x00 0x05 0x00 0x34 0x00 0x00 0x12 0x00
0x5F
0x07 0x14 0x00 0x05 0x00 0x34 0x00 0x00 0x12 0x20
0x7F
0x07 0x14 0x00 0x05 0x00 0x34 0x00 0x00 0x12 0x21
0x80
0x07 0x14 0x00 0x05 0x00 0x34 0x00 0x00 0x12 0x02
0x61
60
Page 62

Write
Brightness
Read Brightness
Write
Aspect ratio
Read Aspect ratio
Auto Adjust Execute 0x06 0x14 0x00 0x04 0x00 0x34 0x12 0x05 0x00 0x63
Write
Horizontal position
Read Horizontal position
Write
Vertical position
Read read Vertical position
Write
Color temperature
Read
Write
Blank
Read Blank status
KeystoneVertical
KeystoneHorizontal
Color mode
Write
Read Keystone status
Write
Read Keystone status
Write
Read Preset mode status
Brightness decrease 0x06 0x14 0x00 0x04 0x00 0x34 0x12 0x03 0x00 0x61
Brightness increase 0x06 0x14 0x00 0x04 0x00 0x34 0x12 0x03 0x01 0x62
0x07 0x14 0x00 0x05 0x00 0x34 0x00 0x00 0x12 0x03
0x62
Aspect ratio Auto 0x06 0x14 0x00 0x04 0x00 0x34 0x12 0x04 0x00 0x62
Aspect ratio 4:3 0x06 0x14 0x00 0x04 0x00 0x34 0x12 0x04 0x02 0x64
Aspect ratio 16:9 0x06 0x14 0x00 0x04 0x00 0x34 0x12 0x04 0x03 0x65
Aspect ratio 16:10 0x06 0x14 0x00 0x04 0x00 0x34 0x12 0x04 0x04 0x66
Aspect ratio
Anamorphic
Aspect ratio Wide 0x06 0x14 0x00 0x04 0x00 0x34 0x12 0x04 0x06 0x68
Aspect ratio 2.35:1 0x06 0x14 0x00 0x04 0x00 0x34 0x12 0x04 0x07 0x69
Aspect ratio 16:6 0x06 0x14 0x00 0x04 0x00 0x34 0x12 0x04 0x08 0x6A
Horizontal position
shift right
Horizontal position
shift left
Vertical position shift
up
Vertical position shift
down
color temperature
Warm
color temperature
Normal
color temperature
Neutral
color temperature
Cool
color temperature
status
Blank On 0x06 0x14 0x00 0x04 0x00 0x34 0x12 0x09 0x01 0x68
Blank Off 0x06 0x14 0x00 0x04 0x00 0x34 0x12 0x09 0x00 0x67
Decrease 0x06 0x14 0x00 0x04 0x00 0x34 0x11 0x31 0x00 0x8E
Increase 0x06 0x14 0x00 0x04 0x00 0x34 0x11 0x31 0x01 0x8F
Decrease 0x06 0x14 0x00 0x04 0x00 0x34 0x11 0x31 0x00 0x8E
Increase 0x06 0x14 0x00 0x04 0x00 0x34 0x11 0x31 0x01 0x8F
Brightest 0x06 0x14 0x00 0x04 0x00 0x34 0x12 0x0B 0x00 0x69
PC 0x06 0x14 0x00 0x04 0x00 0x34 0x12 0x0B 0x08 0x71
Video 0x06 0x14 0x00 0x04 0x00 0x34 0x12 0x0B 0x04 0x6D
0x06 0x14 0x00 0x04 0x00 0x34 0x12 0x04 0x06 0x68
0x07 0x14 0x00 0x05 0x00 0x34 0x00 0x00 0x12 0x04
0x63
0x06 0x14 0x00 0x04 0x00 0x34 0x12 0x06 0x01 0x65
0x06 0x14 0x00 0x04 0x00 0x34 0x12 0x06 0x00 0x64
0x07 0x14 0x00 0x05 0x00 0x34 0x00 0x00 0x12 0x06
0x65
0x06 0x14 0x00 0x04 0x00 0x34 0x12 0x07 0x00 0x65
0x06 0x14 0x00 0x04 0x00 0x34 0x12 0x07 0x01 0x66
0x07 0x14 0x00 0x05 0x00 0x34 0x00 0x00 0x12 0x07
0x66
0x06 0x14 0x00 0x04 0x00 0x34 0x12 0x08 0x00 0x66
0x06 0x14 0x00 0x04 0x00 0x34 0x12 0x08 0x01 0x67
0x06 0x14 0x00 0x04 0x00 0x34 0x12 0x08 0x02 0x68
0x06 0x14 0x00 0x04 0x00 0x34 0x12 0x08 0x03 0x69
0x07 0x14 0x00 0x05 0x00 0x34 0x00 0x00 0x12 0x08
0x67
0x07 0x14 0x00 0x05 0x00 0x34 0x00 0x00 0x12 0x09
0x68
0x07 0x14 0x00 0x05 0x00 0x34 0x00 0x00 0x11 0x31
0x8F
0x07 0x14 0x00 0x05 0x00 0x34 0x00 0x00 0x11 0x31
0x8F
0x07 0x14 0x00 0x05 0x00 0x34 0x00 0x00 0x12 0x0B
0x6A
61
Page 63

Primary Color
Hue
Saturation
Gain
Freeze
Source input
Quick Auto Search
Mute
Volume
Primary color R 0x06 0x14 0x00 0x04 0x00 0x34 0x12 0x10 0x00 0x6E
Primary color G 0x06 0x14 0x00 0x04 0x00 0x34 0x12 0x10 0x01 0x6F
Write
Read Primary color status
Write
Read Hue
Write
Read Saturation
Write
Read Gain
Write
Read Freeze status
Write
Read Source
Write
Read
Write
Read Mute status
Write
Read Volume
Primary color B 0x06 0x14 0x00 0x04 0x00 0x34 0x12 0x10 0x02 0x70
Primary color C 0x06 0x14 0x00 0x04 0x00 0x34 0x12 0x10 0x03 0x71
Primary color M 0x06 0x14 0x00 0x04 0x00 0x34 0x12 0x10 0x04 0x72
Primary color Y 0x06 0x14 0x00 0x04 0x00 0x34 0x12 0x10 0x05 0x73
Hue decrease 0x06 0x14 0x00 0x04 0x00 0x34 0x12 0x11 0x00 0x6F
Hue increase 0x06 0x14 0x00 0x04 0x00 0x34 0x12 0x11 0x01 0x70
Saturation decrease 0x06 0x14 0x00 0x04 0x00 0x34 0x12 0x12 0x00 0x70
Saturation increase 0x06 0x14 0x00 0x04 0x00 0x34 0x12 0x12 0x01 0x71
Gain decrease 0x06 0x14 0x00 0x04 0x00 0x34 0x12 0x13 0x00 0x71
Gain increase 0x06 0x14 0x00 0x04 0x00 0x34 0x12 0x13 0x01 0x72
Freeze On 0x06 0x14 0x00 0x04 0x00 0x34 0x13 0x00 0x01 0x60
Freeze Off 0x06 0x14 0x00 0x04 0x00 0x34 0x13 0x00 0x00 0x5F
Input source VGA 0x06 0x14 0x00 0x04 0x00 0x34 0x13 0x01 0x00 0x60
Input source YPbPr 0x06 0x14 0x00 0x04 0x00 0x34 0x13 0x01 0x08 0x68
SourceSelectDongle 0x06 0x14 0x00 0x04 0x00 0x34 0x13 0x01 0x03 0x63
SourceSelectHDMI1 0x06 0x14 0x00 0x04 0x00 0x34 0x13 0x01 0x07 0x67
SourceSelectHDMI2 0x06 0x14 0x00 0x04 0x00 0x34 0x13 0x01 0x04 0x64
SourceSelectHDMI3 0x06 0x14 0x00 0x04 0x00 0x34 0x13 0x01 0x09 0x69
Input source
Composite
Input source SVIDEO 0x06 0x14 0x00 0x04 0x00 0x34 0x13 0x01 0x06 0x66
Quick Auto Search
on
Quick Auto Search
off
Quick Auto Search
status
Mute on 0x06 0x14 0x00 0x04 0x00 0x34 0x14 0x00 0x01 0x61
Mute off 0x06 0x14 0x00 0x04 0x00 0x34 0x14 0x00 0x00 0x60
Increse Volume 0x06 0x14 0x00 0x04 0x00 0x34 0x14 0x01 0x00 0x61
Decrese Volume 0x06 0x14 0x00 0x04 0x00 0x34 0x14 0x02 0x00 0x62
0x07 0x14 0x00 0x05 0x00 0x34 0x00 0x00 0x12 0x10
0x6F
0x07 0x14 0x00 0x05 0x00 0x34 0x00 0x00 0x12 0x11
0x70
0x07 0x14 0x00 0x05 0x00 0x34 0x00 0x00 0x12 0x12
0x71
0x07 0x14 0x00 0x05 0x00 0x34 0x00 0x00 0x12 0x13
0x72
0x07 0x14 0x00 0x05 0x00 0x34 0x00 0x00 0x13 0x00
0x60
0x06 0x14 0x00 0x04 0x00 0x34 0x13 0x01 0x05 0x65
0x07 0x14 0x00 0x05 0x00 0x34 0x00 0x00 0x13 0x01
0x61
0x06 0x14 0x00 0x04 0x00 0x34 0x13 0x02 0x01 0x62
0x06 0x14 0x00 0x04 0x00 0x34 0x13 0x02 0x00 0x61
0x07 0x14 0x00 0x05 0x00 0x34 0x00 0x00 0x13 0x02
0x62
0x07 0x14 0x00 0x05 0x00 0x34 0x00 0x00 0x14 0x00
0x61
0x07 0x14 0x00 0x05 0x00 0x34 0x00 0x00 0x14 0x03
0x64
62
Page 64

English 0x06 0x14 0x00 0x04 0x00 0x34 0x15 0x00 0x00 0x61
Deutsch 0x06 0x14 0x00 0x04 0x00 0x34 0x15 0x00 0x02 0x63
Italiano 0x06 0x14 0x00 0x04 0x00 0x34 0x15 0x00 0x03 0x64
Write
Language
Read Language
Write
Light Time
Read Light usuage hour
Write
HDMI Format
Read HDMI Format status
Write
HDMI Range
Read HDMI Range status
Write
CEC
Read CEC status
Error status Read Read error status
Write
Brilliant Color
Read Brilliant Color status
Svenska 0x06 0x14 0x00 0x04 0x00 0x34 0x15 0x00 0x0a 0x6B
Nederlands 0x06 0x14 0x00 0x04 0x00 0x34 0x15 0x00 0x0b 0x6C
Polski 0x06 0x14 0x00 0x04 0x00 0x34 0x15 0x00 0x10 0x71
Suomi 0x06 0x14 0x00 0x04 0x00 0x34 0x15 0x00 0x11 0x72
Indonesia 0x06 0x14 0x00 0x04 0x00 0x34 0x15 0x00 0x13 0x74
Reset Light usuage
hour
RGB 0x06 0x14 0x00 0x04 0x00 0x34 0x11 0x28 0x00 0x85
YUV 0x06 0x14 0x00 0x04 0x00 0x34 0x11 0x28 0x01 0x86
Auto 0x06 0x14 0x00 0x04 0x00 0x34 0x11 0x28 0x02 0x87
Enhanced 0x06 0x14 0x00 0x04 0x00 0x34 0x11 0x29 0x00 0x86
Normal 0x06 0x14 0x00 0x04 0x00 0x34 0x11 0x29 0x01 0x87
Auto 0x06 0x14 0x00 0x04 0x00 0x34 0x11 0x29 0x02 0x88
Off 0x06 0x14 0x00 0x04 0x00 0x34 0x11 0x2B 0x00 0x88
On 0x06 0x14 0x00 0x04 0x00 0x34 0x11 0x2B 0x01 0x89
Brilliant Color 0 0x06 0x14 0x00 0x04 0x00 0x34 0x12 0x0F 0x00 0x6D
Brilliant Color 1 0x06 0x14 0x00 0x04 0x00 0x34 0x12 0x0F 0x01 0x6E
Brilliant Color 2 0x06 0x14 0x00 0x04 0x00 0x34 0x12 0x0F 0x02 0x6F
Brilliant Color 3 0x06 0x14 0x00 0x04 0x00 0x34 0x12 0x0F 0x03 0x70
Brilliant Color 4 0x06 0x14 0x00 0x04 0x00 0x34 0x12 0x0F 0x04 0x71
Brilliant Color 5 0x06 0x14 0x00 0x04 0x00 0x34 0x12 0x0F 0x05 0x72
Brilliant Color 6 0x06 0x14 0x00 0x04 0x00 0x34 0x12 0x0F 0x06 0x73
Brilliant Color 7 0x06 0x14 0x00 0x04 0x00 0x34 0x12 0x0F 0x07 0x74
Brilliant Color 8 0x06 0x14 0x00 0x04 0x00 0x34 0x12 0x0F 0x08 0x75
Brilliant Color 9 0x06 0x14 0x00 0x04 0x00 0x34 0x12 0x0F 0x09 0x76
Brilliant Color 10 0x06 0x14 0x00 0x04 0x00 0x34 0x12 0x0F 0x0A 0x77
0x06 0x14 0x00 0x04 0x00 0x34 0x15 0x00 0x01 0x62
0x06 0x14 0x00 0x04 0x00 0x34 0x15 0x00 0x04 0x65
0x06 0x14 0x00 0x04 0x00 0x34 0x15 0x00 0x05 0x66
0x06 0x14 0x00 0x04 0x00 0x34 0x15 0x00 0x06 0x67
0x06 0x14 0x00 0x04 0x00 0x34 0x15 0x00 0x07 0x68
0x06 0x14 0x00 0x04 0x00 0x34 0x15 0x00 0x08 0x69
0x06 0x14 0x00 0x04 0x00 0x34 0x15 0x00 0x09 0x6A
0x06 0x14 0x00 0x04 0x00 0x34 0x15 0x00 0x0c 0x6D
0x06 0x14 0x00 0x04 0x00 0x34 0x15 0x00 0x0d 0x6D
0x06 0x14 0x00 0x04 0x00 0x34 0x15 0x00 0x0e 0x6F
0x06 0x14 0x00 0x04 0x00 0x34 0x15 0x00 0x0f 0x70
0x06 0x14 0x00 0x04 0x00 0x34 0x15 0x00 0x12 0x73
0x06 0x14 0x00 0x04 0x00 0x34 0x15 0x00 0x14 0x75
0x07 0x14 0x00 0x05 0x00 0x34 0x00 0x00 0x15 0x00
0x62
0x06 0x14 0x00 0x04 0x00 0x34 0x15 0x01 0x00 0x62
0x07 0x14 0x00 0x05 0x00 0x34 0x00 0x00 0x15 0x01
0x63
0x07 0x14 0x00 0x05 0x00 0x34 0x00 0x00 0x11 0x28
0x86
0x07 0x14 0x00 0x05 0x00 0x34 0x00 0x00 0x11 0x29
0x87
0x07 0x14 0x00 0x05 0x00 0x34 0x00 0x00 0x11 0x2B
0x89
0x07 0x14 0x00 0x05 0x00 0x34 0x00 0x00 0x0C 0x0D
0x66
0x07 0x14 0x00 0x05 0x00 0x34 0x00 0x00 0x12 0x0F
0x6E
63
Page 65

Write
Screen Color
Read Screen Color status
Write
Over Scan
Read Overscan status
Remote Key Write
Screen color Off 0x06 0x14 0x00 0x04 0x00 0x34 0x11 0x32 0x00 0x8F
Blackboard 0x06 0x14 0x00 0x04 0x00 0x34 0x11 0x32 0x01 0x90
Greenboard 0x06 0x14 0x00 0x04 0x00 0x34 0x11 0x32 0x02 0x91
Whiteboard 0x06 0x14 0x00 0x04 0x00 0x34 0x11 0x32 0x03 0x92
0x07 0x14 0x00 0x05 0x00 0x34 0x00 0x00 0x11 0x32
0x90
Overscan Off 0x06 0x14 0x00 0x04 0x00 0x34 0x11 0x33 0x00 0x90
Overscan 1 0x06 0x14 0x00 0x04 0x00 0x34 0x11 0x33 0x01 0x91
Overscan 2 0x06 0x14 0x00 0x04 0x00 0x34 0x11 0x33 0x02 0x92
Overscan 3 0x06 0x14 0x00 0x04 0x00 0x34 0x11 0x33 0x03 0x93
Overscan 4 0x06 0x14 0x00 0x04 0x00 0x34 0x11 0x33 0x04 0x94
Overscan 5 0x06 0x14 0x00 0x04 0x00 0x34 0x11 0x33 0x05 0x95
0x07 0x14 0x00 0x05 0x00 0x34 0x00 0x00 0x11 0x33
0x91
Menu 0x02 0x14 0x00 0x04 0x00 0x34 0x02 0x04 0x0F 0x61
Exit 0x02 0x14 0x00 0x04 0x00 0x34 0x02 0x04 0x13 0x65
Top 0x02 0x14 0x00 0x04 0x00 0x34 0x02 0x04 0x0B 0x5D
Bottom 0x02 0x14 0x00 0x04 0x00 0x34 0x02 0x04 0x0C 0x5E
Left 0x02 0x14 0x00 0x04 0x00 0x34 0x02 0x04 0x0D 0x5F
Right 0x02 0x14 0x00 0x04 0x00 0x34 0x02 0x04 0x0E 0x60
Source 0x02 0x14 0x00 0x04 0x00 0x34 0x02 0x04 0x04 0x56
Enter 0x02 0x14 0x00 0x04 0x00 0x34 0x02 0x04 0x15 0x67
Auto 0x02 0x14 0x00 0x04 0x00 0x34 0x02 0x04 0x08 0x5A
My Button 0x02 0x14 0x00 0x04 0x00 0x34 0x02 0x04 0x11 0x63
64
 Loading...