

Page 1

ViviCam 2800
Digital Still Camera
User Manual
And Technical Support Guide
Rev. March 12, 1999
Page 2

1
ViviCam 2800 User Manual Contents
Subject:
Table of Contents
FCC Statement
Chapter 1 - Introduction
1.1 Introduction
1.2 Features and Highlights of the V2800
1.3 What’s Included with the V2800
1.4 Optional Items and Accessories
1.5 V2800 Camera Specifications
1.6 Camera Features
1.7 PC (Host) System Requirements
Chapter 2 - Getting Started: Power, and Info Icons
2.1 Powering the Camera
2.1.1 Installing Batteries
2.1.2 Using the AC Adapter
2.1.3 Power Management
2.2 Compact Flash Card
2.2.1 Inserting a Compact Flash Card
2.2.2 Removing a Compact Flash Card
2.3 Turning on the Camera
2.4 Turning off the Camera
2.5 The Information LCD Icons
2.5.1 Information Liquid Crystal Display (LCD)
2.5.2 Image Number
2.5.3 Flash
2.5.4 Macro
2.5.5 Image Quality
2.5.6 Battery Status
2.5.7 Resolution
2.5.8 Self Timer
2.6 Capturing an Image
Chapter 3 - CAM Mode: Advanced Functions
3.1 Opening the CAM menus
3.1.1 Self Timer
3.1.2 Picture Type (Still, Audio, Burst)
3.1.3 Resolution
3.1.4 Image Quality (Compression)
3.1.5 Image Orientation
3.1.6 Shutter Speed
3.1.7 Light Metering
3.1.8 Color Balance
3.1.9 Date Stamp
Page 3

2
3.1.9.1 Stamp Position
3.1.9.2 Stamp Format
3.1.9.3 Date and Time Setup
3.1.10 Folder Control
3.1.11 Reset
3.2.Exposure Value Adjustment
Chapter 4 - PLAY Mode
4.1 Play Mode - Overview
4.2 Reviewing Your Images - Basics
4.3 Play Mode: Advance Functions
4.3.1 Erase
4.3.2 Display Style
4.3.3 Attach Voice
4.3.4 Mark
4.3.5 Slide Show
4.3.6 Slide Show Interval/Period
4.3.7 Folder Control
4.3.8 LCD Brightness
4.3.9 Firmware Updates
4.3.10 About
Chapter 5 - Video Output
5.1 Connecting the V2800 to a Video Device
Chapter 6 - Twain Driver
6.1 Summary of Camera-to-PC Connectivity: Options
6.2 Serial/Twain Connectivity
6.2.1 Physical Connection (Serial)
6.2.2 Twain Driver - Defined
6.2.3 Installing the Twain Driver and Application
6.2.3.1 Step 1: Examine your COM ports
6.2.3.2 Step 2: Installing the Twain Driver
6.2.3.3 Step 3: Installing the Application Software
6.2.4 Image Transfer by Serial/Twain
6.2.5 The V2800 Twain Driver User Interface (DUI)
6.2.5.1 Folders
6.2.5.2 Preview Images in the Camera (Thumbnails)
6.2.5.3 Image Info
6.2.5.4 Slide Show
6.2.5.5 Remote Camera Control
6.2.5.6 Camera Configuration
6.2.5.7 Image Source – Camera or Disk
6.2.5.8 Display All Thumbnails
6.2.5.9 Select All Thumbnails
6.2.5.10 Deselect All Thumbnails
6.2.5.11 Save Images as Files
6.2.5.12 Save Images as a Folder of Files
6.2.5.13 Deleting Images from the Camera
Page 4

3
6.2.5.14 Deleting a Folder of Images from the Camera
6.2.5.15 Acquiring Images from the Camera
6.2.5.16 Closing the V2800 Twain DUI
Chapter 7 - USB Driver
7.1 USB Connectivity
7.1.1 Determine your Version of Windows
7.1.2 Determine if USB is Enabled on your PC
7.1.3 Connect the USB Cable
7.1.4 Installing the USB Driver – Step by Step
Chapter 8 - General Notes
8.1 Precautionary Warnings
8.2 Warranty Policy
8.3 Technical Support
8.4 Usage Environment
8.5 Troubleshooting
8.5.1 The Reset Button
8.5.2 General Troubleshooting – References
FCC Notice
This equipment has been tested and found to comply with the limits for a Class B
digital device, pursuant to part 15 of the FCC Rules. These limits are designed to
provide reasonable protection against harmful interference in commercial installation.
This equipment generates, uses and can radiate radio frequency energy and if not
installed and used in accordance with the instructions, may cause harmful interference
to radio communications. However, there is no guarantee that interference will not
occur in a particular installation. If this equipment does cause harmful interference to
radio or television reception, detectable by turning the equipment in question off and
on, the user is encouraged to try to correct the interference by one or more of the
following measures. 1) Re-orient, or relocate, the receiving antenna. 2) Increase the
distance between the equipment and the receiver. 3) Connect the equipment to an
outlet on a different circuit than that which the receiver is connected to. 4) Consult
your dealer or an experienced radio/TV technician for help.
Page 5

4
Chapter 1 - Introduction
1.1 Introduction
Congratulations on purchasing the ViviCam 2800 (V2800) Digital Still Camera. This
camera brings to you the ease-of-use of a traditional camera, combined with high-tech
functionality. It includes a full-color image LCD (Liquid Crystal Display) for image
previewing which allows you to immediately see the images you have just taken. It
also includes a built-in multi-mode flash with an auto-flash sensor, which
automatically detects whether the flash should be engaged or not. The V2800 uses
Compact Flash memory for storing your images. You may use additional Compact
Flash memory cards for storing additional images as if they were “digital film”
Once you have finished taking your images, you may view them on a TV/monitor, or
you may uploaded them to your personal computer. From there, you can use the
included image editing software to enhance your images before you print, email them,
or post them to a web page.
1.2 Features and Highlights of the V2800
The V2800 is designed to be easy to use; yet it has many powerful features and
functions. Some of the V2800 features include:
1. Portability and ease of use - just like a film camera.
2. 1.8” Color Image LCD display - for image preview and playback.
3. Information LCD – allowing you to adjust basic camera functions quickly and
easily without the need to turn on the image LCD.
4. Four Mode Flash - Auto, On, Off, and Redeye modes.
5. High-Quality Glass Lens - with AutoFocus and macro functions.
6. Digital Zoom – providing a 2:1 zoom function.
7. Compact Flash memory - the standard for digital film.
8. USB Communication – advanced high-speed connectivity to your PC.
9. Twain Driver – for serial data communications to your PC.
10. Video Output – for image playback or live preview on a TV/monitor or NTSC
video display system.
11. Standard JPG image file format – images are stored in the universally accepted
JPG image format.
12. Image Editing software – allowing you to transfer and edit images on your PC.
13. Audio Record Function – allowing you to record voice (audio) while you
capture an image, or attach voice to an image on the CF card anytime after it has
been captured.
14. Burst Capture Mode – allowing you to capture nine images in a sequence.
15. Two image capture resolutions — allowing you to capture images in either
high-resolution (Large -1024 x 768), or VGA resolution (Small - 640 x 480).
(This is useful in circumstance where a lower resolution image is more
appropriate to your needs, such as a web shot)
Page 6

5
16. Variable Image Quality – allowing you to adjust image compression to meet
your needs and storage capacity. Select from Good, Better, and Best.
17. Exposure Control – Select auto exposure, or specify an exposure-time from 2
seconds to 1/8000 second, in fifteen steps.
18. Metering Control – tell the camera whether you wish to have the image metered
(for purposes of exposure) based upon the entire image, or based only upon the
center of your scene.
19. Color Balance Selection – when imaging outdoors, you can tell the camera to
adjust for daylight conditions for better color correction and white balance. Or,
switch to Auto and let the camera determine the settings.
20. Date Back Function – Place the date, time, or time & date on your images.
Position the date stamp in any corner of the image.
21. Slide Show Function – Use your camera to playback your images as a slide
show. Show your images on the LCD image display or on a TV. Use the “mark”
feature to select which images you want to include in your slide show.
22. Self-Timer and Tripod Socket – Get in the picture by mounting your camera on
a tripod and using the self-timer feature.
23. Image Protection - Protect your favorite images from inadvertent erasure or
deletion by marking them as “protected”.
1.3 What’s included with the V2800*
1. V2800 Camera body with 4 MB Compact Flash Card
2. RS232 Cable – for serial data transfer to your PC
3. Video Cable – for connecting to an NTSC video device
4. USB Cable – for connecting to a PC
5. Carrying strap with reset key
6. Carrying case with belt loop attachment
7. Quick Start Guide
8. User Manual
9. Software CD-ROM with Twain drivers (for PC), USB drivers (for PC), and
imaging application**
10. AC power adapter
11. Four AA Batteries
12. Warranty Card
13. Technical Support Flyer
14. Promotional coupons – for accessories (batteries, CF cards & readers, etc.)
* Please note that the basic inclusions do vary somewhat depending upon special
manufacturing circumstances, and promotional programs in which your dealer or
supplier may have specified unique or special package contents.
** Depending upon the manufacturing circumstances of your particular ViviCam
2800 camera the Twain and USB drivers will be either on diskettes, or on a CD-ROM
together with an image editing software.
Page 7

6
1.4 Optional Items and Accessories
Vivitar Corporation has been developing and marketing Digital Still Cameras since
1996. In that time we have learned a great deal from our customers about their needs
and concerns with consumer digital imaging. The two most common concerns or
issues are: 1) PC connectivity, and 2) Battery life.
The following accessories are strongly suggested to address those issues, and further
enhance your ownership experience. We suggest the use of the following optional
accessories –
1. Rechargeable batteries and chargers. Digital cameras are notorious for battery
consumption. It is highly recommended that digital camera owners use
rechargeable NiMH (Nickel-Metal Hydride) AA batteries. Ideally, you would
have two sets of batteries and one charger. One set of batteries can be on-charge,
while the second set would be in the camera. As the batteries deplete you would
rotate the battery sets between charger and camera.
2. Compact Flash cards for additional image storage. These are available in various
sizes from 2 MB to 96MB. Use CF cards which bear the CFA (Compact Flash
Association) logo.
3. A Compact Flash card reader that allows you to download your images directly
from a CF card to your PC via parallel port, or USB port. This method is much
faster and easier than using a serial-data cable connection, or even a USB
connection. This allows you to by-pass the serial data (or USB) download process
altogether. The CF reader is much faster than the serial connection and it
circumvents serial communications conflicts.
4. A PCMCIA CF adapter that allows mobile computers (laptops and notebooks) to
read CF memory cards directly into a PCMCIA slot on your notebook computer.
This allows notebook computer users to by-pass the serial data download process
altogether. The CF PCMCIA adapter is also much faster and circumvents serial
communications conflicts.
These items are available through your dealer, computer stores, on-line sources, or
from the telephone ordering and fulfillment centers including those listed on the
promotional coupons.
Page 8

7
1.5 V2800 Camera Specifications
Description/Class -
Image Sensor -
• Color Depth
• Sensor Type
• Sensor Size
Resolution and Compression -
• Resolution Modes
• Quality (Compression) Modes
Displays -
• LCD Display Size
• Live Display Frame Rate
• Image Playback Options
• Information Display
• Display Brightness Control
• Display Info Localization
XGA Class DSC with color Image LCD, digital
zoom, auto-focus, macro, optical viewfinder, flash,
information display, burst mode, date back, and audio
recording capability.
30 Bit sensor (10 bit per color), 24 bit image output
Sony CCD 204 AK, 1/3”
810K Pixels (square)
1024 x 768 (XGA), and 640 x 480 (VGA)
Good, Better, Best
1.8” Color Image LCD
15 - 20 Frames per second
Single image mode, nine pictures mode, slide show
with adjustable interval
Black & White Information LCD
Yes
English
Capture Modes -
• Modes
• Still Processing Time
Memory -
• Image Storage Memory
• Number of Images on 4 MB
Card in XGA resolution
Formats -
• Image Compression
• Image Format
• File Format
• Image File Sizes, Nominal (in
XGA resolution)
• Audio Format
Operating System & Control -
• Camera O/S
• Programmability
• USB Chipset
Exposure System -
• Exposure Modes
• Weighting System
• Manual Adjust/Override
Burst, Still, Audio
Typically, less than 6 seconds
Compact Flash
11 Good, 24 Better, or 46 Best
(typical – actual count will vary)
JPEG
JPG
DCF
90 KB Good, 170 KB Better, or 372 KB Best
(typical – actual size will vary)
WAV files, up to 10 seconds in duration
Vx Works
Re-Programmable via CF card
NEC 100 MIPS DSP
Automatic or manual
Center weighting or matrix, selectable
User can select manual or auto exposure and
weighting system
Page 9

8
• White Balance
• Shutter Speed Range
Flash -
• Modes
• Effective Flash Range
Optical -
• Focus System
• Lens -
• Focal Length
• Apertures
• Focus Range, normal
• Macro
• 35 mm equivalence
• Zoom
Additional Features -
• Optical Viewfinder
• Tripod Socket
• Self Timer
• Strap
• Date & Time Stamp
• Image Lock/Protection
Automatic, or Daylight modes
1/8000 to 2 seconds
Four modes = On (Fill), Auto, Off, Red-Eye
1 to 10 feet (IGBT system)
Auto Focus using TTL system
Glass
6.57 mm
F2.8, F5.6, F/11
3 feet to infinity
Minimum focus 6” to 8”
45 – 46 mm
2:1 Digital Zoom
Built-in
¼” – 20
10 seconds
Hand strap included
User selectable formats and position for YMD, HM.
Y2K compliant
Images can be marked for protection
Connectivity (I/O) -
• Serial Communications
• USB
• Twain Driver
• Video Output
Power -
• AC Power Adapter -
• Input
• Output
• Plug Dimensions
• Batteries -
• Number And Type
• Images Per Set
• Power Management
Dimensions & Weight -
• Camera
• Weight
RS-232 serial data to PC COM port
USB “storage-class” implementation
32-bit Twain driver for Windows 95/98
NTSC video out –live preview and image playback
(One-piece direct plug-in Transformer. "Power cube"
wall module w/integral power lead & molded plug)
100 – 240 VAC, 50/60 Hz, 250 mA
6 VDC, 1.5 Amp max.
3.5 x 1.3 X 9.75 mm/ center positive
4 AA - Alkaline (included).
NiMH, NiCD, or Lithium OK
Variable, depending upon battery type and LCD
usage
Auto power-off in 60 seconds
5.7” (L) x 2” (W) x 3” (H) (144 x 51.5 x 75 mm)
10.8 oz./307 g (without batteries),
14.3 oz./ 405 g (with batteries)
Note: Features and specifications are subject to change and this specification matrix should be used
only as a guideline. The V2800 is a programmable device and its features can be varied, by design.
Page 10
9
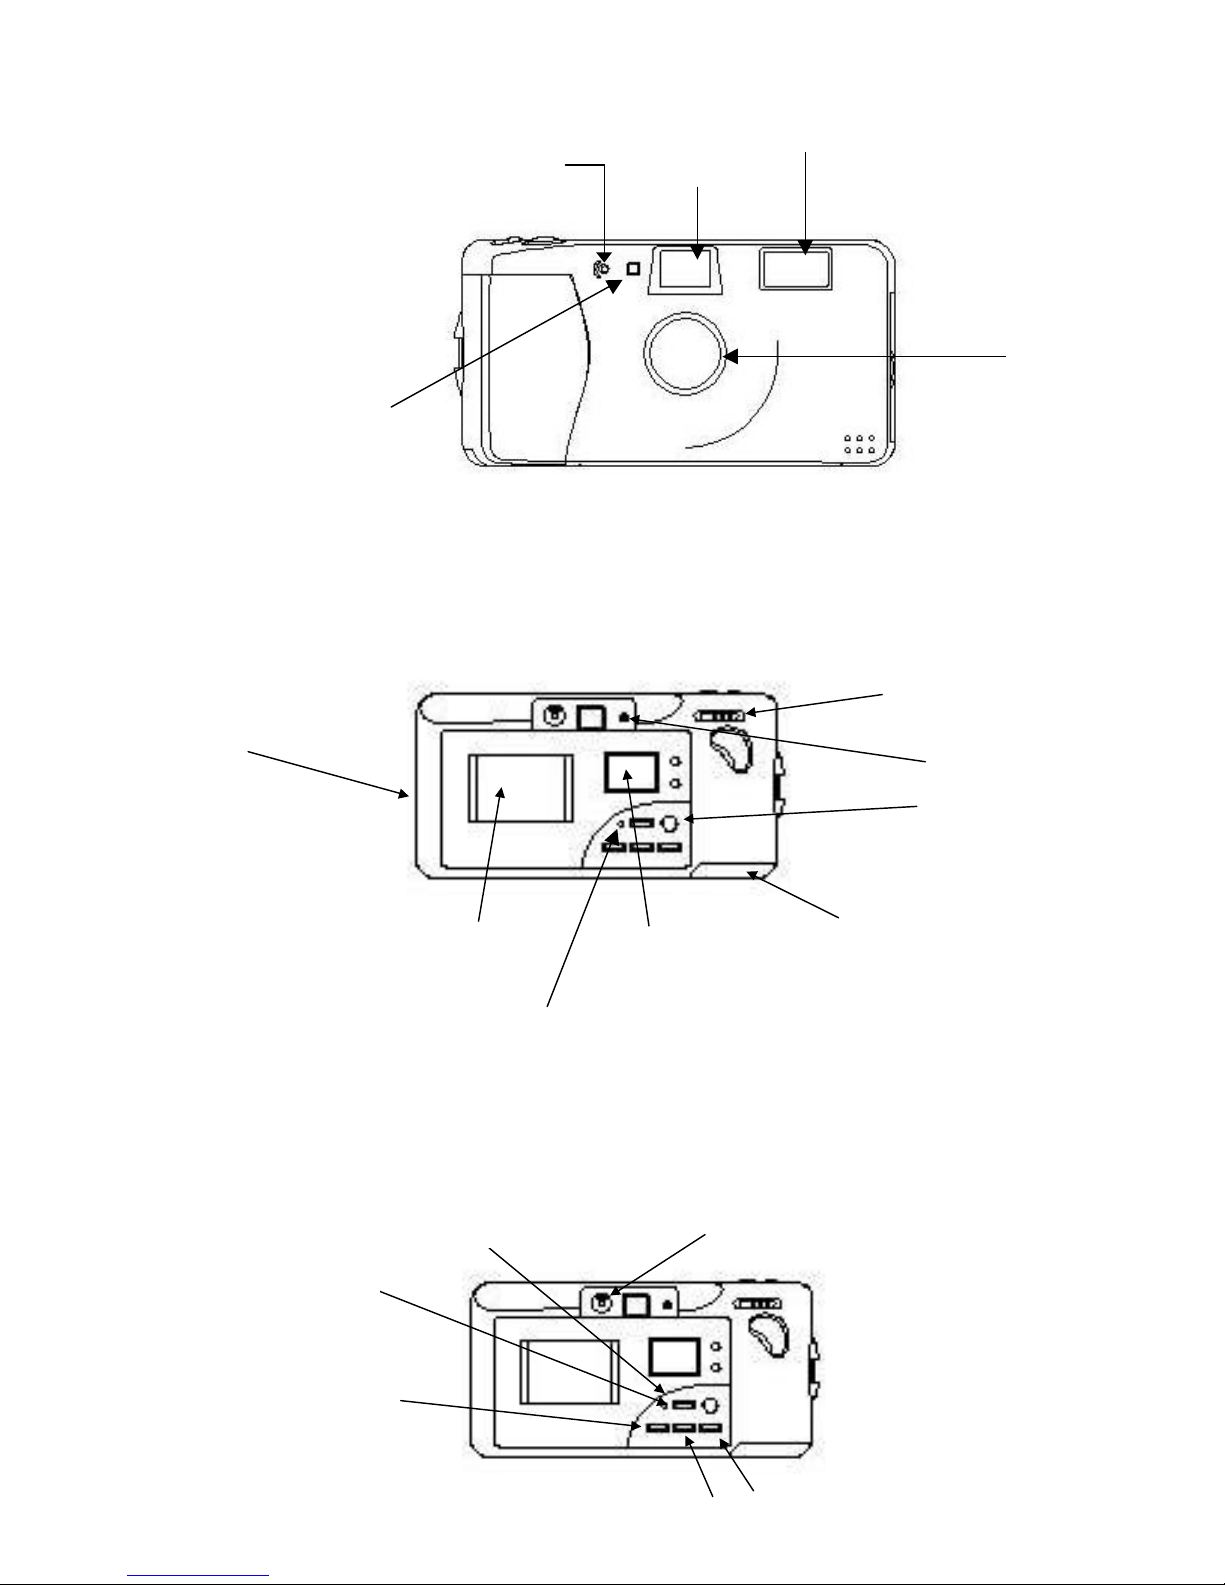
1.6 V2800 Features
Door
Button
Green LED
Menu
Reset
Sensor
Front View
Flash
Back Views
Compartment
Self-Timer
LED
Optical
ViewFinder
Flash
Lens
Mode
Switch
Button
Image LCD
(Color)
Reset Button
Information LCD
(Monochrome)
Microphone
DISP. (Display)
Battery
Door
Enter
- +
Page 11

10
Top View
¼” - 20
Door
CF Card
USB Port
Zoom Out
(T = Telephoto)
Bottom View
Zoom In, (W = Wide)
Shutter
Button
CF
Card
Ejector
Compartment View
NTSC Video
Tripod
Socket,
Battery
(RS-232)
Serial Data
6 VDC
Power
Page 12

11
1.7 System Requirements:
Digital cameras are PC-centric devices. As such, system requirements become a
significant usage issue. The V2800 is a very feature-rich camera that allows you to
connect to your PC in several ways. As such, the PC system requirements vary
depending upon what you wish to do and how you wish to connect your camera to
your PC. The system requirements are driven by your method of connecting to your
PC.
General System Requirements for all users:
• 486/66 MHz, or higher processor, with 16 MB RAM.
• Windows 95, Windows 98
• CD-ROM drive to load drivers and application software
• Floppy disk driver to load Twain and USB drivers (if not included on CD-ROM)
• 2 MB hard drive space for Twain and USB drivers
• Display monitor and video adapter supporting at least 256 colors at VGA (640 x
480) resolution.
Note: If your display is set at 256 colors, your digital camera images will appear dull, colorless,
and “posterized.” For best visual appearance set your display to 800 x 600 resolution. 16 bit
(High Color) or 24 bit (True Color) is recommended.
Additional Requirements to connect to your PC using a serial connection:
• An available 9-pin serial port, correctly configured and operational. A 25 pin
serial port can be accessed using a 25 pin to 9 pin (25F to 9M) adapter. Do not
use a null modem adapter.
Additional Requirements to connect to your PC using a USB connection:
• A USB port, properly configured and operational.
• Windows 95 version OSR2 with USB Supplement (OSR2.1), or
• Windows 98.
Additional Requirements to connect to your PC using a CF reader:
• Parallel port CF readers will require a parallel port (which they usually can share
with a printer, or other parallel port peripheral). Consult with your CF reader
manufacturer for additional details. Parallel port CF readers are available to work
with Windows 95/98, NT 4.0, and even Windows 3.x
• USB CF readers will have requirements as specified by their manufacturers.
Note: If you have a properly configured USB port on a Windows 95/98 machine, there is little
advantage using a USB CF reader over simply using the camera itself. The V2800 is a “storage-class”
USB device which means that when you connect the V2800 to your PC via USB, the camera appears as
a hard drive, just as does the CF reader.
Page 13

12
Application Software: The application software included with the V2800 can be
installed as a matter of choice. If you already have favorite imaging application
software installed on your PC, you may not need to install the bundled software
application.
If you plan to use the serial connection for connecting to you PC, your imaging
software must be Twain compliant and it must support a 32-bit Twain driver source.
If you plan to connect by USB or CF reader then you application software need only
be able to read common JPG files.
Additional Requirements for the PhotoExpress Application are:
• Pentium Processor, or higher
• 105 MB of hard disk space
• Minimum 800 x 600 display settings
MAC: There are no drivers or serial connection cables to directly connect the V2800
to MAC or iMAC computers, nor are there MAC USB drivers. However, it may be
possible to use the V2800 with an iMAC or a PowerMac using an optional USB
version Compact Flash card reader, such as the ImageMate™, USB version, by
SanDisk.
Images captured with your V2800 and stored on a CF card may, however, be read
using a USB CF reader. The CF reader dictates the MAC system requirements. In
general you will need OS 8.1 or higher with USB system extensions. iMAC users can
use their USB port, while PowerMac users will need a PCI to USB adapter.
Page 14
13
Chapter 2 – Getting Started: Power, and Info Icons
2.1 Powering the Camera
Starting up your V2800 is as easy as 1-2-3.
1. Apply power – either batteries or an AC adapter
2. Insert a Compact Flash (CF) card (the “film” for a digital camera.)
3. Turn on the camera
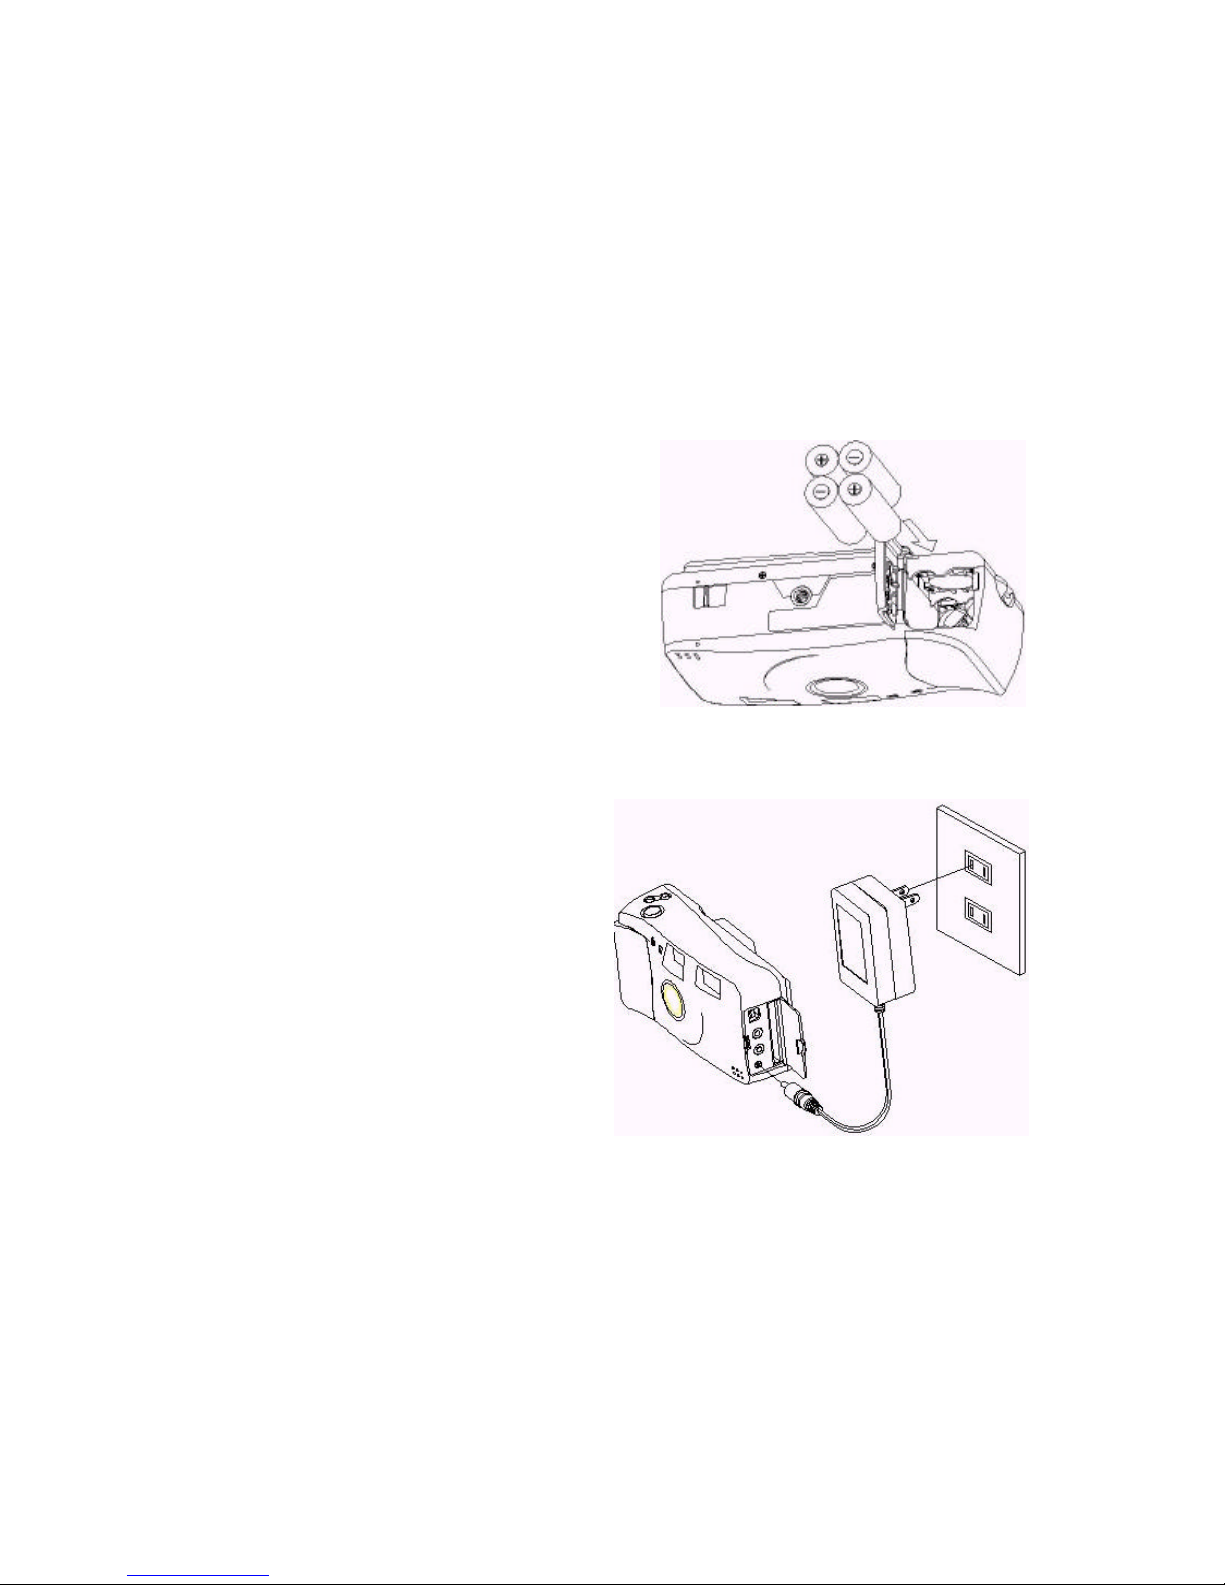
2.1.1 Installing Batteries
To install batteries:
1. Place your thumb upon the battery door
2. Slide the battery door in the direction of
the arrow
3. Place the batteries with the polarity
exactly as shown. Note that there are
polarity indicators on the inside of the
battery door
4. Close the battery door and slide it back into it’s locked position.
2.1.2 Using the AC Adapter
To use the AC adapter, plug the adapter
into a household AC outlet, open the side
compartment door of camera, and
connect the adapter terminal to lower
jack, labeled “DC 6V”
2.1.3 Power Management
Note: The ViviCam 2800 has a power management feature designed to extend battery
life. If the camera is running on batteries, the camera will shut-off automatically if it
is left idle for one minute. To “wake-up” the camera, press the shutter button.
Note: If the camera is running on AC power, the auto-off power management feature is ignored and
the camera will run indefinitely, with one exception. The one exception is: if your camera is connected
to your PC using the AC adapter and you have downloaded all your images from camera to the PC,
then the camera will assume you are finished and the camera will auto-power off. Otherwise, the
camera will run indefinitely when the AC adapter is in use.
Note: The auto-power off time (factory set to one-minute) is adjustable. See section 6.2.5.6
Page 15
14
CF Card
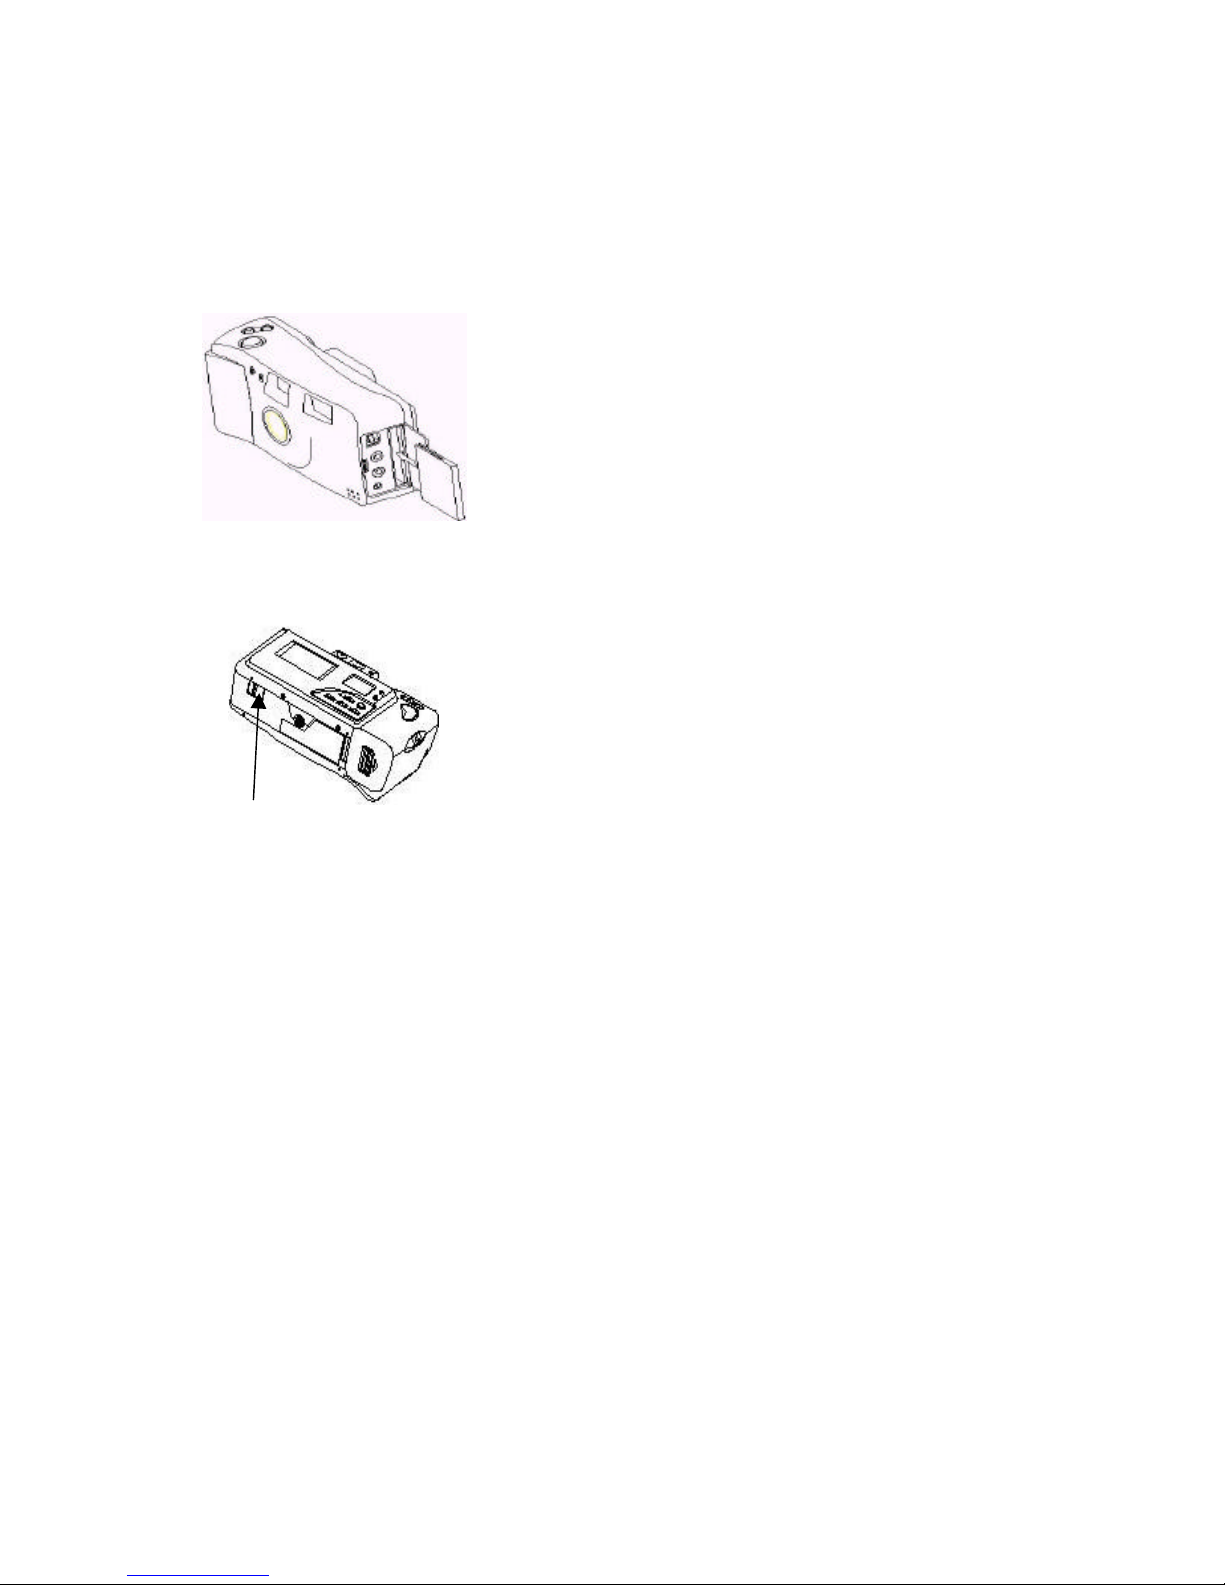
2.2 Compact Flash Card
Now that the batteries are installed (or AC power applied), there must be a CF card in
the camera, just as a film camera needs a roll of film.
2.2.1 Inserting a Compact Flash Card
1. Open the side compartment door.
2. Insert the side of a CF card with the 50 small
holes into the CF slot, pointed into the camera.
3. Push the CF card into the slot until it is seated
firmly.
2.2.2 Removing a Compact Flash Card
1. Open the side compartment door.
2. Slide the memory card ejector in the direction of
the arrow. Note how the ejector moves in a direction
opposite to the direction in which the card itself will
eject. Feel free to slide the ejector button swiftly.
3. Remove Card
Ejector
Page 16

15
2.3 Turning on the Camera
for PLAY mode
for CAM mode
Now that power is applied and the CF card is in place, it’s time to turn on the camera.
At this point you have two choices. What do you want to do? Do you want to take
images, or review images you have already captured.
• To capture images (take pictures) slide the mode switch to the CAM position
• To review existing images slide the mode switch to the PLAY position
Slide to the left
Slide to the right
Power up to CAM. If you switched to CAM, you will see the green LED come on
and the camera (like the small computer that it is) will boot up. You will hear the
auto-focus motor run through a short exercise, the information LCD panel will display
certain information (explained in the next section), and the camera is ready to capture
images.
Note: Part of the power management philosophy is to have the camera power-up with the image LCD
OFF, in order to save battery power. To turn on the LCD display press the DISP button and you will
see live motion video.
Power up to PLAY. If you switched to PLAY, you will see the green LED come on,
the information LCD panel will display certain information (explained in the next
section), and the image LCD will display an image. Press the “-” or “+” buttons to
see the next, or previous image in memory.
Note: What about all that information in the image LCD window? If you prefer to turnoff all the detail
in the image LCD, press the DISP and your image LCD will omit all the information details.
2.4 Turning off the Camera
When it’s time to turn off the camera, slide the mode switch back to the center
position. The camera will power down. Just like your PC, the V2800 takes a short
time to power down, typically three to five seconds.
Page 17

16
2.5 The Information LCD Icons
2.5.1 Information Liquid Crystal Display (LCD)
The small monochrome information LCD provides basic information about the status
and settings of your camera. This information LCD window comes on whenever the
camera is powered.
Image Counter
Redeye
Flash Mode
Flash Mode
Image Quality
Resolution
Battery Status
Macro
Note: If the information display goes blank while the camera is in either PLAY or CAM modes, the
camera has automatically gone into a power saving “sleep” mode. To wake up the camera, press the
shutter button.
Self Timer
2.5.2 Image Number
The three large digits in the upper right-hand corner of the LCD indicate the image
number.
• In CAM mode, this indicates how many more images you can take,
based upon your available CF card memory, resolution, and quality
settings. If no CF card is present, or if it is not fully seated, the Image
display will briefly flash NoCard, and the monochrome display Image
Number will show three dashes, “---”.
Note: The number of images remaining is an estimate. It is a calculation based upon available
memory and the anticipated, or average, file size of an image taken in the resolution and quality
settings that are currently active. File sizes do vary however, depending upon the scene that you have
imaged. Complex images (where the image is very “busy”) take more space than average whereas
images of scenes which are of less contrast may be smaller than average.
• In PLAY mode, it indicates the number of the images currently on the CF card.
If no CF card is present, or if it is not fully seated, the Image display will
display NoCard, and the monochrome display Image Number will show
three zeros, “000”
.
Note: If the CF memory card is full, the image LCD will display “CARD FULL”.
Page 18

17
2.5.3 FLASH
The V2800 has four flash modes: On/Fill, OFF, Auto, and redeye reduction. The flash
is designed to operate in a range from 20 inches (50 cm) to a maximum of 10 feet (3
m.) Scene content (whether your subject is reflective or diffuse, and general lighting
conditions) will effect the range of performance.
Auto. In the auto flash mode the camera will make a determination whether or
not the flash is required. There is a small light sensor on the front of the camera
located between the optical viewfinder and the self-timing indicator that senses the
lighting conditions of your scene. The camera will determine whether or not the flash
is required and it will also regulate the intensity of the flash.
Redeye. Redeye reduction is accomplished by firing the flash twice. The first
flash is a precursor flash of reduced intensity which initiates a retinal reduction in
your subjects. (This causes your subjects eyes/retinas to constrict slightly.) The flash
will then trigger a second time in the proper intensity to capture the image.
On. In this mode the flash will trigger every time regardless of lighting
conditions. This is sometimes known as “fill” flash as many photographers use
this technique to fill in shadows and areas of high contrast.
.
Off. In the off mode, the flash is disabled and will not fire regardless of lighting
conditions.
Hint: The V2800 performs quite well in low light conditions. Try capturing without flash and
determine for yourself how well the low-light performance works for you. Do be careful, however, as
lighting diminishes the exposure time increases and you may find your subjects become blurred. Since
the V2800 is digital and there is no film cost, experiment - try with and without flash.
Note: If the flash is set to Auto, On, or Redeye you will hear a high pitched whine when the camera is
turned to CAM mode. This noise is the sound of the flash capacitor charging.
Hint: If you know you will not be using the flash (outdoors on a sunny day, for example) turn the flash
to OFF. This will result in faster camera startups, faster image-to-image performance, and better
battery life. By setting the flash to OFF the camera will not charge the flash capacitor, saving both time
and batteries.
Changing Flash Modes:
Flash mode
button
1. Start up the camera in CAM mode.
2. Press the flash button to toggle through
each mode. The display icons indicate
your current flash mode.
Page 19
18
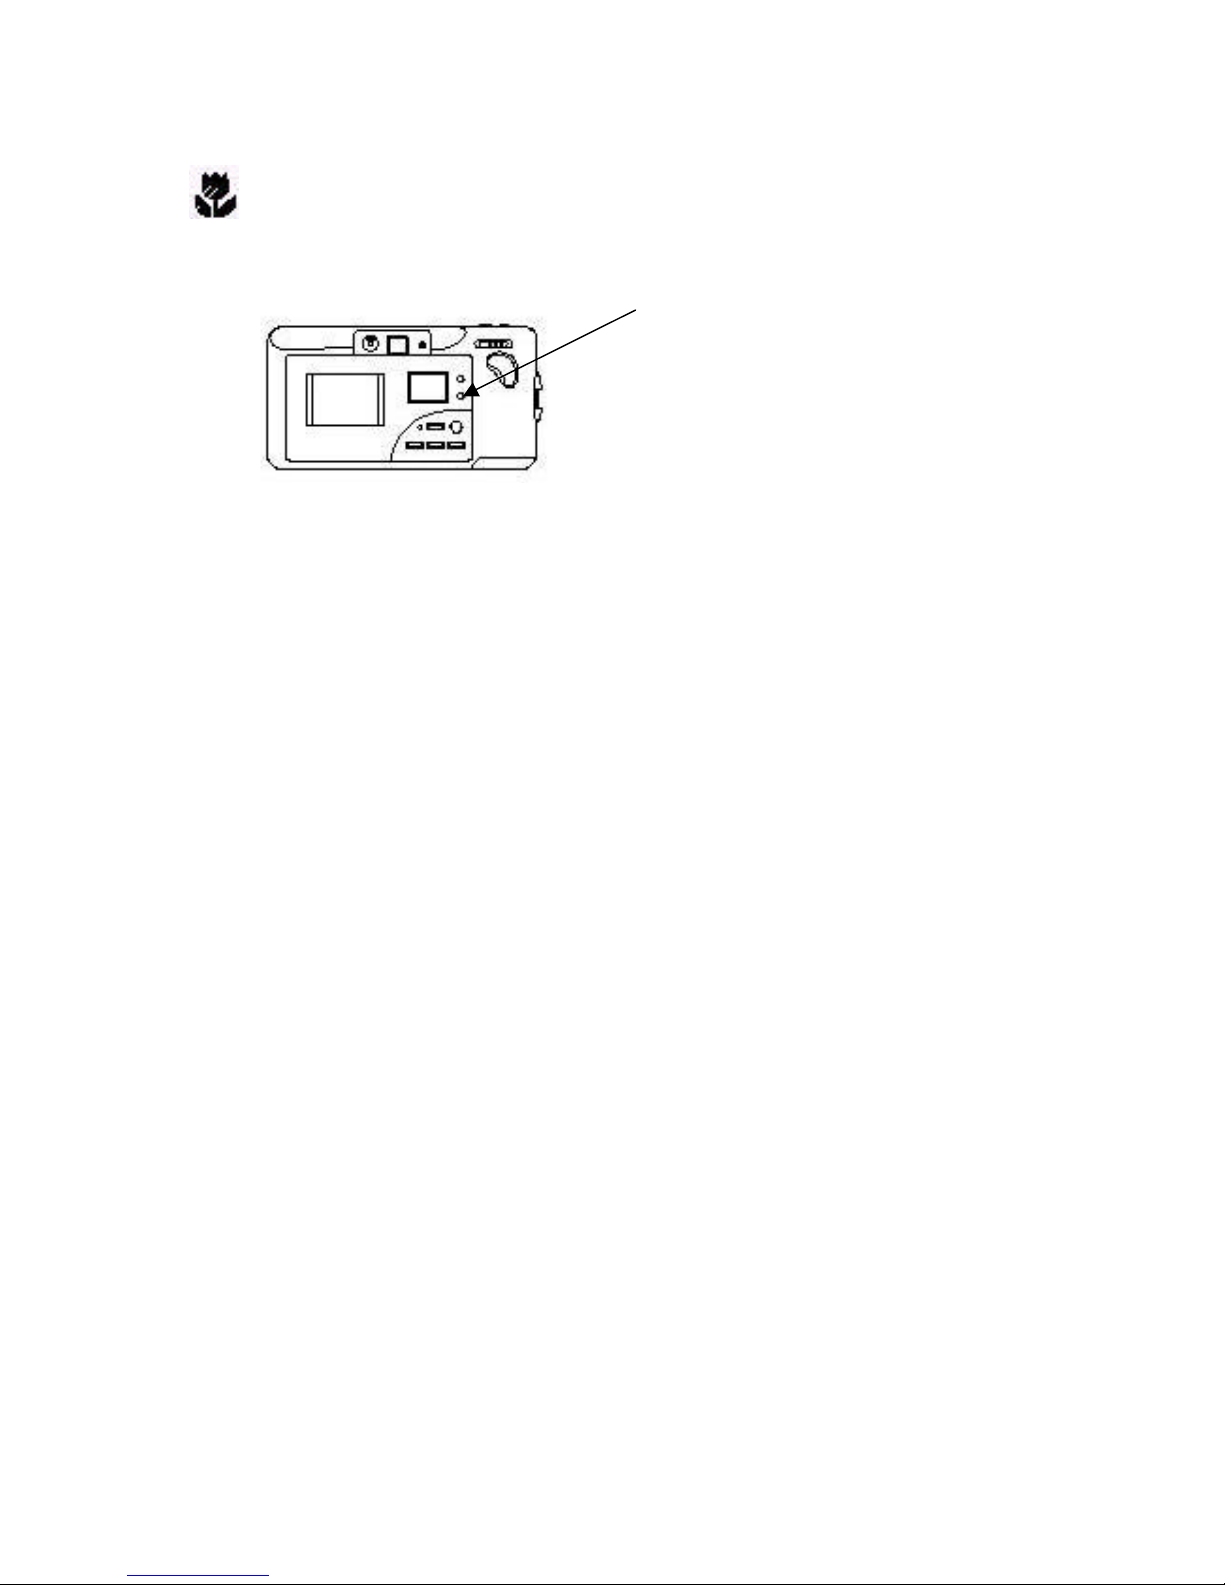
2.5.4 Macro
The macro function disables the auto focus feature and drives the focus motor
to the minimum focus position. The minimum focus distance will be 6” to 8”
(20cm.)
Initiating the Macro function
Macro mode button
Start up the camera in CAM mode.
Press the macro button to toggle macro on or
off. The flower icon indicates macro mode
Hint: After taking a macro shot don’t forget to switch back to normal (auto focus) mode or else
subsequent images may be out of focus.
2.5.5 Image Quality
You may adjust the quality of the images you capture by selecting image quality as
Good, Better, or, Best. Unlike traditional film photography, digital images are stored
on a memory card as a file. All digital cameras use a technique known as
compression to save digital images in files of reasonable size. If compression were
not used, you would only be able to store perhaps two images on a 4 MB CF memory
card. Unfortunately, compressing an image causes degradation in the quality of the
image. The more you compress an image, the smaller the file. Small files, however,
allow you to store more images on a given memory card. The choice is yours. Best
images, or maximum number of images? It is a trade off you can make. The V2800
offers three levels of compression (quality).
Note: Do not confuse quality with resolution. Resolution determines the size of the images on your
screen – 1024 by 768 pixels or 640 by 480 pixels. Quality determines the visual integrity of your
images. Images that are too heavily compressed will appear blocky.
The quality setting will be indicated on the information LCD.
• Best: Using XGA (1024 x 768) resolution, and the Best quality setting you can
expect to store approximately 11 images on a 4 MB CF memory card.
• Better: Using XGA (1024 x 768) resolution, and the Better quality setting you
can expect to store approximately 24 images on a 4 MB CF memory card.
• Good: Using XGA (1024 x 768) resolution, and the Best quality setting you can
expect to store approximately 46 images on a 4 MB CF memory card.
To change quality setting, refer to Chapter 3, section 3.1.4.
Note: You can change image quality from one image to the next. Experiment with the compression
settings to see if you can tell the difference between the three.
Hint: The most appropriate compression (quality) setting for you depends upon the final purpose for
your images. If you plan to print your images, use the “Best” quality. If you plan to email images, or
post them to a website the most appropriate setting will be “Good.”
Page 20

19
2.5.6 Battery Status
The V2800 uses four AA batteries. The information LCD has a battery status
indicator that acts as a fuel gauge.
Three indicator bars signify full battery power. This is the optimal
condition.
Two indicator bars signify adequate, but less than full battery power.
There remains adequate power to operate all camera features.
One indicator bar signifies marginally adequate, battery power. There
remains adequate power to capture images, but the LCD will be disabled.
No indicator bars indicate the presence of batteries but of insufficient
capacity to operate the camera.
Note: As battery capacity diminishes, the V2800 will attempt to keep operating. To do this the camera
will disable the image LCD when battery capacity is critically low. This will allow you to continue to
capture images, but without the benefit of the image LCD. The monochrome LCD will continue to
provide status information, however.
Hint: When you remove alkaline batteries from a digital camera, do not dispose of them hastily.
Digital cameras deplete AA batteries quickly, but not completely. Experience has shown that batteries,
which appear “dead” to a digital camera, are still more than adequate for most other consumer
electronic devices. Take the “dead” batteries from your digital camera and use them in another device
that is not so demanding like a radio, CD player, or battery-operated toy. Try it and see!
2.5.7 Image Resolution
Resolution refers to the number of pixels of the images you capture. The V2800 has
two resolutions, large and small. Large resolution images will be 1024 pixels by 768
pixels. This is often referred to as, XGA. Small resolution images will be 640 pixels
by 480 pixels, known as VGA. VGA images will result in smaller files. Using VGA
(small) resolution you will be able to store almost 50% more images on the CF
memory card.
The following icons on the monochrome LCD indicate resolution -
Large: 1024 x 768 (XGA)
Small: 640 x 480 (VGA)
To change resolution setting, refer to Chapter 3, section 3.1.3.
Page 21

20
2.5.8 Self-Timer
For time-delayed image capture, you may use the self-timer feature. The self-timer
inserts a ten-second delay after you press the shutter button until the image is actually
captured. This feature is often used when the camera is mounted upon a tripod,
allowing you to get in the image.
To invoke the self-timer, refer to Chapter 3, section 3.1.1.
2.6 Capturing an Image
Now that we’ve gotten through all the details – one last detail. How do you take a
picture? Simple. Turn on the camera to CAM mode and push the shutter button.
Wait a few seconds for processing and you are ready to capture your next image.
Note: The V2800 is loaded with features and capabilities. There are so many features and menus that
it can become overwhelming at first. Not to worry. The V2800 is setup at the factory with default
settings that allow you to operate the camera right out of the box without making any adjustments at
all. Just insert the batteries, switch to CAM, and begin capturing images by pressing the shutter button
just like a film-based camera. Explore all these advanced features at your leisure, as you become more
familiar with the camera.
Page 22

21
Chapter 3 - CAM Mode: Advanced Functions
In the CAM mode you have access to the advanced function menus. These advanced
function menus allow you to:
• Invoke the self-timer
• Specify capture modes
• Select resolution
• Specify compression quality
• Orient your images
• Dictate a shutter speed
• Select a metering scheme
• Specify color balance
• Place a formatted date on your images
• Create and change file folders
• Reset the camera.
These functions are distributed over four pages of the CAM menus.
3.1 Opening the CAM menus
Switch to CAM mode.
Press the menu key.
The image LCD will display
Page 1/4 of the CAM menu. Pressing
the menu key again will present the
next menu page.
Note: You may exit the CAM menus at any time by pressing the DISP button.
Page 1/4 of the CAM menus
Page 23

22
3.1.1 Self Timer
The first menu item is the Self-Timer feature. In this example the selftimer is currently OFF.
Press the enter key to go to the self timer sub menu:
Press either the “+” or “-” keys to toggle between the ON and OFF selections. After
making your selection press the enter key to save your choice and return to menu page
1/4. If you have invoked the self-timer notice how the Self-Timer icon appears in the
monochrome information LCD.
The next time you press the shutter button, there will be a 10-second delay before the
image is actually captured.
3.1.2 Picture Type (Still, Audio, Burst)
The second menu item on Page 1/4 is picture type:
There are three capture modes (picture types) -
• You can capture still images (like a normal film camera)
• Capture single frames with voice (audio) attached to each
• Capture a burst – a series of nine consecutive still images
Press Enter key to display the Picture Type sub menu:
Press either the “+” or “-” keys to scroll through the three
choices. After making your selection press the enter key
to save your choice and return to the menu page 1/4.
If you choose “Still with Voice” each image will have a voice segment “attached” to
the image. When capturing an image with voice press the shutter as normal, but
continue to hold the shutter button and speak into the microphone, up to 10 seconds.
Note: Sound recording will take up memory space that would otherwise be used for image storage.
You may notice that the image counter decrements by more than one-number for each image captured
with sound.
Note: To retrieve your sound clips you must either connect the camera to your PC via USB, or use a
card reader to read the CF card directly. Using a serial data Twain connection, there is no mechanism
for audio file transfer.
If you choose “Burst” mode the camera will capture nine images in rapid succession
the next time you press the shutter. Burst mode images are captured at one-half
resolution, or 512 x 368.
Note: “Burst” is a feature you may use occasionally. When finished, do not forget to reset the camera
to “Still” or else you may surprised when your next image turns out to be a burst sequence.
Page 24

23
3.1.3 Resolution
The third menu item on Page 1/4 is picture resolution:
You can set picture resolution as Large (1024 x 768 – XGA), or Small (640 x 480 –
VGA.) Press the enter key to display the Picture Resolution sub menu:
Press either the “+” or “-” keys to toggle between the
two choices. After making your selection press the
enter key to save your choice and return to the menu
page 1/4.
If you have selected Large, the information LCD will display this icon:
If you have selected small, the information LCD will display this icon:
Note: You may change resolution at any time. All subsequent images will be captured at the current
setting until you change it again. Previously stored images will not be changed or altered.
For further discussion on the topic of image resolution, refer to section 2.5.7 of this
manual.
3.1.4 Image Quality (Compression)
The fourth menu item on Page 1/4 is picture compression:
You can set picture compression as Good, Better, or Best. Press the enter key to
display the Picture Compression sub menu:
Press either the “+” or “-” keys to scroll through the
three choices. After making your selection press the
enter key to save your choice and return to the menu
page 1/4.
Note: After you select a compression setting and press enter, you will notice how the information LCD
gives you an immediate update estimating how many more images you will be able to store.
For further discussion on the topic of image quality and compression, refer to section
2.5.5 of this manual.
Page 25

24
3.1.5 Image Orientation
The first menu item on Page 2/4 is Picture Orientation:
You can set picture orientation as either Landscape
or Portrait. Press the enter key to display the Picture
Orientation sub menu:
Press either the “+” or “-” keys to toggle between the two choices. After making your
selection press the enter key to save your choice and return to the menu page 2/4.
The orientation feature is important if you wish to run a slide show presentation on the
LCD or through an NTSC monitor. If you select Landscape the camera simply takes
normal images in a normal orientation. When these landscape images are displayed
on a TV/monitor they will be oriented properly. However, a minor anomaly occurs if
you if you turn the camera and then capture images in a portrait orientation. When
you display those images, they will be oriented (rotated) sideways. They will be
rotated 90 degrees when you display them in a slide show. This is very annoying to
your audience. If, however, you tell the camera that you are going to shoot a portrait
by using this menu feature, the camera will capture the image, but then rotate it 90
degrees so that all your images will subsequently display in an upright fashion. No
more twisting heads at show time!
Note: If you use the Portrait feature the camera assumes that you will rotate it
clockwise each time. If you rotate the camera counter-clockwise, your images
will display upside down. After selecting portrait orientation, turn the camera as
shown here. Don’t forget to switch back to landscape mode when you are done
with portraits.
3.1.6 Shutter Speed
The second menu item on Page 2/4 is Shutter Speed:
You can set the shutter speed to either Auto or
manual. Press the enter key to display the Shutter
Speed sub menu:
Press either the “+” or “-” keys to toggle between the two choices. After making your
selection press the enter key to save your choice and return to the menu page 2/4.
• If you set the shutter speed to Auto the camera will
automatically determine the appropriate shutter speed
and you do not need to worry about it.
• On the other hand, if you prefer manual control for
special purposes, select Manual and you can specify
the shutter speed to any one of sixteen settings from 2
seconds to 1/8000 second. Use the “+” or “-” keys to
move the cursor to the desired setting. Press enter to
store your selection.
Page 26

25
3.1.7 Light Metering
The third menu item on Page 2/4 is Light Metering:
You can specify that the camera meter light (to determine proper exposure settings)
based upon either a Mutli-Spot or Center-Spot
scheme, or algorithm. Press the enter key to
display the Light Metering sub menu:
Press either the “+” or “-” keys to toggle between the two choices. After making your
selection press the enter key to save your choice and return to the menu page 2/4.
This feature allows you to tell the camera how you wish to have the scene sampled in
order to determine proper exposure. For most situations the Multi-Spot will work
well. The camera will use a matrix method to determine exposure based upon the
lighting conditions of several spots in the image scene. For scenes of high contrast,
however, you may wish to choose Center-Spot for more precise scene sampling.
3.1.8 Color Balance
The fourth menu item on Page 2/4 is Color Balance:
You can set the Color Balance speed to either Auto or
Daylight. Press the enter key to display the Color
Balance sub menu:
Press either the “+” or “-” keys to toggle between the two choices. After making your
selection press the enter key to save your choice and return to the menu page 2/4.
This feature allows you to tell the camera that you will be capturing images in
daylight, if that is the case. This may improve the color fidelity (correctness) and
white balance of your daylight images. The cameras processing algorithms will adjust
for daylight (lighting) conditions. If you prefer to let the camera handle these issues
automatically simply leave this setting as Auto.
Hint: Experiment with both settings to see which works best in your lighting conditions.
3.1.9 Date Stamp
The entirety of page 3/4 is devoted to the time and date
stamping of your images.
You can select whether to stamp date your images.
Press the enter key to display the Date Stamp sub
menu:
Page 27

26
Press either the “+” or “-” keys to toggle between the two choices. After making your
selection press the enter key to save your choice and return to the menu page 3/4.
If you choose Date Stamp, the specified Time & Date will be “stamped” on your
images. This will be a “permanent” mark on your images. The following sections
describe how to position and format the date stamp. If you choose None, no Time or
Date stamp will be placed upon your images.
Note: Date stamps can only be removed after the fact by using an image editing software on your PC.
3.1.9.1 Stamp Position
If you have elected to have a Date Stamp placed on your images, you
may specify where you would like those stamps to be positioned on
your images.
The second menu item on Page 3/4 is Stamp
Position. Press the enter key to display the
Stamp Position sub menu:
Press either the “+” or “-” keys to move between the four choices. After making your
selection press the enter key to save your choice and return to the menu page 3/4.
Your date stamp will be positioned according to your selection.
3.1.9.2 Stamp Format
The third menu item on Page 3/4 is Stamp Format. Press the Enter key to display the
Stamp Format sub menu:
Press either the “+” or “-” keys to move between the
three choices. After making your selection press the
enter key to save your choice and return to the menu
page 3/4. The date stamp will be formatted according to your selection.
3.1.9.3 Date and Time Setup
The final menu item on Page 3/4 is Date and Time Setup. Press the
Enter key to display the Date and Time Setup sub
menu:
Press either the “+” or “-” keys to move between
the many choices. To change a value press enter.
After making your selections navigate to “Back
Menu” and press the enter key to save your choices
and return to the menu page 3/4. Your time and
date information has been updated.
Note: The maximum value for Year is 2050.
Page 28

27
3.1.10 Folder Control
The first menu item on Page 4/4 is Folder Control.
Press the enter key to display the Folder Control sub
menu:
Create New. Using the “+” or “-” keys you may select a
folder name. Each time you press “+” or “-” a new folder
name will be suggested. Press enter to create a folder
with the suggested name.
Press DISP to exit this process and return to a blank
screen. Press menu to open the menus again.
Consider the folders you have just created to be like small photo albums on your CF
card. If you are capturing images of several subjects, you may which to sort them into
categories as you capture them.
Change Folder. From the Folder Control Menu, select
Change, and press enter. The camera will display a list of
all the directories (folders) currently available on your CF
card. The check sign indicates the current folder. Press
“+” or “-” to change folders. Press the enter key to select a
folder and then press menu to return to the menus.
3.1.11 Reset
The final menu item on Page 4/4 is Reset. Press the enter key to
display the Reset sub menu:
Press enter to reset the camera to its factory settings.
Press DISP to exit out of the Reset screen.
Note: If you elected to reset the camera:
• Quality will be “Better”
• Resolution will be “Large”
• Shutter will be “Auto”
• Color balance will be “Auto”
• Metering will be “Multi-Spot”
• Orientation will be “Landscape”
• Self-Timer will be “OFF”
Page 29

28
3.2 Exposure Value Adjustment
EV adjustment is not a menu-based adjustment. It uses the function keys.
You can adjust the V2800 exposure quickly and easily (without crunching through
menus) in the range of –3.0 EV to +3.0 EV. You may override (or bias) the auto
exposure in increments of 0.5 EV.
• If your scene appears on the LCD to bee too dark, press “+” key to increase
exposure.
• If your scene appears on the LCD to bee too light, press “-” key to decrease
exposure.
Start-up camera in CAM mode.
Press DISP to turn on the image LCD
Press “-” or “+” to change exposure
When you the press + and - keys, the image LCD will
display an EV exposure scale as shown:
In addition, the information LCD will present a numeric
EV value momentarily.
Page 30

29
Chapter 4 - PLAY Mode Functions
4.1 Play Mode - Overview
In PLAY mode the following functions are available:
1. Review your images
2. Erase images
3. Run a slide show of your images.
4. Display multiple thumbnails or lists
5. Attach Voice to images
6. Control folders of images
7. Adjust image LCD brightness
8. Update camera firmware
4.2 Reviewing Your Images - Basics
Switch to PLAY mode
Your images will display on the image LCD
Press the + and - keys to scroll forward and
backward through your stored images
Press the DISP button to change the display appearance.
Note: You can even zoom in on a displayed image by pressing the T and W zoom buttons.
4.3 Play Mode: Advanced Functions
There are three pages of Menus in PLAY mode.
Switch to PLAY mode
Press the Menu key to open the PLAY
menus
The LCD image display will display Page
1/3 of the PLAY menu. Pressing the menu
key again will present the next menu page.
Note: There must be a CF memory card in the camera to invoke the PLAY menus
Page 31

30
4.3.1 Erase
The first menu item on Page 1/3 is the Erase function:
You can erase any one image, all images, or you
may even format the CF card. Press the Enter key
to display the Erasure sub menu:
Press either the “+” or “-” keys to scroll through the
three choices. After making your selection press the enter key to move to the
appropriate sub menu or sub screen.
If you selected Erase One Picture you will see:
Press the enter key to erase the image currently displayed
or press the “+” or “-” keys to scroll through your images
to find those you wish to erase. Press DISP to
completely exit from the erase functions.
If you selected Erase All you will see:
Press the enter key to erase all images currently on the
CF card or press DISP to completely exit from the erase
functions.
If you selected Card Format you will see:
Press the enter key to format the CF card or press DISP
to completely exit from the erase functions.
Note: There is a difference between Erase All and Card Format. In both cases, all images will be
erased. If you format the CF card, however, all data on the card will be erased including folders and
directories, and any other data file on the CF card, even if it is not associated with the camera. CF
cards can be used to store any computer files including word documents, spreadsheets, etc. Formatting
will eradicate all CF card data.
4.3.2 Display Style
The second menu item on Page 1/3 is the Display Style:
You can specify how you would like your images displayed.
Press either the “+” or “-” keys to scroll through the choices.
You may choose to display four thumbnail images, nine
thumbnails, or just a list of the images on the CF card that indicates image number,
date and time. After making your selection press the enter key to initiate the new
display style and then press DISP three times to see your chosen display style.
Page 32

31
4.3.3 Attach Voice
The third menu item on Page 1/3 is Attach Voice:
Using this feature in PLAY mode, you can attach voice
(audio) to an image after you have already captured and
stored the image. Press enter to display the Attach Voice
sub screen:
Press the enter key to begin recording voice that will be
“attached” to the image currently displayed or press the
“+” or “-” keys to scroll through your images to find the
image to which you wish to add an audio attachment.
To begin recording press and hold the enter key. The word “Recording” will appear
on the image display. When you are finished recording, release the enter key. The
maximum recording time is 10 seconds.
The image to which you have just attached voice will now bear a sound icon:
Note: To retrieve your sound clips you must either connect the camera to your PC via USB, use a card
reader to read the CF card directly. Using a serial data Twain connection, there is no mechanism for
audio file transfer.
4.3.4 Mark
The fourth menu item on Page 1/3 is Mark:
There are two reasons to Mark an image.
1. For protection against erasure
2. To designate it for inclusion (or exclusion) from a
slide show.
Press either the “+” or “-” keys to select Erase Protect or
Slide show. Press enter key to go to the subscreen:
Press the enter key to mark the image currently displayed or
press the “+” or “-” keys to scroll through your images to
find those you wish to mark. Press DISP to completely exit
from the Mark functions.
Images that are Erase Protected will bear this icon:
Images that are marked for slide shows will bear the icon:
Page 33

32
4.3.5 Slide Show
The first menu item on Page 2/3 is the Slide Show function:
Press enter to display the slide show sub menu:
Press either the “+” or “-” keys to select All Pictures
or Marked Pictures. Press enter again to launch a slide show consisting of either
• All images on the CF card
• Just those images which are marked (See section 4.3.4)
The camera will display images as a slide show. Press the menu key to stop the show.
Note: Use the AC adapter for running slide shows. If you are operating the camera on batteries, the
automatic power-off feature will limit your slide show to one minute. At which time the camera will go
into sleep mode. Using the AC adapter disengages the auto-power off feature.
4.3.6 Slide Show Interval/Period
The second menu item on Page 2/3 is the Slide Show Period:
This feature allows you to specify how long each slide
will be displayed in a slide show. Press enter to go to the
sub screen:
Press either the “+” or “-” keys to move the selection bar
to 3, 5, 7, 10, 15, 30, or 60 seconds:
Press enter to confirm your choice and return to the menu Page 2/3. Or, press DISP to
cancel your changes and exit the interval setup process.
4.3.7 Folder Control
The third menu item on Page 3/3 is Folder Control:
Press the enter key to display the Folder Control sub menu:
Notice how Folder Control in PLAY is almost identical
to Folder Control in CAM mode. PLAY mode offers
you the additional ability to erase a folder. (See
Section 3.1.1)
Use the “+” or “-” keys to select Create New, Erase, or Change.
Page 34

33
Create New. Using the “+” or “-” keys you may select a
folder name. Each time you press “+” or “-” a new folder
name will be suggested. Press enter to create a folder with
the suggested name.
Press DISP to exit this process and return to menu Page 2/3.
Consider the folders you have just created to be like small
photo albums on your CF card. If you are capturing images of several subjects, you
may wish to sort them into categories as you capture them.
Change Folder. From the Folder Control Menu, select
Change, and press enter. The camera will display a list of all
the directories (folders) currently available on your CF card.
The check sign indicates the current folder. Press “+” or “-” to
change folders. Press the enter key to select a folder and then
press the Menu key to return to the menu.
Erase. From the Folder Control Menu, select Erase, and press
enter. The camera will display a list of all the directories
(folders) currently available on your CF card. The check sign
indicates the current folder. Press “+” or “-” to change folders.
Press Enter key to highlight and select a folder and then press
the Menu key to return to the menu.
Note: There is no Recycler bin! Once you erase a folder, the folder and all of it’s contents will be
erased. If your V2800 is connected to your PC by USB you can do all of these functions through
Windows Explorer or My Computer. The Windows graphical user interface may be a little easier to
navigate.
4.3.8 LCD Brightness
The fourth menu item on Page 2/3 is LCD Brightness:
This feature allows you to adjust the brightness of the image LCD. Press enter to go
to the sub screen:
Press either the “+” or “-” keys to move the selection
bar to the left or right to decrease or increase LCD
brightness. When finished, press enter to confirm your
setting and return to the menu.
Or, press DISP to cancel your changes and exit the LCD
adjustment.
Page 35

34
4.3.9 Firmware Update
The first menu item on Page 3/3 is Firmware (FW) Update:
If camera firmware updates are released in the future, it is possible to load newer
firmware to the camera from the CF card.
Press enter to display the Firmware update sub screen:
If the appropriate firmware is present on the CF card, you
would press the Telephoto (T) and Wide (W) keys
simultaneously, and the camera will reload its operating
system firmware
Press DISP to exit the Update process and return to image display.
Note: You can render your camera inoperable if this procedure is done incorrectly. Attempting to load
invalid code can also destroy the camera. Your warranty does not cover inadvertent destruction of the
camera by failed updates.
Note: If you have the appropriate firmware, make sure the camera is being operated on AC power with
no chance of power interruption. Loss of power during a firmware reload will result in an incomplete
reload and subsequent camera disfunction.
4.3.10 About
The second menu item on Page 3/3 is the About screen:
This is an information-only screen that tells you which version of firmware is running
in your V2800.
Press enter, and a sub screen will display the current
Firmware Version.
Press DISP to exit and return to image display.
Page 36

35
Chapter 5 - Video Output
The V2800 will output NTSC video to any video device that accepts a common
NTSC input. You can use the V2800 with a TV/Monitor or a VCR. If the V2800 is
in CAM mode you see live video on the Monitor. If the V2800 is in PLAY mode
whatever appears on the image LCD will display on the remote monitor as well. You
can playback images manually or you can use the slide show feature.
5.1 Connecting the V2800 to a Video Device
• Turn off the camera
• Using the video cable provided with the V2800 plug the stereo mini-jack into the
V2800 in the “Video Out” jack. This is the port just below the USB port. The
video jack should have a yellow ring to distinguish it from the serial data port.
• Plug the other end of the video cable into a video-input jack (RCA type) on your
monitor or other video device.
• Turn on the camera, to either CAM or PLAY mode. (If you switch to CAM mode,
you must also turn on the image Display, by pressing the DISP button on the
camera)
• Turn on your video device or monitor
• On your monitor, select the appropriate video channel (Video 1, Video 2, etc.)
Refer to the owner’s manual for your video equipment for details.
• As a rule, whatever you see on the camera’s image LCD will be displayed (or
recorded) on your video device.
• Switch to PLAY mode and try a slide show. (See section 4.3.5)
Page 37

36
Chapter 6 – Serial Connection using the Twain Driver
6.1 Summary of Camera-to-PC Connectivity: Options
There are three methods by which you may move images from your V2800 camera to
your PC. The following discussion is intended to sort out some of the confusion in
selecting which method is best and easiest for you. This balance of this chapter
focuses upon the first method – Serial data connection using the Twain driver.
Serial Connection –
Connecting a digital camera to a PC using a serial data connection was the first
method used by digital camera manufacturers to download images to a PC. It remains
the most commonly used method. It can also be the most frustrating aspect of owning
a digital camera. Connecting a digital camera to a PC using a serial data connection is
perhaps the most challenging (sometimes-frustrating) aspects of consumer digital
imaging today and is a leading cause of product returns.
Note: If your camera and PC will not connect then your serial ports must be examined. You can
inspect your computers ports using the device Manager Tab of the Windows (Start, Settings, Control
Panel, System, Device Manager.) For assistance in enabling or setting your ports, consult your PC
system manual or manufacturer. In some cases, changes may need to be made to your System BIOS.
Please consult a knowledgeable PC expert before attempting any such changes or modifications.
Note: Serial data connections are sometimes referred to as RS-232. Serial ports are often called COM
ports in your system BIOS and operating system.
Why serial connections? Serial connections were (and continue to be) used simply
because virtually every PC in the world has a least one, and often, two serial ports.
Whether or not these serial ports are working, enabled, and free (from other devices)
is where problems arise. If your serial ports are working and free then you will most
likely have no problems. The advantage to serial connectivity is that there is no added
cost or need for any elaborate accessories, other than perhaps a simple adapter. Serial
connections are disadvantaged by interruptions, often by other software (TSRs,
communications programs, etc.) or even by electronic noise. Under all circumstances,
serial connections are relatively slow, being limited in data transfer rate.
USB Connection –
In response to serial data connection problems, digital cameras are moving to
Universal Serial Bus (USB) connections. The V2800 supports USB for PCs. The
advantages to USB are: the elimination of port conflicts (no more IRQ issues), highspeed data transfer, hot-swap capability, reliable connections and transfers, universal
cabling, the potential to connect to iMAC platforms, and other benefits.
The disadvantage to USB is the statistical fact that not every PC has USB. USB
began shipping on some PCs in 1997 and virtually all by late 1998. Implementation
on laptop and notebook computers occurred even later. Furthermore, Windows 98 is
the first operating system to fully integrate USB functionality. Windows 95 users
may or may not be able to use USB depending upon which version of Windows 95
you have. Win95 users must have version OSR2 with the USB supplement 2.1.
Page 38

37
Compact Flash Reader -
A simple by-pass to all of the above is a compact flash (CF) card reader. These are
small peripheral devices that connect to your PC by either the parallel port, or USB
port. Available, but less common, are internal CF-readers mounted inside your PC
next to your floppy drive or on a circuit card. CF Readers are available at a
reasonable cost from numerous third-part vendors. Once installed they offer a simple
and universal solution, allowing you to read images and data directly from any CF
card. These readers will allow you to read any card, from any camera - not just the
V2800. They are very universal and easy to use. If you have a CF reader you do not
need to install any V2800 drivers in order to read the V2800 images from a CF card.
6.2 Serial/Twain Connectivity
There are three steps to making a serial/Twain connection to your PC.
1. You must establish a physical connection - connect the serial data cable
2. Install the Twain driver software
3. Install a Twain-compliant application software
6.2.1 Physical Connection (Serial)
Plug the included serial-data cable into an available 9-pin COM port on the back of
your PC. COM (Serial) ports are located at the back of your desktop PC or notebook.
Look for a connector that is D-shaped, with two rows of (male) pins, with a total of
nine pins. Most desktop computers have two COM ports, whereas notebook
computers usually have just one COM connector. While most desktops have two
serial ports, many times your mouse, or possibly an external modem will occupy one
of them. It is further possible that your desktop computer may have one 9-pin male
serial connector, and one 25-pin male serial connector. If this is the case, you may
purchase a 25F to 9M at a local electronics or computer store in order to use the 25pin.connector.
Note: Do not purchase a “null modem” to use as a 25 to 9 adapter.
After connecting the cable to your PC connect the other end to the data port on your
ViviCam 2800, and connect the molded stereo mini-jack plug into the camera. Plug it
into the port marked “digital”. This is the second port from the bottom. It should
have a black collar around the hole.
Page 39

38
6.2.2 Twain Driver - Defined
There are two pieces of software required to connect your digital camera to your PC
using serial/Twain. The most fundamental component of software is called a
“driver”. A driver is a software module that tells your computer, and its applications,
about the specific nature of your camera (hardware) device. In the case of a digital
camera, the driver has a User Interface (DUI) that helps you to download images from
your camera, and also make adjustments and changes to the camera itself.
The driver included with the V2800 is a “Twain” driver. Twain is an industry
communication standard (protocol) by which hardware developers (camera
companies, like Vivitar Corporation) and software application developers have agreed
to in order to ensure universal hardware/software compatibility and inter-operability.
What this means to the user is that the ViviCam 2800, being Twain-compliant, will
“talk” to any virtually any software application (an image editing application, for
example) which is also Twain compliant.
The second piece of software you will need to download your images is an image
editing application. This must be a Twain-compliant application, of course. To
determine if your favorite imaging software is Twain-compliant consult the manual,
the software developer, or review the help files and look for keywords such as
“Twain”, “Get”, and “Acquire”.
Depending upon the manufacturing circumstances of your particular V2800 camera
the Twain drivers will be either on a diskette, or on a CD-ROM together with an
image editing software.
Summary –
• TWAIN driver. Lets you download pictures from a Twain-compliant device
straight into your computer using a serial data connection.
• Twain-compliant photo/image editing software. A software application that
allows you to quickly and easily download, save, and edit (touch-up) an image
captured with your camera.
6.2.3 Installing the Twain Driver and Application
6.2.3.1 Step 1: Examine your COM ports
You can make the installation process successful by taking a look at your COM ports
to determine which ports are already being used, and which one may be available for
you to use with your camera. If you do this before installing the Twain driver you can
avoid COM port conflicts.
• From the Windows 95/98 task bar click on Start, Settings, Control Panel. Double
click on the “System” icon. A dialog box will appear titled “System Properties”.
Click on the “Device Manager” tab. Look for a small icon labeled “Ports (COM
Page 40

39
and LPT)”. Click once on the “+” mark to the immediate left of ports icon. This
will display all COM and LPT ports available on your PC. Make note of the
COM ports.
• While in the Device Manager tab, also look at the information for your mouse. If
you have a PS/2 mouse you will not face a potential conflict between your mouse
and camera. If you have a serial mouse, try to determine which COM port the
mouse is using. Make note of the mouse COM port, if applicable. Most serial
mice use COM 1.
• While in the Device Manager tab locate your modem. Click on the “+” sign to
open the modem description. Double click on the modem description to
determine which COM port is used by your modem and make note of this.
• You may attempt to derive the same information in another way. Click on Start,
Settings, Control Panel. Look for an icon labeled “Modems”. Double click on the
Modems icon to open the “Modem Properties” dialog box. Click on the tab
labeled “Diagnostics”. This may give you a very good overview of the utilization
of your system COM ports.
(Take notice if there are any Red “X” or yellow exclamation “!” marks in this area.
These are indications of port problems. Please consult your system manufacturer or
PC technician for assistance.)
System Properties/Device Manager.
Notice in this example, there are two
physical COM ports, COM1 and
COM3. Note also, this example has a
PS/2 mouse. A PS/2 mouse poses no
conflict because it does not use a COM
port, unlike a serial-port mouse.
Modem Properties/Diagnostics. In
this example the modem uses COM2.
There are no devices on either COM1
or COM3. Therefore COM1 and
COM3 may be available for the
V2800 to use.
Page 41

40
6.2.3.2 Step 2: Installing the Twain Driver
Insert the Twain driver disk one, or Driver CD, into your floppy disk or CD ROM
drive. (Drivers may ship on either CD or floppy disk.) From the Windows 95/98-task
bar select Start, Run, type a:\setup, Enter (or OK). (For CD-ROM use the drive letter
for your CD, which is often letter d.) You will see a dialog box with two questions: 1)
Which COM port would you like to use, and 2) what baud rate do you prefer.
Using the pull-down menu, select the
COM port based upon your
examination conducted in step 1.
Select a Baud rate. A higher baud rate
will result in faster image transfers, but
with the risk of connection errors and
disruptions. If you have a relatively
new computer try using a rate of
115,200. 57,600 bps is slower, but
often represents a good compromise
between reliability and speed.
Note: If you have selected an inappropriate COM port, or a baud rate that is not reliable, you can
always change the settings after the driver has been installed by either reinstalling the driver or using
the controls within the driver user interface. (Refer to Sections 6.2.5.7, and 6.2.5.6)
Click next and follow any screen instructions, inserting disk two when prompted.
When the installation is complete you will get a message to that effect.
Note: If for some reason you wish to uninstall the V2800 driver, go to the Win 95/98 Task bar and
click Start, Settings, Control Panel. Double-Click on Add/Remove Programs. From the
Install/Uninstall tab, look for ViviCam 2800 Twain Driver. Select ViviCam 2800 and click on
Add/Remove.
6.2.3.3 Step 3: Installing the Application Software
U-Lead Photo Express Version 2.0 Special Edition. If you wish to install the
included Twain-compliant software application, insert the CD-ROM into your CDROM drive. If your computer is set to autorun, the CD will start automatically. If it
does not run automatically, go to the Windows 95/98 task bar and click on Start, Run,
type “d:\setup.exe”, and press Enter (or OK). (If your CD drive is identified by a
drive letter other than d:, use that letter instead.) Follow the screen instructions to
complete the installation.
Note: Your computer must be setup to display at least 16-bit color. This setting is also called 65,000
colors, or High Color. To check your display settings click on Start, Settings, Control Panel. Doubleclick on the “Display” icon to bring up a dialog box entitled “Display Properties”. Click on the
Settings tab. In the lower left-hand corner of this dialog box look for a sub box, titled “Colors.” The
pull down menu will enumerate the options available on your PC. There must be a setting for High
Color (16 bit) or better. In the lower right hand side of this same dialog box there is another sub box
called “Screen area”. You must be able to adjust your screen area to 800 by 600 pixels using the slider
bar, without loosing the color setting. You must be able to have the combination of 16 bit and 800 x
600 in order to install Photo Express 2.0 SE. If you cannot achieve this combination, you must use
another Twain application.
Page 42

41
6.2.4 Image Transfer by Serial/Twain
This section describes the Twain acquisition process. Assuming the serial data cable
is in place, the Twain driver installed, and a Twain application is installed you are now
ready to acquire images and transfer them from the camera to your PC.
There is no standard method or set of steps for Twain acquisition by Twain
applications. Typically most Twain APs involve the selection of a source, followed
by the acquisition of images. First, start the application followed by:
1. File (or Edit), Acquire, Select Source….then select the ViviCam 2800
2. File (or Edit), Acquire, Image
Step one (Source Selection) only needs to be performed once, or whenever you
change your source. (Perhaps you may alternate between a camera and a scanner.)
Step two is performed every time you acquire images from your camera.
The Twain acquisition process is a method by which the host application “calls” upon
the Twain “data source” for the specific device (camera or scanner) in use. The
selected Twain device driver responds to the call and control of the camera is handed
over to the Twain driver. What you will see next is the Twain Driver User Interface
(DUI). Regardless of which application you use, after you click on “Acquire” the
ViviCam 2800 DUI appears and from that point forward, all operations are done
through the DUI.
U-Lead Photo Express Version 2.0 SE is included with the V2800. The following
explanation will guide you through the acquisition to get to the DUI. Start Photo
Express by double-clicking the desktop icon, or go to the Win95/98 task bar and click
on Start, Programs, click on the folder “U-Lead Photo Express 2.0 SE”, and then click
on the Icon, “U-Lead Photo Express 2.0 SE”.
Start Photo
Express.
1. Click on the
Camera Icon.
2. Verify that
the V2800 is
the currently
selected source.
If not, use the
pull-down
menu to select
the ViviCam
2800.
3. Click on
“View Pictures
in the Camera”
Page 43

42
6.2.5 The V2800 Twain Driver User Interface (DUI)
129
876
5
4
3
131214
Next, you are presented the V2800 Twain DUI. This UI will be the same regardless
of the Twain imaging application you are using. This section will explain some of the
features of the V2800 DUI. There are also help files that explain the driver interface
in greater detail. To access theV2800 driver help files go to the Win95/98 task bar
and click on Start, Programs, ViviCam 2800, Twain driver Help.
Note: It is highly recommended that you use the AC power adapter while downloading images. This
prevents battery drain, and it also precludes auto-power off after one minute.
Note: Usually the V2800 auto-powers off after one minute. When using AC the camera stays on
indefinitely. When using AC and downloading images, however, the camera will recognize the fact
that you have downloaded all your images and then it will auto-power off.
11
10
From the V2800 DUI you perform many functions including:
1. Select which camera folder (album) you wish to look at
2. Preview images in the camera, called thumbnails
3. Obtain some information about an image
4. Run a miniature slide show on your PC
5. Control the camera (remotely) from your PC
6. Configure the camera
7. Work with images in the camera or those already downloaded to a disk
8. Display thumbnails of all the images in the camera (the current folder)
9. Select all images/thumbnails
10. Deselect all images/thumbnails
15
16
Page 44

43
11. Save (copy) the selected images to disk as a JPG file
12. Save (copy) the the selected images and their folder to disk
13. Delete the selected images from the camera
14. Delete the selected folders (and images) from the camera
15. Acquire (transfer) the selected images to the Twain application
16. Close the V2800 DUI
Many of these features are explained in greater detail in the following paragraphs.
6.2.5.1 Folders
The V2800 allows you to create multiple folders inside the camera. Think of these as
photo albums inside your camera. This allows you to sort and organize your images
as you take them. For example, you could create one folder (album) and use it for all
your work-related images. You could create a second folder to store images of a trip
you are on. Perhaps you may loan the camera to a friend. You can create a folder for
your friends images, and so forth. If there are multiple folders in the camera, this
feature simply allows you to select which folder you wish to review.
Note: For more information about folders refer to sections 3.1.10 and 4.3.7.
6.2.5.2 Preview Images in the Camera (Thumbnails)
The DUI opens up showing just a blank spot for every image in the camera. This is
done simply to make the Twain connection quickly. To view any one image, click on
the image square. To see all the thumbnails click on the icon to view all thumbnails
(item 8).
6.2.5.3 Image Info
To learn about a particular image select the image
and then touch on the info icon to reveal file format,
size, and creation time & date.
6.2.5.4 Slide Show
You can run a slide show on your PC screen using
the images in the camera. Select the images you
wish to include in your slide show and click on the slide
show icon. Using the slider, adjust the interval between
slides. To have the slide show run continuously, check the
“loop” box. Click on “close” to end the slide show.
Page 45

44
6.2.5.5 Remote Camera Control
You can operate the camera from your PC in a remote control fashion by
clicking on the remote control icon. Then you will see the remote control
dialog box. Remote control is good for studio or lab work. You will see a sequence
of live images at a rate
dependent upon the baud rate
you are using.
You may make adjustments to
image quality and size, image
orientation, select still or burst
mode, set the flash mode,
specify the shutter speed. To
capture an image click on
“Shoot”.
6.2.5.6 Camera Configuration
You may configure your camera by
clicking on the configuration icon. Doing
so will open the Configuration dialog box. There
are four tabs.
The account tab allows you to specify the
current folder, image size and quality, and image
orientation for the camera. You may also add
notational information to the folder.
The serial tab is important. It allows you to specify or
change your COM port and baud rate. If you find that image
transfers are too slow, increase the rate. If you are having
communication disruptions, try slowing the rate. If you did
not know your COM port at the time of installation you may
try another.
The Camera tab tells you about the firmware in your
camera. From here you may make adjustments to flash
mode, shutter speed, slide period, LCD brightness, and
also the auto-power off interval.
The Date & Time tab allows you to set
the camera date and time. You can even
synchronize your cameras clock to that
of your PC.
Page 46

45
6.2.5.7 Image Source – Camera or Disk
From the V2800 DUI you may work with images currently stored in the camera, or
you may work with images that you have already transferred to your PC. When the
V2800 Twain driver initially started you were presented with the Picture Source
screen:
The “Source” button will be
pressed (dark) next to the
selection you made when you
entered the DUI.
You may change from camera
to disk at any time
Hint: If you have selected the wrong COM port and cannot connect to the camera, enter the DUI by
selecting “View Pictures From PC”. Then go to the Camera Configuration button (Refer to section
6.2.5.6) and you may change your COM port selections. This is easier and faster than reinstalling the
Twain Driver.
Note for USB users: You can use the V2800 Twain DUI even if you are using USB. The V2800 is a
USB storage-class device. This means that the CF memory card inside the V2800 is viewed as if it is a
removable disk drive. Try this: Connect your V2800 by USB. Open the Twain DUI by selecting
“View Pictures from PC” and then click on the disk icon in the Source square. Then navigate to the CF
disk in your camera. It will be assigned a drive letter such as e: or f:
6.2.5.8 Display All Thumbnails
To display all the thumbnails of the images in the camera (the current folder),
click on the Display All icon.
6.2.5.9 Select All Thumbnails
To select all the thumbnails of the images in the camera (the current folder),
click on the Select All icon. Alternatively, you may pick and choose individual
images by holding down the Shift and Control keys as you select images. Use shift to
make conterminous selections and Control to make specific selections.
6.2.5.10 Deselect All Thumbnails
To deselect all the thumbnails of the images you have previously selected,
click on the Deselect All icon.
6.2.5.11 Save Images as Files
To save your images as JPG image files, select the thumbnails of interest and
click on the Copy Image(s) to disk icon. This will save the images to any
location you specify in the Save As dialog box. When you save images to you PC
you are actually making a copy. The original image still resides, untouched, in the
camera.
Page 47

46
The “Save To….” dialog box is very important. It allows
you to specify exactly where you wish to store your
images. You may save your images to your hard drive, a
floppy drive, a network drive, a zip drive, a CF reader, or
any other storage device that appears in the drive box.
Note the path statement in the lower information window.
Make note of the path (location) where your images are
being saved so that you can easily find then at a later time.
6.2.5.12 Save Images as a Folder of Files
To save an entire folder of images as JPG image files together in a folder, click
on the Copy Image(s) with Folder icon. This will save all of the images in the
specified folder (as well as the folder itself) to any location you specify in the Save As
dialog box. The folder name becomes a directory name on your PC. When you save
a folder of images to you PC you are actually making a copy. The original images
and folder still reside, untouched, in the camera.
6.2.5.13 Deleting Images from the Camera
You may delete a single image, or multiple images, from the CF card inside the
camera by first selecting those images and then clicking on the Delete Selected
Images icon. If you have already saved images to your PC, only the images in the
camera will be deleted, not the ones saved to your PC.
6.2.5.14 Deleting a Folder of Images from the Camera
You may delete an entire folder of images and the folder itself from the CF
card inside the camera by first selecting the folder then clicking on the Delete
Selected Folder icon. If you have already saved images to your PC, only the images
and folder in the camera will be deleted, not the ones saved to your PC.
6.2.5.15 Acquiring Images from the Camera
The Acquire icon is very different from Save. When you acquire an
image, the selected image(s) will be downloaded from the camera (or
disk) and transferred (delivered) to the host Twain Application. As soon as the
selected images have been acquired by the host application, the V2800 DUI closes
and disappears. You are now back in the Twain application. You may edit, modify, or
save your image according to the rules and functions of the host application.
Note: Some Twain applications only allow the acquisition of one image at a time. Most Twain
applications allow multiple image transfers.
6.2.5.16 Closing the V2800 Twain DUI
To exit the V2800 Twain DUI and return to the host application, click the close icon.
Page 48

47
Chapter 7 - USB Driver
7.1 USB Connectivity –
The V2800 supports USB for Windows 98 and limited Windows 95 USB - capable
PCs. Win95 users must have version OSR2 with the USB supplement 2.1. Refer to
section 6.1 for a discussion of the merits of connecting by USB.
There are five steps to connecting your V2800 to your PC by USB:
4. Determine your version of Windows
5. Determine if USB is enabled on your PC
6. Establish a physical connection - connect the USB cable
7. Install the appropriate USB driver
8. Install a Twain-compliant application software
7.1.1 Determine your Version of Windows
From the Win95/98 Task Bar click on Start, Settings, Control Panel. Double-Click on
the System icon to bring up the Systems Properties dialog box.
Take note of the version
description and refer to the
following table
If your version is - Your Next step is -
Windows 95
4.00.950
Windows 95
4.00.950a
Windows 95
4.00.950 B or higher
Windows 98
4.10.1998
You have the original version of Windows 95, which does not
support USB. Use either the Twain/Serial connection or a CF
reader. Do not attempt to install the USB camera driver.
You have the original version of Windows 95 with Service Pack A,
which does not support USB. Use either the Twain/Serial
connection or a CF reader. Do not attempt to install the USB
camera driver.
You have an OSR version of Windows 95, which may support
USB. Check to see if you have USB supplement 2.1. Refer to the
note immediately following this table.
You have Windows 98 with built-in USB support. Click on the
Device Manager Tab to see if USB is enabled. Go to section 7.1.2
Page 49

48
Special note for Windows 95B OSR 2.0 users. The fact that you have OSR 2.0 is a
necessary but not a sufficient requirement for USB. You must also have the Windows
95 USB (OSR 2.1) supplement. To see if you have this supplement, perform the
following check:
From the Win 95 Task Bar click on Start, Settings, Control Panel. Double click on
the icon “Add/Remove Programs”. The Add/Remove Programs Properties dialog box
will appear:
Scroll down the alphabetical
listing of the registered programs
and applications on your PC.
Look for the USB supplement to
OSR2.
Click Cancel. We are not adding
or removing anything in this
procedure. We are just using the
Add/Remove function as a
convenient way to determine if
your PC has the USB
supplement.
If you do not have the OSR USB supplement, do not install the V2800 USB driver.
Consult your system manufacturer or PC technician to determine how you may locate
this update. (usbsupp.exe)
Page 50

49
7.1.2 Determine if USB is Enabled on your PC
The physical presence of a USB port is not necessarily a guarantee that it has been
enabled or that it is functional. You must have the proper Windows version and your
system BIOS must be set so that USB is enabled.
From the Win95/98 Task Bar click on Start, Settings, Control Panel. Double-Click on
the System icon to bring up the Systems Properties dialog box. Then click on the
Device Manager tab.
Towards the bottom of the device list
there must be a USB controller. Click
on the “+” to expand upon the USB
controller definition to ensure the
USB controller and root hub are
present.
If your USB setup looks complete,
proceed to install the USB camera
driver. If these USB components are
not present, please consult your
system manufacturer. Check to see
that USB is enabled in your BIOS.
(Take notice if there are any Red “X” or yellow exclamation “!” marks in this area.
These are indications of port problems. Please consult your system manufacturer or
PC technician for assistance.)
7.1.3 Connect the USB cable
Plug the included USB cable into a USB port on the back of your PC. USB ports are
located at the back of your desktop PC. Notebook computers may have a USB port
on the side. If there are two ports, either one should work.
Make sure the V2800 is turned OFF.
After connecting the USB cable to your
PC connect the other end to the USB port
on your ViviCam 2800. Plug into the
distinctive “D” shaped port labelled
“USB”. This is the top port.
Page 51

50
7.1.4 Installing the USB Driver – Step by Step
If you have determined that your Windows 95/98 PC is USB enabled then you are
ready to install the V2800 USB driver. Follow the installation steps outlined in this
chapter. USB is implemented differently in Windows 95 and 98. Therefore, there are
two distinctly different drivers, one for Win95 and one for Win98.
Step 1: Setup all your hardware -
1. Turn your V2800 camera off
2. Plug the V2800 AC adapter into an electrical outlet and the camera
3. Connect USB cable between PC and camera
4. Power up your PC
Step 2: Turn on the Camera, to Play Mode -
This is the true test of your USB functionality. If your USB subsystem is functioning
correctly, you will be a quick volley of message boxes about an unknown device. (If
there is no activity, do not proceed with the USB driver installation. Review your PC
and USB ports.)
Step 3: Add New Hardware Wizard –
Step 4: Display a List of Drivers –
If you see this screen you are on the right
track.
Click Next.
Select the second choice (radio button).
Click Next.
Page 52

51
Step 5: Specify the Type of Device You are Installing –
Scroll down the list of devices and
highlight (click on) “System Devices”
The V2800 is actually considered a system
device due to the nature of its architecture.
Click Next.
Step 6: Select Manufacturer…Have Disk
When presented
with the dialog box
asking you to
specify the
manufacturer, click
on “Have Disk”.
Then you will see
the “Install from
Disk” dialog box.
Insert the USB
driver disk.
Click Browse.
Note: If your drivers came on a CD-ROM perform these procedures, browsing to your CD drive,
instead of the floppy disk drive.
Step 7: Select the Correct Information (inf) file for either Win 95 or Win98 –
Win 95 users: double click
your folder. Then click OK.
Win 98 users: double click
your folder. Then click OK.
Note: If your drivers came on a CD-ROM perform these procedures, pointing to your CD drive,
instead of the floppy disk drive.
Page 53

52
Step 8: Follow the Screen Instructions -
Step 9: Detection of the V2800 USB chipset –
At this point the installation process has
correctly identified the chipset within the
V2800 as an NEC USB Digital Still
Camera controller. (NEC supplies the
USB chipset for the V2800.)
Click Next.
This is the path for the files required
in this step. (Windows 98 shown.)
Click on OK.
Step 10: Chipset Device Driver is Installed –
The device driver has been located and
Windows is ready to install it. (Windows 98
shown.)
Click Next
Step 11: Windows needs to find another file -
If the next file cannot be found, click on
browse, and then click on your drive letter
(as shown below….a: for floppy drives, d:
for CD-ROM) Then Click OK.
Page 54

53
Step 12: USB Driver Installation is Complete -
Windows will build a driver database
and you will see a number of message
screens that culminate with this screen.
Windows Device Manager will refer to
your V2800 by the internal chipset, the
NEC, not by the ViviCam 2800 model
name.
Click Finish.
Step 13: Verify the Installation –
The monochrome information display
on the V2800 camera should display
“USb”.
While the camera and PC are still
connected and powered, go to the
Win95/98 Task Bar and click on Start,
Settings, Control Panel. Double-click
on System. Click on the Device
Manager tab. When you expand the
USB listing, the NEC USB DSC device
should appear, as shown on this screen.
Try plugging and unplugging the
V2800 while observing the Device
Manager tab. The NEC entry will
appear and disappear shortly after each
connection and disconnection. This is called hot-swapping, a key feature of USB.
Step 14: My Computer –
The V2800 is a USB storage-class
device. This means that your PC
“thinks” your camera is a removable
disk. With the camera connected and
powered, go to the Windows desktop
and double-click on My Computer.
Windows recognizes your camera and
has even assigned it a drive letter.
Page 55

54
Step 15: Your Camera as a Storage Device –
From this point you may regard your
camera as if it were another hard drive,
or a floppy disk. You can perform any
common file functions including Cut,
Paste, Drag-and Drop, Share, Format,
Create/Delete folders, etc.
The V2800 is so versatile, you may
store any type of file on the CF card,
including word documents, spread
sheets, and image files. The V2800 will
ignore any materials or files that are not
generated by the camera itself. Keep in mind that storing files and unrelated data will
consume space on the CF card, and thereby limit the number of images you can store.
The V2800 USB interface has one restriction, however. Do not attempt to connect the
V2800 by USB and also by Twain/Serial simultaneously. This will generate a conflict
and cause your system to lock-up or become unstable.
Page 56

55
Chapter 8 - General Notes
8.1 Precautionary Warnings
• Do not use this camera if it is emitting smoke, is unusually hot to the touch, is
emitting any unusual odor or noise, or is in any other abnormal state. Use of the
camera in any of these situations may cause a fire or electric shock. If any of these
conditions occur, stop using the camera immediately, turn the camera off, and then
disconnect the power source (batteries or AC power adapter). (If you are using the
AC power adapter, unplug the adapter from the AC power outlet after you have
disconnected the camera.) After checking that smoke is no longer being emitted,
contact your dealer or your local authorized service facility and request repairs.
Never attempt to repair this camera yourself, as this is dangerous.
• Do not use the camera if any water has entered the camera. Switch the camera off,
and then disconnect the power source (batteries or AC power adapter). (If you are
using the AC power adapter, unplug the adapter from the AC power outlet after
you have disconnected the camera.) Then contact your dealer or your local
authorized service facility. Do not continue to use the camera as this may cause a
fire or electric shock.
• Do not use the camera if any foreign objects have entered the camera. Turn the
camera off, and then disconnect the power source (batteries or AC power adapter).
(If you are using the AC power adapter, unplug the adapter from the AC power
outlet after you have disconnected the camera.) Then contact your dealer or your
local authorized service facility. Do not continue to use the camera as this may
cause a fire or electric shock.
• If the camera has been dropped or the camera case has been damaged, switch the
camera off, and then disconnect the power source (batteries or AC power adapter).
(If you are using the AC power adapter, unplug the adapter from the AC power
outlet after you have disconnected the camera.) Then contact your dealer or your
local authorized service facility. Do not continue to use the camera as this may
cause a fire or electric shock.
• Do not place the camera in unstable locations such as on a wobbly table or sloping
surface where the camera may fall or tip over and cause injury.
• Take care that the camera is not exposed to moisture, and that water does not get
into the camera. Take particular care when it is raining or snowing or when you
are using the camera at the beach or near water. Water in the camera may cause a
fire or electric shock.
• Do not insert or drop metallic or inflammable foreign objects into the camera
through access points such as the Compact Flash card slot. This may cause a fire
or electric shock.
• Do not attempt to modify this camera. This may cause a fire or electric shock.
Page 57

56
• Do not remove the camera casing. This may cause an electric shock. Your dealer
or local authorized service facility should carry out internal inspection,
maintenance and repairs.
• Do not use this camera in the bathroom or near water, especially with the AC
adapter. This may cause a fire or electric shock.
• Do not touch the power plug during a thunderstorm if you are using the AC power
adapter. This may cause an electric shock.
• Never use this camera, look through the viewfinder, or watch the LCD (liquid
crystal display) while you are operating a moving car, motorcycle, or bicycle.
This may cause a traffic accident.
• Do not attempt to charge standard alkaline batteries. This may cause the battery to
split or leak causing fire or injury.
• Do not carry or store a battery with objects such as metal pens, necklaces, coins or
hairpins. This could short-circuit the positive and negative poles of the battery.
This could cause the battery to split or leak, resulting in fire or injury.
• Do not heat, or attempt to disassemble a battery, and do not place a battery in
water or in a fire. Any of these situations may cause the battery to split or leak,
cause fire or injury.
• Do not subject a battery to strong impacts, such as hitting it with a hammer,
stepping on it, or dropping it. Any of these may cause the battery to split or leak
causing fire or injury.
• Use only the specified batteries or AC power adapter specified for use with this
camera. The use of other power sources may cause a fire.
8.2 Warranty Policy
This camera is under warranty for a period of one year from the date of purchase, by
the original purchaser. In case of defects in materials or workmanship, Vivitar
Corporation will repair or replace the camera free of charge within the warranty
period. This warranty applies to the camera only. This warranty does not include
batteries, Compact Flash cards, or other accessories that have not been manufactured
by Vivitar Corporation. This warranty will not be honored if the camera has been
mishandled or tampered with, or altered by anyone other than the manufacturer. Other
than for the warranty herein, Vivitar Corporation is not responsible for loss, damage,
or inconvenience of any kind.
Prior to returning a camera, you must first obtain an RMA number from Vivitar
Technical Support or Customer Service Operations. The RMA number, a brief
description of the difficulties encountered, and proof-of-purchase with the date of
purchase clearly indicated, must accompany a defective camera being returned under
Page 58

57
warranty. Prior to returning any product you must call Technical Support or Customer
Service to attempt to diagnose the problem and receive an RMA number. All related
shipping and transportation costs and insurances are at the owner's expense. Any
alteration of this warranty cannot be made without Vivitar Corporation’s written
approval.
Warranty Claims
All claims under warranty must be made promptly after occurrence of problem, and
received within the applicable warranty period by Vivitar. Before you can return any
equipment for repair, you must obtain a return authorization number (RMA#) and
instructions as to how and where said equipment should be shipped. RMA numbers
are only valid for 14 days from the date of issuance. Any merchandise received after
this time or without the RMA # will be refused. Vivitar reserves the right to reject any
non-acceptable means of transportation. When equipment is returned for any reason,
the sender shall be responsible for all damage resulting from improper packing or
handling, and for loss in transit, not withstanding any defect or nonconformity in the
equipment. In all cases, Vivitar has sole responsibility to determine the cause and
nature of said problem, and said determination with regard thereto shall be final.
To contact us: Instructions for a return:
Vivitar Corporation Call for a RMA#
1280 Rancho Conejo Blvd. Put RMA# outside of packaging box
Newbury Park, California 91320 Enclose copy of proof of purchase
(800) 532-3286 Technical Support Enclose product description
(949) 595-2199 Technical Support Ship package prepaid and insured
(805) 498-7008 x109 Customer Service (We do not accept C.O.D. shipments)
Call Technical Support for any technical questions - If you wish to obtain an RMA#
for product service, call customer service for warranty or non-warranty repairs, spare,
or replacement parts.
8.3 Technical Support
For immediate assistance, please read the Quick Start and Owners Manual. These
were carefully written to help you get the most out of your new camera. Advanced
users can get started with the Quick Start. Newer users may prefer to read the
Owner’s Manual.
If You are Having Difficulties. If your ViviCam 2800 does not appear to work
properly, please….
DO NOT RETURN IT TO THE STORE - for technical assistance.
For technical assistance consult our website at www.vivitar.com.
Page 59

58
You may also call our technical support line for assistance. Before you call, please…
1) Review the Owner’s Manual and Quick Start guide.
2) Determine if your problem is related to your camera, or your computer
connection.
• Check the camera for basic operations.
• Does it turn-on?
• Can you take a picture, and review it on the LCD display?
If the camera operates, captures images, and displays images on the LCD, the camera
is functioning correctly.
If you cannot get your camera and PC to connect, please consult your PC
manufacturer, or consult a local PC technician and have your serial or USB ports
checked. Our technical support staff can help you with your camera, but are not able
to give expert advice regarding the configuration of your PC.
We offer toll-free technical support for thirty days. Technical Support is available 24
hours a day, 7 days a week. We offer free support for a period of 30 days, limited to
three calls. You may reach technical support at (800)-532-3286. After thirty days, or
three calls, you may obtain assistance by calling (949)-595-2199.
You may also obtain support via our website at www.vivitar.com. On our website we
post driver updates, frequently asked questions, and other helpful information. There
is also a knowledge-based help system to guide you through any problems and
questions you may have.
8.4 Usage Environment
The recommended operating temperature of the camera is 32 to 104 F (0 to 40C)
Exercise caution when moving between areas with extreme changes in temperature
and humidity. Condensation may form on the lens and optical viewfinder.
Avoid exposing the ports and CF card slot to dust and moisture.
Do not expose the camera to extreme shock or vibration.
Exercise caution when cleaning the lens and optical viewfinder components. Use
only lens cleaners and lens tissue.
8.5 Troubleshooting
8.5.1 The Reset Button
The V2800 is essentially a small computer. It has a processor and an
operating system just like your PC, but on a smaller scale. Like a
computer, the V2800 can get confused and “hang” occasionally. To
remedy this situation you may “re-boot” the V2800 by pressing the reset
Page 60

59
button. To press the reset button, use the V2800 hand strap. On the hand strap there
is a small plastic sliding collar with two small nubs. These nubs are the correct
diameter and length to serve as a reset key.
8.5.2 General Troubleshooting – References
Problem Possible Reason Solution Refer to Section -
No Power
Camera cannot
transfer images to
PC (serial)
Camera connects
to PC (serial) but
it takes forever to
transfer an image
Camera can not
transfer images to
PC (USB)
Image LCD
Displays Vertical
Bars
No Video image
to external
monitor
Battery polarity is incorrect. Reinstall batteries in
proper orientation
Batteries are depleted Replace batteries, try
AC adapter
Camera has powered-off
automatically
AC adapter not delivering 6
VDC
Incorrect COM port Specify correct COM
Baud rate is too high Adjust/lower baud
Camera has powered-off
automatically
Serial Connection is incorrect Confirm the
V2800 not designated as Source Select V2800 6.2.4
Baud rate is too low Adjust/increase baud
Serial connections are limited to
a transfer rate of 115,200
Another program or TSR is
competing for resources
Wrong version of Windows Use Serial
USB is not enabled Enable USB 7.1.2
Cable not connected Verify cable
USB drive not installed Install Driver 7.1.4
Camera has powered-off
automatically
Camera Operating System has
become confused and is “hung”
Monitor specification Must be NTSC 5.1
Connection is not correct Confirm connection 5.1
Monitor’s channel is wrong Change new channel Monitor manual
Camera mode is wrong Check camera mode 5.1
Camera has powered-off
automatically
Press the shutter
button, Use AC
adapter
Check outlet for 110
VAC
port
rate
Press the shutter
button
connection
rate
Switch to USB or
add a CF reader
Switch to USB or
add a CF reader
connection or CF
reader
connection
Press the shutter
button, use AC
adapter
Press Reset button 8.5.1
Press the shutter
button, use AC
adapter
2.1.1
2.1.1, 2.1.2
2.1.3
6.2.3
6.2.5.6
2.1.3
6.2.1
6.2.5.6
6.1
6.1
7.1.1
7.1.3
2.1.3
2.1.3
Page 61

60
Images are Very
Dark
Image is Very
Bright
Images are not
Sharp
Shutter key does
not work
Image LCD
Display will not
Turn on
Batteries deplete
Quickly
I have been
pressing all the
buttons and I
have no idea what
I have done
Flash mode is OFF Set flash mode to
2.5.3
Auto or ON
Object is too far from camera Adjust distance 2.5.3
Finger is in front of flash lamp Adjust stance
Auto-Exposure is “fooled” Use manual EV
3.2
override
Auto-Exposure has calculated an
average exposure setting
Try alternate
Metering scheme
3.1.7
Flash has added too much light Set flash mode to
No-Flash
Object is too near Adjust distance 2.5.3
Auto-Exposure is “fooled” Use manual EV
3.2
override
Auto-Exposure has calculated an
average exposure setting
Camera is in Macro Mode Switch back to Auto-
Try alternate
Metering scheme
3.1.7
2.5.4
Focus
Too Much Compression Use Better or Best
2.5.5
modes
Object is too close Try Macro mode 2.5.4
Lens is dirty Clean lens 8.4
Camera not in CAM mode Switch to CAM
3.1
mode
Camera is processing previous
image(s)
Memory card is full Insert a new memory
Wait for processing
to finish
2.6
2.2.1, 2.2.2
card
Batteries are depleted Replace batteries, try
2.1.1, 2.1.2, 2.1.3
AC adapter
You are connected to a PC in
USB mode
The image display is
OFF during a USB
session
This is common for Digital
Cameras
Switch to
rechargeable NiMH,
1.4, 2.1.1, 2.1.2
use AC adapter
Not a problem Reset the camera
3.1.11
functions to the
factory defaults
 Loading...