

Page 1

-
User Manual
Model
:
Page 2

1. Camera Precautions 2
2. Vivicam 10 Specifications 3
3. Vivicam 10 Features 5
4. Taking Images (Pictures) 9
5. Installing Driver and Utility Software 13
6. Transferring Images To Your PC 21
7. Using the Vivicam 10 as a PC Camera 25
8. Supplement 27
INDEX
Page 3

1.
Camera Precautions
Follow these guidelines when using your Vivicam:
n Keep camera away from the following:
- High temperatures and excessive humidity
- Direct sunlight or other heat sources
- Dust
- Extreme vibration
n Do not use camera outdoors if it is raining or snowing
n If the lens or the viewfinder becomes dirty, clean them
with a lens brush or soft, clean cloth. Never touch the
lens with your fingers.
n If water or a foreign substance should get in the
camera, turn the camera off immediately and remove
the batteries
n Do not open the camera case or attempt your own
repairs. High-voltage internal components may create
risk of electrical shock or fire.
n Do not open the battery compartment when the camera
power is on
n Transfer important images to your computer as soon
as possible to avoid losing image data
Page 4

2. Vivicam 10 Specifications
2.1 Specification
n Resolution choices:
Digital Camera mode : 640 x 480 pixels (VGA)
PC Camera mode : 640 x 480 pixels
320 x 240 pixels
160 x 120 pixels
n Focus : Standard mode : 0.9m to infinity from camera
Macro mode : 25cm ~ 30cm
n 24-bit full color
n Memory: Built-in 8MB Flash memory
n File Format: BMP (selectable after download)
n Flash: lnternal
n Flash modes: Auto/Off
n Self-timer: 10 seconds
n Power: AA alkaline battery x 2
n Interface: USB
n Auto Power Off: Automatically turns power off if inactive
after
approximatly 60 seconds
Page 5
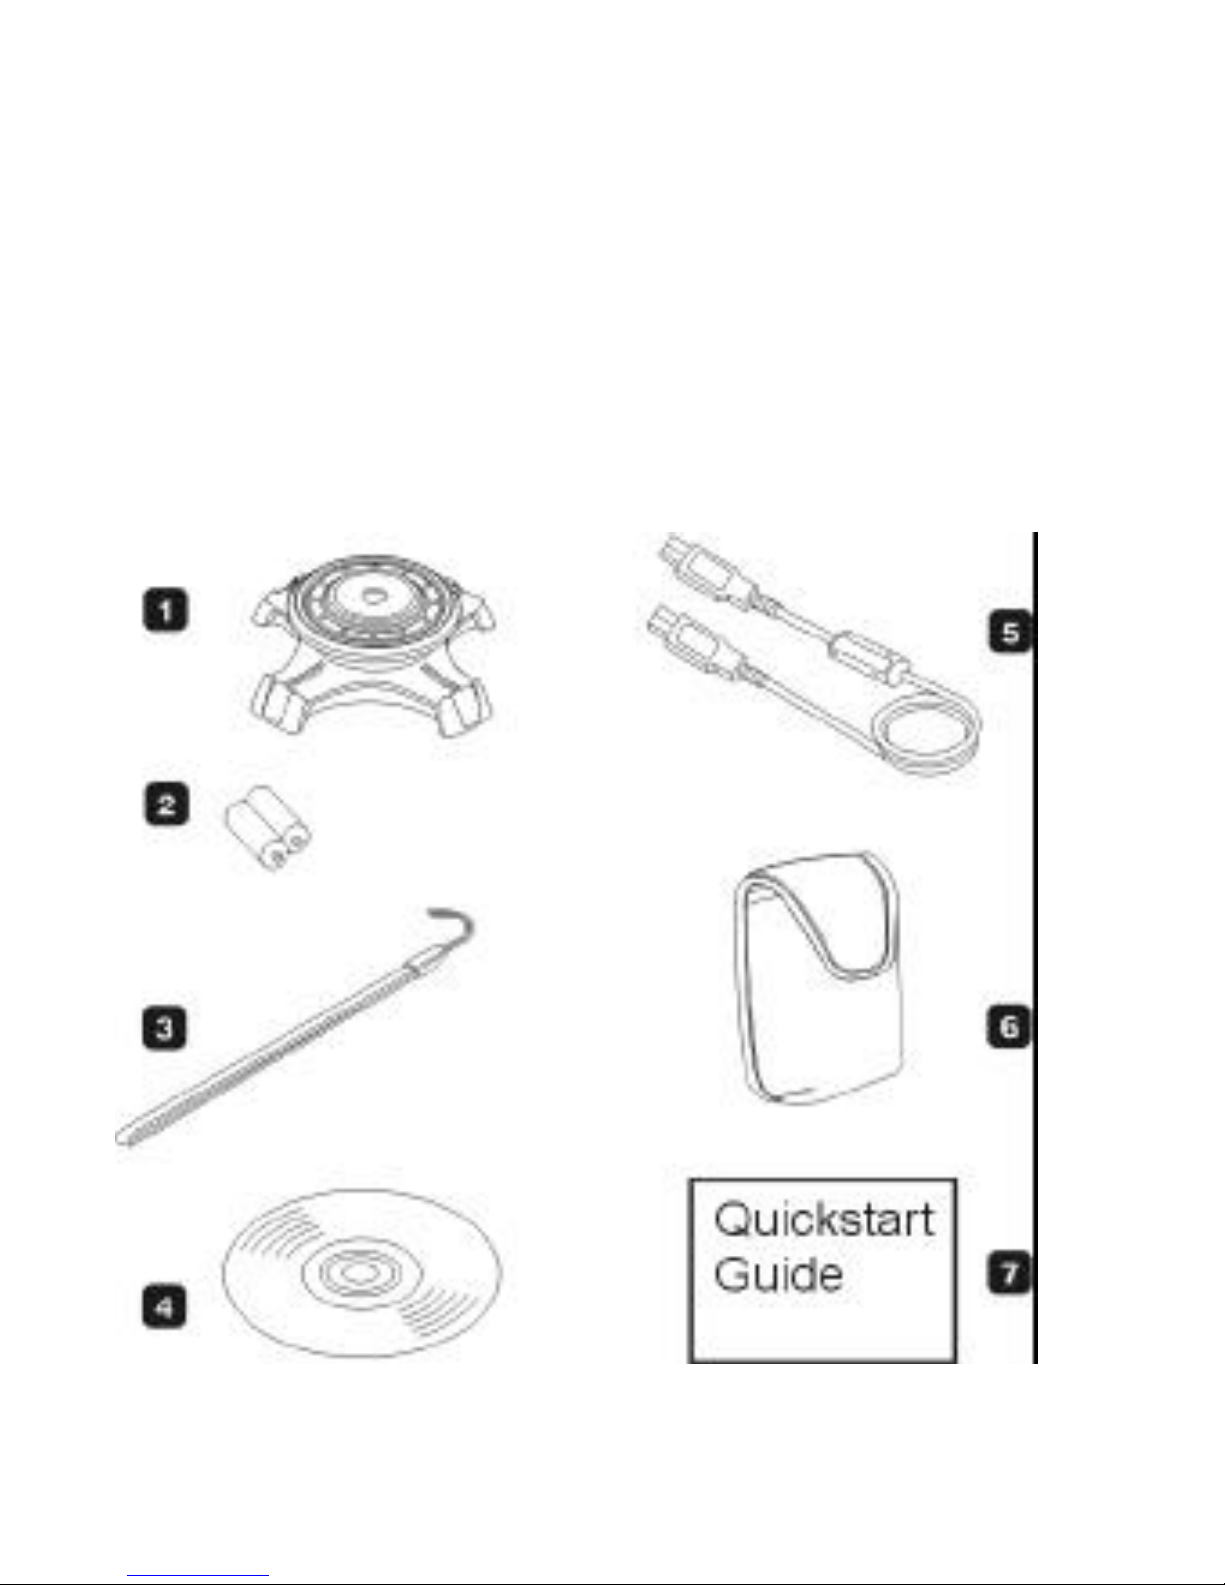
2.2 Accessories
1. Camera Cradle
2. Two AA alkaline batteries
3. Camera hand strap
4. Camera driver and utility software CD
5. USB cable
6. Camera pouch
7. Quickstart Guide
Page 6

3. Vivicam 10 Features
3.1 General Guide
Front
Back
Page 7
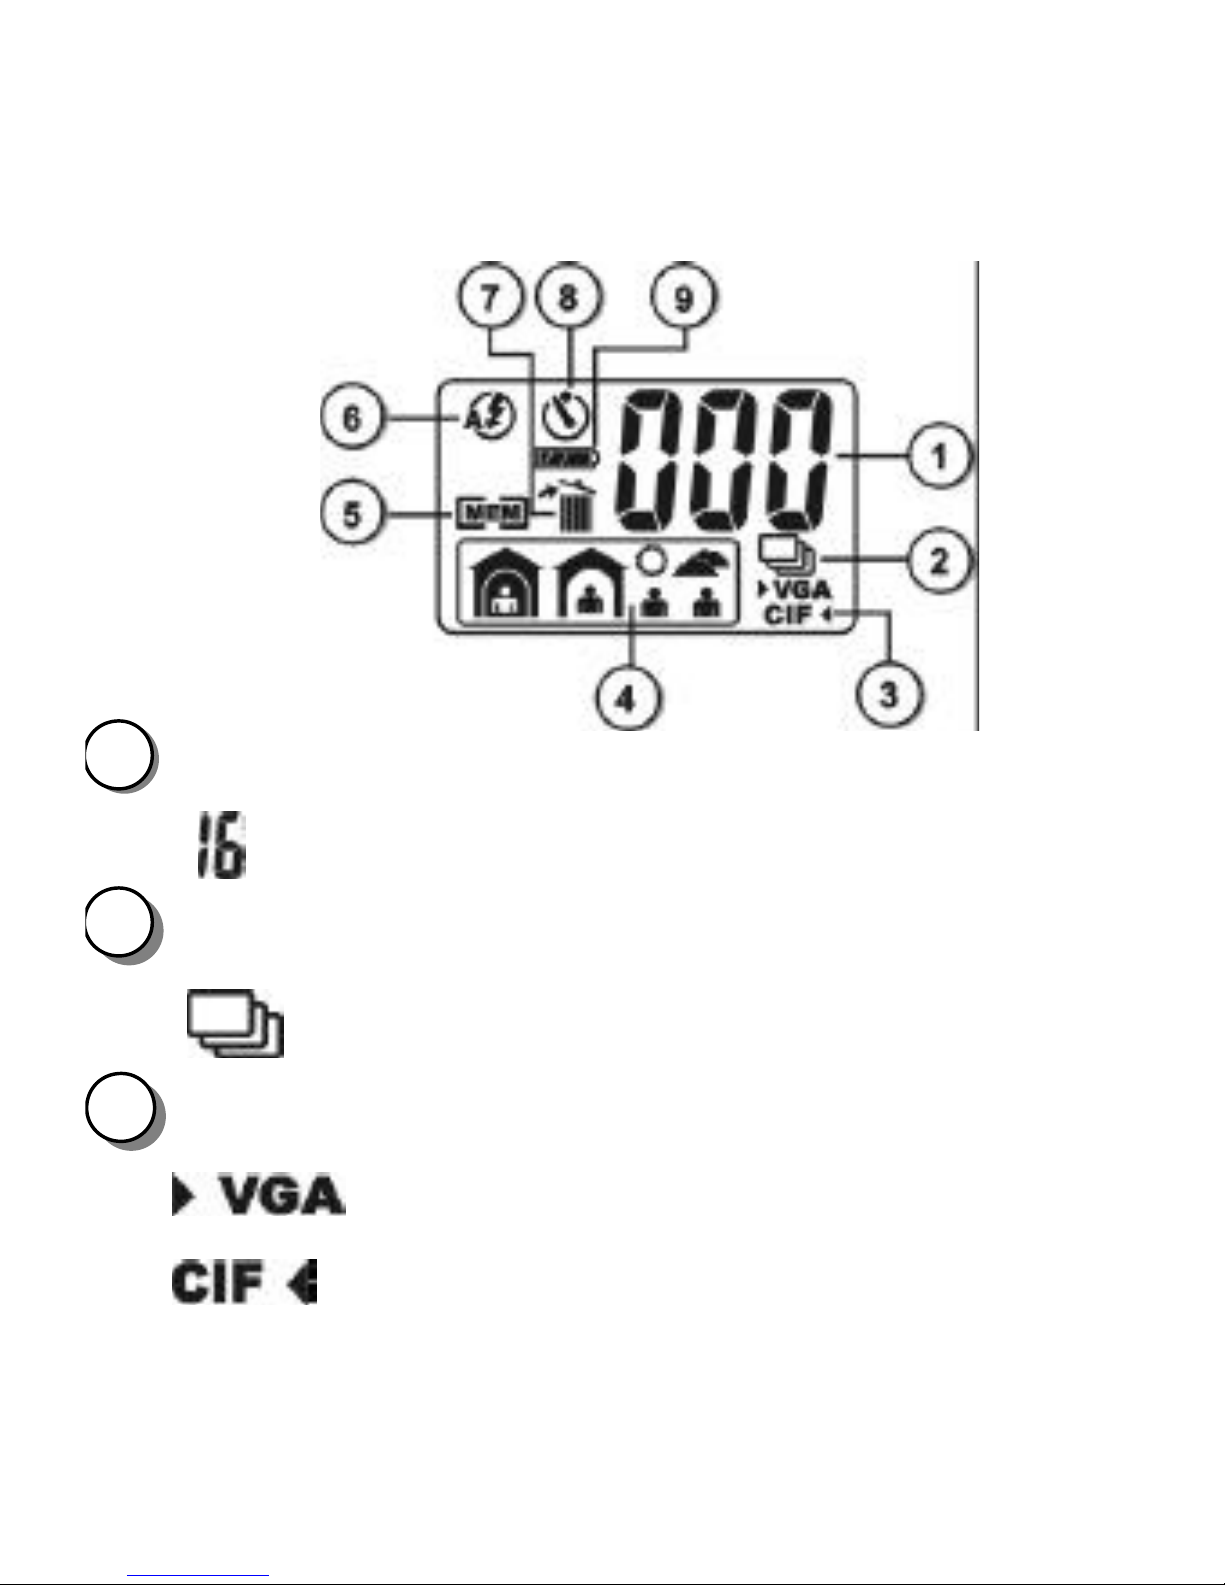
3.2 LCD Panel lndicator
n Image Counter
n :Total number of images you have captured
n Continuous Capture
n : Continuous capture mode
n lmage Resolution
n : 640 x 480 pixels (default setting)
n : 320 x 240 pixels
3 1 2
Page 8

n Shooting Environment
n : Outdoor 1 (Cloudy, default setting)
n : Outdoor 2 (Sunny)
n : lndoor 1 (Bright)
n : lndoor 2 (Dark)
n Memory Full
n : Memory full icon
n Flash Mode
n : Auto mode
n : Off mode (default setting, no icon display)
n Image Delete
n : Deletes all images
n : Deletes last image
4 5 7 6
Page 9
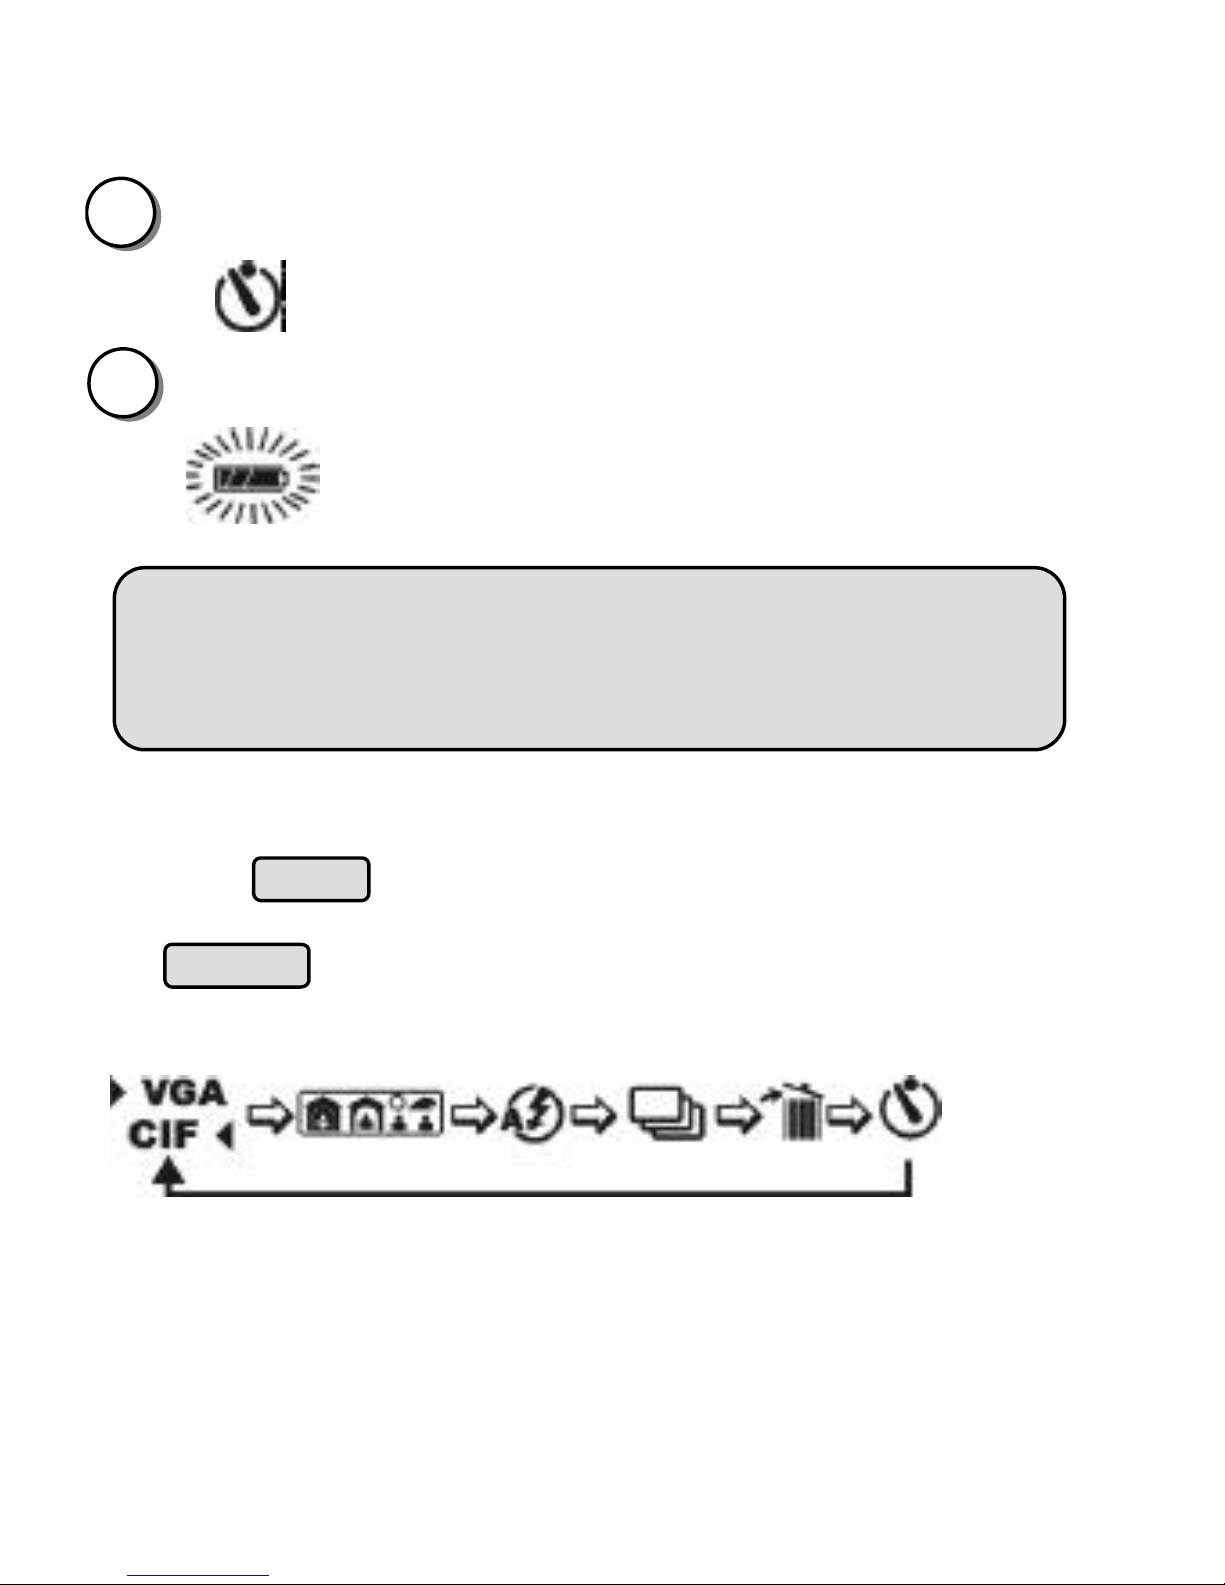
n Self-timer
n : Self-timer mode
n Low Battery Warning
n : This icon will appear, blinking and beeping,
indicating low battery power.
? lmportant Note:
The camera will stop taking pictures. Please
replace both batteries as soon as possible.
Camera Function Selection
n Press Mode button to select the desired function.
The function icon on the LCD panel will blink. Press
Select button until you hear 2 beeps to confirm.
n Function Mode Status
8 9
Page 10
4. Taking Images (Pictures)
4.1 Turning Power On
n Power on : Press Power button and camera will b
eep.
n
Power off : Press Power button again and camera will
beep.
(The camera will automatically turn off if inactive for
about 60 seconds.)
4.2 Taking Images (Pictures)
n Select focus mode (switch on left of camera body)
: Standard mode (0.9m ~ infinity)
Normal mode.
: Macro mode (25cm ~ 30cm) - For taking close-up
s
The Macro mode LED will light when switched to
this mode.
n Press Shutter button to take an image, camera will
beep.
n LCD Panel will show :
: Number of images you have taken.
: When memory is full, the icon will blink and beep
continuously.
Page 11

4.3 Self-timer Capture
n Press Mode select to
n Press Shutter
n The self-timer LED will blink and the camera will beep
for 10
seconds.
n Camera will take an image.
¬ If you want to exit the " Self-timer capture " function
press Mode select to
4.4 Using Flash
n : Auto Flash mode (flash fires automatically when
required by current exposure setting.)
n : Off Flash mode
n The flash's working range is 0.8~1.5 meters, (Best is
1.0~1.2
meters)
n When taking images with the flash, the "Busy" LED on
the back of the camera will blink after you press the
Shutter button. The flash is charging while the LED
is blinking.
Page 12

n 4.5 Continuous Capture
n Press Mode select to (The camera will
automatically switch to CIF mode)
n Press Shutter continuously to take pictures.
n Picture counter will continuously accumulate.
n STOP : Continuous capture stops whe
n your finger leaves
the shutter button or memory is full.
4.6 Delete Pictures
n Press Mode select to
n Press Select until you hear 2 beeps
n The camera will delete all pictures and
the picture counter will refresh to " 0 "
2. Delete last picture
n Press Mode select to
n Press Select until you hear 2 beeps
n The camera will delete last picture and
the picture counter will show result.
Page 13

4.7 Selecting the image resolution
n :640 x 480 pixels (default setting)
(The camera should take about 50 images)
n : 320 x 240 pixels
(The camera should take about 160 images)
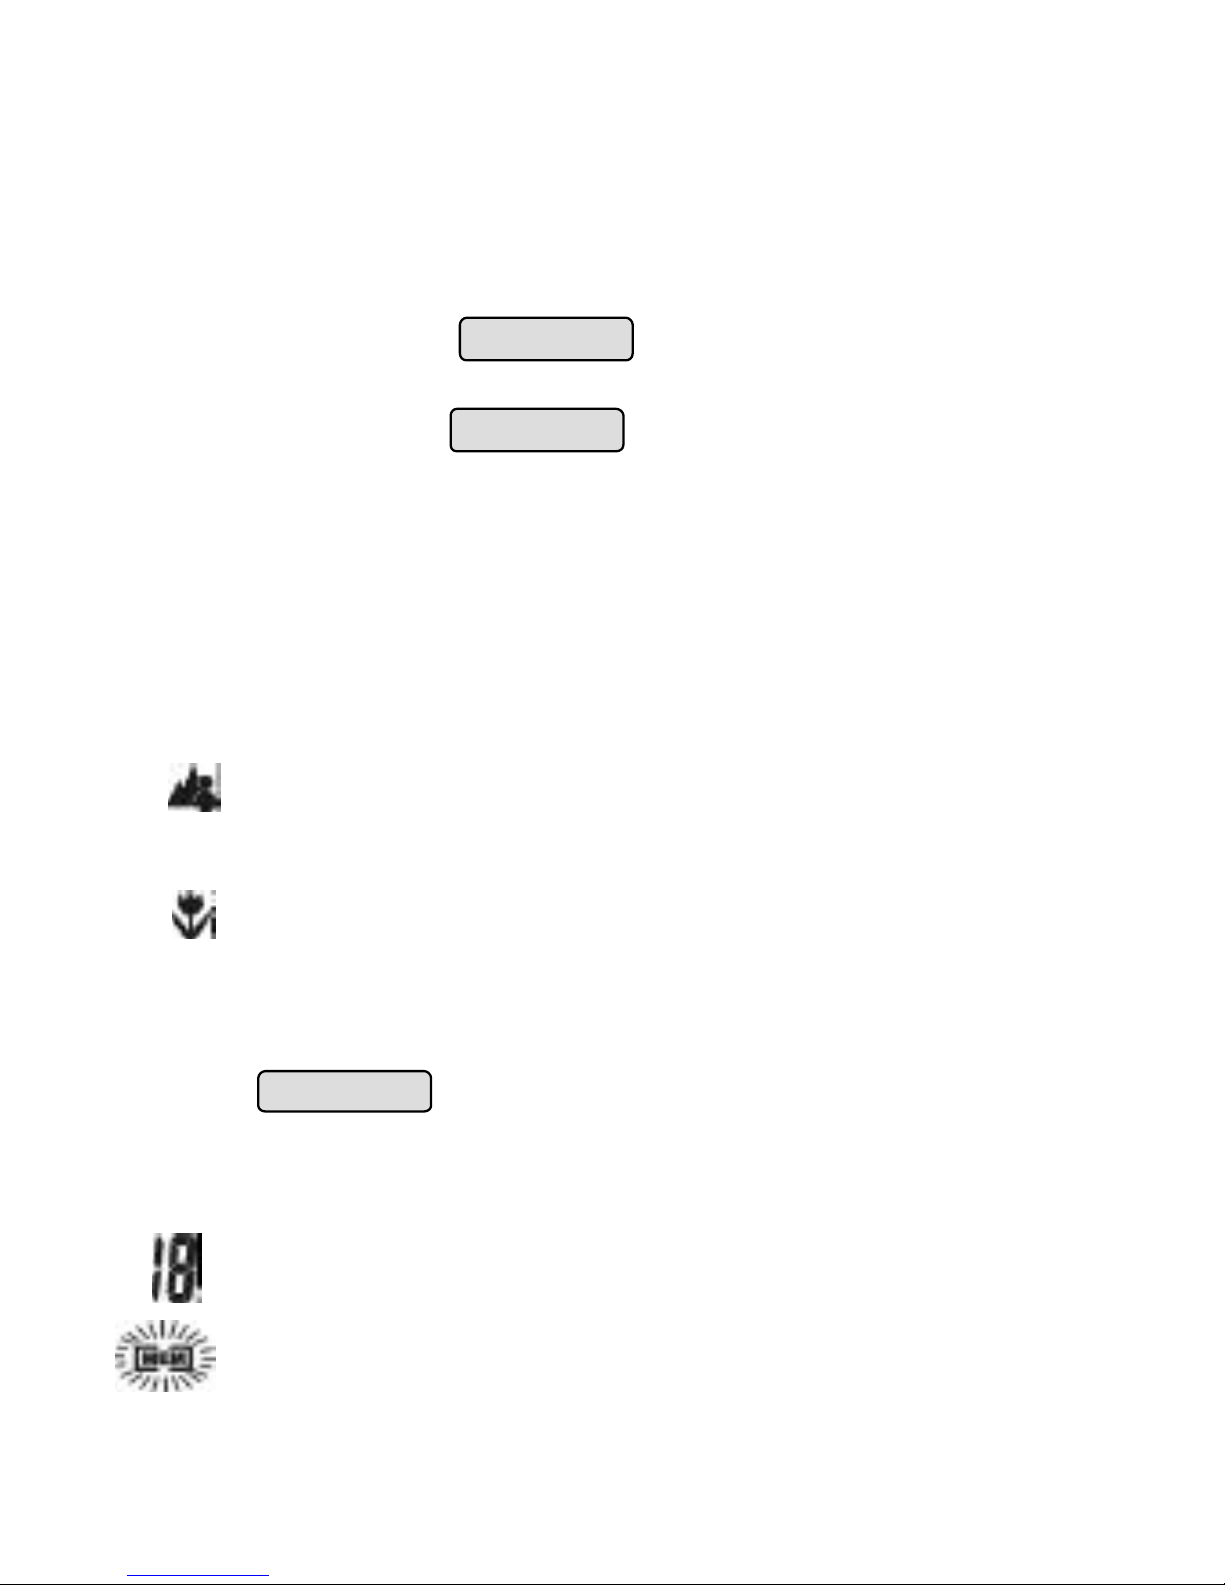
4.8 Selecting a shooting environment
n : Outdoor 1 (Default setting. Use this setting for
taking pictures outdoors on a cloudy day.)
n : Outdoor 2 (Optional. Use this setting for
taking
pictures outdoors on a sunny day.)
n : ndoor 1 (Optional. Use this setting for taking
pictures indoors in bright conditions.)
n : Indoor 2 (Optional. Use this setting for taking
pictures indoors in dark conditions.)
Page 14

5. Installing Driver and Utility Software
5.1 Computer System Requirements
Please check your PC system requirements before
-ROM drive
4. Mouse
5.2 Installation of Vivicam TWAIN Driver and AVI Maker on
Windows 98, ME and 2000
1. Turn on your computer
-ROM drive,
the following Window will appear :
Click on "lnstall Vivicam
TWAIN Driver"
Page 15

3. To display the list of languages available, click on the
Click " OK " to proceed to next step.
4. Your computer will display:
Click " Next " and follow setup procedure.
Page 16

5. The TWAIN driver and AVI Maker installation is complete.
Click " Finish " to finish installation.
5.3 Installation of Vivicam TWAI
N Driver and AVI Maker on
Windows XP
1.Insert the CD installation disk into your CD-ROM drive.
2.The Vivicam Installation Menu appears. Click Install
Vivicam
Twain Driver on the Software Installer dialog box. (Or
double click the CD drive icon in My Computer and run
InstallMgr.exe in the root directory of the CD.)
Page 17

3. Follow the on screen instructions to complete the installa-
4. Please plug-in your Vivicam with USB cable.
5. System will detect Vivicam.
6. When the Found New Hardware Wizard
window appears,
please select Install from a list or specific location
[ Advanced],and click Next to continue.
Page 18

7. When the following window appears, please select Search
removable media [floppy, CD-ROM...] , and click Next to
continue.
8. Files are copied as the following screen appears:
Page 19

9. Click Finish to continue the installation.
10. The Found New Hardware Wizard
window appears again.
Install from a list or specific location
, and click Next to continue.
Page 20

11. When the following window appears, please select
Search
removable media [floppy, CD-ROM...] , and click Next to
continue.
12. System files are copied and the following screen appears:
Page 21

13. Click Finish to complete the installation
5.4 Installation of Vivicam TWAIN Driver and AVI Maker
on Windows XP ( If you plug-in your Digital Camera
first without installing drivers. Please follow the steps
to complete of installation for Digital Camera. )
1.Insert the CD installation disk into your CD-ROM drive.
2.When the Found New Hardware Wizard window appears.
Please select Install from a list or specific location
[Advanced], and click Next to continue.
Click on the utility software you wish to install.
Page 22

6.Transferring Images To Your Computer
Once you have TWAIN driver and utility software installed,
you may start downloading pictures from your Vivicam.
6.1 Connecting Vivicam to PC
Use the USB cable to connect camera to your computer.
VIVICAM10 Computer
6.2 Windows will complete the following USB device
- Dual-Mode DSC (Controller)
- Dual-Mode DSC (Video Camera)
- Dual-Mode DSC (Still Camera)
6.3 Transferring Images From Vivicam 10
1. Open " Photo lmpression 2000 " application software.
.
Page 23

6. Click " Acquire " button and the Vivicam TWAIN
7. The pictures you have taken will automatically display in
8. Choose pictures that you want or click " Select All " to
Page 24

6.4 Create AVI Video File from AVI Maker
Continuous Capture Mode of Vivicam to
sequential images.
3. AVI Maker will automatically read the continuous
pictures from Vivicam and will show the following
window:
Page 25

4. Select the desired compression quality and click on
Create. Select a name for the AVI file and click on Save
to create the AVI.
5. The new AVI video file will automatically show on the
Windows Media Player!
Page 26

7. Using the Vivicam as a PC Camera
You can connect Vivicam 10 to your computer and use
it as a PC camera.
1. Connect USB cable to Vivicam and to your PC's USB port.
The LCD panel on the camera will show .
2. Please refer to related instructions for using the camera
as a PC camera if your PC already has PC camera
soffware installed.
(select " Vivicam 10&20 " if the software has video
capture source list.)
lmportant Note:
Do not disconnect the USB cable while you are
using your Vivicam as a PC camera. This may
cause a function failure.
Page 27

SUPPLEMENT
If you plug-in your Digital Camera without first installing
the
drivers - Please follow the steps to complete the installation
.
1.Insert the CD installation disk into your CD-ROM drive.
2.When the Found New Hardware Wizard window appears.
Install from a list or specific location
[Advanced], and click Next to continue..
3. When the following window appears.
Please select Search removable media [floppy, CD-
ROM...] , and click Next to continue.
Page 28

4.System files are copied and then the following screen
appears. Click Finish to continue the installation.
Page 29

5.Next, the Found New Hardware Wizard
window appears
again. Select Install from a list or specific location
[Advanced], and click Next to continue.
6. When the following window appears, select Search
removable media [floppy, CD-ROM ...], click Next
to continue.
Page 30

7. System files are copid and then the following screen
appears. Please click Finish
to continue the installation.
8. Please double click the CD drive icon in My Computer
and run InstallMgr.exe in the root directory of the CD.
9. Click Install VIVICam Twain Driver on the
Software Installer dialogue box, and follow the
instructions to complete the installation. Setup will
finish installing the necessary files on your computer.
It will prompt you to restart your computer. Click
Yes and then Finish to restart your computer and to
complete Setup.
Page 31

10. After computer restarting, the following window
appears.
Please select Install the software automatically
[Recommended], and click Next to continue.
Page 32

11. System copies files and the following screen appears.
Please click Finish to continue the installation
12. When the following window appears.
Please select Install the software automatically
[Recommended], and Click Next to continue.
Page 33

13. System files are copied and the following screen
appears. Click Finish to complete the installation.
 Loading...