

6
14
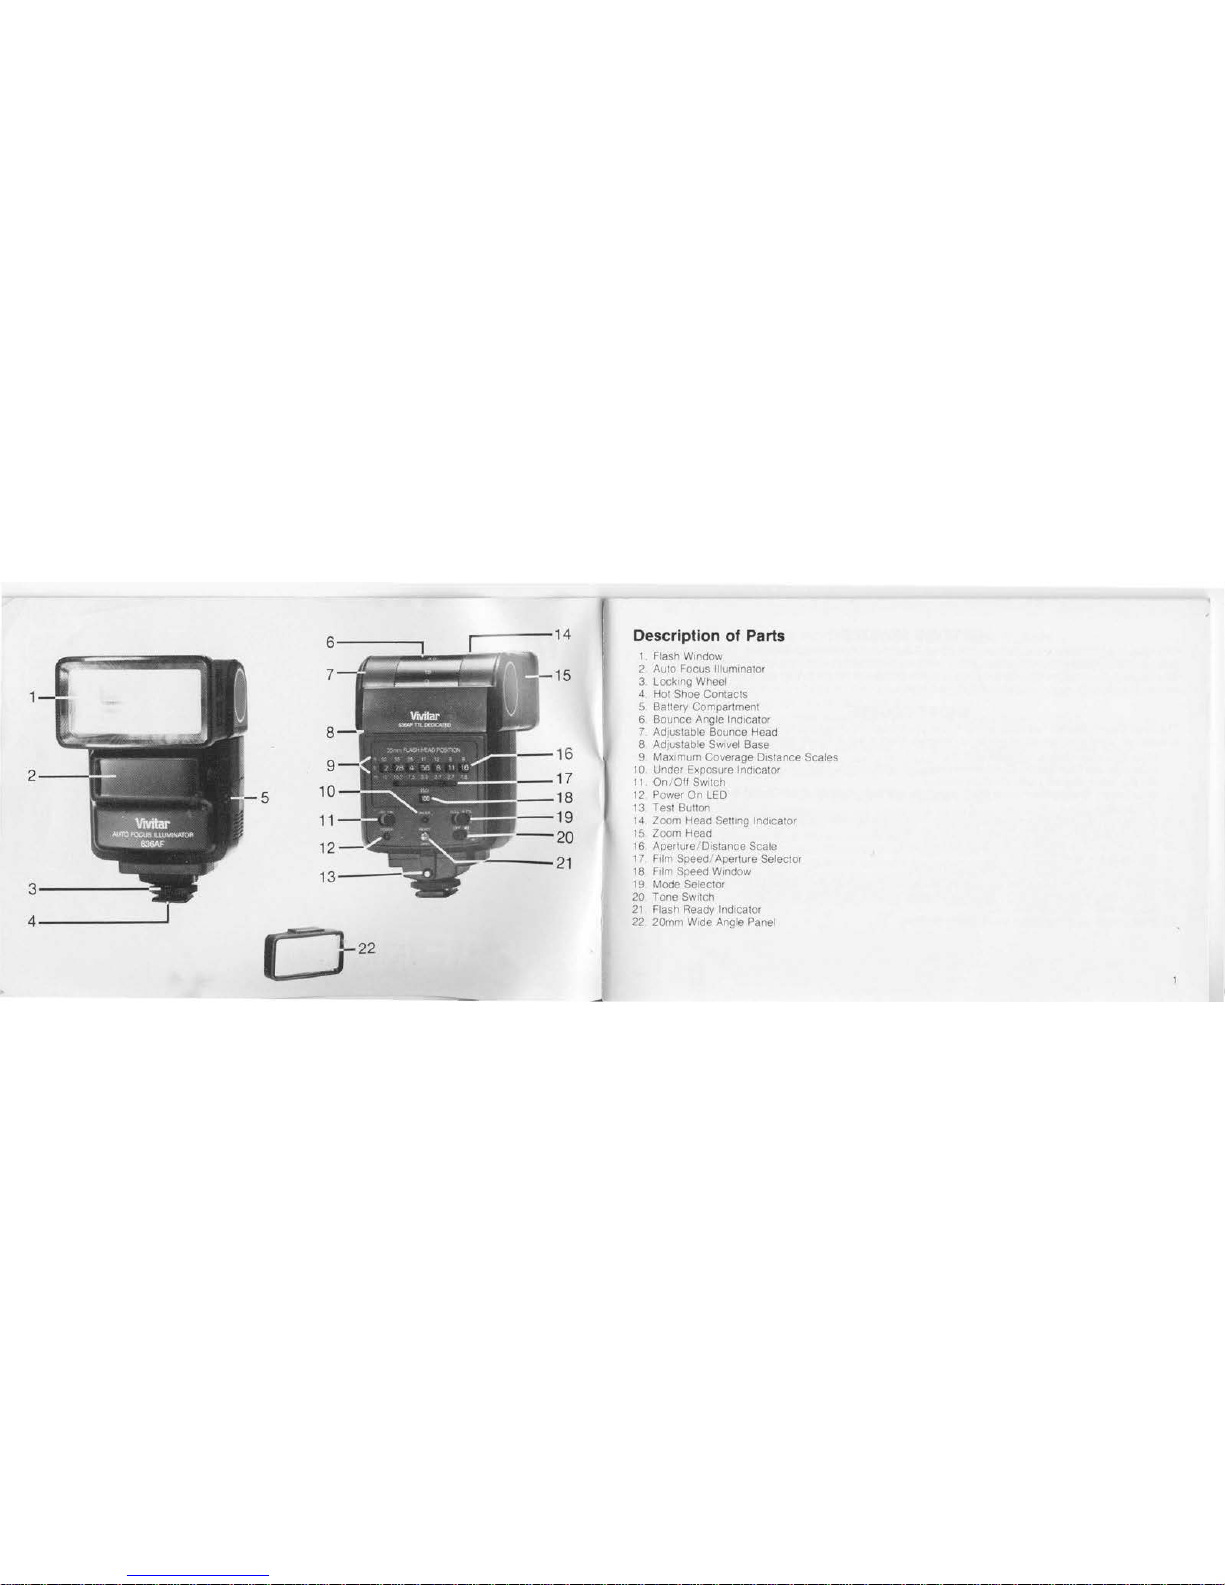
Description of Parts
1.
Flash Window
7
15
2 Auto Focus Illuminator
3. Lockrng Wheel
4.
Hot Shoe Contacts
5 Battery Compartment
6
Bounce
Angle Indicator
8
7 Adjustable Bounce Head
16
8
AdJUStable
Swivel Base
9 Maxrmum Coverage Distance
Scales
2
9
10
. Under Exposure Indicator
11.
On/O
ff
Switch
5
10
12
. Power On LED
13
Test Button
11
14
. Zoom Head Settrng lndrcator
15
Zoom Head
12
16
.
Aperture/ Drstance
Scale
21
17
.
Film Speed/ Aperture Selector
13
18
Frlm
Speed Wrndow
3
19
Mode Selector
20
Tone Swrtch
21
Flash Ready I ndrcator
4
22
20mm
Wrde
Angle Panel
22
GETTING
STARTED
This manual
is
divided into two sections: the S
hor
t Course and the Detailed
Sections
. The Short Course
gets you shooting
flash pictures quickly with a minimum of instruction . The Detailed Sect
1on
provides .
detailed instructions about the extensive and versatile features of the
flash. We urge you
to
read the
ent1re
manual
to
obtain the maximum enjoyment of your flash.
SHORT COURSE
The Short Course Section has been written to get you started shooting flash pictures quickly and easily.
is
based
on
using your camera
in
any
of
its Program settings with a 50mm nor
mal
AF
lens.
1 Make sure your camera
is
loaded with film.
2.
Slide open the flash Battery Compartment cover
(5)
and insert 4 fresh
AA
alkaline batteries following
the alignment diagram inside the compartment. . .
3.
Slide Battery Compartment cover back into place and make sure the Flash On/Off
Sw1tch
1s
in
the
OFF
posit1on
. . .
4.
Gently slide the flash fully into the accessory shoe
of
the camera and lighten the
Lock1ng
Wheel (3).
5. Turn the
flash
ON (11
).
The Power
On
LED
(12) will glow.
6.
In
a few seconds. the Ready Indicator (21) will glow.
7. Set the Mode Selector
(1
9)
to
TTL.
8. Push
or
pull Zoom Head (15)
to
the 50mm setting. . .
9. Rotate the
Flash Head so that
it
is
pointing
in
the same
d1rectron
, and parallel
to
the lens.
1 o. Make sure the camera
is
set to any
of
its program settings,
i.e.
P-Dual. P.
or
P-Hlgh.
11
Set 50mm
AF
normal lens
to f/22
.
12
. If the Ready Light
is
glowing, you'
re
ready
to
shoot.
2
SOME NOTES ABOUT YOUR NEW FLASH
This dedicated Vivitar Electronic Flash Unit
is
designed specifically for Nikon 2020 or
F501
Auto Focus
35mm
SLR
cameras. It provides automatic through-the-lens (
TIL
) flash exposures
in
addition
to
manual
flash.
F~rthermore
.
when the light
is
too dim for the camera
to
auto focus. the flash 's built-in Illuminator
automatically
provides a source
of
light for the camera to auto focus. This allows you
to
take sharply
focused pictures
in
very low light
or
even total darkness.
IMPORTANT: The auto focus mode selector
on
the front of the camera must
be
in
the
·s
· setting
in
order
for the Auto Focus
Illuminator to function.
There are
two
modes
of
automatic TTL flash operation: Program and Aperture Priority.
In
the Manual
Mode, there are two manual flash power levels of FULL and -4
(1
/16th of FULL power). The
-4
setting
is
ideal for fast recycle lime when auto exposure
is
not needed.
A SIMPLE TTL FLASH TEST
To verify the TTL exposure operation,
an
actual exposure must
be
made with the flash attached
to
the
camera and
film loaded
in
the camera. For test purposes, a light toned piece
of
paper can be positioned
at
the film plane
as
a film substitute and the camera back must
be
closed. Please note that light toned paper
may give incorrect responses due
to
differences
in
its reflective qualities versus actual film.
In
any case.
an
actual flash exposure must be made
by
depressing the camera shutter release button. When the flash
is
fired and there
is
insufficient light output, the lightning symbol in the viewfinder and the Under Exposure
LED (1
0)
on
the flash will blink. In addition, when the flash Tone Switch (20)
is ON, there will be a beeping
sound.
If there
is
enough light, no warnings will occur. (Nikon camera systems only warn
of
flash under
exposure
.)
3
 Loading...