

Page 1
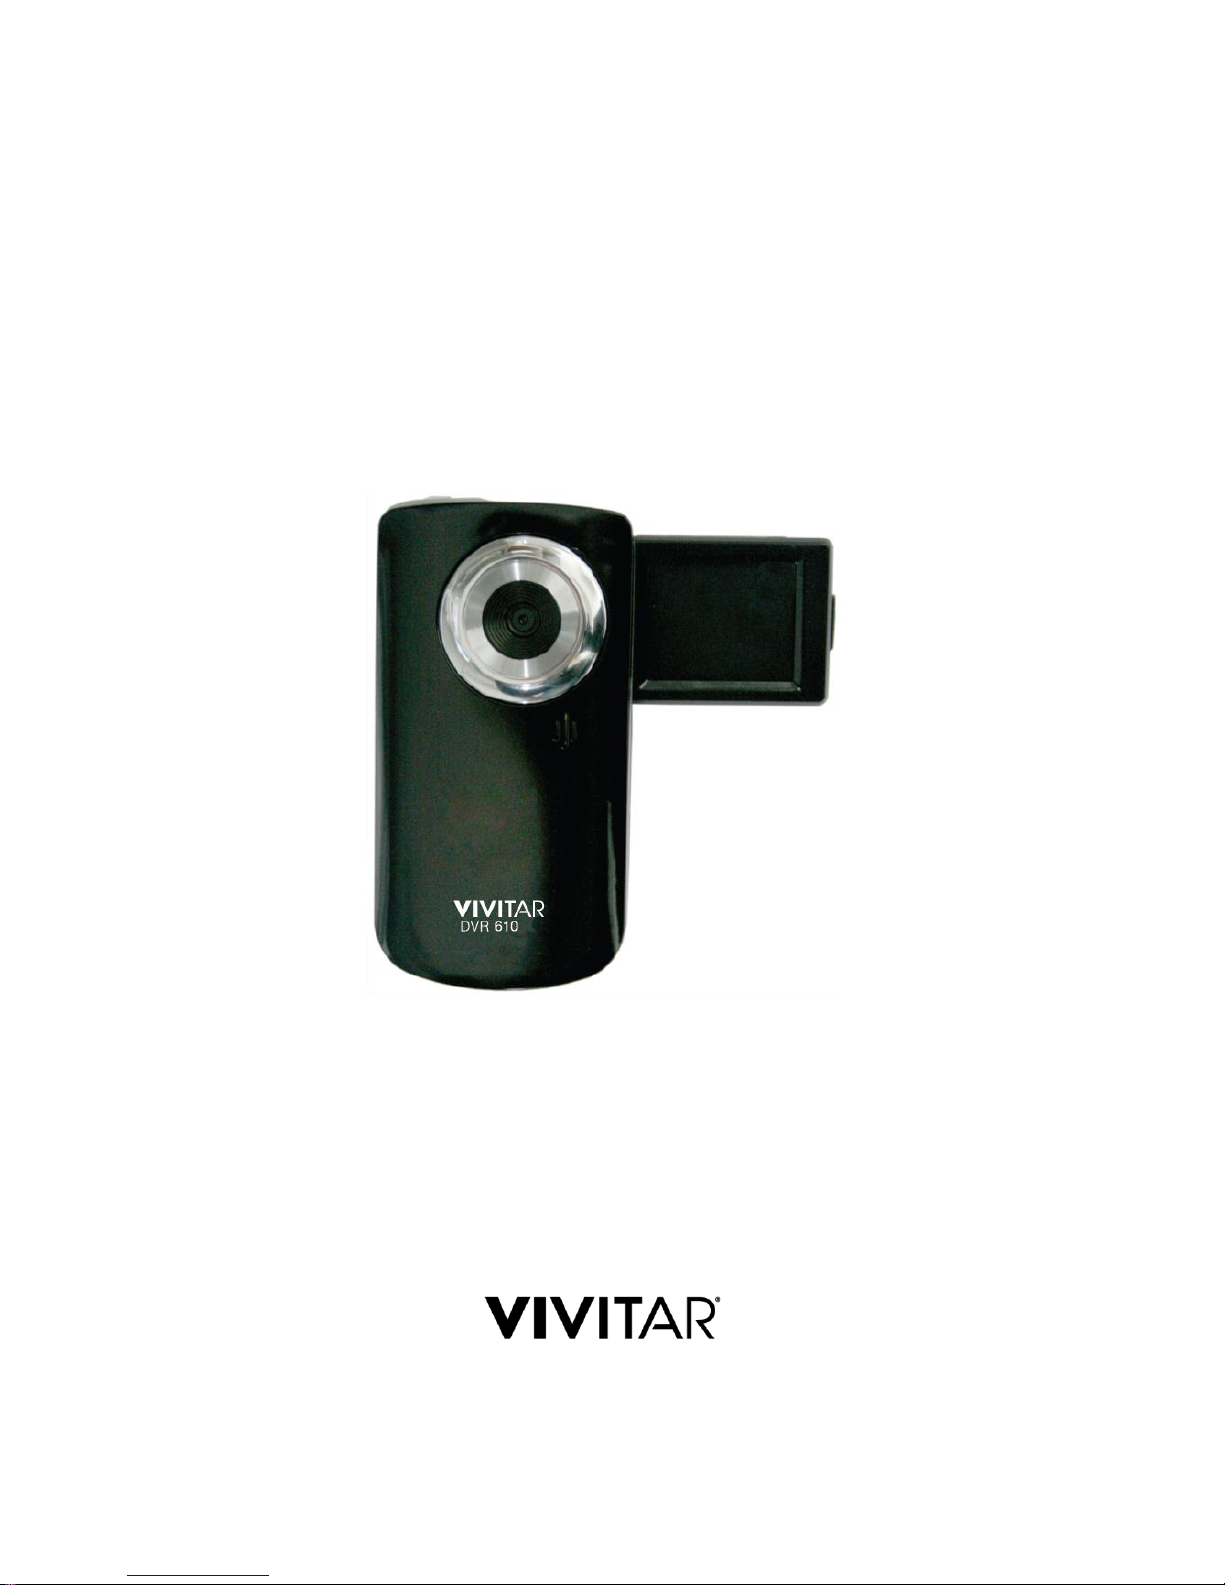
610v2 Digital Video Camera
User Manual
Windows and the Windows logo are registered trademarks of Microsoft Corporation.
All other trademarks are the property of their respective companies.
© 2016 Sakar International, Inc. All rights reserved.
Page 2

1
TABLE OF CONTENTS
Introduction .................................................................................................................................. 2
What’s Included ............................................................................................................................ 2
Parts of the Camera ..................................................................................................................... 3
Initial Camera Setup ..................................................................................................................... 4
Main Camera Modes .................................................................................................................... 7
Camera Technical Specifications .................................................................................................. 8
Computer System Requirements ................................................................................................. 9
Powering the Camera On/Off ..................................................................................................... 10
Changing Camera Mode ............................................................................................................. 11
Navigating the Menus................................................................................................................. 12
Camera Feature: ViviLink ........................................................................................................... 13
Video Capture Mode .................................................................................................................. 14
Video Playback Mode ................................................................................................................. 22
Photo Capture Mode .................................................................................................................. 27
Photo Playback Mode ................................................................................................................ 39
Installing the Software ................................................................................................................ 46
Connecting the Camera to the Computer ................................................................................... 48
Getting Videos and Photos from the Camera to the Computer .................................................. 49
Getting Started! .......................................................................................................................... 50
Transferring Images from the Camera to the Computer Manually .............................................. 50
Camera Maintenance ................................................................................................................. 52
Sakar Warranty Card .................................................................................................................. 52
Technical Support ....................................................................................................................... 53
Troubleshooting .......................................................................................................................... 53
Page 3
2
Introduction
Thank you for purchasing this camera. Everything you need to take quality digital Videos (AVI)
and Photo (JPG) is included with your camera.
Vivitar makes capturing those special moments as easy as possible.
Please read this manual carefully first in order to get the most out of your digital video camera.
NOTE:
Your camera requires an SD Memory card (up to 32GB) for normal use.
SD Memory cards are not included and need to be purchased separately.
For best video performance of your device, it is strongly recommended to use a high speed
SD Memory card of Class 4 or higher. Class 4 cards are usually marked with .
This camera is a Plug and Play device. You can download the pictures and videos captured
by your camera without the software by directly accessing the camera’s memory card from
your computer. It is recommended however that you install the Vivitar Experience Image
Manager Software to enjoy the full Vivitar experience.
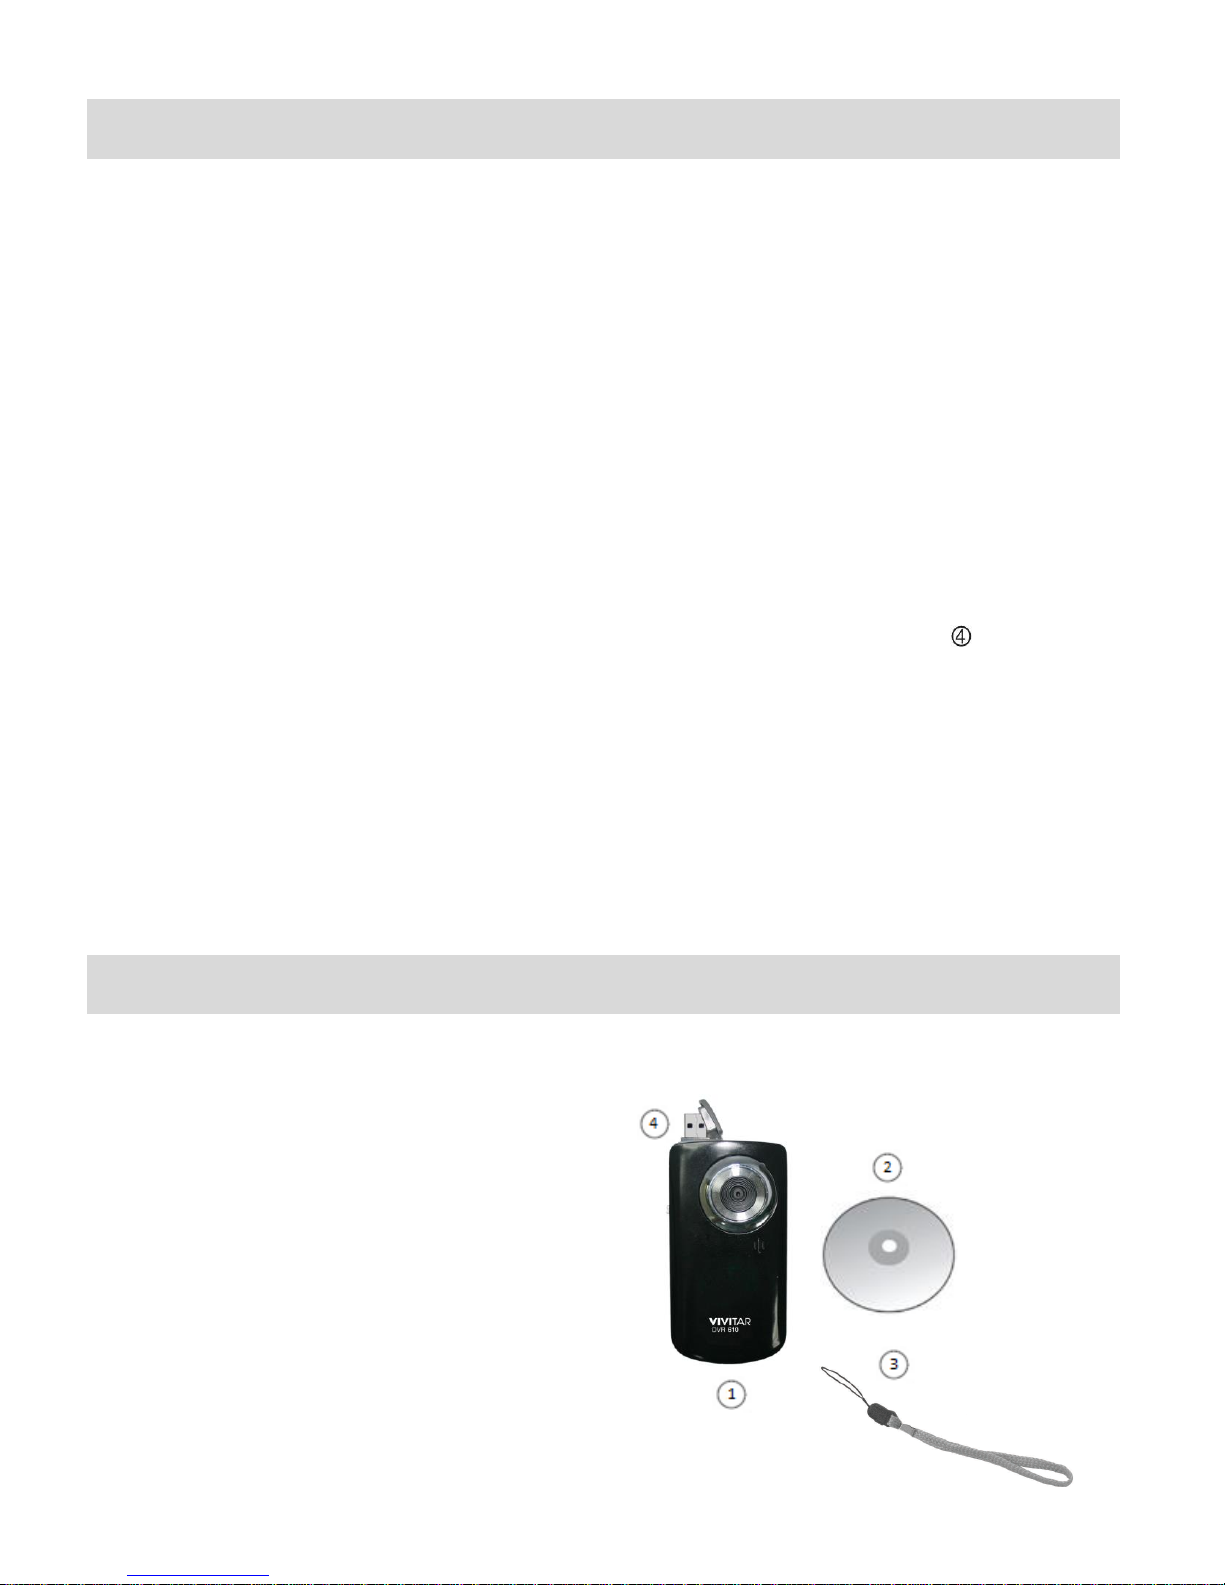
What’s Included
1. Digital Video Camera
2. Vivitar Experience Image Manager
Software Installation CD
3. Wrist Strap
4. Built-in USB Connector
NOTE: SD Memory Card not included.
Page 4

3
Parts of the Camera
1.
Power Button
11.
Battery Compartment
2.
Shutter Button
12.
SD Memory Card Slot
3.
Left / Zoom Out/ Thumbnail View Button
13.
USB Connector
4.
Right / Zoom In Button
14.
USB Lever
5.
MODE (M) Button
15.
Wrist Strap Connector
6.
SET/OK Button
16.
Speaker
7.
Up / Previous Image / Scene Selection Button
17.
Microphone
8.
Down / Next Image / Delete Button
18.
Tripod Socket
9.
LCD Flip Screen
10.
Digital Lens
Page 5
4
Initial Camera Setup
INSTALLING THE BATTERIES
INSTALLING THE MEMORY CARD
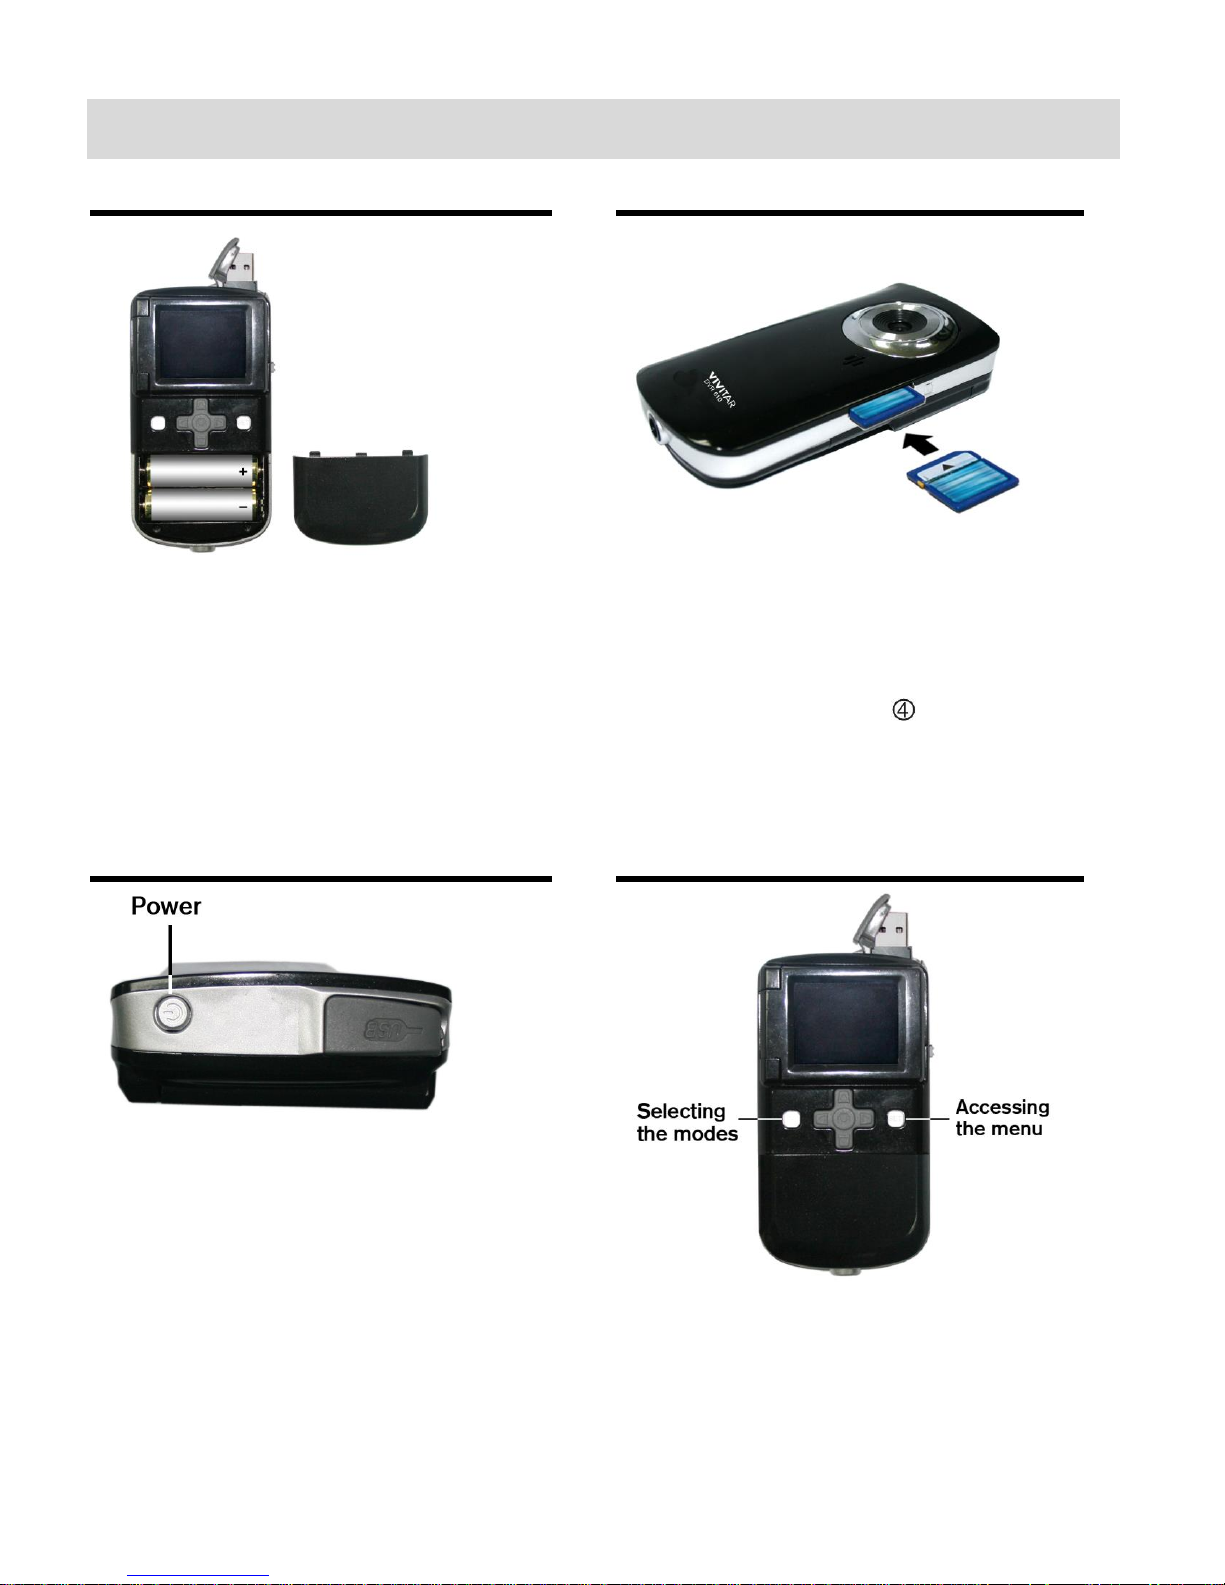
Slide open the battery cover on the
front of the camera. Install 2 x AA
batteries with the correct polarity, as
illustrated inside the battery
compartment. Slide the cover to close
the battery compartment.
Alkaline batteries recommended.
SD Memory card (up to 32GB) needed for
normal use.
For best video performance, it is strongly
recommended to use a high speed SD
Memory card of Class 4 or higher.
NOTE: Please turn off the camera before
installing the SD Memory card.
TURNING ON THE CAMERA
USING THE CAMERA
Page 6

5
FIRST TIME INITIAL SETUP
When powering the camera ON for the first time the camera will take you through the INITIAL
CAMERA SETUP.
Powering the Camera ON
1. BATTERIES:
Make sure the batteries have been inserted properly into your digital video camera.
Alkaline batteries are recommended.
Slide the battery cover on the front of the camera in a downward direction to open the
cover. Insert 2x AA (1.5V) batteries (not included) with the correct polarity, according to
the polarity illustrated inside the battery compartment.
NOTE:
Rechargeable batteries are not recommended for use.
Remove the batteries from the camera when not in use for an extended period.
Do not mix alkaline and non-alkaline batteries.
Some features, if they are included with your camera such as Flash, will not work if the
battery power level is low.
When the battery power is low the battery icon turns red and the camera will
automatically turn off a few seconds later.
The energy status of the power is displayed on LCD as shown below:
Full battery power Medium battery power Low battery power
2. SD MEMORY CARD:
Make sure an SD Memory card has been properly inserted into your camera.
The Memory Card slot is located on the side of your digital video camera.
To properly insert the SD Card:
Push the SD card gently into the slot in the direction shown on the camera (see SD icon
by the SD card slot). Press the SD card until you hear a slight clicking sound. This
indicates the SD card has been inserted correctly.
NOTE:
After the camera is powered on, an SD icon appears on the LCD display. If you do not
see the SD icon on the display, please check if the card was inserted properly.
Page 7

6
Make sure the SD card is not locked (check the lock switch on the side of the SD card). If
the SD card is locked this will prevent the camera from saving captured photos to the SD card.
3. POWER ON:
Press the POWER button, on the side of the camera, to turn on the camera.
Setting the Camera Language
You will be prompted to select a language for the camera.
1. The Language selection menu appears.
2. Select the language of your choice by pressing the UP or DOWN direction control
buttons.
3. Press the SET button to confirm the selection and exit the setup.
After selecting a language, you will be asked if you would like to continue with the initial camera
setup. A message will appear: “Continue with Camera Setup?”
Select “Yes” to continue or “No” to exit the setup.
NOTE: If you select “No” and decide to leave the camera setup, the camera will be set to its default
settings. These settings can be adjusted at any time manually through the menus in the camera.
Setting the ViviLink Default Option
Once you have selected “Yes” to continue the setup, you will be asked to set the default ViviLink
destination for photos and videos taken with your digital camcorder.
The ViviLink technology allows you to quickly and easily upload your camcorder’s photos and
videos to the social networks of your choice with the accompanying Vivitar Experience Image
Manager Software application.
1. First you will be asked to choose the default ViviLink social network for Photos and then for
Videos.
2. Use the UP and DOWN buttons to highlight the desired default social network and press
the SET button to confirm the selection for Photos and then for Videos.
Congratulations! Your digital camcorder is now ready to use!
Page 8
7
Main Camera Modes
VIDEO CAPTURE MODE
Use this mode to capture videos with your digital video camera.
This is the default mode when the camera is powered ON.
To take a video, aim your camera as desired and press the Shutter button to start the
record. A blinking record indicator will appear on the LCD screen while record is in
progress. To stop the record, press the Shutter button again. The video will be
automatically saved to your camera’s memory card.
To access the various menus for the Video Capture mode, press the SET button while in
the Video Capture mode.
PHOTO CAPTURE MODE
Use this mode to capture pictures with your camera.
After turning on your camera, press the MODE (M) button once to open the Photo Capture
mode.
To take a picture, aim your camera as desired and press the Shutter button.
The picture will be automatically saved to your camera’s memory card.
To access the various menus for the Photo Capture mode, press the SET button while in
the Photo Capture mode.
PLAYBACK MODE (PHOTOS & VIDEOS)
Use this mode to view and manage the photos and videos on your camera.
After turning on your camera, press the MODE (M) button twice to open the Playback mode
for photos and videos. You can scroll through the photos and videos that you’ve previously
taken to view, edit or delete them as desired.
To access the various menus for the Playback mode for photos and videos, press the SET
button while in the Playback mode.
Your camera has different modes for the various camera functions.
You can switch modes by pressing the MODE (M) button on your camera after the camera has
been powered ON.
Page 9
8
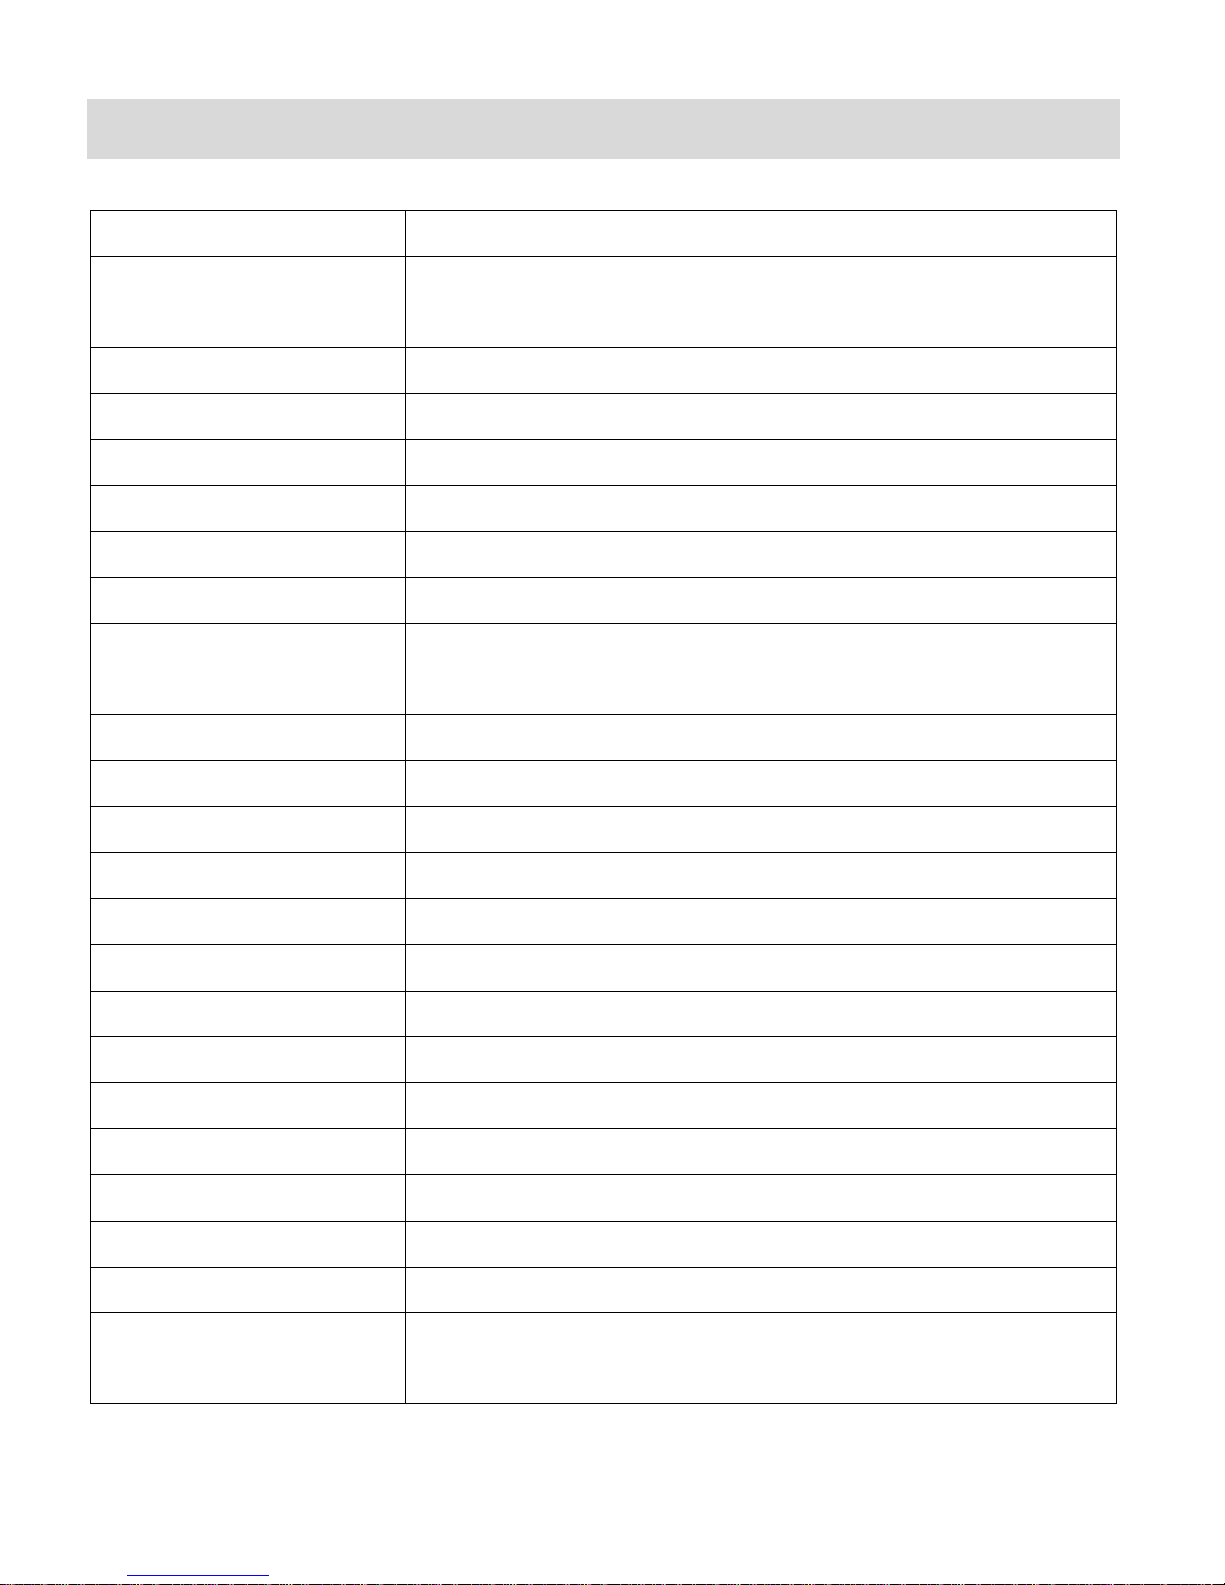
Camera Technical Specifications
Product type
Digital Video Camera
Digital Video Resolution
D1 720x480 (30fps), VGA 640x480 (30fps),
QVGA 320x240 (30fps )
Digital Photo Resolution
2M (1600x1200), 1.3M (1280x1024), VGA (640x480)
Image Sensor
CMOS Sensor
LCD Display
1.8 Inch TFT, Flip LCD – 180 degrees
External Memory
SD card (up to 32GB) needs to be inserted to use the camera
Zoom
2X Digital Zoom
Frequency
50Hz / 60 Hz
Scene
Auto, Scenery, Portrait, Night Scenery, Night Portrait,
High Sensitivity, Sport, Beach, Party
Self-Timer
2 seconds, 5 seconds, 10 seconds, Off
White Balance
Auto, Daylight, Cloudy, Incandescent, Fluorescent
Multi SnapShots
Yes
Exposure
-3.0EV ~ +3.0EV
ISO
Auto, 100, 200, 400
Slide Show
3 seconds, 5 seconds, 10 seconds
Language
English, French ,Spanish, Portuguese, German, Dutch, Italian
Speaker
Built-in
File Format
AVI and JPEG
Power Saving
1 minute, 3 minutes, 5 minutes, Disable
Battery
2 X AA batteries (1.5V)
Transmission interface
USB 2.0
Working temperature
0~45C
Computer System
Requirements
WINDOWS® XP (SP3), Vista (SP1) and WINDOWS® 7 and
above; MACINTOSH OSX v10.5.x and above
Page 10

9
Computer System Requirements
To be able to download photos and videos to your computer using the Vivitar Experience™
Image Manager Software, you will need the following minimum configuration:
WINDOWS OS
MICROSOFT® Windows XP with Service Pack 3, Windows Vista with Service Pack 1 or
MICROSOFT® Windows 7 or above
Pentium® 4 processor (or above)
1 GB RAM, 250 MB available hard disk space
16-bit Color monitor, 1024 X 768 recommended screen resolution
CD-ROM Drive
QuickTime® 6 or higher
MICROSOFT ® Internet Explorer 7 or higher
Windows Media Player 10 or higher
DirectX 9 or higher
Internet connection required
MACINTOSH OS
Intel Processor running MACINTOSH OS X v10.5.x or later
1 GB RAM, 250 MB available hard disk space
Display: 1024 x 768 or higher-resolution monitor
QuickTime® 6 or higher
CD-ROM Drive
Internet connection required
NOTE: Make sure the latest compatible Adobe® Flash® Player is installed on your computer.
Page 11
10
Powering the Camera On/Off
Make sure the batteries have been inserted properly into your digital camera.
Make sure an SD card has been inserted into your camera. SD card up to 32GB - SD Card
not included.
Please see Initial Camera Setup for more information.
POWERING THE CAMERA ON
Press the Power button to turn your camera ON.
After powering on, the camera emits a sound.
The LCD screen turns on with your camera in Video Capture mode to start.
POWERING THE CAMERA OFF
While the camera is on, you can press the Power button again at any point to turn your
camera OFF. A “Goodbye” screen appears and then the camera will power off completely.
POWER SAVE
Your digital video camera also has an Auto Power Off feature that automatically turns off your
camera after a specific period of time that your camera is left idle. The Auto Power Off settings
can be set from the Auto Power Off setting in the Video Capture Mode or Photo Capture Mode
menu.
Page 12

11
Changing Camera Mode
Your camera has three main modes:
1. Video Capture Mode - Use this mode to capture videos with your digital video camera
2. Photo Capture Mode - Use this mode to capture photos with your digital video camera.
3. Playback Mode (for photos and videos) - Use this mode to view the videos and photos
you have already taken with your camera.
When the camera is first powered ON, the Video Capture Mode is active. The icons that appear
on the LCD screen are the best default settings so that you can begin to capture and enjoy clear
quality videos and photos.
To change the active camera mode, make sure the camera is powered ON and press the MODE
(M) button.
When in Video Capture Mode, this icon will display on the top-left corner of the LCD display.
When in Photo Capture Mode, this icon will display on the top-left corner of the LCD display.
When in Playback Mode, this icon will display on the top-left corner of the LCD display.
Page 13

12
Navigating the Menus
Each camera mode has a set of menus specific to that mode.
1. Press the SET button to open the menus for the current mode.
2. Press the LEFT or RIGHT button to scroll between the various menus for the current
mode.
3. Press the UP or DOWN button to highlight the desired menu option.
4. Press the SET button to select and save the highlighted menu option.
5. If the selection can be remembered by the camera, a selection icon appears to the
right of the selected menu option. Changes made to these options remain until you
change them again at a later time.
Some menu options are single-use functions that are not remembered by the camera and
do not display the selection icon when selected.
6. At any time you can press the MODE (M) button to exit the menus and return to the
previous screen.
NOTE:
For most menu settings, an icon reflecting your selection displays on the LCD screen.
The settings are saved by your digital camera until you manually change the setting or
restore the camera’s default factory settings.
Page 14

13
Camera Feature: ViviLink
VIVILINK OPTION
The ViviLink technology allows you to quickly and easily upload your camera’s photos and videos
to the social networks of your choice with the accompanying Vivitar Experience™ Image
Manager application. A ViviLink destination can be assigned to a photo or video in Playback
mode.
ViviLink: Playback Mode
A ViviLink destination can be added to a captured image by accessing the ViviLink menu in
Playback mode. Simply select an image and then select the ViviLink.
1. After powering on your camera, press the MODE button twice to enter Playback Mode.
2. Press the UP or DOWN button to select your photo or video to which you would like to
add a ViviLink.
3. Press the SET button to open the menu options and press the RIGHT or LEFT button to
select the ‘ViviLink’ option.
4. Press the UP or DOWN button to select the desired ViviLink option and then press SET
to save your selection and exit the menu.
5. The selected ViviLink icon appears on the image.
You can use this menu option to change the ViviLink at any time.
Page 15

14
Video Capture Mode
The Video Capture Mode allows you to capture videos with your digital camera.
When the camera is first powered ON, the camera will be in Video Capture Mode.
The video icon appears on the top left corner of the LCD.
TAKING A VIDEO
1. Selecting the Scene with the LCD Display:
While in Video Capture mode, use the LCD display to direct the camera at the scene you
would like to capture.
NOTE: The amount of time available for recording video appears on the top right of the
LCD screen.
2. Zoom Options:
Press the Right - T/Zoom In and Left - W/Zoom Out buttons to better set the camera
display if desired.
3. Capturing the Video:
STANDARD SCREEN MODE:
START: Press the Shutter button to START the video capture.
The elapsed time appears on the top right corner of the LCD screen.
A blinking red record indicator appears on the LCD screen while record is in
progress.
STOP: To stop recording the video, press the Shutter button again.
The video is automatically saved to the camera’s SD Memory Card.
FLIP SCREEN MODE:
You can also capture your videos using the Flip Screen.
When you would like to quickly and easily include yourself in the video, simply flip the
LCD display out and hold the camera facing towards you. Make sure you can see yourself
within the scene on the LCD screen, look at the lens, then press the Shutter button to
begin recording and press again when you would like to stop recording your video.
It’s as easy as twist and shoot!
Page 16
15
NOTE: The amount of recording time available for the resolution selected appears on the top
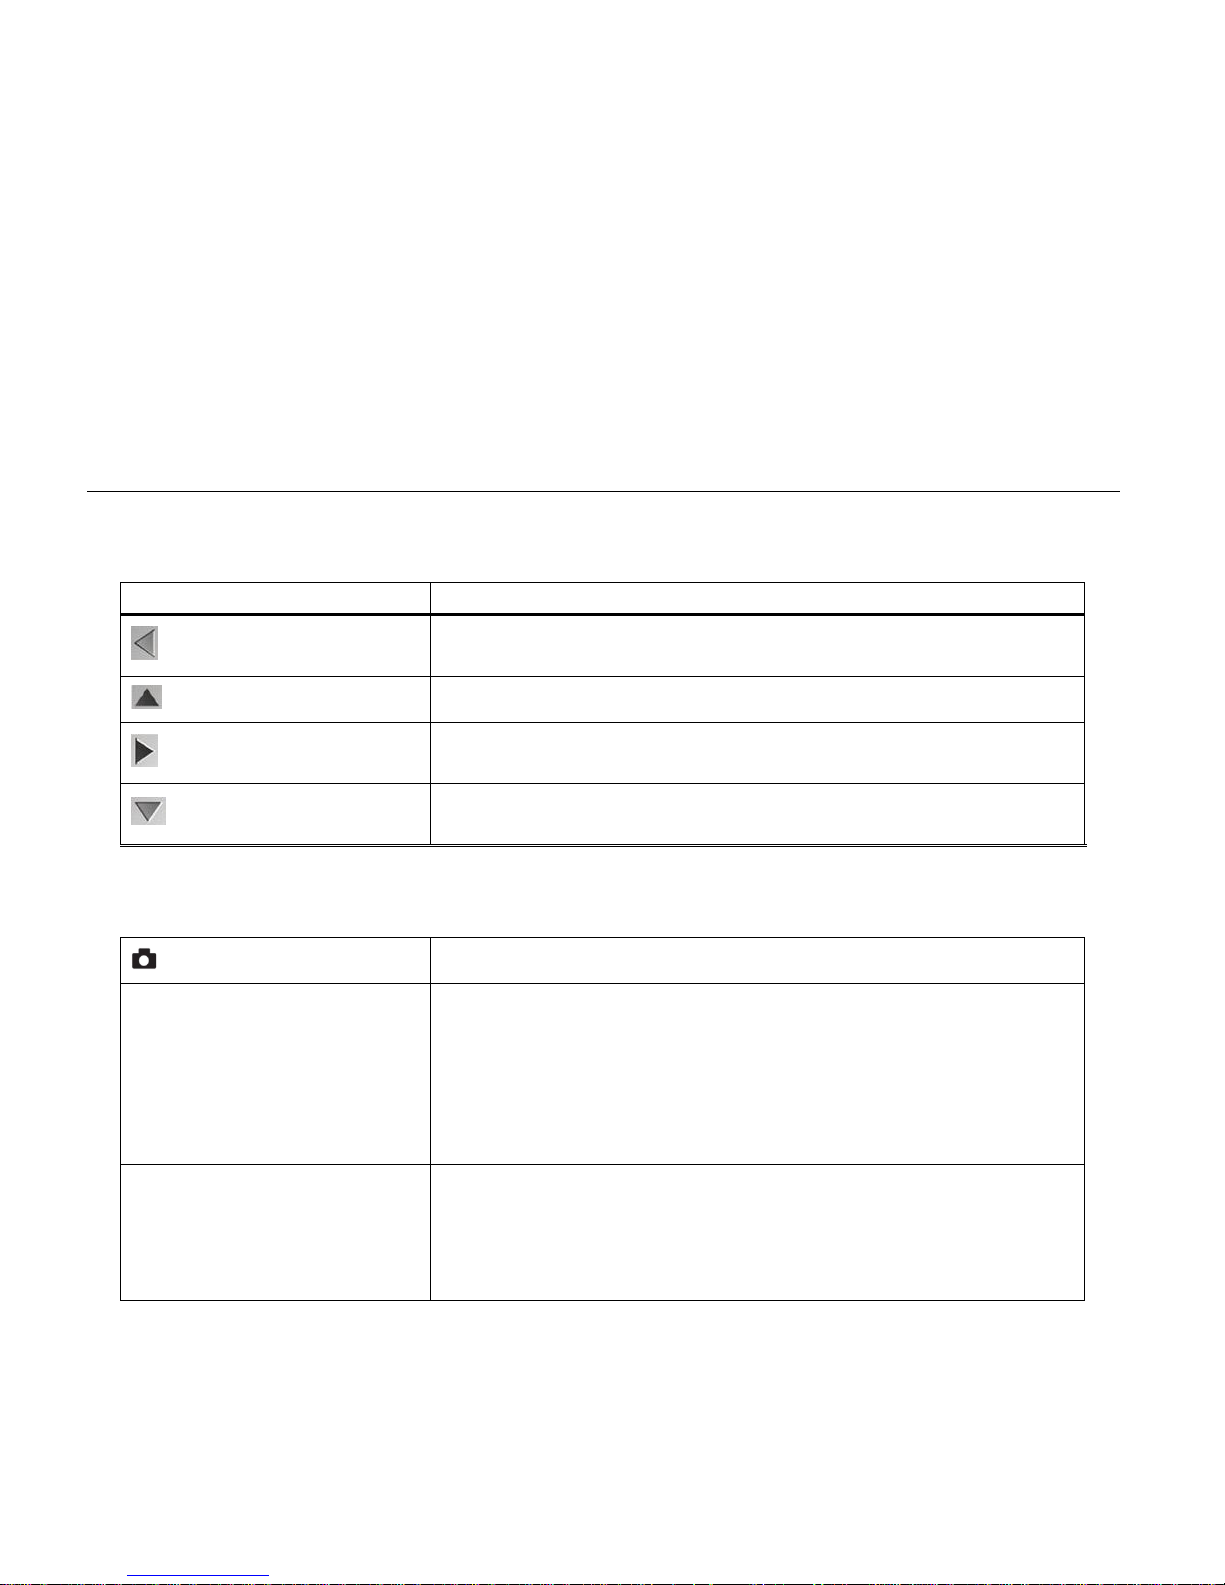
Quick Function Buttons
Action
Left
Zooms Out
Up
Scene Selection – Opens the Scene menu
Right
Zooms In
Down
Delete – Allows you to delete the last video captured
Other
Shutter
Starts and stops the video recording
SET/OK
Opens the Menu options for Video Capture Mode.
Saves your selected menu option.
NOTE: To navigate through the Menus, use the Left,
Up, Right, and Down directions control buttons.
MODE (M)
Toggles between the Video Capture Mode, Photo
Capture Mode, and Playback Mode.
Exits the Menu options screen.
right of LCD screen. The lower the resolution setting the more recording time is available.
However, videos recorded at lower resolution are of less quality than videos recorded at the
higher resolution.
Remember, the amount of time that you can capture videos also depends on the size of the SD
memory card inserted as well as the video resolution selected.
VIDEO CAPTURE MODE BUTTON FUNCTIONALITY
Your digital camera has a four-directional pad that functions as Quick Function buttons.
Page 17
16
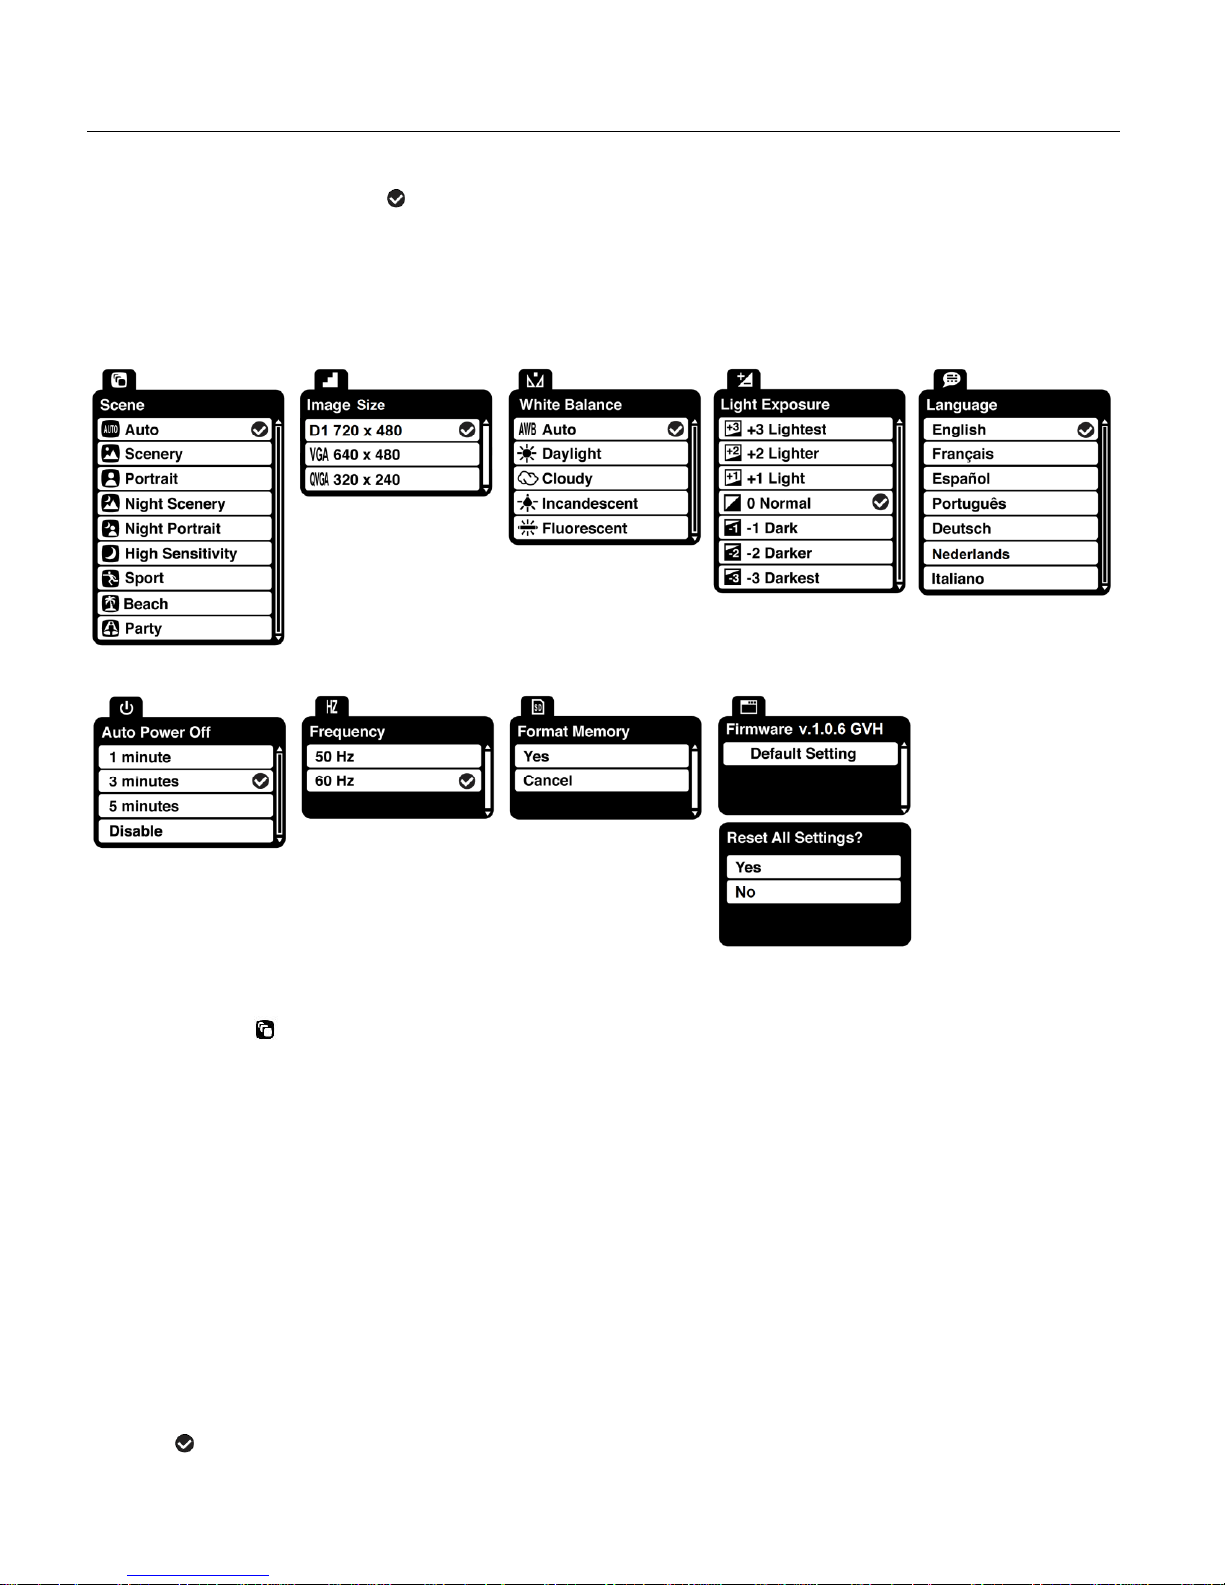
VIDEO CAPTURE MODE MENUS
The following are the menus that appear in your camera’s Video Capture Mode:
In the image below, the selection icon appears by the default settings.
Once you change a setting, the setting is saved by your camera until you manually change the
setting or restore the camera’s default factory settings. The selected setting appears with a
check mark.
Scene Menu
The ‘Scene’ menu allows you to choose scene settings that let your camera to adapt properly to
your current environment.
NOTE: Remember: The ‘Scene’ menu is also accessible by pressing the UP Quick Function
Button while in Capture Mode.
1. Press the SET button to open the menus for the current mode.
2. Press the LEFT or RIGHT button to scroll and select the ‘Scene’ menu.
3. Press the UP or DOWN button to highlight a specific option.
4. Press the SET button to confirm and select the highlighted menu option.
A selected option icon appears on the selected item.
Page 18

17
5. To continue within the menus and select a different menu option:
Press the LEFT or RIGHT button to select the next menu item.
6. To exit the menu view:
Press the MODE button to exit the menu and return to your previous mode.
An icon reflecting your selection is displayed on the LCD screen.
Image Size Menu
The ‘Image Size’ menu allows you to choose the desired size of the images taken by your
camera. Keep in mind that images with a higher resolution will also take up more of your
camera’s memory.
The Image Size options include:
D1 720x480
VGA 640x480
QVGA 320x240
1. Press the SET button to open the menus for the current mode.
2. Press the LEFT or RIGHT button to scroll and select the ‘Image Size’ menu.
3. Press the UP or DOWN button to highlight a specific option.
4. Press the SET button to confirm and select the highlighted menu option.
A selected option icon appears on the selected item.
5. To continue within the menus and select a different menu option:
Press the LEFT or RIGHT button to select the next menu item.
6. To exit the menu view:
Press the MODE button to exit the menu and return to your previous mode.
An icon reflecting your selection is displayed on the LCD screen.
White Balance Menu
The ‘White Balance’ feature allows your camera to adjust the coloring of the captured images
depending on the type of light source in the current environment.
Properly adjusting the White Balance setting to match your current environment will allow the
camera to properly balance the colors in the images that are taken with your camera.
Page 19

18
1. Press the SET button to open the menus for the current mode.
2. Press the LEFT or RIGHT button to scroll and select the ‘White Balance’ menu.
3. Press the UP or DOWN button to highlight a specific option.
4. Press the SET button to confirm and select the highlighted menu option.
A selected option icon appears on the selected item.
5. To continue within the menus and select a different menu option:
Press the LEFT or RIGHT button to select the next menu item.
6. To exit the menu view:
Press the MODE button to exit the menu and return to your previous mode.
An icon reflecting your selection is displayed on the LCD screen.
Light Exposure Menu
The ‘Light Exposure’ setting helps you control the amount of light that enters your camera’s lens.
This setting should be adjusted when the environment is lighter or darker than normal.
When the environment has more light than is needed, reduce the exposure setting (by using the
negative - count) to reduce the amount of light allowed into the lens by your camera.
If the environment has less light (darker) than is needed, increase the exposure setting (by using
the positive + count) to increase the amount of light allowed into the lens by your camera.
1. Press the SET button to open the menus for the current mode.
2. Press the LEFT or RIGHT button to scroll and select the ‘Light Exposure’ menu.
3. Press the UP or DOWN button to highlight a specific option.
4. Press the SET button to confirm and select the highlighted menu option.
A selected option icon appears on the selected item.
5. To continue within the menus and select a different menu option:
Press the LEFT or RIGHT button to select the next menu item.
6. To exit the menu view:
Press the MODE button to exit the menu and return to your previous mode.
An icon reflecting your selection is displayed on the LCD screen.
Page 20

19
Language Menu
You can select your camera’s language setting by selecting the desired language from the
‘Language’ menu.
1. Press the SET button to open the menus for the current mode.
2. Press the LEFT or RIGHT button to scroll and select the ‘Language’ menu.
3. Press the UP or DOWN button to highlight a specific option.
4. Press the SET button to confirm and select the highlighted menu option.
A selected option icon appears on the selected item.
5. To continue within the menus and select a different menu option:
Press the LEFT or RIGHT button to select the next menu item.
6. To exit the menu view:
Press the MODE button to exit the menu and return to your previous mode.
Auto Power Off Menu
You can use the ‘Auto Power Off’ feature in order to conserve you camera’s battery life. The
designated time represents when your camera will automatically power off.
When the camera sits idle for the designated period of time, the camera will shut off completely
and will need to be powered on again with the power button before the next use.
1. Press the SET button to open the menus for the current mode.
2. Press the LEFT or RIGHT button to scroll and select the ‘Auto Power Off’ menu.
3. Press the UP or DOWN button to highlight a specific option.
4. Press the SET button to confirm and select the highlighted menu option.
A selected option icon appears on the selected item.
5. To continue within the menus and select a different menu option:
Press the LEFT or RIGHT button to select the next menu item.
6. To exit the menu view:
Press the MODE button to exit the menu and return to your previous mode.
Page 21

20
Frequency Menu
The options in the ‘Frequency’ menu represent the frequency of the electrical current in
fluorescent lighting sources in your locale. If your camera is set to a frequency that does not
match your country’s electric current, you may see waves on the images taken by your camera.
50Hz – UK, Europe and Australia
60Hz – US, Canada and South America
1. Press the SET button to open the menus for the current mode.
2. Press the LEFT or RIGHT button to scroll and select the ‘Frequency’ menu.
3. Press the UP or DOWN button to highlight a specific option.
4. Press the SET button to confirm and select the highlighted menu option.
A selected option icon appears on the selected item.
5. To continue within the menus and select a different menu option:
Press the LEFT or RIGHT button to select the next menu item.
6. To exit the menu view:
Press the MODE button to exit the menu and return to your previous mode.
Format Memory Card Menu
You can use the ‘Format Memory Card’ menu to delete all of the content that is currently on your
camera’s memory card.
Keep in mind that formatting the memory card will permanently delete all of the content on
your camera’s memory card.
This option will delete all of the content at one time. If you would like to delete individual images,
use the delete menu in the camera’s Playback mode.
NOTE: Restoring factory defaults or formatting the camera may result in the loss of data.
Please ensure you have backed up your images before you attempt this.
1. Press the SET button to open the menus for the current mode.
2. Press the LEFT or RIGHT button to scroll and select the ‘Format Memory Card’ menu.
3. Press the UP or DOWN button to highlight a specific option:
- CANCEL: To exit without formatting the SD Memory Card, select ‘Cancel’ and press the
SET button.
Page 22

21
- FORMAT: To proceed with the format, select “Yes” and press the SET button.
You will be asked to confirm the formatting of the memory card.
• Select ‘No’ and press the SET button to exit without formatting.
• Select ‘Yes’ and press the SET button to begin the format.
The memory card will be completely formatted.
Firmware (Factory Default Settings) Menu
Use the ‘Firmware’ menu to view the Firmware version on your camera or to reset your camera
settings to the Factory Default Settings.
1. Press the SET button to open the menus for the current mode.
2. Press the LEFT or RIGHT button to scroll and select the ‘Firmware’ menu.
3. The ‘Default Setting’ option is automatically selected.
4. Press the SET button to reset the camera to the Factory Default Settings.
You will be asked to confirm the resetting to the Factory Default Settings.
• Select ‘No’ to exit the menu and return to the previous mode without resetting to the
default settings.
• Select ‘Yes’ and press the SET button to proceed with the reset.
You will then automatically exit the menu and return to the previous mode with the digital
camera settings set to the Factory Default Settings.
NOTE: After RESETTING to the default settings, it is recommended to select your system
language and ViviLink using the Video/Photo Capture Mode Menu. If you do not, the next time
the digital video camera is powered on, you will be prompted to select these settings.
Page 23

22
Video Playback Mode
The Playback Mode allows you to review videos and edit photos that you’ve already taken with
your camera.
When you first turn on the camera, the camera will be in Video Capture mode by default.
Press the MODE (M) button twice to open the Playback Mode.
The latest captured image appears on the LCD screen. If there are no images stored, a
message (No File) appears.
The playback icon appears on the top left corner of the LCD.
PLAYING VIDEOS ON YOUR CAMERA
1. Selecting Your Video:
Once in Playback mode, press the UP or DOWN button to scroll through the images
on your camera’s memory card until you find the video you would like to view.
- Press the UP button to display the previous image.
- Press the DOWN button to display the next image.
Each captured image (video and photo) is displayed on the LCD screen.
- Videos appear with ‘AVI’ on the top left of the LCD screen.
- Photos appear with ‘JPG’ on the top left of the LCD screen.
2. Playing Your Selected Video:
START: Press the Shutter button to start playing the video.
While the Video is playing all the icons on the top section of the LCD disappear.
The elapsed playing time and video control icons appear on the bottom of the LCD.
PAUSE: Press the Shutter button again to pause the video and press again to
continue playing and pausing as needed.
STOP: To fully stop the video and restore the icons to the LCD, press the UP button.
Page 24
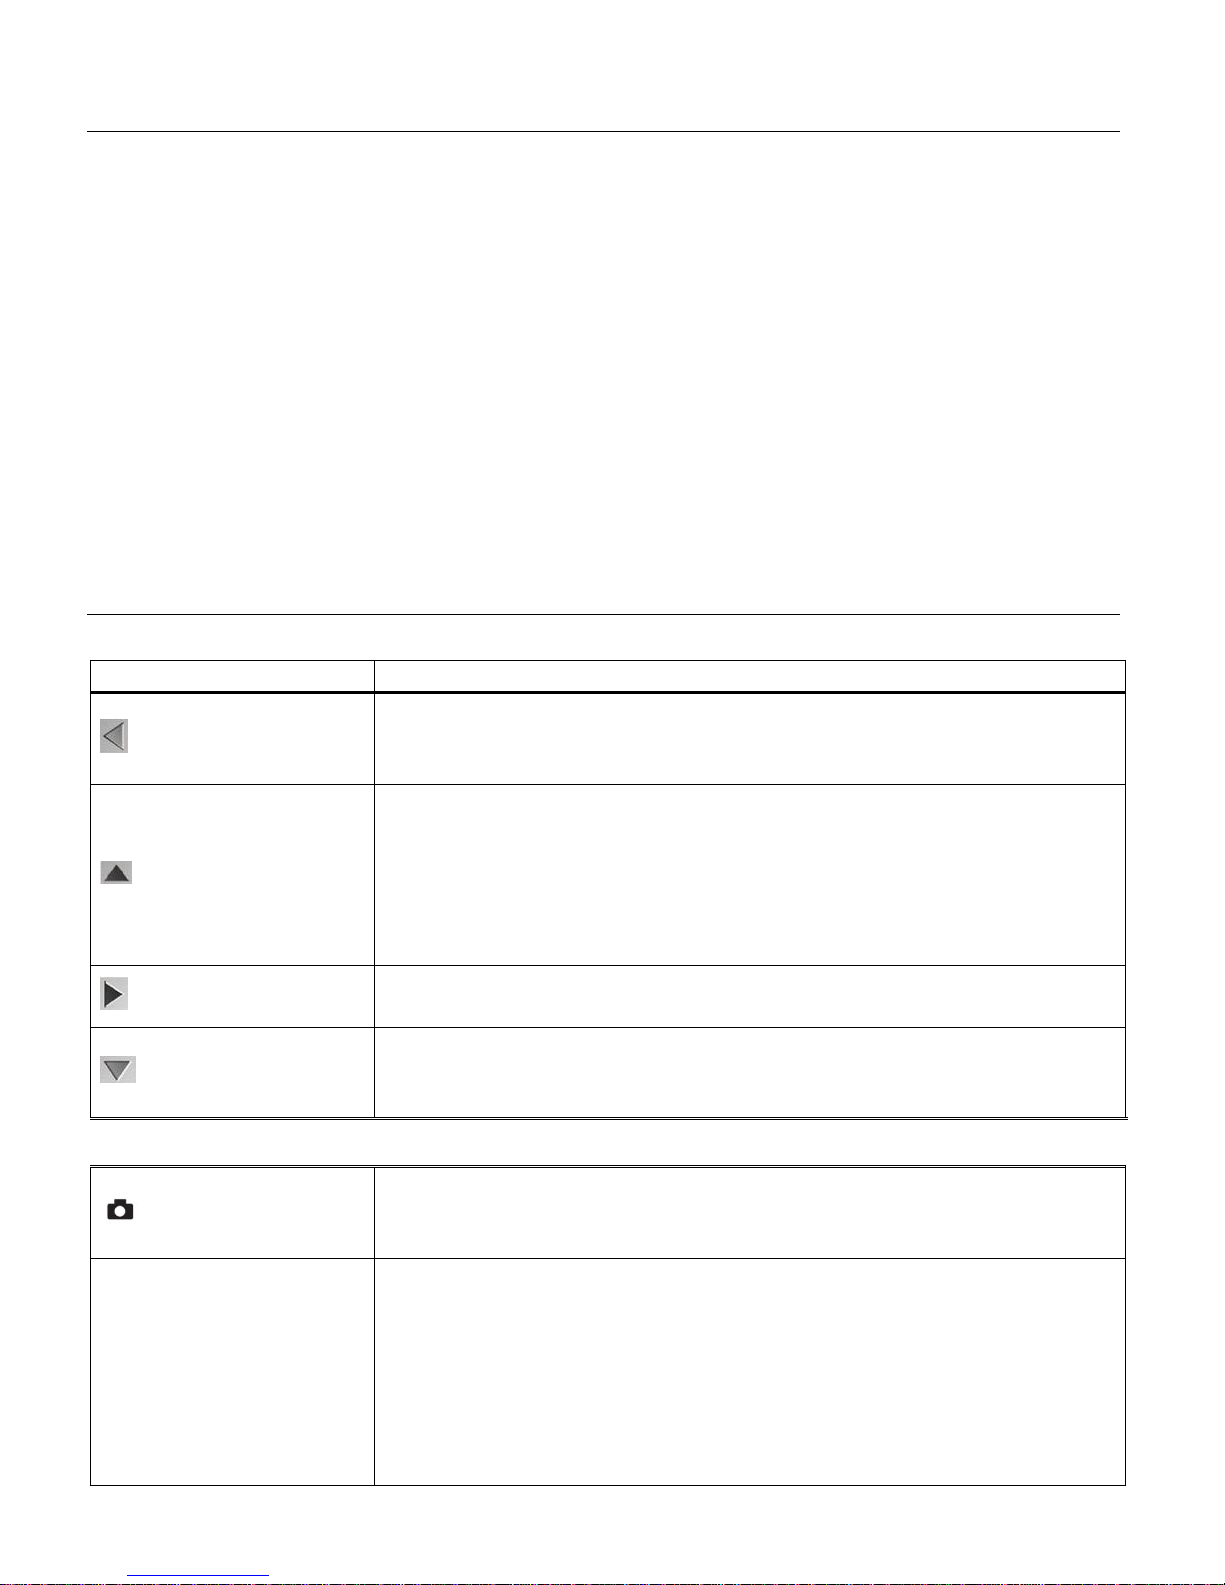
23
THUMBNAIL VIEW
Quick Function Button
Action
Left
Opens Thumbnail view (when not playing a selected video).
Scrolls through the images while in Thumbnail view.
Up
Displays the PREVIOUS image (when not playing a selected
video).
STOPS the video playback.
Scrolls through the images while in Thumbnail view.
Right
Scrolls through the images while in Thumbnail view.
Down
Displays the NEXT image (when not playing a selected video).
Scrolls through the images while in Thumbnail view.
Other
Shutter
PLAYS the selected video file.
PAUSES the selected playing video.
SET/OK
MENU: Opens the menu options for Video Playback Mode.
Saves your selected menu option.
In Thumbnail view, enlarges to full screen the selected thumbnail
image and exits Thumbnail view.
NOTE: To navigate through the Menus, use the Left, Up, Right, and
Easily navigate and select the image you wish to view by using the Thumbnail View.
The images on your camera will be displayed in a 3 X 3 matrix where you can use the direction
buttons to scroll and select images from the thumbnails.
To access the Thumbnail view while in Playback Mode:
1. Press the LEFT - W/Zoom Out button.
2. All the images on your camera appear in the Thumbnail View.
Videos appear with ‘AVI’ and photos appear with ‘JPG’.
3. Use the UP / DOWN / LEFT / RIGHT buttons to scroll and find the image you wish to view.
4. Press the SET button to select and enlarge the video full size. You can then play the video.
VIDEO PLAYBACK MODE BUTTON FUNCTIONALITY
Your digital camera has a four-directional pad that functions as Quick Function buttons.
Page 25
24
Down directions control buttons.
MODE (M)
Toggles between the Video Capture Mode, Photo Capture Mode,
and Playback Mode.
Exits the menu screen.
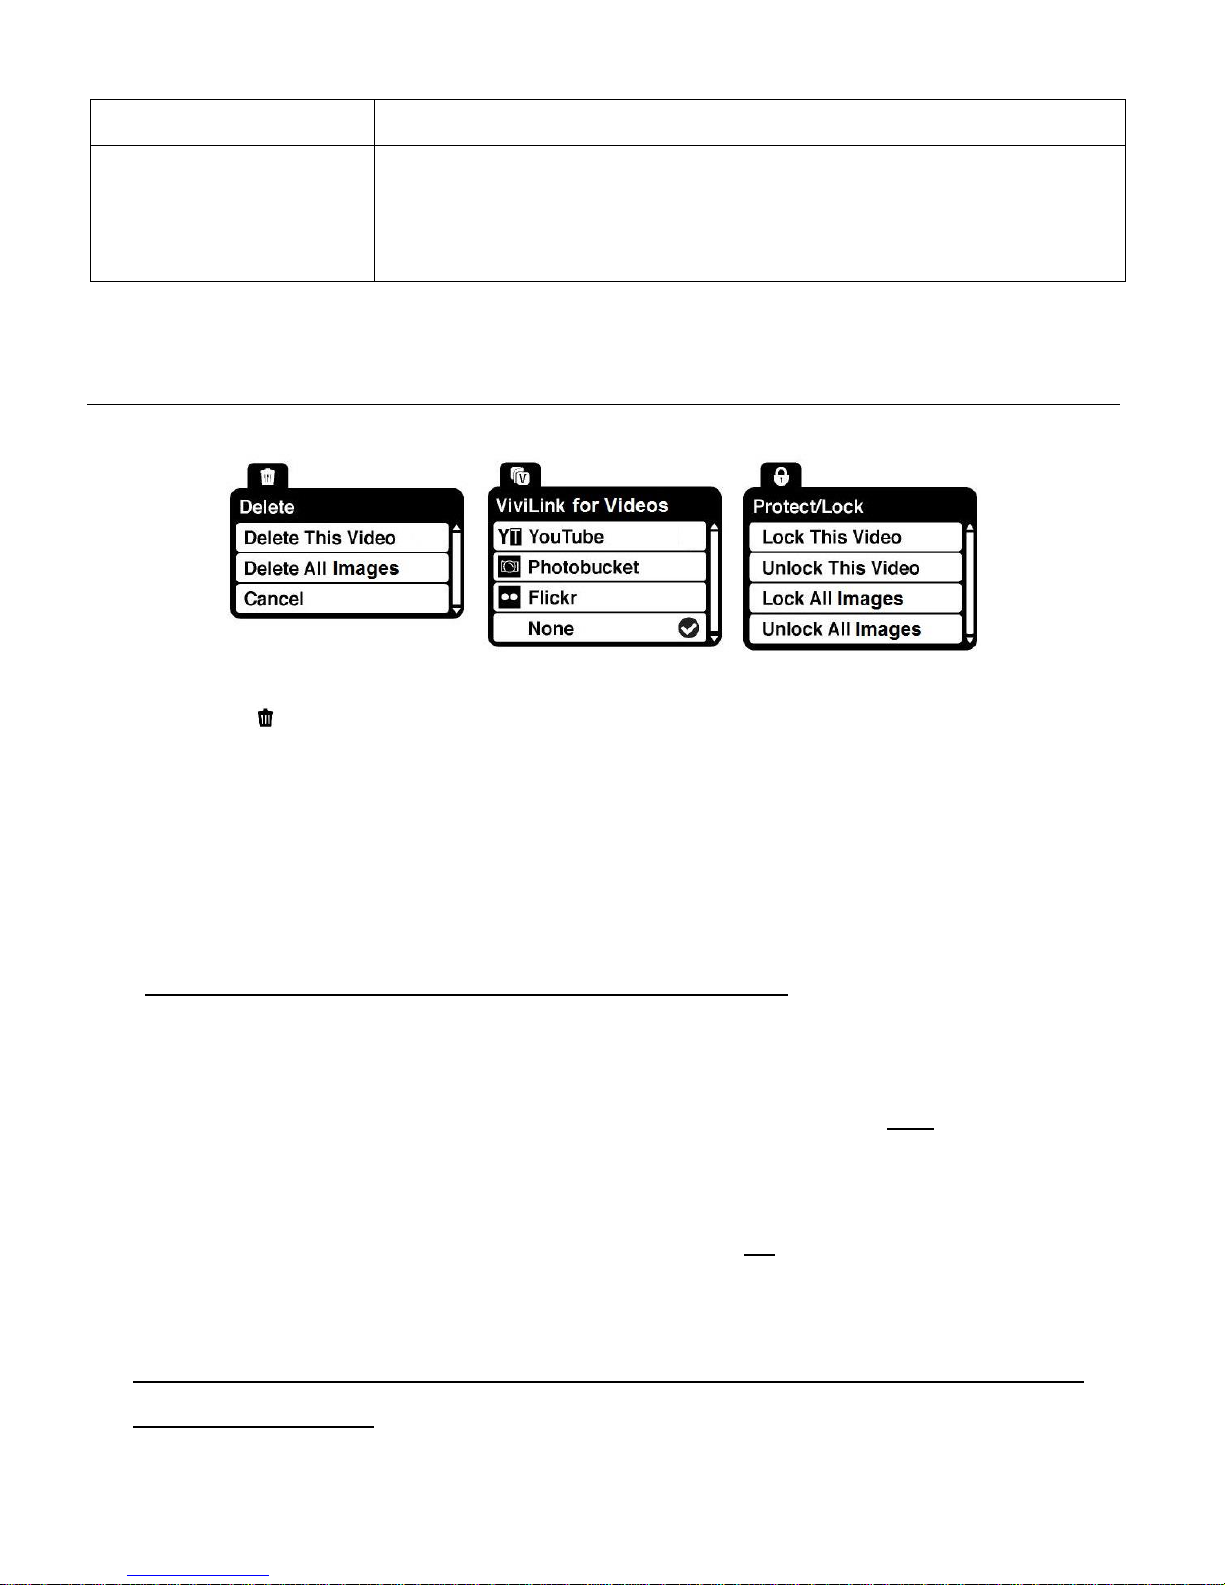
VIDEO PLAYBACK MODE MENUS
The following are the menus that appear in your camera’s Video Playback Mode:
Delete Menu
While in the Playback mode, you can delete videos from your camera using the Delete menu.
1. Select the video you would like to delete.
2. Press the SET button to open the menu options.
5. Press the LEFT or RIGHT button to scroll and select the ‘Delete’ menu.
6. Press the UP or DOWN button to scroll through and highlight a specific menu option.
DELETE THIS VIDEO - To delete the selected (single) video:
Select “Delete This Video” and press the SET button.
You will be asked to confirm the deletion of the video.
If you would like to proceed with deleting the current image, select ‘Yes’ and press the
SET button to confirm. The video will be deleted and you will exit the menu and return to
the Playback mode.
If you do not want to delete the current image, select ‘No’ and press the SET button. The
video will not be deleted and you will exit the menu and return to the Playback mode.
DELETE ALL IMAGES - To delete all the images (videos and photos) you have saved on
your SD Memory card:
Select ‘Delete All Images’ and press the SET button.
Page 26

25
If you would like to proceed with deleting all the videos and photos, select ‘Yes’ and press
the SET button.
You will be asked to reconfirm:
- DELETE: If you would like to proceed with deleting all images, select ‘Yes’ and press
the SET button to confirm. All unlocked images (both videos and photos) will be
permanently deleted.
A blank ‘No Files Exist’ screen will appear.
Press the MODE button to exit the ‘No Files Exist’ screen.
Remember: All images will be deleted except images that are Protected/Locked. To
delete a locked image, first unlock the image, then select delete.
- CANCEL: If you do not want to delete the images, select ‘No’ and press the SET button.
The images will not be deleted and you will exit the menu and return to the Playback
mode.
ViviLink for Videos Menu
The ViviLink technology allows you to quickly and easily upload your camcorder’s photos and
videos to the social networks of your choice with the accompanying Vivitar Experience™ Image
Manager application.
The ‘ViviLink for Videos’ options include: YouTube, Photobucket, Flickr, None
1. Select the video to which you would like to add a ViviLink.
2. Press the SET button to open the menus for the current mode.
3. Press the LEFT or RIGHT button to scroll and select the ‘ViviLink for Videos’ menu.
4. Press the UP or DOWN button to highlight a specific option.
5. Press the SET button to confirm and select the highlighted menu option.
A selected option icon appears on the selected item.
6. To continue within the menus and select a different menu option:
Press the LEFT or RIGHT button to select the next menu item.
7. To exit the menu view:
Press the MODE button to exit the menu and return to your previous mode.
An icon reflecting your selection is displayed on the LCD screen.
Page 27

26
Protect/Lock Menu
Pictures and videos taken with your camera can be protected or “locked” to prevent any deletion
or alteration being made to the files. The ‘Protect/Lock’ options include:
Lock This Video, Unlock This Video, Lock All Images, Unlock All Images
1. View the video you would like to protect/lock.
2. Press the SET button to open the menus for the current mode.
3. Press the LEFT or RIGHT button to scroll and select the ‘Protect/Lock’ menu.
4. Press the UP or DOWN button to highlight a specific option.
LOCK THIS VIDEO - To Lock the Selected Image:
To lock the selected image use the UP or DOWN button to highlight ‘Lock This Video’ and
then press the SET button. The image now appears in Playback Mode with the lock icon .
UNLOCK THIS VIDEO - To Unlock the Selected Image:
To unlock the selected locked image use the UP or DOWN button to highlight ‘Unlock This
Video’ and then press the SET button. The image now appears in Playback Mode without
the lock icon.
LOCK ALL IMAGES - To Lock All Images:
To lock all captured videos and photos use the UP or DOWN button to highlight ‘Lock All
Images’ and then press the SET button. All images now appear in Playback Mode with the
lock icon .
UNLOCK ALL IMAGES - To Unlock All Images:
To unlock all locked videos and photos use the UP or DOWN button to highlight ‘Unlock All
Images’ and then press the SET button. The images now appear in Playback Mode without
the lock icon.
5. Press the MODE button at any time to exit the menu and return to your previous mode.
NOTE:
Any image that is locked displays a lock symbol on the LCD screen when viewing that image
in the Playback Mode. Videos that are not locked do not display the lock symbol.
Remember that you cannot delete videos while they are locked.
Page 28

27
Photo Capture Mode
The Photo Capture mode allows you to capture pictures with your digital camera.
When the camera is first powered ON, the camera will be in Video Capture Mode.
Press the MODE (M) button once to enter Photo Capture Mode.
The camera icon appears on the top left corner of the LCD.
TAKING A PICTURE
1. Selecting the Scene with the LCD Display:
While in Photo Capture mode, use the LCD display to direct the camera at the scene you
would like to capture.
NOTE: The amount of photos that can be captured with the available memory and as per
the selected resolution will appear on the top right corner of the LCD screen.
2. Zoom Options:
Press the Right - T/Zoom In and Left - W/Zoom Out buttons to better set the camera
display if desired.
3. Capturing the Photo:
STANDARD SCREEN MODE:
Press the Shutter button to capture and save your photo to the memory card.
FLIP SCREEN MODE:
You can also capture your photos using the Flip Screen.
When you would like to quickly and easily include yourself in the photo, simply flip the
LCD display out and hold out the camera facing towards you. Make sure you can see
yourself within the scene on the LCD screen and click the Shutter button to take the
picture. It’s as easy as twist and shoot!
NOTE: The lower the resolution setting the more photos can be taken. However lower resolution
photos are of less quality than photos taken at higher resolution.
Page 29
28
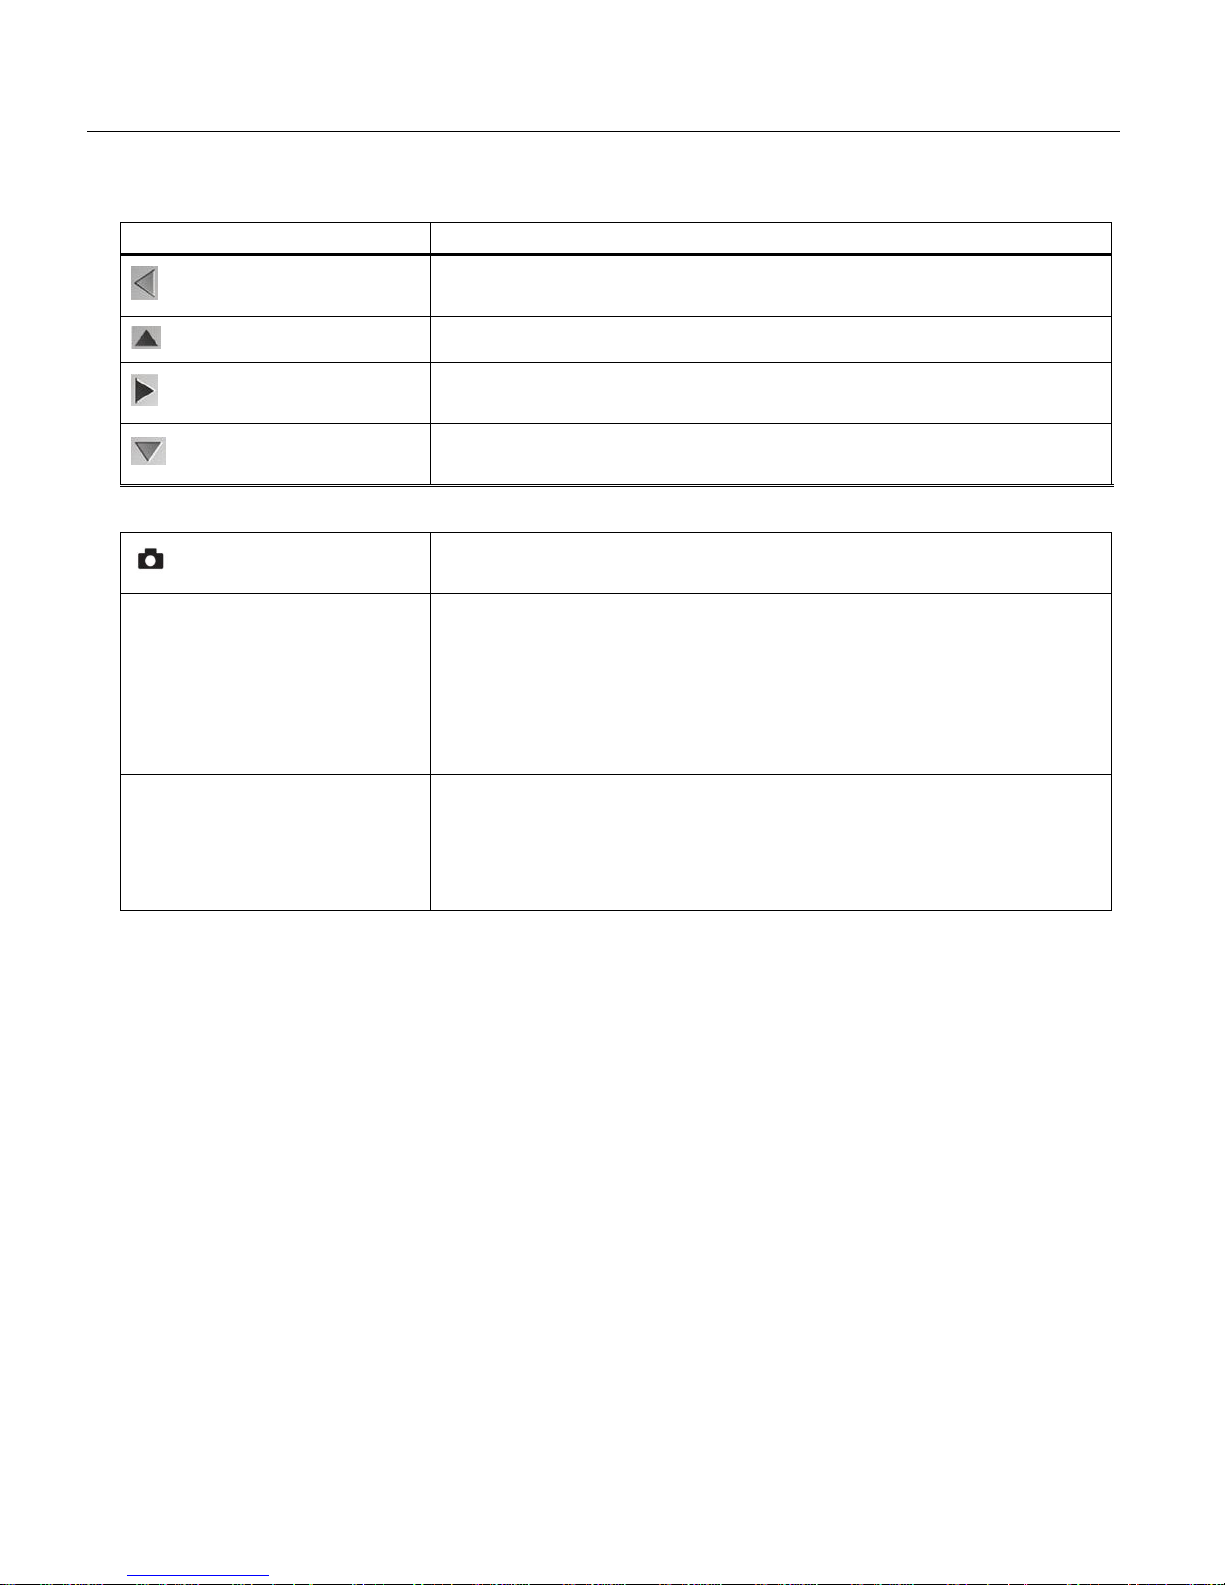
PHOTO CAPTURE MODE BUTTON FUNCTIONALITY
Quick Function Button
Action
Left
Zooms Out
Up
Scene Selection – Opens the Scene menu
Right
Zooms In
Down
Delete – Allows you to delete the last photo captured
Other
Shutter
Captures the Picture
SET/OK
Opens the menu options for Photo Capture Mode.
Saves your selected menu option
NOTE: To navigate through the Menus, use the Left, Up,
Right, and Down directions control buttons.
MODE (M)
Toggles between the Video Capture Mode, Photo Capture
Mode, and Playback Mode.
Exits the Menu options screen.
Your digital camera has a four-directional pad that functions as Quick Function buttons.
Page 30
29
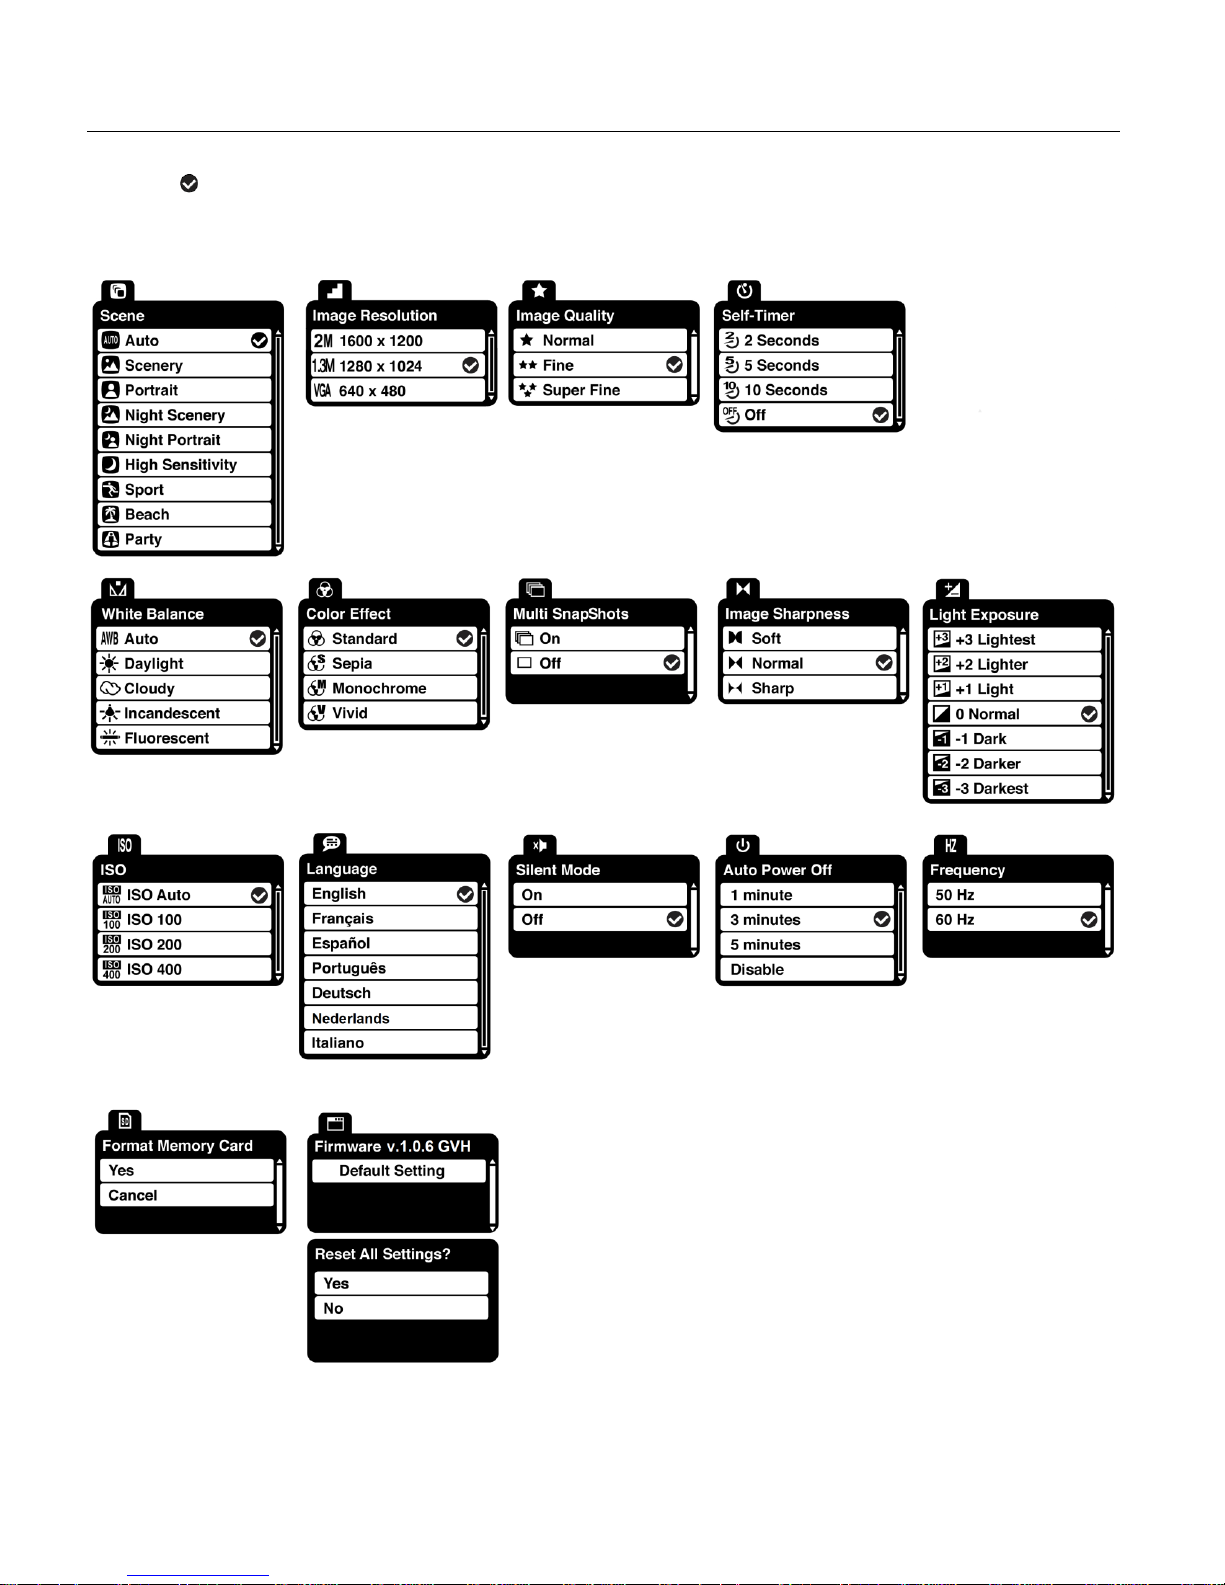
PHOTO CAPTURE MODE MENUS
The following are the menus that appear in your camera’s Photo Capture Mode.
The selection icon appears by the default settings.
Once you change a setting, the setting is saved by your camera until you manually change the
setting or restore the camera’s default factory settings.
Page 31

30
Scene Menu
The ‘Scene’ menu allows you to choose scene settings that let your camera to adapt properly to
your current environment.
NOTE: Remember: The ‘Scene’ menu is also accessible by pressing the UP Quick Function
Button while in Capture Mode.
1. Press the SET button to open the menus for the current mode.
2. Press the LEFT or RIGHT button to scroll and select the ‘Scene’ menu.
3. Press the UP or DOWN button to highlight a specific option.
4. Press the SET button to confirm and select the highlighted menu option.
A selected option icon appears on the selected item.
5. To continue within the menus and select a different menu option:
Press the LEFT or RIGHT button to select the next menu item.
6. To exit the menu view:
Press the MODE button to exit the menu and return to your previous mode.
An icon reflecting your selection is displayed on the LCD screen.
Image Resolution Menu
The Image Resolution menu allows you to choose the desired size of the images taken by your
camera. Keep in mind that images with a higher resolution will also take up more of your
camera’s memory.
1. Press the SET button to open the menus for the current mode.
2. Press the LEFT or RIGHT button to scroll and select the ‘Image Resolution’ menu.
3. Press the UP or DOWN button to highlight a specific option.
4. Press the SET button to confirm and select the highlighted menu option.
A selected option icon appears on the selected item.
5. To continue within the menus and select a different menu option:
Press the LEFT or RIGHT button to select the next menu item.
6. To exit the menu view:
Press the MODE button to exit the menu and return to your previous mode.
An icon reflecting your selection is displayed on the LCD screen.
Page 32

31
Image Quality Menu
The ‘Image Quality’ menu allows you to select the desired quality level of the images taken by
your camera. Keep in mind that images with a higher image quality level will also take up more
memory on your camera.
1. Press the SET button to open the menus for the current mode.
2. Press the LEFT or RIGHT button to scroll and select the ‘Image Quality’ menu.
3. Press the UP or DOWN button to highlight a specific option.
4. Press the SET button to confirm and select the highlighted menu option.
A selected option icon appears on the selected item.
5. To continue within the menus and select a different menu option:
Press the LEFT or RIGHT button to select the next menu item.
6. To exit the menu view:
Press the MODE button to exit the menu and return to your previous mode.
An icon reflecting your selection is displayed on the LCD screen.
Self Timer Menu
The ‘Self Timer’ menu allows you to set a delay between the time that the camera’s Shutter
button is pressed and the actual capture of the picture.
This is an optimal feature if you don’t just want to take the picture but would also like to be in the
picture yourself. Just set the desired Self-Timer delay, press the Shutter button on your camera
and position yourself in front of the camera as desired.
1. Press the SET button to open the menus for the current mode.
2. Press the LEFT or RIGHT button to scroll and select the ‘Self Timer’ menu.
3. Press the UP or DOWN button to highlight a specific option.
4. Press the SET button to confirm and select the highlighted menu option.
A selected option icon appears on the selected item.
5. To continue within the menus and select a different menu option:
Press the LEFT or RIGHT button to select the next menu item.
6. To exit the menu view:
Press the MODE button to exit the menu and return to your previous mode.
An icon reflecting your selection is displayed on the LCD screen.
Page 33

32
White Balance Menu
The ‘White Balance’ feature allows your camera to adjust the coloring of the captured images
depending on the type of light source in the current environment.
Properly adjusting the White Balance setting to match your current environment will allow the
camera to properly balance the colors in the images that are taken with your camera.
1. Press the SET button to open the menus for the current mode.
2. Press the LEFT or RIGHT button to scroll and select the ‘White Balance’ menu.
3. Press the UP or DOWN button to highlight a specific option.
4. Press the SET button to confirm and select the highlighted menu option.
A selected option icon appears on the selected item.
5. To continue within the menus and select a different menu option:
Press the LEFT or RIGHT button to select the next menu item.
6. To exit the menu view:
Press the MODE button to exit the menu and return to your previous mode.
An icon reflecting your selection is displayed on the LCD screen.
Color Effect Menu
The ‘Color Effect’ menu allows you to choose a color effect to add to the images taken with your
camera.
1. Press the SET button to open the menus for the current mode.
2. Press the LEFT or RIGHT button to scroll and select the ‘Color Effect’ menu.
3. Press the UP or DOWN button to highlight a specific option.
4. Press the SET button to confirm and select the highlighted menu option.
A selected option icon appears on the selected item.
5. To continue within the menus and select a different menu option:
Press the LEFT or RIGHT button to select the next menu item.
6. To exit the menu view:
Press the MODE button to exit the menu and return to your previous mode.
Page 34

33
Multi Snapshots Menu
When enabled, the ‘Multi Snapshots’ feature allows you to take three rapid snapshots in a row
with a single press of the Shutter button.
This feature can be effective when trying to capture a particular moment in a sporting event or
other scenes with quick movements.
1. Press the SET button to open the menus for the current mode.
2. Press the LEFT or RIGHT button to scroll and select the ‘Multi Snapshots’ menu.
3. Press the UP or DOWN button to highlight a specific option.
4. Press the SET button to confirm and select the highlighted menu option.
A selected option icon appears on the selected item.
5. To continue within the menus and select a different menu option:
Press the LEFT or RIGHT button to select the next menu item.
6. To exit the menu view:
Press the MODE button to exit the menu and return to your previous mode.
An icon reflecting your selection is displayed on the LCD screen.
Image Sharpness Menu
Using the ‘Image Sharpness’ menu you can set the level of sharpness in the images taken with
your camera. The sharpness level dictates if the edges of objects in the image are more or less
distinct.
1. Press the SET button to open the menus for the current mode.
2. Press the LEFT or RIGHT button to scroll and select the ‘Image Sharpness’ menu.
3. Press the UP or DOWN button to highlight a specific option.
4. Press the SET button to confirm and select the highlighted menu option.
A selected option icon appears on the selected item.
5. To continue within the menus and select a different menu option:
Press the LEFT or RIGHT button to select the next menu item.
6. To exit the menu view:
Press the MODE button to exit the menu and return to your previous mode.
An icon reflecting your selection is displayed on the LCD screen.
Page 35

34
Light Exposure Menu
The ‘Light Exposure’ setting helps you control the amount of light that enters your camera’s lens.
This setting should be adjusted when the environment is lighter or darker than normal.
When the environment has more light than is needed, reduce the exposure setting (by using the
negative - count) to reduce the amount of light allowed into the lens by your camera.
If the environment has less light (darker) than is needed, increase the exposure setting (by using
the positive + count) to increase the amount of light allowed into the lens by your camera.
1. Press the SET button to open the menus for the current mode.
2. Press the LEFT or RIGHT button to scroll and select the ‘Light Exposure’ menu.
3. Press the UP or DOWN button to highlight a specific option.
4. Press the SET button to confirm and select the highlighted menu option.
A selected option icon appears on the selected item.
5. To continue within the menus and select a different menu option:
Press the LEFT or RIGHT button to select the next menu item.
6. To exit the menu view:
Press the MODE button to exit the menu and return to your previous mode.
An icon reflecting your selection is displayed on the LCD screen.
ISO Menu
The ‘ISO’ menu allows you to set the level of sensitivity that your camera has to light in the
surrounding environment. When the ISO level is increased, the image sensor in your camera will
be more sensitive to light and allow you to capture images in lower-light situations. The higher
sensitivity to light however, may reduce the quality of the images that are taken.
When the ISO is reduced, the image sensor in your camera will be less sensitive to light and will
optimize the image quality in environments with bright lighting.
1. Press the SET button to open the menus for the current mode.
2. Press the LEFT or RIGHT button to scroll and select the ‘ISO’ menu.
3. Press the UP or DOWN button to highlight a specific option.
4. Press the SET button to confirm and select the highlighted menu option.
A selected option icon appears on the selected item.
Page 36

35
5. To continue within the menus and select a different menu option:
Press the LEFT or RIGHT button to select the next menu item.
6. To exit the menu view:
Press the MODE button to exit the menu and return to your previous mode.
An icon reflecting your selection is displayed on the LCD screen.
Language Menu
You can select your camera’s language setting by selecting the desired language from the
‘Language’ menu.
1. Press the SET button to open the menus for the current mode.
2. Press the LEFT or RIGHT button to scroll and select the ‘Language’ menu.
3. Press the UP or DOWN button to highlight a specific option.
4. Press the SET button to confirm and select the highlighted menu option.
A selected option icon appears on the selected item.
5. To continue within the menus and select a different menu option:
Press the LEFT or RIGHT button to select the next menu item.
6. To exit the menu view:
Press the MODE button to exit the menu and return to your previous mode.
Silent Mode Menu
You have the option of activating the camera’s ‘Silent Mode’ to disable all of the sound effects
(except for beeps heard during the Self-Timer countdown) that the camera emits when
performing camera functions.
NOTE: This does not affect the sound during video recording.
1. Press the SET button to open the menus for the current mode.
2. Press the LEFT or RIGHT button to scroll and select the ‘Silent Mode’ menu.
3. Press the UP or DOWN button to highlight a specific option.
4. Press the SET button to confirm and select the highlighted menu option.
A selected option icon appears on the selected item.
Page 37

36
5. To continue within the menus and select a different menu option:
Press the LEFT or RIGHT button to select the next menu item.
6. To exit the menu view:
Press the MODE button to exit the menu and return to your previous mode.
Auto Power Off Menu
You can use the ‘Auto Power Off’ feature in order to conserve you camera’s battery life. The
designated time represents when your camera will automatically power off.
When the camera sits idle for the designated period of time, the camera will shut off completely
and will need to be powered on again with the power button before the next use.
1. Press the SET button to open the menus for the current mode.
2. Press the LEFT or RIGHT button to scroll and select the ‘Auto Power Off’ menu.
3. Press the UP or DOWN button to highlight a specific option.
4. Press the SET button to confirm and select the highlighted menu option.
A selected option icon appears on the selected item.
5. To continue within the menus and select a different menu option:
Press the LEFT or RIGHT button to select the next menu item.
6. To exit the menu view:
Press the MODE button to exit the menu and return to your previous mode.
Frequency Menu
The options in the ‘Frequency’ menu represent the frequency of the electrical current in
fluorescent lighting sources in your locale. If your camera is set to a frequency that does not
match your country’s electric current, you may see waves on the images taken by your camera.
50Hz – UK, Europe and Australia
60Hz – US, Canada and South America
1. Press the SET button to open the menus for the current mode.
2. Press the LEFT or RIGHT button to scroll and select the ‘Frequency’ menu.
3. Press the UP or DOWN button to highlight a specific option.
4. Press the SET button to confirm and select the highlighted menu option.
Page 38

37
A selected option icon appears on the selected item.
5. To continue within the menus and select a different menu option:
Press the LEFT or RIGHT button to select the next menu item.
6. To exit the menu view:
Press the MODE button to exit the menu and return to your previous mode.
Format Memory Card Menu
You can use the ‘Format Memory Card’ menu to delete all of the content that is currently on your
camera’s memory card.
Keep in mind that formatting the memory card will permanently delete all of the content on
your camera’s memory card.
This option will delete all of the content at one time. If you would like to delete individual images,
use the delete menu in the camera’s Playback mode.
NOTE: Restoring factory defaults or formatting the camera may result in the loss of data.
Please ensure you have backed up your images before you attempt this.
1. Press the SET button to open the menus for the current mode.
2. Press the LEFT or RIGHT button to scroll and select the ‘Format Memory Card’ menu.
3. Press the UP or DOWN button to highlight a specific option:
- CANCEL: To exit without formatting the SD Memory Card, select ‘Cancel’ and press the
SET button.
- FORMAT: To proceed with the format, select “Yes” and press the SET button.
You will be asked to confirm the formatting of the memory card.
• Select ‘No’ and press the SET button to exit without formatting.
• Select ‘Yes’ and press the SET button to begin the format.
The memory card will be completely formatted.
Page 39

38
Firmware (Factory Default Settings) Menu
Use the ‘Firmware’ menu to view the Firmware version on your camera or to reset your camera
settings to the Factory Default Settings.
1. Press the SET button to open the menus for the current mode.
2. Press the LEFT or RIGHT button to scroll and select the ‘Firmware’ menu.
3. The ‘Default Setting’ option is automatically selected.
4. Press the SET button to reset the camera to the Factory Default Settings.
You will be asked to confirm the resetting to the Factory Default Settings.
• Select ‘No’ to exit the menu and return to the previous mode without resetting to the
default settings.
• Select ‘Yes’ and press the SET button to proceed with the reset.
You will then automatically exit the menu and return to the previous mode with the digital
camera settings set to the Factory Default Settings.
NOTE: After RESETTING to the default settings, it is recommended to select your system
language and ViviLink using the Video/Photo Capture Mode Menu. If you do not, the next time
the digital video camera is powered on, you will be prompted to select these settings.
Page 40

39
Photo Playback Mode
The Playback Mode allows you to review and edit photos and videos that you’ve already taken
with your camera.
When you first turn on the camera, the camera will be in Video Capture mode by default.
Press the MODE (M) button twice to open the Playback Mode.
The latest captured image appears on the LCD screen. If there are no images stored, a
message (No File) appears.
The Playback icon appears on the top left corner of the LCD.
VIEWING PHOTOS ON YOUR CAMERA
1. Selecting Your Photo:
Once in Playback mode, press the UP or DOWN button to scroll through the images
on your camera’s memory card until you find the photo you would like to view.
- Press the UP button to display the previous image.
- Press the DOWN button to display the next image.
Each captured image (video and photo) is displayed on the LCD screen.
- Videos appear with ‘AVI’ on the top left of the LCD screen.
- Photos appear with ‘JPG’ on the top left of the LCD screen.
2. Viewing Your Selected Photo:
You can zoom in to or zoom out of your selected photo.
Press the RIGHT - T / Zoom In button to Zoom In and magnify up to 4X the selected
photo. To navigate around the zoomed photo:
- Press the Shutter button, then use the UP / DOWN / LEFT / RIGHT buttons to
navigate around the zoomed photo.
- Press the Shutter button again to exit the move option.
Press the LEFT - W/Zoom Out button to Zoom Out of the selected photo. To
navigate around the zoomed photo:
- Press the Shutter button, then use the UP / DOWN / LEFT / RIGHT buttons to
navigate around the zoomed photo.
- Press the Shutter button again to exit the move option.
Page 41
40
THUMBNAIL VIEW
Quick Function
Button
Action
Left
Zooms out of the selected photo after you have zoomed in.
Opens Thumbnail view.
Scrolls through the images while in Thumbnail view.
Up
Displays the PREVIOUS image.
Scrolls through the images while in Thumbnail view.
STOPS the Slide Show.
Right
Zooms in to the selected photo.
Scrolls through the images while in Thumbnail view.
Down
Displays the NEXT image.
Scrolls through the images while in Thumbnail view.
Other
SHUTTER
When selected photo is zoomed, press the Shutter button to begin the
navigation of the magnified photo. Use the direction buttons to navigate.
Press the Shutter button again to exit the magnified navigation mode.
Easily navigate and select the image you wish to view by using the Thumbnail View.
The images on your camera are displayed in a 3 X 3 matrix where you can use the direction
buttons to scroll and select images from the thumbnails.
1. Press the LEFT - W/Zoom Out button.
2. All the images on your camera appear in the Thumbnail View.
Videos appear with ‘AVI’ and photos appear with ‘JPG’.
3. Use the UP / DOWN / LEFT / RIGHT buttons to scroll and find the photo you wish to view.
4. Press the SET button to select and enlarge the photo full size. You can then view and
magnify the photo.
PHOTO PLAYBACK MODE BUTTON FUNCTIONALITY
Your digital camera has a four-directional pad that functions as Quick Function buttons.
Page 42
41
SET/OK
Opens the menu options for Photo Playback Mode.
Saves your selected menu option.
In Thumbnail view, enlarges to full screen the selected thumbnail
image and exits Thumbnail view.
NOTE: To navigate through the Menus, use the Left, Up, Right, and
Down directions control buttons.
MODE (M)
Toggles between the Video Capture Mode, Photo Capture Mode, and
Playback Mode.
Exits the menu screen.
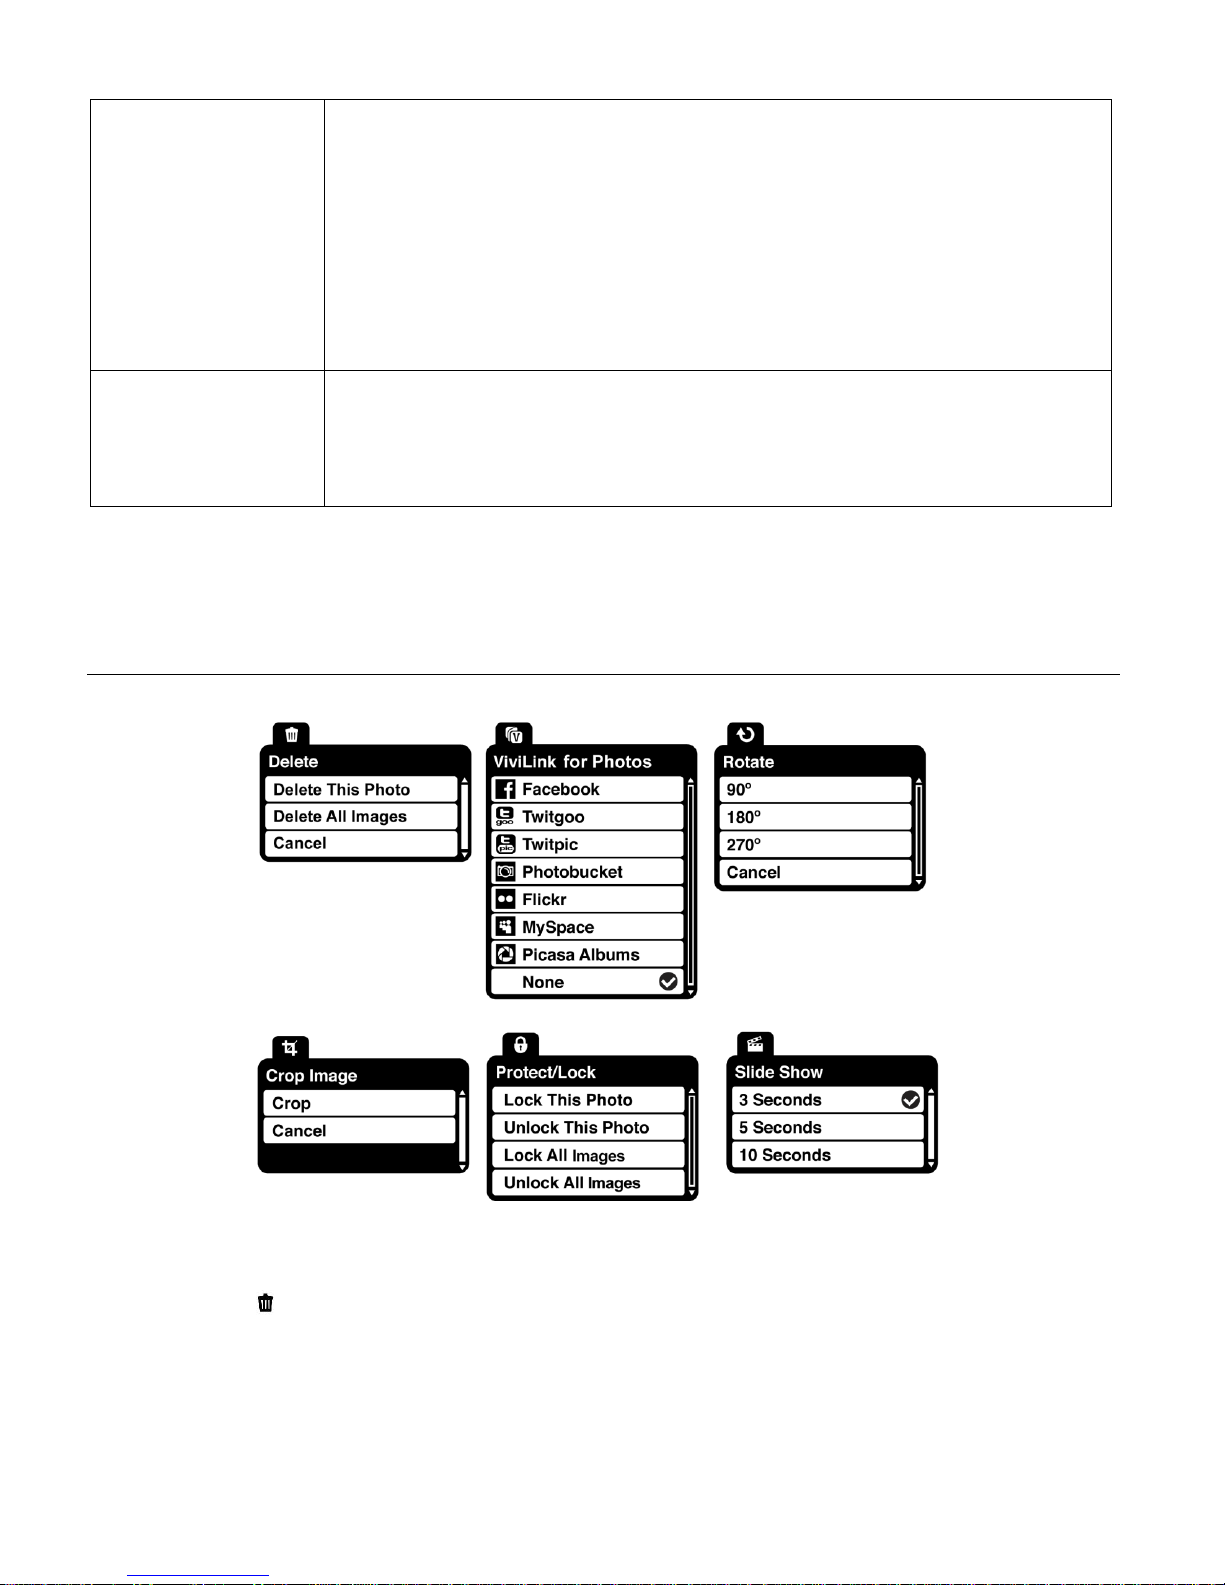
PHOTO PLAYBACK MODE MENUS
The following are the menus that appear in your camera’s Photo Playback Mode:
Delete Menu
While in the Playback mode, you can delete photos from your camera using the Delete menu.
1. Select the photo you would like to delete.
2. Press the SET button to open the menu options.
3. Press the LEFT or RIGHT button to scroll and select the ‘Delete’ menu.
Page 43

42
4. Press the UP or DOWN button to scroll through and highlight a specific menu option.
DELETE THIS PHOTO - To delete the selected (single) photo:
Select “Delete This Photo” and press the SET button.
You will be asked to confirm the deletion of the photo.
If you would like to proceed with deleting the current image, select ‘Yes’ and press the
SET button to confirm. The photo will be deleted and you will exit the menu and return to
the Playback mode.
If you do not want to delete the current image, select ‘No’ and press the SET button. The
photo will not be deleted and you will exit the menu and return to the Playback mode.
DELETE ALL IMAGES - To delete all the images (videos and photos) you have saved on
your SD Memory card:
Select ‘Delete All Images’ and press the SET button.
If you would like to proceed with deleting all the videos and photos, select ‘Yes’ and press
the SET button.
You will be asked to reconfirm:
- DELETE: If you would like to proceed with deleting all images, select ‘Yes’ and press
the SET button to confirm. All unlocked images (both videos and photos) will be
permanently deleted.
A blank ‘No Files Exist’ screen will appear.
Press the MODE button to exit the ‘No Files Exist’ screen.
Remember: All images will be deleted except images that are Protected/Locked. To
delete a locked image, first unlock the image, then select delete.
- CANCEL: If you do not want to delete the images, select ‘No’ and press the SET button.
The images will not be deleted and you will exit the menu and return to the Playback
mode.
ViviLink for Photos Menu
The ViviLink technology allows you to quickly and easily upload your camcorder’s photos and
videos to the social networks of your choice with the accompanying Vivitar Experience™ Image
Manager application.
Page 44

43
The ‘ViviLink for Photos’ options include: Facebook, Twitgoo (Twitter), Twitpic (Twitter),
Photobucket, Flickr, MySpace, Picas Albums, None
1. Select the photo to which you would like to add a ViviLink.
2. Press the SET button to open the menus for the current mode.
3. Press the LEFT or RIGHT button to scroll and select the ‘ViviLink for Photos’ menu.
4. Press the UP or DOWN button to highlight a specific option.
5. Press the SET button to confirm and select the highlighted menu option.
A selected option icon appears on the selected item.
6. To continue within the menus and select a different menu option:
Press the LEFT or RIGHT button to select the next menu item.
7. To exit the menu view:
Press the MODE button to exit the menu and return to your previous mode.
An icon reflecting your selection is displayed on the LCD screen.
Rotate Menu
Use this menu to rotate the pictures that you’ve taken with your camera.
1. View the image you would like to rotate.
2. Press the SET button to open the menus for the current mode.
3. Press the LEFT or RIGHT button to scroll and select the ‘Rotate’ menu.
4. Press the UP or DOWN button to scroll through the rotate options.
5. Press the SET button to select and save the desired rotate option.
The selected picture now appears rotated in the Playback mode.
Crop Image Menu
You can crop pictures on your camera with the Crop feature.
NOTE: VGA resolution photos cannot be cropped.
1. View the image you would like to Crop.
2. Press the SET button to open the menus for the current mode.
3. Press the LEFT or RIGHT direction control buttons to scroll and select the ‘Crop Image’
menu.
Page 45

44
4. Press the UP or DOWN direction control buttons to highlight the ‘Crop’ option.
5. Press the SET button to open the Crop option.
6. The blue crop box opens on the selected picture.
- MOVE CROP BOX:
Use the directional buttons to move the crop box to define the desired crop area.
- RESIZE CROP BOX:
To change the size of the crop box press the MODE (M) button. Then press the RIGHT
(Zoom In) to enlarge the crop box size. To decrease the crop box size, press the LEFT
(Zoom Out) button. Press the MODE (M) button again to exit the resize option.
7. When you are ready to crop, press the SHUTTER button.
8. When you see the cropped picture appear, press the SHUTTER button again to save or
press the SET button to cancel and return to the previous menu.
9. If you selected to save, the cropped picture is saved as a new picture to your memory card.
Protect/Lock Menu
Pictures and videos taken with your camera can be protected or “locked” to prevent any deletion
or alteration being made to the files. The ‘Protect/Lock’ options include:
Lock This Photo, Unlock This Photo, Lock All Images, Unlock All Images
1. View the photo you would like to protect/lock.
2. Press the SET button to open the menus for the current mode.
3. Press the LEFT or RIGHT button to scroll and select the ‘Protect/Lock’ menu.
4. Press the UP or DOWN button to highlight a specific option.
LOCK THIS PHOTO - To Lock the Selected Image:
To lock the selected image use the UP or DOWN button to highlight ‘Lock This Photo’ and
then press the SET button. The image now appears in Playback Mode with the lock icon .
UNLOCK THIS PHOTO - To Unlock the Selected Image:
To unlock the selected locked image use the UP or DOWN button to highlight ‘Unlock This
Photo’ and then press the SET button. The image now appears in Playback Mode without
the lock icon.
Page 46

45
LOCK ALL IMAGES - To Lock All Images:
To lock all captured videos and photos use the UP or DOWN button to highlight ‘Lock All
Images’ and then press the SET button. All images now appear in Playback Mode with the
lock icon .
UNLOCK ALL IMAGES - To Unlock All Images:
To unlock all locked videos and photos use the UP or DOWN button to highlight ‘Unlock All
Images’ and then press the SET button. The images now appear in Playback Mode without
the lock icon.
5. Press the MODE button at any time to exit the menu and return to your previous mode.
NOTE:
Any image that is locked displays a lock symbol on the LCD screen when viewing that image
in the Playback Mode. Photos that are not locked do not display the lock symbol.
Remember that you cannot delete photos while they are locked.
Slide Show Menu
The Slide Show menu allows you to play a slide show of all your captured photos. You can set
the interval length of time that each picture is displayed during the slide show.
1. Press the SET button to open the menus for the current mode.
2. Press the LEFT or RIGHT button to scroll and select the ‘Slide Show’ menu.
3. Press the UP or DOWN direction control buttons to scroll through the interval options.
4. Press the SET button to select and save the interval option and to automatically begin playing
the Slide Show.
NOTE: To exit the Slide Show menu without playing the Slide Show, press the MODE (M)
button.
5. While the Slide Show is playing, press the UP button to stop playing the Slide Show and return
to the Playback Mode.
Page 47
46
Installing the Software
The Vivitar Experience Image Manager Software can be installed either using the included CD
ROM or by accessing the link online.
INSTALLING THE SOFTWARE – USING THE CD ROM
You must be connected to the Internet to install and run the Vivitar Experience Image Manager
Software.
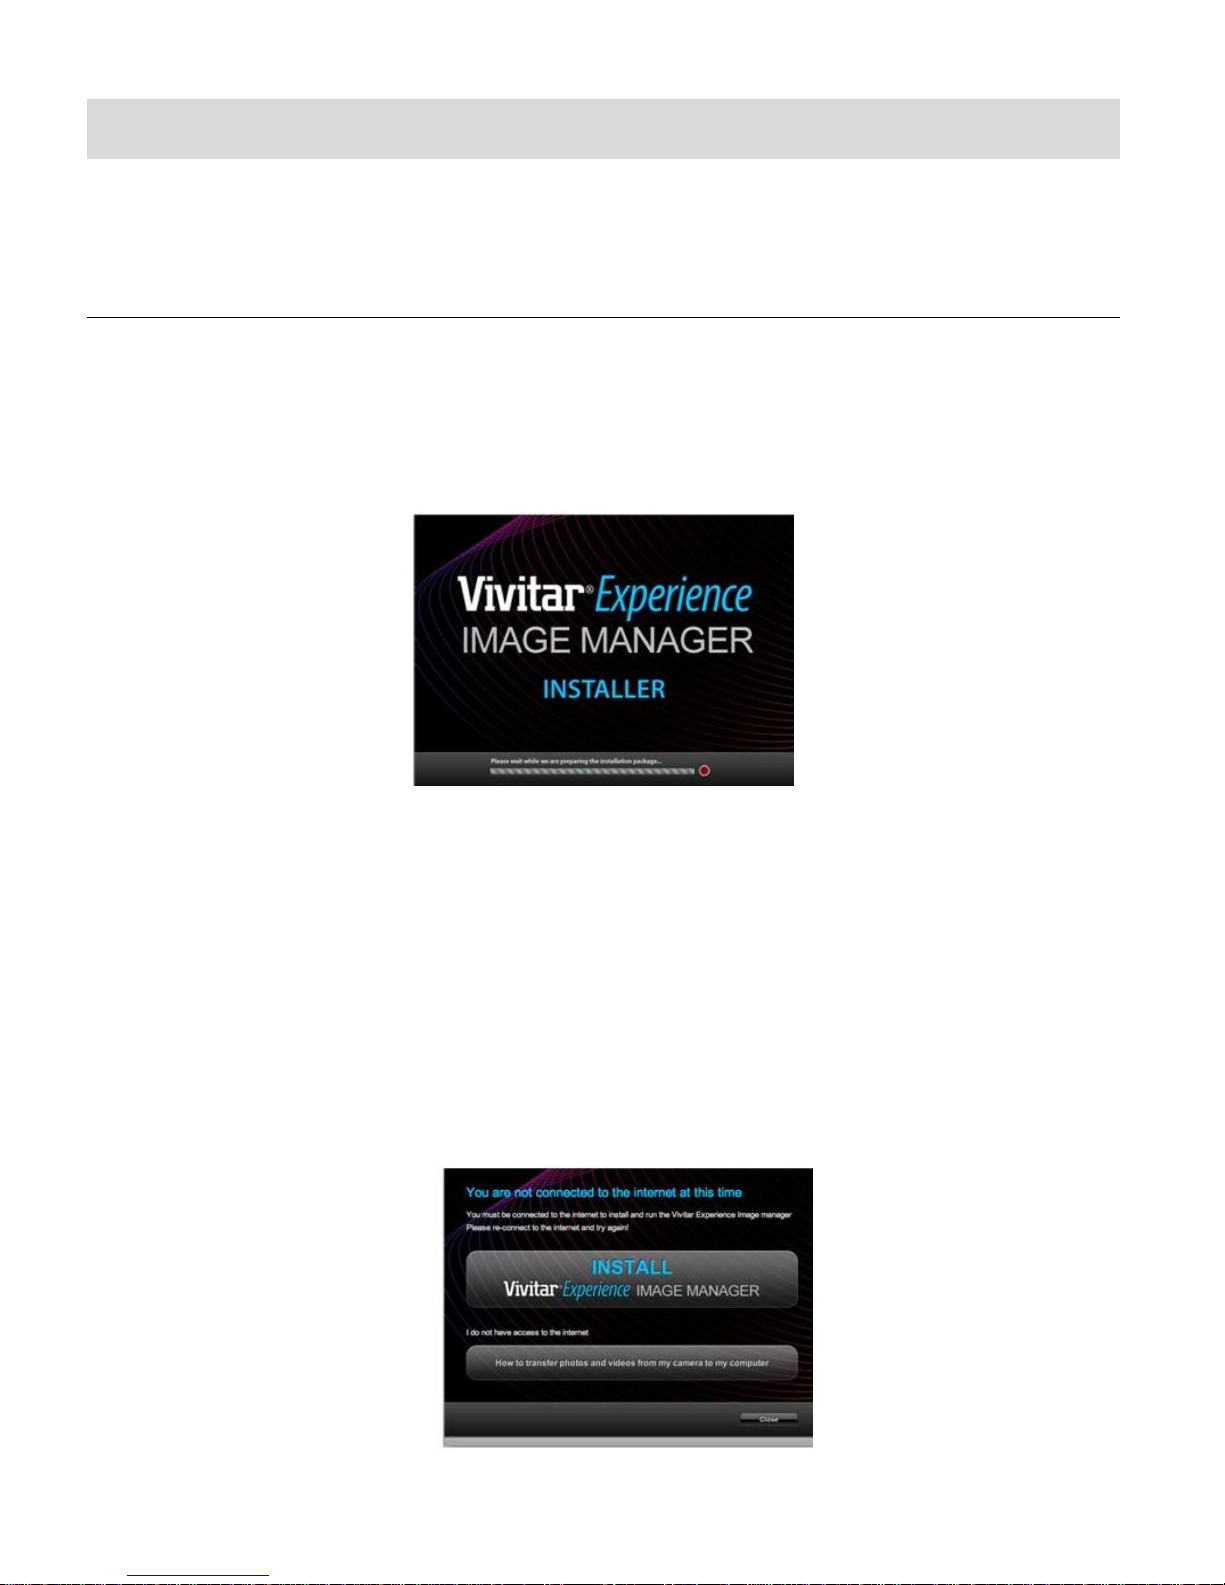
1. Insert the installation CD into your CD-ROM drive. The installation screen should
automatically open.
2. On WINDOWS OS: The Vivitar Experience Image Manager Installer window appears. If the
window does not appear, open the application’s CD/DVD drive and click on “Setup.exe” to
launch the installer.
3. On MACINTOSH OS: Click the icon that appears on the desktop to install the Vivitar
Experience Image Manager.
4. If you do not have Internet access at the time of inserting the CD-ROM, connect to the
Internet and then click the “Install Vivitar Experience Image Manager” button to begin the
installation.
Page 48

47
NOTE: If you do not have Internet access, you can still download media from the
camcorder. Click the “How to transfer photos and videos from my camera to my computer”
button for instructions.
5. If you have Internet access, the “Choose your language” window opens, choose your
language and click “Next” to open the next window.
6. Select your camera model from the list and click “Next” to open the next window.
7. Click “Next” to confirm your camera model selection and to install the application.
8. Please wait while the application is being installed on your computer.
9. Please review the license terms.
On WINDOWS OS and Macintosh: Click the “I accept the terms of this license agreement”
and then click “Next” to continue.
10. On WINDOWS OS only: Let the “Vivitar Experience Image Manager” installer create the
folder to where the program will be installed, and then click “Install”.
11. Please wait while the application continues the installation process on your computer.
On MACINTOSH OS: If needed, please follow instructions to install the Adobe® Flash®
Player. This requires Internet connection.
12. On WINDOWS OS: Click the “Close” button when the installation is complete.
Click the “Launch Vivitar Experience Image Manager” to open the application.
13. On MACINTOSH OS: Click the “Quit” button when the installation is complete.
Click the “Launch Vivitar Experience Image Manager” to open the application.
14. If you close the application you can run the Vivitar Experience Image Manager from the
Programs (PC) or Applications (Mac) menu on your computer.
Page 49

48
INSTALLING THE SOFTWARE – USING THE ONLINE LINK
The Vivitar Experience Image Manager Software can also be downloaded and installed via the
following online links:
WINDOWS OS: http://tinyurl.com/viviwin
MAC OS: http://tinyurl.com/vivimac
1. Enter the appropriate URL (shown above) into a web browser on your computer.
You can also click on one of the links above to follow the link.
2. The file for installing the software automatically begins to download to your computer.
Please note that the web page may appear empty, however the download automatically
begins.
3. Locate the downloaded application files on your computer’s ‘Downloads’ folder once the
download is complete:
On WINDOWS OS the file name is: vivitargeneric_win.exe
ON MAC OS in file name is: vivitargeneric_mac.pkg
4. Double click on the downloaded application file to begin installing the Vivitar Experience
Image Manager Software.
5. Follow all instructions.
6. Once installation is complete, the Vivitar Experience Image Manager application may open
automatically or you can click the app icon to launch the application.
Connecting the Camera to the Computer
1. Make sure the SD Memory card is inserted in the camera.
2. To reveal the connector, open the USB cover. Press the USB lever down and then upward.
Connect the camera’s USB connector to the USB port of your computer.
3. Power the camcorder ON if it does not turn on automatically upon the connection to the
computer.
4. The first time you connect the device to the computer you may have to wait a few seconds
until the computer recognizes the device.
Page 50
49
Getting Videos and Photos from the Camera to the
Computer
The SD Memory card needs to be inserted. Do not disconnect the camera’s built-in USB
connector from the computer during transfer. Doing so will cancel the transfer of any files on their
way to your computer.
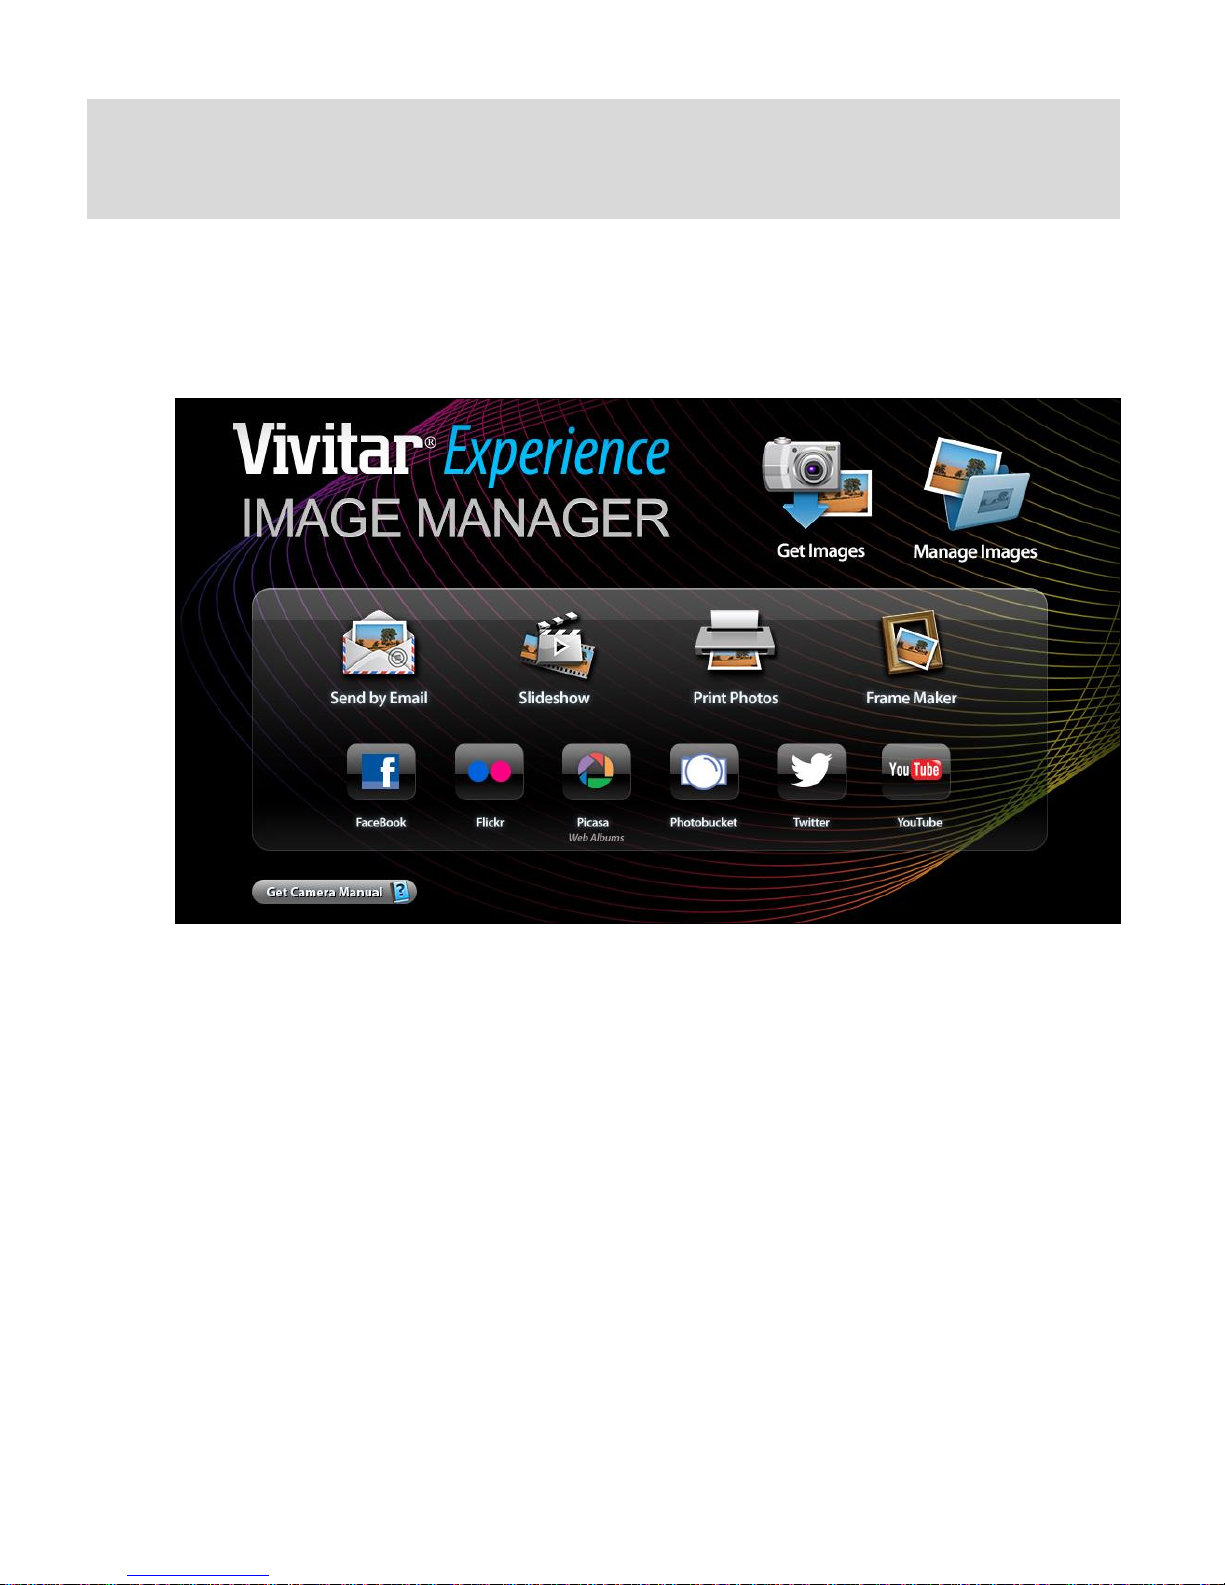
1. Select the “Get Images” button from the Main menu.
2. The “Get media from device” window opens.
3. You can select to download photos, videos or both.
4. Select your camera (removable disk) from the device window. If your camera is the only
USB device connected then it will be selected automatically.
5. Select a location on the computer where to place the new photo and video files.
6. Add the new photo and video files to albums if desired.
7. Select to remove the media files from the selected device (removable disk) after the import.
8. Click the “Get Media” button to transfer the files from your camera to your computer.
9. A media download progress bar appears on the bottom left showing the number of media
files downloading to your computer. A message appears when the download is complete.
10. The photo and video files that you selected are now downloaded to your computer to the
selected folder ready for your use.
Page 51

50
Getting Started!
Using the Vivitar Experience™ Image Manager you can:
Upload and manage videos to and from the most popular photo sharing and social networking
sites - Facebook, Flickr, Picasa, Photobucket, Twitter, and YouTube
Note: The Twitter online social network limits the upload size of photos to up to 3MB.
Seamlessly transfer photos and videos from one social network to another
Organize your images by creating offline and online albums
Edit images using automatic and manual tools
Use automatic “Geotagging” with built in Google Maps
For more details on how to use the Vivitar Experience™ Image Manager open the “Help
Guide” option or the “Take a Tour” option from the Help menu.
Transferring Images from the Camera to the Computer
Manually
TRANSFERRING PHOTOS AND VIDEOS: WINDOWS OS
1. Use the USB built-in connector on your camera to connect your camera to your computer.
2. ‘MSDC’ appears on the LCD.
3. A window appears with a list of options, select “Open folder to view files” and click OK.
4. Open the DCIM folder and the folder inside to view the media files.
5. Select the media and copy the files from this folder into your computer. Optionally, select the
files and choose Copy from the Edit menu. Then select a folder and choose Paste from the
Edit menu.
6. We recommend that you copy the images into the Pictures/My Pictures folder and the
videos into the Videos/My Videos folder.
7. Do not disconnect the camera from the computer during transfer. Doing so will cancel the
transfer of any files on their way to your computer.
Page 52

51
TRANSFERRING PHOTOS AND VIDEOS: MACINTOSH OS
1. Use the USB built-in connector on your camera to connect your camera to your computer.
2. ‘MSDC’ appears on the LCD.
3. The camera’s device icon appears on the desktop.
4. Click on the device icon and open the DCIM folder and the folder inside to view the media
files.
5. Select the files and drag them into your computer. Optionally, select the files and choose
Copy from the Finder’s Edit menu. Then select a folder and choose Paste from the Edit
menu.
6. We recommend that you copy the images into the Pictures folder and the videos into the
Movies folder.
7. Do not disconnect the camera from the computer during transfer. Doing so will cancel the
transfer of any files on their way to your computer.
TRANSFERRING PHOTOS AND VIDEOS: APPLE IPAD
NOTE: Please check your device packaging for compatibility with the iPad.
Apple iPad Camera Connection
For models that are compatible with the iPad, photos and videos can be imported from your
digital camera to your iPad by following either one of the options below:
1. Connecting your digital camera to your iPad using an iPad Camera Connector:
Plug the Camera Connector into the dock connector port on your iPad, then attach your
digital camera using a USB cable (included) to the Camera Connector.
NOTE: iPad Camera Connector not included. This may be purchased separately.
2. Using an iPad SD Card Reader:
Connect the SD Card Reader to your iPad, then insert your digital camera's Memory card
into the slot to import photos and videos directly from your camera's SD card.
NOTE: iPad SD Card Reader not included. This may be purchased separately.
After you make the connection, your iPad automatically opens the Photos application, which
allows you choose which photos and videos to import, then organizes them into albums.
Page 53

52
Camera Maintenance
Sakar US
Sakar International
Attention: Service Department
195 Carter Drive
Edison, NJ
08817
Sakar UK/Europe
Attention: Service
Department
2D, Siskin Parkway East
4020 Middlemarch Business
Park
Coventry, CV3 4SU
Sakar Australia
Return faulty camera to
the Refund Counter at the
store where purchased
The digital camera is a delicate device.
Please handle your camera with care to avoid damaging it.
Do not expose your camera to heat sources.
Do not use you camera in wet or moist conditions.
Sakar Warranty Card
This warranty covers for the original consumer purchaser only and is not transferable. Products
that fail to function properly UNDER NORMAL USAGE, due to defects in material or
workmanship will be repaired at no charge for parts or labor for a period of one year from the time
of purchase.
What Is Not Covered By Warranty:
Damages or malfunctions not resulting from defects in material or workmanship and damages or
malfunctions from other than normal use, including but limited to, repair by unauthorized parties,
tampering, modification or accident.
What To Do When Service Is Required:
When returning your defective product (postage pre-paid) for service, your package should
include:
1. Copy of original bill of sale.
2. A detailed written description of the problem.
3. Your return address and telephone number (Daytime).
MAIL TO ADDRESS BELOW:
Page 54

53
Technical Support
For technical support issues please visit our website at www.vivitar.com . You can find manuals,
software and FAQ’s at the website. Can’t find what you are looking for? E-mail us at
[email protected] and one of our technical support team members will answer your
questions. For phone support in the US please call 1-800-592-9541, in the UK call 0800 917 4831,
in Australia call 1800-006-614. If you would like to call from anywhere else, please visit
www.vivitar.com for your local toll free number.
Troubleshooting
Q: I have taken photos and selected the “Get Images” button. I get a message that the
images were successfully transferred but the photos do not appear on my computer.
What do I do?
First ensure that you have in fact taken photos. Press the Shutter button to take some sample
photos and then try downloading them again.
With test photos, if the camera's power is off before you upload them to the computer, the photos
are not stored in the camera’s memory. These photos should be uploaded quickly before the
camera's power is off. If the photos are saved to the SD memory card, then all the photos
should appear.
Q: How do I make sure I don't lose important pictures?
This camera requires an SD card for normal use. If the camera's power is off, nothing will happen
to the images stored on the SD memory card. We recommend always downloading your photos
to your computer as soon as possible to prevent unintentional data loss.
Q: I deleted images using the Vivitar Experience™ Image Manager. The images were also
deleted from my computer. How do I recover images that I accidently deleted?
All images deleted using the Vivitar Experience™ Image Manager are sent to your computer’s
Recycle or Trash Bin and can be retrieved from there.
DVR610v2-EN-080816-TA FWV v.1.0.6 GVH
 Loading...