

Page 1

www.orphancameras.com
This manual is for reference and historical purposes, all rights reserved.
This creation is copyright© by M. Butkus, NJ, U.S.A.
These creations may not be sold or distributed without the expressed permission of the producer
I have no connection with any camera company
On-line camera manual library
If you find this manual useful, how about a donation of $2 to:
M. Butkus, 29 Lake Ave., High Bridge, NJ 08829-1701
and send your e-mail address so I can thank you.
Most other places would charge you $7.50 for a electronic copy or
$18.00 for a hard to read Xerox copy.
This will allow me to continue this site, buy new manuals and pay their shipping costs.
It'll make you feel better, won't it?
If you use Pay Pal, go to my web site
www.orphancameras.com and choose the secure PayPal donation icon.
Page 2
www.orphancameras.com
Page 3
www.orphancameras.com
':
.:
t:;i+i;J:,lj
Page 4
I
www.orphancameras.com
5
16
12
15
,"s
Page 5
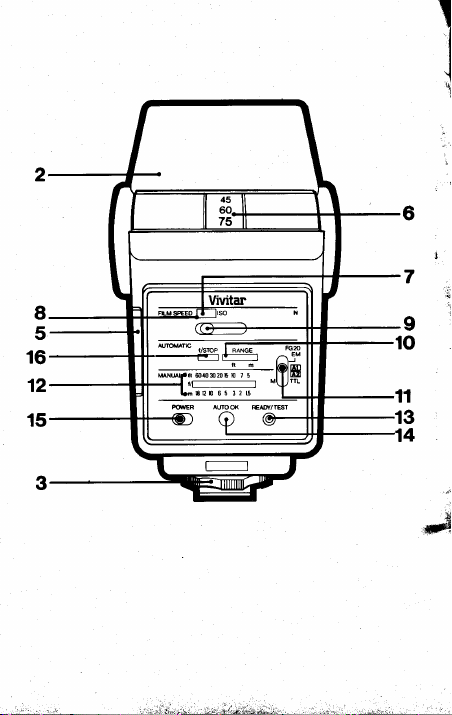
DESCRIPTION
www.orphancameras.com
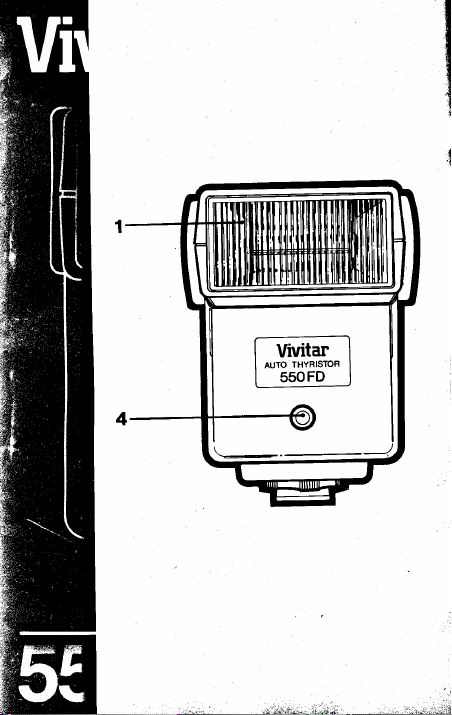
1.
Flash
Head/Reftector
2.
Adjustable
ono\
3. Mounting
4.
Light
5. Battery
6.
Bounce
7.
ISO
8. Film
9. Film
10.
Auto
'11.
Mode
1 2.
Manual
13.
Flash
14.
Auto
15.
Power
16.
Auto
NOTE:
The
550FD
camera
SLR
cameras.
Ricoh,
Pentax
you
have
using.
Bounce
Foot
Sensor
Compartment
Angle
Fitm
Speed
Speed
Window
Speed
Selector
Exposure
Selector
f/Stop/Distance
Ready
OK Indicator
ON/OFF
f
/Stop
Window
is
availabte
brand
and
The
N for
all
Nikon
and
Olympus.
matches
Head (0o,
with
Locking
Indicator
Scate
Range
Light/Ftash
Switch
in
is
fully
3 models
models,
Make
the
camera
OF
CONTROLS
45o,
Wheel
Cover
Window
Scales
Test
Button
3
separate
are
and
sure
to
CR
for
MpO
the
brand
modets
S5OFD
dedicated
60o, 75o
by
popular
most
Canon
anct
for Minolta,
model
you
ate
and
HERE
The
easiest
pictures.
designed
Detailed
follow
IT
Vivitar
550FD
possible
This
to
instructions
this
basic
show
IS
has
use in
section
you
section
been
designed
obtaining quality
of the
instruction
the
basic
use
operation
with your
for
to offer
llash
manual
of this
camera
the
is
unit.
model
Page 6

HOW
www.orphancameras.com
TO
prepare
To
familiarize
Please
fold
out the
Locate
that
are called
easily
Please
4
separate
Area 1 is
Speed
Area2 is
A2
f/stop Window
Window
Area 3 is
manual
also
used for TTL
TTL
auto
Area
4 has
OK Indicator
Test Button
proceed
Now
1. INSTALL
Open
the Battery
in the
direction
AA
alkaline or fully-charged
sure
that
to the
markings
down
on
Battery
2.
MOUNT
IMPORTANT:
USE IT
the
unit
for operation,
yourself
turn
all the
when
note
Window
(10),
f/stop/Distance
exposure
the +
the batteries
Compartment
When
f
rom
ON/OFF
prevent
camera.
with its
to
the Description
illustration
controls, indicators
out,
so
they
are referred
that the
areas
for
for Automatic
basically
rear
to make
Film
Speed
(8)
and the
(16),
and
the Mode
for Manual
operation
distance.
the Power
(14),
and the Ftash
(13).
follows:
as
THE
BATTERIES
Compartment
of the
-
and
inside
THE
FLASH
attaching
the
camera,
Switch
possibility
the
controls
of
Controls
(inside
section
you
will
be
to in
of the
550FD is
your
flash
setting
and has
Fitm
Speed
operation
the Auto
Exposure
Selector
operation
(12).
Scales
to indicate
ON/OFF
arrow. Install
the
with
door closed.
Switch
Door
NiCad
polarity
markings
battery
your
thumb
ON THE
or removing
always
in
the
OFF
of damage
Ready
compartment.
take
a moment
and indicators.
page
front
cover).
and
other
able to
have
features
find them
the
instructions.
divided
easy
to
the Film
Setector
and has
the A1
Range
(1't).
and
This
area
maximum
(j5),
Light/Ftash
(5)
by stiding
four
fresh,
batteries,
correspond
and slide
CAMERA
the
flash
the flash
position
to
use:
has
the Auto
size
being
to
your
to
and
into
(9).
the
is
push
the
or
it
Page 7
Slide
www.orphancameras.com
the
unit
knurled
lock
insure
3. ENERGIZE
Slide the
position
will
4.
SELECT
Slide the
until the film
Indicator
using in
CORRECT
IMPROPER
ON
5.
SELECT
Try
the four
A1
and A2
determined
number
Set this
;
cameras
corresponding
Exposure
distance
setting will
Setting
6-40
(depth
range
focus.
set
of batteries,
wherever possible.
to
be
In the
exposure
Dedicated
wheel
secure
Power
to
energize
glow
when
FILM
Film
speed
Window
your
FILM
EXPOSURES
SOME DEDICATED
DESIRED
settings
settings,
by the
will
appear
f
/stop
may
Range
range
give
A'l
will
ft., with
a relatively
of field).
from 3-20
For
fastest
set
the
al
"M"
(manual)
capability
Function
onto the
camera's
in
the
mounting
UNIT
the
Speed
camera.
on
do
Auto
(in
good
provide
Setting
ft., with
we recommend
corresponding
direction
to the
ON/OFF
Switch
the
unit. The
unit is
ready
SPEED
Selector
disptayed
(8)
matches
FAILURE
SPEED
MAY RESULT
WHEN
CAMERAS.
FLASH
of the
automatic
flash
unit
in the
Auto
your
camera
this
automatically.)
Range
(10)
Window
feet
and
exposures.
greatest
the
shallow
provides
A2
an increased
recycle
time
Of
course,
setting,
(Nikon
owners
Instructions
hot
camera.
fi
Ready
to
(9)
to
in
the Fitm
the
TO
THE
MODE
Mode
Setector
exposure
sensor
f
/Stop
lens.
will
appear
and
meters)
zone
and more
using
your
auto f/stop.
there
is no
section)
shoe. Turn
of the
arrow
5) to
the
ON
Light
be used.
the right
Speed
film
speed
SET THE
IN
UNIT
IS
(11).
will
be
and an f/stop
Window
(Note:
certain
The
in
the
indicates
tne
over
which
auto range,
of
sharp
an
auto
exposure
zone
of
flashes per
position
lens
must
auto
see
Specific
and the
the
to
(13)
or teft
you
are
USED
In
the
(.t6).
Auto
this
from
focus
sharp
A1
be able
l
3
Page 8
Auto
www.orphancameras.com
f/Stop Window
(10)
Window
Distance
Scale
between
the feet
scale,
determine
note
the f/stop
your
Set
camera lens
exposure. For
you
must
change
When
(for
exposure
system. The Auto
the Auto f/Stop
determine
TTL,
Scale
check the TTL f/Stop
this manual.
Note
R/TTL
functions
and auto fill-flash.
for
on a
power
6.
Indicalor)
The
A2
confirms
For
A2
press
Auto
iTlow
no
distance, or if
4
select a
flash-to-sublect
the Mode
Nikon
owners, the M/TTL
will
the maximum
observe
(12)
opposite the
lor
550FD
position,
on the Ricoh
Canon
cameras
Canon camera,
manual
AUTO
OK INDICATOR
Auto
OK Indicator
TTL
and
that
proper
use of the Auto
settings, aim
the Flash Test
Indicator.
OK
green
if- the
green
light
(16)and
will be
blank. However,
(12)
will indicate
and meter
your
opposite this
proper
different f/stop
Selector is
be determined
Exposure
Window
the distance
Canon/Rlcoh model
the
550FD
The R/TTL
and
the 550FD
flash without
auto
settings. The Auto
your
subject will
the flash
Button
The
subject is
is seen, reduce
you
are using A2
Auto
Exposure
the Manual
a range
scales. To
flash-to-subyect
distance
to this f/stop
exposure
distances.
(16)
auto exposure
f
/stop
Distance
XR-P
when
(14)
at
Auto
to make
in the
setting
set to the TTL
position),
by the camera
Range
Window
will
be blank.
on the Manual
you
have chosen,
Chart at the rear
performs
OK Indicator
within the
most
camera, including
setting
flashed
oroduces a
automatic
(Sufficient
operates onty in
OK Indicator
be correctly
your
key
(13)
while watching
will
OK
light
your
flash-to-sublect
switch to A1.
Range
of f
/stops
use this
distance
and
on the
scale.
your
manual mode,
you
as
position
automatic
metering
(10)
and
To
distance for
Disrance
or
of
In the
users:
dedicated
in fhat
setting
full
exposure.
Light
the A1,
exposed.
the 41
at
up and
range.
TTL
or
the
lf
has no function
subject and
auto
Page 9

when
www.orphancameras.com
using
work
attached
loaded
toned
plane
be
grve
reflective quality
actual
lhe
7.
BOUNCE
By
the
colored reflective
since
colors.
correct
check
8.
DEDICATED
Please
Instructions
and model.
9. TO
Once
procedure
workings
utilize
checklist
the
a)
Load
bl
With
and turn lock
musl
intermittent
the
if
an
actual
to the
in
the
camera.
piece
paper
of
as
a film
closed.
Incorrect
camera
"bouncing"
ceiling,
bounced
you
its
picture-taking
substitute
Please
responses
"exposure"
flash
shutter
FLASH
flash
subjects
light
affecting
operating
the
Auto
OK lndicator
refer
to
the
section for
TAKE
A
gone
have
described
of
the flash
great
potential.
provided
is
camera
power
flash
be securely
contact
TTL
setting,
exposure
camera.
In
Or,
tor
should
and the
note
that
due
versus
actual
must
release
off reflective
can be
surfaces
will
be influenced
results
accordingly.
range
under
FUNCTIONS
Specific
your particular
PICTURE
through
above,
unit well
However,
as
a convenient
procedure.
with film
and
OFF, mount
ring
down
locked
and malfunction.
the
Auto
is
made
that
case
purposes,
test
positioned
be
camera
light-toned
its
to
difference
film.
be made
button.
surfaces
more
soffly
when
using
"bounce"
explained
Dedicated
the
familiarization
you
will
enough
the
sel
the
flash
against
shoe. Flash
on
camera
oK
will
with
In
To
understand
only
the
flasfi
film
must
a light_
at the
back
paper
may
in
either
case.
by
depressing
such
lighted.
color
film.
by
such
determine
conditions,
above.
Function
camera
to
begin
following
reference
film
speed.
on
camera
prevent
to
be
film
must
as
Avoid
brand
the
to
for
shoe
an
!
Page 10

c) Set camera to
www.orphancameras.com
(On
most
for
speed on flash
flash Power
necessary
compose the
USE
OF OPTIOI'IAL
optional
flash
set
as a
adapt
modern 35mm
you,
set
color
to
the
guide
filtered-flash
dedicated function,
setting
Set film
d)
e)
Set
f) Set flash Mode
g)
lf
lens.
h) Focus.
10.
The
the
provided
is
you
as
Experimentation
automatic mode
your
550FD
automatically.)
unit.
Switch to
Selector to mode
required
picture.
COLOR FIITERS
filters
should be used
Manual
mode. The
only.
is highly recommended.
to
or
SLR
cameras witn
will make
ON.
f/stop
and
Specific
your
creative
X-sync
desired.
your
on
shoot.
lollowing
data may vary
only
style.
speed.
the
camera
with
chart
Page 11

o
www.orphancameras.com
E(na
rJi*--
9c
JO
=- Q o
lao Y Y c c
FE
lrJo
Elxh0)0)
ooou\J
(J
E F :
g
E
- ?, R
!s x x X tr:-*
; = = ;
= X A A
E
gt
':- ':
J J
-
ar ar
-e
b
b
c
c
-.9
-=
F.:l(!
.==cm
tr
x.=
=
E
b
I =
- ---C
r
"-!
5
E: ==P
U r\ d\ ,
9Al
Y>-C-
g
E
;
=
3
=
6
R
: -c
-
g?
5 E E
o- d d
.,,>E
:
=ERB
<:=s
6
o)
c
(l)x
-
Y+-
b€
s7)
>
E;
u
o,;'i.
s=F:
=:
U).)
corotY
;E
=e2
B
b-.4
a\ J a\ .:
ildm;
m
H
Page 12

GENERAL
www.orphancameras.com
Guide Number (lSO
Basic
flash
Angle
of
Power
Source.' 4
Recycle
(with
4
Auto:
0.5-4.0
Manual:
(with
fully
Auto:
0.5-3.0
Manual:
Number
(with
4 AA
Auto:
450-1800
Manual:
(with
fully
Auto:
200-750
Manual:
Auto
Circuif Thyristor
Automatic
Exposure
(t/2):6-40
A1
(t/
A2
4)'.3-2q
(For
TTL
Chart
at the rear
Sensor Measuring
Flash
Duration:
Manual:
Auto:
1
/1,000-1
Auto
OK Circuit:
Flash Ready
F/ash
fest
Light
Color Temperature:
Calculator
8
SPECI
Coverage.'34o
AA
Time,
Average
AA
alkaline):
sec.
4.0
sec.
charged
3.0 sec.
of Flashes,
450
charged
200
f/Stops
Flash Ranges
operation,
1
/1,000
Button:
Sca/e:
NiCads):
sec.
alkaline):
NiCads):
and
(2.0-12
ft
(1
ft
.0-6
see the
of this
Angle:
sec.
/30,000 sec.
Green lamp,
Light: Orange
Combined
6000o Kelvin
ISO
FICATIONS
100)
tsO/ft
(50mm)
80
x 46o
alkaline
or NiCad
Average
Corresponding
with tSO
m)
manual.)
64, 100,200,400,
t0O
m)
TTL
f/Stop/Distance
Approx.
18o
extended
neon
tube
with
Flash
DIN/m
(50mm)
24
batteries
Auto
Film:
on-ttme
Readv
i000,
1600
Page 13

Hot
www.orphancameras.com
Shoe:
Vertical
Bouncing:0,
Dedicated
specific
camera/flash
Optional
Wide
Angle
Locking,
with
Functions:
Accessories;
Lens
and
dedicated
45,
60, 75
Variable
instruction
Cotor
Fitter
contacts
and
90o
per
camera (see
section)
Kit
Specifications
subject
to
change
without
notice.
Page 14

SPECIFIC
www.orphancameras.com
FUNCTION
WITH 55OFD
NIKON
(FLASH
POSITION
REMOVING
AUTOMATIC
1.
2. On-Camen
3. On-Flash
4.
5. Viewtinder
6. Auto
r0
F3
SWITCH
POWER
BEFORE
FROM CAMERA.)
OPERATION
speed settlng
Film
in
film
-
M/TTL.
Lens f
lens to f/stop shown
on
lens. With either
used
and
Check
of
Scales on
appropriate
within
when the
LED) and
automatically
exposure
on
lf using
made
OK".
smaller
subject.
on both
use
Set shutter dial
back of flash.
the manual or
rear
Mode and Shutter Speed
Mode Selector
SettinS
/stop
lf using
(smaller
the better
Exposure
with film in the camera
lf there is no
method,
number) the
the overall
f/stop Distance
the TTL
the f/stop/range
the Manual f/stop
the back
f/stop.
lnformation
ready light
on the flash,
for flash.
set
Verification
is verified by
immediately
flash
of
TTL, an actual camera
number or
f/stop
lf
A.l or
using
DEDICATED
INSTRUCTIONS
MUST BE
MOUNTING
-
set the
camera and
"A"
or
to
-
-
lt using
in Automatic f
ffl, set any
the
greater
flash
of the flash
Make sure subject
you
-
glows
the shutter
Take the
glowing
"AUTO
OK"
move
push
42,
IN THE
FLASH CN OR
ASA/lso for the
flash.
Setting
speed.
any
A'1, A2 or
to
Set
42,
or
Window
/stop
f/stop
f/stop
the
the flash
Distance
is well
flash on and
will
be
picture.
OK)
"AUTO
must be
"AUTO
TTL,
use
to the
sel
-
Al
wider
performance.
Chart in the back
to help choose an
have chosen,
Turn
lhe
in the viewfinder
(AUTO
green
the flash is fired.
after
exposure
to activate
in
closer
"READY/TEST"
OFF
on
range,
(a
red
Auto
OK"
I
Page 15

BUTTON on back of flash to activate
www.orphancameras.com
lf
is no
there
or switch to A1 and re-set lens accordingly.
closer
"AUTO
lf no
MANUAL
1.
2.
3. Use the mechanical shutter
4. Once the
OPERATION
On-Camen
-
Turn
main
off
Wait 30 seconds for
to turn off.
circuit
On-Flash
the camera to take
about
the flash ready light
for
20-30
camera
Mode
internal
timer circuit.
NIKON FA
(FLASH
POWER
POSITION BEFORE
REMOVTNG
AUTOMATIC OPERATION
1. Film
film in use on both camera and flash.
2.
On-Camen
-
speed except
250.lt
above, shutter
shutter
NOTE: The FA
Exposure flash circuit.
minimum f/stop will not
exposure. Set f/stop as described
3.
On-Flash
M/TTL.
FROM CAMERA.)
Speed Setting
mode
Set any
mode
will fire at set speed.
Mode
"AUTO
OK" and using
A1, move
OK" in
Mode
and Shutter Speed Setfing
camera
internal
Selector - Set to
the
timer circuit
seconds)
glows
WITH
SWTTCH
MOUNTING FLASH
-
Mode
and Shutter Speed Setting
except
"M250"
"M"
to
set
will fire
not have a Program
does
Selector
closer.
power
camera
release
picture.
is
pictures
may
without further waiting
55OFD
MUST BE rN THE
Set the ASA/lSO for the
"M".
Set
"8".
or
Shutter willfire
and shutter set at 250 or
lf
at 250.
Therefore,
produce program
-
Set to A1, A2 or
"AUTO
A2, move
and self timer.
TTL
timei
"M/TTL".
on the front of
(usually
off
shutter to
set below 250,
setting
in
be taken
ON OR
lens
flash
Section
takes
any
OK".
after
OFF
at
to
4,
1l
Page 16

4.
www.orphancameras.com
Lens f
lens to f/stop
on back
lens. With
used
and the better the
Check the TTL f/stop
of the manual
Scales on the back of the flash
appropriate f/stop. Make
within the f/stop/range
5. Viewfinder
when the ready
LED)
automatically
6. Auto
exposure is verified
on rear
lf
using TTL,
made with
OK".
smaller f/stop
subject.
BUTTON on
lf
there is no
closer or
lf no
MANUAL
1.
On-Canpn Mode and
-
Set shutter
2.
On-Flash Mode
3. Film
film in
4.
Lens f
sub,ect
distance on Manual
back of flash
distance.
12
Setting - lf
/stop
shown in
of flash. lf
either method, the wider
(smaller
number)
or the Manual
lnformation
and on the flash, the
Exposure Verification
lf
"AUTO
Speed
use on both
/stop
light
set
of flash immediately
an actual camera
film in the
there is no
number
lf
using A1 or A2.
back of flash to
"AUTO
switch to 41
OK" in A1, move
OPERATION
dial
Settrng - Set the ASA/lSO
Setting
distance on
and set
using A1
Automatic f/stoo
using ff[, set
greater
the
overall flash
glows
for flash. Take
by
camera to
"AUTO
OK" and
to M250.
Selector - Set to
camera and flash.
-
lens
f/stop Distance
lens
performance.
Distance
Chart in the
f/stoo Distance
to helo
sure subject
you
have
-
Turn the
in the viewfinder
shutter will
the
(AUTO
glowing green
after the flash
exposure must
activate
in TTL,
OK"
move
or
closer
"READY/TEST"
push
activate
using
re-sel
and
Focus lens
lens
closer.
Shutter Speed
Find
barrel.
to f/stop opposite
A2, set
or
Window
any f/stop
the f
/stop
the flash
choose
is well
chosen.
flash on
be
picture.
OKl
"AUTO
"AUTO
use
to
the
"AUTO
A2, move
accordingly.
Setfing
"M/TTL".
for the
and note
subject
Scale on
on
range,
back
an
and
(a
red
-
Auto
OK"
is fired.
be
OK".
that
Page 17

i
www.orphancameras.com
,
I
I
I
I
r film
5. Viewfinder
tew seconds
viewfinder
6. Auto Exposure
Does not
NIKON
(FLASH
POSITION
REMOVTNG
AUTOMATIC
1.
Film
2.
On-Camen Mode
-
3.
On-FIash
Generally, A1 will
4.
Lens f/stop
in Automatic
5. Viewfinder
few seconds
viewfinder
6. Auto Exposure
exposure is
on
Push
and
is no
using A2,
accordingly.
move
iIANUAL
1.
On-Camera Mode
-
2.
On-Flash Mode
3. Film
and on the
function in
FE WITH
POWER
BEFORE MOUNTING
FROM
Speed
in use on
Set shutter
Mode
and on the flash.
rear
of flash
"READY/TEST"
the
activate
"AUTO
switch to A1
closer.
OPERATION
Set shutter
Speed
lnformation
the ready
-
Turn
flash on
glow
light
will
flash. Take
Verification (AUTO
the manual
the
mode.
in
oicture.
OK)
55OFD
SWTTCH MUST
CAMERA.)
OPERATION
Setting - Set the ASA/tSO
both camera
and
dial to M90.
Selector
provide
Setting - Set lens
f/stop
Window
lnformation
the ready
verified
"AUTO
OK", move
lf
Setfing
light will
Verification (AUTO
glowing
by
immediately
OK" or take
and change f/stop
there is no
and
dial to M90.
Setector
-
Set the ASA/tSO
and
Shutter
-
Set to 41 or
best flash
on
-
Turn
Take
green
after the
BUTTON
closer
"AUTO
Shutter
-
Set to
BE rN
FLASH
flash.
Speed
performance.
to f/stop
back of flash.
flash
on and in
glow
in
picture.
the
OKl
"AUTO
flash is
to fire ftash
picture.
a
to the
subject or,
OK" with
Speed
"M/TTL".
and in
the
-
THE
ON
for the
Setting
A2.
shown
the
-
lf
on lens
A'1,
$ettlng
I
for
OFF
OR
Auto
OK"
fired.
there
the
a
I
a
if
13
Page 18

film in use
www.orphancameras.com
f
4. Lens
subject
distance
of flash and
back
distance.
Viewtinder
5.
few seconds
viewfinder
Auto
6.
Does
on both
Setting
/stop
distance
Manual
on
lnlormation
the
and
Exposure
function
not
camera
-
Focus lens
lens barrel.
on
f/stop
lens
set
light
ready
the flash.
on
Verification
in the
flash.
and
Find subject
Distance
f/stop opposite
to
-
Turn flash
glow
will
Take the
(AUTO
mode.
manual
and
Scale
on and
in the
piclure.
OK)
note
on
-
that
in a
WITH
NIKON
(FLASH
POSITION
REMOVTNG
AUTOMATIC
1.
2. On-Camen
3. On-FIash
4. Lens
5.
14
FE.2
POWER SWITCH
BEFORE
FROM
Speed
Fitm
film in use
-
set
250
M/TTL.
lens to
on back
lens.
used
and
check
ol
Scales
appropriate
within
Viewtinder
on
"A"
or any
Set
250,
over
or
slower,
Mode
t/stop Setting
f/stop shown
flash.
of
either
With
(smaller
the better
TTL f/stop
the
manual
the
on the
f/stop/range
the
CAMERA.)
OPERATION
Settlng
both camera
Mode
shutter
shulter
Selector
lf
method,
number)
the
or the
back
f/stop.
lnformation
55OFD
MUST
MOUNTING
-
the
Set
and
and Shutter
except
speed
will still fire at
will fire at set
-
Set
-
lt using
Automatic f /stop
in
ffl,
using
wider the f /stop
the
greater
the
flash
overall
Distance chart
f/stop
Manual
flash
of the
Make sure
you
have chosen
-
Turn
THE OFF
IN
BE
ON
FLASH
Speed
"M250"
250.
speed.
to A1,
Al or
the
in the
Distance
the flash
for the
Setting
or
lf set at
A2 or
A2,
Window
f/stop
flash
is wel/
"B".
on and
ASA/lSO
flash.
set any
performance.
to help choose
subiect
OR
lf
set
on
range,
back
an
Page 19

6. Auto
www.orphancameras.com
MANUAL
1.
2.
3.
4.
i#
5.
6.
when the ready
LED)
and on
Exposure
is verified
of flash
TTL,
film
there is no
f/stop
using A1
on
is no
or switch
"AUTO
OPERATION
Speed
use
on both
f/stop
distance
on Manual
of flash
lnformation
seconds
and on
function
the flash,
set for flash.
an
back
"AUTO
OK"
Mode
Setting - Set
Setting
and
the
automatically
exposure
on rear
lf
using
made with
OK". lf
smaller
subject. lf
BUTTON
lf there
closer
lf no
On-Camen
-
Set shutter
On-Flash Mode
Film
film in
Lens
subject
distance
back
distance.
Viewfinder
few
viewfinder
Auto Exposure
Does not
glows
light
Verification (AUTO
immediately
actual
in the
number
to A1
in Al,
dial to M250.
Setector
on
set lens
ready
the flash.
Verification (AUTO
in
the
glowing
by
camera
camera to
"AUTO
or
or A2,
of ftash
OK" and
and re-set
move
and
Shutter
camera
-
Focus
lens
barrel. Find
f/stop
-
light
the
manual
in
the viewfinder
shutter
Take
after the
OK" in TTL.
move
push
to
activate
-
Set
the ASA/tSO
and flash.
Distance
to f/stop
Turn
will
Take
will
be
picture.
the
OK) - Auto
"AUTO
green
f lash is
exposure
closer to the
using A2,
closer.
lens
glow
must
"AUTO
activate
use
"READY/TEST"
"AUTO
move
lens
accordingly.
Speed
Settlng
"M/TTL".
to
for
and note
subiect
Scaie
on
opposite
flash
on
and in
in
the
the
oicture.
-
OK)
mode.
(a
OK"
fired.
be
OK".
the
that
red
a
15
Page 20

NIKON
www.orphancameras.com
(FLASH
POSITION
REMOVING
AUTOMATIC
1.
2.
at 60
NOTE:
Exposure
minimum
exposure.
3.
On-Flash Mode
M/TTL.
4.
Lens
lens
on
lens.
used
and the
Check
of
Scales
appropriate
within
5. Viewf
in
lightning
ready
the
6. Auto
exposure
on rear
lf
made
16
FG
POWER
BEFORE
Film
Speed
film
in
use
On-Camera
-
"A",
Set
"8".
lf
set over
or slower,
The
flash
f/stop
Set f/stop
f/stop
to f/stop
back
of flash.
With
either method,
(smaller
better
the TTL
the
manual
on
lhe
the
f
inder
a few
seconds
bolt
and
shutter
oicture.
Exposure
is
of flash
using TTL,
with
film
WITH
SWITCH
FROM
CAMERA.)
OPERATION
Settrng
on
both
Mode
"P"
or
any
60,
shutter
FG
does not
circuit.
will nol
Selector
Setting
shown
lf
number)
the
overall
f/stop
or the
back
f/stop.
Make
/stop/range you
lnformation
the ready
and 60 will
automatically
Verification
verifled
immediately
an
actual
in the
55OFD
MUST
MOUNTING
-
Set the
camera
and flash.
and
Shutter
speed
will
will
fire
have
Therefore,
produce
as
described
-
-
lf
using
in
Automatic
ffl,
the
greater
the
flash
Distance
Manual
f/stop
flash
sure
have
-
Turn
LED's
appear
(AUTO
glowing
after
camera
camera
except
still fire
a
Set to A1,
wider
performance.
subiect
green
exposure
to
shutter
using
of the
by
BE
IN
THE
FLASH
ON
ASA/tSO
at
set
Chart in
to
and indicate
set for
activate
Speed
',M90"
at 60. lf
set
speed.
program
setting
program
in
Section 4.
A1
or
A2, sel
f
/stop
any
f/srop
the f/sroo
the flash
Distance
help
choose
is
chosen.
the
flash
opposite
flash.
OKI
,,AUTO
the flash
for
Settlng
lens
flash
A2
Window
the
wett
on,
the
-
is
must
,'AUTO
OFF
OR
the
or
set
to
or
on
range,
back
an
and
flash
Take
Auto
OK"
fired.
be
Page 21

I
www.orphancameras.com
i
OK"
tf there
,
I
I
t/stop
using
back
'A2,
and
to 41
"AUTO
no
MANUAL
1.
On-Camen
-
Set
2.
On-Ftash
3.
Film
film
in
4.
Lens
subject
distance
back
distance.
5. Viewfinder
few
seconds
viewfinder
6. Auto
Does
NIKON
(FLASH
POSITION
REMOVTNG
AUTOMATIC
1.
Fitm
film
in
2.
On-Camen
-
EM:
"A".
to
3.
On-Flash
"A1"
or
is
number
A1
push
/A2.
of flash
to
"AUTO
if no
and
cfrange
OK"
OPERATION
Mode
shutter
Mode
Speed
Setting
use on
both
f
/stop Setting
distance
on Manual
of flash
and set
lnformation
the
and
Exposure
not function
EM/FG.2O
POWER
BEFORE
FROM
OPERATION
Speed
Setting
use
on
both
Mode
Set
mode
Mode
"A2"
position.
,,AUTO
no
or
move
closer
',READY/TEST"
,,AUTO
activate
OK",
f/stop
move
and
M90.
Setector
-
camera
_
on lens
f/stop
lens
ready
light
flash.
in
the
on lens
Shutter
Ser
Focus
barrel.
_
manual
in A1,
dial to
on the
Verification
WITH
SWITCH
MUST
MOUNTING
CAMERA.)
-
Set
camera
and
Shutter
,,AUTO".
to
Setecfor
_
OK,' in
to
OK".
move
closer.
Speed
-
Set
the
ASA/tSO
and flash.
fens
Find
Distance
to
f/stop
Turn
flash
glow
will
Take
(AUTO
mooe.
BE IN
FLASH
the
ASA/|SO
and
flash.
Speed
FG_20:
Set
to
TTL,
use
subiect.
BUTTON
When
or
switch
Setting
,,M/TTL".
for
and
note
subiect
Scaie
on
opposite
on
and
in
the
picture.
_
OK)
tower
using
the
that
the
closer
accordingly.
to
the
55OFD
THE
OFF
ON
OR
for
rhe
Seftng
Set
shutt-er
,,FG_20/EM,,.
lf
in
on
lf
a
17
Page 22

4. Viewfinder
www.orphancameras.com
few seconds'.
flash
FG-20
flash
Lens t/stop
5.
position,3
exposure,
performance
(smaller
ring on the
(highest
indicator
results
flash
1 00
indicators
turn
Maximum
Manual
flash. Simply
you
that dislance.
6. Auto
exposure
on
Push
activate
"AUTO
move closer
and
"AUTO
MANUAL
1 .
On-Camen
-
any setting.
2. On-FIash
Film Speed Settlng
3.
in
lnformation
EM
ready and
ready and
ready
fi{m are t 12.0,
meler
have
rear of
"READY/TEST"
change
EM:
use
shutter automatically
-
red lightning
a
shutter
SettinS
f/stops are available
depending
is obtained
number)
lens until
number)
viewfinder.
in the
in blinking
light. The 3
function
also
on, depress
flash distance
Distance
f
/stop
note
chosen
Exposure
is verified
flash immediately
"AUTO
OK"
OK", change
to subject.
f/stop on
move closer.
OK".
OPERATION
Mode and Shutter
mode
Set
Mode
on both camera
Verification
-
-
of the 3.
is indicated
LED
and
Selecfor
Turn
LED appears
red
a
bolt appears
automatically
-
lf using
film speed.
on
by using
Simply
fastest shutter
the
without a blinking
Use of
warning
correct
4.0.
2.8 and
if camera
shutter
be
can
on the back
Scale
the
distance
make sure
(AUTO
glowing
by
after
BUTTON
take a
or
to lower
f/stop
lf
using
lens accordingly.
to M90. FG-20:
-
Set to
-
ASA/lSO
Set
flash.
and
flash on and
indicating
flash;
for
set
indicating
flash.
set for
FG-20/EM
for auto
Best flash
speed
f/stops
for
OK)
"AUTO
flash
flash and
picutre.
number or
shutter
Set
"M/TTL".
for the
f/stop
the f/stop
and
ISO
warning
is off.
the
the
of
f/stop
the
is
within
-
Auto
OK"
is fired.
lf no
A1
to
lf no
Setflng
to
film
the wider
adjust
other
in viewfinder
f/stops
Blinking
meter
release halfway.
found on
oppos'ite
subiect
green
the
to fire
flash
A2, switch
Speed
in a
To
Page 23

i#4
www.orphancameras.com
|f
t#
Lens f
/stop
subJect
distance
distance on
back of flash and set
distance.
Viewf inder lnformation
few seconds the ready
viewfinder
Auto
Does not function in the manual mode.
and on the flash.
Exposure
-
Setting
lens
on
Manual f/stop Distance
Verification
lens
Focus
barrel. Find sublect
lens
-
light will
to
Turn
Take
f/stop
flash on
glow
the oicture.
(AUTO
and note
opposite that
Scale on
in the
OK)
and
-
in
a
tg
Page 24

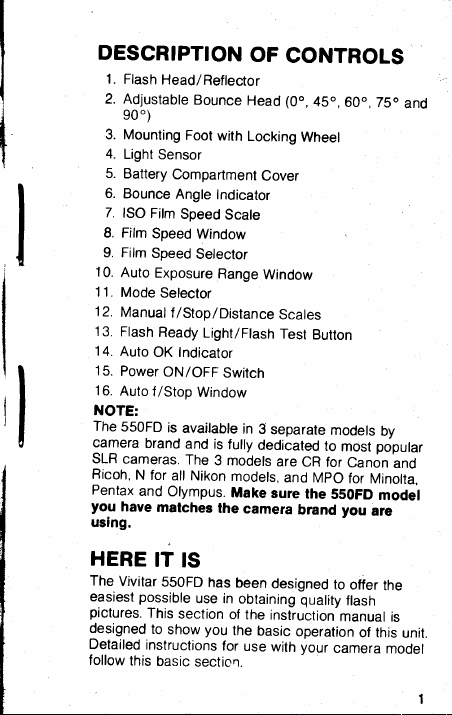
Vivitar 550FD
www.orphancameras.com
TTL f/Stop Distance
Tableau
Tabelle
Tabla
de dlalragmas
25 5016/
diaphragmes
des
Blenden
von
100
Chart
et distances
en
u. Entfernungen bei
y
distancias
para
TTL
tso
800/1000
200
400
TTL
TTl-Betrieb
1600
1.4
Corresponding
Ranges
Distances correspondantes
Entsprechende
Reichweiten
Distancias correspondientes
(12-68
34-220
ft.
m.)
1.4
1.4
2.0
2.8
4.0
5.6
8.0
11
2.0
2.8
4.0
5.6
8.0
11
16
1.4
2.0
2.8
4.0
5.6
8.0
11
16
22
1.4
2.0
2.8
4.0
5.6
8.0
11
16
22
1.4
2.0
2.8
4.0
5.6
8.0
11
16
22
1.4
2.0
2.8
4.0
5.6
8.0
1'l
16
22
2.0
2.6
4.0
5.6
8.0
't1
16
22
24-160 ft.
17-1 10 ft.
12-80 ft.
ft.
8.6-s7
6.0-40 ft.
4.3-28 ft.
3.0-20 ft.
tt.
21-14
2.1-10 ft.
2.1-7.2 ft.
2.1-5.0 ft.
2.1-3.6
ft.
(8-48
m.)
(5.8-34
(4-24
m.\
(2.9-17
(2.0-12
(1.5-8.5
(1.0-6.0
(0.7-4.2
(0.7-3.0
(0.7-2.1
(0.7-1
.5
(0.7-1.0
m,)
m.)
m.)
m.)
m.)
m.l
m.)
m.)
m.)
m.)
A1
A2
 Loading...