

Vivitar 49056 User Manual

49056
Digital Helmet Camera
User Manual
© 2009-2012 Sakar International, Inc. All rights reserved.
Windows and the Windows logo are registered trademarks of Microsoft Corporation.
All other trademarks are the property of their respective companies.

1
Contents
Introduction .................................................................................................................................. 2
What’s Included ............................................................................................................................ 2
Parts of the Camera ..................................................................................................................... 3
Initial Camera Setup ..................................................................................................................... 4
Camera Mounts and Accessories ................................................................................................. 7
Main Camera Modes .................................................................................................................... 9
Using your Helmet Camera ........................................................................................................ 10
Camera Technical Specifications ................................................................................................ 14
Computer System Requirements ............................................................................................... 15
Installing the Software ................................................................................................................ 16
Connecting the Camera to the Computer ................................................................................... 17
Getting Videos from your Camera to Your Computer ................................................................. 18
Get started!................................................................................................................................. 19
Transferring Videos from my Camera to my Computer Manually ............................................... 19
Camera Maintenance ................................................................................................................. 21
Sakar Warranty Card .................................................................................................................. 22
Technical Support ....................................................................................................................... 23
Troubleshooting .......................................................................................................................... 23
2
Introduction
Thank you for purchasing this Digital Helmet Camera. Everything you need to take quality digital
photos and videos is included with your camera.
Vivitar makes capturing those special moments as easy as possible.
Please read this manual carefully first in order to get the most out of your digital camera.
NOTE:
Your digital helmet camcorder supports an SD or MMC Memory Card (up to 16GB).
In order to use your digital helmet camcorder normally, please insert the SD Memory card
before use.
SD Memory cards are not included and need to be purchased separately.
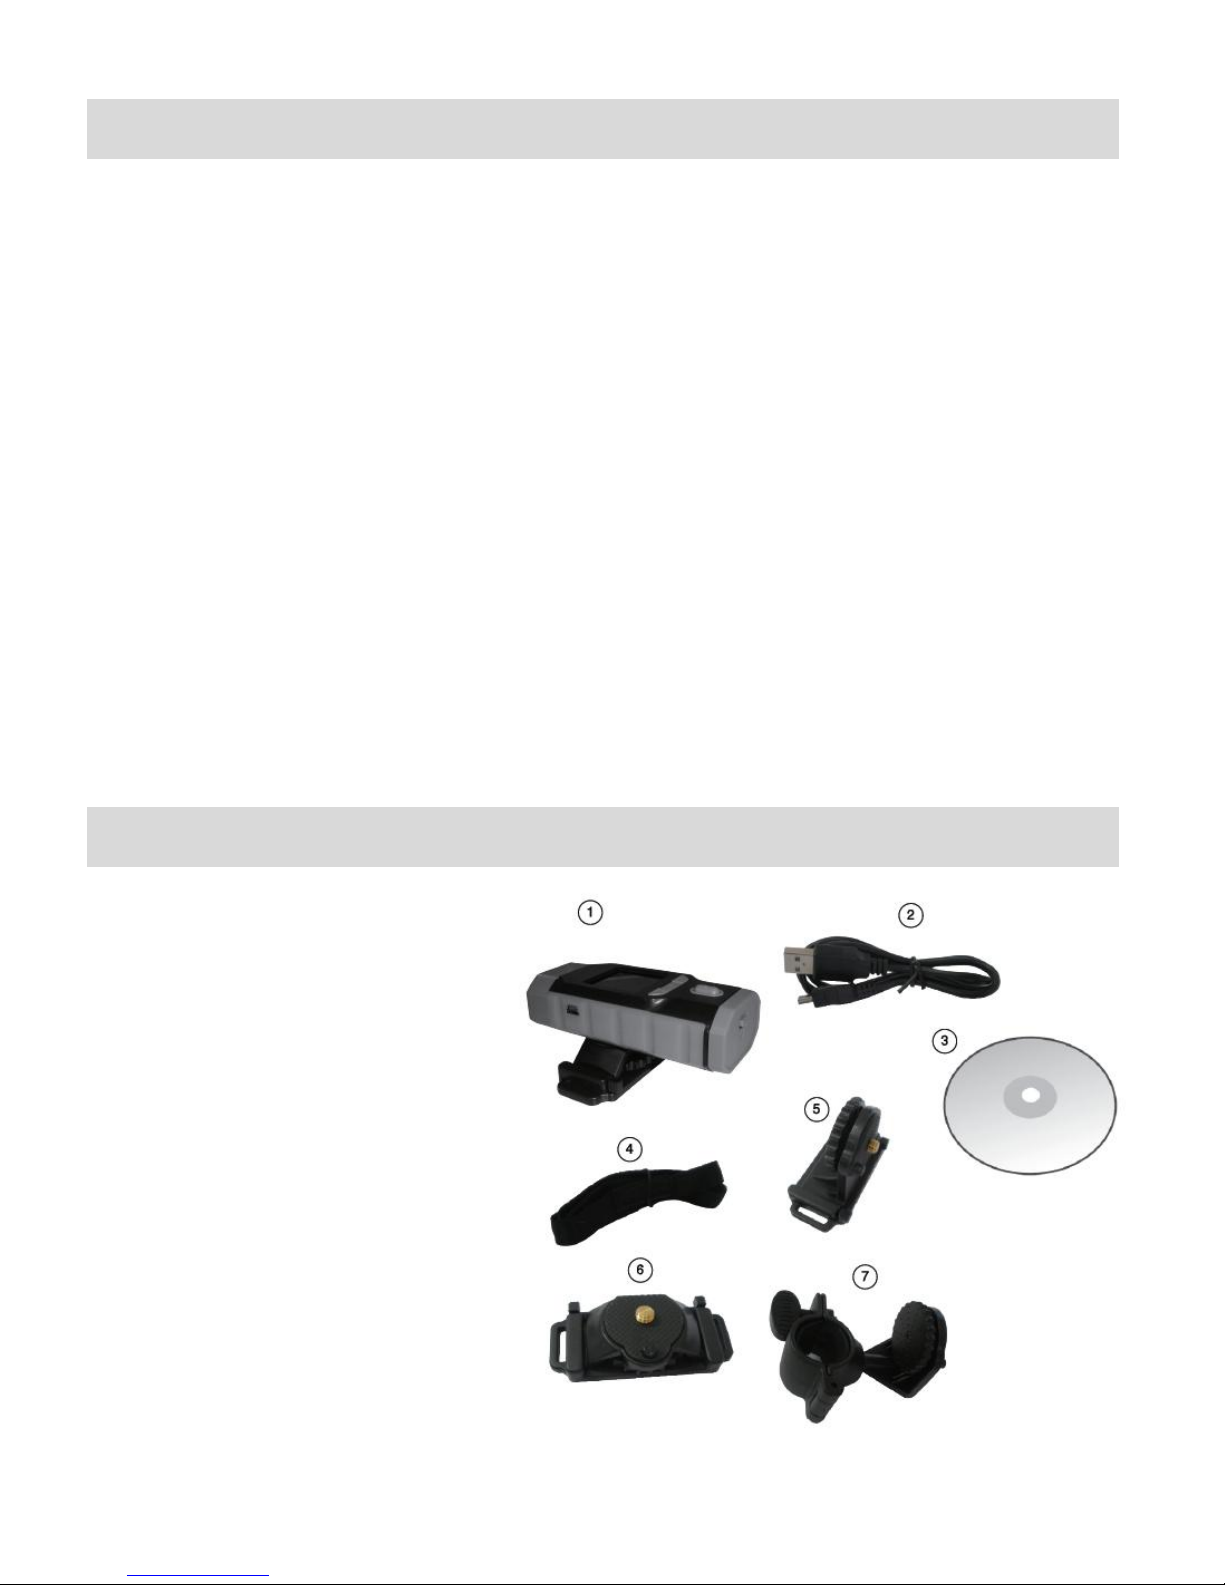
What’s Included
1. Digital Helmet Camcorder
2. USB Cable
3. Vivitar Experience Image
Manager Installation CD
4. Strap
5. Slide Adhesive Mount
6. Top Adhesive Mount
7. Bike Mount
NOTE: SD Memory Card and batteries not included.
3
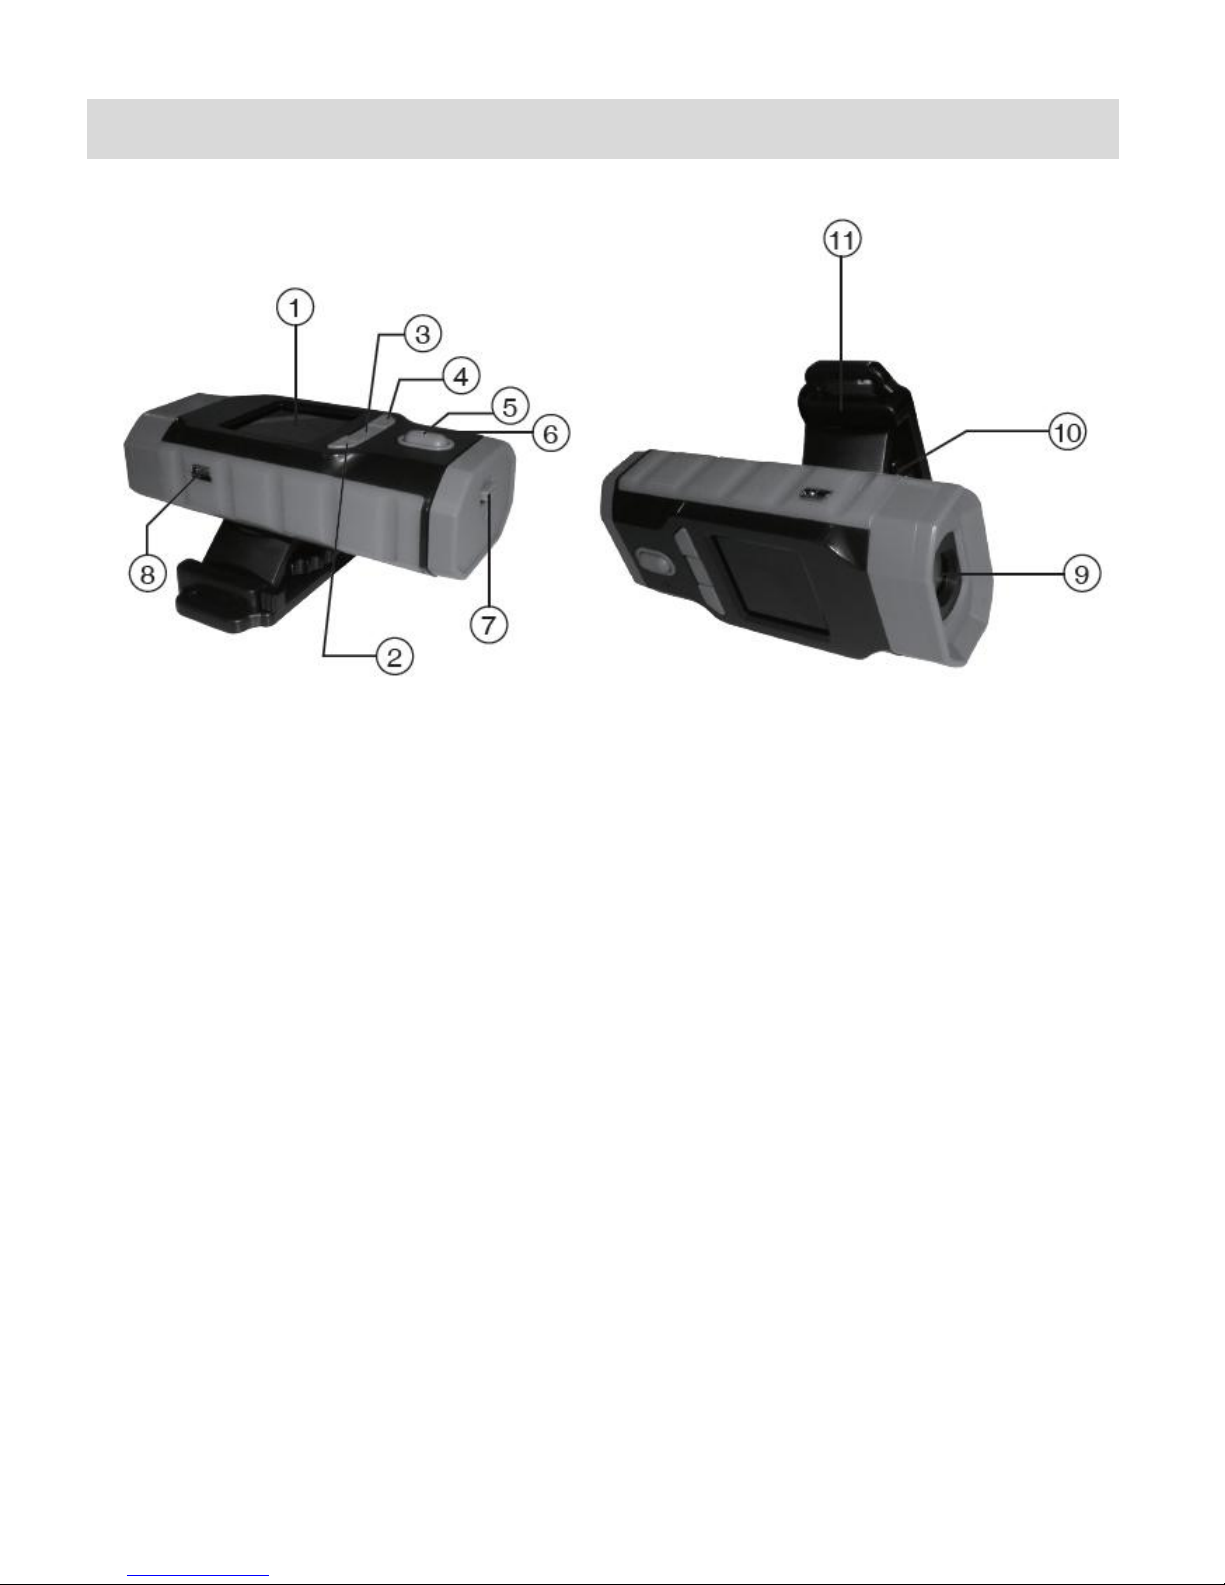
Parts of the Camera
1.
LCD Screen
2.
Display / DELETE Button
3.
POWER Button
4.
MODE Button
5.
Shutter Button
6.
Power Indicator Light/Busy LED
7.
Battery Compartment / Memory Card Slot
8.
USB Jack
9.
Lens
10.
Microphone
11.
Camera Mount
4
Initial Camera Setup
Installing the Batteries
Installing the SD Memory Card
Insert 2 AAA (1.5V) batteries.
Alkaline batteries recommended (not
included).
SD Memory card (up to 16GB)
needed for normal use.
Turning On the Camera
Using the Camera
Selecting the Mode

5
Powering the Digital Camcorder ON
Battery Indicator
Description
The battery level is full.
The battery level is half.
The battery level is low, indicating to prepare for
replacing batteries.
If no battery level icon shows, the battery is
exhausted and the camcorder will automatically turn
off in a few seconds.
Batteries
Make sure the batteries have been inserted properly into your digital video recorder.
Use 2 x AAA (1.5V) batteries. Rechargeable batteries are not recommended for use.
Open the battery and SD Card compartment by pushing down the compartment cover lever
(as indicated by the arrow on the cover).
Insert 2 x AAA batteries with the positive (+) and negative (-) poles matching the directions
indicated on the battery cover.
Close the battery door.
NOTE:
Remove the batteries from the camera when not in use for an extended period.
Do not mix alkaline and non-alkaline batteries.
Some features, such as Flash (if applicable), will not work if the battery power level is low.
When the battery power is low the battery icon turns red and the camera will automatically
turn off a few seconds later.
Battery Indicator:
Be sure to turn off the camcorder power before inserting or removing batteries.
Use only Alkaline battery to power this camcorder. Use of any other type battery is not
recommended.
Replace all batteries at the same time. Never mix old and new batteries.
Remove batteries after extended use.
The camcorder body may be warm after extended use. This is normal.

6
SD Card
Make sure an SD card has been properly inserted into your camera. (SD card not included.)
To properly insert the SD Card:
1. Turn off the camcorder.
2. Pull down the Battery cover/Memory card slot to open it.
3. Insert the SD card with the front piece of the card against the LCD screen. If the memory card
has successfully been inserted, you will hear a click and an icon will appear on the LCD
screen.
4. To remove the card, gently press on the edge of the card and release it. Pull the card out and
close the battery cover.
5. If the card is inserted or removed while the camcorder's power is on, it may damage the card
and/or any recorded data. Always confirm that the power is off before inserting the card into
the camcorder.
NOTE:
After the camera is powered on, an SD icon will appear on the LCD display. If you do not see
the SD icon on the display, please check if the card was inserted properly.
Make sure the SD card is not locked (check the lock switch on the side of the SD card). If the
SD card is locked this will prevent the camera from saving captured photos to the SD card.
Power On
Press the POWER button, located above the LCD Screen, to turn on the digital video camera.

7
Camera Mounts and Accessories
Installing the Helmet Camcorder Mounts
The digital camera comes with three different kinds of mounts:
Top Adhesive Mount, Side Adhesive Mount, Bike Mount
To use the mounts:
Insert the cylinder screw of the chosen mount into the camera mount at the bottom of the camera,
making sure that the nearby black knob is aligned with the parallel hole. Turn the screw's disc
clock-wise to tighten the screw to the camera.
NOTE:
1. For each mount: connect the screw of the mount to the camera mount of the camcorder.
2. For the helmet cam: Thread the strap through the mount and connect the camcorder to your
helmet. Alternatively, you can use the adhesive sticker to connect the camera to your
helmet.
3. For the bike cam: Open the mount and insert the rubber pad. Then place on the handlebars
and close with the screw.
 Loading...