

Vivitar 39056 Digital Camera User Manual

39056
Night Vision Camcorder
User Manual
© 2009-2012 Sakar International, Inc. All rights reserved.
Windows and the Windows logo are registered trademarks of Microsoft Corporation.
All other trademarks are the property of their respective companies.

1
Contents
Introduction .................................................................................................................................. 2
What’s Included ............................................................................................................................ 2
Parts of the Camcorder ................................................................................................................ 3
Initial Camcorder Setup ................................................................................................................ 4
Main Camcorder Modes ............................................................................................................... 8
Camcorder Technical Specifications ............................................................................................. 9
Computer System Requirements ............................................................................................... 10
Using Your Camcorder ................................................................................................................ 11
Changing Camcorder Mode ........................................................................................................ 11
Navigating the Modes ................................................................................................................. 12
Camcorder Features: Infrared Night Vision Light, ViviLink, Resolution ...................................... 13
Video Capture Mode .................................................................................................................. 15
Photo Capture Mode .................................................................................................................. 17
Playback Mode ........................................................................................................................... 19
Setup Mode ................................................................................................................................ 23
Installing the Software ................................................................................................................ 25
Connecting the Camcorder to the Computer .............................................................................. 26
Getting Photos and Videos from the Camcorder to the Computer ............................................. 27
Get Started! ................................................................................................................................ 28
Transferring Media from the Camcorder to the Computer Manually ........................................... 28
Camcorder Maintenance ............................................................................................................ 30
Sakar Warranty Card .................................................................................................................. 30
Technical Support ....................................................................................................................... 31
Troubleshooting .......................................................................................................................... 31

2
Introduction
Thank you for purchasing this digital video recorder. Everything you need to take quality digital
photos and videos is included with your camcorder.
Vivitar makes capturing those special moments as easy as possible.
Please read this manual carefully first in order to get the most out of your digital camcorder.
Note:
Your digital camcorder supports an SD Memory Card (up to 32GB).
In order to use your digital video recorder normally, it is strongly recommended to insert
the SD Memory card before use.
SD Memory cards are not included and need to be purchased separately.
What’s Included
1. Digital Camcorder
2. USB cable
3. Vivitar Experience Image Manager
software Installation CD
Note: SD Memory Card not included.
3
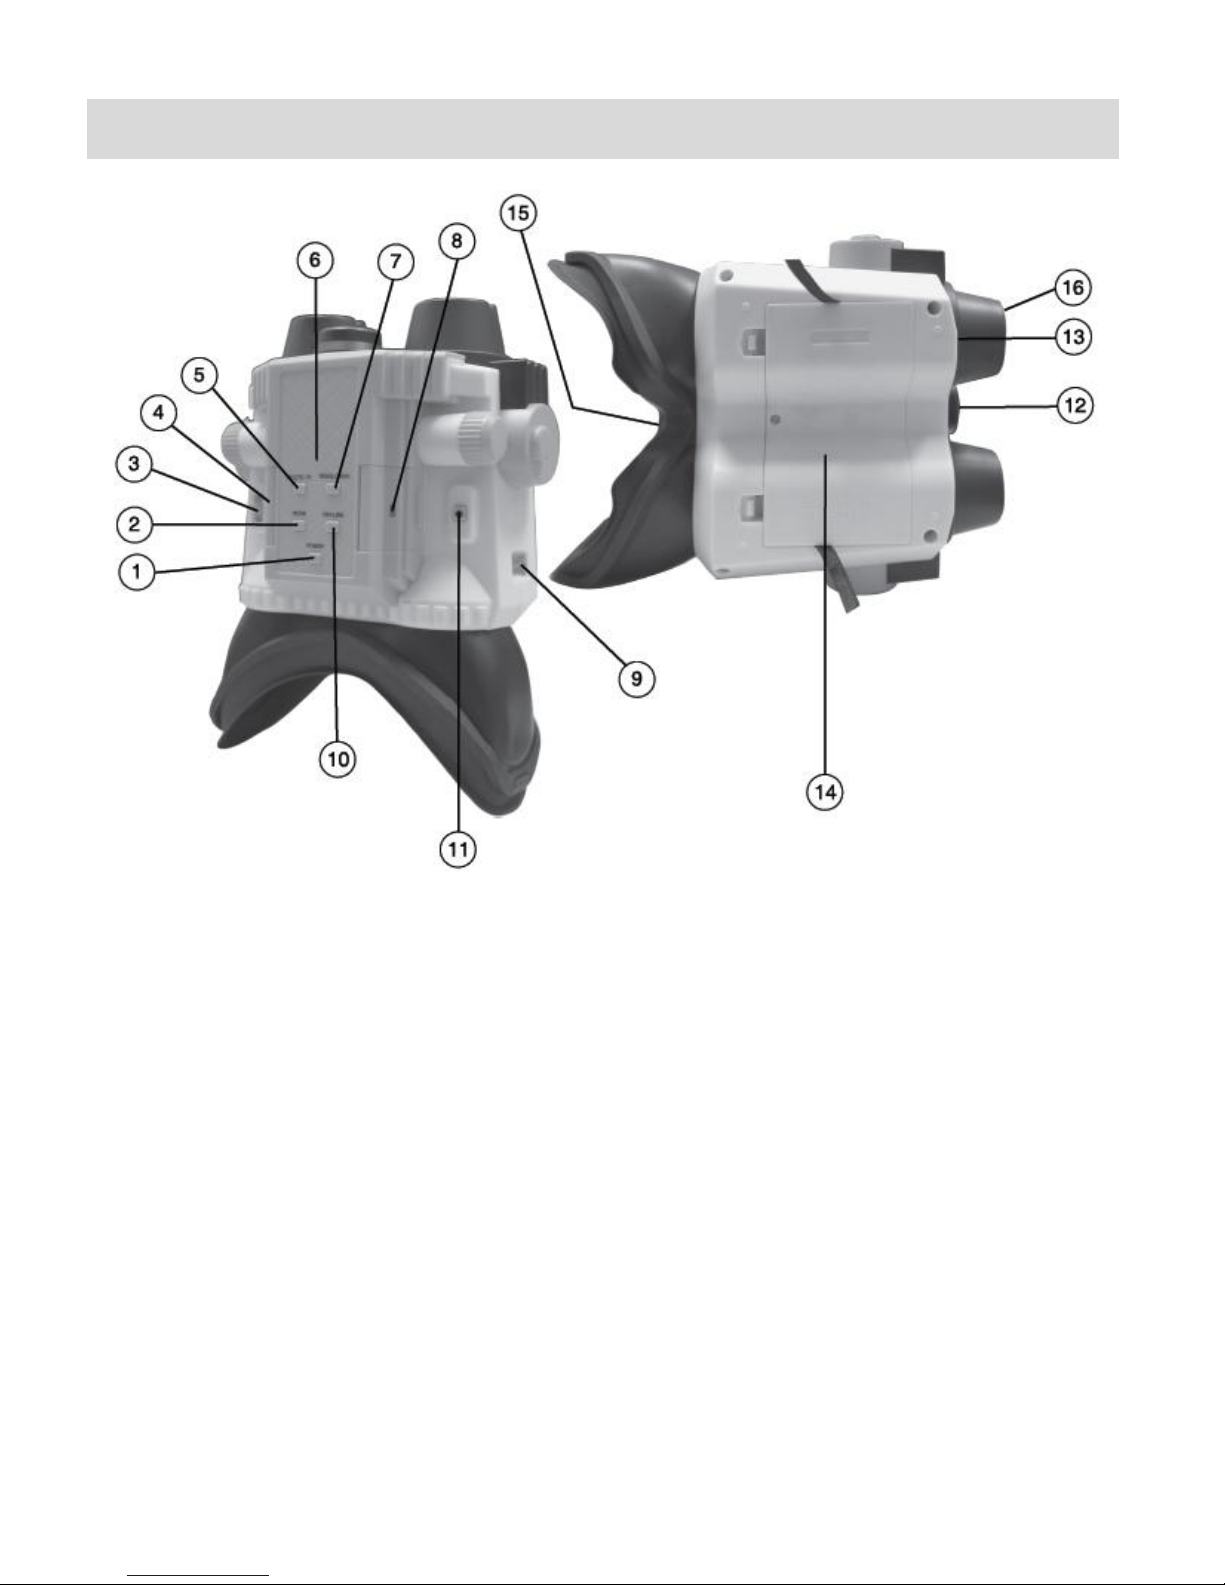
Parts of the Camcorder
1. Power Button
9. Camera Strap Hooks
2. MODE Button
10. ViviLink Button
3. Zoom Control Lever:
T (UP) / W (DOWN) Button (Zoom In/Zoom Out)
11. Shutter/Record/OK Button
12. Lens
4. SD Card Slot
13. Microphone
5. Delete/IR Flash Button
14. Battery Compartment Cover
6. LED Indicator Light
15. LCD Screen
7. Resolution Button
16. IR Lights
8. USB Port

4
Initial Camcorder Setup
Installing the Batteries
Installing the Memory Card
Insert 4 x AA batteries (1.5V).
Alkaline batteries recommended.
Batteries not included.
Insert SD Memory card (up to 32GB)
before use.
Turning On the Camera
Using the Camera

5
When powering the camera ON for the first time the camera will take you through the initial
camera setup.
Powering the Camcorder ON
1. Batteries
Make sure the batteries have been inserted properly into your digital camera, according to
the polarity shown inside the battery compartment.
Use 4 x AA (1.5V) batteries. Alkaline batteries are recommended. (Batteries not included.)
Note:
Remove the batteries from the camera when not in use for an extended period.
Do not mix alkaline and non-alkaline batteries.
Some features, such as Flash, will not work if the battery power level is low.
When the battery power is low the battery icon turns red and the camera will
automatically turn off a few seconds later.
Rechargeable batteries not recommended.
The energy status of the power is displayed on LCD as shown below:
Full battery power Medium battery power Low battery power
2. SD Card
Make sure an SD card has been properly inserted into your camera. (SD card not
included.)
To properly insert the SD Card:
Push the SD card into the slot in the direction shown on the camera (see SD icon by the
SD card slot). Push the SD card until you hear a slight clicking sound. This indicates the
SD card has been inserted correctly.

6
Note:
After the camera is powered on, an SD icon will appear on the LCD display. If you do not
see the SD icon on the display, please check if the card was inserted properly.
Make sure the SD card is not locked (check the lock switch on the side of the SD card). If
the SD card is locked this will prevent the camera from saving captured photos to the SD card.
3. Power On
Press the POWER button to turn on the camera.
Setting the Camera Language
1. You will first be prompted to select a language for the camera. The Language selection
menu will appear. Select the language of your choice by pressing the UP / DOWN button.
Then press the OK / Shutter button to confirm the selection.
2. After selecting a language, you will be asked if you would like to continue with the initial
camera setup. A message will appear: “Continue with Camera Setup?”
Select “Yes” to continue or “No” to exit the setup.
Note: If you select “No” and decide to leave the camera setup, the camera will be set to its default
settings. These settings can be adjusted at any time manually through the menus in the camera.

7
Setting the ViviLink Default Option
Once the Language has been set, you will be asked to set the default ViviLink destination for
photos and videos taken with your camera.
The ViviLink technology allows you to quickly and easily upload your camera’s photos and videos
to the social networks of your choice with the accompanying software application.
1. First you will be asked to choose the default ViviLink social network for Photos. Use the UP /
DOWN button to highlight the desired default social network and press the OK / Shutter
button to confirm the selection.
2. Next you will be asked to choose the default ViviLink social network for Videos. Use the UP /
DOWN button to highlight the desired default social network and press the OK / Shutter
button to confirm the selection.
Congratulations! Your camcorder is now ready to use.

8
Main Camcorder Modes
Video Capture Mode
Use this mode to capture videos with your digital camcorder.
This is the default mode when the camcorder is powered ON.
To take a video, aim your camera as desired and press the Shutter button to start the
recording. A blinking, red record indicator appears on the LCD screen while the recording
is in progress. To stop recording, press the Shutter button again. The video is
automatically saved to your camera’s memory card.
Photo Capture Mode
Use this mode to capture pictures with your camera.
After turning on your camcorder, press the MODE button and select ‘DSC’ to open the
Photo Capture mode.
To take a picture, aim your camera as desired and press the Shutter button.
The picture is automatically saved to your camera’s memory card.
Playback Mode (Photos & Videos)
Use this mode to view and manage the videos and photos on your camera.
After turning on your camera, press the MODE button and select ‘Playback’ to open the
Playback mode for photos and videos. You can scroll through the photos and videos that
you’ve previously taken to view or delete them as desired.
Setup Mode
Use this mode to select your camcorder settings.
After turning on your camera, press the MODE button and select ‘Setup’ to open the
camcorder setting menu options.
Your camcorder has different modes for the various camera functions.
You can switch modes by pressing the MODE button on your camera after the camera has been
powered ON.

9
Camcorder Technical Specifications
Image Sensor
CMOS Sensor
Image Resolution
2048x1536 (3M), 1920x1080 (2M),
1080x1024 (1.3M), 640x480 (VGA)
Video Resolution
640x480 (VGA ) pixels, 320x240 (QVGA) pixels
File Format
JPEG ; AVI
External Memory
SD Memory Card (up to 32GB)
LCD Display
2.0 Inch TFT
Lens
f=4.8mm, F=2.6mm
Zoom
4X Digital Zoom
ISO
Auto / 100 / 200 / 400
Flash
IR (Infrared) Lights
Microphone
Yes
Frequency
50 Hz, 60 Hz
Auto Power Off
60 seconds (default)
Language
English, French, Spanish, Portuguese, German, Dutch, Italian,
Russian, Turkish
Interface
USB 2.0
System Requirements
Windows XP (SP 3), Vista (SP1) and 7 ;
Mac OSX v10.5.x and above
Battery
4 X AAA (1.5V)
Working Temperature
0~40 C
 Loading...