

Page 1
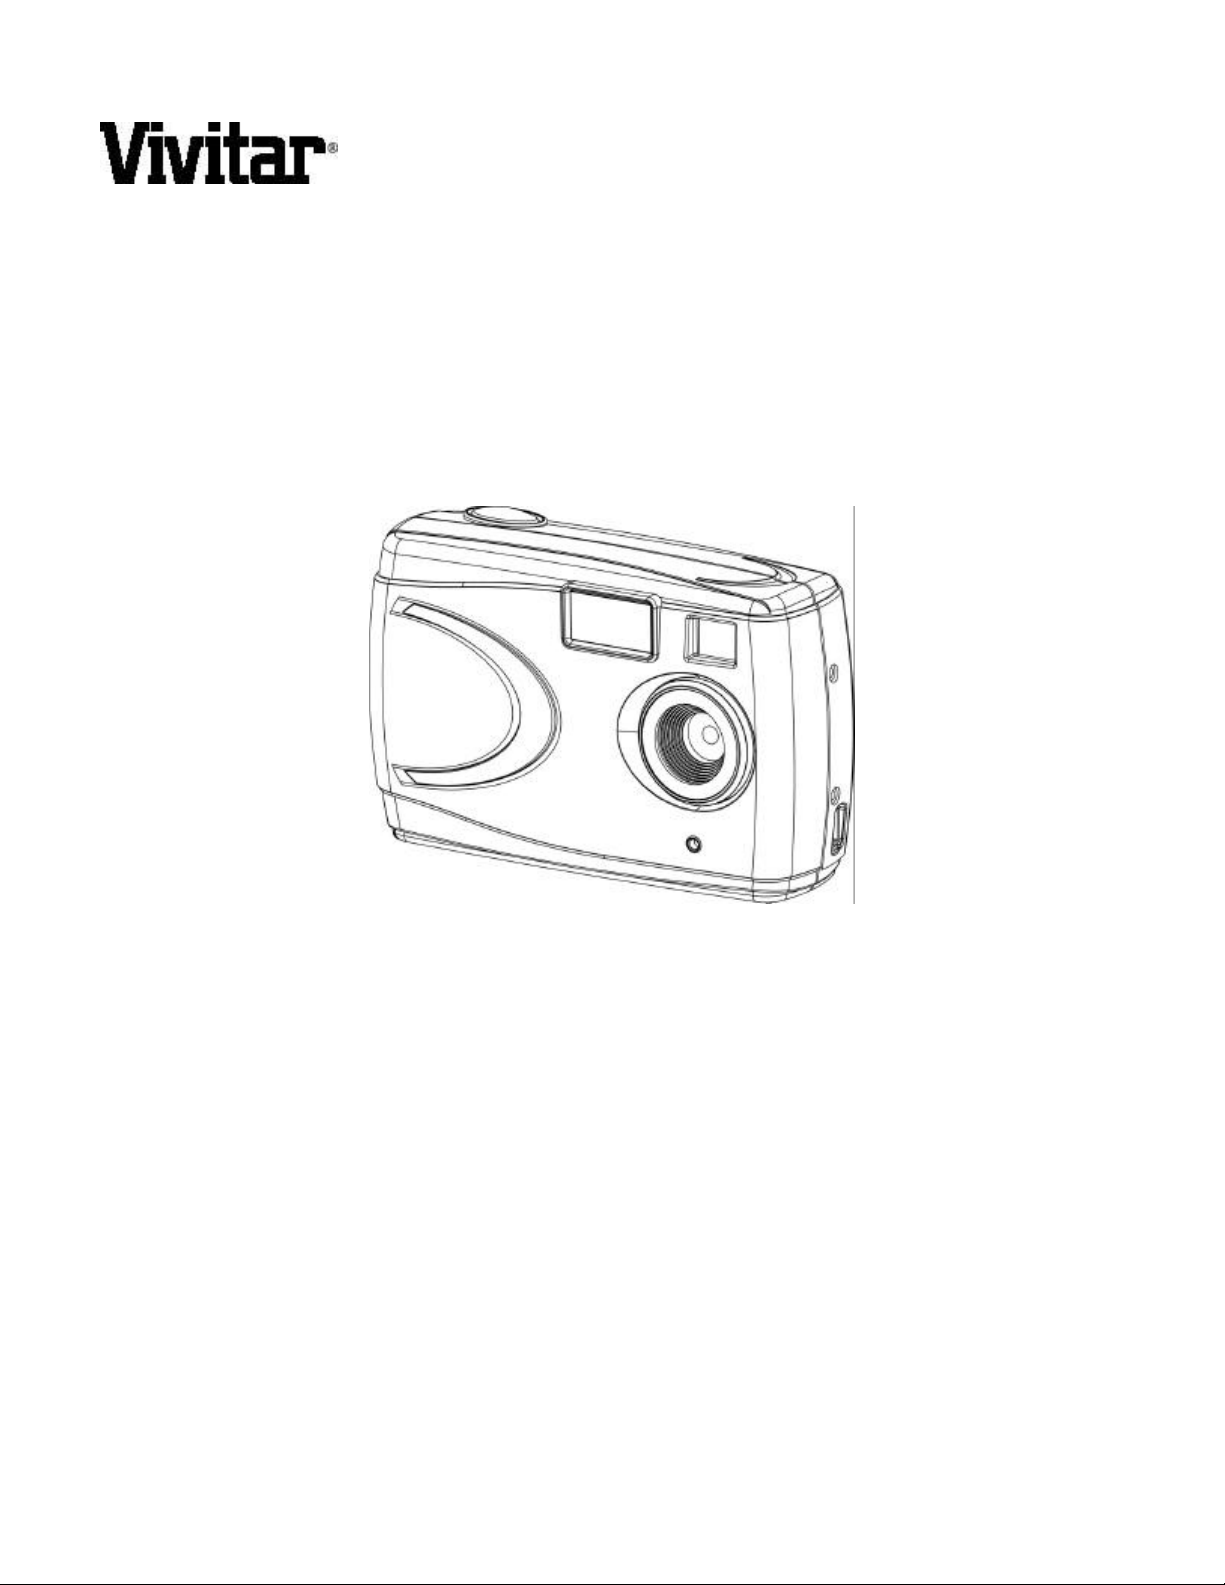
ViviCam 3345
1.3 Mega Pixel Digital Camera
Owner’s Manual
Page 2

ViviCam 3345 User Manual
This manual is designed to assist you in using the ViviCam 3345. Information in this document has been carefully
checked for accuracy; however, no guarantee is given to the absolute correctness of the contents. The information
in this document is subject to change without notice. © Copyright 2004 Vivitar Corporation.
Federal Communications Commission (FCC) Compliance
This equipment has been tested and found to comply with the limits for a Class B digital device, pursuant to Part 15 of the FCC
Rules. These limits are designed to provide reasonable protection against harmful interference in a residential installation. This
equipment generates, uses, and can radiate radio frequency energy and, if not installed and used in accordance with the
instructions, may cause harmful interference to radio communications. However, there is no guarantee that interference will not
occur in a particular installation. If this equipment does cause harmful interference to radio or television reception, which can be
determined by turning the equipment off and on, the user is encouraged to try to correct the interference by one or more of the
following measures:
• Reorient or relocate the receiving antenna.
• Increase the separation between the equipment and the receiver.
• Connect the equipment to an outlet on a circuit different from that to which the receiver is connected.
• Consult the dealer or an experienced radio/TV technician for help.
Note!
Changes or modifications not expressly approved by the party responsible for compliance could void your authority to operate
the equipment.
Use of shielded cable is required to comply with Class B limits in Subpart B of Part 15 of the FCC rules. Do not make any
changes or modifications to the equipment unless otherwise specified in the manual. If such changes or modifications should be
made, you could be required to stop operation of the equipment.
Declaration of Conformity
This device complies with part 15 of the FCC rules. Operation is subject to the following conditions:
o This device may not cause harmful interference.
o This device must accept any interference received, including interference that may cause undesired operation.
Canadian Department of Communications
o This class B digital apparatus meets all requirements of the Canadian Interference-causing Equipment Regulations.
o Cet appareil numérique de la classe B respecte toutes les exigences du Réglement sur le matériel brouilieur du
Canada.
Trademark Recognition
Windows (an abbreviated term referring to the Microsoft Windows Operation System), NetMeeting, and Media Player are
registered trademarks and products of Microsoft Corporation registered in the USA and other countries. Arcsoft, Image
Impression and Video Impression are products and trademarks of Arcsoft Inc. Other corporate, product names, or trade
references are trademarks or registered trademarks of their respective companies.
General Warnings
When fitting batteries into the camera, check the polarity of the batteries (- and +) to ensure that you insert the battery correctly.
Incorrect polarity may result in the batteries splitting or leaking and causing a fire, injury, or soiling of the battery compartment.
Remove the batteries if the camera will not be used for an extended period of time. The batteries may leak and cause a fire,
injury or soiling of the battery compartment. If the batteries leak, clean and wipe the battery compartment carefully and install
new batteries. Wash your hands carefully if you touch the battery fluid. Please note that when you remove the batteries your
images will be lost from the camera memory.
WARNING: Handling the USB cable on this product may expose you to lead, a chemical known to the State of California to
cause birth defects or other reproductive harm. Wash your hands after handling. V3345 User Manual English Rev: 040414tpiehn
Page 3

ViviCam 3345 User Manual - Table of Contents
GENERAL INFORMATION......................................................................................................................... 4
COMPUTER SYSTEM REQUIREMENTS ........................................................................................................... 4
PACKAGE CONTENTS ................................................................................................................................. 4
GETTING STARTED.................................................................................................................................. 5
CAMERA FEATURES ................................................................................................................................... 5
INSERTING AND REMOVING AN SD OR MMC MEMORY CARD .......................................................................... 6
USING THE VIVICAM 3345........................................................................................................................ 7
POWERING THE CAMERA ON/OFF.............................................................................................................. 7
CAMERA ICONS AND DESCRIPTIONS ............................................................................................................. 7
CAPTURING DIGITAL STILL IMAGES .............................................................................................................. 8
USING THE FLASH...................................................................................................................................... 9
USING THE SELF-TIMER.............................................................................................................................. 9
RECORDING DIGITAL VIDEO...................................................................................................................... 10
DELETING IMAGES AND VIDEOS ................................................................................................................. 10
INSTALLING THE SOFTWARE................................................................................................................ 12
SOFTWARE OVERVIEW AND FEATURES....................................................................................................... 12
INSTALLING SOFTWARE APPLICATIONS & DRIVERS ...................................................................................... 12
CONNECTING TO YOUR COMPUTER.................................................................................................... 14
CONNECTING TO A PC.............................................................................................................................. 14
DOWNLOADING FILES TO YOUR PC..................................................................................................... 15
DOWNLOADING IMAGES USING MASS STORAGE MODE ................................................................................ 15
16CAMERA MAINTENANCE....................................................................................................................16
CARING FOR YOUR CAMERA ...................................................................................................................... 16
OPERATING & STORAGE ENVIRONMENTS ................................................................................................... 16
CLEANING THE VIVICAM 3345................................................................................................................... 16
PRODUCT SPECIFICATIONS.................................................................................................................. 17
TROUBLESHOOTING.............................................................................................................................. 18
Page 4

GENERAL INFORMATION
Computer System Requirements
The ViviCam 3345 is designed to work with your home or office computer. To ensure proper operation your
computer must meet the following requirements:
• Pentium II Class 400 MHz processor
• Windows® 98SE/ME/2000/XP
• 128MB RAM
• 300 MB free hard disk space
• USB port
• CD-ROM drive
Package Contents
Open the ViviCam 3345 package and examine the contents. Your package should contain the following items.
Note, however, that items included with your camera kit may vary slightly depending upon the options selected
by your camera retailer. Check with your retailer for details, as options will vary by retailer.
• Vivicam 3345
• Camera wrist strap
• 2 AA batteries
• USB cable
• Quick Start Guide
• Software CD containing:
o ViviCam 3345 Driver
o Owner’s Manual (PDF)
o Ulead Image Explorer 8.0 SE
o Ulead COOL 360
o Adobe Acrobat Reader
Page 5
5
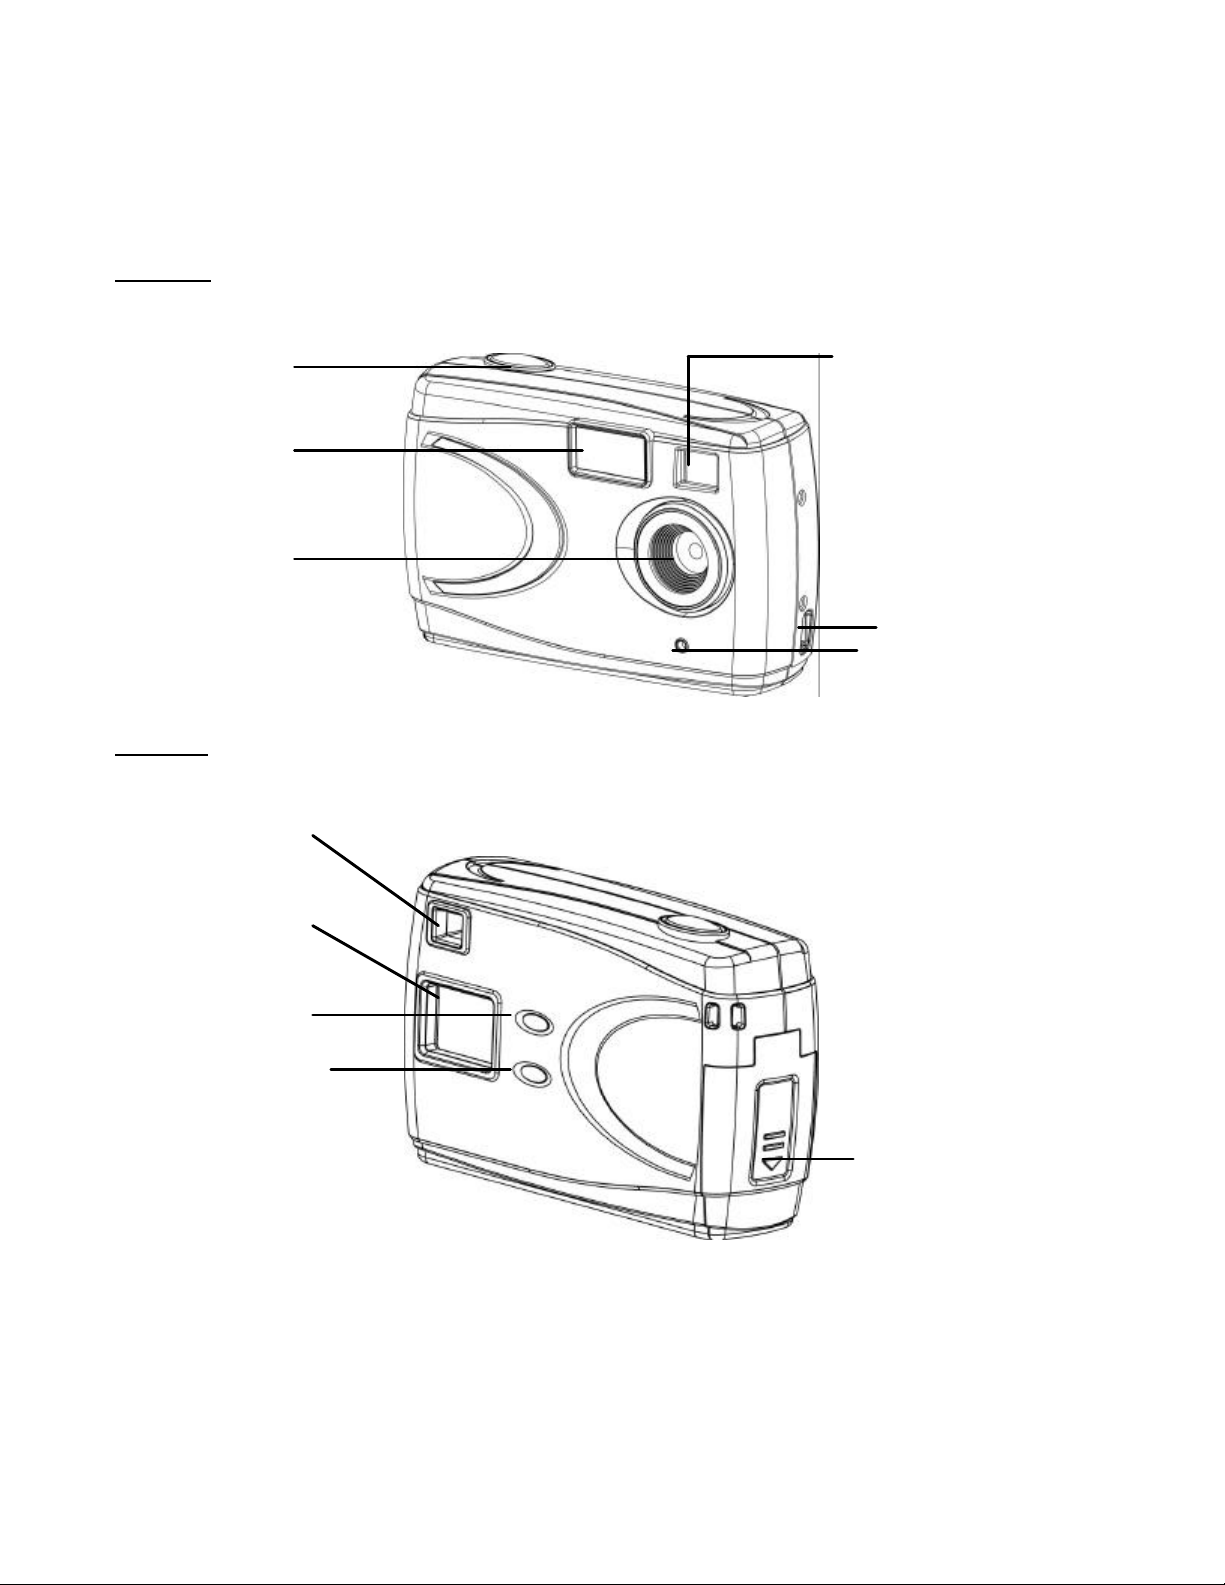
Camera Features
Please refer to the following diagrams to identify the features of the ViviCam 3345:
Front View
GETTING STARTED
Rear View
Viewfinder
Status LCD
Shutter
button
Flash
Lens
Viewfinder
USB port
Self-timer LED
Power/Mode
Button
Select Button
Battery Compartment
SD/MMC Card slot
(inside)
Page 6
6
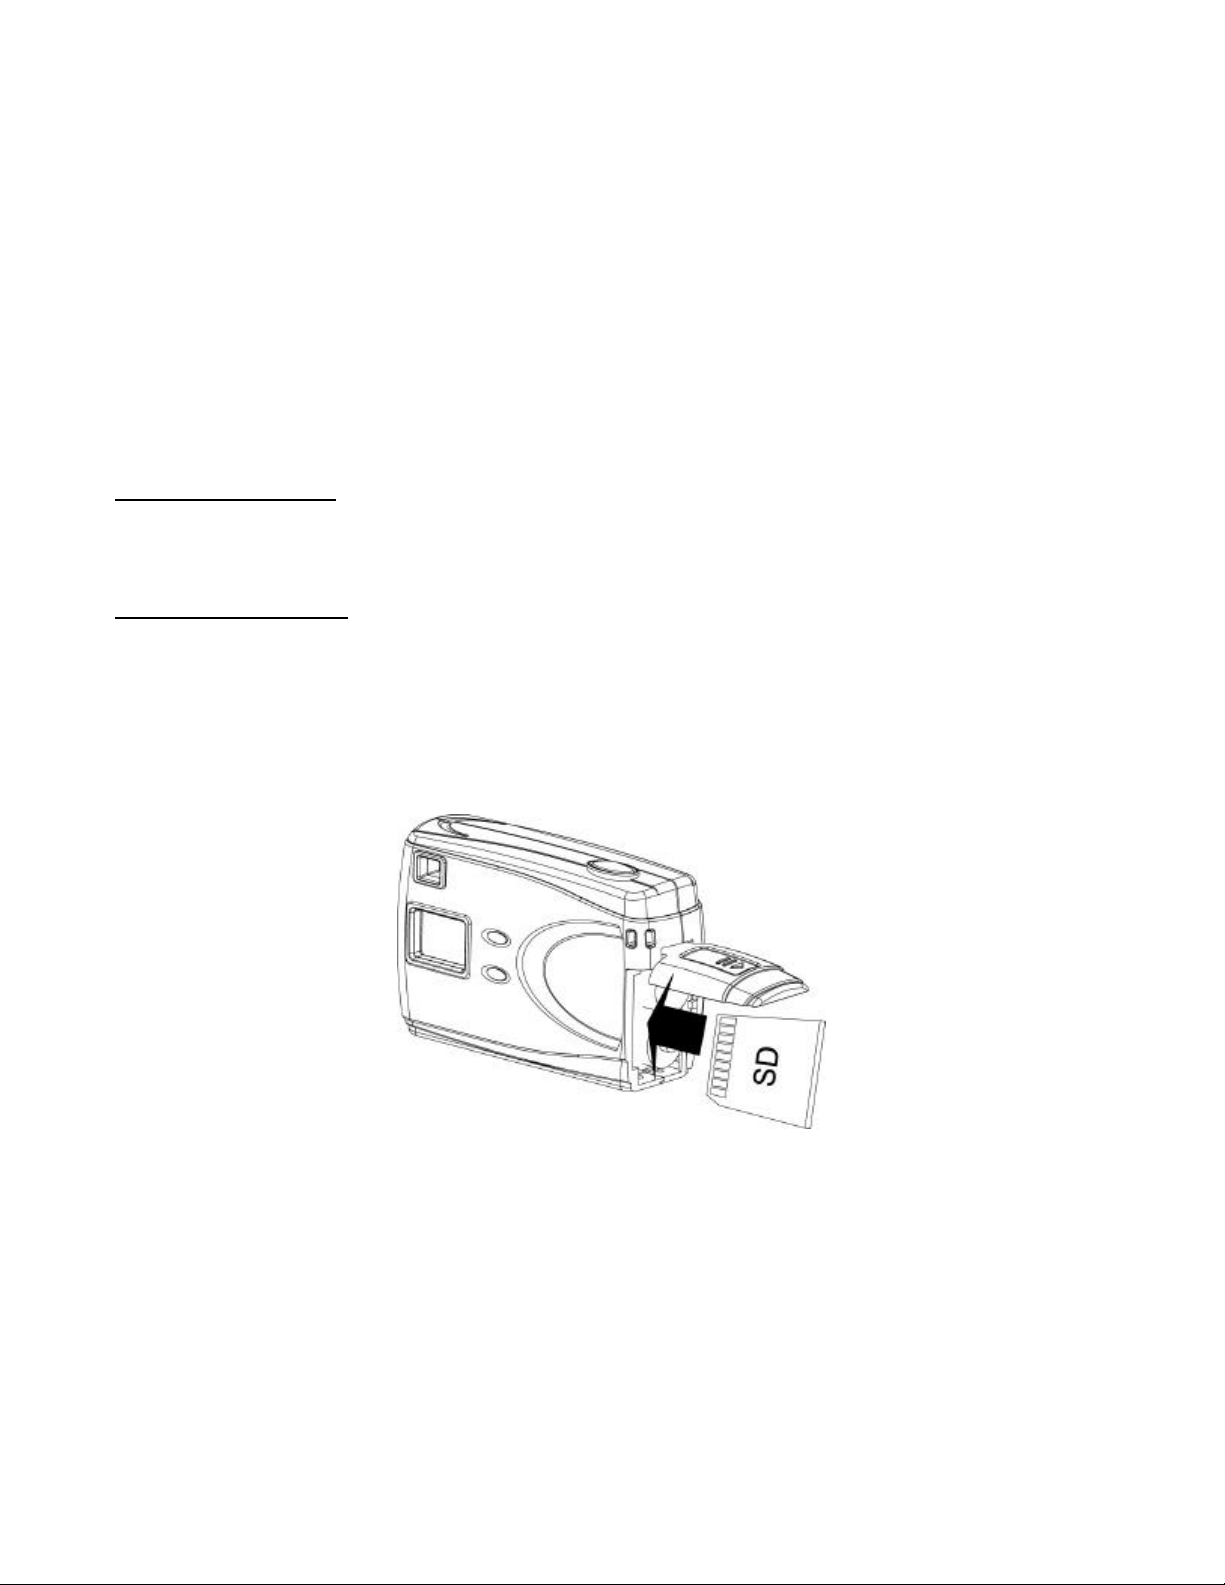
Inserting and Removing an SD or MMC Memory Card
The ViviCam 3345 accepts a Secure Digital (SD) or a MultiMedia Card (MMC) memory card up to 256MB
capacity. The memory card takes priority over the internal memory. Whenever a memory card is inserted the
camera will immediately use the memory card in preference to the internal memory. Therefore, when a memory
card is inserted, the camera will store images and videos on the memory card. Likewise, the camera will
playback images and videos that are stored on the memory card only. To access internal memory remove the
memory card.
Inserting a Memory Card
1.
Insert an SD or MMC card into the memory card slot located on the side of the camera, and gently
press down with your finger.
Removing a Memory Card
1.
Gently press down on the memory card and it will partially eject. Pull the card out with your fingers.
Note: To use the internal memory (8MB), please remove the memory card first.
Page 7

7
USING THE VIVICAM 3345
Powering the Camera ON/OFF
• To turn the ViviCam 3345’s power ON, press and hold the button for three to four seconds. The
camera will beep and the status LCD will display camera status information.
• To turn the ViviCam 3345’s power OFF, press and hold the button for three (3) seconds and the
status LCD will shut off.
Note: The ViviCam 3345 automatically powers off after 60 seconds of inactivity.
Camera Icons and Descriptions
Icons Descriptions
Capture Mode for capturing digital still images
Number of images that you may capture in the available memory
Movie Mode for capturing video clips
Time (maximum duration) of a video that may be captured in the available
memory
Resolution settings for still images
??? 1600 x 1200 (2 mega-pixel images, using internal interpolation)
?? 1280 x 1024 (native 1.3 mega-pixel resolution of the camera)
? 640 x 480 (VGA, reduced resolution – for capturing more images)
Self-timer allows 10 seconds to capture an image
Note: The self-timer function uses two-star (1280 x 1024) resolution setting ONLY
Battery level indicator:
3 segments: battery is full
2 segments: battery is half full
1 segments: battery is low; flash is disabled
0 segments: battery is near empty; the icons on the status LCD will flash
PC / Web Cam mode. Set the camera to “PCC” before connecting to your PC to
use the PC camera function.
The Power/Mode Button
PC-connection – camera is connected to a computer with the USB cable
Page 8

8
The Select Button
Icon Descriptions
Automatic Flash: The flash will fire if there is insufficient ambient light
Note: The flash icon blinks when the flash capacitor is charging. Wait for the icon
to stop blinking before capturing an image.
Flash OFF: The flash will not fire in any lighting condition
Flash ON: The camera will flash regardless of lighting conditions
Indoor Exposure: For taking images indoors
Outdoor Exposure: For taking images outdoors
Delete ALL: Deletes all images and/or videos saved in the camera memory or on
a memory card
Delete LAST: Deletes the last image or video stored on the camera or the
memory card
Capturing Digital Still Images
1.
Press and hold the button for three to four seconds to power on the camera.
2.
Press the button again to select the desired image resolution:
Superfine 1600 x 1200 (2 MP interpolated)
Fine 1280 x 1024 (1.3 MP native resolution)
Economy 640 x 480 (VGA, reduced resolution)
The “Fine” resolution setting (1280 x 1024) is suggested for general use. The superfine resolution
will yield a 2 mega-pixel image (1600 x 1200) that is generated (calculated) by a process called
interpolation, inside the camera. Superfine images will include finer detail than their 1.3 mega-pixel
equivalents, however, they will consume more memory space. Images captured in Economy (640 x
480) will have noticeably less detail but require less memory space in the camera. Try capturing
some images in all three resolutions and compare the results.
3.
Frame your subject through the viewfinder.
4.
Hold the camera steady and press the Shutter button firmly to capture an image. The camera will
beep to confirm that the image has been captured, and the status LCD will decrement by one,
displaying the number of images that can be captured in the remaining available memory.
Page 9

9
Using the Flash
1.
Press the button to select the desired resolution.
2.
Press the Select ( ) button to toggle through the following options and select your desired flash
and exposure settings:
Flash OFF/Outdoor ? Auto flash/Outdoor ? Flash OFF/Indoor ? Auto flash/Indoor ? Flash
ON/Indoor ? Flash ON/Outdoor.
3.
Frame your subject through the viewfinder.
4.
Hold the camera steady and press the Shutter button firmly to capture an image.
Note:
• If the flash is charging , the flash icon on the status LCD will blink. The camera will not capture an
image while this icon is blinking. Wait for the icon to stop blinking before capturing an image.
• The flash will yield best results when the subject is 5 to 6.5 feet (1.5 to 2 meters) away from the camera.
The image may be over exposed if you hold the camera too close to your subject (e.g. less than 5 feet
or 1.5 meters away.)
• The camera will not flash if the battery indicator shows only one segment. Change or recharge the
battery to replenish power before using the camera with the flash.
Using the Self-timer
1.
Press the button three times to the self-timer icon
the native (two-star) resolution setting.
2.
Place your camera on a tripod (or a flat surface) and frame the subject through the viewfinder.
3.
Press the Select ( ) button to select your desired flash and exposure settings.
The camera will automatically adjust to
.
4.
When ready to capture an image, press the Shutter button once to start the timer. The camera will
beep and the red LED will blink slowly. As the time counts down to 10 seconds, the camera will
beep and flash faster.
Note: The self-timer function only functions at 1280 x 1024 resolution (two-stars.)
Page 10

Recording Digital Video
1.
Press and hold the button for three to four seconds to power on the camera.
2.
Press the button four times to the Movie icon
3.
Press the Select ( ) button to select the desired exposure setting:
Indoor or Outdoor
.
4.
Frame your subject through the viewfinder and press the Shutter button once to start recording. The
video icon
display the time remaining (in seconds) for the available memory.
5.
To stop recording a video, press the Shutter button again. The status LCD will display the maximum
duration of a video-clip that you can capture based upon the available memory.
Note:
• The Movie mode does not use the flash function.
• If an external memory card is used, the camera will store video on the card.
will blink continuously while the camera is recording a video. The status LCD will
Deleting Image and Video Files
This function allows you to delete images and videos stored on your ViviCam 3345, or on a memory card.
Deleting the Last Image
1.
Press and hold the Select button for one second, and the Delete Last icon will appear on
the status LCD.
2.
Press the Shutter button once to delete the last file recorded. The camera will beep to confirm that
the last recorded file has been deleted.
10
Page 11

3.
To return to the main screen without deleting any file, press the Select button twice. DO NOT press
the Shutter button.
Deleting All Images and Videos
1.
Press and hold the Select button for one second. The Delete Last icon will appear on the
status LCD. Toggle to the Delete ALL
2.
Press the Shutter button to delete ALL images and videos stored in the memory. The camera will
beep to confirm that all files have been deleted from memory.
3.
To return to the main screen without deleting any files, press the Select button again. DO NOT
press the Shutter button.
4.
Please note that if a memory card is used, the camera will delete images from the memory card
only. If you want to delete images from internal memory, please remove the memory card and
select Delete ALL again.
Depending on the mode, the status LCD will display the following information:
Image mode: number of images that can be stored in memory
Movie mode: duration of a video that can be stored in memory (in seconds or minutes)
After a deletion the status display updates to reflect the amount of memory. Because images of different
resolution (one, two, or three-stars) occupy different amounts of memory, the number of images displayed on
the status LCD may or may not change.
icon by pressing the Select button again.
Note: Delete ALL is the equivalent of formatting the memory card or the internal memory. Please download all
your images and video s before “deleting all”. Refer to the section “Downloading Files to Your PC”.
11
Page 12

INSTALLING SOFTWARE
Software Overview and Features
The following software and drivers are included on the CD to enhance your digital imaging experience. (The
ViviCam 3345 Driver is used only for Windows 98SE users.) Windows ME, 2000, and XP users can connect
their 3345 camera directly to their computer with the supplied USB cable and download their images and videos
without installing any software or drivers whatsoever.
Note: Windows 98 users must install the driver software before connecting the camera to their PC for the first
time.
The ViviCam 3345 CD ROM also includes several image and video editing software titles for an enhanced
imaging experience. These applications are not required to operate the camera.
Adobe Acrobat Reader allows you to view PDF documents such as this manual.
ViviCam 3345 Driver for Windows 98SE
• Installs the driver for Windows 98SE users
ViviCam 3345 User Manual
• Selecting this option also installs a copy of the Owner’s Manual on your computer
Adobe Acrobat Reader
• Access this Owner’s Manual and other PDF documents
Installing Software Applications & Drivers
Insert the CD software into your
computer’s CD-ROM drive. The CD
should auto run. If the CD does not auto
run, go to Start ? Run, and type in
“d:\setup.exe” (where D:\ is your CDROM drive). The ViviCam 3345’s
Installer Menu will appear on the
computer screen as shown:
12
Page 13

Move your cursor over the software that you want to install on your computer, and click it once to begin the
installation. Follow the on-screen instructions below to complete installing your software.
When installing the ViviCam 3345 driver, a progress screen will
appear:
Click “Next” to start the installation.
Wait for the application to install on your computer. When the installation is completed, the computer
prompts you to reboot your system. Select “Yes, I want to restart my computer now” and click “Finish” to
reboot your computer.
Applications. Click on the desired software application to install and follow the screen instructions to
complete installation.
Acrobat Reader. Click the Acrobat Reader application to install and follow the screen instruction to
complete installation.
Note: It is important that you save and close all programs before rebooting your computer.
Special Note for Windows 98SE Users. You may be prompted to restart your computer after each application is
installed. When prompted by the computer to reboot, please select “No, I will restart my computer later” and
click “Finish.” I install all software that you desire and then reboot your PC.
13
Page 14

MAKING CONNECTIONS
Connecting to your PC
After the software installation is completed, connect the ViviCam 3345 to the computer to download the images
and videos. Follow these steps:
1. Power OFF the camera.
2. Plug the small end of the USB cable into the USB port on the ViviCam 3345.
3. Plug the larger end of the USB cable into the USB port of your computer.
4. The PC will detect a new hardware upon connection, and the camera will automatically
power on.
5
The camera will display in the LCD to indicate it is connected to the computer.
14
Page 15

operation
iles, Take no action,
and click “OK”.
DOWNLOADING IMAGES AND VIDEOS TO YOUR PC
Downloading Using the Mass Storage function
Windows 98SE Users. The driver installation must be completed before downloading files from the ViviCam
3345 to the computer.
1. Connect the ViviCam 3345 to your computer.
2. The ViviCam 3345 uses the USB “Mass Storage” approach so the computer will
automatically detect the camera as a removable disk.
For Windows XP, the Windows Wizard will launch (shown below). Select the desired
offered by Windows to Play, Find/Fix/Share Images, Open folders to view f
Copy images to a folders on my computer, View a slideshow of the images, etc.
4. For Windows 98se/Me/2000, go to “My Computer” and open “Removable Disk (E:)” or
perhaps another letter. Double click on the “Removable Disk” icon. Find the folder
“DCIM” inside the Removable Disk. Double-click to open the next folder labeled
“100MEDIA”. Your image and video files are stored in this folder.
>
5. To transfer images to your computer, highlight the desired files, and choose one of the
following methods:
1. Copy & Paste
• Right-click on the highlighted files with the mouse and select “Copy”.
• Go to the desired location, right-click again and select ”Paste”.
2. Drag & Drop
• Left-click on the highlighted files with the mouse and hold down on the button.
• Drag the files to the desired location and release the button.
>
15
Page 16

Caring for Your Camera
Do not store or use the camera in the following environments:
• Very humid, dirty or dusty places
• In direct sunlight or in places subject to extreme temperatures, such as in a closed car during
summer
• Extremely cold places
• Places that are subject to strong vibrations, smoke, or steam
• Places that are subject to strong magnetic fields (near motors, transformers or magnets)
• Places with chemicals such as pesticides or next to rubber or vinyl products for a long period of time
Camera Maintenance
• In the rain or snow
Operational & Storage Environment
Store your ViviCam 3345 in a cool, dry place if you do not intend to use it for a long period of time. Remove the
batteries if the camera will not be used for more than 10 days. Do not exceed the following temperature and
humidity ranges when using and storing your ViviCam 3345.
Operating Temperature 32°F - 104°F (0°C - 40°C)
Operating Humidity 30% - 90% RH
Storage Temperature -40°F - 158°F (-40°C - 70°C)
Storage Humidity 10% - 85% RH
Cleaning the ViviCam 3345
Use a small soft brush or lens pen to remove dust from the lens and LCD surface. Wipe the surface lightly with
a soft, lint-free dry cloth. If needed, apply a small amount of lens cleaning liquid to a piece of lens cleaning
paper and wipe it gently. Do not apply cleaning liquid directly to the lens. Do not touch the lens with your
fingers. Do not scratch any part of the camera with sharp objects. Clean the camera’s body with a soft, dry cloth.
Do not use volatile substances such as thinners, benzene or insecticide, as these may react with camera body
and cause deformation to the camera.
16
Page 17

Image sensor 1.3 Mega Pixel sensor
Internal memory 8 MB built-in flash memory
PRODUCT SPECIFICATIONS
Image resolution
Image resolution 1600 x 1200 1280 x 1024 640 x 480
Image capacity 2 8 images 12 images 49 images
Video resolution 320 x 240
Video frame rate Variable, typically up to 8 fps
Video capacity 2 Up to 28 seconds (no audio)
File format JPEG (still images), AVI (video clips – no audio)
Exposure Automatic with settings for Indoor and Outdoor
White balance Automatic
Lens focal length 8.8 mm
Lens Type Fixed focus
Range of focus 39“ to infinity (1m – infinity)
Lens aperture F/2.8
Flash Modes Automatic, on (fill), off
Display Monochrome status LCD
Superfine 1 Fine Economy
Computer interface USB v1.1 type B, USB v2.0 full speed compatible
Power source Two (2) AA battery
Power Management Camera powers-off after 60 seconds of inactivity
OS support Windows 98SE/ME/2000/XP, Mac OSX
Camera dimension (LxWxD) 3.2 x 2.3 x 1.3 inches (91 x 57.5 x 30) mm
Camera weight 4 ounces (80g) - Approximate, without batteries
1. By internal interpolation. Native resolution is 1280 x 1024
2. Image and video capacity varies depending upon scene content and complexity
17
Page 18

Power button must be pressed
The camera powers off automatically after
.
my images to my
If any problems arise with the ViviCam 3345, refer to this troubleshooting chart:
Symptom Possible cause Solution
TROUBLESHOOTING
The camera doesn’t turn on.
The camera won’t capture a
image.
I can’t download images to the
PC.
The battery is drained. Change or recharge the battery. Also,
check for correct polarity (orientation) of
the batteries.
Press and hold the Power button until
for 3 to four seconds
Is the camera turned on?
Is the camera connected to a
computer?
The light condition is
insufficient.
The camera is processing. Wait for the camera to store files. The
Connection may have failed. Check to ensure that all connections are
“ON” appears in the status display
60 seconds. Make sure the camera’s
power is ON before taking an image.
The camera’s buttons are not functional
when connected to a PC. Disconnect the
camera to capture more images.
Turn the flash mode to Flash ON.
image number blinks at status LCD while
the camera is processing and stops
blinking when the camera is ready for use
secure. Look for Removable Disk under
My Computer.
I get a blurred image when
downloading
computer.
There may be a momentary
delay between pressing the
shutter button and the actual
exposure.
18
Hold your ViviCam 3345 steady until you
hear a “beep” which indicates the
exposure is completed.
 Loading...