

Page 1
32597 Digital Camcorder
User‟s Manual
© 2009 Sakar International, Inc. All rights reserved.
Windows and the Windows logo are registered trademarks of Microsoft Corporation.
All other trademarks are the property of their respective companies.
Page 2

1
Table of Contents
Introduction ................................................................................................................ 2
Key Features ............................................................................................................. 2
What your digital camcorder includes ......................................................................... 3
Computer System Requirements for Windows XP ..................................................... 4
Computer System Requirement for Windows Vista .................................................... 4
Computer System Requirements for Macintosh ......................................................... 5
A Quick Look at your Digital Camcorder..................................................................... 6
Preparing Your Camcorder for Use ............................................................................ 7
Inserting an SD Memory Card ................................ .................................................... 9
Maintenance and Care ............................................................................................. 10
Main Icons on the LCD Screen ................................................................................ 11
Digital Camcorder Function Control ......................................................................... 13
Connecting the Camcorder to a TV .......................................................................... 23
Install the Vivitar Experience Image Manager Software............................................ 24
Connect your camcorder to the computer ................................................................ 25
Get photos and videos from your camcorder to your computer ................................ 26
Get started! .............................................................................................................. 27
Transfer media from my camera to my computer manually (Using Windows)........... 28
Transfer media from my camera to my computer manually (Using Macintosh) ......... 29
Sakar Warranty Card ............................................................................................... 30
Technical Support .................................................................................................... 31
Technical Specifications........................................................................................... 32
Trouble Shooting ..................................................................................................... 33
Page 3

2
Introduction
Thank you for purchasing the 32597 Digital Camcorder. With your camcorder
you can shoot video clips and take individual photos. In addition, a SD
compatible memory card of up to 8GB needs to be inserted for normal use.
Key Features
3 camcorder modes – Video, Photo and Playback.
Digital Video resolutions – 640x480 (VGA), 320x240 (QVGA).
Digital camera resolution - 640X480 (VGA)
1.5" LCD Preview Screen
Limited Internal Memory
Supports external SD memory card up to 8GB
Built-in Microphone
Takes digital photos and videos
Page 4

3
Vivitar Experience Image Manager software for uploading and managing
photos and videos to or from the most popular photo sharing and social
network websites.
What your digital camcorder includes
Digital Camcorder
USB cable
TV-out cable
Vivitar Experience Image Manager software Installation CD
Quick Start Guide
Wrist strap
Page 5

4
Computer System Requirements for Windows XP
To be able to download photos and videos to your PC, you will need the following
minimum configuration:
Pentium 4 processor or above with Windows XP service pack 2
512 MB RAM, with 100MB of free disk space
1024 x 768 Recommended screen resolution
16-bit color or higher display adaptor
CD-ROM Drive
QuickTime 6 or higher
Microsoft Internet Explorer 7 or higher
Windows Media Player 10 or higher
Computer System Requirement for Windows Vista
To be able to download photos and videos to your PC your will need the following
minimum configuration:
Windows Vista
800MHz processor and 512 MB of system memory
20GB hard drive with at least 15GB of available space
Page 6

5
Support for Super VGA graphics
Available USB Interface
CD-ROM drive
QuickTime 6 or higher
Microsoft Internet Explorer 7 or higher
Computer System Requirements for Macintosh
Macintosh with Intel processor running Mac OS X v10.4.6 or later
256 MB RAM, 100 MB free disk space
Display: 1024 x 768 or higher-resolution monitor
QuickTime 6 or higher
Page 7
6
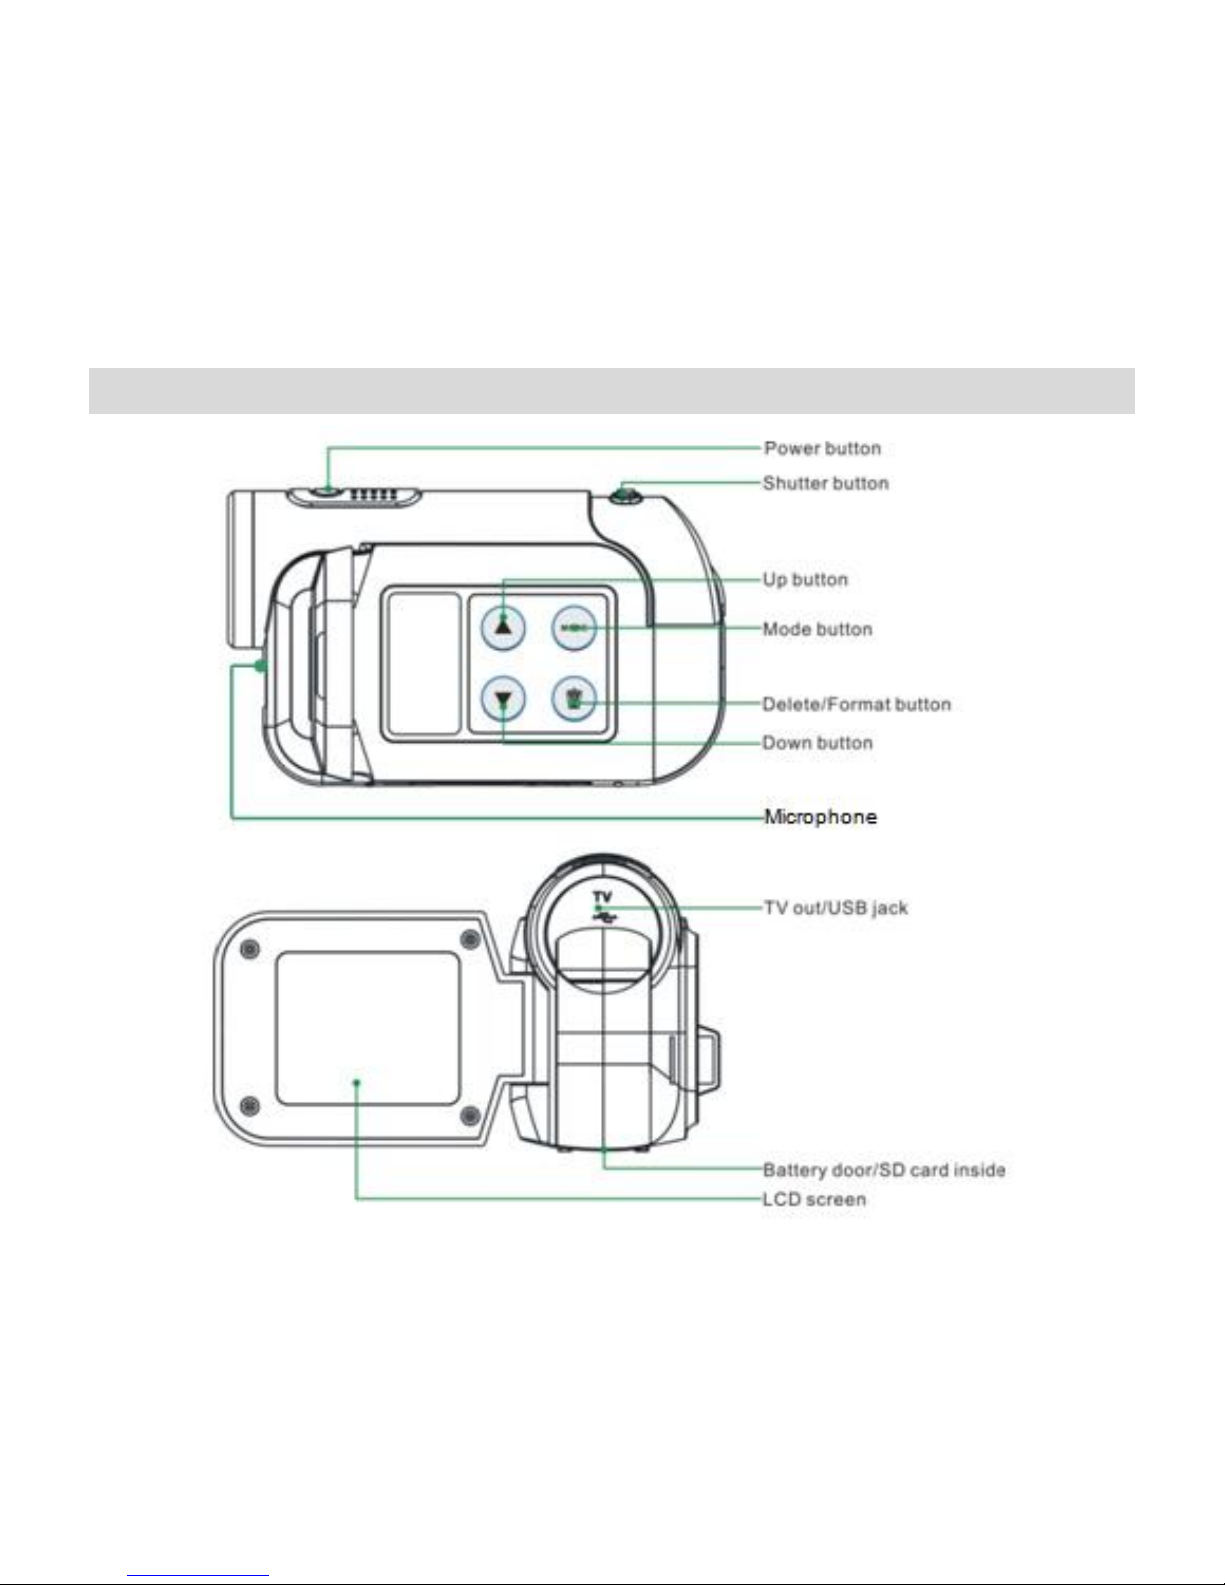
A Quick Look at your Digital Camcorder
Page 8
7
Preparing Your Camcorder for Use
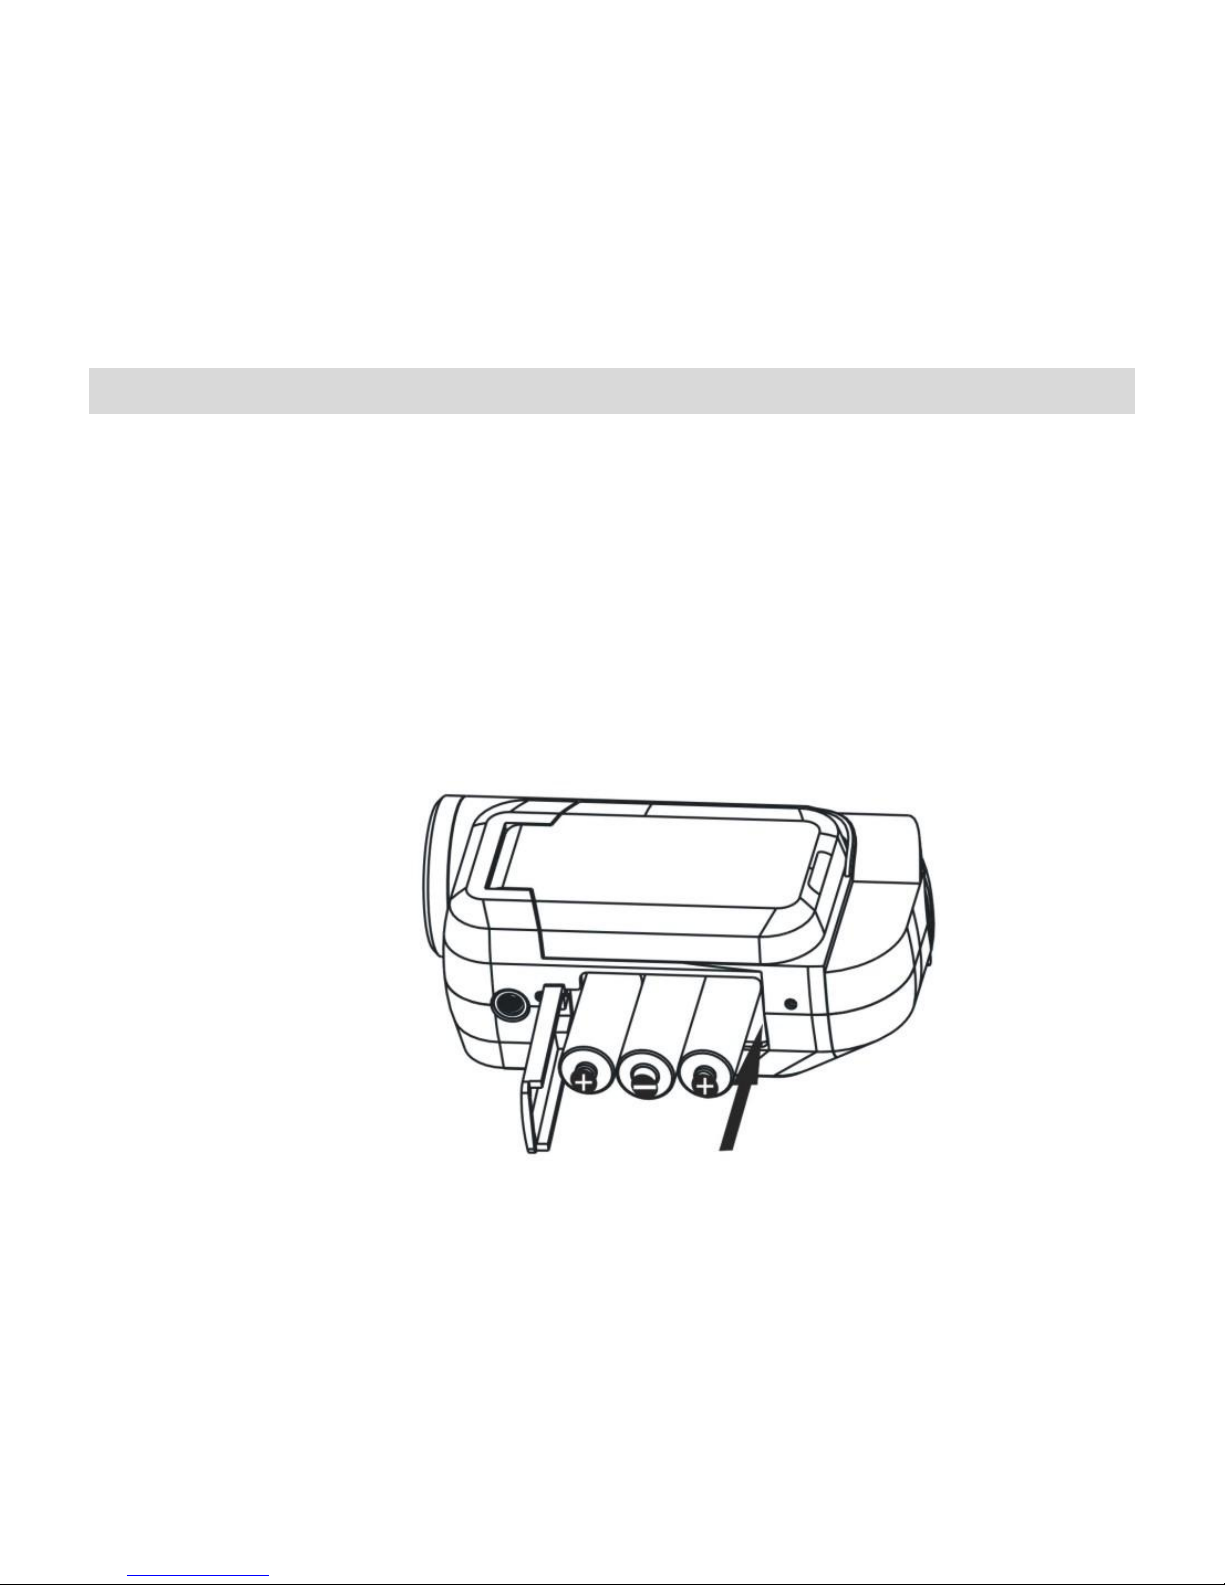
Battery Installation
Your camcorder requires three “AA” batteries (not included). It is recommended that
alkaline batteries be used.
1. Open the battery cover on the bottom of the camcorder.
2. Insert the batteries in accordance with the polarity indicated in the battery
compartment.
3. Close the battery cover.
Page 9

8
Note:
We strongly recommend downloading your test photos and videos regularly to
your computer in order not to lose them.
Do not open the battery cover indiscriminately as test photos and video clips in
memory will be lost.
Do not mix old and new batteries.
Do not mix alkaline, standard (carbon-zinc), or rechargeable (nickel-cadmium
metal hydride) batteries.
Remove the batteries from the camcorder when not in use for an extended period
to prevent leakage which may cause damage.
Page 10
9
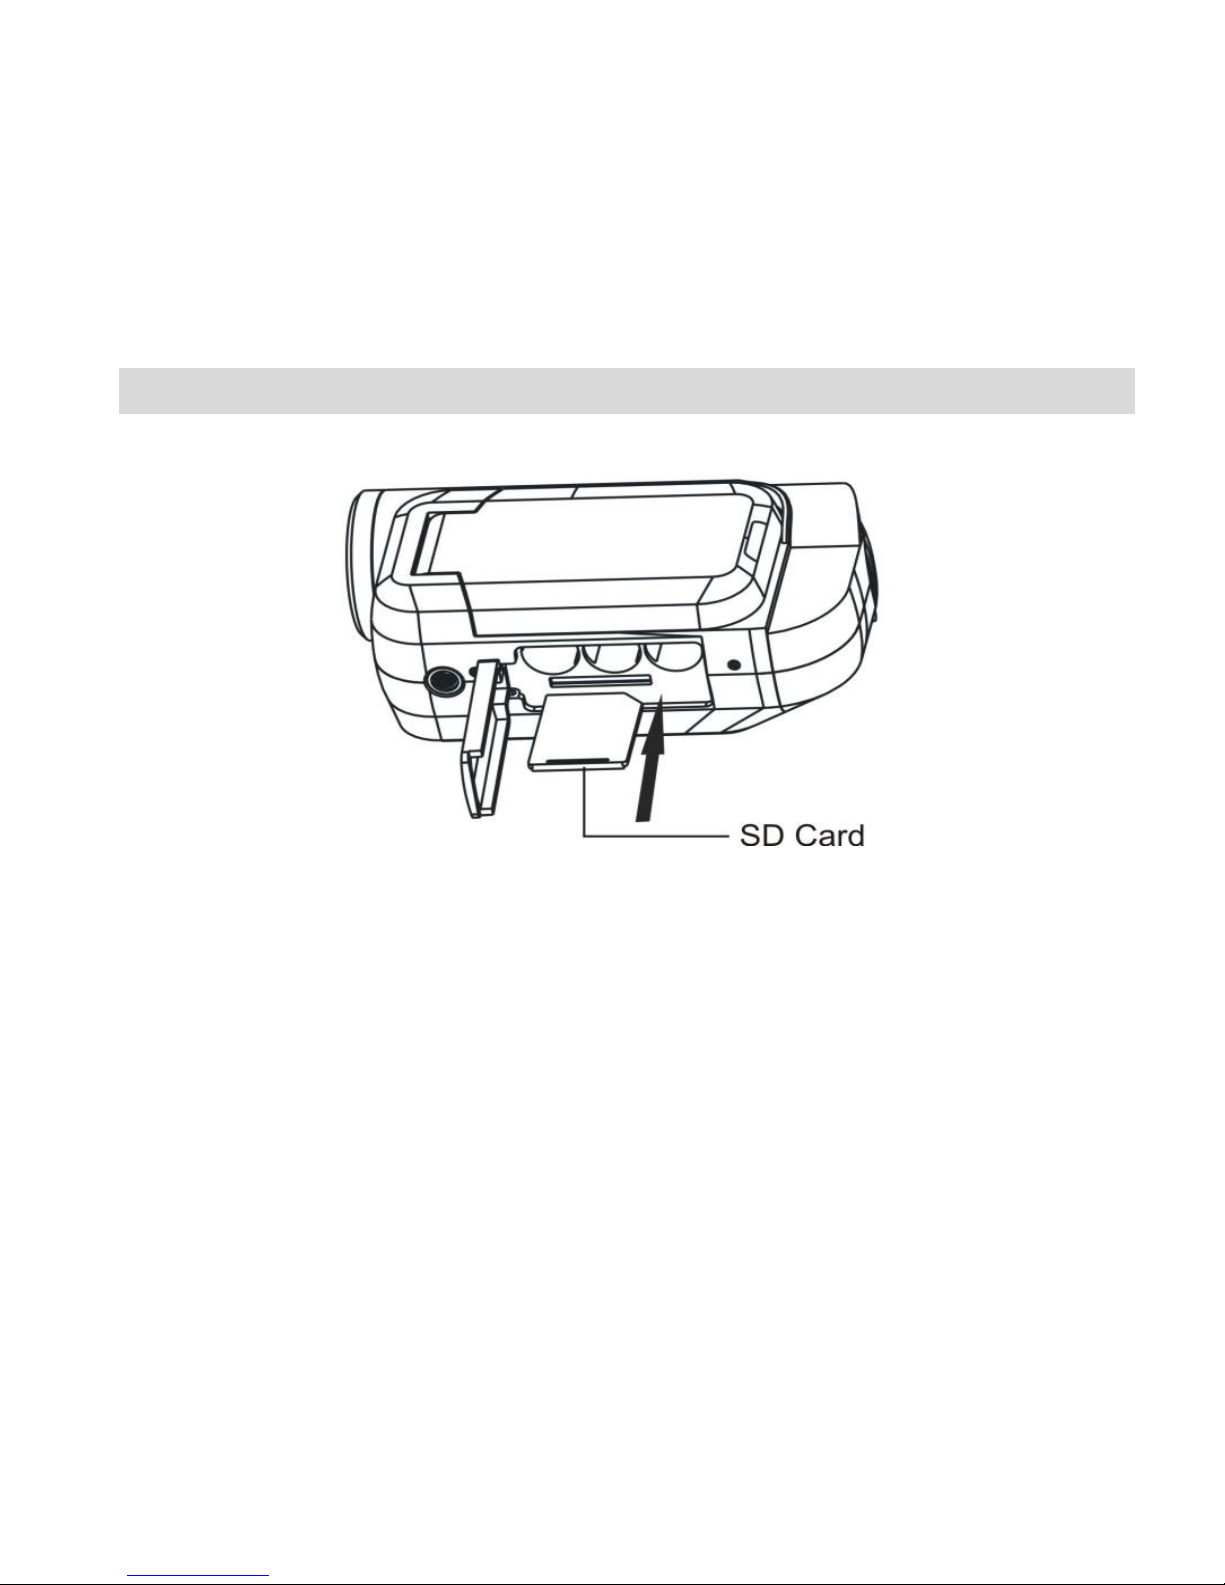
Inserting an SD Memory Card
An SD memory card is needed for normal use to take photos and videos.
Note:
This device supports SD cards up to 8GB.
Limited internal memory is only for test images and videos. Please insert an SD
card for normal use. All the data in the built-in memory will be lost when you
change your batteries or power off your camcorder.
Formatting will delete all data on the SD Memory Card including protected data.
Page 11

10
Do not open the battery compartment during formatting as this may damage the
card and render it unusable.
Be sure to format the card with the camcorder.
SD memory cards formatted on a PC or device other than the camcorder must not
be used.
Maintenance and Care
Before using the camcorder, please ensure that you read and understand the safety
precautions described below:
• Do not try to open the case of the camcorder or attempt to modify this camcorder in
any way. Maintenance and repairs should be carried out only by authorized service
providers.
• Keep the camcorder away from water and other liquids. Do not use the camcorder
with wet hands. Never use the camcorder in the rain or snow. Moisture creates the
danger of electric shock.
• Use only the recommended power accessories. Use of power sources not expressly
recommended for this equipment may lead to overheating, distortion of the
equipment, fire, electrical shock or other hazards.
Page 12

11
Main Icons on the LCD Screen
DV (Video) mode
DSC (Photo) mode
Page 13

12
Playback mode
Page 14

13
Digital Camcorder Function Control
Power on
Press and hold the Power button to turn on your camcorder.
The LCD monitor will light up indicating that your camcorder is ready for use.
Power off
Press and hold the Power button to turn your camcorder off. The camcorder will
switch off.
If the camcorder is not in use or in an operational mode for 60 seconds it will
switch off automatically.
Capturing videos
In order to capture videos (with audio) using your camcorder you need to be in
the DV mode.
In DV mode there are two video resolutions for you to choose from before
capturing your video.
Page 15

14
Press the „Up‟ or „Down‟ button on your camera to select the appropriate resolution:
★★: 640x480 pixels (VGA),
★: 320x240 pixels (QVGA).
1. Switch on the camcorder. The default mode is DV (video) and the DV
icon will appear on the top left corner on the LCD screen.
Alternatively, press the Mode button repeatedly until the DV icon
appears on the LCD.
2. The amount of time remaining to record videos appears on the
bottom right corner of the LCD. The time is calculated per the
Page 16

15
resolution selected and SD card inserted.
3. Hold the camcorder steady or attach the camcorder to a tripod and
use the LCD to focus on the object.
4. Press the Shutter button to begin capturing your video.
5. A red flashing spot will appear next to the DV icon on the LCD
indicating that the capture is in progress.
6. The REC time counter begins to count up thus showing the length of
time for this video being captured.
7. In order to stop the video capture, press the Shutter button again.
The red spot will disappear and the screen will go blank for a second
as the video is saved in AVI format to the SD memory card.
Page 17

16
Note:
Internal memory will allow you to take a few seconds of test videos.
Before shooting, you will need to insert an SD card to expand your memory
capacity (see section above for instructions on how to insert SD memory card)
When the memory is full, a red SD card icon will appear on the LCD
screen.
Remember to download photos and video files to your computer as often as
possible.
Poor or inadequate lighting may cause the video capture to fail.
Page 18

17
Taking photos
The image resolution of photos taken with this camcorder is 640x480 pixels.
This resolution is fixed and cannot be altered or changed.
.
1. Switch on the camcorder.
2. Press the Mode button to select the DSC mode
3. The DSC icon will appear on the LCD screen.
4. Hold the DV camera steady and use the LCD to focus on the object.
5. Press the Shutter button to take the photo. (There will be a short delay while
the camera saves the photo in JPEG format to memory.)
6. The photo counter on the bottom right on the LCD indicates the amount of
photos that remain to be taken with the existing memory.
Page 19

18
Note:
You cannot take photos whilst the camcorder is connected to a
computer.
Download photos and video clips to your computer regularly.
When the memory is full, a red SD Card icon will appear on the
LCD screen.
Playback mode
1. Switch on the camcorder.
2. Press the Mode button repeatedly until the Playback mode is selected.
3. The number of video clips or photos taken and their sequence appear in
the bottom right hand corner of the LCD.
4. There is a Playback mode for photos where the Playback icon appear on
the top left corner of the LCD
Page 20

19
5. To view photos, press the UP or DOWN button.
6. The photos will appear on the LCD in the sequence that that they are
stored in the memory.
7. This Playback mode can also be used to view your videos.
8. To play back video clips, press the UP or DOWN button and select an
Page 21

20
AVI file. The file sequence number on the bottom right hand corner of
the LCD will display the media on your camcorder in the sequence that
they were captured.
9. Press the Shutter button to play back the video clips with audio in your
camcorder.
10. Press the Shutter button to stop playing.
Note: Photos are saved in JPEG format and Video clips are saved in AVI
format. When there is no file in the memory, a No File icon will appear on
the LCD screen.
Delete Mode
Deleting current Photo or Video file:
1. In Playback mode, select a photo or video you want to delete.
2. Press the Delete button once. A delete icon will appear on the LCD screen:
Page 22

21
3. Press the UP or DOWN button to select to delete or to cancel.
4. Press the Shutter button to confirm your choice.
5. If you selected , the selected image is deleted.
Deleting all Photos and Video files:
1. Press the Mode button to select the Playback mode.
2. Press the Delete button twice. A message will appear on the LCD screen.
3. Press the UP or DOWN button to select to delete all media on your
camera or to cancel.
4. Press the Shutter button to confirm your choice.
Page 23

22
5. If you selected , all the images are deleted.
Format
1. Press the Mode button to select the Playback mode.
2. Press the Delete button three times. A message will appear on the LCD screen .
3. Press the UP or DOWN button to select to format or to cancel.
4. Press the Shutter button to confirm your choice.
Note:
Format will delete all data in your camcorder‟s memory.
Please be double sure before you execute this function.
All delete operations can only be done in Playback mode.
In Playback mode, you can exit by pressing the Delete button repeatedly
without any deletion and formatting.
Page 24

23
Connecting the Camcorder to a TV
Connect the camcorder to the TV via the supplied cable. Power on the TV and then
your camcorder. The camcorder‟s LCD screen turns blank, and picture that
previously appeared on the camcorder `s LCD screen now appear on the TV
screen.
Note:
You cannot enter the TV out mode if your DV has no batteries inserted.
TV out jack
inside!
Connect to TV!
1. Connect the camcorder to a TV via the TV-out cable (supplied). The TV slot is
situated next to the USB slot at the back of the camcorder. Lift up the cover
and insert the cable.
2. Turn on the TV and the camcorder, and then set the TV to “AV” mode.
3. When the camcorder is set to record, capture or playback mode, you can
preview the subjects you want to record on the TV screen.
4. When the camcorder is set to Playback mode, you can review all the pictures
and videos stored on the SD card inserted in the camcorder n the TV screen.
5. Do not disconnect your TV cable when capturing videos via the TV screen.
Page 25

24
Install the Vivitar Experience Image Manager Software
Warning: Do not plug your camcorder into the computer until the Vivitar
Experience Image Manager software installation is complete.
1. Insert the installation CD into your CD-ROM drive. The Vivitar Experience
Image Manager will begin to install.
2. Please review the license terms.
On PC and Macintosh: Click the “I accept the terms of this license agreement”
and then click “Next” to continue.
3. On PC only: Let the “Vivitar Experience Image Manager” installer create the
folder to where the program will be installed, and then click “Install”.
4. Please wait while the application continues the installation process on your
computer.
5. Follow all instructions.
6. On PC: Click the “Close” button when the installation is complete.
On Macintosh: Click the “Quit” button when the installation is complete.
The application automatically opens.
7. If you closed the application, click on the Vivitar Experience Image Manager
Page 26

25
from your desktop icon (PC) or from the Programs or Applications menu on
your computer.
Connect your camcorder to the computer
1. Use the USB cable that came with your camcorder to connect your camcorder
to your computer.
2. Your camcorder will automatically turn on.
3. The first time you connect the device to the computer you will have to wait a
few moments until the computer recognizes the device.
Page 27
26
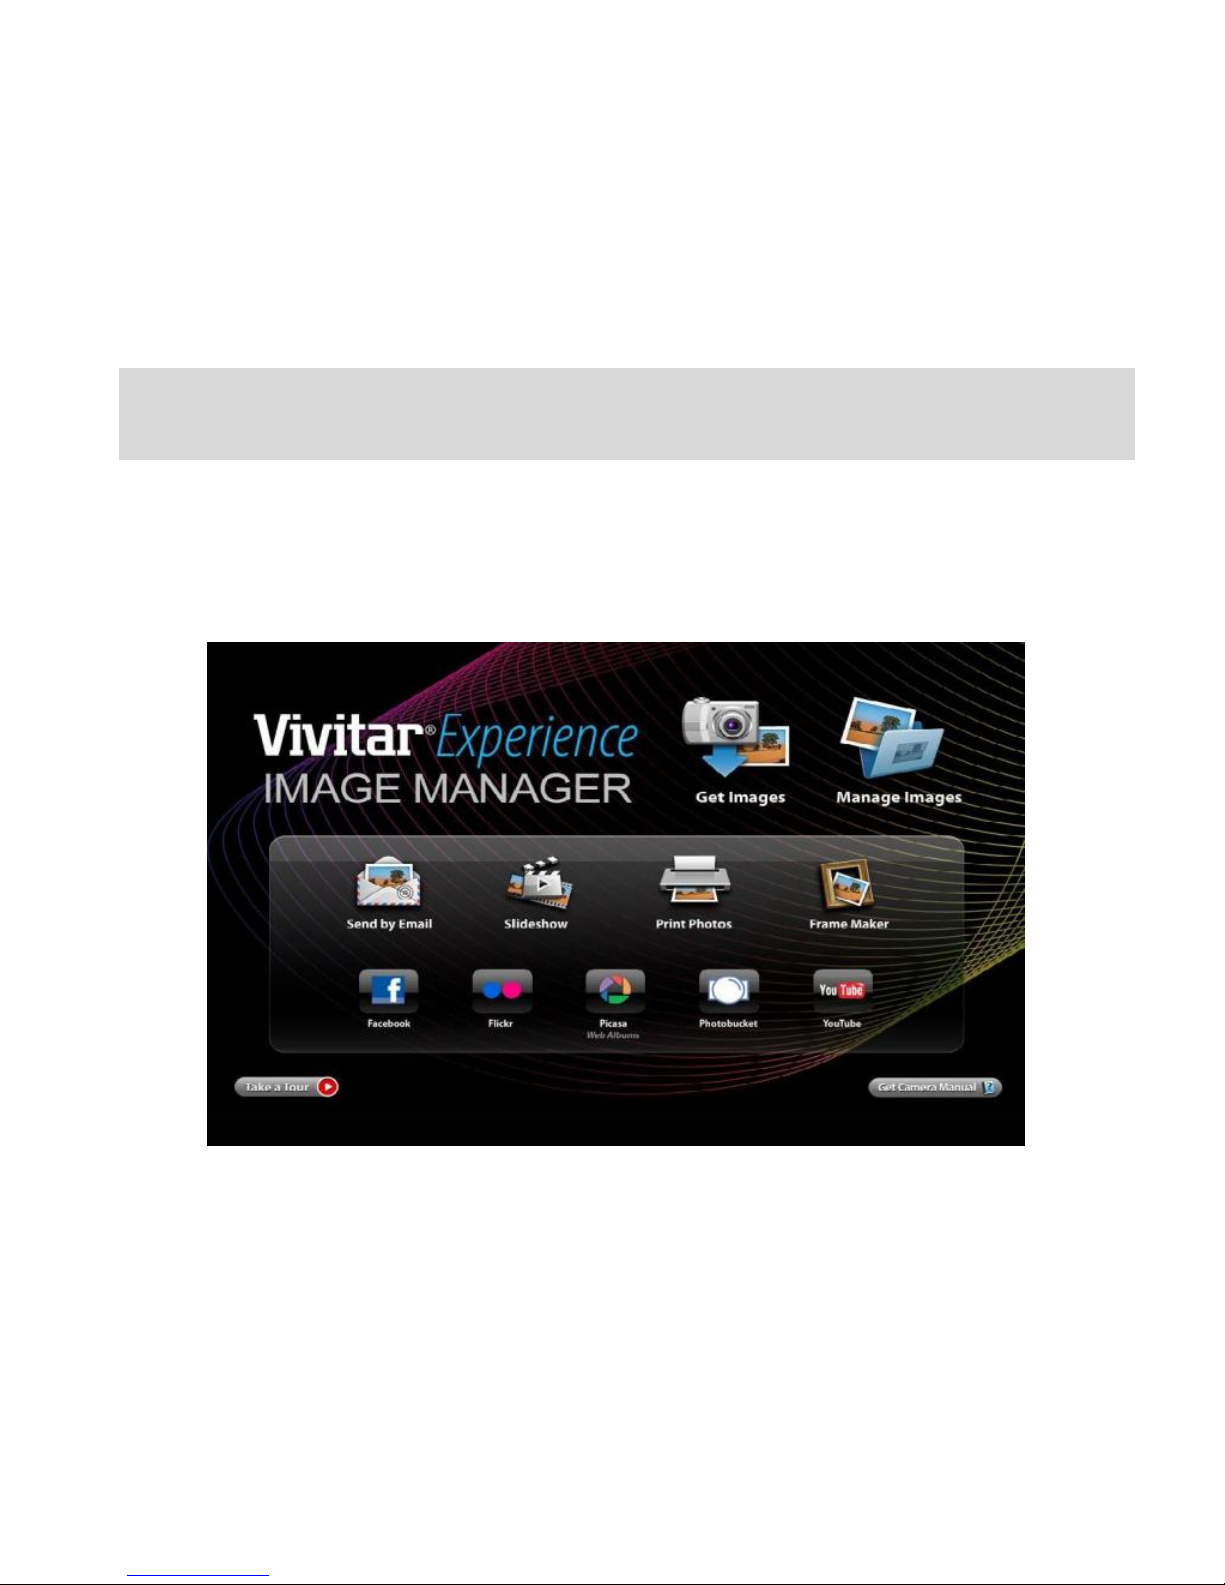
Get photos and videos from your camcorder to your
computer
Do not disconnect the cable during transfer. Doing so will cancel the transfer of
any files on their way to your computer.
1. Select the “Get Images” button from the Main menu.
Page 28

27
2. The “Get media from device” window opens.
3. Both photos and videos (if you have captured any) will get downloaded.
4. Select your camera model from the device window. If your camcorder is the
only device connected then it will be selected automatically.
5. Select a location on the computer where to place the new photo and video
files.
6. Add the new photo and video files to albums if desired.
7. Select to remove the media files from the selected device after the import.
8. Click the “Get Images” button to transfer the photos and videos from your
camcorder to your computer.
A media download progress window appears in the middle of the screen
showing the number of media files downloading to your computer. A message
appears when the download is complete.
9. The photo and video files that you selected are now downloaded to your
computer to the selected folder and albums ready for your use.
Get started!
Using the Vivitar Experience Image Manager, you can:
Upload and manage photos and videos to and from the most popular
photo sharing and social networking sites - Facebook, Flickr, MySpace,
Picasa, Photobucket and YouTube.
Seamlessly transfer photos and videos from one social network to
another.
Page 29

28
Organize your images by creating offline and online albums.
Edit images using automatic and manual tools.
Use automatic “Geotagging” with built in Google Maps.
For more details on how to use the Vivitar Experience Image Manager open
the Help file or click the “Take the Tour” button on the application`s Home
page.
Transfer media from my camera to my computer manually (Using
Windows)
1. Use the USB cable that came with your camcorder to connect your
camcorder to your computer.
2. A USB icon will appear on the LCD, indicating that your camera is in
Mass Storage Mode.
3. A window appears on your computer with a list of options, select Open folder
to view files and click OK.
4. Open the DCIM folder and the folder inside to view the media files.
5. Select the media and copy the files from this folder into your computer.
Optionally, select the files and choose Copy from the Edit menu. Then select
a folder and choose Paste from the Edit menu.
6. We recommend that you copy the images into the Pictures/My Pictures folder
and the videos into the Videos/My Videos folder.
Page 30

29
7. Do not disconnect the cable during transfer. Doing so will cancel the transfer
of any files on their way to your computer.
Transfer media from my camera to my computer manually (Using
Macintosh)
1. Use the USB cable that came with your camcorder to connect your
camcorder to your computer.
2. A USB icon will appear on the LCD, indicating that your camcorder is in
Mass Storage Mode.
3. The camcorder‟s device icon appears on the desktop.
4. Click on the device icon and open the DCIM folder and the folder inside to
view the media files.
5. Select the files and drag them into your computer. Optionally, select the files
and choose Copy from the Finder‟s Edit menu. Then select a folder and
choose Paste from the Edit menu.
6. We recommend that you copy the images into the Pictures folder and the
videos into the Movies folder.
7. Do not disconnect the cable during transfer. Doing so will cancel the transfer
of any files on their way to your computer.
Note: After you connect your camcorder to your computer, the camera will remain on
all the while it is plugged into the USB and it won‟t be switched off. On disconnecting the
USB cable the camcorder will automatically switch off.
Page 31

30
Sakar Warranty Card
This warranty covers for the original consumer purchaser only and is not transferable.
Products that fail to function properly UNDER NORMAL USAGE, due to defects in
material or workmanship. Your product will be repaired at no charge for parts or labor
for a period of one year.
What Is Not Covered By Warranty:
Damages or malfunctions not resulting from defects in material or workmanship and
damages or malfunctions from other than normal use, including but limited to, repair
by unauthorized parties, tampering, modification or accident.
What To Do When Service Is Required:
When returning your defective product (postage pre-paid) for service, your package
should include:
1. Copy of original bill of sale
2. A detailed written description of the problem.
3. Your return address and telephone number (Daytime)
MAIL TO ADDRESSES BELOW:
Sakar International
Attention: Service Department
195 Carter Drive
Edison, NJ 08817
Page 32

31
Technical Support
For technical support issues please visit our website at www.vivitar.com.
You can find manuals, software and FAQ‟s at the website. Can‟t find what
you are looking for? E-mail us at [email protected] and one of our
technical support team members will answer your questions. For phone
support in the US please call 1-800-592-9541, in the UK call 0800 917
4831. If you would like to call from anywhere else, please visit
www.vivitar.com for your local toll free number.
USA Sales Office:
195 Carter Drive
Edison, NJ
08817
UK Sales Office:
2D, Siskin Parkway East
4020 Middlemarch Business Park
Coventry, CV3 4PE
Page 33

32
Technical Specifications
Image Sensor
CMOS Sensor
Image Resolution (DSC)
640X480(VGA.)
Video Resolution (DV)
640X480 (VGA) / 320X240 (QVGA)
LCD Display
1.5" LCD preview screen
Internal Memory
Limited 8MB SDRAM for test images only
External Memory
SD card (up to 8GB)
Lens
F 2.8 f=3.0mm
Exposure
Auto
White Balance
Auto
File Format
JPEG ( Still Image) / AVI ( Video)
TV out
YES
Automatic Energy Saving
60 seconds
Microphone
YES
Interface
USB 1.1
Battery
3 x AA(1.5V) / USB 5V
Working Temperature
0-40 ℃
Page 34

33
Trouble Shooting
Relative parts
Symptom
Explanation Solution
Taking a
Video/photo
The DV can‟t take
video/photo after you
press the Shutter button.
Batteries level is too low. Replace
them with new ones
The DV is not in Video/Camera
mode. Please set DV
to the correct mode
Auto Power off. Restart your
device
The SDRAM or SD card is fully
loaded with files.
Please delete some files or
change a memory card.
Auto power off
The camera powers off
automatically
The camcorder was not in use for
over 60 seconds/1 minute
The battery pack is fully
exhausted
Battery pack
The battery pack is quickly
exhausted
The atmospheric temperature is
too low
The batteries are completely
dead. Please replace them
with new ones.
DV & battery
The DV or battery is hot
Using the DV continuously for a
long time
Page 35

34
Photos
The photos are too blurry
Exposure is not sufficient
Deleting
You can‟t delete the files
The battery level is too low.
Please replace them with new
ones.
SD card
You can‟t insert the
memory card correctly
Insert the card in the correct
direction.
This device complies with the part 15 of the FCC rules. Operation is subject to the following two
conditions: (1) this device may not cause harmful interference, and (2) this device must accept any
interference received, including interference that may cause undesired operation.
Caution: changes or modifications not expressly approved by the party responsible for compliance
could void the user's authority to operate the equipment.
NOTE: This equipment has been tested and found to comply with the limits for a Class B digital
device, pursuant to Part 15 of the FCC Rules. These limits are designed to provide reasonable
protection against harmful interference in a residential installation. This equipment generates, uses
and can radiate radio frequency energy and if not installed and used in accordance with instructions
may cause harmful interference to radio or television reception, which can be determined by turning
the equipment off and on. The user is encouraged to try to correct the interference by one or more of
the following measures:
__ Reorient or relocate the receiving antenna.
__ Increase the separation between the equipment and receiver.
__ Connect the equipment into an outlet on a circuit different from that to which the receiver is
connected.
__ Consult the dealer or experienced radio/ TV technician for help.
A00-090909GES
 Loading...