

Page 1
The
angle motion
detection
When set to
For best coverage, mount the PIR2 device so that the likely
The
device
animals
This document includes installation
declarations.
Passive Infrared Motion Detector
(V
Quick Reference
PRINT INSTRUCTIONS: REFERENCE SHEET V-PIR2-345 P/N 77-000040-001 REV 1.1 |
INK:
FOLDS:
Mounting with a bracket:
Installation Instructions
(
and the Knowledge In Motion site at:
Mounting without a bracket (recommended):
2. Replace the front part of the device onto the back plate by sliding it down into place.
INSTALLATION TIPS:
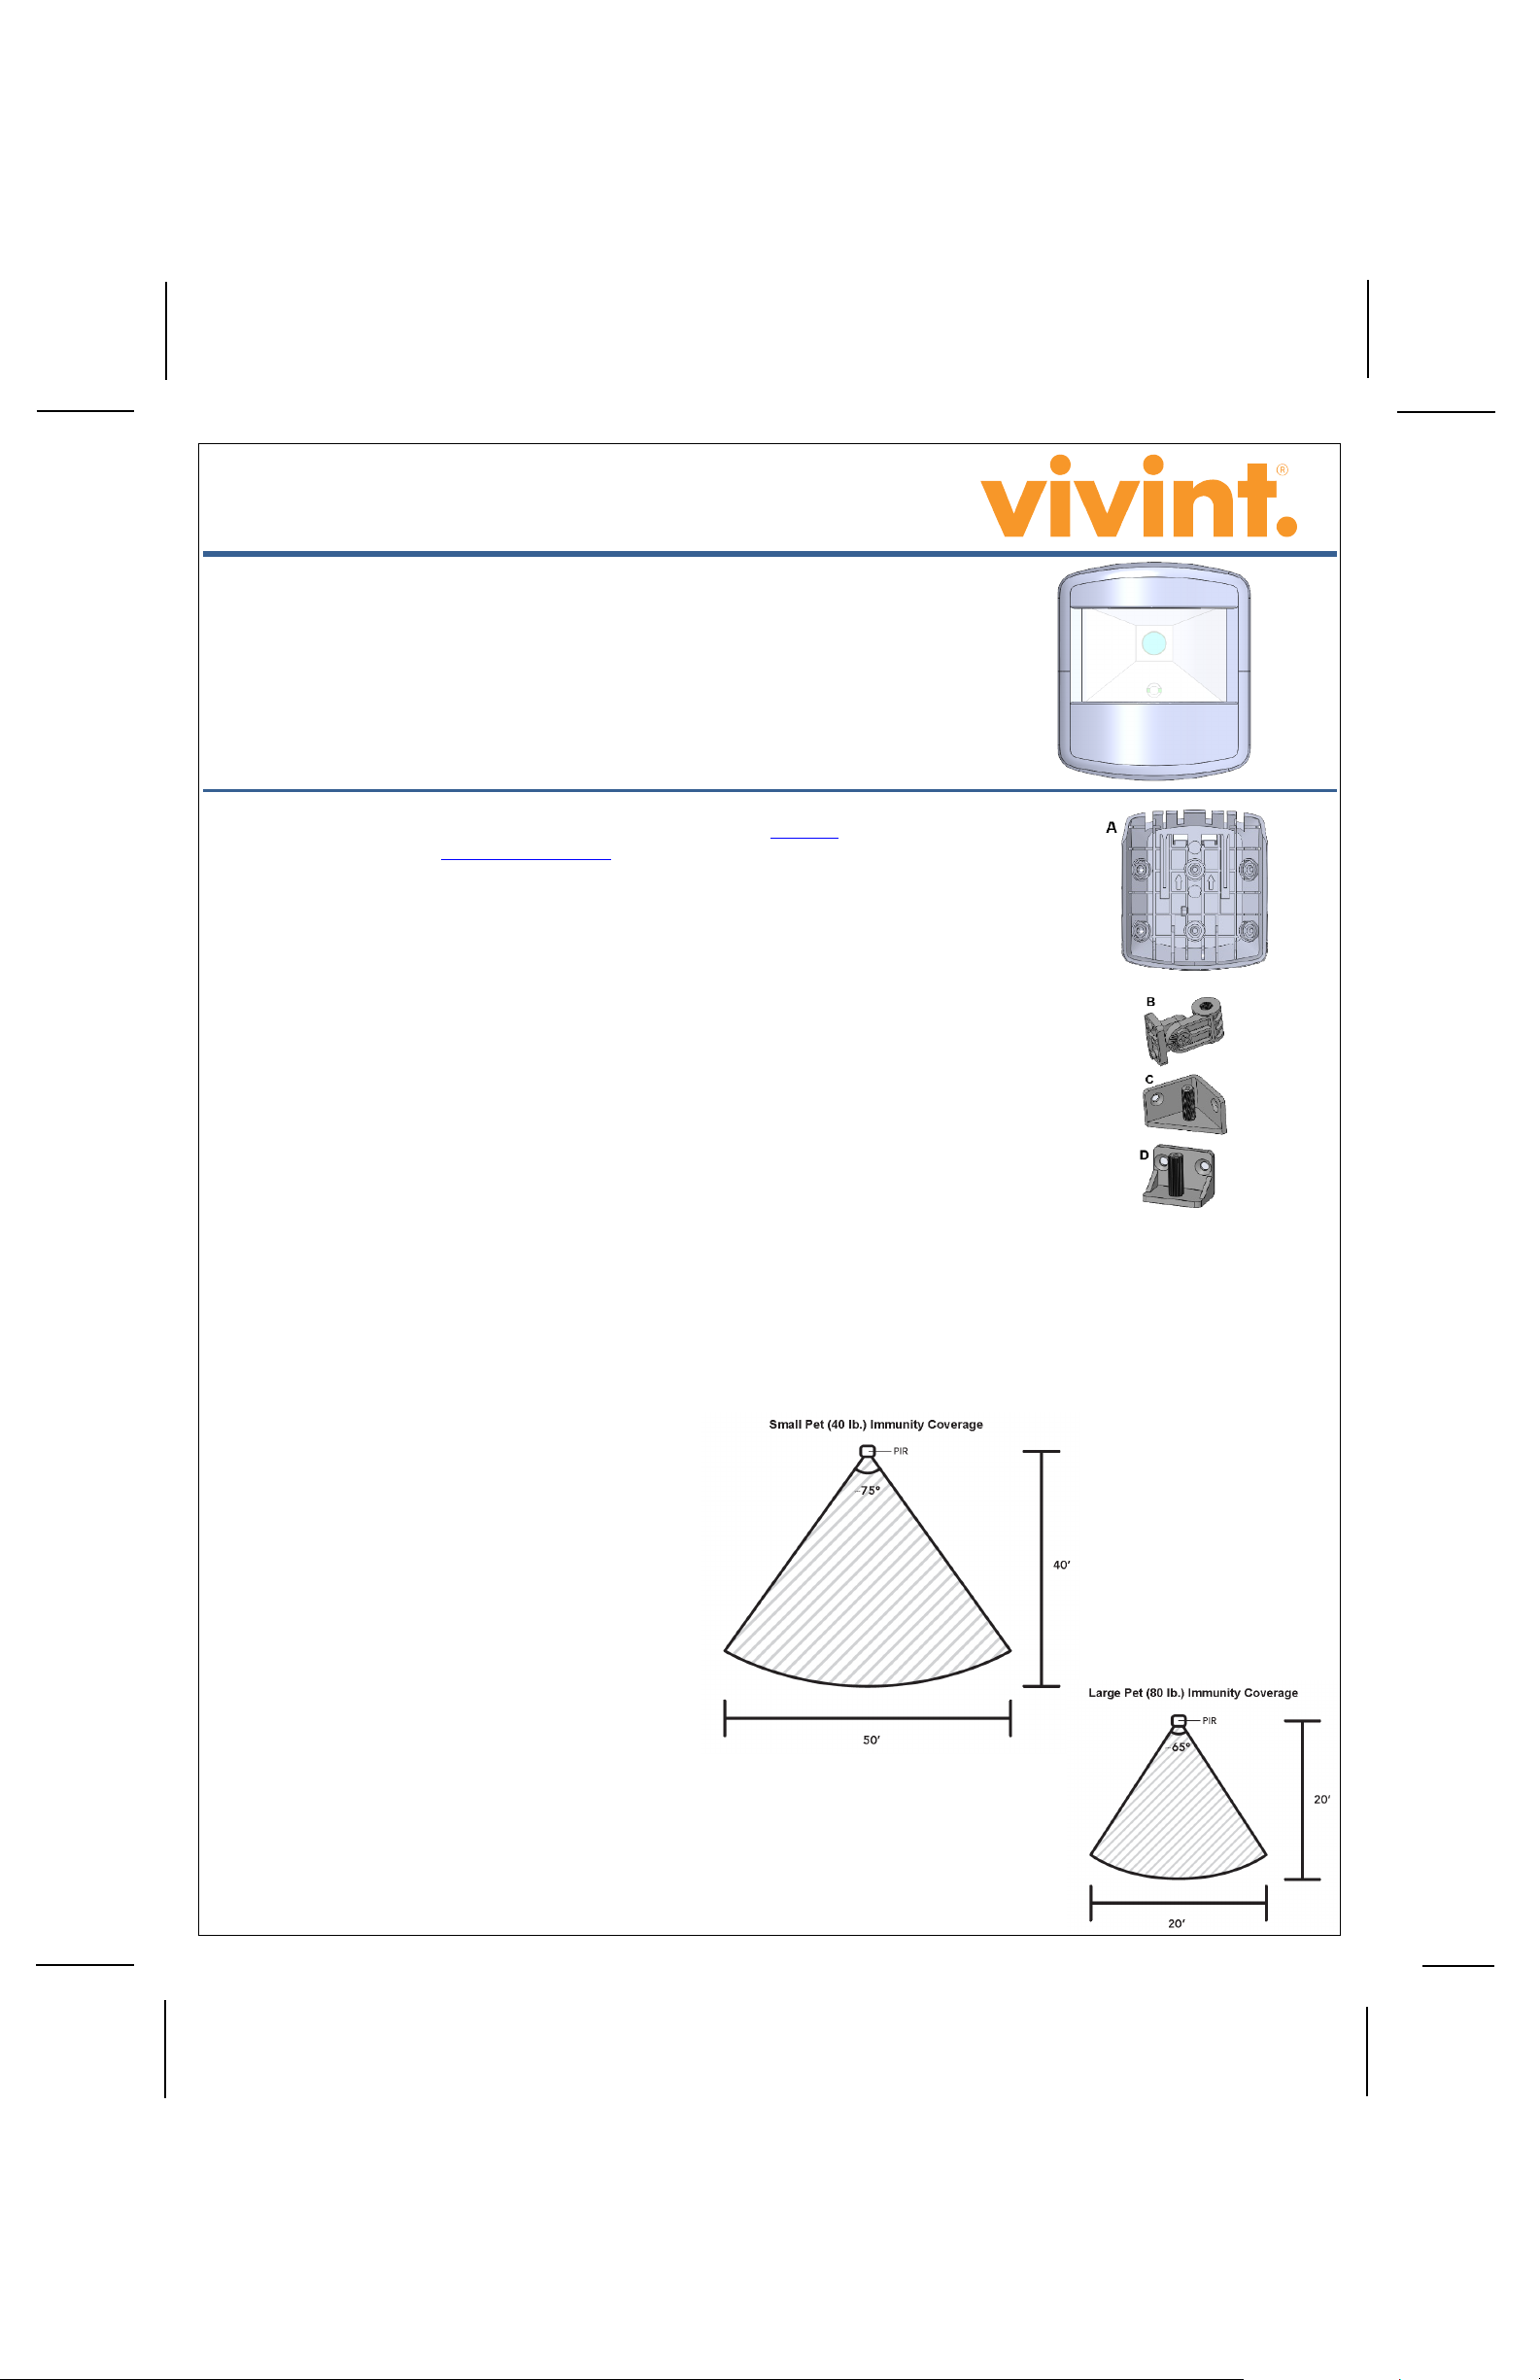
Settings for Pet Immunity
Small Pet
Used in environments where small animals may be present in the monitored
area while the system is armed. Do not use
weighs more than 40 pounds
area is 50 f
to the small
Large Pet
Used in environments where larger animals may be present while the system
is armed. This setting is generally acceptable for animals up to 80 pounds
(
20 f
Many factors can influence the pet immunity abilities of PIR motion
Sensitivity
help reduce false alarms
BLACK | MATERIAL: 20 LB MEAD BOND | SIZE: 8.50" X 11.00" SCALE 1:1 |
BI-FOLD VERTICAL, BI-FOLD HORIZONTAL (TO FIT IN BOX)
-PIR2-345)
Vivint Passive Infrared Motion Detector (PIR2) is a wall-mounted wireless device that provides wide-
as part of the overall Vivint security system. The PIR2 device can be mounted on a flat wall or in a corner.
high sensitivity, the PIR2 has a maximum protection area of 40 feet (12.2 m) deep by 50 feet (15.2) wide.
direction of intruder motion is across the protected area.
PIR2 device is tamper-protected; it will transmit a signal to the control panel if the cover is taken off or if the
is removed from its mounting location. The PIR2 also provides false alarm protection by being pet immune for
up to 80 pounds (36.3 kg). For more information, see the "Settings for Pet Immunity" section below.
, usage, and test instructions, as well as technical specifications and regulatory
For more details about adding wireless sensors to the system, go to the Support page at: Vivint.com,
corp.vivint.com/sites/KIM/)
1. Mount the PIR2 back plate (part A) 7.5 feet (2.3 m) above the floor with arrows pointing up. The PIR2 can be
mounted on a flat wall or in a 90-degree corner. To mount on a flat wall, secure the PIR2 back plate to the wall using
the two supplied long screws in the center two holes of the PIR2 back plate. To mount in a corner, secure the device
by using the two provided screws on one side of the back plate.
NOTE: The PIR2 lens is designed to work best when mounted flat against the wall at 7.5 feet (2.3 m). If the mounting angle is
changed, the protected area, pet immunity, and sensitivity can be greatly affected.
1. Use the supplied short screw to secure the PIR2 back plate (part A) to the angle adjuster (part B).
2. Mount the selected bracket — the corner mount (part C) or the flat wall mount (part D) — at a height of 7.5 feet (2.3 m)
using the supplied long screws and anchors.
3. Place the assembly of parts A and B on the shaft of bracket C or D.
4. Screw the head screw with washer into the top of part B to hold the assembly to the shaft of C or D.
5. Attach the main body of the PIR2 to the mounted back by sliding it down onto the back plate.
• Mount so that the likely direction of intruder motion is across the protected area.
• Use High sensitivity when it is anticipated an intruder may only cover a small portion of the protected area.
• Low sensitivity is recommended for settings with pets when intruders are expected to cover a larger portion of the protected area.
• Do not install where the detector is exposed to direct sunlight or above strong sources of heat.
• Ensure the detection area does not have obstructions (curtains, screens, large pieces of furniture, plants, etc.) that may block the coverage pattern.
• Avoid mounting locations that contain objects likely to produce a rapid change in temperature such as central heating, ducts, open flames, etc.
• Do not mount in the middle of the end of a hallway. It is better to mount in the corner of the hallway.
• If pet immunity is desired, mount where animals cannot come within six feet of the detectors by climbing on furniture or other objects. Also, do not
aim the detector at a stairway or furniture or other objects that can be climbed by an animal.
Immunity:
this setting if any given animal
(18.1 kg). On this setting, the PIR2 coverage
eet (15.2 m) wide by 40 feet deep (12.2 m). (Note: Set the jumper
pet icon.)
Immunity:
36.3 kg). On this setting, the PIR2 coverage area is 20 feet (6.1 m) wide by
eet (6.1 m) deep. (Note: Set the jumper to the large pet icon.)
NOTE:
detectors:
• Short-haired animals generally put off more heat causing the
detector to alarm easier than it would with a longer-haired animal.
• If animals jump onto a piece of furniture or climb stairs it may cause
the detector to believe the animal is larger than it really is.
• If multiple animals are close together the detector may see them as
one, larger animal.
Settings:
High — recommended when a possible intruder is expected to cover
only a small portion of the protected area. (Set the jumper to HI.)
Low — recommended when a possible intruder is expected to cover a
larger portion of the protected area, and/or to
when pets are present. (Set the jumper to LO.)
Page 2

Installer Test
Hold the
User Test
Wireless Signal Range
350 feet (106.7 m), open air
Batteries
2 X Panasonic CR123A or equivalent
Battery Life
3-5 years under normal usage
Transmitter Frequency
345 MHz
Code Outputs
Alarm, Alarm Restore, Supervisory, Low Battery, Tamper
Supervisory Interval
70 minutes per signal (12 hours for panel to report supervision failure)
Operating Temperature Limits
32° to 120°F (0° to 49°C)
Relative Humidity
5-95% Non-Condensing
Battery Installation
If the battery is low, a low
FCC and Industry Canada Regulatory Declarations*
CAUTION!
This device has been
following two conditions:
These limits are designed to provide reasonable protection against harmful interference in a residential installatio
installed and used in accordance with the instructions, may cause harmful interference to radio communications. However, ther
If this equipment does cause harmful interference to radio or television reception, which can be deter mined by turning the eq
by one or more of
PRUDENCE
Conformément à la régle mentation d'Industrie Canada, le présent émette
Canada. Dans le but de réduire les risques de brouillage ra dioélectrique à l'intention des autres utilisateurs, il faut chois
équivalente (p.i.r.e.) ne dépasse pas l'intensité nécessaire à l'établissement d'une communication satisfaisante.
Le présent a ppareil est conforme aux CNR d’Industrie Canada applicab
Ces limites sont conçues pour four nir une protection raisonnable contre les inte rférences nuisibles dans une installation rés
radiofréquence et, s'il n'est pas installé et utilisé conformément a ux instructions, il peut causer des interférences nuisi bl
interférences no se pro duiront pas dans une ins tal
l'équipement hors et sous tension, l'utilisateur est enco uragé à essayer de corriger l'interférence pa r un
FCC ID:
IC ID:
*For more compliance and warranty information, visit:
Batteries must not be recharged, disassembled or disposed of in fire.
your area. Keep away from small children. If batteries are swallowed, promptly see a doctor.
© 2014 Vivint Inc. All Rights Reserved. | www.vivint.com | 1-800-216-5232 | Device M/N: MD01 | Doc P/N: 77-000040-001 Rev. 1.1
Wireless Product Notice
Wireless communications hardware provides reliable communication; however, there are some limitations which must be observed.
Specifications
test button for 2 seconds to send test signals to the control panel.
1. Press and hold the test button on the side of the device. The red LED should turn on as soon as the button is pressed.
After 2 seconds, the red LED will blink once to indicate the device has entered test mode.
2. The red LED will briefly turn on every few seconds that motion is detected. The PIR2 will also transmit to the panel
while motion is detected. NOTE: Test mode lasts for 90 seconds, after which the device returns to normal operation.
battery notification will be indicated on the panel. Use only the recommended replacement batteries (see Specifications). To replace the batteries:
1. Slide the main body of the PIR2 up off the back plate (part A).
2. Pull battery ribbon to remove batteries.
3. Insert the replacement batteries while observing the correct polarity. Ensure the battery ribbon runs up underneath the batteries so they can easily be removed.
WARNING! The polarity of the battery must be observed (as shown in the image). Improper handling of lithium batteries may result in heat generation, explosion, or
fire, which may lead to personal injury. Replace only with the same or equivalent battery type as recommended by the manufacturer.
AVERTISSEMENT! La polarité de la batterie doit être observée (comme indiqué dans l'image). Une mauvaise manipulation des piles au lithium peut conduire à la
production de chaleur, une explosion ou un incendie, ce qui peut entraîner des blessures. Remplacez-le par le même type ou équivalent de la batterie tel que
recommandé par le fabricant.
• The transmitters are required to comply with all applicable wireless rules and regulations. As such, they have limited transmitter power and limited range.
• Wireless signals may be blocked by radio signals that occur on or near the wireless operating frequencies.
Unauthorized changes or modifications could void the user’s authority to operate the equipment.
tested and found to comply with the limits for a Class B digital device, pursuant to Part 15 of FCC Rules and Industry Canada license-exem pt RSS standard(s). Operation is subject to the
(1) This device may not cause harmful interference, and
(2) This device must accept any interfe rence received, including interference that may cause undesired operation of the device.
• Reorient or relocate the receiving antenna.
• Increase the separation betwee n the equipment and the receiver.
• Connect the equipme nt into an outlet on a circuit different from that to whic h the receiver is connec ted.
• Consult the dealer or an experie nced radio/television technician for help.
! Changements ou modifications pourraient annuler le droit de l'utilisat eur à utiliser l'équipement non autorisées.
(1) l’appareil ne doit pas produire de brouillage, et
(2) l’utilisateur de l’appareil doit accepter tout brouillage radioélectrique s ubi, même si le brouillage est susceptible d’en compromettre le fonctionnement.
• Réorienter ou déplacer l'antenne de réception.
• Augmentez la distance entre l'équipement et le récepteur.
• Connecter l'équipement à une sortie sur un circuit différent de celui sur lequel le récepteur est bra nché.
• Consulter le revendeur ou un technicien ra dio / télévision expérimenté pour de l'aide.
the followi ng measures:
lation particulière. Si cet équipement provo que des interférences nuisibles à la réception radio ou télévision, ce qui peut être déterminé en metta nt
Disposal of used batteries must be made in accordance with the waste recovery and recycling regulations in
n. This equipment generates, uses, and can radiate radio frequency energy and, if not
e is no guarantee that interference will not occur in a particular installation.
uipment off and on, the user is encouraged to try to correct the interference
ur radio peut fonctionne r avec une antenne d'un type et d'un gain maximal (ou inférieur) approuvé pour l'émetteur par Indust rie
ir le type d'antenne et son gain de sorte que la puissance isotrope rayonnée
les aux appareils radio exempts de licence. L’exploitation est autorisée aux deux conditions suivantes:
identielle. Cet équipement génère, utilise et peut éme ttre une énergie de
es aux communications radio. Cependant, il n'existe auc une garantie que des
e ou plusieurs des mes ures suivantes:
2AAAS-MD01
10941A-MD01
www.vivint.com
 Loading...