

Page 1

Owner’s Guide
V1p and V1w loudspeaker
Read these instructions that contain important information about the
safe use, installation and maintenance of this loudspeaker.
• Unpack the loudspeaker following the instruction sheet attached to the
shipping crate. The method is also described below. Check for
damage. Keep potentially hazardous packaging (plastic bags,
polystyrene etc.) out of reach of children.
• Dispose of packaging in compliance with current waste disposal
requirements.
• This loudspeaker must only be used for the purpose for which it is
intended.
• The manufacturer declines all responsibility for damage resulting from
improper, incorrect or negligent use.
• Repairs must only be carried out by a service centre authorised by the
manufacturer.
• Failure to comply with the above requirement will jeopardise the safe
use of the loudspeaker and associated guarantees (if applicable).
1
Page 2

IMPORTANT NOTE
THE SILVER ALUMINIUM DOMED/CONED DRIVE
UNITS ARE EXTREMELY SENSITIVE. THEY MUST
NEVER BE SUBJECTED TO PROBING FINGERS OR
OTHER SHARP OBJECTS!
IF SO, CERTAIN DAMAGE WILL RESULT AND A
REPLACEMENT DRIVER WILL HAVE TO BE FITTED.
THIS REPLACEMENT WILL NOT BE PERFORMED
UNDER GUARANTEE CONDITIONS.
PLEASE READ ALL PAGES PRIOR TO INSTALLATION
2
Page 3

INTRODUCTION
Few owners of new Hi Fi
equipment read the instruction
manual.
Vivid Audio has decided not to
provide a formal instruction manual
or user guide on this product.
Instead, we have designed a
concise informative piece, which
should hold your interest whilst
browsing through it. While doing
so, you will learn about the do’s
and don’ts of this fine piece of
equipment.
We at Vivid Audio are enthusiasts.
We enjoy what we do - and are
good at it. Although Vivid Audio is
but a few years old, we have
revolutionised perceptions on the
performance of a good
loudspeaker. We believe in sound
engineering design and have a
skilled crew of engineers and
design professionals on board
looking after all aspects of our
products.
UNPACKING
Lay the sealed product on its back
as indicated by the arrows on the
side of the box.
Use a power driver or Phillips
cross-head screwdriver to remove
the screws securing the top
wooden cover of the crate. Remove
the cover and place safely aside.
Remove the accessories from the
crate before proceeding.
Remove the loudspeakers from the
crate by lifting them from the lower
section of the crate. CAREFULLY
remove the protective materials,
paying special attention not to
damage the drivers in the process
(see warning).
Reassemble the packaging and
save for future use.
Stand mounting (V1p only)
The loudspeaker will benefit
enormously from the use of
approximately 400mm high sturdy
loudspeaker stands. It is
recommended to spike to
loudspeaker stands to the floor and
to compliantly bond the
loudspeaker base to the top of the
stand by using the re-usable
flexible adhesive provided.
Wall mounting (V1w only)
In the case of the wall mount
version, a wall mount kit is provided
and two variants are available,
catering for both dry walling and
brick and mortar type walling.
For dry walling the circular securing
plate is provided with two mounting
holes for the two 8mm coach
screws (provided). Once the plate
is firmly secured into a suitable
sturdy stud, the mounting stalk can
be secured in position and nipped
up with a 13mm spanner (not
provided). The loudspeaker is then
fitted over the cut-out knuckle,
positioned and tightened up by
hand.
PLEASE ENSURE THAT THE
COACH SCREWS ARE FIRMLY
LOCATED INTO WOODEN STUD
AND DO NOT MOUNT THE
LOUDSPEAKER UNTIL THE
SECURITY OF THIS MOUNTING
HAS BEEN APPROVED.
For the masonry/brick mounting,
the plate and coach screws are not
used but the M8 Rawl type bolt is
utilised. By using a suitable 14mm
drill bit, bore the hole to take the
Rawl bolt.
3
Page 4

The mounting stalk is screwed
directly onto the exposed m8
thread and is used to secure the
whole sub assembly to the wall
(use a 13mm spanner not
provided).
In order to obtain the maximum
benefit from your purchase, it is
important to know something about
the acoustics of the room in which
you intend to install the
loudspeakers. No matter how well
the product performs in a good
environment, the performance will
be adversely influenced if care is
not taken at this stage. Extensive
information of room acoustics is
available to you on our web site
www.vividaudio.com
This procedure applies to V1p due
to physical constraints on the use
of V1w.
A précis of this guideline follows:
MAKE SURE YOUR AMPLIFIER IS
TURNED OFF!!
All connections/reconnections must
be made when the amplifier is
switched off.
Start with the two main front
speakers. Position the left front
speaker one fifth of the width of the
room from the left hand wall and
one third of the distance from the
back wall. Connect the low
frequency (LF) terminals of the
loudspeaker ONLY (facing the back
of the loudspeaker, the LF
terminals are on your left). We
suggest you now load some well
known music with predictable lower
octave musical content into the CD
player. A listener should be seated
in the listening position and listen to
subtle changes in bass character
and cleanliness whilst the speaker
is moved in the longitudinal plane
towards and away from the rear
wall of the room. A point will be
reached where the bass sounds
clean and believable. Mark this
distance from the rear wall. Do the
same in the lateral place about the
position just realised. An improved
result should be obtained. DEAD
EASY! You have found the optimal
position for the low frequency
portion of the audio band in your
room.
Place the right hand speaker in the
mirror position on the right hand
side of the room. From the seated
position you should be equidistant
from each speaker. We suggest
you toe the speakers in towards the
listening position so that the
visually extended centres of the
tweeters cross some way in front of
you in the listening position. This
may be re-adjusted once the
loudspeakers are settled in.
Use a well
-known piece of music.
At this stage you should mark and
note the position you have found.
After listening to this track and a
few others you may find that
moving the speaker forward
(towards the listening position),
improves the sound stage. This is a
personal preference and is worth
spending time on.
MAKE SURE YOUR AMPLIFIER IS
TURNED OFF!!
Connect the right red terminal of
your amplifier to the red terminals
of your right hand loudspeaker. The
black terminal of your amplifier is
connected to your right hand
loudspeaker’s black terminals
4
Page 5

The left hand loudspeaker is
connected in exactly the same
manner as the right hand one.
If you are not sure of the method
please obtain help from your
dealer.
MAINTENANCE
THERE ARE NO USER
SERVICEABLE PARTS
CONTAINED IN THIS
LOUDSPEAKER SYSTEM.
THE DRIVE UNITS ARE VERY
SENSITIVE AND MUST NEVER
BE SUBJECTED TO MISGUIDED
FINGERS! IF SO, CERTAIN
DAMAGE WILL RESULT AND A
REPLACEMENT DRIVER WILL
HAVE TO BE FITTED. THIS
REPLACEMENT IS NEVER
CARRIED OUT UNDER
GUARANTEE CONDITIONS.
Please refer all problems to your
dealer who has been trained to
deal with any queries you may
have regarding this product.
CLEANING
Use only the soft moistened lint
free cloth (provided) to clean this
product.
5
Page 6

SERVICE NOTES
Service under guarantee is only provided upon presentation of reasonable
evidence (e.g. completed guarantee card or purchase receipts) indicating the
date of the claim is within the guarantee period.
The guarantee is not valid if the defect is due to accidental damage (including
during transport), misuse or neglect and in case of alterations or repair carried
out by unauthorised persons.
The guarantee may not apply if the product requires modification or
adaptation to enable it to operate in any country other than the country for
which it was designed, manufactured, approved and/or authorised or if any
damage results from these modifications.
Service (during and after guarantee) is available in all countries where this
product is officially distributed by Vivid Audio. In countries where Vivid Audio
does not distribute the product, the local Vivid Audio Agent or distributor
organisation will provide service although there may be a delay if the
appropriate spare parts and technical manual are not readily available.
These statements do not affect your statutory rights as a consumer.
In the event of difficulty please contact the Vivid Audio via our web site
www.vividaudio.com
Guarantee
This Vivid Audio product is guaranteed against failure arising from faulty
workmanship and materials for a period of 2 years from date of purchase. An
extended guarantee may be negotiated by registering your product on our
web site
This guarantee is only valid in the country of original purchase.
All claims under this guarantee must be made to the distributor in the buyer’s
country by returning the unit securely packed in the original crate and
packaging, with all accessories, postage/freight pre-paid and insured. The unit
will be repaired or replaced at no charge for parts and labour.
This guarantee remains valid only if the serial number of the unit has not been
defaced or removed and if repairs are performed only by authorised Vivid
Audio dealers or distributors.
It does not cover damage due to misuse, accident or neglect. The distributor
or manufacturer, (Vivid Audio (PTY) Ltd, South Africa), retains the exclusive
right to make such judgement on the basis of inspection. The retailer,
distributor and manufacturer of this Vivid Audio Loudspeaker shall not be
liable for consequential damage arising from the use, misuse or failure of this
product, including injuries to persons or property.
To qualify for this guarantee, the enclosed guarantee registration card must
be filled in and returned to the manufacturer within 14 days of purchase, OR
the product may be registered via Vivid Audio’s web site, at
www.vividaudio.com.
www.vividaudio.com. These guarantees are not transferable.
6
Page 7
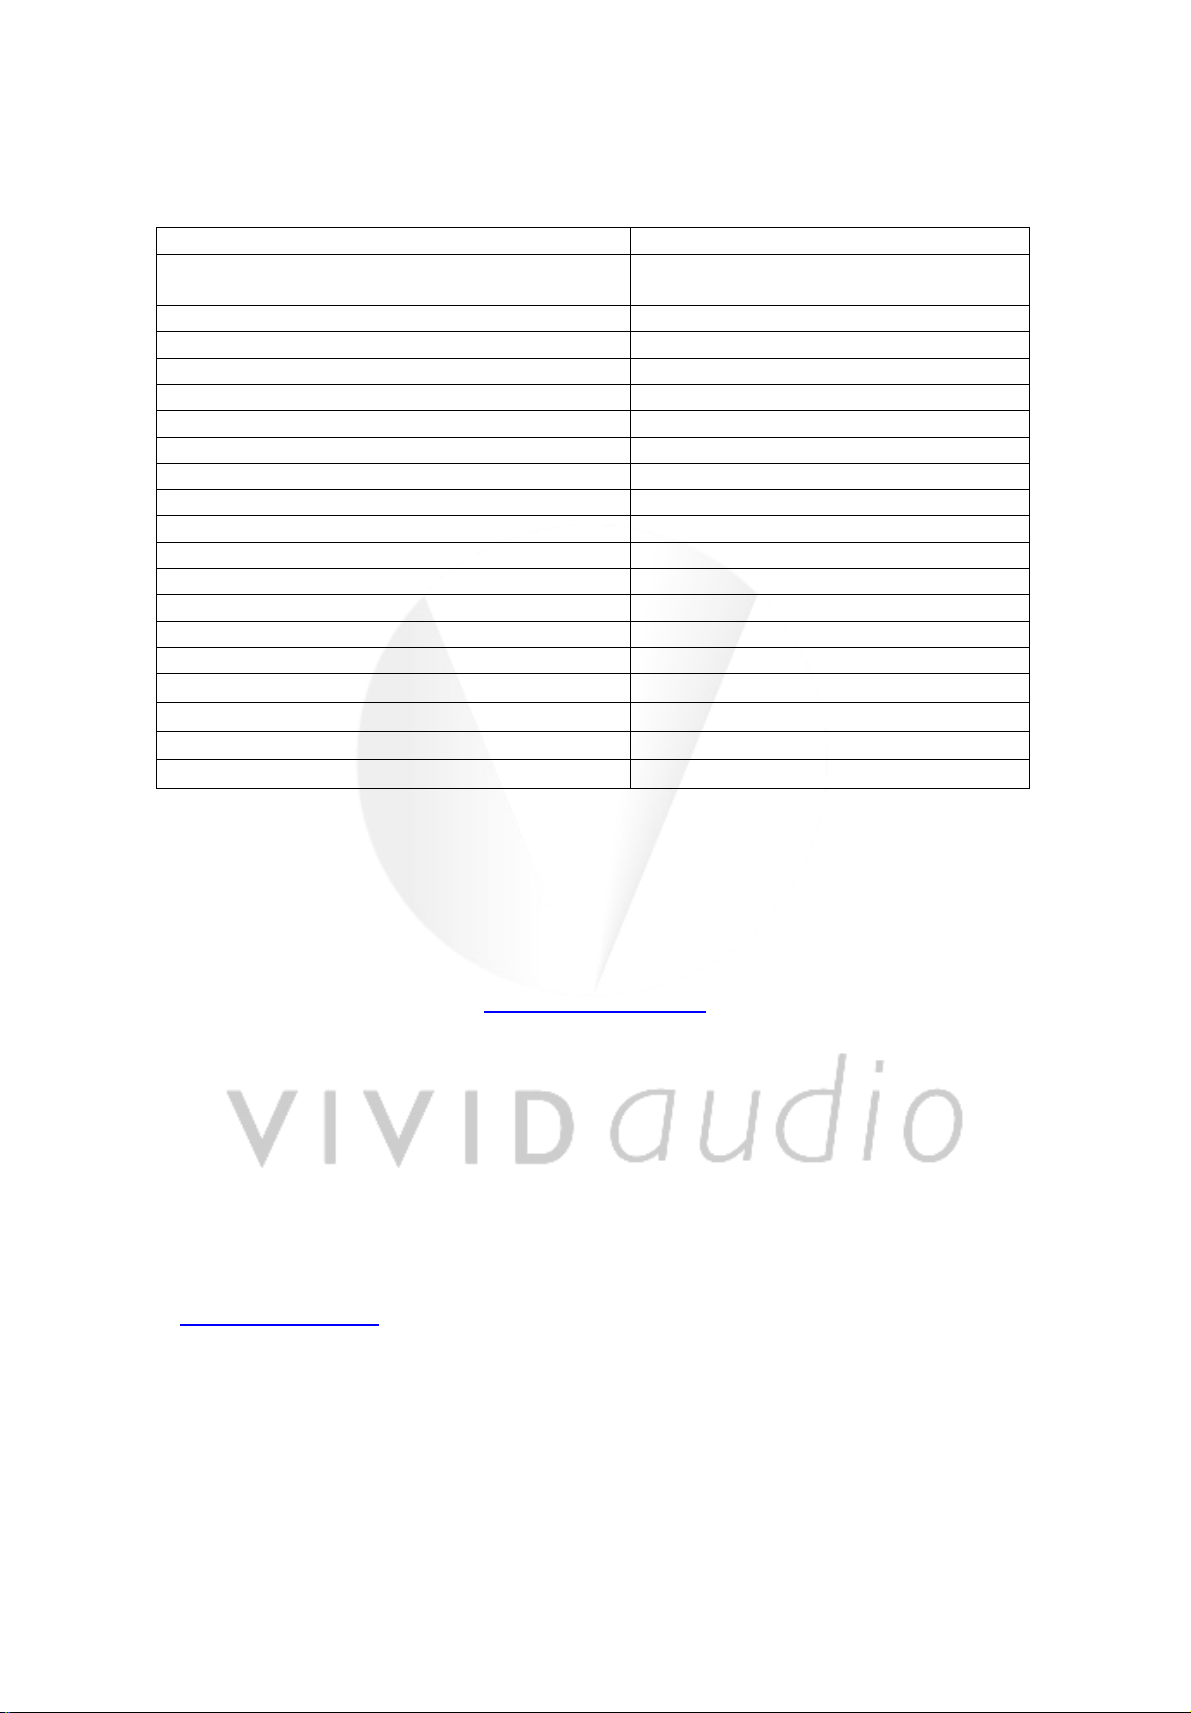
SPECIFICATION VIVID AUDIO V1
Configuration 2 way vented cabinet
Cabinet material Complex loaded carbon fibre filled
polymer
Finish High gloss automotive
Drive units 26mm metal dome hf unit
158mm metal coned lf unit
Sensitivity 89dB/1w @1m
Nominal Impedance (Ω)8
Frequency range (hz) - 6dB points 42 – 42,000
Frequency response (hz) 45 – 39,000 +/- 2dB on reference axis
Harmonic distortion (2nd and 3 rd harmonics) < .0.5% over frequency range
Cross over frequencies (hz) 3000
Power handling (music program) watts rms 150
V1p Loudspeaker dimensions (H, W, D) mm 635, 255, 195
V1w Loudspeaker dimensions (H, W, D) mm 595, 255, 195 (+ 88mm),
V1p Net mass (kg) 15
V1w Net mass (kg) 12
V1p Shipping dimensions pair (H, W, D) mm
V1w Shipping dimensions pair (H, W, D) mm
V1p Shipping mass pair (kg) 42
V1w Shipping mass pair (kg) 37
750, 640, 360
750, 640, 320
VIVID AUDIO (PTY) LTD., P. O. BOX 343, KLOOF, 3640 KWAZULU NATAL,
SOUTH AFRICA
Telephone: +27 31 705 4168, Facsimile: +27 31 705 4167
info@vividaudio.com
VIVID AUDIO and the VIVID AUDIO logo are registered trade marks.
Patents exist on domed drivers D26 and D50. Patents exist on C125 bass-mid driver.
All VIVID AUDIO products are in conformity with the EMC directive and the low
voltage directive.
Availability of models may vary from country to country.
Please visit our web site for the details of your nearest authorised dealer and to learn
more about us and our technology.
www.vividaudio.com
VIVID AUDIO reserves the right to change the design and or specifications of VIVID
AUDIO products without prior notice.
© 2003/4/5 VIVID AUDIO (PTY) Ltd. All rights reserved
7
Page 8

INSTALLATION NOTES: DATE:…………………..
______________________________________________
______________________________________________
______________________________________________
______________________________________________
______________________________________________
______________________________________________
______________________________________________
______________________________________________
______________________________________________
______________________________________________
______________________________________________
______________________________________________
______________________________________________
______________________________________________
______________________________________________
8
Page 9

Some early loudspeaker history
1874 - Ernst W. Siemens was the first to describe the "dynamic" or moving-coil
transducer, with a circular coil of wire in a magnetic field and supported so that it
could move axially. He filed his U. S. patent application for a "magneto-electric
apparatus" for "obtaining the mechanical movement of an electrical coil from
electrical currents transmitted through it" on Jan. 20, 1874, and was granted patent
No. 149,797 Apr. 14, 1874. However, he did not use his device for audible
transmission, as did Alexander G. Bell who patented the telephone in 1876. After
Bell's patent was granted, Siemens applied for German patent No. 2355, filed Dec.
14, 1877, for a nonmagnetic parchment diaphragm as the sound radiator of a
moving-coil transducer. The diaphragm could take the form of a cone, with an
exponentially flaring "morning glory" trumpet form. This is the first patent for the
loudspeaker horn that would be used on most phonographs players in the acoustic
era. His German patent was granted July 30, 1878 and his British patent No. 4685
was granted Feb. 1, 1878.
1898 - Oliver Lodge filed for British patent No. 9712 on
Apr. 27, 1898, for an improved loudspeaker with
nonmagnetic spacers to keep the air gap between the
inner and outer poles of a moving coil transducer. This
was the same year he applied for a patent on his famous
radio tuner. A model of his loudspeaker is in the British
Science Museum in South Kensington, and a photo was
published in Wireless World Dec. 21, 1927. This
improvement was later claimed by Pridham and Jensen in
the Magnavox application for patent No. 1,448,279 filed
Apr. 28, 1920, and granted Mar. 13, 1923.
1901 - John Stroh first described the conical paper diaphragm that terminated at the
rim of the speaker in a section that was flat except for corrugations, filed for the
British patent No. 3393 on Feb. 16, 1901, granted Dec. 14, 1901.
1908 - Anton Pollak improved the moving-coil loudspeaker with a voice-coil centering
spider, filed for U.S. patent No. 939,625 on Aug. 7, 1908, granted Nov. 9, 1909.
1911 - Edwin S. Pridham and Peter L. Jensen in Napa, California, invented a
moving-coil loudspeaker they called the "Magnavox" that was used by Woodrow
Wilson in San Diego in 1919.
1915 - Harold Arnold began program at Bell Labs to
improve phonographic sound recording. The first priority
was the electronic amplifier using the new vacuum tube,
second was the microphone, and third was the
loudspeaker that would improve the "balanced armature"
units developed for public address. After WWI, J. P.
Maxfield led this project that produced E. C. Wente's
moving coil speaker by 1925, the Orthophonic
phonographic player by 1925, and Vitaphone talking
motion pictures by 1926.
1918 - Henry Egerton on 1918/01/08 filed patent for balanced-armature loudspeaker,
used in the Bell Labs No. 540AW speakers developed by N. H. Ricker Oct. 6, 1922,
that became the 540 commercial speaker by 1924; was based on the balanced
armature telephone patent of Thomas Watson granted Oct. 24, 1882, similar to
devices also developed by Siemens and Frank Capps.
Oliver Lodge
from Das Fotoarchiv
early Bell loudspeakers
9
Page 10

1921 - The Phonetron based on patent No. 1,847,935 filed
Apr. 23, 1921, by C. L. Farrand, was the first coil-driven
direct-radiator loudspeaker to be sold in the U.S. and was
well-received, competing with the horns used by table
radios
1923 - The Thorophone was a gooseneck loudspeaker
with a voice-coil driver
1925 - The research paper of Chester W. Rice and
Edward W. Kellogg at General Electric was important in
establishing the basic principle of the direct-radiator
loudspeaker with a small coil-driven mass-controlled
diaphragm in a baffle with a broad midfrequency range of
uniform response. Edward Wente at Bell Labs had
independently discovered this same principle, filed patent
No. 1,812,389 Apr. 1, 1925, granted June 30, 1931. The
Rice-Kellogg paper also published an amplifier design that
was important in boosting the power transmitted to
loudspeakers. In 1926, RCA used this design in the
Radiola line of a.c. powered radios.
1925 - Victor Orthophonic acoustic phonograph player had a folded exponential horn
that was later used as model for the Klipsch speaker of the hi-fi era. Within a year,
the Orthophonic faced competition from all-electric phonographs with an
electromechanical pickup, vacuum-tube amplifier, and moving-coil loudspeaker, such
as the Brunswick Panatrope sold by the Brunswick-BalkeCollender Company.
1926 - Vitaphone sound system for motion pictures used a
new speaker developed at Bell Labs. Wente and Thuras
designed the Western Electric 555-W speaker driver that
was coupled with a horn having a 1-in. throat and a 40-sq.
ft. mouth; it was capable of 100-5000 hz freq. range with
an efficiency of 25% (compared to 1% today) needed due
to low amp power of 10 watts. The power amps were 205D. Older loudspeakers were balanced armature type, but
the newer 555-W speakers of the Vitaphone were moving
coil type.
1928 - Herman J. Fanger filed patent No. 1,895,071 on
Sep. 25, 1928, granted Jan. 24, 1933, that described what
came to be known as the coaxial speaker, composed of a
small high frequency horn with its own diaphragm nested
inside or in front of a large cone loudspeaker, based on
the variable-area principle that made the center cone light and stiff for high
frequencies and the outer cone flexible and highly damped for lower frequencies.
1929 - E. W. Kellogg filed patent No. 1,983,377 on September 17, 1929, granted
December 4, 1934, that described an electrostatic speaker composed of many small
sections able to radiate sound with out magnets or cones or baffles. This patent, as
well as the 1932 British patents of Hans Vogt, influenced Peter Walker to build the
Quad ESL flat panel speaker in 1957.
1929 - J. D. Seabert of Westinghouse developed a horn-type loudspeaker that
directed the sounds of human speech toward the audience better than cone
speakers that were intended for the over-all sound including music to fill the entire
theatre. These "directional baffle" horns had an opening 3 ft. by 4 ft. and were
different from small-throat horns.
1925 Grebe radio
receiver and 1924
Western Electric 540
speaker (NMAH)
Vitaphone 555-W, from
AT&T Archives
10
Page 11
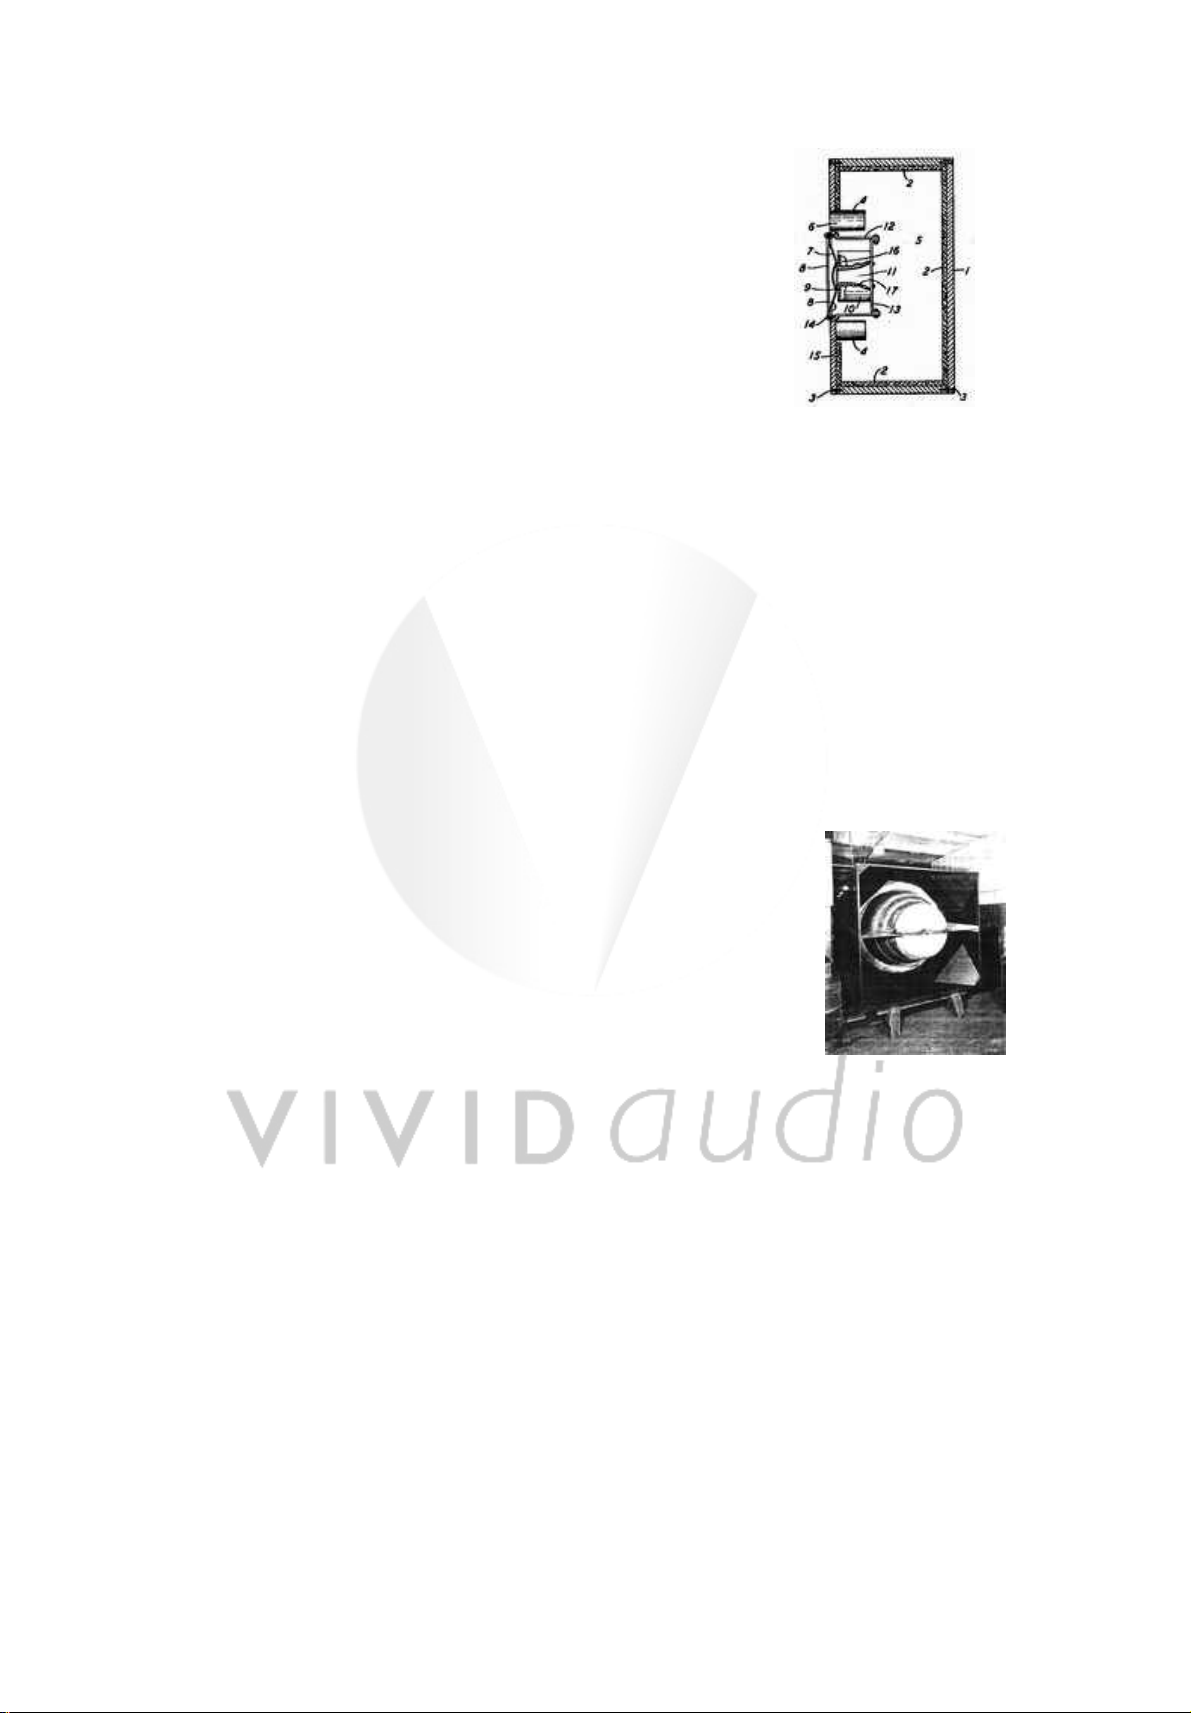
1930 - Albert L. Thuras filed patent No. 1,869,178 on Aug.
15, 1930, granted July 26, 1932, for the bass-reflex
principle while working at Bell Labs. Early cabinets used a
passive baffle to direct sound to the front, allowing the
back of the cabinet to be open for the low sounds. The
bass-reflex enclosure kept the low-frequency sounds from
being lost from the rear of the diaphragm.
1931 - Bell Labs developed the two-way loudspeaker,
called "divided range" for the demonstration by H. A.
Frederick in December of vertically cut records. The high
frequencies were reproduced by a small horn with a
frequency response of 3000-13,000 hz, and the low
frequencies by a 12-inch dynamic cone direct-radiator unit with a frequency response
within 5db from 50-10,000 hz. By 1933, a triple-range speaker had been developed
for the Constitution Hall demo in April, adding Western Electric No. 555 driver units
as the mid-range speaker. For the low frequency range 40-300 hz, a large moving
coil-driven cone diaphragm in a large baffle expanding from a 12-in throat to a 60inch mouth over a total length of 10 ft. This 3-way system was introduced in motion
picture theatres as "Wide Range" reproduction.
1932 - RCA demonstrated a dual-range speaker of its own design for theatres, using
three 6-inch cone diaphragms with aluminium voice coils in divergent directions, with
a response of 125-8000 hz, and 10-ft. horns 40-125 hz.
1933 - "Progress was such that a demonstration of the new system - called
"stereophonic" because of its ability to give a spatial sense corresponding to
stereoscopic vision - was given before the National Academy of Sciences and many
invited guests at Constitution Hall, Washington in the spring of 1933. Transmission
was
over wire lines from the Academy of Music in Philadelphia and
three channels were used with microphones respectively at left,
centre and right of the orchestra stage and loud speakers in
similar positions in Constitution Hall." This transmission of music
"was carried out with special loud speakers developed for the
purpose by Dr. Wente and the late A. L. Thuras. The objectives
in the design of these loudspeakers were uniform response over
the whole tonal range of the orchestra, an enhanced sound
power output capacity without noticeable non-linear distortion
and uniform distribution of the emitted sound at all frequencies
throughout a wide solid angle. For the receiving unit and the
multicellular horn which were developed for this demonstration,
Dr. Wente, jointly with the Bell Telephone Laboratories, was
awarded a gold plaque by the Academy of Motion Picture Arts and Sciences in
1936." (Bell Labs, 1953)
1935 - Douglas Shearer and John Hilliard at MGM developed a standard theatre
speaker system, starting with the Loews 5000-seat Capitol Theatre on Broadway.
James Lansing and Dr. John F. Blackburn of Cal Tech designed a 2-way speaker
system; the high frequency driver had a 3-inch aluminium diaphragm and throat size
of 1.4 inches; the low frequency baffled cone unit was 15 inches. ERPI provided
speakers from Fletcher's hi-fi experimental equipment to help design the speakers.
The low frequency horn used four 15-in. Lansing cone drivers and Lansing 284
drivers for multicell horns of different sizes. The system was installed in 12 theatres
for the opening of "Romeo and Juliet" with Norma Shearer, sister of Douglas,
Thuras bass-reflex patent
Thuras theater
speaker 1933, from
AT&T Archives
11
Page 12

then installed in all Loews Theatres, then became the
standard established by the Academy.
1940 - Paul W. Klipsch filed patent No. 2,310,243 on Feb.
5, 1940, granted Feb. 9, 1943, for the corner horn
speaker.
1941 - Altec Lansing Corp. was formed when Altec bought
Lansing; Altec Service Corp. (from "all technical") had
been formed in 1938 by M. Conroe and George
Carrington to manage ERPI installations after ERPI was
dissolved. John Hilliard worked at Altec Lansing in 1943
on magnetic airborne sub detection and in 1945 put on the
market the 2-way "Voice of the Theater" speaker system with improved horns and
magnet drivers. See Lansing Heritage for images and a
detailed history.
1949 - W. E. Kock and F. K. Harvey at Bell Labs
developed the acoustical lens, and reported findings in
1949 JAES. These lenses are used in James B. Lansing
theater speakers and home hi-fi speakers
1953 - Arthur Janszen was granted patent No. 2,631,196
on March 10, 1953, for an electrostatic high-frequency
speaker
1954 - Acoustic Research introduced the small AR-1
bookshelf loudspeaker that used the acoustic suspension
principle developed by company co-founder Edgar
Villchur. This was soon followed by the $89 AR-2 and by the AR-3 with improved
domed tweeters in 1958.
1957 - Quad ESL marketed as the first full-range
electrostatic loudspeaker, designed by Peter Walker and
David Williamson, based on Edward W. Kellogg's patent
No. 1,983,377 filed September 17, 1929 and granted
December 4, 1934.
1974 - Earthquake premiered Nov. 15 in the Chinese
Theatre in Hollywood with Universal Picture's
Sensurround process developed by W. O. Watson and
Richard Stumpf at Universal. Four large low-frequency
horns were located behind the screen, two in each corner.
The Model W horn in each corner was 8 ft. long, 4 ft. wide, 4 ft. high. The Model C
horn in each corner was a modular unit 1 ft. wide and 5 ft. high. Two additional horns
were located on a platform in the rear of the theatre. Each horn was driven by a
1000-watt amplifier controlled by inaudible tones on a special optical control track
along with the normal 4-track magnetic soundtrack of the 35mm Panavision filmstrip.
Steven E. Schoenherr
Aztec A-7 Voice of the
Theatre, from Audio, Dec.
1961
Avery Fisher with 9-tube
amp and coaxial speaker,
from Fortune, Oct. 1946
Walker's ESL, from Quad
12
Page 13

VIVID AUDIO (PTY) LTD., P. O. BOX 343, KLOOF, 3640 KWAZULU NATAL,
SOUTH AFRICA
Telephone: +27 31 705 4168, Facsimile: +27 31 705 4167
info@vividaudio.com
VIVID AUDIO and the VIVID AUDIO logo are registered trade marks.
Patents exist on domed drivers D26 and D50. Patents exist on C125 bass-mid driver.
All VIVID AUDIO products are in conformity with the EMC directive and the low
voltage directive.
Availability of models may vary from country to country.
Please visit our web site for the details of your nearest authorised dealer and to learn
more about us and our technology.
www.vividaudio.com
VIVID AUDIO reserves the right to change the design and or specifications of VIVID
AUDIO products without prior notice.© 2003/4/5 VIVID AUDIO (PTY) Ltd. All rights
reserved
13
 Loading...