


SOUND VIEW SERIES
USER MANUAL

VIVID MODELS
» VFS492SVS
» VFS4106SVS
» VFS4120SVS
» VFS4133SVS
02 SOUND VIEW SERIES | contents
CONTENTS

SOUND VIEW SERIES | contents 03
INTRODUCTION
· copyright
· included in box
· tools needed
· attention
· environmental conditions
· cautions
· installation
· how to uninstall
PRECAUTIONS
ASSEMBLY
04
06
08

04 SOUND VIEW SERIES | introduction
INTRODUCTION
Dear Customer!
Congratulations on making your purchase. We hope you
enjoy using your new projection screen.
In order to make each viewing a unique video-cinema
experience, we have provided this user manual containing
detailed information about installing and operating your new
projection screen.
Be sure to read through all the information in this manual
before using and/or attempting to install the equipment.
Please note that your warranty will become void in the
event that the equipment is handled, installed, or
operated incorrectly.
The contents of this user manual will guide you through the
proper handling, installing, and operating of your new
Vivid projection screen.

SOUND VIEW SERIES | introduction 05
Included in Box:
· Horizontal Frames (2)
· Vertical Frames (2)
· Corner Brackets (4)
· Top Mount (1)
· Bottom Mount (1)
· Horizontal Tension Bars (2)
· Vertical Tension Bars (2)
· 10mm Corner Screws (16)
· Tension Pegs
· Fabric
Horizontal Frames
& Vertical Frames
Corner Brackets Top Mount Bottom Mount
Horizontal
Tension Bars
Vertical
Tension Bars
10mm Corner
Screws
Tension Pegs
Tools Needed:
Electric Drill, Level, & (8) Screws Suitable for Wall Type

06 SOUND VIEW SERIES | precautions
PRECAUTIONS
Attention:
Fix Frame Screen consists of
a light-weight aluminum
frame. Handle it with care to
avoid damage.
When not in use, cloth or
curtain can be used to cover
the screen to avoid dirt or
foreign objects.
When cleaning the screen
fabric, please use soft cloth
with little clean water. No
cleaning agents shall be
used.
Please do not touch the
fabric with fingers or sharp
edge like a blade.
Do not hang anything on the
frame.
Environment:
Temperature should be
between -5°C(22°F) and
40°C(104°F). Humidity level
below 90%.
Not too dusty.

SOUND VIEW SERIES | precautions 07
Cautions:
The screen should be
mounted indoors.
Please make sure that the
wall structure can support the
weight and is suitable for
installation.
Please make sure that screen
is level after installation.
This installation process can
only be performed by adult.
Keep Distance
No Heavy Objects
Only For Adults
No Moisure
Wall Mounted Installation
Level Frame
08 SOUND VIEW SERIES | assembly
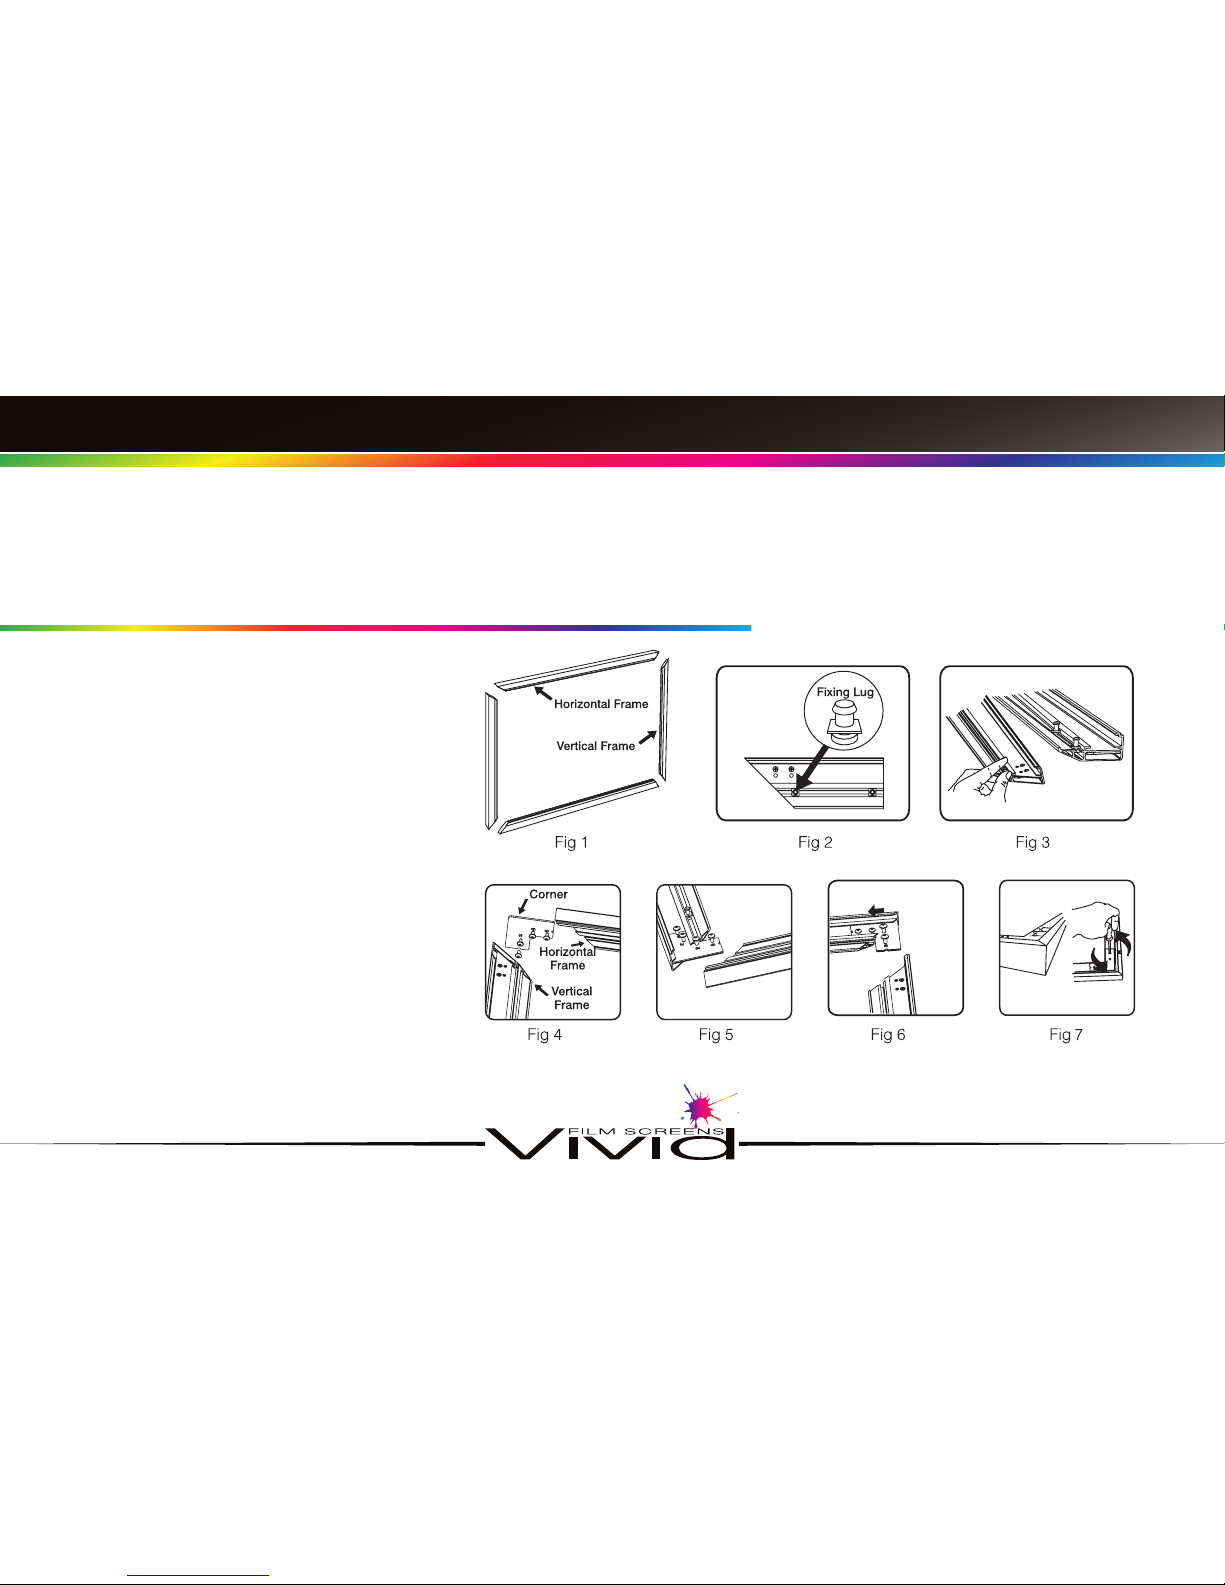
ASSEMBLY
1. Lay each section of the
frames on a tidy, flat surface.
(Fig. 1)
2. Slide tension pegs into
grooves on the reverse side
of frames. (Fig. 2-3)
3. Connect both horizontal
and vertical frame sections
with the corner brackets.
Ensure all joints are square
and then tighten the 10mm
corner screws. (Fig. 4-7)

SOUND VIEW SERIES | assembly 09
4. Unfold the screen fabric and insert the
tension bars into the perimeter slots of the
fabric. Make sure the smooth white surface
(no seams) is facing forward. (Fig. 8-10)
5. Align tension pegs with eyelets on the
Fabric. Using the tension bar, pull the
fabric over the tension pegs making sure
the bar is on the back side. (Fig. 11-15)
Installer’s Tip: Arrange
horizontal tension bars
first, then the the sides.

10 SOUND VIEW SERIES | assembly
6. There is a locking latch on the bottom
wall mount only. (Fig. 16)
7. Fix the mounts onto the wall separately.
(Fig. 17-18)
Up Bracket
Bottom Bracket
Secure Button
Locking Latch
Fig 16
Up Bracket
Bottom Bracket
h
Fig 17 Fig 18
Measured Straps

SOUND VIEW SERIES | assembly 11
Happy Viewing!
Fig 19 Fig 20 Fig 21 Fig 22
8. Hook screen onto the top mount and
bottom mount. (Fig. 19-20)
9. To uninstall the screen, please press the
latch towards the wall to release bottom
frame from bottom mount. Then, lift the screen
a little to release it totally from top and
bottom groove of the mounts. (Fig. 21-22)

WWW.SKYWALKER.COM
9390 VETERANS MEMORIAL PKWY, O’FALLON, MO 63366 | 800.844.9555
Make a Splash!
 Loading...