

Page 1
1
Manual by: Emilijo Mihatov / Owen P Walker
Copyright © 2000
User Manual
Software Version 1.0H/2.0E
Part Number: DVV211-A
Document Number: 157
Page 2

2
IMPORTANT NOTICE
COPYRIGHT
The material in this document is copyright, and may not be quoted or reproduced in any
form without written permission from Fairlight ESP Pty Ltd.
LIMITED WARRANTY POLICY
All the software and hardware provided with, or purchased especially for, Fairlight
products has been tested for functionality. Fairlight ESP Pty Ltd will make its best efforts to
correct reported defects for future releases subject to technical practicabilities. Fairlight ESP
will also replace any defective media on which software has been delivered provided that the
item to be replaced is returned to the dealer who supported the product within 90 days of
purchase.
Fairlight ESP Pty Ltd makes no warranty or representation either expressed or implied
with respect to the system's performance or fitness for a particular purpose.
In no event will Fairlight ESP Pty Ltd be liable for direct or indirect damages arising from
any defect in the product or its documentation. Further, Fairlight ESP Pty Ltd will not accept
any liability for any programs, sounds, audio recording, video recording or sequences stored
in or used with Fairlight products, including the cost of recovery of such data.
The warranties, remedies and disclaimers above are exclusive and take precedence over
all others, oral or written, express or implied, to the extent permitted by law in the
geographical area of the product's use. No employee of Fairlight ESP, agent, distributor or
employee of an agent or distributor is authorized to offer any variation from this policy.
Copyright 2000:
Fairlight ESP Pty Ltd,
Unit 2, 1 Skyline Place,
French's Forest, NSW 2086,
AUSTRALIA.
Telephone +61 2 8977 9999
Fax +61 2 8977 9900
Page 3

3
TABLE OF CONTENTS
IMPORTANT NOTICE ......................................... 2
Terms Used Within This Manual ................. 4
SECTION 1 - OVERVIEW .................................... 5
1.1 Description ........................................... 5
1.2 Theory of Operation .............................. 5
SECTION - 2.0 FEATURES .................................. 6
2.1 Disk Drive Formats ......................... 6
2.1.1 COMPATIBILITY WITH OTHER VIVID .....
SYSTEMS ................................................. 6
2.2 Recording and Playback functions.. 6
2.2.1 BUILT IN TIME CODE READER ............... 6
2.2.2 TIMEBASE CORRECTOR ....................... 6
2.3 Other features ...................................... 6
2.3.1 Menu based setup system ............ 6
2.3.2 R
EMOTE CONTROL ........................... 6
SECTION 3 - PARTS AND CONTROLS .................... 7
3.1Transport........................................... 7
3.2 LCD Panel ....................................... 7
SECTION 4 - DISK T RANSPORT CONTROLS ............ 8
4.1 EJECT .................................................... 8
4.2 REW ...................................................... 8
4.3 PLAY ..................................................... 8
4.4 FF .......................................................... 8
4.5 STOP ..................................................... 8
4.6 REC ....................................................... 8
4.7 Shuttle Mode......................................... 8
4.8 Locate to Start / End .............................. 8
SECTION 5 - SYSTEM CONFIGURATION ................. 9
5.1 Recording ............................................. 9
5.2 Playback ............................................. 11
SECTION 6 - SHUTDOWN ................................ 12
SECTION 7 - FILE AND DISK MANAGEMENT ......... 13
SECTION 8 - VIDEO DUBS USING THE MFX3 .........
PLUS ......................................................... 15
8.1 Connecting the equipment ................. 15
8.2 Configuring the MFX for control of both
devices ..................................................... 15
8.3 Preparing the ViVid for recording........ 16
8.4 Cueing the source material ................. 16
8.5 Doing the dub ..................................... 16
8.6 Preparation for playback on ViVid ...... 17
SECTION 9 - LCD MENU STRUCTURE ................ 18
9.1 Main LCD Screen ............................... 18
9.2 Main Menu (MAIN) ............................. 18
9.3 Master Time Setup (MASTER) .............. 18
9.4 Select Title (TITLE) .............................. 18
9.5 Select Master Reel (REEL)................... 18
9.6 Source Setup (SRC) ............................. 18
9.7 Disk Record Setup (DISK) ................... 19
9.8 Manage Disk ...................................... 19
9.9 Tidy Disk ............................................. 19
9.10 Goto .................................................. 19
9.11 Miscellaneous System Setup ............ 19
9.12 System Information ........................... 19
SECTION 10 - VIVID QUALITY FACTOR TIME ...........
CHART ....................................................... 20
SECTION 11 - VIVID MENU TREE ..................... 21
INDEX ........................................................ 22
Page 4

4
TERMS USED WITHIN THIS MANUAL
Title - A folder or directory which can conatin reels.
Reel - A ‘reel’ is created by a single continuous recording of pictures and sound into the ViVid.
Before starting to use the ViVid, it is useful to understand what is represented by the following terms :-
Page 5

5
SECTION 1 - OVERVIEW
This chapter outlines the features of the Fairlight ViVid digital video disk recorder.
1.1 DESCRIPTION
ViVid is a general purpose video and audio recorder that can be used in a number of professional applications
where reliable and fast access to non-linear video and audio is required. Its main purpose is to act as a videofollow device during editing sessions with the Fairlight MFX3
plus
Digital Audio Workstation.
The disk recorder takes video, audio and timecode signals, and records them in real time onto a high speed
magnetic disk drive. In playback the process is reversed with all signals being output in sync with each other, using
front panel or Sony 9-pin remote control.
The quality of the picture that the ViVid disk recorder can record is variable with 16 different compression settings
to choose from. The user can set the best rate to suit the application to make the most of remaining disk space.
ViVid has been designed to contain few moving parts and all components have been selected for optimum
performance and reliability, With no tape path or heads to clean and an average life for the hard disk of 650,000
hours, ViVid disk recorder technology sets new standards for video recording system reliability.
The system uses BNC connectors for video and time code signals and XLR connectors to carry balanced audio.
1.2 THEORY OF OPERATION
ViVid operates by digitising and compressing video and audio signals on to a removable hard disk. 8 bit
quantization and 4:2:2 sampling are employed in the video path with up to 16 bit quantisation and up to 48 kHz
sampling in the audio path. A separate time code file is recorded along with a database file for instant access. The
internal database stores data that enables ViVid to access and manipulate the recorded signals for instant access.
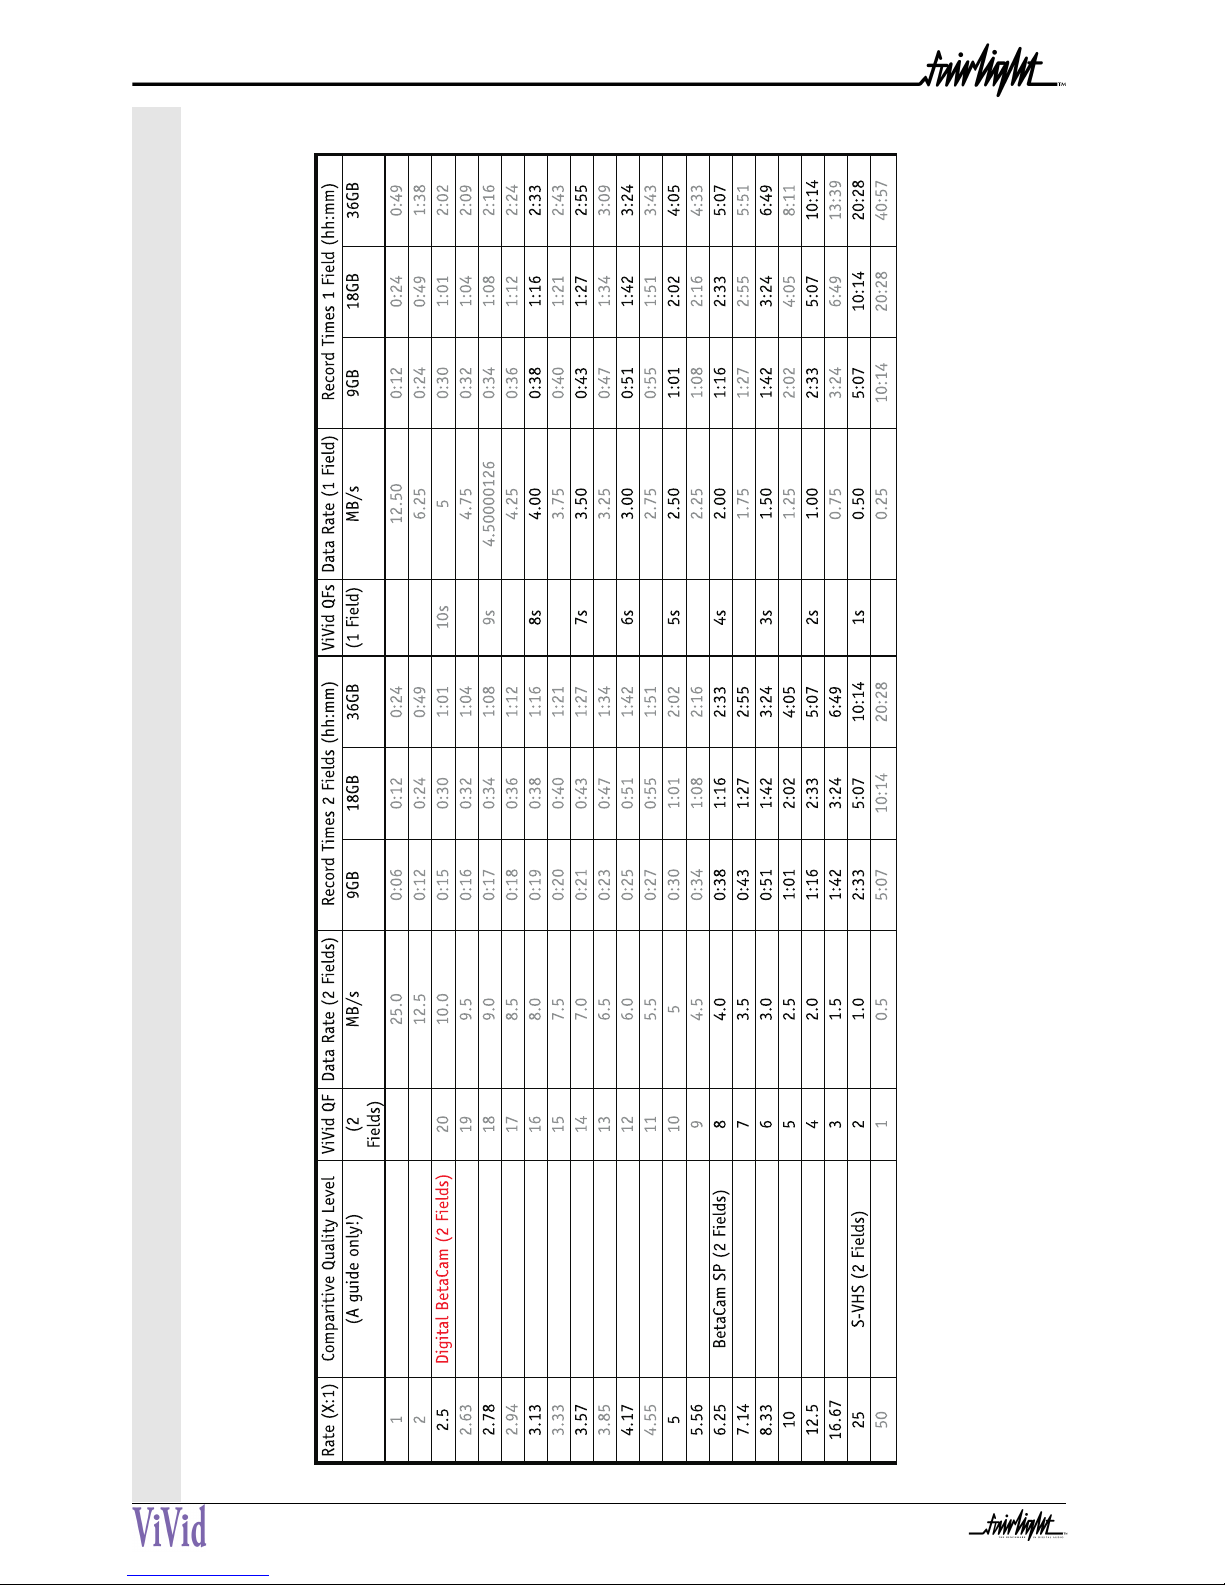
The maximum video recording length in ViVid is determined only by the remaining available disk space. (Please
refer to Section 10 - Quality Factor Record Time Chart on page 20 for more information.)
As ViVid can have 999 titles with 999 reels in each, it becomes simple to organise the video and audio logically on
the disk for fast and easy access.
Page 6

6
SECTION - 2.0 FEATURES
ViVid is capable of recording and playing back composite and Y/C video and balanced analog audio signals in
either the NTSC or PAL standards. With an external remote control unit connected, jog, shuttle, slow-motion and
cue functions are available and the unit can be used as a nonlinear playback / recorder in an editing system. The
ViVid can also be used in a time code chase mode.
2.1 DISK DRIVE FORMATS
2.1.1 COMPATIBILITY WITH OTHER VIVID SYSTEMS
A disk drive recorded on this unit can be played back on other ViVid systems. All the video and audio files are
stored on the same removable drive.
2.2 RECORDING AND PLAYBACK FUNCTIONS
2.2.1 BUILT IN TIME CODE READER
The built in time code reader allows the unit to read timecode from an external timecode source such as a
Video Tape Recorder.
2.2.2 TIMEBASE CORRECTOR
The built in digital picture processor gives stable playback of the reels at all speeds. ViVid can play back in
single or both field modes regardless of the field mode of the original recording.
2.3 OTHER FEATURES
2.3.1 MENU BASED SETUP SYSTEM
All the initial settings for system operation are accessed through a simple menu system on the LCD panel,
using the front panel controls.
2.3.2 REMOTE CONTROL
The unit can be operated by remote control through the standard Sony 9-pin serial interface.
Page 7
7
SECTION 3 - PARTS AND CONTROLS
3.1 TRANSPORT
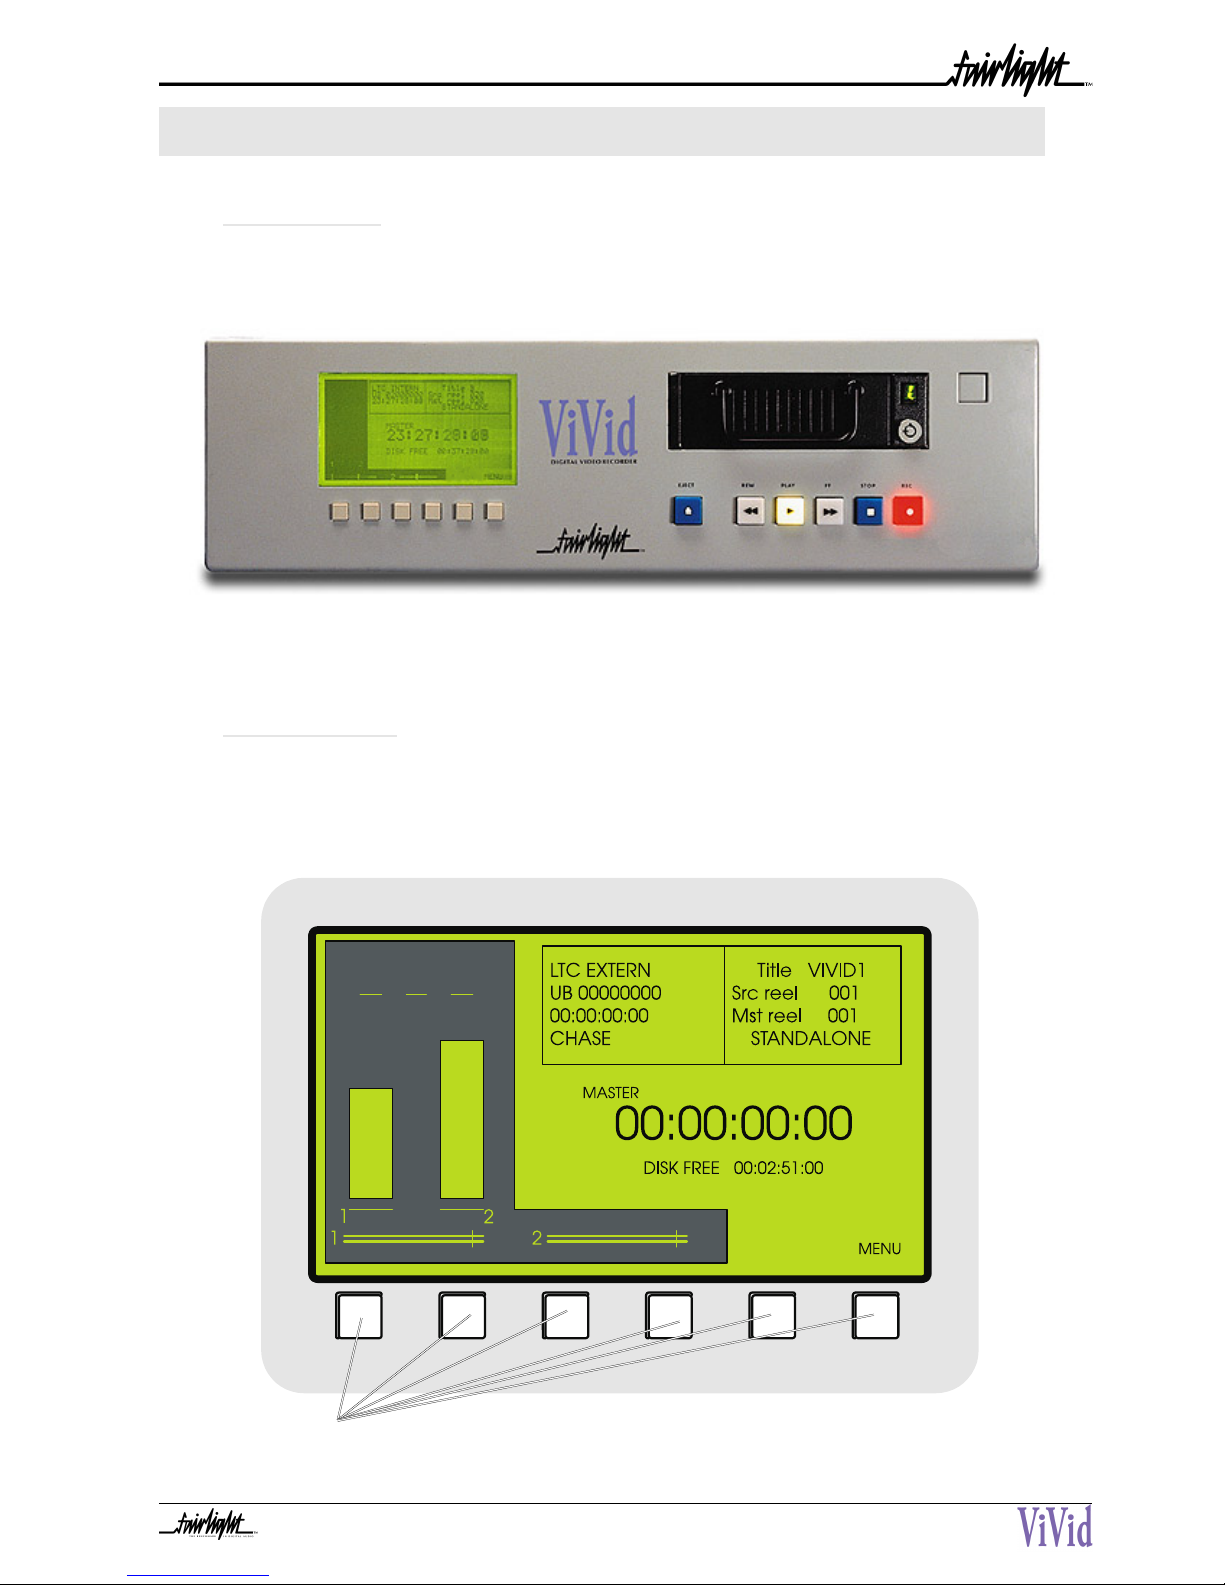
The front panel has the disk transport controls comprising, EJECT, (Shut Down), REW, PLAY, FF and
RECORD.
3.2 LCD PANEL
The Sofy Keys below the LCD panel enable the user to set parameters such as the frame rate, audio
levels and picture quality level.
Soft Keys
Page 8

8
SECTION 4 - DISK TRANSPORT CONTROLS
4.1 EJECT
Pressing this button will begin the shutdown procedure for ViVid. Press the EJECT button once and follow the
prompts on the LCD screen. Wait for 5 seconds after switching off the unit before removing the drive.
4.2 REW
Pressing the REW button, lights the indicator and rewinds the clip. During rewind, pictures are visible on the
monitor.
4.3 PLAY
Pressing the PLAY button begins playback of the clip.
4.4 FF
Pressing the FF button fast forwards the clip. During fast forward, pictures are visible on the monitor.
4.5 STOP
Pressing the STOP button stops the clip.
If E to E on STOP is selected, ViVid will output the input video and audio signals when in STOP mode.
If E to E DISABLED is selected, ViVid will output the digitised video when in STOP mode.
4.6 REC
Holding down the REC button and then pressing the PLAY button begins a recording.
4.7 SHUTTLE MODE
When in Play Mode, press and hold the PLAY button down and then press and hold down either the FF or
REW button. Releasing the PLAY button first will shuttle the clip at approx 10 times normal speed in forward
or reverse, while displaying picture on the Composite and Y/C output and sound output from the Analog
Outputs.
4.8 LOCATE TO START / END
When in Stop Mode, press and hold the Stop button down, then press either the FF or REW button. This will
conveniently locate the ViVid to the last or the first frame in the Title respecitvely.
Page 9

9
SECTION 5 - SYSTEM CONFIGURATION
This chapter describes the preparation necessary before using the unit for recording or playback, including menu
settings and basic operating procedures.
5.1 RECORDING
1. Set the video input to the desired input from COMPOSITE or Y/C.
Select - MENU, SRC, VIDEO INPUT.
2. Set E to E Mode to ON in order to monitor the video input while the unit is in STOP.
3. Set the reference video to use VIDEO INPUT, REFERENCE INPUT or FREE RUN.
Select - MENU, SRC, VIDEO REF.
4. Select internal or external time code:
Select - MENU, SRC, INT/EXT.
5. Toggle the INT/EXT button to select the LTC source. Use INT when the source material does not
contain time code information, or EXT if you wish to slave the ViVid to the incoming time code from the
source deck.
6. To check for incoming timecode, play the source deck and check the TC display under the LTC
EXTERNAL on the ViVid LCD screen. This should then display the incoming time code.
7. Choose to record one field or two fields.
Select - MENU, DISK, REC FIELDS.
Tip: Choosing one field allows a picture to be captured with less video compression at the same data rate.
Normally a video frame consists of two fields of information. To draw all the pixels of information, the
video signal is alternatively scanned. Firstly the odd lines of information are scanned, then the even lines.
This series of odd then even lines are then combined (interlaced) to provide the complete image. These
odd and even lines are called Fields.
Normally a video picture consists of both, but using 9-Pin control, there is no way to discern which of the
two fields are being displayed unless the picture is at full playback speed. Sometimes it may be beneficial
during an edit session, to use only one field instead of two to get the same quality picture at half the data
rate in order to conserve disk space Alternatively operate at the highest Quality Factor in single field to
capture a higher quality pixel if the material to be recorded is already showing signs of compression
artifacts.
Page 10

10
8. Set the desired Quality Factor.
Select - MENU, DISK, FACTOR INCR.
The Factor Incr button toggles through ViVid's different data rates or Quality Factors, from 1 to 8 in Two
Field Mode, or 1s to 8s if in Single Field mode. These settings start at 500 kB/s and then increment in 500 kB/s
steps right up to 9000 kB/s.
Note: Audio is also included in calculation of this value. If audio is disabled, then a slight increase in video
quality occurs as the bandwidth normally reserved for audio is now available for the video data.
6. Set the frame rate.
Select - MENU, MASTER, NEXT NEW TITLE FRAME RATE.
This is a toggle between 25 fps (EBU) and 30 fps (SMPTE) and 30 fps non drop frame(SMPTE)
7. Create a new Title.
Select - MENU, MASTER, TITLE, NEW.
Here you are asked to name the Title. The name can consist of up to 8 alpha numeric characters. Use the
arrow keys to place the < > cursor over the required character and press SELECT for each character. The
RUB button backspaces one character at a time to erase an incorrect entry. Repeat this process until the
entire Title name is visible in the box below the character set. Then press OK, and then EXIT. You can also
press Cancel at any time to abort entry of a new Title.
8. Select Master reel for playback and recording.
Select - MENU, MASTER, REEL, NEW.
Use the arrow keys to place the < > cursor over the required number and press SELECT. The RUB button
backspaces one character at a time. Repeat this process until the entire Reel number is visible in the box
below the character set. Then press OK.
Note: In NTSC you will be asked if the reel is Drop Frame or Non Drop Frame. If you are unsure of the FCM
(frame code mode) of the incoming time code, play the source VTR and observe the time code reader on the
LCD panel under LTC EXTERN. Drop frame time code will have a semi colon between the frames and
seconds digits while non drop frame will show a colon. If the wrong mode is chosen ViVid will record for five
minutes, stop and will warn the operator. Another reel must then be created with the correct mode selected
and recording begun again. When you have chosen drop or non drop frame press OK.
9. Audio Mode Selection.
Select - MENU, DISK, AUDIO ON/OFF.
Page 11
11
10. Audio Sample Rate Selection.
Select - MENU, DISK, AUDIO RATE.
This MUST be done before any recording takes place as these values cannot be changed for the current Title
once audio has already been recorded in this Title.
5.2 PLAYBACK
1. Select the desired Title
Select - MENU, MASTER, TITLE.
Use the arrow keys to highlight the desired Title and then press OK.
Note: The ViVid will, on power-up, automatically default to the last Title and Reel open when the system was
shut down.
2. Set the Master playback reel.
Select - MENU,MASTER,REEL.
Use the arrow keys to highlight the desired Reel and then press OK.
3. Set EE Mode to OFF, so that the video can be seen in still frame when the transport is stopped.
Select - MENU,SRC,E-E
Select EE on stop.
4. Set the required number of fields in run, slow and still modes.
Select - MENU, MISC, DISPLAY
5. Configure the MFX3
plus
for optimum control performance.
(on the Fairlight MFX3
plus
) Select - Blue+Set-up M1
In audio is off, the bandwidth reserved for the audio will be assigned to video, allowing a slightly higher
quality image to be captured.
If audio is on, set the levels while in record. The left 4 buttons under the LCD panel are the input gain
controls. Pressing each button moves the Ch 1 or Ch 2 fader on the LCD screen to the left or right denoting a
decrease or increase in gain respectively.
Set Unlace to "Off" and Lace to "0 sec".
Tip: If the ViVid is being used with another control system, please consult the documentation supplied with
the system for optimum non-linear video operation settings.
6. Press play on your external controller.
Page 12

12
SECTION 6 - SHUTDOWN
1. Press the EJECT button on the front panel or the remote control device.
2. When the LCD shows “Are you sure you want to shut down this disk drive” press “Yes”.
3. When the LCD shows “Proceed to Shutdown”, press "OK".
4. When the LCD shows " IT IS NOW SAFE TO TURN OFF ViVid", turn off the power.
WARNING!
It is ESSENTIAL that the Shutdown procedure and power off be followed accurately or damage
to the unit may result. This is the only way to safely shut down the ViVid without damaging the
system.
ALWAYS allow 10 seconds after powering off the ViVid before powering it back on again.
NEVER turn off the disk drive using the key while the power is on, as damage to ViVid or its disk
drive may result.
NEVER run the unit without a media drive in place.
Page 13
13
SECTION 7 - FILE AND DISK MANAGEMENT
1. Deleting a Video Title.
Select - MENU, DISK, MANAGE DISK, ERASE TITLE.
Use the v and > keys to place the < > cursor over the desired title and press OK. ViVid will then ask you to confirm
your decision to delete the selected Title.
2. Deleting a Video Reel.
Select - MENU, DISK, MANAGE DISK, ERASE REEL.
Use the v and > keys to place the < > cursor over the desired Reel and press OK. ViVid will then ask you to confirm
your decision to delete the selected Reel.
WARNING!
Note: This process will delete all video and audio files in the selected Title or Reel
PERMANENTLY. To prevent the incorrect deletion of required video and audio material, please
choose carefully.
3. Formatting a Media Disk.
Select - MENU, MANAGE DISK,TIDY DISK, FORMAT DISK
This process may take between 15 and 20 minutes and may be used to prepare a new or existing ViVid disk to begin
a new series of projects, or to repair a disk that has been somehow damaged.
WARNING!
This process is irreversible and once formatted, all media files including all video and audio files
on this disk are Deleted! Use with caution!
4. Erasing all files on a Media Disk.
Select - MENU, DISK, MANAGE DISK, TIDY DISK, ERASE FILES.
Select this function to erase all files on a disk in one action.
WARNING!
This process is irreversible and once deleted all media files including all video and audio files on
this disk are lost FOREVER! Use with caution!
Page 14

14
defragmenting of the media disk is recommended for optimum performance.
5. Defragmenting a Media Disk.
Select - MENU, DISK, MANAGE DISK, TIDY DISK, DEFRAG DISK.
Use this function when the disk begins to show signs of fragmentation, eg: Black frames appearing in video, errors in
recordings, noise in audio playback. This can occur after a period of use where Titles are created and deleted. Regular
6. Boot Up Recovery options.
This function should only be used after consultation with your authorised Fairlight service technician.
If you suspect that your media disk or initialisation file may have been corrupted by power failure or similar mishap,
then after consulting with your authorised Fairlight service technician, holding the EJECT button on start-up of your
ViVid prompts you with an option to abort the Boot-Up process.
If you choose no, then the system will start normally. If you choose yes, then the following recovery options are
provided -
a) Format - This option formats your ViVid media disk completely and irreversibly deleting all media files from your
system.
b) Erase All - This option also completely and irreversibly deletes all media files from your system, but does so
without reformatting the disk. This is a quicker option but may not resolve a disk format problem.
c) Renew Config - This option replaces a corrupt system settings file with a fresh new copy.
Page 15
15
SECTION 8 - VIDEO DUBS USING THE MFX3
PLUS
It may be desirable to control a dub session between a source video tape machine and the ViVid using MFX3
plus
digital
audio workstation console. This is often an efficient way of working when a machine room containing the video
hardware is located a distance away from the studio containing the MFX3
plus
console.
8.1 CONNECTING THE EQUIPMENT
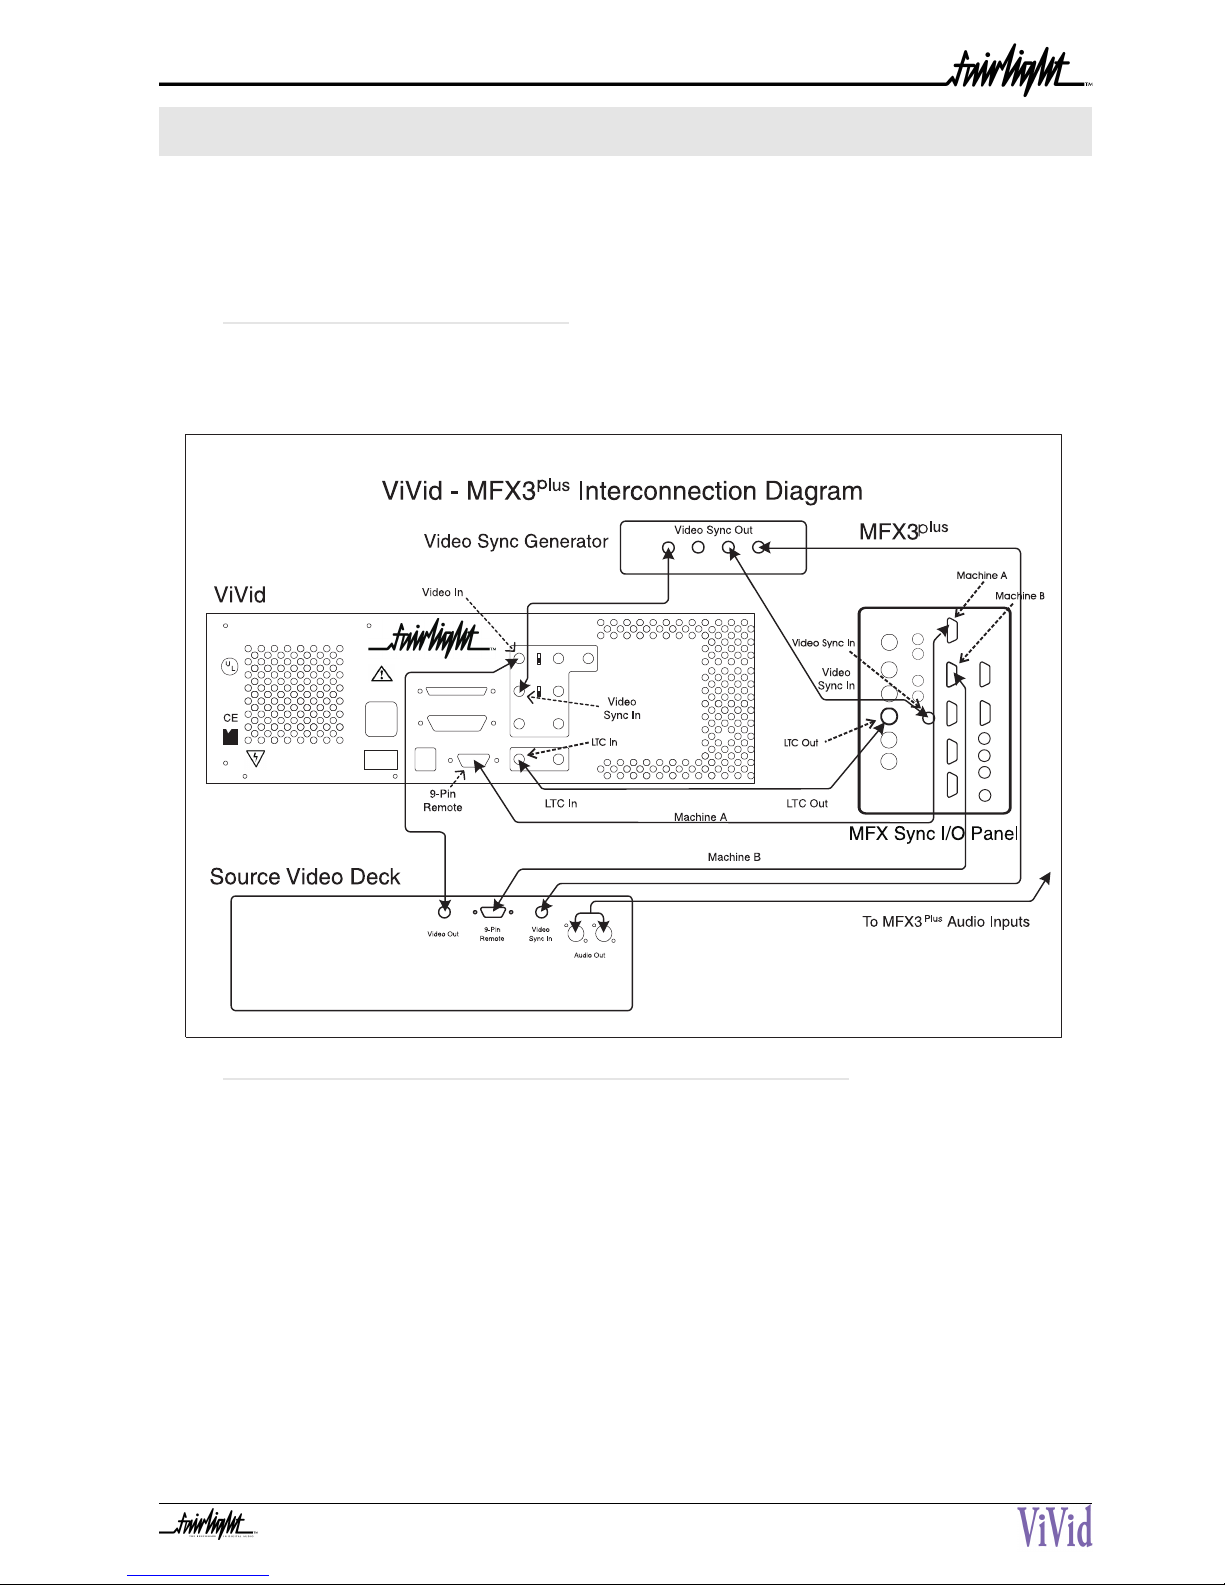
The four pieces of equipment, the ViVid , the MFX3
plus
, Video Sync Generator and the source video tape
deck should be connected as indicated in the diagram below -
8.2 CONFIGURING THE MFX FOR CONTROL OF BOTH DEVICES
Note: From here on, all selections and actions are to be carried out on the MFX3Plus console. For
information on configuring the ViVid's recording parameters, please consult the Recording section of this
manual.
Select - Blue+Set-up M1
Press the "Type" soft-key. Then turn the Jog wheel until the LCD beneath "Type" displays "Sony A".
Set "Lace" to Off and "Unlace" to 0 Sec.
Select - Blue+Set-up M2
Press the "Type" soft-key. Then turn the Jog wheel until the LCD beneath "Type" displays "Sony B".
Page 16

16
8.3 PREPARING THE VIVID FOR RECORDING
Select - M1
This will place the ViVid on-line.
Select - Blue+Set-up M1, Arm Trks 1-4
Select - Track 1
Select - Gen
Select - Record+Play
This will arm the ViVid in preparation for recording. ViVid will now switch to monitoring the video input, the
TC input to External, and put the ViVid in time code chase mode. The ViVid will appear as if it is recording,
but in reality it is simply recording the same frame of video into the same time code location until it receives
valid time code to chase.
Note: If the MFX3
plus
does not display a small red "V" on the screen in the area above the first audio track
number in your screen, then the ViVid may not have accepted the record command. Check to see if all the
steps had been followed correctly, then try re-selecting Record-Play until the "V" appears.
De-select - Gen
De-select - M1
This will take the ViVid off-line, and stop the MFX time code generator.
8.4 CUEING THE SOURCE MATERIAL
Select - M2
This will put the source deck on-line, and will allow you to locate the tape to the start of the video material
requiring transfer to the ViVid.
Note: Always allow a few seconds of pre-roll before the head of the material you wish to dub across. This
will assure you capture all the video needed.
8.5 DOING THE DUB
Now that the source video has been cued and the ViVid is awaiting time code, all that is required is for the
MFX3
plus
to send time code to the ViVid for it to begin recording.
Select - Play
Select - Gen
Starting the MFX3
plus
time code generator will allow the ViVid to begin recording. If required, you can wait
until a desired frame appears before hitting the Gen key to cue the source material on the fly. When the end
of the required vision has played, you can then stop playback.
It may also be necessary to record audio onto the MFX3
plus
at the same time as the video is being digitized to
the ViVid. In this case the steps to take are as follows -
Page 17
17
Select - Arm
Select - Track x, Track y (Where x and y are the tracks the incoming audio will appear.)
Select - Record+PLay
Select - Gen
Stop playback when the dub is complete.
8.6 PREPARATION FOR PLAYBACK ON VIVID
De-Select - M2
De-select - Gen
This will take M2 off-line, and stop the MFX3
Plus
from generating time code.
Select - M1
Select - Blue+M1
Select - Arm Trks A1-4
Select - Track 1
This dis-arms the ViVid tracks and takes it out of the dubbing mode.
Select - Edit
The ViVid is now ready for playback being controlled by the MFX3
plus
.
Note: Macros can be used to automate all these steps. Please consult your dealer for instructions on how to
record macros into your MFX3
plus
console.
Page 18

18
SECTION 9 - LCD MENU STRUCTURE
9.1 MAIN LCD SCREEN
LTC EXTERN ViVid records time code from the TIME CODE IN connector.
LTC INTERN ViVid resolves time code from an internal generator.
UB Displays the incoming user bits from the TIME CODE IN connector.
TC Displays the incoming time code from the TIME CODE IN connector.
Title Displays the current Title.
Src reel Displays the current source reel.
Standalone Indicates ViVid is in Standalone mode.
Mst reel Displays the current master reel being used by ViVid. Set this in the Master menu.
00:03:52:13 Displays the current time code position of ViVid.
DISK FREE Displays the amount of recording time available at the current data rate.
CHASE Indicates time code chase mode is active.
Audio OFF Indicates audio recording and playback has been disabled. Set in the Audio menu.
1 =|==== Ch 1 audio gain.
2 =|==== Ch 2 audio gain.
MENU Activates Main Menu
9.2 MAIN MENU (MAIN)
Master Displays the Master Time Setup Menu.
Src Displays the Source Setup Menu.
Disk Displays the Record Setup Menu.
Goto Displays the Goto Menu.
Misc Displays the Miscellaneous System Setup Menu.
EXIT Returns to the previous menu.
9.3 MASTER TIME SETUP (MASTER)
Title Displays the Select Title Menu.
Reel Displays the Select Master Reel Menu.
Frame Rate Enables selection of either 25, 30ND or 30DF frame rates.
EXIT Saves the chosen options and returns to the previous menu.
9.4 SELECT TITLE (TITLE)
New Displays an alphanumeric keyboard. Use the arrow keys to move between the characters.
Use SELECT to use the chosen character. Use RUB to delete the selected character.
OK Selects the highlighted Title and returns to the previous menu.
CANCEL Returns to the previous menu without changing the current Title.
9.5 SELECT MASTER REEL (REEL)
New Displays a numeric keyboard. Use the arrow keys to move between the characters.
Use SELECT to use the chosen character. Use RUB to delete the selected character.
OK Selects the highlighted Reel and returns to the previous menu.
CANCEL Returns to the previous menu without changing the current Reel.
9.6 SOURCE SETUP (SRC)
Ext / Int ViVid will record or reference to an internal or external time code source.
Chase Causes ViVid to chase timecode coming in the LTC input.
Video Input Selects either Composite or Y/C video input.
Video Ref Selects the Video signal to be used as Video Reference.
E-E E-E on stop displays incoming video on stop, EE-Disabled shows the picture from disk on stop.
EXIT Saves the chosen options and returns to the previous menu.
Page 19

19
9.7 DISK RECORD SETUP (DISK)
Factor Incr Toggles through the different data rates or Quality Factors used for recording video. The higher the
Quality Factor, the less recording time available on the disk.
Rec Fields Selects one field or two field record mode.
Audio On/Off Enables or disables audio recording.
Audio Rate Toggles the audio sample rate between 24kHz and 48kHz.
Manage Disk Displays the MANAGE DISK menu.
EXIT Saves the chosen options and returns to the previous menu.
9.8 MANAGE DISK
Erase Title Erases all data in a Title in preparation for a fresh job or to free disk space. This process is irreversible.
Erase Reel Erases all data in a Reel in preparation for a fresh job or to free disk space. This process is irreversible.
Tidy Disk Displays the Tidy Disk menu.
EXIT Saves the chosen options and returns to the previous menu.
9.9 TIDY DISK
Format Disk Performs a complete format of the Media Disk, erasing all files in preparation for a fresh job or to free
disk space.This process is irreversible.
Erase Files Erases all media files from the Media Disk in preparation for a fresh job or to free disk space. This
process is irreversible.
Defrag Disk Performs a defragmentation operation on the Media Disk, ensuring optimum performance.
EXIT Returns to the previous menu.
9.10 GOTO
Goto Start Locates the ViVid to the first frame of video recorded in the current reel.
Goto End Locates the ViVid to the last frame of video recorded in the current reel.
Goto Timecode Locates the ViVid to a user defined frame of video in the current reel. Use the arrow keys to move
between the numbers in the timecode display and then use the + and - keys to set the desired value.
Press OK to goto the displayed timecode location.
EXIT Returns to the previous menu.
9.11 MISCELLANEOUS SYSTEM SETUP
Loop Allows the selection of a start and end time for loop playback, enables / disables this mode.
Display Fields Allows the selection between field mode and frame mode for still or slow modes.
LTC Offset Applies a user definable offset to incoming timecode.
System Info Displays the System Info Menu
9.12 SYSTEM INFORMATION
9-pin Device Type Toggles between faal (ViVid is controlled by MFX) and 2152 (Sony Betacam emulation)
Software Version Information only
EXIT Returns to previous menu.
Page 20
20
SECTION 10 - VIVID QUALITY FACTOR TIME CHART
This chart can be used to calculate record times for ViVid media disks which inclused the piture and audio data.
Please note that Audio is not included in the chart. ViVid supports a Max data rate of 4MBs.)
Page 21
21
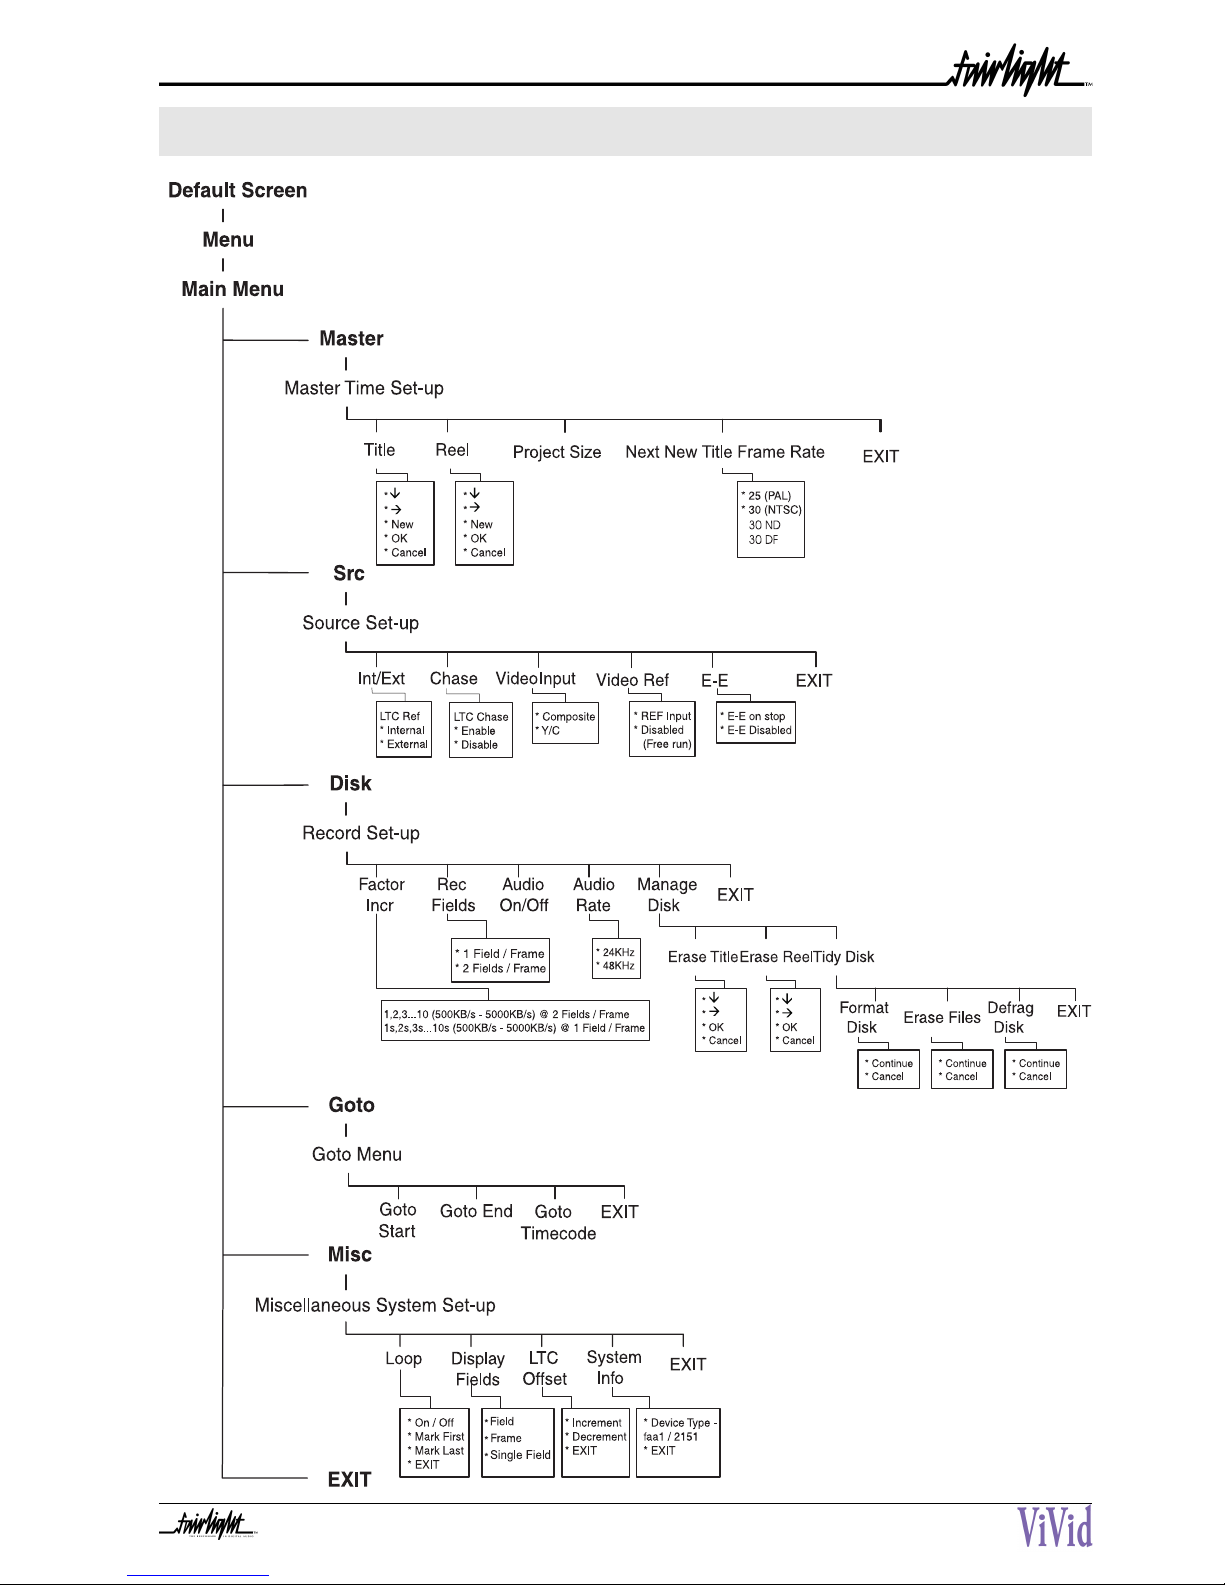
SECTION 11 - VIVID MENU TREE
Page 22

22
INDEX
A
AUDIO ON/OFF .......................................................................... 19
C
CHASE ........................................................................................... 18
COMPATIBILITY ............................................................................... 6
CONFIGURING THE MFX .......................................................... 15
D
DEFRAGMENTING A MEDIA DISK............................................ 14
DELETING A VIDEO REEL .......................................................... 13
DELETING A VIDEO TITLE .......................................................... 13
DEVICE TYPE 9-PIN ...................................................................... 19
DISK .............................................................................................. 18
DISK DRIVE FORMAT ..................................................................... 6
DISK FREE ..................................................................................... 18
DISPLAY FIELDS .......................................................................... 19
E
EJECT ................................................................................................8
ERASE REEL .................................................................................. 19
ERASE TITLE .................................................................................. 19
ERASING ALL FILES ON A MEDIA DISK ................................... 13
EXIT ............................................................................................... 18
EXTERNAL TIMECODE ................................................................ 18
F
FACTOR INCR .............................................................................. 19
FF ...................................................................................................... 8
FIELD MODE ................................................................................ 19
FORMATTING A MEDIA DISK .................................................... 13
FRAME MODE .............................................................................. 19
FRAME RATE ................................................................................. 18
G
GOTO .................................................................................... 18, 19
GOTO END .................................................................................. 19
GOTO START ................................................................................ 19
GOTO TIMECODE ....................................................................... 19
L
LCD PANEL...................................................................................... 7
LOOP ............................................................................................ 19
LTC EXTERN.................................................................................. 18
LTC INTERN .................................................................................. 18
LTC OFFSET .................................................................................. 19
M
MACROS ....................................................................................... 16
MAIN LCD SCREEN ..................................................................... 18
MAIN MENU ................................................................................ 18
MANAGE DISK ............................................................................. 19
MASTER ........................................................................................ 18
MASTER TIME SETUP................................................................... 18
MENU ........................................................................................... 18
MISC .............................................................................................. 18
MST REEL...................................................................................... 18
N
NEW - TITLE / REEL ...................................................................... 18
P
PLAY ................................................................................................. 8
PLAYBACK ..................................................................................... 11
R
REC FIELDS................................................................................... 19
RECORD SETUP ........................................................................... 19
RECORDING AND PLAYBACK FUNCTIONS ............................... 6
REEL .............................................................................................. 18
S
SELECT MASTER REEL ................................................................. 18
SELECT TITLE ................................................................................ 18
SHUTTLE MODE ............................................................................ 8
SOFTWARE VERSION .................................................................. 19
SOURCE SETUP ........................................................................... 18
SRC ................................................................................................ 18
SRC REEL ...................................................................................... 18
STANDALONE .............................................................................. 18
STOP ................................................................................................ 8
SYSTEM INFORMATION ............................................................. 19
T
TC ................................................................................................... 18
THE FRONT PANEL ........................................................................ 7
TIDY DISK ..................................................................................... 19
TITLE ............................................................................................. 18
U
UB .................................................................................................. 18
Page 23

23
V
VIDEO INPUT
18
VIDEO REF
18
W
WARRANTY POLICY
 Loading...