

P/N:4.04.000036
vCam-5
Quick Guide V1.2
Standard package includes:
- SD card
- USB thumb drive
- Ethernet cable
- 12V DC power cord
- AC power cord
- camera removal tool
- skid hex wrench
- CD with user handbook & software
- tool carry pouch
Refer to the user manual for detailed instructions, safety and care
information.
Fuse – Make sure the 10A-250V fuse is installed in the fuse
compartment on the back of the unit.
Vivax-Metrotech Corporation (USA)
3251 Olcott Street, Santa Clara, CA 95054, USA
T/Free: 800-446-3392 Tel: +1-408-734-1400
Fax: +1-408-734-1415 Email: sales@vxmt.com
Vivax-Metrotech Ltd. (UK)
14-15 Bishops Court Gardens, Bishops Court Lane,
Clyst St. Mary, Exeter, Devon, EX5 1DH, UK
Tel: +44(0)1392-368833 Email: salesUK@vxmt.com
Vivax Canada Inc. (Canada)
41 Courtland Ave Unit 6, Vaughan, ON L4K 3T3, Canada
TEL: +1-289-846-3010 Fax: +1-905-752-0214
Email: CanadianSales@vxmt.com
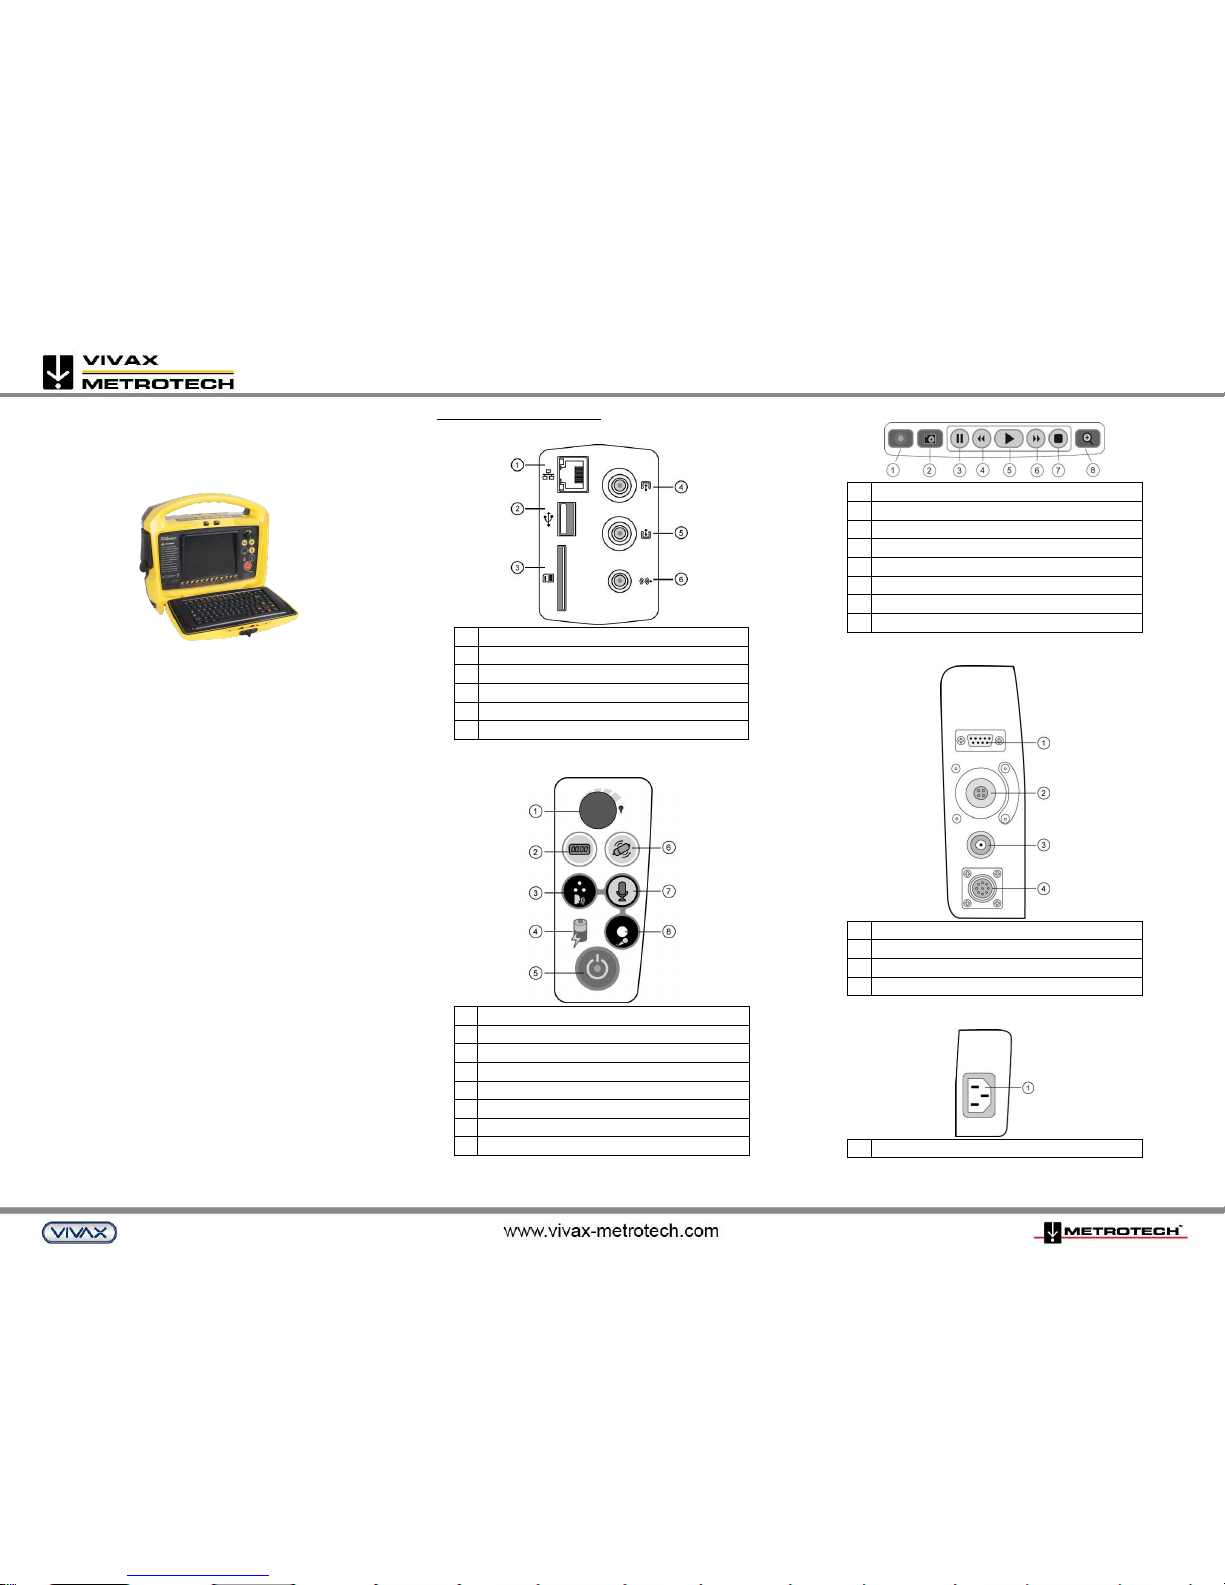
Control Module Interface
Media Ports (left side)
1
RJ45 Ethernet Port
2
USB Port
3
SD Card Slot
4
Video Input Socket
5
Video Output Socket
6
Audio Out Socket
Main Controls (front panel)
1
LED Dimmer Control
2
Distance Counter Reset*
3
Internal Microphone
4
Battery Charging Indicator
5
Power On/Off
6
Sonde On/Off
7
Microphone On/Off
8
External Microphone Socket
*Note that it is important that you verify the actual position and depth with a
Sonde Locator or Pipe & Cable Locator before excavating pipe.
Video Recording/Playback Controls
1
Start / Stop Video Recording
2
JPEG Snapshot Capture
3
Pause Video Recording or Playback
4
Rewind Video Playback
5
Play Video
6
Fast Forward Video Playback
7
Stop Video Recording or Playback
8
Digital Zoom
Power/Interconnect Sockets (right side)
1
RS232 Data Port
2
Camera Head Test Port
3
External 12V DC Power (IN) Socket
4
Reel Interconnect Cable Socket
AC in Power Socket (bottom left side)
1
AC Power (IN) Socket

P/N:4.04.000036
Mounting the Control Module
1. Line up the control module‘s mounting pins(a) to the open
slots on the reel mounting plate.
2. Lower the control module into the reel mounting plate(b)
3. Standing in front of the control module, push the bottom of
the control module backwards until the control module
locks in place.
NOTE
Do not use the Control Module as a handle to move the reel.
Move the reel only by the reels handle.
Using the Reels
Cage Lock - Unlock the cage lock by pulling the T-knob
(B), turning it a ¼ turn and releasing so pin falls into
keyed slot (C)
Friction Brake - Set the friction brake (A) to slow the
movement of the cable rod drum.
Cable Guide – Turn the reel so that
the push rod goes through the
cable guide.
Keyboard Function Keys
Keys
Function
Description
ESC
Menu step back
and clear text
Returns to the previous
screen or clears text from the
screen
F1 Help
Help
Control Module help and
information
F2 Info
On screen
Distance, Date
and Time
Toggles information position
on screen. Bottom, Top, Off.
Ctrl-F2
Information Color
Changes the text color of the
on screen Distance
Ctrl-F3
Text Writer On/Off
Turns the text writer on and
off
F3
Text Color
Changes the text writer font
color
F4
Background Color
Changes the background
color of the text writer
F5
Recall Saved
Page
Recall a saved pages from
memory
F6
Save Page
Save current page to memory
F7
Delete Page
Delete current page from
memory
F8
Delete All Pages
Delete all saved pages from
memory
F9
Display Setting
Adjust LCD display settings
F10
Menu
Access File and Setup Menus
F11
Font
Toggles through different text
fonts
F12
Wi-Fi On/Off
Turns Wi-Fi on and off
Basic Functions
Video Recording:
1. Press to start recording.
2. Press to stop recording and return to live camera.
Snapshot Recording:
1. Press the camera key to take snapshots when viewing
or recording from the camera or during video playback.
Zooming:
1. Press to activate zoom window
2. Use the arrow keys to select area to zoom, then press
enter.
3. Repeat these steps to use 3 levels of zoom.
vCam-5 Menu Navigation
Use the F10 Menu key to open the “File Menu”. Use the
Left/Right arrow keys to move through the various
menu sections.
Use the Up/Down arrow keys to select files or actions.
To select multiple files to copy, move or delete, highlight
the file and press the Enter Key to check off multiple files.
Note that only 6 files can be copied, moved or deleted at
one time on the same file page.
Press the ESC key at any time to go back to the
previous menu selection and main menu.
Video Playback and Viewing Snapshots
Press Menu key to bring up the File Menu.
Use up/down keys to select Video, Picture or All Files,
right arrow to video or picture file list, use down arrow to
highlight video to play or picture to view, right arrow to
Play and press Enter or use right arrow to play or view.
Copy, Move or Delete Videos and Pictures
Insert a USB stick or SD card into the media port on left
side of control module.
Follow the above Menu Navigation instructions but for
the last step select Copy, Move or Delete as the action.
A progress indicator will appear on the screen showing
the time remaining for the file copy, move or deletion.
Wait until the progress indicator goes away AND the
main file menu is displayed before removing the USB
stick or SD card.
NOTE
Copy = Makes a copy of the video or picture on a USB stick or
SD card. The original still remains on the hard drive.
Move = Moves the file from the hard drive to the USB stick or
SD card. No file remains on the hard drive.
Delete = Deletes the file from the hard drive.
TIPS
It is not recommended that the internal hard
drive is used for long term storage. It is good
practice to do regular backups and transfer of
videos and pictures to an external storage
device or office/home computer.
Disclaimer: Product and accessory specification and availability information is
subject to change without prior notice.
 Loading...