

Page 1
en fr
5
480
5
26
55
19
55
18,5
17,6
Page 2
a
b
a
b
Page 3
Ø max.
12,4
Page 4

10
Page 5

en
All installation, regulation and adaptation to
other types of gas must be carried out by an
authorised installation technician,
respecting all applicable regulations,
standards and the country's electrical and
gas supply companies' specifications.
It is recommended that you call our
Technical Assistance Service for adaptation
to other types of gas. Before you begin, turn
off the appliance's electricity and gas supply.
(see
table I).
The chipboard used to make the worktops
2-
tends to swell quite quickly when it comes into
contact with moisture. Thus we recommend
treating the cut edges with a special glue, to
protect them from steam or any condensation
that might drip down beneath the cooker
unit's work surface.
Depending on the model, the clips and the
watertight seal (lower edge of the cooking hob)
may already be fitted; if this is the case, do not
remove them under any circumstance.
The seal ensures that the entire work
surface will be watertight, and prevents water
seepage.
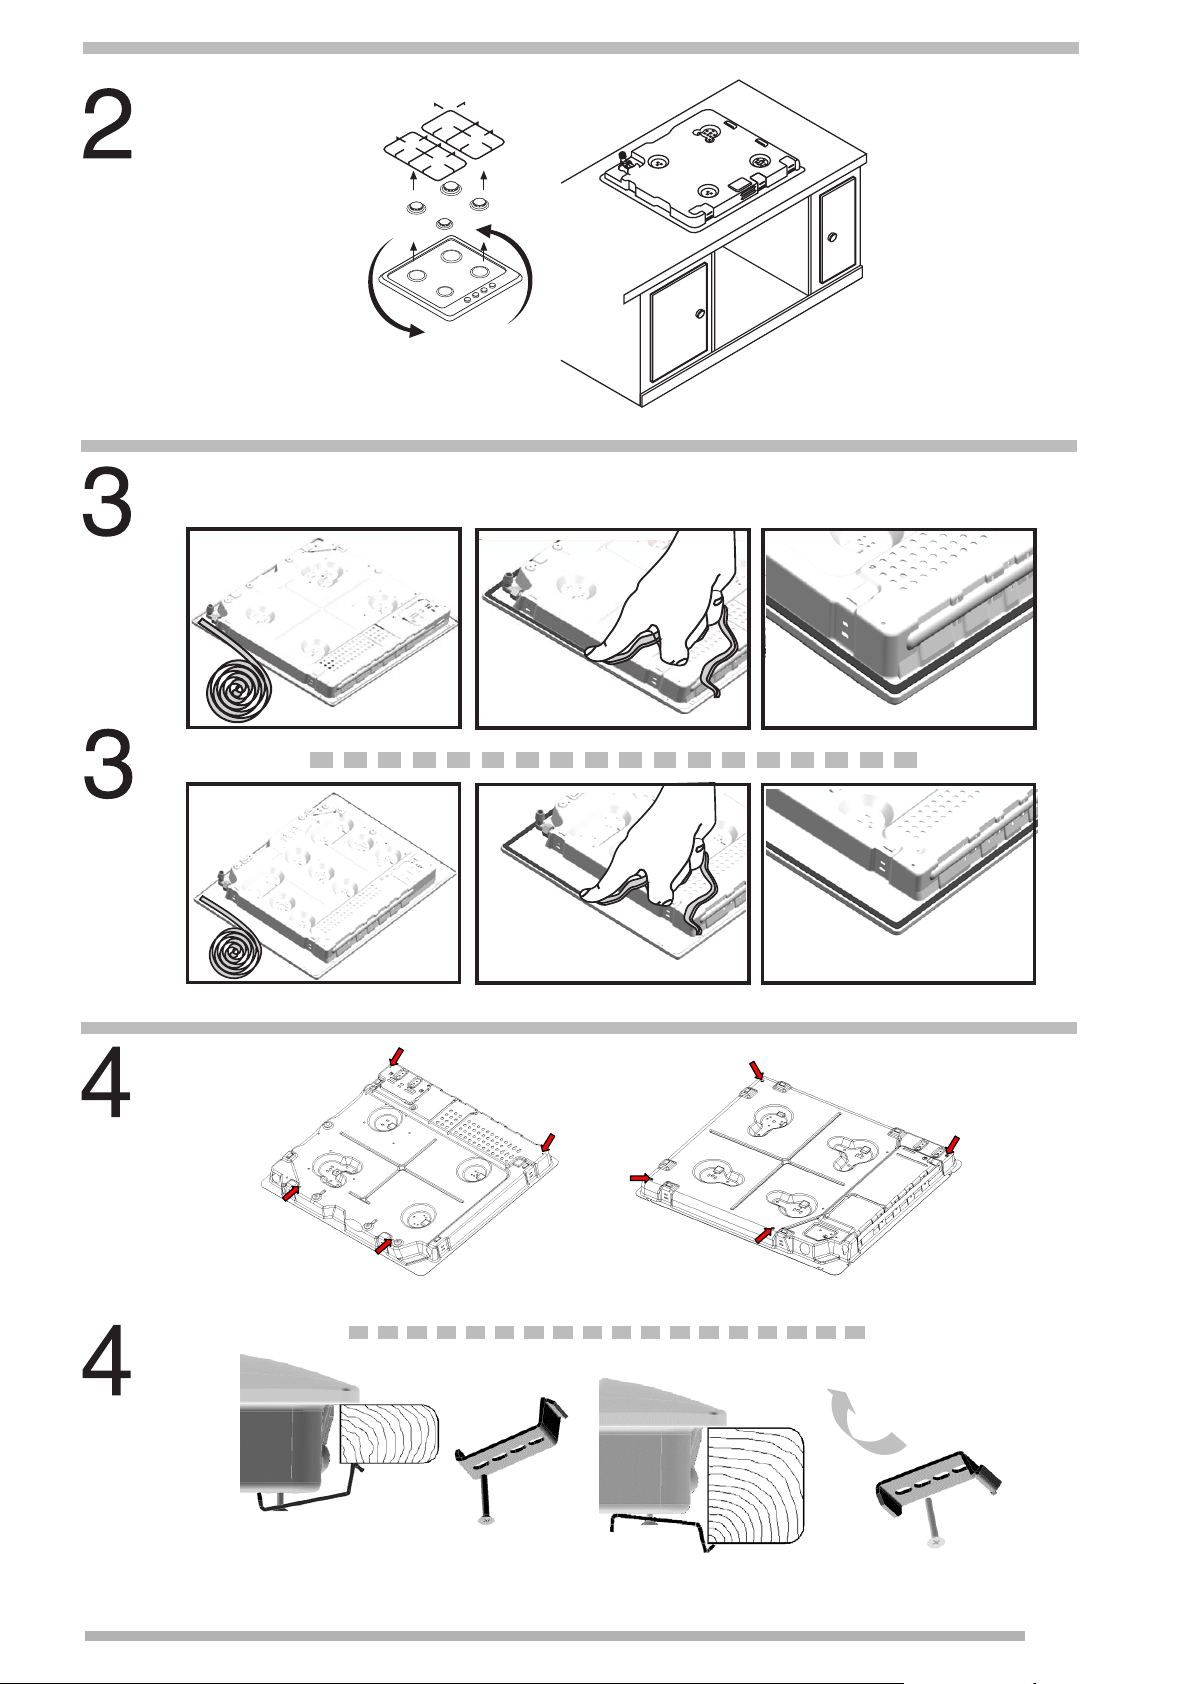
If this item has not been fitted in the factory,
remove the pan supports and the gas burner
covers and diffusers from your cooking hob,
and turn it upside down.Fig. 2. Now fit the
adhesive seal supplied with the appliance
onto the lower edge of the cooking hob,
Fig. 3a/3b,remove the clips from the attached
accessories bag and screw them into the lower
points designed for this purpose, Fig. 4a.
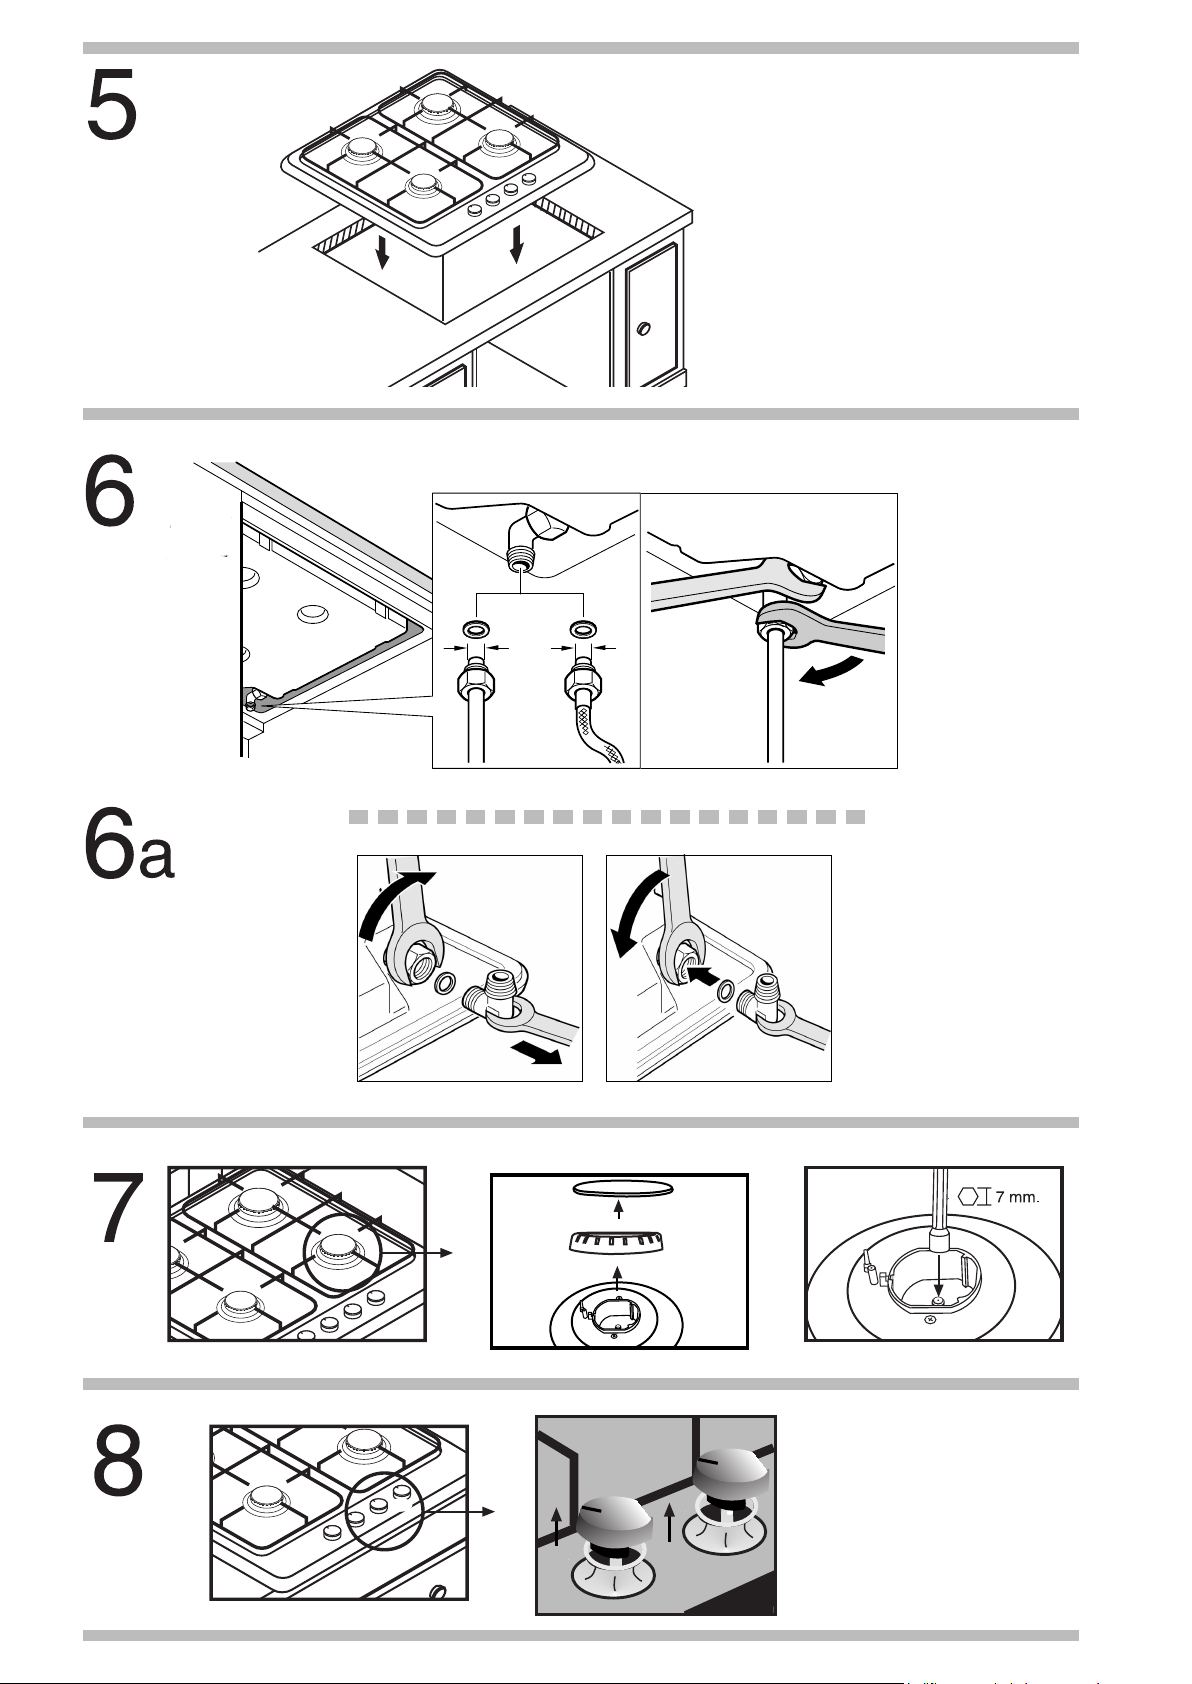
Press down on the hob edges to ensure
that the cooking hob is supported all the way
round Fig. 5.
Once the hob is fitted you should turn the clip
and tighten the screw as shown in Fig. 4b.
-
3
For disassembly, unscrew the clip and
proceed in the reverse manner
(20,955 mm)
.
All installation, regulation and adaptation to
other types of gas must be carried out by an
authorised installation technician,
respecting all applicable regulations,
standards and the country's electrical and
gas supply companies' specifications.
It is recommended that you call our
Technical Assistance Service for adaptation
to other types of gas. Before you begin, turn
off the appliance's electricity and gas supply.
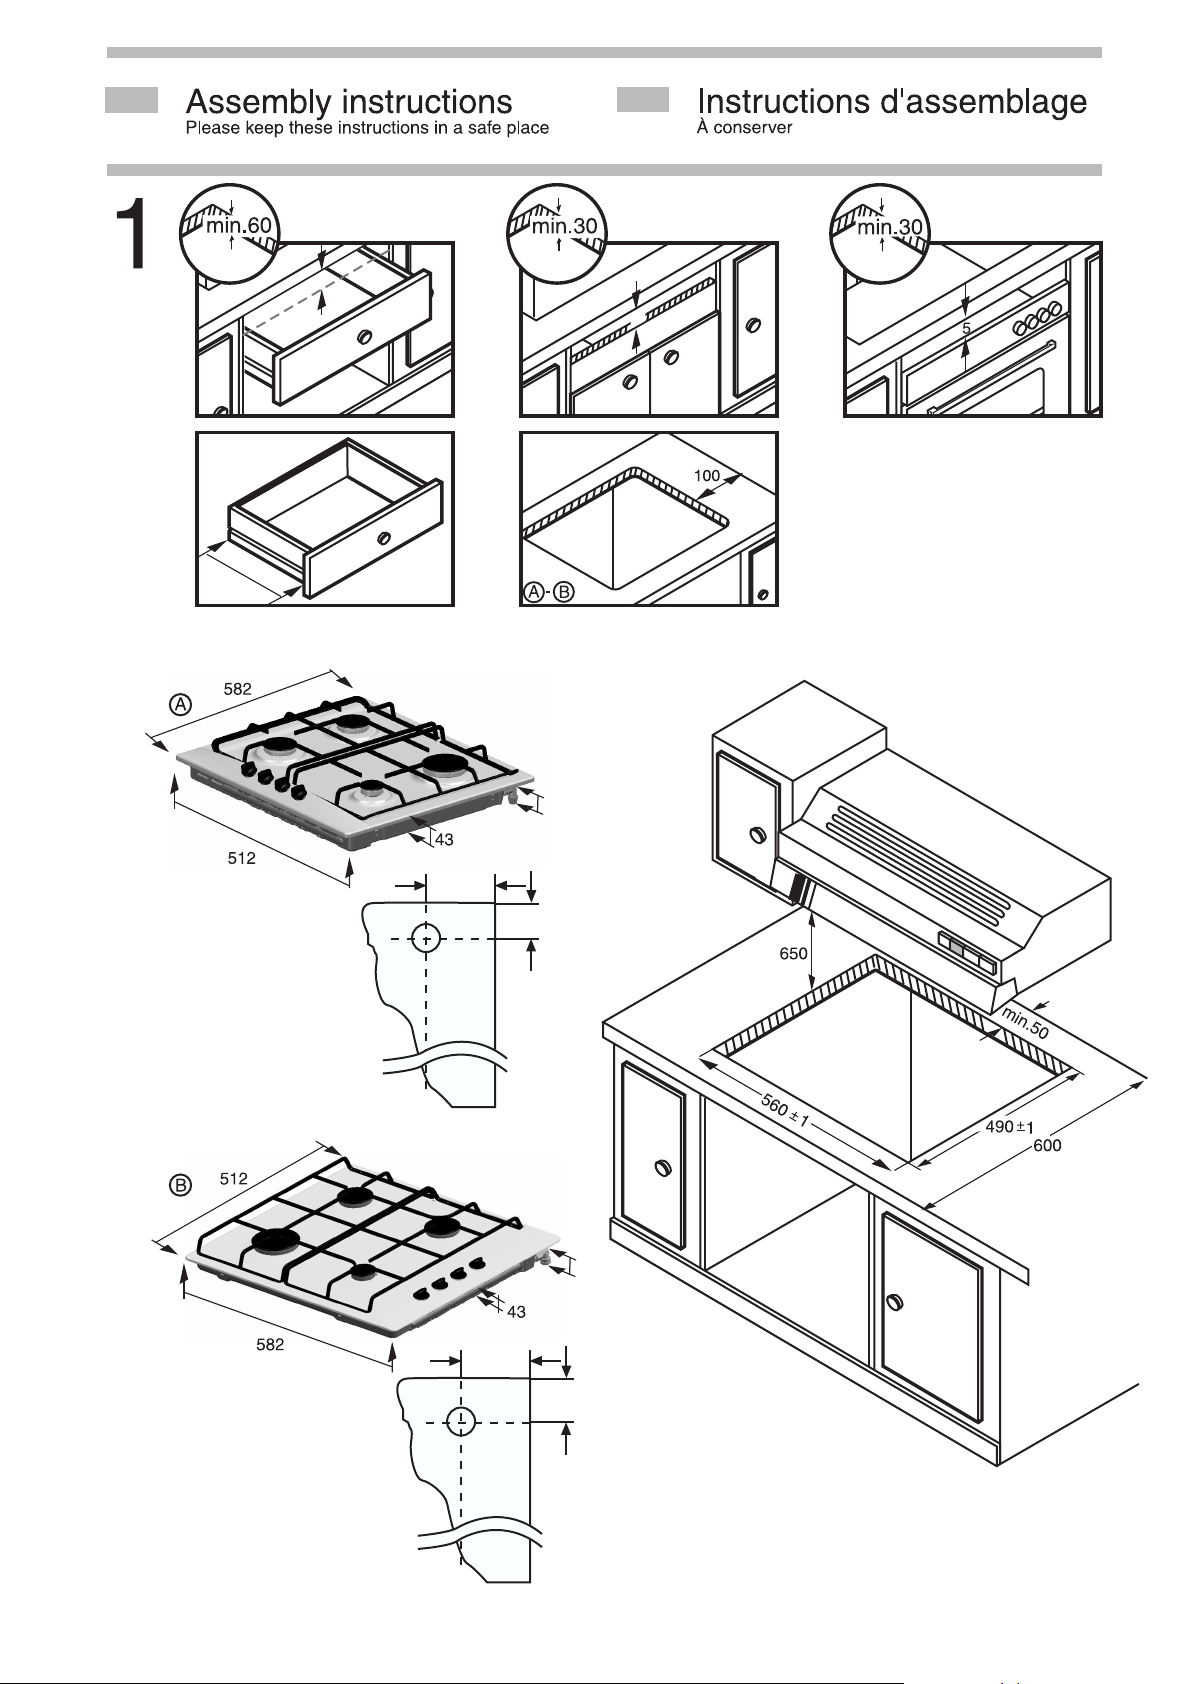
If no oven is installed under an electrical or
mixed (gas and electric) hob, place a
separator of non-flammable material e.g.
plywood or metal at a distance of 10 mm.
from the bottom of the hob to prevent access
to the lower part of the hob.
If no oven is installed under a gas hob, it is
suggested to place a separator of nonflammable material e.g. plywood or metal at
a distance of 10 mm. from the bottom of the
hob to prevent access to the lower part of the
hob.
In the event that a drawer is located beneath
the appliance, please make sure that the
drawer contains no heat-sensitive or easily
combustible objects, such as spray cans or
shoe polish. Use a heat-resistant utility drawer
only.
If the cooking hob is to be installed above
an oven, check that the oven is fitted with
power
ventilation, and check the dimensions
according
to the assembly manual.
(L min. 1m - max. 3m).
(see table II)
It has a flexible rubber seal. Simply
apply pressure with the tip of the screwdriver
to release the thread toward the tap´s
adjusting screw. Fig. 9.
(fig. 10):
Page 6

Tous les travaux d'installation, de réglage et
d'adaptation à un autre type de gaz doivent
être réalisés par un technicien habilité qui
doit respecter les normes et la législation
applicables, ainsi que les prescriptions des
sociétés locales fournisseuses d'électricité
et de gaz.
Il est recommandé d'appeler le Service
Technique pour l'adaptation à un autre type
de gaz.
Avant toute action, coupez l'alimentation
électrique et de gaz de l'appareil.
Avant de connecter l'appareil à l'installation,
il faut vérifier qu'il s'adapte au type de gaz qui
l'alimentera
Nos tables de cuisson sont préparées en usine
pour fonctionner avec le type de gaz indiqué
sur la plaque signalétique.
(voir tableau I).
2- Les fibres en bois utilisées pour la
confection des plans de travail, en entrant au
contact de l'humidité, gonflent assez rapidement.
C'est pourquoi il est conseillé de vernir avec
une colle spéciale les surfaces de découpe,
afin de les protéger de la vapeur ou de l'eau
condensée qui pourrait se déposer sous la
table de travail du meuble de cuisine.
Selon le modèle, les agrafes et le joint
d'étanchéité (bord inférieur de la table de
cuisson) peuvent être fabriqués d'usine ; si
c'est
le cas, il ne faut jamais les retirer.
Le joint garantit l'imperméabilisation de
toute lasurface de travail et évite les infiltrations.
S'il n'est pas placé d'usine, retirez les grilles,
les couvercles des brûleurs et les diffuseurs de
votre table de cuisson puis placez-la à l'envers,
Fig 2, placez le joint autocollant fourni avec
l'appareil sur le bord inférieur de la table de
cuisson, Fig. 3a/3b, retirez les agrafes de la
poche des accessoires jointe puis vissez aux
points inférieurs préparés à cet effet. Fig. 4a.
Pressez les extrémités de sorte que la
table de cuisson s'appuie sur tout son
périmètre, Fig. 5.
Vous devrez, quand le plan de travail aura
encastré, tourner l'agrafe et visser très
été
fort
comme l'indique la Fig. 4b.
Si son démontage est nécessaire,
3 -
dévisser l'agrafe et procéder de la manière
inverse.
Tous les travaux d'installation, de réglage et
d'adaptation à un autre type de gaz doivent
être réalisés par un technicien habilité qui
doit respecter les normes et la législation
applicables, ainsi que les prescriptions des
sociétés locales fournisseuses d'électricité
et de gaz.
Il est recommandé d'appeler le Service
Technique pour l'adaptation à un autre type
de gaz.
Avant toute action, coupez l'alimentation
électrique et de gaz de l'appareil.
fr
Si aucun four n'est inst
cuisson
électrique ou mixte
placez un séparateur en matériau
ininflammable, par exemple en contreplaqué
ou métal à une distance de 10 mm du bas de
la table de cuisson pour éviter d'accéder à la
partie inférieure de la table de cuisson.
Si aucun four n'est installé sous une table de
cuisson à gaz, il est conseillé de placer un
séparateur en matériau ininflammable, par
exemple en contreplaqué ou métal à une
distance de 10 mm du bas de la table de cuisson
pour éviter d'accéder à la partie inférieure de
la table de cuisson.
Si un tiroir est placé sous l'appareil, assurezvous que le tiroir ne contient pas d'objets
sensibles à la chaleur ou facilement
combustibles, tels que des aérosols ou du
cirage. N'utilisez qu'un tiroir réalisé en matériaux
résistant à la chaleur.
Pour l'installer sur un four, vous devez
vérifier qu'il possède une ventilation forcée et
vérifier aussi les dimensions selon le manuel
de montage. Centrez la table de cuisson dans
son creux aveugle d'encastrement dans le
meuble.
allé sous une table de
(gaz et électrique),
(20,955 mm)
(L min. 1m - max. 3m).
(voir tableau II)
(fig. 10):
Page 7

∑
,
∑
,
(
)
(g
)
(g
)
I
WV~Hz
/h
G31
/h
G30
G20
m3/h
G31
Qn (kW)
G30
G25
Qn (kW)
G20
VVK26G2120 HSE-6RA4010 7,50 7,50 0,715 544 535 0,6 W 230 V~ 50 Hz
VVK26G2150 HSE-6RA4010 7,50 7,50 0,715 544 535 0,6 W 230 V~ 50 Hz
VVK26G2160 HSE-6RA4010 7,50 7,50 0,715 544 535 0,6 W 230 V~ 50 Hz
0,715 544 535 0,6 W 230 V~ 50 Hz
7,50
VVK26G2220 HSE-6RA4030 7,50
0,715 544 535 0,6 W 230 V~ 50 Hz
7,50
VVK26G2250 HSE-6RA4030 7,50
0,715 544 535 0,6 W 230 V~ 50 Hz
7,50
VVK26G2260 HSE-6RA4030 7,50
VVK26G3250 HSE-6FB4030 7,50 7,50 0,715 544 535 0,6 W 230 V~ 50 Hz
COUNTRIES/GASES GAS ADJUSTED MODEL TYPE
G-20/20 mbar ERDGAS / ERDGAS E /
NATURGAS / GAS NATURAL /
MAAKAASU NATURGAS / Φυοικ_αεοιο /
NATURAL GAS / GAS METANO / GAS
NATUREL / GAZ ZIEMNY
G-20/G-25-20/25 mbar AARDGAS / GAZ
NATUREL LACQ
2H3B/P
20-30
II
EE/LT/SI/CZ/SK
2H
20
LV
I
2E
20
LU
I
PT
2H3+
II
20-30/37
2H3+
II
20-28/37
ES/GB/GR
2E+3+
BE/FR
II
20/25-28-30/37
Cat.
P(mbar)
G-20/20 mbar ERDGAS / ERDGAS E /
ES/GB/GR/IE
BE/FR
AT/DK/FI/SE/LV
NATURGAS / GAS NATURAL /
MAAKAASU NATURGAS / Φυοικ_αεοιο /
NATURAL GAS / GAS METANO / GAS
NATUREL / GAZ ZIEMNY
2H3+
II
20-28/37
EE/LT/SI/CZ/SK
2E+3+
DE/LU
II
20/25-28-30/37
2H
20
I
IT/PT
Cat.
P(mbar)
G-20/G-25-20/25 mbar AARDGAS / GAZ
NATUREL LACQ
2H3B/P
20-30
II
2E
20
I
2H3+
II
20-30/37
Cat.
P(mbar)
Page 8

II
GAS mbar Qn (Kw) m3/h g/h Qr (kW)
G20 20 72 1,00 0,095 - 27 0,33
G30 29 50 1,00 - 73 27 0,33
G31 37 50 1,00 - 71 27 0,33
G20 20 3 0,286 G30 29 85 3 - 218
G31 37 85 3 - 214 39 0,6
G20 20 100 1,75 0,167 G30 29 67 1,75 - 127
G31 37 67 1,75 - 125 30 0,41
G20 20
G30 29
G31 37 97 3,60 - 257 53 1,26
G20 20
G30 29
G31 37 78 2,30 - 164 53 1,26
134
140 3,60
97 3,60
115 2,50
78 2,30
0,343
- 261
0,238
- 167
39
39
30
30
- 53 1,26
53 1,26
- 53 1,26
53 1,26
0,5
0,6
0,35
0,41
9000275175 H
 Loading...