

Vitus Audio MP-L201 Owner's Manual

MP-L201
Owner’s Manual

2
MP-L201 | Version 1
on a personal note
Certificate . . . . . . . . . . . . .4
from the creator
Foreword . . . . . . . . . . . . . . 5
introduction
About this manual . . . . . . . . . 6
Introduction to
the Masterpiece Series . . . . . . . 6
1. getting started
Unpacking the box MP-L201 . . .8
What’s in the box . . . . . . . . . . 8
MP-L201 device overview . . . . . 9
Unpacking the box MP-PSU . . . 10
What’s in the box . . . . . . . . . 10
MP-PSU device overview . . . . 11
The topology of
the volume control. . . . . . . . 12
2. connecting
Turning the MP-L201 on and off. 13
Connecting the MP-L201 . . . . 14
MP-L201 rear panel . . . . . . . 15
MP-PSU rear panel . . . . . . . . 15
3. operation
Operation modes . . . . . . . . 18
Functions – MP-PSU front panel 19
Functions – MP-L201
left front panel . . . . . . . . . . 20
Functions – MP-L201
right front panel . . . . . . . . . 21
MP-L201 Menu: introduction . . 22
MP-L201 Menu:
discription of the elements. . . . 24
4. operation & service
Safety notice . . . . . . . . . . . 26
Mains supply voltage . . . . . . 26
Maintenance . . . . . . . . . . . 26
Mains fuses . . . . . . . . . . . . 27
Replacing a blown fuse . . . . . 28
5. warranty
Warranty . . . . . . . . . . . . . 30
6. specifications
MP-L201 Specifications . . . . . 33
All rights reserved. No part
of this publication may be
reproduced, stored in or
introduced into a retrieval
system, or transmitted in
any form, or by any means
(electronic, mechanical,
photocopying, recording
or otherwise) without the
prior written permission of
Vitus Audio. Any person who
does any unauthorized act
in relation to this publication
may be liable to criminal
prosecution and civil claims for
damages.
Information contained in this
manual is subject to change
without notice, and whilst it
is checked for accuracy, no
liabilities can be accepted for
errors.

3
MP-L201 | Version 1
table of contents
7. examples operation
Example 1 . . . . . . . . . . . .34
Example 2 . . . . . . . . . . . . 35
Example 3 . . . . . . . . . . . . 36
Example 4 . . . . . . . . . . . .37
Example 5 . . . . . . . . . . . .38
Example 6 . . . . . . . . . . . .39
Example 7 . . . . . . . . . . . .40
Example 8 . . . . . . . . . . . .41
Example 9 . . . . . . . . . . . .42
Example 10 . . . . . . . . . . . . 43
Example 11 . . . . . . . . . . . . 44
Example 12 . . . . . . . . . . . . 45
7. examples connecting
devices
Connecting devices . . . . . . . 46
8. RC-010 system
remote
RC-010 System Remote . . . . .49
8. RC-010 getting
started
What’s included . . . . . . . . .50
RC-010 System Remote Device
overview. . . . . . . . . . . . . . 51
8. RC-010 operation
RC-010 System Remote operation
modes . . . . . . . . . . . . . . . 52
The menu structure . . . . . . .57
RC-010 Discription of
the elements in the menu. 58
RC-010 The menu structure . . . 59
8. RC-010 examples
Examples Setup . . . . . . . . .60
Example 1 . . . . . . . . . . . . . 61
Example 2 . . . . . . . . . . . . . 62
Example 2.1 . . . . . . . . . . . . 62
Example 2.2 . . . . . . . . . . . . 63
Example 2.3 . . . . . . . . . . . . 64
Example 2.4 . . . . . . . . . . . . 65
Example 2.5 . . . . . . . . . . . . 66
Example 3 . . . . . . . . . . . . . 67
Example 4 . . . . . . . . . . . . . 68
Example 5 . . . . . . . . . . . . . 69
Example 6 . . . . . . . . . . . . . 70
Example 7 . . . . . . . . . . . . . 71
8. RC-010 specifications
Specifications . . . . . . . . . . . 72
8. RC-010 controls
The functions of the buttons for
the different products. . . . . . . 73
The RC 5 codes for the remote.
Decimal . . . . . . . . . . . . . . 74
The RC 5 codes for the remote.
Hexadecimal . . . . . . . . . . . 75
9. pictures
MP-L201 Inside view . . . . . . . 76
MP-PSU Inside view . . . . . . .77
MP-L201 Front view . . . . . . .78
RC-010 Front view . . . . . . . .79

4
MP-L201 | Version 1
on a personal note
Certificate
Model: MP-L201
Product ID/Serial
__________________________________
Product Build Date
__________________________________
Signed
__________________________________
All products details, specifications and
measurements are recorded for your MPL201 and kept by Vitus Audio.

5
MP-L201 | Version 1
from the creator
Foreword
First of all, thank you for
choosing the Vitus Audio
MP-L201 Line Stage, we
are sure you will enjoy it for
many years to come. When
purchasing a Vitus Audio
product, you are guaranteed
a musical performance,
which exceeds the current
musical standards. Vitus
Audio is dedicated to musical
performance rather than
technical details and high
performance measures.
We believe that many
manufactures are blinded by
the current available theory,
instead of looking for new
answers.
At Vitus Audio everything
works until proven not to.
This way we always try to
push the limits and explore
the unexplored. As a result
of this, many of the solutions
we use today are considered
to be “impossible to ever
get working”,however they
have convinced many people
and reviewers world wide
of the opposite. Before any
of our new topologies are
implemented in our products,
they are carefully reviewed by
our dedicated listening panel.
This way we can guarantee
the correct level of musically
performance and robustness.
Generally we’re after super
neutral, super detailed and
super dynamic reproduction
without “loosing” the nerve
in the music which often is
a drawback of many high
end amplifiers. Our real
strongholds are complete
silence, unbelievable depth
and width in the soundstage
resulting in a far more open
sound with higher resolution
-you could say, closer to the
artist. As a result of the above,
our amps do not “focus” on
any specific frequencies - i.e.
no extension of top or bass,
which of course results in high
clarity of the midrange since
it’s “naturally present”!
Hans Ole Vitus

6
MP-L201 | Version 1
introduction
About this manual
This is your MP-L201 owner’s
manual. The following pages
will describe, as clearly
as possible, how to get
your MP-L201 operating
fast and simple. Although
some operations are selfexplanatory, we strongly
suggest you read this manual
to avoid any damage to the
unit. The manual is designed
to be helpful. If there are
points you feel we could cover
better, or that we have missed
out – please tell us.
Important
information
is presented like
this. Ignoring this
information may cause
damage to you or the
unit. Damage caused
to the unit by ignoring
this information might
invalidate the warranty.
Introduction to the
Masterpiece Series
The Vitus Audio Masterpiece
Series is a true high-end series
of products, which is build on
our true dedication to neutral
music reproduction. Every
detail is carefully thought
through, and all choices made
during development, where
based purely on listening, and
not measuring. Only the best
available materials are used to
ensure an overall quality which
will last for many years, when
treated right.

7
MP-L201 | Version 1
introduction
F
120
100
80
60
40
- 40
20
- 20
0
C
50
40
30
- 20
20
10
- 10
- 40
- 30
0
introduction
This amplifier is
VERY heavy –
make sure to be
at least two people to
unpack the unit. You
might damage both
your back and the
amplifier if extra care
is not applied. Vitus
Audio A/S cannot
be held responsible
for any damage that
is a consequence of
uncareful handling of
the unit.
After unpacking
allow 24 hours
for the product to
reach room temperature
before connecting up
and switching on. This
is to allow condensation
to dissipate, which
might otherwise
cause damage to the
electronics. Remember
also that condensation
can form when you
move the amplifier from
a cold place to a warm
room.
CAUTION
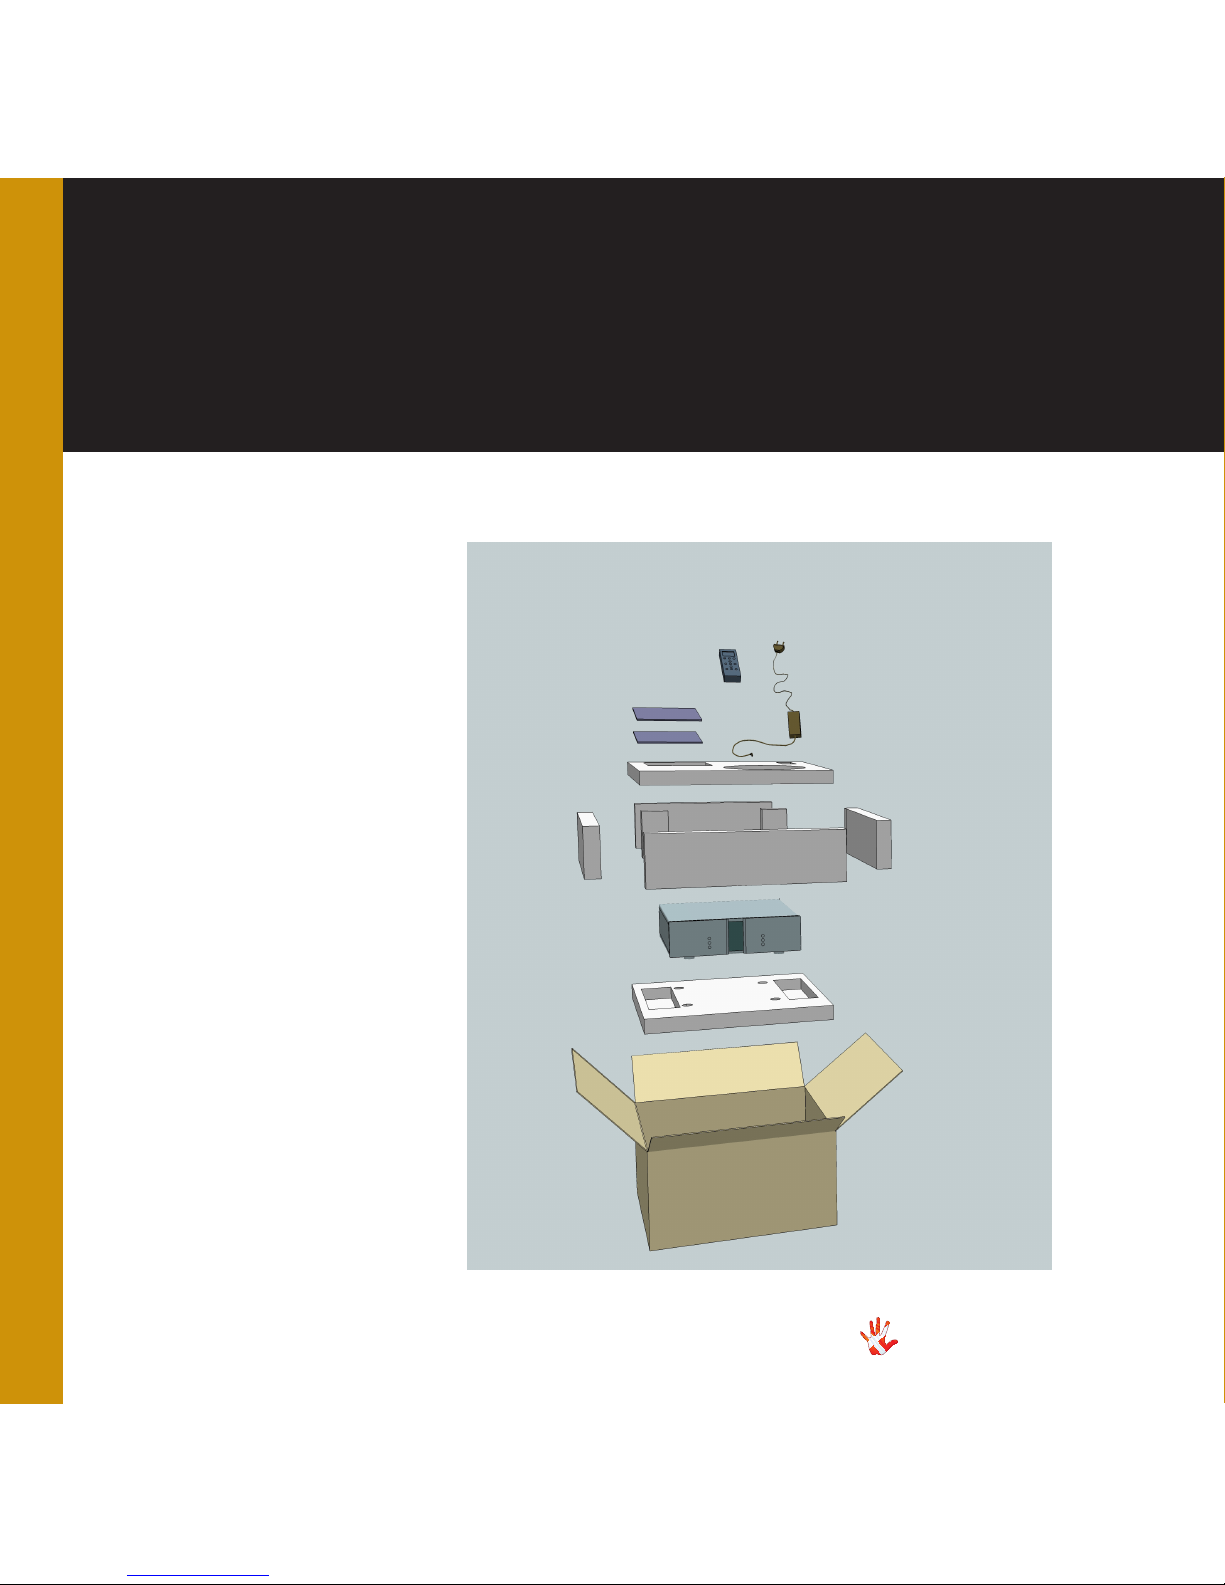
Figure 1 Box exploded view
Foam bottom
Box
Foam top
Foam Sides
6 pieces
MP-L201
Brochure
Manual
Remote Charger
RC-010
8
MP-L201 | Version 1
Unpacking the box
MP-L201
After you have opened the
top, it is possible to remove
the top protective foam which
gives you direct access to the
amplifier. In the top you will
find the remote, the power
cord and brochures. Now
remove the side protective
foam, this will make it easier
to grab hold of the MP-L201.
Two people carefully lift the
amplifier out of the box, and
put it directly onto the floor.
Store the empty box and the
protective foam for later use.
What’s in the box
MP-L201
RC-010 System Remote
Remote Charger
MP-L201 Manual
Vitus Audio Brochure
Foam top
Foam Sides 6 pieces
Foam bottom
Box
1. getting started

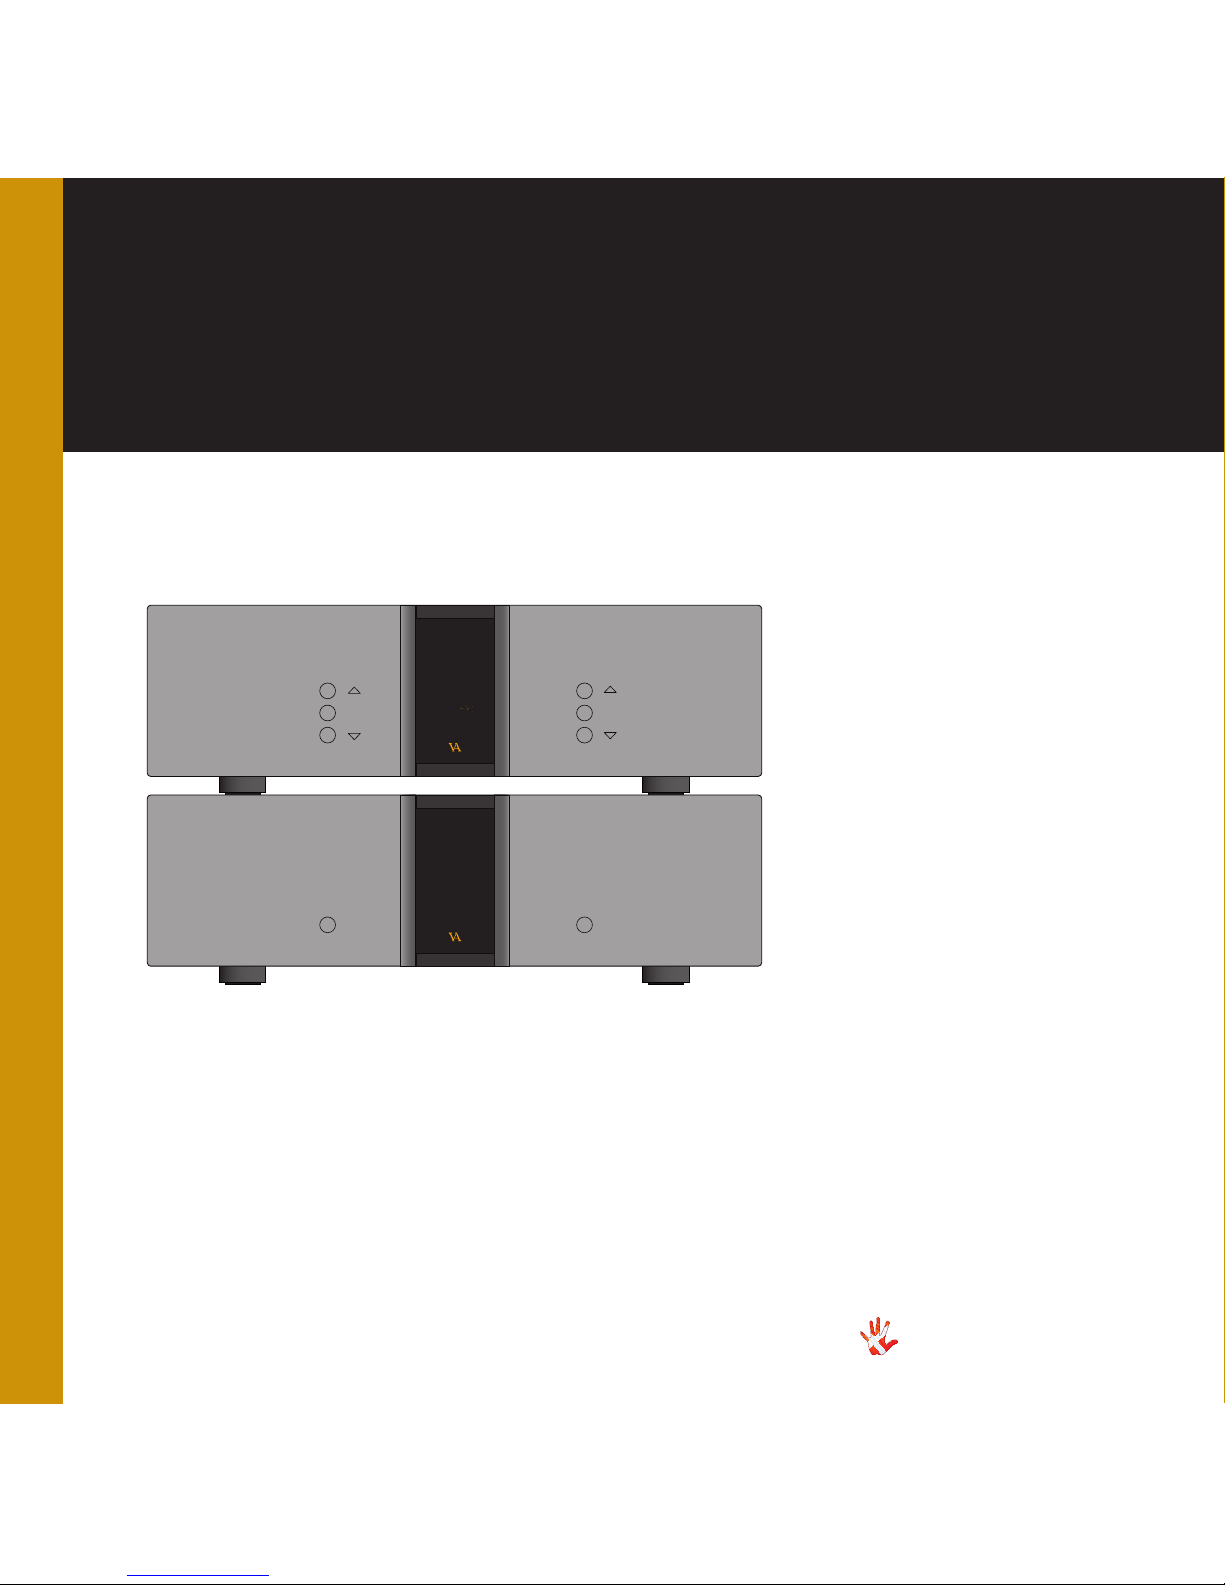
Figure 2 Device overview
9
MP-L201 | Version 1
1. getting started
1. getting started
MP-L201 device
overview
The body of the MP-L201
is constructed of anodized
aluminium.
Material: anodized aluminium.
Dimensions (H x W x D):
130 x 435 x 430
Weight: 20 KG
135 mm
435 mm
435 mm
20 mm

Box exploded view
Foam bottom
Box
Foam top
Foam Sides
6 pieces
MP-PSU
Andromeda power cord
PSU AC Power cord
Unpacking the box
MP-PSU
After you have opened the
top, it is possible to remove
the top protective foam which
gives you direct access to the
power supply. In the top you
will find the power cords. Now
remove the side protective
foam, this will make it easier
to grab hold of the MP-PSU.
Two people carefully lift the
amplifier out of the box, and
put it directly onto the floor.
Store the empty box and the
protective foam for later use.
What’s in the box
MP-PSU
Andromeda Power Cord
Foam top
Foam Sides 6 pieces
Foam bottom
Box
10
MP-L201 | Version 1
1. getting started

Figure 2 Device overview
MP-PSU device overview
The body of the MP-PSU
is constructed of anodized
aluminium.
Material: anodized aluminium.
Dimensions (H x W x D):
130 x 435 x 430
Weight: 30 KG
135 mm
435 mm
435 mm
20 mm
11
MP-L201 | Version 1
1. getting started
1. getting started

12
MP-L201 | Version 1
1. getting started
The topology of the volume
control used in the MP-L201
is very different compared
to the “standard”. The MPL201 uses a series of fixed
resistor networks to control
the volume. Relays are used
to switch between the resistor
networks. Across all volume
steps, a fixed resistor is in
series with the signal path. This
gives the best performance
possible. When you change
volume, a different number of
shunt resistors are used.
To prevent pop in the output,
we have chosen to first add
the new shunt resistors, and
then wait a short time, before
removing the unused shunt
resistors at the new volume
step. This will give a minor fall
in volume before settling at
the new volume step. It takes
only very little time to get
used to this type of operation
of the volume, and it will give
you superior sound quality
over the traditional digital and
analogue potentio meters.
The topology of the volume control.

13
MP-L201 | Version 1
2. connecting
2. connecting
Turning the MP-L201 on and off.
Always turn on the products
beginning from the source:
CD-Player a pre-amplifier a power amplifier.
Always turn off your products in
reverse order:
Power amplifier a pre-amplifier a CD-Player
Not following this procedure,
may cause damage to any
of your products/speakers.
Damage caused to any of your
products/speakers by not
following this procedure will
invalidate the warranty.

Place the MP-L201 on its shelf.
Connect all the sources to
the inputs of the MP-L201,
Connect the outputs of the
MP-L201. Carefully connect
the mains to the MP-L201,
after you have connected both
inputs and outputs.
We have included the RCA
output for compatabilyty
reasons only. The MP-L201 is
balanced from input to output,
we recommend you use the
balanced (XLR) output.
This is a true balanced
amplifier, DO NOT connect
the ”-“output (Figure 3) to
any ground source, including
chassis or signal ground, this
will damage the amplifier.
Connecting the
MP-L201
14
MP-L201 | Version 1
2. connecting
“GND”
Ground
Always follow this procedure.
1. Turn the MP-L201 off.
2. Disconnect the mains power supply
(take the andromeda cable out).
3. Remove the PSU Power Cable
4. Move/Transport the MP-L201
5. Allow 24 hours for the MP-M201 to
reach room temperature.
6. Connect the MP-M201.
Moving and transporting
the MP-L201
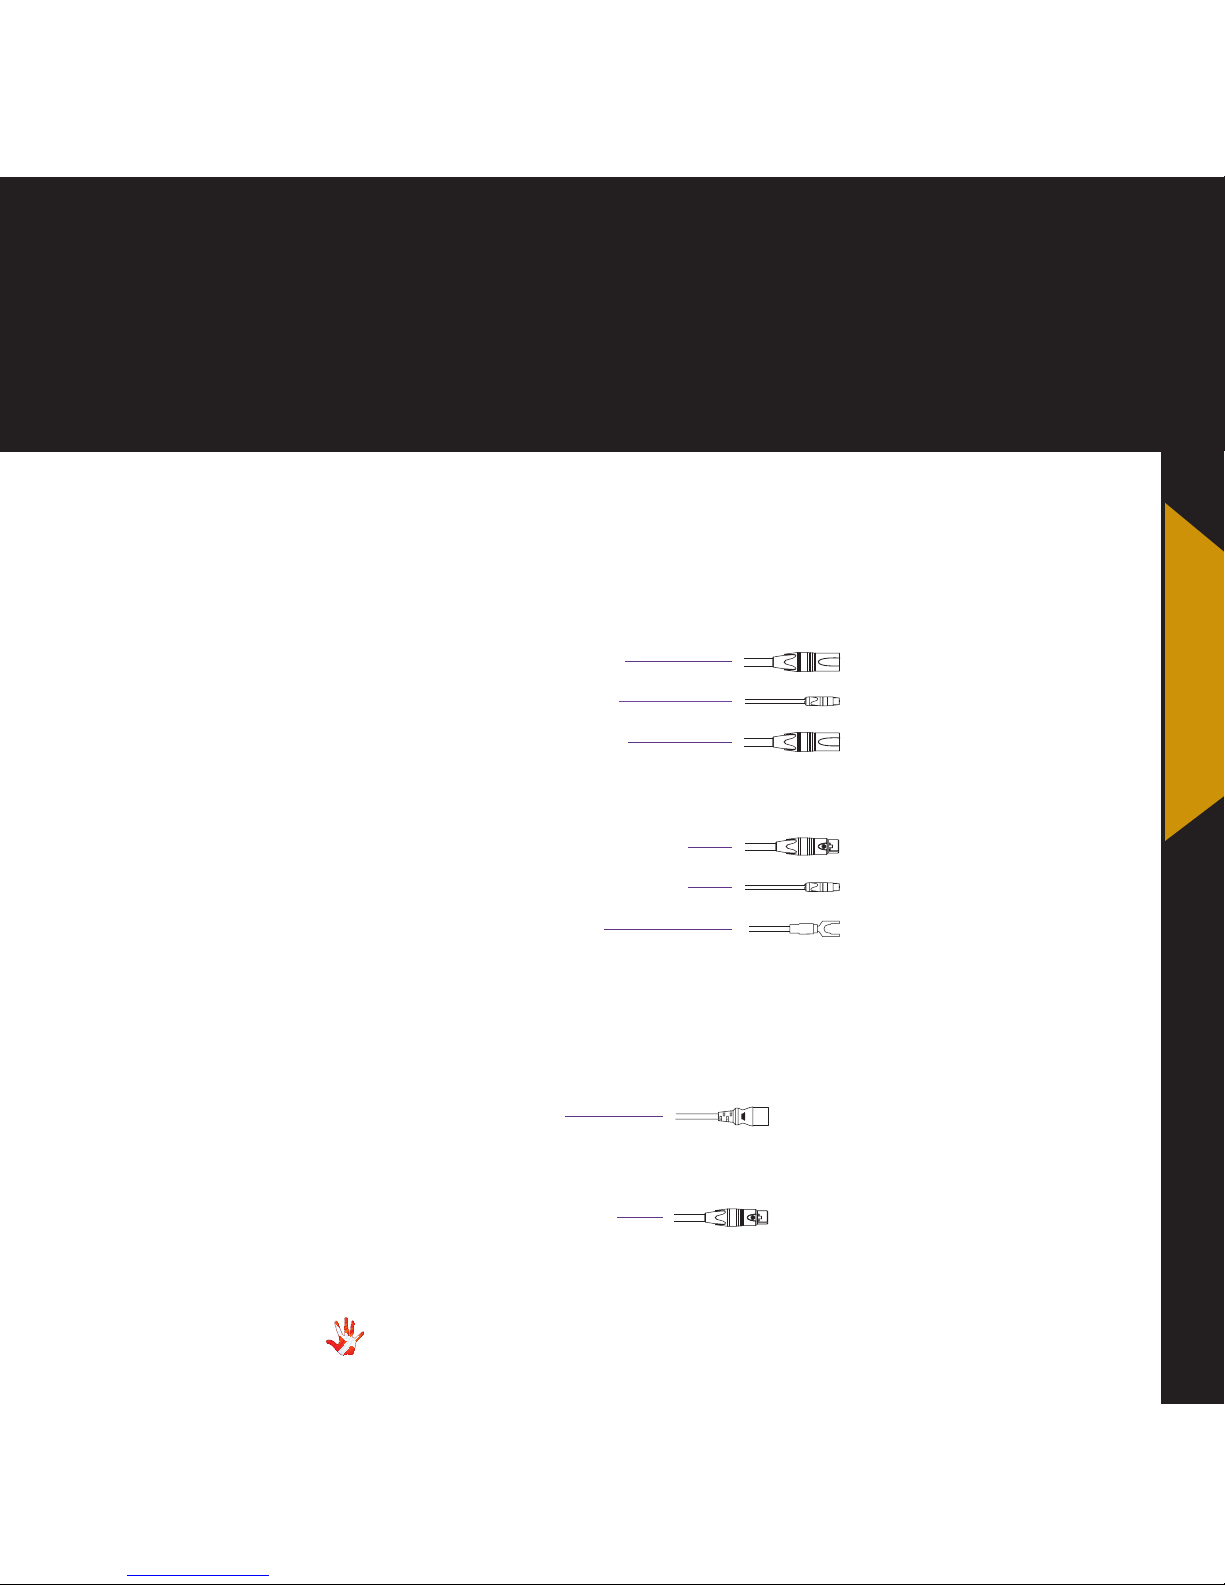
MP-L201 rear panel
Inputs.
Input 1,2,3. XLR
Input 4,5 RCA
PSU Right / Left
Outputs
Output 1,2, XLR (R+L)
Output 3,4 RCA (R+L)
Ground/Earth
MP-PSU rear panel
Inputs.
Power AC
Outputs
PSU right + left
Ground
XLR out (L+R)
XLR out (L+R)
Power
RCA in
DC in
RCA out (S/PDIF)
XLR in
15
MP-L201 | Version 1
2. connecting
2. connecting
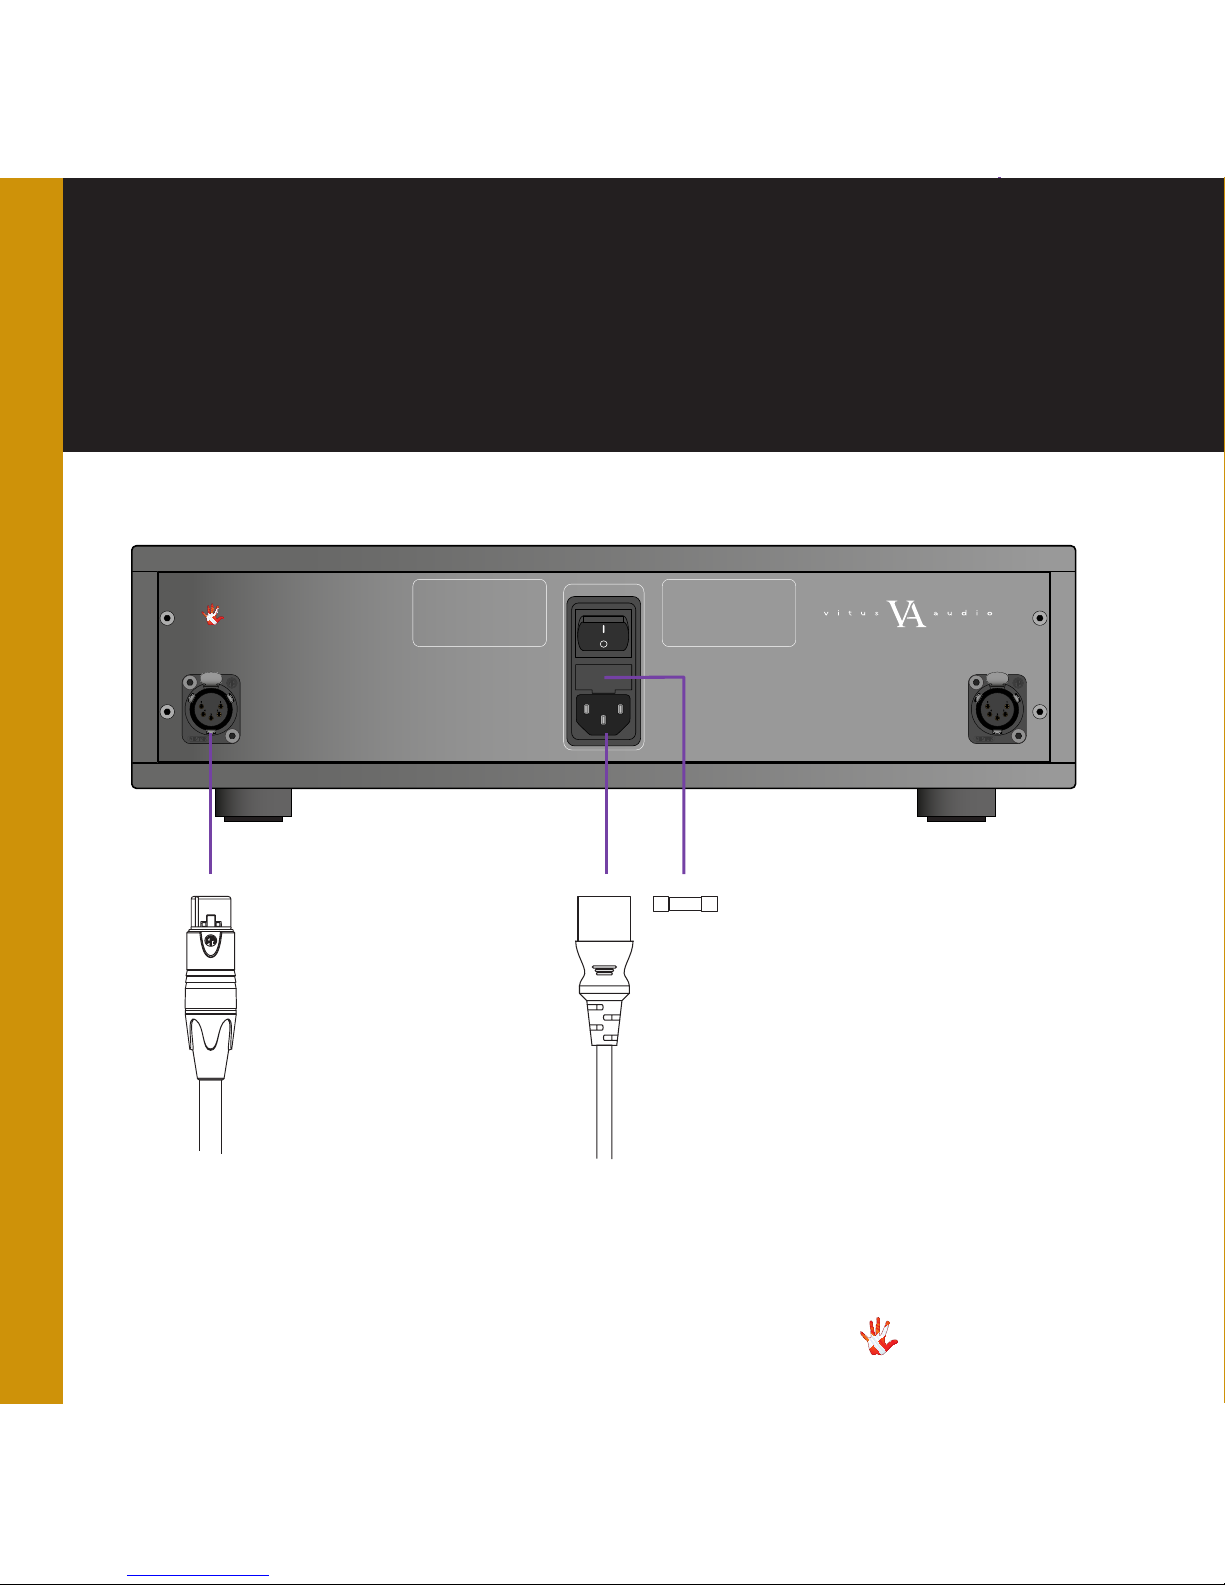
MP-PSU Rear panel.
Power
AC in
PSU
DC out
16
MP-L201 | Version 1
2. connecting
Denmark
Master piece Series
External Powersupply for:
MP-P201 and MP-L201
PSU Right PSU Left
NEUTRIK
PUSH
NEUTRIK
PUSH
Denmark
Input 1Input 2Input 3
MAINS
GND
Input 4
Input 1
Input 4
Output 1
Output 2
Output 1
Output 2
Output 3 Output 3
Output 4
Input 3
Output 4Input 5
Input 2
Input 5
Handcrafted in Denmark
By Vitus Audio an
AVA Group Company
NEUTRIK
PUSH
NEUTRIK
PUSH
NEUTRIK
PUSH
NEUTRIK
PUSH
NEUTRIK
PUSH
NEUTRIK
PUSH
PSU Right PSU Left
Fuse
Denmark
Input 1Input 2Input 3
GND
Input 4
Input 1
Input 4
Output 1
Output 2
Output 1
Output 2
Output 3 Output 3
Output 4
Input 3
Output 4Input 5
Input 2
Input 5
NEUTRIK
PUSH
NEUTRIK
PUSH
NEUTRIK
PUSH
NEUTRIK
PUSH
NEUTRIK
PUSH
NEUTRIK
PUSH
PSU Right PSU Left
RCA in
PSU
DC in
17
MP-L201 | Version 1
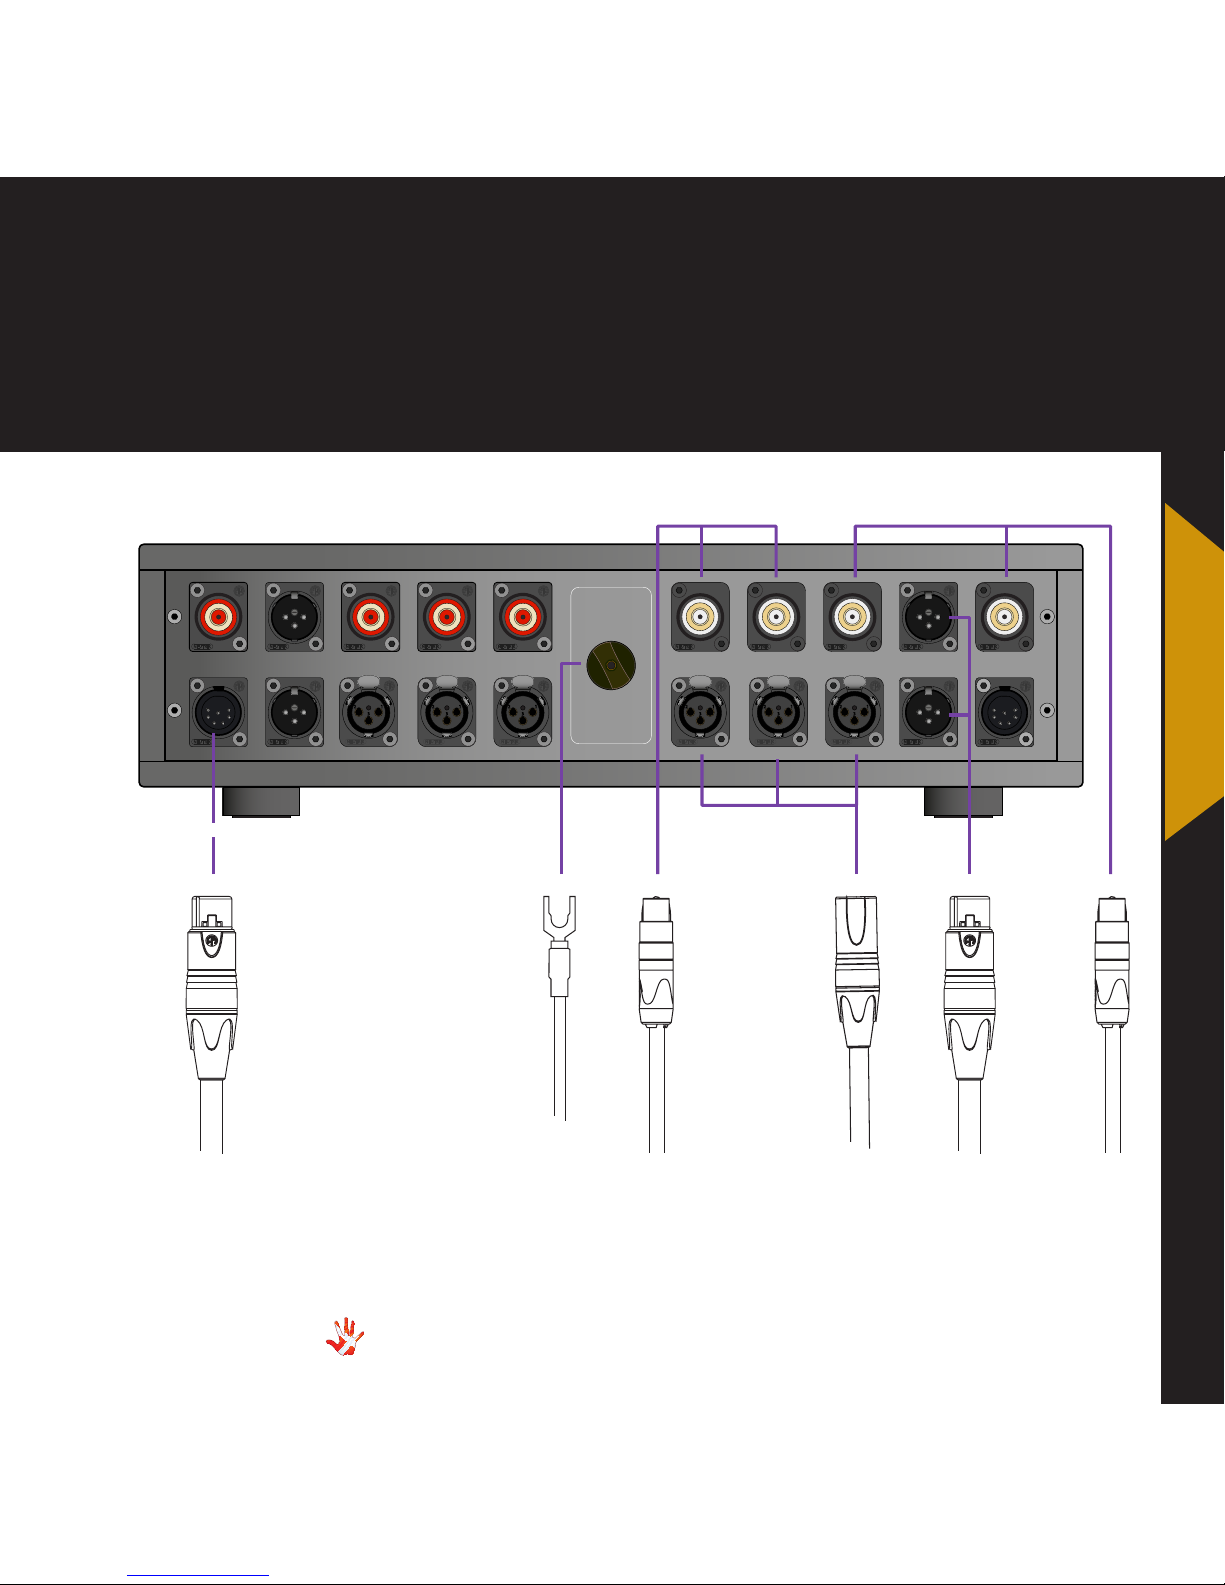
2. connecting
XLR in XLR out RCA outGround
MP-L201 Rear panel.
2. connecting
MP-L201 Front panel.
INPUT
MENU
SELECT
MUTE
MP-L
+
INPUT
+
STANDBY
POWER
18
MP-L201 | Version 1
3. operation
The MP-L201 has 3
operation modes
1. Normal mode.
This is the mode you use when
listening to music.
2. Menu mode
In this mode you can alter the
settings of the MP-L201.
3. Standby mode.
In this mode the controls of
the MP-L201 are deactivated.
The MP-L201 does not shut
down in Standby Mode in
order to maintain an optimal
working temperature
Operation modes

MP-PSU Front panel.
INPUT
MENU
SELECT
MUTE
MP-L
+
INPUT
+
STANDBY
POWER
19
MP-L201 | Version 1
3. operation
3. operation
In Standby Mode the power to the
MP-L201 is cut off. The MP-PSU itself
does not shut down, it is in a sleep
mode, this in order to maintain an
optimal working temperature
Normal mode
In normal mode there are
2 basic functions/buttons
available on the PSU Front
panel.
1. STANDBY Puts the
PSU in and out of
Standby Mode
2. POWER Switches the
MP-PSU
on and off.
Functions – MP-PSU front panel

Figure 6 MP-L201 Left front panel.
INPUT
MENU
SELECT
STANDBY
MUTE
MP-D
20
MP-L201 | Version 1
3. operation
Normal mode
In normal mode there are
3 basic functions/buttons
available on the left front.
1. INPUT + Selects
between the
5 inputs.
2. MENU Switches to
“Menu mode”.
3. INPUT - Selects between
the 5 inputs.
Menu mode
You enter menu mode, by
pushing the ”MENU” button
once in Normal mode. In the
Menu mode there are 3 basic
functions/buttons:
1. Scroll forward in the
menu.
2. MENU/ Enter & Exit
SELECT submenus and
selectsettings.
3. Scroll backward in the
menu.
Functions – MP-L201 left front panel

INPUT
MENU
SELECT
STANDBY
MUTE
MP-D
Figure 7 MP-L201 Right front panel.
21
MP-L201 | Version 1
3. operation
Normal mode
In normal mode there are
3 basic functions/buttons
available on the right front:
1. Turns volume UP.
2. MUTE Mutes the output.
3. Turns volume DOWN.
Menu mode
In the text-menu it is possible
to change the name of the
input. This is done by using
the following buttons from the
right front:
1. Change selected
character.
2. MUTE Go to the next
character
in the display.
3. Change selected
character.
Functions – MP-L201 right front panel
3. operation

22
MP-L201 | Version 1
3. operation
The sub-menus are indicated
with a colour.
RESET V.INIT BRIGHT FILTER.
and INPUT
RESET
Restore the settings of the MPL201 to its default settings.
Volume settings
The MP-L201 starts up in
the same volume step on
initialization. You can select
in which volume step, the MPL201 should initialize. You can
set the initial volume step in
the menu, to a step between
-99.0dB and +6dB.
You can also set the initial
volume-step to “REMEMBER”.
When you set the MP-L201
to “REMEMBER”, then it
remembers the volume step
from when it was put to
standby. Next time the MPL201 leaves standby, it will
start in this volume step.
Bright
Change the brightness of the
display any step between 0 and 3.
Filter(optional)
When you have the optional filter
installed, then it is possible to filter
the output signal, for example if
you want to use the MP-L201 for
bi-amping.
MP-L201 Menu: introduction

23
MP-L201 | Version 1
3. operation
Input settings
The MP-L201 comes with
5 inputs. The settings for
each individual input can
be adjusted in the menu.
The input selection is saved
automatically every 10 minutes.
Each time you initialize the
MP-L201, the last saved setting
is restored. You can manually
save a setting by pressing the
MENU button down 2-3 sec.
When “SAVE” is shown in the
display, the setting has been
saved.
Input phase settings
It is possible to invert the
phase.
Input gain settings
Offset gain setting / Sensitivity
setting. Different sources often
have different output voltages.
This has a direct influence
on the typical volume level
that is needed for a specific
sound level, hence changing
between sources can result in
high sound level differences.
To accommodate easy
operation, we have included
a gain (or as some prefer to
call it – sensitivity setting) in
our amplifiers – it simply sets
the volume starting point at a
specific volume – to match the
source. The offset-value can be
set from - 12 dB to +12 dB.
Input sensitivity
Devices can have differences
in output level. You can adjust
the sensitivity of each input
between ≤ 2 Vrms, ≤ 4 Vrms
and ≤ 8 Vrms. to minimize
these differences. To prevent
clipping of the input. The
sensitivity level needs to be
higher then the input level.
Input name settings
As a standard, the inputs are
named input 1, input 2, etc. In
the text-menu you can find a
list of predefined input names.
If the name of your device is
not in the list, you can choose
to make your own device
name.
Disabling inputs
If you only use some of the
inputs, it is possible to disable
the inputs that are
not used. Using the “Input”
button, the system skips the
disabled inputs, and jumps to
the next input.
3. operation

24
MP-L201 | Version 1
3. operation
SETUP
Change the settings of the MPL201.
DATA
Shows information about this
MP-L201.
RESET
Restore the settings of the MPL201 to its default settings.
V.INIT
Change the initial dB step of the
volume in the MP-L201 to any
step between -99 and12.dB
VOL.STEP
The MP-L201 has a standard
volume step of -42 dB. You can
set the volume step to a step,
between -99.0 dB to +6dB.This
step will be the new volume
step. Even when after the power
cord has been disconnected the
MP-L201 still starts up in the new
volume step.
REMEMBER
Set the MP-L201 to remembers
the current volume step. The MPL201 will start up in this volume
step when it leaves standby. This
volume step is not remembered
when the power cord is removed.
Then the MP-L201 will initiate in
the volume step as it is defined in
the V.INIT sub-menu.
FILTER(optional)
Enable or disable the filters
of the four outputs. A restart
(unplugging power supply) is
needed for changes to take
effect.
INPUTS
Change settings for each input.
INPUT X
Change the settings of input X.
PHASE
Turn phase inversion on or off.
FIXED
Lock and unlock the volume by
switching between FIX ON/FIX
OFF.
SET FIX
Set the volume of input X to a fixed
dB step. (Input X is now locked to
a dB step and can not be adjusted
with the volume control)
ADJUST
Adjust the fixed dB step to any
step between -99 and +12 dB.
This function is only available
when FIX ON is selected.
OFFSET
Select an offset- gain, between
-12 and 12 dB, for input X. This
function is only available when
FIX OFF is selected
SENSE
Change the sensitivity of the
input. Select between ≤ 2 Vrms,
≤ 4 Vrms and ≤ 8 Vrms. The
sensitivity level needs to be
higher then the input level. To
prevent clipping of the input
TEXT
Choose a name for input X.
USED
Select whether input X has to be
USED or not NOT USED. When
you select NOT USED input X will
not be shown in the list of inputs.
BRIGHT
Change the brightness of the
display any step between 0 and 3.
MP-L201 Menu: discription of the elements.
 Loading...