

Vitrek Xitron 2000 Series, Xitron 2000MN, Xitron 2000I, Xitron 2000M, Xitron 2000IN User Manual

USER GUIDE
2000 Family
DC / Temperature Source
Instruments


Warranty
This Vitrek instrument is warranted against defects in material and workmanship for
a period of two years after the date of purchase. Vitrek agrees to repair or replace any
assembly or component (except batteries) found to be defective, under normal use,
during the warranty period. Vitrek's obligation under this warranty is limited solely
to repairing any such instrument, which in Vitrek's sole opinion proves to be
defective within the scope of the warranty, when returned to the factory or to an
authorized service center. Transportation to the factory or service center is to be
prepaid by the purchaser. Shipment should not be made without prior authorization
by Vitrek.
This warranty does not apply to any products repaired or altered by persons not authorized by Vitrek or not in accordance with instructions provided by Vitrek. If the
instrument is defective as a result of misuse, improper repair, or abnormal conditions
or operations, repairs will be billed at cost.
Warranty 3
Vitrek assumes no responsibility for its product being used in a ha-zardous or
dangerous manner, either alone or in conjunction with other equipment. Special
disclaimers apply to this instrument. Vitrek assumes no liabili-ty for secondary
charges or consequential damages, and, in any event, Vitrek's liability for breach of
warranty under any contract or otherwise, shall not exceed the original purchase
price of the specific instrument shipped and against which a claim is made.
Any recommendations made by Vitrek or its representatives, for use of its products
are based upon tests believed to be reliable, but Vitrek makes no warranties of the
results to be obtained. This warranty is in lieu of all other warranties, expressed or
implied and no representative or person is authorized to represent or assume for
Vitrek any liability in connection with the sale of our products other than set forth
herein.
Instrument Serial Number:______________________________________________

2000I & 2000M Instrument’s User Guide, Revision B
4
Document Part Number MO-2000-M Revision C
Copyright
Copyright© 2019 Vitrek. All rights reserved.
Vitrek
All rights reserv
ed. No part of this publication may be reproduced, transmitted,
transcribed, stored in a retrieval system, or translated into any language in any
form with prior written consent from Vitrek. This product’s user guide is
copyrighted and contains proprietary information, which is subject to change
without notice. The product displays and instructional text may be used or copied
only in accordance with the terms of the license agreement.
is a trademark of Vitrek. All other trademarks or
registered trademarks are ackno
wledged as the exclusive property of their
respective owners.
In the interest of continued product development, Vitrek reserves the right to
make changes in this guide and the product it describes at any time, without
notice or obligation.
12169 Kirkham Road
Poway, CA 92064
Telephone: 858–689-2755
Email: info@vitrek.com

Contents
Warranty _______________________________________________ 3
Introduction _____________________________________________ 9
Front Panel Controls and Connections _______________________ 11
Contents 5
Product Description _________________________________________ 9
Features _________________________________________________ 10
Display __________________________________________________ 11
“POWER” Switch _________________________________________ 11
Battery Indicators __________________________________________ 12
Red “BATT CHG” Light _________________________________ 12
Green “OK” Light _______________________________________ 12
“OUTPUT” Terminals ______________________________________ 12
Keypad __________________________________________________ 13
Numeric Keys __________________________________________ 13
+/– Key _______________________________________________ 13
Arrow Keys ____________________________________________ 13
Multiplier Keys _________________________________________ 13
Units/Enter Keys ________________________________________ 14
“CLR” Key ____________________________________________ 14
“MNU” Key ___________________________________________ 14
Rear Panel Connections and Controls ________________________ 15
Charging Connector ________________________________________ 15
Compensated Thermocouple Connection _______________________ 15
Interface Connectors _______________________________________ 16
2000-IE-BAT Connector __________________________________ 16
2000-
RS-BAT Connector _________________________________ 16
Rear Panel Switch _________________________________________ 16
Charging the Battery _____________________________________ 19
The Internal Battery ________________________________________ 19

2000I & 2000M Instrument’s User Guide, Revision B
6
To Charge the Battery ____________________________________ 19
Charging Status _________________________________________ 20
Charging from the Charging Module ___________________________ 20
Charging Modules _______________________________________ 21
Charging from an External DC Voltage Supply __________________ 22
Continuous Power from External Supply _______________________ 22
Operating the 2000 Instrument _____________________________ 23
Front Panel Operation ______________________________________ 23
Initial Power Application _________________________________ 23
Connecting to the OUTPUT Terminals ______________________ 24
Displaying Instrument Status ______________________________ 24
Numeric Data Entry _____________________________________ 26
Direct Entry of Required Output Level _______________________ 27
Changing Displayed Multiplier _____________________________ 28
Direct Entry of Temperature Data ___________________________ 29
Reversing Polarity of the Present Output Level ________________ 29
Adjusting Output Level or Simulated Temperature _____________ 30
Increasing or Decreasing Output Level _______________________ 31
Changing Adjustment Value _______________________________ 32
Terminating Adjust mode _________________________________ 32
Selecting Default Power on Condition _______________________ 32
Range Locking _________________________________________ 33
Calculating Output Mode of Operation _______________________ 34
Selecting Measurement Mode ______________________________ 37
Deselecting Measurement Mode ____________________________ 37
Rear Panel Operation _______________________________________ 38
Using Thermocouple Simulation ___________________________ 38
Deselecting Thermocouple Simulation Mode __________________ 41
Using the Memory Options ________________________________ 43
Memory Organization ______________________________________ 43
Front Panel Memory _____________________________________ 43
Rear Panel Memory ______________________________________ 45
General Memory Considerations ___________________________ 46
Applications ___________________________________________ 48
Low-level DC Power _______________________________________ 48
Ensuring Stable Voltage Connections ________________________ 49

Contents
Ensuring Stable Current Connections ________________________ 50
Process Control Industry Applications__________________________ 52
Calibrating in Process Control Environments __________________ 52
Simulating Thermocouple Systems __________________________ 55
Measuring Thermocouple Outputs __________________________ 56
Engineering Laboratory Environment Applications _____________ 57
Calibration and Maintenance ______________________________ 61
Internal Calibration ________________________________________ 61
External Calibration ________________________________________ 62
Equipment Required to Recalibrate _________________________ 62
Initiating External Calibration ______________________________ 64
Performing External Calibration ____________________________ 65
Periodic Maintenance _______________________________________ 71
Internal Maintenance _______________________________________ 72
Replacing the Internal Battery ________________________________ 73
Interface Operation ______________________________________ 75
RS232 Interface Option _____________________________________ 75
Selecting RS232 ________________________________________ 76
RS232 Handshake Lines __________________________________ 76
IEEE488 Interface Option ___________________________________ 76
Remote/Local Operation __________________________________ 77
Address Selection _______________________________________ 77
IEEE488 Handshake Lines ________________________________ 77
Bus Commands _________________________________________ 78
Other IEEE488 Specific Items _____________________________ 78
Reading Data Via an Interface ________________________________ 79
Sending Data Via an Interface ________________________________ 79
Command Set for the 2000 Instrument _________________________ 79
Keypress, Simulation Command Characters ___________________ 79
Firmware Version F.02 ___________________________________ 81
Extended Command Set __________________________________ 81
Command String Usage _____________________________________ 82
Setting an Output Voltage or Current ________________________ 82
Adjusting Output Level ___________________________________ 83
Reading Present Output Level ______________________________ 83
Internal Calibration ________________________________________ 83
External Calibration ________________________________________ 84
7

2000I & 2000M Instrument’s User Guide, Revision B
8
Appendix A– Output Specifications _________________________ 85
DC Voltage Output Specifications _____________________________ 85
DC Current Output Specifications _____________________________ 86
Voltage Measurement Specifications ___________________________ 87
Thermocouple Specifications _________________________________ 87
Appendix B– General Specifications ________________________ 93
Warm-Up Time _________________________________________ 94
Environmental __________________________________________ 94
Isolation _______________________________________________ 94
Computation ___________________________________________ 94
Tables
Table 1: Resistance Values for Transfer 58
Table 2: Voltage Accuracy Margins 62
Table 3: Current Accuracy Margins 63
Table 4: Command Characters 80
Table 5: Shortcut Command Character Sequences 80
Table 6: Extended Command Set 81
Table 7: DC Voltage Output 85
Table 8: DC Current Output 86
Table 9: Thermocouple Simulation and Measurement Specifications 88
Table 10: CJC Stability-Simulation and Measurement 89 & 90

Introduction
This chapter describes the 2000I, 2000M, 2000IN and 2000MN DC power source
instruments and highlights their features and functionalities. The 2000 instruments were introduced in 1989 to support the fields of Process Control, Calibration, and General Equipment Testing.
Product Description
The 2000I, 2000M, 2000IN and 2000MN products are portable, lightweight DC
power source instruments. Their capabilities include the generation of precision
bipolar DC voltages
tion of a variety of thermocouple types with optional active cold junction compensation; and measurement of voltage and thermocouple outputs. On a 2000
instrument, you may enter a scaling factor, an offset factor and a “units” text
string, which enables the calibration of four 20mA loops in the “actual” units and
scaling of the transducer. Optional IEEE488 or RS232 isolated interfaces further
enhance the 2000 instruments, allowing them to be used in varying applications.
Introduction 9
1
; precision bipolar DC currents2; the high accuracy simula-
The 2000I, 2000M, 2000IN and 2000MN 2000MN instruments use microprocessor and digital-analog conversion technologies to produce highly flexible, accurate instruments with high reliability. The combination of HCMOS
microprocessor technologies with low-power precision analog circuitry yields a
long battery life while maintaining a lightweight rugged package and a 0.5ppm
analog output resolution.
Automatic internal calibration and simple front panel (covers on) external calibration maintain high accuracy. A comprehensive range of computational abilities
enable a variety of applications.
1
DC voltage expands up to 22V and down to 10nV resolution
2
DC current expands up to 22mA and down to 10pA resolution

2000I & 2000M Instrument’s User Guide, Revision B
10
Note: To ensure full use of this instrument, review this complete user guide at
setup.
Features
Fully bi-polar DC voltage and current output capability.
DC output of 22 volts at 10ppm accuracy and 22mA at 40ppm accuracy.
Temperature simulation with 0.01 degree resolution, 0.03 – 0.06 degree
accuracy.
Temperature measurement with 0.1 – 0.2 degree accuracy.
Auto cold-junction compensation.
Battery or line operation.
Suited for “in field” calibration requirements of the process control indus-
try.
Portable for use in remote sites.
Functions as a “transducer replacement” with computed output levels and
enabled data entry in: psi, KPa, mmHg, and g/sec units.
Able to calibrate at the “sending” unit.
2000M and 2000MN instruments perform thermocouple simulations.
Connects in parallel with a transducer 4 -20mA output enabling to modify
its output interfaces.
Small size and weight
Low noise performance
IEEE488: Full Talk/Listen capabilities. Isolated from output circuitry up to
500V peak
RS232: Full Talk/Listen capabilities. Selectable baud of 1200 or 19,200
baud. Isolated from output circuitry up to 500V peak.
Front Panel Controls and Connections 11
Front Panel Controls and Connections
This chapter discusses the basic use of the various controls, connectors and indicators on the front panel of the 2000I, 2000M, 2000IN and 2000MN DC power
source instruments.
the Battery.
ic tasks refer to Front Panel Operation.
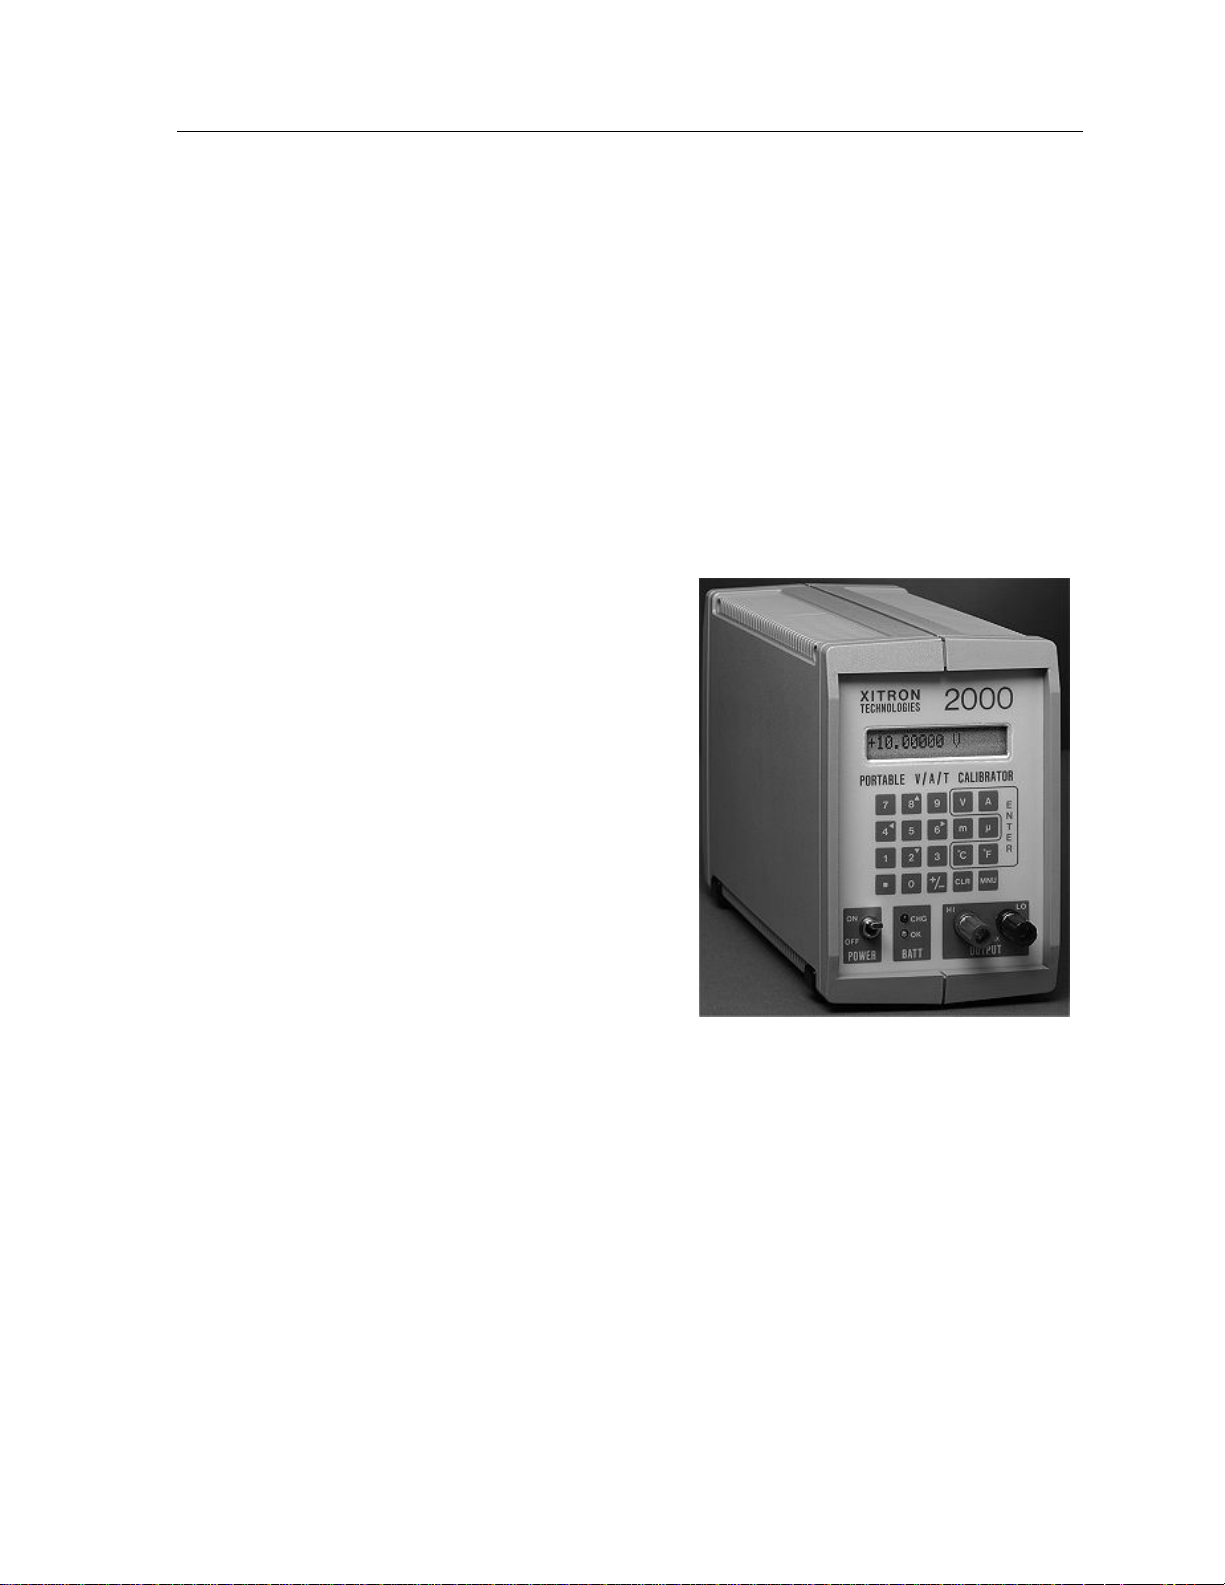
Display
The 2000 Families DC power source
instrument display is a 16 character,
single line reflective liquid crystal
(LCD). This display shows selectable
status or the present output of the
instrument.
For a
Before using your instrument refer to the text on Charging
complete discussion on the methods used to perform specif-
During interactive sequences the display enables you to select a mode and
enter a value for your desired output,
calculation or measurement
The 2000 Instrument
“POWER” Switch
This toggle switch controls the power applied to the circuitry in the instrument.
Note that the charging module is always connected to the charging control circuitry in the instrument, thus the POWER switch does not control the charging of the
battery.
.

2000I & 2000M Instrument’s User Guide, Revision B
12
When the POWER switch is toggled up, in the ON position, the microprocessor
and analog circuitry is powered and the instrument may be operated normally.
The power source may be either from the battery or the charging module, as applicable. When the power switch is toggled down, in the OFF position, the only
operation enabled is charging the internal battery.
Battery Indicators
These indicators reflect the status of the lead-acid battery (2000I, 2000M) and the
Nickel Metal Hydride batteries used (2000IN and 2000MN).
Red “BATT CHG” Light
This red light (LED) illuminates when the internal battery is being charged. Upon
full charge this light extinguishes.
Green “OK” Light
This green light (LED) illuminates when the power switch is turned on for 2000I
and 2000M. For the 2000IN and 2000MN products, the Green LED is used as a
Fuel Status indicator as well as showing that the unit is powered on. It is recommended that the unit is plugged in to the supplied power supply when the Green
LED begins to flash
Note: To continue using if the light extinguishes, connect the instrument to a
charging module or an external DC supply, turn the unit off and then back on to
reset the internal cutoff circuitry.
“OUTPUT” Terminals
All output voltages, currents and temperatures are available from this pair of
binding posts mounted on the instrument’s front panel. These terminals, one red,
one black, accept banana plugs, spade leads or wires, as required.

Front Panel Controls and Connections 13
Keypad
These 20 keys are used for all manual entries into the instrument and to initiate
any required actions. These keys are in the following groups:
Numeric Keys
These keys: “0, 1, 2, 3, 4, 5, 6, 7, 8, 9,” and “.”are used to enter numeric data
into the instrument. While the display is showing the actual output level, these
keys initiate a numeric entry of a new output level; this entry will be completed
by pressing the required unit’s key.
+/– Key
The change sign (+/–) key may be used during a numeric entry to change the
polarity of the entered data. If this key is pressed while the actual output level is
being displayed (i.e., when not in a numeric entry) then the output level is reversed (i.e., the output polarity is changed).
Arrow Keys
During a menu selection, and during the “Adjust” mode, the “2, 4, 6 and 8” keys
are arrow keys, which scroll through various actions that show in the display.
These keys are used to select the
previous displayed action.
These keys are used to select the
next action.
To abort the selection of an activity and return the instrument to its previous condition, press the MNU key.
4 key has a (left arrow)
2 key has a (down arrow)
6 key has a(right arrow)
8 key has an (up arrow)
Multiplier Keys
The “m” (milli) key and µ (micro) key are used during a numeric entry to select
the required multiplier for the entered data. If the m key is pressed then the en-
tered numeric is divided by one thousand. If the µ key is pressed then the entered
data is divided by one million.

2000I & 2000M Instrument’s User Guide, Revision B
14
Note that prior to selecting the required units key, an entered multiplier may be
changed by pressing the other multiplier or cleared by pressing the multiplier key
a second time. Pressing a multiplier key while an actual output level or measured
input level is being displayed (i.e., not during numeric entry) changes the display.
If the multiplier key is different from the display, then the display format
changes to use the selected multiplier.
If the multiplier key is the same as the display, it toggles the usage of the
selected multiplier in the display format.
Units/Enter Keys
The V, A, ºC and ºF keys are encircled within a white line on the keypad. These
keys are used to output in the selected units, which terminates a numeric entry.
They can also select the displayed action. For example in “Measure” mode
(2000M only) the V,
the measured data.
A, ºC and ºF keys are used to change the displayed units of
“CLR” Key
This key is used to reinitiate a numeric entry (i.e., clear the display ready for restarting the entry), or during a choice selection, this key aborts the action in
progress. During the “Adjust” mode of operation, this key deselects that mode
with the output remaining at the present level.
“MNU” Key
This key is used to select one of the “special” activities of the instrument. When
initially pressed, you are prompted to select the desired action. Press any of the
keys that have an arrow (2, 4, 6 or 8) to scroll through the textual options to display the required selection and then press a unit’s key to execute it.

Rear Panel Connections and Controls 15
Rear Panel Connections and Controls
This chapter discusses the basic use of the various controls and connectors located on the rear panel of the 2000I, 2000M, 2000IN and 2000MN power source
instruments. For a
tasks refer to Front Panel Operation.
Charging Connector
This connector, located on the rear panel in the lower right-hand corner, is the
receptacle for the connector of the charging module. See Charging the Battery
for further details regarding the usage of this connector.
complete discussion of the methods used to perform specific
Important Note: When connecting a charger other than that provided by
Vitrek, ensure the selected charger’s output voltage is: 12V at 1.5A and the
center conductor is positive polarity and uses 2.5mm DC plug.
Compensated Thermocouple Connection
This thermocouple output and measurement connections are only present on the
2000M and 2000MN instruments. Use this connection whenever the active cold
junction compensation (CJC) mode of thermocouple simulation or measurement
is being used.
This thermocouple connection, located in the lower center back of the instrument,
is wired in parallel with the output terminals on the front panel. Thus normal output voltages or currents can be obtained using an uncompensated connection.
During calibration of thermocouple measuring instruments, be sure to use
mocouple wire between the 2000M or 2000MN instrument and the unit being
calibrated.
ther-

2000I & 2000M Instrument’s User Guide, Revision B
16
Interface Connectors
A connector slot is available at the top center in the back panel. A connector in
this location is only present when either of the interface options IE-BAT or RSBAT is fitted in the instrument.
IE-BAT Connector
This is a standard IEEE488 connector, and is fitted if option IE-BAT is fitted in
the instrument. The usage of this connector and the method of using the IEEE488
interface are fully described in the Interface Operations chapter.
RS-BAT Connector
This is a female 9-pin sub-miniature D type connector, and contains the RS232
connections for the RS-BAT option of the instrument. The connections are as
follows:
1. Data Carrier Detect (Output from instrument)
2. Transmit Data (Output from instrument)
3. Receive Data (Input to instrument)
4. Data Terminal Ready (Input to instrument)
5. Ground (Common return for these signals)
6. Data Set Ready (Output from instrument)
7. Request To Send (Input to instrument)
8. Clear To Send (Output from instrument)
9. Ring Indicate (Output from instrument)
Note: These connections enable using a straight through connected cable to an
IBM AT® compatible RS232 connector. Use of this connector and the RS232
interface is fully described in the Interface Operations chapter.
Rear Panel Switch
The rear-panel mounted toggle switch is only present when the IE-BAT option is
fitted in the instrument. When ON (up position), the internal interface is enabled
for operation and is disabled when OFF (down position).

Rear Panel Connections and Controls 17
Note that the battery life is considerably shortened when the IE-BAT Interface is
enabled, thus it is highly recommended that this switch be maintained in the OFF
(down) position whenever this interface is not being used. The IE-BAT Interface
is only usable when this switch is in the ON position.

2000I & 2000M Instrument’s User Guide, Revision B
18

Charging the Battery
This chapter discusses the methods available for charging the internal battery and
for continuously powering the 2000 instruments from an AC power supply.
Charging the Battery 19
Note: Charge the
time taken to recharge will be extended when the instrument is in this condition.
battery with the IE-BAT interface option enabled, although the
The Internal Battery
The 2000 instruments are powered from an internal sealed lead-acid battery
(2000I and 2000M) or a Nickel Metal Hydride battery for the 2000IN and
2000MN product builds. The battery is fully charged when shipped from Vitrek.
During shipping or storage the battery may discharge. We recom-mend the
battery be recharged for at least 12 hours prior to its initial use. Use the charging
unit provided Vitrek to charge the internal battery and to operate this instrument.
Ensure that the included charging unit is compatible with your local power
ratings and socket connection.
Caution: If using an external DC supply other than the provided charger ensure
the selected charger’s output voltage is: 12V at 1.5A and the center conductor is
positive polarity, the DC connector is a 2.5mm Power Jack.
To Charge the Battery
A full charge to the internal battery is achieved by inserting the small plug of the
charging unit into the socket in a recess of the rear panel and then plugging the
charging unit into a suitable AC power outlet.

2000I & 2000M Instrument’s User Guide, Revision B
20
Charging Status
For battery charge status, refer to the front panel’s red BATT CHG light.
If the BATT CHG light extinguishes then the battery is fully charged.
If the BATT CHG light does not extinguish after several hours of charg-
ing, turn the unit OFF and back ON (2000I and 2000M Only).
If the light remains illuminated then continue to charge the unit for a few
more hours and retry turning the unit OFF and back ON.
And if the light still does not extinguish then replace the unit’s battery.
Charging from the Charging Module
If the internal battery has become discharged, recharge it by plugging the DC
output plug on the Charging Module’s cable end into the recessed receptacle on
the instrument’s rear panel and plugging the Charging Module into the local AC
supply. Ensure that the voltage rating of the Charging Module is in accordance
with the local AC supply voltage.
Note: For the fastest possible recharging time, place the front panel POWER
switch in the OFF position.
While charging the internal battery, the BATT CHG light will be illuminated.
When this LED becomes extinguished, the internal battery is fully charged.
The instrument can be operated while it’s charging. Note that when doing so, to
fully charge the internal battery may take up to 15 hours. If the instrument is not
operated during charging then a full charge will take up to 12 hours.
Caution: If the instrument is connected to other circuitry or instrumentation
when the Charging Module is connected, ensure that less than 500V of common
mode potential to ground is present; SEVERE DAMAGE could result if excessive common mode voltages are present.

Charging the Battery 21
Warning: Prior to recharging the internal battery disconnect the 2000 instru-
ment from any intrinsically-safe process control system. Charging while connected could adversely affect the safety of the process control system.
Charging Modules
One of these modules is included with the main unit (as specified at the time of
order). Additional charging modules may be obtained using the codes described
below.
“M02000”
This option delivers an additional copy of this user guide. If not included at the
time of placing the order for the basic unit, please have the serial number of your
unit available when making this order.
“MS2000”
This option delivers a full service manual, incorporating schematics, assembly
diagrams, fault diagnosis aids and full servicing information. If not included at
the time of placing the order for the basic unit, please have the serial number of
your unit available when making this order.
“SP48”
A 48” long shielded cable with low thermal spade lugs terminating each lead. Use
this leads for applications requiring superior performance at levels below 1μV.
“PL36”
A 36” long shielded cable with low thermal plugs terminating each lead. This
lead should be used for applications requiring superior performance at levels below lµV.
“T1”
A wall-mount charger with 120VAC input and 12VDC @ 1.5A minimum output.
(This version has been obsoleted; The T5 is the recommended replacement)

2000I & 2000M Instrument’s User Guide, Revision B
22
“T5”
A free-standing, universal charger with 85VAC - 265VAC input and 12VDC @
1.5A minimum output.
Charging from an External DC Voltage Supply
Similarly, the instrument may have its internal battery charged from an external
DC voltage supply of between 10V and 15V, with at least 1.5A of drive capability. If this is desired, obtain a DC power jack, which meets the requirements of
2.5mm pin diameter and 5.5mm external diameter. For example: Switchcraft®
760. The center pin connector should be a positive potential connection, note that
internal circuitry prevents damage from polarity reversal.
The DC power supply used may be any laboratory type of power supply or alternatively a 12V lead-acid battery (e.g., an automobile battery). This latter method
for recharging the internal battery in the instrument yields the useful feature of
allowing you to recharge the instrument from an automobile (e.g., the cigarette
lighter), thus you may take the instrument into remote locations (or locations
where the local AC supply is unknown) without the concern of recharging the
internal battery.
Continuous Power from External Supply
The charging module or an external DC supply may be left continuously applied
without damage to the 2000 instrument. It is recommended that for the 2000I and
2000M products the unit is allowed to discharge completely to reduce the
memo-ry effect of the Lead Acid battery. Vitrek recommends using an external
DC supply for process control applications.
Warning: Unless the charging source is an external battery, continuous opera-
tion from an external supply when the instrument is connected to a process control system may degrade the safety of that system.

Operating the 2000 Instrument 23
Operating the 2000 Instrument
This chapter discusses operating the 2000I, 2000M, 2000IN and 2000MN DC
power source instruments. Throughout this chapter, the instrument is assumed to
be a 2000M or 2000MN, which has full capabilities, described in this User Guide.
If data is entered for which the option is not fitted, then a message displays for
two seconds, and the entry is discarded.
Front Panel Operation
The 2000 instrument’s front panel provides the user interface for the following
functions: power ON; DC power output; mode selection; data entry, edit and re-
call; measurement; and calibration. Note that recall of steps is covered in the Us-
ing the Memory Options chapter and calibration is covered in Calibration and
Maintenance. Additional 2000 instrument uses are covered in the Applications
chapter.
Initial Power Application
Shortly after the POWER switch is toggled to the ON position, the display will
show the model number and the latest firmware version.
Example: Version: F:03
During the display of this data, the internal microprocessor performs tests upon
the internal circuitry. If any faults are detected, then a message describing the
fault will be displayed. Dependant on the nature of the fault, the instrument will
either display the message for approximately two seconds prior to the instrument
continuing with normal operation or hold the displayed message. In this instance–
no further operation of the instrument is possible until the fault has been corrected.

2000I & 2000M Instrument’s User Guide, Revision B
24
When the POWER switch is placed in the OFF position, the terminals remain in
the condition prevailing. Vitrek recommends selecting the “Stand-by” state
prior to switching the POWER switch OFF, to afford the highest level of
protection both to any circuitry connected to the instrument and to protect the
instrument from inadvertent application of external signals.
Connecting to the OUTPUT Terminals
To deliver voltage, current, or temperature to your test equipment, connect it to
the binding-post terminals using banana plugs, spade leads or wire. When a positive polarity of output is requested, the RED terminal is the positive terminal and
has the requested current flow.
Notes:
1) The terminals are automatically configured as input terminals when the
2000M instrument is set to the “Measure” mode.
2) In cold junction compensation mode (CJC), the output connectors are wired
in parallel with a female rear-panel mounted connector.
Displaying Instrument Status
The DC calibrator instrument offers the flexibility of setting the output level and
setting the instrument’s status to “Standby” or “Operate”. This is done following
the application of power. The display shows the output level and status following
the messages associated with the power on internal tests. With the instrument in
the user-selectable “Standby” mode, the output connectors are disconnected internally.
The following example is seen in “Operate” status, which means the output level
is actually being produced at the output terminals of the instrument. Examples of
the output level and status displays are:
< +10.00000mV >
The following example is seen in “Standby” status, which means the output terminals are open circuited internally.
<+ 10.00000mV Stby >

Operating the 2000 Instrument 25
The displayed output level will be present when the instrument returns to “Operate” status.
Displaying Mode Options
The menu-selectable modes display the opposite selection that is presently active
in the instrument. For instance:
When “Select Operate” displays, the instrument is actually in “Standby”.
When “Select Standby” displays, the instrument is actually in the “Oper-
ate” mode.
When “Start Adjust” displays, the instrument is in the “End Adjust” or
“Operate” mode.
When “End Adjust” displays, the instrument is actually in “Adjust” mode.
When “Lock . . . Rng” displays, the instrument may be in “Unlock . . .
Rng” or the “Operate”or “Standby” mode.
When “Use Active CJC” displays, when the instrument is in “Passive
CJC” or “Operate” mode.
When “Use Passive CJ” displays, the instrument is actually in “Active
CJC”.
Selecting “Operate” or “Standby”
In “Standby” mode the2000 instrument internally open circuits its output terminals. This ensures you and the instrument itself are safe from current and voltage.
When the instrument is in the “Standby” state the characters “Stby” are displayed
at the
right-hand end of the display. When the instrument is in the “Operate” state
then this area is blank in the display format.
To change the mode from “Operate” to “Standby” (or vice versa):
1. Press the MNU key. Depending on the mode, the display will show one of
the following:
< Select Operate > or < Select Standby >
2. Press any of the Units/Enter keys (V, A, ºC or ºF) to display the output (val-
ue) in terms of the displayed mode.

2000I & 2000M Instrument’s User Guide, Revision B
26
3. The display then returns to displaying the selected output level and mode.
The output terminals will either be open circuit–if “Standby” was selected, or
at the requested output level–if “Operate” was selected.
Caution: Prior to selecting the “Operate” mode, check the displayed output lev-
el. If the connected external circuitry is incompatible with the selected output
level, then this circuitry could be damaged when changing to “Operate” mode.
Numeric Data Entry
At various places in the following procedures, the user is requested to provide
numeric data input to the instrument, this paragraph describes the actions required.
Numeric data entry is initiated by pressing a numeric key on the front panel (i.e.,
the digit keys 0 through 9 or the decimal point key). The display then shows the
entered numeric in the left-most character position of the display and the remaining portions of the display will be blank. The cursor will automatically move to
under next possible character entry point, showing the position into which the
next key press will be placed. (Leading zeroes, prior to a decimal point or prior to
a non-zero numeric, are ignored.)
Up to 7 digits plus a decimal point may be entered, entries beyond this are ignored. If no decimal point has been pressed, it is assumed to be following the last
digit pressed (e.g., an entry of
The multiplier keys (m and u) may be used during numeric entries. Thus entries
0.001 and 1m are equivalent. Note that certain entries must use a multiplier,
of
e.g., if an entry of
If an error is made during numeric entry then several options exist for correcting
the data, prior to terminating the entry. The steps are the same for a new entry or
during a prompted entry.
0.00000012 is desired, then this must be entered as 0.12µ.
124 is equivalent to an entry of 124.0).
To correct a data entry error:
1. Press the CLR key. This initializes the entry point either to a blank area or the
previous data.

Operating the 2000 Instrument 27
2. Enter or reenter the entire numeric. If the CLR key is pressed at this time,
then the numeric entry is aborted, the display returns to the previous display.
3. If an incorrect multiplier key is pressed, then simply press the correct multip-
lier to overwrite the previously selected incorrect one. If no multiplier is required, but one is inadvertently selected, then press this multiplier a second
time to clear it.
4. If the decimal point is inadvertently pressed, then press the decimal point
again in the correct position to override the previous entry.
The previous sequence for numeric entry is generally used throughout all entry
sequences. Where specific differences exist refer to the following paragraphs for
an explanation.
Direct Entry of Required Output Level
When the display shows the actual output level and status, the required output
level may be entered. Key in the numeric data followed by the required multiplier
(if desired), and the required units (the units key terminates the entry). The following entries are examples of this procedure.
If the required output is a voltage or current, then the required numeric data is
entered (with a multiplier if desired) followed by the required V or A units key.
To set the output to: 11.2342 V
1. Press the following keys: 1 1 . 2 3 4 2 V
2. The display then shows the requested output level:
+11.23420 V
To set the output to: -10mV
1. Press the following keys: 1 0 +/- m V
2. The display then shows the requested output level:
-10.00000mV
To set the output to: 20.0035mA
1. Press the following keys: 2 0 . 0 0 3 5 m A
2. The display then shows the requested output level:
+20.00350mA

2000I & 2000M Instrument’s User Guide, Revision B
28
Note that the output level is displayed using the same multiplier as used during
the entry of the output level, thus entries of:
1V, 1000mV and 1000000uV.
Each achieve an output level of:
that the selection of polarity should be made during the entry of the numeric data,
pressing the +/– key before pressing any numeric keys causes the present output
level to reverse its polarity.
Caution: For voltage outputs always specify value in millivolts to prevent dam-
age to equipment.
If the entered output level is beyond the capabilities of the instrument, then the
closest possible output level is selected, and a warning message is displayed for
approximately two seconds.
1V, but the display format will differ. Note also
Changing Displayed Multiplier
The output level is displayed using the same multiplier used during the data entry.
Pressing the same multiplier key as is presently displayed will deselect the multiplier.
To reformat the display data use the multiplier keys to select the desired format
for the output level. Pressing the multiplier key that is not presently displayed,
reformats the display. See the examples below.
To deselect the multiplier:
1. For example: if the display is: +10.00000mV
2. Press the
m key to change the display to: +.0100000 V
To use the selected multiplier:
1. For example: if the display is: +10.00uV
2. Press the
m key to reformat the display to: +0.01000mV

Operating the 2000 Instrument 29
And
1. For example: if the display is: +.1000000 V
2. Press the µ key to reformat the display to: +100000. µV
Direct Entry of Temperature Data
The temperature of the hot junction of the thermocouple system to be simulated
may be directly entered similarly to entering output voltage or current. The difference is that the display format is fixed. And although the multiplier may be
used numerically during the entry, the display format is unaffected.
For example: If
lected. The display format used for temperature simulations also includes information regarding the thermocouple type.
Examples of the format used are:
+1000.00°C R and +1000.00°F R
120mºC is entered, then a temperature of 0.12ºC will be se-
In both cases, the selected thermocouple type is “R”. For details on the method
used to select the thermocouple type, cold junction compensation technique and
cold junction temperature, refer to Thermocouple Simulation or Measurement
Set-Up paragraph.
Reversing Polarity of the Present Output Level
As previously mentioned, the polarity of the present output level (or simulated
temperature) may be reversed by simply pressing the +/- key.
1. If the displayed output level is
2. Press the +/- key to change the output level to:
And
1. If the displayed simulated temperature is: +100.00ºC R
: +1.000000 V
-1.000000 V

2000I & 2000M Instrument’s User Guide, Revision B
30
2. Press the +/- key to change the simulated temperature to: -100.00ºC R
Note that unlike voltage or current output levels, the limits of available simulation
temperatures are not identical in both polarities (in general). If the attempted temperature exceeds these limits, then the simulation temperature will be set to the
limit at the requested polarity and a warning message will be displayed for approximately two seconds.
Adjusting Output Level or Simulated Temperature
The 2000 instruments allow you to incrementally step up, or down, the output
level and to incrementally step up, or down, the hot junction simulation temperature. Use this “Adjust” mode to perform calibration of an external unit of equipment. During a calibration procedure the 2000 instrument will display each
modified output level of the equipment being calibrated. This function allows for
any error in the equipment to be highlighted. This section describes the method
used to perform this action.
To access “Adjust” mode:
1. Press the MNU key and then an arrow key: 2, 4, 6, or 8 repetitively until the
adjust choice displays:
2. Press any of the Units/Enter keys (V, A, ºC or ºF
mode. The display then returns to displaying the selected output level, with
the least significant displayed digit flashing (showing the size of the increment that will be used).
During the “Adjust” mode of operation, the following changes to the display format occur:
< Start Adjust >
) to select the “Adjust”
The display no longer shows the “Stby” characters at the right hand end of
the display when in “Standby” mode.
The multiplier is automatically selected to provide the required resolution
in the display. The previously described ability to control the multiplier
used in the display format is inactive.
The thermocouple type data is no longer provided in the display.

Operating the 2000 Instrument 31
The amount by which the output has been deviated from the initial value is
shown in the display.
The level present when the “Adjust” mode was initiated is referred to as the no-
minal output in this document. Examples of display formats during “Adjust”
mode are shown below, with the increment digit underlined for clarity.
If the initial output level is: –1.0 V and no adjustment had taken place,
then the display shows: 1.000000V + 0.0µV
If the initial output level is: +10.0mV, and the output is adjusted to:
10.028mV, then the display shows: +10.02800m – 28µV.
The displayed deviation shows the amount the item being calibrated is in error.
Specifically it shows the opposite polarity to the amount the output level was
deviated, thus the nominal value is the addition of the actual output level and the
displayed deviation. The deviation always displays using the lowest possible multiplier, therefore:
A voltage deviation of up to 999uV is displayed using the µ multiplier.
A voltage deviation of up to 999mV is displayed using the m multiplier,
and
A voltage greater than 999mV is displayed without a multiplier.
Current output levels and deviations are displayed similarly to the voltage output
levels and deviations shown above, with the exception that the deviation multip-
lier may be
keys.
An example of a simulated temperature deviation is shown below. Note that the
format is slightly different from a voltage or current output in that multipliers are
not used for either the deviation or the simulated temperature. The maximum
deviation possible is:
ture beyond this limit will be ignored:
p, n, µ or m as required. Note that only µ and m are Units/Enter
+/– 99.99ºC or ºF. Any attempt to deviate a tempera-
+1000.00+10.00ºC
Increasing or Decreasing Output Level
After the “Adjust” mode has been initiated, the output level or simulated temperature may be increased or decreased by using the
, 8 (up arrow) key or

2000I & 2000M Instrument’s User Guide, Revision B
32
2(down arrow) key. The output level or simulated temperature is incremented
or reduced by the value of the selected (flashing) digit with full under/ and overflow carry to the remaining digits (including carry through zero).
Changing Adjustment Value
As explained in the preceding paragraph, the output level (or simulated temperature) is adjusted by the value of the flashing digit in the display. This can be adjusted, within the constraints of the displayed value, by pressing the 4(left
arrow) key, which moves the adjustment digit to the left, or the
key, which moves the adjustment digit to the right. Any attempt to shift the adjustment digit out of the present display window is ignored.
Terminating Adjust mode
Terminating the “Adjust” mode of operation is achieved using the MNU key once
and arrow keys repetitively. Here, the display shows the action as:
6 (right arrow)
< End Adjust >
After selection of this action, the output level and status display return to their
normal format. The output level, or simulation temperature, returns to the nominal value, the value that was present when the “Adjust” mode was initiated.
The “Adjust” mode may be terminated by pressing the CLR key, which leaves
the output level unchanged.
Selecting Default Power on Condition
The 2000 instruments allow you to define the state and output level at which the
instrument will commence operation following application of power. The sequence required to select the desired output level and status are described below.
Press the MNU key. A menu displays, prompting you to select either the
“Standby” or “Operate” state.

Operating the 2000 Instrument 33
If neither “Standby” or “Operate” are the desired action at this point, con-
tinue to press any of the arrow keys, or the MNU key until the “Set Defaults” action is displayed: < Set Defaults >
Press any of the Units/Enter keys (V, A, ºC or ºF) to select this action. The
display then prompts to select whether the instrument is to assume the
“Operate” or “Standby” state, following power on, the display
shows: < Select Standby >
If the “Operate” mode is required, then press any of the arrow keys to se-
lect the alternate action: < Select Operate >
When the desired action displays, press any of the Units/Enter keys (V, A,
ºC or ºF) to select the action required. The display then shows the present
default output level, similar to that shown in the example:
+1.000000 V
This shows that the output level following power on will be: +1.0 V
Now enter the desired initial output level, terminating the entry by press-
ing the Units/Enter keys: V or A, as required.
The instrument returns to normal Operation, displaying the present output level
and status. The default values set during this procedure are used when the instrument is next powered ON.
Performing Internal and External Calibrations
Calibration is initiated via the MNU key. Refer to the Maintenance and Calibration chapter.
Range Locking
The F.02 or later firmware versions provide “Range Lock” mode for the 20VDC
and 2VDC, as well as for the 20mA DC current range. These range locking features provide more functionality for calibration and testing of diverse circuits
such as control loops and A/D converters. In locked range mode, the accuracy/offset/resolution specifications for the selected range apply for all entered output levels, including those which would normally invoke a lower range. For
precise testing with extremely small output levels, it is recommended to unlock
the instrument to allow operation in Auto-Range mode.

2000I & 2000M Instrument’s User Guide, Revision B
34
The “Range Lock” mode can be selected by stepping through the menu, similar to
the operation of all earlier firmware versions. The three possible locked ranges,
20V, 2V, and 20mA, will appear in sequence. With the desired range on the display, pressing any one of the Units/Enter keys will lock the instrument in the
shown range. Unlocking the ranges can be accomplished in a similar fashion.
When in locked 20V or 20mA range, output levels below 2.2V or 2.2mA respectively, will not cause the instrument to range down. Similarly, when in 2.0V
locked range, the instrument will not range down when programmed to output
levels below 0.22V. The full ranges are continuous therefore, without the level
switching that would occur in auto-range mode. Range locking can be made the
default (power-up) mode by selecting the “Set Defaults” menu choice.
When in 2.0V locked range, the output level cannot exceed 2.2V, irrespective of
the entered value. As before, when programming values which exceed the instrument's output level capability, the 2000 instruments will automatically go to
“Standby” operation, as these level requests are illegal commands.
Version F.02 accepts 22mA as a valid output level, where earlier firmware versions would only accept output current commands up to 21.999mA, and would
cause the instrument to revert to “Standby” state when programmed to output
22mA.
Calculating Output Mode of Operation
The 2000I, 2000M, 2000IN and 2000MN DC power source instruments have the
capacity to compute the actual output level from an equation entered in the spe-
cific data units of the instrument being calibrated. For example, a process controllers' 4 - 20mA input scaled to yield a 50 to 150psi range of pressure indications.
Further examples of the use of this feature are given in the Applications chapter.
Initiating and Setting-Up the Calculated Output Mode of
Operation
The sequence of key presses required to initiate the “Calculated Output” mode of
operation is as described below:

Operating the 2000 Instrument 35
1. Press the MNU key, the display will then prompt you for selection of either
the “Standby” or “Operate” state as described previously in this chapter.
2. Since neither “Standby” nor “Operate” are desired, press an arrow key until
the “Calculated Output” action is displayed:
< Calculated >
3. Then press any of the Units/Enter keys (V, A, ºC or ºF) to select this action.
4. The equation used by the 2000 instruments to calculate the actual output level
is formed by a straight line passing through two points, which you define.
These two points (called A and B) may be in any order—ascending or descending—and simply require the entry of the actual output level and the
equivalent user entry level at each of these points.
5. The display then prompts you to enter Output A (i.e., the actual output level
for point A), and displays the presently stored data. Press the corresponding
units key (if this data is to be retained) or enter the desired data and units.
6. The display then prompts you to enter User Data A and displays the presently
stored data. Press any units key (if this data is to be retained) or enter the desired data and then press any units key.
7. The display then prompts you to select the required user entry units. You may
sequentially select (for each character position) the desired character by using
the
, 8 and 2keys. Note that both upper- and lower-case characters are
available and up to three characters may be specified. To terminate the selec-
tion of each character press the 6 key and select the next character to be en-
tered, or press any of the Units/Enter keys (V, A, ºC or ºF
entry.
) to terminate the
Note: The list of available characters is as follows, in the order selected:
The $, %, and / characters;
The upper-case alphabet (i.e., A through Z);
The lower-case alphabet (i.e., a through z);
The º and μ characters.
8. The display then prompts you to enter Output B (i.e., the actual output level
for point B), and displays the presently stored data. Press any units key (if this
data is to be retained) or enter the desired data followed by any units key.

2000I & 2000M Instrument’s User Guide, Revision B
36
Note that the units for this data are automatically those previously selected for
the Output A data.
9. The display then prompts you to enter User Data B and displays the presently
stored data. Press any units key (if this data is to be retained) or enter the desired data and then press any units key. Note that the units for this data are automatically those previously selected for the User Data A data.
10. Following entry of the above data, the instrument will then initiate the “Cal-
culated Output” mode of operation.
Operating in the Calculated Output Mode
Operation of the instrument while in the “Calculated Output” mode of operation
is the same as that while in the normal mode of operation, with the following
exceptions:
1. Numeric entries of the required output level are in the user units set during
the set-up of this mode of operation, thus the unit key used to terminate the
entry is discarded.
2. While a multiplier key may be used during the entry, this does not affect the
display format (it is used to scale the entered data however).
3. The “Adjust” mode may be used while in “Calculated Output” mode; howev-
er, the display format is such that the user units are not displayed during the
adjustment process.
4. The data points A and B may be changed while in “Calculated Output” mode
by simply repeating the procedure as was used to initiate this mode. The new
factors replacing those previously used. Note that these data are stored in a
non-volatile manner, thus are available always, even following power-down.
Deselecting the Calculated Output Mode
Deselecting the “Calculated Output” mode of operation is achieved by pressing
any of the Units/Enter keys (V, A, ºC or ºF
action will deselect the “Calculated Output” mode of operation and leave the out-
put level and type unaffected. The display will show the output level corresponding to the previously used user data. This deselecting process may be used as a
check of the entered data.
) without prior numeric entry. This

Operating the 2000 Instrument 37
Selecting Measurement Mode
Use this mode to measure voltage or temperature of another device. With the
instrument in Measure mode, the output connectors automatically reconfigure as
input terminals.
To select Measurement mode:
1. Press the MNU key to access “Operate” or “Standby” modes.
2. If the instrument is presently in the “Operate” state, then select the “Standby”
state.
3. While in “Standby”connect the voltage or thermocouple to be measured.
4. Press the MNU key; again and repetitively press any of the arrow keys until
the “Measure” prompt displays.
5. Press any of the Units/Enter keys to select the Measure mode.
The instrument will then begin measuring the applied voltage, converting it into
the computed temperature for the selected thermocouple type.
To display the measured voltage:
Press the V key.
To show the computed temperature in the respective units.
Press the ºC or ºF key.
To reformat the display using the desired multiplier:
Press the μ or m keys while the display is showing the measured voltage.
Deselecting Measurement Mode
While the instrument is in the Measure mode of operation, the “Output” mode
may be selected in the following manner:
1. Press the MNU key. If the instrument is presently in the “Operate” state, then
disconnect the voltage or thermocouple previously being measured.
2. Repetitively press any of the arrow keys until the “Output” prompt is dis-
played.
3. Press any of the Units/Enter keys to select the “Output” mode.

2000I & 2000M Instrument’s User Guide, Revision B
38
Rear Panel Operation
All the connections available on the 2000 instruments rear panel are dependent on
which options are fitted. Refer back to the Rear Panel Connections and Controls.
Note: In the 2000M instrument, the
couple measurement input, should be taken from the connector mounted on the
rear panel.
thermocouple simulation output, or thermo-
Using Thermocouple Simulation
The type of thermocouple to be simulated or measured may be altered, whether
active or passive cold junction compensation (CJC) is used, and whether the cold
or reference temperature is used. Note that this data is non-volatile, thus may be
selected prior to use, even if the instrument is to be powered down. This option is
available in the 2000M only.
Thermocouple Simulation and Measurement Set-Up
The 2000M instrument’s thermocouple simulation capability is achieved by setting the desired simulation parameters and then commanding the required temperature outputs. Setting the simulation parameters involves the selection of the
desired thermocouple type, the method of cold junction compensation, and the
cold junction temperature (if “Passive CJ” has been selected).
Selecting the thermocouple type involves the using the command shortcut character T followed by the thermocouple type character. For example if a K or an N
type simulation was required, then the string “TK” or “TN” respectively, would
be transmitted to the instrument.
If Active CJC is required, then transmit the command string “J1” to the instrument, while passive mode is selected by the “J0” string. When changing from the
active to the passive mode, the previously used passive mode reference temperature defaults.

Operating the 2000 Instrument 39
Notes:
Selecting and deselecting thermocouple simulation is simply achieved by:
1) Sending a temperature to the instrument, for example: Send the com-
mand string “+22.89C” to select the thermocouple simulation mode
with a simulated hot junction of +22.89ºC.
2) Sending a voltage or current to the unit: for example: The command
string “+10.0V” will set the output level to +10V, which deselects
thermocouple simulation mode.
Always, the Thermocouple Simulation Set-Up data used is that previously defined, thus it is not necessary to redefine these parameters for each simulation
temperature. Terminating thermocouple simulation is achieved by sending the
unit a voltage
string without any numeric data. In this case, the output level simply stays at the
previously Calculated voltage, but terminates thermocouple simulation.
or current output level command, or by sending the “V” command
To achieve Thermocouple Simulation:
1. Press the MNU key, the display will prompt you to select either the “Standby” or “Operate” state.
2. Press any arrow key repeatedly until either one of the following appears:
< Use Active CJC > or < Use Passive CJ >
3. If the instrument is (presently) set to use active CJC the display will read:
“Use Passive CJ”. This feature allows you to select the opposite mode.
4. If the displayed selection is required, then press any of the Units/Enter keys
(V, A, ºC or ºF
To achieve Thermocouple Measurement Set-Up:
1. Press the MNU key and the display will prompt you to select either the
“Standby” or “Operate” state.
), otherwise press the CLR key to abort the selection.

2000I & 2000M Instrument’s User Guide, Revision B
40
3. Neither “Standby” nor “Operate” are desired actions, therefore continue to
press any of the arrow keys repeatedly until the “Thermocouple” set up ac-
tion is displayed.
4. Press any of the Units/Enter keys (V, A, ºC or ºF) to select “Thermocouple”.
5. The display then shows the default thermocouple type to be simulated simi-
larly to the display shown below. Here a type “R” thermocouple is to be simulated.
6. Then select the required default thermocouple type to be simulated by re-
peatedly pressing the 4(left arrow) or 6 (right arrow) keys until the required thermocouple type is underlined. The selection is then made by
pressing any of the Units/Enter (V, A, ºC or ºF) keys.
7. If “Active CJC” has been selected, then the unit will return to normal opera-
tion, displaying the present output level and status. If the instrument is presently performing a thermocouple simulation, then this data will be used
immediately, or it will be used when the temperature to be simulated is entered. Otherwise, the instrument prompts you to enter the reference junction’s (reference) temperature for thermocouple simulations.
8. The display will show the presently stored data similarly to:
9. Next enter the required default reference temperature.
10. Terminate the entry by pressing the required Units/Enter keys (ºC or ºF).
< Thermocouple >
< Type-BEJNRST >
+1000.00ºC
Notes:
1) If a single junction thermocouple is to be simulated, you can select ei-
ther 0ºC or 32ºF as the reference temperature. The hot junction temperatures will be entered as the temperature rise of this junction goes
above the ambient temperature, or the present ambient temperature
may be entered as the reference temperature. In this case the entered
hot junction temperature will be absolute temperatures.
2) The reference temperature may be entered in either ºC or ºF units. The
units used for display during the actual usage of this mode are determined by those used to enter the hot junction temperature.
The instrument will then return to normal operation, displaying the present output
level and status. If the instrument is presently performing a thermocouple simulation, then this data will be used immediately, otherwise this data will be used
whenever a temperature to be simulated is entered.

Operating the 2000 Instrument 41
For Thermocouple specifications refer to Appendix A—Power Output Capacity
Specifications.
Deselecting Thermocouple Simulation Mode
To deselect the thermocouple simulation mode, select for a voltage or current
output by pressing the Units/Entry keys (V or A). This method offers the ability
to view the actual output level being used for the Thermocouple Simulation.

2000I & 2000M Instrument’s User Guide, Revision B
42

Using the Memory Options 43
Using the Memory Options
The option called MEM is a 10-step memory, which allows you to program up to
10 output levels. These levels may be recalled speedily from either the front panel
or by the rear panel mounted contact closure input.
The ten memory steps are automatically stored in electronic nonvolatile memory. Thus, the stored data are maintained during removal of power from the
instrument, including discharge of the internal battery.
Memory Organization
The memory steps are numbered (in order) from 0 to 9 inclusive. Each of the 10
programmable memory steps may contain the following data:
Whether the step is Active or Inactive. If a step is flagged as Inactive, the
remaining data within the step is maintained but a recall of the memory
steps will skip this step.
The required output level multiplier to be used for display.
The required output units.
Any output within the capability of the instrument may be programmed.
The multiplier used during the entry (if any) will be used to format the
displayed output level when recalled.
Whether the output is to be placed in the “Operate” or “Standby” state
when the step is recalled.
Front Panel Memory
The front panel memory steps may be either edited or recalled by initially pressing the MNU key.

2000I & 2000M Instrument’s User Guide, Revision B
44
Editing Memory Steps
1. Press the MNU key twice. The display now shows the choice:
< Edit Memory >
2. Press any of the ENTER keys to select this choice. The display now shows
the prompt for the memory step number to be edited, for example:
< Press Memory 5 >
3. You may press the CLR or MNU keys at this time to terminate the procedure.
Press the numeric key corresponding to the memory to be edited. The display
now shows the present status of the selected memory step, either:
< Inactive >
or
< Active >
4. The displayed status of the memory step may be toggled by pressing any of
the arrow keys or the MNU key. When the desired status is shown, press any
of the ENTER keys to select. If the Inactive state was selected, the display
will return to the prompt (step 2 above):
< Press Memory 5 >
5. The display then shows the presently stored output level, multiplier and unit.
The memory step number being edited is shown in the right-hand end of the
display.
6. You may now enter the desired output level into the memory step. The mul-
tiplier used during this entry (if any) will be used for formatting the display
following recall of the step. The entry is terminated when a valid Units/Enter
key (V, A, ºC or ºF) is pressed. The display now shows the present selection
as to whether the instrument will be in the “Operate” or “Standby” state following recall of the step. The memory step being edited is shown in the
left-hand end of the display.
7. You may toggle the displayed status for the memory step by pressing any of
the arrow keys or the MNU key. When the desired status displays, select it by

Using the Memory Options 45
pressing any of the Units/Enter keys. The display is then returned to the
“Press Memory” prompt, as shown in step 2 above.
Recalling Memory Steps
Front panel memory steps may be sequentially recalled by following the procedure shown below.
1. Press the MNU key and arrow key until the display shows the selection:
< Select 1st Mem >
2. Press any of the ENTER keys. If all memory steps had previously been pro-
grammed as Inactive, then an error message is displayed and no memory step
is recalled. Otherwise, the lowest numbered memory step which has been
previously programmed as Active will be recalled.
3. When the present output level has been recalled from a memory step, the step
number is displayed in the right-hand end of the display (except when the
output level is being adjusted). You may select the next higher numbered Active memory step by pressing the 8(up arrow) key, or the next lower numbered Active memory step by pressing the 2(down arrow) key.
4. Return the instrument to normal operation by pressing the MNU key. The
display will show the choice:
< Exit Mem Mode >
5. Now press any of the Units/Enter keys.
Rear Panel Memory
You may sequentially recall memory steps by closing contacts between the connections to the rear panel contact closure input. This input has a nominal open
circuit voltage of 5V DC with a nominal source impedance of
bounced for 50ms at both closure and release. Note that closure will initiate selec-
tion of the next Active memory step or the lowest numbered memory step (if none
is presently in use). These contacts are electrically isolated from the output terminals of the instrument. This rear-panel connector is located in the upper, center
and is a 0.101 sub-miniature phono socket. The recommended mating plug is
obtainable from Switchcraft® as part number 850. The connector is provided
4.7KΩ, and is de-

2000I & 2000M Instrument’s User Guide, Revision B
46
with each instrument as standard and when MEM is ordered. (Vitrek part
number C109001001000001).
General Memory Considerations
Memory of Instument Status
The contents of a memory step only affect the selection of the “Operate” or
“Standby” status when the memory step is initially recalled. To change the state
following recall use the method outlined in Front Panel Operation.
Editing Memory Steps
The contents of a memory step may be edited at any time, if the memory step
being edited is presently in use, then note that the present output level will be
updated when the memory step is next recalled.
Adjusting the Output Level
The “Adjust” mode of operation of the instrument may be used in conjunction
with recalling memory steps. Recalling a memory step while in this mode sets the
actual output level and the nominal output level to that recalled from the memory.
In this manner you are not required to deselect “Adjust” mode when sequentially
recalling steps from memory.
Thermocouple Simulation
Only the simulation temperature and the temperature units are stored in a memory
location. This feature allows you to change thermocouple type or change between
Active and Passive Cold Junction Compensation without reprogramming the
memory steps.

Using the Memory Options 47

2000I & 2000M Instrument’s User Guide, Revision B
48
Applications
This chapter describes specialized applications for using the 2000I, 2000M,
2000IN and 2000MN DC power source instruments and some ways to ensure the
quality of the power source.
The front panel terminals are used to:
Provide stable low-level DC voltage and current;
Calibrate instrumentation found in process control environments and engi-
neering laboratories;
Compute output;
Perform as transfer standards of various values; and
Provide reference sources in instrumentation circuits.
The (2000M) rear panel connector is used to:
Simulate thermocouple systems; and
Measure thermocouple output.
Low-level DC Power
The 2000 instruments have ability to provide 24-hour stable low level (DC) power via the front panel terminals. Voltage stability runs at the 10V level of 2.1ppm
and current stability runs at the 1mA level of 6.0ppm.

Applications 49
Ensuring Stable Voltage Connections
When connecting to a 2000 instrument for low-level DC voltage operation, take
care that extraneous thermal E.M.F. voltages are reduced to minimal levels.
These thermal E.M.F. voltages may be caused by temperature differentials between the binding posts and the internal ambient in the instrument or by temperature differentials between the connection leads and the binding posts.
• Ensure that no drafts are present across the front panel terminals, particularly from air conditioning or heating outlets, as these can easily cause
thermal gradients between the terminals and the internal ambient in the instrument.
• Use high quality, high purity copper wiring to connect to the front panel
terminals and ensure the thermal mass of each lead is similar. The effects
of drafts are dramatically increased if materials other than copper and variations in gauge are used.
• If connections are made using direct wires (i.e., terminal clamps) then:
Use the thinnest wire possible (26 AWG or smaller) to reduce thermal
mass. The temperature of the thinner wire easily matches the terminal.
This wire additionally reduces the effect of drafts due to the reduction
of thermal shunting from the internal ambient of the instrument.
—Or—
Use very heavy gauge wire (16 AWG or larger), achieving the same
effect by pulling the terminal to the same temperature as that of the
wire.
• Avoid using standard, commercial banana jacks. Vitrek en-sures the SP48
and PL36 options are manufactured from highly pure copper and gold
plating, ensuring they exhibit low thermal effects.
• Take care to reduce the effects of interference when connecting the 2000
instruments to equipment that has little line frequency rejection, or in environments where non-line frequencies may be injected into the connections.
• Commercial coaxial cable may be used for extreme cases of interference;
however, the effects of thermal E.M.F. voltages will degrade performance.
In these cases the Vitrek SP48 option is recommended for low thermal
effects.

2000I & 2000M Instrument’s User Guide, Revision B
50
In most circumstances, the use of a tightly twisted pair of 28AWG wires is
recommended, as this both reduces the effects of thermal E.M.F. voltages
and achieves the close coupling required to reject interference.
Route all line wiring and any digital wiring as distant as possible from the
analog instrument connections (particularly computer interface and networking cables). For routing distances greater than three feet, use a
shielded cable or twisted pair to connect to the terminals
When the instrument is driving a load, consider the impedance of the wiring.
With a 10mA load, the cabling will drop lμV for every 0.1mΩ of cable resistance.
Check that sufficient wire gauge is used and that the connections to the terminals
are clean and tight.
Ensuring Stable Current Connections
The considerations for low-level DC currents are similar to those for voltages, but
thermal E.M.F. voltages and lead resistances have no effect on performance. The
primary effects in this mode of operation are those of interference, cable leakage
and dielectric storage.
.
The effect of interference on low level currents is far more pronounced
than for DC voltages.
For high performance use tightly coupled twisted pairs and/or shielded
cables. When using shielded cables, note that while electro-magnetic interference is essentially eliminated, the capacitive injection is eliminated in
the center conductor of the cable (only). The twisted pair balances the injection thus has less effect.
Some instrumentation has far different noise rejection characteristics in
one terminal than the other—commonly, one terminal is the virtual earth
of an amplifier. Reverse the connections to find the best orientation, particularly when shielded cables are being used.

Applications 51
When dealing with low-level DC currents at high compliances, the effects
of leakage currents become dominant. To limit leakage use the correct insulation throughout the cabling, and keep all connectors and front panels
free of grease and dirt. Note that most low-level leakage currents are
non-ohmic in nature and tend to be a constant current leakage for compliances above a few hundred millivolts. Insulators with high-insulation
resistance ratings measured at several hundred volts may not exhibit this
performance when operated at low levels.
For general use P.T.F.E. (known as Teflon®) is effective for low lea-
kage performance. Keep free of grease.
For high compliance voltages use Polyethylene or Polypropylene to
lessen the effects of dielectric storage, which results in long settling
times. Polyethylene is the insulation used in most high-quality shielded
cables.
To eliminate leakage problems without long settling times use
non-insulated wiring and maintain an air gap between wires. However,
this method may cause excessive interference problems if the cables
are long or the environment is particularly adverse.
Route connecting cables with regard to line wiring. Low-level DC currents
are sensitive to interference where high impedance levels are involved. In
extreme cases the connection of a high quality Polypropylene capacitor
(usually 10nF) across the terminals of the instrument may be used, but the
effect on settling time (particularly at high compliances) must be considered.
A primary source of interference is the movement of personnel near the
cables. This effect is caused both by the perturbation of the line frequency
field near the person and the direct change in capacitance between the person and the cabling. These effects are reduced by using shielded or twisted
pair cables, and may be further reduced by employing anti-static procedures in the surrounding environment to reduce the DC potential between
the moving person and the cabling. In general, the only method of eliminating this problem is to avoid excessive movement near the cables, and to
keep these cables as short as possible.
Low-Level Application Summary
To reduce thermal E.M.F. voltage interference to acceptable levels:
Use twisted pairs of 26 AWG (or smaller) wire.

2000I & 2000M Instrument’s User Guide, Revision B
52
Use the Vitrek option SP48 shielded lead set.
To reduce current interference to acceptable levels:
Use twisted pairs of 26AWG (or smaller) wire with Teflon® insula-
tion.
Use Polyethylene insulated shielded cables or short lengths of bare
wire.
In both voltage and current low-level applications, reduce the movement
of personnel near the instrument and cabling to a minimum, and place all
line wiring and digital cabling at a distance from the analog signal cables
or wires.
Process Control Industry Applications
The 2000 instruments can be used in the process control industry:
For calibration and maintenance applications.
Wherever an accurate source of DC voltage or current is required.
As a strain gauge bridge simulator with bridge supplies and as a RTD
thermometer bridge simulator with bridge supplies.
As an external DC supply in remote sites.
As an accurate simulator of most transducers.
Calibrating in Process Control Environments
The 2000 instruments may be used to calibrate low-level DC voltage or current
equipment, such as, chart recorders, nullmeters, galvanometers, analog to digital
and digital to analog convertors. The 2000 instruments meet the in-field calibration requirements of the process control industry.
Caution: Connecting the 2000 instruments to an active process control system
may adversely affect that system’s safety. Note that the 2000I and 2000M instruments do not have intrinsic safety certification for process control systems.

Applications 53
Using the Adjust Mode to Check Calibration
For this application the “Adjust” mode of operation is used to measure the error
of the equipment being tested. To test, simply set the calibrator to the required
output level and then adjust the output level until the equipment being calibrated
reads the correct value. The display of the calibrator will then show the actual
error of the unit. When one unit has been calibrated, remove the calibrator from
the “Adjust” mode. The output level will then revert to the nominal output level
in readiness for calibration of the next unit.
Calibrating Transducer Systems:
Connect the 2000 instrument in parallel with a 4 – 20mA or a 1 – 5V transducer
output to modify the transducer’s indicated output.
Adjusting Calibration of Multiple Units
The drive capabilities of the 2000 instruments are sufficient to adjust the calibration of multiple units of equipment simultaneously. In voltage mode this is
achieved by connecting all the units to be calibrated in parallel. 10 to 20 units can
be adjusted simultaneously at voltages above 220mV. At voltages below 220mV
the 50
output impedance of the 2000 instruments becomes significant.
If the units being adjusted have 10M
(or lower) input impedance then a correc-
tion has to be made for the output impedance of the 2000 instrument.
The output impedance of the 220mV range is 45.048 • 0.1%
The output impedance of the 22mV range is 49.998 • 0.1%.
Thus the correction required to allow for the input impedance of the units
being adjusted is:
Correction = (ZO + Z
IN
) / Z
IN
Where the required output voltage should be multiplied by Correction.
Z
is the actual output impedance of the 2000I or 2000M instrument.
O
Z
is the combined input impedance of the instrument being adjusted.
IN
The increase in the limits of error due to applying this correction
is: Error = ( ( 1000 + EZ
) * ZO) / Z
IN
IN

2000I & 2000M Instrument’s User Guide, Revision B
54
Where EZ
is the tolerance of the input impedance
IN
(in ppm, 1% = 10000ppm).
Where Error is the increase in the limits of error (in ppm).
Thus, if the combined input impedance is 1M • 0.1%, at an output level of
l00mV the increased uncertainty is an insignificant: 0.09ppm, and the correction
is 1.00004505—an increase in the output level requested of 45.05ppm.
Setting Scale and Offset Factors for Computed Output Mode:
The equation used by the 2000 instruments to compute the output level from entered data while operating in this mode, is:
Output level (scale factor * entered data) + offset factor
The instruments automatically calculate scale factor and offset factor from the
data at points A and B as follows:
Scale factor (outputB - outputA ) / (userB - userA)
Offset factor = outputB - (scale factor * userA)
The 2000 instruments simulate a 4 - 20mA loop whose output corresponds to a
pressure span of 50 to 150psi:
outputA = 4mA userA = 50psi
outputB = 20mA userB = 150psi
After entering this data (selecting “Calculated Output” mode), enter data in the
units of psi, the 2000 instrument will then output the corresponding current (e.g.,
for an entry of 100psi, the output is 12mA). Note that any Units/Enter keys (V, A,
ºC or ºF
The 2000 instruments can be operated in parallel with a sending unit of a transducer having the above characteristics. Use the instrument to modify the transducer indication by entering the data entry as given above, except with the 4mA
offsets removed. Thus output
and user
) may be used to enter data while in this mode.
and outputB will be 0mA and 16mA respectively,
A
and userB will be 0psi and 100psi respectively. The instruments output
A

Applications 55
the required correction, in the units used by the transducer. Note that this correction may be of either polarity.
Note: The entered data are non-volatile, thus they may be entered at your base
location, and then be used at a remote site without the need to reenter these data.
Refer to Using the Memory Options.
Adjusting Current Measuring of Multiple Units
The 2000 instruments may be used to adjust multiple-current measuring equipment simultaneously. This is achieved by connecting the units in series. Here the
18V compliance capacity of the 2000 instrument allows for as many as 15 units
to be adjusted simultaneously. When connecting line-powered current measuring
equipment in series check for excessive leakage-current flowing from an input
terminal to ground. Current leakage does not affect the measurement when a single unit is connected, but each unit will affect the indications of others when connected in series.
Also many highly-sensitive current measuring devices have inferior rejection to
interference on one of their input terminals. When connected in series the interference generated by one unit can adversely affect the performance of the next. To
operate multiple units in series, test for loss of accuracy during this procedure.
Before adjusting any equipment check the calibration of each unit individually,
then connect the equipment in series and recheck.
Note: The low output impedance of the 220mV and 22mV ranges of the 2000
instruments enable a small correction factor to be easily applied when the instrument is driving low load impedances.
Simulating Thermocouple Systems
2000M and 2000MN instruments can be used to simulate single and dual junction
thermocouple systems. This instrument offers the choice of using the internal
cold junction
junction. When using internal cold junction
couple simulation,
reference junction to achieve thermocouple simulation, accuracies approach
0.02ºC
compensation or using an external high accuracy ice-point reference
compensation to achieve thermo-
the accuracies approach 0.1ºC. When using external ice-point

2000I & 2000M Instrument’s User Guide, Revision B
56
The 2000M and 2000MN instruments simulate the thermocouple system by com-
puting the hot and reference junction-E.M.F. voltages from the N.I.S.T. tables
with linear interpolation. The output level is set to the difference between these
two levels (V
HOT
-V
). Thus single thermocouple (uncompensated) systems can
REF
be simulated by setting the cold junction simulation temperature to 0ºC using the
“Passive CJ” mode.
Select the “Active CJC” mode of operation in the 2000M or 2000MN instrument,
and connect the equipment being calibrated to the rear panel connector using the
correct thermocouple wire (verify polarity). The instrument will automatically
measure and compensate for any ambient temperature at the actual junction between the connecting thermocouple and the CJC #80-BARS.
To set up thermocouple simulation:
1. Select the thermocouple type: B, E, J, K, N, R, S or T;
2. Choose active or passive cold junction compensation;
3. Enter the required hot junction simulation temperature in either ºC or ºF
units.
Note: In cases where an external reference junction exists, and this junction has a
known temperature with an accuracy of better than 0.1ºC, the 2000M or 2000MN
should be operated in the PASSIVE CJC mode.
Measuring Thermocouple Outputs
The 2000M or 2000MN also offers thermocouple measurement capabilities. You
can calibrate both the receiver and the thermocouple itself
To measure a thermocouple output:
1. Select the desired thermocouple type and cold junction compensation method.
2. Connect the thermocouple to the 2000M or 2000MN instrument.
3. Select the “Standby” state.
4.
Select the Measure mode of operation.
.

Applications 57
Engineering Laboratory Environment Applications
The 2000 instruments have many uses in the Calibration and Engineering Laboratory environments.
Short-Term Transfer Standards
The 2000 instruments can be used for medium accuracy transfers in the calibration laboratory based on their:
DC voltage 24-hour stability (at the 10V level) of 2.1ppm, and
DC current 24 hour stability (at the 1mA level) of 6.0ppm,
The excellent low level stability of these instruments also enables them to be used
as a bucking type of source for inter-cell comparisons with 0.2μV uncertainty
below 22mV. Refer to Table 1.
The short-term stability for current output enables the use of the 2000 instruments
for resistance transfers. In this application the 2000I or 2000M instrument is set
to a suitable current for the resistance to transfer—a 10V drop across the resistor.
A high accuracy digital voltmeter is used to measure the voltage drop across the
standard. On the same the standard resistor is then replaced by a resistor of unknown value (one within a 10:1 ratio of the standard).
The value of the unknown resistance is then given by the formula:
R
unknown
= R
standard
* (V
unknown
/ V
standard
)
Note that this method yields better performance, at higher values, than the normally used practice of placing the two resistors in series and measuring the voltage across each resistor. This is because the voltmeter usually has leakage
current flow to ground in one terminal (usually the LO terminal), which unbalances the circuit for the two measurements. In this method, the circuit is in the
same conditions for each measurement, thus this effect is eliminated. The major
item affecting accuracy is the finite output impedance of the current source,
which is only of importance when the two resistor values are significantly different.

2000I & 2000M Instrument’s User Guide, Revision B
58
The 2000 instruments have an output impedance greater than 1011, thus this
affect is not of importance for unknown values below 1M. The following table
gives the uncertainty of the transfer for various values of standard and unknown
resistors. See Note following table.
Table 1: Resistance Values for Transfer
STANDARD UNKNOWN CURRENT
100 10 20mA 5.75ppm 11.25ppm
10 100 20mA 5.75ppm 7.25ppm
1K 100 10mA 6.5ppm 8.5ppm
1K 1K 10mA 6.5ppm 7.6ppm
10K 1K 1mA 6.1ppm 8.1ppm
10K 10K 1mA 6.0ppm 7.1ppm
100K 10K 100μA 7.5ppm 9.5ppm
100K 100K 100μA 6.5ppm 7.6ppm
1M 100K 10μA 20ppm 22ppm
1M 1M 10μA 10ppm 11.1ppm
10M 1M 1μA 137ppm 139ppm
10M 10M 1μA 37ppm 38.1ppm
100M 10M 0.1μA 1300ppm 1300ppm
100M 100M 0.1μA 307ppm 308ppm
BASIC UNCER-
TAINTY
UNCERTAINTY
WITH 1PPM + 1μV
DVM STABILITY
Note: The Basic Uncertainty figures in this table are those associated with the
instrument’s stability only, while the overall uncertainty figures are those including 1ppm + 1V uncertainty for the voltmeter, which can be achieved with a high
precision DVM, e.g., Hewlett-Packard 3458A. Note also that, in a standards
la-
boratory environment, up to 2:1 better uncertainties are readily attainable from
the 2000 instruments.

Applications 59
Other Laboratory Applications:
1. Variable voltage or current reference source:
The 2000 instruments may be used as voltage and current reference sources
in most instrumentation circuits, enabling the measurement of reference sensitivity and related effects. The low noise of battery power injects little noise
into the circuitry.
2. Floating voltage or current sources:
The 2000 instruments are able to float up to 500V from ground potential
without danger and with almost no DC or AC leakage to ground or line.
3. Testing circuitry controlled by DC voltages or currents:
The 2000 instruments test circuitry, such as, Voltage Controlled Oscillators,
etc. Their low, wide-band noise output combined with the
high rejection of injected noise, enable them to perform testing tasks usually
done with standard AC powered calibration equipment. The “Adjust” mode
of operation enable these circuits to be rapidly tested for linearity by incrementing the output of the 2000 instrument in user defined steps.
battery power and

2000I & 2000M Instrument’s User Guide, Revision B
60

Calibration and Maintenance 61
Calibration and Maintenance
This chapter describes the procedures for internal calibration, external calibration,
periodic maintenance and internal maintenance of the 2000I, 2000M, 2000IN and
2000MN DC power source instruments.
Internal Calibration
The internal calibration procedure ensures the 2000 instrument’s low-level DC
voltage and current specifications are maintained. Perform an internal calibration
on a periodic basis at 30 day intervals or less and in conditions where the ambient
temperature has changed by more than 5ºC. If the instrument is in use as a transfer standard between sites, perform the internal calibration at both sites.
This sequence performs an operational confidence check of the analog and digital
circuitry and then performs an internal calibration of the zero offsets. The internal
calibration sequence is described below:
To perform an internal calibration:
1. Press the MNU key. The display will prompt you to select either “Standby”
or “Operate” mode.
2. Select neither mode by continuing to press any of the arrow keys until the
INTERNAL CALIBRATION choice is displayed:
3. Press any of the Units/Enter keys (V, A, ºC or ºF
The instrument then performs the internal tests and calibrations automatically.
During these tests and calibrations the display shows the progress, generating
warning messages if any out of tolerance or malfunctioning circuitry is detected.
After completing an internal cal test, the instrument returns to the output level
that was present when the sequence was initiated.
< Internal Cal >
) to select Internal Cal.

2000I & 2000M Instrument’s User Guide, Revision B
62
If any errors are detected during the internal calibration and test sequence, the
instrument displays a warning message:
If the error is minor, such as an error not affecting performance, then the
message displays for approximately two seconds and the sequence is continued.
If the error is major, such as an error that seriously affects the performance
then the message continuously displays and the sequence is suspended at
that stage.
External Calibration
The 2000 instruments require periodic calibration (e.g., physical adjustment)
against external calibration standards to maintain the published specifications.
The period at which these calibrations are performed is dependant on your accu-
racy requirements, as shown in the accuracy tables in Appendix A-Power Output
Capacities Vitrek recommends calibration intervals of 90 days, 6 months or 1
year to meet your in house accuracy needs. For example: in some applications,
such as, general engineering laboratories and process control envi-ronments, the
1 year accuracies may be excessive. In these cases a 3-year interval may be
satisfactory.
Equipment Required to Recalibrate
High precision DC voltage measuring equipment is required to accurately calibrate the 2000 instruments. The objective is an accuracy margin better than those
shown in Tables 2 and 3.
Table 2: Voltage Accuracy Margins
INPUT
LEVEL
10V
1V
100mV
10mV
0
ACCURACY
for 90-day specification
V 92V
52
V 10.5V
6.5
V 1.38V
0.88
V 0.25V
0.2
V 0.1V
0.1
ACCURACY
for 1-year specification

Calibration and Maintenance 63
Examples of equipment with the above capabilities are:
Valhalla® 2720GS (any version);
Fluke® 5440B and Fluke 845AB Nullmeter—used together as a measur-
ing device, Fluke 752A reference divider is also recommended, but not required;
Hewlett-Packard® 3458A Digital DC Ammeter; with opt./A2, manual.
Solartron® 7081 or Datron® 1281 Digital Multimeters, if recently cali-
brated at these levels.
Note: The accuracy required at a zero input level may be achieved by using the
short-term stability of the measuring device, as it simply requires a short circuit
to calibrate the measuring device.
The 2000 instruments require current measuring equipment with the accuracy
requirements shown in Table 3, for a margin of 2:1 or better. Vitrek recommends
using a high-accuracy digital DC ammeter, such as, the Hewlett-Packard 3458A, or a DC voltage measuring device and laboratory standard
resistors to achieve the current measurement accuracies. Use standard resistor
values of 100Ω, lKΩ, 10KΩ, 100KΩ and 1000KΩ respectively.
Table 3: Current Accuracy Margins
INPUT
LEVEL
ACCURACY
for 90-day specification
ACCURACY
for 1-year specification
10mA 210nA 315nA
1mA 15.5nA 26nA
100A
10A
2.1nA 3.2nA
275pA 400pA
0 25pA 50pA
Important Note: The c
ombination of the resistance and DC voltage measurement uncertainty should not exceed the figures shown in Table 2. When calculating the uncertainty of the DC voltage measurement, be sure to include the effects
of input impedance (at the 1V DC level) and the input current of the measuring

2000I & 2000M Instrument’s User Guide, Revision B
64
instrument. Any zero offsets in the measuring system can be compensated for by
calibrating the zero current of the system using an open circuit measurement.
Initiating External Calibration
To initiate an external calibration you may be required to enter a password and/or
the common (global) password.
Important Note: The V or I mode (known state) must be set before perform-
ing external calibration or password entry is ignored.
1. To obtain optimum accuracy, perform an internal calibration immediately
prior to initiating an external calibration.
2. To initiate the external calibration procedure: press the MNU key on the front
panel and then repeatedly press an arrow key (i.e., 2, 4, 6 or 8) until the display shows the following message:
< External Cal >
3. Press any of the Units/Enter keys (V, A, ºC or ºF) to make the selection. If the
instrument has been programmed to require a password for this procedure,
you will be prompted with the following display:
< Enter Password >
4. If no password is requested the following will display:
< Start Ext. Cal. >
5. If a password is required, enter the digits and press a units key (V, A, ºC or
ºF). If the correct password has been entered the following will display:
< Start Ext. Cal. >
If the incorrect password is entered the display will abort after flashing:
< Wrong >

Calibration and Maintenance 65
Note: To abort the external calibration selection at any time, press the CLR
key. You will return the instrument to the output level and status that was
present when the MNU key was initially pressed.
6. In no password is requested or the correct password is entered, press any of
the arrow keys to continue.
7. Whether a password was previously required or not, you may be prompted to
enter a new password:
< New Password >
To bypass entering a new password, press any of the arrow keys to
continue.
To enter a password, press any of the Units/Enter keys (V, A, ºC or
ºF). The following will display:
<Global Password?>
To enter a password at this time, press the digits for the new password
(up to 10 digits). Press the CLR key to abort, as required. Press any of
the Units/Enter keys to place the password in non-volatile storage. Use
this entered password for all subsequent external calibrations. If the
user presses a Units/Enter key (V, A, ºC or ºF), having pressed no numeric keys, then a null password is entered, which effectively disables
the password protection system.
If the previously selected password has been lost, use the common
password for all 2000 instruments, which is listed on the last page of
this user guide. Note that this page/password may have been filed to
prevent access. The following will display:
<Select password>
8. The instrument is ready to begin the external calibration sequence.
Performing External Calibration
The instrument automatically selects the next output level and selects the “Adjust” mode of operation, with the least significant digit as the adjustment digit.

2000I & 2000M Instrument’s User Guide, Revision B
66
Front Panel Key Adjustments
The left and right arrow keys select the adjustment digit, the up and
down arrow keys adjust the selected digit. To abort any external calibration step
press the CLR key. To abort the calibration entirely press the MNU key. To normally end a calibration step—thus entering the adjusted calibration factor, press
any of the Units/Enter keys.
Note: Pressing a Units/Enter key while the displayed deviation is at zero will
effectively skip the procedure to the next calibration
calibration factor.
Important Note: Take precautions against thermally generated voltages during
the execution of the external calibration as extremely low-level DC voltage mea-
surements are required. Be advised of the Applications chapter
ing low-level DC voltage connections.
1. Attach the 2000I or 2000M instrument to a recently zeroed nullmeter.
2. Measure the actual output level of the 2000 instrument using the nullmeter.
Adjust the instrument, using the arrow keys, until the output level is measured
to 0.0
3. Calibrate to an output level of +10.00000mV. Adjust the output level of the
2000 instrument to within 0.2
2000
2000
Nullmeter
V, within 0.1V, 0.2V, 1V and 10V respectively.
V of 10mV as described in step 2.
Nullmeter
100:1 Divider
point without affecting the
discussion regard-
1V DC
Source

Calibration and Maintenance 67
This output level may be measured directly by using:
A high precision DMM, or;
A nullmeter to monitor the deviation between this instruments' output
level and that of a precision calibrated 10mV source, or;
The preferred method of using a nullmeter to monitor the deviation be-
tween this instrument’s output level and the output of a high precision
100:1 attenuator whose input is obtained from a precision calibrated
1V source.
4. Calibrate to an output level of +100.000mV. Adjust the output level to with-
in 0.7
V of 100mV as described in step 2.
2000
Nullmeter
100:1 Divider
10V DC
Source
This output level may be measured directly by using:
A high precision DMM, or;
A nullmeter to monitor the deviation between this instrument’s output
level and that of a precision calibrated 100mV source, or;
The preferred method of using a nullmeter to monitor the deviation be-
tween this instrument’s output level and the output of a high precision
100:1 attenuator whose input is obtained from a precision calibrated
10V source.
5. Calibrate to an output level of +1.000000V. Adjust the output level of the
instrument to within 6
V of 1V as described in step 2.

2000I & 2000M Instrument’s User Guide, Revision B
68
2000
This output level may be measured directly by using:
Nullmeter
10:1 Divider
10V DC
Source
A high precision DMM, or;
A nullmeter to monitor the deviation between this instrument’s output
level and that of a precision calibrated 1V source, or;
The preferred method of using a nullmeter to monitor the deviation be-
tween this instrument’s output level and the output of a high precision
10:1 attenuator whose input is obtained from a precision calibrated
10V source.
6. Calibrate to an output level of +10.00000V. Adjust the output level of the
2000 instrument to within 60
2000
Nullmeter
V of 10V as described in step 2.
10V DC
Source
This output level may be measured directly by using:
A high precision DMM, or;
The preferred method of using a nullmeter to monitor the deviation be-
tween this instrument’s output level and that of a precision calibrated
10V source.
7. Calibrate to an output level of -10.00000V. Adjust the output level of the
2000 instrument to within 60
V of 10V as described in step 2.

Calibration and Maintenance 69
This output level may be measured directly by using:
A high precision DMM, or;
The preferred method of using a nullmeter to monitor the deviation be-
tween this instrument’s output level and that of a precision calibrated
10V source.
8. Calibrate to an output level of 0.00000A. Adjust the output level of the
2000 instrument as described in step 2, until the voltage measured
is: 0.0 +/–2.5
This output level may be measured directly by using:
V, i.e., a current level of 0 +/– 25pA.
A calibration standard 100K resistor and a high precision DMM, or;
A nullmeter to monitor the voltage drop across the standard resistor
9. Calibrate to an output level of 1.0000A. Adjust the output level of the 2000
instrument as described in step 2 until the voltage measured is:
100mV +/– 7.5
V, i.e., a current of 1A +/– 75pA.
2000
Resistor
Voltmeter
This output level may be measured directly by using:
A calibration standard 100K resistor and a high precision DMM, or;
A nullmeter to monitor the voltage drop across the standard resistor.
10. Calibrate to an output level of 10.000A. Adjust the output level of the 2000
instrument as described in step 2 until the voltage measured is:
100mV +/– 5
V, i.e., a current of 10A +/– 500pA.

2000I & 2000M Instrument’s User Guide, Revision B
70
This output level may be measured directly by using:
A calibration standard 10K resistor and a high precision DMM, or;
A nullmeter to monitor the voltage drop across the standard resistor.
11. Calibrate to an output level of 100.00A. Adjust the output level of the 2000
instrument as described in step 2 until the voltage measured is 100mV +/-
V, i.e., a current of 100A +/– l0nA.
10
This output level may be measured directly by using:
A calibration standard 1K resistor and a high precision DMM, or;
A nullmeter to monitor the voltage drop across the standard resistor.
12. Calibrate to an output level of +10.00000A. Adjust the output of the 2000
instrument as described in step 2, until the voltage measured is 1.0V +/–
V (assuming exact resistance of 100K), i.e., a current of l0A +/–
25
250pA.
This output level may be measured directly by using a calibration standard
100K resistor and a high precision DMM to monitor the voltage drop
across the standard resistor.
13. Calibrate to an output level of +100.0000
A. Adjust the output of the 2000
instrument as described in step 2, until the voltage measured is 10V +/–
20
V (assuming exact resistance of 10K), i.e., a current of 100A +/–
2nA
This output level may be measured directly by using a calibration standard
10K resistor and a high precision DMM to monitor the voltage drop across
the standard resistor.
14. Calibrate to an output level of +1.000000mA. Adjust the output of the 2000
instrument as described in step 2, until the voltage measured is 1.0V +/–
V (assuming exact resistance of 1K), i.e., a current of 1mA +/– 15nA
15

Calibration and Maintenance 71
This output level may be measured directly by using a calibration standard
1K resistor and a high precision DMM to monitor the voltage drop across
the standard resistor.
15. Calibrate to an output level of +10.00000mA. Adjust the output of the 2000
instrument as described in step 2, until the voltage measured is 1.0V +/–
V (assuming exact resistance of 100), i.e., a current of 10mA +/–
20
200nA.
This output level may be measured directly by using a calibration standard
100 resistor and a high precision DMM to monitor the voltage drop across
the standard resistor.
16. The next calibration point will be to measure zero (0.0) VDC. Attach a small
piece of #24 AWG buss wire to the output terminals and allow at least two
minutes for the reading to settle.
17. The final calibration point will be to measure 0.1VDC. Remove the buss wire
and apply 0.1VDC to the output terminals. Allow at least two minutes for set-
tling.
18. No further calibration steps are required. The instrument will now store the
calibration factors obtained during this procedure and then select the “Stand-
by” state with the power on default output level.
Note: Laboratory standard resistors are not normally the exact nominal value.
The actual measured voltage drop used for each DC current calibration step will
require adjustment for the actual value of the resistor.
V
MEASURED
= I
Periodic Maintenance
The 2000I(N) and 2000M(N) DC power source instruments require little
periodic maintenance; however, Vitrek makes the following recommenda-tions:
1. Allow the internal battery to fully discharge, and then fully recharge at least
once a year. This will ensure that the battery retains its storage capacity.
2. Clean the external surfaces of the chassis with a soft damp cloth. Do not clean
the front panel with Freon based cleaning solutions. Take care that moisture
does not enter the chassis during cleaning. If the external surfaces become ex-
REQUIRED
* R
ACTUAL

2000I & 2000M Instrument’s User Guide, Revision B
72
cessively dirty or damaged, contact Vitrek Customer Service (or one of its
agents) for details on how to rectify this situation.
3. If the instrument is to be stored for extended periods of time, fully charge
before storing. This will ensure that the battery will accept a full charge when
removed from storage.
Internal Maintenance
In general, the 2000I and 2000M DC power source instruments do not require
internal maintenance. In the event of a failure, a calibration fault, or when the
internal battery requires replacement, however, the instrument may require opening.
Important Note: The information provided here allows you to replace the bat-
tery. If you wish to perform detailed fault finding within this instrument, obtain
the MS2000 option Vitrek.
Caution: The 2000 instruments contain delicate precision circuitry; ensure static
control procedures are followed while internal maintenance is in progress.
Warning: Prior to removing the outside covers of the 2000 instruments, ensure
that the external charging unit or power supply is disconnected and check that the
front panel’s POWER switch is OFF.
To obtain access to the instrument’s internal circuitry:
Note: Ensure static control procedures are followed during disassembly and
reassembly.
1. Remove the four lower feet by pulling them horizontally away from the chas-
sis.
2. Remove the two cross-head screws exposed by the rem
step 1.
3. Remove the two cross-head screws holding the top of the two halves of the
outer chassis covers.
4. Carefully remove both halves of the outer chassis covers by pulling them
horizontally out and away from the internal chassis.
oval of the feet in

Notes:
1) If significant handling is required, disconnect the positive battery lead to
prevent discharge.
2) Take note of the location and orientation of each connector cable prior to
removal of Microprocessor and Analog boards for ease of reassembly.
3) Handle all boards carefully to ensure the integrity of their fragile circui-
try.
5. Locate and remove the six cross-head screws that hold the Microprocessor
board to the chassis left side (front viewing). Disconnect cables and lift out
the board.
6. Locate and remove the six cross-head screws and the six nylon washers that
attach the Analog board to the brackets on the chassis right side (front viewing). Disconnect cables and lift out the board.
7. Locate and remove the four cross-head screws that hold the Power Supply
board to the standoffs mounted on the chassis bottom. Maintain cable connections to this board, as board can be adjusted while connected.
Replacing the Internal Battery
Calibration and Maintenance 73
Sealed Lead-Acid batteries have an excellent operational life; however their ability to retain charge degrades with time, especially at high temperatures. Replacement of the internal battery is recommended after:
Two years,
A significant loss of storage ability is noticed,
The BATT CHG light does not extinguish after 15 hours of charging.
Caution: The internal battery should only be replaced by an exact
replacement. Obtain a replacement battery from Vitrek.
Warnings:
1) Sealed lead-acid and Nickel Metal Hydride batteries are normally stored in a
charged condition, take extreme care when handling the battery.
2) Always handle and dispose of Sealed Lead-Acid and Nickel Metal Hydride
batteries in a safe manner, it is recommended that a Local Authorized Battery
recycler be used.

2000I & 2000M Instrument’s User Guide, Revision B
74
To replace a battery:
1. Open the instrument and remove the Microprocessor board as described in
the instruction: To obtain access to the internal circuitry. Additionally re-
move the Analog board and loosen the Power Supply board, as required, to
assist in replacing the battery.
2. Remove the two #6 nuts and corresponding screws that hold the battery strap
to the bracket. (Instruments with studs, require only removal of the nuts.)
3. Remove the battery strap and old battery.
4. Install a new battery and reassemble the instrument in reverse order of disas-
sembly instructions. Be careful to replace all cable interconnections, using
the same orientation and cable routing as was present prior to disassembly.
Ensure the nylon washers are included when reattaching the Analog board.
Warning: The printed circuit boards are continuously powered by the battery,
use extreme care in handling them. Reconnect the battery cables after reattachment of the boards.
5. Following complete reassembly, fully charge the replaced battery, in accor-
dance with the charging procedures in the Battery Charging chapter.
6. Perform an internal and external recalibration on instrument after charging in
accordance with the calibration procedures.

Interface Operation 75
Interface Operation
This chapter discusses the methods used to interface the 2000I and 2000M DC
power source instruments using the optional interface connectors RS-BAT and
IE-BAT. In general, operation of these instruments via an interface involves the
writing and reading of ASCII data to or from the instrument.
In both interfaces, the same characters are used for each command. The only differences between these two interfaces are due to the physical characteristics and
the “built-in” commands; defined by the IEEE488 interface. In both instances, the
operation of the interface is completely disabled when the rear panel’s INTER-
FACE ENABLE toggle switch is OFF or when a front panel operation, such as
baud rate or address selection, is not initiated.
Note: Throughout this section, it is assumed that the user is fully conversant with
manual operation of the 2000 instrument.
RS232 Interface Option
The RS232 option enables the 2000 instruments to be controlled or interrogated
by any RS232 interfaced computer or terminal. A modem telephone link enables
control or interrogation to be performed remotely. Rates of 1200, 19,200 and
2400 baud may be selected. This interface is fully isolated from the analog circuitry of the instruments for voltages of up to 500V.
When the RS-BAT interface is fitted in the instrument, an additional selection is
available when commanded by the MNU key.

2000I & 2000M Instrument’s User Guide, Revision B
76
Selecting RS232
To select the RS232 data format:
1. Repeatedly press the MNU key until the “SET RS232” selection displays.
2. Press any of the Units/Enter keys (V, A, ºC or ºF) to select this action. The
unit will then display the presently selected baud rate for the RS232 interface.
3. You may alter the baud by using any of the arrow keys (2, 4, 6 or 8) until the
desired rate is shown. Press any of the Units/Enter keys to select a new baud
rate.
Note: Ensure that the computer is connected to the RS232 port, set to this baud
rate and set for 8 bit data with no parity, 1 stop bit and 1 start bit.
With the RS-BAT option there is no defined remote or local states, thus the in-
strument will respond to commands from either the front panel or the interface, as
applicable.
RS232 Handshake Lines
The RS-BAT interface is configured to use the RS232 hardware handshake lines
RTS and CTS to handshake data. The usage of these hardware handshake lines
ensures that data will not be lost due to differences in processing speeds between
the 2000 instrument and the computer. Sometimes the particular computer used
will not be able to use these handshake lines properly. To prevent data overrun,
place delays between sending individual command strings.
IEEE488 Interface Option
The IE-BAT option enables the 2000 instruments to be controlled or interrogated
by any IE-BAT interfaced computer. This interface is fully isolated from the analog circuitry of the 2000I and 2000M DC power source instruments for voltages
of up to 500V.

Interface Operation 77
Remote/Local Operation
The IEEE488 interface defines separate “REMOTE” and “LOCAL” states. While
in the LOCAL state, which is following the initial application of power, the in-
strument will only respond to commands from the instrument’s front panel. Plac-
ing the instrument in the “REMOTE” state by way of the defined interface
command, the instrument will only respond to commands received via the inter-
face or until released into the “LOCAL” state by the defined interface command.
In either state, the instrument’s present status can be read by the interface.
If the instrument is in the ‘REMOTE” state and “LOCAL LOCKOUT” has not
been commanded, then press the MNU key to return the instrument to the “LO-
CAL” state.
Address Selection
When the 2000-IE-BAT option is fitted, an additional item is available from the
MNU key; this is the selection of the interface address. This is accessed by pressing the MNU key on the front panel. The last menu selection (press either the
MNU key or any of the arrow keys until this selection is displayed) will be the
prompt to change the IEEE488 address, if this is selected (by pressing any of the
Units/Enter keys) then the present address will be displayed and the user may
enter a new address by pressing the arrow keys until the desired address is shown.
Press any of the Units/Enter keys to select the displayed address or press the
MNU key to abort the entry.
IEEE488 Handshake Lines
All the timing requirements of the bus interface are handled by the hardware
handshake system used by the IEEE488 interface. During decode of a command
all further received data are held-off by this hardware handshake until the decode
has been completed. If you want to synchronize the activities of the controller and
the 2000 instrument in this respect, then use the SRQ capabilities of the 2000
instrument. Additionally note that a two-second delay is forced between sending
a Device Clear (either DCL or SDQ bus command) and sending data to the 2000
instrument.

2000I & 2000M Instrument’s User Guide, Revision B
78
Bus Commands
As previously mentioned, the IEEE488 interface can perform many tasks that the
RS232 does not; those used by the 2000 instrument are as follows:
1. Remote/Local Selection. This has been previously described.
2. Device Clear capabilities. The IEEE488 defined Device Clear functions (both
selective and global) force the 2000 to perform a power-on reset function.
3. Serial Poll capabilities. The IEEE488 defined serial poll capabilities of the
2000 correspond to the requirements of the IEEE488 standard, the response
byte transmitted by the 2000 consisting of 2 bits of information, the remaining 6 bits all being returned as logical 0. The next to most significant bit (with
a decimal equivalence of 64) is set if the 2000 instrument is actively asserting
the IEEE488 SRQ line, and the least significant bit (with a decimal equivalence of 1) is set if the 2000 has completed actioning the previously received
command string
4. Interface Clear capabilities. The IEEE488 standard defines this command,
which causes the interface portion of the 2000 instrument to be reset to the
power on conditions, aborting any bus activity in progress.
5. Parallel Poll capabilities. The 2000 instrument does not have any Parallel poll
capabilities.
Other IEEE488 Specific Items
Should a handshake sequence be improperly completed during a transfer of data
to or from the 2000 interface, and then the 2000 instrument will automatically
perform a power on reset sequence. This facility prevents the interface becoming
locked out should the interface cable be removed or become faulty during a data
transfer.
Also note that the 2000 instrument offers the facility of changing the IEEE488
address via the front panel or via the interface. To protect the interface from entering an undefined state when this occurs, the 2000 instrument will automatically
perform a power on reset sequence when this occurs.

Interface Operation 79
Reading Data Via an Interface
With either interface, you can read the data presently being displayed on the front
panel of the 2000 instrument. With the 2000-RS-BAT interface this is achieved
by transmitting the @ character to the 2000 instrument, with the IE-BAT interface this is achieved by simply reading the instrument. In either case, the instru-
ment responds by sending a single space character, followed by the 16 character
display string, and terminating by the carriage return and line feed characters
(with the IE-BAT interface this last character is sent with the EOI line asserted).
Sending Data Via an Interface
Both the RS-BAT and IE-BAT interfaces operate similarly with regards to sending data to the instrument. The only difference is the requirement to place the
instrument in the “REMOTE” state when using the IE-BAT interface. Characters
transmitted to the interface are stored in a buffer until a line feed character is re-
ceived, or until a character with the EOI line is asserted (in the IE-BAT interface).The received characters are then decoded and actioned.
Up to 30 characters may be stored in the receive buffer, which may contain more
than one complete command string type, as desired.
Command Set for the 2000 Instrument
The 2000I, 2000M, 2000IN or 2000MN instrument command sets are split into
two groups:
The commands, which correspond exactly to individual front panel key
presses—to allow the same procedure to be followed, whether the instrument is being used locally or remotely. See Table 4
The shortcut commands—that allow certain commonly used functions to
be easily accessed by remote commands. See Table 5.
Keypress, Simulation Command Characters
The characters received from the interface that correspond to individual front
panel keys are shown in Tables 4 and 5.

2000I & 2000M Instrument’s User Guide, Revision B
80
Note: Command types other than those listed in Tables 4, 5 or 6 are always dis-
carded and ignored.
Table 4: Command Characters
Front Panel
Key
0 0 . (period) . (Dec. Pt.)
1 1 +/– –
2 2 V, Volts, or ENTER V
3 3 A, Amps, or ENTER A
4 4 m (milli-) m
5 5 µ (micro-) u
6 6 ºC, or ENTER C
7 7 ºF, or ENTER F
8 8 CLR E
9 9 MNU M
Characters
Received
Front
Panel Key
Command Charac-
ter Received
When using the IE-BAT interface, each character may be sent with the EOI line
asserted, in which case the display will show the progress of the command that is
being built in this manner.
Table 5: Shortcut Command Character Sequences
Char/Seq Description of Action
@
D
I
J0
J1
K0
K1
N
Initiates the output of the display data (RS-BAT only)
Selects the “Adjust” mode.
Commands an internal calibration sequence.
Selects “Passive CJ” (i.e., turns off internal Active CJC) (2000M)
Selects “Active CJC” activity
(i.e., turns on internal Active CJC). (2000M)
Deselects the “Calculated Output” mode of operation.
Selects “Calculated Output” mode of operation, using the presently
set pair of user defined points and units.
Deselects the “Adjust” mode.

Interface Operation 81
Char/Seq Description of Action
O
P
R
S
T
X
Selects the “Operate” state.
Commands the interface to assert the SRQ (service request) line
when a previously received command has been fully actioned. Applies to UE2000 only.
Commands a power-on reset sequence.
Selects the “Standby” state.
Sets the Thermocouple type to that described by the character im-
mediately following, e.g., “TK” sets the thermocouple type to “K”.
Initiates an external calibration, which is equal to selecting “External Cal”.
Firmware Version F.02 or Newer
The Firmware Version F.02 update to the 2000I, 2000M, 2000IN and 2000MN
DC power source instrument models include all the standard capabilities, including “Range Lock” mode, the ITS-90 Thermocouple temperature for the 2000M
and 2000MN instruments and an extended command set.
Extended Command Set
The interface command list includes “Range Lock” and “Measurement” modes.
The software version F.02 command set for the 2000 instruments and RS-BAT
and IE-BAT interfaces is given in Table 6.
Table 6: Extended Command Set
Command Description
G0 Deselects the “Measure” mode
G1 Selects the “Measure” mode
L1 Locks the 20 volt Range
L2 Locks the 2 volt Range
L5 Locks the 20mA Range
Tx Selects thermocouple type x (2000M only)
UA Unlocks all ranges: voltage and current
U1 Unlocks the 20 volt Range

2000I & 2000M Instrument’s User Guide, Revision B
82
Command Description
U2 Unlocks the 2 volt Range
U5 Unlocks the 20mA Range
Command String Usage
Vitrek assumes the user is conversant with the send and receive data commands
when using the actual computer interface and with the language used to control
the 2000 instruments. Vitrek also assumes all com-mand strings (those shown
enclosed in quotation marks) are followed by the car-riage return and linefeed
characters. Note that it is unnecessary to send the quotation mark characters and
that the final character is sent with the EOI line asserted (UE2000 interface).
Setting an Output Voltage or Current
Sending the character string “K0+10.0VO” commands the 2000 instruments to
output a voltage of +10V. Note that the K0 portion of this string deselects the
Calculated mode to ensure that the instrument is in the “Operate” mode. Voltages
of +10.23mV and -3.456V are similarly commanded by the strings
“K0+l0.23mVO” and “K00-3.45O” respectively. Note the condition shown in
the later example where negative quantities require numeric entry be started before the entry of a negative polarity (avoiding the polarity character performing a
change in the present output polarity), this is readily achieved by sending the 0
character prior to the actual numeric quantity (this may be performed for either
polarity of numeric data). Note further that any additional digits beyond the capabilities of the instrument are ignored (thus the output level will actually be set to
-3.45V in the latter example).
Similarly to the voltage output examples shown above, current outputs may be
commanded also. For example, if output levels of +20.6543mA, -0.1mA or
+10.5A are required, then the strings “K0+20.6543mAO”, “K00-0.1mAO” or
“K0+10.5AO” respectively, would be transmitted to the 2000 instruments.
In these examples, the numeric entry of the output level is achieved by simulation
of front panel key presses, thus the same techniques are applicable as defined in
the Front Panel Operation section of this document.

Interface Operation 83
Adjusting Output Level
This may be achieved by shortcut commands or by simulating keyboard com-
mands by using command characters. To select the “Adjust” mode of operation
the instrument may send the character string D or the character string MMV. In
the later character string, note that these characters simulate the key presses re-
quired to perform the desired task: MNU, MNU and V, whereas the first com-
mand string uses the shortcut form.
Having selected the “Adjust” mode of operation, the user may send any combina-
tion of (2, 4, 6 or 8) characters to simulate the down, left, right, and up arrow
keypad commands respectively, thus selecting the required digit and incrementing or decrementing it as desired.
Reading Present Output Level
In each example shown below, the actual output character string is followed by
the carriage return and line feed characters.
The 2000 instruments output level and status may be read at any time, when using
the IE-BAT interface. You can read via the RS-BAT interface after transmitting
the @ character to the 2000I or 2000M instrument and then reading the characters
as received from the instrument.
If the output level is
mode, then the received string will be
always transmitted (a leading space, the 16 display characters, the carriage return
character, and the linefeed character).
There are many different combinations of output data that are possible, the user is
advised to program either the 2000I or 2000M instrument manually and read the
display data for each intended operation before programming its software.
+10.23567V, in the “Operate” state and not in “Adjust”
Internal Calibration
You may command an automatic internal calibration of internal zero offsets
whenever desired. Remotely command an internal calibration via either interface
by sending the command string “I”. The progress of the internal calibration can
+10.23567V. Note that 19 characters are

2000I & 2000M Instrument’s User Guide, Revision B
84
be obtained (for both interfaces) by reading the 2000 instrument display data as
described in the Maintenance and Calibration chapter.
The accuracy specifications presented in the Appendix A tables assume the use of
this function at least every 30 days, or for a temperature change of greater than
5ºC from that at the previous internal calibration.
External Calibration
You may command an external calibration whenever desired. Remotely command an external calibration via either interface by sending the command string
“X”. To prevent unauthorized access, an optional password protection scheme is
used.
A one-year external calibration interval is recommended for normal use. Reduce
this interval if greater accuracies are required. While calibration at 23ºC ambient
is highly recommended, this may be performed at any temperature from 10ºC to
35ºC without degradation of accuracy specifications. The accuracy figures in the
Appendix A tables are valid for temperatures up to 5ºC from this temperature.
When used in less accurate applications, the external calibration interval may be
extended up to three years; the accuracies achieved are shown in the respective
tables.

Appendix A—Output Specifications 85
Appendix A–
Output Specifications
The DC voltage and current output capabilities of the 2000I,2000M, 2000IN and
the 2000MN instruments are provided here. Additionally, specifications for the
2000M instrument’s of thermocouple measurement and simulation option are
included here.
DC Voltage Output Specifications
The accuracy figures given in Table 7 are valid throughout the temperature range
of 18º to 28ºC. The 24 hour stability figures are for constant load and temperature
(within 1ºC) and are measured using a DC to 2Hz bandwidth. The accuracy figures are relative to calibration standards. Add 3ppm + 1µV to the voltage figures,
and 15ppm + 20pA to the current figures, for absolute accuracy.
Table 7: DC Voltage Output
Levels <22mV 22 - 220mV 0.22 - 2.2V 2.2 - 22V
Resolution 10nV 100nV 1V 10V
24 Hr. Stability (ppm + V) 3.0 + 0.08 2.5 + 0.1 1.8 + 0.5 1.8 + 3.0
90 Day Accuracy (ppm + V) 20 + 0.2 15 + 0.25 12 + 1.0 10 + 4.0
1 Year Accuracy (ppm + V) 30 + 0.2 25 + 0.25 20 + 10.0 18 + 4.0
Temperature Coefficient P
(ppm + V)
Pk-PK Noise 0.01 – 10 Hz
(ppm+ V/C)
RMS Noise 10Hz – 10KHz 5µV 5µV 7.5µV 10µV
2.5 + 0.03 2.0 + 0.04 1.5 + 0.2 1.5 + 1.0
0.3 + 0.04 0.3 + 0.06 0.3 + 0.3 0.3 + 2.0

2000I & 2000M Instrument’s User Guide, Revision B
86
Note: To maintain accuracy whenever outside this temperature range, apply the
relevant temperature coefficient adder.
Settling Time: ---------- Less than 2 seconds to within 10ppm of change + 0.25µV
Drive Capability: ------ 15mA max. (50 output impedance below 220mV, 0.1
above 220mV)
Overload: --------------- Output fully protected against short-circuits
Long-Term Effects: --- Add 25ppm of output to 1 year specification for 3 year
accuracy
DC Current Output Specifications
DC current output is available in both the 2000I, 2000M, 2000IN and the
2000MN instruments. Refer to Table 8.
Table 8: DC Current Output
Levels
Resolution 10pA 100pA 1nA 10nA
24 Hr. Stability (ppm + nA) 7.0 + 0.03 5.0 + 0.15 5.0 + 1.0 5.0 + 15
90 Day Accuracy (ppm + nA) 50 + 0.05 40 + 0.15 30 + 1.0 40 + 20
1 Year Accuracy (ppm + nA) 70 + 0.1 60 + 0.25 50 + 2.0 60 + 30
Temperature Coefficient P
(ppm + nA) /C
Pk-PK Noise 0.01 – 10Hz
(ppm+ nA)
RMS Noise 10Hz – 10KHz 200pA 750pA 5nA 50nA
< 22µA 22 – 220µA 0.22 – 2.2mA 2.2 - 22mA
5.0 + 0.015 5.0 + 0.1 5.0 + 1.0 5.0+1.0
1.5 + 0.02 1.2 + 0.1 0.8 + 0.5 0.8 + 5.0
Settling Time: ---------- Less than 2 seconds to within 10ppm of change + 50pA.
Drive Capability: ------ Greater than 18V compliance ability, stable into active
and/or inductive loads.
Overload: --------------- Output fully protected against open circuits, or applied
voltages less than 50V.
Output Impedance: ---- Greater than 10
11

Appendix A—Output Specifications 87
Long-Term Effects: --- Add 60ppm of output to 1 year specification for three year
accuracy
Voltage Measurement Specifications
Voltage measurement capabilities are present in the 2000M instrument. To measure voltage, access the instrument’s “Measurement” mode.
In Voltage Measurement mode (-0.15 to +0.15V):
A 90 day absolute accuracy is 0.01% +1µV +3ppm +1V throughout the
temperature range.
A 1 year absolute accuracy is 0.02% +1µV +3ppm +1V throughout the
temperature range.
Thermocouple Specifications
The specifications for Thermocouple simulation and measurements are shown in
Table 9. All temperatures are given in ºC, the desired temperature may be defined
in the instrument in either ºC or ºF units. The required output voltage is internally
computed from the entered temperatures from N.I.S.T. look-up tables for the re-
spective thermocouple type with interpolation. Note: Both cold and hot junction
temperatures may be entered.

2000I & 2000M Instrument’s User Guide, Revision B
88
Table 9. Thermocouple Simulation and Measurement Specifications
Type
B
E
J
K 0.01ºC 0.01ºC -140 to +1372ºC
N 0.01ºC 0.03ºC -200 to +1300ºC
R, S
T
Simulation
Resolution
0.01ºC
0.01ºC
0.01ºC
0.01ºC
0.01ºC
0.01ºC
0.01ºC
0.01ºC
0.01ºC
0.01ºC
0.01ºC
Measurement
Resolution
0.15ºC
0.08ºC
0.15ºC
0.05ºC
0.01ºC
0.02ºC
0.01ºC
0.06ºC
0.03ºC
0.02ºC
0.01ºC
Measurement Range
+200 to +300ºC
+300 to +1820ºC
-270 to -260ºC
-260 to -70ºC
-70 to +1000ºC
-210 to -140ºC
-140 to +760ºC
0 to +200ºC
+200 to +1768ºC
-200 to +100ºC
+100 to +400ºC

Note:
The +3ppm + 1µV
absolute accuracy
adder for the Vitrek
produc-tion
calibration may be
substituted by the
accuracy figures of
your calibration
equipment, changing
the absolute accur-
acies provided in this
table.
Simulation using Passive CJC Simulation using Active CJC
Type
B
E
J -210 to 760 0.02 0.02 0.05 0.07 0.10 0.07 0.12 0.20 0.17 0.25
K
N
R, S
T
Range C
200 to 300 0.06 0.11 0.14 0.60 0.65 0.11 0.21 0.29 0.70 0.80
300 to 700 0.04 0.07 0.09 0.40 0.45 0.09 0.17 0.24 0.50 0.60
700 to 1820 0.02 0.045 0.06 0.20 0.25 0.07 0.15 0.21 0.30 0.40
-270 to -260 0.07 0.12 0.25 0.40 0.55 0.12 0.22 0.40 0.50 0.70
-260 to -250 0.02 0.06 0.08 0.20 0.25 0.07 0.16 0.23 0.30 0.40
-250 to -240 0.02 0.04 0.05 0.15 0.17 0.07 0.14 0.20 0.25 0.32
-240 to -230 0.01 0.03 0.04 0.10 0.12 0.06 0.13 0.19 0.20 0.27
-230 to 1000 0.01 0.02 0.03 0.07 0.09 0.06 0.12 0.18 0.17 0.24
-140 to 800 0.01 0.02 0.03 0.06 0.07 0.06 0.12 0.18 0.16 0.22
800 to 1372 0.01 0.035 0.05 0.07 0.09 0.06 0.14 0.20 0.17 0.24
-200 to -150 0.02 0.03 0.04 0.13 0.14 0.07 0.13 0.19 0.23 0.29
-150 to 1000 0.01 0.02 0.04 0.08 0.10 0.06 0.12 0.19 0.18 0.25
1000 to 1300 0.01 0.03 0.04 0.06 0.07 0.06 0.13 0.19 0.16 0.22
0 to 100 0.02 0.045 0.05 0.25 0.26 0.07 0.15 0.20 0.35 0.41
100 to 1000 0.02 0.035 0.05 0.15 0.17 0.07 0.14 0.20 0.25 0.32
1000 to 1768 0.02 0.06 0.07 0.16 0.17 0.07 0.16 0.22 0.26 0.32
-200 to -100 0.01 0.025 0.03 0.08 0.09 0.06 0.13 0.18 0.18 0.24
-100 to 400 0.01 0.015 0.02 0.05 0.06 0.06 0.12 0.17 0.15 0.21
Stability Relative Accuracy Absolute Accuracy Stability Relative Accuracy Absolute Accuracy
24 hr 90 day 1 yr. 90 day 1 yr. 24 hr 90 day 1 yr. 90 day 1 yr.
2000I & 2000M Instrument’s User Guide, Revision B 89
Table 10a: CJC Stability — Simulation

Measurement using Passive CJC Measurement using Active CJC
Type
B
E
J -210 to 760 0.03 0.10 0.13 0.15 0.19 0.08 0.20 0.28 0.25 0.34
K
N
R, S
T
Range C
200 to 300 0.11 0.19 0.22 0.68 0.73 0.16 0.29 0.37 0.78 0.88
300 to 700 0.07 0.17 0.19 0.52 0.57 0.12 0.27 0.34 0.62 0.72
700 to 1820 0.04 0.25 0.26 0.43 0.48 0.09 0.35 0.41 0.53 0.63
-270 to -260 0.12 0.20 0.33 0.48 0.63 0.17 0.30 0.48 0.58 0.78
-260 to -250 0.04 0.11 0.13 0.28 0.33 0.09 0.21 0.28 0.38 0.48
-250 to -240 0.03 0.08 0.09 0.19 0.21 0.08 0.18 0.24 0.29 0.36
-240 to -230 0.02 0.06 0.07 0.13 0.15 0.07 0.16 0.22 0.23 0.30
-230 to 500 0.02 0.08 0.09 0.15 0.17 0.07 0.18 0.24 0.25 0.32
-230 to 1000 0.02 0.13 0.14 0.18 0.20 0.07 0.23 0.29 0.28 0.35
-140 to 300 0.02 0.06 0.07 0.10 0.12 0.07 0.16 0.22 0.20 0.27
300 to 800 0.02 0.11 0.12 0.15 0.17 0.07 0.21 0.27 0.25 0.32
800 to 1372 0.02 0.18 0.19 0.21 0.23 0.07 0.28 0.34 0.31 0.38
-200 to -150 0.03 0.06 0.07 0.16 0.18 0.08 0.16 0.22 0.26 0.33
-150 to 300 0.02 0.06 0.08 0.12 0.15 0.07 0.16 0.23 0.22 0.30
300 to 1000 0.02 0.13 0.15 0.19 0.22 0.07 0.23 0.30 0.29 0.37
1000 to 1300 0.02 0.17 0.18 0.20 0.22 0.07 0.27 0.33 0.30 0.37
0 to 100 0.04 0.08 0.08 0.28 0.29 0.09 0.18 0.23 0.38 0.44
100 to 300 0.04 0.09 0.10 0.20 0.22 0.09 0.19 0.25 0.30 0.37
300 to 1000 0.04 0.16 0.17 0.27 0.29 0.09 0.26 0.32 0.37 0.44
1000 to 1768 0.03 0.25 0.26 0.35 0.37 0.08 0.35 0.41 0.45 0.52
-200 to -100 0.02 0.06 0.06 0.11 0.12 0.07 0.16 0.21 0.21 0.27
-100 to 400 0.02 0.07 0.07 0.10 0.11 0.07 0.17 0.22 0.20 0.26
Stability Relative Accuracy Absolute Accuracy Stability Relative Accuracy Absolute Accuracy
24 hr 90 day 1 yr. 90 day 1 yr. 24 hr 90 day 1 yr. 90 day 1 yr.
Table 10b: CJC Stability — Measurement
90 Appendix A— Power Output Capacity Specifications


92
2000I & 2000M Instrument’s User Guide, Revision B

Appendix B–
General Specifications
Battery Discharge Time: 8 hours min. after full charge
conditions: output unloaded; interface disabled
6 hours min. after full charge
conditions: output loaded, interface disabled
5 hours min. after full charge
conditions: RS232 interface enabled
Battery Charge Time: 12 hours max. to full charge
cond
Appendix B–General Specifications 93
itions: unit OFF (2000I and 2000M)
15 hours max. to full charge
conditions; unit ON, interface disabled
Charging Module:
Battery Type:
Battery Charging Signal: Red LED illuminates on the front panel when internal
Battery Voltage Level: Green LED illuminates on the front panel when the in-
Univerasal Input 85Vac -265VAC:
DC Output: 12V @ 1.5A Min
Sealed Lead Acid–Maintenance Free (2000I and
2000M) Nickel Metal Hydride, STD 3800mAH,
Main-tenance Free,
Contact Vitrek customer support for availability.
battery during charging.
ternal battery has sufficient voltage to power the instrument (2000I and 2000M). On the 2000IN and 2000MN
the Green LED will begin to flash to warn the user that
the Battery State has depleted to a state that requires that
the batteries need to be recharged.
Additional batteries available,

94
2000I & 2000M Instrument’s User Guide, Revision B
Note: The internal circuitry is automatically powered down when the battery
voltage is low. Note that when this condition is achieved the only way to repower
the instrument is to plug it into the external charger. This will reset the internal
circuitry and reconnect the internal battery circuitry.
Warm-Up Time
The specifications for both V or I mode are valid following a fifteen-minute pe-
riod after setting the power switch to the ON position (assuming a charged bat-
tery). For readings involving temperature, a warm-up time of at least 30 Minutes
is recommened..
Environmental
Operating Temperature: 0ºC to 50ºC
Storage Temperature: -30ºC to 63ºC
Humidity: 70% RH max. at 40ºC (non-condensing)
Isolation
150V peak isolation to external chassis from output terminals
500V peak isolation to ground when charging module or interface is con-
nected.
1500V peak isolation between terminals, and from either terminal to chas-
sis/ground, when in “Standby” mode.
Computation
Both the 2000I,2000M, 2000IN and 2000MN power source instruments can use a
computed output level such as an equation output = S*entry + 0, where S and 0
are user-defined constants. The output may be either voltage or current and you
may optionally define displayed units of up to three characters in length using
upper- or lower-case characters. Computations are performed with 0.1ppm precision.

Appendix B–General Specifications 95

2000I & 2000M Instrument’s User Guide, Revision B
96
The common passw
ord for enabling External Calibration is:
10288
Place instrument in a known state, such as, current or
voltage before entering the password.
Note that this page can be removed, as required, to protect
this data from unauthorized users.

Password Page 97
 Loading...