

Page 1

VITLAB
®
micropipette
VITLAB GmbH
Linus-Pauling-Str.1
63762 Grossostheim
Germany
tel: +49 6026 97799-0
fax: +49 6026 97799-30
[email protected]
www.vitlab.com
Gebrauchsanweisung
Operating Manual
Pipette / Pipette
Page 2

Page 3

3
Inhalt
1. Sicherheitsbestimmungen 4
2. Verwendungszweck 5
3. Einsatzgrenzen 5
4. Einsatzbeschränkungen 5
5. Einsatzausschlüsse 5
6. Funktions- und Bedienelemente 6
7. Pipettieren 7
8. Volumen kontrollieren 9
9. Genauigkeitstabelle 10
10. Justieren 11
11. Autoklavieren 12
12. UV Entkeimung 12
13. Filter Pipette 5 ml / 10 ml 12
14. Wartung und Reinigung 13
14.1. VITLAB® micropipette bis 1000 µl 13
14.2. VITLAB® micropipette 5 ml / 10 ml 14
15. Bestelldaten · Zubehör 15
15.1 Bestelldaten 15
15.2 Zubehör 15
16. Ersatzteile 16
16.1. VITLAB® micropipette bis 1000 µl 16
16.2. VITLAB® micropipette 5 ml / 10 ml 17
17. Störung - was tun? 18
18. Reparatur · Kalibrierservice 19
18.1. Reparatur 19
18.2. Kalibrierservice 19
19. Mängelhaftung 20
20. Entsorgung 20
Page 4

4
Bitte unbedingt sorgfältig durchlesen!
Dieses Gerät kann in Kombination mit gefährlichen Materialien, Arbeitsvorgängen und Apparaturen
verwendet werden. Die Gebrauchsanleitung kann jedoch nicht alle Sicherheitsprobleme aufzeigen,
die hierbei eventuell aufteten. Es liegt in der Verantwortung des Anwenders, die Einhaltung der
Sicherheits- und Gesundheitsvorschriften sicherzustellen und die entsprechenden Einschränkungen
vor Gebrauch festzulegen.
1. Sicherheitsbestimmungen
1. Jeder Anwender muss diese Gebrauchsan-
leitung vor Gebrauch des Gerätes gelesen
haben und beachten.
2. Allgemeine Gefahrenhinweise und Sicher-
heits-vorschriften befolgen (z. B. Schutzkleidung, Augenschutz und Schutzhandschuhe
tragen). Beim Arbeiten mit infektiösen oder
gefährlichen Proben müssen die Standardlaborvorschriften und -vorkehrungen eingehalten werden.
3. Angaben der Reagenzienhersteller beachten.
4. Gerät nur zum Pipettieren von Flüssigkeiten
im Rahmen der definierten Einsatzgrenzen
und -beschränkungen einsetzen. Einsatzausschlüsse beachten (s. Seite 5)! Bei Zweifel
unbedingt an den Hersteller oder Händler
wenden.
5. Stets so arbeiten, dass weder Anwender
noch andere Personen gefährdet werden.
Spritzer vermeiden. Nur geeignete Gefäße
verwenden.
6. Die Berührung der Spitzenöffnung ist beim
Arbeiten mit aggressiven Medien zu vermeiden.
7. Nie Gewalt anwenden.
8. Nur Original-Ersatzteile verwenden. Keine
technischen Veränderungen vornehmen.
Das Gerät nicht weiter zerlegen, als in der
Gebrauchsanleitung beschrieben ist!
9. Vor Verwendung stets den ordnungsgemäßen Zustand des Gerätes prüfen. Sollten
sich Störungen des Gerätes ankündigen (z.B.
schwergängiger Kolben, Undichtigkeit), sofort aufhören zu pipettieren und das Kapitel
‚Störung – was tun‘ befolgen (s. Seite 18).
Ggf. an den Hersteller wenden.
Page 5

5
3. Einsatzgrenzen
Das Gerät dient zum Pipettieren von Proben unter Beachtung
folgender Grenzen:
- Einsatz zwischen +15 °C und +40 °C von Gerät und Reagenz –
andere Temperaturen auf Anfrage
- Dampfdruck bis 500 mbar
- Viskosität: 260 mPa s
2. Verwendungszweck
Luftpolsterpipette zum Pipettieren von wässerigen Lösungen
mittlerer Dichte und geringer bis mittlerer Viskosität.
4. Einsatzbeschränkungen
Viskose und benetzende Flüssigkeiten können die Genauigkeit des
Volumens beeinträchtigen. Ebenso Flüssigkeiten, deren Temperatur mehr als ± 1 °C von der Raumtemperatur abweicht.
5. Einsatzausschlüsse
Der Anwender muss die Eignung des Geräts für den Verwendungszweck selbst überprüfen.
Das Gerät kann nicht eingesetzt werden:
- für Flüssigkeiten, die Polypropylen angreifen
- für Flüssigkeiten, die Polycarbonat angreifen (Sichtfenster)
- für Flüssigkeiten mit sehr hohem Dampfdruck
- für Flüssigkeiten, die FKM und Polyetheretherketon (PEEK)
angreifen
Page 6
6
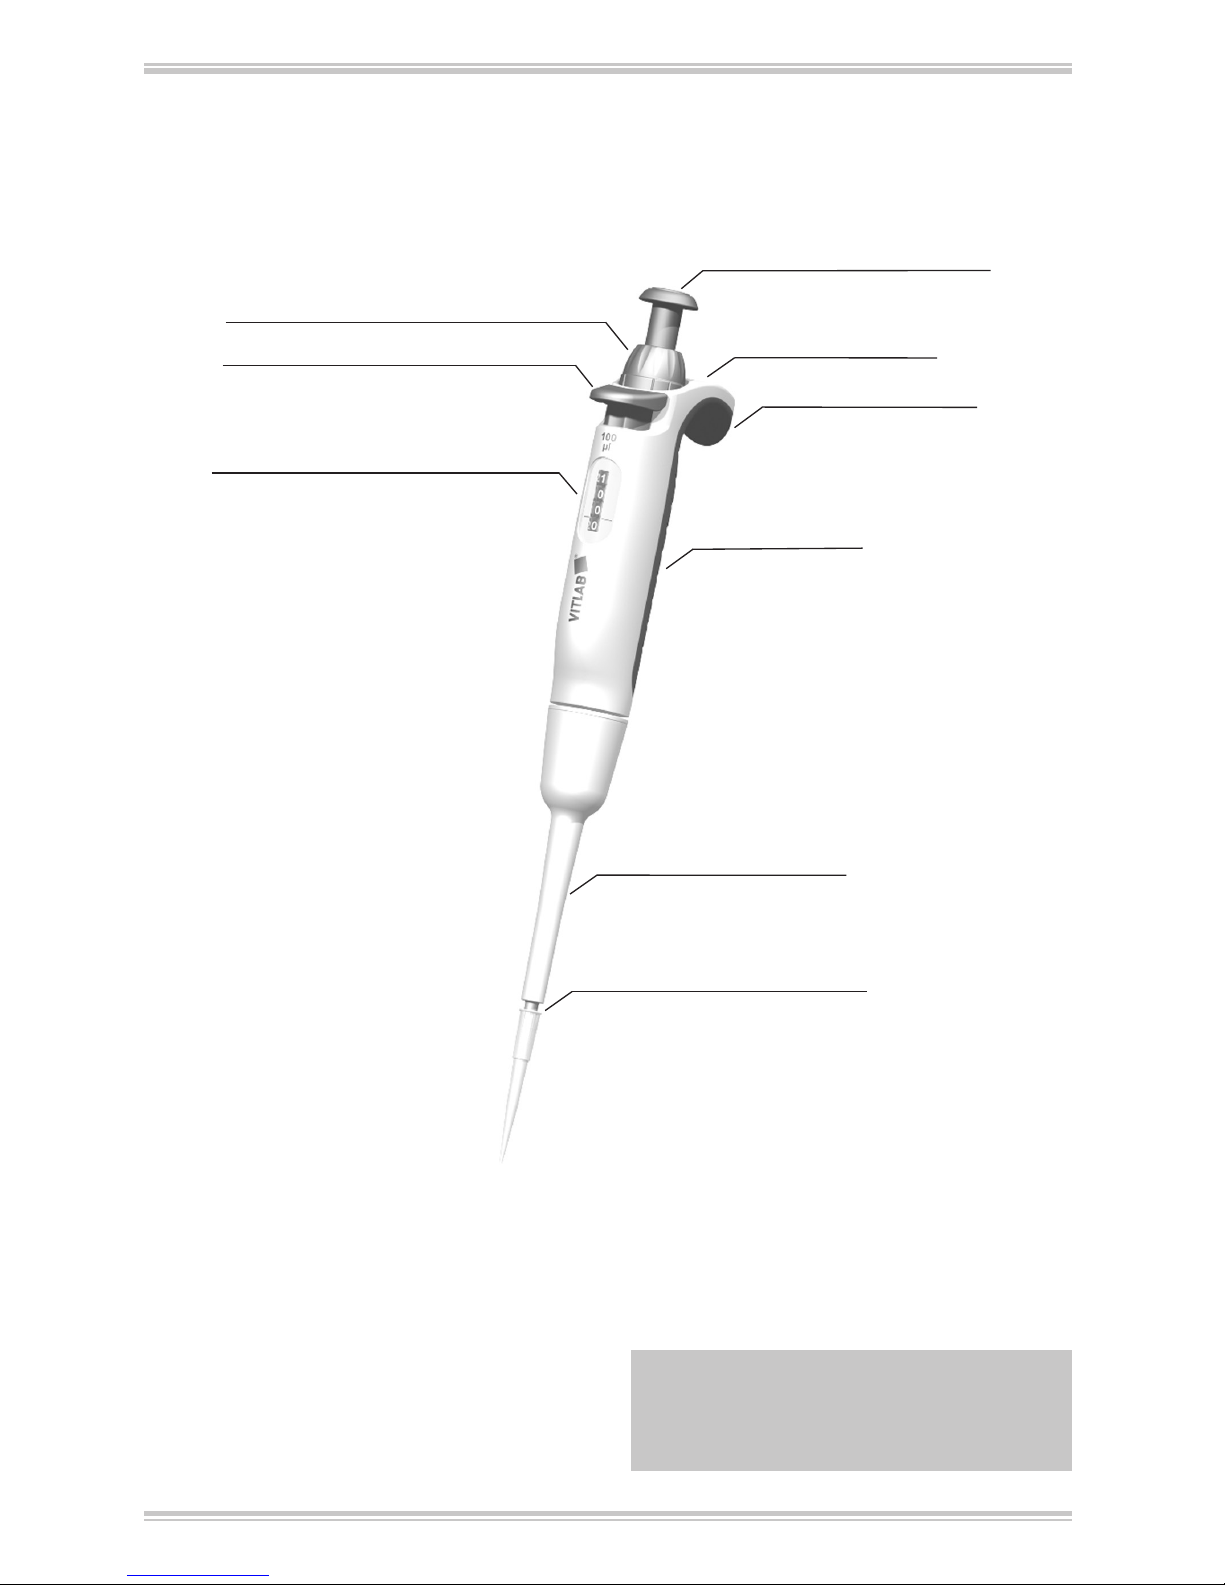
6. Funktions- und Bedienelemente
Volumeneinstellrad
Spitzenabwurftaste*
Volumenanzeige**
**Volumenanzeige
Die Ziffern in der Anzeige werden von oben nach
unten gelesen, der Strich entspricht dem Dezimalpunkt.
*Spitzenabwurftaste
Die Seriennummer befindet sich hinter der Spitzenabwurftaste.
Hinweis:
Einwandfreie Analysenergebnisse sind nur mit
Qualitäts-Spitzen zu erreichen. Wir empfehlen
VITLAB®-Pipettenspitzen.
Pipettierknopf
Kalibrierfunktion
Fingerbügel
Griffteil
Spitzenaufnahmekonus
(Abb.: VITLAB® micropipette 100 µl)
Pipettenschaft
Page 7
7
- 5 ml- und 10 ml-Geräte sollten nur mit eingebautem PE-Filter
verwendet werden (s. Seite 12)!
- Pipettenspitzen sind Einmalartikel!
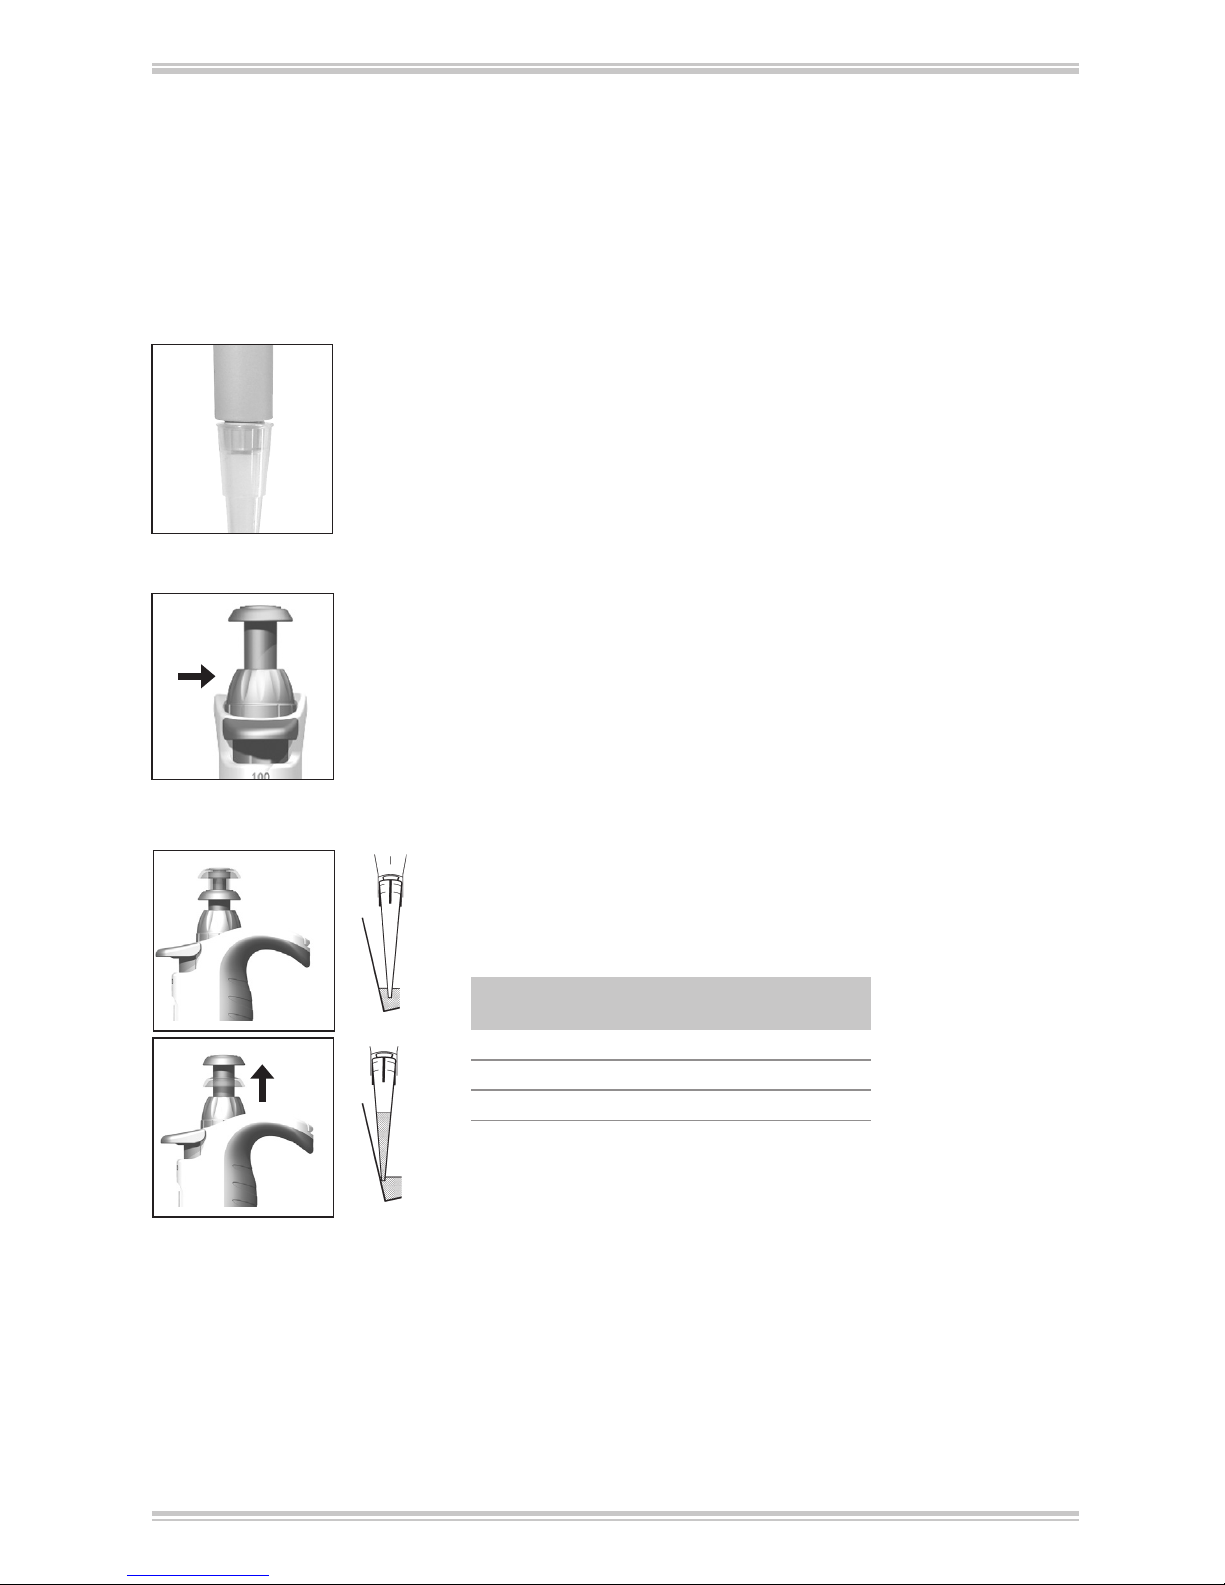
2. Volumen einstellen
Volumeneinstellrad zur Auswahl des gewünschten Volumens
drehen. Dabei gleichmäßig drehen und abrupte Drehbewegungen
vermeiden.
3. Probe aufnehmen
a) Pipettierknopf bis zum ersten Anschlag drücken.
b) Gerät senkrecht halten und Spitze in die Flüssigkeit eintauchen.
c) Pipettierknopf gleichmäßig zurückgleiten lassen. Damit die
Flüssigkeit ihre Endposition erreicht, Spitzen noch ca. 1-2 s
eingetaucht lassen.
d) Spitzen kurz an die Gefäßwand führen.
1. Spitzen aufstecken
Richtige Spitzen entsprechend dem Volumenbereich bzw. ColorCode verwenden!
Auf dichten und festen Spitzensitz achten.
7. Pipettieren
Volumenbereich
Eintauchtiefe
in mm
Wartezeit
in s
> 1 µl - 100 µl 2 - 3 1
> 100 µl - 1000 µl 2 - 4 1
> 1000 µl 3 - 6 3
Page 8
8
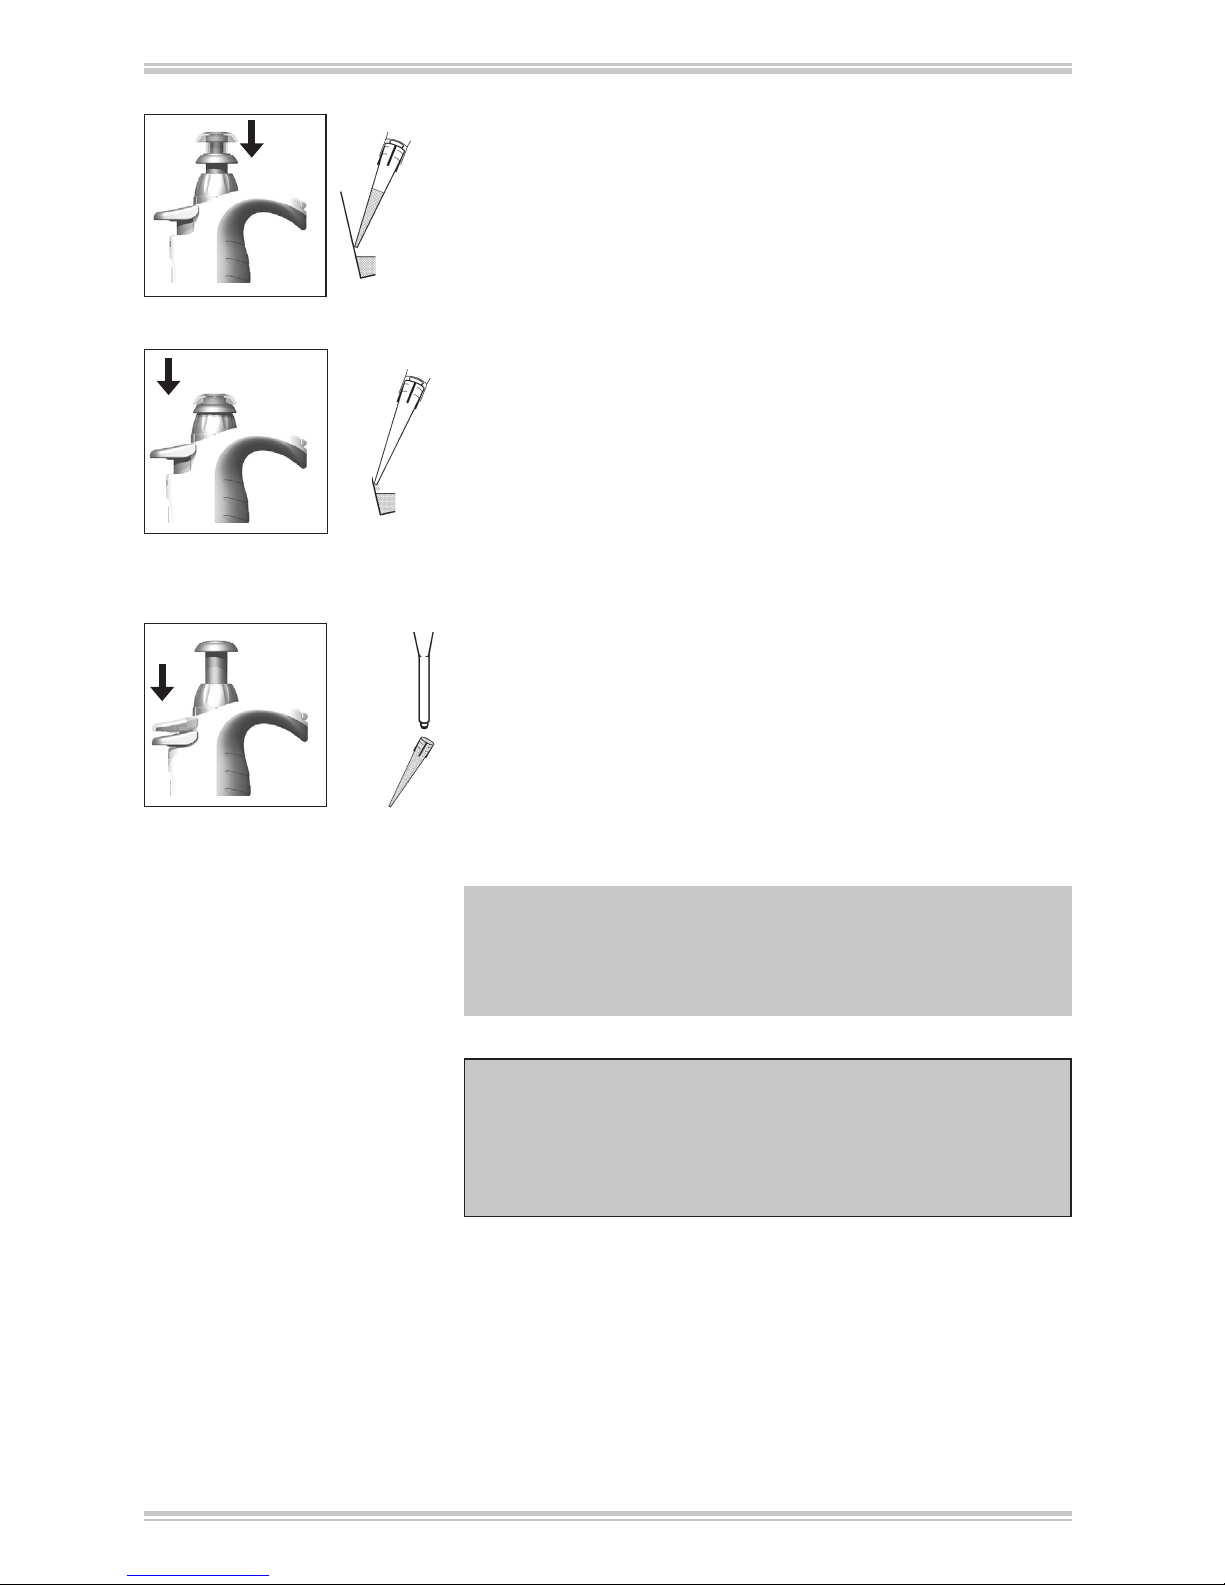
5. Spitzen abwerfen
Pipettenschaft über einen geeigneten Entsorgungsbehälter halten
und die Spitzenabwurftaste bis zum Anschlag niederdrücken.
Hinweis:
Die ISO 8655 schreibt vor, die Pipettenspitzen vor dem eigentlichen Pipettiervorgang einmal mit der Probenflüssigkeit
vorzuspülen.
Wichtig!
Gerät mit gefüllten Spitzen nicht hinlegen, da sonst Medium
in das Gerät fließen und dieses kontaminieren kann! Gerät
stets aufrecht und ohne Spitze im separat zu bestellenden
Regalhalter bzw. Tischständer aufbewahren.
c) Spitzen durch Überhub völlig entleeren: Pipettierknopf bis zum
zweiten Anschlag drücken.
d) Pipettenspitze dabei an der Gefäßwand abstreifen.
e) Pipettenspitze von der Gefäßwand zurücknehmen und Pipet-
tierknopf zurückgleiten lassen.
4. Probe abgeben
a) Pipettenspitze an Gefäßwand anlegen. Pipette im Winkel von
30-45° zur Gefäßwand halten.
b) Pipettierknopf mit gleichmäßiger Geschwindigkeit bis zum er-
sten Anschlag drücken und festhalten. Bei Seren, hochviskosen
oder entspannten Medien entsprechende Wartezeit einhalten,
um Genauigkeit zu verbessern.
Page 9

9
8. Volumen kontrollieren
Wir empfehlen, je nach Einsatz, alle 3-12 Monate eine Prüfung des Gerätes. Der Zyklus kann aber
den individuellen Anforderungen angepasst werden.
Die gravimetrische Volumenprüfung der Pipette erfolgt durch nachfolgende Schritte und entspricht
der DIN EN ISO 8655, Teil 6.
1. Nennvolumen einstellen
Maximales angegebenes Gerätevolumen
einstellen (Vorgehensweise siehe Seite 7).
2. Pipette konditionieren
Pipette vor der Prüfung konditionieren,
indem mit einer Pipettenspitze fünfmal die
Prüfflüssigkeit (H2O dest.) aufgenommen
und abgegeben wird.
3. Prüfung durchführen
a) Neue Pipettenspitze aufstecken und einmal
mit Prüfflüssigkeit vorspülen.
b) Prüfflüssigkeit aufnehmen und in das Wäge-
gefäß pipettieren.
c) Pipettierte Menge mit einer Analysenwaage
wägen. Beachten Sie bitte die Gebrauchsanleitung des Waagenherstellers.
d) Pipettiertes Volumen berechnen. Dabei die
Temperatur der Prüfflüssigkeit berücksichtigen.
e) Mindestens 10 Pipettierungen und Wägun-
gen in 3 Volumenbereichen (100%, 50%,
10%) werden empfohlen.
Berechnung für Nennvolumen V
0
xi = Wäge-Ergebnisse
n = Anzahl der Wägungen
Z = Korrekturfaktor (z. B. 1,0029 µl/mg
bei 20 °C, 1013 hPa)
Mittelwert
x =
Σ x
i
n
Mittleres Volumen
Richtigkeit*
Variationskoeffizient*
Standardabweichung
V = x · Z
100 s
V
VK% =
Σ (xi – x)
2
n – 1
s = Z ·
*) = Berechnung von Richtigkeit (R%) und Variationskoeffizient (VK%): R% und VK% werden
nach den Formeln der statistischen Qualitätskontrolle berechnet.
V – V
0
V
0
R% = · 100
Hinweis:
Prüfanweisungen (SOPs) stehen unter
www.vitlab.com zum Download zur Verfügung.
Page 10
10
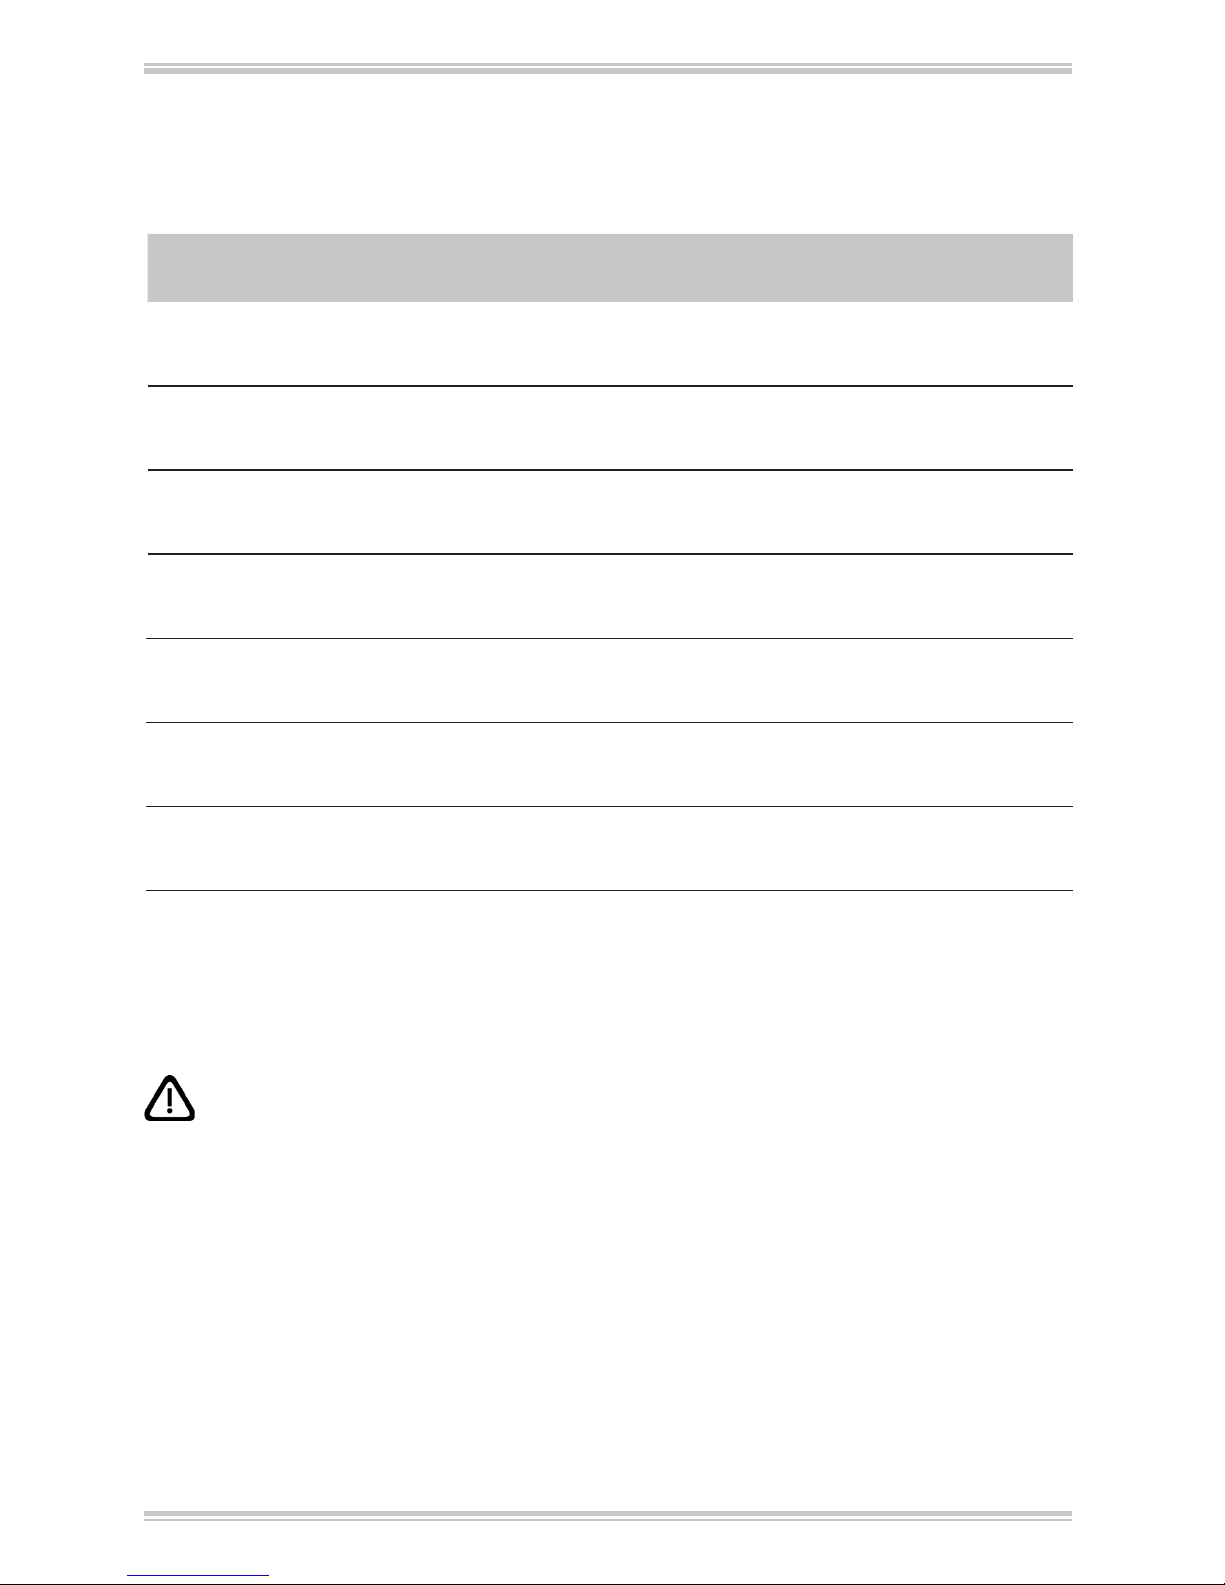
9. Genauigkeitstabelle
VITLAB® micropipette, Typ variabel
Volumenbe-
reich µl
Teilvolumen
µl
R*
≤ ± %
VK*
≤ %
Teilschritte
µl
Empfohlener
Spitzentyp, µl
0,5 - 10
10
5
1
1
1,6
7
0,5
1
4
0,01 0,5 - 20
2 - 20
20
10
2
0,8
1,2
5
0,4
0,7
2
0,02 2 - 200
10 - 100
100
50
10
0,6
0,8
3
0,2
0,4
1
0,1 2 - 200
20 - 200
200
100
20
0,6
0,8
3
0,2
0,3
0,6
0,2 2 - 200
100 - 1000
1000
500
100
0,6
0,8
3
0,2
0,3
0,6
1 50 - 1000
500 - 5000
5000
2500
500
0,6
0,8
3
0,2
0,3
0,6
5 500 - 5000
1000 - 10000
10000
5000
1000
0,6
0,8
3
0,2
0,3
0,6
10 1000 - 10000
Endprüfwerte bezogen auf das auf dem Gerät aufgedruckte Nennvolumen (= max. Volumen) bei gleicher Temperatur (20 °C) von Gerät, Umgebung und aqua dest., gemäß der
DIN EN ISO 8655.
* R = Richtigkeit
* VK = Variationskoeffizient
20 °C
Ex
Page 11
11
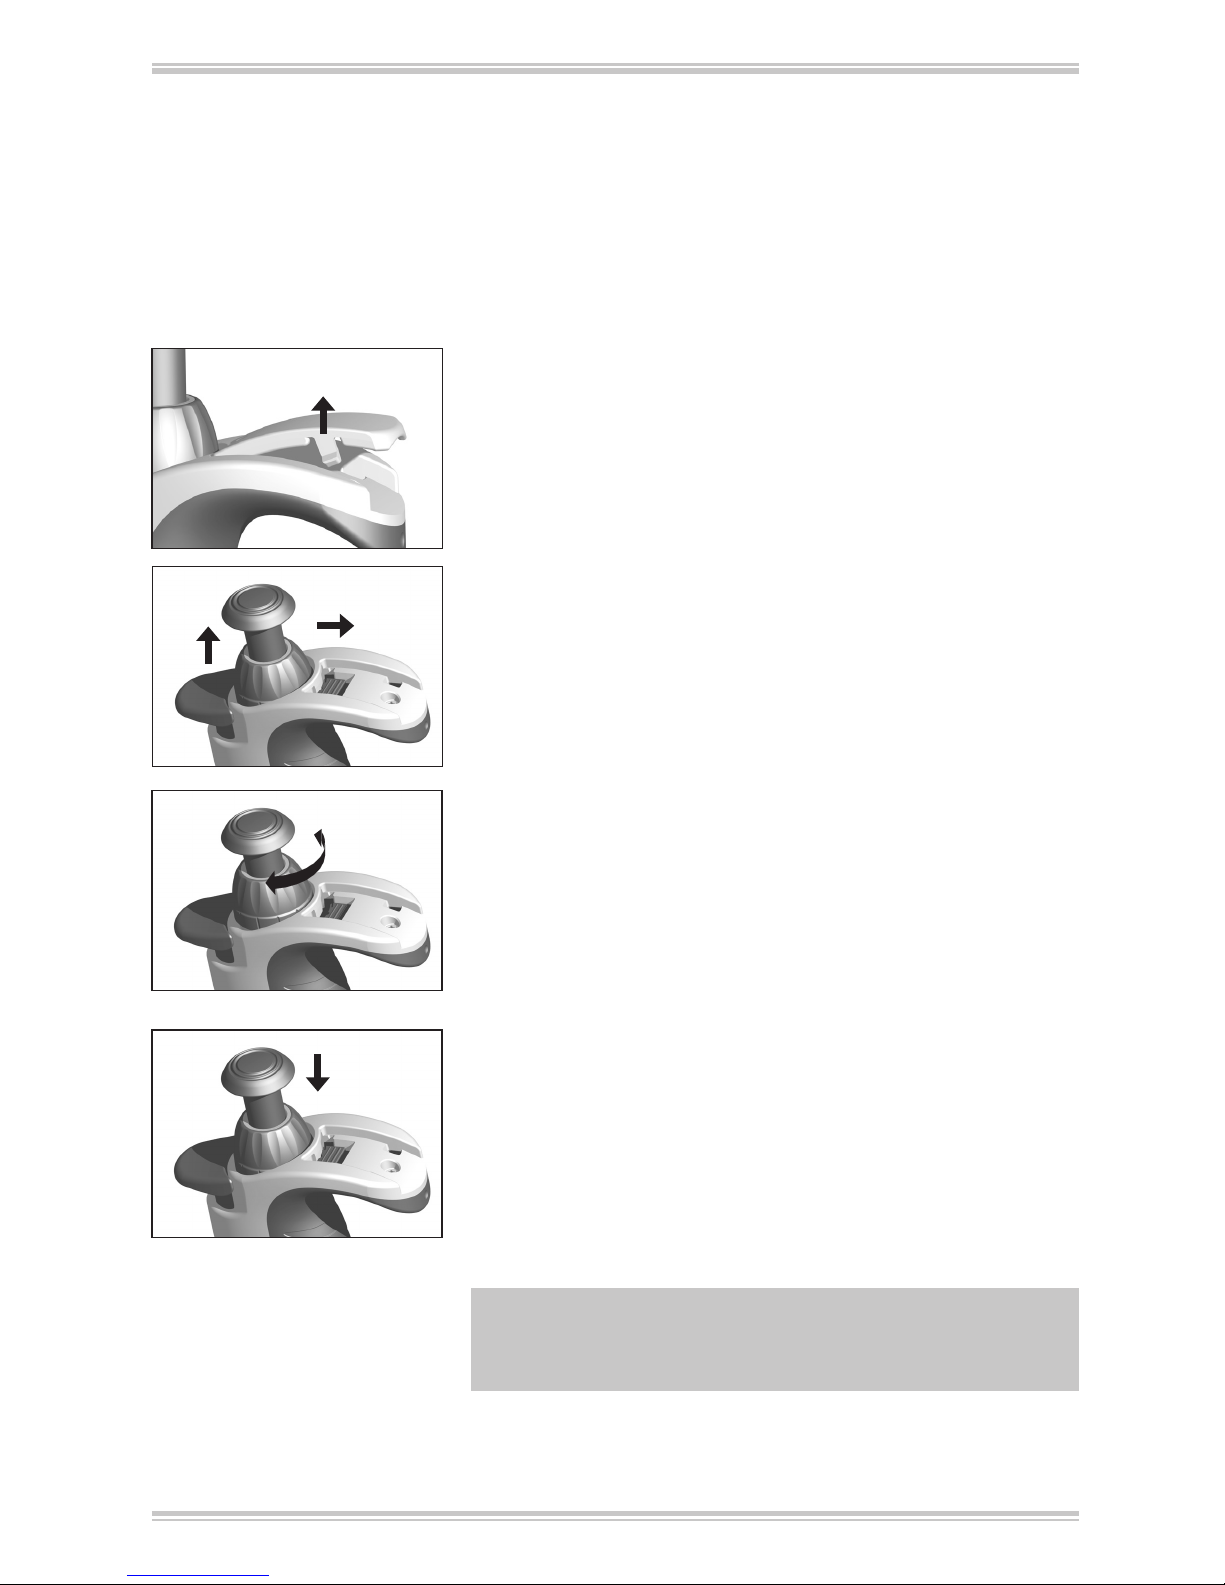
10. Justieren
Das Gerät ist permanent justiert für wässerige Lösungen. Sollte einwandfrei feststehen, dass die
Pipette ungenau arbeitet oder, um das Gerät auf Lösungen unterschiedlicher Dichte und Viskosität
oder speziell geformte Pipettenspitzen einzustellen, kann es justiert werden.
1. Volumenkontrolle durchführen, Ist-Wert ermitteln (s. Seite 9).
2. Abdeckung entfernen: Haken nach vorn drücken, leicht anhe-
ben und nach hinten ziehen.
3. Mit einer Büroklammer oder einer unbenutzten Pipettenspitze
die Schutzfolie entfernen (die Schutzfolie wird nicht weiter
benötigt).
4. Roten Justageschieber vollständig nach hinten schieben, Volu-
meneinstellrad hochziehen (Entkopplung) und Justageschieber
loslassen.
5. Justagewert einstellen:
Den zuvor ermittelten Ist-Wert mit dem Volumeneinstellrad
einstellen. Es wird eine Volumenkontrolle nach jeder Justage
empfohlen.
6. Justageschieber erneut vollständig nach hinten schieben, das
Volumeneinstellrad nach unten drücken und den Justageschieber loslassen. Abdeckung wieder montieren.
Hinweis:
Die Änderung der Werkseinstellung wird durch den dann
sichtbaren roten Justageschieber angezeigt.
Page 12

12
13. Filter Pipette 5 ml / 10 ml
Der hydrophobe PE-Filter dient als Schutz vor dem Eindringen von
Flüssigkeit in die Pipette.
Filter wechseln, sobald der Filter benetzt oder verschmutzt ist.
- Flachen Gegenstand, z. B. Schraubendreher verwenden.
- Filter vorsichtig herausziehen, ohne den Spitzenkonus zu
beschädigen.
Vor dem Autoklavieren Filter entfernen!
Das Gerät kann auch ohne Filter betrieben werden.
11. Autoklavieren
Die Pipette ist komplett autoklavierbar bei 121 °C (2 bar) und
einer Haltezeit von mindestens 15 Minuten nach DIN EN 285.
1. Pipettenspitze abwerfen.
2. Ohne weitere Demontage die komplette Pipette autoklavieren.
Bei Pipette 5 ml und 10 ml den Filter vor dem Autoklavieren
entfernen.
3. Pipette vollständig abkühlen und trocknen lassen.
Hinweis:
Die Wirksamkeit des Autoklavierens ist vom Anwender selbst
zu prüfen. Höchste Sicherheit wird durch Vakuumsterilisation
erreicht. Wir empfehlen die Verwendung von Sterilisationsbeuteln.
Achtung!
Vor dem Autoklavieren muss die Volumeneinstellung auf
einen mit Ziffern versehenen Wert eingestellt werden (z.B. auf
11,25 oder 11,26, aber nicht dazwischen).
Bei häufigem Autoklavieren sollten Kolben und Dichtung zur
besseren Gängigkeit mit Silikonfett gefettet werden.
Bitte nur empfohlenes Silikonfett verwenden, s. Zubehör Seite
15. Gegebenenfalls nach dem Autoklavieren Schraubverbindung
zwischen Griffteil und Pipettiereinheit festziehen.
12. UV-Entkeimung
Das Gerät ist gegen die übliche Belastung einer UV-Entkeimungslampe beständig. Infolge der UV-Einwirkung ist eine Farbänderung möglich.
Page 13
A
B
D
E
S
C
13
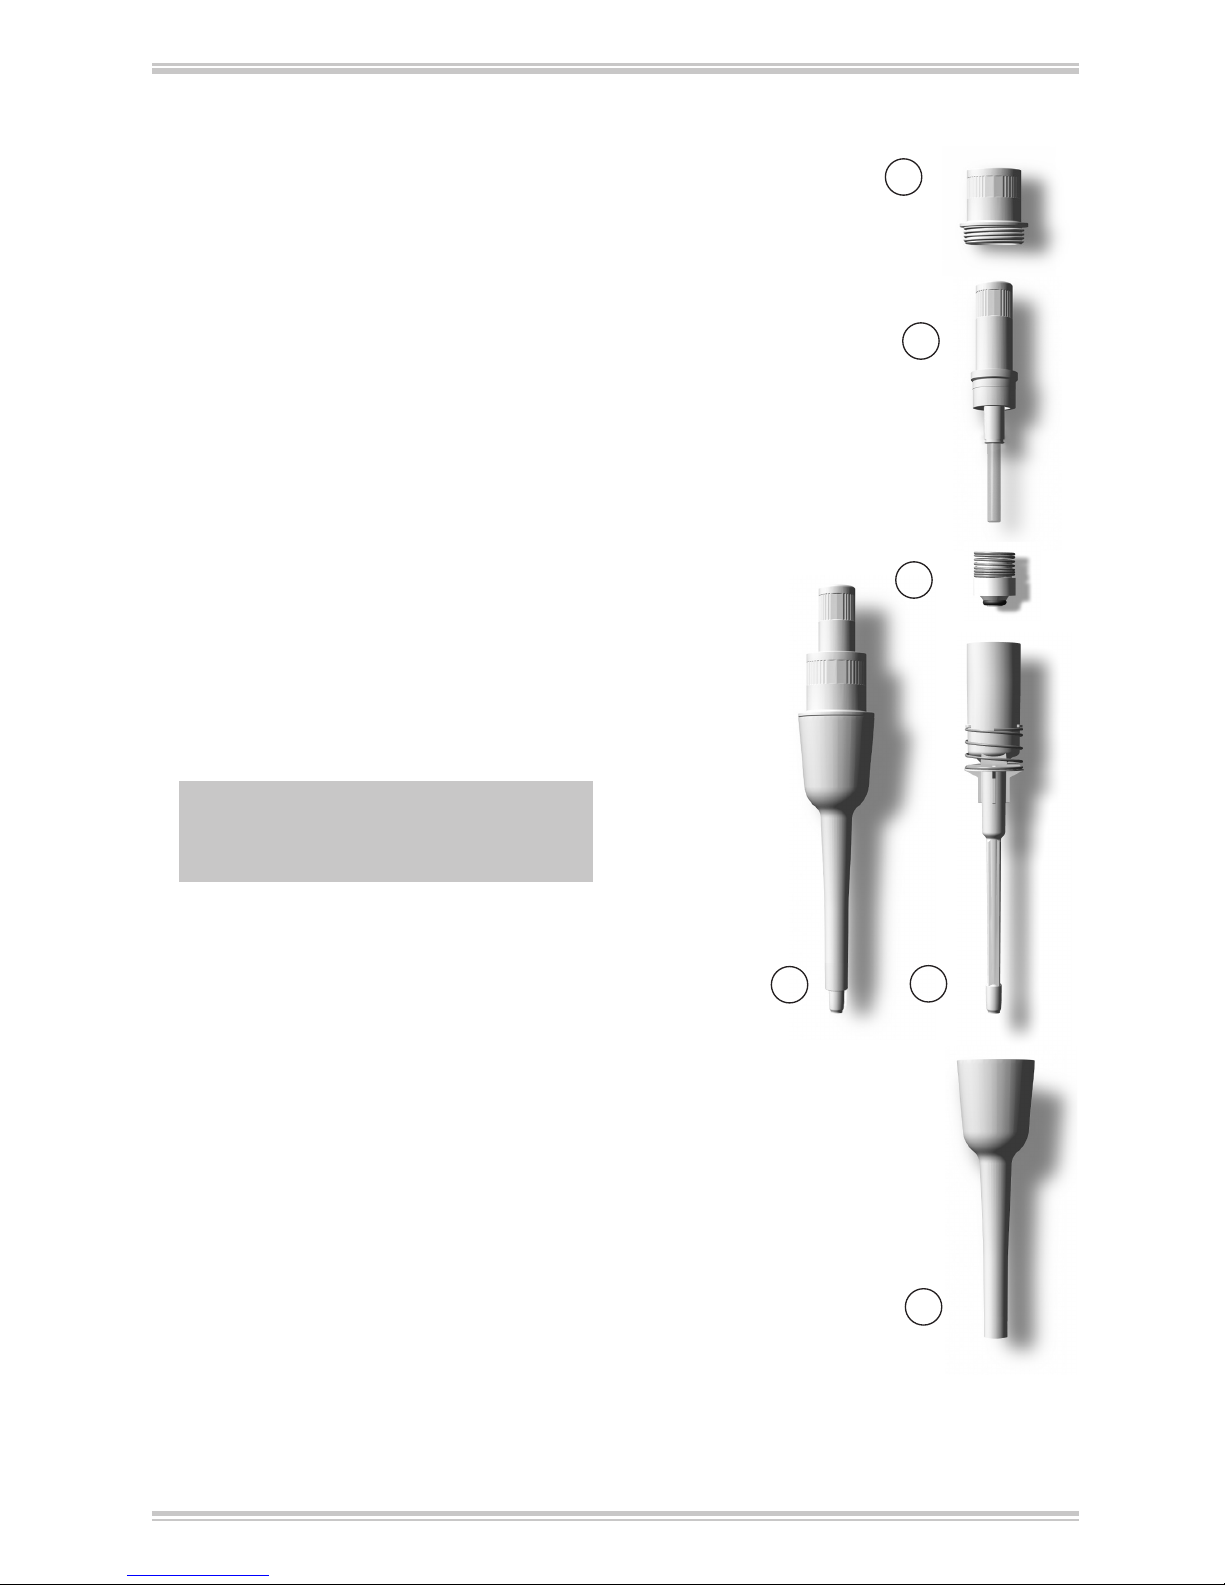
14. Wartung und Reinigung
14.1. VITLAB® micropipette bis 1000 µl
1. Wartung
Pipettenaufnahmekonus auf Beschädigung prüfen. Kolben und
Dichtung auf Verschmutzung untersuchen.
Dichtheit des Geräts prüfen: Dazu Probe aufsaugen und Gerät ca.
10 s senkrecht halten. Falls sich an der Pipettenspitze ein Tropfen
bildet: Störung – was tun? Seite 18.
2. Demontage und Reinigung
1. Pipettenschaft (S) vom Griffteil durch Abschrauben lösen.
2. Abwerferoberteil (A) aus dem Pipettenschaft herausschrauben.
3. Schaft (B, C u. D) aus dem Abwerferunterteil (E) herausziehen.
4. Kolbeneinheit (B) herausschrauben.
Hinweis:
Kolben bleibt mit Kolbeneinheit (B) verbunden!
5. Dichtung mit Feder (C) entnehmen (bei Pipette 10 µl nicht
möglich!).
6. Abgebildete Teile mit Seifenlösung oder Isopropanol reinigen,
anschließend mit aqua dest. spülen.
7. Teile trocknen (max. 120 °C).
8. Kolben und Dichtung hauchdünn mit Silikonfett nachfetten.
Bitte nur empfohlenes Silikonfett verwenden, s. Zubehör
Seite 15.
9. Abgekühlte Teile wieder in umgekehrter Reihenfolge montieren. Kolbeneinheit und Abwerferoberteil (A, B) nur handfest
anziehen.
(Abbildung
beispielhaft)
Page 14
S
K
F
G
I
H
F´
14
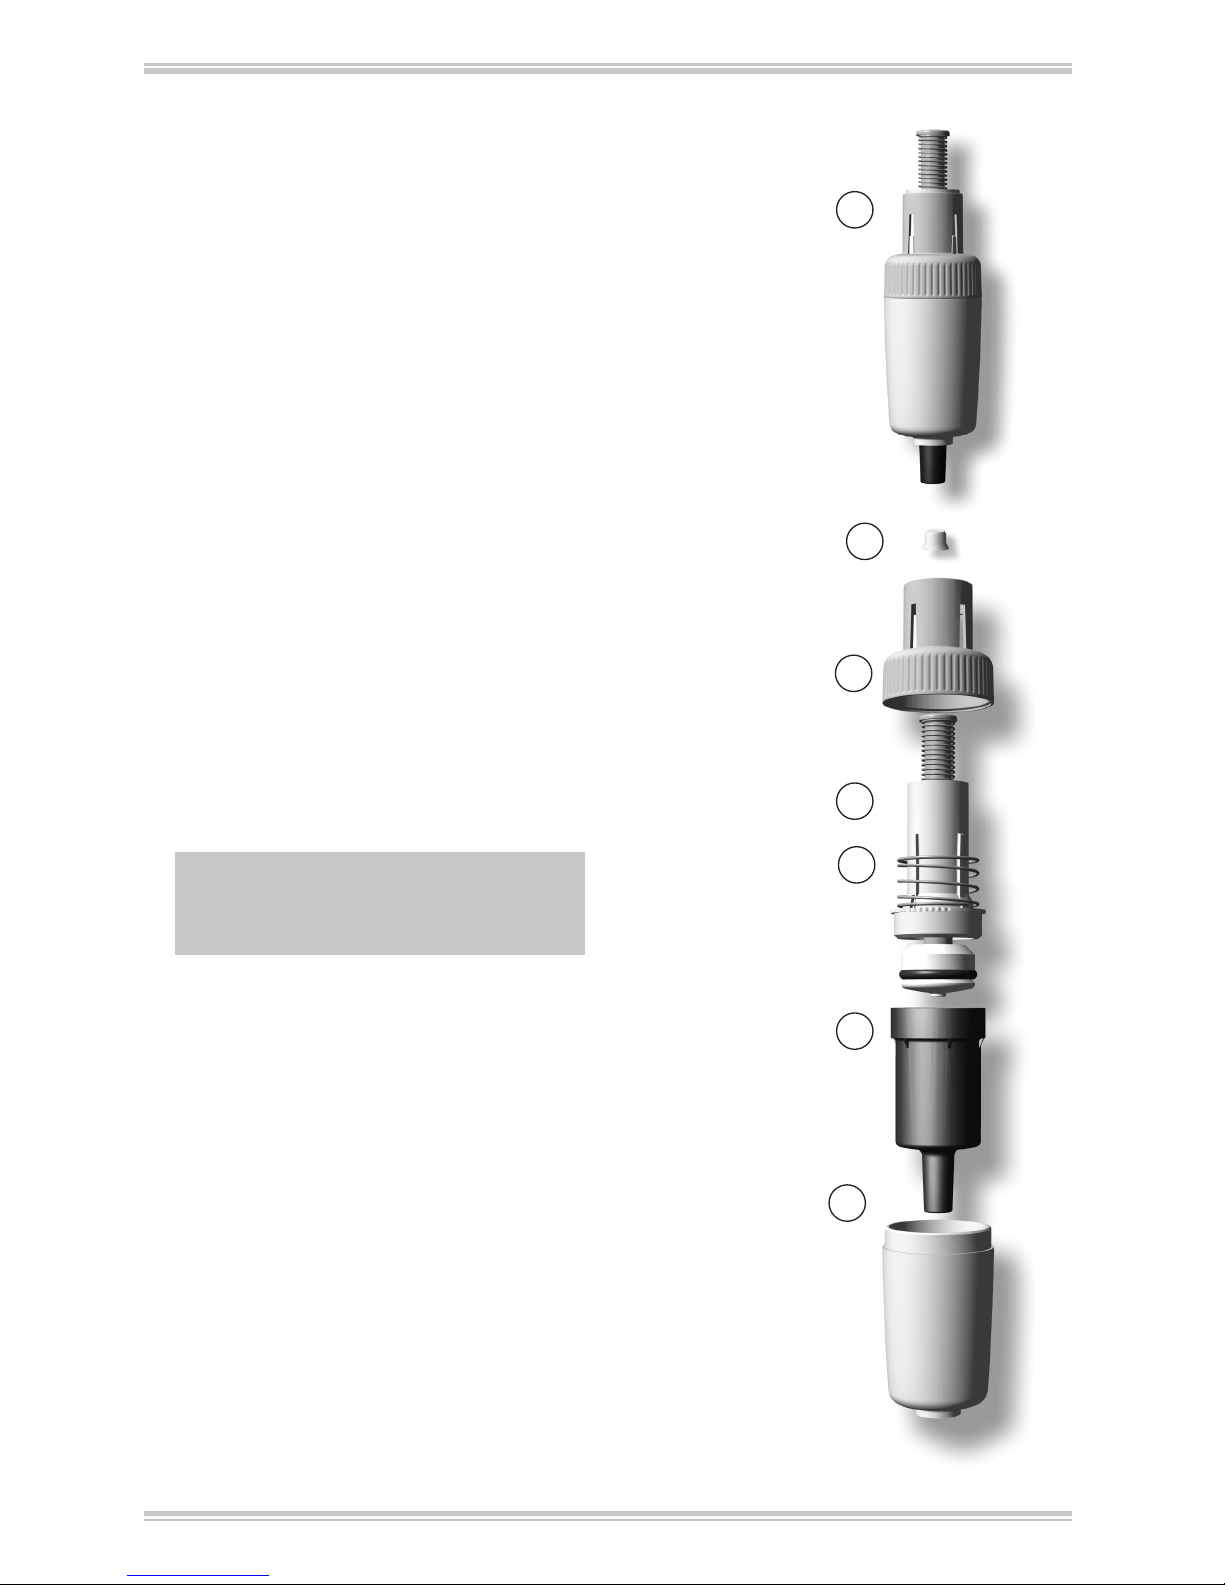
14.2. VITLAB® micropipette 5 ml und 10 ml
1. Wartung
Pipettenaufnahmekonus auf Beschädigung prüfen. Kolben und
O-Ring-Dichtung auf Verschmutzung untersuchen.
Dichtheit des Geräts prüfen. Dazu Probe aufsaugen, Gerät ca. 10 s
senkrecht halten. Falls sich an der Pipettenspitze ein Tropfen bildet:
„Störung – was tun?“, Seite 18.
2. Demontage und Reinigung
1. Kompletten Schaft (S) durch Drehen am Abwerferoberteil (F)
vom Griffteil lösen und Filter (K) aus Schaftunterteil (H) herausziehen.
2. Abwerferunterteil (F‘) durch Abschrauben vom Abwerferoberteil (F) trennen.
3. Kolbeneinheit (G) mit Abwerferfeder
( I ) und Schaftunterteil (H) auseinander-schrauben.
4. O-Ring von Kolbeneinheit abziehen und reinigen.
Hinweis:
Die Kolbeneinheit (G) nicht weiter demontieren!
5. Kolbeneinheit (G) und Schaftunterteil (H) mit Seifenlösung
oder Isopropanol reingen, anschließend mit aqua dest. spülen.
6. Teile trocknen (max. 120 °C) und abkühlen lassen.
7. O-Ring sorgfältig innen und außen fetten und auf Kolben
aufziehen.
8. Die Einzelkomponenten wieder in umgekehrter Reihenfolge
montieren.
(Abbildung
beispielhaft!)
Page 15
15
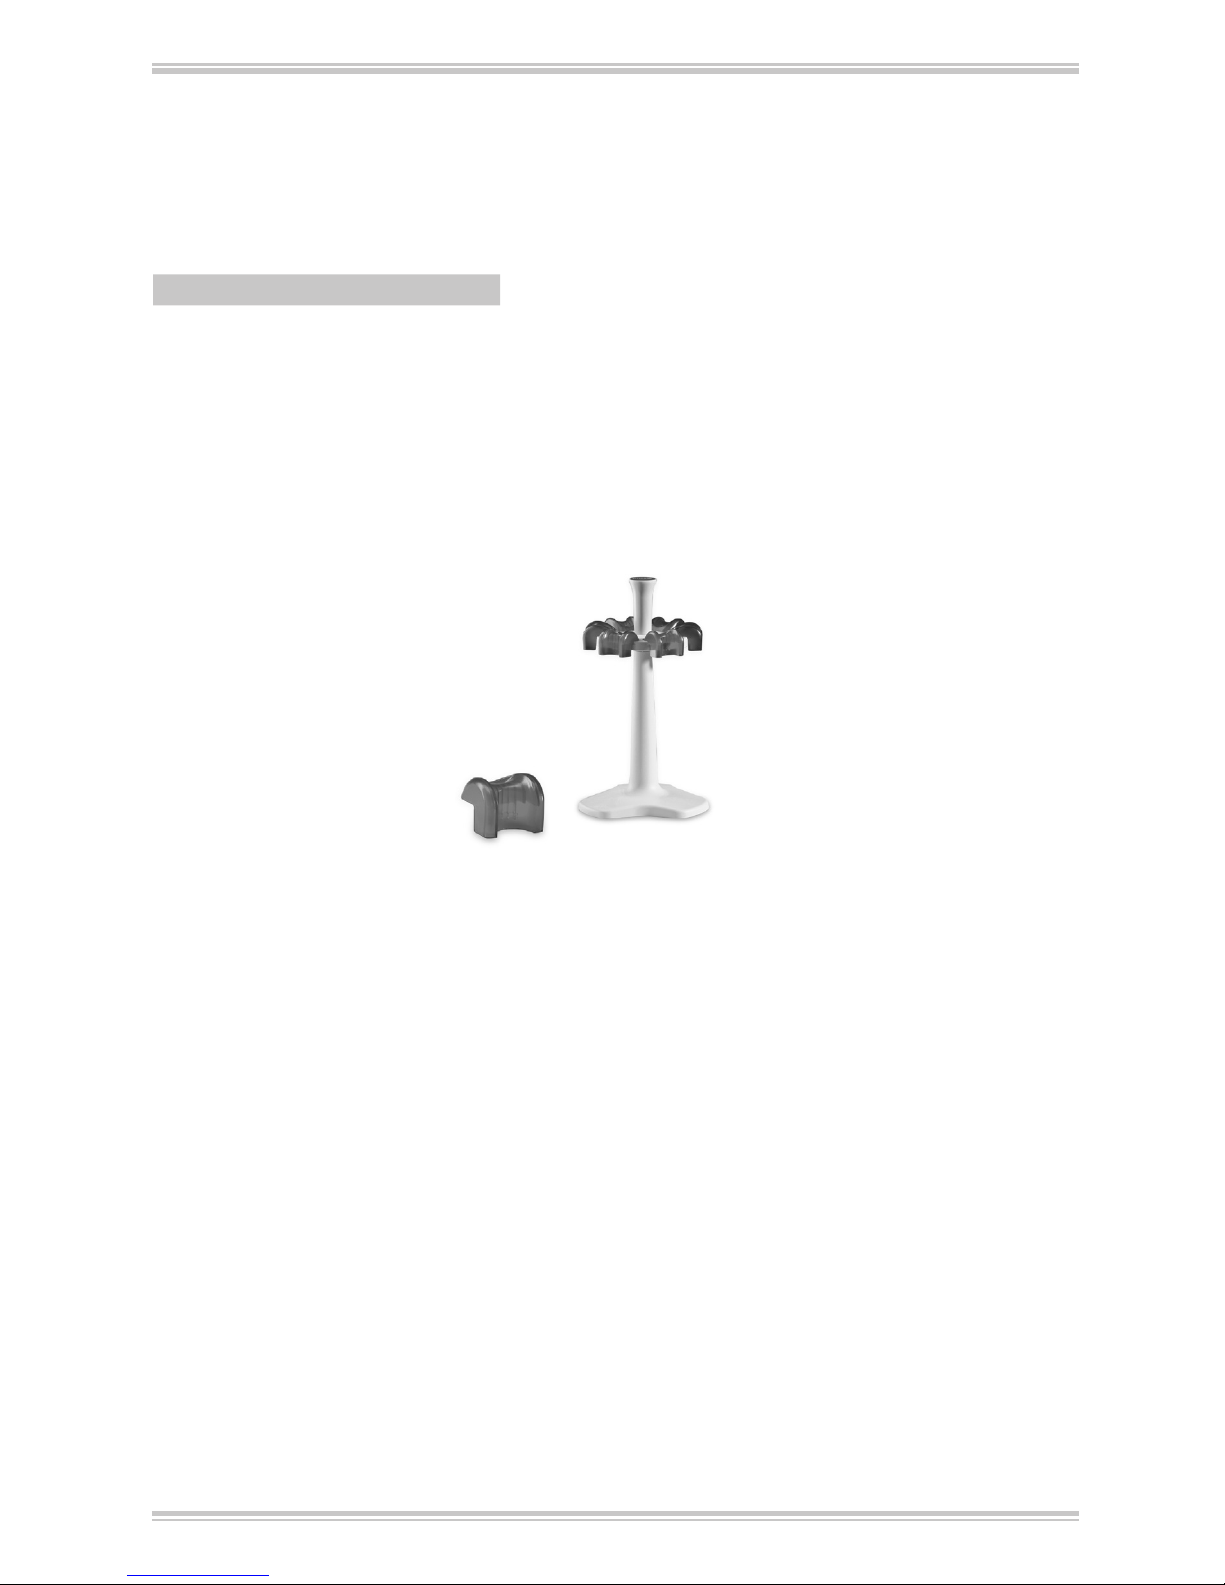
15. Bestelldaten und Zubehör
Tischständer für 6 VITLAB®
micropipette
Best.-Nr. 1672002
Regalhalter für 1 VITLAB®
micropipette
Best.-Nr. 1672000
VITLAB® micropipette
Volumen Best.-Nr.
0,5 - 10 µl 1641000
2 - 20 µl 1641002
10 - 100 µl 1641004
20 - 200 µl 1641006
100 - 1000 µl 1641008
0,5 - 5 ml 1641010
1,0 - 10 ml 1641012
15.2. Zubehör
15.1. Bestelldaten
Filter für VITLAB® micropipette 5 ml
VE 25 Stk. Best.-Nr. 1672010
Filter für VITLAB® micropipette 10 ml
VE 25 Stk. Best.-Nr. 1672012
Silikonfett für VITLAB® micropipette bis 1000 µl
VE 1 St. Best.-Nr. 1672015
Silikonfett für VITLAB® micropipette 5 ml/10 ml
VE 1 St. Best.-Nr. 1672016
Page 16
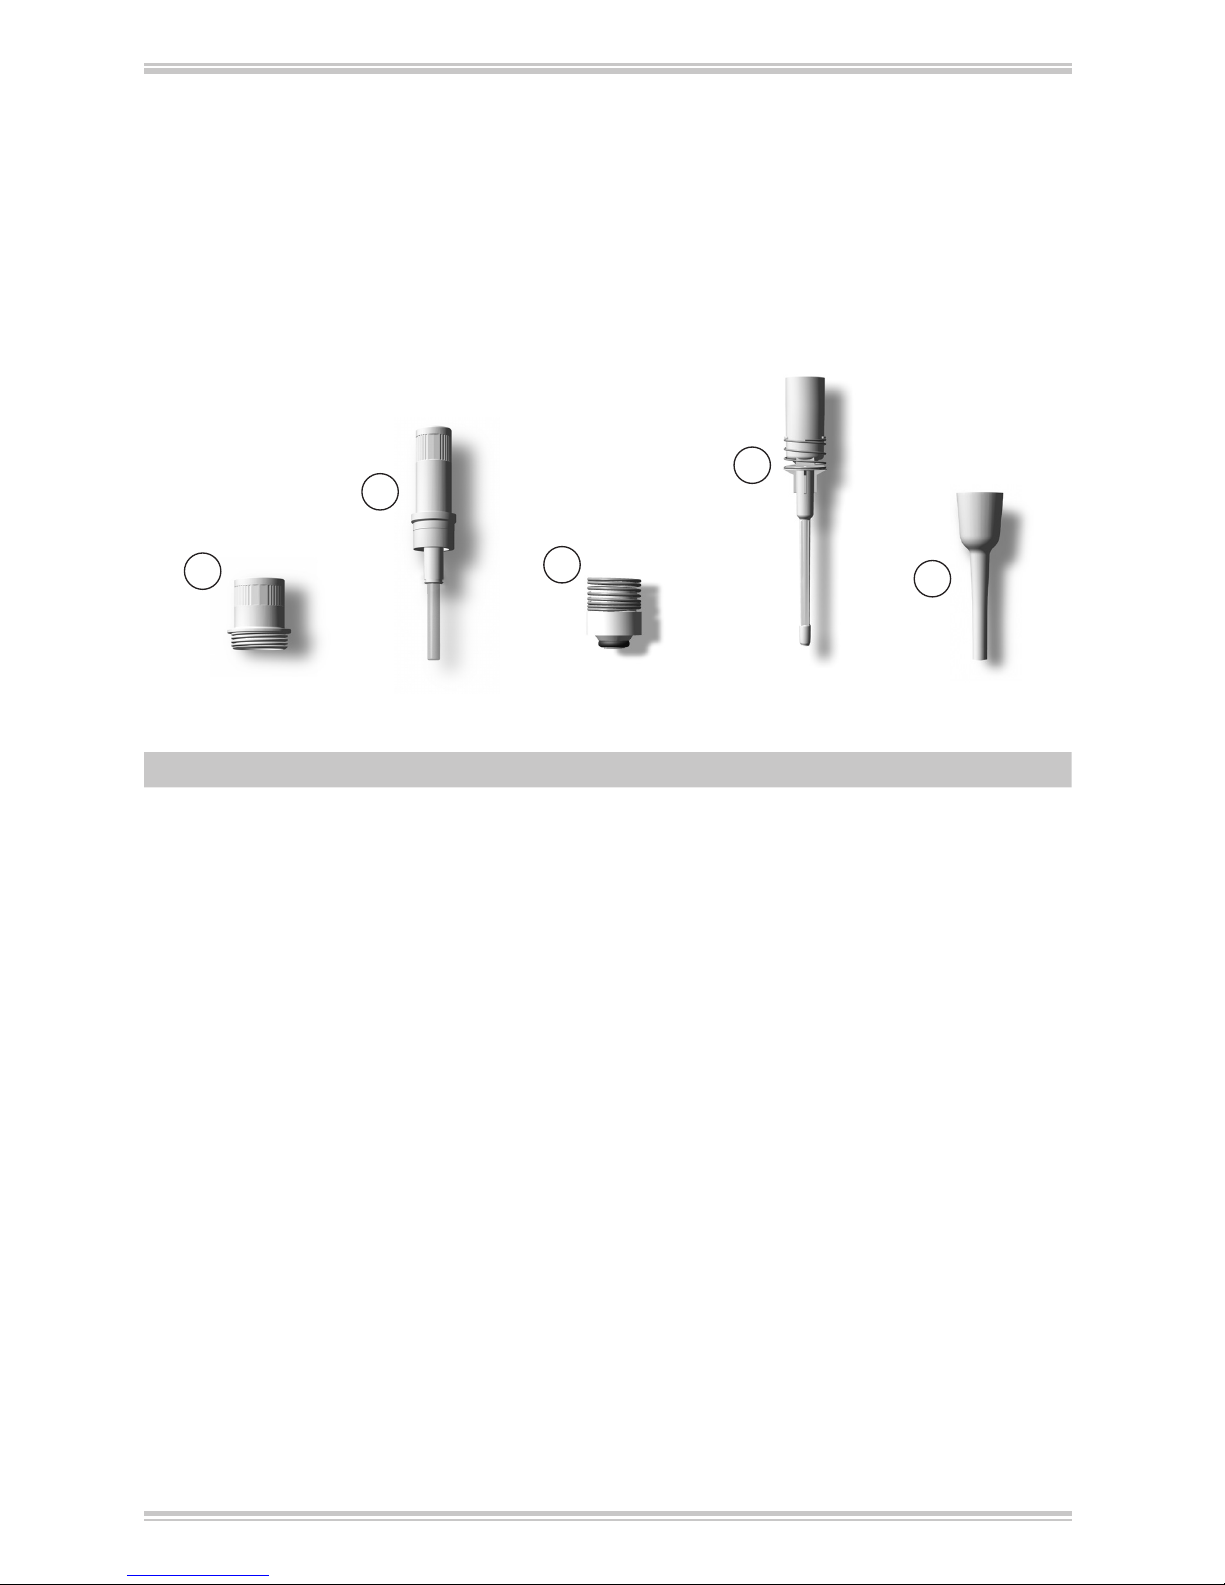
A
B
E
C
D
16
16. Ersatzteile
16.1. VITLAB® micropipette bis 1000 µl
Abwerferoberteil
Kolbeneinheit
Dichtung
mit Feder
Schaft mit Abwerferfeder
Abwerferunterteil
Volumen A B C D E
0,5 - 10 µl 1671400 1671411 - 1671431* 1671441
2 - 20 µl 1671401 1671412 1671420 1671432 1671442
10 - 100 µl 1671402 1671416 1671424 1671433 1671443
20 - 200 µl 1671403 1671417 1671425 1671434 1671444
100 - 1000 µl 1671404 1671418 1671426 1671435 1671445
* 0,5-10 µl inkl. Dichtung
Vor dem Nachbestellen einer Kolbeneinheit oder Dichtung mit
Feder für Ihre VITLAB® micropipette mit Glaskolben (bis Seriennummer 08N) wenden Sie sich bitte an [email protected]. (Abbildung beispielhaft, Aussehen und Abmessungen der Ersatzteile
entsprechen dem jeweiligen Nennvolumen.)
Page 17
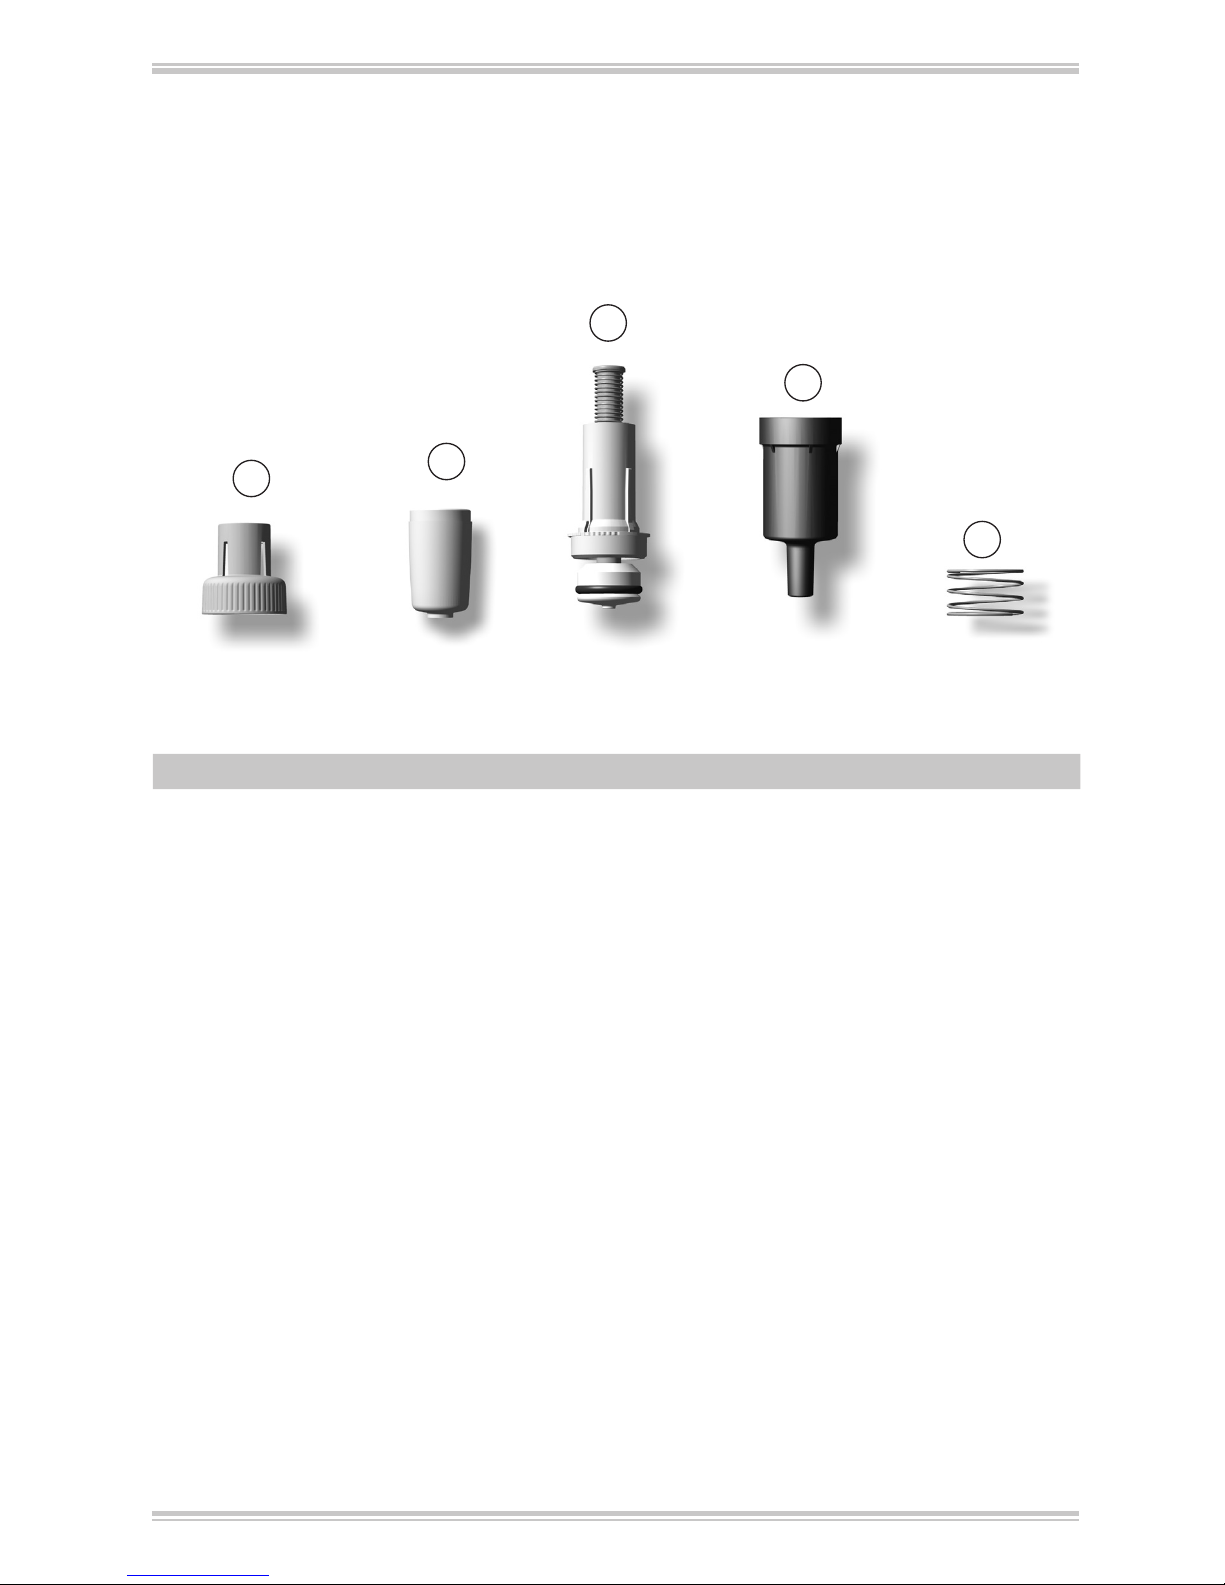
I
H
G
F´
F
17
16.2. VITLAB® micropipette 5 ml und 10 ml
Abwerferoberteil
Abwerferunterteil
Kolbeneinheit
Schaftunterteil
Abwerferfeder
(Abbildung beispielhaft, Aussehen und Abmessungen der
Ersatzteile entsprechen dem jeweiligen Nennvolumen.)
Volumen F + F‘ G H I
0,5 - 5 ml 1671451 1671455 1671461 1671465
1 - 10 ml 1671452 1671456 1671462 1671465
Page 18

18
17. Störung - was tun?
Störung Mögliche Ursache Was tun?
Spitze tropft
(Gerät undicht)
- Ungeeignete Spitze - Nur Qualitätsspitzen verwenden
- Spitze sitzt nicht fest - Spitze fester aufdrücken
Gerät saugt nicht oder zu wenig auf, abgegebenes Volumen
zu klein
- Dichtung verunreinigt - Dichtung reinigen
- Dichtung oder Konus
beschädigt
- Dichtung oder Schaft ersetzen
- Kolben verunreinigt oder
beschädigt
- Kolben reinigen oder ersetzen
Ansaugen sehr langsam - Schaft verstopft - Schaft reinigen
- Bei 5 ml und 10 ml
Geräten Filter verschmutzt
- Filter wechseln
Abgegebenes Volumen zu groß - Pipettierknopf vor dem
Ansaugen zu weit bis in den
Überhub gedrückt
- Auf korrekte Handhabung
achten. Siehe ‚Pipettieren‘,
Seite 7.
Kolben schwergängig - Kolben verschmutzt oder
ohne Fett
- Kolben reinigen und fetten
Page 19

19
18. Reparatur - Kalibrierservice
Sollte eine evtl. Funktionsstörung nicht im eigenen Labor durch
einfachen Austausch von Ersatzteilen zu beheben sein, muss das
Gerät zur Reparatur eingesandt werden.
Dabei ist zu beachten, dass aus Sicherheitsgründen nur
saubere und dekontaminierte Geräte geprüft und repariert
werden können!
18.1. Zur Reparatur einsenden
a) Gerät gründlich reinigen und dekontaminieren.
b) Formular „Erklärungen zur gesundheitlichen Unbedenklichkeit“
ausfüllen (Vordrucke können beim Händler oder Hersteller
angefordert werden bzw. stehen unter www.vitlab.com zum
Download bereit).
c) Ausgefülltes Formular gemeinsam mit dem Gerät an den Her-
steller bzw. Händler senden mit genauer Beschreibung der Art
der Störung und der verwendeten Medien.
Der Rücktransport geschieht auf Gefahr und Kosten des Einsenders.
18.2. Kalibrierservice
Die ISO 9001 und GLP-Richtlinien fordern die regelmäßige
Überprüfung Ihrer Volumenmessgeräte. Wir empfehlen, alle
3-12 Monate eine Volumenkontrolle vorzunehmen. Der Zyklus
ist abhängig von den individuellen Anforderungen an das Gerät.
Bei hoher Gebrauchshäufigkeit oder aggressiven Medien sollte
häufiger geprüft werden.
Die ausführliche Prüfanweisung steht unter www.vitlab.com zum
Download bereit.
VITLAB bietet Ihnen darüber hinaus die Möglichkeit, Ihre Geräte
durch unseren Kalibrierservice kalibrieren zu lassen.
Schicken Sie uns einfach die zu kalibrierenden Geräte mit der
Angabe, welche Art der Kalibrierung Sie wünschen. Sie erhalten
die Geräte nach wenigen Tagen zusammen mit einem Prüfbericht
(Werkskalibrierung) bzw. mit einem DAkkS-Kalibrierschein zurück.
Nähere Informationen erhalten Sie von Ihrem Fachhändler oder
direkt von VITLAB.
Page 20

20
19. Mängelhaftung
Wir haften nicht für Folgen unsachgemäßer Behandlung, Verwendung, Wartung, Bedienung oder nicht autorisierter Reparatur des
Gerätes oder für Folgen normaler Abnutzung, insbesondere von
Verschleißteilen wie z.B. Kolben, Dichtungen, Ventilen sowie bei
Glasbruch. Gleiches gilt für die Nichtbeachtung der Gebrauchsanleitung. Insbesondere übernehmen wir keine Haftung für
entstandene Schäden, wenn das Gerät weiter zerlegt wurde als in
der Gebrauchsanleitung beschrieben oder wenn fremde Zubehörbzw. Ersatzteile eingebaut wurden.
20. Entsorgung
Bei der Entsorgung der Geräte und der Spitzen bitte die jeweiligen
nationalen Entsorgungsvorschriften beachten.
Technische Änderungen, Irrtum und Druckfehler vorbehalten.
Page 21

Contents
1. Safety Instructions 22
2. Purpose 23
3. Limitations of use 23
4. Operating Limitations 23
5. Eperating Exclusions 23
6. Operating and Control Elements 24
7. Pipetting 25
8. Checking the Volume 27
9. Accuracy Table 28
10. Adjustment 29
11. Autoclaving 30
12. UV sterilisation 30
13. Filter pipette 5 ml / 10 ml 30
14. Servicing and Cleaning 31
14.1. VITLAB® micropipette up to 1000 µl 31
14.2. VITLAB® micropipette 5 ml / 10 ml 32
15. Ordering Information · Accessories 33
15.1. Ordering Information 33
15.2. Accessories 33
16. Spare Parts 34
16.1. VITLAB® micropipette up to 1000 µl 34
16.2. VITLAB® micropipette 5 ml / 10 ml 35
17. Troubleshooting 36
18. Repairs · Calibration Service 37
18.1. Return for repair 37
18.2. Calibration Service 37
19. Warranty Information 38
20. Disposal 38
21
Page 22

Please read the following carefully!
This instrument may sometimes be used with hazardous materials, operations, and equipment. It is
beyond the scope of this manual to address all of the potential safety risks associated with its use in
such applications. It is the responsibility of the user of this pipette to consult and establish appropriate safety and health practices and determine the applicability of regulatory limitations prior to use.
1. Safety Instructions
1. Every user must read and understand this
operating manual prior to using the instrument and observe these instructions during
use.
2. Follow general instructions for hazard prevention and safety instructions; e.g., wear
protective clothing, eye protection and
gloves. When working with infectious or
other hazardous samples, all appropriate regulations and precautions must be followed.
3. Observe all specifications provided by reagent manufacturers.
4. Only use the instrument for pipetting liquids
that conform to the specifications defined
in the limitations of use and operating limitations. Observe operating exclusions (see
page 23). If in doubt, contact the manufacturer or supplier.
5. Always use the instrument in such a way
that neither the user nor any other person is
endangered. Avoid splashes. Use only suita-
ble vessels.
6. Avoid touching the tip orifices when working with hazardous samples.
7. Never use force on the instrument!
8. Use only original spare parts. Do not at-
tempt to make any technical alterations. Do
not dismantle the instrument any further
than is described in the operating manual!
9. Before use check the instrument for visible
damages. If there is a sign of a potential
malfunction (e.g., piston difficult to move,
leakage), immediately stop pipetting. Con-
sult the ‘Troubleshooting’ section of this
manual (see page 36), and contact the
manufacturer if needed.
22
Page 23

2. Purpose
Air-displacement pipette for pipetting aqueous solutions of medium density and low to medium viscosity.
3. Limitations of Use
The instrument is intended for the pipetting of liquids within the
following limitations:
- Temperature of both the instrument and solution should be
between 15 °C to 40 °C (59 °F to 104 °F). Consult the ma nufacturer for use in temperatures outside of this range.
- Vapor pressure up to 500 mbar
- Viscosity: 260 mPa s (260 cps)
4. Operating Limitations
Viscous and highly adhesive liquids may impair volumetric accuracy. Volumetric accuracy may also be impaired when pipetting
liquids that differ from ambient temperature by more than ± 1 °C/
± 1.8 °F.
5. Operating Exclusions
The user has to ensure the compatibility of the instrument with
the intended application.
This instrument cannot be used:
- for liquids incompatible with polypropylene
- for liquids incompatible with polycarbonate (inspection window)
- for liquids of a very high vapor pressure
- for liquids incompatible with FKM and polyetheretherketone
(PEEK)
23
Page 24
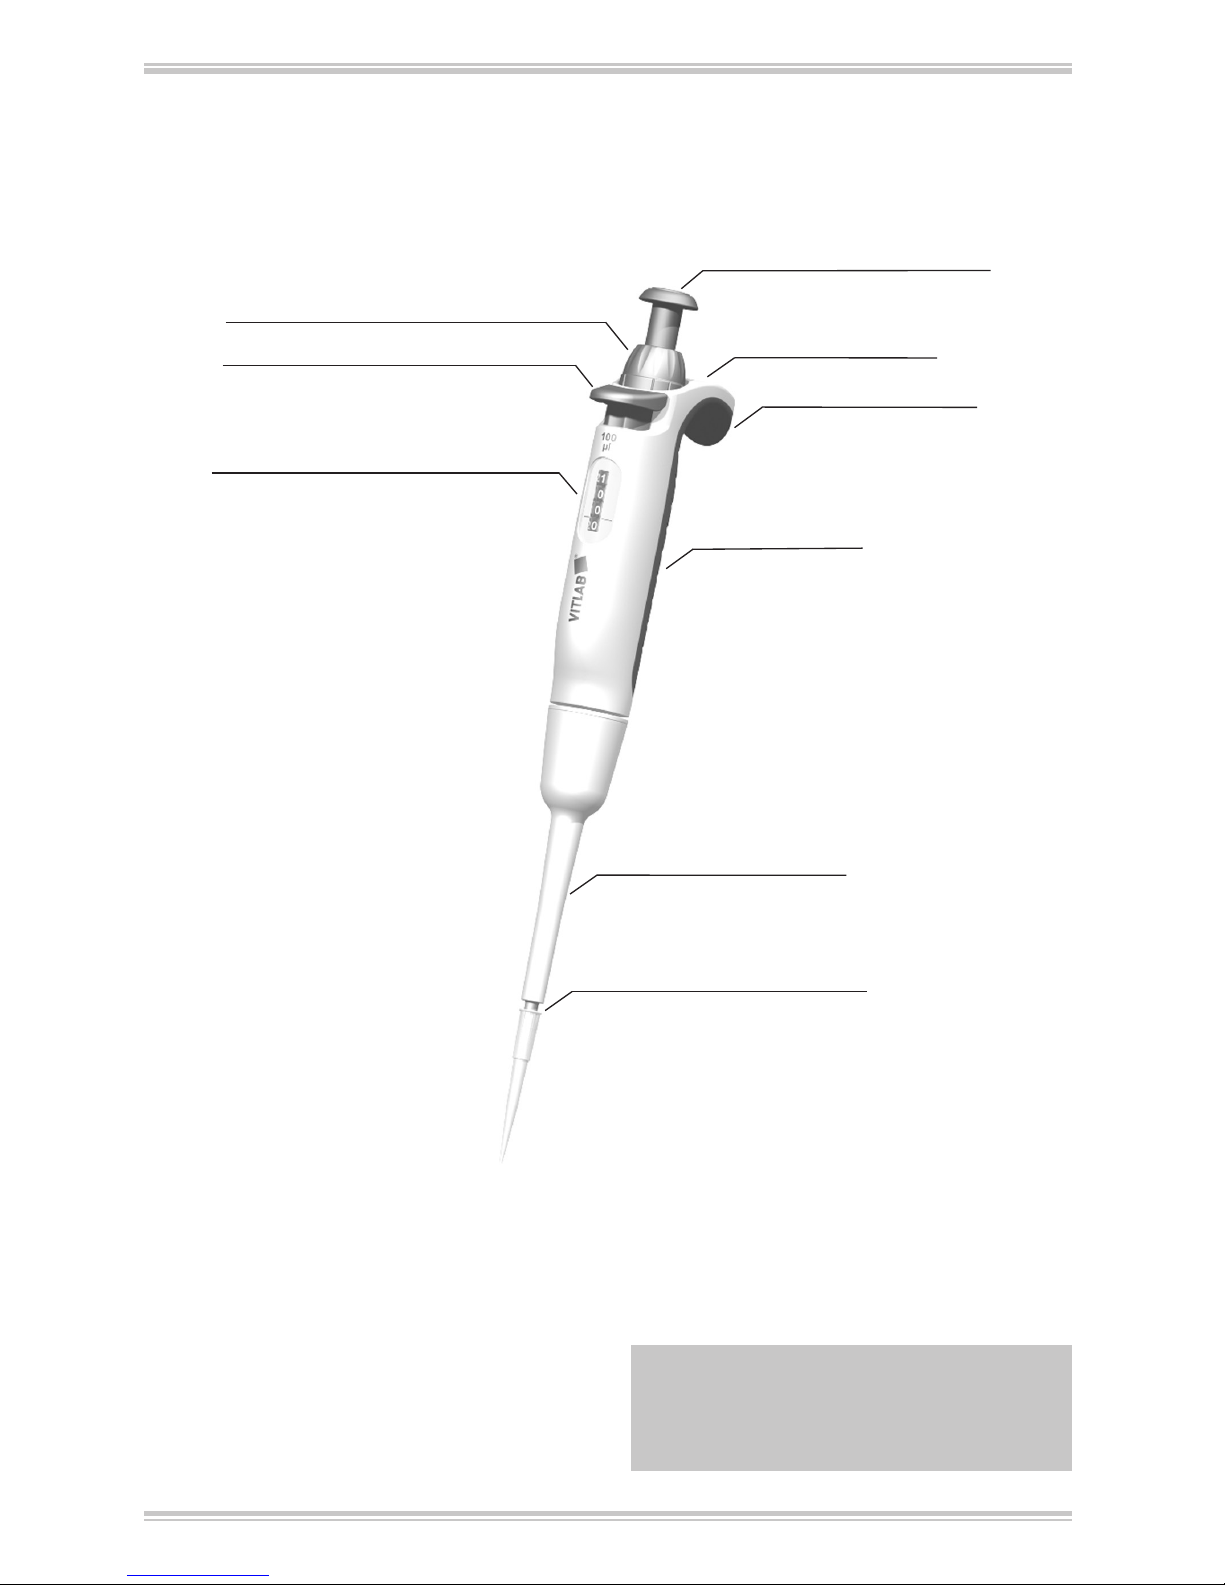
6. Operating and Control Elements
Volume-setting wheel
Tip ejection key *
Volume display **
Pipetting button
Calibration function
Finger rest
Handgrip
Tip cone
Pipette shaft
**Volume display
The figures in the display are read from top to
bottom, the dash represents the decimal point.
*Tip ejection key
The serial number is behind the tip ejection key.
Note:
Optimum analysis results can only be obtained with quality tips. We recommend
VITLAB® pipette tips.
(Fig. shows VITLAB® micropipette 100 µl)
24
Page 25
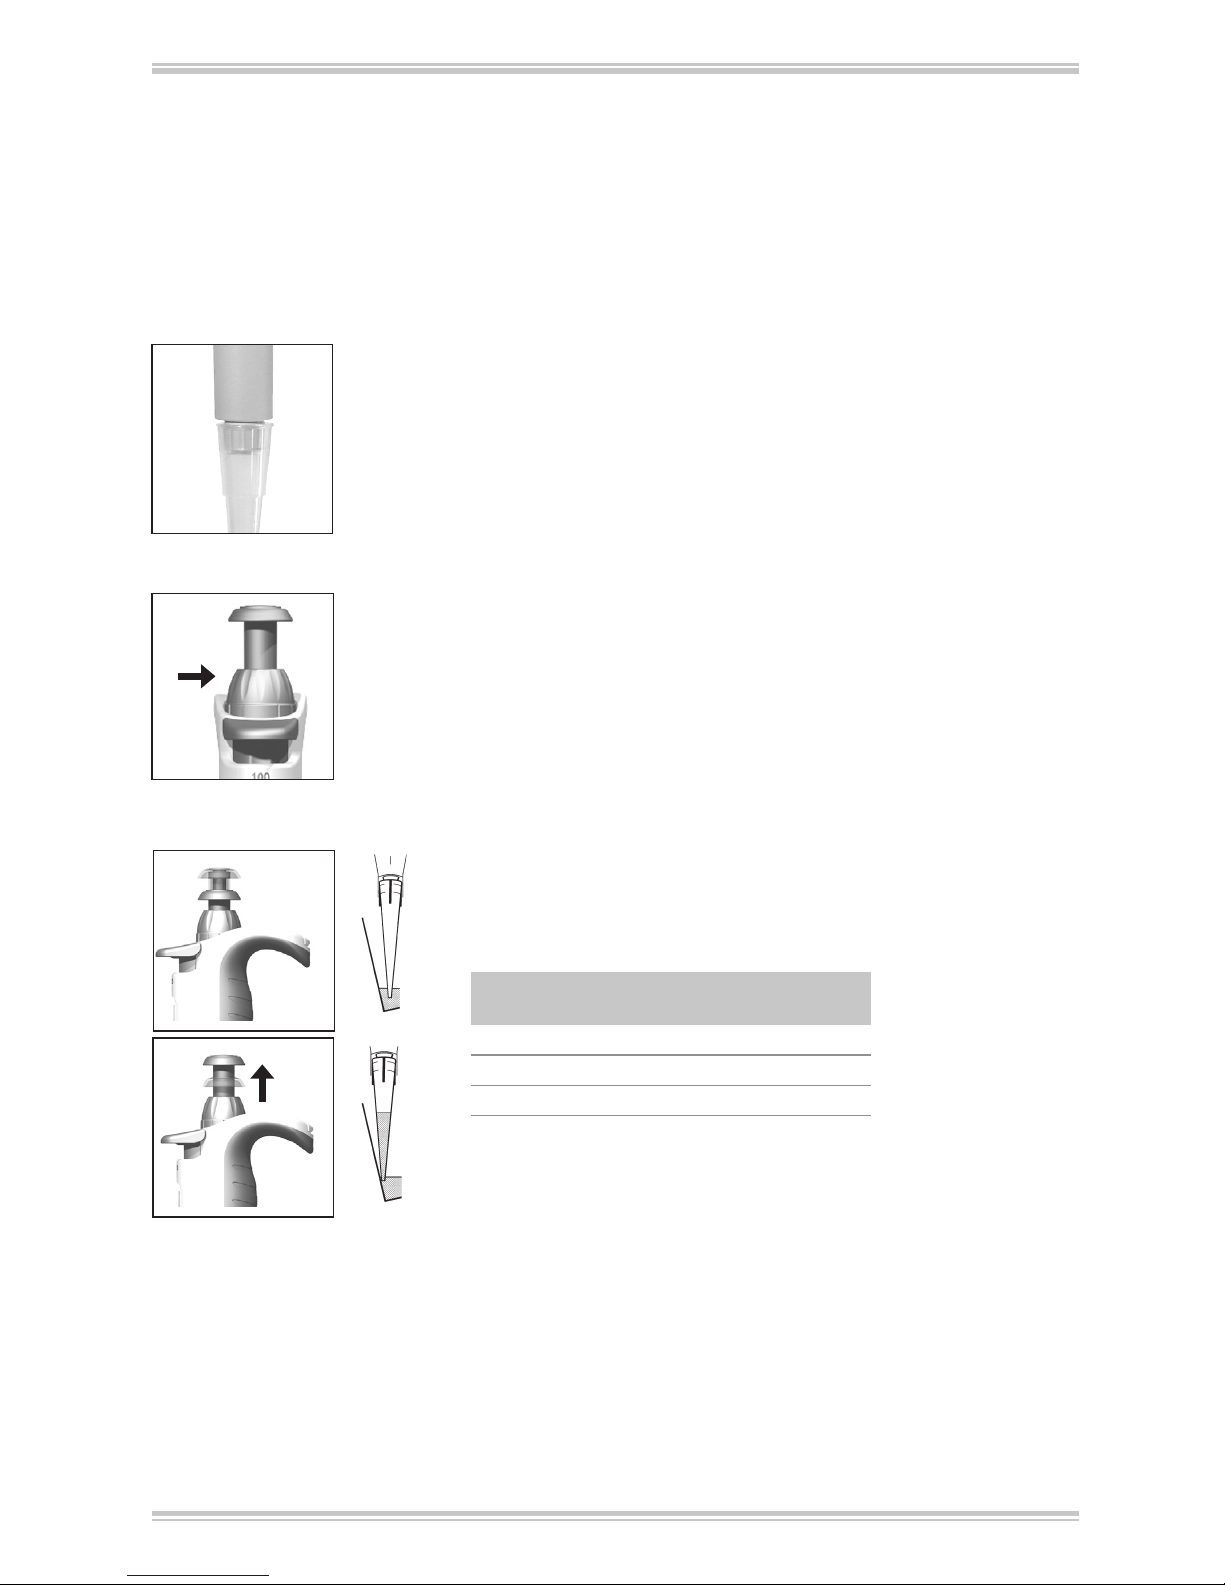
Use the correct tips according to the volume range or the color
code.
Ensure that the tips is securely seated.
a) Press pipetting button to the first stop.
b) Hold the pipette vertically and immerse the tip into the liquid.
c) Let the pipetting button slide back slowly. In order for the
liquid to reach its end position, leave the tip immersed for
another 1-2 s.
d) Touch the tip against the container wall.
3. Aspirate sample
2. Volume setting
Select the desired volume by rotating the volumes setting wheel.
Avoid twisting and abrupt rotating motions during this adjustment.
7. Pipetting
1. Fitting the tip
- 5 ml and 10 ml instruments should only be used with the PE
filter installed (see page 30).
- Pipette tips are disposable items!
25
Volume
range
Immersion
depth in mm
Waiting
time in s
> 1 µl - 100 µl 2 - 3 1
> 100 µl - 1000 µl 2 - 4 1
> 1000 µl 3 - 6 3
Page 26
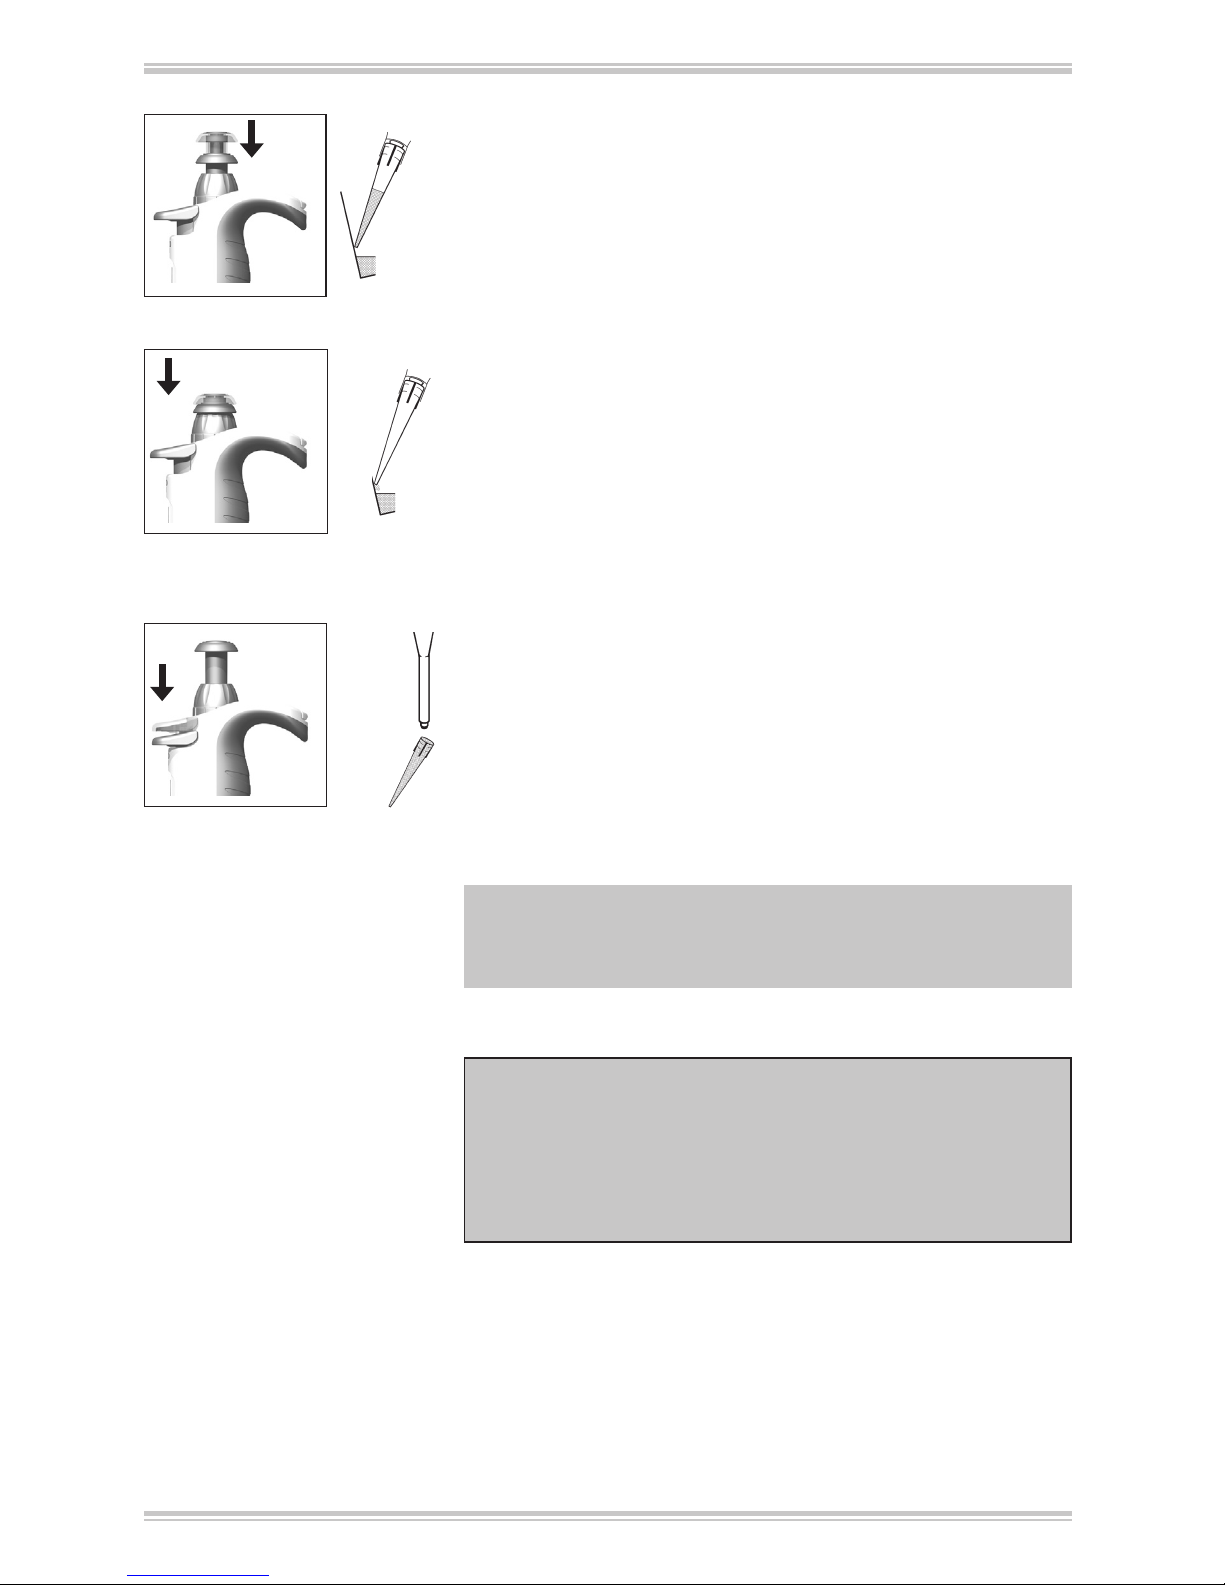
5. Ejecting the tip
Hold the pipette shaft over a suitable disposal container and press
the tip ejection key to the stop.
Note:
ISO 8655 prescribes rinsing the pipette tip once with the sample liquid prior to the actual pipetting process.
Important!
Don‘t lay the instrument horizontal when the tip is filled.
Liquid may enter and contaminate the instrument. The instrument should be stored without tips, placed upright in the
shelf/rack mount or bench top rack which can be ordered
seperately.
c) The blow-out stroke empties the tip completely: Press the pi-
petting button down to the second stop.
d) While doing this, wipe the pipette tip against the wall of the
container.
e) Remove the pipette tip from the container wall and let the
pipetting button slide back.
a) Place the pipette tip against the wall of the vessel. Hold the
pipette at an angle of 30-45° relative to the container wall.
b) Press the pipetting button slowly to the first stop and hold it
down. For serum and liquids of high viscosity or low surface
tension, observe adequate waiting time to improve accuracy.
4. Discharge sample
26
Page 27

Mean value
x =
Σ x
i
n
Mean volume
Accuracy*
Coefficient of Variation*
Standard Deviation
V = x · Z
100 s
V
CV% =
Σ (xi – x)
2
n – 1
s = Z ·
V – V
0
V
0
A% = · 100
8. Checking the Volume
Depending on use, we recommend inspection of the instrument every 3 to 12 months. The cycle
can, however, be adjusted to individual requirements.
The gravimetric testing of the pipette volume is performed according to the following steps and is in
accordance with DIN EN ISO 8655, Part 6.
1. Set nominal volume
Set volume to the maximum volume indi-
cated on the instrument (see page 25 for
procedure).
2. Condition the pipette
Condition the pipette before testing by using
a pipette tip to aspirate and discharge the
test liquid (distilled H2O) five times.
3. Carry out the test
a) Attach new pipette tip and prerinse one time
with test liquid.
b) Aspirate liquid and pipette it into the weigh-
ing vessel.
c) Weigh the pipetted quantity with an
analytical balance. Please follow the operating manual instructions from the balance
manufacturer.
d) Calculate the volume, taking the tempera-
ture of test liquid into account.
e) At least 10 pipettings and weighings in three
volume ranges (100%, 50%, 10% of nominal volume) are recommended for statistical
analysis.
Calculation for nominal volume V
0
xi = Weighing results
n = Number of weighings
Z = Correction factor (e.g. 1,0029 µl/mg at 20 °C, 1013 hPa)
*) = Calculation of accuracy (A%) and variation
coefficient (CV%): A% and CV% are calculated
according to the formulas for statistical control.
Note:
Testing instructions (SOPs) are available for
download at www.vitlab.com.
27
Page 28
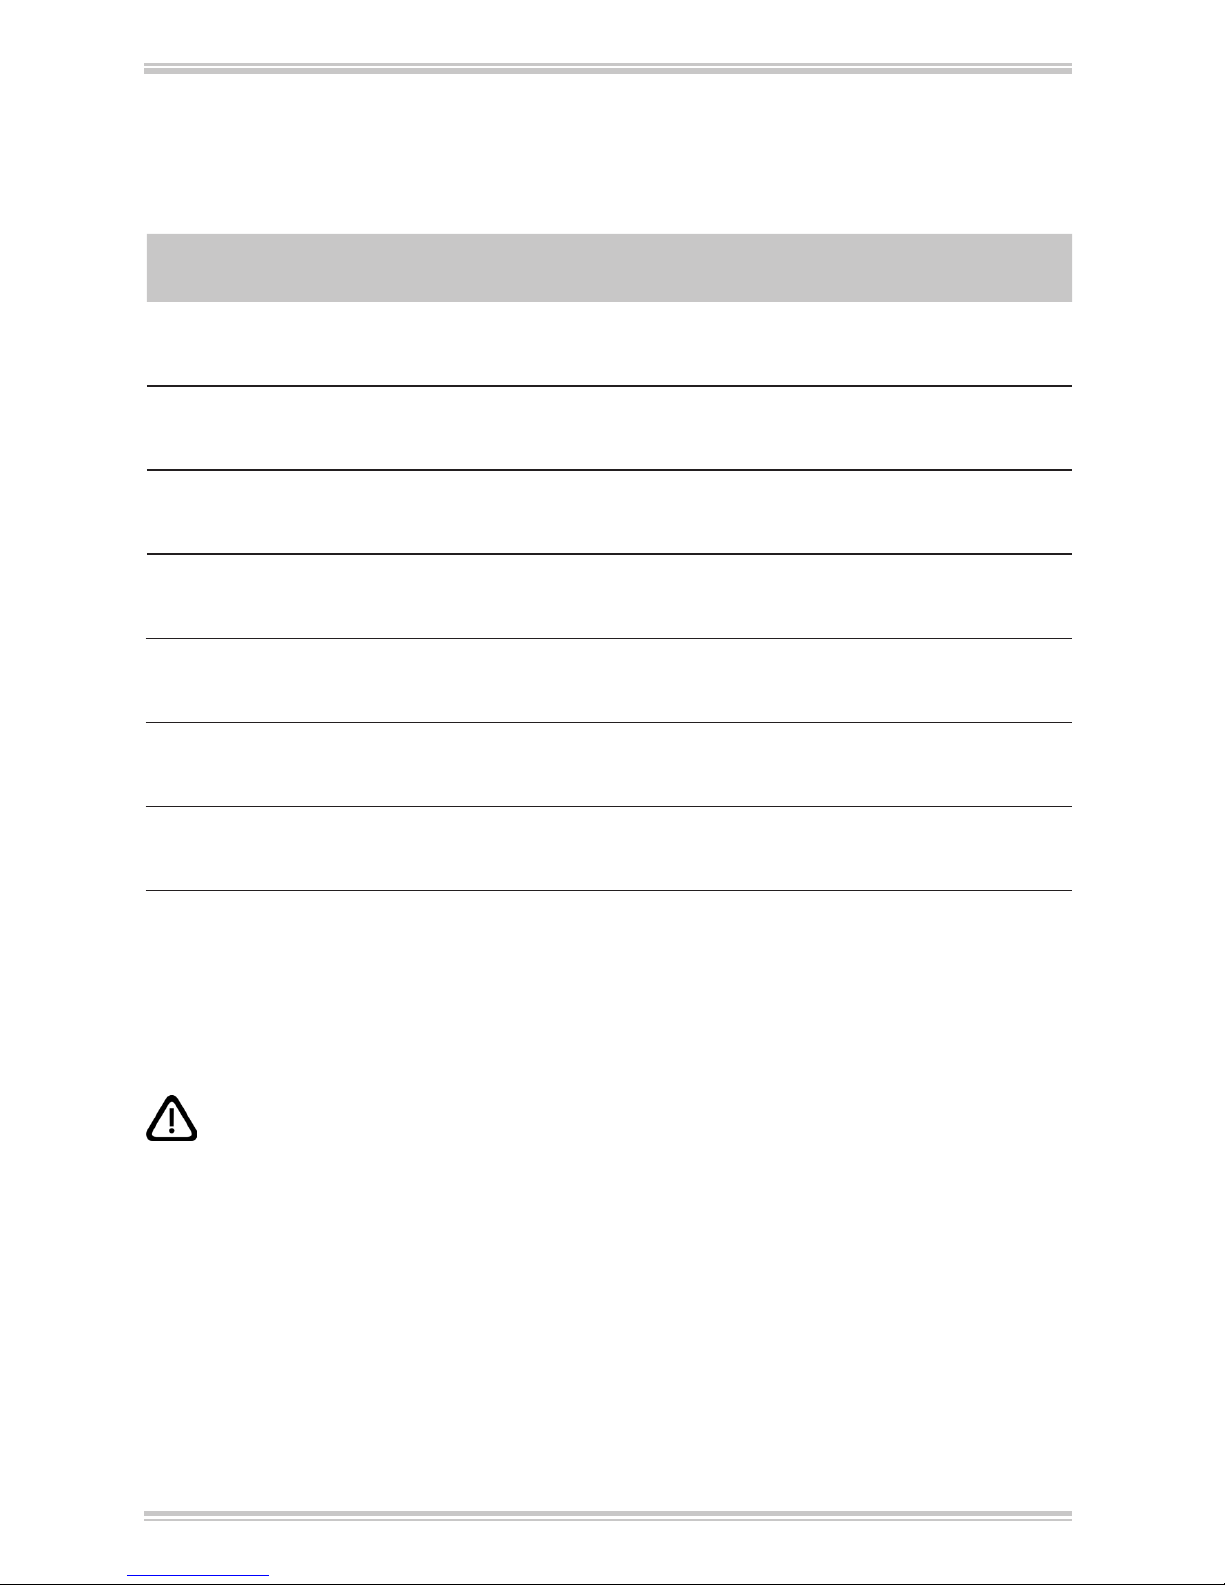
Volume range
µl
Volume step
µl
A*
≤ ± %
CV*
≤ %
Increment
µl
Recommended
type of tip, µl
0.5 - 10
10
5
1
1
1.6
7
0.5
1
4
0.01 0.5 - 20
2 - 20
20
10
2
0.8
1.2
5
0.4
0.7
2
0.02 2 - 200
10 - 100
100
50
10
0.6
0.8
3
0.2
0.4
1
0.1 2 - 200
20 - 200
200
100
20
0.6
0.8
3
0.2
0.3
0.6
0.2 2 - 200
100 - 1000
1000
500
100
0.6
0.8
3
0.2
0.3
0.6
1 50 - 1000
500 - 5000
5000
2500
500
0.6
0.8
3
0.2
0.3
0.6
5 500 - 5000
1000 - 10000
10000
5000
1000
0.6
0.8
3
0.2
0.3
0.6
10 1000 - 10000
9. Accuracy Table
VITLAB® micropipette, Digital adjustable
Final test values related to the nominal capacity (maximum volume)
indicated on the instrument, obtained when instrument and distilled
water are equilibrated at ambient temperature (20 °C/68 °F) and with
smooth operation. According to DIN EN ISO 8655.
* A = Accuracy
* CV = Coefficient of Variation
28
20 °C
Ex
Page 29
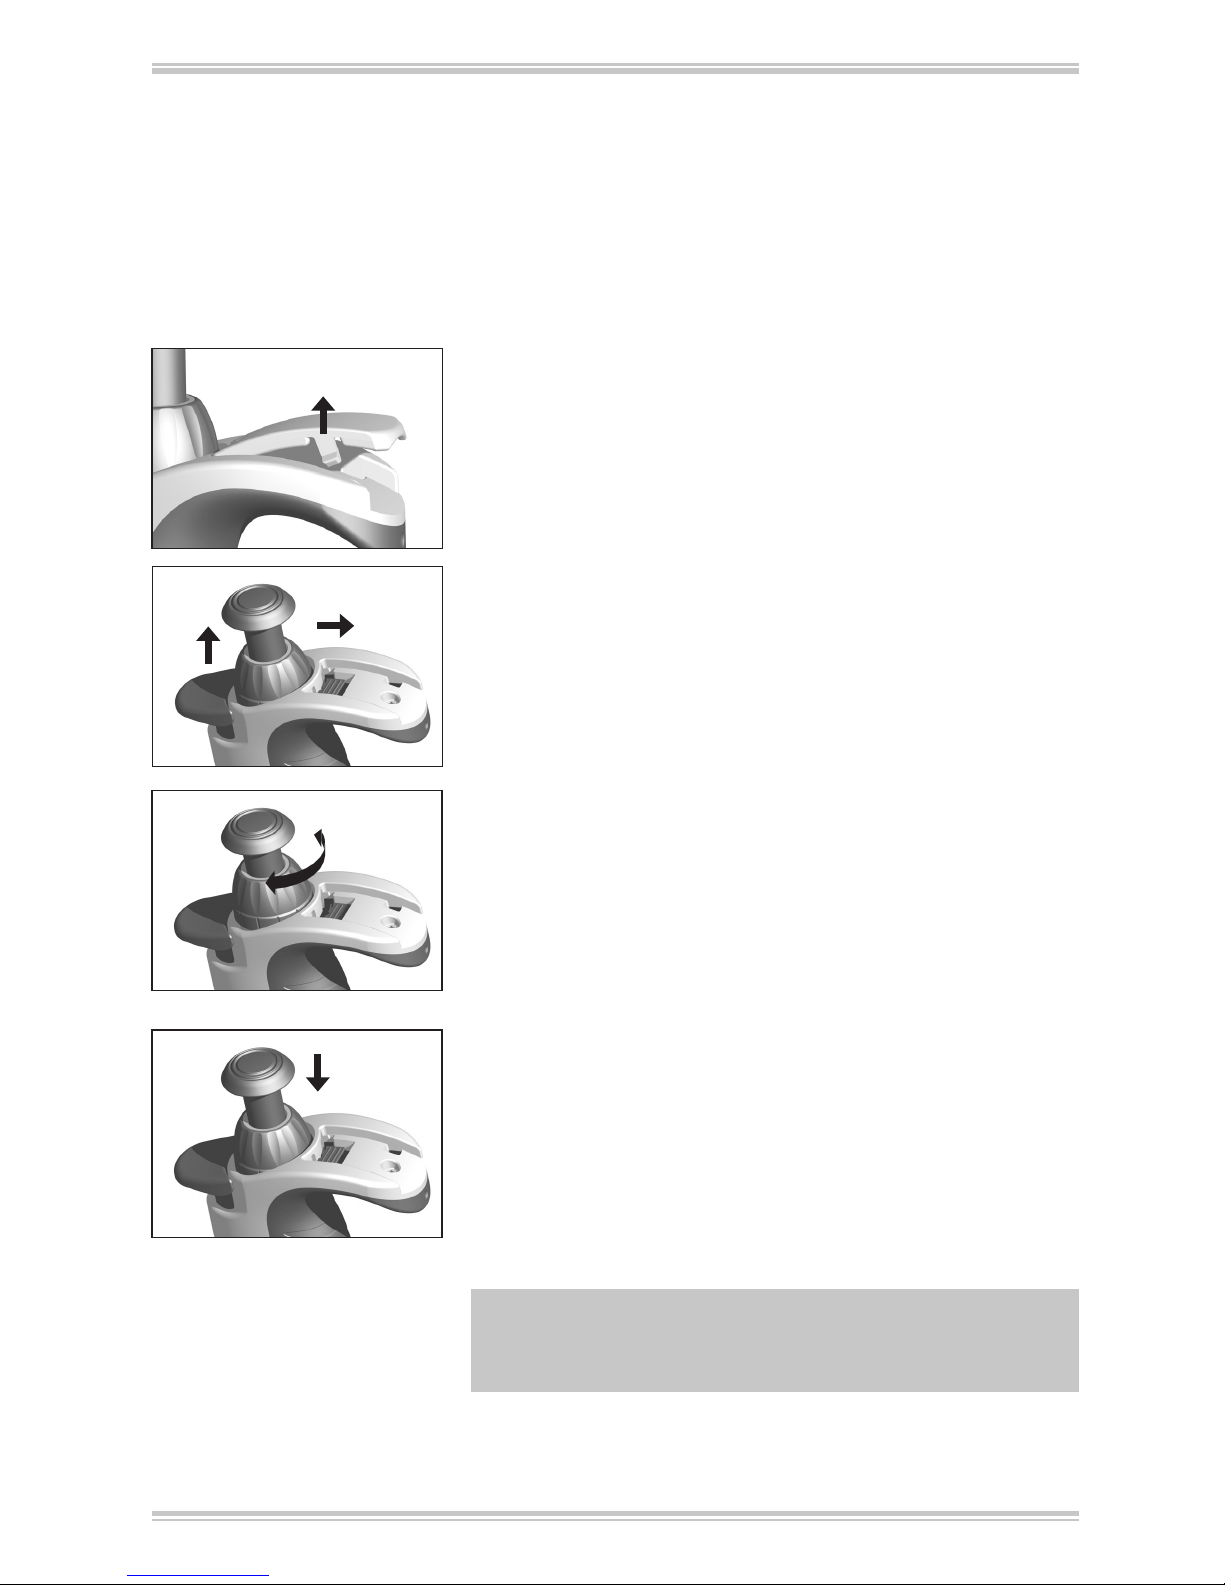
10. Adjustment
The instrument is permanently adjusted for aqueous solutions. If the pipette operation is clearly
inaccurate, or if the instrument must be adjusted for solutions of different densities and viscosities or
specially-shaped pipette tips, adjustments can be made.
1. Check the volume, determine actual value (see page 27).
2. Remove the cover: Push the hook forward, raise it slightly and
then pull it back.
3. Using a paperclip or an unused pipette tip, remove the protective film (this protective film can be discarded).
4. Push the red adjustment slider completely back, raise the
volume-setting wheel (decoupling) and release the adjustment
slider.
5. Set the adjustment value:
set the volume-setting wheel to the previously determined
actual value. A volume check is recommended after every
adjustment.
6. Push the adjustment slider completely back again, push the
volume-setting wheel downwards and release the adjustment
slider. Re-insert the cover.
Note:
The change to the factory settings is indicated by the red
adjustment slider now visible in the lable window.
29
Page 30

13. Filter pipette 5 ml / 10 ml
A hydrophobic PE filter is used as a safeguard
against liquid entering the pipette.
Change the filter if it becomes wet or contaminated.
- Use a flat object such as a screwdriver
- Remove the filter without damaging the tip cone.
Remove the filter before autoclaving!
The instrument can be operated without a filter.
11. Autoclaving
The pipette is completely autoclavable at 121 °C (250 °F), 2 bar
absolute (30 psi) with a holding time of at least 15 minutes, according to DIN EN 285.
1. Eject the pipette tip.
2. Autoclave the complete pipette without any further disassembling. Remove the filter of pipette 5 ml and 10 ml before
autoclaving.
3. Allow the pipette to completely cool and dry.
Note:
The effectiveness of the autoclaving must be
verified by the user. Maximum reliability is obtained with vacuum sterilization. We recommend the use of sterilization bags.
Attention!
Prior to autoclaving, the volume adjustment
must be set on an available numbered volume (e.g., 11.25 or
11.26 but not between).
If the pipette is autoclaved frequently, the piston and the seal
should be greased with silicone grease in order to preserve
smooth movement. Please use only the recommended silicone
grease, see accessories page 33. If necessary after sterilization,
tighten the connection between the hand grip and the pipette
shaft.
12. UV sterilization
The unit can withstand the usual output of a UV sterilization
lamp. The effects of the UV may cause some color change.
30
Page 31
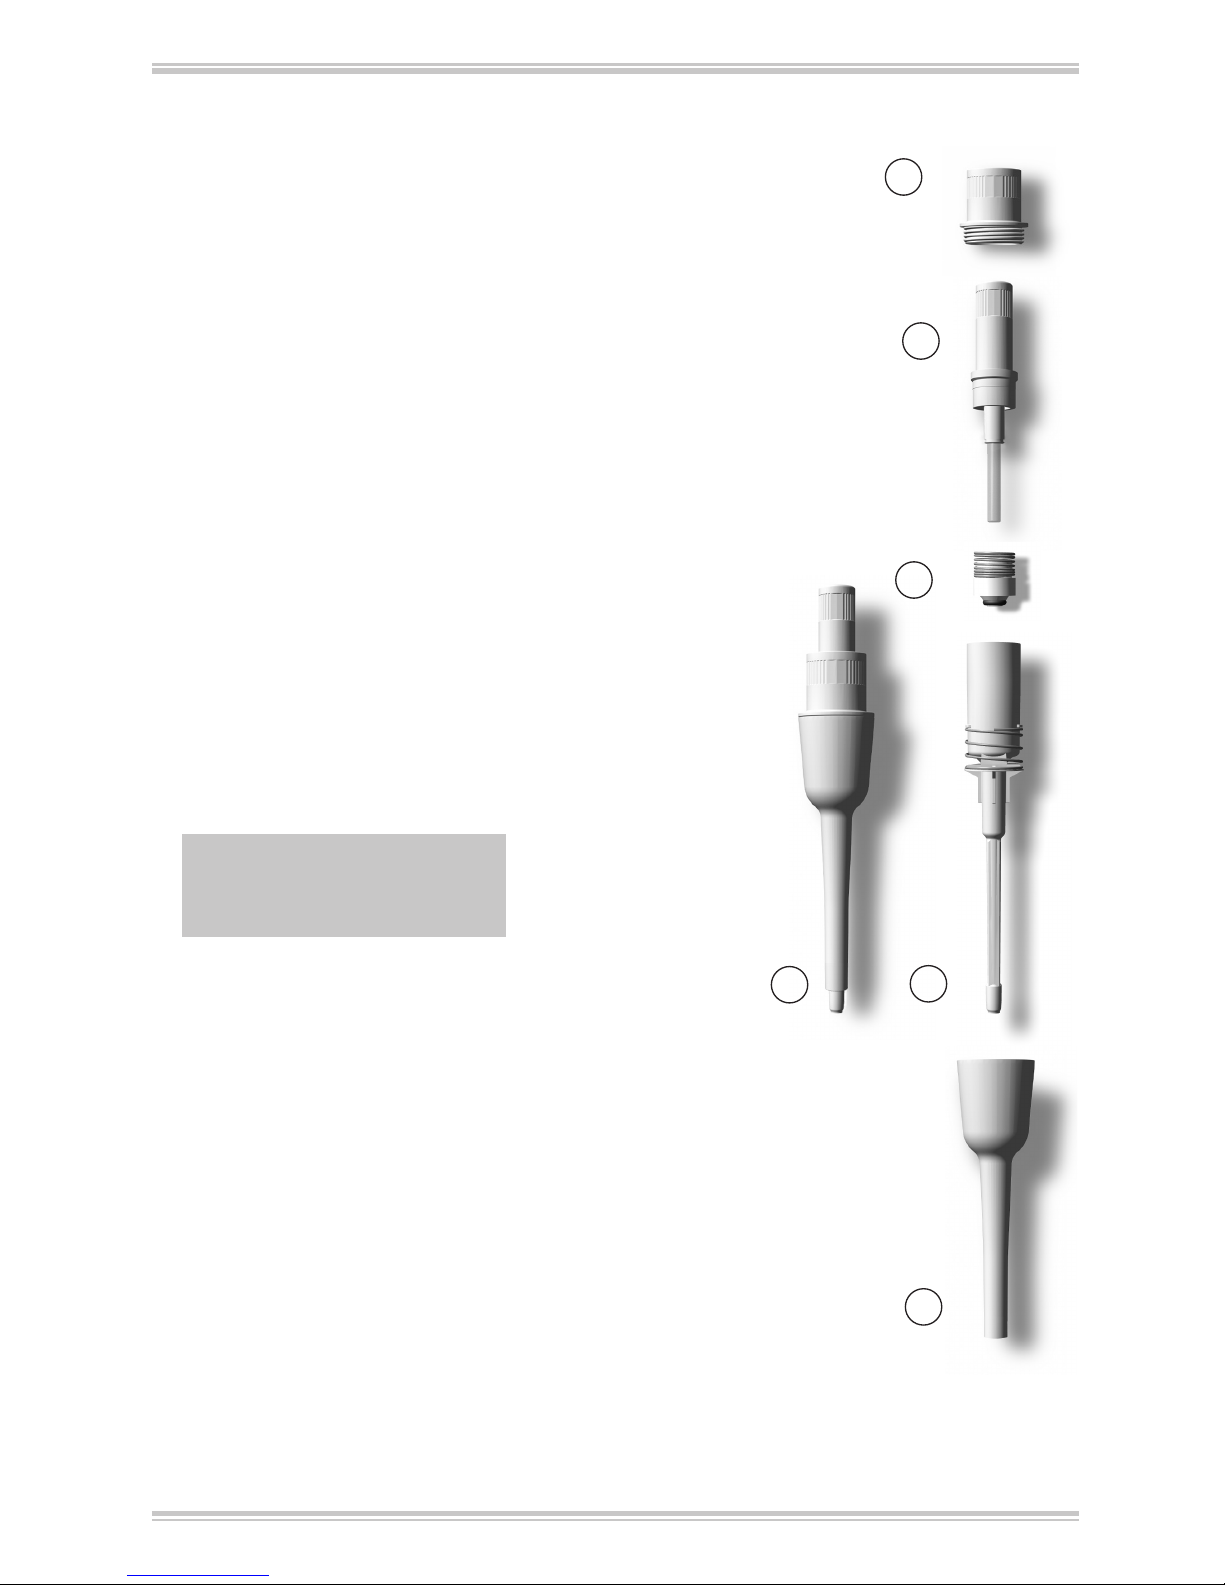
A
B
D
E
S
C
14. Servicing and Cleaning
14.1. VITLAB® micropipette up to 1000 µl
2. Disassembly and cleaning
1. Unscrew the pipette shaft (S) from the hand grip.
2. Unscrew the upper part of the ejector (A) from the pipette
shaft.
3. Pull the shaft (B, C and D) out of the lower part (E) of the ejector.
4. Unscrew the piston unit (B).
Note:
Piston remains connected with
piston unit (B)!
5. Remove the seal with spring (C) (this is non-removable on 10
µl pipette models).
6. Clean the parts shown with a mild soap solution or isopropa-
nol and then rinse with distilled water.
7. Allow the parts to dry (max.120 °C/ 248 °F).
8. Grease piston and seal with a very thin layer of silicone grease.
Please use only the recommended silicone grease, see accessories page 33.
9. Assemble the ambient temperature parts in reverse order from
above. Piston unit and upper part of the ejector (A, B) should
only be hand-tight.
(For illustration
purposes only)
1. Servicing
Inspect the pipette tip cone for damage.
Inspect the piston and seal for contamination.
Test the instrument‘s piston seal. To do this affix a tip, and
aspirate a sample. Hold the instrument vertically, with the sample
in the tip for approximately 10 s. If a drop forms at the tip orifice,
see the troubleshooting guide on page 36.
31
Page 32
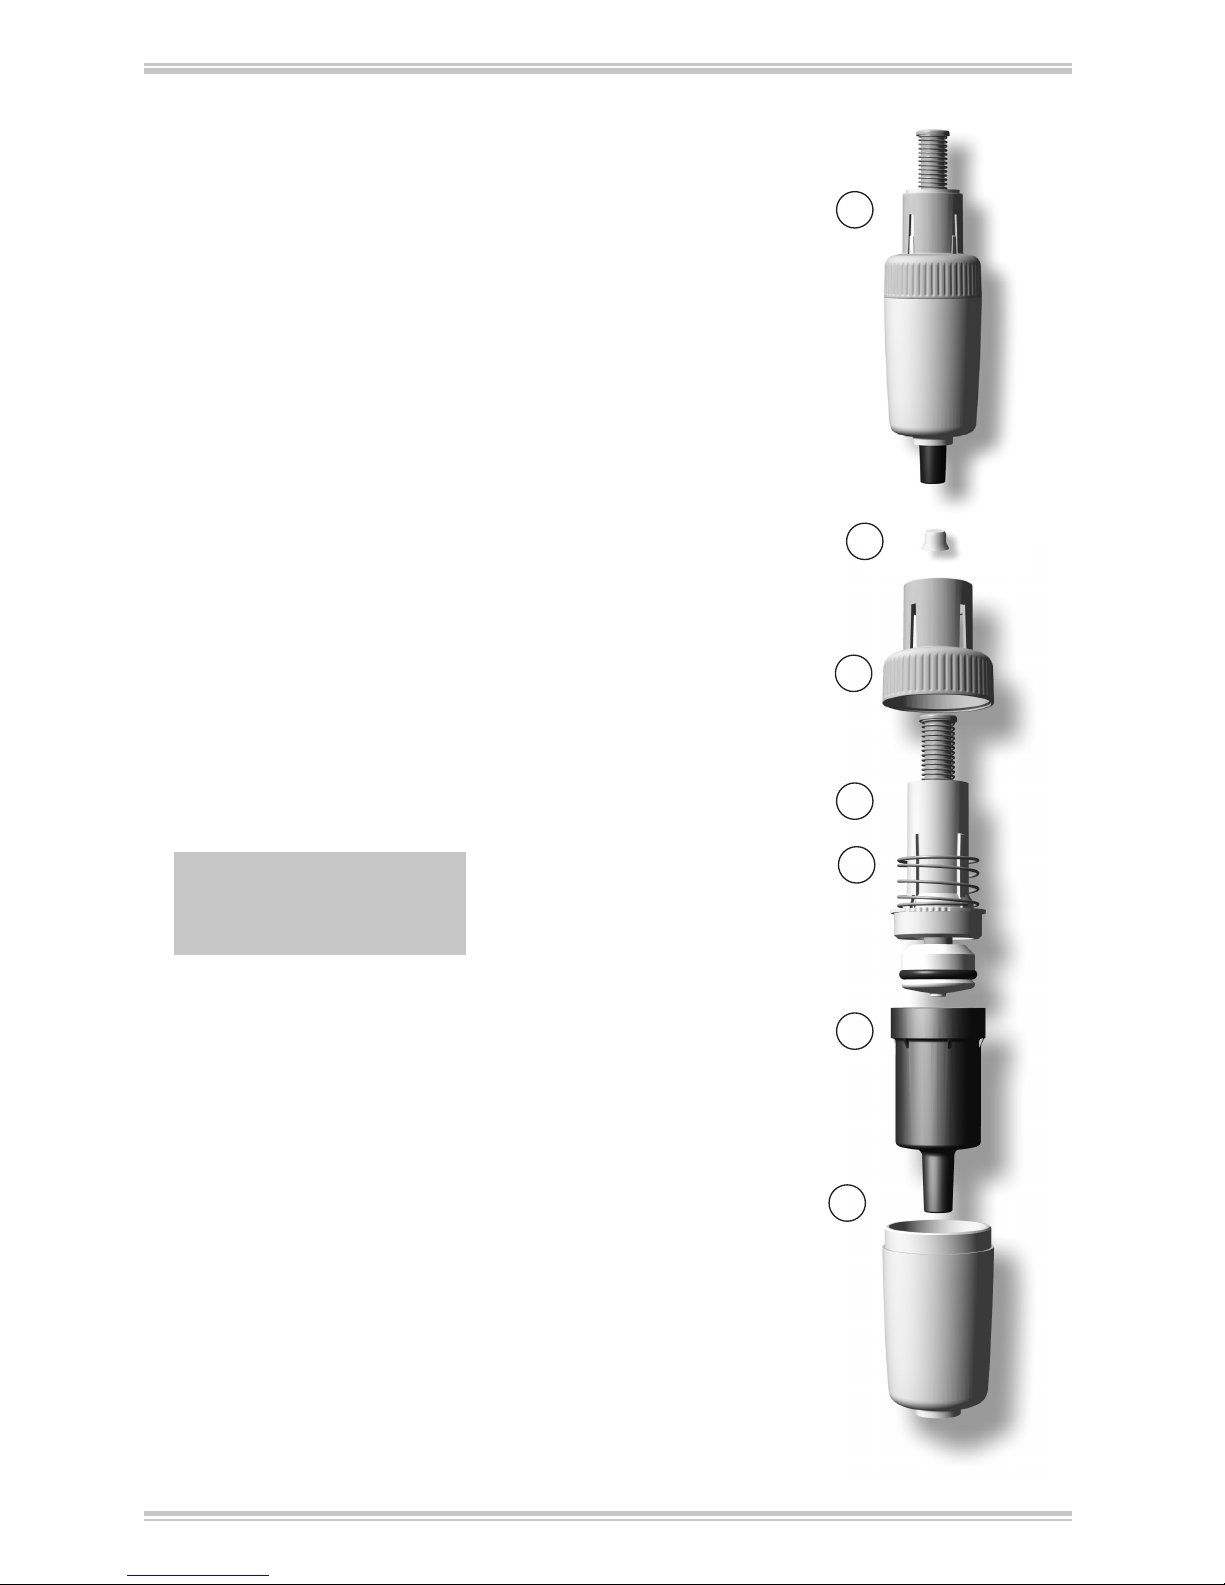
S
K
F
G
I
H
F´
14.2. VITLAB® micropipette 5 ml and 10 ml
1. Servicing
Inspect the pipette tip cone for damage.
Inspect the piston and O-Ring-seal for contamination.
Test the instrument‘s piston seal. To do this, affix a tip, and
aspirate a sample. Hold the instrument vertically, with the sample
in the tip for approximately 10 s. If a drop forms at the tip orifice,
see the troubleshooting guide on page 36.
2. Disassembly and cleaning
1. Remove the entire shaft (S) from the handgrip by rotating at
the upper end of the ejector (F) and remove the filter (K) from
the bottom part of the shaft (H).
2. Separate the bottom part of the ejector (F‘) by unscrewing it
from the upper part of the ejector (F).
3. Unscrew and dismantle the piston unit (G) with the ejector
spring
( I ) and the bottom part of the shaft (H).
4. Remove the O-Ring-seal from the piston unit and clean it.
Note:
Do not disassemble piston
unit (G) any further!
5. Clean piston unit (G) and lower part of pipette shaft (H) with
a soap solution or isopropanol and then rinse with distilled
water.
6. Allow the parts to dry (max. 120 °C / 248 °F) and to cool
down.
7. Carefully lubricate the inside and outside of the O-ring and
mount it on the piston.
8. Assemble the individual components in the reverse order from
that described above.
(For illustration
purposes only)
32
Page 33

15. Ordering Information and Accessories
Bench-top rack for 6 pipettes
Cat. No. 1672002
Shelf/rack mount for 1 pipette
Cat. No. 1672000
VITLAB® micropipette
Volume Cat. No.
0.5 - 10 µl 1641000
2 - 20 µl 1641002
10 - 100 µl 1641004
20 - 200 µl 1641006
100 - 1000 µl 1641008
0.5 - 5 ml 1641010
1.0 - 10 ml 1641012
15.2. Accessories
15.1. Ordering Information
Filter for VITLAB® micropipette 5 ml,
pack of 25 Cat. No.1672010
Filter for VITLAB® micropipette 10 ml,
pack of 25 Cat. No. 1672012
Silicone grease for VITLAB® micropipette up to 1000 µl
pack of 1 Cat. No. 1672015
Silicone grease for VITLAB® micropipette 5 ml/10 ml
pack of 1 Cat. No. 1672016
33
Page 34
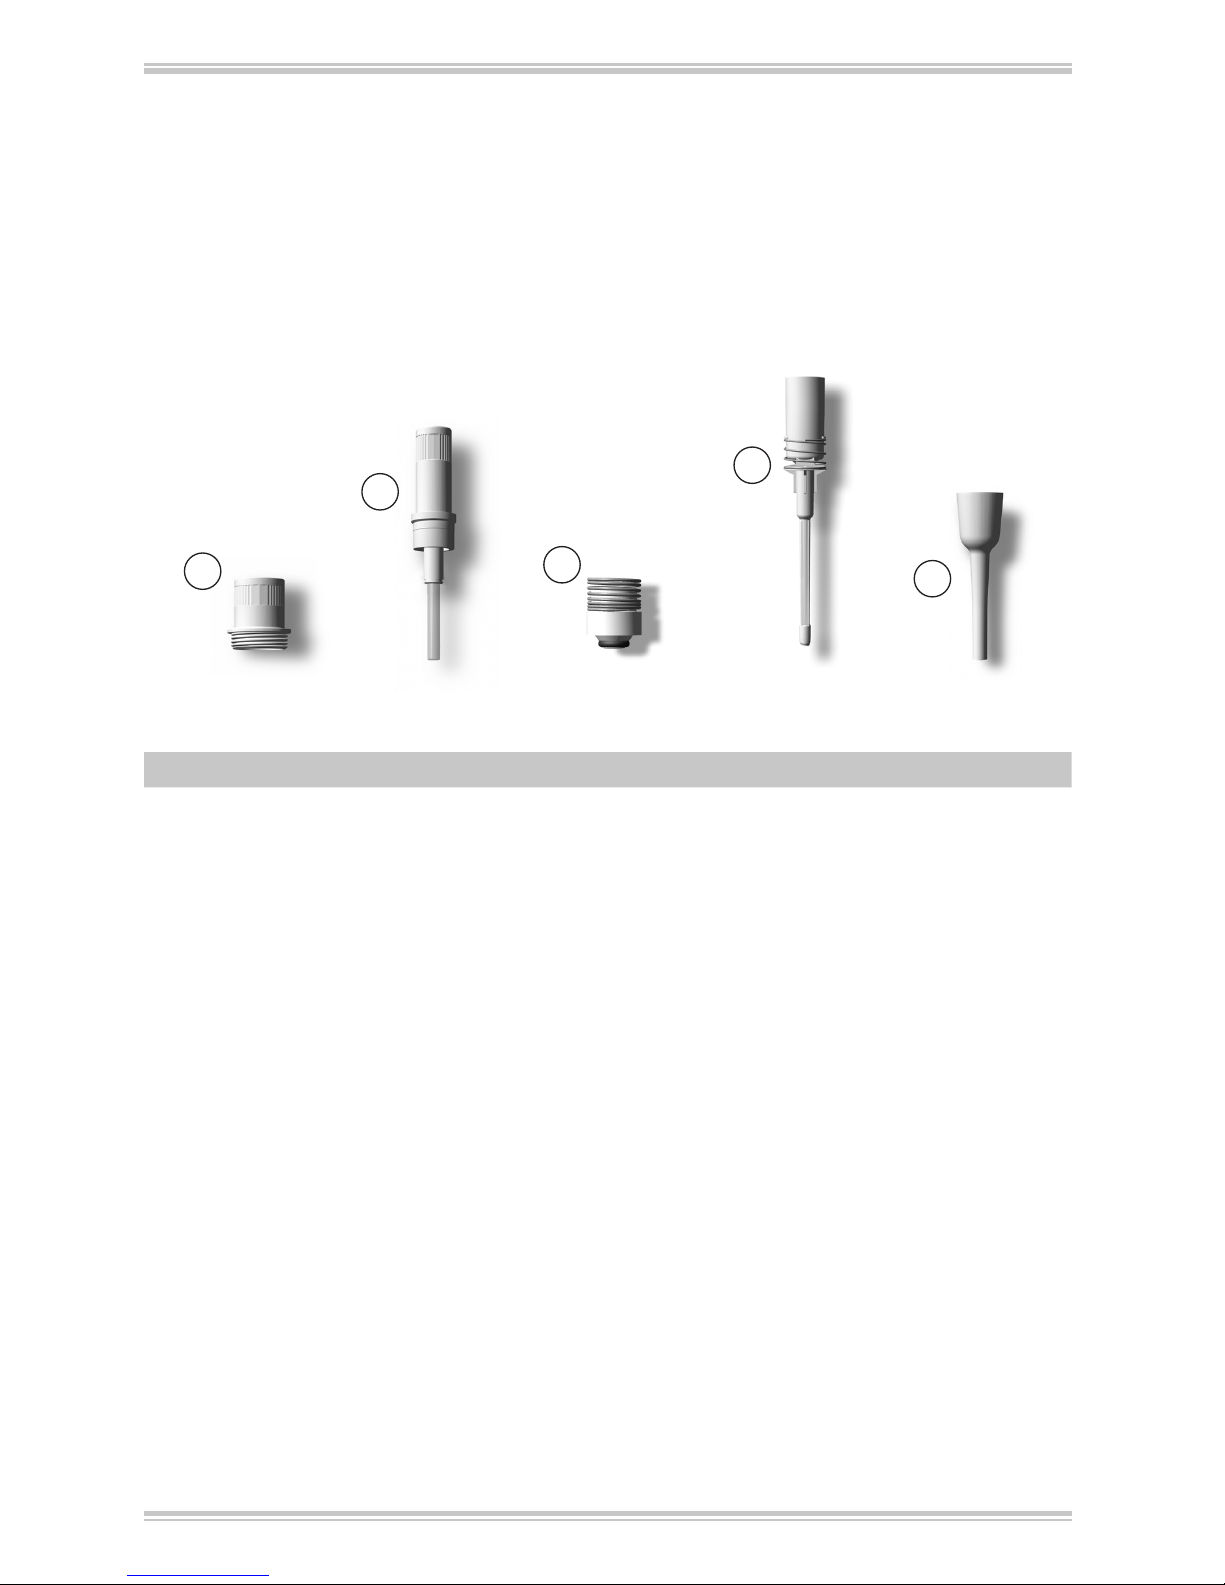
A
B
E
C
D
16. Spare parts
16.1. VITLAB® micropipette up to 1000 µl
Upper part
of ejector
Piston
unit
Seal with
spring
Shaft with
ejector spring
Lower Part
of ejector
Volume A B C D E
0.5 - 10 µl 1671400 1671411 - 1671431* 1671441
2 - 20 µl 1671401 1671412 1671420 1671432 1671442
10 - 100 µl 1671402 1671416 1671424 1671433 1671443
20 - 200 µl 1671403 1671417 1671425 1671434 1671444
100 - 1000 µl 1671404 1671418 1671426 1671435 1671445
* 0.5-10 µl including seal
Before reordering a piston unit or seal and spring for your
VITLAB® micropipette with glass piston (up to serial number
08N), please contact [email protected].
(For illustration purposes only, parts will differ slightly depending on nominal volume of instrument.)
34
Page 35
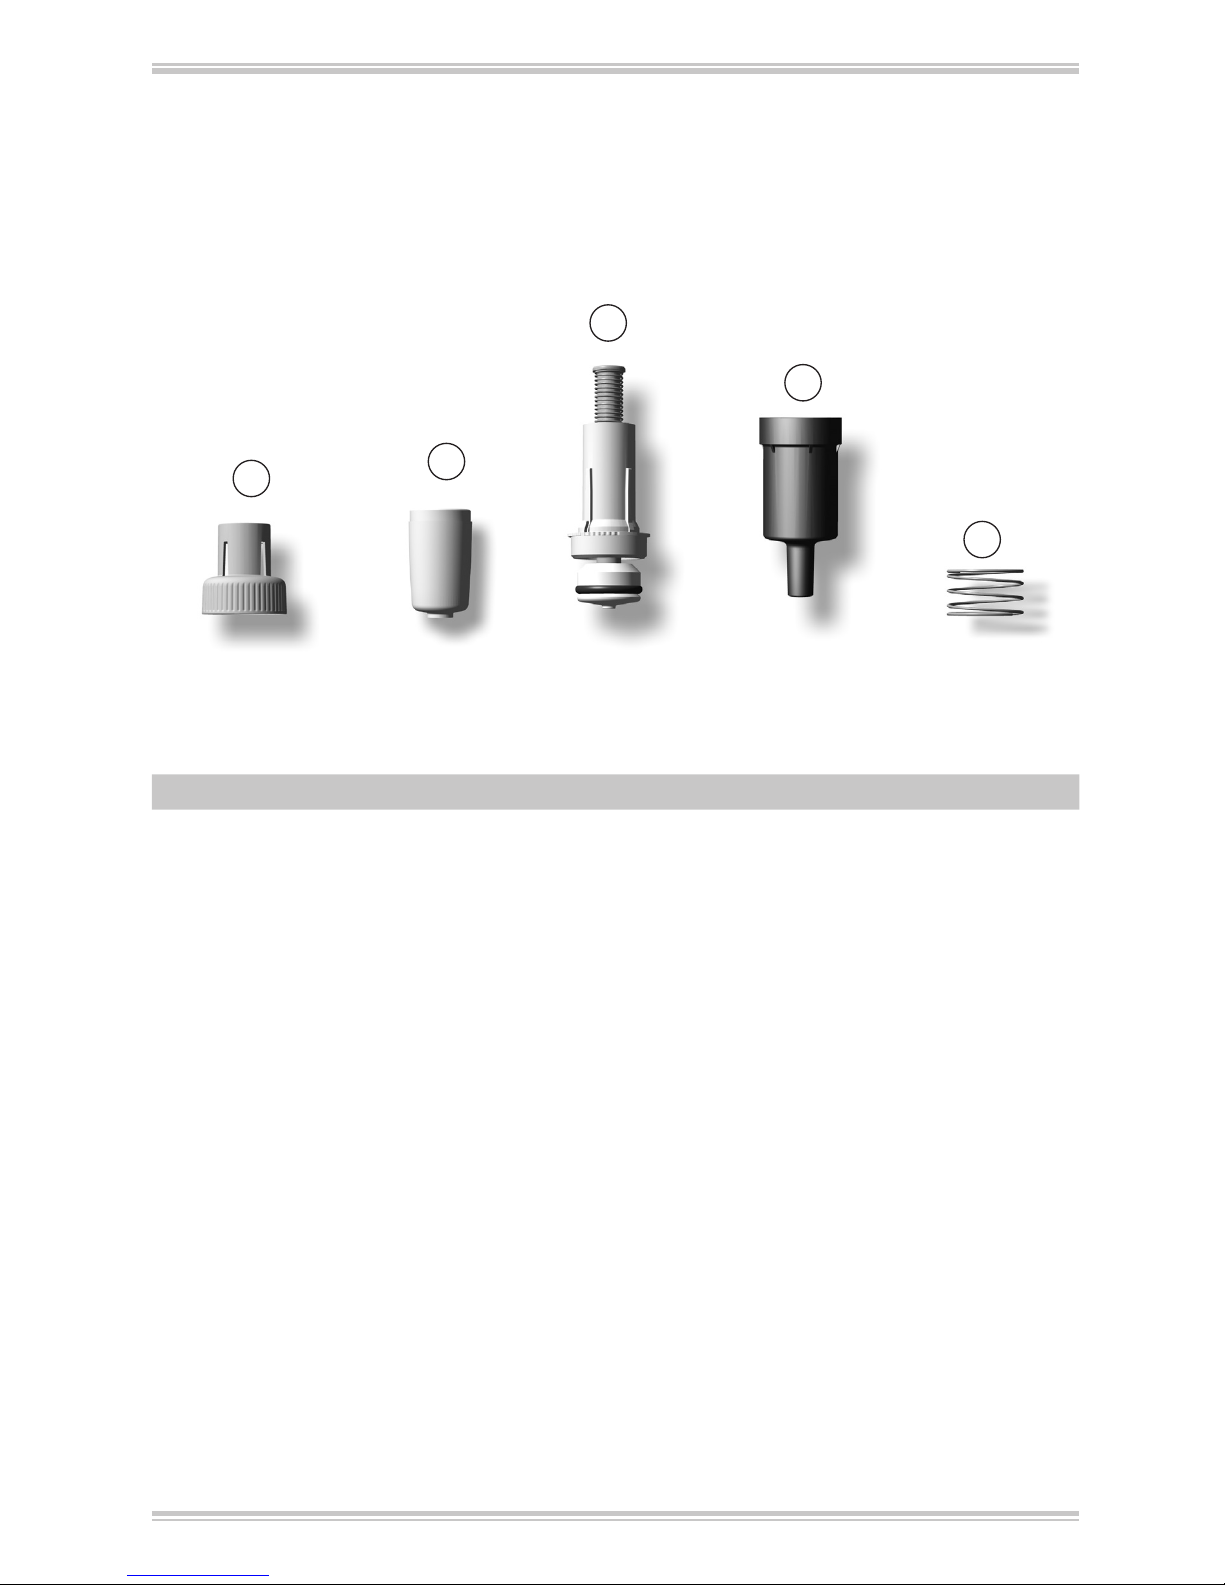
I
H
G
F´
F
Upper part
of ejector
Lower part
of ejector
Piston
unit
Lower part
of pipette
shaft
Ejector
spring
16.2. VITLAB® micropipette 5 ml and 10 ml
(For illustration purposes only, parts will differ slightly depending on nominal volume of instrument.)
Volume F + F‘ G H I
0.5 - 5 ml 1671451 1671455 1671461 1671465
1 - 10 ml 1671452 1671456 1671462 1671465
35
Page 36

17. Troubleshooting
Problem Possible cause Corrective action
Tip dripping
(instrument leaks)
- Unsuitable tip - Only use high-quality tips
- Tip not seated tightly - Press tip on firmly
The instrument does not aspirate or aspirates too little; the
discharged volume is too low
- Seal contaminated - Clean seal
- The seal or cone is damaged - Replace seal or shaft
- The piston is contaminated or
damaged
- Clean or replace piston
Aspiration is too slow - Shaft clogged - Clean shaft
- The filter in the 5 ml and 10
ml models is contaminated
- Change the filter
Discharged volume is too large - Pipetting button pressed too
far into the blow-out position
before sample uptake
- Operate properly.
See ‚Pipetting‘, page 25.
Piston is difficult to move - The piston is contaminated or
needs grease
- Clean and grease piston
36
Page 37

18. Repairs - Calibration Service
If a problem cannot be fixed by following the troubleshooting
guide, or by replacing spare parts, then the instrument must be
sent in for repair.
For safety reasons, instruments returned for checks and
repairs must be clean and decontaminated!
18.1. Return for repair
a) Clean and decontaminate the instrument carefully.
b) Complete the „Declaration on Absence of Health Hazards“
(ask your supplier or manufacturer for the form. The form can
also be downloaded from www.vitlab.com).
c) Send the completed form along with the instrument to the
manufacturer or to the dealer with an exact description of the
type of malfunction and the media used.
The return transport of the instrument is at risk and cost of the
sender.
18.2. Calibration Service
ISO 9001 and GLP-guidelines require regular examinations of your
volumetric instruments. We recommend checking the volume
every 3-12 months. The interval depends on the specific requirements on the instrument. For instruments frequently used or in
use with aggressive media, the interval should be shorter.
The detailed testing instruction can be downloaded on
www.vitlab.com.
VITLAB also offers you the possibility to have your instruments
calibrated by the VITLAB Calibration Service.
Just send in the instruments to be calibrated, accompanied by an
indication of which kind of calibration you wish. Your instruments will be returned within a few days together with a test
report (VITLAB calibration service) or with a DAkkS Calibration
Certificate. For further information, please contact your dealer or
VITLAB.
37
Page 38

19. Warranty
We shall not be liable for the consequences of improper handling,
use, servicing, operating or unauthorized repairs of the instrument or the consequences of normal wear and tear especially of
wearing parts such as pistons, seals, valves and the breakage of
glass as well as the failure to follow the instructions of the operating manual. We are not liable for damage resulting from any
actions not described in the operating manual or if non-original
parts have been used.
20. Disposal
For the disposal of instruments and tips, please observe the relevant national disposal regulations.
Subject to technical modification without notice.
We will not be held responsible for printing or typographical errors.
38
Page 39

Page 40

13 / 1695043 / 0718 / 2
 Loading...