

Page 1
Version 1.2A
User’s Guide
USB Microscope
Page 2

Page 3

1
Contents
1. Product Introduction ........................... 2
1.1 Packing Contents: ........................ 2
1.2 Start to use .................................. 2
1.3 Buttons on microscope ................ 4
1.4 Microscope focus ......................... 5
2. Printed Notice ...................................... 8
2.1 Maintenance ................................ 8
2.2 Product Specification ................... 9
2.3 Safety Instructions ..................... 10
Page 4
2
1. Product Introduction
1.1 Packing Contents:
The box contains 1 microscope and 7 accessories.
Item
Q’ty
Item
Q’ty
USB Microscope
1
Install CD
1
USB 2.0 Cable
1
User’s Guide
1
Stand S108
1
Calibrator
1
Stand assemble guide
1
White Balance card
1
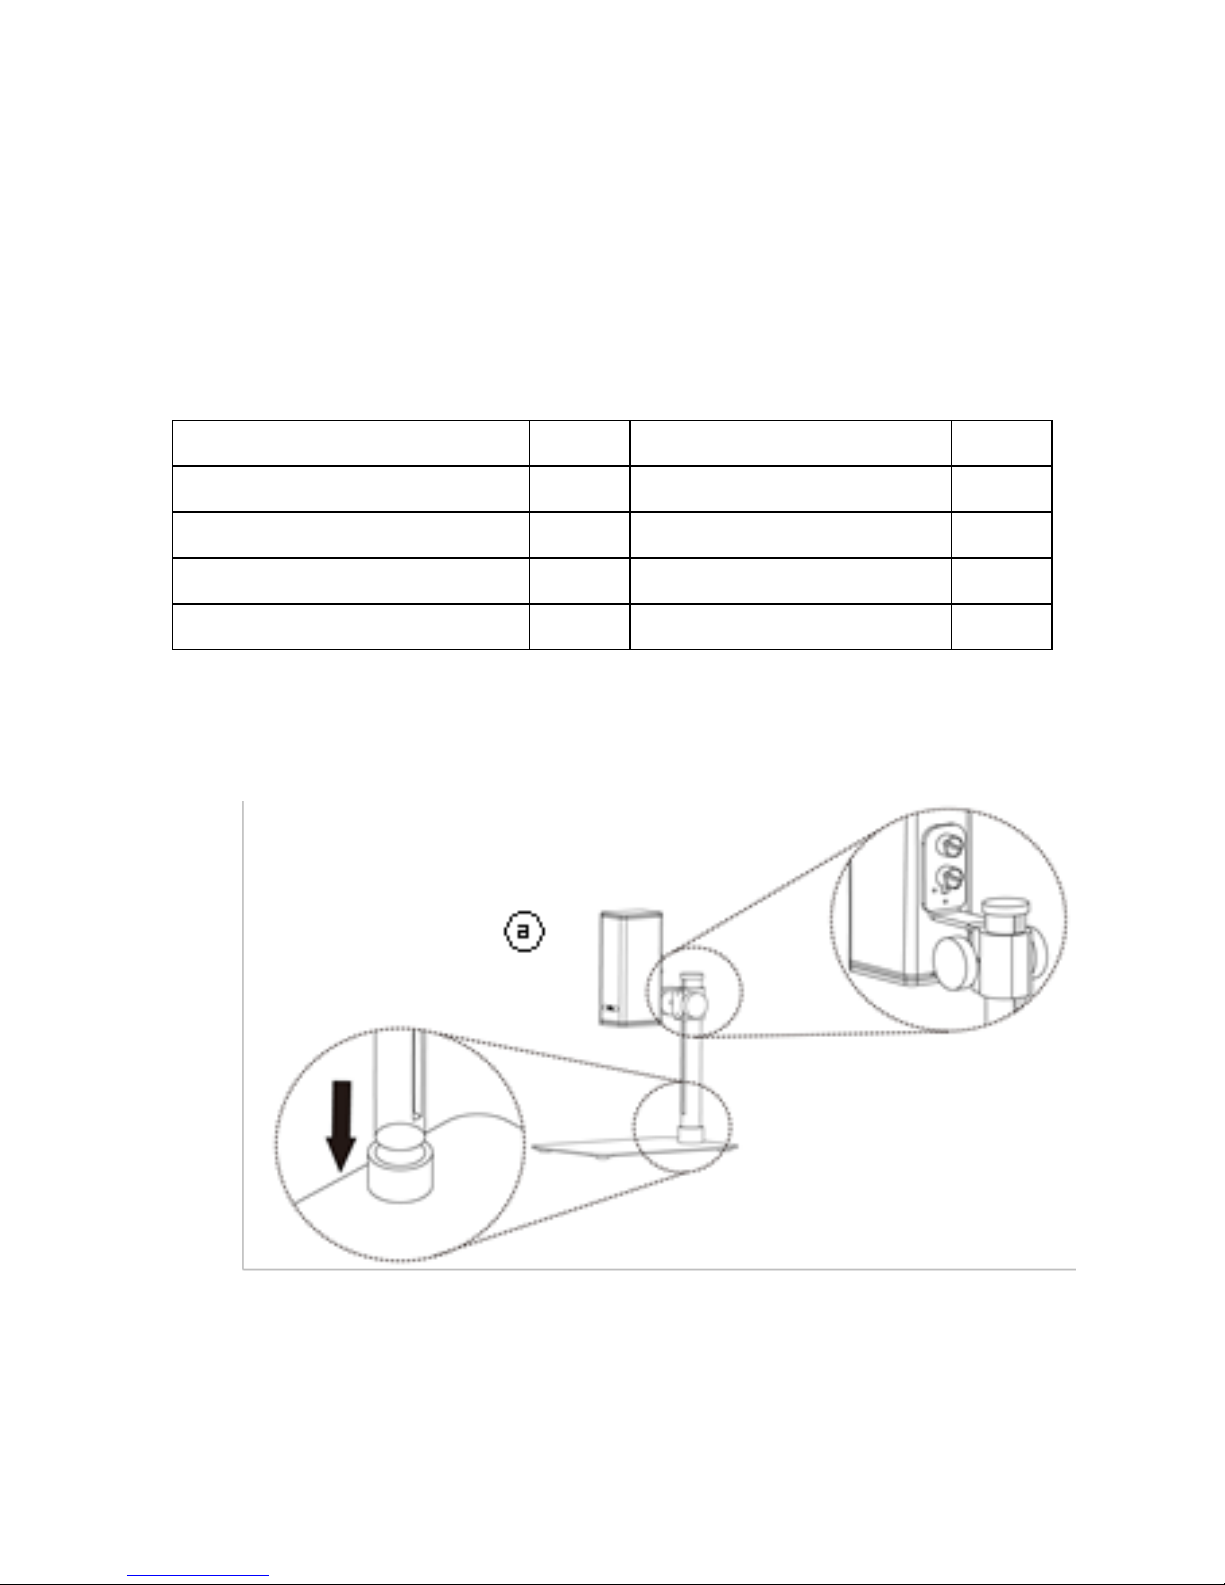
1.2 Start to use
(1) Assemble microscope with Stand
Tighten microscope onto stand ○
a
. (See stand assemble guide)
○a
Page 5

3
(2) Connect microscope to PC via complimentary USB cable ○
b
.
(3) Install Software
Install software CD and execute autorun(○
c
) to install software.
For detailed install procedures, please refer to the Install
Manual inside the software CD. If the software CD is missing
or damaged, please download from http://www.vitiny.com .
(4) Connect to PC
Double click microscope software icon (○
d
) on PC desktop.
When software opened, click on the connect icon(○e) to
preview image from the software. Adjust stand height or
focus button If the image is out of focus or blurry. For
detailed software operation, please refer to the Application
○b
Page 6

4
Manual inside the software CD.。
1.3 Buttons on microscope
(1) Optical zoom
Zoom in/out button. Zoom in(○
f
), when magnification is
higher, the distance is closer. Zoom out (○
g
), when
magnification is smaller, the distance is longer. (○h)
microscope lens.
○
c
○
d
○
e
○i
○f
○h
○k
○m
○l
○n
○O
○j
○g
Page 7

5
(2) LED Adjustment:
Preview image in higher magnification requires higher
luminance, on the contrary, lower magnification requires less
luminance. It’s suggested to set the “Auto Exposure” as
“Manual” in the software.
(○i) Increase luminance. (○
j
) Decrease luminance. (○k) LED
Light. (○
k
) LEDs for Lower working distance. (LED x 4), (○l)
LEDs for middle height working distance. (LED x 2), (○m) LEDs
for higher working distance (LED x 2). LEDs options will change
automatically.
(3) USB port
USB port (○
n
) supply power to microscope and PC connection
to preview image.
(4) Stand hole (○
O
) to fix microscope.
1.4 Microscope focus
There are two ways to focus. First, choose focus distance to
adjust the microscope height, then zoom in/out on the software
or microscope until clear. Second, first to choose the image
sensor position then adjusts the microscope height. Distance:
distance from lens to object. Sensor position: Image sensor
position.
Page 8

6
(1) Fix focus distance
Use knob (○P) to adjust the distance from lens to object.
When the distance is closer, the magnification is higher. Either
use Distance control mode in the software or buttons on the
microscope to focus.
(2) Fix sensor position
Choose the desired distance or FOV from the drop down list in
the software.
When the sensor position is fixed, adjust the stand knob (○P)
to focus.
○
P
Page 9

7
Magnification chart
26 focus section setting is based on the whole focus area, the
sensor position tells the magnification size, field of view, or
distance. The below chart is measured on 4:3 ratio on 21.5”
screen, it’s only a reference data, might not be accurate
enough. Based on the image ratio (preview window size), field
of view and magnification size will change.
Focus distance from 8mm~160mm(0.315~6.299 inch).
4:3 ratio on 21.5” monitor (Reference data)
1 2 3 4 5 6 7 8 9
159
114
92.0
70.0
48.5
39.5
35.0
30.5
26.0
FOV(mm)
35.0
25.0
20.0
15.0
10.0
8.00
7.00
6.00
5.00
10
13
17
22
34
42
48
56
68
Focus section
10
11
12
13
14
15
16
17
18
Distance(mm)
23.0
21.0
19.0
17.0
16.0
15.0
14.0
13.0
12.0
FOV(mm)
4.50
4.00
3.50
3.00
2.80
2.60
2.40
2.20
2.00
Magnification (X)
75
85
97
113
122
131
142
155
170
Focus section
19
20
21
22
23
24
25
26
Distance(mm)
11.5
11.0
10.5
10.0
9.5
9.0
8.5
8.0
FOV(mm)
1.90
1.80
1.70
1.60
1.50
1.40
1.30
1.20
Magnification (X)
179
189
200
213
227
244
262
284
Page 10

8
2. Printed Notice
Please read the following information before operating.
2.1 Maintenance
Please abide by the following rules while storing or using this product:
2.1.1 Keep dry: do not place the product in a humid environment. Dry surroundings
help extend the life of the product.
2.1.2 Avoid temperature shock: temperature shock (for example, taking the product
into a warm room from a cold environment) will cause internal condensation
inside the machine. Please put the device inside the protection bag or
handbag to prevent temperature shock, and avoid using the device in an
environment with extreme temperatures.
2.1.3 Avoid dropping: the device may malfunction if it encounters strong collision,
vibration, or distortion.
2.1.4 Turn the microscope off before cutting off the power supply : do not forced
cut off the power supply.
2.1.5 Do not face the lens against strong light or sunshine for extended periods of
time: Strong light rays may degrade sensitive elements and generate white
stains on images.
2.1.6 Handle the device carefully: do not disassemble USB cable and Lens
forcefully and avoid contact with the lens since they are subjected to
damage.
2.1.7 Make sure to switch the power supply off and unplug the power cable if the
device is not in operation for an extended period of time. Store the device in a
dry environment with excellent ventilation. Do not expose the machine in an
environment lower than -5ºC or higher than 50ºC.
2.1.8 While carrying, put the device inside the box to prevent it from being
damaged.
Page 11

9
2.2 Product Specification
CMOS Sensor
5 million pixels CMOS senor
L e n s
High Sensitive Lens
Magnification
10x~280x on21.5” monitor
Light Source
White LED × 8pcs
USB Port
USB 2.0, 3.0 Compatible, PC connection
F o c u s w a y
Microscope buttons/ Pc focus control
P o w e r
Consumption
1.125A(Max)
S i z e
48(L)×64(W)×150(T) mm
W i g h t
Host weight around 310 grams
Operation
environment
Temperature -5℃ ~ 50℃; Humidity-lower
than 85% (No Condensation)
For any changes, please visit http://www.vitiny.com
Page 12

10
2.3 Safety Instructions
As an electronic product, please do not use the device in any
place in which electronic products are prohibited.
Keep the device away from water sources to avoid electric
shock as it is not waterproof.
Keep the device away from chemicals or substances with
explosive or fire hazards. Switch the device off near gas
stations.
In the case that there are foreign substances or water inside
the device, or the device is dropped or damaged, please switch
off and remove the power supply to avoid fire and electric
shock.
Do not look steadily into Light sources after switching on the
host as it is harmful to your eyes.
Please use only the product accessories provided in the box for
connections. Do not use any outside products without approval
of original factory.
Please remove the power supply from the microscope when
not in use.
Do not disassemble the machine for inspection. For any
problems occurring in the machine itself, please power off the
device and contact us through e-mail: mltc@vitiny.com
Page 13

ViTiny Warranty Sheet
P r o d u c t
Model no
S/L nos.
P ur ch as e
d a t e
DD/MM/YYYY
Purchaser
T e l n o :
A d d r e s s
Email
Distributor Seal for Confirmation
( Stamp is necessary for validation of the Warranty )
※Distributor’s seal shall include name of the shop, telephone and address※
Page 14

Please ask the distributor to fill in the name of the shop, address, purchase date, and
other contents to protect your rights and validate your one-year warranty since upon
the purchase date.
Contents of Warranty: The warranty is provided free of charge for faults caused by
manufacturing within one year from the purchase date.
Non-warranty:
1. Product appearance parts, such as the outer casing, and LED cover, etc (charged
spare parts are limited to one year after completing the product manufacturing).
2. Consumption goods of the host itself, such as LED lights, lens and Sensor.
3. Product accessories and fittings, such as the power supplier, USB cable, calibrator,
Stand…etc.
Services caused by any of the following situations in the period of the warranty shall
not be provided free of charge:
1. Improper use or disassembly, repair or refitting.
2. Any damages to the device caused by external or environmental factors.
3. Discrepancy of product serial number, unfilled or unidentified warranty. Any
inspection or repair service after the period of warranty will be charged as
follows:
(1) Service fees (including transportation fees) of product inspection.
(2) Repair fees.
(3) Fees of replaced parts
ViTiny Service Center Tel: 07-657-9551 Fax: 07-657-9561
Address: 10 F., No.1, Section 1, Syuecheng Road, Dashu District, Kaohsiung City 840,
Taiwan (R.O.C.)
Website: http://www.vitiny.com
Page 15

Page 16

HTTP://WWW.VITINY.COM
© MicroLinks Technology Corp. All rights reserved.
 Loading...