

Page 1

NOU S VIV ONS SAIN
We l iv e h ea lth y
MANICURE / PEDICURE SET
НАБОР ДЛЯ МАНИКЮРА
И ПЕДИКЮРА
“Vitesse France S.A.R.L” (Витессе, Франция)
91 Руе Де Фоборг Сант Хонор, Париж 75008, Франция
Сделано в Китае
www.vitesse.ru
VS-967
Page 2
www.vitesse.ru
Dear Customer!
You have made an excellent decision. Vitesse home range offers you an exclusive,
high quality range of appliances for your ultimate home luxury and healthy living.
1. Safety i nst ruc tions
1.1 Dange r of el ect ric shocks
• Before plugging the app lia nces pl eas e ma ke sure i t is i n co mpl ian ce w ith
the specifica tio ns men tioned on t he adapter with the voltage of your
power soc ket .
• Do not subm erg e the a ppliance in wat er or o the r liquids.
• Never us e the a ppl iance in t he bat h or sh owe r. Do no t keep the appliance
in places f rom w hic h it could fall int o the b ath tub or wash basin .
• Do not use th e app lia nce if there is any d ama ge to t he power cord or pl ug.
• Do not carry t he applian ce by the power cord and nev er use th e power
cord as a han dle .
• Do n ot to uch t he ap pli ance if it h as fa lle n int o wat er: i mme dia tely unplug
the cord fr om th e pow er socket.
• Never use t he ap pli ance outdoors .
• Never ope n the a ppl iance casing.
1.2 fire ha zar d
• Keep the ap pli anc e and its cord away f rom h ot su rfaces.
• Never cov er th e app liance when in us e.
1.3 risk of i nju ry
• Keep the ap pli anc e out of reach of chi ldr en.
• Use only th e att ach ments that come w ith a ppl iance.
• Do not use th e app lia nce on wounds or ra she s on fi ngers or toes.
2. Proper u se
• This manic ure/pedicur e set is suite d to car ing for and filing fin gernails
a nd to ena ils a nd is strict ly in ten ded for private u se on ly.
3. Adapter s pec ifi cations
• Input: …… …23 0Vac 50H z
• Output: . ... ... ..3.0Vdc 5 00m A
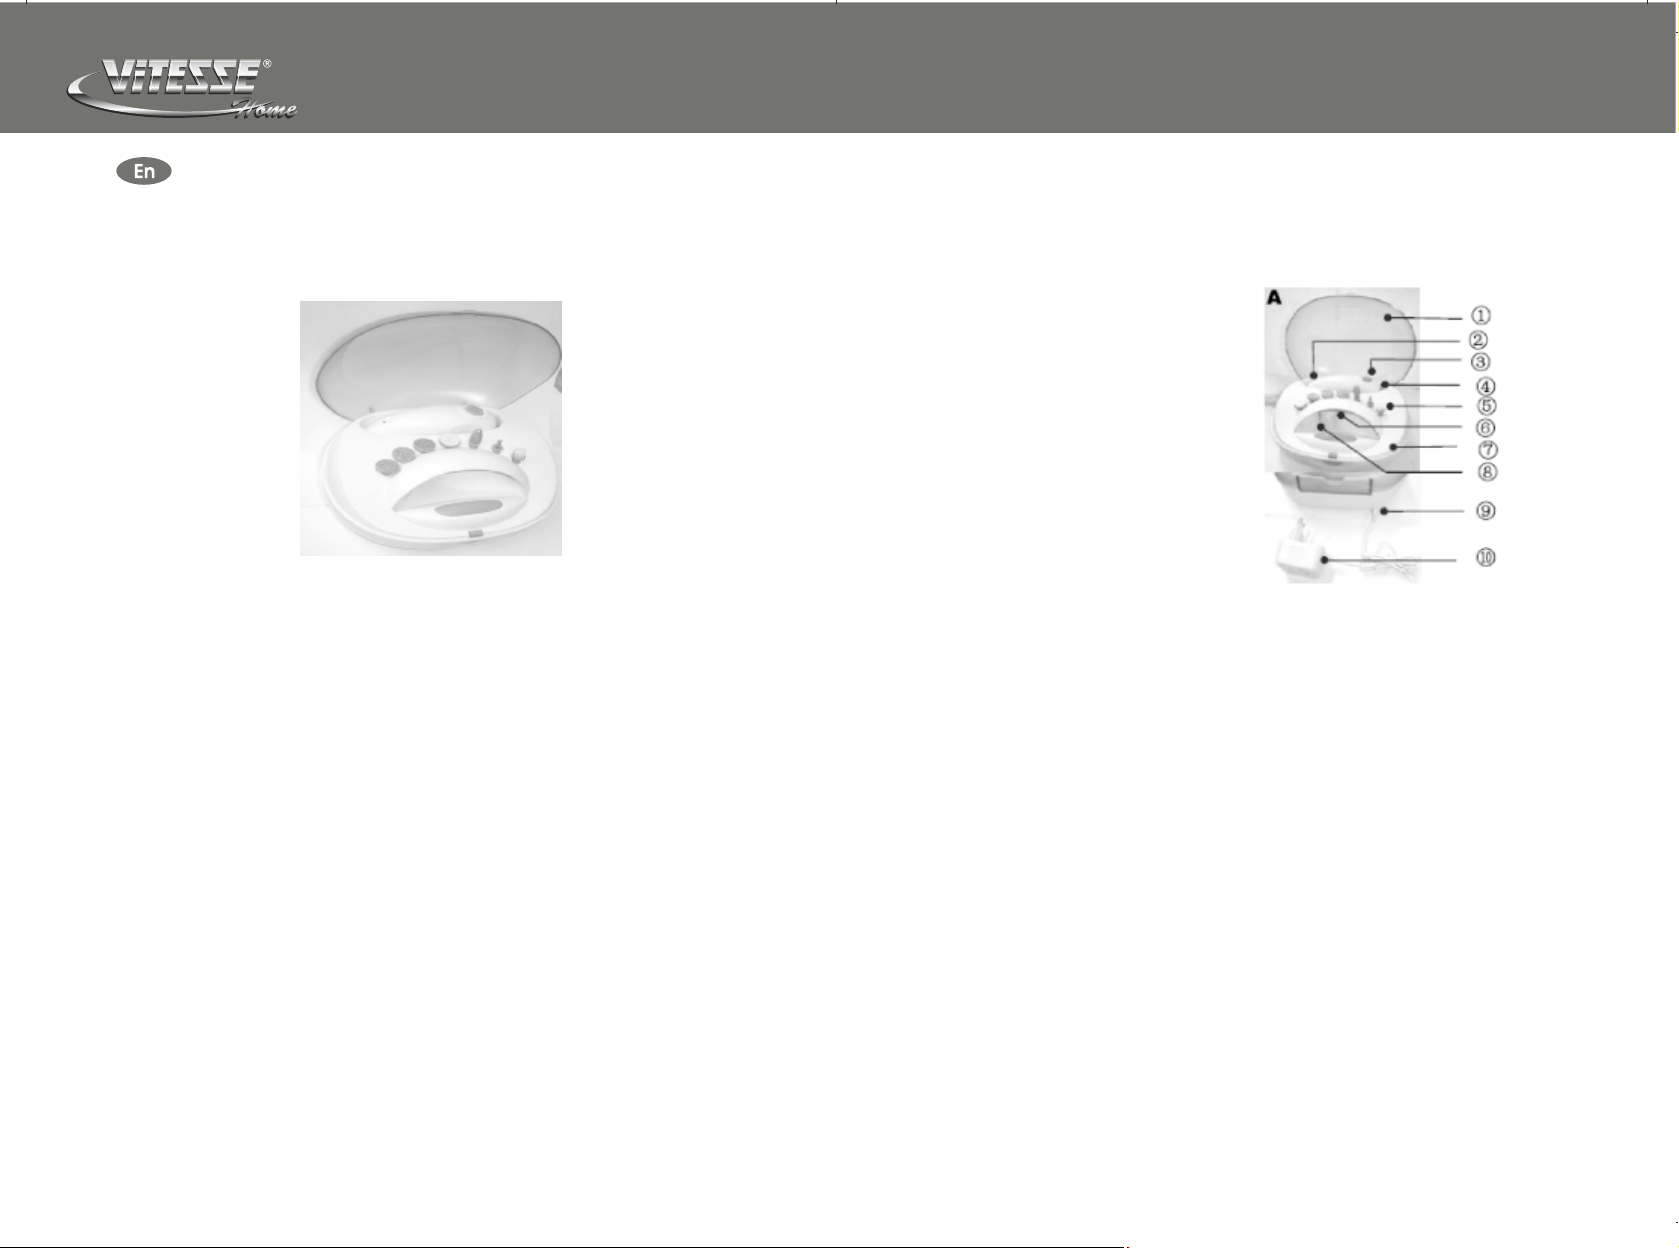
4. Applian ce de scr iption
① Screen/ cap
② Battery c har gin g light
③ Five-po sit ion s witch for contr oll ing
speed and s pin d ire ction.
④ Hand set fo r var iab le attachment s.
⑤ Attachme nts
⑥ UV lamp
⑦ Packagi ng- /st orage box
⑧ Nail poli sh dr yer
⑨ Adapter so cke t
⑩ Adapter
5. Operat ion
5.1 charg ing t he ba ttery
• Charge th e battery fo r 16 ho urs bef ore t he very f irs t use of the app lia nce
to make sur e the b att ery is fully char ged .
• Normal ch arg ing t ime is approxim ate ly 8 ho urs.
• The casing ser ves a lso a s a battery charg ing s tat ion.
Switch the five-posit ion swi tch ③ to po sit ion 0 (o ff) and pla ce the hand
set in the pr ovi ded a ppliance.
Insert the adapter cable in t he soc ket on the casing ⑦ an d t he pow er cor d
in the powe r soc ket .
The cha rgi ng lig ht ② re mai ns lit whil e the battery is loa din g. Unplug the
power cor d bef ore u sing the hand set .
5.2 using t he ha nd se t
• You ma y now begin the ma nic ure/pedicur e. Ther e are two spe ed levels
and two spin dir ect ion sett ings availabl e, regul ate d by th e fiv e-p osition
switch③ . With the fiv e-p osi tio n swit ch set to the right , the atta chm ent
spins clockwi se. Wi th the five- pos iti on swi tch se t to the lef t, the
Attachm ent s pin s anti-clockw ise .
The posit ion s ’I’ and ‘II ’ re gulate the spee d.
Positio n I = slo w
Positio n II = fa st
Positio n 0 = off
P/1 P/2
Page 3

www.vitesse.ru
5.3 mains -po wer ed operations w ith t he po wer adapter
• If the a ppl ian ce’s batte ry is no t charged, you c an still op era te th e
applian ce directl y from the ma ins pow er s upp ly u sin g the included power
adapter. Impo rta nt: use only the power adapter suppl ied with the
applian ce.
• Insert the adap ter cabl e in the sock et on th e und er side of the a ppl ian ce
then plug t he ad apt er cord into the po wer s ock et.
• The appliance need s 30 sec ond s wa rm- up t ime before it can be operated
from the mains supp ly. After t his p eri od, t he ap pli ance will operate at full
capacit y.
6. Attachm ent s
① Filing / sh api ng di sc
② Filing / sh api ng di sc
③ Precisi on fi lin g disc
④ Soft poli shi ng di sc
⑤ Large fil ing c one
⑥ Cleanin g bru sh
⑦ Small fil ing c one
7. Mou nti ng th e attachments
Before mo unt ing a ttachments, m ake s ure t he hand set is swit che d off.
Mount the at tachments dir ect ly onto the hea d of the han d set . To rem ove
attachm ent s, si mply twist them o ff the ha nd se t.
7.1 filin g/s hap ing disc
To remove cal lus es fr om hands and feet
• Use the coarse d isc ( ang ular grain) ① for m ore s ens itive skin
• Use the coarse dis c (round grain ) ② - Do not apply grea t pre ssu re to
patches o f raw s kin .
• M o ve th e h a n d s e t ba c k - a nd – fo rt h o v e r t h e s k i n s u r f a ce .
7.2 large f ili ng co ne ⑤
Fo r sl ig h t ly h a r de n e d pa t c he s , cor n s or p a t ch e s of r o u gh s k i n
Move the hand set gently bac k and f ort h whi le wo rki ng on t he ar eas o f
raw skin.
7.5 brush ⑥
Use the bru sh fo r cle aning nails aft er fi lin g.
The brush a lso r emo ves residual cu tic le an d prepares the na il fo r pol ishing.
7.6 Soft po lis hin g disc④
After th e ma nic ure/pedi cur e, the polishing dis c sm oothes an d sh ine s the
filed nai l, le ndi ng it gloss and lus ter.
8. Use of the n ail d rye r
Insert th e ada pte r cable in the sock et on t he si de of the casing.
Plug the co rd in to th e power socket.
Switch the applian ce on/o ff using the switch on the opp osite side of the
Casing.
The a ir should now blow o ut fro m the f ron t o f the a ppliance. T he nail
dryer i s con str ucted su ch th at th e casing can be p lac ed in a ly ing or a
standin g pos iti on (see C)
Disconn ect the power cord from the power socket when the nail polish is
Dry.
9. Cleani ng
• Disconnect the po wer co rd from the powe r sock et before cleaning the
applian ce.
• Never us e li quid or ab rasive cl ean ing . A da mp tow el is sufficient. The
attachm ent s 1-7 m ay be cleaned wit h ① ② ③ ④ alc oho l from time to t ime .
7.3 coars e pre cis ion file ⑦
For filin g and s hap ing strong toe na ils
7.4 small f ili ng/ shaping di scs ③
For filin g and s hap ing of nails
For thin an d fra gil e nails
For stron g, ha rd na ils
P/3 P/4
Page 4
www.vitesse.ru
Уважаемые покупатели! Вы приняли блестящее решение!
Фирма Vitesse предлагает Вам гамму эксклюзивных высококачественных
приборов для несомненно роскошного и здорового образа жизни.
РУКОВОДСТВО ПО ЭКСПЛУАТАЦИИ
Перед первым использованием прибора внимательно прочитайте руководство
по эксплуатации. Сохраните руководство для дальнейших консультаций.
ТЕХНИКА БЕЗОПАСНОСТИ
• Перед тем как подключить устройство к сети, убедитесь, что напряжение в
сети соответствует напряжению, указанному на адаптере прибора.
• Во избежание поражения электрическим током, не погружайте прибор в воду
или в другую жидкость.
• Никогда не используйте прибор в ванной комнате или душе.
• Не используйте прибор, если на шнуре или на вилке видны следы
повреждения, он падал или был поврежден. Обратитесь в сервисную
мастерскую для осмотра или ремонта.
• Никогда не используйте шнур для того, чтобы переносить прибор.
• Не пытайтесь достать прибор, если он упал в воду, немедленно достаньте
адаптер прибора из розетки.
• Не используйте прибор вне помещения.
• Следите за тем, чтобы кабель питания не касался горячих поверхностей.
• Во время использования, никогда не накрывайте прибор тканью или другой
материей.
• Не оставляйте работающий прибор без присмотра, следите чтобы дети
находились на безопасном расстоянии от прибора.
• Используй те толь к о те при н а длеж н ости, кот о рые р е комен д ует
производитель.
• Не используйте прибор, если на ваших пальцах есть раны или другие
повреждения.
• Прибор предназначен только для персонального использования.
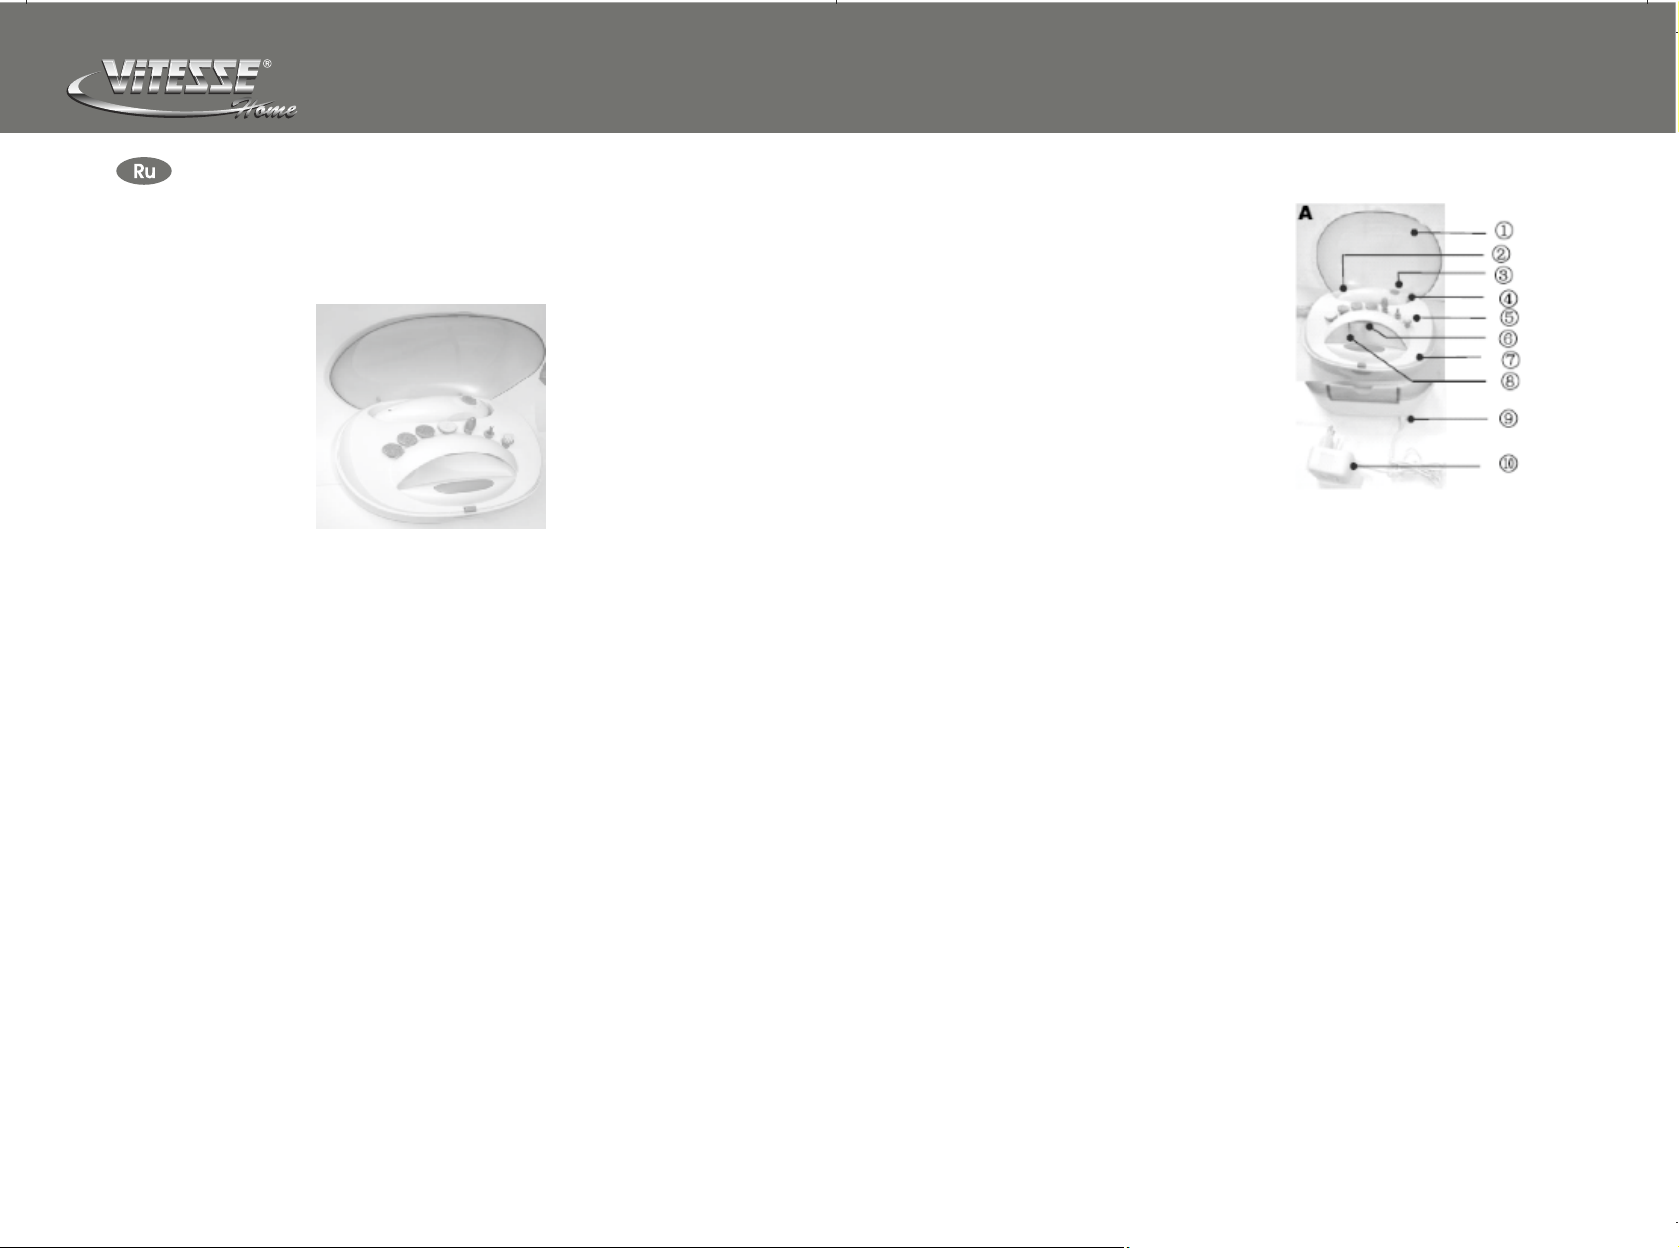
ОПИСАНИЕ
① Крышк а.
② Индик ат ор заря дки .
③ Рег ул ятор ск орости и
направлен ия вр ащения нас адк и.
④ Устро йст во для ма ник юра/педикюра.
⑤ Насадки .
⑥ Ультр афи ол етовая ла мпа.
⑦ Контейн ер для хране ния .
⑧ Сушка д ля но гтей.
⑨ Штек ер ад аптера.
⑩ Адаптер .
ЭКСПЛУАТАЦИЯ
Зарядка аккумулятора
• Перед первым использованием прибора, зарядите его на протяжении 16
часов, для того что бы убедиться, что заряд аккумуляторов полный.
• Нормальное время заряда аккумуляторов около 8 часов.
• Контейнер для хранения так же служит, как станция для зарядки
Аккумуляторов.
• Поставьте регулятор скорости и направления вращения насадки ③ в
положение 0 (ВЫКЛ).
• Вставьте штекер адаптера в контейнер для хранения ⑦ , затем вставьте
адаптер в розетку.
• Индикатор заряда аккумуляторов будет светиться до тех пор, пока
аккумуляторы полностью не зарядятся. Достаньте адаптер из розетки,
перед использованием набора.
Использование набора
• Устройство для маникюра/педикюра имеет две скорости вращения и два
направления вращения, регулируемых с помощью регулятора скорости и
направления вращения насадки ③ . Повернув регулятор скорости и
направления вращения вправо, насадка будет вращаться по часовой
стрелке. Повернув регулятор скорости и направления вращения влево,
насадка будет вращаться против стрелки.
Положение ’I’ и ‘II’ регулирует скорость вращения насадки.
Положение ’I’ = низкая скорость вращения насадки.
Положение ‘II’ = высокая скорость вращения насадки.
Если аккумуляторы устройства для маникюра/педикюра не заряжены, вы по
прежнему можете использовать его, непосредственно с помощью адаптера.
Внимание: Используйте только тот блок питания, который поставлялся в
комплекте с прибором.
Вставьте штекер адаптера в устройство для маникюра/педикюра, затем
вставьте блок питания в розетку.
Прибору необходимо разогреться на протяжении 30 секунд, перед тем как
начать работу непосредственно от электросети. После этого периода, прибор
будет работать на полную мощность.
P/5 P/6
Page 5

www.vitesse.ru
Комплектующие
① Диск для придания формы ногтям
② Диск для придания формы ногтям
③ Маленький диск для точной
Обработки и приданию формы ногтям
④ Насадка для полировки ногтей
⑤ Большая конусная насадка
⑥ Мягкая щеточка для очищения
Поверхности ногтя
⑦ Маленькая конусная насадка
Установка принадлежностей
Перед тем как установить нужную вам насадку, убедитесь, что прибор
выключен. Установите нужную вам насадку точно на головку триммера.
Для того что бы снять насадку, просто потяните ее на себя ее.
1. Диск для придания формы ногтям
Для того чтобы убрать огрубевшую кожу на руках и ногах
• Используйте мелкозернистую насадку ① для нежной кожи
• Используйте крупнозернистую насадку ② для грубой кожи. Не делайте
чрезмерных усилий.
• Двигайте прибор вперед и назад по всей поверхности кожи.
2. Большая конусная насадка ⑤
Для слегка отвердевшей кожи, омозолелостей и грубой кожи.
Немного надавив на прибор, двигайте его вперед и назад по всей
поверхности кожи.
3. Маленькая конусная насадка ⑦
Для обработки и приданию форм крепким ногтям
4. Маленький диск для обработки и приданию формы ногтям ③
Для обработки и приданию формы ногтям.
Для обработки тонких и ломких ногтей
Для твердых и сильных ногтей
5. Щетка ⑥
Используйте щетку для чистки ногтей после обработки насадками
Щетка также удаляет остатки кутикул и подготавливает ногти для
полировки.
6. Мягкий диск для полировки ногтей ④
После маникюра или педикюра придаст вашим ногтям гладкий и сияющий
вид
7. И спользование сушилки для ногтей
Вставьте штекер адаптера в контейнер для хранения.
Вставьте адаптер в розетку
Включите прибор с помощью включателя с тыльной стороны прибора
После этого должен дуть воздух с передней части прибора. Сушилка для
ногтей
Разработана таким образом, что крышка может находиться в открытом или
закрытом положении (рис.С).
Достаньте адаптер из розетки, когда лак для ногтей высохнет.
УХОД И ЧИСТКА
Перед чисткой прибора достаньте адаптер из розетки. Никогда не
используйте жидкие или абразивные моющие средства для чистки. Протрите
прибор с помощью влажной ткани. Насадки 1-7 вместе с частями прибора ①,
②, ③, ④ можно чистить с помощью спирта.
ТЕХНИЧЕСКИЕ ХАРАКТЕРИСТИКИ
Адаптер
Потребляемая мощность……….230В, 50Гц
Выходная мощность………. 3В, 500 мА
ВНИМАНИЕ! Все материалы данного руководства были тщательно проверены. При
обнаружении опечаток, опущений и несоответствий компания оставляет за собой
право окончательной трактовки. Дизайн и характеристики прибора могут быть
изменены без предварительного уведомления. Перед приобретением ознакомьтесь
с фактическими характеристиками изделия.
Срок службы товара не менее 2-х лет при соблюдении условий эксплуатации.
По окончании срока эксплуатации электроприбора не выбрасывайте его
вместе с обычными бытовыми отходами, а передайте в официальный
пункт сбора на утилизацию. Таким образом, Вы поможете сохранить
окружающую среду.
P/7 P/8
 Loading...