

Page 1
NOU S VIVONS SAIN
We l iv e health y
FOOD PROCESSOR
КУХОННЫЙ КОМБАЙН
“Vitesse France S.A.R.L”
91 rue du Faubourg Saint Honore´
75008 Paris-France
www.vitesse.ru
VS-230
Page 2
www.vitesse.ru
DEAR CUSTOMER!
You have made an excellent decision. Vitesse® “Nouveau” home range offers
you an exclusive, high quality range of appliances for your ultimate home
luxury and healthy living.
INSTRUCTION MANUAL
Read all instructions carefully before using this product.
Be Certain the lid is securely locked in place before operating the appliance. If
you are using the appliance without the blender, the appliance will not function
if the housing cap has not been fixed onto the attached hole for the Blender.
AC: 230V ~ 50 Hz 650 W
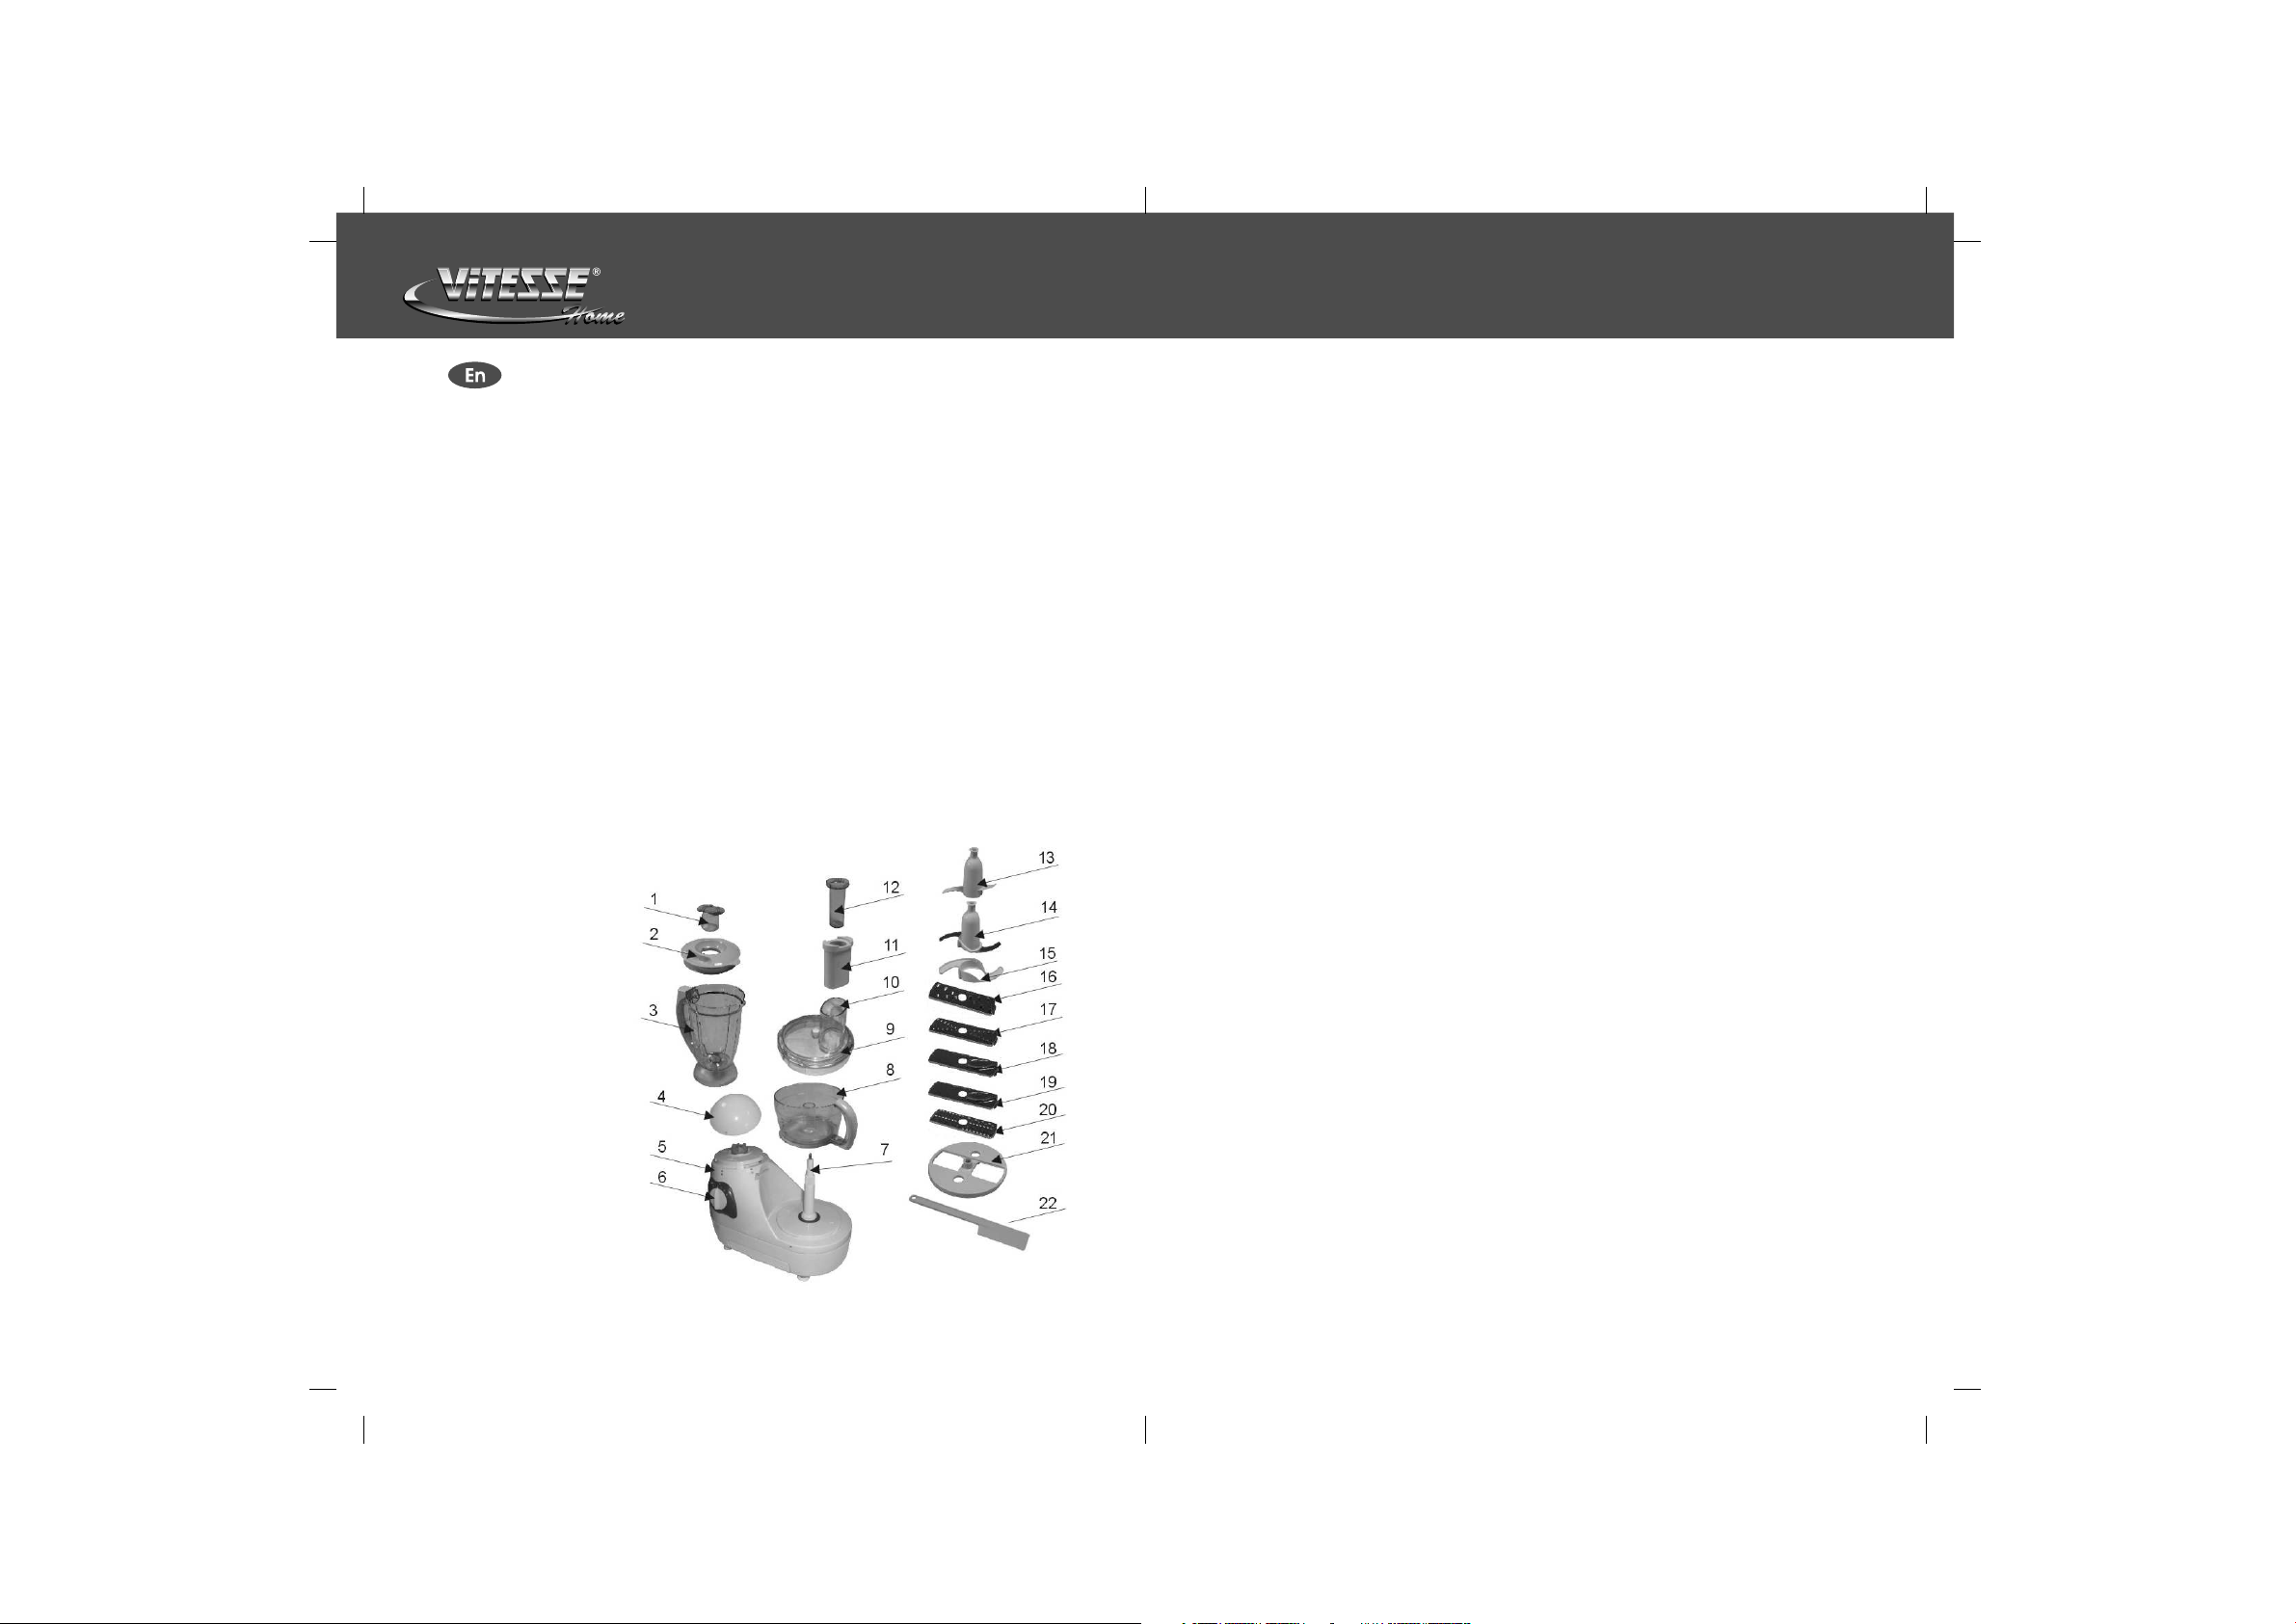
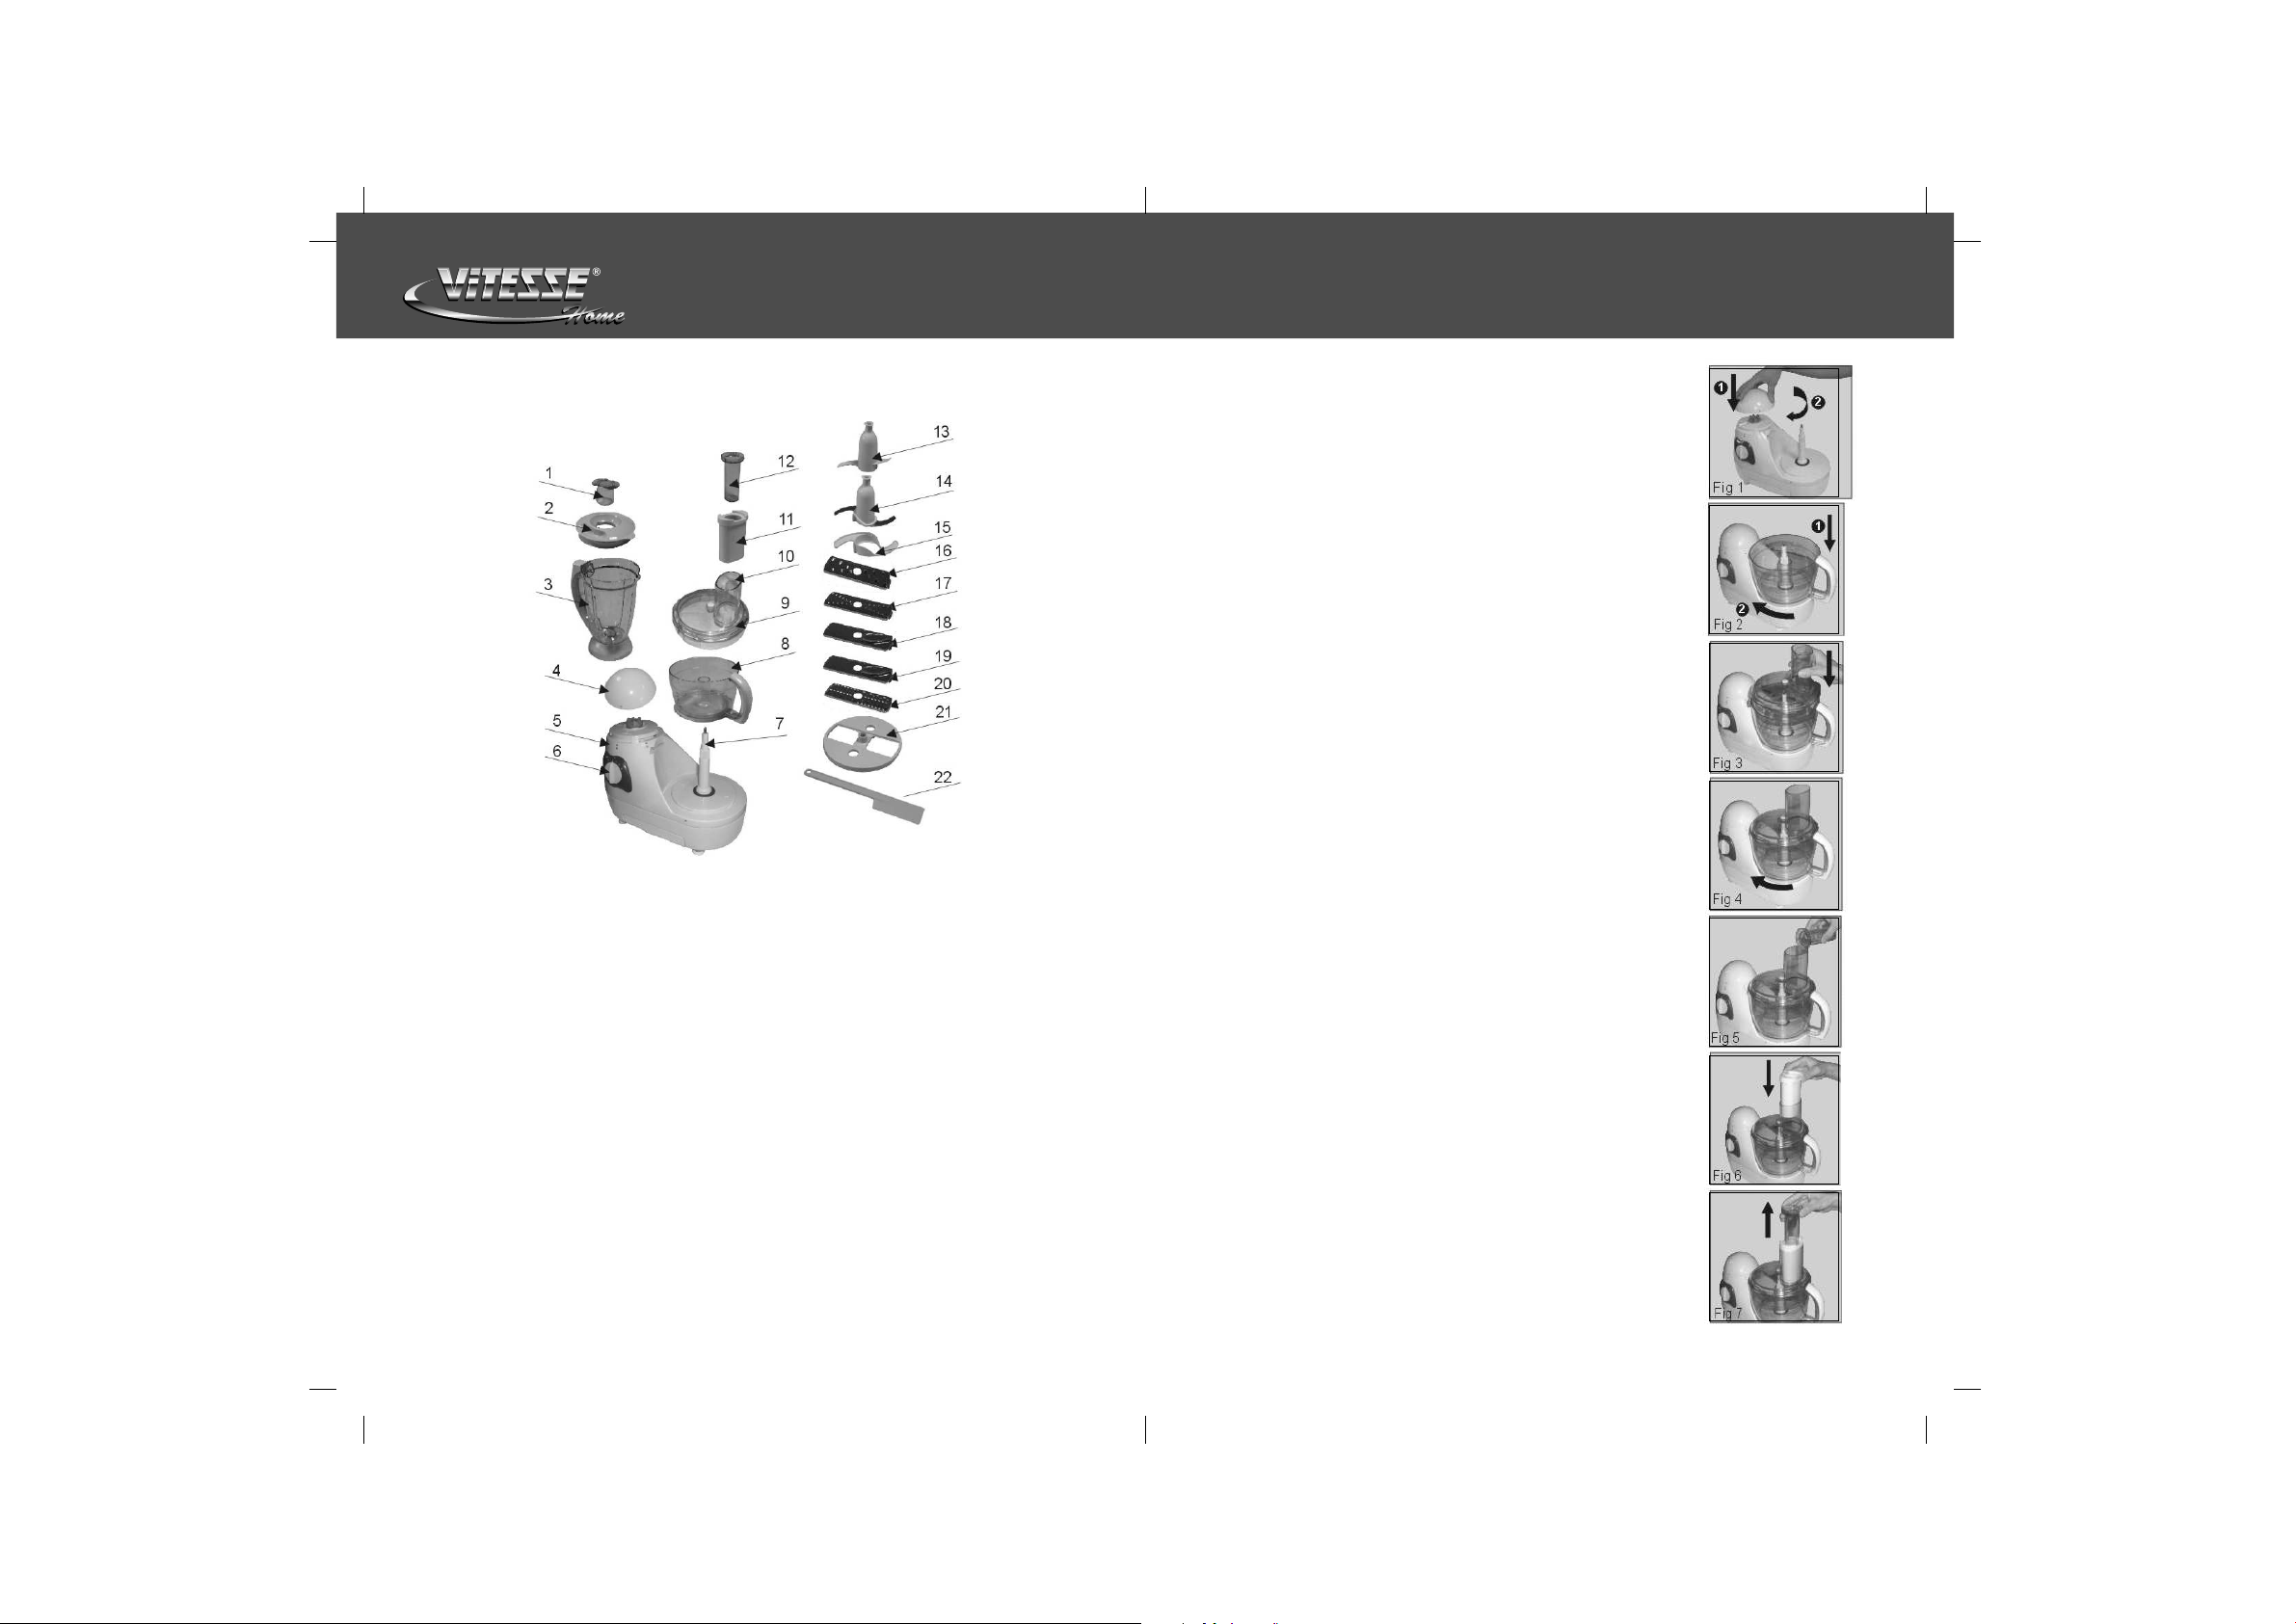
1. Blender Stopper
2. Blender Lid
3. Blender Jar(1.5 L Max)
4. Housing Cap
5. Housing
6. Knob
7. Driving Nozzle
8. Bowl (1.5L Max)
9. Bowl Lid
10. Inlet
11. Pusher
12. Pusher Cup
13. Kneading Accessory
14. “S” Blade
15. “S” Blade Protector
16. Coarse Shredder
17. Fine Shredder
18. Coarse Slicer
19. Fine Slicer
20. Potato Cutter
21. Cutter Disc
22. Spatula
Important Safeguards
When using the electrical appliances, basic safety precautions should always
be followed including the following:
• Please read all the instructions carefully before use and retain for future
reference.
• To protect against risk of electrical shock do not immerse the appliance,
cord or plug in water or other liquid.
• Close supervision is necessary when any appliance is used by or near
children.
• Unplug the appliance when not in use and before cleaning
• Do not touch hot surfaces and avoid contacting moving parts.
• If the supply cord is damaged, it must be replaced by the manufacturer or
its service agent or a similarly qualified person in order to avoid a hazard.
• The use of attachments not recommended or sold by the manufacturer
may cause fire, electric shock or injury.
• Household appliances are not intended for industrial or commercial use.
• Take special care not to allow the cord to hang over the edge of the table or
counter.
• Keep hands and utensils away from moving blades or discs while
processing food to reduce the risk of severe injury to persons or damage to
the food processor. A scraper may be used but must be used only when the
food processor is not running.
• Blades are sharp. Handle carefully
• To reduce the risk of injury, never place cutting blades or discs on base
without first putting bowl properly in place.
• Be certain the lid is securely locked in place before operating the
appliance.
• Never feed food by hand. Always use food pusher
• Do not attempt to defeat the lid interlock mechanism.
• Always operate the blender with lid in place.
• When blending hot liquids, remove the centre piece of two-piece lid
Save these instructions
P/1 P/2
Page 3

www.vitesse.ru
HOW TO USE:-
1. Placing the Bowl
- Put the housing cap on the housing, and turn it
clockwise (Fig 1)
- Put the bowl on the food processor as shown (Fig 2)
- Turn the handle clockwise until the bowl cannot be
moved any further and you hear a “Click”
2. Placing the Bowl Lid
- Put the lid on the bowl as shown in the Fig 3
- Turn the lid with some force clockwise until the lid will
not move any further and you hear a “click”
(Fig 4)
- Make sure that the mark on the lid and the arrow on
the bowl are directly opposite each other.
3. Food Inlet and Pusher
- The inlet can be used to add liquid and solid
ingredients (Fig 5)
- Use the pusher to push ingredients through the throat
(Fig 6)
- You can also use the pusher to close the inlet while
the appliance is running to prevent dust or drops of
liquid from escaping through the inlet.
- The pusher has been provided with a pusher cap
(Fig 7)
- The pusher cap can be removed to create a narrow
inlet.
- A narrower inlet may be handy (e.g. cover) when you
want to cut or when the amount of ingredients used is
too small to use the normal inlet.
4. Attachments
- The housing cop or the blender have been properly
mounted onto the housing
- If both the blender and the bowl have been mounted
correctly onto the housing, only the blender will
function.
A. “S” Blade
· Be careful: the cutting edges of the “S” Blade are very
sharp! Especially when removing the blade from the
bowl. Emptying the bowl and during clearing.
FUNCTION:-
· The “S” Blade can be used for chopping, mixing ,
blending, preparing puff pastry, crumble and short
crust pastry.
HOW TO USE:-
· Remove the “S” Blade from the “S” Blade protector
(Fig 8)
· Put the bowl on the housing and fit the “S” Blade onto
the driving shaft (Fig 9)
· Put the ingredients onto the bowl (Fig 10)
· Fasten the lid onto the bowl and put the pusher in the
inlet
· Se the speed control to the position indicated in the
table and switch-on the application. If you have
doubts about the correct speed, always select the
highest speed (position 3)
· Applications / recipes mentioned in the table will be
ready after 10~60 Seconds.
TIPS:-
1. Put the pieces approximately 3 * 3 * 3 (Cm3) in the
bowl.
2. The appliance chops very quickly, let it run for short
periods at a time.
3. Do not let the appliance run for too long time.
4. If food sticks to the “S” Blade or to the inside of the
bowl.
- Turn the appliance off.
- Remove the lid from the bowl
- Remove the ingredients from the “S” Blade or the
inside of the bowl with a spatula.
Be careful with the cutter: the cutting edges are very
sharp! Especially while removing the blade from the
cutter disc.
HOW TO USE:-
- Put the bowl on the housing
- Put the cutter from the cutter storage (on the bottom
of the unit) (Fig 11)
- Put one side of the cutter on the disc (Fig 12)
- Press down the side that has the word “Push Up” of
the cutter with the toe (Fig 13)
- Put the cutter disc in place with two fingers (Fig 14)
- Put the lid on the bowl (Fig 15)
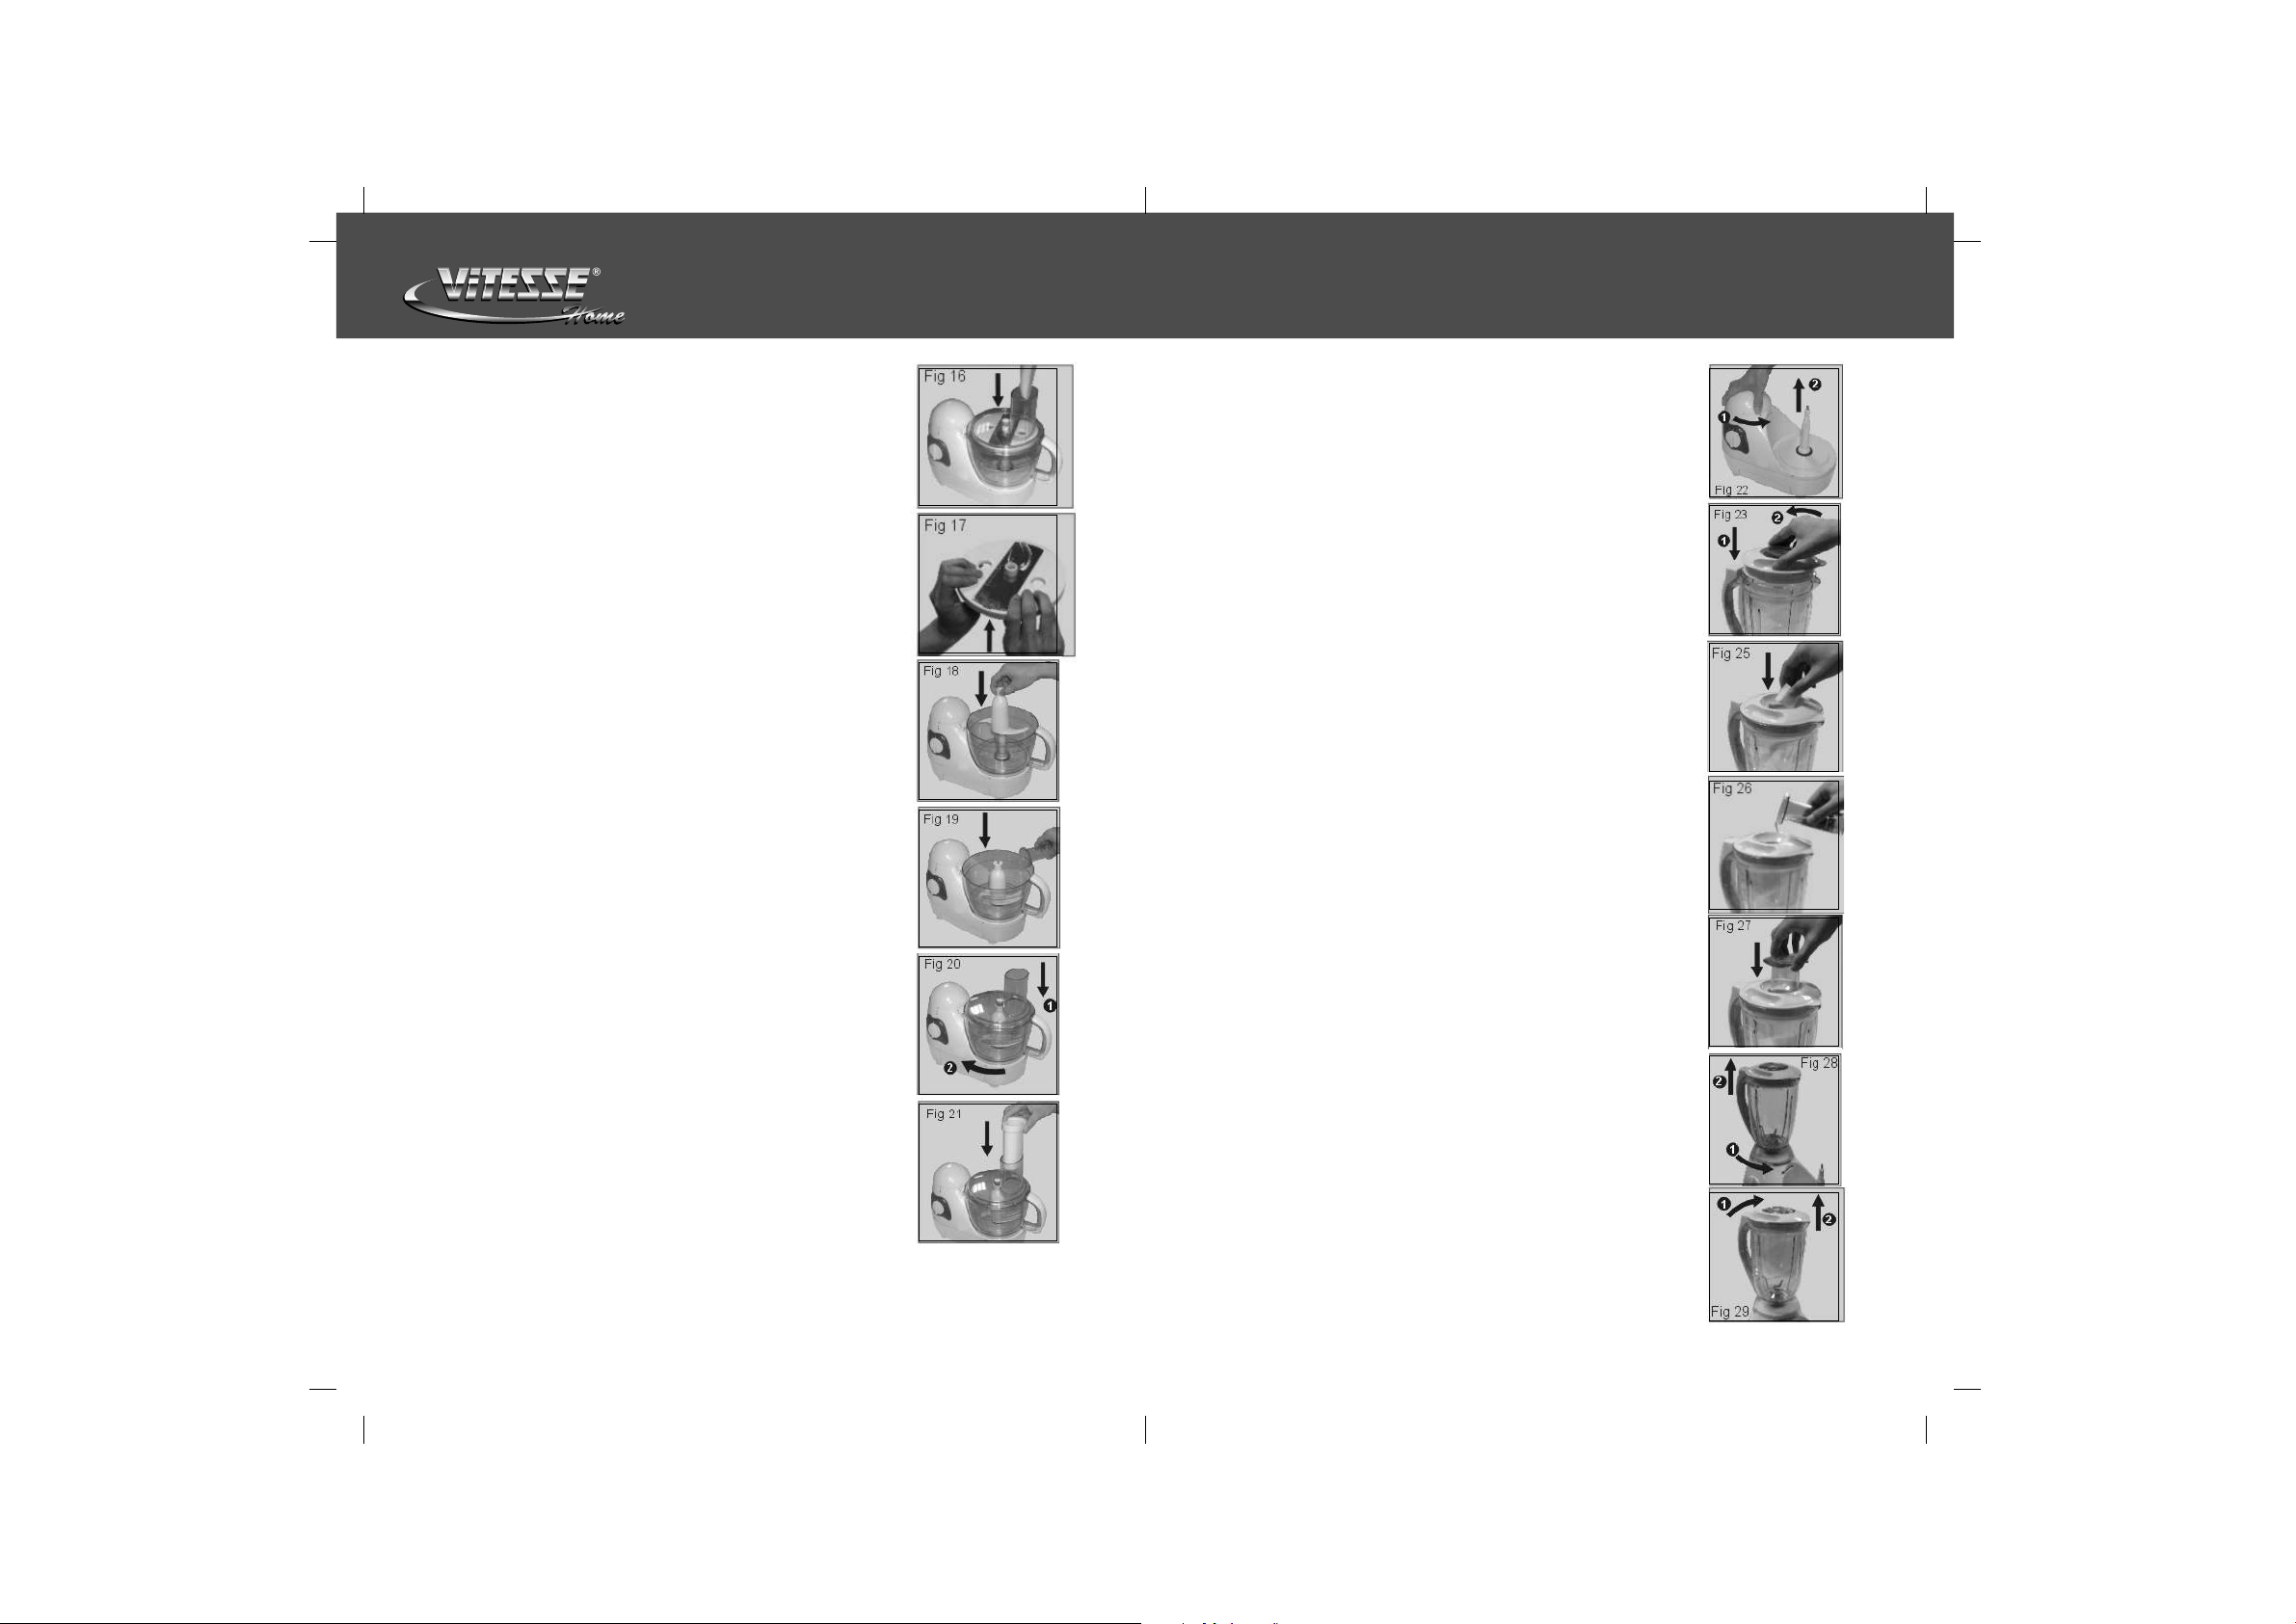
- Put the ingredients in the inlet (Fig 16)
- Press the pusher lightly onto the ingredients in the
inlet.
- For grating and slicing: set the speed control to
position 3. (Highest Speed)
- If you want to cut soft vegetable or fruits, you can also
select a lower speed setting
Fig 8
Fig 9
Fig 10
P/3 P/4
Page 4
www.vitesse.ru
- Press the ingredients slowly and steadily down with
the pusher (Fig 16)
- Press the side of the cutter that has the word “Push
Up” out of the disc with the toe. (Fig 17)
KNEADING ACCESSORY:
Function:
The kneading accessory can be used for kneading bread
dough and for mixing batters and cake mixtures.
How to Use:
- Put the bowl on the housing and fit the kneading
accessory onto the driving shaft. (Fig 18)
- Put the ingredients in the bowl and fasten the lid onto
the bowl. (Fig 19. 20)
- Put the pusher in the inlet to close it (Fig 21)
- Set the speed control to position 3. (Highest Speed),
ready after 1~3 Minutes.
BLENDER:-
Important:-
1. The appliance must be used together with the bowl
and the bowl lid. If you use appliance without the
blender, the appliance will not function if the housing
cap has not been fixed onto the attaching hole for the
blender.
2. Before Use: do not put the main plug in the socket
until you have attached the blender jar and the
housing cap in the correct way.
3. After use: Unplug the appliance before you remove
the blender jar from the housing.
4. Do not full the blender jar with the ingredients that are
hotter than 80 Degree Celsius.
5. To prevent spilling, do not put more then 1.5 liters of
liquid in the blender jar.
6. Never remove the lid while the blender is running.
7. Notice: Always remove the lid from the blender jar
before mounting and dismounting the blender jar.
8. Do not operate the blender attachment over 3
minutes.
Function:-
The blender can be used for pureeing very finely and for
blending. It can be used for e.g. soups, sauces, milk
shakes, baby food, vegetable, fruit thin batter, puree,
etc., if necessary, cut solid ingredients into smaller
pieces before you put them in the blender.
How to use the Blender:-
- Remove the housing cap (Fig 22)
- Press the lid into place and turn it anti-Clockwise into
it is firmly fixed (Fig 23)
- Mount the blender jar onto the attaching hole and turn
it clockwise until it is firmly fixed (Fig 24)
- Put the ingredients in the blender jar (Fig 25, 26)
- Attach the stopper by pressing it down (Fig 27)
- Assemble the bowl and the bowl lid by twisting the lid
until to its fixture in the clockwise direction.
- Switch on the appliance by setting the speed control
to the recommended speed.
TIPS:-
1. The opening in the lid can be used to add ingredients
while the appliance is running. To do so, remove the
stopper from the lid.
2. It may be necessary to switch off the appliance from
time to time to remove pieces of flood sticking to the
inside of the blender jar.
- Switch off the appliance and unplug it.
- Remove the stopper and the lid
- Remove the pieces sticking to the inside of the
blender jar with a soft spatula.
Keep the spatula at a safe distance from the knives.
- Turn the blender jar anti-clockwise. Take out the
blender jar (Fig 28)
- Turn the lid clockwise (Fig 29)
P/5 P/6
Page 5
HOW TO CLEAN:-
www.vitesse.ru
1. Always unplug the appliance before you start cleaning the housing.
2. Wipe the housing over with a clean, damp cloth after each use. Never
immerse any part of the housing in water or other liquid.
3. The bowl and lid may be washed by hand in hot soapy water. Do not place in
the dishwater. Do not use abrasives.
4. Clean the blade, the knife of the blender and the slicer very carefully. The
cutting edges are very sharp!
5. Always clean the parts that have come into contact with food in hot water
with washing-up liquid immediately after use.
6. If your appliance suddenly stops running
- Pull the mains plug out of the socket.
- Set the switch to position “O”.
- Let the appliance cool down for 15 minutes
- Switch on the appliance again.
Table:-
Ingredients
A. Dough
(Bread)
B. Apples,
Carrots
C. Potato
D. Meats/Fish
E. Vegetables
F. Fruits
Max.
Quantity
700g Flour
(Scale: Flour/
Water = 100/60)
500g
500g
500g (Cut the
meat/fish into
cubes of 3 cm)
500g
500g
Speed
Setting
3
3
3
3 / p
2
2
Accessory
Kneading
Fine/Coarse/
Shredder
Fine/Coarse/
Slicer
Potato Cutter
“S” Blade
“S” Blade
“S” Blade
Operating
Time
60 Seconds
30 Seconds
30 Seconds
15 Seconds
Уважаемые покупатели! Вы приняли блестящее решение!
Фирма Vitesse® “Nouveau” предлагает Вам гамму эксклюзивных
высококачественных приборов для несомненно роскошного и здорового
образа жизни.
РУКОВОДСТВО ПО ЭКСПЛУАТАЦИИ
Перед первым использованием прибора внимательно прочитайте
руководство по эксплуатации. Сохраните руководство для дальнейших
консультаций.
ТЕХНИКА БЕЗОПАСНОСТИ
При использовании прибора, следует придерживаться основных мер
безопасности, включая следующие:
• Перед первым использованием прибора внимательно прочитайте
руководство по эксплуатации.
• Перед тем как подключить устройство к сети, убедитесь, что
напряжение в сети соответствует напряжению, указанному на
приборе.
• Во избежание поражения электрическим током, не погружайте
прибор в воду или в другую жидкость.
• Не оставляйте работающий прибор без присмотра, следите чтобы
дети находились на безопасном расстоянии от прибора.
• Всегда доставайте штепсель из розетки, перед чисткой прибора.
• Не касайтесь горячих поверхностей и движущихся частей прибора.
• Не используйте прибор, если на шнуре или на вилке видны следы
повреждения, он падал или был поврежден. Обратитесь в сервисную
мастерскую для осмотра или ремонта.
• Ис по л ь з ов ан и е пр и на дл еж но с т е й, не ре ко ме нд ов а нн ых
производителем, может привести к поражению электрическим током.
• Используйте прибор только по назначению.
• Следите за тем, чтобы кабель питания не свисал со стола и не касался
горячих поверхностей.
• Будьте предельно внимательны, не трогайте движущиеся лезвия или
диски во время работы, так как они могут поранить вас.
• Лезвия очень острые, обращайтесь с ними очень осторожно.
• Перед использованием убедитесь, что крышка прибора установлена
правильно.
• Запрещается проталкивать продукты пальцами, используйте
толкатель, для того, что бы протолкнуть продукты в прибор.
• Не пытайтесь убрать или модернизировать предохранительный
механизм крышки.
• Прибор не должен эксплуатироваться людьми с плохим состоянием
здоровья или с плохими чувствительными или умственными
способностями.
P/7 P/8
Page 6
www.vitesse.ru
ОПИСАНИЕ
1. Зажим
2. Крышка блендера
3. Чаша блендера (1.5 л.)
4. Крышка базы
5. Корпус
6. Ручка управления
7. Привод
8. ×àøà (1.5 ë.)
9. Крышка чаши
10. Приемная горловина
11. Толкатель
12. Узкий толкатель
13. Насадка для смешивания
14. «S» образное лезвие
15. Защита «S» образного лезвия
16. Крупная терка
17. Средняя терка
18. Шинковка для крупного нарезания ломтиками
19. Шинковка для среднего нарезания ломтиками
20. Шинковка для нарезания картофеля
21. Режущий диск
22. Лопатка
ЭКСПЛУАТАЦИЯ
Использование
1. Установка чаши
• Установите кр ы ш к у на корпус прибора и
поверните по часовой стрелке (Fig. 1).
• Поставьте чашу на прибор как показано на Fig.2 .
• Поверните ручку чаши по часовой стрелке до тех
пор, пока не услышите щелчок.
2. Установка крышки
• Поставьте крышку на чашу как показано на Fig.3.
• Поверните крышку по часовой стрелке до упора,
пока вы не услышите щелчок Fig.4.
• Убедитесь что отметка на крышке и стрелка на
чашe, находятся друг против друга.
3. Загрузка продуктов питания и толкатель
• Загрузочную горловину можно использовать как
для добавления пищевых продуктов так и для
добавления жидкостей. Fig.5.
• Для то го что бы за г руз и ть пи щу, вс е гд а
используйте толкатель. Fig.6.
• Вы можете использовать толкатель для закрытия
заг рузочно й горловины, во время раб оты
прибора.
• Толкатель поставляется с узким толкателем.
• Вы можете достать его, чтобы сделать тоньше
загрузочную горловину.
4. Установка
• Убедитесь что крышк а базы или блендер
правильно установлены на базе.
• Если одновременно установить на базу чашу и
блендер, работать будет только блендер.
A. «S» образное лезвие
• Будьте предельно внимательны, так как лезвия
очень острые! Особенно тогда, когда достаете их
из чаши.
Использование лезвий
• Вы можете использовать «S» образное лезвие
для нарезания, смешивания, приготовления
слоеного теста.
P/9 P/10
Page 7

www.vitesse.ru
Как использовать:
· Достаньте лезвие из защиты как показано на
рисунке Fig.8
· Поставьте чашу на базу и установите на привод
лезвие Fig.9
· Положите ингредиенты в чашу Fig.10
· Установите на чашу крышку и поставьте в
отверстие толкатель.
· Установите ре г улятор скорости в нужное
положение и включите прибор, если у вас есть
с ом н ен и я по по в од у ск о ро с ти , вс е гд а
устанавливайте самую высокую (положение 3).
Полезные советы:
· Кладите в чашу кусочки приблизительно таких
размеров 3*3*3 (см. 3).
· Прибор нарезает очень быстро, поэтому пусть он
работает на коротких промежутках.
· Не позволяйте прибору работать долгое время.
· Если пища застревает в лезвие или в чаше.
- Выключите прибор
- Снимите крышку с чаши.
- С помощью лопатки достаньте застрявшую пищу.
Будьте предельно внимательны, лезвие очень
острое.
Как использовать:
· Установите крышку базы на корпус
· Положите лезвие, предварительно достав его из
защиты для лезвия, на дно прибора Fig. 11.
· Положите один конец лезвия на диск Fig. 12.
· Нажмите на сторону со словами «Push Up» с
помощью пальцев Fig. 13.
· С помощью двух пальцев установите диск Fig. 14.
· Поставьте крышку на чашу Fig. 15.
· Положите ингредиенты в чашу, через загрузочную
горловину.
· С помощью толкателя протолкните пищу в
от верс т и е . Для превосход но го результата
установите регулятор скорости в положение «3».
· Если вам надо нарезать мягкие овощи, фрукты,
установите скорость пониже.
Fig 8
Fig 9
Fig 10
· П росовыва йте ингреди енты в загрузочну ю
горловину медленно и аккуратно Fig. 16.
· С помощью пальцев нажмите на ту сторону где
написано «Push Up» и достаньте лезвие Fig. 17.
Приспособление для смешивания:
Использование:
Насадка для смешивания предназначена для
смешивания теста и порошков для приготовления
пирогов и тортов.
Как использовать:
· Установите чашу на базу и установите насадку
для смешивания на привод Fig. 18.
· Положите ингредиенты в чашу и накройте
крышкой Fig. 19, 20.
· Поставьте толкатель в отверстие, для того чтобы
закрыть его Fig. 21
· Поставьте регулятор скорости в положение 3,
готово в течении 1 -3 минут.
Блендер
1. Важно: Используйте вместе с чашей и крышкой.
Если вы не установили крышку базы на ее место,
то прибор не будет работать.
2. Перед использованием: не вставляйте штепсель
в розетку, до тех пор, пока вы не установили чашу
блендера и крышку базы правильно.
3. После использования: достаньте штепсель из
розетки, перед тем как снять чашу блендера.
4. Н е з а п о л ня йт е ч а ш у ин гр ед и е н т а м и ,
температура которых выше 80 °С.
5. Для того чтобы предотвратить разбрызгивание не
переполняйте чашу.
6. Никогда не снимайте крышку, когда работает
блендер.
7. Внимание: всегда снимайте крышку, перед тем
как снять или установить чашу блендера.
8. Разовое вк л ю ч е н ие блендера не должно
превышать 3 минут.
P/11 P/12
Page 8

www.vitesse.ru
Функции:
Блендер можно использовать как для приготовления
супов пюре, так и для смешивания соусов, молочных
коктейлей, детского питания.
Как использовать блендер:
1. Снимите крышку базы Fig. 22.
2. Поставьте крышку на место и поверните ее против
часовой стрелки, пока она не зафиксируется Fig.
23.
3. Установите чашу блендера на ее место и
поверните ее по часовой стрелке до упора Fig. 24.
4. Добавьте нужные ингредиенты Fig. 24 - 25.
5. Установите стоппер с помощью нажатия на него.
6. Выберете нужную скорость.
Полезные советы:
1. Отверстие в крышке можно использовать для
добавления ингредиентов.
2. Иногда необходимо выключать блендер, для того
чтобы снять прилипшие к стенкам ингредиенты.
Выключите прибор и достаньте штепсель из розетки.
Снимите стоппер и крышку
Уберите прилипшие ингредиенты с помощью
лопатки.
УХОД И ЧИСТКА
1. Всегда доставайте штепсель из розетки, перед чисткой.
2. Протрите корпус с помощью влажной и мягкой ткани. Никогда не
погружайте корпус в воду.
3. Чаши и крышки можно мыть в теплой мыльной воде. Не мойте их в
посудомоечной машине.
4. Протрите лезвия, будьте осторожны.
5. Всегда мойте те части, которые контактируют с пищей.
6. Если ваш прибор внезапно остановился
• Достаньте штепсель из розетки.
• Поставьте регулятор скорости в положение «0».
• Подождите в течение 15 минут, пока не остынет прибор.
• Включите прибор.
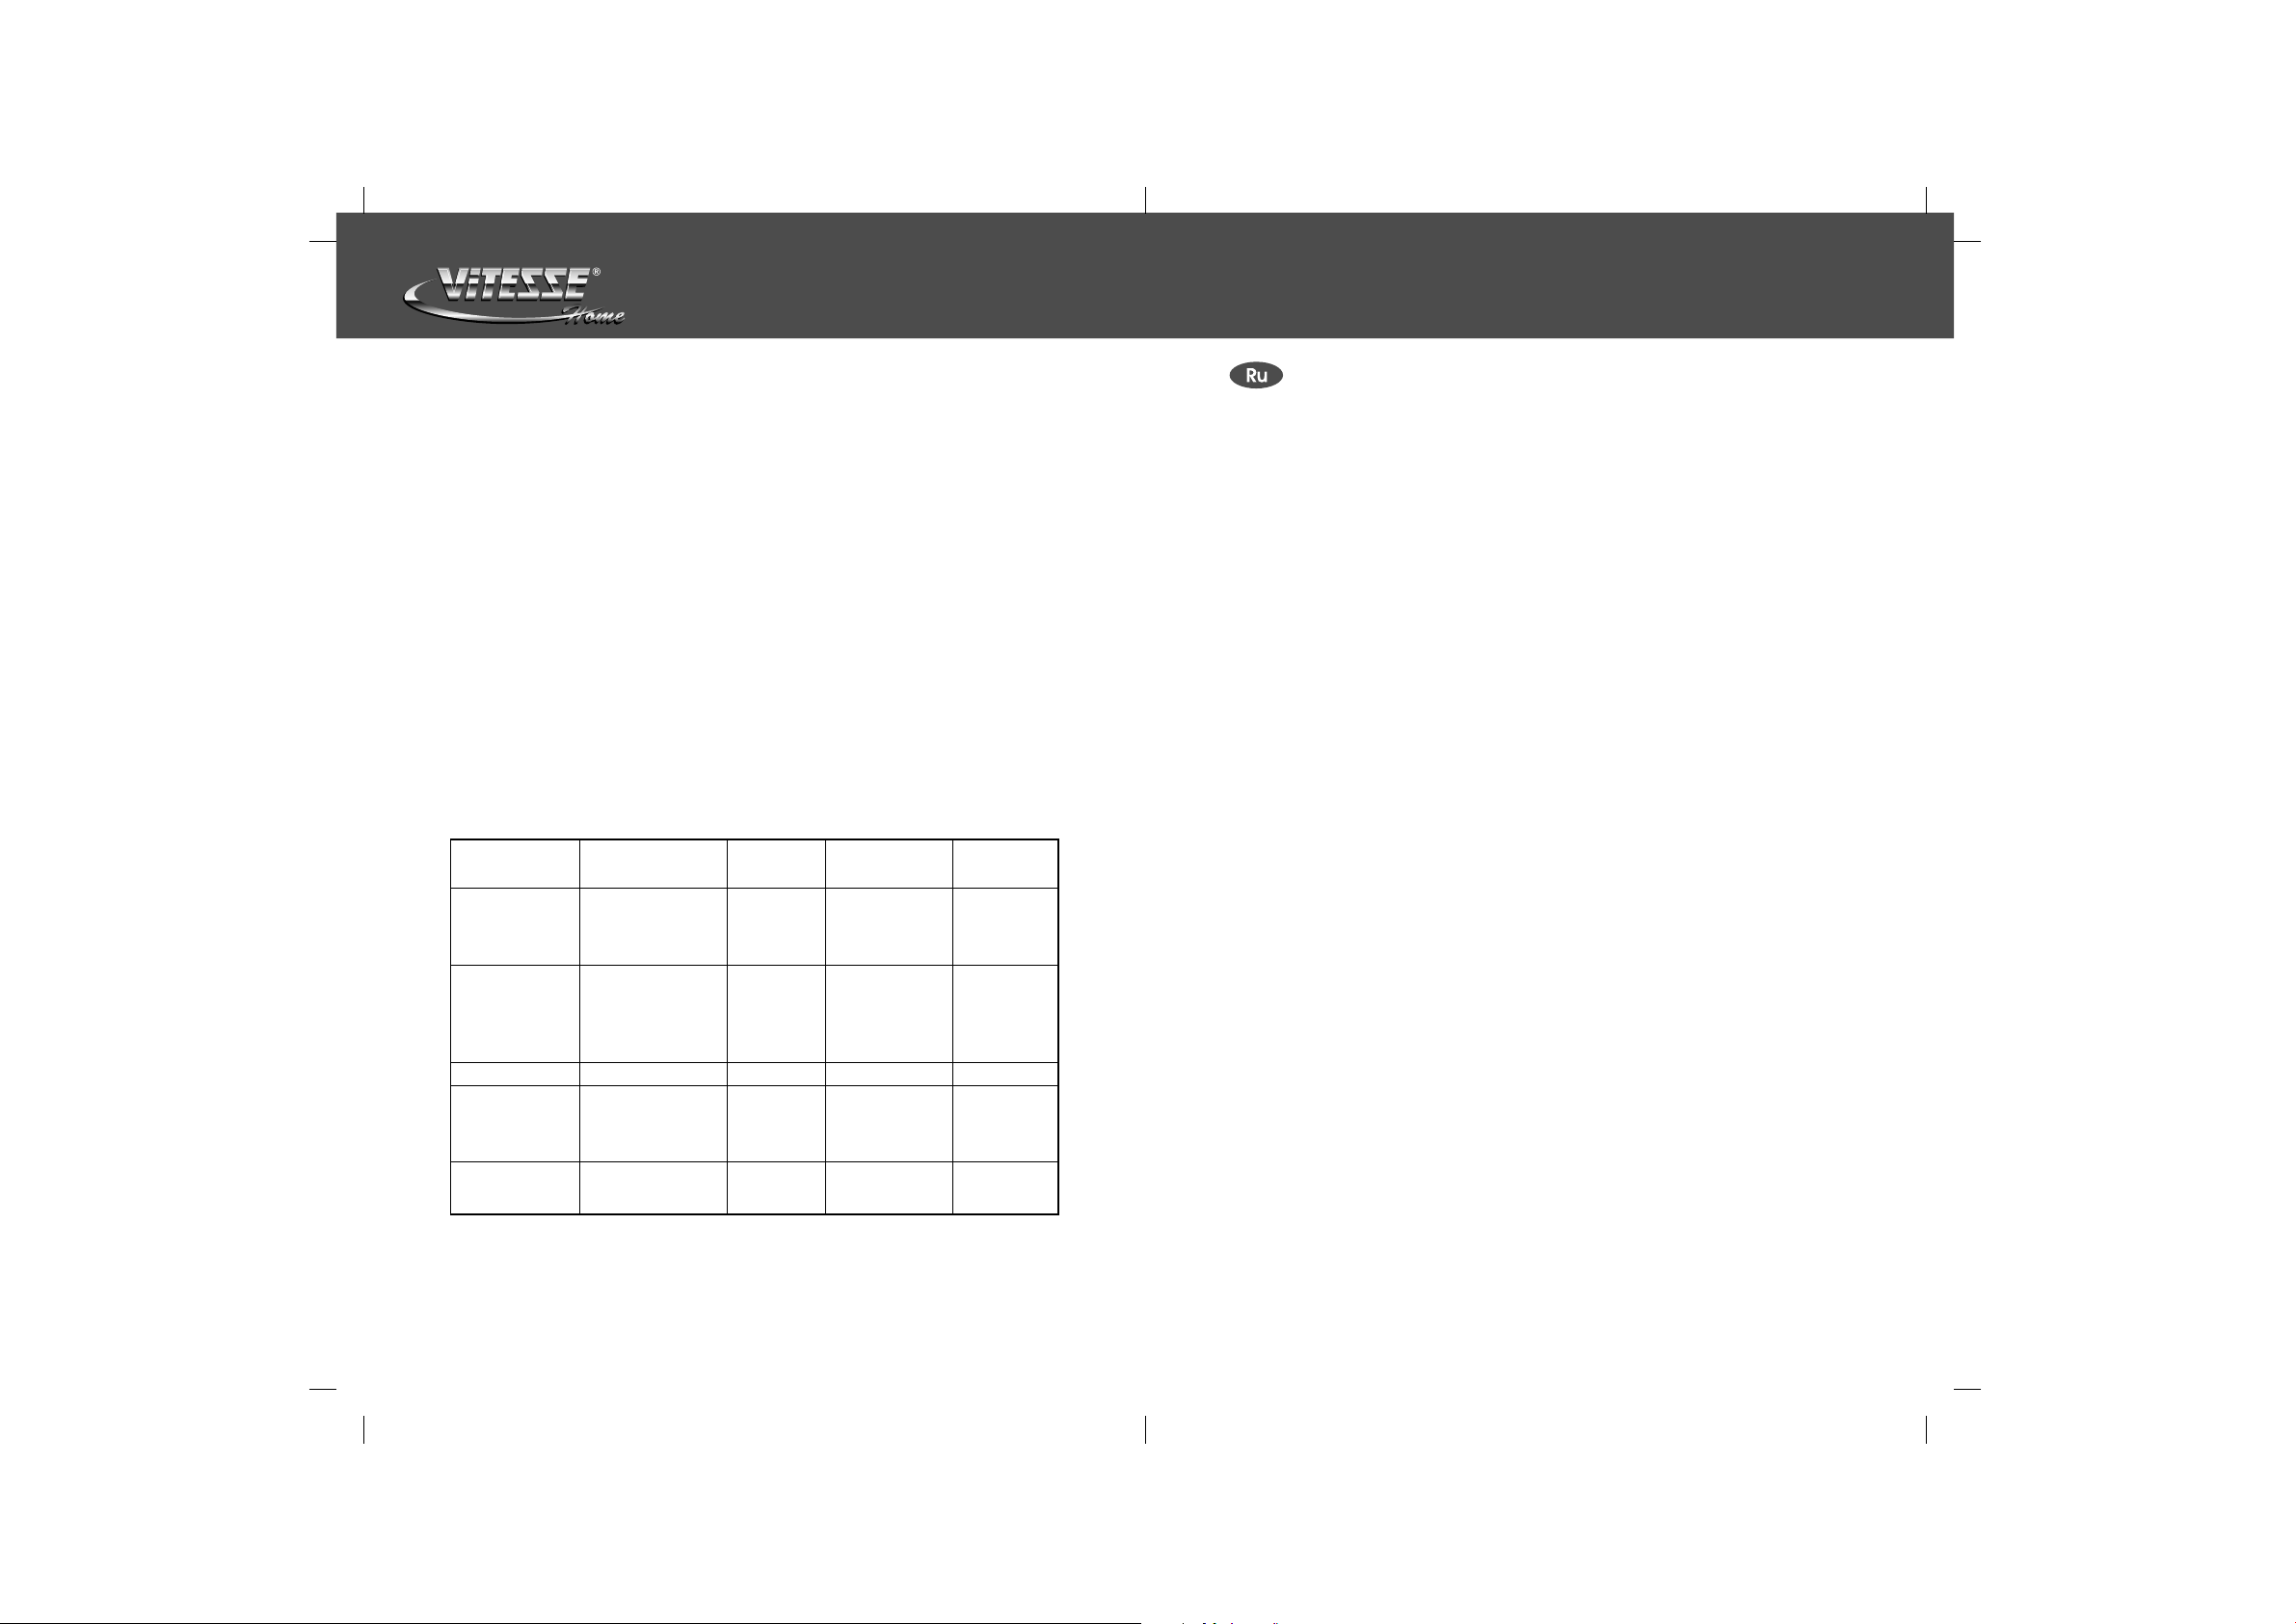
Таблица
Ингредиенты
Тесто для
хлеба
Яблоки,
морковь
Картофель
Ìÿñî, ðûáà
Максимальное
количество
700 ãð. Ìóêè
Пропорция: муки
è âîäû 100\60
500ãð
500ãð
500гр. Нарежьте
на маленькие
ломтики
Скорость
3
3
3
3
Принадлежности
Насадка для
смешивания теста
Крупная терка,
средняя терка,
диск для крупного
нарезания
ломтиками,
диск для среднего
нарезания
ломтиками
Насадка для
нарезания
картофеля
«S» образное
лезвие
Время
работы
60 секунд
30 секунд
P/13 P/14
 Loading...