

Page 1
NOU S VIVONS SAIN
We l iv e health y
MULTI-FOOD PROCESSOR
КУХОННЫЙ КОМБАЙН
“Vitesse France S.A.R.L”
91 rue du Faubourg Saint Honoreґ
75008 Paris-France
www.vitesse.ru
VS-202
Page 2

12
7
8
6
5
3
4
2
1
11
10
9
13
SAVE THESE INSTRUCTIONS!
www.vitesse.ru
Dear Customer!
OTHER CONSUMER SAFETY INFORMATION
THIS APPLIANCE IS INTENDED FOR HOUSEHOLD USE ONLY.
You have made an excellent decision. Vitesse® “Nouveau” home range offers
you an exclusive, high quality range of appliances for your ultimate home luxury
and healthy living.
Polarized Plug
This appliance has a polarized plug-one blade is wider than the other. As a
safety feature, this plug will fit into a polarized outlet only one way. If the plug
IMPORTANT SAFEGUARDS
does not fit fully into the outlet, reverse it and try again. If it still does not fit,
contact an electrician.
When using electrical appliances, basic safety precautions should always be
followed, including the following.
Do not attempt to defeat this safety feature.
• READ ALL INSTRUCTIONS. KEEP THESE INSTRUCTIONS FOR FUTURE
USE.
• To protect against risk of electrical shock, do not put base, cord, or plug in water
Bottom Cover
To reduce the risk of fire or electric shock, do not attempt to remove the bottom
cover. There are no user serviceable parts inside.
or other liquid.
• Close supervision is necessary when any appliance is used by or near children.
• Turn unit off and unplug from outlet when not in use, before putting on or taking
off parts, and before cleaning. To disconnect, turn unit off, remove the plug and
Before First Use
· When unpacking the product and removing packing material, handle the
Chopping Blade, and Slice/Shred Disc carefully; they are very sharp.
pull out from wall outlet.
• Avoid contacting moving parts.
• Do not operate any appliance with a damaged cord or plug or after the appliance
malfunctions, or has been damaged in any manner.
· Wash all parts except the Base in hot, soapy water. Rinse them dry. These
parts can also be placed in the dishwasher. Be sure to read this Use & Care
Book to learn the correct methods for taking the unit apart and cleaning.
• The use of attachments not recommended or sold by the appliance
manufacturer may cause fire, electric shock, or injury.
PARTS AND FEATURES
• Do not use outdoors.
• Do not let cord hang over edge of table or counter or touch hot surfaces.
• Keep hands and utensils away from moving blades or Discs while processing
food to prevent the possibility of severe personal injury or damage to the food
processor. A scraper may be used but must be used only when the food
processor is not running.
• Blades are sharp. Handle carefully.
• Do not touch the blades when inserting or removing the Chopping Blade and
Slice/Shred Disc.
• To avoid injury, never place Chopping Blade or Slice/Shred Disc on Base
without first putting Bowl properly in place. Make sure motor, Disc, and/or
Chopping Blade have stopped completely before removing cover.
• Be certain cover is securely locked in place before operating appliance.
• Never feed food into chute by hand. Always use Food Pusher.
• Do not operate this appliance in the presence of explosive and/or flammable
fumes.
• This appliance is intended for household use only, not for commercial or
industrial use.
• Do not attempt to change the cover interlock mechanism.
• Do not leave the appliance unattended while it is running.
Moving Parts. Keep fingers out of discharge opening.
1. Movable loop
2. Bowl Lid
3. Slice/Shred Disc
4. Disc Stem
5. Bowl
6. Center Post
7. Base
8. Control Panel
9. Food Chute Lid
10.
Food Chute
11.
Slide button
P/1 P/2
Page 3
1
2
PUSH
3
www.vitesse.ru
2
3
1
pulse
off
on
lock
u
n
l
o
c
k
2
1
3
1.pulse
- Pulse button must be pressed and held for unit to
operate. When released, unit will stop. Use PULSE
for short processing tasks, such as chopping nuts,
raw meats, or vegetables. This lets you check
processed results and control the consistency.
2.on
- When this button is pressed, unit runs continuously
until OFF button is pressed.
3.off
- Processor should always be left in OFF position
when not in use.
USING YOUR FOOD PROCESSOR
Do not attempt to chop ice in this food processor; it will damage the bowl and
Note:
dull the Chopping Blade. This unit will not whip cream, beat egg whites to a
desirable volume, grind coffee beans, spices or other items with high oil content,
or slice or shred hard-cooked eggs, marshmallows, or soft cheeses.
Important:
For your protection, this unit has an interlock system. The processor
will not operate unless the bowl is properly locked onto the base and cover is
properly locked onto the bowl. Do not attempt to operate the unit without the bowl
lid, bowl and food chute Lid correctly in place. Be sure base is on a flat, dry and
clean surface before you begin processing.
How to assemble the Bowl
Align the base and bowl as illustrated Fig. 1. Align the
Bowl
Base
bowl handle with the UNLOCK mark on the base. Turn
the bowl counterclockwise until it clicks onto the base.
The bowl handle should now align with the LOCK mark
on the base.
Note: There is only one position for the bowl to lock onto
the base. The unit will not operate if the bowl does not
lock onto the base.
Fig. 1
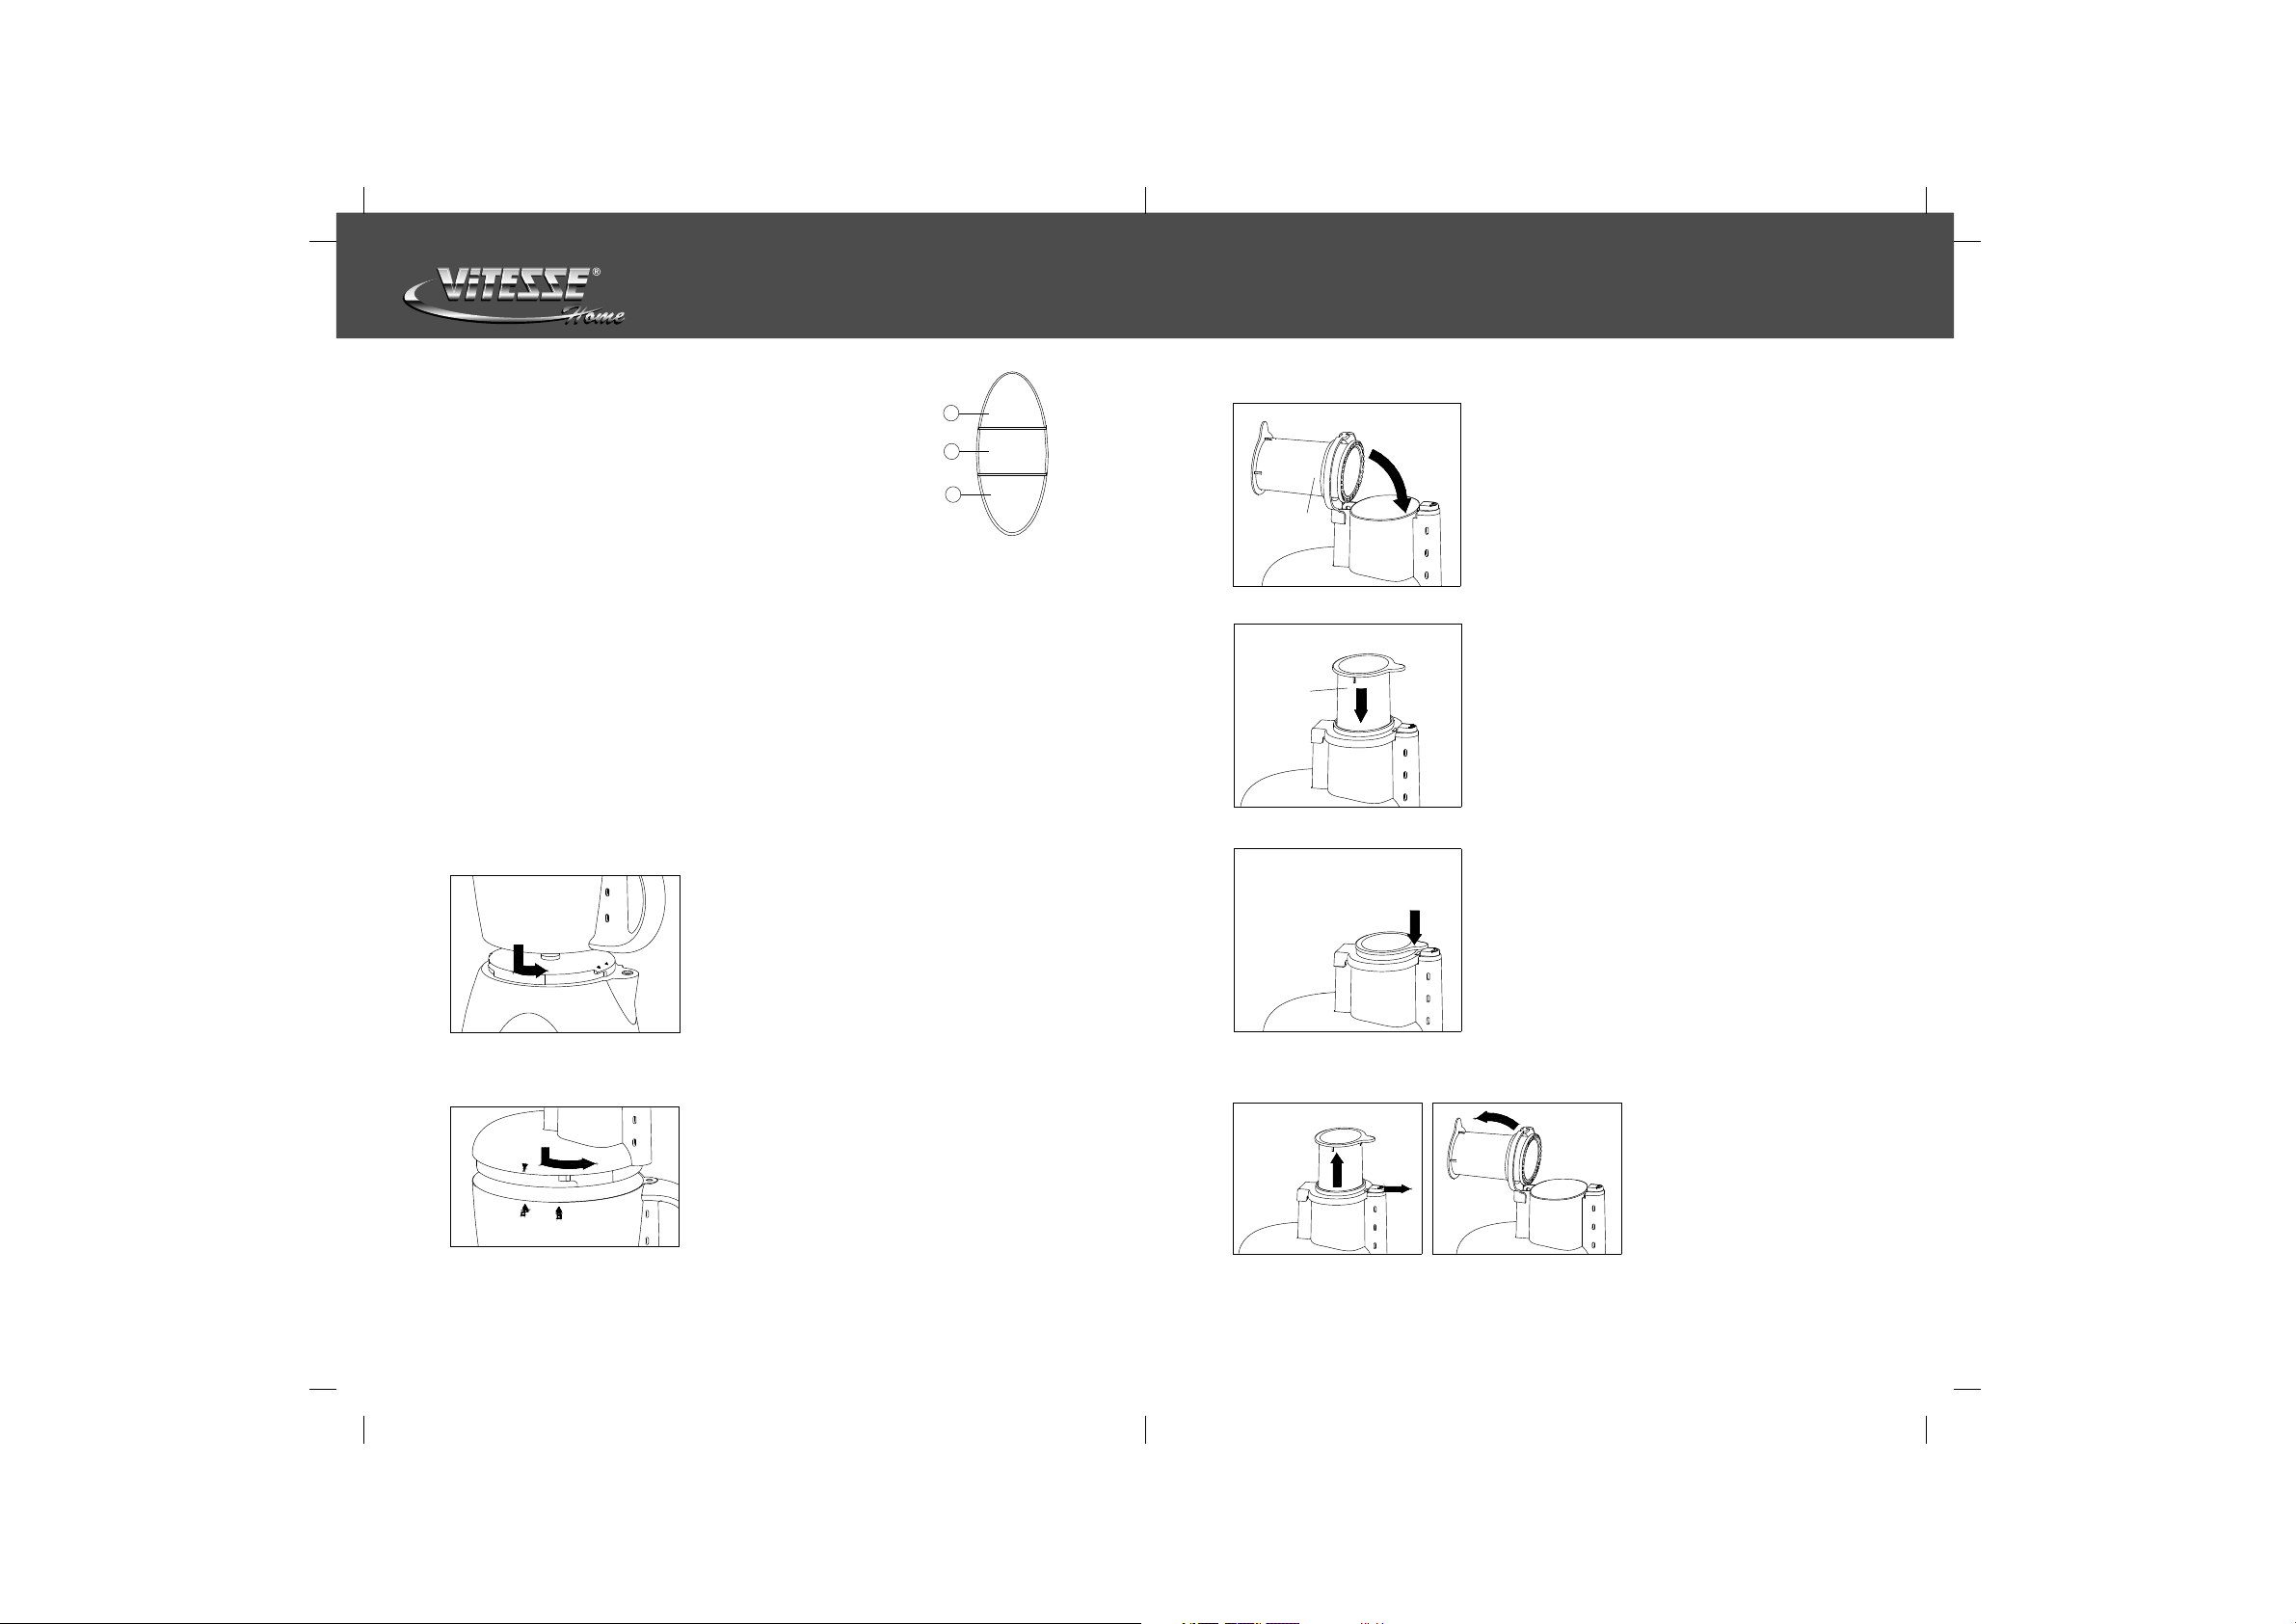
How to lock the Food Chute Lid
Grasp the removable loop; rotate the food chute lid to
make the removable loop fit into the food chute.
As illustrated in Fig. 3.
Food
chute lid
Fig. 3
Push down the Movable loop into the food chute.
As illustrated in the Fig. 4.
Movable
loop
Fig. 4
Push on the tab of Movable Loop to latch the Food
Chute lid onto the food chute.
As illustrated in Fig. 5.
Note: Unit will not operate if the food chute lid does not
latch onto the food chute.
Fig. 5
How to lock the Cover
Open the Food Chute Lid (see section below on “How
to open Food Chute Lid”). Place the cover onto the
bowl. Align the q mark on the cover and the UNLOCK
mark on the bowl (as illustrated in Fig. 2). Twist the
cover counter-clockwise towards LOCK until it clicks
onto the bowl. The q mark on the cover should now
align with the LOCK mark on the bowl.
Note: When cover is locked into position, the safety
Fig. 2
mechanism on the cover and bowl will align. The unit
How to Open the Food Chute Lid
1. Pull up the Movable Loop
2. Pull slide release button
out
3. Pull back the food chute lid
and Movable loop
Note: Before opening food
chute lid, turn the unit OFF
and unplug the cord.
Fig. 6 Fig. 7
will not operate if the cover is not locked onto bowl.
P/3 P/4
Page 4
www.vitesse.ru
PUSH
LOCK
LOCK
U
N
L
O
C
K
thin foods
PUSH
large foods
U
N
L
O
C
K
LOCK
Cent er
Post
Choppi ng
Bl ade
U
N
L
O
C
K
lock
HOW TO CHOP
Note: Make sure the unit is turned OFF and unplugged before use.
For best results: Cut food into 1 inch (2.5cm) pieces in advance.
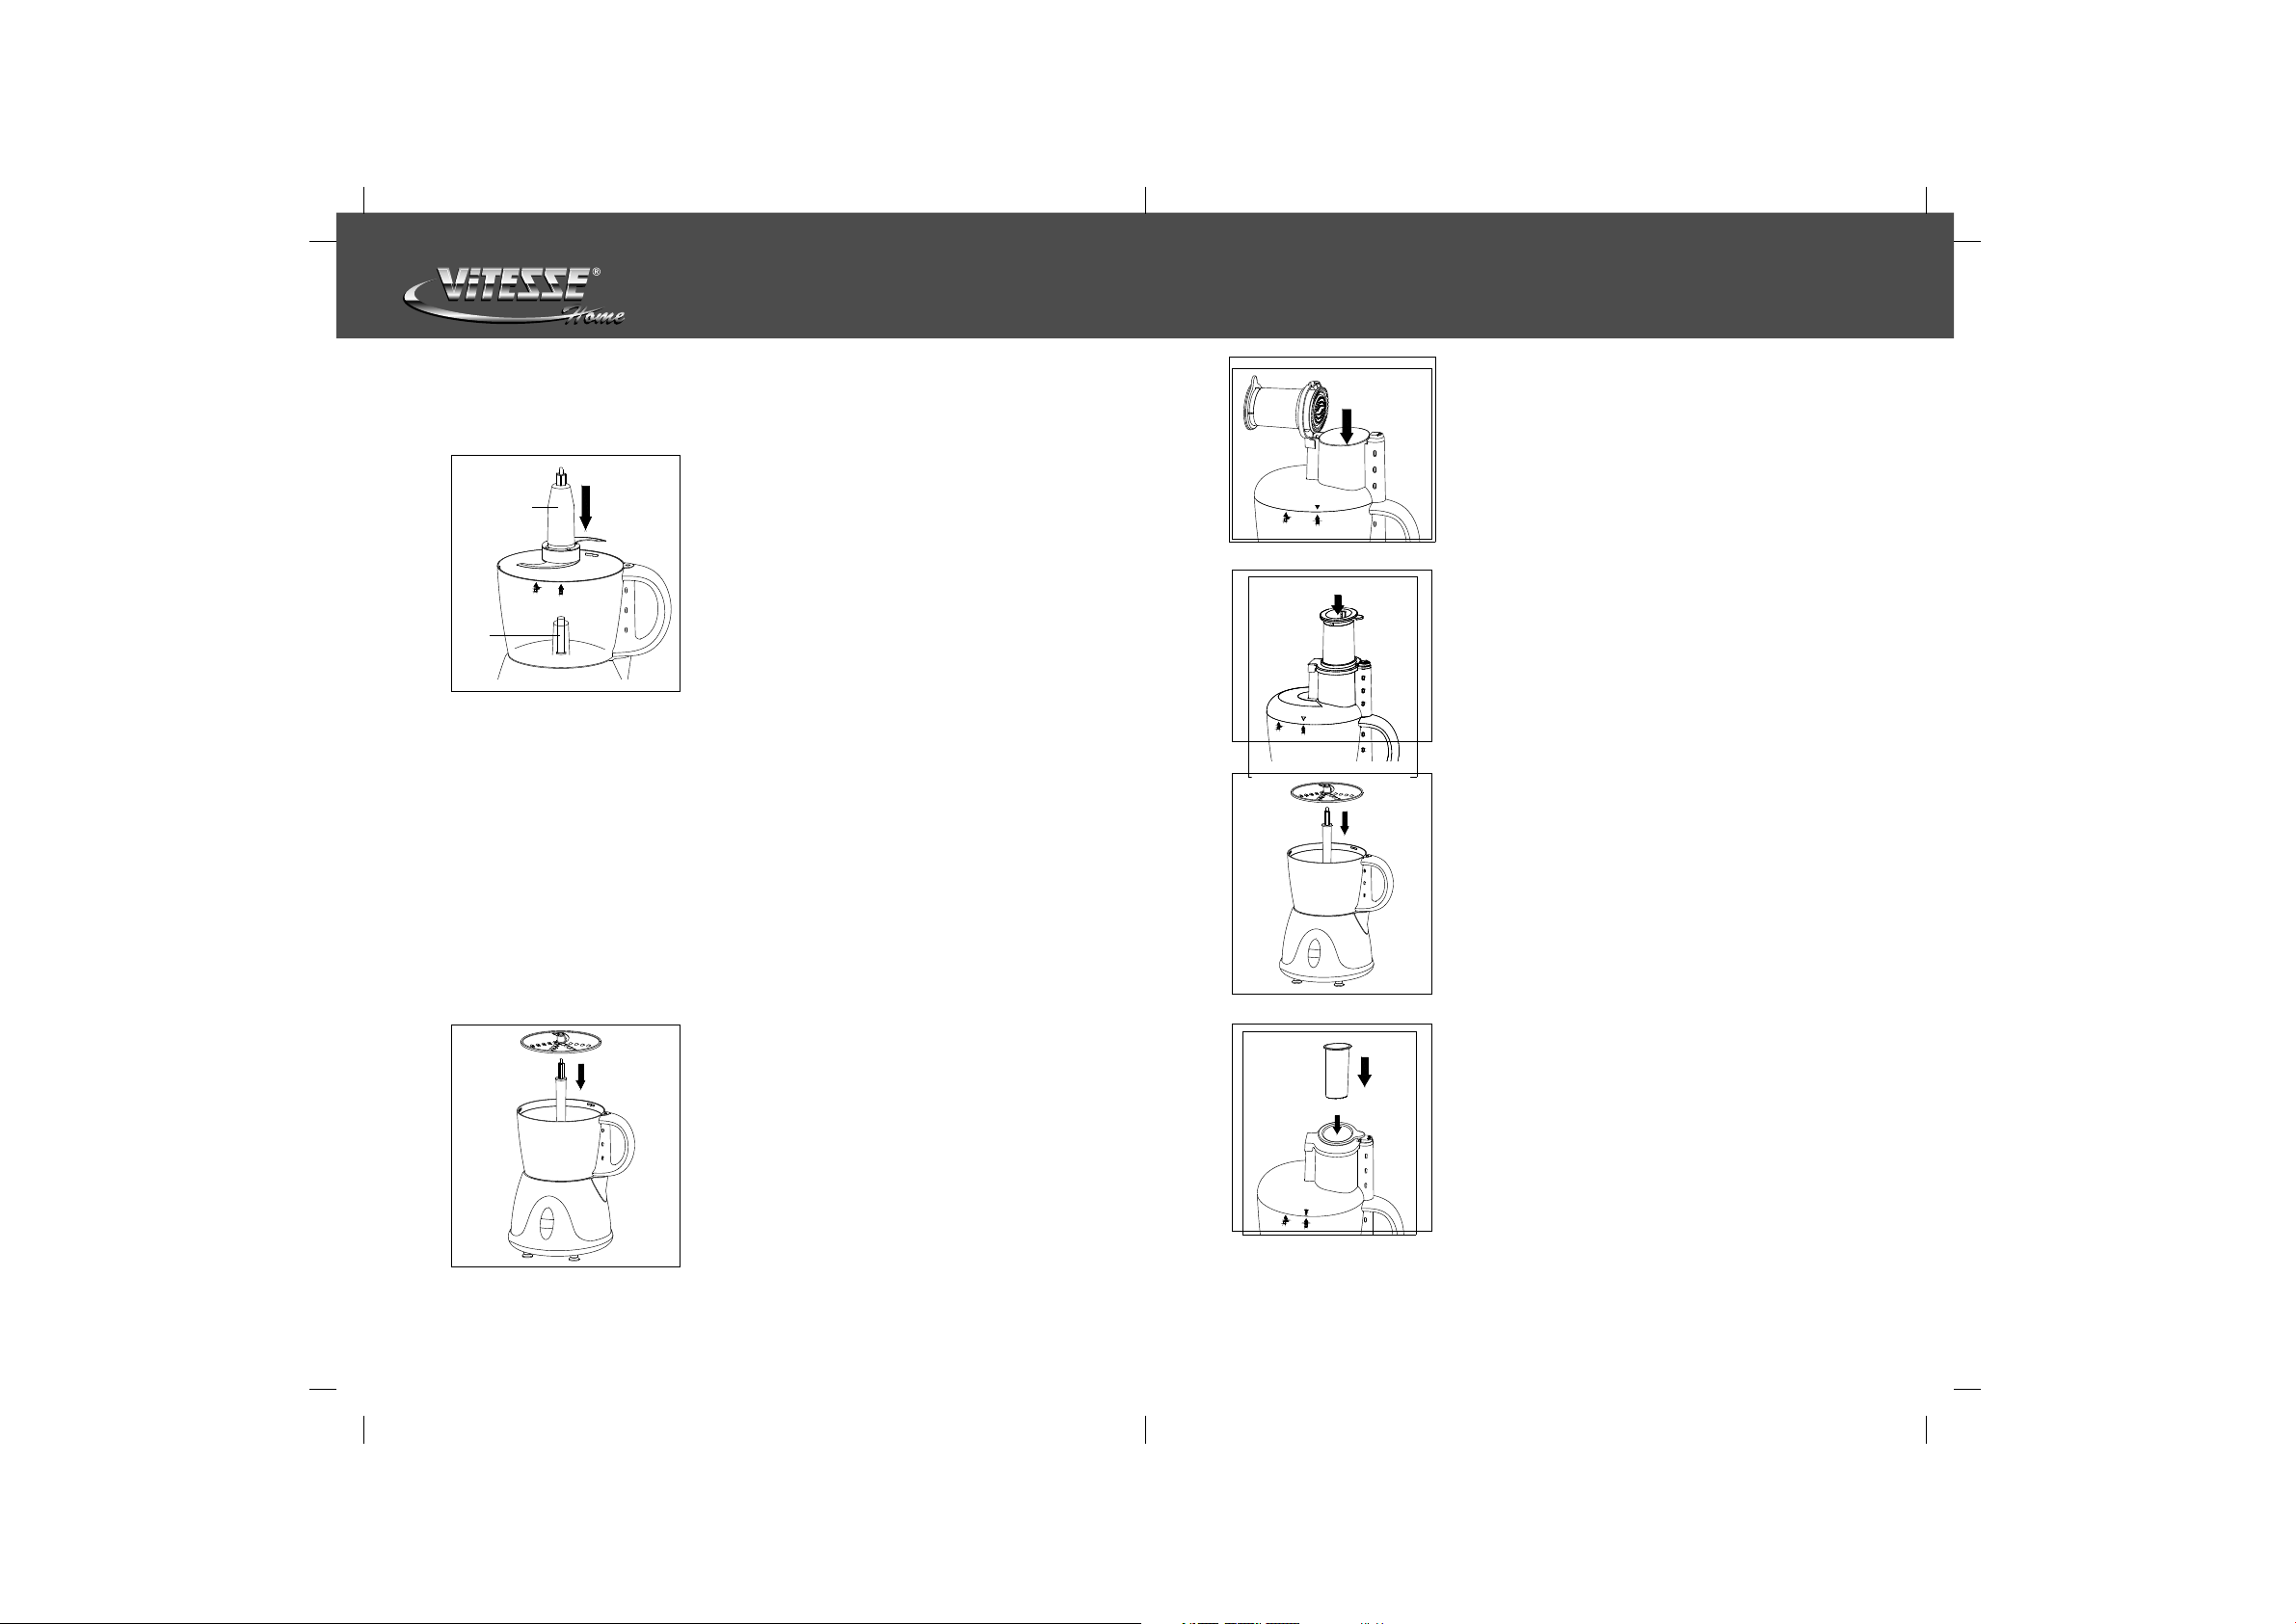
1. Lock the bowl onto base. (See “How to assemble the
bowl”)
Chopping
Blade
2. Grasp the chopping blade by its base and slide it
onto the center post. (Fig. 8)
3. Place food into bowl.
4. Lock cover onto bowl. (See “How to assemble the
cover”)
5. Lock the Food Chute Lid. (See “How to lock the food
chute lid”). Insert food pusher into Movable loop.
Center
Post
6. Plug the cord into an electric outlet. Use the Food
Guide to prepare food for chopping.
7. Press Pulse to run unit (or press ON for continuous
processing). When on pulse mode, hold the Pulse
position for about 2-3 seconds, check results, repeat
Fig. 8
if desired.
8. When finished processing, release the Pulse button, or if you were using continuous ON,
press OFF, allow the chopping blade to stop rotating.
9. Take out the food pusher and open the Food Chute Lid (see “How to open the Food
Chute Lid”). Twist the food chute and cover towards the unlock mark to remove.
10.Hold the Chopping Blade by its base and remove. Unlock the bowl by turning it clockwise
towards the UNLOCK mark, and lift off. Empty the processed food.
Note: Chopping Blade is very sharp, use caution when handling
HOW TO SLICE OR SHRED
Note: Make sure the unit is turned OFF and unplugged before use.
Never use hand to push food into processor. The use of heavy pressure will not
speed operation. Do not use the processor continuously for more than 3
minutes at a time; allow a rest period of 5 minutes between working cycles.
Process large food
1. Lock the bowl onto the base; see “How to assemble
the bowl”.
2. Slide the disc stem onto the center post of the base.
With the desired side facing up (slicing or shredding),
push the slice/shred disc onto the disc stem (Fig. 9).
Use caution when handling disc, blades are
extremely sharp.
3. Lock cover onto bowl; see “How to assemble the
Cover”.
Fig. 10
Fig. 11
Fig. 12
Fig. 13
4. Fill the food chute with large food such as large piece
of cabbage, green pepper, whole tomato (Fig. 10).
Lock the food chute lid. (See “How to lock the Food
Chute Lid”). Use the Food Guide to help you prepare
food for slice/shred processing.
5. Slide the food pusher into the Movable loop; plug the
cord into an electric outlet.
6. Firmly press the ON button, then press down lightly but
firmly on the food pusher. (Fig. 11)
7. When food chute is empty, press OFF, allow the disc to
stop rotating. Open the Food Chute Lid (See “How to
open the Food Chute Lid”). Twist the food chute/cover
towards the UNLOCK mark to remove the cover.
8. Carefully remove the Shredding Disc. Unlock the bowl
by turning it clockwise towards the UNLOCK mark,
and lift off. Empty the processed food.
Note: Shredding Disc is very sharp, use caution when
handling
Process long and thin food
1. Lock the bowl onto base; see “How to assemble the
bowl”.
2. Slide the disc stem onto the center post of the base.
With the desired side facing up (slicing or shredding),
push the slice/shred disc onto the disc stem (Fig. 12).
Use caution when handling disc, blades are extremely
sharp.
3. Lock cover onto bowl; see “How to assemble the
Cover”.
4. Lock the Food Chute Lid. (See “How to lock the food
chute lid”.)
5. Fill the Movable loop with long and thin food such as
potato, pepperoni, carrots, and celery. Insert food
pusher into Movable loop (Fig. 13).
6. Firmly press the ON speed button, then press down
lightly but firmly on food pusher.
7. When finished processing, press OFF, allow the disc
to stop rotating, open the Food Chute Lid. (See “How
to open the food chute lid”). Twist the food chute/cover
towards the UNLOCK mark to remove the cover.
8. Carefully remove the Shredding Disc. Unlock the bowl
by turning it clockwise towards the UNLOCK mark,
and lift off. Empty the processed food.
Note: Shredding Disc is very sharp, use caution when
handling
Fig. 9
Note: You must open the Food Chute Lid first before locking or opening the cover.
(See “How to open the food chute lid”)
P/6P/5
Page 5

www.vitesse.ru
Food Processing Tips/Liquids
1. Hot liquids (less than 80°C) and hot foods can be processed in the bowl.
2. Be sure to process small amounts of liquids-2 cups or less at a time. Larger
amounts may result leakage from the bowl.
Care & Cleaning
NOTE: Do not attempt to sharpen the cutting edges of the chopping blade or
the reversible disc. They are permanently sharpened at the factory and will be
ruined by attempted sharpening.
Cleaning
1. Before cleaning, be sure the unit is switched off and the cord is unplugged.
2. Whenever possible, rinse parts immediately after processing for easy cleanup.
3. Wipe the base, control knob, and feet with a damp cloth and dry thoroughly.
Stubborn spots can be removed by rubbing with a damp cloth and a mild, nonabrasive cleaner. Do not immerse the base in liquid.
4. All removable parts can be washed by hand or in a dishwasher, top rack.
- If washing by hand, wash in hot, sudsy water, rinse, and dry thoroughly. If
necessary, use a small nylon bristle brush to thoroughly clean the bowl and
food chute/cover, this type of brush will also help prevent cutting yourself on
the chopping blade and slice/shred disc.
- If washing in a dishwasher, place removable parts on the top rack only-not in
or near the utensil basket.
5. Do not use rough scouring pads or cleansers on any plastic or metal parts.
6. Do not fill the bowl with boiling water or place any of the parts in boiling water.
Some foods, such as carrots, may temporarily stain the bowl. To remove
stains, make a paste of 2 tablespoons (30ml) baking soda and 1 tablespoon
(15ml) warm water. Apply the paste to the stains and rub with a cloth. Rinse in
water and dry.
CRANBERRIES,
MINCED
EGGS, CHOPPED
GARLIC, MINCED
MEAT,CHOPPED
(RAW OR COOKED)
MUSHROOMS,
CHOPPED
NUTS, CHOPPED
ONIONS, CHOPPED
PARMESAN OR
ROMANO CHEESE,
GRATED
PARSLEY,
CHOPPED
3 cups
(750ml)
Up to 12
Up to 12
Up to 2.5
cups (600ml)
Up to 12
medium
2 cups (300ml)
Up to 2 large
Up to 1-1/2
cups (375ml)
Up to 2 cups
(500ml)
Pulse to chop to desired fineness. Can also add
sugar to make cranberry relish.
Peel, dry and halve hard-cooked eggs. Add to
Bowl. Pulse to chop, checking fineness after 4-5
pulses.
Be sure bowl is dry. Drop clove(s) down food
chute while unit is running.
Cut the meat into 1”(2.54cm) cubes. Add to bowl
and pulse to chop.
Halve large ones and add to Bowl. Pulse to
desired fineness.
Add to Bowl and pulse to chop.
Quarter, and add to bowl. Pulse 1 or 2 times to
coarsely chop. For green onions, up to 2 cups
(500ml) cut into 1” (2.54cm) pieces.
Allow cheese to reach room temperature. Cut
into 1”(2.54cm) cubes. Add to bowl and pulse to
coarse chop; process continuously to finely
grate.
Add to Bowl and Pulse to chop to desired
fineness, abort 10-15 seconds Process other
herbs in same manner (basil, cilantro,
mint).
BABY FOOD
BREAD CRUMBS
COOKIE/CRACKER
CRUMBS
CHOPPING GUIDE
AMOUNTFOOD
Up to 4 cups
(1000ml)
Up to 5 slices
Up to 5 cups
(1250ml)
PEPPER, GREEN, RED,
YELLOW CHOPPED
DIRECTIONS
Add up to 4 cups(1000ml) cooked vegetables
and/or meat to Bowl, along with 1/4 cup(60ml)
liquid per cup of solid food, Process
continuously to desired fineness.
Cut either fresh or dry bread slices into1 1/2-2
inch (3.75 & 5cm) pieces. Add to Bowl and
process to fine crumbs.
Use for crumbing graham crackers, chocolate or
vanilla wafers. Break larger crackers into 1 1/2-2
inch (3.75 & 5cm) pieces. Add to Bowl and
process until fine.
P/7 P/8
SOUPS, PUREED
OR CREAMED
SQUASH
(BUTTERNUT),
PUMPKIN OR SWEET
POTATOES PUREED
STRAWBERRIES,
PUREED
TOMATOES,
CHOPPED
Up to 1
pepper
2 cups
(500ml)
Up to 5 cups
(1250ml),
1”(2.54cm)
cubes
2 cups
(500ml)
4 medium
Cut into 1”(2.54cm) pieces. Add to bowl and
pulse to chop.
Add up to 2 cups hot(less than 80 ) vegetable
soup for pureeing and creaming. Process to
desired smoothness
Add 1/4 cup(60ml) of cooking liquid per cup of
food. Pulse to finely chop then process
continuously to puree.
Hull and halve large berries. Add to bowl and
pulse to chop. Process continuously to
puree.
Quarter tomatoes. Add up to 4 and pulse to
desired size.
°C
Page 6

www.vitesse.ru
FOOD
CABBAGE
CARROTS
CHEESE,
CHEDDAR
CHEESE,
MOZZARELLA
FOOD
APPLE
CABBAGE/LETTUC
E
CARROTS
CELERY
CUCUMBER
MUSHROOMS
ONIONS
PEACHES/PEARS
PEPPERS, GREEN,
RED, YELLOW
ETC.
PEPPERONI
POTATOES
STRAWBERRIES
TOMATOES
CHOPPING GUIDE
DIRECTIONS
Use shredding disc for very fine cabbage or slaw. Cut into pieces
to fit chute. Shred using light pressure. Empty Bowl as cabbage
reaches disc.
Position in chute and shred.
Cheese must be well chilled. Cut to fit chute.
Cut to fit chute. Cheese must be chilled in freezer for 30 minutes
prior to shredding. Use light pressure.
Cut to fit chute.
SLICING GUIDE
DIRECTIONS
Halve and stack horizontally in chute. Use firm pressure.
Halve head, Cut to fit chute.
Cut to fit chute.
Remove string. Pack chute for best results.
Cut to fit chute if necessary.
Stack chute with mushrooms on their sides for lengthwise
slices.
Halve and fill chute, positioning onions upright for coarsely
chopped results.
Halve and core. Position upright in chute and slice using light
pressure.
Halve and seed. Fit pepper up bottom of chute, squeezing slightly
to fit if necessary. Cut large ones into quarters or strips,
depending on desired results. Slice using moderate pressure.
Cut into 3” (8cm) lengths. Remove inedible casing.
Peel if desired. Position in chute, cutting large potatoes in
halves.
Hull. Arrange berries on their sides for lengthwise slices.
Use small tomatoes for whole slices, halve if necessary. Use
gentle, but firm pressure.
Peel. Cut turnips to fit chute.
Уважаемые покупатели! Вы приняли блестящее решение!
Фирма Vitesse® “Nouveau” предлагает Вам гамму эксклюзивных
высококачественных приборов для несомненно роскошного и здорового
образа жизни.
ТЕХНИКА БЕЗОПАСНОСТИ
При использовании любого электроприбора необходимо соблюдать
правила техники безопасности. Будьте особенно внимательны к ниже
указанным пунктам.
• ПЕРЕД ПЕРВЫМ ИСПОЛЬЗОВАНИЕМ ПРИБОРА ВНИМАТЕЛЬНО
ПРОЧИТАЙТЕ РУКОВОДСТВО ПО ЭКСПЛУАТАЦИИ. СОХРАНИТЕ
РУКОВОДСТВО ДЛЯ ДАЛЬНЕЙШИХ КОНСУЛЬТАЦИЙ.
• Во избежание поражения электрическим током, не погружайте базу
кухонного комбайна, шнур питания и штепсельную вилку в воду или
другую жидкость.
• Будьте особенно внимательны, если вблизи прибора находятся дети.
• Выключите и отсоедините прибор от электросети, после использования,
при сборке или разборке комплектующих частей, а также перед чисткой.
• Не касайтесь движущихся частей кухонного комбайна.
• Не используйте прибор с поврежденным шнуром питания или
штепсельной вилкой, а также любыми другими неисправностями.
• Для безопасной работы используйте комплектующие и приспособления,
рекомендованные производителем.
• Не следует применять кухонный комбайн вне помещения.
• Следите за тем, чтобы кабель питания не свисал с края стола и не
касался горячих поверхностей.
• Во время эксплуатации держите руки и посуду вдали от движущихся
ножей и дисков, во избежание сложного травмирования или
повреждения кухонного комбайна. Скребок можно использовать, только
кода прибор выключен.
• Все острия ножей очень острые. Будьте осторожны.
• Не касайтесь режущих поверхностей, когда вставляете или снимаете
дисковые насадки.
• Во избежание травмирования, не помещайте нож для измельчения или
дисковые насадки для нарезки или шинкования на базе прибора, если
чаша не установлена должным образом. Перед тем, как открывать
крышку, убедитесь, что все движущиеся детали полностью
остановились.
• Перед эксплуатацией прибора проверьте, чтобы крышка была плотно
закрыта.
• Не загружайте продукты в желоб руками. Используйте для этого
толкатель.
• Не п ри м е н я й т е у с т ро й с т в о в бл из и в з р ы в о о п а с ны х и
легковоспламеняющихся веществ (газов).
• Этот прибор предназначен для использования в домашних условиях.
• Не пытайтесь изменить механизм блокировки крышки.
• Не следует оставлять кухонный комбайн без наблюдения во время
эксплуатации.
• Осторожно! Движущиеся детали. Держите пальцы вдали от отверстия
для заполнения.
P/9 P/10
Page 7

12
7
8
6
5
3
4
2
1
11
10
9
13
www.vitesse.ru
2
3
1
pulse
off
on
ДОПОЛНИТЕЛЬНАЯ ИНФОРМАЦИЯ ПО ТЕХНИКЕ БЕЗОПАСНОСТИ
П Р И Б О Р П Р Е Д Н А З Н А Ч Е Н Т ОЛ Ь К О Д Л Я Д О М А Ш Н Е ГО
ИСПОЛЬЗОВАНИЯ.
1. PULSE/
Имульсный
режим
- К н о п к а « И м п у л ь с н о г о р е ж и м а »
предназначена для приведения в действие
прибора . Выключая эт у кн о п ку, Вы
прерываете работу кухонного комбайна.
Полярная вилка
В целях безопасности прибор оснащен штепсельной вилкой
соответствующей требованиям евростандарта, совместимой только с
евро-розеткой.
Режим PULSE, функцию кратковременного
включения следует использовать для легкой
о б р а б о т ки п ро д у к т о в , н ап р и м е р ,
измельчения орехов, перемалывание сырого
мяса или овощей. Данный режим позволяет
Не следует игнорировать эту характеристику безопасности.
Нижняя крышка
Во избежание риска пожара или поражения электрическим током, не
снимайте нижнюю крышку.
2. on/Вкл.
проверять результаты обработки, а также
контролировать состояние продуктов.
- Кнопка предназначена для длительной
эксплуатации прибора. В данном режиме
кухонный комбайн работает до тех пор,
пока не будет выключен с помощью кнопки
Перед первым использованием
· При распаковке прибора, снимая упаковочные материалы, будьте
осторожны с насадкой для измельчения и дисками для нарезки и
3. off/Выкл.
OFF/Выкл.
- После использования прибора, нажмите
кнопку OFF/Выкл, чтобы выключить прибор
шинкования. Режущие поверхности очень острые.
· Вымойте все детали, кроме базы прибора в горячей мыльной воде.
ЭКСПЛУТАЦИЯ
Вытрите насухо. Все части комбайна пригодны также для мытья в
посудомоечной машине. Внимательно изучите правильные методы
разборки и чистки прибора, описанные в данном руководстве по
эксплуатации и уходу.
Внимание:
чашу и затупит нож для измельчения. Данный кухонный комбайн не
взбивает сливки или яичные белки до желаемого объема, не перемалывает
Не следует измельчать лед в данном приборе; это повредит
кофейные зерна, специи или другие продукты с высоким содержанием
ОПИСАНИЕ
масла, также не нарезает ломтиками и не измельчает на круто сваренные
яйца, зефир или мягкий сыр.
1. Съемное крепежное
С целью безопасности, прибор оснащен системой блокировки.
кольцо
2. Крышка чаши
3. Диск для нарезки/
шинкования
4. Кронштейн для дисков
5. Чашa
Важно:
Поэтому комбайн не будет работать, пока чаша не зафиксирована на базе
должным образом, а крышка прочно не закрыта. Не используйте устройство,
если крышка чаши, чаша и крышка желоба для продуктов правильно не
установлены. Перед эксплуатацией устанавливайте базу прибора на
ровной, сухой и чистой поверхности.
6. Привод кронштейна
дисков
Установка чаши
7. База
8. Панель управления
9. Крышка желоба для
продуктов
10. Желоб
для продуктов
11. Кнопка
фиксирования
12. Насадка
для измельчения
13.
Чашa
База
Установите чашу на базе, как показано на Рис.1.
Сопоставьте ручку чаши с отметкой UNLOCK на
базе. Поворачивайте чашу против часовой стрелки,
пока она не зафиксируется. Убедитесь, что ручка
чаши совпадает с отметкой LOCK на базе.
Внимание: Только эта позиция, указывает, что чаша
правильно зафиксирована на базе. В случае, если
чаша не зафиксирована, прибор не будет работать.
Рис. 1
P/11 P/12
Page 8

www.vitesse.ru
1
2
PUSH
3
2
1
3
lock
u
n
l
o
c
k
Cent er
Post
Choppi ng
Bl ade
U
N
L
O
C
K
lock
Как правильно закрывать крышку
Откройте крышку желоба (смотрите раздел « Как
открывать крышку желоба для продуктов»).
Установите крышку на чаше. Сопоставьте отметку
q на крышке с отметкой UNLOCK на чаше
(смотрите Рис. 2). Поворачивайте крышку против
часовой стрелки в направлении отметки LOCK,
пока не прозвучит щелчок. Крышка закрыта
правильно, если отметка q на крышке совпадает с
отметкой LOCK на чаше.
Рис. 2
Внимание: Предохранительный механизм на
крышке и чаше настроен в том случае, если крышка
установлена правильно.
Как правильно закрывать крышку желоба для продуктов
Чтобы установить съемное крепежное кольцо в
отверстие желоба для продуктов, возьмитесь за
съемное крепежное кольцо и поверните крышку
желоба. Как показано на Рис. 3.
Крышка
желоба для
продуктов
Рис. 3
Протолкните съемное крепежное кольцо в желоб
для продуктов. Смотрите Рис.4.
Съемное
крепежное
кольцо
Рис. 4
Чтобы зафиксировать крышку желоба, нажмите на
ушко съемного крепежного кольца.
Смотрите Рис. 5.
Внимание: Прибор не будет работать, если крышка
желоба не закрыта правильно.
Как открывать крышку желоба для продуктов
1. Выньте съемное крепежное
кольцо.
2. Плавно нажмите пусковую
кнопку.
3. Откройте крышку желоба
в м е с т е с о с ъ е м н ы м
крепежным кольцом.
Рис. 6 Рис. 7
Внимание: Перед тем к ак
открывать крышку желоба,
в ы к л ю ч и т е п р и б о р и
отсоедините от электросети.
ИЗМЕЛЬЧЕНИЕ
Внимание: Перед использованием убедитесь, что прибор выключен и
отсоединен от электросети.
Для достижения наилучших результатов: Предварительно нарежьте
продукты кусочками по 2.5см.
1. Установите чашу на базе (смотрите раздел
“Установка чаши”)
Chopping
Blade
Center
Post
7. Подключите прибор к электросети. Перед приготовлением продуктов для
обработки, прочитайте «Рекомендации по измельчению продуктов».
8. Когда закончили измельчение, нажмите кнопку «Импульсного режима», или, если
была нажата кнопка ON/Вкл и использовалась длительная обработка, нажмите
кнопку OFF\Выкл. Подождите, пока нож для измельчения перестанет вращаться.
9. Выньте толкатель и откройте крышку желоба (смотрите раздел “Как правильно
открывать крышку желоба для продуктов”). Поверните крышку вместе с
крепежным кольцом в направлении отметки unlock.
10.Выньте режущую насадку, держа за основание. Затем поверните чашу по часовой
стрелке в направлении отметки UNLOCK и снимите ее. Пересыпьте измельченные
продукты.
Внимание: Будьте осторожны! Нож для измельчения очень острый.
2. Возьмите за основание нож для измельчения и
плавно протолкните. (Рис. 8)
3. Загрузите продукты в чашу.
4. Закройте крышку чаши (смотрите раздел
“Установка крышки”).
5. Зафиксируйте крышку желоба для продуктов
(смотрите раздел “Как правильно закрывать
крышку желоба для продуктов”). Вставьте
толкатель в съемное крепежное кольцо.
6. Чтобы привести в действие прибор, нажмите
кнопку «Импульсного режима» (или кнопку
ON/Вк л д л я длител ь н о го пр о ц е с с а ) . В
Рис. 8
«Импульсном режиме» прибор должен работать
2-3 минуты. Затем проверьте результат. Если
есть необходимость, повторите действие еще
раз.
Рис. 5
P/13 P/14
Page 9

www.vitesse.ru
PUSH
LOCK
LOCK
U
N
L
O
C
K
thin foods
PUSH
large foods
U
N
L
O
C
K
LOCK
НАРЕЗКА ИЛИ ШИНКОВАНИЕ
Внимание: Перед использованием убедитесь, что прибор выключен и
отсоединен от сети.
Не загружайте продукты в кухонный комбайн руками. Помните, используя
сильное давление, Вы не ускорите процесс. Максимальное время
непрерывной эксплуатации устройства 3 минуты. После каждого цикла
работы, позвольте прибору остыть на протяжении 5 минут.
Обработка больших кусков продуктов
1. Зафиксируйте чашу на базе; смотрите раздел
“Установка чаши”.
2. Плавно насадите кронштейн для дисков на
привод. Определив, какая функция будет
использоваться (нарезка или шинкование),
установите соответственно диск для нарезки или
ши нкова ния ( Рис. 9). Будьте ост орож ны,
устанавливая дисковые насадки, лезвия ножей
очень острые.
3. Зафиксируйте крышку на чаше; смотрите раздел
«Установка крышки».
Рис. 9
Рис. 10
Рис. 11
4. Наполните желоб продуктами, такими как большие
куски капусты, зеленого перца, или целый помидор
(Рис. 10). Закройте крышку желоба (смотрите
раздел «Как правильно закрывать крышку желоба
для продукто в » ) . Перед приго товление м
пр од у к т ов д л я о бр аб от к и , п ро ч ит ай те
«Рекомендации по нарезке или шинкованию
продуктов».
5. Вставьте толкатель в съемное крепежное кольцо;
подключите прибор к электросети.
6. Нажмите сильно кнопку ON/ Вкл , затем ослабьте
нажим, и сильно нажмите на толкатель (Рис. 11).
7. Когда опустошите желоб для продуктов, нажмите
кнопку OFF/ Выкл, и подождите, пока диск
перестанет вращаться. Чтобы открыть крышку
желоба, поверните ее в направлении отметки
UNLOCK (смотрите раздел «Как правильно
открывать крышку желоба для продуктов»).
8. Осторожно выньте диск для нарезки. Затем
поверните чашу по часовой стрелке в направлении
отметки UNLOCK и снимите ее. Пересыпьте
нарезанные продукты.
Обработка длинных и тонких кусков продуктов
1. Установите чашу на базе; смотрите раздел
“Установка чаши”.
2. Плавно насадите кронштейн для дисков на
привод. Определив, какая функция будет
использоваться (нарезка или шинкование),
установите соответственно диск для нарезки или
шинкования (Рис. 12). Будьте осторожны,
устанавливая дисковые насадки, лезвия ножей
очень острые.
3. Зафиксируйте крышку желоба; смотрите раздел
«Как правильно закрывать крышку желоба для
Рис. 12
продуктов».
4. Наполните съемное крепежное кольцо длинными
и тонкими кусками продуктов, таких как картошка,
пепперони, морковь, или сельдереи. Вставьте
толкатель в съемное крепежное кольцо (Рис. 13).
5. Нажмите сильно кнопку ON/ Вкл, затем ослабьте
нажим, и сильно нажмите на толкатель.
6. Когда закончите нарезку продуктов, нажмите
кнопку OFF/ Выкл, подождите, пока диск
перестанет вращаться и откройте крышку желоба.
Чтобы открыть крышку желоба, поверните ее в
направлении отметки UNLOCK (смотрите раздел
«Как правильно открыть крышку желоба для
Рис. 13
продуктов»).
8. Осторожно выньте дисковую насадку для нарезки.
Затем поверните чашу по часовой стрелке в
направлении отметки UNLOCK и снимите ее.
Пересыпьте нарезанные продукты.
Вним а н и е : Буд ьт е осто р о ж н ы ! Диск д л я
шинкования продуктов очень острый.
Внимание: Перед тем как закрывать или открывать крышку прибора,
следует предварительно открыть крышку желоба для продуктов (смотрите
раздел «Как правильно открывать крышку желоба для продуктов).
Взбивание жидкости
1. Горячие жидкости (температура не должна превышать 80°C) и горячие
продукты можно взбивать в чаше.
2. Заполнять чашу следует небольшим количеством жидкости максимум 2
чашки за один раз. При взбивании большего количества, жидкость может
выливаться.
Уход и чистка
Внимание:
Не следует точить режущую кромку ножа для измельчения или
реверсивный диск. Они хорошо заточены при производстве и последующие
попытки точить приведут к повреждениям.
P/15 P/16
Page 10

www.vitesse.ru
Чистка
1. Перед чисткой убедитесь, что прибор выключен и отсоединен от
электросети.
2. По возможности прополощите детали сразу после эксплуатации.
3. Протрите базу, кнопку управления и ножки кухонного комбайна влажной
тканью и тщательно просушите. Несмываемые пятна, удалите при
помощи влажной ткани с небольшим количеством мягкого неабразивного
средства для чистки. Не погружайте базу прибора в воду или другую
жидкость.
4. Все съемные детали вымойте вручную или в посудомоечной машине.
- Если моете детали руками, используйте горячую, мыльную воду.
Затем прополощите и тщательно просушите. В случаe необходимости,
очистите чашу, и желоб для продуктов/крышку маленькой
полиамидной щеткой. Такой тип щетки также обезопасит от порезов
ножами.
- Если моете кухонный комбайн в посудомоечной машине, помещайте
съемные детали только на верхней полке, таким образом, чтобы они
находились вдали от корзины для посуды.
5. Не используйте жесткие губки, средства для чистки или любые другие
пластмассовые или металлические предметы.
6. Не наполняйте чашу кипящей водой, а также не помещайте съемные
части в кипящую воду во время чистки. Такие продукты как морковь могут
временно окрасить внутреннюю поверхность чаши. Чтобы удалить
пятна, сделайте раствор из 2 столовых ложек (30мл) пищевой соды и 1
столовой ложки (15 мл) теплой воды. Нанесите раствор на пятна и
вытрите тканью. Затем прополощите водой и высушите.
РЕКОМЕНДАЦИИ ПО ИЗМЕЛЬЧЕНИЮ ПРОДУКТОВ
ПРОДУКТ
ДЕТСКОЕ
ПИТАНИЕ
ХЛЕБ
ПЕЧЕНЬЯ/
КРЕКЕР
КЛЮКВА
КОЛИЧЕСТВО
Макс 4 чашки
(1000мл)
Макс 5
ломтико
Макс 5 чашек
(1250мл)
3 чашки
(750мл)
ПРИМЕЧАНИЕ
Положите не более чем 4 чашки (1000мл)
вареных овощей и/или мяса в чашу, и налейте
жидкость в соотношении 1/4 чашки (60мл)
жидкости на каждую чашку твердых продуктов.
Смешивайте непрерывно до желаемой густоты.
Нарежьте свежий или сухой хлеб ломтиками
(3.75 & 5см каждый кусок). Положите в чашу и
измельчите до крошек.
Для дробления используйте крекер грубого
помола, шоколад или ванильные вафли.
Разломайте большой крекер на кусочки (3.75 &
5см) каждый. Положите в чашу и измельчите до
желаемого результата.
Перемелите до желаемой густоты, в импульсном
режиме. Можно также добавить по вкусу сахар.
ЯЙЦА
ЧЕСНОК
МЯСО
РУБЛЕННОЕ
(СЫРОЕ ИЛИ
ВАРЕННОЕ)
ГРИБЫ
ОРЕХИ
ЛУК
СЫР ПАРМЕЗАН
ИЛИ СЫР РОМАНО
ПЕТРУШКА
ЗЕЛЕНЫЙ,
КРАСНЫЙ,
ЖЕЛТЫЙ ПЕРЕЦ
СУПЫ, СЛИВКИ
Макс 12
Макс 12
Макс 2.5
чашки
(600мл)
Макс 12
среднего
размера
2 чашки
(300мл)
Макс 2
большие
головки
Макс 1-1/2
чашки
(375мл)
Макс 2
чашки
(500мл)
Макс 1
перец
2 чашки
(500мл)
Снимите скорлупу с яиц сваренных вкрутую,
высушите, разделите пополам и положите в
ча ш у. Изм е л ьч а т ь яйц а с лед у е т в
импульсном режиме. После 4-5 циклов,
проверьте результат.
Убедитесь, что чаша полностью сухая.
Добавляйте дольки чеснока во время работы
прибора.
Нарежьте мясо кубиками (по 2,54см).
Загрузите в чашу и перемалывайте в
импульсном режиме.
Paзpeжьте большие грибы и положите в
ча шу. Из м ел ьч а й те д о ж е л ае мо го
результата.
Загрузите в чашу и перемалывайте в
импульсном режиме.
Разрежьте луковицу на четыре части и
положите в чашу. Для грубого измельчения
нажмите кнопку импульсного режима 1-2
раза. Если хотите измельчить зеленый лук
возьмите макс. 2 чашки (500млl) и порежете
на кусочки размером (2,54см).
Подождите, пока сыр полежит при комнатной
температуре. Порежьте кубиками (2.54см).
Загрузите в чашу и нажми те кнопку
импульсного режима для грубой терки. Если
хотите натереть сыр тонко, используйте
обычный режим.
За г рузите в чаш у и и з м ельчайте в
имп у л ь сн о м р е жим е д о ж е л аем о г о
результата. Прерывая работу на 10-15
секунд, возобновите снова. Если хотите
измельчить другие ароматические или
кухонные травы (базилик, зелень кориандра,
мяту), повторите описанное действие.
Порежьте перец на кусочки размером
(2,54см). Положите в чашу и измельчите в
импульсном режиме.
Налейте макс. 2 чашки горячего овощного
супа (температура жидкости не должна
превышать 80 ). Взбивайте до однородной
массы.
°C
P/17 P/18
Page 11

www.vitesse.ru
ТЫКВА БОЛЬШАЯ
СТОЛОВАЯ (ОРЕХ
СЕРЫЙ), ТЫКВА
ОБЫКНОВЕННАЯ,
СЛАДКИЙ КАРТОФЕЛЬ
КЛУБНИКА
ПОМИДОРЫ
Макс 5
чашек
(1250мл),
кубиками
(2.54см)
2 чашки
(500см)
Добавьте 1/4 чашки(60мл) жидкости на
одну чашку продуктов. Мелко измельчите
в и м п ул ьс н о м р еж им е, з а те м
обра б ат ы в а йте непре р ы вно, для
получения массы в виде пюре.
Очистите и разрежьте большие ягоды.
Загрузите в чашу и измельчите в
импульсном режиме. Затем включите на
постоянный режим для того, чтобы
получить пюре.
Разрежьте приготовленные помидоры на
четыре части. Положите макс. 4 штучки и
измельчите в импульсном режиме.
РЕКОМЕНДАЦИИ ПО ШИНКОВКЕ ПРОДУКТОВ
ПРОДУКТ ПРИМЕЧАНИЕ
КАПУСТА
МОРКОВЬ
СЫР ЧЕДДЕР
СЫР МАЦАРЕЛЛА
КАРТОФЕЛЬ
Измельчая очень тонкую или шинкованную капусту,
используйте нож для шинковки. Нарежьте кусочками, чтобы
наполнить желоб для продуктов. Шинковать следует при
небольшом давлении. Опорожните чашу, если капуста
заполнила чашу и достигла ножевой насадки
Поместите в желоб и шинкуйте.
Сыр следует хорошо охладить и порезать, перед тем как
наполнить желоб для продуктов.
Нарежьте кусочками, которые бы поместились в желоб.
Положите на 30 минут в морозильную камеру. Шинкуйте при
легком давлении.
Нарежьте небольшими кусочками, чтобы заполнить
желоб.
РЕКОМЕНДАЦИИ ПО НАРЕЗКЕ ПРОДУКТОВ
ПРОДУКТ ПРИМЕЧАНИЕ
ЯБЛОКО
A
КАПУСТА/САЛАТ
МОРКОВЬ
СЕЛЬДЕРЕЙ
ОГУРЕЦ
ГРИБЫ
ЛУК
ПЕРСИК/ГРУША
ЗЕЛЕНЫЙ,
КРАСНЫЙ,
ЖЕЛТЫЙ ПЕРЕЦ
ПЕППЕРОНИ
КАРТОФЕЛЬ
КЛУБНИКА
ПОМИДОР
РЕПА
Разрежьте пополам яблоко и положите горизонтально в
желоб для продуктов. При нарезке используйте постоянное
давление.
Нарежьте кaчaн капусты такими кусочками, которые бы
помещались в желоб.
Нарежьте такими кусочками, которые бы помещались в
желоб.
Удалите волокна из растения. Загрузите в желоб для
продуктов, для достижения наилучшего результата.
Если есть необходимость, нарежьте такими кусочками,
которые бы помещались в желоб.
Для нарезки накладывайте грибы продольно в желоб для
продуктов.
Разрежьте лук пополам и загрузите в желоб, укладывая в
вертикальном положении для грубой нарезки.
Разрежьте пополам и удалите сердцевину. Поместите
вертикально в желоб и нарезайте при слабом давлении.
Разрежьте пополам и удалите семена. Заполните желоб,
полностью, таким образом, чтобы перец плотно прилегал,
если необходимо, слегка надавив. Большой перец
разрежьте на четыре части. Нарезайте при умеренном
давлении.
Порежете на три кусочка по (8см) каждый. Снимите
несъедобную оболочку.
Очистите, если желаете от кожицы картошку. Большую
разрежьте пополам и поместите в желоб.
Очистите и загрузите так, чтобы нарезка получалась в
длину.
Используйте маленький помидор для нарезки целых
кружочков, а, если хотите получить нарезку половинками,
разрежьте помидор. Используйте слабое, но постоянное
давление.
Очистите. Нарежьте такими кусочками, которые бы
помещались в желоб для продуктов.
P/19 P/20
 Loading...