

Page 1

TM
Galaxy
Getting Started
Guide
Page 2

ii
VTEL, Galaxy and Vtouch are trademarks of VTEL Corporation. Digital Visual Communications is a service mark of VTEL Corporation. All
other brand names and product names are trademarks or registered trademarks of their respective companies.
VTEL was issued the following patents by the U.S. Patent Office: Patent 5,657,246 titled, “Method and apparatus of a videoconference user
interface” and Patent 5,825,754 title, “Filter and process for reducing noise in audio signals.”
© 1999 by VTEL Corporation. All rights reserved. No part of this document may be reproduced in any form, including translation to another
language, without the prior written consent of VTEL Corporation.
Use, duplication, or disclosure by the Government is subject to restrictions as set forth in subparagraph (c) (1) (iii) of the Rights in Technical
Data and Computer Software clause at DFARS 252.227-7013.
The information contained in this document is subject to change without notice. VTEL assumes no responsibility for technical or editorial
errors or omissions that may appear in this document or for the use of this material; nor does VTEL make any commitment to update the
information contained in this document.
Document Edition Part Number Date
First 907-1080-EN1.00 August 1999
Video: 512.672.017/0172
Tel.: 512.437.2700
Fax: 512.437.2792
VTEL Corporation
108 Wild Basin Road
Austin, Texas 78746
www.vtel.com
Video: ++44 (0) 118 959 7112
Tel.: ++44 (0) 118 955 3200
Fax: ++44 (0) 118 956 0545
VTEL Europe Ltd.
Apex Plaza, Reading
Berks RG1 1AX, UK
www.vtel.com
Page 3

FCC Notice
This equipment has been tested and found to comply with the limits for a Class A digital device, pursuant to Part 15 of the FCC Rules. These
limits are designed to provide reasonable protection against harmful interference when the equipment is operated in a commercial
environment. This equipment generates, uses and can radiate radio frequency energy and, if not installed and used in accordance with the
instruction manual, may cause harmful interference to radio communications. Operation of this equipment in a residential area is likely to
cause harmful interference in which case the user will be required to correct the interference at his or her own expense.
Notice to Canadian Users
The digital apparatus does not exceed the Class A limits for radio noise emissions from digital apparatus set out in the Radio Interference
Regulations of the Canadian Department of Communications.
Le présent appareil numérique n’émet pas de bruits radioélectriques dépassant les limites applicable aux appareils numériques de la classe A
prescrites dans le Réglement sur le brouillage radioélectrique édicté par le ministére des Communications du Canada.
Austel Notice: For Use in Australia
This equipment can be connected to a telecommunications service only by an Austel-permitted terminal adapter.
Software License Agreement
This is a legal agreement between you, as the end user and Licensee, and VTEL Corporation. The VTEL Software includes computer
software, associated media, printed materials, and online or electronic documentation. By installing, copying, downloading, accessing or
otherwise using the Licensed Software, you agree to be bound by these terms.
LICENSE
VTEL grants Licensee a personal, non-exclusive license to use the VTEL Software, subject to the terms of this Agreement. Third party
software provided with VTEL Products is subject to the terms of the Third Party’s Software License Agreement. Licensee agrees to abide by
the terms and conditions of such Third Party Software License Agreements. Licensee shall not: (1) reverse-compile or disassemble any VTEL
Software, or attempt to do so; (2) modify the VTEL Software in any manner or to any extent; (3) copy the VTEL Software, except that one
copy of the VTEL Software may be made for archival purposes. The archival copy shall include VTEL’s copyright notice, along with a notice
that the copy is for archival purposes only and is subject to the provisions of this Agreement. Licensee agrees to take appropriate action by
instructions, agreement or otherwise to protect the VTEL Software and all parts thereof from unauthorized copying, modification, or
disclosure by its agents, employees, or customers. Licensee shall not assign or otherwise transfer this Agreement or any right hereunder. Any
attempt to transfer shall be null, void, and of no effect. The VTEL Software shall be used only as provided with the VTEL Products. This
license will terminate immediately without notice from VTEL if Licensee fails to comply with any of these provisions.
iii
TITLE
Title and intellectual property rights to the VTEL Software, including all translations, compilations, derivative works, copies and partial
copies, remains solely with VTEL and/or its third party licensors. All rights not expressly granted under this Agreement are reserved by VTEL
and/or its third party licensors.
LIMITED WARRANTY
VTEL warrants to Licensee that VTEL Software will substantially conform to VTEL’s specifications at the time of delivery to Licensee. VTEL
provides the third party software “AS IS”, and makes no warranties whatsoever with respect to third party software which is governed solely
by the terms of the Third Party Software License Agreements. VTEL does not warrant that the VTEL Software will be error-free or operate
without interruption. VTEL will supply Licensee, free of charge, with those releases of the VTEL Software which VTEL, in its sole judgement,
deems necessary to correct errors or malfunctions in the VTEL Software for a period which is the earlier of (a) 180 days after the date the
VTEL Software is delivered to Licensee, or (b) 90 days after the date the VTEL Software is installed for use by Licensee. VTEL makes no
warranty as to any of the following: defects other than those which result from the VTEL Software materially failing to meet VTEL’s
specifications; defects related to Licensee’s misuse, neglect, accident or abuse of the VTEL Software or associated hardware; defects in any
VTEL Software which has been modified by Licensee; defects appearing when VTEL Software is used in violation of this Agreement.
THE FOREGOING WARRANTY IS EXCLUSIVE AND IS IN LIEU OF ALL OTHER EXPRESS OR IMPLIED WARRANTIES
INCLUDING, BUT NOT LIMITED TO, WARRANTIES OF MERCHANTABILITY OR WARRANTIES OF FITNESS FOR ANY
PARTICULAR PURPOSE.
LIMITATION OF LIABILITY
IN NO EVENT SHALL VTEL OR ITS LICENSORS BE LIABLE FOR DAMAGES WHATSOEVER INCLUDING, WITHOUT
LIMITATION, SPECIAL, INCIDENTAL, CONSEQUENTIAL, OR INDIRECT DAMAGES FOR LOSS OF BUSINESS PROFITS,
BUSINESS INTERRUPTION, LOSS OF BUSINESS INFORMATION, OR ANY OTHER PECUNIARY LOSS ARISING OUT OF THE USE
OF THE SOFTWARE EVEN IF VTEL HAS BEEN ADVISED OF THE POSSIBILITY OF SUCH DAMAGES.
U.S. GOVERNMENT RESTRICTED RIGHTS
The Licensed Software is provided with RESTRICTED RIGHTS. Use, duplication, or disclosure by the U.S. Government is subject to
restrictions as set forth in subparagraph (c)(1)(ii) of The Rights in Technical Data and Computer Software clause at DFARS 252.227-7013 or
in subparagraphs (c)(1) and (2) of the Commercial Computer Software--Restricted Rights at 48 CFR 52.227-19, as applicable. This
Agreement is governed by and constructed in accordance with the internal laws of the state of Texas and the United States, including patent
and copyright laws and shall not be affected by any conflict of laws provisions which would make Texas laws inapplicable.
Page 4

iv
Page 5

Contents
Chapter 1. Introduction to Galaxy 1.1
Controlling the Vtouch Software . . . . . . . . . . . . . . . . . . . . . . . . . . . . . . . . . 1.1
Remote Control . . . . . . . . . . . . . . . . . . . . . . . . . . . . . . . . . . . . . 1.1
Using the Built-In Help System . . . . . . . . . . . . . . . . . . . . . . . . . . . . . . . . . . . 1.2
Online Help . . . . . . . . . . . . . . . . . . . . . . . . . . . . . . . . . . . . . . . . 1.2
Chapter 2. Your First Call 2.1
Making a Call with the Hand Dialer . . . . . . . . . . . . . . . . . . . . . . . . . . . . . . 2.1
Call Progress . . . . . . . . . . . . . . . . . . . . . . . . . . . . . . . . . . . . . . . . . . . . . . . . 2.2
Disconnecting a Call . . . . . . . . . . . . . . . . . . . . . . . . . . . . . . . . . . . . . . . . . . 2.2
Chapter 3. Call Screen Features 3.1
Overview of the Call Screen . . . . . . . . . . . . . . . . . . . . . . . . . . . . . . . . . . . . . 3.1
Speed Dial List Features . . . . . . . . . . . . . . . . . . . . . . . . . . . . . . . . . . . . . . . . 3.2
Adding a Site to the Speed Dial List . . . . . . . . . . . . . . . . . . . . . . 3.2
Editing a Speed Dial List Entry . . . . . . . . . . . . . . . . . . . . . . . . . . 3.3
Dialing from the Speed Dial List . . . . . . . . . . . . . . . . . . . . . . . . . 3.3
Deleting a Site from the Speed Dial List . . . . . . . . . . . . . . . . . . . 3.3
Speed Dial List Options . . . . . . . . . . . . . . . . . . . . . . . . . . . . . . . . . . . . . . . . 3.4
Sort By... . . . . . . . . . . . . . . . . . . . . . . . . . . . . . . . . . . . . . . . . . . 3.4
Hide Pictures . . . . . . . . . . . . . . . . . . . . . . . . . . . . . . . . . . . . . . . 3.4
Call Progress . . . . . . . . . . . . . . . . . . . . . . . . . . . . . . . . . . . . . . . . . . . . . . . . 3.5
Snapshots . . . . . . . . . . . . . . . . . . . . . . . . . . . . . . . . . . . . . . . . . . . . . . . . . . . 3.5
Disconnecting a Call . . . . . . . . . . . . . . . . . . . . . . . . . . . . . . . . . . . . . . . . . . 3.5
v
Chapter 4. Options During a Call 4.1
Adjusting the Volume . . . . . . . . . . . . . . . . . . . . . . . . . . . . . . . . . . . . . . . . . . 4.1
Sending Slides . . . . . . . . . . . . . . . . . . . . . . . . . . . . . . . . . . . . . . . . . . . . . . . 4.1
Changing the Camera View . . . . . . . . . . . . . . . . . . . . . . . . . . . . . . . . . . . . . 4.1
Restoring Camera View . . . . . . . . . . . . . . . . . . . . . . . . . . . . . . . . . . . . . . . . 4.2
Viewing the Picture-in-Picture (PIP) Window . . . . . . . . . . . . . . . . . . . . . . . . 4.3
Launching Extra Programs . . . . . . . . . . . . . . . . . . . . . . . . . . . . . . . . . . . . . . 4.4
Sharing an Application . . . . . . . . . . . . . . . . . . . . . . . . . . . . . . . . . . . . . . . . . 4.5
Adding the Remote Site to the Speed Dial List . . . . . . . . . . . . . . . . . . . . . . . 4.6
Automatically Saving Views (Dual Monitor Systems Only) . . . . 4.2
Manually Saving Views . . . . . . . . . . . . . . . . . . . . . . . . . . . . . . . 4.2
Going to a Saved View . . . . . . . . . . . . . . . . . . . . . . . . . . . . . . . . 4.3
Opening the Extras Screen . . . . . . . . . . . . . . . . . . . . . . . . . . . . . 4.4
Adding an Extra . . . . . . . . . . . . . . . . . . . . . . . . . . . . . . . . . . . . . 4.4
Quit Sharing an Application . . . . . . . . . . . . . . . . . . . . . . . . . . . . 4.5
Galaxy
TM
Page 6

vi
Contents
Chapter 5. Working with Slides 5.1
Overview of Slides . . . . . . . . . . . . . . . . . . . . . . . . . . . . . . . . . . . . . . . . . . . . 5.1
Opening an Existing Slide Tray or Graphic . . . . . . . . . . . . . . . . . . . . . . . . . 5.1
Sending a Slide . . . . . . . . . . . . . . . . . . . . . . . . . . . . . . . . . . . . . . . . . . . . . . . 5.1
Creating a New Slide Tray . . . . . . . . . . . . . . . . . . . . . . . . . . . . . . . . . . . . . . 5.2
Rearranging Slides . . . . . . . . . . . . . . . . . . . . . . . . . . . . . . . . . . . . . . . . . . . . 5.2
Annotating on a Slide . . . . . . . . . . . . . . . . . . . . . . . . . . . . . . . . . . . . . . . . . 5.3
Printing a Slide . . . . . . . . . . . . . . . . . . . . . . . . . . . . . . . . . . . . . . . . . . . . . . . 5.3
Saving a Slide Tray . . . . . . . . . . . . . . . . . . . . . . . . . . . . . . . . . . . . . . . . . . . 5.3
Managing Slide Trays . . . . . . . . . . . . . . . . . . . . . . . . . . . . . . . . . . . . . . . . . 5.4
Present Mode . . . . . . . . . . . . . . . . . . . . . . . . . . . . . . . . . . . . . . . . . . . . . . . . 5.4
Entering Present Mode . . . . . . . . . . . . . . . . . . . . . . . . . . . . . . . . 5.4
Using Present Mode . . . . . . . . . . . . . . . . . . . . . . . . . . . . . . . . . . 5.5
Exiting Present Mode . . . . . . . . . . . . . . . . . . . . . . . . . . . . . . . . . 5.5
Receiving a Slide . . . . . . . . . . . . . . . . . . . . . . . . . . . . . . . . . . . . . . . . . . . . . 5.5
Closing a Slide Tray . . . . . . . . . . . . . . . . . . . . . . . . . . . . . . . . . . . . . . . . . . . 5.5
Chapter 6. Multiway Conferencing 6.1
Before Joining a Conference . . . . . . . . . . . . . . . . . . . . . . . . . . . . . . . . . . . . . 6.1
Joining a Conference . . . . . . . . . . . . . . . . . . . . . . . . . . . . . . . . . . . . . . . . . . 6.1
Viewing Participants . . . . . . . . . . . . . . . . . . . . . . . . . . . . . . . . . . . . . . . . . . 6.2
Participating in a Conference . . . . . . . . . . . . . . . . . . . . . . . . . . . . . . . . . . . . 6.2
Conference without a Chairperson . . . . . . . . . . . . . . . . . . . . . . . 6.3
Conference with a Chairperson . . . . . . . . . . . . . . . . . . . . . . . . . 6.3
Controlling a Conference . . . . . . . . . . . . . . . . . . . . . . . . . . . . . . . . . . . . . . . 6.3
Becoming the Chair . . . . . . . . . . . . . . . . . . . . . . . . . . . . . . . . . . 6.3
Chairperson Functions . . . . . . . . . . . . . . . . . . . . . . . . . . . . . . . . 6.3
Granting Requests . . . . . . . . . . . . . . . . . . . . . . . . . . . . . . . . . . . 6.4
Chapter 7. Alternate Methods of Controlling Vtouch Software 7.1
Mouse . . . . . . . . . . . . . . . . . . . . . . . . . . . . . . . . . . . . . . . . . . . . . . . . . . . . . 7.1
Keyboard . . . . . . . . . . . . . . . . . . . . . . . . . . . . . . . . . . . . . . . . . . . . . . . . . . . 7.1
Annotation Tablet . . . . . . . . . . . . . . . . . . . . . . . . . . . . . . . . . . . 7.1
Tablet . . . . . . . . . . . . . . . . . . . . . . . . . . . . . . . . . . . . . . . . . . . . . . . . . . . . . 7.2
Getting Started Guide
Page 7
Chapter 1
Introduction to Galaxy
1.1
Welcome to GalaxyTM, the premiere videoconferencing system from VTEL®. This
you a brief, high-level overview of the Galaxy system, then lead you through your first videoconference. After
you finish reading this manual, and while you are exploring the V
further questions. If so, please use the built-in Help feature within the software. It is easily accessible at all times
and can provide quick answers to your specific questions. (See page 1.2 for instructions on opening Help.)
Controlling the V
For information on using an alternate method of software control, please see Chapter 6.
TOUCH
Software
TOUCH
software on your own, you may have
Getting Started Guide
will give
Remote Control
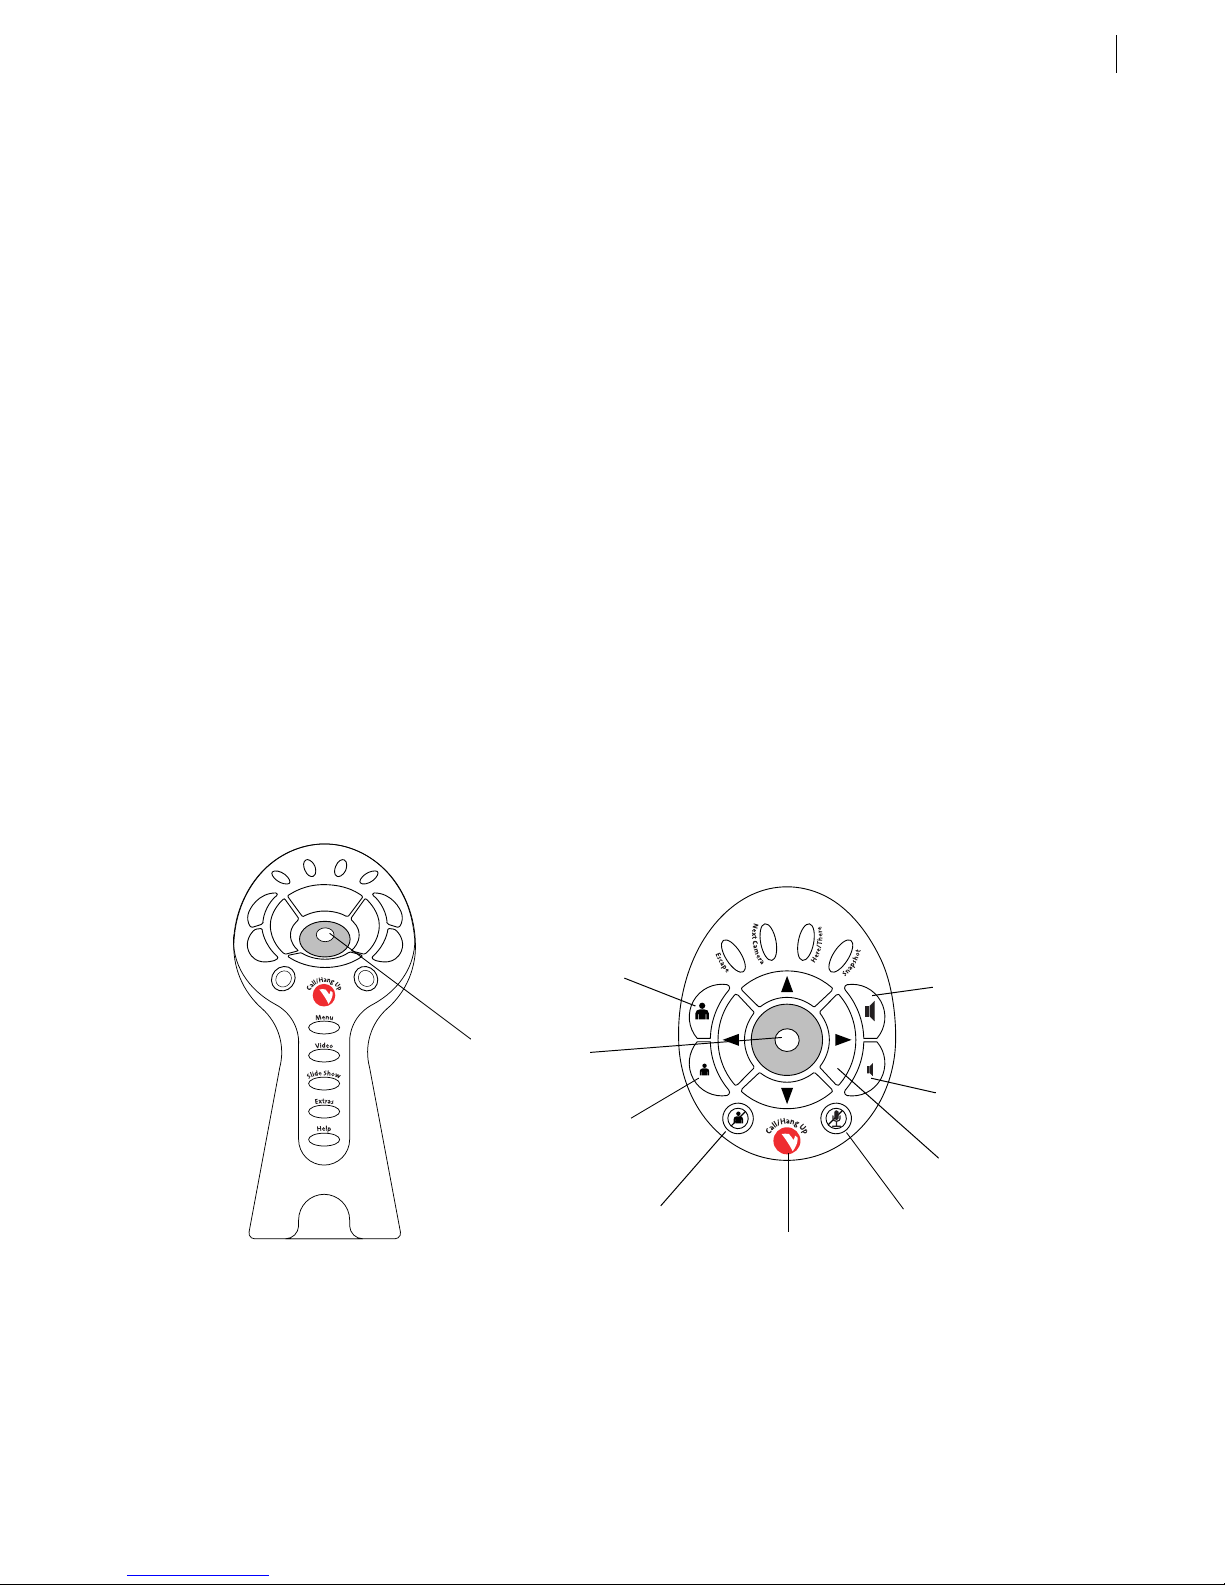
The remote control is the simplest and most efficient method of operating your V
provide one-touch access to all major system functions.
One of the most convenient aspects of the remote control is that it moves the cursor
words, from one selectable item to another. Unlike a mouse that can move to any location on the screen —
perhaps missing a button you wish to select — the remote control arrow buttons guide your cursor intelligently
around the screen.
front view
TOUCH
software. The buttons
to active areas; in other
only
top view
camera
zoom in
camera joystick
and select button
camera
zoom out
video mute
place call or hang up
increase volume
decrease volume
cursor control
(all four arrows)
audio mute
Galaxy
TM
Page 8
1.2
Chapter 1. Introduction to Galaxy
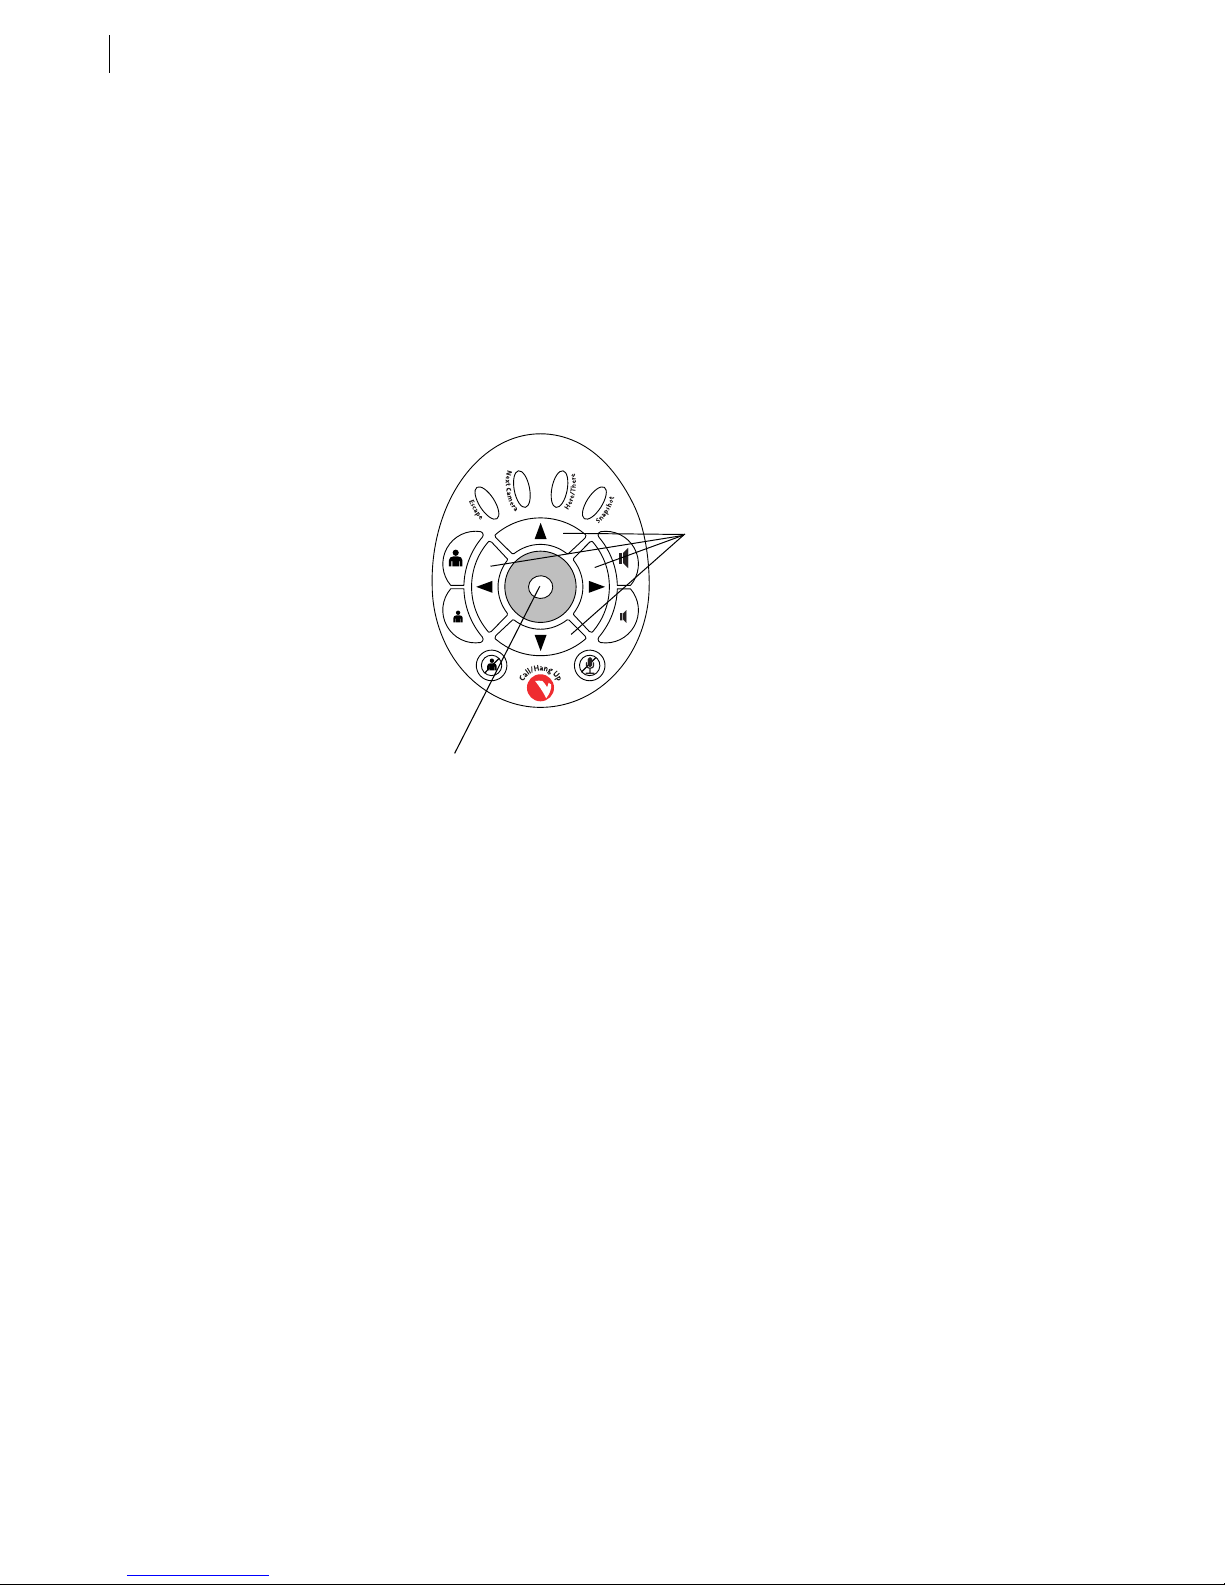
Selecting an item:
To practice the steps below, first press the
•
Throughout this
on-screen buttons and menu items, simply perform the two steps
below.
1. Use the four arrow buttons on the remote control to navigate the orange highlight to the item you want
to choose.
2. Press the light gray button in the center of the remote control once to activate the highlighted function.
button on the remote control to display the
Video
Getting Started Guide,
Video
when you are asked to “Select”
arrow buttons
menu.
gray (select) button
Using the Built-In Help System
The Help system that is built into the V
TOUCH
place a video call and have a question while you are in the
explanation of that particular screen. To close Help, press the
button.
Done
Online Help
If you cannot find the answers you need with the built-in Help system, visit the VTEL Galaxy web site at
http://www.galaxy.vtel.com/help
where you can find more in-depth Help.
software is extremely intuitive. For example, if you are trying to
menu, simply press the
Call
button on the remote control or select the
Escape
button for an
Help
Getting Started Guide
Page 9
Chapter 2
Your First Call
This chapter will guide you through placing your first video call. Proceed to Chapter 3 for more in-depth
information about the
•
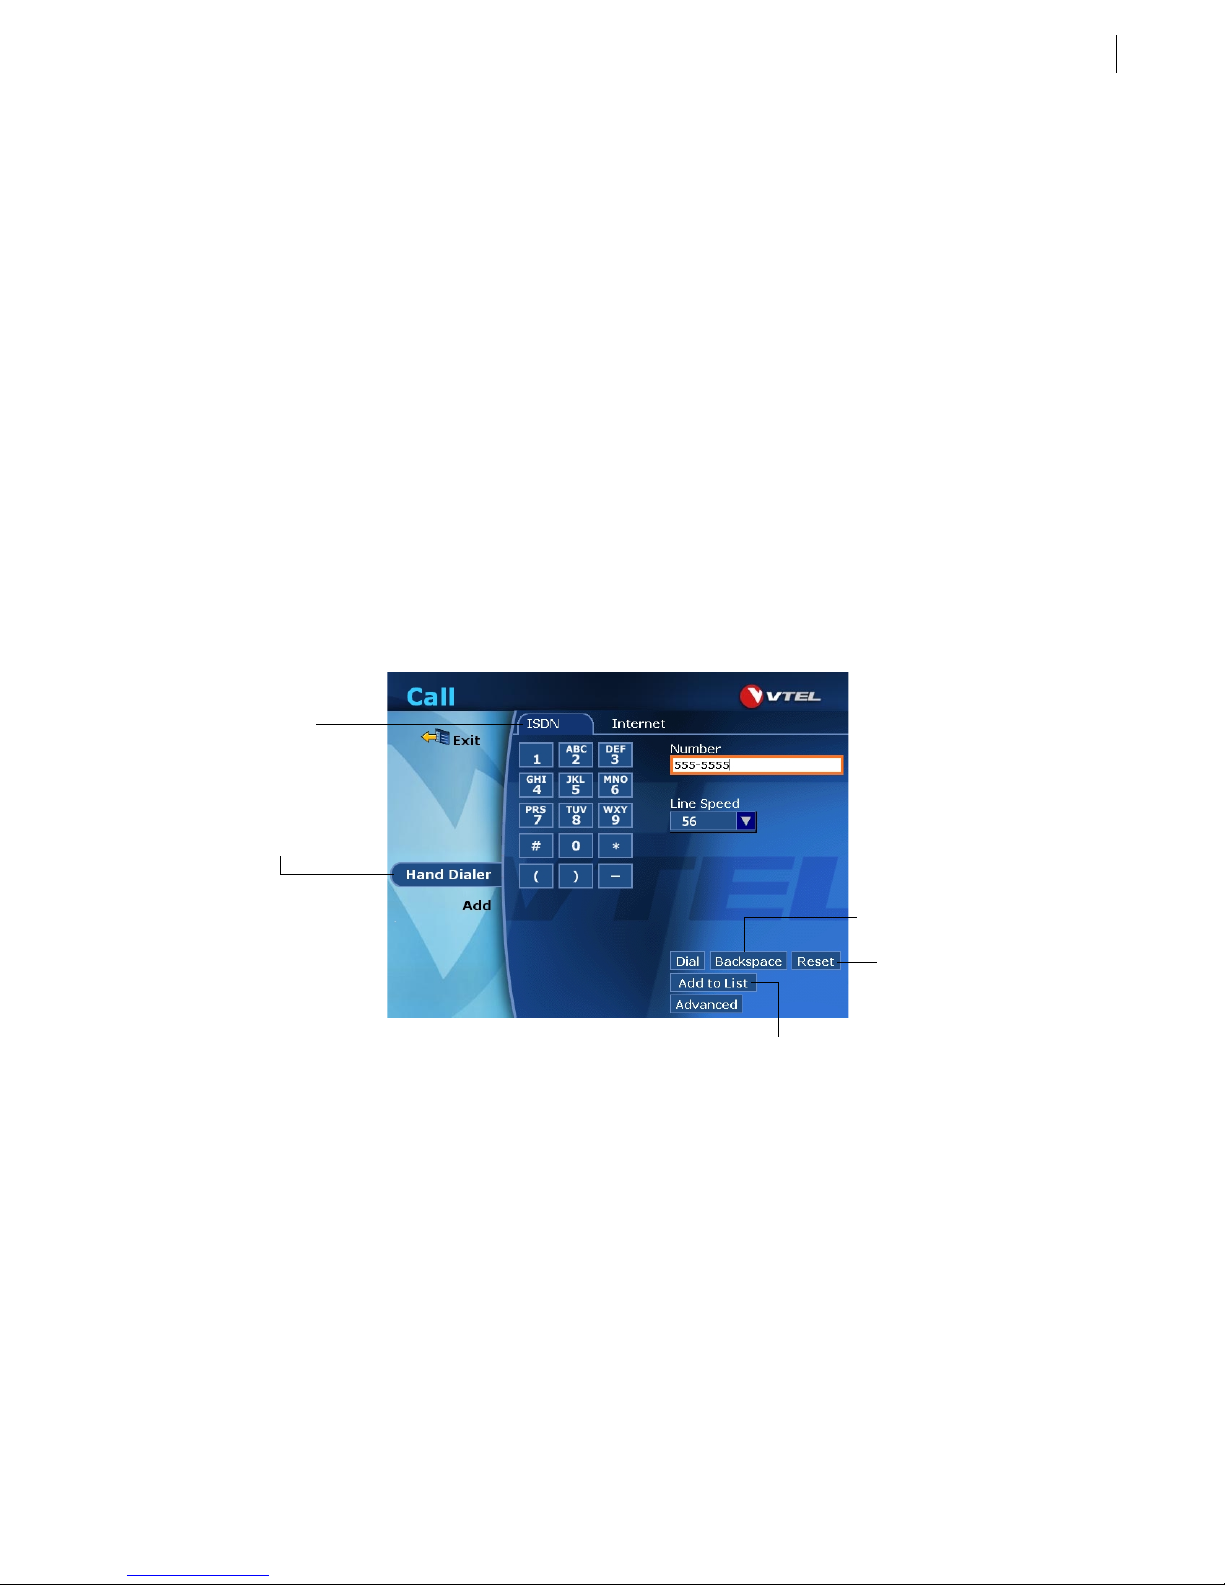
Making a Call with the Hand Dialer
1. The
button on the remote control.
screen is used to place all outgoing Galaxy calls; open it by pressing the red
Call
screen.
Call
See page 1.2 for instructions on selecting on-screen buttons and
menus with the remote control.
Call/Hang Up
2.1
2. Select the
3. Select a network type tab at the top of the screen.
Select a network
type tab.
Hand Dialer
4. Move the orange highlight to the
dial. You can also use the on-screen keypad and the remote control to enter the numbers.
Hand Dialer
button
button.
Number
Backspace
last character entered.
Reset
on the screen.
Add to List
the Speed Dial list.
field and use the keyboard to type the number you wish to
saves the information in
deletes the
clears all entries
If you make an error while entering information, use the
keyboard to delete the last character entered. If you wish to erase all of the information on the page,
select the
5. Select a
example, “384” means that 384 kilobits of data will be transferred every second (Kbps). Higher line
rates provide better video quality, however, your line charges may increase as well.
6. Select the
Line Speed
button.
Reset
from the drop-down list. This is the rate at which your call will be connected. For
button to begin dialing the call.
Dial
Backspace
button or the backspace key on the
Galaxy
TM
Page 10
2.2
Chapter 2. Your First Call
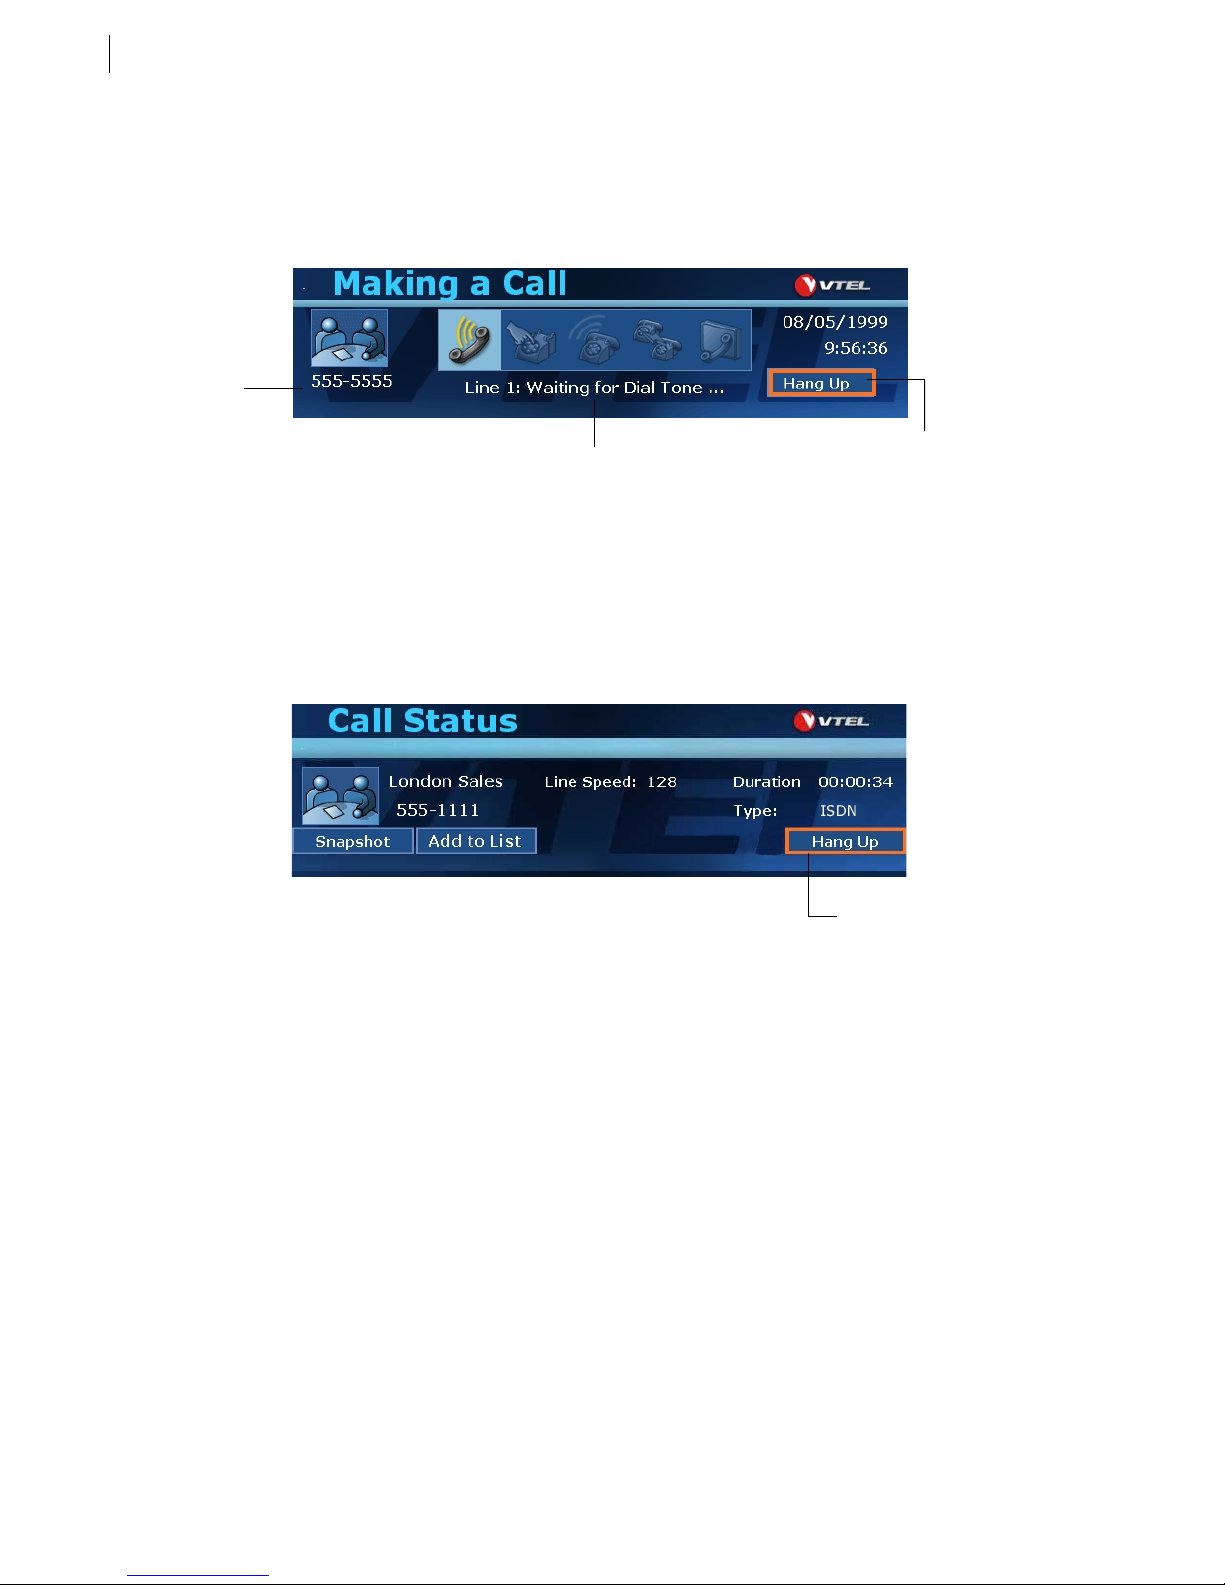
Call Progress
After you click the
monitor. Five icons give you a visual representation of the call status.
Caller ID
information
and snapshot
button to place a call, a small
Dial
Making a Call
screen will appear in the lower part of the
Disconnecting a Call
During a call, press the
Select the
Hang Up
Call/Hang Up
button to disconnect the call.
Status messages
appear here.
button to display the
Call Status
screen:
Click the
button to disconnect
the call.
Hang Up
Click here to
disconnect the call.
Getting Started Guide
Page 11
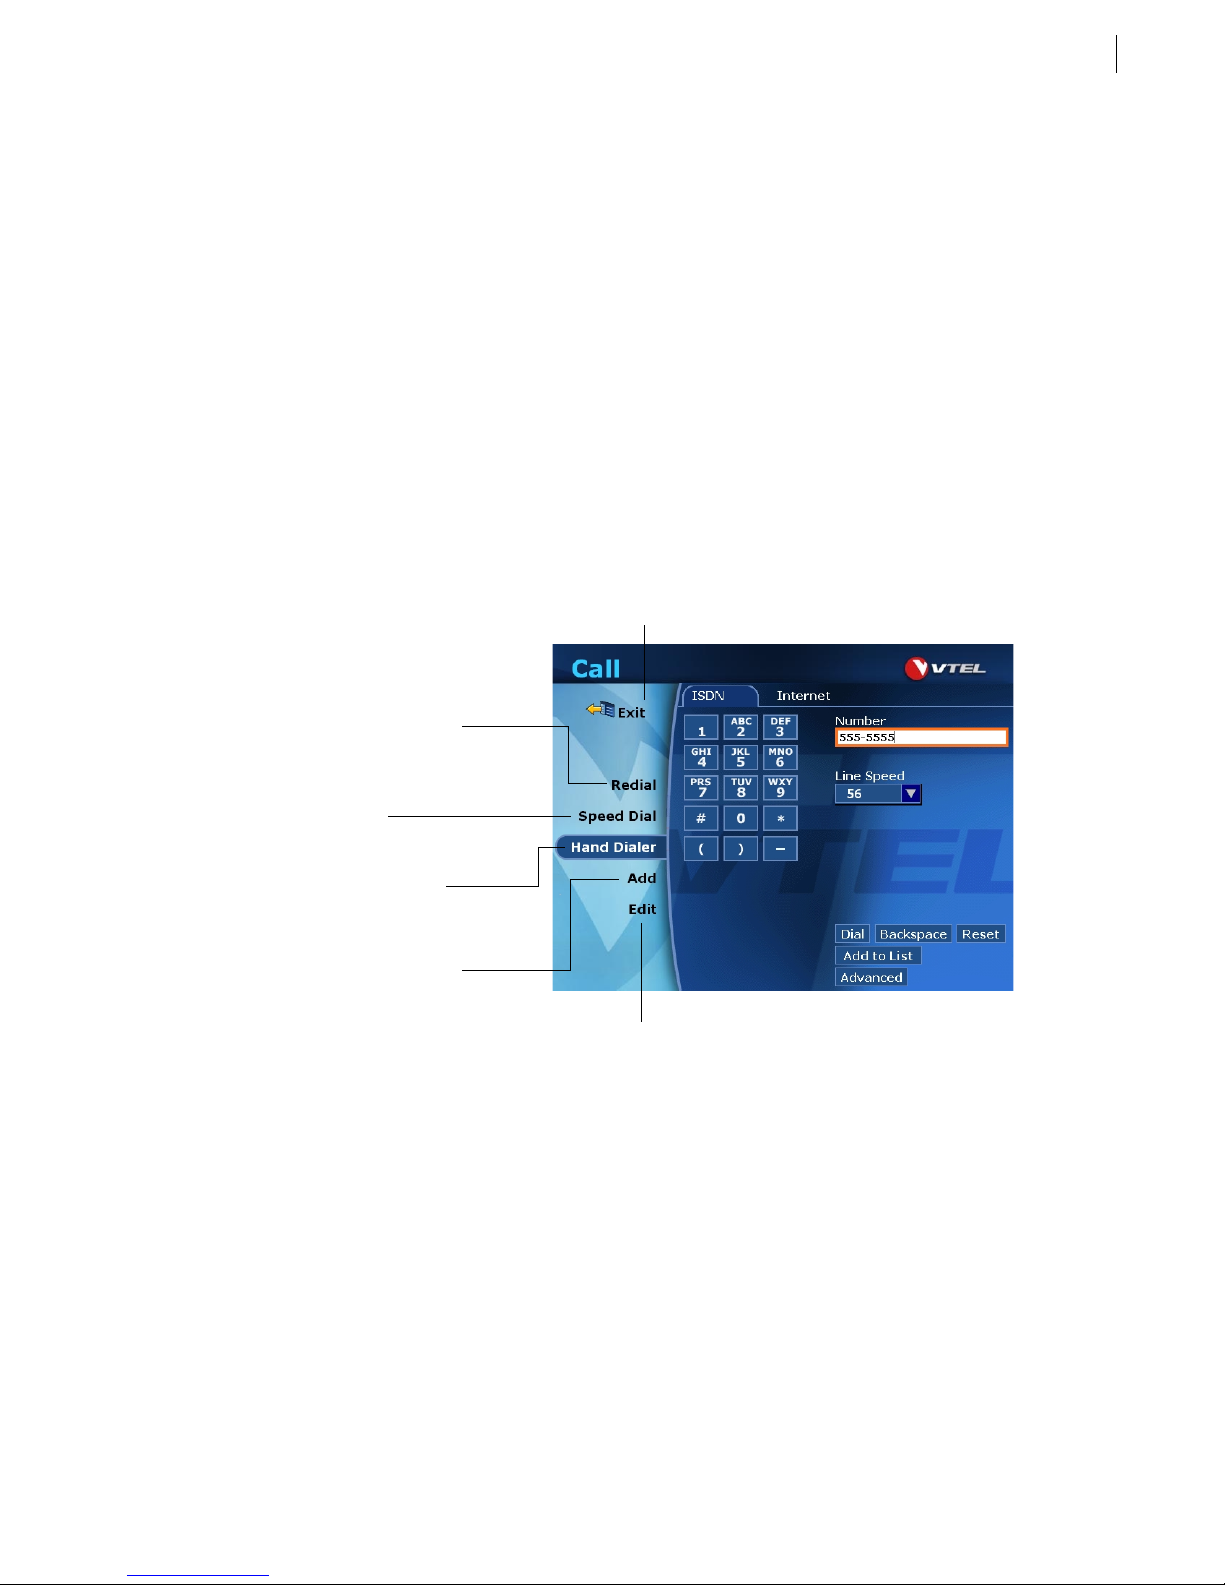
Chapter 3
Call Screen Features
3.1
The
pressing the red
screen contains several features that make videoconferencing simpler and more efficient. Open it by
Call
Call/Hang Up
•
See page 1.2 for instructions on selecting on-screen buttons and
menus with the remote control.
button on the remote control.
Overview of the Call Screen
The first time you open the
in the
the Speed Dial list, the
screen, more options will become available. For example, if you select
Call
Edit
Redial
displays a list of the
most recently called sites.
Speed Dial
book. This is where you store
site names and numbers.
Use
that is not in your Speed Dial list.
acts as an address
Hand Dialer
to call a site
screen you will see the
Call
and
Speed Dial
Hand Dialer
options will appear.
Exit
the Call screen.
and
options. As you use other features
Add
and create a new entry for
Add
Add
Click
the Speed Dial list.
to save a site to
Use the
an existing Speed Dial list entry.
Edit
screen to change
Galaxy
TM
Page 12
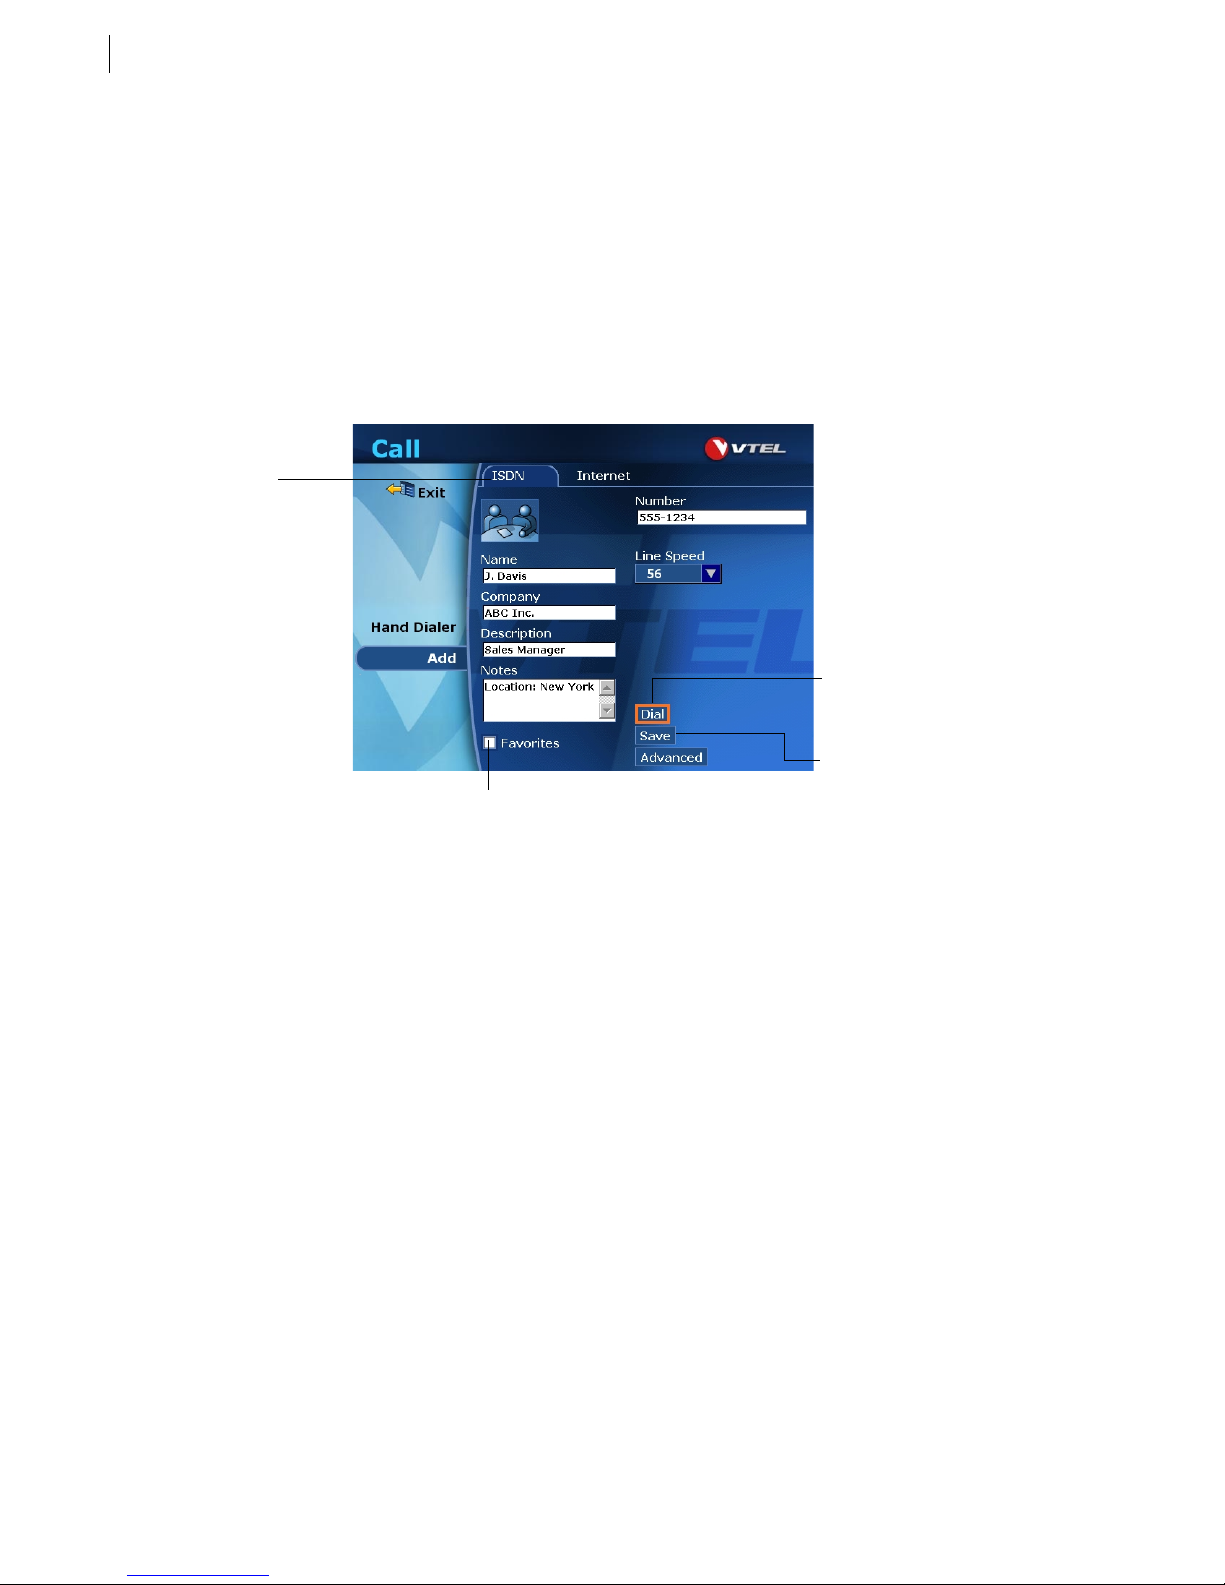
3.2
Chapter 3. Call Screen Features
Speed Dial List Features
The Speed Dial list is an integral part of the Galaxy system; it acts as an address book where you can save site
names and numbers. You can even customize each entry with a snapshot to make it easier to recognize (see
“Snapshots” on page 3.5).
Adding a Site to the Speed Dial List
1. Press the red
Call/Hang Up
2. Click on the correct network type tab at the top of the screen.
button on the remote control to open the
screen, then select
Call
Add
.
3. Enter a name for the site in the
Select a network
type tab.
Notice that the Speed Dial
button does not appear
until you add a site.
Click here if this is one of your
frequently called sites.
Name
field.
4. Enter any other information that will be helpful to you, such as
5. Select the
Favorites
checkbox if this is one of the sites you will frequently call. See page 3.4 for
information on sorting by Favorites in the Speed Dial list.
Dial
connects a call to this
site and saves it to the
Speed Dial list.
Save
Select
site to the Speed Dial list.
to record the
Company, Description
and/or
Notes
.
6. Move the highlight down to the
If you make an error while entering information, use the backspace key on the keyboard to delete the last
character entered.
7. Select a
Line Speed
from the drop-down list. This is the rate at which your call will be connected. For
example, “384” means that 384 kilobits of data will be transferred every second (Kbps). Higher line
rates provide better video quality, however, your line charges may increase as well.
8. When you are finished, press the
9. The
Getting Started Guide
Speed Dial
list will be displayed and your new entry will appear in the list.
Number
Save
field and use the keyboard to type the number you wish to dial.
button to save the information into the Speed Dial list.
Page 13
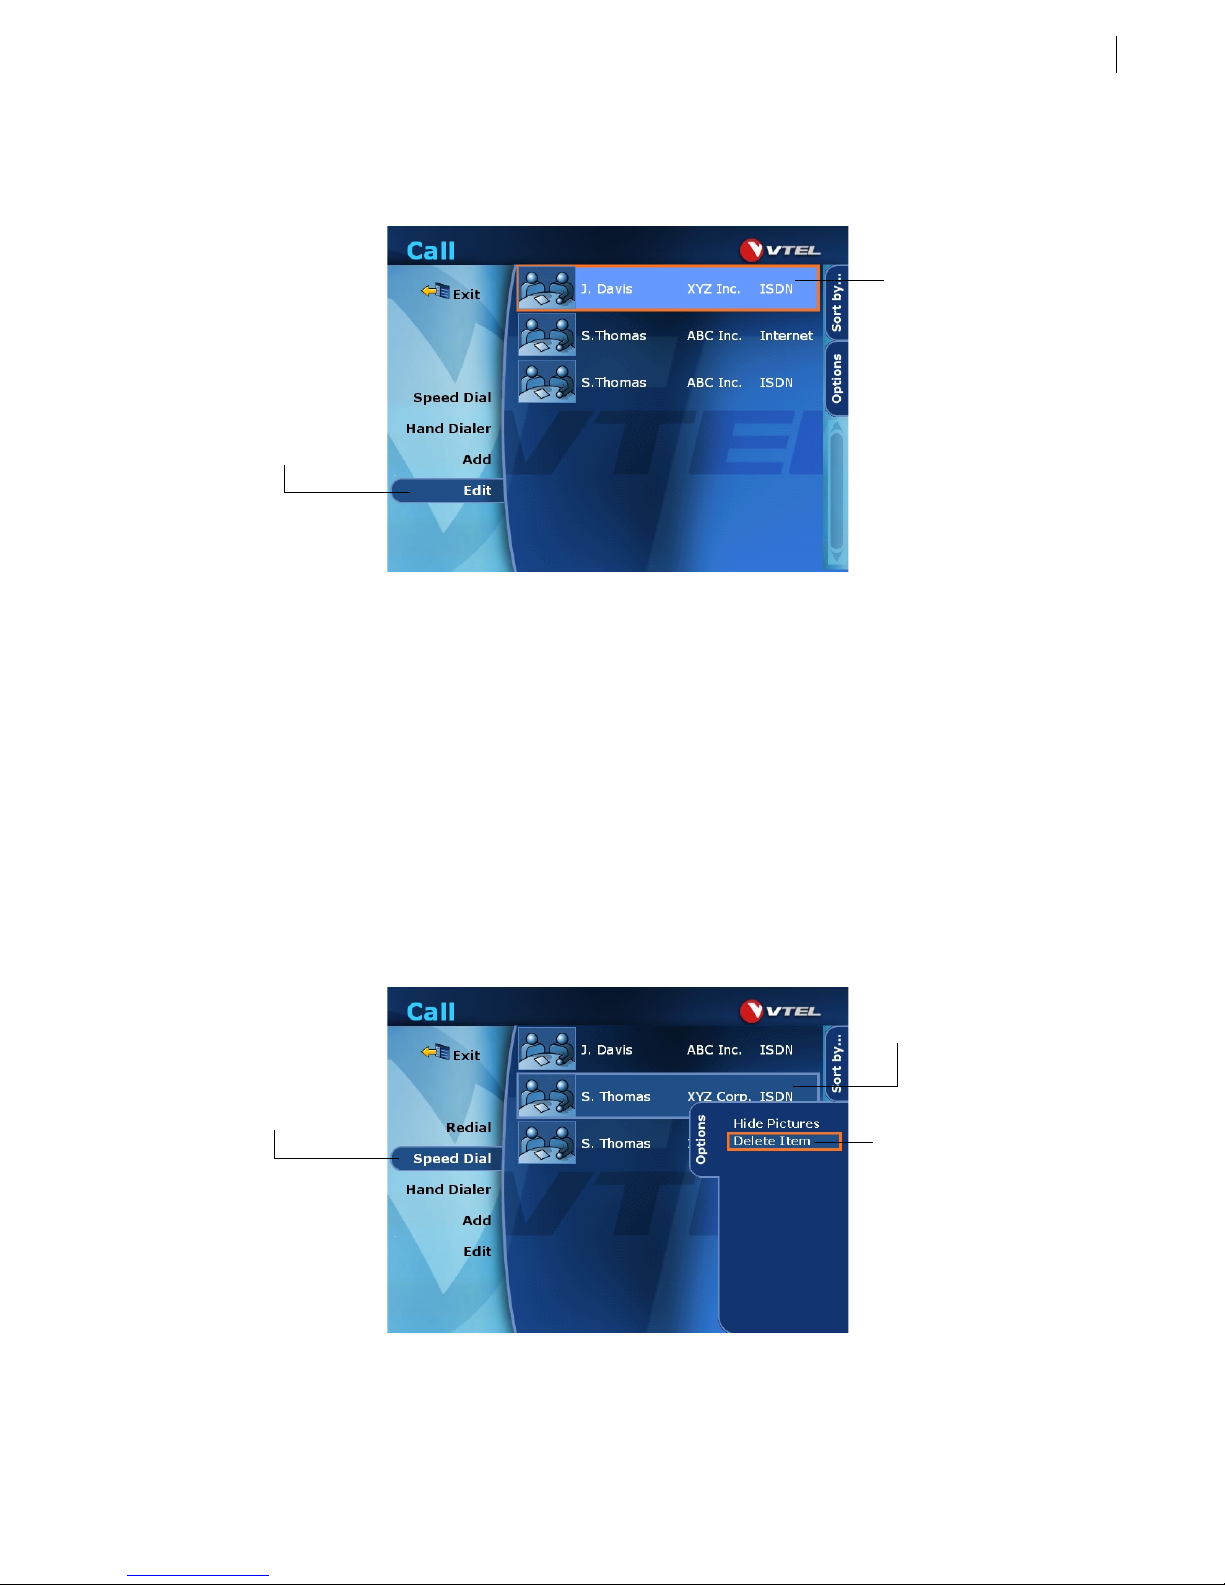
Editing a Speed Dial List Entry
1. Press the red
button.
Edit
button
2. Select the site that you want to edit.
Call/Hang Up
button on the remote control to open the
Speed Dial List Features
screen, then select the
Call
Select the site you want to
change.
Edit
3.3
3. The
any information, press the
screen functions exactly like the
Edit
button.
Save
screen (see page 3.2). After you have finished changing
Add
Dialing from the Speed Dial List
1. Press the red
button.
Dial
Call/Hang Up
2. Select the site you want to dial. Use the up or down arrow buttons on the remote control if you need to
view more of the list.
button on the remote control to open the
screen, then select the
Call
Deleting a Site from the Speed Dial List
1. Press the red
button.
Dial
Speed Dial
button
Call/Hang Up
button on the remote control to open the
screen, then select the
Call
Select the site you
want to delete.
Click the
then click
Options
Delete Item
tab,
Speed
Speed
.
2. Highlight the site you want to delete, then select the
3. After the Options tab expands, select
Delete Item
Options
tab.
. The site is removed from the Speed Dial list.
Galaxy
TM
Page 14
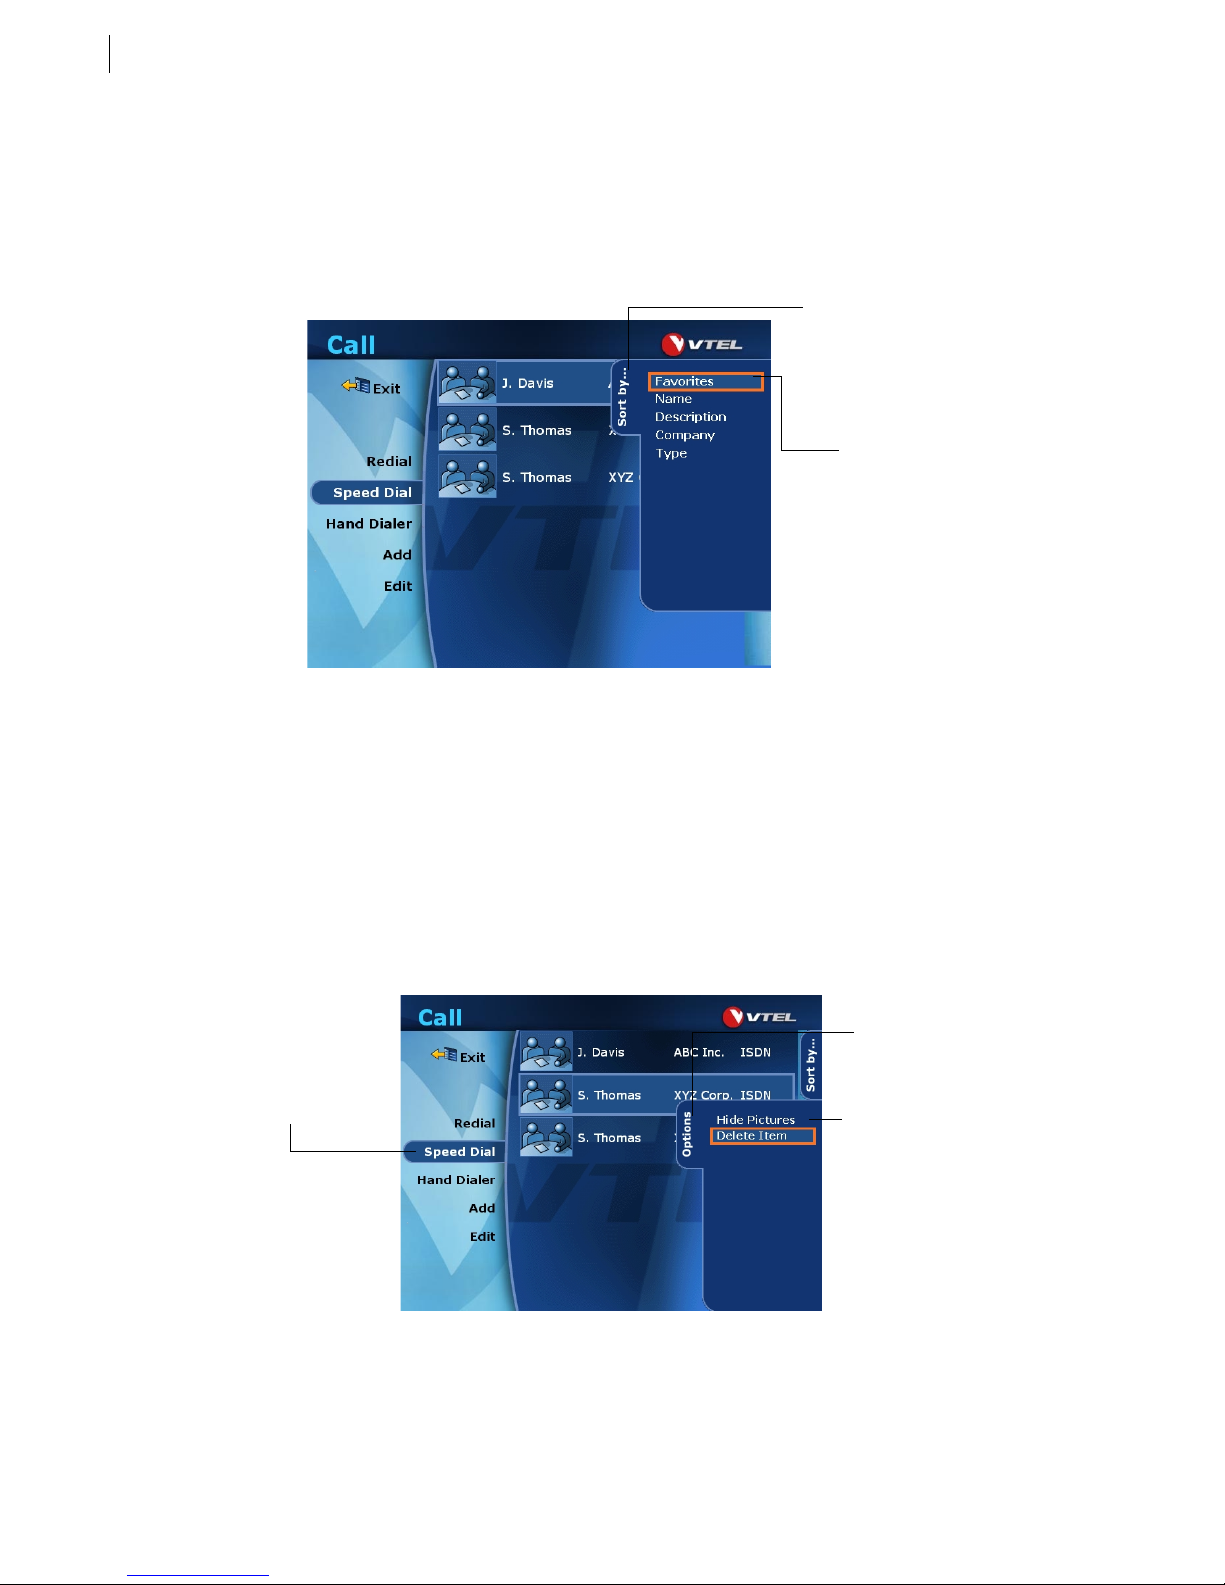
3.4
Chapter 3. Call Screen Features
Speed Dial List Options
Sort By...
Use the
choose
Sort by...
Favorites
listings by company names.
feature to change the way that listings appear in the Speed Dial list. For example, you can
to display only your most frequently called sites. Or, sort by
Company
to alphabetize the
Select the
tab to expand it.
Select it again to
make it disappear.
Select a sorting
method from the list.
Sort by...
1. Press the red
button.
Dial
2. Select the
Sort by...
Call/Hang Up
tab to expand it.
button on the remote control to open the
screen, then select the
Call
Speed
3. Select a sorting method from the list.
4. Close the
Sort by...
tab by pressing the
button on the remote control, or by selecting the
Escape
Sort by...
tab again.
Hide Pictures
By default the Speed Dial list displays a caller ID snapshot of each site, if available. You can choose to disable this
feature, allowing more listings to appear on a page.
Options
Hide Pictures
.
Speed Dial
button
Select the
tab to expand it.
Select
1. Press the red
button.
Dial
2. Select the
3. Select
Getting Started Guide
Call/Hang Up
Options
Hide Pictures
tab.
.
button on the remote control to open the
screen, then select the
Call
Speed
Page 15
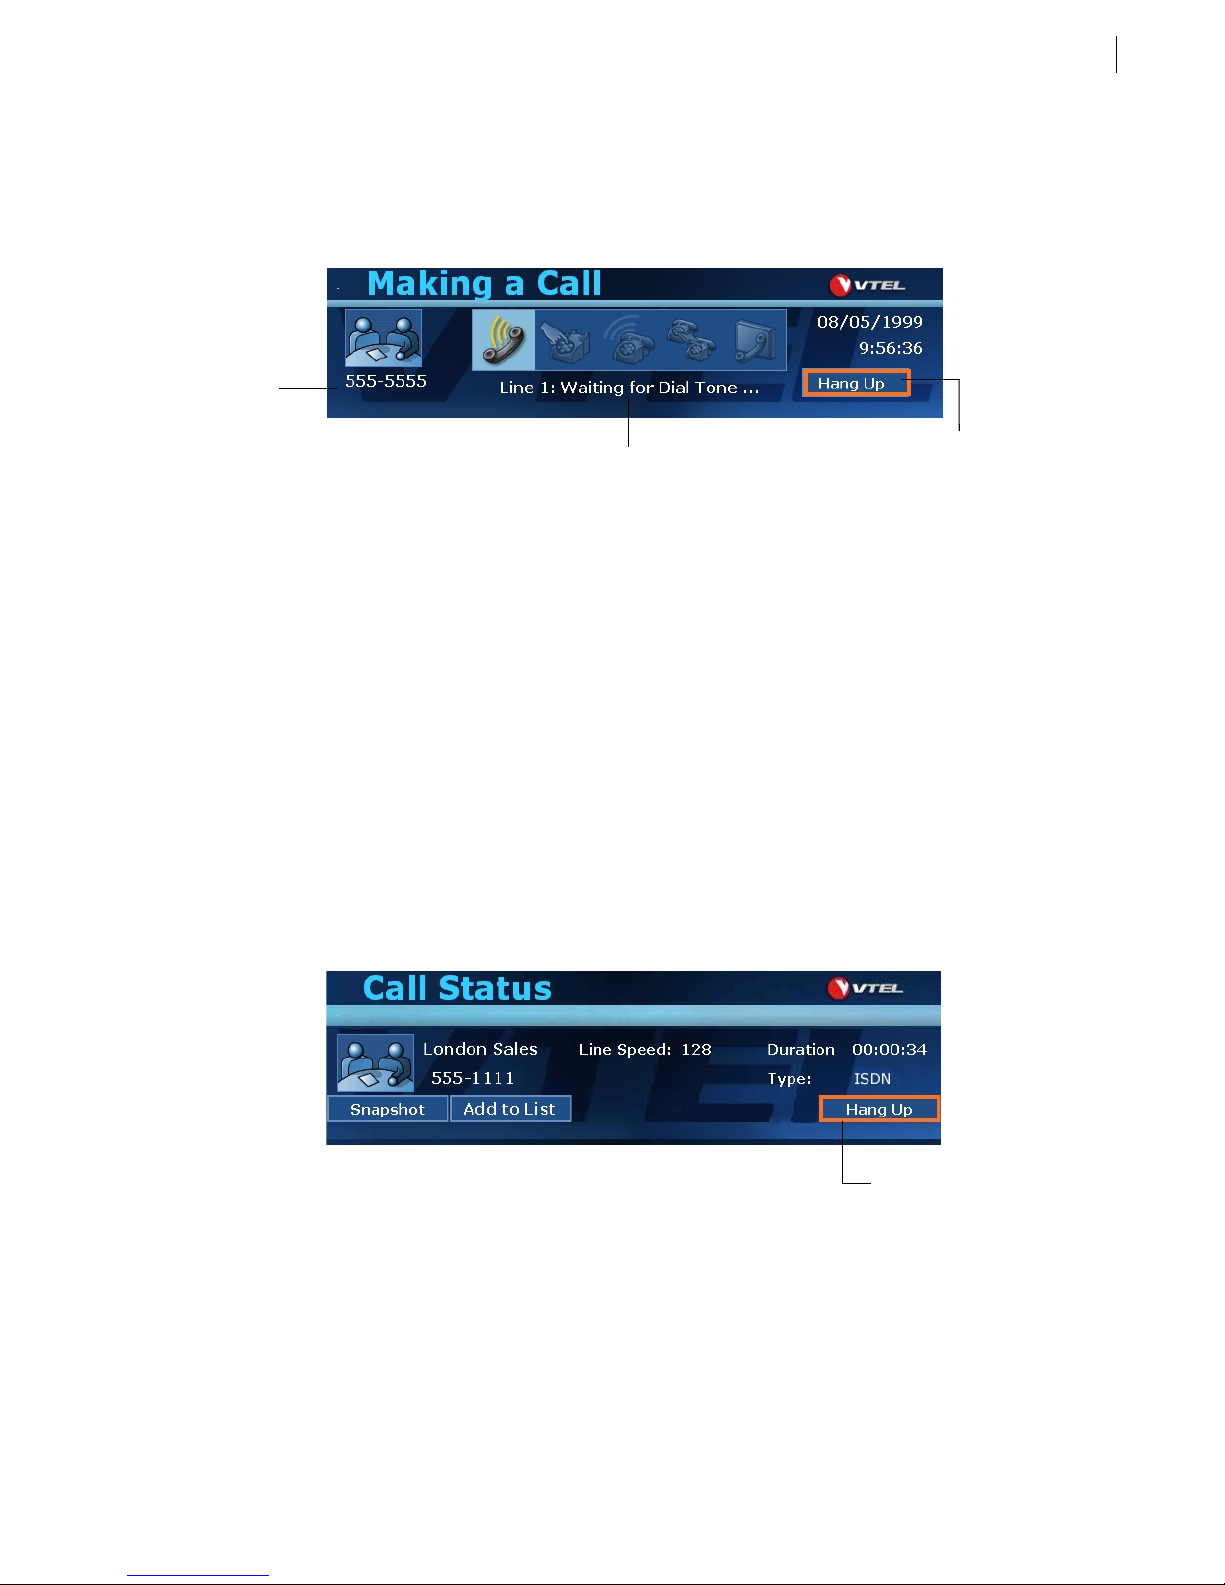
Call Progress
After you click the
monitor. Five icons give you a visual representation of the call connection status.
Caller ID
information
and snapshot
(if available).
button to place a call, a small
Dial
Making a Call
screen will appear in the lower part of the
Call Progress
3.5
Status messages indicate the
stages of call connection.
Snapshots
Follow these steps to create a snapshot to accompany a Speed Dial list entry:
1. During a call press the red
2. Select the
Snapshot
button.
Call/Hang Up
button to display the
Call Status
The image of the far end site that you are currently viewing will become the Snapshot associated with
that site.
Disconnecting a Call
During a call, press the red
disconnect the call.
Call/Hang Up
button to display the
Call Status
Click the
button to disconnect
the call.
Hang Up
screen.
screen. Select the
Hang Up
button to
Hang Up
Click
disconnect the call.
to
Galaxy
TM
Page 16

3.6
Getting Started Guide
Page 17
Chapter 4
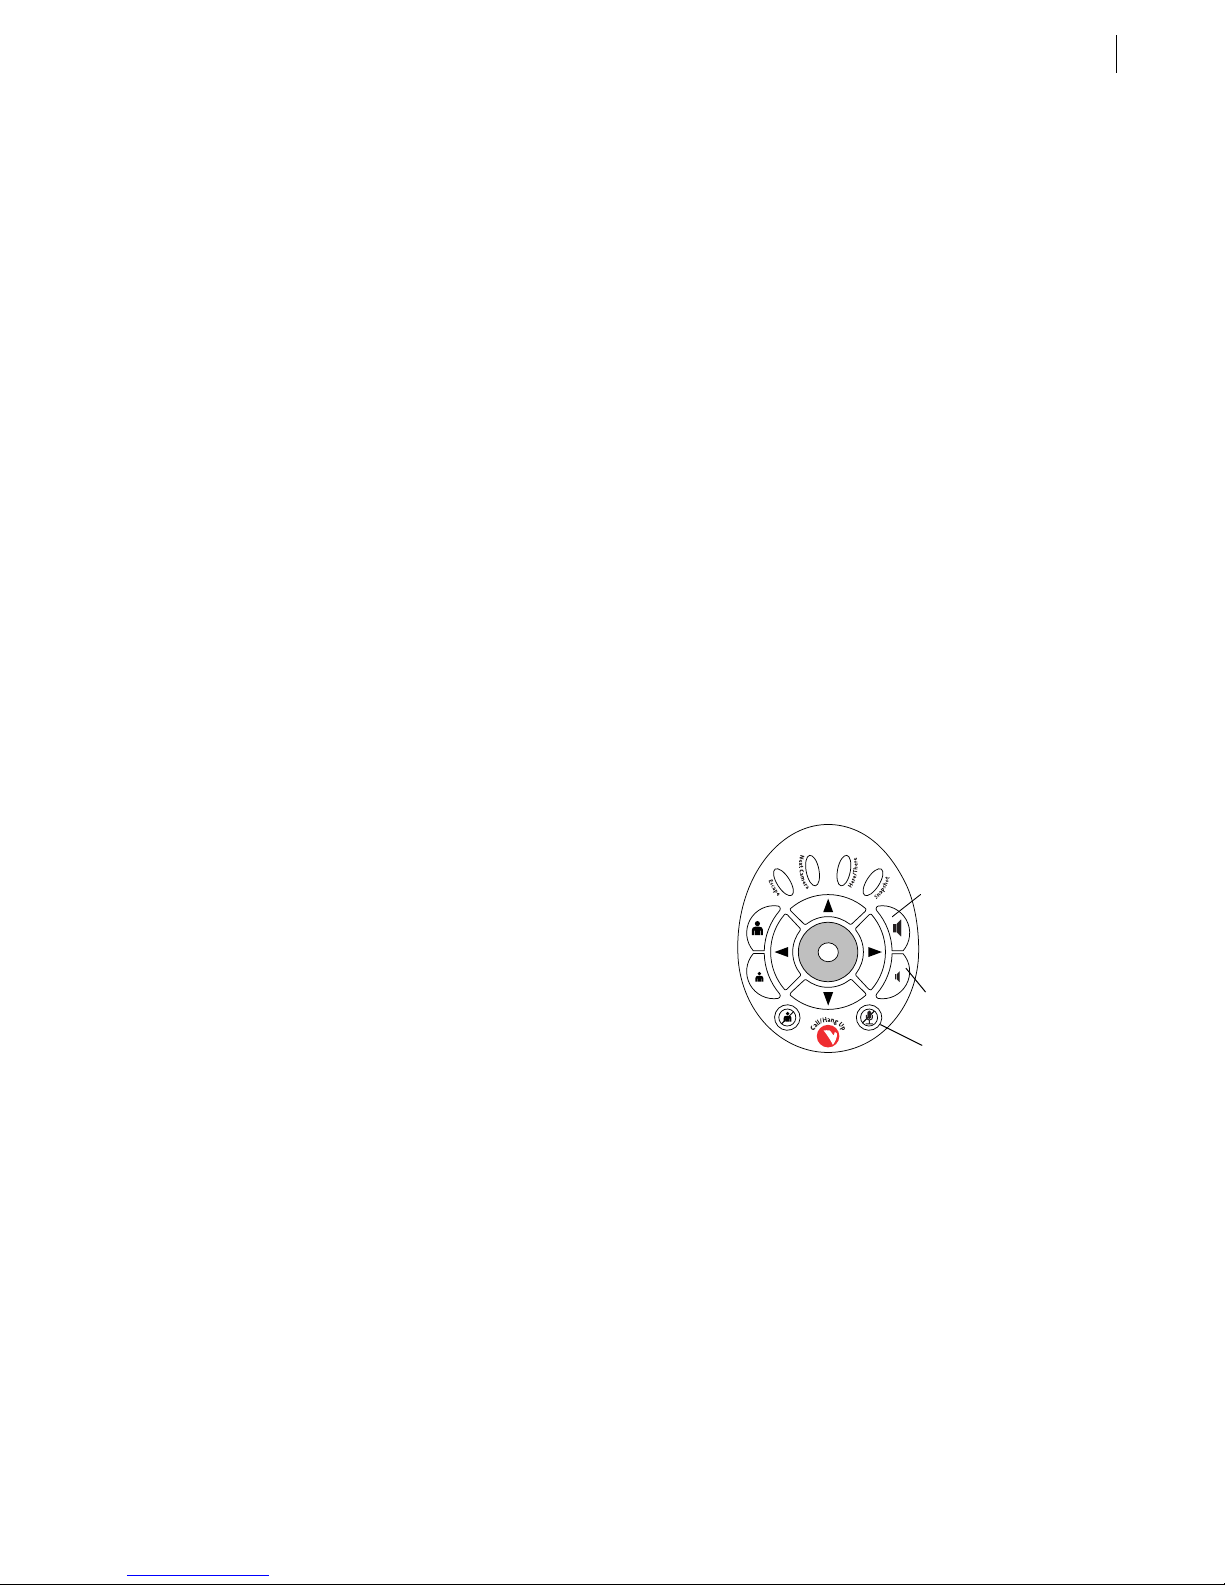
volume down
audio mute
volume up
Options During a Call
There are several common functions that most users are likely to perform during a videoconference:
adjust the volume
•
send or receive slides
•
change the camera view
•
move the camera to a memorized view
•
view the Picture-in-Picture (PIP) window
•
launch Extra programs
•
share an application
•
add a Speed Dial list entry
•
4.1
The following sections give brief explanations of each of these functions. For more detailed information, simply
press the
button on the remote control at any time.
Help
•
See page 1.2 for instructions on selecting on-screen buttons and
menus with the remote control.
Adjusting the Volume
To adjust the volume while in a call, use the
Volume Down
Use the
sent to the other site. This can be especially useful if you are
listening to a presentation, for example, and want to be sure that
you do not accidently interrupt.
buttons on the remote control.
Audio Mute
button to stop all of your audio from being
Volume Up
and
Sending Slides
The V
TOUCH
slides, or an entire presentation to the remote site. You may also draw on slides with easy-to-use annotation
tools. For a complete explanation of Slides, please see Chapter 5.
software includes a powerful component called “Slides” which you can use to send a graphic, a few
Changing the Camera View
With the V
to which you are connected. For example, this can be helpful when the far end speaker is referring to a
whiteboard that is not within the camera view. Instead of asking the speaker to change the camera angle, you can
perform that function from your own site.
TOUCH
software you have the ability to maneuver your own camera, as well as the camera at the site
Please note that not all systems support far end camera control, or some may have that function disabled.
Specifically, calls over a LAN network (H.323 standard) do not support this functionality.
Galaxy
TM
Page 18
4.2
Chapter 4. Options During a Call
•
Perform these functions when the monitor is filled with a video image.
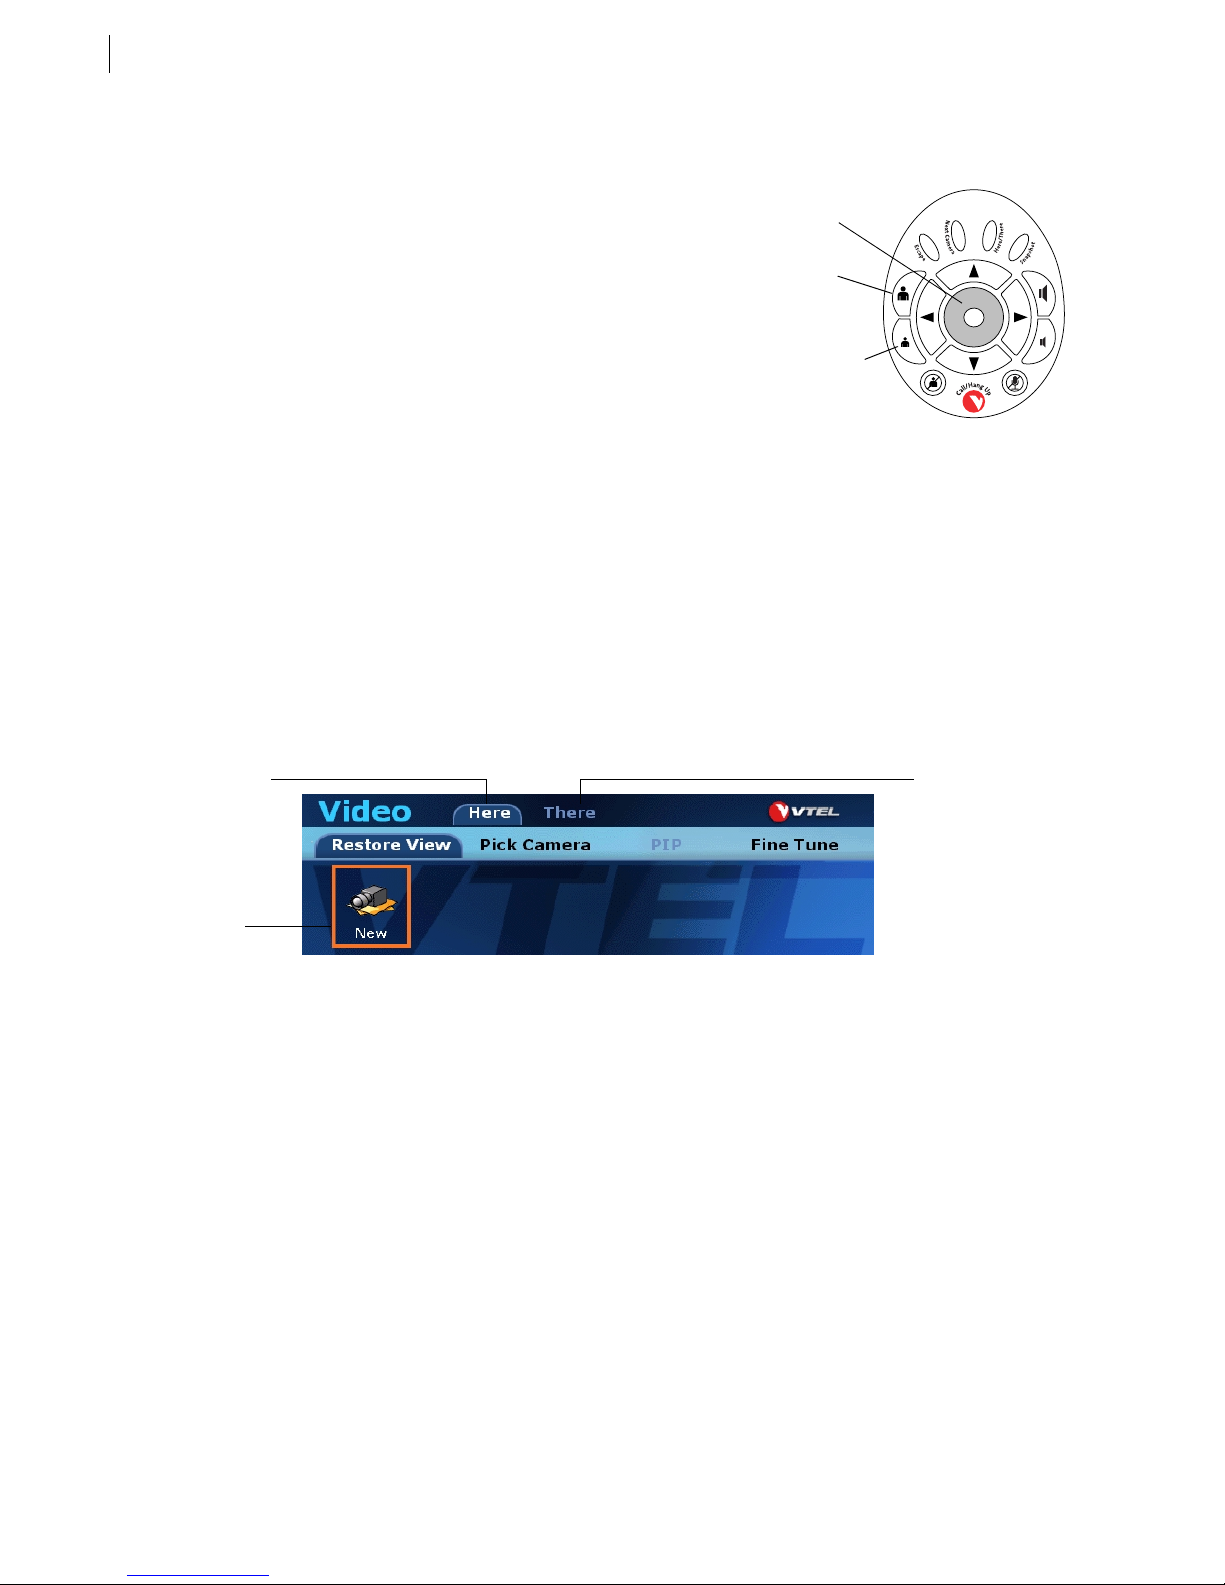
Moving the Camera at Your Site (Here)
1. The center of the remote control is a joystick that moves the local
camera control
joystick
camera up, down, left and right.
2. To zoom in or out, use the
Zoom In
and
Zoom Out
buttons on
zoom in
the remote control.
Moving the Camera at the Far Site (There)
1. To gain access to the remote camera controls, press the
Here/There
button on the remote control.
zoom out
2. Controlling the remote camera is the same as controlling the local
camera; simply move the joystick in the direction you want the camera to move.
Restoring Camera View
Moving the camera manually takes time and attention away from your focus on the meeting. Since there are a
limited number of positions where you will actually point the camera during a meeting (such as a group shot,
individual participants or a whiteboard) the system allows you to jump quickly among memorized camera
positions.
To access these memorized camera views press the
tab.
View
Here
Select
camera views of
your local site.
to save
button on the remote control, then select the
Video
Restore
There
Select
save camera views
of the remote site.
to
New
Add a
camera view.
•
The following features can apply to both ends of a conference — your
site (Here) and the site you are connected to (There) — if the remote
system supports far end camera control. Use the
on the remote control to switch between control of the two sites.
Here/There
button
Automatically Saving Views (Dual Monitor Systems Only)
The V
TOUCH
and remains idle for several seconds. The default number of saved Views is five. After the fifth View has been
saved, the next View will replace the first (oldest) View.
software will automatically save a View each time the camera moves to a new position then stops
•
Your system administrator can increase or decrease the number of
saved Views. The maximum number is eight.
Manually Saving Views
You can set a View yourself by focusing the camera on the position you wish to save and then selecting
the
Restore View
menu. A small snapshot of the current View is saved on the menu, along with a number
denoting the position of the View.
New
on
Getting Started Guide
Page 19
Viewing the Picture-in-Picture (PIP) Window
•
If you have manually created five Views and then move the camera via
the joystick, an automatic View will be saved which will overwrite your
first saved View.
Going to a Saved View
To move the camera to a saved View, select the appropriate View snapshot on the
camera view will move to that location.
Each View is saved
with a number and a
small snapshot of
that camera view.
Restore View
menu and the
Viewing the Picture-in-Picture (PIP) Window
There are two types of Galaxy systems — single monitor and dual monitor. When a single monitor system is
connected in a call, the monitor displays the remote site (There). A PIP window is useful so that the local site
(Here) can verify that they are in the camera view and move their camera as needed. Dual monitor systems
display the remote site (There) on the left monitor and either the local site (Here) or graphics on the right
monitor. When displaying graphics on the right monitor, a PIP window may be useful to the local site.
4.3
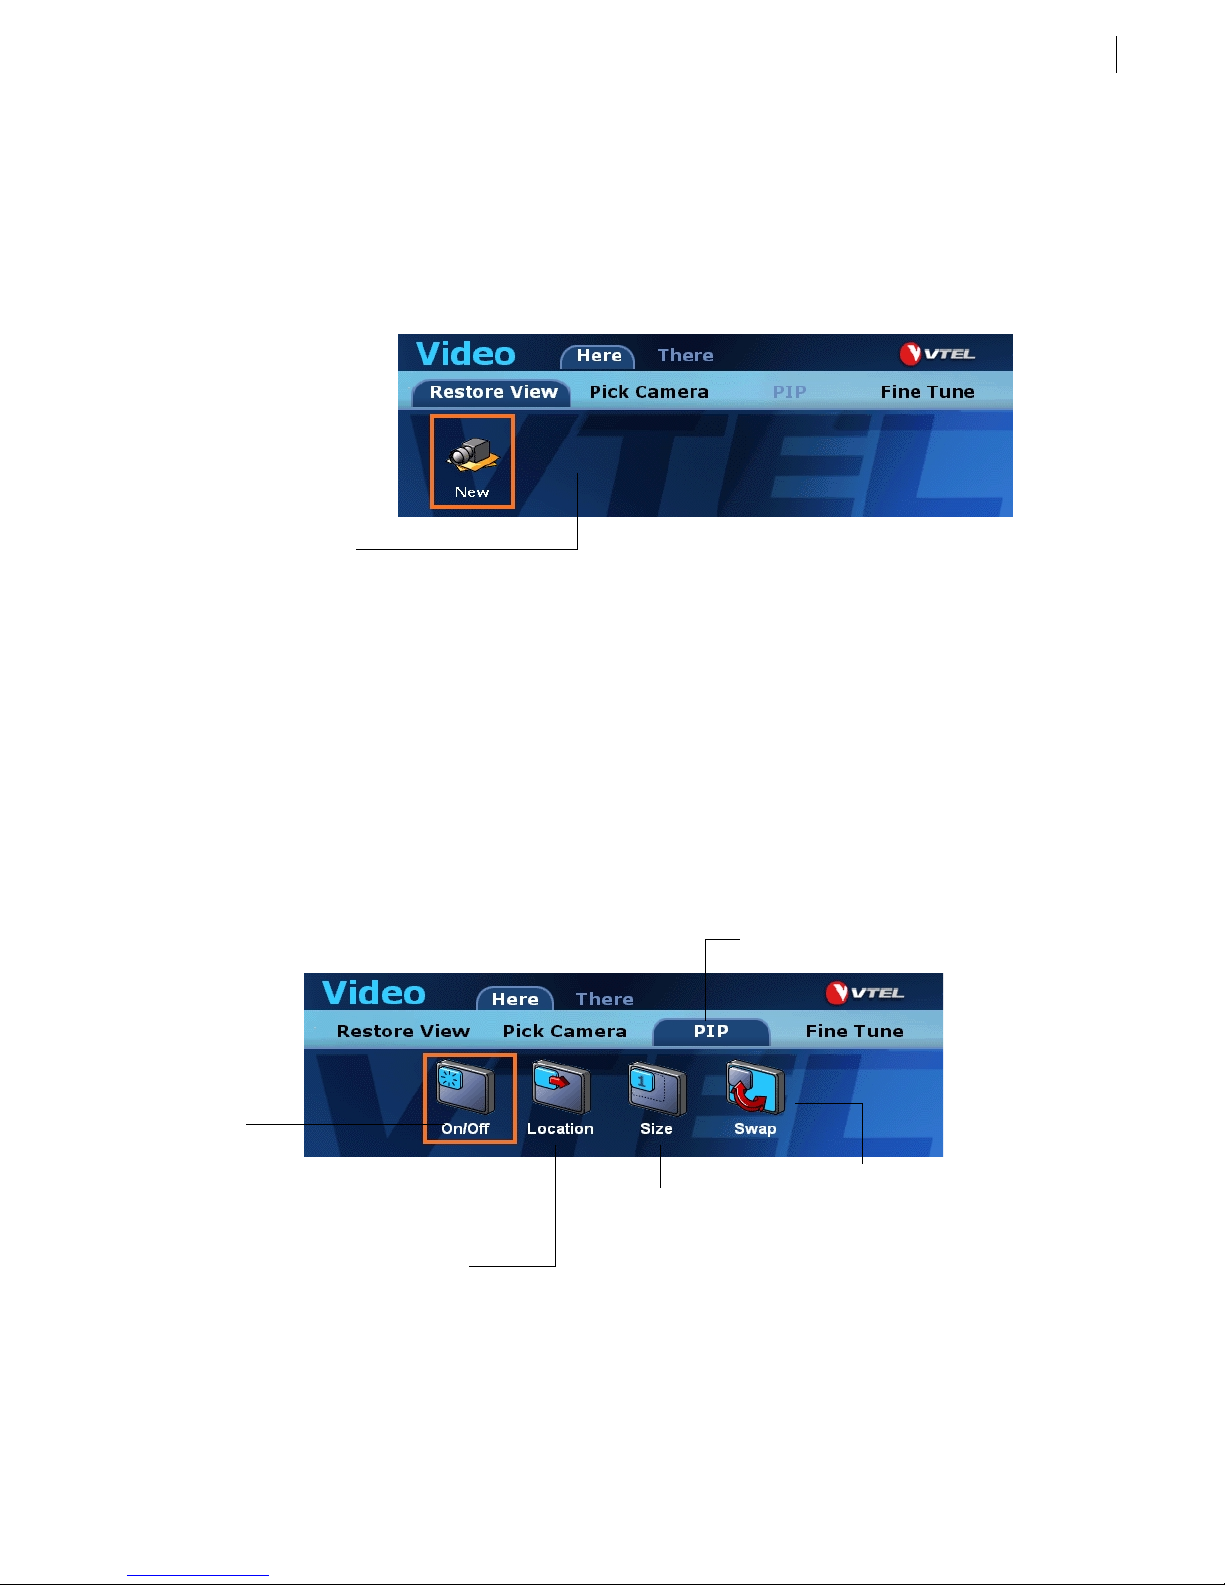
1. Click the
button on the remote control. The
Video
2. Select the PIP tab to display the
Turn the PIP
feature on
and off.
There are four locations for the
PIP window (four corners). Each
time you select this button the
PIP window will move to the
next possible location.
PIP
menu:
menu will appear.
Video
Choose a size for
the PIP — large or
small.
Select the
PIP
tab.
Swap
the PIP window display. You
can choose to show your own local
video (Here) in the main window
and the remote video (There) in
the PIP window, or vice versa.
Galaxy
TM
Page 20
4.4
Chapter 4. Options During a Call
Launching Extra Programs
The V
TOUCH
this computer, just as you would on your own desktop computer. While you are in a videoconference you can
access these applications with the
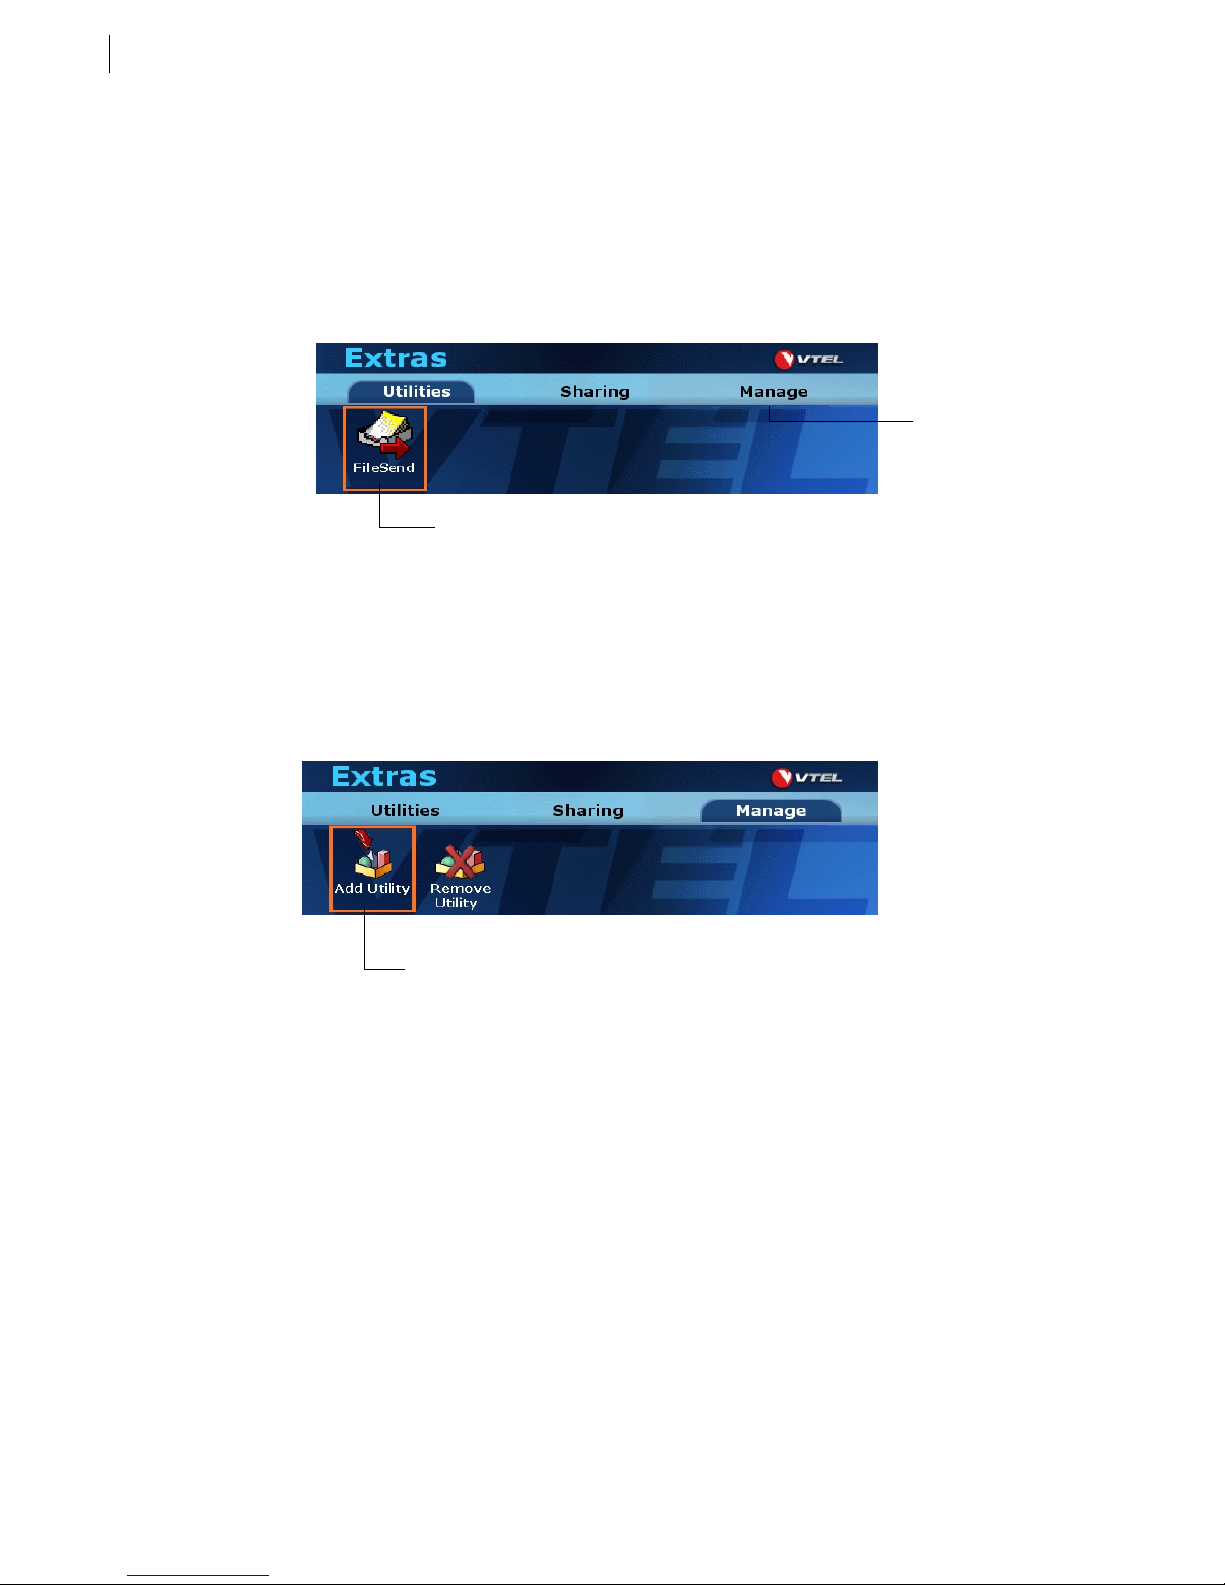
Opening the Extras Screen
Click the
software operates on a fully-functional Windows-based computer. You can install applications on
menu so you do not have to exit the V
Extras
button on the remote control to display the
Extras
Extras
TOUCH
menu.
software.
Click
add or remove
Extras.
Manage
to
Adding an Extra
1. Select
2. Select the
Manage
on the
Add Utility
FileSend
already been
added for you.
menu.
Extras
button.
Click here to add a
new Extra utility.
has
Getting Started Guide
Page 21
Sharing an Application
4.5
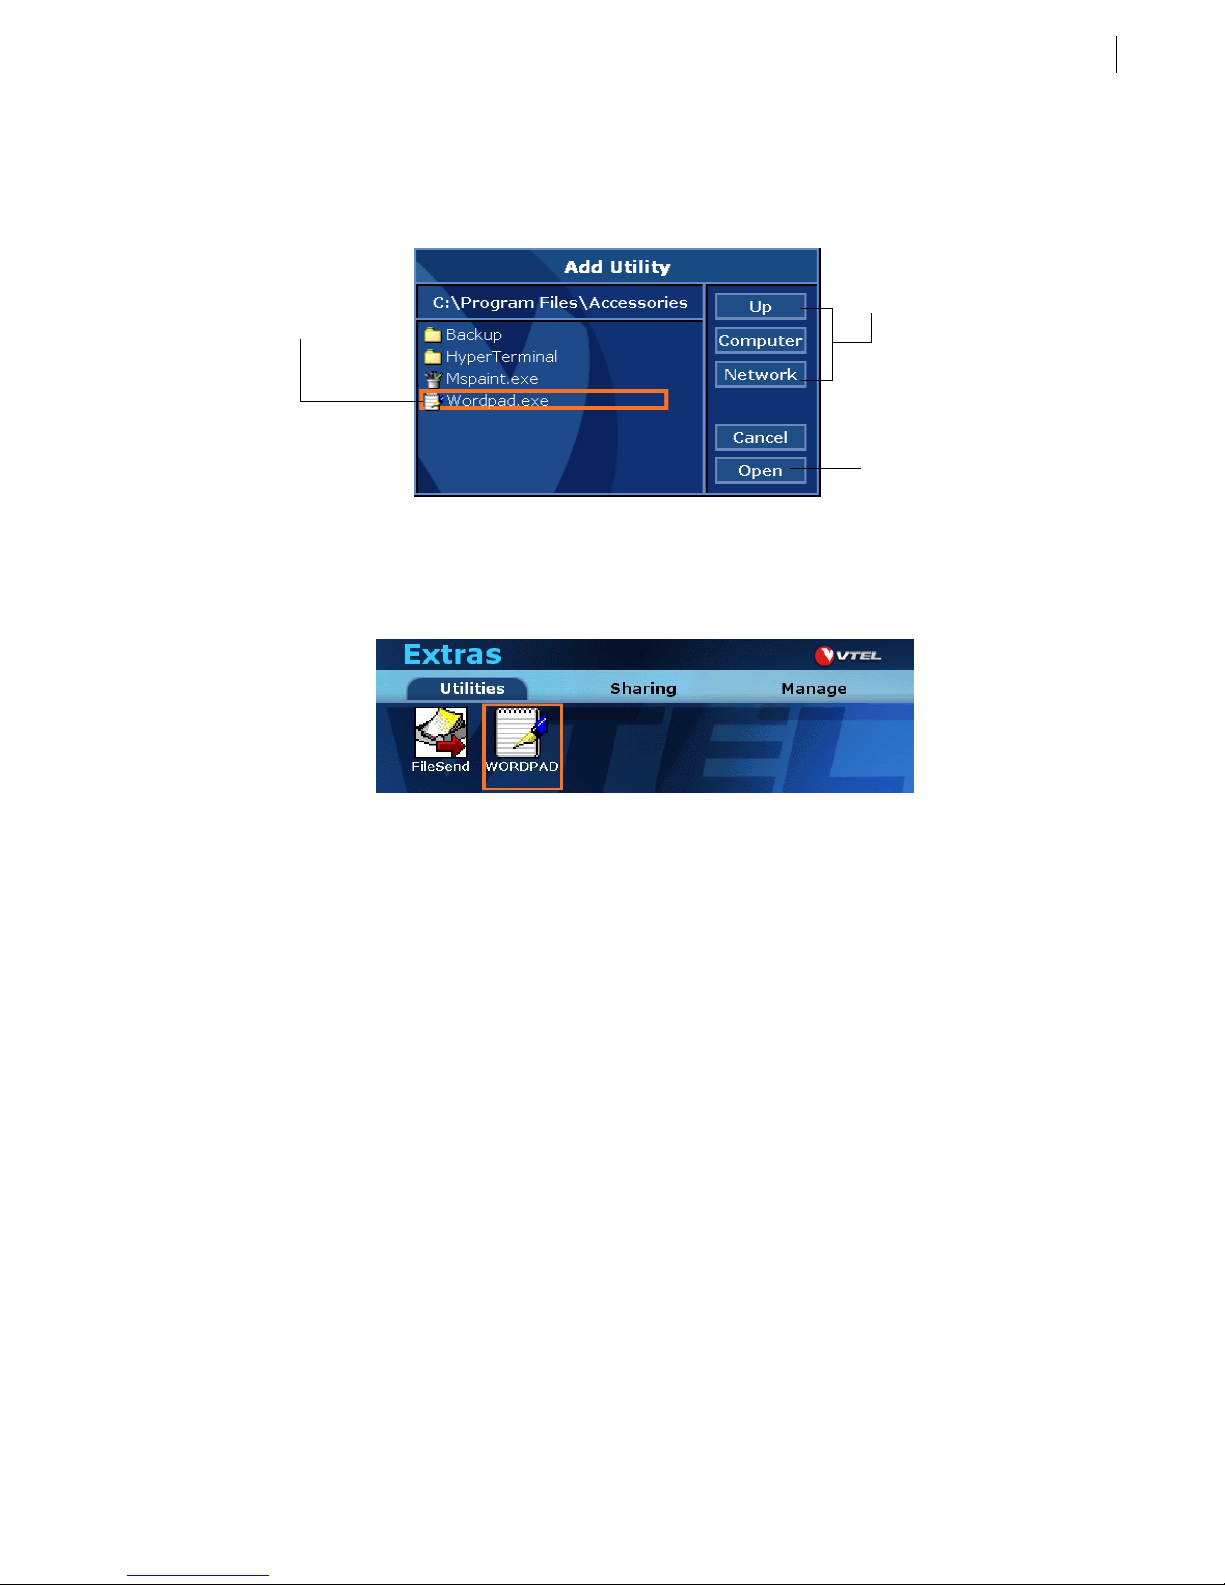
3. Use the
Add Utility
window to locate the name of the program you wish to add. Highlight the name of
the program in the list, then select the
the WordPad application.
Select the name of
the program you
want to add.
4. Click the
Utilities
tab to view the application you added.
button on the right. In this example we have chosen to add
Open
Use these buttons to browse to
other locations on the local
computer or your company’s
network.
Open
Select
the program on your
Extras screen.
to place
Sharing an Application
•
Application sharing is an optional feature.
During a videoconference you may want to collaborate on a file or project. The application sharing feature
allows both sites to view and work on the same document, such as a spreadsheet or memo.
1. Press the
2. Select a Utility from the
this menu.) This will launch that application on your Galaxy system.
3. Select the
4. Select the application you want to share with the remote site. It will automatically be visible on their
system.
5. Both sides can edit the file as needed.
Quit Sharing an Application
1. Press the
2. Select the
button on the remote control.
Extras
Utilities
Sharing
Extras
Sharing
tab to display a list of all open applications on your system.
button on the remote control.
tab.
menu. (See the section above for instructions on adding applications to
Galaxy
TM
Page 22
4.6
3. Locate the application that you are sharing; its name will be underlined.
4. Select the application name. When the confirmation dialog box appears, select
Stop Sharing
.
Adding the Remote Site to the Speed Dial List
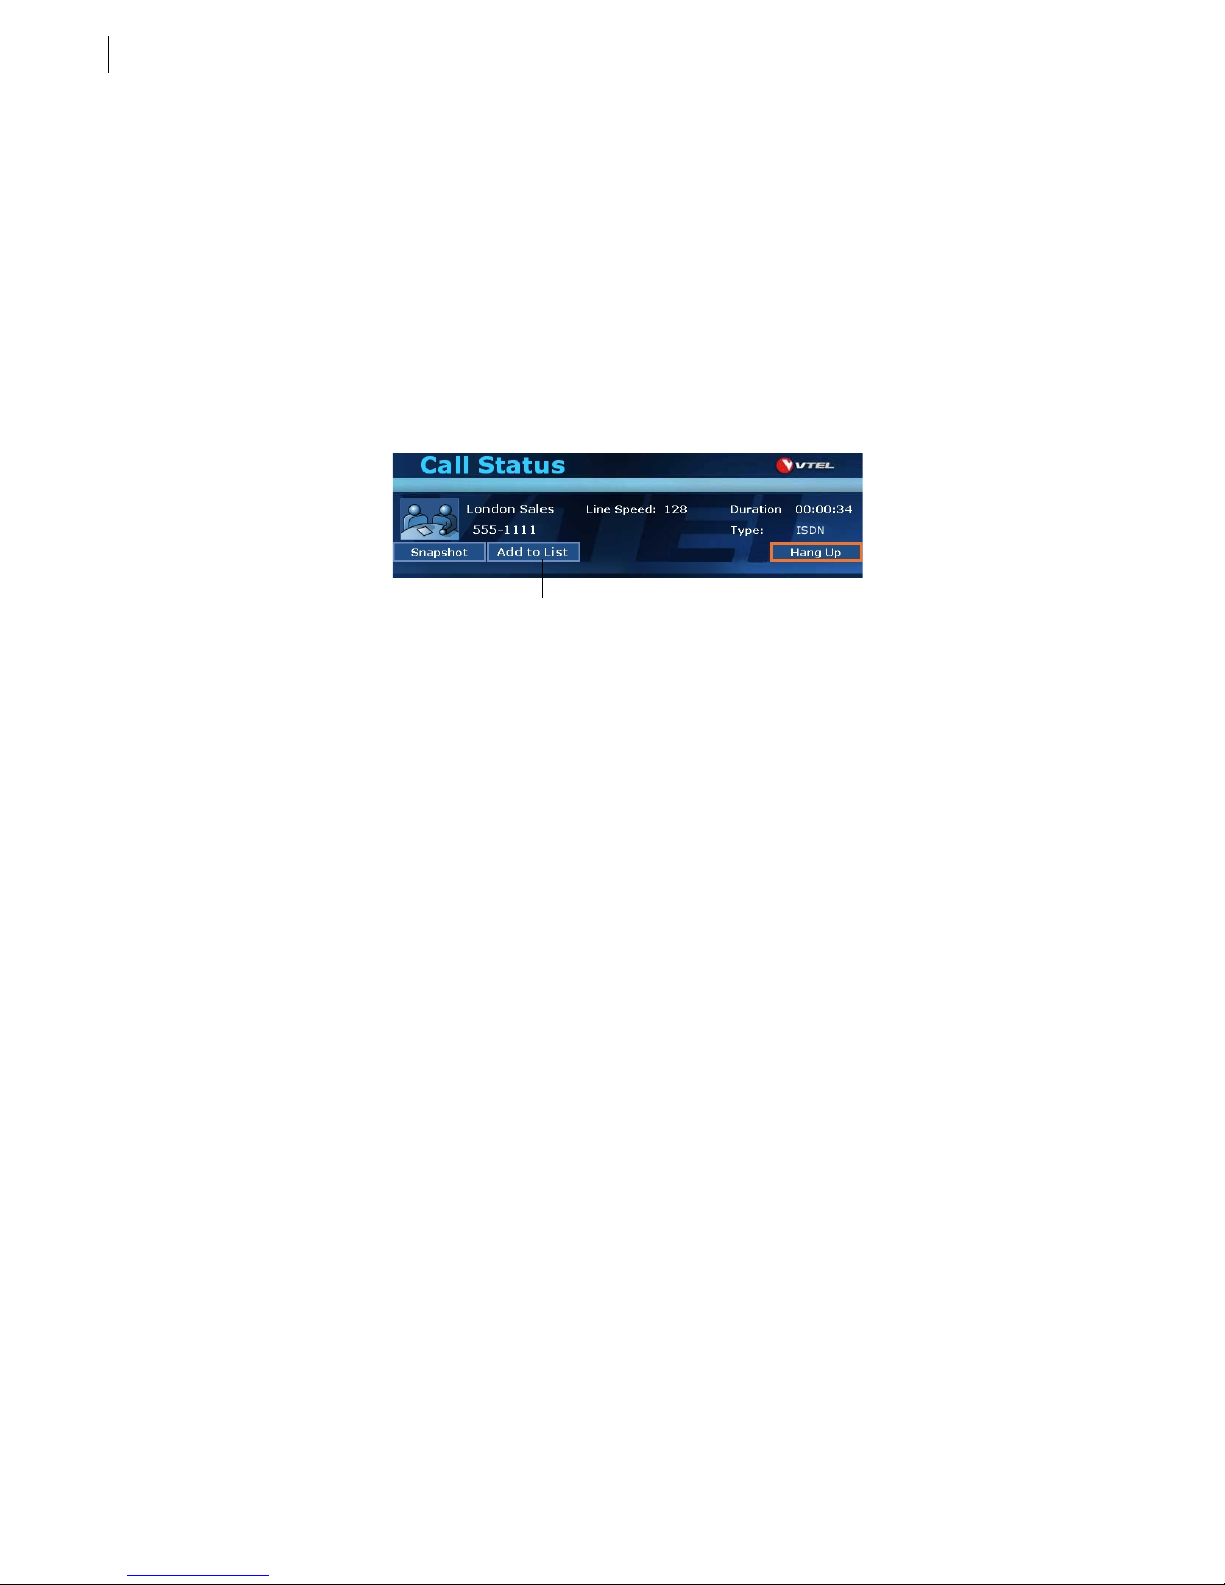
If you are connected to another Galaxy site that is not in your Speed Dial list, you can add it quickly while in a
call.
1. Press the red
Call/Hang Up
lower half of the monitor.
2. Select
Add to List
. This will save the site information into the Speed Dial list.
button on the remote control. The
Click here to add the remote site
to your Speed Dial list.
Call Status
screen will appear in the
Getting Started Guide
Page 23
Chapter 5
Working with Slides
During a videoconference you can send a graphic, a few slides, or an entire presentation to the remote site with
the Slides application. This chapter explains how to use Slides to make your presentation flow smoothly.
•
See page 1.2 for instructions on selecting on-screen buttons and
menus with the remote control.
Overview of Slides
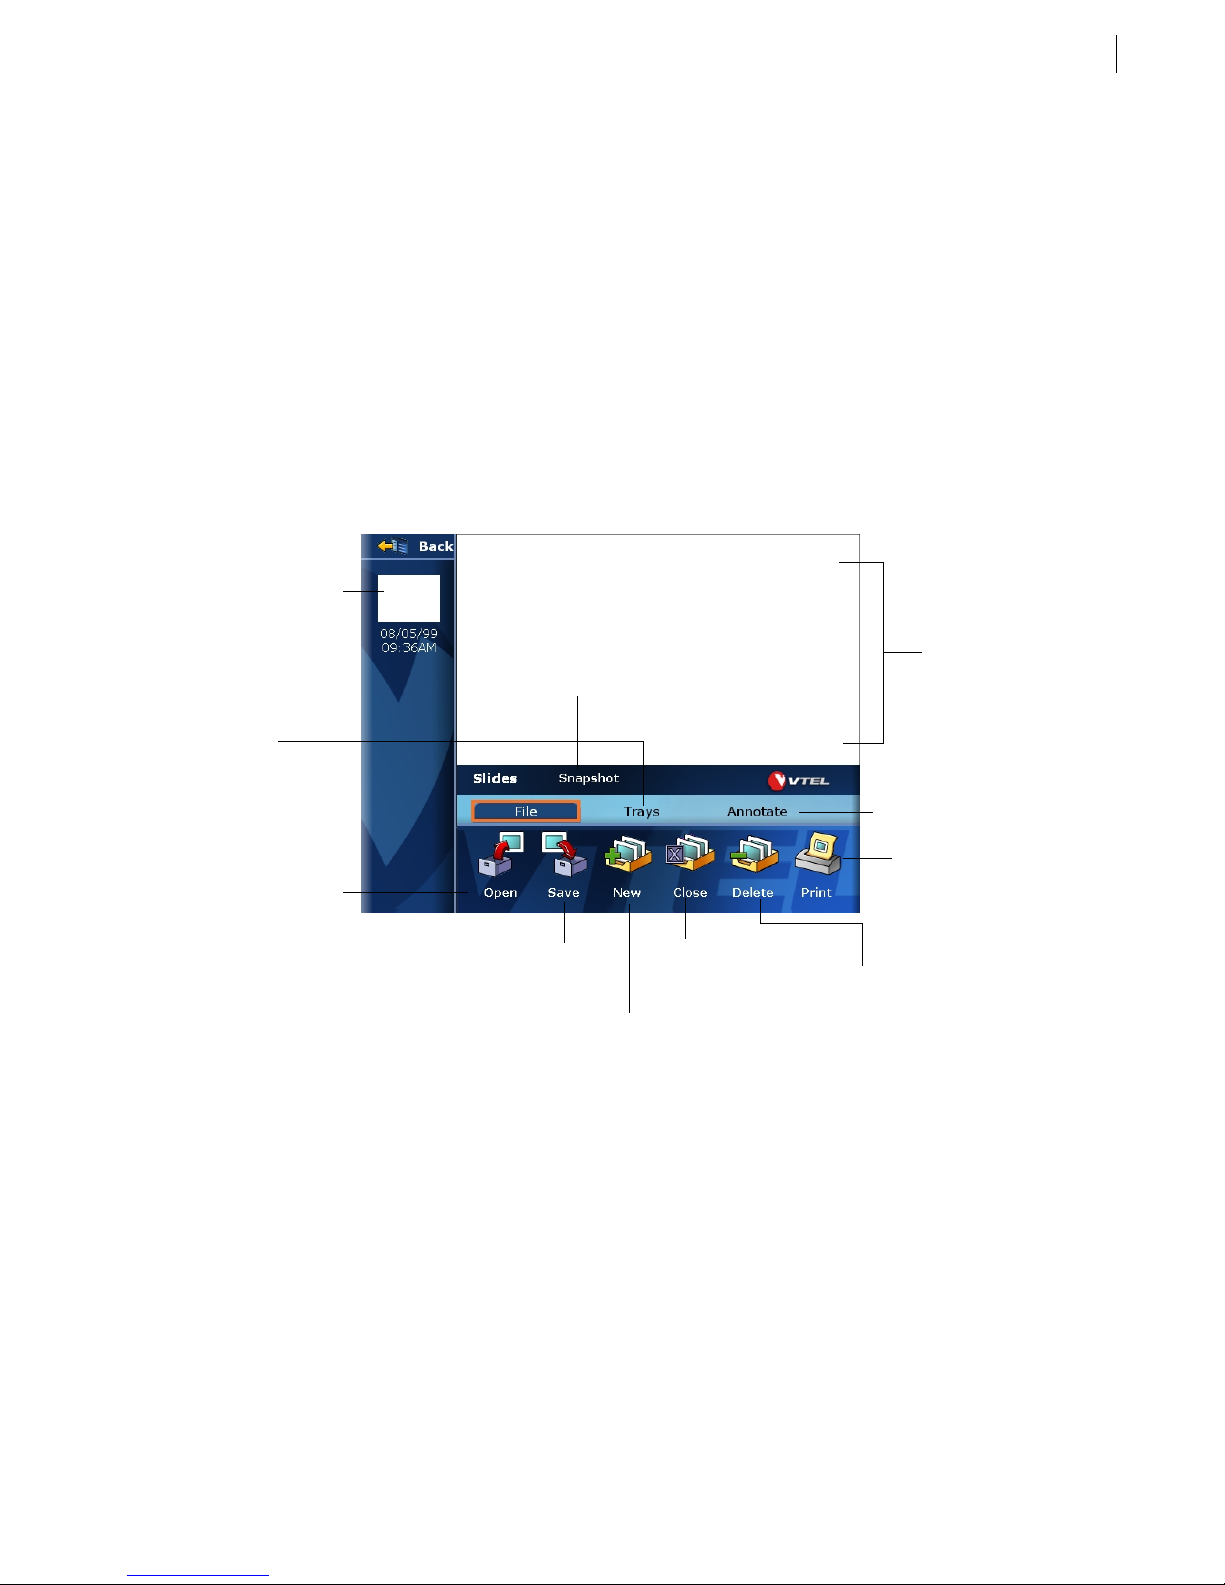
Open the Slides function by pressing the
Thumbnail views of
current slides
View a list of open
slide trays.
Slide Show
button on the remote control.
The name of the
active tray appears
here.
Slide viewing and
annotation area
5.1
Open the annotation
tools.
Print
the current
Delete
tray.
slide.
a slide
Open
an existing slide
tray, presentation or
graphic.
Save
changes to the
current slide tray.
Open a
slide tray.
Close
the currently
active slide tray.
New
Opening an Existing Slide Tray or Graphic
1. When the Slides application is open, select the
to a presentation (.ppt), graphic (.bmp, .jpg, .tga), or slide tray (.slt) file.
2. Locate the file you want to open and select
•
You can have several slide trays open at one time, although only one is
the
active
tray. Select
Open
Tray
to see a list of open trays.
button. A window appears so that you can navigate
Open
. The graphic(s) will appear in the column on the left.
Sending a Slide
To send a slide, select its thumbnail picture in the column on the left. The slide will appear in your viewing area
and will automatically be sent to the remote site.
Galaxy
TM
Page 24
5.2
Chapter 5. Working with Slides
Creating a New Slide Tray
A slide tray is a collection of individual slides that are saved as a group.
1. When the Slides application is open, select the
New
button.
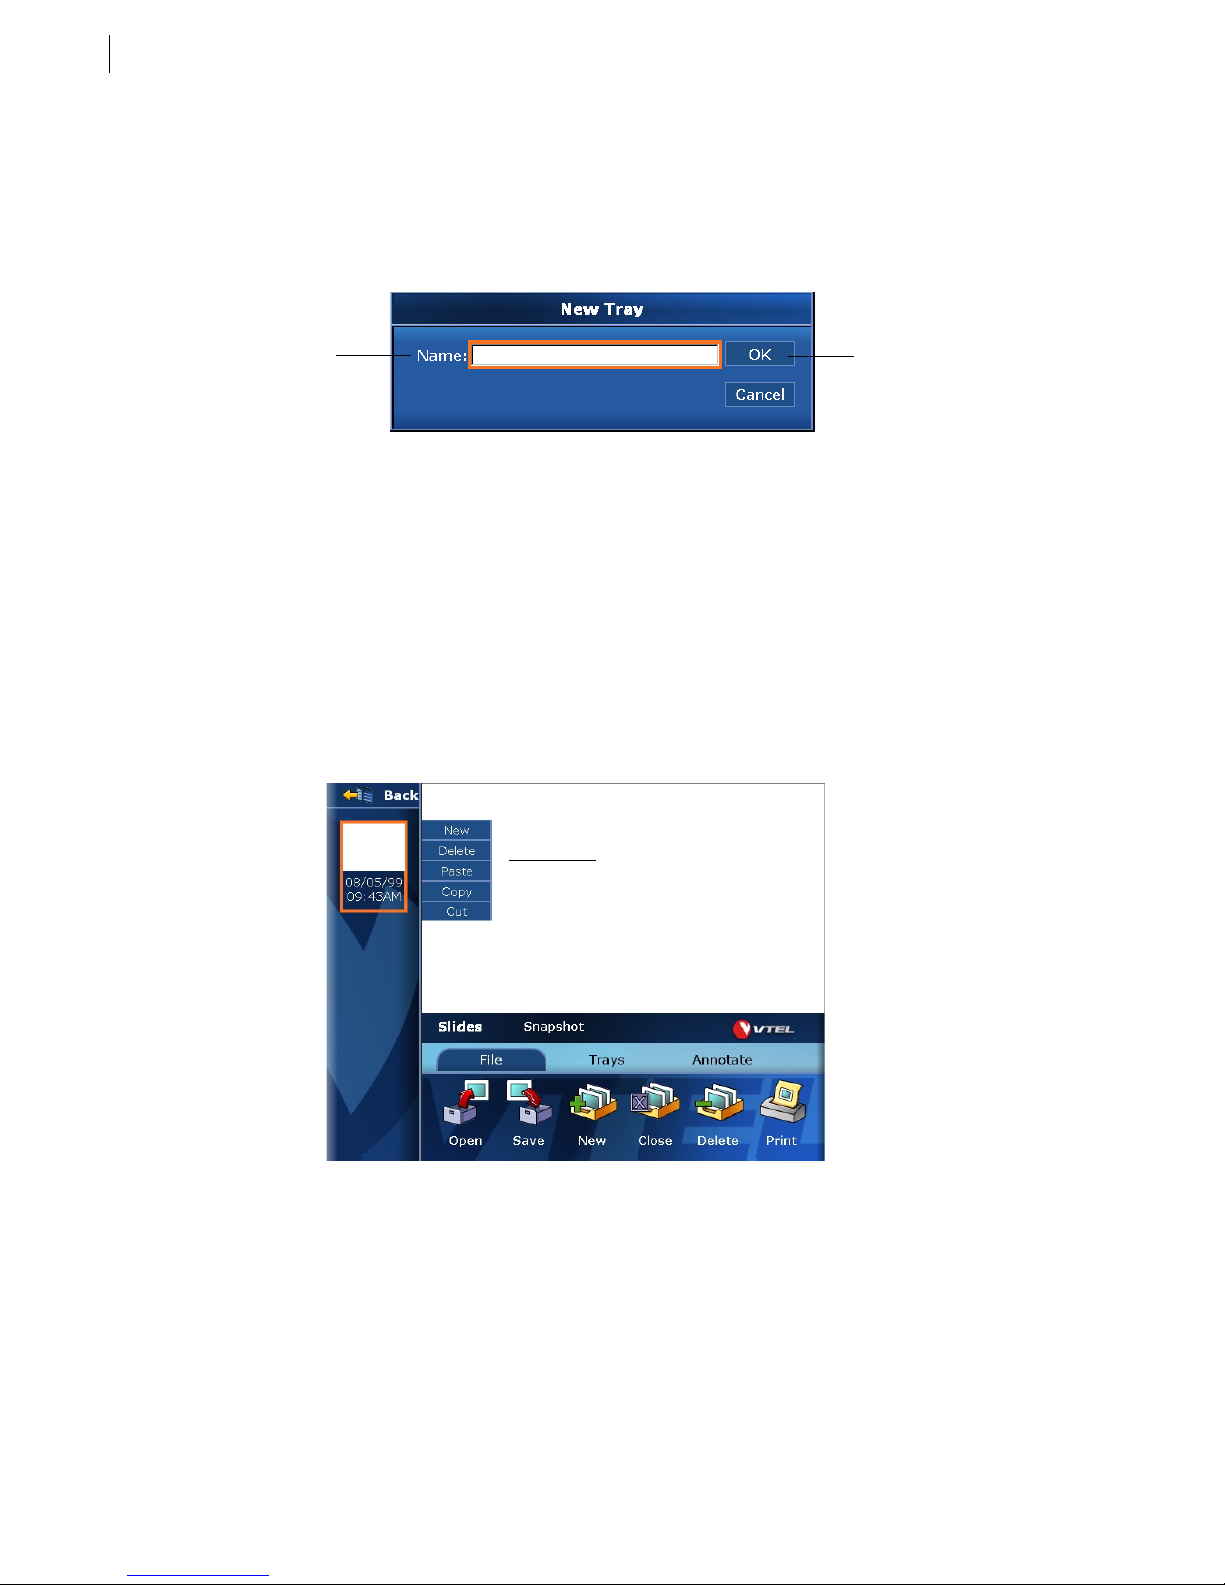
2. A window will appear so that you can name your new slide tray.
Type a name for
your new slide
tray here.
3. Use the
button to add graphics to your new slide tray.
Open
•
In order to make your videoconference flow more smoothly, you may
wish to create your new slide tray before you place a call.
Select OK to save
the new tray.
Rearranging Slides
1. Highlight the slide you wish to move or delete. A pop-up menu will appear next to the slide.
2. Select
clipboard.
from the pop-up menu. This removes the slide from the list, and copies it onto the computer’s
Cut
Use the pop-up menu to
rearrange your slide tray.
3. To place the slide in a new location, highlight another slide and select
from the pop-up menu. This
Paste
will paste the cut slide above it. For example, cut Slide B to the clipboard then highlight Slide A and
select
. Slide B will now appear above Slide A.
Paste
•
Only one slide at a time can exist on the clipboard. Selecting
will delete the previous slide from memory and save the new slide
instead.
Cut
again
Getting Started Guide
Page 25
Annotating on a Slide
Annotating on a Slide
The pull-out tablet attached to the wireless keyboard is provided for annotating on slides. Simply slide the tablet
out until the yellow light is activated. Remove the pen from its holder and use it to “write” on the tablet. When
the pen is touching the active area of the tablet, the yellow light will turn green. You can view your annotations
onscreen as you write on the tablet. Annotations are automatically sent to the site to which you are connected.
5.3
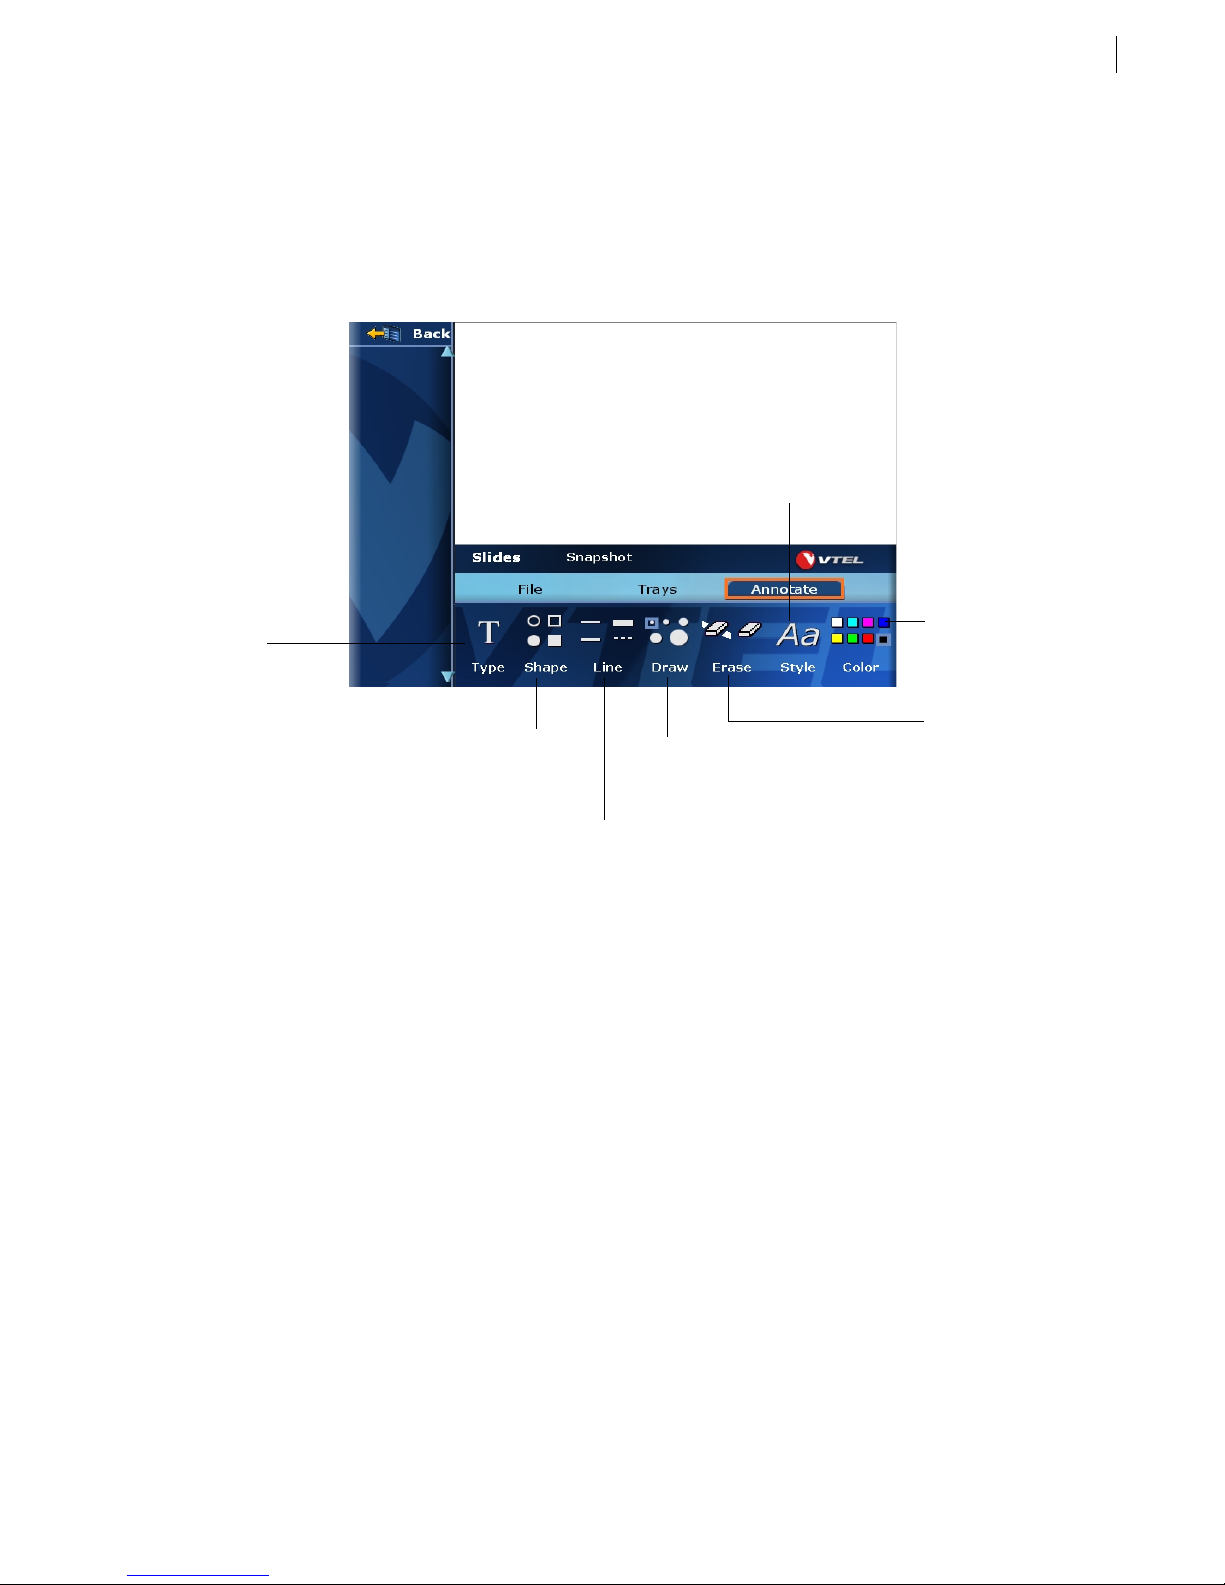
You can access more annotation choices by selecting
Activate the
typing tool.
Choose a shape to draw, and
whether it should be filled or
not filled.
Activate the line tool and select a
line width.
Annotate
in the Slides application:
Select a type style, such as
bold or italic, and choose a
font and point size.
Activate the freehand pen tool
and select a width.
Change the current
annotation color.
Erase annotations.
Printing a Slide
Select the
your default printer.
button in the Slides application. The slide that is currently in your viewing area will be printed to
Print
Saving a Slide Tray
When you open a graphic or presentation in the Slides application, it is automatically saved in the active slide
tray. The default Snapshot tray is the active tray, unless you have opened a different tray.
When you are finished with a videoconference, select the
your tray. Otherwise, the slides will simply be saved into a tray with the current date and time.
button. This will allow you to specify a name for
Save
Galaxy
TM
Page 26
5.4
Chapter 5. Working with Slides
Managing Slide Trays
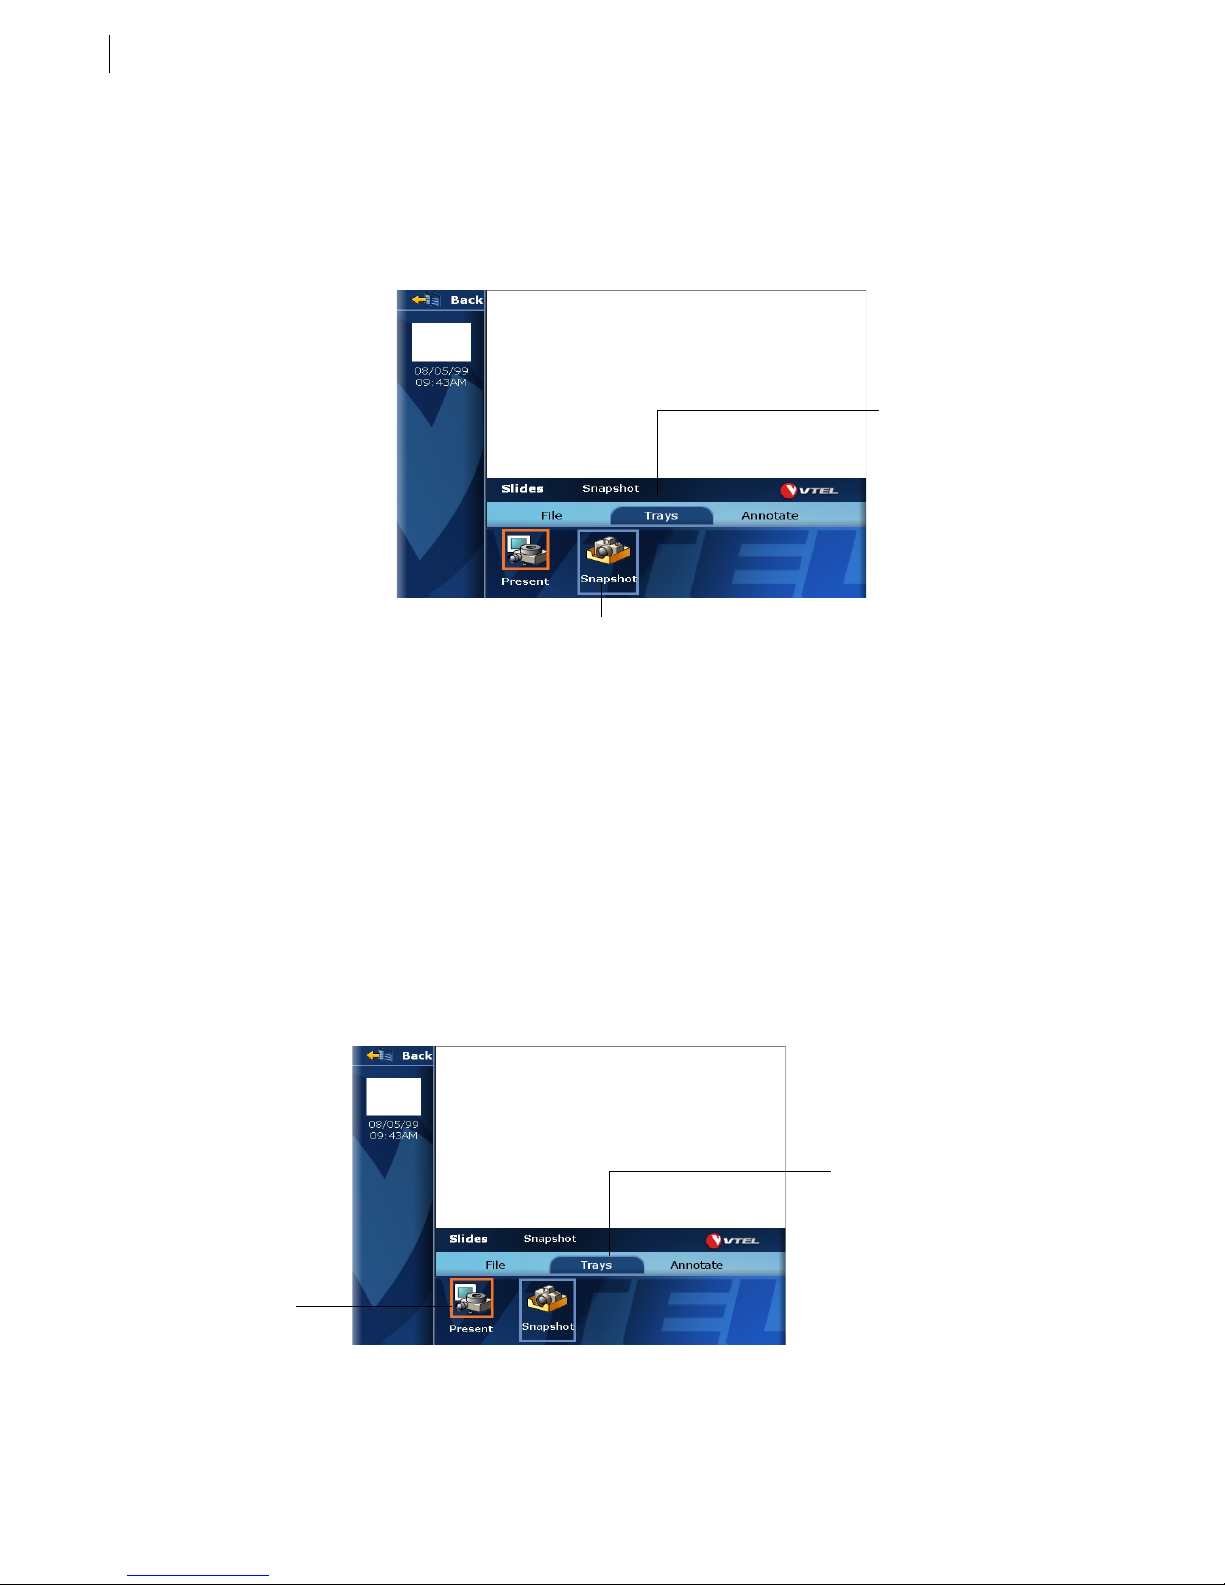
You can have several slide trays open at one time. Use the
menu to choose which tray to view.
Trays
1. Select
in the Slides window.
Trays
2. Select the tray you want to display.
Trays
Select
Select the tray you want to view
from the list of open trays.
Present Mode
If you want your audience to concentrate only on your slides and not be distracted by any other objects, use
Present mode. When you select
possible.
Present
the Slides window disappears and your slides fill the monitor as fully as
•
When you select
remote user (There) will also need to perform the steps below to use
Present mode at their site.
Entering Present Mode
1. Select the
2. Select the
Present
Select
tab in the Slides window.
Trays
Present
button.
Present
it affects your local site only (Here). The
Trays
Select
Getting Started Guide
Page 27

Receiving a Slide
Using Present Mode
To display your slides one by one, use the down or right arrow buttons on the remote control to proceed to the
next slide. Use the left or up arrow buttons on the remote control to display the previous slide.
Exiting Present Mode
Press the
button on the remote control to exit Present mode and return to the Slides window.
Escape
Receiving a Slide
When the remote site sends a slide, the Slides window will appear and the new slide will be visible in the viewing
area. You do not have to do anything on your local system to make the slide appear.
5.5
The V
TOUCH
software will automatically create a slide tray to save the incoming slides. The tray will be named
with the current date and time.
Closing a Slide Tray
Select the
trays will remain open.
After you close a tray, the default Snapshot tray becomes the active tray. The default Snapshot tray cannot be
closed.
button in the Slides window. This will close the currently active slide tray. All other open slide
Close
Galaxy
TM
Page 28

5.6
Getting Started Guide
Page 29
Chapter 6
Multiway Conferencing
There are two types of videconferences: point-to-point and multipoint. In a point-to-point conference, two sites
are connected directly to each other. In a multipoint conference, several sites are all connected to a multipoint
control unit (MCU). All of the sites can hear each other, but there are several options for video display which are
controlled by features of the MCU and also the V
TOUCH
software.
6.1
This chapter explains how to participate in a multipoint conference and how to use the V
features.
•
Please note that there are some differences in the way that the Galaxy
software interacts with different MCUs. Where applicable, these
differences will be noted for the VTEL MCU-II and the VTEL SmartLink.
Contact your system administrator if you are unsure how to proceed.
TOUCH
software
Before Joining a Conference
When you join a MCU conference, you will need to know the number to dial. In some cases, this may even be
unnecessary if the MCU has placed a call to your system. Your system administrator will assist you with the
correct procedure.
Joining a Conference
1. Press the red
2. Use the Hand Dialer or Speed Dial list to dial the conference telephone number. (See Chapter 3 for
information on the Hand Dialer and Speed Dial list.)
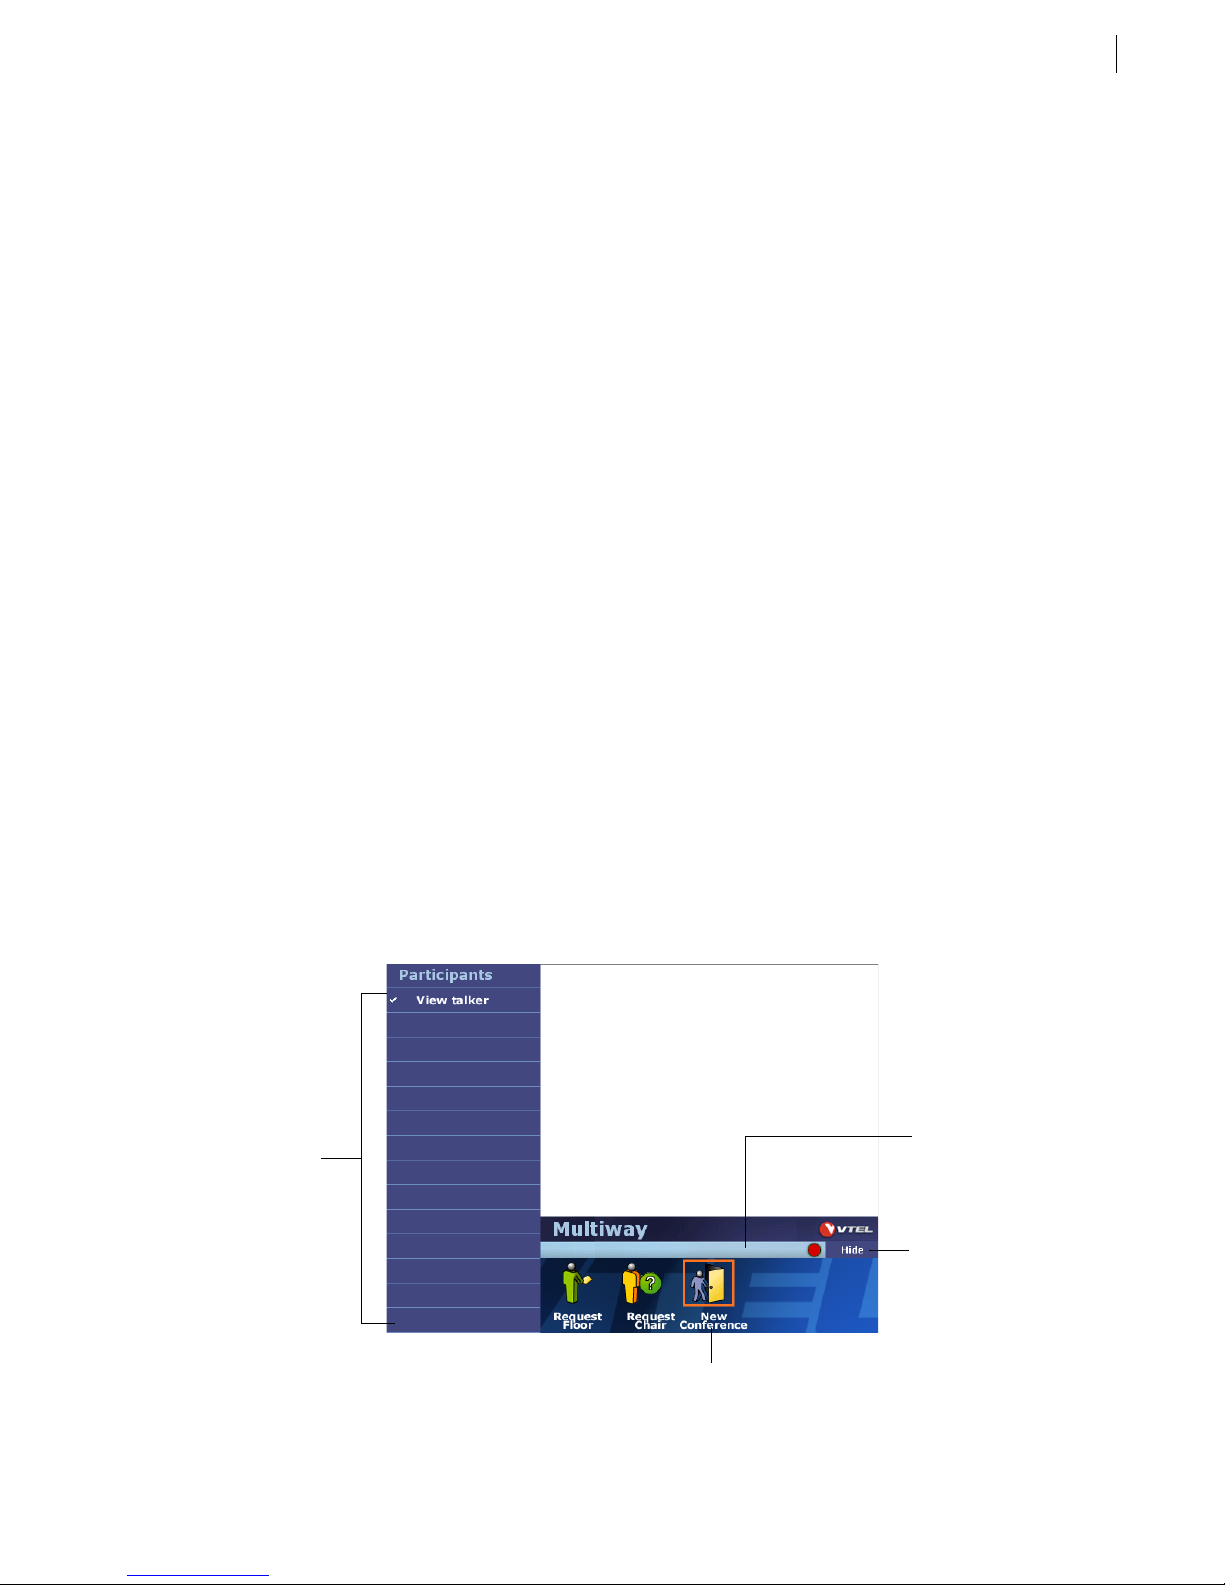
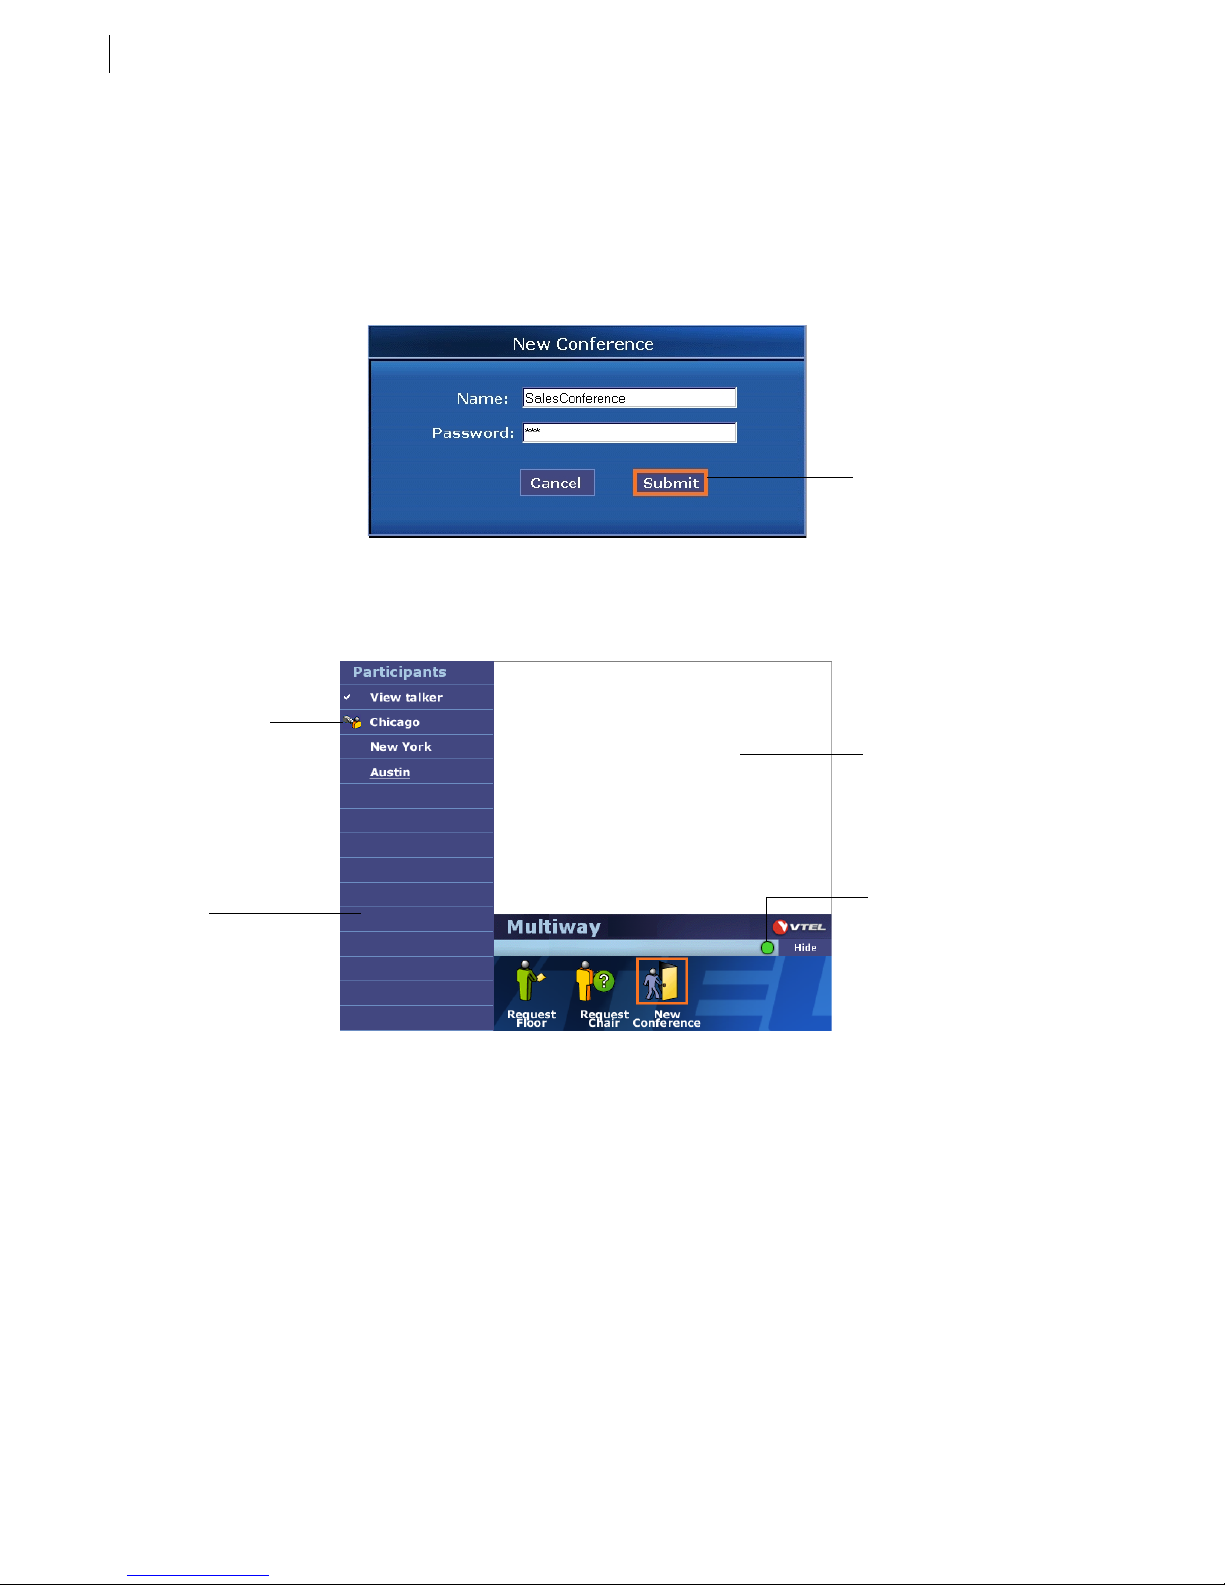
After the call is connected, the following Multiway screen will appear:
Call/Hang Up
button on the remote control to view the
Call
screen.
All conference
participants will be
listed here as they
join the conference.
New Conference
Select
Status messages
appear on this bar.
Hide
Select
more video and only
a small part of this
Multiway screen.
to join or create a conference.
to see
Galaxy
TM
Page 30
6.2
Chapter 6. Multiway Conferencing
3. Normally you will automatically be part of a conference after your call connects. However, in some rare
cases with an MCU-II you may need to select the
New Conference
button to join or create a new
conference.
When the
New Conference
•
The conference name and password are case-sensitive.
window appears, enter the conference name and password and select
Select
enter a conference
name and password.
When you have successfully joined the conference, you will see several on-screen indicators:
This graphic indicates
which site is the
Chairperson.
Video from one of the
other Participants will
appear in your viewing
area.
Submit
Submit
after you
.
All other sites that are
connected in your
conference appear in
this list.
This light is green
when you are being
viewed by another site.
When the light is red,
no one is viewing your
site.
Viewing Participants
Usually during a multiway conference you will want to view the site that is talking at that moment. If you select
View talker
in the Participants list, the software will automatically show you the video for the site that is
speaking. The name of the site that you are viewing is underlined in the Participants list.
If you prefer to view a specific site, select that site name from the Participants list. You can return to
automatically viewing the speaker by selecting
View talker
at any time.
Participating in a Conference
There are two types of multiway conferences — those that have a Chairperson and those that do not. The way
you participate in each of these is slightly different.
Getting Started Guide
Page 31
Controlling a Conference
Conference without a Chairperson
You can speak at any time and participate in the conference, as needed. You may want to select the
to minimize the Multiway screen, since you probably will not need to use any software controls.
Hide
button
Conference with a Chairperson
When a conference has a Chairperson, all sites may still speak freely and be heard by the other Participants.
However, the Chairperson controls the video that is displayed to the Participants.
‘View Talker’ Mode
The default setting is
View talker
selected, all Participants see the video of the site that is currently speaking.
Broadcast Mode
The Chairperson may decide to turn off the
Participants. For example, if the Chairperson is giving a presentation, he or she can broadcast that presentation
to all other sites. Even if another Participant speaks, the video will remain on the Chairperson.
If the Chairperson is broadcasting one specific site but you would like to show your video to the other
Participants, select
Request Floor
screen.
, which is the same as conference without a Chairperson. When
View talker
setting and instead broadcast one specific site to all the
View talker
on the Multiway screen and your request will appear on the Chairperson’s
is
6.3
Controlling a Conference
Becoming the Chair
If you want to become the Chairperson of your conference, select
Request Chair
request this position, you will automatically be granted the Chair. If another site already has Chairperson
privileges, they will have to choose to select the
Release Chair
button. The MCU will then grant the Chair to the
next requester.
Chairperson Functions
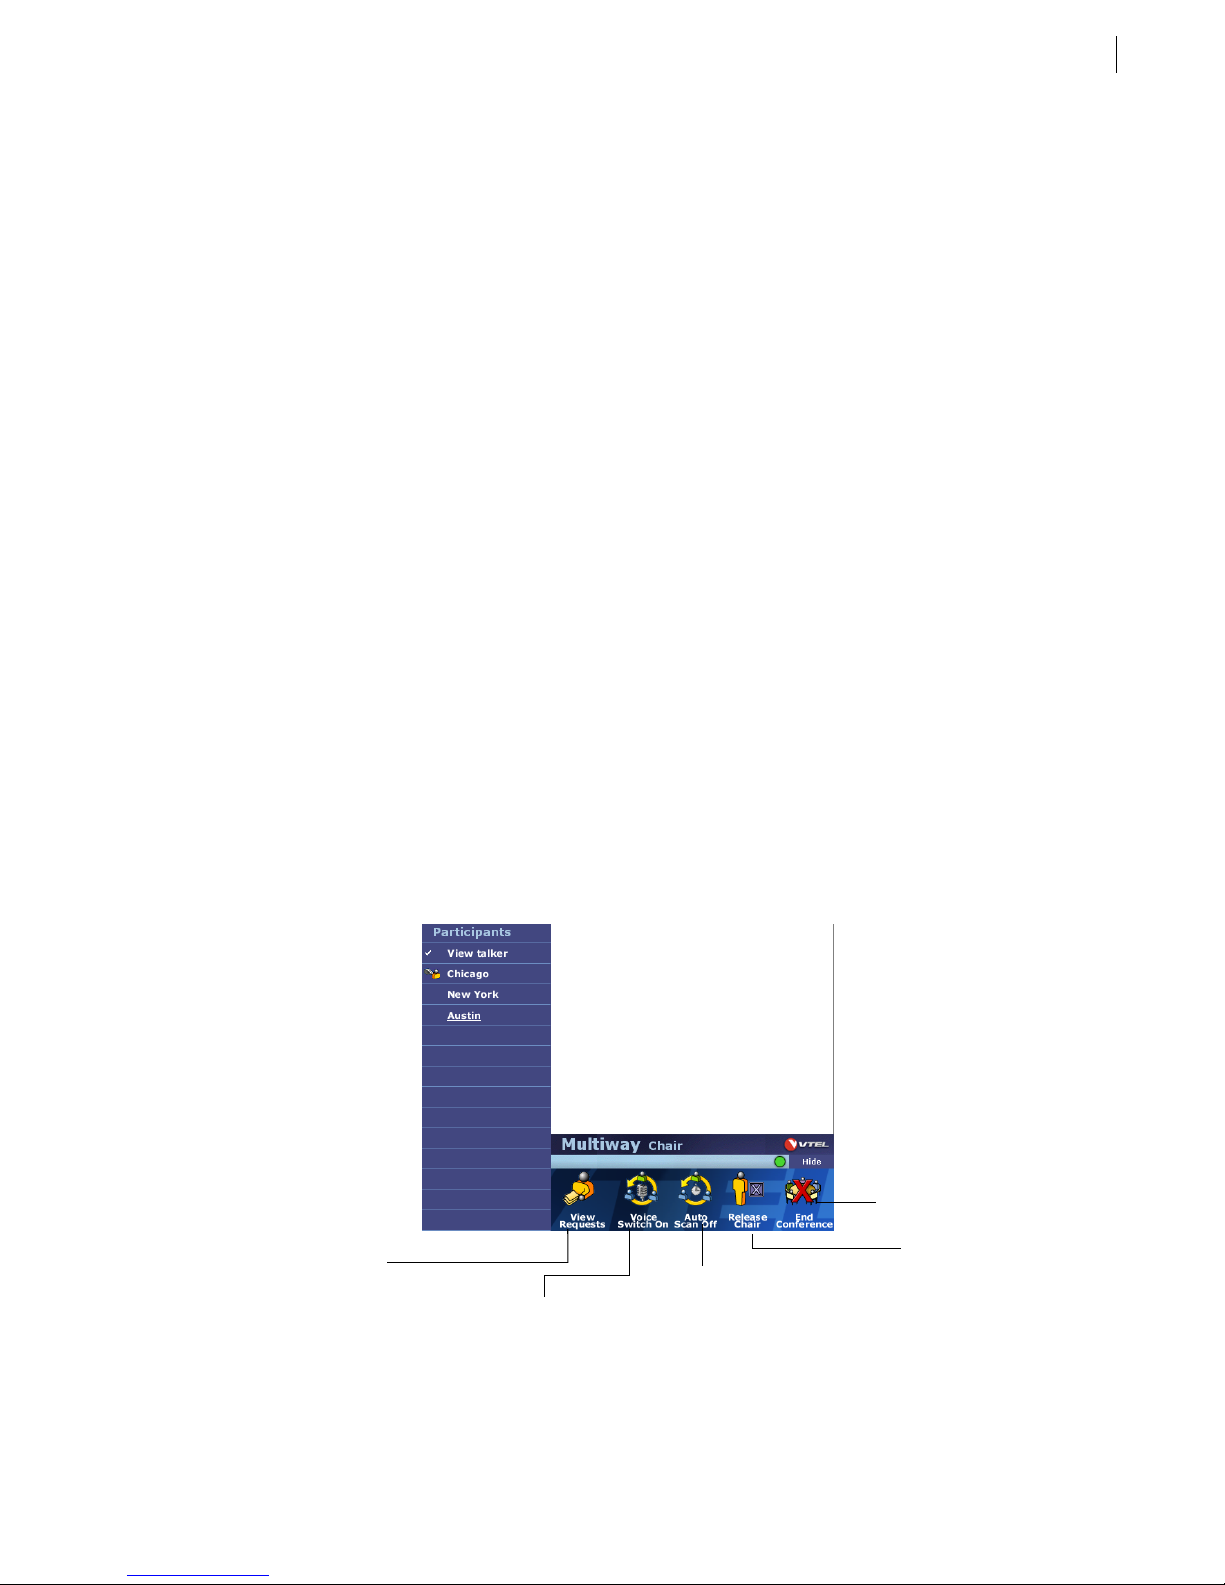
When you become the conference Chairperson, a new set of buttons appears on the Multiway screen:
. If you are the first person to
End
Select
Conference
disconnect all sites
from the MCU. Check
with your system
administrator to see
if this is desirable.
to
See requests from the
conference Participants.
When
conference participants see
the site that is currently
speaking. When you select a
site to broadcast, Voice
Switch is turned off.
Voice Switch
is on all
Auto Scan
Select
through all Participants’
video automatically. You
can see each site for an
equal amount of time. The
Participants’ video is not
affected.
to browse
Release
Select
Chair
to give up
your Chairperson
rights to another
site.
Galaxy
TM
Page 32
6.4
Chapter 6. Multiway Conferencing
Granting Requests
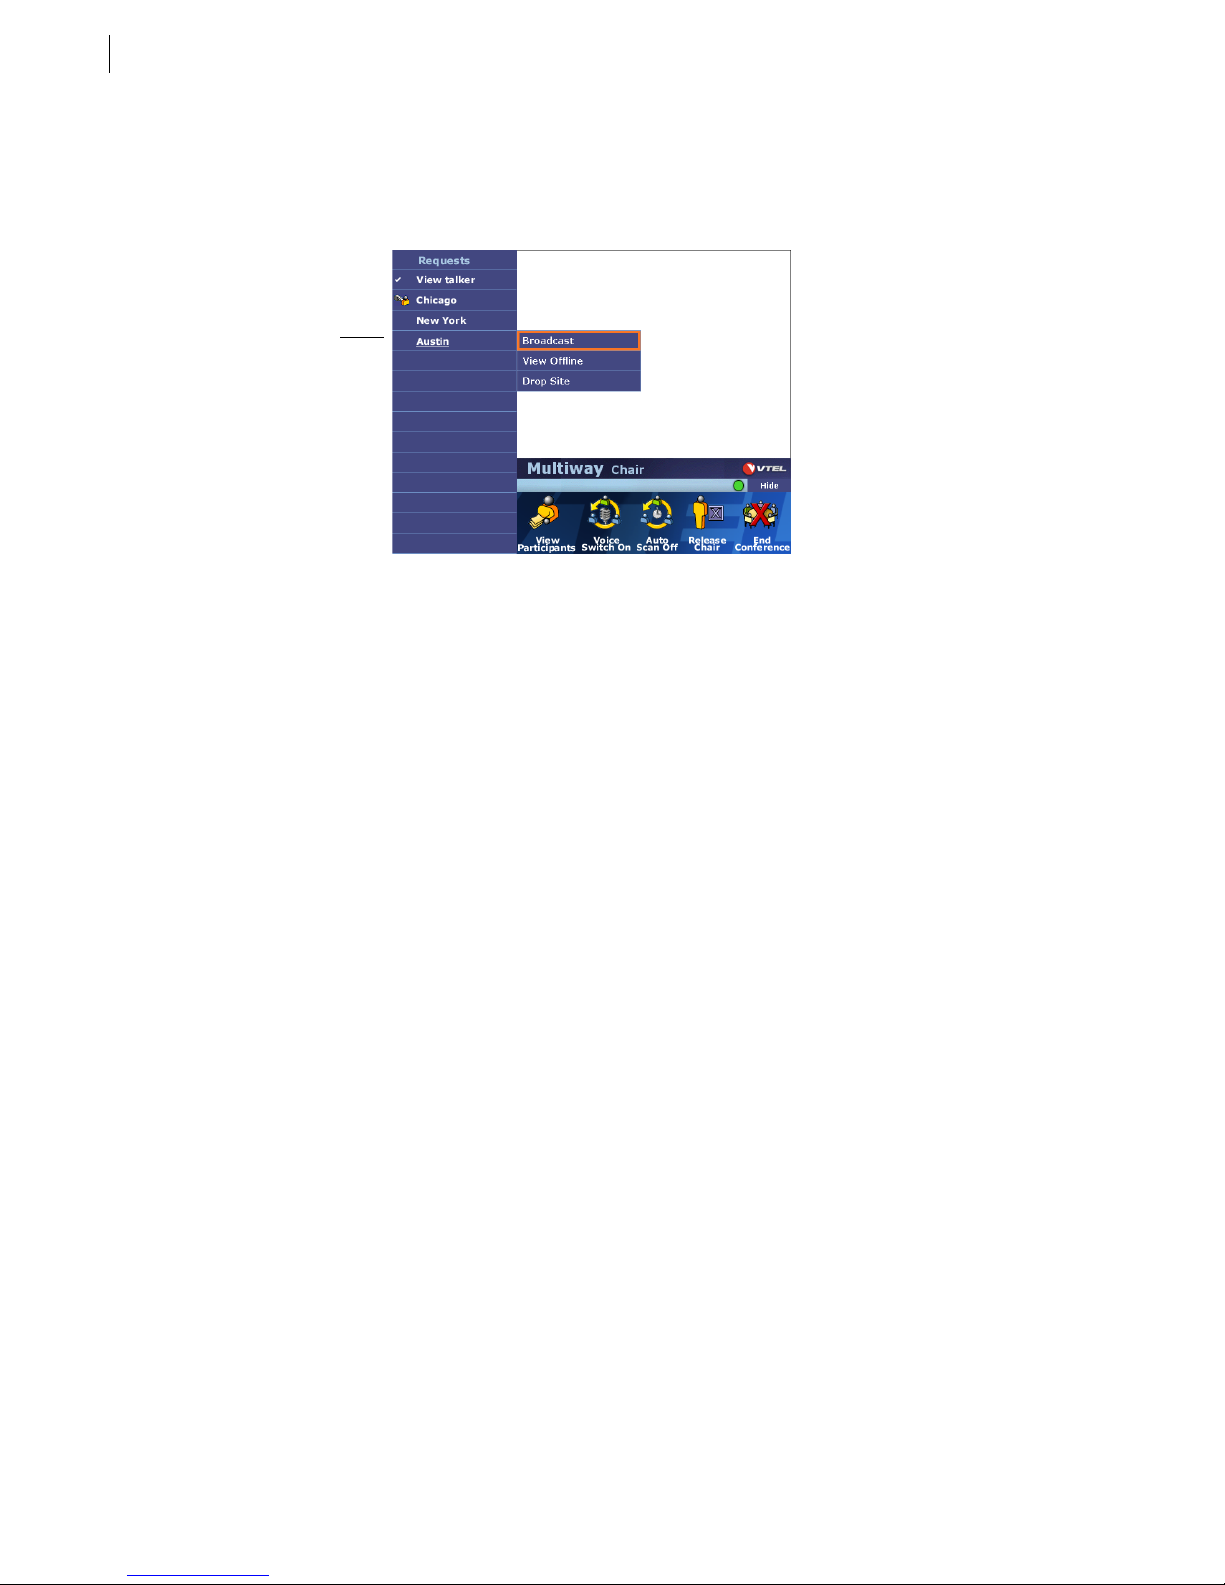
When a site wishes to be seen, or “take the floor,” they select the
name on the Requests list. The Chairperson selects
View Requests
Request Floor
to see this list. Requests also scroll by on the
status bar.
Select a name in the
Requests list and then
choose an option from the
pop-up list. Select
Broadcast
site’s video to the other
Participants.
to display that
Select a site name from the Requests list and choose an action with the pop-up menu. Your choices are:
button. This places their site
•
Broadcast:
•
View Offline:
•
Drop Site:
Participants can also select
show this site’s video to all the other Participants
you can view this site, but other Participants do not.
disconnect this Participant from the conference.
Request Chair
if they want to become the new Chairperson. In order to grant that
request the current Chairperson must select
Release Chair
.
Getting Started Guide
Page 33
Chapter 7
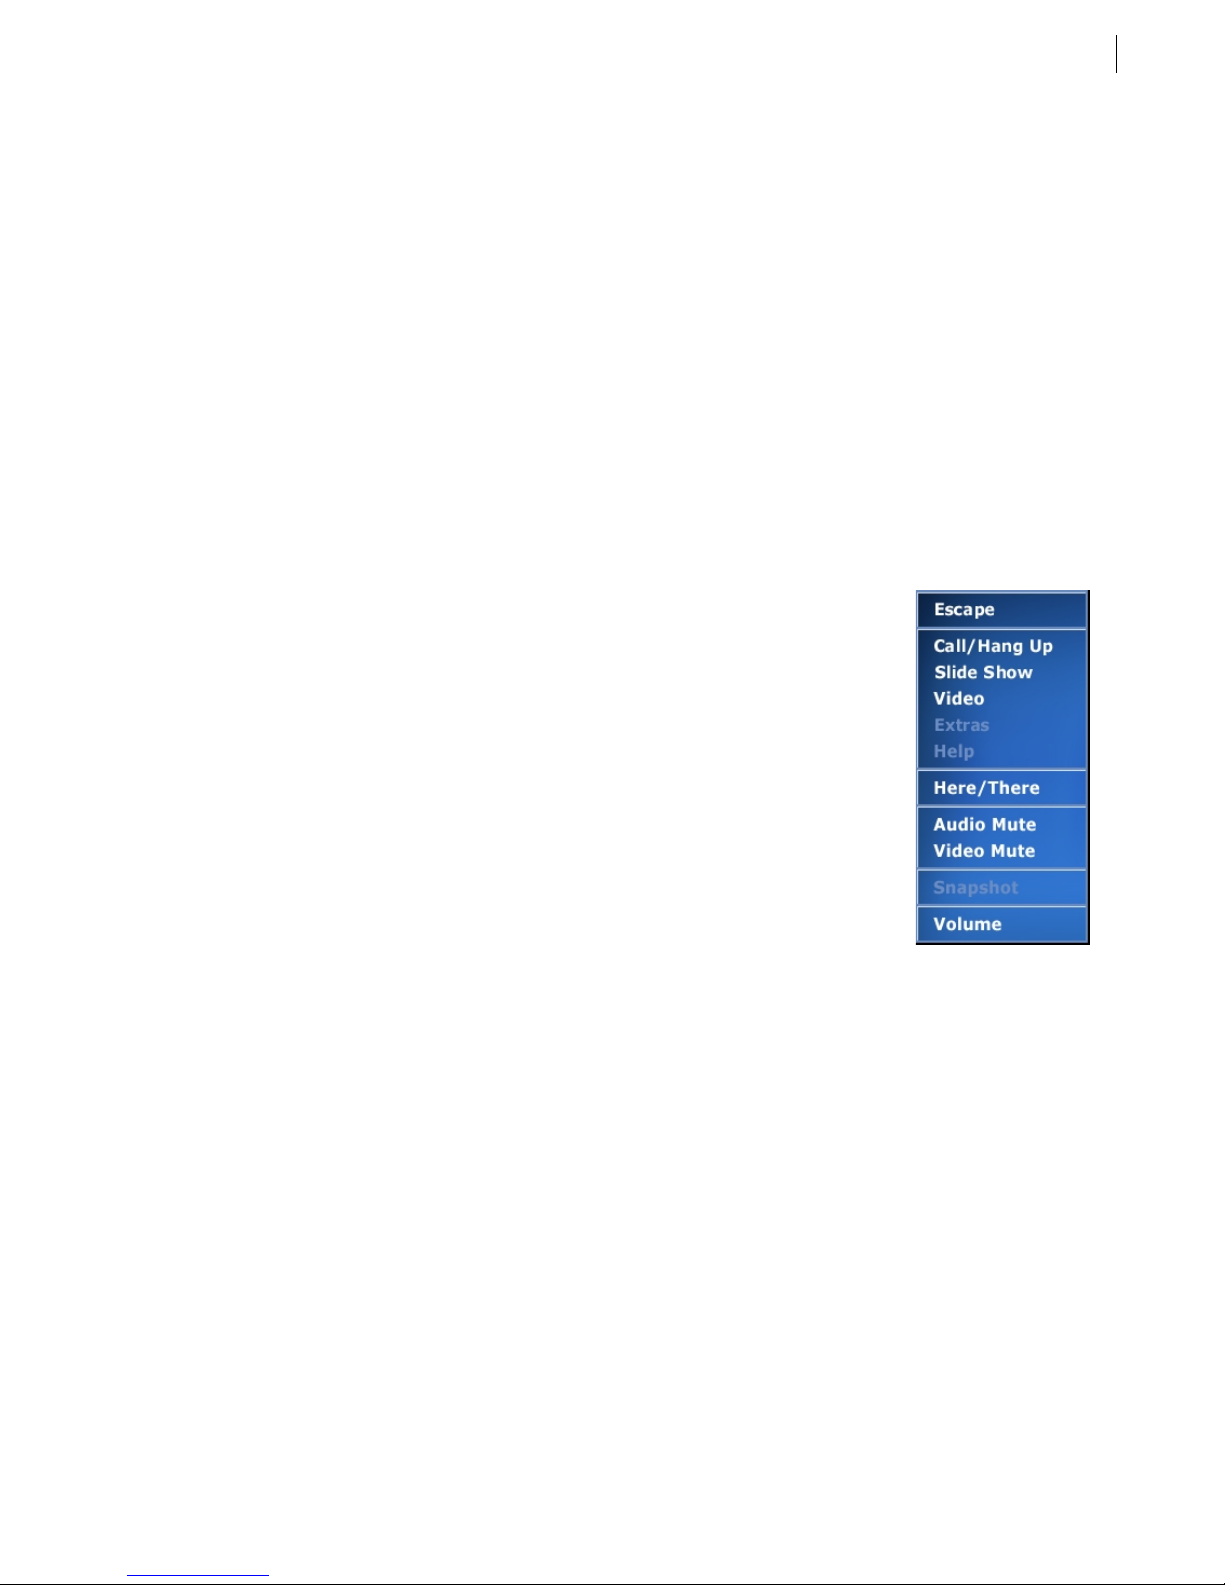
Right mouse button
pop-up menu
Alternate Methods of Controlling
7.1
TOUCH
V
The remote control is the simplest and most efficient method of operating your Galaxy system. However, you
may also use a mouse or keyboard to navigate the V
Software
TOUCH
software.
Mouse
Using a mouse with the Galaxy system is exactly like using a mouse in Windows
or any other software program. Simply move your mouse cursor over the button
you wish to select and click the left mouse button.
You can perform many of the remote control functions by clicking the right
mouse button. A pop-up menu will appear that contains a list of choices similar to
those on the remote control: Call/Hang Up, Slides, Audio Mute, Snapshot, etc.
Keyboard
The keyboard is used mainly for entering text and numbers, such as adding a site
to the Speed Dial list. Many of the remote control functions are also built into the
keyboard; for example, pressing the F1 key will open the Help system. Use the
button labels as your guide.
Selecting an Item:
1. Use the arrow keys on the keyboard to highlight the item you want to
2. Press the
Annotation Tablet
The wireless keyboard also contains an attached annotation tablet. To use the tablet simply slide it out fully until
the yellow light appears. Remove the pen and “write” on the tablet. The yellow light will turn green when the
stylus is writing within the active area. To select an item, press down once with the pen. For more information on
annotation within the Slides program, please see page 5.3.
After five minutes of non-use the tablet will enter battery conservation mode. Simply touch the pen anywhere in
the active area of the tablet to “wake” it.
select.
key to select the item.
Enter
Galaxy
TM
Page 34
7.2
Chapter 7. Alternate Methods of Controlling VTOUCH Software
Tablet
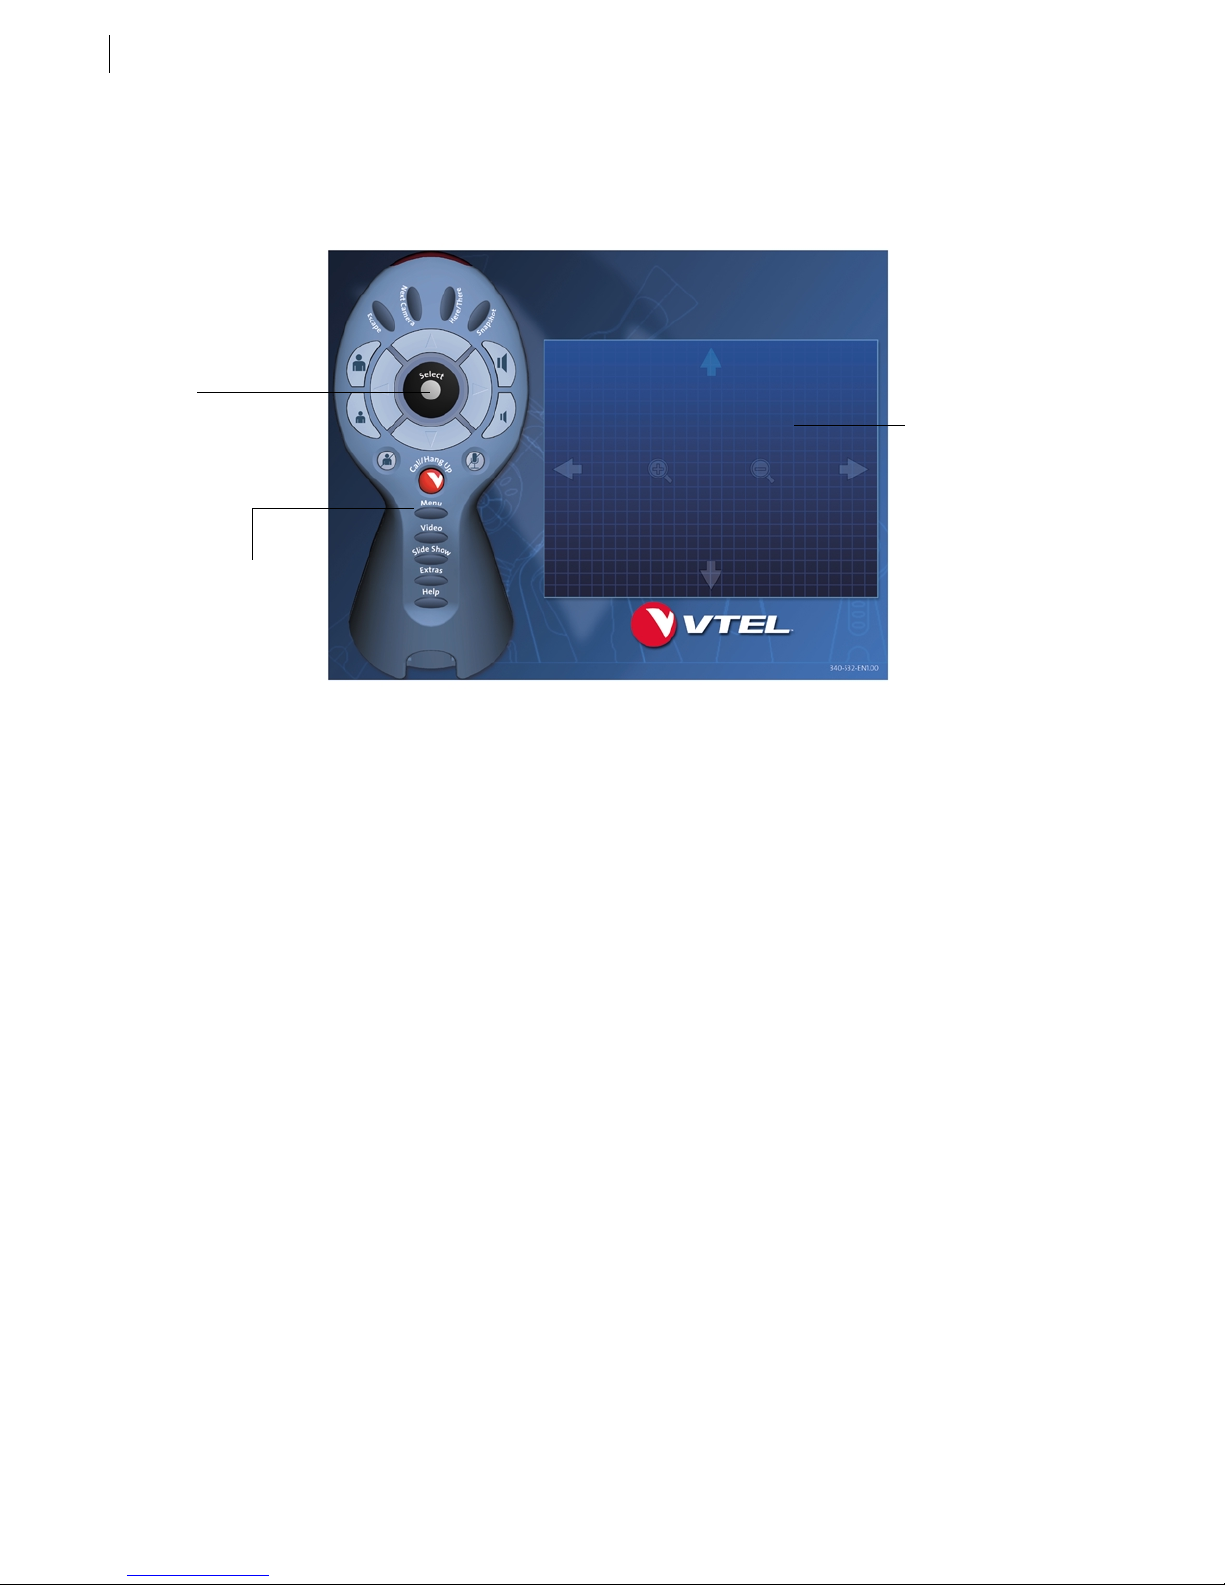
Many previous VTEL systems used a digital tablet for navigation and annotation input. Owners of VTEL tablets
will receive a new tablet overlay to use with their Galaxy system. The new overlay is a representation of the
remote control (described on page 1.1).
Press your tablet
pen here to select
an on-screen menu
or other highlighted
item.
This is the
annotation area
when the Slides
application is open;
otherwise, it is the
camera control area.
Tap a button to
activate that feature.
Getting Started Guide
Page 35

Index
I.1
A
address
VTEL web site
address book
annotate
annotation tablet
application sharing
audio mute
5.3
4.1
1.2
3.2
7.1
4.5
B
broadcast
6.4
C
call
options during
progress
status
2.2, 3.5
Call screen
add a site
dialing from the Speed Dial list
disconnect
Hand Dialer
snapshots
Speed Dial list
Call/Hang Up button
camera control
camera views
automatically save
manually save
Chairperson (multiway call)
controlling Vtouch software
keyboard
mouse
older tablets
7.1
4.1
2.2, 3.5
3.2
2.2, 3.5
2.1
3.5
3.2
2.1
4.1
4.1
4.2
4.2
7.1
7.2
D
disconnect a call
2.2, 3.5
6.3
3.3
H
Hand Dialer
hang up
help
accessing built-in help
in-depth web site
Here/There
2.1
2.2, 3.5
4.1
K
keyboard
7.1
L
line speed
2.1
M
Manage Extras
MCU
6.1
mouse
multiway conference
7.1
broadcast
Chairperson
controlling
new conference
request to speak
viewing participants
viewing the speaker
4.4
6.4
6.3
6.3
O
online help
1.2
P
picture-in-picture
PIP
4.3
Present mode
presets
4.2
4.3
5.4
1.2
1.2
6.1
6.2
6.2
6.2
6.2
E
Extras button
Extras menu
add an Extra
add utility
Manage
Sharing
4.4
4.4
4.4
4.5
4.4
4.5
G
Galaxy web site
1.2
R
receiving slides
remote control
controlling cameras with
selecting with
restore camera view
5.5
1.1
1.2
S
selecting an item
Sharing
Slide Show button
4.5
1.2
5.1
4.2
4.1
Galaxy
TM
Page 36

I.2
Index
Slides
annotate
close a tray
manage trays
new slide tray
open an existing tray
overview
Present mode
print
rearrange
receive a slide
save a tray
send a slide
snapshots
Speed Dial list
add a site
delete a site
dial a site
edit a site
hide pictures
Options
Sort by...
5.3
5.1
5.3
5.2
5.3
3.5
3.2
3.2
3.3
3.3
3.4
3.4
5.5
5.1
3.3
3.4
5.4
5.2
5.4
5.5
5.1
T
tablet
annotation
legacy VTEL systems
See
tray.
Slides.
V
View Talker
volume
VTEL web site
V
TOUCH
navigating
6.2
4.1
software
1.1
keyboard
mouse
remote control
tablet
7.2
W
web site
1.2
7.1
7.2
1.2
7.1
7.1
1.1
Getting Started Guide
 Loading...