

Vitek VT-TNR1646PF-3T, VT-TNR6480E1-12T, VT-TNR1646PF-16T, VT-TNR818PF-6T, VT-TNR818PF-8T Quick Start Guide
...Page 1
VT-TNR Series
Transcendent Series Line-Up of 8 MegaPixel
H.265 Real Time Network Video Recorders with
4K HDMI Output
QUICK START GUIDE
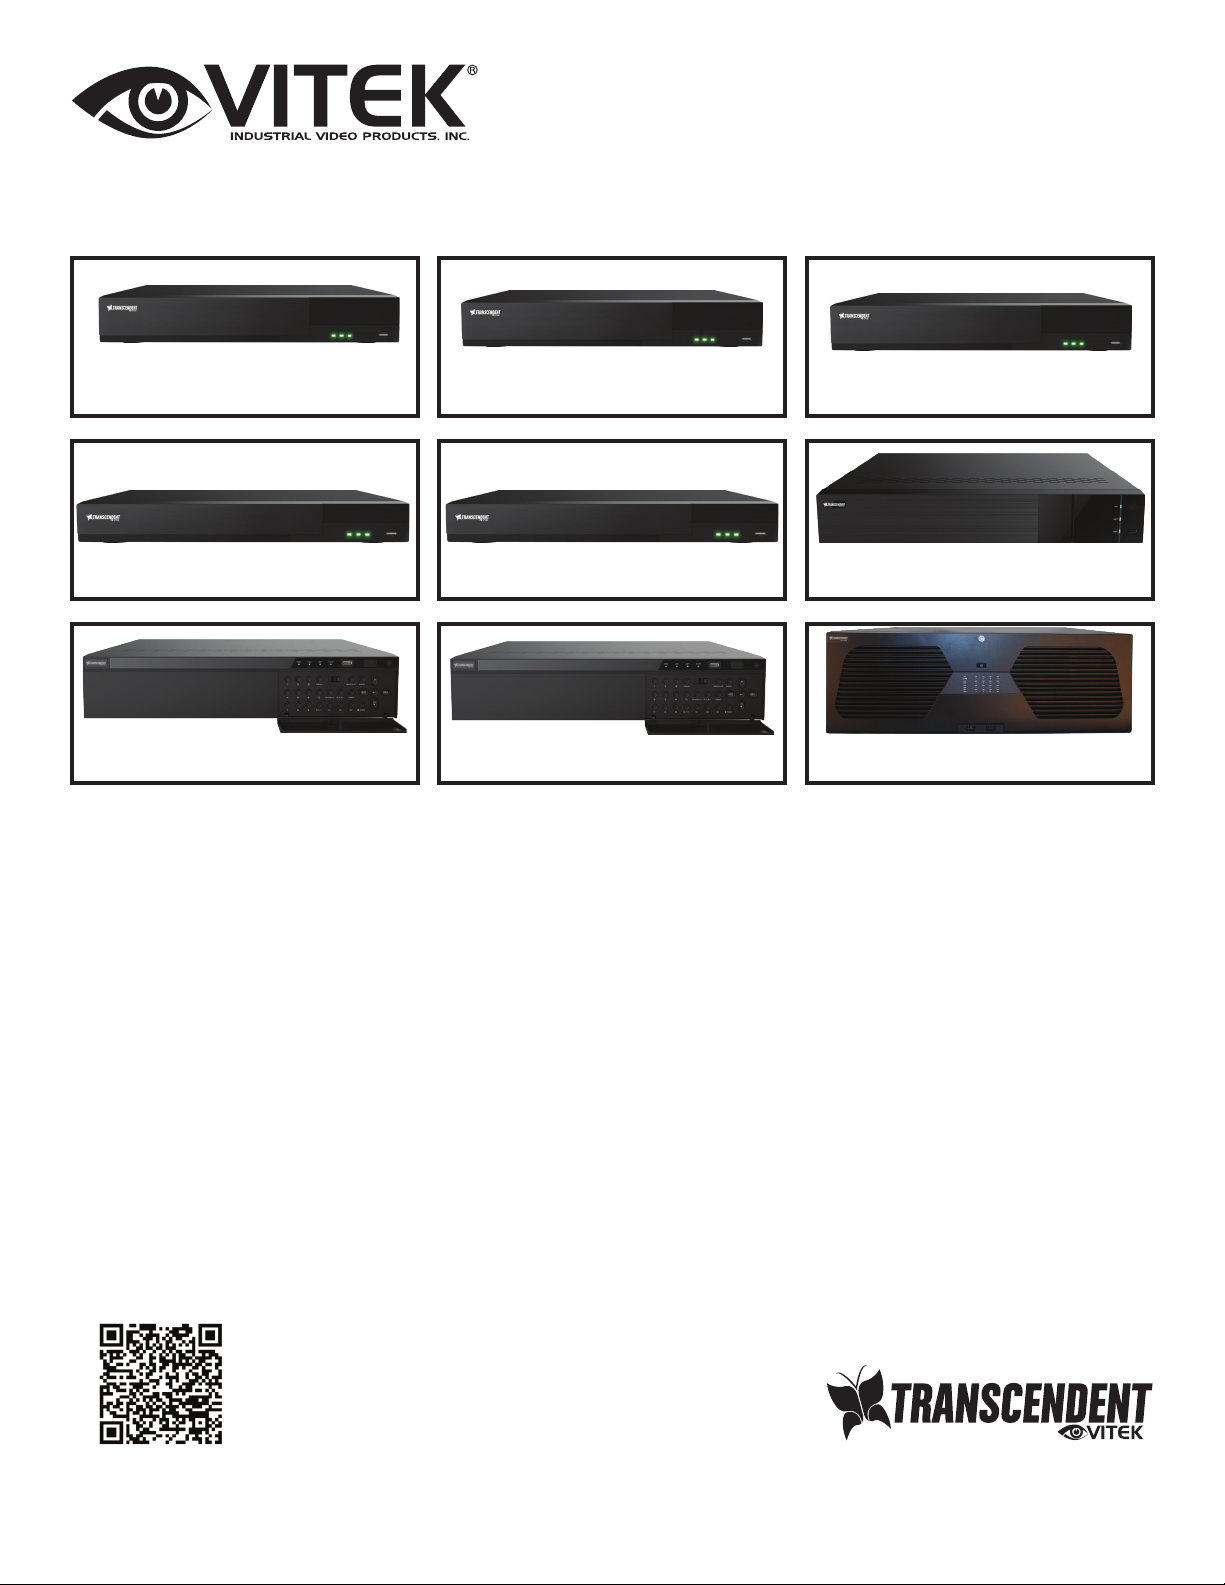
VT-TNR414P(2)
VT-TNR1616P
VT-TNR818P(2)
VT-TNR1616F
VT-TNR818PF
VT-TNR1646PF
VT-TNR3216PF VT-TNR6480E1 VT-TNV128E
FEATURES:
• 4, 8, 16, 32, 64, and 128 Channel Stand-alone Real-time IP Network
Video Recorders
• Full 8 Megapixel Real-time recording & playback
• 4K HDMI & VGA Video Outputs
• H.265 / H.264 Video Compression
• Plug and Play & Auto configuration for many leading ONVIF compliant IP Camera models
• Internal PoE Switch (VT-TNR414P(2), VT-TNR818P(2), VT-TNR1616P, VT-TNR1646PF and VT-TNR3216PF)
• 1 Gigabit LAN / Dual 1 Gigabit LAN (VT-TNR6480E1, VT-TNV128E)
• Pentaplex: Live Display / Record / Playback / Backup / Remote Access
• Supports SATA2/SATA3 HDD
• Applications for iOS® & Android®
• Fully Programmable Intelligent Analytics including Face Detection (VT-TNR818PF, VT-TNR1616F,
VT-TNR1646PF, VT-TNR3216PF), Fisheye DeWarping (All except VT-TNR414P(2) and VT-TNR818P(2)),
Object Removal/Museum Search, Line Crossing, and Area Intrusion Detection
• Remote Viewing over the Internet via Web Browser or LAN
• Mac OS® Client & CMS Central Management Software Included
• Supports both Dynamic and Static IP Addresses
• Web-based remote configuration
PLEASE NOTE:
Scan the QR Code for the Complete User Guide. Visit:
http://www.vitekcctv.com/Downloads for additional
Software, Tools, and Updates.
Page 2

VT-TNR414P(2)
VT-TNR818P(2)
VT-TNR818PF
VT-TNR1616P
4CH NVR 720P/960P/1080P/3MP/4MP/5MP/8MP 120fps
40Mbps 1TB, (1hdd, 1-10TB), 4K Output, HDMI, VGA,
PTZ, 4 PoE Ports
8CH NVR 720P/960P/1080P/3MP/4MP/5MP/8MP
240fps 64Mbps 1TB, (1hdd, 1-10TB), 4K Output, HDMI,
VGA, PTZ, 8 PoE Ports
8CH NVR 720P/960P/1080P/3MP/4MP/5MP/8MP 240fps
64Mbps 1TB, (1hdd max, 1-10TB), w/Face Detection
License, De-Warping, 4K Output, HDMI, VGA, PTZ, 8 PoE
Ports
16CH NVR 720P/960P/1080P/3MP/4MP/5MP/8MP
480fps 128Mbps 1TB, (2hdd max, 1-20TB), 4K Output,
HDMI, VGA, PTZ, 16 PoE Ports
VT-TNR1616F
VT-TNR1646PF
VT-TNR3216PF
VT-TNR6480E1
16CH NVR 720P/960P/1080P/3MP/4MP/5MP/8MP 480fps
128Mbps 1TB, (2hdd max, 1-20TB), 4K Output, HDMI,
VGA, PTZ, w/Face Detection License, De-Warping, No
PoE Ports
16CH NVR 720P/960P/1080P/3MP/4MP/5MP/8MP 480fps
128Mbps 1TB, (4hdd max, 1-40TB), 4K Output, HDMI,
VGA, PTZ, w/Face Detection License, De-Warping, 16
PoE Ports
32CH NVR 720P/960P/1080P/3MP/4MP/5MP/8MP 960fps
256Mbps 1TB, (8hdd Max, 1-80TB), 4K Output, HDMI,
VGA, AUDIO, ALARM, PTZ, w/Face Detection License,
De-Warping, 16 PoE Ports
64CH NVR 720P/960P/1080P/3MP/4MP/5MP/8MP
1920fps 320Mbps 80TB, (8hdd Max, 1-80TB),Supports
De-Warping, 4K Output, HDMI, VGA, AUDIO, ALARM,
PTZ, No PoE - Now with E-SATA (x2) & RAID 0,1,5,6 & 10
VT-TNV128E
128CH ENTERPRISE NVR 720P/960P/1080P/3MP/4MP/
5MP/8MP 1920fps 320Mbps, (16hdd Max, 1-160TBt), Raid
0,1,2,5,6 &10. 4K Output, HDMI, VGA, AUDIO, ALARM,
PTZ, No PoE
Page 3
SETUP & CONFIGURATION:
1. Notes
● Please read this instruction carefully for correct use of the product and preserve it for future reference.
● This manual is suitable for 4/8/16 CH Network Video Recorder. All the examples and pictures used here are for
reference only.
● There may be several technically incorrect places or printing errors in this manual. The updates will be added into
the new version of this manual. The contents of this manual are subject to change without notice.
● To prevent electric shocks and risk of fire hazards, only use the power source that Vitek provided with your NVR.
2. Check Package Contents
Please confirm that the device and all accessories are included in the package. If there is any damage, shortages
or defects, please contact your dealer immediately.
1) Transcendent Series NVR
2) IR Remote Control
3) Quick Start Guide
4) Power Supply
5) USB Mouse
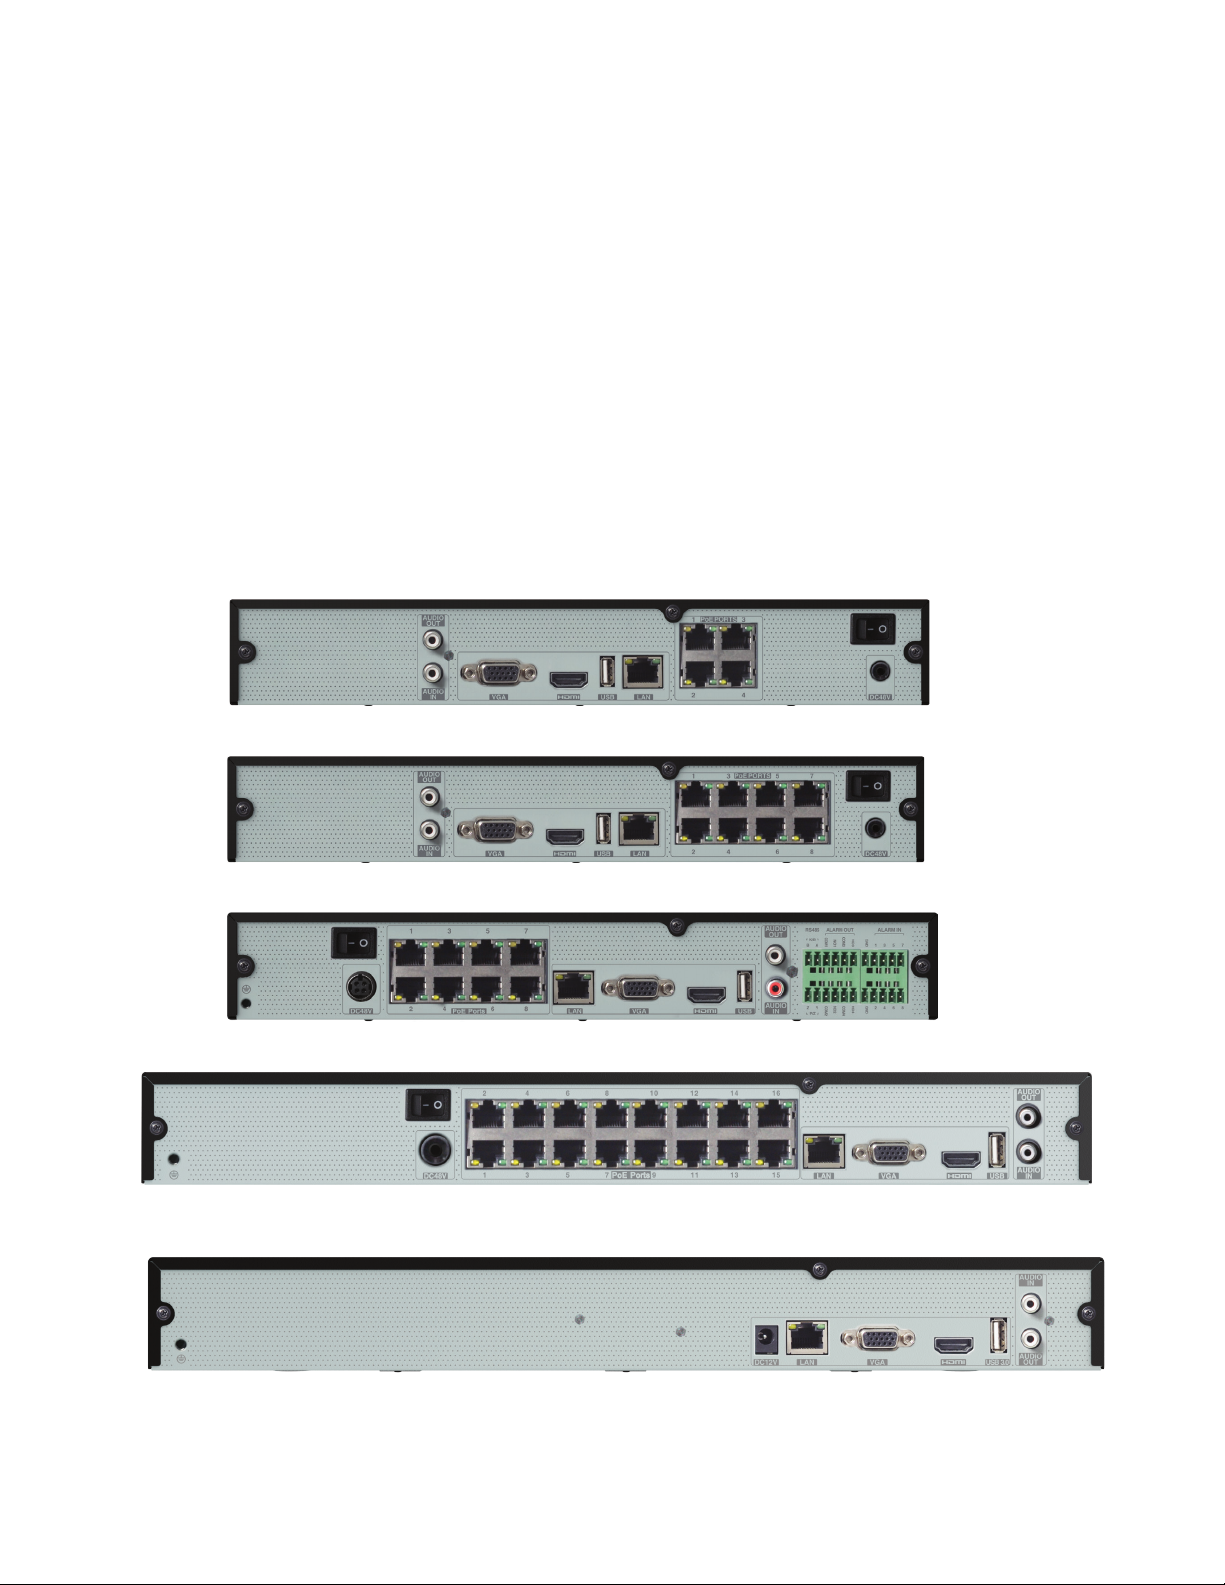
3. Rear Panel Connections
VT-TNR414P(2) Rear Panel Connections
VT-TNR818P(2) Rear Panel Connections
6) Rack Ears (16, 32 & 64 Channel Models)
7) 4GB USB Flash Drive (32, 64 & 128 Channel Models)
VT-TNR818PF Rear Panel Connections
VT-TNR1616P Rear Panel Connections
VT-TNR1616F Rear Panel Connections
VT-TNR1616F Rear Panel Connections
Page 4
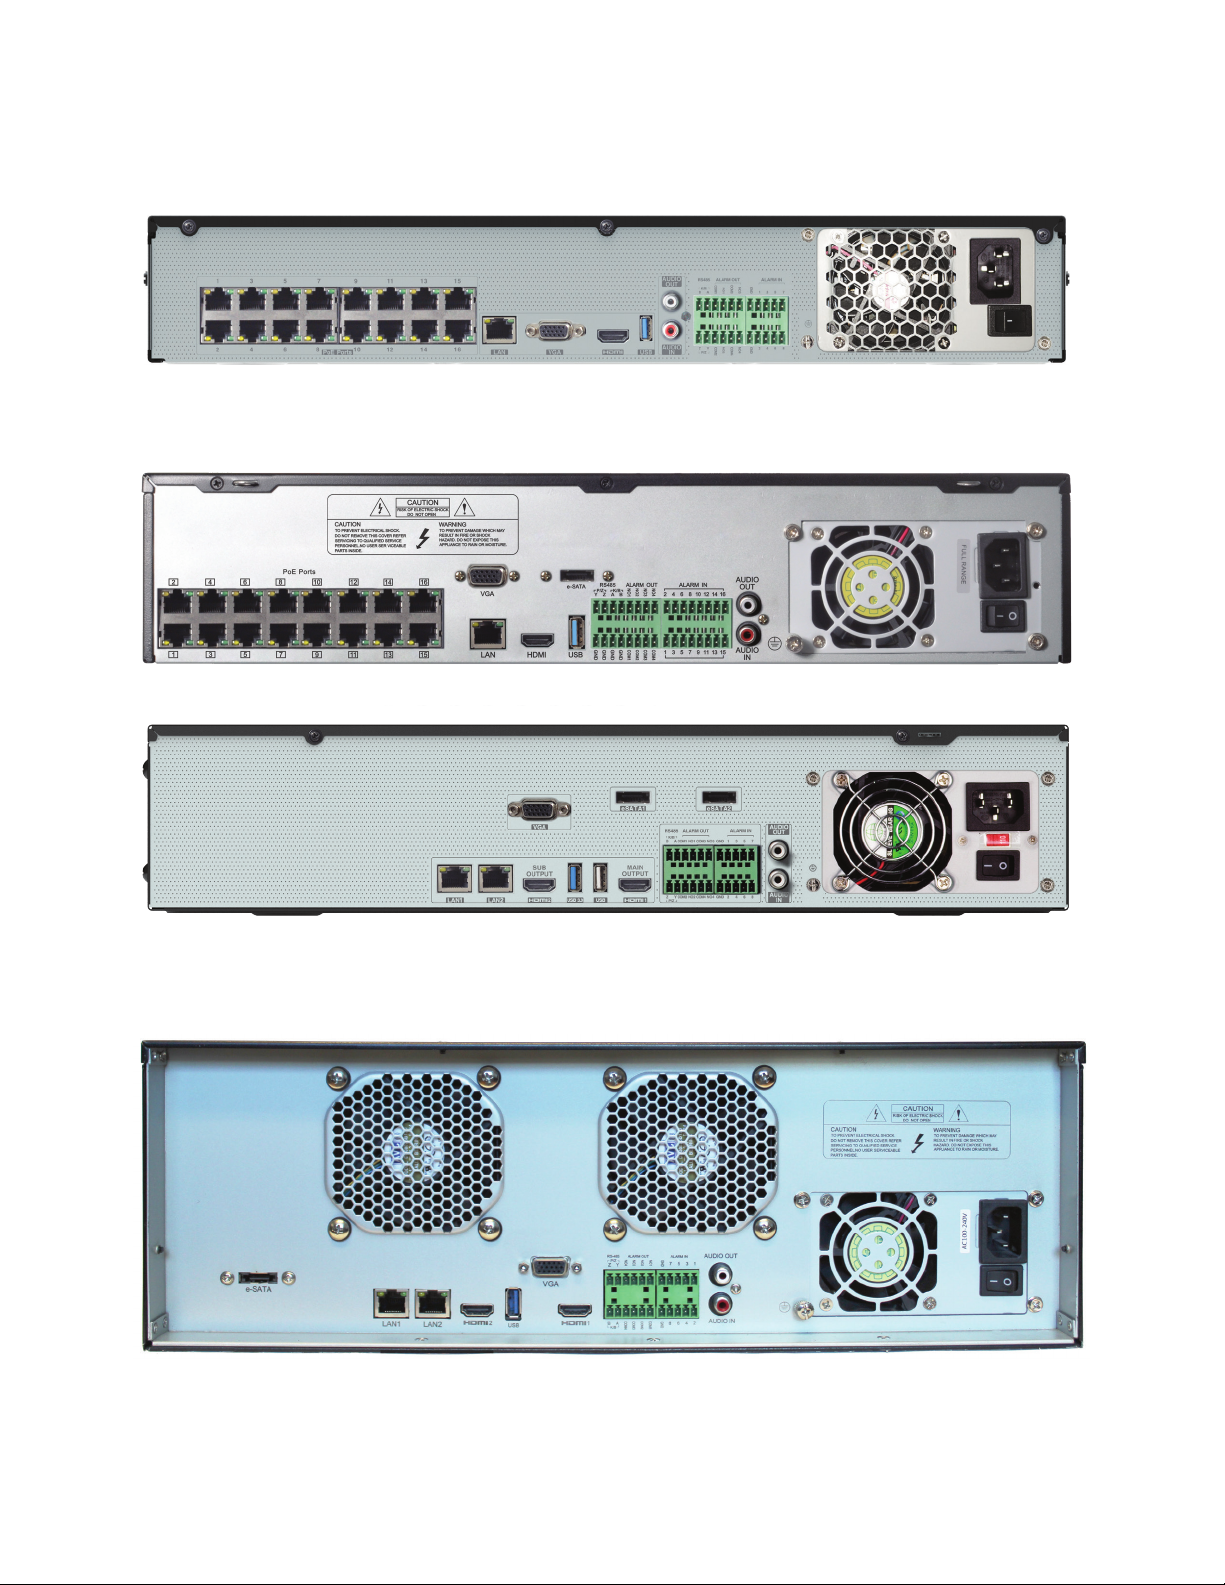
VT-TNR1646PF Rear Connections
VT-TNR3216PF Rear Connections
VT-TNR6480E1 Rear Connections
VT-TNV128E Rear Connections
Page 5

4. System Startup
● Please make sure all the connections are done properly before you power on the unit. Proper startup and
shutdown are crucial to expending the life of your device
● Startup:
① Connect the output display device to the VGA/HDMI interface of the NVR.
② Connect the mouse and power. The device will boot and the power LED will turn blue.
③ A WIZARD window will pop up (you should select the display language the first time you use the NVR).
Click “Wizard Setup” to start wizard. The setting steps are as follows.
System Login:
Set your own password or use the default when you use the wizard for the first time (the default username of the
system is admin and the default password of admin is 123456); select the login username and enter the corresponding password next time.
Click “Edit Security Question” to set questions and answers for password security of admin. Click “Next” to continue
or click “Cancel” to exit the wizard.
Page 6

Date and Time Configuration:
● The date and time of the system needs to be set up if you use the wizard for the first time. Refer to the following
figure. Set the time zone, system time, date format and time format. The DST will be enabled by default if the time
zone selected includes DST. Click “Next” to continue.
Network Settings:
● Check “Obtain an IP address automatically” and “Obtain DNS automatically” to get the IP address and DNS
automatically (the DHCP function of the router in the same LAN should also be enabled), or manually input them.
Input the HTTP port, RTSP port and Server port. Click “Next” to continue.
Note:
If you use the NVR with the PoE network ports, the online state of the internal Ethernet port will be shown on the
interface. Refer to the picture below.
Page 7

QRCode:
● You can scan the QRCode through the mobile client which is installed on a mobile phone or Tablet to log into the
mobile client instantly.
Serial Number
Add Camera:
● Click “Refresh” to refresh the list of online IP cameras which are in the same local network with NVR and then click
to add the searched camera. Click “Add All” to add all the cameras in the list. Click to delete the added
camera. Click “Delete All” to delete all the added cameras.
Serial Number
SERIAL #
Page 8

● Click to edit the found IP camera as shown on the below left. Input the new IP address, subnet mask, gateway,
username and the password of the camera. Click “OK” to save the settings.
### --- ### --- ###
● Click to edit the added camera as shown on the above right. Input the new camera name, IP address, port,
username and the password of the camera. You can click “Test” to test the effectiveness of the input information.
Click “OK” to save the settings. You can change the IP camera name only when the added camera is online. Click
“Next” to continue.
Page 9

Disk Settings:
● You can view the disk number, disk capacity of the NVR and serial number, R&W status of the disk. Click “Formatting” to format the disk. Click “Next” to continue
Page 10

Record Settings:
● Two record modes are available: Auto and Manual.
● Auto: Select one auto mode in the interface as shown below and then click “OK” button to save the settings.
Page 11

NOTES
Page 12

LIMITED PRODUCT WARRANTY
VITEK products carry a three (3) year limited warranty. VITEK warrants
to the purchaser that products manufactured by VITEK are free of any
rightful claim of infringement or the like, and when used in the
manner intended, will be free of defects in materials and workman-
ship for a period of three (3) years, or as otherwise stated above, from
the date of purchase by the end user. This warranty is nontransfer-
able and extends only to the original buyer or end user customer of a
VITEK Authorized Reseller.
The product must have been used only for its intended purpose, and
not been subjected to damage by misuse, willful or accidental
damage, caused by excessive voltage or lightning.
The product must not have been tampered with in any way or the
guarantee will be considered null and void.
This guarantee does not aect your statutory rights.
Contact your local VITEK Reseller should servicing become necessary.
VITEK makes no warranty or guarantee whatsoever with respect to
products sold or purchased through unauthorized sales channels.
Warranty support is available only if product is purchased through a
VITEK Authorized Reseller.
28492 CONSTELLATION ROAD VALENCIA, CA 91355
WWW.VITEKCCTV.COM
Version 5.1
September 2019
 Loading...