

Page 1
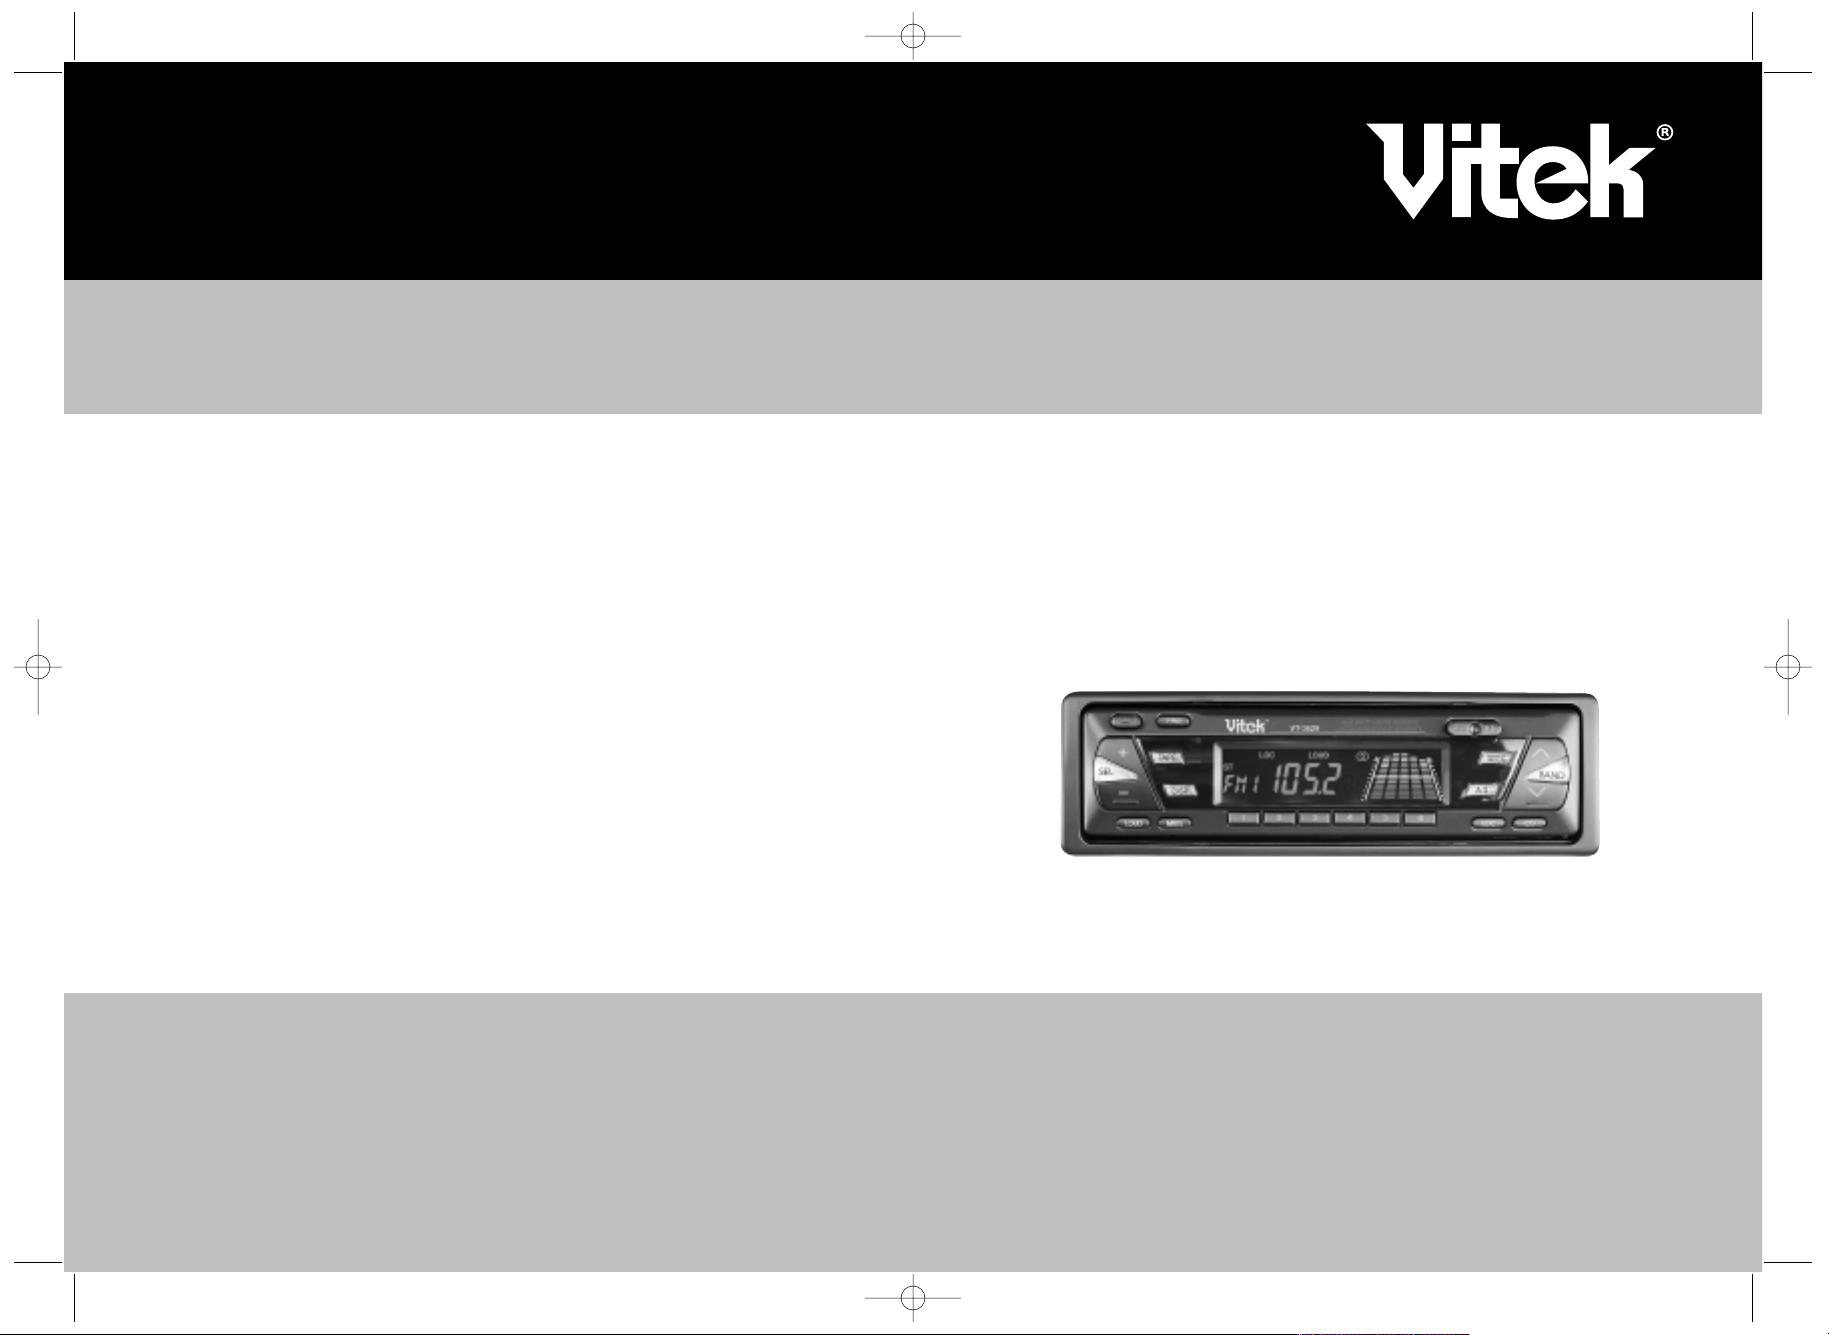
ИНСТРУКЦИЯ ПО ЭКСПЛУАТАЦИИ
MANUAL INSTRUCTION
АВТОМОБИЛЬНАЯ МАГНИТОЛА
CAR RADIO CASSETTE PLAYER
МОДЕЛЬ VT'3629
3629.qxd 28.10.03 15:12 Page 2
Page 2
INSTALLATION
Precautions
• Choose the mounting location carefully so that the unit will not interfere with the
normal driving functions of the driver.
• Avoid installing the unit where it would be subject to high temperatures, such as
from direct sunlight or hot air from the heater, or where it would be subject to
dust, dirt or excessive vibration.
• Use only the supplied mounting hardware for a safe and secure installation.
• Be sure to remove the front panel before installing the unit.
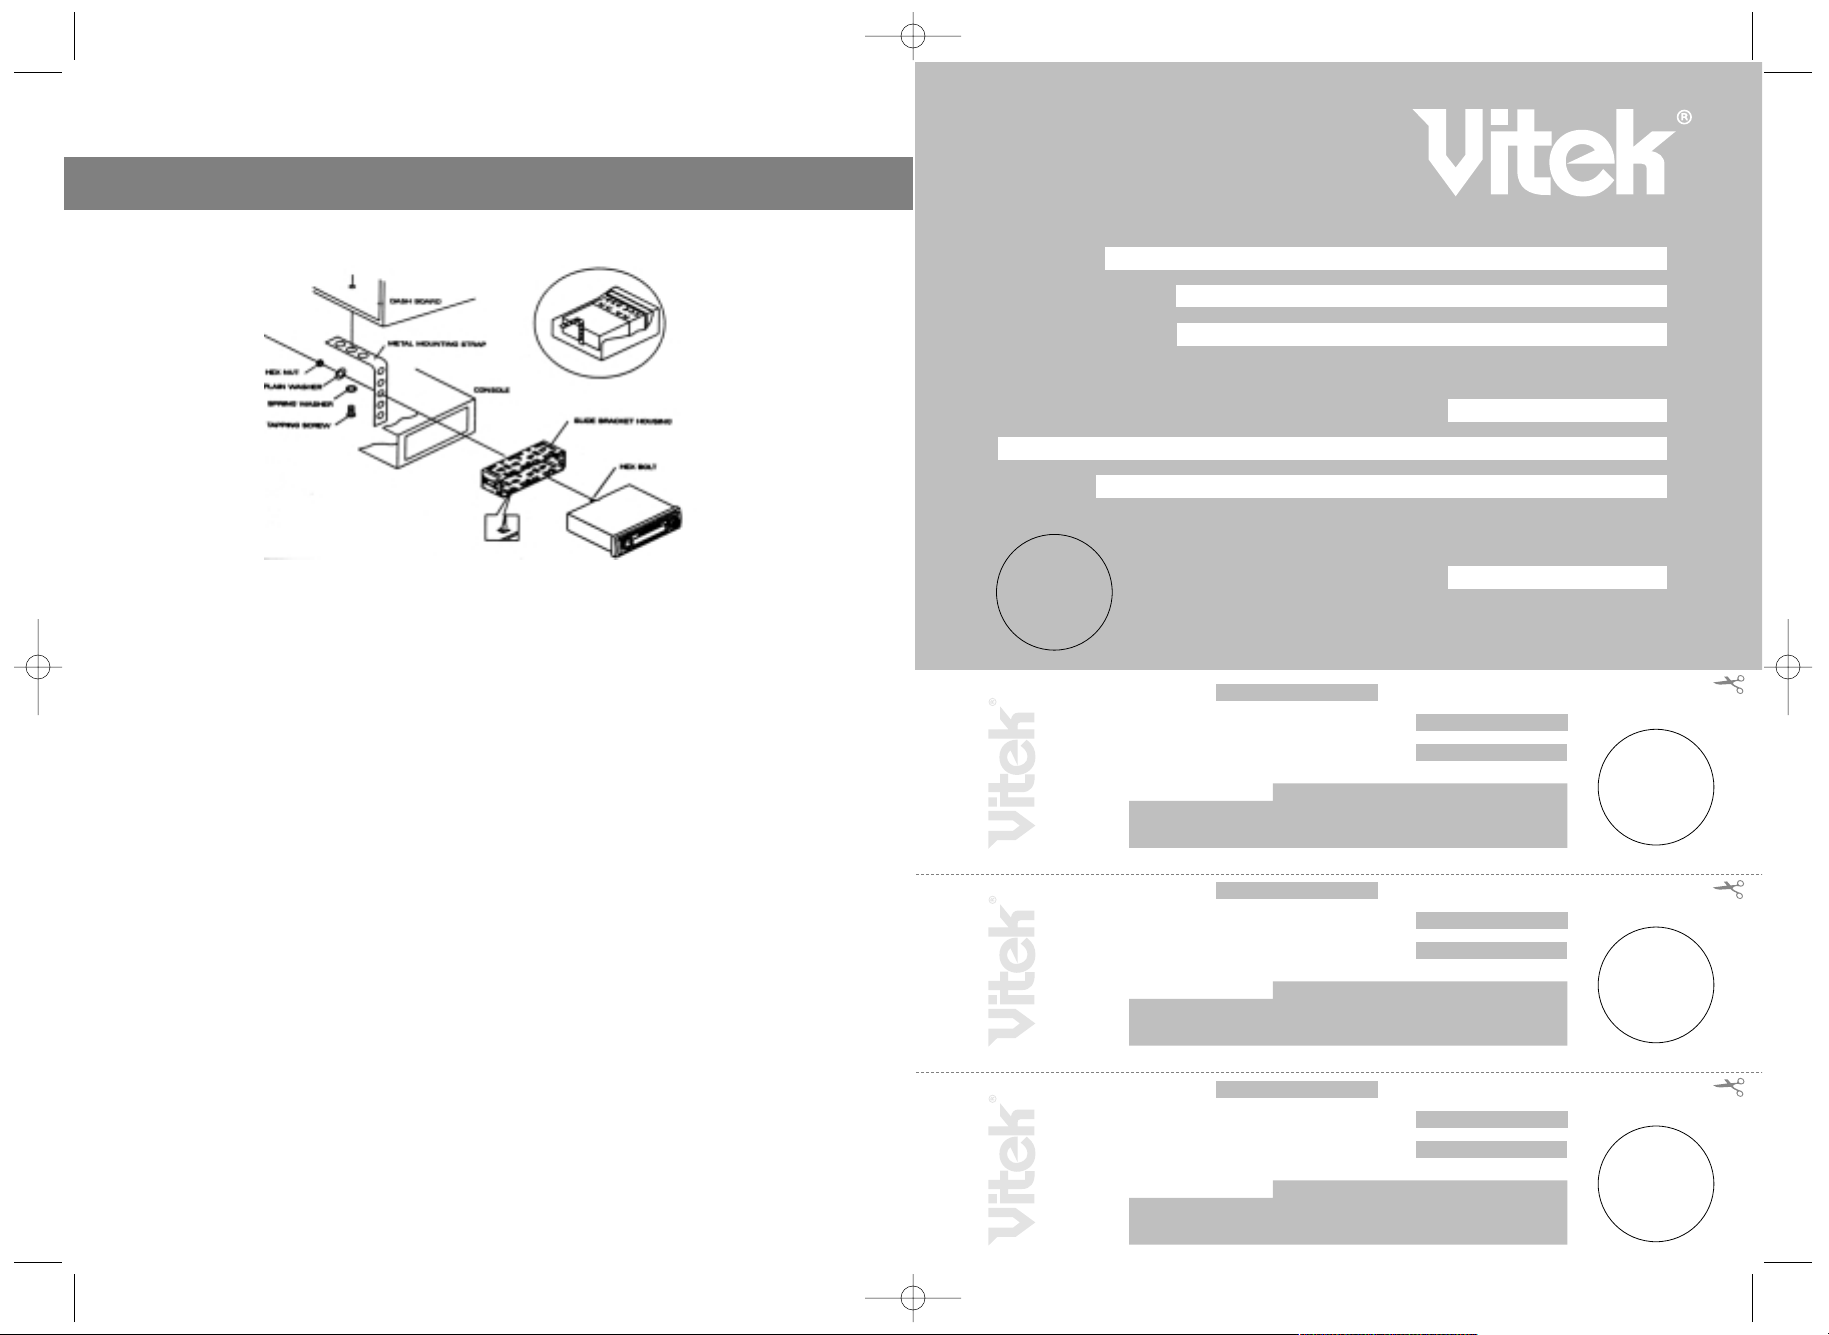
Unit Removal
• Remove the detachable front panel.
• Insert the supplied key into the slot as shown, and slide the unit out of the dash
board while holding the trim plate.
• Slide the unit out of the dashboard.
• Remove the metal strap attached to the back of the unit.
• Remove the key from the slot.
• Disconnect all the wires of the unit and the antenna plug.
2
ENGLISH
Гарантийный талон
Сведения о покупке
Модель:
Серийный №:
Дата покупки:
Сведения о продавце
Название и адрес продающей организации
Телефон:
Подтверждаю получение исправного изделия, с условиями гарантии ознакомлен
П
одпись покупателя
Внимание!
Гарантийный талон действителен только при наличии печати
продающей организации
М.П.
Купон №3
М.П.
Модель: Серийный №:
Дата поступления в ремонт:
Дата выполнения ремонта:
Вид ремонта:
Купон №2
М.П.
Модель: Серийный №:
Дата поступления в ремонт:
Дата выполнения ремонта:
Вид ремонта:
Купон №1
М.П.
Модель: Серийный №:
Дата поступления в ремонт:
Дата выполнения ремонта:
Вид ремонта:
CCP 362900000
CCP 362900000
CCP 362900000
CCP 362900000
3629.qxd 28.10.03 15:12 Page 4
Page 3

LOCATION AND FUNCTION OF CONTROLS
BASIC OPRERA
TIONS
1. PANEL RELEASE BUTTON
1. Press the panel release button, then the front panel will be folded down.
2. Remove the front panel by pulling its middlehand outward.
3. Push the front metal plate into the main body. A 'click' sound be heard.
4. To attach the panel again, push the front panel into the main body. A 'click' sound should
be heard.
2. POWER ON / OFF BUTTON
Press this button to turn on or off the power.
3. MUTE BUTTON
Press this button to mute the audio, press it again to resume the audio, when mute is acti
vated, the 'Mute' Symbol on the LCD will flash.
4. LOUDNESS BUTTON
Press the loudness button to boost the low frequencies at low and medium listening level.
5. ADJUST MODE SELECT BUTTON
The level adjustment of volume, bass, treble, balance and fader are performed through the
combination with the level up/down buttons.
Sequence of the adjust modes: VOL >BAS >TRE >BAL >FAD
Each time this button is pressed, the adjust mode will advance one position. The selected
adjusted mode can be viewed on the LCD as follow:
ENGLISH
314
VO VOLUME ADJUST MODE
BA BASS ADJUST MODE
TR TREBLE ADJUST MODE
B BALANCE ADJUST MODE
F FADER ADJUST MODE
3629.qxd 28.10.03 15:12 Page 6
Page 4

УСЛОВИЯ ГАРАНТИЙНОГО ОБСЛУЖИВАНИЯ
Уважаемый покупатель!
Фирма VITEK выражает благодарность за Ваш выбор и гарантирует
высокое качество и безупречное функционирование приобретенного Вами
изделия при соблюдении правил его эксплуатации.
Срок гарантии на все изделия - 12 месяцев со дня покупки. Данным
гарантийным талоном VITEK подтверждает исправность данного изделия и
берет на себя обязательство по бесплатному устранению всех
неисправностей, возникших по вине производителя.
Гарантийный ремонт может быть произведен в авторизированном
сервис-центре на территории России.
Условия гарантии:
1. Настоящая гарантия имеет силу при соблюдении следующих условий:
- правильное и четкое заполнение гарантийного талона с указанием
наименования модели, ее серийного номера, даты продажи и печати
фирмы-продавца в гарантийном талоне и отрывных купонах;
- наличие оригинала квитанции (чека), содержащего дату покупки.
2. VITEK оставляет за собой право на отказ в гарантийном обслуживании в
случае непредоставления вышеуказанных документов, или если
информация в них будет неполной, неразборчивой, противоречивой.
3. Гарантия не включает в себя периодическое обслуживание, установку,
настройку изделия на дому у владельца, чистку аудио-видео головок.
4. Не подлежат гарантийному ремонту изделия с дефектами, возникшими
вследствие:
- механических повреждений;
- несоблюдения условий эксплуатации или ошибочных действий
владельца;
- неправильной установки, транспортировки;
- стихийных бедствий (молния, пожар, наводнение и т. п.), а также других
причин, находящихся вне контроля продавца и изготовителя;
- попадания внутрь изделия посторонних предметов, жидкостей,
насекомых;
- ремонта или внесения конструктивных изменений неуполномоченными
лицами;
- использования аппаратуры в профессиональных целях;
- отклонений от Государственных Технических Стандартов питающих,
телекоммуникационных и кабельных сетей;
- при выходе из строя деталей, обладающих ограниченным сроком
службы.
5. Настоящая гарантия не ущемляет законных прав потребителя,
предоставленных ему действующим законодательством.
РУССКИЙ
13
While the selected function is displayed, press the'+' or'' level up / down buttons to adjust
level as desired. The level adjustment must be performed within 5 seconds after the function
is displayed, otherwise the unit will return to volume adjustment mode, which is the default
mode when the unit is powered up.
BEEP TONE
To turn on beep tone, press selection button (SEL) for more than 2 seconds, a beep
sound can be heard. To turn off beep tone, press selection button again for more
than 2 seconds.
CASSETTE OPERATIONS
The Tape Slot is located behind the faceplate, press the Panel Release Button to fold down
the faceplate, insert the cassette tape and close the faceplate, then press the Tape Button
to begin cassette playing (To cancel cassette play mode, press Band button to select radio
mode and CD button to select CD mode.)
6. TAPE BUTTON
7. FAST FORWARD / REWIND
When one of these buttons is pressed, it will lock in place and the tape will advance or rewind
rapidly. When the tape reaches the end it will automatically reverse and playback will begin at
normal speed. To stop the fast forward or rewind operation before the end of the tape, slight
ly press the other button, playback will resume at normal speed.
AUTO AND MANUAL REVERSE (PROGRAM)
When the tape reaches the end, it will reverse the play direction automatically, playing will be
started from the beginning of the opposite side of the tape. You can also reverse the play
direction manually by pushing both FF and REW buttons at the same time. The play direction
can be viewed from the LCD.
8. EJECT BUTTON
The Eject Button is also located behind the faceplate, so it should be folded down before
accessing this button. To eject the cassette tape, push the eject button all the way in.
9. METAL TAPE SELECTOR (“1” BUTTON)
This is a dual function button, under radio mode, it performs the function of station preset
ting, when the unit is in tape mode, it is used to select between normal tape or metal tape
playback. When the unit is powered up, normal tape is automatically selected, to change to
metal tape, press the button once under tape mode, the MTL symbol on the LCD will light up.
RADIO OPERATIONS
10. BAND BUTTON
Use this button to select the desire radio band.
11. MANUAL TUNING ' UP BUTTON / DOWN BUTTON
When one of these buttons is pressed, the tuning frequency will advance up or down by one
step, if the button is pressed for more than half second, the tuning frequency will advance up
or down rapidly until the button is released.
12. PRESET SCAN / AUTO MEMORY STORE (AMS) BUTTON
When this button is pressed for less than 1 second, the radio will enter Preset Scan mode,
the tuner will scan all the preset stations, displaying a flashing channel number on the chan
nel indicator for 5 seconds, the station can be listened during this period, press the button
again to stop scanning.
When this button is pressed for more than 1 second, the radio will enter Auto Memory Store
mode, the tuner will scan the selected band and automatically store six stations into the
memories, after the operation is completed, it performs Preset Scan for one time.
13. SEEK BUTTON
When this button is pressed and released, the radio will tune up to the next station and remain
ENGLISH
4
3629.qxd 28.10.03 15:12 Page 8
Page 5
воспроизведении фонограммы необходимо очистить от пыли и грязи
рабочие поверхности магнитной головки, тонвалов и прижимных
роликов. Для этого протрите их неворсистым тампоном, пропитанным
спиртом, или используйте чистящую кассету.
• Прикосновение к магнитной головке металлическими предметами
недопустимо.
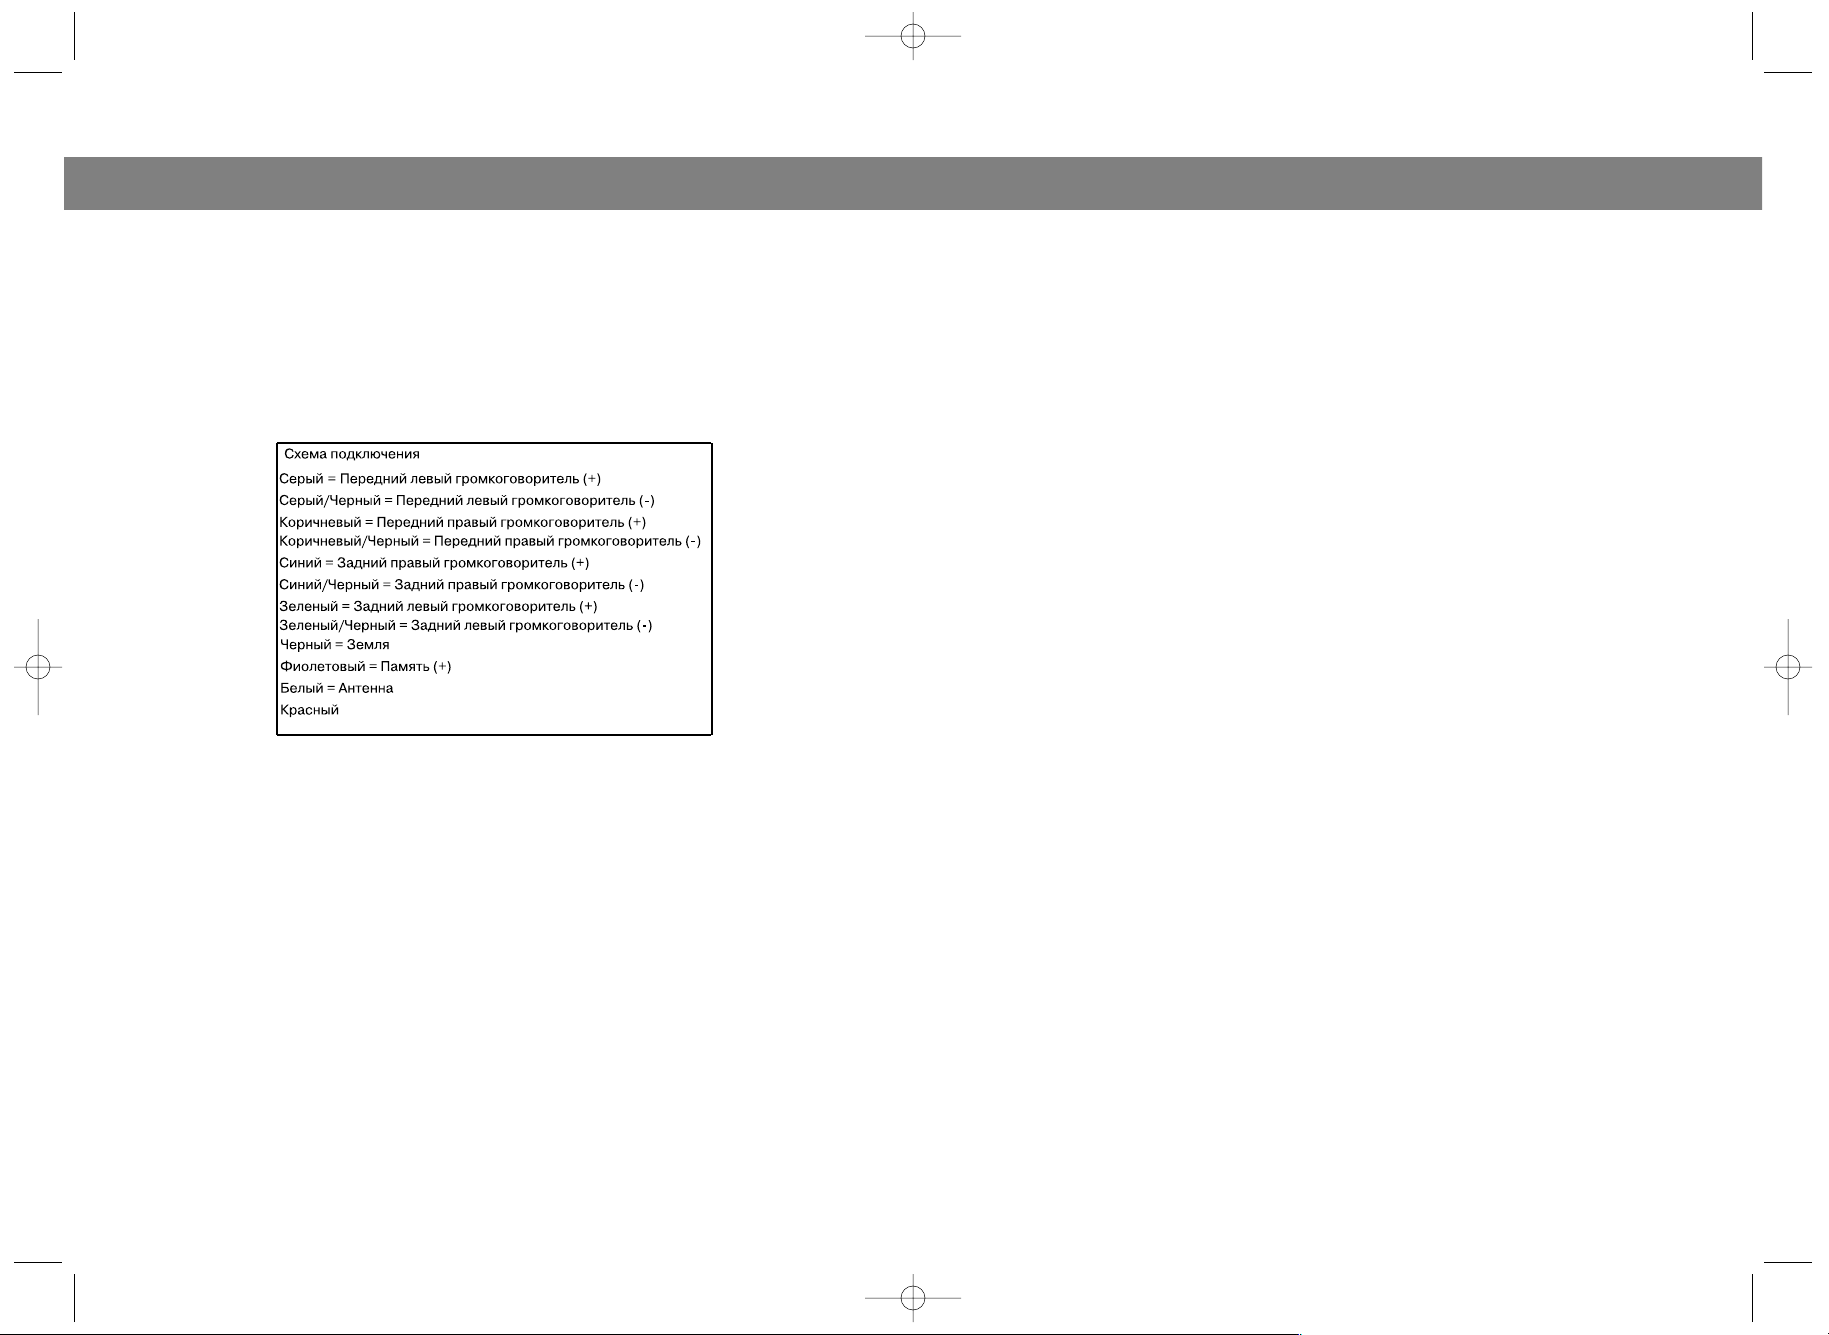
СХЕМА ПОДКЛЮЧЕНИЯ МАГНИТОЛЫ
СПЕЦИФИКАЦИЯ
Питание DC 12 В, отрицательное
заземление
Выходная мощность 4 х 35 Вт
Магнитофон
Система воспроизведения 4 дорожки,
2 направления
Скорость ленты 4,75 см/с
Взвешенное значение детонации 0,3%
Взвешенное значение сигнал/шум 40 дБ
Радиоприемник
FM диапазон 64 108 МГц
AM диапазон 522 1620 КГц
СРОК СЛУЖБЫ АВТОМАГНИТОЛЫ НЕ МЕНЕЕ 3Х ЛЕТ
РУССКИЙ
12
on the frequency, to store the station into memory, press the desired preset station button
until beep sound is heard, this indicate that the station is stored in memory, to skip the cur
rent station and continue seeking, press and release the Seek Button once more.
14. LOCAL / DX BUTTON
When the until is powered up, DX mode will be selected automatically. In some area where he
number of radio stations is high, it may be difficult to search a radio station under Seek or
AMS mode, under this condition, if Local mode is selected, the weak stations will be by
passed because the sensitivity of the radio is decreased, it will be easier to search the desire
station.
OTHER FUNCTIONS
15. CD INPUT/CD BUTTON
Accepts input from CD player, to use this feature, connect CD signal to the CD input jack
located at the rear of the unit, then press the CD button at the front panel. To cancel CD
mode, press Band button to select radio mode or Tape button to select cassette play mode.
16. DISPLAY BUTTON
Press this button to display clock, the clock will remain for about five seconds, then return to
previous display mode.
CLOCK ADJUSTMENT
Press Display button for more than 2 seconds, the LCD will flash, this shows that the clock is
under adjustment mode.
Under clock adjustment mode, press the manual tuning down button to adjust hour or the
manual tuning up button to adjust minute. After adjustment is completed, press Display but
ton again to return to normal operation, or it will resume to normal automatically if no key is
pressed for about 8 seconds.
NOTE: The clock keeps working even though the ignition key is off.
BACKUP POWER CONNECTION
The violet cable of the main unit must be connected directly to the car battery (+) or to a (+)
point where +12V DC is always alive. Current drain of the backup circuit is very small that it
does not cause battery discharge problem even if the car is parked for a long period.
POWER ANTENNA ACTIVATOR
This is used when you have an automatic power antenna. When the unit is turned on the
antenna extends automatically, when the unit is turned off, the antenna retracts automati
cally.
17. RESET BUTTON
If the unit operates abnormally or displays wrong letters on the LCD, press the reset button
for more than 2 seconds to reset the microprocessor. The Reset button is located behind the
detachable panel.
MAINTENANCE
For System
The following suggestions help you care for the product so that you can enjoy it for years.
1. Keep the product dry. If it does get wet, wipe it dry immediately. Liquids might contain
minerals that can corrode the electronic circuits.
2. Keep the product away from dust and dirt, which can cause premature wear of pans.
3. Handle the product gently and carefully. Dropping it can damage circuit boards and
cases, and can cause the product to work improperly.
4. Wipe the product with a dampened cloth occasionally to keep it looking new. Do not use
harsh chemicals, cleaning solvents, or strong detergents to clean the product.
5. Use and store the product only in normal temperature environments.
5
ENGLISH
3629.qxd 28.10.03 15:12 Page 10
Page 6

17. Кнопка сброса настроек
Нажмите на кнопку "RESET", которая находится за лицевой панелью
магнитолы, кончиком шариковой ручки или другим узким металлическим
предметом в следующих случаях:
после подсоединения проводов питания, ни одна кнопка не работает,
на дисплее высвечивается ошибка.
ИЗВЛЕЧЕНИЕ ПРИБОРА ИЗ ПРИБОРНОЙ ПАНЕЛИ
(только для установки, без последующего многократного извлечения
прибора)
1. Извлеките обрамляющую рамку из боковых пазов.
2. Вставьте поддерживающий ключ (прилагается с прибором) в отверстие.
Потяните прибор на себя и придерживайте боковые пазы.
3. Удалите металлическую полоску, находящуюся с задней стороны прибора.
4. Извлеките поддерживающий ключ из отверстия.
5. Отсоедините все провода от прибора и антенный разъем.
ТЕХНИЧЕСКОЕ ОБСЛУЖИВАНИЕ МАГНИТОЛЫ
• Оберегайте магнитолу от ударов, сырости и пыли.
• Храните и эксплуатируйте магнитолу в нормальном температурном
режиме: от минус 10 до плюс 45 градусов по Цельсию. Эксплуатация вне
этого температурного диапазона может привести к преждевременному
отказу магнитолы.
• При содержании автомобиля вне поля зрения на открытом воздухе или в
неотаплиевом гараже рекомендуется снять магнитолу и хранить в теплом
помещении.
• Все переключения органов управления производите четко, не прилагая
больших усилий.
• Обращайтесь с аппаратом бережно и аккуратно.
• Время от времени протирайте магнитолу влажной тканью. Не
используйте для чистки химические средства.
• Качество работы магнитолы зависит от качества кассет. В случае плохой
перемотки, заедании кассеты рекомендуется во избежание порчи
магнитолы изъять кассету из пользования.
• Не используйте кассету, если она была повреждена или запутана.
• Не оставляйте кассету в проигрывателе, если Вы не собираетесь ее
прослушивать, особенно при жаркой окружающей температуре.
• Оберегайте кассеты от пыли, грязи, прямых солнечных лучей, не храните
их рядом с электрическими двигателями и магнитами.
• При снижении уровня высокочастотных сигналов и некачественном
РУССКИЙ
11
High temperature can shorten the life of electronic devices, damage batteries, and dis
tort or melt plastic parts.
For Tape Player
Periodic cleaning of the tape head and capstan shaft will ensure good reproduction of music
and troublefree operation. Cleaning of the tape head should be done every 20 to 30 hours
of operation or when the high tones have become less clear.
1. Use a cassette cleaning cartridge if available. If one is not available, use a cotton swab
soaked in isopropyl (rubbing) alcohol.
2. While holding the tape door open, locate tape head to the right of the opening and in the
centre of the unit.
3. Clean the tape head with the cotton swab.
4. Clean the capstans and the pinch rollers with the cotton swab.
5. Allow the tape head, capstans and pinch rollers to dry before operating.
6. Do not touch the tape with your fingers; if it becomes lose, wind it back by twisting a six
sided pencil in the cassette reel.
ELECTRICAL CONNECTION
Make sure your car battery is a 12 volt (6 filler caps) negative ground system (if not, a con
verter will be necessary). Before starting wiring connections, disconnect the power supply
by removing the fuse from the fuse box. Connect the power wire to one of the extra terminals
of the fuse box. Connect the black ground wire to a metal part of the car. It is important to
make good contact. Make other wiring connections as shown. Replace the fuse in the red
power lead wire.
SPECIFICATION
Power Supply Requirements DC 11 14 В (Negative ground)
Output Power 4 x 35 W
Tape Speed 4.75 cm/sec. (C60 tape)
Wow & Flutter Less than 0.4%
Cross Talk at 1KHz More than 40 dB
Channel Separation at 1 KHz More than 40 dB
Frequency Response 125 Hz 8 KHz
AM 522 1620 KHz
FM 64 108 MHz
SERVICE LIFE OF THE CAR RADIO CASSETTE PLAYER NOT LESS THAN 3 YEARS
ENGLISH
6
3629.qxd 28.10.03 15:12 Page 12
Page 7

11. Кнопки поиска радиостанций
Для поиска желаемой радиостанции, нажмите и удерживайте кнопки
настройки радиостанций ! или ".
12. Клавиша AMS (автоматическое сканирование станций)
Когда эта кнопка нажата в течение менее 2с, включается режим
предварительно установленного сканирования. Тюнер начнет сканировать
все предварительно установленные станции, высвечивая номер на
индикаторе в течение 5 с. Нажмите на кнопку еще раз, чтобы отменить
сканирование.
Когда эта кнопка нажата в течение более 2с, вы включаете режим
"Автоматическое запоминание/сканирование настроек". Тюнер будет
сканировать выбранный диапазон и автоматически занесет в память первые
шесть наиболее "мощных" радиостанций.
13. Поиск следующей станции
Если нажать эту кнопку и отпустить, произойдет настройка на следующую
передающую станцию. Чтобы занести станцию в память, нажмите на кнопку,
соответствующую предварительно установленной станции до тех пор, пока
не услышите звуковой сигнал. Он означает, что станция занесена в память.
Чтобы перескочить на предыдущую станцию и продолжить поиск, нажмите и
отпустите кнопку "SEEK" еще раз.
14. Кнопка ограничения выбора станций с наиболее сильным
сигналом
При включении этой функции в режиме автоматического и ручного поиска
станции со слабым сигналом будут пропущены.
15. Кнопка сканирования
Если нажать эту кнопку и отпустить, начнется режим поиска радиостанций.
Если станция найдена, в течение 5 с. происходит ее запоминание, и после
этого сканирование продолжится. Чтобы отменить эту функцию, нажмите
эту кнопку еще раз.
16. Кнопка режима дисплея
Нажмите на кнопку, чтобы высветилось время на дисплее. Это продлится в
течение 5 с, а затем вернется предыдущий режим.
У
становка часов. В режиме работы часов нажмите на кнопку "DISP" в течение
2 с. Дисплей замигает. Это указывает, что часы находятся в режиме
установки. Для установки нужного часа нажмите кнопку ручной настройки ".
Для установки нужного количества минут нажмите кнопку ручной
настройки !.
Когда установка закончена, нажмите кнопку "DISP".
10
УСТАНОВКА
Примечания:
• Перед окончательной установкой прибора попробуйте подсоединить
провода и убедитесь, что это сделано правильно.
• Для того чтобы правильно установить прибор, используйте только детали,
входящие в комплект. Использование других деталей может привести к
нарушению работы прибора.
• Если установка потребует существенных изменений конструкции
автомобиля (например, сверления дыр и т.п.), проконсультируйтесь у
специалиста.
• Установите прибор в таком месте, чтобы он не мешал водителю и не мог
поранить пассажиров в случае экстренной остановки, например, при
аварии.
• Если после установки угол наклона прибора превышает 30° по отношению
к горизонту, возможны сбои в его работе.
• Оберегайте прибор от воздействия высоких температур, прямого
солнечного света, а также попадания в него пыли и грязи.
7
РУССКИЙРУССКИЙ
3629.qxd 28.10.03 15:12 Page 14
Page 8

громкость. При нажатии на кнопку (+) громкость будет увеличиваться, а при
нажатии на кнопку () уменьшаться. При этом на дисплее будет
отображаться символ VO и уровень громкости в условных единицах.
Для регулировки тембра низких или высоких частот необходимо выбрать
кнопкой SEL соответствующий режим, при этом при выборе регулировки
тембра НЧ на дисплее будет отображаться символ "BA" и цифры,
указывающие значение регулируемого параметра в условных единицах. При
выборе регулировки тембра ВЧ на дисплее будет отображаться символ "TR".
Для распределения мощности между правыми и левыми каналами, а также
передними и задними громкоговорителями, необходимо установить режим
регулирования баланса или фронт/тыл. При этом на дисплее будут
отображаться соответствующие символы "BAL"или "FAD" . Кнопками (+)/()
установите желаемое соотношение громкости между громкоговорителями.
Режим "fader" действует только на четырехканальных моделях.
Чтобы включить звуковой сигнал, нажмите и удерживайте в течение 2с.
кнопку SEL, для отключения нажмите и удерживайте кнопку SEL еще раз.
6. Кнопка выбора режима “Магнитофон”
7. Кнопка ускоренной перемотки вперед/назад и реверса.
При нажатии на одну из этих клавиш происходит ускоренная перемотка
вперед или назад. Для отмены этой функции слегка нажмите на соседнюю
кнопку. Если нажаты обе кнопки одновременно в режиме воспроизведения
кассеты, движение кассеты будет изменено. При окончании перемотки
ленты в кассете автоматически включается режим воспроизведения.
8. Кнопка выброса кассеты
Кнопка выброса кассеты находится за лицевой панелью. Чтобы извлечь
кассету, откройте переднюю панель, нажав на кнопку (1), а затем на кнопку
"EJECT".
9. Переключатель для различных типов кассетной ленты
Кнопка “1” имеет два значения. При выборе режима “Радио” используется
для занесения в память радиостанции; при выборе режима
воспроизведения кассеты для выбора типа кассетной ленты. При
воспроизведении кассеты автоматически выбран режим для кассетной
ленты TypeI (Normal). Для смены режима на TypeII (CrO
2
; Me), нажмите
кнопку 1 раз, при этом на дисплее появится символ MTL. Для отмены
данного режима нажмите кнопку еще раз.
10. Кнопка выбора диапазона
Нажав на эту кнопку, вы можете выйти из режима воспроизведения кассеты,
а также выбрать желаемый частотный диапазон.
98
РЕГУЛЯТОРЫ УПРАВЛЕНИЯ И ФУНКЦИИ
1. Кнопка открытия панели
При нажатии на кнопку передняя панель принимает горизонтальное
положение, после чего панель можно извлечь.
2. Кнопка включения/выключения
Нажмите, чтобы включить или выключить автомагнитолу.
3. Кнопка отключения звука
Нажмите эту кнопку, чтобы отключить звук. При повторном нажатии звук
включается.
4. Кнопка включения тонокомпенсации
Включение этой функции усиливает низкие и высокие частоты звукового
диапазона, что создает эффект насыщенности звука, особенно при малых
уровнях громкости.
5. Кнопка выбора режима управления звуком
Нажатием на кнопку вы можете выбрать один из следующих режимов:
громкость/ низкие частоты/ высокие частоты/ баланс/ распределения
мощности между передними и задними громкоговорителями
Каждый режим высвечивается на дисплее. Выбор режимов происходит в
комбинации с кнопками настройки вверх (+) и вниз (). Начальный режим
РУССКИЙ РУССКИЙ
3629.qxd 28.10.03 15:12 Page 16
 Loading...