

Page 1
Car Audio CD/MP3 player
MODEL VT-3623
4
9
15
21
www.vitek-aus.com
MANUAL INSTRUCTION
3623_im.qxd 30.03.05 18:44 Page 1
Page 2
2
3623_im.qxd 30.03.05 18:44 Page 2
Page 3
3
3623_im.qxd 30.03.05 18:44 Page 3
Page 4

CAR AUDIO CD/MP3 PLAYER WITH DIGITAL
RADIO RECEIVER
Model VT-3623
ABOUT THIS DEVICE
This device has a range of complicated features
that provide improved signal reception quality
and device operation. All of these features are
designed to be operated easily, but may require
some additional explanation.
These operating instructions are meant to help
you get the most use out of this players possibilities and increase your listening pleasure.
We recommend becoming acquainted with
these features and how they work by carefully
reading these instructions before using the
device. It is especially important that you read
and follow the precautions: contained on the
next page and in other sections.
Note:
A. In addition to regular CD discs, this player can
read CD-R and CD-R/W discs that contain audio
tracks; although, depending on the condition of
the recording device used to record the program
or the CD-R and CD-R/W discs themselves,
some CD-R and CD-R/W discs cannot be
played.
B. When recording music onto CD-R and CD-R/W
discs, very high recording speeds can lead to
poor quality sound signals. This is why we recommend you choose a recording speed of 24x
or less to record onto CD-R discs and a speed
of 4x or less to record onto CD-R/W discs.
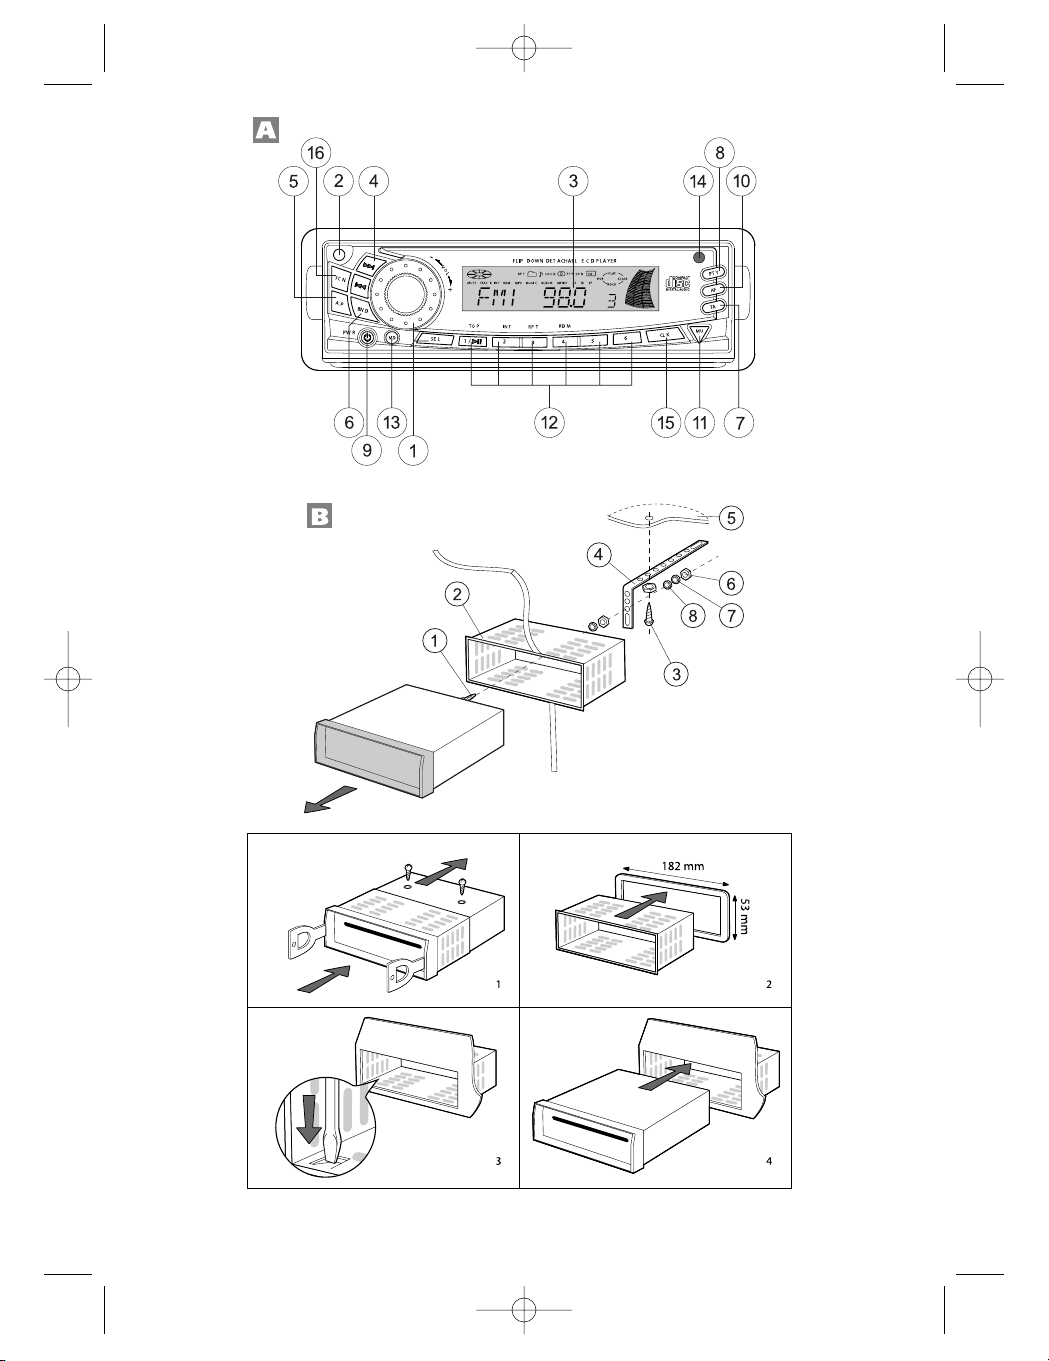
LOCATION AND FUNCTIONS OF OPERATING
CONTROLS
1. Multi-functional switch for adjusting the volume level and navigating the settings menu
(VOL / SEL / ENTER)
1). Repeatedly press the SEL button to choose
the desired sound parameter: VOLUME, BASS,
TREBLE, BALANCE and FADER and then rotate
the VOL knob to change the selected sound
parameter.
2). Press and hold the SEL button for more than 1
second to activate the MENU mode; TA SEEK
(traffic announcement search)/TA ALARM
(warning) will appear on the screen; then press
the SEL button repeatedly to choose the following modes: MASK DPI/MASK ALL (cancel
processing of alternative frequencies/cancel
all), DSP OFF (deactivate the audio processor)/POP M /ROCK M/CLASS M/FLAT M, LOUD
ON /LOUD OFF (tone compensation),
ESP12/ESP45 (anti-shock function), BEEP
ON/BEEP OFF (audible signal), SEEK1/SEEK2,
STEREO/MONO, LOCAL/DX, VOL LAST/VOL
ADJ (default volume level). (When the VOL
ADJUST mode is active, the next mode in the
menu will be A-VOL, after which you can set the
volume level). After choosing the desired menu
mode, rotate the VOL knob to set the desired
parameters for the chosen feature.
3). TRACK SEARCH FEATURE in MP3 mode:
A. Press the A.P button once to choose the
TRACK SEARCH feature; the TRK SCH indicator will appear on the display.
B. Press the SEL button to enter the TRACK
mode; 001 will appear on the display and the
first symbol will start to blink. Then, rotate the
VOL knob to change the number from 0 to 9.
(Press the SEL button for more than 0.5 seconds to play the selected track)
C. Press the SEL button to make the tenths-place
digit blink and then rotate the VOL knob to
change the number from 0 to 9. (Press the SEL
button for more than 0.5 seconds to play the
selected track)
D. Press the SEL button to make the hundredths-
place digit blink and then rotate the VOL knob to
change the number from 0 to 9.
E. Press the SEL button to play the selected track.
(If the selected number is greater than the number of tracks on the MP3 disc, then the last track
on the disc will be played).
4).FILE SEARCH FEATURE in MP3 mode:
A. Press the A.P button quickly two times to
choose the FILE SEARCH feature; FILE SCH will
appear on the display.
B. Press the SEL button once quickly to choose
and display the first folder.
Then, rotate the VOL knob to view the folder
choices forward and reverse.
Press and hold the SEL button for more than
0.5 seconds to play back the first track of the
selected folder.
C. Press the SEL button once quickly to choose
and display the first track in the chosen folder.
Then, rotate the VOL knob to view the track
choices in the folder forward and reverse.
D. Press the SEL button once quickly to playback
the selected track.
5).CHARACTER SEARCH FEATURE in MP3
mode:
A. Press the A.P button quickly three times to
choose the CHARACTER SEARCH FEATURE.
The CHAR SCH symbol will appear on the display.
B. Press the SEL button once quickly to confirm
the CHARACTER SEARCH mode; the letter A
will appear on the screen.
C. To choose the letter A, press the SEL button.
D. Rotate the VOL knob to change the letter and
ENGLISH
4
3623_im.qxd 30.03.05 18:44 Page 4
Page 5

press SEL again to confirm the chosen letter.
E. After the first letter is chosen, the next letter in
the name appears starting with A.
F. Repeat steps B through D to confirm the second
letter.
G. Enter the remaining letters in the same manner.
Note:
1) When pressing the SEL button to confirm a letter, if the SEL button is pressed for more than
0.5 seconds, playback will begin of the song
that beings with the chosen letter (letters).
2) You can choose the number 0-9 and the *
symbol using the VOL knob.
2. FRONT PANEL OPENING BUTTON
Press button 2 opens the front panel and you
can then insert a disc into the CD player or press
the EJ button to eject a disc from the player, or
remove the front panel.
3. LCD (LIQUID CRYSTAL DISPLAY)
4. UP (UP) AND DOWN (DN) BUTTONS
1) While in RADIO mode, press the : and 9 down
buttons repeatedly to manually tune to the
desired station. Press and hold the : and 9
buttons for more than 0.5 to auto-tune to the
next radio station with a high signal level.
2) In CD mode, press the : button to playback the
next track. Press the 9 button once to playback
the current track from the beginning; press the
9 button twice quickly to playback the previous
track. Press and hold the : and 9 buttons to
skip forward and back.
5. AUTO SAVE / SCAN BUTTON
1) In radio mode, press the A.P button hear all of
the radio stations saved in memory for 5 seconds; the station number and frequency will
blink on the screen. If you press and hold this
button for more than 2 seconds, then all stations
in the current band will be found and saved into
the memory slots. When the auto-save operation
has completed, each saved station will be
played for 5 seconds. To stop scanning of found
stations, press one of the station memory (1-6)
buttons to choose a radio station.
2) In MP3 mode, press the A.P button repeatedly
to choose between search modes: TRACK
SEARCH, FILE SEARCH, or CHARACTER
SEARCH.
6. RADIO BAND
Press the BAND (BND) button repeatedly in
RADIO mode to choose the desired frequency
band.
7. TA (TRAFFIC ANNOUNCEMENT) BUTTON
Press the TA (TRAFFIC ANNOUNCEMENT)
button to turn the TA mode on or off.
When the TA mode is on (the TA symbol
appears on the display), the radio begins search
for TA stations the TA symbol will appear on
the display for a certain period of time.
When a traffic announcement is broadcasted:
1). If the radio is in CD playback mode, it temporarily switches to radio mode.
2). The radio temporarily switches to the station that
is broadcasting traffic information; the TP
symbol will appear on the display.
3). If the volume level is less than 20, then it will be
increased to 20 and return to the previous mode
and volume level after the traffic announcement
has finished. If the volume is adjusted during the
traffic announcement, then the previous volume
level will still be set.
TA interrupt function:
Pressing this button cancels the current traffic
announcement, but TA mode will remain on.
8. PROGRAM TYPE BUTTON
Quickly and repeatedly press the PROGRAM
TYPE (PTY) button to choose one of the following modes:
MUSIC (PTY MUSIC) - - SPEECH (PTY
SPEECH)- - OFF (PTY OFF)
Program type selection is achieved using the
presets button, as described in step 12 (STATION PRESETS BUTTONS). Quickly and repeatedly press one of the 6 presets buttons to
choose the PROGRAM TYPE.
When the music or speech program type has
been selected, the display will show the previously set program type. If new parameters are
not entered within 2 seconds, then a search is
conducted of earlier selected program types. If
the desired program type is not found within
after one search cycle, then the NO PTY symbol will blink on the screen and the radio will
return to normal operating mode.
9. POWER ON BUTTON
Press any button, except the EJECT and OPEN
buttons, to turn on the devices power; to turn
off the device, press and hold the PWR button
for more than 0.5 seconds. (After connecting
the device to power (ACC POWER) for the first
time, during the first 3 seconds, the device can
only be turned on)
10.AF (ALTERNATIVE FREQUENCIES) BUTTON
When pressed quickly, the AF mode is activated and the AF symbol appears on the display.
Indicator off: AF mode off.
Indicator on: AF mode on and has radio-data
information (RDS).
ENGLISH
5
3623_im.qxd 30.03.05 18:44 Page 5
Page 6

Indicator is blinking: AF (mode is on, but no
RDS information has been received yet).
When AF mode is activated, the radio constantly verifies the signal strengths on alternate
frequencies of the current radio station. The verification interval, depending on the signal
strength of the current station, can be from several for strong stations to several seconds for
weak ones. Each time the signal strength on an
alternate station is stronger than the signal of
the current station, the radio switch to that station for a very short period of time; the NEW
FREQUENCY symbol will appear on the display
for 1-2 seconds. Remember that the station
switching time is very short and is hardly noticeable during normal radio listening.
In FM mode, when the AF function is active,
the SEEK, SCAN and AUTO-MEMORY function
may receive and save only RDS programs.
When pressed for a long time, the AF mode
changes to REGION CODE ON/OFF mode.
REGIONAL MODE ON:
AF mode or PROGRAM IDENTIFIER SEARCH
(PI SEEK) begins for radio stations whose PI
codes are the same as the current stations.
(The PI codes are checked during AF CHECK)
REGIONAL MODE OFF:
Regional codes in PI format are ignored in AF
mode or PI SEEK mode. ( PI code and COVERAGE AREA is not checked during AF search)
11.MUTE BUTTON (MU)
Press this button to quickly turn off and on the
sound.
You can also use the following buttons to turn on
the sound: MODE, BAND, VOL, LOUD,
and SEL.
12.STATION PRESETS BUTTONS [ 1-6 ] and
UP/(TOP/CDP) BUTTON, INTRODUCTION
(INT), REPEAT (RPT), RAMDOM PLAYBACK
(RDM).
(A). RADIO MODE
Pressing these buttons quickly recalls a previously saved station.
When pressed for more than one second, the
current stations frequency is saved to that buttons memory.
Upon choosing the program type mode (PTY),
the preset button are used in the following manner: Music ---Speech---Off
Music
1. Pop, rock
2. light music
3. classical, other mus.
4. jazz, country
5. national, old
6. folklore
Speech
1. News, events, information
2. Sport, education, drama
3. Culture, science, other
4. Weather, finances, children
5. Society, religion, live call-in shows
6. Travel, leisure, documentaries
B) In CD/MP3 player mode, press the TOP/CDP
button to pause playback; press it again to
resume. Hold this button down for 0.5 seconds
to playback the first track on the disc.
C) In CD/MP3 player mode, press the INT button to
playback the first 10 seconds of each track;
press it again to stop INT mode playback and
play the current track in its entirety.
D) In CD/MP3 player mode, press the REPEAT
(RPT) button to repeat playback of the current
track. Press it again to cancel the current mode.
E) In CD/MP3 player mode, press the RANDOM
PLAYBACK (RDM) button to play all tracks in
random order. Press this button again to cancel
this mode.
F) In MP3 playback mode, buttons M5 and M6 skip
10 tracks forward/back during normal playback.
13.MODE BUTTON
Press to choose the sound source: Radio or
CD/MP3 player.
14.REMOTE CONTROL UNIT SENSOR
15.CLOCK BUTTON (CLK)
1) RADIO MODE
When RDS data is being received, quickly and
repeatedly press this button to display the following information in order:
Station name PS -> FREQUENCY -> CLOCK
-> Program type PTY ->
When radio-data information is not being
received, quickly and repeatedly press this button to display the following information in order:
FREQUENCY -> CLOCK -> Program type
PTY ->
2) CD/MP3 PLAYER MODE
Quickly press this button to display the time for
5 seconds, then the display returns to the previous information displayed until this button is
pressed again.
3) SETTING THE TIME
In clock mode, press and hold this button for
more than 1 second. Then, when the time
begins to blink, press the + and buttons to set
the hours and minutes.
16.SCAN BUTTON (SCN)
Press to scan the frequency band. When a radio
ENGLISH
6
3623_im.qxd 30.03.05 18:44 Page 6
Page 7

station with a stable signal is found, the current
frequency will blink for 5 seconds; press the button again to stop scanning and listen to the current station, other wise the device will continue
scanning every 5 seconds.
INSTALLATION
INSTALLING THE UNIT IN YOUR AUTOMOBILE
(FIG. B)
1. The device
2. Guide rails
3. Front panel
4. Hex bolt
5. Lock-nut
6. Flat disc
7. Car body
8. Bracket
9. Securing screws
10.M5 hex bolts X 15
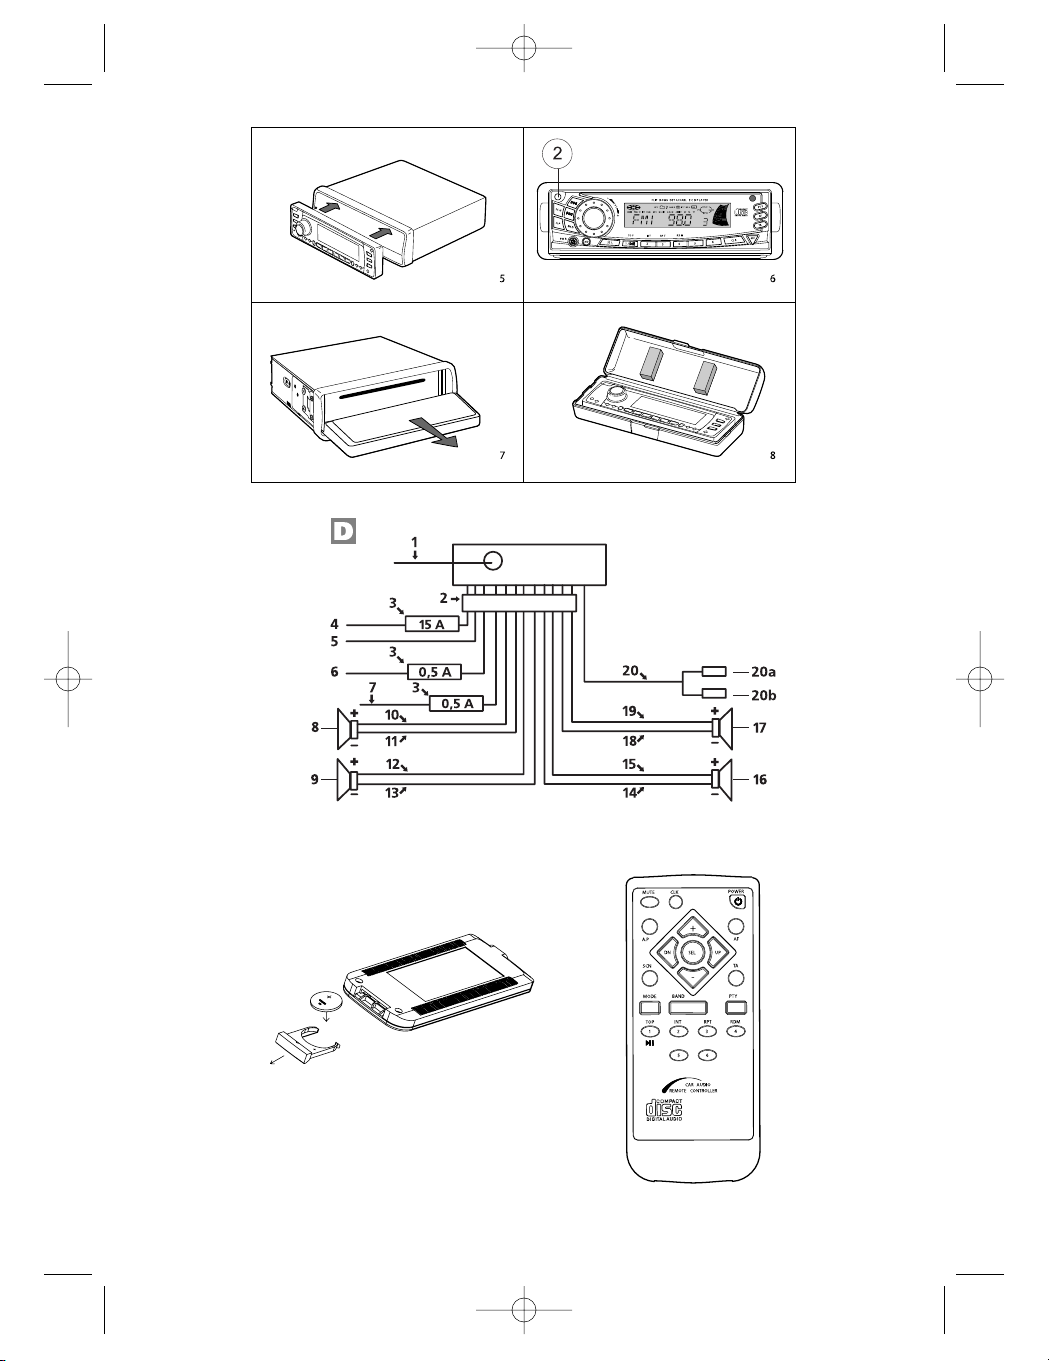
CONNECTING THE SPEAKERS (FIG. D)
1. ANTENNA JACK
2. ISO JACK
3. FUSES
4. MEMORY B+ (YELLOW)
5. BLACK (GROUND-)
6. RED (B+)
7. BLUE ANTENNA POWER
8. FRONT LEFT SPEAKER
9. LEFT REAR SPEAKER
10.WHITE
11.WHITE/BLACK
12.GREEN
13.GREEN/BLACK
14.VIOLET/BLACK
15.VIOLET
16.RIGHT REAR SPEAKER
17.FRONT RIGHT SPEAKER
18.GRAY/BLACK
19.GREY
20.LINE AUDIO OUT JACK (RCA)
20a.RED - RIGHT
20b.WHITE - LEFT
NOTE:
1. Only use speakers with 4 ohms of resistance.
2. Do not allow the antenna power wire to touch
metal elements of the vehicle or the rear panel
of the player.
INSTALLATION EXAMPLE (FIG.1,2,3,4)
Installing in a dashboard
1. Remove the screws and clips.
3. CLIP. Break off these clips if necessary.
Note:
Store the key in a reliable place, as you
may need to remove the device from the car in
the future.
SAFETY MEASURES AND CARE
1. If it is very hot in the vehicle (after standing in
the sun, for example), turn on the player only
after the vehicle has been driven for a while and
the salon has cooled down.
2. Use the supplied plastic case to store the front
panel.
3. The device is designed for use in vehicles in
which the negative pole of the battery is connected to the chassis of the vehicle. Verify this
before installation.
4. Make sure that the speaker wires are not shorted-out before turning on the device. Otherwise
an overload could occur that might damage the
amplifier.
5. Do not attach the removable panel until the unit
has been fully installed.
Removal and installation of the front panel
The front panel of this device can be removed in
order to avoid theft.
REMOVING THE FRONT PANEL
Before removing the decks front panel, turn off
the power by pressing button (1)POWER
ON/OFF (PWR).
Press the panel release button 14 to remove the
front panel (REL), pull the panel towards yourself.
See the figure (5,6,7,8).
Notes:
Do not press too hard when installing the panel.
It freely snaps into place with light pressure.
When taking the panel with you, place it in the
supplied case.
Do not press hard on the LCD screen when con-
necting the front panel to the main unit.
DISC PLAYBACK:
Cleaning discs
Before playing a disc, wipe it with a clean, lintfree cloth. Wipe the disc in the direction of the
arrows.
ATTENTION:
Do not use solutions like gasoline and solvents.
Cleaning products and anti-static cleaners may
damage the device.
Do not insert the disc label down. This can dam-
age the device.
NOTE:
Do not insert another disc while there is already
one in the player. This can damage the player.
Hold the disc by its edges. To keep the disc
clean, do not touch either of its surfaces.
Do not stick paper or film to discs.
Do not expose discs to the effects of direct sun-
light or high temperatures. Do not leave discs in
the car when parked in direct sunlight.
REPLACING THE BATTERY IN THE REMOTE
CONTROL UNIT:
1. Slide off the battery cover in the direction indicated.
2. Replace the old battery with a new one, positive
(+) side up.
3. Replace the battery cover.
NOTE REGARDING THE BATTERY IN THE
REMOTE CONTROL UNIT:
1. Incorrect use of the battery can lead to over-
ENGLISH
7
3623_im.qxd 30.03.05 18:44 Page 7
Page 8
heating or explosion and cause injury or fire.
2. Battery leaks can damage the remote control
unit (Battery life: 6 months when used in the
usual manner and under normal temperature
conditions).
3. Do not short-circuit the batterys poles.
4. Do not dispose of the battery in an open flame.
5. To avoid accidents, store the battery out of the
reach of children.
LOCATION AND USE OF OPERATING CONTROLS (ONLY ON THE REMOTE CONTROL
UNIT)
Remote
control Front
unit panel
MUTE . . . . . . . .MU
POWER . . . . . .PWR
MODE . . . . . . .MD
BAND . . . . . . . .BND
+/- . . . . . . . . .VOL+/-
UP . . . . . . . . .:
DN . . . . . . . . .9
FIXING MALFUNCTIONS
In order to fix the problem, read the following
recommendations. If the problem persists, contact your nearest service center.
No power
The vehicles ignition is not on
If the device is correctly connected to the vehicles power system, set the ignition switch to
ACC
The fuse is blown
Replace the fuse
Disc wont load
There is already a disc in the player
Remove the disc from the player and then insert
a new one
Disc cannot be read
The disc is not loaded correctly
Insert the disc label-up
The disc is dirty or scratched
Clean the disc or insert a new one
It is too hot in the car
Cool the salon down to normal room temperature
No sound
The volume is set too low
Set the volume to the desired level
The speaker wires are not connected properly
Check the speaker wire connections
Buttons dont work
The built-in microcomputer is not functioning
properly due to static electricity.
Press the RESET button
The front panel is not installed correctly
Install the front panel correctly
The disc skips during playback
The installation angle is greater than 30°
Adjust the installation angle of the player
The disc is dirty or scratched
Clean the disc / Insert a new one
The radio doesnt work, auto-tuning does
not work
The antenna cable is not connected.
The signal is too weak
Connect the antenna cable firmly
Try to manually tune the desired station
CHARACTERISTICS
GENERAL
Power supply 13.8 V Direct Current.
Current use 5 A maximum.
Output power 4 X 40W.
FM
Frequency band 66 MHz 108 MHz
Sensitivity3 uV.
I.F. Frequency 10.7 MHz.
AM
Frequency band 522 KHz 1620 KHz
I.F. Freqency 450 KHz
Sensitivity 40 dB
LINE OUT
Out CD MAX 1200 mv
CD PLAYER
System: compact disc audio system
Supported discs CD/CD-R/CD-RW/MP3
Signal Format frequency of 44.1KHz.
Frequency band 10-20 KHz < 5dB.
CD Signal level 50 dB [1KHz]
Number of channels: 2 stereo.
Chassis dimensions:
178[Width] X 50[Height] X 165[Length].
Due to constant upgrading, the characteristics
and design of this product may be changed
without prior notification.
SERVICE LIFE OF THE UNIT NOT LESS 5 YEARS
GUARANTEE
Details regarding guarantee conditions can be
obtained from the dealer from whom the appliance
was purchased. The bill of sale or receipt must be
produced when making any claim under the terms of
this guarantee.
This product conforms to the EMCRequirements as laid down by the Council
Directive 89/336/EEC and to the Low
Voltage Regulation (23/73 EEC)
ENGLISH
8
3623_im.qxd 30.03.05 18:44 Page 8
Page 9

CD/MP3-AUTORADIO MIT DIGITALEM
RADIOEMPFÄNGER
MODELL VT-3623
ÜBER DIESE ANLEITUNG
Dieses Gerät hat eine Reihe komplizierter
Funktionen, die eine verbesserte Qualität des
Empfangs und der Arbeit des Gerätes
gewähren. Sie sind auf eine einfache
Handhabung orientiert, können jedoch einige
zusätzliche Erläuterungen erfordern.
Diese Anleitung ist dazu bestimmt, um Ihnen zu
helfen den maximalen Nutzen aus den
Möglichkeiten dieses CD/MP3-Spielers zu
ziehen und Ihren mehr Freude beim Abhören zu
schenken.
Wir empfehlen Ihnen sich mit den Funktionen
und deren Arbeit bekannt zu machen und vordem Gebrauch des Gerätes aufmerksam die
Anleitung zu lesen. Es ist besonders wichtig,
dass Sie die Vorsichtsaßnahmen lesen und
einhalten, die auf der nächsten Seite und in
anderen Abschnitten angeführt sind.
Anmerkung:
A. Zusätzlich zu gewöhnlichen CDs kann dieses
Gerät CD-R- und CD-R/W-Träger wiedergeben,
die Audioaufnahmen enthalten; es kann jedoch
sein, dass in Abhängigkeit mit dem Zustand der
Aufnahmegeräte, der Aufnahmeprogramms
oder des CD-R- und CD-R/W-Rohlings einige
der CD-Rs oder CD-R/Ws nicht wiedergegeben
werden können.
B. Bei Musikaufnahmen auf CD-Rs oder CD-R/Ws
kann eine zu hohe Aufnahmegeschwindigkeit zu
einer schlechten Qualität des Tonsignals führen,
deshalb wird es empfohlen die Geschwindigkeit
24x oder weniger für die CD-R-Aufnahme, und
die Geschwindigkeit 4x oder weniger für CDR/W-Aufnahmen zu wählen.
ANORDNUNG UND FUNKTIONEN DER
STEUERUNGSTASTEN
1. Mehrzweckschalter zum Regeln der Lautstärke
und für die Navigation im Einstellungsmenu des
Gerätes (VOL / SEL / ENTER)
1). Pressen Sie aufeinander folgend die Taste SEL
für die Wahl des gewünschten Klangwertes:
VOLUME(Lautstärke), BASS (Bass),
TREBLE(Höhen), BALANCE (Kanalbalance) und
FADER (Signalpegel), und drehen Sie danach
den Griff VOL (Lautstärke), um den gewählten
Klangwert zu ändern.
2). Pressen und halten Sie über 1 Sekunde lang die
Taste SEL (Wahl), um den Menubetrieb
(MENU) einzuschalten, auf dem
Flüssigkristalldisplay erscheint TA SEEK
(Verkehrsfunksuche)/TA ALARM (Warnung),
pressen Sie danach aufeinander folgend die
Taste SEL, um die Betriebsart zu wählen:
MASK DPI/MASK ALL (die Bearbeitung der
Alternativfrequenzen widerrufen/alles widerrufen), DSP OFF(Audio-Pozessor aus)/POP M
/ROCK M/CLASS M/FLAT M (Pop, Rock, klassische Musik, neutrale Musik), LOUD ON /LOUD
OFF (Tonausgleich an/aus), ESP12/ESP45
(Vibrationsschutzfunktion), BEEP ON/BEEP OFF
(Tonsignal an/aus), SEEK1/SEEK2
(Suche1/Suche2), STEREO/MONO
(Stereo/Mono), LOCAL/DX (lokales/entferntes
Radiosignal), VOL LAST/VOL ADJ (voreingestellter Lautstärkenpegel). (Wenn der Betrieb der
Lautstärkenregelung eingeschaltet ist (VOL
ADJUST), wird die nächste Betriebsart A-VOL
sein, danach können Sie die Lautstärke einstellen). Nach der Wahl des gewünschten
Menubetriebs (MENU) drehen Sie die
Lautstärkentaste VOL, um die Betriebsart des
gewünschten Wertes zu wählen.
3).TITELSUCHFUNKTION im MP3-Betrieb:
A. Pressen Sie einmal die Taste A.P, um die
Betriebsart der Titelsuche TRACK SEARCH zu
wählen, auf dem LCD-Display erscheint der
Indikator TRK SCH.
B. Pressen Sie die Taste SEL, um den Titelbetrieb
(TRACK) einzugeben, auf dem Display erscheint
001 und das erste Symbol beginnt zu blinken.
Drehen Sie danach die Lautstärkentaste VOL,
um die Ziffern von 0 bis 9 zu wählen. (Pressen
Sie nach dem Beenden die Taste SEL für mehr
als 0.5 Sekunden, um die Wiedergabe des
gewählten Titels zu beginnen)
C. Pressen Sie die Taste SEL, damit die zehnstel-
ligen Ziffern zu blinken beginnen, danach
drehen Sie den Lautstärkengriff VOL, um die
Ziffern von 0 bis 9 zu wählen. (Pressen Sie nach
dem Beenden die Taste SEL für mehr als 0.5
Sekunden, um die Wiedergabe des gewählten
Titels zu beginnen)
D. Pressen Sie die Taste SEL, damit die hundert-
stelligen Ziffern zu blinken beginnen, und
drehen Sie danach den Lautstärkengriff VOL,
um die Ziffern von 0 bis 9 zu wählen.
E. Pressen Sie die Taste SEL für die Wiedergabe
des gewählten Titels. (Wenn die Nummer des
gewählten Titels größer ist, als die letzte
Titelnummer auf dem MP3-Disc, wird der letzte
Titel auf dem MP3-Disc wiedergegeben).
4).FILESUCHBETRIEB im MP3-Modus:
A. Pressen Sie schnell zweimal die Taste A.P um
die Betriebsart FILESUCHE (FILE SEARCH) zu
wählen, auf dem Display erscheit FILE SCH.
B. Pressen Sie einmal schnell die Taste SEL , um
DEUTSCH
9
3623_im.qxd 30.03.05 18:44 Page 9
Page 10

die erste Directory zu wählen und sie
anzuzeigen.
Drehen Sie danach den Lautstärkengriff VOL
für die schrittweise Wahl der Directory nach
vorne oder zurück.
Pressen Sie die Taste SEL und halten Sie sie
über 0.5 Sekunden gepresst, um die
Wiedergabe des ersten Titels aus der gewählten
Directory zu beginnen.
C. Pressen Sie einmal schnell die Taste SEL, um
den ersten Titel zu wählen und ihn auf die
Anzeige zu bringen. Drehen Sie danach den
Lautstärkengriff VOL , für die schrittweise Wahl
des Titels in der Directory nach vorne und
zurück.
D. Pressen Sie einmal schnell die Taste SEL, um
die Wiedergabe des gewählten Titels zu beginnen.
5).Betriebsart TITELSUCHE NACH NAME im
MP3-Betrieb:
A. Pressen Sie schnell die Taste A.P dreimal, um
die Betriebsart TITELSUCHE NACH NAME
einzustellen. Auf dem Display erscheint CHAR
SCH.
B. Pressen Sie einmal schnell die Taste SEL , um
die Betriebsart TITELSUCHE NACH NAME zu
bestätigen; auf dem Display erscheint das
Symbol A.
C. Um das Symbol A zu wählen, pressen Sie die
Taste SEL.
D. Um das Symbol A zu ändern, drehen Sie den
Griff VOL , um einen anderen Buchstaben zu
wählen, und pressen Sie SEL noch einmal, um
das gewählte Symbol zu bestätigen.
E. Beim bestätigen des ersten Symbols beginnt die
Eingabe des zweiten Symbols von A.
F. Wiederholen Sie die Schritte von B bis D, um
das zweite Symbol zu bestätigen.
G. Geben Sie die restlichen Symbole nach densel-
ben Regeln ein.
ANMERKUNG:
1) Beim Pressen der Taste SEL zur Bestätigung
des Symbols, wenn die Taste SEL länger als
0.5 Sekunden gepresst wird, beginnt die
Wiedergabe des Titels, dessen Name mit den
gewählten Symbolen beginnt.
2) Es können 0-9 und das Symbol * mit dem
Lautstärkengriff VOL gewählt werden.
2. ÖFFNERTASTE
Beim Pressen der Taste 2 wird das Fronttafel
nach vorne geklappt, und Sie die CD in das CDFach eingeben, oder die Taste EJ pressen, um
die CD aus dem CD-Spieler zu nehmen, oder
um die Fronttafel abzunehmen.
3. LCD (FLÜSSIGKRISTALLDISPLAY)
4.TASTEN AUF (UP) UND AB (DN)
1) Pressen Sie im Radiobetrieb RADIO nacheinander schnell die Taste : oder 9 für die manuelle
schrittweise Abstimmung des gewünschten
Senders. Pressen und halten Sie die Taste :
oder 9 über 0.5 Sekunden lang, um die
automatische Sendereinstellung mit hohem
Signalpegel zu starten.
2) Im CD-Wiedergabebetrieb (CD) pressen Sie die
Taste : für die Wiedergabe des nächsten Titels.
Pressen Sie einmal die Taste 9 für die
Wiedergabe des nächsten Titels vom Anfang an,
pressen Sie die Taste 9 für die Wiedergabe des
letzten Titels. Pressen und halten Sie die Taste
: oder 9, um die Titel nach vorne oder rückwärts auszulassen.
5. TASTE AUTO-SPEICHERUNG/ ABTASTEN
1) Pressen Sie im Radiobetrieb die Taste A.P , um
alle Radiosender, die in den Speicher eingetragen wurden, je 5 Sekunden lang anzuhören,
auf de LCD-Display wird die Sendernummer und
die Bandbreite angezeigt. Wenn Sie diese Taste
länger als 2 Sekunden gepresst halten, werden
alle Sender im aktuellen Bandbereich gefunden
und in den Speicherzellen gespeichert. Wenn
die Auto-Speicheroperation beendet ist, wird
automatisch jeder der gespeicherten Sender je
5 Sekunden lang gespielt. Um die Abtastung der
gefundenen Sender zu stoppen, pressen Sie die
Ziffertasten 1-6, um den Sender zu wählen.
2) Pressen Sie im MP3-Betrieb abwechselnd die
Taste A.P für die Wahl des Titelsuchbetriebs
(TRACK SEARCH), des Filesuchbetriebs (FILE
SEARCH), oder der TITELSUCHE NACH NAME
(CHARACTER SEARCH).
6. RADIO-BANDBEREICH (BAND)
Pressen Sie nacheinander die Taste BANDBEREICH (BND) in der Betriebsart RADIO, um
de gewünschten Bandbereich zu wählen.
7. VERKEHRSFUNKTASTE (TA [TRAFFIC
ANNOUNCEMENT])
Durch Pressen der Taste VERKEHRSFUNK
(TA) wird die TA-Funktion ein- oder ausgeschaltet.
Wenn der TA-Betrieb eingeschaltet ist (auf de
Display wird TA angezeigt), beginnt er die TASendersuche und auf dem Display wird für
einige Zeit das Symbol TA angezeigt.
Wenn Verkehrsfunk gesendet wird:
1). Wenn das Gerät im CD-Wiedergabebetrieb
eingeschaltet ist, wird es sich vorläufig auf den
Radiobetrieb umschalten.
2). Es wird sich vorläufig auf den
Verkehrsfunksender umschalten, auf dem
Display wird TP angezeigt.
3). Wenn der Lautstärkepegel unter 20 liegt, wird
DEUTSCH
10
3623_im.qxd 30.03.05 18:44 Page 10
Page 11

er bis auf 20 gehoben und wird wieder in die
Ausgangslautstärke wechseln, wenn die
Verkehrsfunkansage zu Ende ist. Wenn die
Lautstärke während des Verkehrfunks
eingestellt wird, wird die vorangegangene
Lautstärke eingestellt.
Abbrechfunktion der TA-Funktion:
Das Pressen dieser Taste bricht die laufende
Verkehrsfunkansage ab, der TA-Betrieb wird
dabei jefoch nicht abgestellt.
8. TASTE PROGRAMTYP PTY (PROGRAM
TYPE)
Pressen Sie nacheinander schnell die Taste
PROGRAMMTYP (PTY) für die Wahl von einer
der Betriebsarten:
Programmtyp MUSIK (PTY MUSIC) - Programmtyp SPECHSENDUNG (PTY SPEECH)-
- Programmtyp AUS (PTY OFF)
Die Wahl des Programmtyps erfolgt mit den
Voreingabetasten, wie es im Punkt 12
beschrieben wird (VOREIGABETASTEN).
Pressen Sie nacheinander eine der 6
Voreingabetasten, um den PROGRAMMTYP zu
wählen.
Wenn der Programmtyp Musik oder der
Programmtyp Sprechsendung eingestellt ist,
erscheint auf dem Display die vorangegangene
Einstellung des Programmtyps. Wenn innerhalb
von 2 Sekunden keine neuen Einstellungen
eingegeben wurden, wird die Suche nach de
vorher eingegebenen Programm durchgeführt.
Wenn innerhalb von einem Abtastzyklus von
allen Programmen der gewünschte
Programmtyp nicht gefunden wird, wird auf dem
Display die Aufschrift (NO PTY) blinken und
das Radio schaltet in de gewöhnlichen
Radiobetrieb um.
9. TASTE EINSCHALTEN DER SPEISUNG
Zum Einschalten des Gerätes pressen Sie eine
beliebige Taste, außer der Taste CD-AUSGABE
(EJECT) und ABNAHME DER FRONTTAFEL
(OPEN), pressen und halten Sie die Taste EINSCHALTEN DER SPEISUNG (PWR) für mehr
als 0.5 Sekunden, um das Gerät auszuschalten.
(Nach dem Anschluss des Gerätes an das
Stromnetz (ACC POWER) zum ersten Mal kann
innerhalb von 3 Sekunden das Gerät nur
eingeschaltet werden)
10.TASTE ALTERNATIVFREQUENZEN AF
[ALTERNATIVE FREQUENCIES]
Beim kurzen Pressen wird der AF-Betrieb
gewählt und auf dem Display erscheint der
IndikatorAF.
Indikator aus: AF-Funktion an.
Indikator an: AF-Funktion an,
Radiodatensendung vorhanden (RDS).
Indikator blinkt: AF (Funktion an, es wird jedoch
noch keine RDS-Info empfangen).
Bei der Wahl des AF-Betriebs überprüft das
Radio ständig den Signalpegel auf den
Alternativfrequenzen des aktuellen
Radiosenders. Der Zeitabstand der Abtastung
hängt vom Signalpegel dieses Senders ab, von
einigen Minuten für starke Sender bis zu einigen
Sekunden für schwache Sender. Jedes Mal,
wenn das Signal auf der Alternativfrequenz
stärker als das Signal des laufende Senders ist,
schaltet sich das Radio in kürzester Zeit auf
diese Frequenz um, auf dem Display wird innerhalb von 1-2 Sekunden NEUE FREQUENZ (NEW
FREQUENCY) angezeigt. Da die Umschaltdauer
sehr kurz ist, ist es kaum zu hören sein.
Im FM-Betrieb, wenn die AF-Funktion an ist,
können die Funktionen SUCHE (SEEK), ABTASTUNG (SCAN), AUTOMATISCHE SPEICHERUNG
(AUTO-MEMORY) nur RDS-Programme empfangen und speichern.
Beim langen Pressen schaltet der AF-Betrieb in
die Betriebsart EINSCHALTEN/AUSCHALTEN
DES REGIONALCODES (REGION CODE
ON/OFF) um.
Regionalbetrieb an: REGIONAL MODE ON:
AF-Betrieb oder PROGRAMMIDENTIFIKATORSUCHE (PI SEEK) kann bei Sendern angewendet werden, die die gleichen PI-Codes haben,
wie der aktuelle Sender. (Der PI-Code wird
während der AF-PRÜFUNG (CHECK) geprüft)
Regionalbetrieb aus: REGIONAL MODE OFF:
Der Regionalcode im PI-Code-Format wird im
AF-Betrieb oder SUCHE PI ignoriert. (Der PICode und der Abdeckungsbereich (COVERAGE
AREA) werden während der AF-Suche nicht
überprüft)
11.Stummstelltaste (MU)
Pressen Sie diese Taste, um den Klang schnell
einzuschalten und wieder einzuschalten.
Zum Einschalten des Klanges können auch die
Tasten BETRIEBSART (MODE), BANDBEREICH (BAND), LAUTSTÄRKE (VOL), TONAUSGLEICH (LOUD), WAHL (SEL) bedient werden.
12.TASTE FÜR DIE VOREISTELLUNG DER
SENDER [ 1-6 ] und TASTEN AUF/
(TOP/CDP), INTRO (INT), WIEDERHOLUNG (RPT), ZUFÄLLIGE TITELWAHL
(RDM).
(A). RADIOBETRIEB
Beim kurzen Pressen stellen diese Tasten den
voreingestellten Sender ein.
Wenn Sie länger als eine Sekunde pressen, wird
die Frequenz des aktuellen Senders in dieser
DEUTSCH
11
3623_im.qxd 30.03.05 18:44 Page 11
Page 12

Speicherzelle gespeichert.
Bei der Wahl der Betriebsart Programmtyp PTY,
werden die Speichertasten wie folgt angeordnet:
Programmtyp Musik---Programmtyp
Sprechsender---Abgeschaltet
Programmtyp Musik
1. Pop, Rock
2. Leichte Musik
3. Klassik, andere Mus..
4. Jazz, Country
5. Nationalmusik, alte Mus.
6. Folksmusik
Programmtyp Sprechsender
1. Nachrichten, Events, Information
2. Sport, Bildung, Drama
3. Kultur, Wissenschaft, Diverse
4. Wetter, Finanzen, Kinder
5. Gesellschaft, Religion, Anrufe Der Radiohörer
Live
6. Reisen, Freizeit, Dokumentalistik
B) Im CD/MP3-Betrieb pressen Sie die Taste
TOP/CDP, um die Wiedergabe anzuhalten,
damit die Wiedergabe fortgeführt wird, pressen
Sie sie ein zweites Mal. Halten Sie sie 0.5
Sekunden lang gepresst, damit der erste Titel
wiedergegeben wird.
C) Pressen Sie im CD/MP3-Betrieb die Taste INT,
damit jeder Titel je 10 Sekunden lang
wiedergegeben wird, pressen Sie sie ein weiteres Mal, um diese Betriebsart abzustellen und
um den gewählten Titel wiederzugeben.
D) Pressen Sie im CD/MP3-Betrieb die Taste
WIEDERHOLUNG (RPT) für die wiederholte
Wiedergabe des laufenden Titels. Pressen Sie
sie noch einmal, um die aktuelle Betriebsart
abzustellen.
E) Pressen Sie im CD/MP3-Betrieb die Taste
ZUFÄLLIGE WAHL (RDM) für die Wiedergabe
der Titel in einer zufälligen Reihenfolge. Pressen
Sie sie noch einmal, um diese Betriebsart
abzustellen.
F) In der Betriebsart der MP3-Disc-Wiedergabe
haben die Tasten M5 und M6 die
Wechselfunktion von Titel 10 nach vorne/zurück
bei gewöhnlicher Wiedergabe.
13.Taste Betriebsart (MODE)
Pressen Sie sie, um die Tonquelle zu wählen:
Radio oder CD/MP3-Spieler.
14.FERNBEDIEUNGSSENSOR
15.TASTE UHR(CLK)
1) RADIOBETRIEB
Wenn Radiodaten (RDS) empfangen werden,
pressen Sie nacheinander schnell die Taste der
aufeinander folgenden Anzeige der unterstehenden Punkte:
Sendername PS -> Frequenz FREQUENCY > Uhr CLOCK -> Programmtyp PTY ->
Wenn die Radiodaten nicht empfangen werden,
pressen Sie diese Taste schnell nacheinander,
damit die folgenden Punkte auf dem Display
aufeinander folgend angezeigt werden:
Frequenz FREQUENCY -> Uhr CLOCK ->
Programmtyp PTY ->
2) CD/MP3-SPIELER-BETRIEB
Pressen Sie diese Taste kurz, damit innerhalb
von 5 Sekunden auf dem Display die Uhrzeit
angezeigt wird, danach wechselt das Display zur
vorangegangenen Betriebsart um, die vor dem
Pressen der Taste eingestellt war.
3) EINSTELLEN DER UHRZEIT
Pressen und halten Sie sie über eine Sekunde
lang. Wenn die Uhrenanzeige zu blinken beginnt, pressen Sie die Tasten + oder -, um die
Stunden oder die Minuten einzustellen.
16.Taste ABTASTUNG (SCN)
Pressen Sie sie für die Abtastung des
Radiobandbereiches. Wenn ein Sender mit stabilem Signal empfangen wird, kann ihre
laufende Frequenz innerhalb von 5 Sekunden
aufleuchten, pressen Sie diese Taste, um die
Abtastung zu stoppen und die laufende
Frequenz zu speichern, sonst wird das Gerät in 5
Sekunden die Antastung wieder fortsetzen und
zum nächsten Sender schalten.
VORSICHTSMASSNAHMEN UND PFLEGE
1. Wen es im Fahrzeug zu heiß ist (z.B., wenn es in
der Sonne geparkt ist), sollten Sie das Autoradio
nur dann einschalten, wenn das Auto etwas
gefahren wurde und der Innenraum sich etwas
abgekühlt hat.
2. Benutzen Sie zum Aufbewahren der Fronttafel
das Plastiketui.
3. Das Gerät ist für einen Elektroleitungstyp projektiert worden, bei dem der negative Pol der
Batterie an das Fahrzeuggestell angeschlossen
wird. Überprüfen Sie das vor dem Einbau.
4. Achten Sie darauf, dass die Lautsprecherdrähte
beim Einschalten des Gerätes nicht kurzschließen. Anderenfalls erfolgt eine Überbelastung, die den Verstärker außer Betrieb setzen
kann.
5. Setzen Sie die Fronttafel nicht ein, bevor Sie den
Einbau beendet haben.
EINBAU
EINBAUEN DES AUTORADIOS INS AUTO
1. Gerät 6. Flache Scheibe
DEUTSCH
12
3623_im.qxd 30.03.05 18:44 Page 12
Page 13

2. Führungsbahn 7. Fahrzeugaufbau
3. Fronttafel des Autos 8. Konsole
4. Sechskantmutter 9. Fixierschraube
5. Gegenmutter 10.Sechskantschraube
M5 X 15
Installationsbeispiel
Einbau in die Gerätetafel (Abb. 1,2,3,4)
1. Drehen Sie die Schrauben und die Klammer ab
3. KLEMME. Falls es notwendig sein sollte, biegen
Sie diese Klemmen ab.
Anmerkung: Bewahren Sie den Schlüssel an
einem sicheren Platz auf, da Sie ihn in der
Zukunft brauchen könnten, um das Gerät aus
dem Auto auszubauen.
WIEDERGABE VON CDs/MP3s:
Reinigung der CDs
Wischen Sie die CD vor der Wiedergabe mit
einem sauberen Tuch ohne Faserdecke an.
Wischen Sie die CD in Pfeilrichtung ab.
ACHTUNG:
Verwenden Sie keine Mittel wie Benzin oder
Lösungsmittel. Die im Handel erhältlichen
Reinigungsmittel und Antistatikmittel können
das Gerät beschädigen.
Legen Sie die CD nicht mit dem Etikett nach
unten ein. Dadurch kann das Gerät beschädigt
werden.
ACHTUNG:
Legen Sie keine andere CD ein, wenn sich im
Gerät bereits eine CD befindet. Dadurch kann
das Gerät beschädigt werden.
Fassen Sie die CD an den Kanten an. Fassen Sie
die Oberflächen nicht an, damit die CD sauber
bleibt.
Kleben Sie kein Papier oder Folie auf die CD.
Schützen Sie die CD vor direkter
Sonneneinstrahlung oder der Einwirkung von
hohen Temperaturen. Lassen Sie keine CDs im
Auto liegen, wenn es unter direkter
Sonneneinstrahlung geparkt ist.
LAUTSPRECHERANSCHLUSS (Abb. D)
1. ANTENNEBÜCHSE
2. ISO SCHNITTSTELLE
3. SICHERUNGEN
4. SPEICHER B+ (GELB)
5. SCHWARZ (ERDUNG -)
6. ROT (B+)
7. BLAU ANTENNESPEISUNG
8. LAUTSPRECHER VORNE LINKS
9. LAITSPRECHER HINTEN LINKS
10.WEISS
11.WEISS/SCHWARZ
12.GRÜN
13.GRÜN/SCHWARZ
14.VIOLETT/SCHWARZ
15.VIOLETT
16.LAUTSPRECHER HINTEN RECHTS
17.LAUTSPRECHER VORNE RECHTS
18.GRAU/SCHWARZ
19.GRAU
20.BÜCHSE DES AUDIO-LINEARAUSGANGS
«TULPE» RCA LINE-OUT
20a.ROT RECHTS
20b.WEISS LINKS
ANMERKUNG:
1. Es müssen Lautsprecher mit einem Widerstand
von4 Ohm verwendet werden.
2. Lassen Sie das Kabel der Antennespeisung
nicht mit den Metallelementen des
Fahrzeuggestells oder des Gerätes in Kontakt
kommen.
Behebung von Störungen
Um ein Problem zu beseitigen, sollten Sie die
Empfehlungen bezüglich der Fehlerbehebung
beachten. Wenn sich das Problem trotzdem
nicht lösen lässt, wenden Sie sich bitte an ein
Service-Center in Ihrer Nähe.
ANORDNUNG UND FUNKTIONEN DER
STEUERUNGSTASTEN (NUR AUF DEM
FERNBEDIENUNGSTEIL)
FERNBEDIENUNGSTEIL FRONTTAFEL
Klangaus MUTE . . . .MU
Speisung POWER . .PWR
Betriebsart MODE . .MD
Bandbereich BAND .BND
+/- . . . . . . . . . . . . .Lautstärke VOL+/-
Auf UP . . . . . . . . . . . .:
Ab DN . . . . . . . . . . . .9
AUSWECHSELN DER SPEISEELEMENTE AUF
DEMFERNBEDIEUGSTEIL:
1. Nehmen Sie den Batteriehalter in Pfeilrichtung
raus.
2. Wechseln Sie die alte Batterie aus und legen Sie
eine neuer Batterie mit dem (+)-Pol nach oben
ein.
3. Setzen Sie den Batteriehalter zurück in die
Fernbedienung ein.
ANMERKUNG ZUR BATTERIE DES FERNBEDIENUNGSTEILS:
1. Eine inkorrekte Abwendung der Batterie kann zu
einer Überhitzung oder einer Explosion führen
und dadurch Wunden oder Feuerbrand zeugen.
2. Ein Auslaufen der Batterie kann die
Fernbedienung beschädigen (Haltbarkeitsdauer
einer Batterie: 6 Monate bei Normalgebrauch
bei normaler Zimmertemperatur).
3. Schließen Sie die Pole der Batterie nicht kurz.
4. Werfen Sie die Batterie nicht ins Feuer.
DEUTSCH
13
3623_im.qxd 30.03.05 18:44 Page 13
Page 14

5. Um Unfälle zu vermeiden, sollten Sie die
Batterie an kindersicheren Orten aufbewahren.
KEINE SPEISUNG
Die Zündung des Autos ist nicht an
Wenn das Gerät korrekt an die an das
Elektronetz des Autos angeschlossen wurde,
stellen Sie den Zündschlüssel in die Position
ACC
Sicherung ist durchgebrannt
Wechseln Sie die Sicherung aus
Die CD lässt sich nicht einlegen
Im CD-Spieler befindet sich eine andere CD
Nehmen Sie die CD aus dem CD-Spieler, legen
Sie danach die neue CD ein
Die CD kann nicht abgelesen werden
Die CD wurde falsch eingelegt
Legen Sie die CD mit dem Etikett nach oben ein
Die CD ist sehr schmutzig oder defekt
Reinigen Sie die CD oder legen Sie eine neue
ein
Eine sehr hohe Innentemperatur im Auto
Kühlen Sie den Innenraum etwas ab, bis sich die
Normaltemperatur einstellt
Kein Klang
Es ist eine zu niedrige Lautstärke eingestellt
worden
Stellen Sie die gewünschte Lautstärke ein
Die Drähte wurden an die Lautsprecher falsch
angeschlossen
Überprüfen Sie den Anschluss der Drähte
Die Tasten funktionieren nicht
Die Fronttafel ist nicht richtig eingesetzt worden
Setzen Sie die Fronttafel korrekt ein
Die Wiedergabe wird unterbrochen
Der Einbauwinkel beträgt über 30 Grad
Regeln Sie den Einbauwinkel, damit er unter 30
Grad liegt
Die CD ist stark verschmutzt oder defekt
Reinigen Sie die CD/ legen Sie eine neue ein
Das Radio funktioniert nicht.
Die automatische Wahl der Sender funktioniert
nicht
Das Antennekabel ist nicht angeschlossen.
Zu schwache Signale
Fixieren Sie das Antennekabel
Versuchen Sie die manuelle Abstimmung
KENNDATEN
ALLGEMEIN
SpeisungDirektstrom 13.8V.
Stomaufnahme max. 5 A
Ausgangsleistung 4 X 40W.
FM
Bandbereich 66 MHz 108 MHz
Sensibilität 3 uV.
Frequenz I.F 10.7 MHz.
AM
Bandbereich 522 KHz 1620 KHz
Frequenz I.F 450 KHz
Sensibilität 40 dB
Linearausgang (LINE OUT)
Ausgang CD MAX 1200 mv
CD-Spieler
System : Audio-CD-System
Unterstützte Formate: CD/CD-R/CD-RW/MP3
Signalformat Frequenz 44.1KHz.
Bandbereich 0-20 KHz < 5dB.
Signalpegel CD 50 dB [1KHz]
Kanalanzahl 2 Stereo.
Chassisgröße:
178[Breite] X 50[Höhe] X 165[Länge].
Aufgrund einer ständigen Verbesserung können
die Charakteristiken und das Design des Artikels
ohne Vorbescheid geändert werden.
DIE LEBENSDAUER DES GERÄTES BETRÄGT
NICHT WENIGER ALS 5 JAHRE
Gewährleistung
Ausführliche Bedingungen der Gewährleistung kann man
beim Dealer, der diese Geräte verkauft hat, bekommen. Bei
beliebiger Anspruchserhebung soll man während der
Laufzeit der vorliegenden Gewährleistung den Check oder
die Quittung über den Ankauf vorzulegen.
Das vorliegende Produkt entspricht den
Forderungen der elektromagnetischen
Verträglichkeit, die in 89/336/EWG Richtlinie des Rates und den Vorschriften
23/73/EWG über die
Niederspannungsgeräte vorgesehen sind.
DEUTSCH
14
3623_im.qxd 30.03.05 18:44 Page 14
Page 15

АВТОМОБИЛЬНЫЙ ПРОИГРЫВАТЕЛЬ
CD/MP3 ДИСКОВ С ЦИФРОВЫМ
РАДИОПРИЕМНИКОМ
МОДЕЛЬ VT-3623
О ДАННОЙ ИНСТРУКЦИИ
Данное устройство имеет ряд сложных
функций, обеспечивающих улучшенное
качество приема и работы устройства. Все
они рассчитаны на простоту в
использовании, но могут требовать
дополнительных пояснений.
Данное руководство по эксплуатации
предназначено для того, чтобы помочь вам
извлечь всю пользу из возможностей этого
плеера и повысить Ваше удовольствие от
прослушивания.
Мы рекомендуем Вам ознакомиться с
функциями и их работой, и внимательно
прочитать руководство перед началом
использования устройства. Особенно важно,
чтобы Вы прочитали и соблюдали
«предосторожности», изложенные на
следующей странице и в других разделах.
Примечание:
A. В дополнение к обычному CD, данное
устройство может воспроизводить диски CDR и CD-R/W, на которых содержатся аудио
треки; однако, в зависимости от состояния
записывающего оборудования,
записывающей программы или самого диска
CD-R и CD-R/W, некоторые диски CD-R или
CD-R/W могут не воспроизводиться.
B. При записи музыкального CD на диске CD-R
или CD-R/W, слишком высокая скорость
записи может привести к плохому качеству
звукового сигнала, поэтому рекомендуется
выбирать скорость 24x или меньшую для
записи CD-R, и скорость 4x или меньшую для
записи CD-R/W.
РАСПОЛОЖЕНИЕ И ФУНКЦИИ КНОПОК
УПРАВЛЕНИЯ
1. Многофункциональный переключатель для
регулировки уровня громкости и навигации в
меню настроек устройства (VOL / SEL /
ENTER)
1). Последовательно нажимайте кнопку SEL
для выбора необходимого параметра звука:
VOLUME(громкость), BASS (бас),
TREBLE(верхние частоты), BALANCE (баланс
Лев./Прав. каналов) и FADER (баланс
Фронт./Тыл. динамиков), затем вращайте
ручку VOL (громкость) для изменения
выбранного параметра звука.
2).Нажмите и удерживайте более 1 секунды
кнопку SEL (выбор) для включения режима
меню (MENU), на жидкокристаллическом
дисплее появится TA SEEK (поиск
объявления трафика)/TA ALARM
(предупреждение), затем последовательно
нажимайте кнопку SEL для выбора
режимов: MASK DPI/MASK ALL (отменить
обработку альтернативных частот/отменить
все), DSP OFF(аудио процессор
отключен)/POP M /ROCK M/CLASS M/FLAT M
(поп, рок, классическая музыка, нейтральная
музыка), LOUD ON /LOUD OFF (тонкомпенсация включена/выключена),
ESP12/ESP45 (функция защиты от вибрации),
BEEP ON/BEEP OFF (звуковой сигнал
включен/отключен), SEEK1/SEEK2
(поиск1/поиск2), STEREO/MONO
(стерео/моно), LOCAL/DX (местный/дальний
радиосигнал), VOL LAST/VOL ADJ (уровень
громкости по умолчанию). (Когда включен
режим настройки громкости (VOL ADJUST),
следующий после него будет режим A-VOL,
после этого вы можете настроить уровень
громкости). После выбора нужного режима
меню (MENU), вращайте кнопку громкости
VOL для выбора режима выбранного
параметра.
3).РЕЖИМ ПОИСКА ТРЕКА в режиме MP3:
A. Нажмите один раз кнопку A.P для выбора
режима поиска трека TRACK SEARCH, на
ЖК дисплее появится индикатор TRK SCH.
B. Нажмите кнопку SEL для ввода режима
трека (TRACK), на экране появится 001 и
первый символ будет мигать. Затем
вращайте кнопку громкости VOL для
изменения цифр от 0 до 9. (По окончании
нажмите кнопку SEL на более чем 0.5
секунды для воспроизведения выбранного
трека)
C. Нажмите кнопку SEL, чтобы замигали
десятизначные цифры, затем вращайте ручку
громкости VOL для изменения цифр от 0 до
9. (По окончании нажмите кнопку SEL на
более чем 0.5 секунды для воспроизведения
выбранного трека)
D. Нажмите кнопку SEL, чтобы замигали сотни,
затем вращайте ручку громкости VOL для
изменения цифр от 0 до 9.
E. Нажмите кнопку SEL для воспроизведения
выбранного трека. (Если номер выбранного
трека больше, чем наибольший номер трека
на диске МР3, то будет воспроизводиться
последний трек на диске МР3).
4). РЕЖИМ ПОИСКА ФАЙЛА в режиме MP3:
A. Дважды быстро нажмите кнопку A.P для
выбора режима ПОИСКА ФАЙЛА (FILE
SEARCH), на экране появится FILE SCH.
B. Быстро один раз нажмите кнопку SEL для
РУССКИЙ
15
3623_im.qxd 30.03.05 18:44 Page 15
Page 16

выбора и отображения первой папки.
Затем вращайте ручку громкости VOL для
пошагового выбора папки вперед или назад.
Нажмите кнопку SEL и удерживайте ее
более 0.5 секунды для воспроизведения
первого трека выбранной папки.
C. Быстро один раз нажмите кнопку SEL для
выбора и показа первого трека выбранной
папки. Затем вращайте ручку громкости
VOL для пошагового выбора трека в папке
вперед или назад.
D. Быстро один раз нажмите кнопку SEL для
воспроизведения выбранного трека.
5). Режим ПОИСКА ПО НАЗВАНИЮ в режиме
МР3:
A. Быстро нажмите кнопку A.P три раза для
выбора режима ПОИСКА ПО НАЗВАНИЮ. На
дисплее появится CHAR SCH.
B. Быстро один раз нажмите кнопку SEL для
подтверждения режима ПОИСКА ПО
НАЗВАНИЮ и на экране появится первый
символ A.
C. Для выбора символа А нажмите кнопку
SEL.
D. Для смены символа A, вращайте ручку
VOL для выбора другой буквы и нажмите
SEL еще раз для подтверждения
выбранного символа.
E. При подтверждении первого символа ввод
второго символа названия начнется с A.
F. Повторите шаги с B до D для подтверждения
второго символа.
G. Введите оставшиеся символы по тому же
правилу.
ПРИМЕЧАНИЕ:
1) При нажатии кнопки SEL для
подтверждения символа, если кнопка SEL
нажимается дольше, чем 0.5 секунды,
начнется воспроизведение песни, имя
которой начинается на выбранный символ
(символы).
2) Можно выбрать 0-9 и символ * с помощью
ручки громкости VOL.
2. КНОПКА ОТКРЫВАНИЯ
Нажатие кнопки 2 откидывает переднюю
панель, и вы можете вставить диск в
отделение CD, или нажать кнопку EJ для
извлечения диска из плеера, или снять
переднюю панель.
3. LCD (ЖИДКОКРИСТАЛЛИЧЕКИЙ
ДИСПЛЕЙ)
4. КНОПКИ ВВЕРХ (UP) И ВНИЗ (DN)
1) В режиме РАДИО быстро последовательно
нажимайте кнопку : или 9 для ручной
пошаговой настройки нужной радиостанции.
Нажмите и удерживайте кнопку 9 или :
более 0.5 секунды для автоматической
настройки радиостанции с высоким уровнем
сигнала.
2) В режиме воспроизведения компакт-дисков
(CD), нажмите кнопку : для
воспроизведения следующего трека.
Нажмите один раз кнопку 9 для
воспроизведения текущего трека с его
начала, нажмите кнопку 9 для
воспроизведения последнего трека.
Нажмите и удерживайте кнопку 9 или :
для пропуска вперед или назад.
5. КНОПКА АВТОМАТИЧЕСКОГО
СОХРАНЕНИЯ / СКАНИРОВАНИЯ
1) В режиме радио нажмите кнопку A.P для
прослушивания всех радиостанций,
занесенных в память, по 5 секунд, на ЖКдисплее будут мигать номер станции и
частота. Если удерживать эту кнопку нажатой
более 2 секунд, то будут найдены все
станции в текущем диапазоне и сохранены в
ячейках памяти. Когда операция
автоматического сохранения завершена,
будет автоматически воспроизводиться
каждая из найденных радиостанций в
течение 5 секунд. Для остановки
сканирования найденных станций нажимайте
цифровые кнопки 1-6 для выбора
радиостанции..
2) В режиме МР3 попеременно нажимайте
кнопку A.P для выбора режима поиска трека
(TRACK SEARCH), поиска файла (FILE
SEARCH), или ПОИСКА ПО НАЗВАНИЮ
(CHARACTER SEARCH).
6. РАДИО ДИАПАЗОН (BAND)
Последовательно нажимайте кнопку
ДИАПАЗОН (BND) в режиме РАДИО для
выбора нужного диапазона частот.
7. КНОПКА ПРИЕМА ИНФОРМАЦИИ О
ДОРОЖНОМ ДВИЖЕНИИ (ТРАФИКЕ) (TA
[TRAFFIC ANNOUNCEMENT])
Нажатие кнопки ИНФОРМАЦИИ О
ДОРОЖНОМ ДВИЖЕНИИ (TA) включает или
выключает режим ТА.
Когда включен режим ТА (на дисплее
показывается TA), он начнет поиск станции
ТА и на дисплее некоторое время будет
высвечиваться символ TA.
Когда передается объявление о трафике:
1). Если устройство находится в режиме
воспроизведения дисков CD , оно временно
переключится в режим радио.
2). Временно переключится на станцию,
передающую информацию о трафике, на
дисплее будет показано ТР.
РУССКИЙ
16
3623_im.qxd 30.03.05 18:44 Page 16
Page 17

3). Если уровень громкости ниже 20, то он будет
поднят до 20, и вернется к предыдущему
режиму и уровню громкости, когда
объявление о трафике будет закончено. Если
громкость настраивается во время
объявления о трафике, то будет установлен
предыдущий уровень громкости.
* функция прерывания функции TA:
Нажатие этой кнопки отменяет текущее
объявление о трафике, но режим ТА не
будет отключен.
8. КНОПКА ТИП ПРОГРАММЫ PTY (PROGRAM
TYPE)
Быстро и последовательно нажимайте кнопку
ТИП ПРОГРАММЫ (PTY) для выбора одного
из следующих режимов:
Тип программы МУЗЫКА (PTY MUSIC) - - Тип
программ РЕЧЬ (PTY SPEECH)- - Тип
программы ВЫКЛ. (PTY OFF)
Выбор типа программы осуществляется
кнопками предустановки, как описано в
пункте 12 (КНОПКИ ПРЕДУСТАНОВОК).
Быстро и последовательно нажимайте одну
из 6 кнопок предустановок для выбора ТИПА
ПРОГРАММЫ.
Когда установлен Тип программы музыка или
Тип программы речь, то на дисплее
отображается предыдущие установки типа
программ. Если в течение 2 секунд не были
введены новые параметры, то ведется поиск
ранее выбранного типа программы. Если в
течение одного цикла сканирования всех
программ нужный Тип программы не найден,
на дисплее будет мигать (NO PTY) и радио
перейдет к обычному радио режиму.
9. КНОПКА ВКЛЮЧЕНИЯ ПИТАНИЯ
Для включения устройства нажмите любую
кнопку, кроме кнопки ИЗВЛЕЧЕНИЕ ДИСКА
(EJECT) и ОТСОЕДИНЕНИЯ ПАНЕЛИ (OPEN),
нажмите и удерживайте кнопку ВКЛЮЧЕНИЕ
ПИТАНИЯ (PWR) более 0.5 секунды для
отключения устройства. (После подключения
устройства к сети (ACC POWER) первый раз в
течение 3-х секунд можно только включить
устройство)
10. КНОПКА АЛЬТЕРНАТИВНЫЕ ЧАСТОТЫ AF
[ALTERNATIVE FREQUENCIES]
При быстром нажатии выбирается режим
AF и на дисплее появляется индикатор AF.
Индикатор выключен: режим AF выключен.
Индикатор включен: режим AF включен, и
имеется информация радиоданных (RDS).
Индикатор мигает: AF (режим включен, но
информация RDS еще не воспринимается).
При выборе режима AF радио все время
проверяет уровень сигнала на
альтернативных частотах текущей
радиостанции. Временной интервал
проверки зависит от уровня сигнала данной
станции, от нескольких минут для сильной
станции до нескольких секунд для слабой.
Каждый раз, когда сигнал на альтернативной
частоте сильнее сигнала текущей станции,
радио переключается на ту частоту за очень
короткое время, на дисплее 1-2 секунды
показывается НОВАЯ ЧАСТОТА (NEW FREQUENCY). Ввиду того, что время
переключения очень короткое, при обычном
прослушивании программы это почти не
слышно.
В режиме FM, когда включена AF, функции
ПОИСКА (SEEK), СКАНИРОВАНИЯ (SCAN),
АВТОМАТИЧЕСКОГО СОХРАНЕНИЯ (AUTOMEMORY) могут принимать и сохранять
только программы RDS.
При долгом нажатии, режим AF переходит в
режим ВКЛЮЧЕНИЯ/ВЫКЛЮЧЕНИЯ КОДА
РЕГИОНА (REGION CODE ON/OFF).
Региональный режим включен: REGIONAL
MODE ON:
Режим AF или ПОИСК ИДЕНТИФИКАТОРА
ПРОГРАММЫ (PI SEEK) применим к
радиостанциям, у которых все коды PI такие
же, как и у текущей станции. (Код PI
проверяется во время ПРОВЕРКИ AF
(CHECK))
Региональный режим отключен REGIONAL
MODE OFF:
Региональный код в формате кода PI
игнорируется в режима AF или ПОИСКА PI.
(Код PI и Зона Покрытия (COVERAGE AREA)
не проверяются во время поиска AF)
11.Кнопка Отключения Звука (MU)
Нажмите кнопку для быстрого отключения
или возобновления звука.
Для включения звука можно также нажать
кнопки РЕЖИМ (MODE), ДИАПАЗОН
(BAND), ГРОМКОСТЬ (VOL), ТОНКОМПЕНСАЦИЯ (LOUD), ВЫБОР (SEL).
12. КНОПКИ ПРЕДУСТАНОВКИ СТАНЦИЙ [ 16 ] и КНОПКИ ВВЕРХ/ (TOP/CDP),
ОЗНАКОМЛЕНИЕ (INT), ПОВТОР
(RPT), ПРОИЗВОЛЬНЫЙ ВЫБОР
(RDM).
(A). РЕЖИМ РАДИО
При быстром нажатии эти кнопки вызывают
предустановленную радиостанцию.
При нажатии более чем на одну секунду,
частота текущей станции сохраняется в
данной ячейки памяти.
При выборе режима Тип программы PTY,
кнопки предустановленной памяти
РУССКИЙ
17
3623_im.qxd 30.03.05 18:44 Page 17
Page 18

распределяются следующим образом:
Тип программы музыка---Тип программмы
речь---выключено
Музыка
1. ïîï, ðîê
2. легкая музыка
3. классика, другая муз.
4. джаз, кантри
5. национальная, старая
6. фольклор
Ðå÷ü
1. Новости, события, информация
2. Спорт, образование, драма
3. Культура, наука, разное
4. Погода, финансы, дети
5. Общество, религия, звонки слушателей в
прямом эфире
6. Путешествия, отдых,документальные
материалы
B) В режиме CD/MP3 плеера нажмите кнопку
TOP/CDP для паузы воспроизведения
диска, для возобновления воспроизведения
нажмите ее снова. Удерживайте ее нажатой
0.5 секунды для воспроизведения первого
трека диска.
C) В режиме CD/MP3 плеера нажмите кнопку
INT для воспроизведения первых 10 секунд
каждого трека, нажмите ее еще раз для
остановки режима INT и для
воспроизведения выбранного трека.
D) В режиме CD/MP3 плеера нажмите кнопку
ПОВТОР (RPT) для повторного
воспроизведения текущего трека. Нажмите
ее снова для отмены текущего режима.
E) В режиме CD/MP3 плеера нажмите кнопку
ПРОИЗВОЛЬНЫЙ ВЫБОР (RDM) для
воспроизведения треков в произвольном
порядке. Нажмите ее еще раз для отмены
этого режима.
F) В режиме воспроизведения МР3 дисков
кнопки M5 и M6 имеют функции перехода на
10 треков вперед/назад при обычном
воспроизведении.
13.Кнопка РЕЖИМ (MODE)
Нажмите для выбора источника звука: Радио
или CD/MP3 плеер.
14.СЕНСОР ДИСТАНЦИОННОГО
УПРАВЛЕНИЯ
15.КНОПКА ЧАСЫ (CLK)
1) РЕЖИМ РАДИО
Когда принимаются радио данные (RDS),
быстро и последовательно нажимайте эту
кнопку для поочередного отображения на
дисплее следующих пунктов:
Имя станции PS --> Частота FREQUENCY -->
Часы CLOCK --> Тип программы PTY -->
Когда радио данные не воспринимаются
быстро и последовательно нажимайте эту
кнопку для поочередного показа на дисплее
следующих пунктов:
Частота FREQUENCY --> Часы CLOCK --> Тип
программы PTY -->
2) РЕЖИМ CD/MP3 ПЛЕЕРА
Быстро нажимайте эту кнопку для
отображения на дисплее времени в течение
5 сек, затем дисплей возвращается к
предыдущему режиму до следующего
нажатия этой кнопки.
3) НАСТРОЙКА ВРЕМЕНИ
В режиме часов удерживайте ее нажатой
более 1 секунды. После того, как показатель
времени начнет мигать, нажимайте кнопки +
или - для установки часов или минут.
16.Кнопка СКАНИРОВАНИЕ (SCN)
Нажмите для сканирования радиодиапазона.
Когда обнаруживается радиостанция с
устойчивым сигналом, е¸ текущая частота
мигает в течение 5 секунд, снова нажмите
эту кнопку для остановки сканирования и
сохранения текущей частоты; в противном
случае устройство через 5 секунд продолжит
сканирование и перейдет к следующей
станции.
УСТАНОВКА
КРЕПЛЕНИЕ МАГНИТОЛЫ В АВТОМОБИЛЕ
(Рис. B)
1. Устройство
2. Направляющие салазки
3. Передняя панель автомобиля
4. Шестигранная гайка
5. Контргайка
6. Плоская шайба
7. Кузов автомобиля
8. Кронштейн
9. Фиксирующий шуруп
10.Шестигранный болт M5 X 15
ПОДКЛЮЧЕНИЕ КОЛОНОК (РИС. D)
1. РАЗЪЕМ АНТЕННЫ
2. ISO РАЗЪЕМ
3. ПРЕДОХРАНИТЕЛИ
4. ПАМЯТЬ B+ (ЖЕЛТЫЙ)
5. ЧЕРНЫЙ (ЗЕМЛЯ -)
6. КРАСНЫЙ (B+)
7. СИНИЙ ПИТАНИЕ АНТЕННЫ
8. ПЕРЕДНЯЯ ЛЕВАЯ КОЛОНКА
9. ЗАДНЯЯ ЛЕВАЯ КОЛОНКА
10.БЕЛЫЙ
11.БЕЛЫЙ/ЧЕРНЫЙ
12.ЗЕЛЕНЫЙ
РУССКИЙ
18
3623_im.qxd 30.03.05 18:44 Page 18
Page 19

13.ЗЕЛЕНЫЙ/ЧЕРНЫЙ
14.ФИОЛЕТОВЫЙ/ЧЕРНЫЙ
15.ФИОЛЕТОВЫЙ
16.ЗАДНЯЯ ПРАВАЯ КОЛОНКА
17.ПЕРЕДНЯЯ ПРАВАЯ КОЛОНКА
18.СЕРЫЙ/ЧЕРНЫЙ
19.СЕРЫЙ
20.РАЗЪЕМ ЛИНЕЙНОГО АУДИОВЫХОДА
«ТЮЛЬПАН» RCA LINE-OUT
20a.КРАСНЫЙ ПРАВЫЙ
20b.БЕЛЫЙ ЛЕВЫЙ
ПРИМЕЧАНИЕ:
1. Необходимо использовать колонки с
сопротивлением 4 Ома.
2. Не допускайте соприкосновения провода
питания антенны с металлическими
элементами кузова автомобиля или данного
устройства.
Установка в приборную панель
(Рис. 1,2,3,4)
1. Открутите шурупы и скобу
3. ЗАЖИМ. При необходимости загните эти
зажимы
Замечание: Храните ключи в надежном
месте, так как в будущем вам может
понадобиться снять устройство из
автомобиля.
СНЯТИЕ ПЕРЕДНЕЙ ПАНЕЛИ
Перед тем, как снять переднюю панель
устройства, обязательно отключите его
питание, нажав кнопку 1 - ВКЛ./ВЫКЛ.
ПИТАНИЯ (PWR).
Для снятия панели с устройства нажмите
кнопку отсоединения панели 14 (REL).
Когда панель окажется в горизонтальном
положении, потяните е¸ на себя.
Смотрите иллюстрацию 5,6,7,8.
Снятие и установка передней панели
Передняя панель этого устройства может
сниматься для того, чтобы предотвратить
кражу устройства. (Рис. 5, 6, 7, 8)
Примечания:
При установке панели не прикладывайте
значительные усилия. Она свободно
присоединяется легким нажатием.
При переноске панели кладите ее в
прилагаемый пенал.
При присоединении передней панели к
устройству не нажимайте сильно на ЖКдисплей.
МЕРЫ ПРЕДОСТОРОЖНОСТИ И УХОД
1. Если внутри машины очень жарко (например,
после стоянки на солнце), включайте
проигрыватель только после того, как
машина проедет немного и салон охладится.
2. Используйте пластмассовый пенал для
хранения передней панели.
3. Устройство спроектировано для типа
электропроводки автомобиля, при которой
отрицательный полюс батареи
подсоединяется к кузову. Проверьте это
перед установкой.
4. Следите за тем, чтобы провода колонок не
закоротились при включении устройства. В
противном случае возникнет перегрузка,
которая может привести к выходу из строя
усилителя.
5. Не устанавливайте съемную панель до
окончания монтажа устройства.
ВОСПРОИЗВЕДЕНИЕ ДИСКА:
Чистка дисков
Перед воспроизведением диска протрите
его чистой тряпкой без ворсинок.
Протирайте диск в направлении стрелки.
ВНИМАНИЕ:
Не используйте такие растворы, как бензин и
растворители. Имеющиеся в продаже
чистящие средства или антистатики могут
повредить устройство.
Не вставляйте диск этикеткой вниз. Это
может повредить устройство.
ВНИМАНИЕ:
Не вставляйте другой диск, если в
устройстве уже имеется диск. Это может
повредить устройство.
Берите диск за его края. Чтобы диск
оставался чистым, не трогайте его
поверхность.
Не приклеивайте бумагу или пленку на диск.
Не подвергайте диск воздействию прямого
солнечного света или высокой температуры.
Не оставляйте диски в машине,
припаркованной под прямым солнечным
светом.
ЗАМЕНА БАТАРЕЙКИ В ПУЛЬТЕ
ДИСТАНЦИОННОГО УПРАВЛЕНИЯ:
1. Выньте держатель батарейки в направлении,
указанном стрелкой.
2. Замените старую батарейку на новую с
полярностью (+) вверх.
3. Вставьте держатель батарейки на место в
пульте дистанционного управления.
ЗАМЕЧАНИЕ О БАТАРЕЙКЕ ПУЛЬТА
ДИСТАНЦИОННОГО УПРАВЛЕНИЯ:
1. Неправильное использование батарейки
может вызвать перегрев или взрыв и
привести к ранению или пожару.
2. Утечка батарейки может повредить пульт
дистанционного управления (Срок годности
батарейки: 6 месяцев при использовании в
обычном режиме при обычной комнатной
температуре).
3. Не замыкайте накоротко полюса батарейки.
РУССКИЙ
19
3623_im.qxd 30.03.05 18:44 Page 19
Page 20

4. Не бросайте батарейку в огонь.
5. Во избежание несчастных случаев, храните
батарейку в местах, недоступных детям.
РАСПОЛОЖЕНИЕ И ФУНКЦИИ КНОПОК
УПРАВЛЕНИЯ (ТОЛЬКО НА ПУЛЬТЕ
ДИСТАНЦИОННОГО УПРАВЛЕНИЯ)
ПЕРЕДНЯЯ ПАНЕЛЬ ПУЛЬТ ДУ
Звук выключен MUTE .MU
Питание POWER . . . . .PWR
Режим MODE . . . . . . .MD
Диапазон BAND . . . . .BND
+/- . . . . . . . . . . . . . . .Громкость VOL+/-
Вверх UP . . . . . . . . . . .:
Âíèç DN . . . . . . . . . . .9
УСТРАНЕНИЕ НЕИСПРАВНОСТЕЙ
Чтобы устранить проблему, прочитайте
рекомендации по устранению
неисправностей. Если все же не получается
устранить проблему, обратитесь в
ближайший к Вам сервисный центр..
Нет питания
Не включено зажигание автомобиля
Если устройство правильно подключено к
автомобильной электрической сети,
установите ключ зажигания в положение
ACC
Сгорел предохранитель
Замените предохранитель
Диск не загружается
Внутри проигрывателя находится диск CD
Извлеките диск из проигрывателя, затем
вставьте новый диск
Диск не читается
Диск неправильно вставлен
Вставьте компакт-диск лицевой стороной
вверх
Компакт-диск очень грязный или
бракованный
Почистите диск или поставьте новый
Очень высокая температура в машине
Охладите салон, пока температура в нем не
станет обычной
Нет звука
Установлен низкий уровень громкости
Настройте громкость на нужный уровень
Неправильно подключены провода к
колонкам
Проверьте подключение проводов
Кнопки не работают
Передняя панель не до конца установлена на
место
Установите переднюю панель правильно
Происходят провалы в воспроизведении
Угол установки превышает 30 градусов
Отрегулируйте угол установки, чтобы он был
менее 30 градусов
Компакт-диск очень грязный или
бракованный
Почистите диск / поставьте новый
Радио не работает.
Не работает автоматический выбор радио
станций
Кабель антенны не подключен.
Слишком слабые сигналы
Надежно зафиксируйте кабель антенны
Попробуйте настроиться на станцию вручную
ХАРАКТЕРИСТИКИ
ОБЩЕЕ
Питание
Прямой ток 13.8 V.
Потребление тока 5 A максимум.
Выходная мощность 4 X 40W.
FM
Диапазон частот 66 MHz 108 MHz
Чувствительность 3 uV.
Частота I.F 10.7 MHz.
AM
Диапазон частоты 522 KHz 1620 KHz
Частота I.F 450 KHz
Чувствительность 40 dB
Выход линии (LINE OUT)
Выход CD MAX 1200 mv
Проигрыватель CD
Система аудио система для компакт дисков
Поддерживаемые диски: CD/CD-R/CDRW/MP3
Формат сигнала: частота 44.1KHz.
Диапазон частот: 10-20 KHz < 5dB.
Уровень сигнала CD 50 dB [1KHz]
Количество каналов 2 стерео.
Размеры шасси 178[Ширина] X 50[Высота] X
165[Длина].
Из-за постоянных улучшений,
характеристики и дизайн изделия могут
изменяться без предварительного
уведомления.
Срок службы прибора - неменее 5-ти лет
Данное изделие соответствует всем требуемым
европейским и российским стандартам
безопасности и гигиены.
Производитель: АН-ДЕР ПРОДАКТС ГмбХ,
Австрия
Йеневайнгассе, 10/10, 1210, Вена, Австрия
РУССКИЙ
20
3623_im.qxd 30.03.05 18:44 Page 20
Page 21

Автомоб³льний програвач CD/MP3 диск³в ³з
цифровим рад³оприймачем
Модель VT-3623
ПРО ДАНУ ²НСТРУКЦ²Ю
Даний пристр³й маº ряд складних функц³й,
що забезпечують пол³пшену як³сть прийому й
роботи пристрою. Ус³ вони розрахован³ на
простоту у використанн³, але можуть
вимагати додаткових пояснень.
Даний пос³бник з експлуатац³¿ призначений
для того, щоб допомогти вам витягти всю
користь ³з можливостей цього плеºра й
п³двищити Ваше задоволення в³д
прослуховування.
Ми рекомендуºмо Вам ознайомитися з
функц³ями ³ ¿хньою роботою, ³ уважно
прочитати кер³вництво перед початком
використання пристрою. Особливо важливо,
щоб Ви прочитали й дотримували
«обережностей», викладених на наступн³й
стор³нц³ й в ³нших розд³лах.
Ïðèì³òêà:
A. На додаток до звичайного CD, даний
пристр³й може в³дтворювати диски CD-R ³
CD-R/W, на яких м³стяться ауд³о треки; однак,
залежно в³д стану записуючого обладнання,
записуючо¿ програми, або самого диска CDR ³ CD-R/W, деяк³ диски CD-R або CD-R/W
можуть не в³дтворюватися.
B. При запис³ музичного CD на диску CD-R або
CD-R/W, занадто висока швидк³сть запису
може привести до погано¿ якост³ звукового
сигналу, тому рекомендуºться вибирати
швидк³сть 24x або меншу для запису CD-R, ³
швидк³сть 4x або меншу для запису CD-R/W.
РОЗТАШУВАННЯ Й ФУНКЦ²¯ КНОПОК
КЕРУВАННЯ
1. Багатофункц³ональний перемикач для
регулювання р³вня голосност³ й нав³гац³¿ в
меню настроювань пристрою (VOL / SEL /
ENTER)
1). Посл³довно натискайте кнопку SEL для
вибору необх³дного параметра звуку: VOLUME (голосн³сть), BASS (бас), TREBLE (верхн³
частоти), BALANCE (баланс по каналах) ³
FADER (р³вень сигналу), пот³м обертайте
ручку VOL (голосн³сть) для зм³ни обраного
параметра звуку.
2). Натисн³ть ³ втримуйте б³льше 1 секунди
кнопку SEL (виб³р) для включення режиму
меню (MENU), на р³дкокристал³чному диспле¿
зявиться TA SEEK (пошук оголошення
траф³ка)/TA ALARM (попередження), пот³м
посл³довно натискайте кнопку SEL для
вибору режим³в: MASK DPI/MASK ALL
(в³дм³нити обробку альтернативних
частот/в³дм³нити все), DSP OFF (ауд³о
процесор в³дключений)/POP M /ROCK
M/CLASS M/FLAT M (поп, рок, класична
музика, нейтральна музика), LOUD ON /LOUD
OFF (тон-компенсац³я включена/виключена),
ESP12/ESP45 (функц³я захисту в³д в³брац³¿),
BEEP ON/BEEP OFF (звуковий сигнал
включений/в³дключений), SEEK1/SEEK2
(пошук1/пошук2), STEREO/MONO
(стерео/моно), LOCAL/DX (м³сцевий/далекий
рад³осигнал), VOL LAST/VOL ADJ (р³вень
голосност³ за замовчуванням). (Коли
включений режим настроювання голосност³
(VOL ADJUST), п³сля нього буде режим A-VOL,
п³сля цього ви можете настро¿ти р³вень
голосност³). П³сля вибору потр³бного режиму
меню (MENU), обертайте кнопку голосност³
VOL для вибору режиму обраного параметра.
3). РЕЖИМ ПОШУКУ ТРЕКУ в режим³ MP3:
A. Натисн³ть один раз кнопку A.P для вибору
режиму пошуку треку TRACK SEARCH, на РК
диспле¿ зявиться ³ндикатор TRK SCH.
B. Натисн³ть кнопку SEL для вводу режиму
треку (TRACK), на екран³ зявиться 001 ³
перший символ буде мигати. Пот³м
обертайте кнопку голосност³ VOL для зм³ни
цифр в³д 0 до 9. (По зак³нченн³ натисн³ть
кнопку SEL на б³льш н³ж 0.5 секунди для
в³дтворення обраного треку)
C. Натисн³ть кнопку SEL, щоб замигали
десятизначн³ цифри, пот³м обертайте ручку
голосност³ VOL для зм³ни цифр в³д 0 до 9. (По
зак³нченн³ натисн³ть кнопку SEL на б³льш н³ж
0.5 секунди для в³дтворення обраного треку)
D. Натисн³ть кнопку SEL, щоб замигали сотн³,
пот³м обертайте ручку голосност³ VOL для
зм³ни цифр в³д 0 до 9.
E. Натисн³ть кнопку SEL для в³дтворення
обраного треку. (Якщо номер обраного треку
б³льше, н³ж найб³льший номер треку на диску
МР3, то буде в³дтворюватися останн³й трек
на диску МР3).
4). РЕЖИМ ПОШУКУ ФАЙЛУ в режим³ MP3:
A. Дв³ч³ швидко натисн³ть кнопку A.P для
вибору режиму ПОШУКУ ФАЙЛУ (FILE
SEARCH), на екран³ зявиться FILE SCH.
B. Швидко один раз натисн³ть кнопку SEL для
вибору й в³дображення першо¿ папки.
Пот³м обертайте ручку голосност³ VOL для
покрокового вибору папки вперед або назад.
* Натисн³ть кнопку SEL ³ втримуйте ¿¿ б³льше
0.5 секунди для в³дтворення першого треку
обрано¿ папки.
C. Швидко один раз натисн³ть кнопку SEL для
вибору й показу першого треку обрано¿
УКРА¯НЬСКИЙ
21
3623_im.qxd 30.03.05 18:44 Page 21
Page 22

папки. Пот³м обертайте ручку голосност³
VOL для покрокового вибору треку в папц³
вперед або назад.
D. Швидко один раз натисн³ть кнопку SEL для
в³дтворення обраного треку.
5). Режим ПОШУКУ ЗА НАЗВОЮ в режим³ МР3:
A. Швидко натисн³ть кнопку A.P три рази для
вибору режиму ПОШУКУ ЗА НАЗВОЮ. На
диспле¿ зявиться CHAR SCH.
B. Швидко один раз натисн³ть кнопку SEL для
п³дтвердження режиму ПОШУКУ ЗА НАЗВОЮ
й на екран³ зявиться перший символ A.
C. Для вибору символу А натисн³ть кнопку
SEL.
D. Для зм³ни символу A, обертайте ручку VOL
для вибору ³ншо¿ букви й натисн³ть SEL ще
раз для п³дтвердження обраного символу.
E. При п³дтвердженн³ першого символу вв³д
другого символу назви почнеться з A.
F. Повтор³ть кроки з B до D для п³дтвердження
другого символу.
G. Увед³ть символи, що залишилися, по тому ж
правилу.
ÏÐÈ̲ÒÊÀ:
1) При натисканн³ кнопки SEL для
п³дтвердження символу, якщо кнопка SEL
натискаºться довше, н³ж 0.5 секунди,
почнеться в³дтворення п³сн³, ³мя яко¿
починаºться на обраний символ (символи).
2) Можна вибрати 0-9 ³ символ * за
допомогою ручки голосност³ VOL.
2. КНОПКА В²ДКРИВАННЯ
Натискання кнопки 2 в³дкидаº передню
панель, ³ ви можете вставити диск у
в³дд³лення CD, або натиснути кнопку EJ для
виймання диска ³з плеºра, або зняти
передню панель.
3. LCD (Р²ДКОКРИСТАЛ²ЧНИЙ ДИСПЛЕЙ)
4. КНОПКИ НАГОРУ (UP) ² ВНИЗ (DN)
1) У режим³ РАД²О швидко посл³довно
натискайте кнопку 9 або : для ручного
покрокового настроювання потр³бно¿
рад³останц³¿. Натисн³ть ³ втримуйте кнопку 9
або : б³льше 0.5 секунди для
автоматичного настроювання рад³останц³¿ з
високим р³внем сигналу.
2) У режим³ в³дтворення компакт-диск³в (CD),
натисн³ть кнопку : для в³дтворення
наступного треку. Натисн³ть один раз кнопку
9 для в³дтворення поточного треку з його
початку, натисн³ть кнопку 9 для в³дтворення
останнього треку. Натисн³ть ³ втримуйте
кнопку 9 або : для пропуску вперед або
назад.
5. КНОПКА АВТОМАТИЧНОГО ЗБЕРЕЖЕННЯ /
СКАНУВАННЯ
1) У режим³ рад³о натисн³ть кнопку A.P для
прослуховування вс³х рад³останц³й,
занесених у память, по 5 секунд, на Ркдиспле³ будуть мигати номер станц³¿ й
частота. Якщо втримувати цю кнопку
натиснутою б³льше 2 секунд, то будуть
знайден³ вс³ станц³¿ в поточному д³апазон³ й
збережен³ в ком³рках памят³. Коли операц³я
автоматичного збереження завершена, буде
автоматично в³дтворюватися кожна з³
знайдених рад³останц³й протягом 5 секунд.
Для зупинки сканування знайдених станц³й
натискайте цифров³ кнопки 1-6 для вибору
рад³останц³¿..
2) У режим³ МР3 поперем³нно натискайте
кнопку A.P для вибору режиму пошуку треку
(TRACK SEARCH), пошуку файлу (FILE
SEARCH), або ПОШУКУ ЗА НАЗВОЮ (CHARACTER SEARCH).
6. РАД²О Д²АПАЗОН (BAND)
Посл³довно натискайте кнопку Д²АПАЗОН
(BND) у режим³ РАД²О для вибору
потр³бного д³апазону частот.
7. КНОПКА ПРИЙОМУ ²НФОРМАЦ²¯ ПРО
ДОРОЖН²Й РУХ (ТРАФ²К) (TA [TRAFFIC
ANNOUNCEMENT])
Натискання кнопки ²НФОРМАЦ²¯ ПРО
ДОРОЖН²Й РУХ (TA) включаº або виключаº
режим ТА.
Коли включений режим ТА (на диспле¿
показуºться TA), в³н почне пошук станц³¿ ТА ³
на диспле¿ якийсь час буде висв³чуватися
символ TA.
Коли передаºться оголошення про
траф³к:
1). Якщо пристр³й знаходиться в режим³
в³дтворення диск³в CD , в³н тимчасово
переключиться в режим рад³о.
2). Тимчасово переключиться на станц³ю, що
передаº ³нформац³ю про траф³к, на диспле¿
буде показане ТР.
3). Якщо р³вень голосност³ нижче 20, то в³н буде
п³днятий до 20, ³ повернеться до
попереднього режиму й р³вня голосност³,
коли оголошення про траф³к буде зак³нчено.
Якщо голосн³сть настроюºться п³д час
оголошення про траф³к, то буде
встановлений попередн³й р³вень голосност³.
* функц³я переривання функц³¿ TA:
Натискання ц³º¿ кнопки скасовуº поточне
оголошення про траф³к, але режим ТА не
буде в³дключений.
8. КНОПКА ТИП ПРОГРАМИ PTY (PROGRAM
TYPE)
УКРА¯НЬСКИЙ
22
3623_im.qxd 30.03.05 18:44 Page 22
Page 23

Швидко й посл³довно натискайте кнопку ТИП
ПРОГРАМИ (PTY) для вибору одного з
наступних режим³в:
Тип програми МУЗИКА (PTY MUSIC) - - Тип
програм МОВА (PTY SPEECH)- - Тип програми
ВИКЛ. (PTY OFF)
Виб³р типу програми зд³йснюºться кнопками
попередньо¿ установки, як описано в пункт³
12 (КНОПКИ ПОПЕРЕДН²Х УСТАНОВОК).
Швидко й посл³довно натискайте одну з 6
кнопок попередн³х установок для вибору
ТИПУ ПРОГРАМИ.
Коли встановлений Тип програми музика або
Тип програми мова, то на диспле¿
в³дображаються попередн³ установки типу
програм. Якщо протягом 2 секунд не були
уведен³ нов³ параметри, то ведеться пошук
ран³ше обраного типу програми. Якщо
протягом одного циклу сканування вс³х
програм потр³бний Тип програми не
знайдений, на диспле¿ буде мигати (NO
PTY) ³ рад³о перейде до звичайного рад³о
режиму.
9. КНОПКА ВКЛЮЧЕННЯ ЖИВЛЕННЯ
Для включення пристрою натисн³ть будь-яку
кнопку, кр³м кнопки ВИЙМАННЯ ДИСКА
(EJECT) ³ В²ДªДНАННЯ ПАНЕЛ² (OPEN),
натисн³ть ³ втримуйте кнопку ВКЛЮЧЕННЯ
ЖИВЛЕННЯ (PWR) б³льше 0.5 секунди для
в³дключення пристрою. (П³сля п³дключення
пристрою до мереж³ (ACC POWER) перший
раз протягом 3-х секунд можна т³льки
включити пристр³й)
10. КНОПКА АЛЬТЕРНАТИВН² ЧАСТОТИ AF
[ALTERNATIVE FREQUENCIES]
При швидкому натисканн³ вибираºться
режим AF ³ на диспле¿ зявляºться ³ндикатор
AF.
²ндикатор виключений: режим AF
виключений.
²ндикатор включений: режим AF
включений, ³ º ³нформац³я рад³оданих (RDS).
²ндикатор мигаº: AF (режим включений, але
³нформац³я RDS ще не сприймаºться).
При вибор³ режиму AF рад³о увесь час
перев³ряº р³вень сигналу на альтернативних
частотах поточно¿ рад³останц³¿. Часовий
³нтервал перев³рки залежить в³д р³вня
сигналу дано¿ станц³¿, в³д дек³лькох хвилин
для сильно¿ станц³¿ до дек³лькох секунд для
слабко¿. Щораз, коли сигнал на
альтернативн³й частот³ сильн³ше сигналу
поточно¿ станц³¿, рад³о переключаºться на ту
частоту за дуже короткий час, на диспле¿ 1-2
секунди показуºться НОВА ЧАСТОТА (NEW
FREQUENCY). Через те, що час переключення
дуже короткий, при звичайному
прослуховуванн³ програми це майже не
чутно.
У режим³ FM, коли включена AF, функц³¿
ПОШУКУ (SEEK), СКАНУВАННЯ (SCAN),
АВТОМАТИЧНОГО ЗБЕРЕЖЕННЯ (AUTOMEMORY) можуть приймати й збер³гати т³льки
програми RDS.
При довгому натисканн³, режим AF
переходить у режим
ВКЛЮЧЕННЯ/ВИМИКАННЯ КОДУ РЕГ²ОНУ
(REGION CODE ON/OFF).
Рег³ональний режим включений: REGIONAL MODE ON:
Режим AF або ПОШУК ²ДЕНТИФ²КАТОРА
ПРОГРАМИ (PI SEEK) п³дходить до
рад³останц³й, у яких ус³ коди PI так³ ж, як ³ в
поточно¿ станц³¿. (Код PI перев³ряºться п³д
час ПЕРЕВ²РКИ AF (CHECK))
Рег³ональний режим в³дключений
REGIONAL MODE OFF:
Рег³ональний код у формат³ коду PI
³гноруºться в режим³ AF або ПОШУКУ PI.
(Код PI ³ Зона Покриття (COVERAGE AREA) не
перев³ряються п³д час пошуку AF)
11.Кнопка В³дключення Звуку (MU)
Натисн³ть кнопку для швидкого в³дключення
або поновлення звуку.
Для включення звуку можна також натиснути
кнопки РЕЖИМ (MODE), Д²АПАЗОН
(BAND), ГОЛОСН²СТЬ (VOL), ТОНКОМПЕНСАЦ²Я (LOUD), ВИБ²Р (SEL).
12.КНОПКИ ПОПЕРЕДНЬО¯ УСТАНОВКИ
СТАНЦ²Й [ 1-6 ] ³ КНОПКИ НАГОРУ/
(TOP/CDP), ОЗНАЙОМЛЕННЯ (INT),
ПОВТОР (RPT), ДОВ²ЛЬНИЙ ВИБ²Р
(RDM).
(A). РЕЖИМ РАД²О
При швидкому натисканн³ ц³ кнопки
викликають попередньо встановлену
рад³останц³ю.
При натисканн³ б³льш н³ж на одну секунду,
частота поточно¿ станц³¿ збер³гаºться в дан³й
ком³рц³ памят³.
При вибор³ режиму Тип програми PTY, кнопки
попередньо встановлено¿ памят³
розпод³ляються в такий спос³б:
Тип програми музика---Тип програми мова --
-виключене
Музика
1. ïîï, ðîê
2. легка музика
3. класика, ³нша муз.
4. джаз, кантр³
5. нац³ональна, стара
6. фольклор
УКРА¯НЬСКИЙ
23
3623_im.qxd 30.03.05 18:44 Page 23
Page 24

Ìîâà
1. Новини, под³¿, ³нформац³я
2. Спорт, осв³та, драма
3. Культура, наука, р³зне
4. Погода, ф³нанси, д³ти
5. Сусп³льство, рел³г³я, дзв³нки, слухач³в у
прямому еф³р³
6. Подорож³, в³дпочинок, документальн³
матер³али
B) У режим³ CD/MP3 плеºра натисн³ть кнопку
TOP/CDP для паузи в³дтворення диска, для
поновлення в³дтворення натисн³ть ¿¿ знову.
Утримуйте ¿¿ натиснутою 0.5 секунди для
в³дтворення першого треку диска.
C) У режим³ CD/MP3 плеºра натисн³ть кнопку
INT для в³дтворення перших 10 секунд
кожного треку, натисн³ть ¿¿ ще раз для
зупинки режиму INT ³ для в³дтворення
обраного треку.
D) У режим³ CD/MP3 плеºра натисн³ть кнопку
ПОВТОР (RPT) для повторного в³дтворення
поточного треку. Натисн³ть ¿¿ знову для
скасування поточного режиму.
E) У режим³ CD/MP3 плеºра натисн³ть кнопку
ДОВ²ЛЬНИЙ ВИБ²Р (RDM) для в³дтворення
трек³в у дов³льному порядку. Натисн³ть ¿¿ ще
раз для скасування цього режиму.
F) У режим³ в³дтворення МР3 диск³в кнопки M5 ³
M6 мають функц³¿ переходу на 10 трек³в
уперед/назад при звичайному в³дтворенн³.
13.Кнопка РЕЖИМ (MODE)
Натисн³ть для вибору джерела звуку: Рад³о
або CD/MP3 плеºр.
14.СЕНСОР ДИСТАНЦ²ЙНОГО КЕРУВАННЯ
15. КНОПКА ГОДИННИК (CLK)
1) РЕЖИМ РАД²О
Коли приймаються рад³о дан³ (RDS), швидко
й посл³довно натискайте цю кнопку для
почергового в³дображення на диспле¿
наступних пункт³в:
²мя станц³¿ PS --> Частота FREQUENCY -->
Годинник CLOCK --> Тип програми PTY -->
Коли рад³о дан³ не сприймаються швидко й
посл³довно натискайте цю кнопку для
почергового показу на диспле¿ наступних
пункт³в: Частота FREQUENCY --> Годинник
CLOCK --> Тип програми PTY -->
2) РЕЖИМ CD/MP3 ПЛЕªРА
Швидко натискайте цю кнопку для
в³дображення на диспле¿ часу протягом 5,
пот³м дисплей вертаºться до попереднього
режиму до наступного натискання ц³º¿
кнопки.
3) НАСТРОЮВАННЯ ЧАСУ
У режим³ годинника втримуйте ¿¿ натиснуто¿
б³льше 1 секунди. П³сля того як показник часу
почне мигати, натискайте кнопки + або - для
установки годин або хвилин.
16. Кнопка СКАНУВАННЯ (SCN)
Натисн³ть для сканування рад³од³апазону.
Коли виявляºться рад³останц³я з³ ст³йким
сигналом, ¿¿ поточна частота мигаº протягом
5 секунд, знову натисн³ть цю кнопку для
зупинки сканування й збереження поточно¿
частоти; у противному випадку пристр³й
через 5 секунд продовжить сканування й
перейде до наступно¿ станц³¿.
УСТАНОВКА
КР²ПЛЕННЯ МАГН²ТОЛИ В АВТОМОБ²Л²
1. Пристр³й
2. Напрямн³ полозки
3. Передня панель автомоб³ля
4. Шестигранна гайка
5. Контргайка
6. Плоска шайба
7. Кузов автомоб³ля
8. Кронштейн
9. Ф³ксуючий шуруп
10.Шестигранний болт M5 X 15
Приклад установки
Установка в приладову панель (Мал. 1,2,3,4)
1. В³дкрут³ть шурупи й скобу
3. ЗАТИСКАЧ. При необх³дност³ загн³ть ц³
затискач³
Зауваження: Збер³гайте ключ³ в над³йному
м³сц³, тому що в майбутньому вам може
знадобитися зняти пристр³й з автомоб³ля.
Зняття й установка передньо¿ панел³
Передня панель цього пристрою може
зн³матися для того, щоб запоб³гти крад³жц³
пристрою.
ЗНЯТТЯ ПЕРЕДНЬО¯ ПАНЕЛ²
Перед тим, як зняти передню панель
пристрою, обовязково в³дключ³ть його
живлення, натиснувши кнопку 1 - ВКЛ./ВИКЛ.
ЖИВЛЕННЯ (PWR).
Для зняття панел³ ³з пристрою натисн³ть
кнопку в³дºднання панел³ 14 (REL). Коли
панель опиниться в горизонтальному
положенн³, потягн³ть ¿¿ на себе.
Див³ться ³люстрац³ю (5,6,7,8).
Прим³тки:
При встановленн³ панел³ не прикладайте
значн³ зусилля. Вона в³льно приºднуºться
легким натисканням.
При перенесенн³ панел³ клад³ть ¿¿ в
УКРА¯НЬСКИЙ
24
3623_im.qxd 30.03.05 18:44 Page 24
Page 25

прикладену п³ну.
При приºднанн³ передньо¿ панел³ до
пристрою не натискайте сильно на РКдисплей.
ЗАПОБ²ЖН² ЗАХОДИ Й ДОГЛЯД
1. Якщо всередин³ машини дуже жарко
(наприклад, п³сля стоянки на сонце),
включайте програвач т³льки п³сля того, як
машина про¿де трохи й салон остудиться.
2. Використовуйте пластмасову п³ну для
збер³гання передньо¿ панел³.
3. Пристр³й спроектований для типу
електропроводки автомоб³ля, при як³й
негативний полюс батаре¿ приºднуºться до
кузова. Перев³рте це перед установкою.
4. Стежте за тим, щоб проводи колонок не
закоротилися при включенн³ пристрою. У
противному випадку виникне
перевантаження, що може привести до
виходу з ладу п³дсилювача.
5. Не встановлюйте зн³мну панель до зак³нчення
монтажу пристрою.
В²ДТВОРЕННЯ ДИСКА:
Чищення диск³в
Перед в³дтворенням диска протр³ть його
чистою ганч³ркою без ворсинок. Протирайте
диск у напрямку стр³лки.
УВАГА:
Не використовуйте так³ розчини, як бензин ³
розчинники. Наявн³ в продаж³ засоби, що
чистять, або антистатики можуть ушкодити
пристр³й.
Не вставляйте диск етикеткою вниз. Це може
ушкодити пристр³й.
УВАГА:
Не вставляйте ³нший диск, якщо в пристро¿
вже º диск. Це може ушкодити пристр³й.
Áåð³òü äèñê çà éîãî êðà¿. Ùîá äèñê
залишався чистим, не торкайте його
поверхню.
Не приклеюйте пап³р або пл³вку на диск.
Не п³ддавайте диск впливу прямого
сонячного св³тла або високо¿ температури.
Не залишайте диски в машин³, припаркован³й
п³д прямим сонячним св³тлом.
П²ДКЛЮЧЕННЯ КОЛОНОК
1. РОЗªМ АНТЕНИ
2. ISO ÐÎǪÌ
3. ЗАПОБ²ЖНИКИ
4. ПАМЯТЬ B+ (ЖОВТИЙ)
5. ЧОРНИЙ (ЗЕМЛЯ -)
6. ЧЕРВОНИЙ (B+)
7. СИН²Й ЖИВЛЕННЯ АНТЕНИ
8. ПЕРЕДНЯ Л²ВА КОЛОНКА
9. ЗАДНЯ Л²ВА КОЛОНКА
10.Á²ËÈÉ
11.Б²ЛИЙ/ЧОРНИЙ
12.ЗЕЛЕНИЙ
13.ЗЕЛЕНИЙ/ЧОРНИЙ
14.Ф²ОЛЕТОВИЙ/ЧОРНИЙ
15.Ф²ОЛЕТОВИЙ
16.ЗАДНЯ ПРАВА КОЛОНКА
17.ПЕРЕДНЯ ПРАВА КОЛОНКА
18.С²РИЙ/ЧОРНИЙ
19.ѲÐÈÉ
20.РОЗªМ Л²Н²ЙНОГО АУД²ОВИХОДУ
«ТЮЛЬПАН» RCA LINE-OUT
20a.ЧЕРВОНИЙ ПРАВИЙ
20b.Б²ЛИЙ Л²ВИЙ
ÏÐÈ̲ÒÊÀ:
1. Необх³дно використовувати колонки з
опором 4 Оми.
2. Не допускайте торкання проводу живлення
антени до металевих елемент³в кузова
автомоб³ля або даного пристрою.
ЗАМ²НА БАТАРЕЙКИ В ПУЛЬТ²
ДИСТАНЦ²ЙНОГО КЕРУВАННЯ:
1. Вийм³ть тримач батарейки в напрямку,
зазначеному стр³лкою.
2. Зам³н³ть стару батарейку на нову з
полярн³стю (+) нагору.
3. Вставте тримач батарейки на м³сце в пульт³
дистанц³йного керування.
ЗАУВАЖЕННЯ ПРО БАТАРЕЙКУ ПУЛЬТА
ДИСТАНЦ²ЙНОГО КЕРУВАННЯ:
1. Неправильне використання батарейки може
викликати перегр³в або вибух ³ привести до
поранення або пожеж³.
2. Вит³к батарейки може ушкодити пульт
дистанц³йного керування (Терм³н придатност³
батарейки: 6 м³сяц³в при використанн³ в
звичайному режим³ при звичайн³й к³мнатн³й
температур³).
3. Не замикайте накоротко полюса батарейки.
4. Не кидайте батарейку у вогонь.
5. Щоб уникнути нещасних випадк³в, збер³гайте
батарейку в м³сцях, недоступних д³тям.
РОЗТАШУВАННЯ Й ФУНКЦ²¯ КНОПОК
КЕРУВАННЯ (Т²ЛЬКИ НА ПУЛЬТ²
ДИСТАНЦ²ЙНОГО КЕРУВАННЯ)
ПУЛЬТ
ДИСТАНЦ²ЙНОГО
КЕРУВАННЯ ПЕРЕДНЯ ПАНЕЛЬ
Звук виключений MUTE...MU
Живлення POWER ...........PWR
Режим MODE ..................MD
Д³апазон BAND ...............BND
+/- ..................................Голосн³сть VOL+/-
УКРА¯НЬСКИЙ
25
3623_im.qxd 30.03.05 18:44 Page 25
Page 26

Нагору UP .......................:
Óíèç DN ..........................9
УСУНЕННЯ НЕСПРАВНОСТЕЙ
Щоб усунути проблему, прочитайте
рекомендац³¿ з усунення несправностей.
Якщо все-таки не виходить усунути
проблему, зверн³ться в найближчий до Вас
серв³сний центр..
Немаº живлення
Не включене запалювання автомоб³ля
Якщо пристр³й правильно п³дключений до
автомоб³льно¿ електрично¿ мереж³, установ³ть
ключ запалювання в положення
ACC
Згор³в запоб³жник
Зам³н³ть запоб³жник
Диск не завантажуºться
Усередин³ програвача знаходиться диск CD
Витягн³ть диск ³з програвача, пот³м вставте
новий диск
Äèñê íå ÷èòàºòüñÿ
Диск неправильно вставлений
Вставте компакт-диск лицьовою стороною
нагору
Компакт-диск дуже брудний або бракований
Почист³ть диск або поставте новий
Дуже висока температура в машин³
Остуд³ть салон, поки температура в ньому не
стане звичайною
Немаº звуку
Установлено низький р³вень голосност³
Настройте голосн³сть на потр³бний р³вень
Неправильно п³дключен³ проводи до колонок
Перев³рте п³дключення провод³в
Кнопки не працюють
Передня панель не до к³нця встановлена на
м³сце
Установ³ть передню панель правильно
В³дбуваються провали у в³дтворенн³
Кут установки перевищуº 30 градус³в
В³дрегулюйте кут установки, щоб в³н був
менше 30 градус³в
Компакт-диск дуже брудний або бракований
Почист³ть диск / поставте новий
Рад³о не працюº.
Не працюº автоматичний виб³р рад³о станц³й
Кабель антени не п³дключений.
Занадто слабк³ сигнали
Над³йно заф³ксуйте кабель антени
Спробуйте настро¿тися на станц³ю вручну
ХАРАКТЕРИСТИКИ
ЗАГАЛЬНЕ
Живлення Прямий струм 13.8V.
Споживання струму 5 A максимум.
Вих³дна потужн³сть 4 X 40W.
FM
Д³апазон частот 66 MHz 108 MHz
Чутлив³сть 3 uV.
Частота I.F 10.7 MHz.
AM
Д³апазон частоти 522 KHz 1620 KHz
Частота I.F 450 KHz
Чутлив³сть 40 dB
Âèõ³ä ë³í³¿ (LINE - OUT)
Âèõ³ä CD MAX 1200 mv
Програвач CD
Система ауд³о система для компакт-диск³в
П³дтримуван³ диски CD/CD-R/CD-RW/MP3
Формат сигналу частота 44.1KHz.
Д³апазон частот 10-20 KHz < 5d.
Р³вень сигналу CD 50 dB [1KHz]
К³льк³сть канал³в 2 стерео.
Розм³ри шас³ 178[Ширина] X 50[Висота] X
165[Довжина].
Зауваження: Через пост³йн³ пол³пшення,
характеристики й дизайн виробу можуть
зм³нюватися без попереднього пов³домлення.
ТЕРМ²Н СЛУЖБИ ПРИЛАДУ НЕ МЕНШ 5-ТИ
РОК²В
Гарант³я
Докладн³ умови гарант³¿ можна отримати в
дилера, що продав дану апаратуру. При
предявленн³ будь-яко¿ претенз³¿ протягом
терм³ну д³¿ дано¿ гарант³¿ варто предявити чек
або квитанц³ю про покупку.
Даний вир³б в³дпов³даº вимогам до
електромагн³тно¿ сум³сност³, що
предявляються директивою
89/336/ªЕС Ради ªвропи й
розпорядженням 23/73 ªЕС по
низьковольтних апаратурах.
УКРА¯НЬСКИЙ
26
3623_im.qxd 30.03.05 18:44 Page 26
Page 27

3623_im.qxd 30.03.05 18:44 Page 27
Page 28

3623_im.qxd 30.03.05 18:44 Page 28
 Loading...