

Page 1
14
20
26
VT-2336 BK
Humidifier
Увлажнитель
3
8
1
IM VT-2336.indd 1 28.12.2016 17:46:11
Page 2
IM VT-2336.indd 2 28.12.2016 17:46:12
Page 3

E N G L I S H
HUMIDIFIER VT-2336 BK
Insufficient room humidity negatively affects
humans’ and pets’ health as well as plants and
furniture. The recommended comfortable room
humidity level is from 40% to 60%. The air humidifier VT-2336 BK allows you to improve the air
quality in the room.
DESCRIPTION
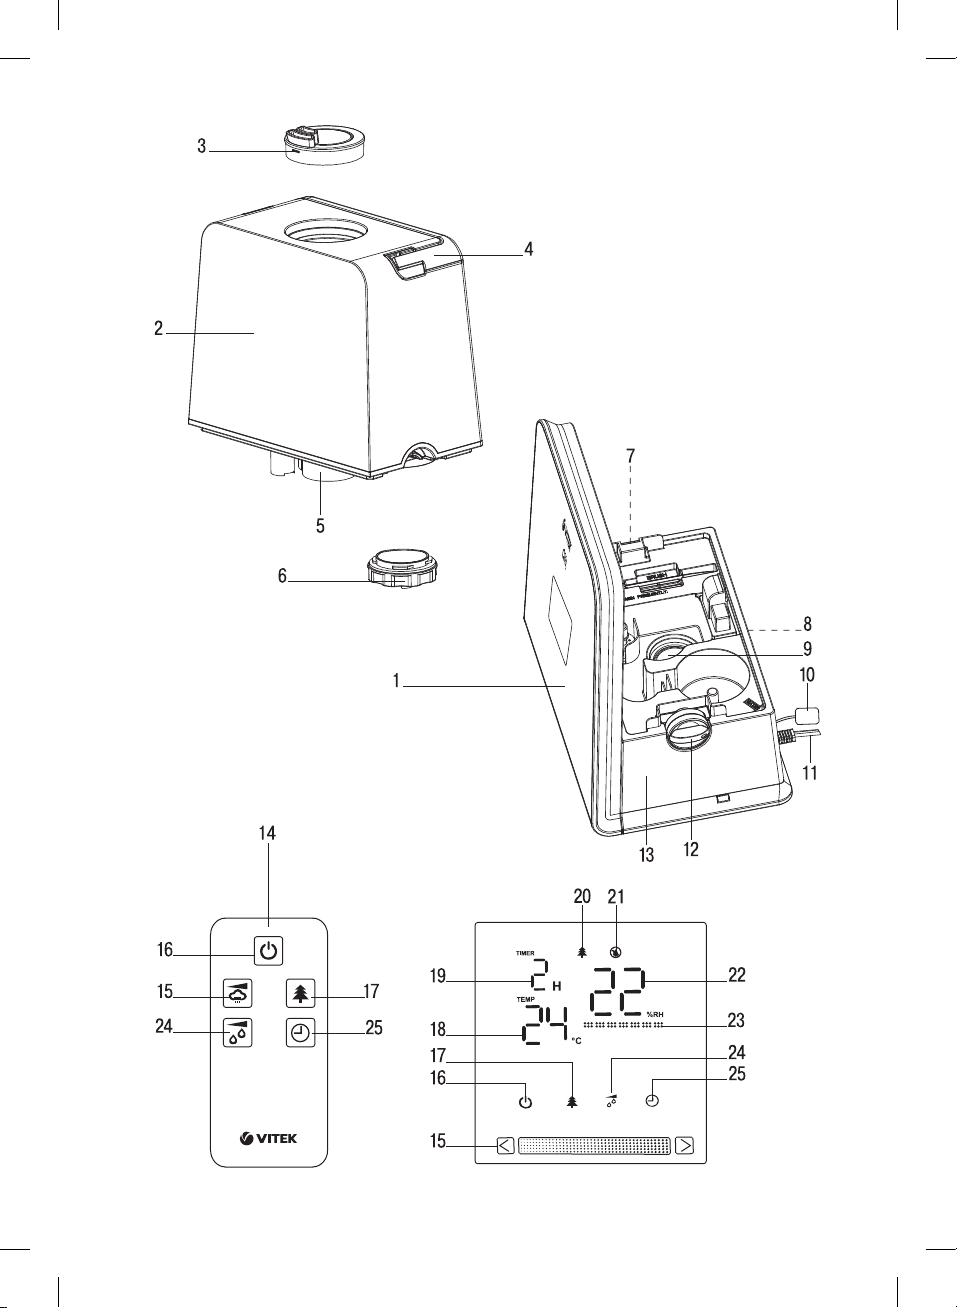
1. Control panel and display
2. Water tank
3. «Mist» release double nozzle
4. Water tank carrying handle
5. Water inlet
6. Water tank lid
7. Water tank illumination
8. Aromatic oil container
9. Process chamber with sprayer
10. Humidity sensor
11. Power cord
12. Water tank clamp handle
13. Air humidifier body
14. Remote control
Control panel (1) and remote
control (14) buttons
15. «Mist» release intensity setting panel/button
16. ON/OFF button
17. Water tank lighting/ionization mode on/off
button
18. Room temperature indication symbols
19. Timer indication symbols
20. Ionization mode on symbol
21. Empty water tank symbol
22. Room relative humidity symbols
23. «Mist» release intensity mode symbols
24. Room relative humidity setting button
25. Timer setting button
ATTENTION!
For additional protection it is reasonable
to install a residual current device (RCD) with
nominal operation current not exceeding
30 mA. To install RCD, contact a specialist.
SAFETY MEASURES
Before using the electrical unit, read this instruction manual carefully and keep it for future reference.
Use the unit for its intended purpose only, as
specified in this manual. Mishandling of the unit
may lead to its breakage and cause harm to the
user or damage to his/her property.
• Before switching the unit on, make sure that
voltage of the mains corresponds to unit operating voltage.
• Place the unit on a flat, moisture-resistant sur-
face. The distance to the walls, other furniture
and interior objects should be at least 30 cm.
• Do not place the unit on carpet surfaces with
high pile.
• Do not place the air humidifier in places
exposed to direct sunlight, high temperatures,
near computers or other sensitive electronic
appliances.
• Do not use the unit outdoors.
• Use the supplied removable parts only.
• Do not operate the unit without water; switch
the unit off when the water tank is empty.
• Do not use soda or dirty water or any perfume
additives.
• Water temperature should not exceed +40°С.
• Do not switch the unit on if the water tank is
not installed.
• Unplug the unit before removing the water
tank.
• Do not cover the unit.
• Do not cover the openings on the unit body
and avoid getting of foreign objects inside
them.
• Do not immerse the unit body, the power plug
or the power cord into water or any other liquids.
• Do not move or tilt the unit during the opera-
tion and do not remove the water tank.
• Always unplug the unit and pour out water
from the water tank and the process chamber before cleaning or if you do not use the
air humidifier.
• Before moving the unit to another place,
unplug it and pour out water from the water
tank and the process chamber. When carrying
the unit, hold it by the body with both hands.
• Do not touch the power plug with wet hands.
• Clean the unit regularly.
• If you are not planning to use the remote con-
trol for a long time, remove the battery from
the battery compartment.
• Strictly follow the polarity according to the
markings when installing the battery.
• Replace the batteries in time.
3
IM VT-2336.indd 3 28.12.2016 17:46:12
Page 4

ENGLISH
• Do not allow children to touch the unit body
and the power cord during operation.
• This unit is not intended for usage by children.
• The unit is not intended for usage by physi-
cally or mentally disabled persons (including
children) or by persons lacking experience or
knowledge if they are not under supervision of
a person who is responsible for their safety or
if they are not instructed by this person on the
usage of the unit.
• Do not leave children unattended to prevent
using the unit as a toy.
• For children safety reasons do not leave poly-
ethylene bags, used as packaging, unattended.
Attention! Do not allow children to play with
polyethylene bags or packaging film. Danger of
suffocation!
• Never pull the power cord when disconnect-
ing the unit from the mains; take the power
plug and carefully pull it out of the mains
socket.
• Never use the unit if the power cord or the
power plug is damaged, if the unit works
improperly or after it was dropped.
• Do not attempt to repair the unit. Do not disas-
semble the unit by yourself, if any malfunction
is detected or after it was dropped, unplug
the unit and apply to any authorized service
center from the contact address list given in
the warranty certificate and on the website
www.vitek.ru.
• Transport the unit in the original package
only.
• For environment protection do not discard the
unit with usual household waste after its service life expiration; apply to a specialized center for further recycling.
• Keep the unit out of reach of children and dis-
abled persons.
THE UNIT IS INTENDED FOR HOUSEHOLD
USAGE ONLY
BEFORE THE FIRST USE
After unit transportation or storage under
cold (winter) conditions, it is necessary to
keep it for at least three hours at room temperature.
There may be water spots in the air humidifier, this is normal, as the unit has undergone
factory quality control.
– Unpack the unit, remove any stickers and
package materials that can prevent unit operation. Check the unit for damages. In case of
damages do not switch the unit on.
– Before plugging the unit in make sure that
your home mains voltage corresponds to the
unit operating voltage.
Notes:
– Use the air humidifier at the room tempera-
ture from +10° С to +40°С, and relative humidity less than 80%.
– Water temperature should not exceed +40°С.
Installing batteries in the remote control (14)
• Press on the lock and remove the battery
holder from the remote control (14), install a
CR2025 battery, strictly following the polarity.
• Install the battery holder back to its place.
Note: If there is an isolation insert in the remote
control battery compartment, remove the insert.
Battery replacement
• Press on the lock and remove the battery
holder from the remote control (14), install
new CR2025 battery, strictly following the
polarity, and install the battery holder back
to its place.
USING THE AIR HUMIDIFIER
– Remove the nozzle (3).
– Turn the clamp handle (12) counterclockwise
until bumping.
– Take the water tank by the handle (4) and
remove it from the unit body (13).
Notes:
– use the handle (4) for carrying the water
tank (2) only;
– do not use the handle (4) to carry the air
humidifier with the water tank (2) installed.
– Turn over the tank (2), remove the lid (6) rotat-
ing it counterclockwise until bumping.
– Fill the tank (2) with necessary amount of
water, insert the lid (6) into the water inlet (5)
and screw it rotating it clockwise until bumping.
– First place the filled water tank (2) back to its
place and then install the nozzle (3).
– Fix the water tank (2) on the air humidifier
body (13) turning the clamp handle (12) clockwise until bumping.
– Wait till the process chamber (9) is filled with
water.
4
IM VT-2336.indd 4 28.12.2016 17:46:12
Page 5

E N G L I S H
– If you want to use the aromatization func-
tion, press on the «Aroma» container (8) and
remove it. Add some drops of water-soluble
aromatic oil on the felt and install the «Aroma»
container (8) back to its place, pressing on it
until the clamp clicking.
Notes:
– use water-soluble aromatic oils only;
– if you are not going to use the aromati-
zation function, remove the felt from the
container (8), wash it and install back to its
place;
– Insert the plug into the mains socket, you will
hear a sound signal and the digital indications of temperature (18) and relative humidity (22) will appear on the control panel
display (1).
Note: - the room temperature and relative
humidity measurements are taken every 15 minutes.
– Switch the unit on by touching the button (16).
You will hear a sound signal, and the unit will
be switched on and start operating at the
maximal «mist» release intensity; the display
will be glowing brighter and the «mist» release
intensity symbols (23) will appear.
Note: - regardless of the preset operating mode,
the display brightness decreases in 15 seconds
after you touch the control buttons for the last
time.
– You can adjust the mist release direction by
turning the nozzle (3) in various directions.
– To finish the air humidifier operation touch the
ON/OFF button (16) again.
– Unplug the unit.
Notes:
– the operation mode buttons on the control
panel (1) are sensory, you just need to touch
the button to switch the necessary operation
mode on.
– the humidity level indications (22) may be
slightly different from the readings of another
hygrometer.
– the humidity level indications depend on the
room temperature.
– draughts or other air flows may significantly
affect the air humidity and temperature indications in the room.
– the humidity sensor (10) is attached to the
power cord (11), make sure that the openings
on the sensor (10) body aren’t blocked with
foreign objects during the operation.
CONTROL PANEL (1) AND REMOTE
CONTROL (14) BUTTONS
ON/OFF button (16)
– Press/touch the button (16) (on the remote
control) to switch the unit on and press/touch
the button (16) again to switch the unit off.
«Mist» release intensity setting panel (15)
– After switching the air humidifier on you can
set the required «mist» release intensity. To
do this, touch the panel (15) in the right place
or draw your finger along the panel (15); the
«mist» release intensity will be shown on the
display with the symbols (23).
– To set the required «mist» release intensity
with the remote control press the button (15).
Water tank lighting and ionization
on/off button (17)
– Press/touch the button (17), the negative ion
generator will be switched on and the symbol (20) will light up on the display.
– To switch the ionization mode off press/touch
the button (17) again, the symbol (20) will go
out.
– Touch the button/press and hold the button
(17) for 3 seconds, the water tank (2) lighting (7) will be switched on; to switch the water
tank (2) lighting (7) off touch the button/press
and hold the button (17) again for 3 seconds,
the lighting (7) will go out.
Room relative humidity setting button (24)
– Consequently press/touch the button (24) to
set the desired level of relative humidity in the
room within the range from 30% to 75% with
the step 5%, the humidity level will be shown
on the display with the symbols (22).
– After you set the required humidity level, the
digital indications (22) will flash 5 times, and
then the digital indications (22) of actual room
humidity will appear and the symbol «%RH»
will be flashing.
– When the humidity reaches the preset level,
the air humidifier will be switched off; when
the humidity level decreases, the unit will be
switched on again, thus maintaining the preset room humidity level.
– To switch the selected humidity maintenance
mode off press/touch the button (24) until
the symbols «CO» appear on the display. The
humidity maintenance mode will be switched
5
IM VT-2336.indd 5 28.12.2016 17:46:12
Page 6

ENGLISH
off and the actual room humidity indica-
– use filtered, boiled and settled water. If tap
tions (22) will appear on the display.
– If you need to check the preset humidity value,
press/touch the button (24) once, the preset
humidity indications (22) will appear on the
display and flash 5 times, and then the actual
humidity indications (22) will be shown.
– Change water in the water tank (2) twice a week.
– Thoroughly wash the process chamber (9)
Note: the room humidity level measurements
are taken every 15 minutes.
Timer setting button (25)
– Consequently press/touch the button (25)
to set up the timer within the range from 1 to
– Before cleaning the process chamber (9)
– To clean the sprayer add 5-10 drops of
12 hours with 1 hour step which will be shown
on the display with the symbols (19).
– When the set time is reached the unit will be
switched off.
– To switch the timer off press/touch the but-
ton (25) until the symbols (19) go out.
– Rinse the process chamber (9) and the water
Low water level indication
– When the water tank (2) is empty, the unit will
– Clean the air humidifier body (13) with a soft,
be switched off, there will be sound signals,
and the empty water tank symbol (21) will light
– As the humidity sensor (10) openings become
up red on the display.
– Switch the unit off with the button (16),
remove the nozzle (3), turn the clamp handle (12) counterclockwise and remove the
Notes:
– do not immerse the air humidifier body (13)
water tank (2).
– Fill the tank (2) with water (see the chapter
– do not use abrasive substances and sol-
«USING THE AIR HUMIDIFIER»).
– First place the filled water tank (2) back to
its place and then install the nozzle (3), fix
– as a cleaning agent for the «sprayer» you can
the tank (2) by turning the clamp handle (12)
clockwise until bumping.
– Switch the unit on for further operation.
STORAGE
CLEANING AND CARE
– Pour the water out of the tank and make sure
WARNING! Always switch the unit off and
unplug it before cleaning.
Hard water causes appearance of mineral scale
– Do not keep the unit with water inside the tank
in the process chamber (9) and in the water
tank (2) that leads to improper operation of the
– Keep the air humidifier away from children in
unit. To avoid it:
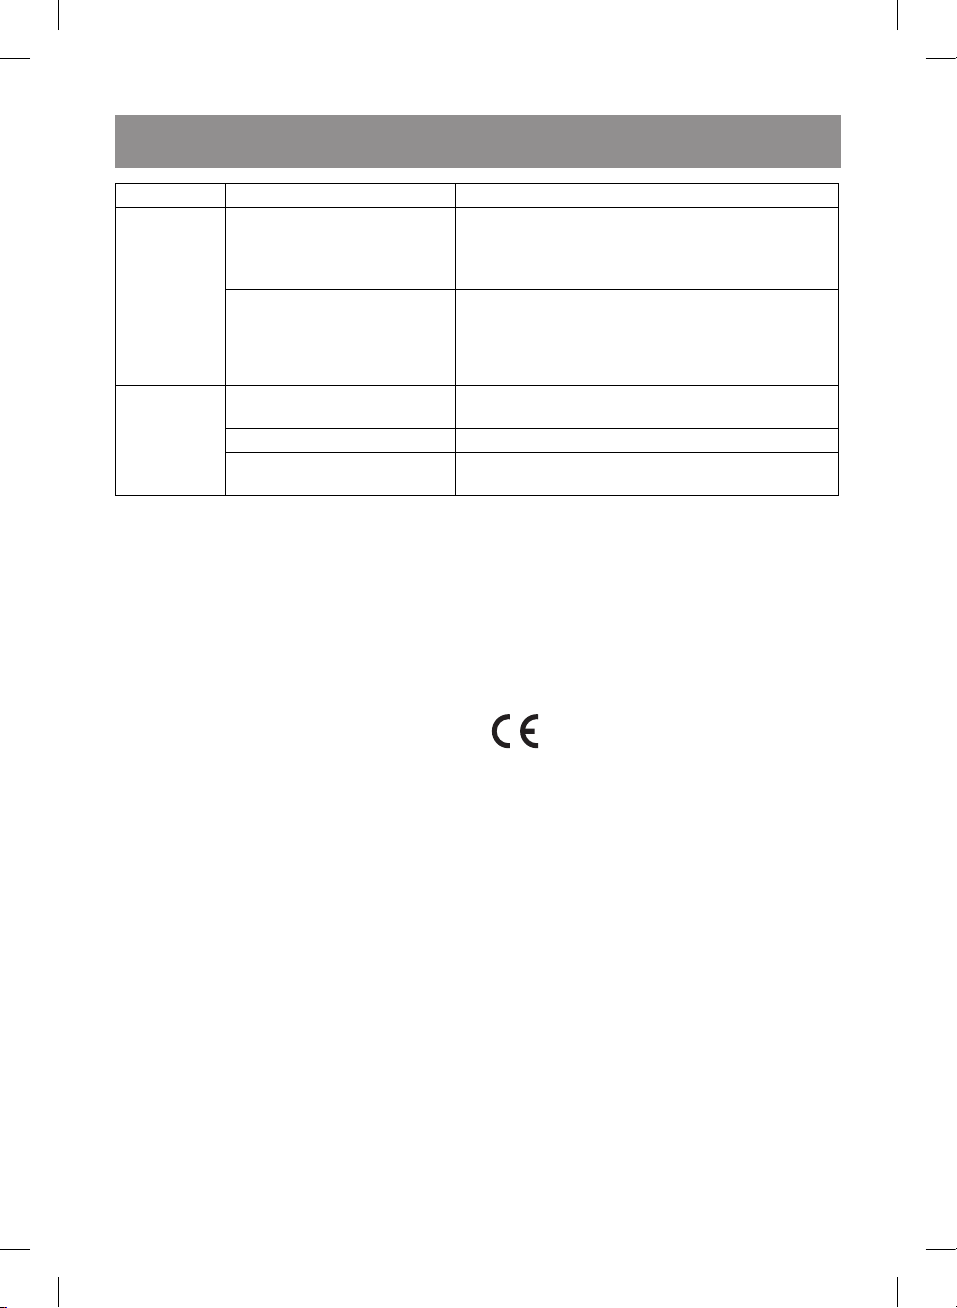
TROUBLESHOOTING
Malfunction Possible causes Troubleshooting
No “mist” The unit is connected
improperly
Check if the power plug is inserted into the mains
socket.
The unit is off Switch the unit on by pressing the button (16).
Water tank is empty or there
Fill the water tank with enough water.
isn’t enough water in the tank.
6
water is hard, it is recommended to mix tap
water with distilled water in proportion 1:1. If
tap water is too hard, mix it with distilled water
in proportion 1:2 or use distilled water only.
and the water tank (2) with neutral detergent
solution twice a week.
remove the heating element protective lid.
detergent on it and wait for approximately
10-15 minutes. Remove the scale from the
sprayer surface with a soft brush, and then
wash the process chamber (9) with neutral
detergent solution.
tank (2) several times. Wipe the process
chamber (9) with a soft cloth.
slightly damp cloth, and then wipe it dry.
dirty, clean the sensor (10) body with a dry
cloth or a suitable brush.
into water or other liquids;
vents to clean «sprayer» and the air humidifier body (13).
use a descaling agent for kettles, strictly following the instruction for this substance.
that the process chamber and the «sprayer»
are dry before taking the unit away for storage.
or the process chamber.
a dry cool place.
IM VT-2336.indd 6 28.12.2016 17:46:12
Page 7
E N G L I S H
Malfunction Possible causes Troubleshooting
Foreign smell
appears
during the
operation
First use Disconnect the unit from the mains. Remove the
water tank, unscrew the lid (6) and pour the water
out of the water tank, then leave the water tank in a
dry cool place for 12 hours.
Dirty or stale water Unplug the unit, remove the water tank, unscrew
the lid (6), pour the water out of the water tank
and clean the tank (as described in the chapter
“Cleaning and care”), then fill it with clean water.
Foreign noise The water tank is installed
DELIVERY SET
Air humidifier – 1 pc.
Remote control – 1 pc.
Instruction manual – 1 pc.
TECHNICAL SPECIFICATIONS
Supply voltage: 220-240 V ~ 50 Hz
Power consumption: 30 W
Water tank capacity: 5.5 l
Water flow: ≥ 300 ml/h
Humidified area: up to 35 m
The manufacturer reserves the right to change
the unit specifications without a preliminary notification
improperly.
Not enough water in the tank Fill the water tank with enough water.
The unit is placed on an
uneven surface.
2
Make sure that the water tank is installed properly.
Place the unit on a flat steady surface.
Unit operating life is 3 years
Guarantee
Details regarding guarantee conditions can be
obtained from the dealer from whom the appliance was purchased. The bill of sale or receipt
must be produced when making any claim under
the terms of this guarantee.
This product conforms to the EMCRequirements as laid down by the Council
Directive 2004/108/ЕС and to the Low
Voltage Regulation (2006/95/ЕС)
7
IM VT-2336.indd 7 28.12.2016 17:46:12
Page 8

русский
УВЛАЖНИТЕЛЬ VT-2336 BK
Недостаточная влажность в помещении негативно сказывается на здоровье человека,
домашних животных, растениях и предметах мебели. Рекомендуемый комфортный
уровень относительной влажности воздуха
в помещениях составляет от 40% до 60%.
Увлажнитель VT-2336 BK позволит улучшить
качество воздуха в помещении.
ОПИСАНИЕ
1. Панель управления и дисплей
2. Резервуар для воды
3. Двойное сопло выхода «пара»
4. Ручка для переноски резервуара для воды
5. Отверстие для заливки воды
6. Крышка резервуара для воды
7. Подсветка резервуара для воды
8. Контейнер для ароматических масел
«Aroma»
9. Рабочая камера с «распылителем»
10. Датчик влажности
11. Сетевой шнур
12. Ручка фиксатора резервуара для воды
13. Корпус увлажнителя
14. Пульт дистанционного управления
Кнопки на панели управления (1)
и на пульте дистанционного
управления (14)
15. Панель/кнопка установки интенсивности
выхода «пара»
16. Кнопка включения/выключения
17. Кнопка включения/выключения режима
ионизации/подсветки резервуара
для воды
18. Символы отображения температуры
в помещении
19. Символы отображения времени работы
таймера
20. Символ включения режима ионизации
21. Символ окончания воды в резервуаре
22. Символы относительной влажности
в помещении
23. Символы установленного режима
интенсивности выхода «пара»
24. Кнопка установки относительной
влажности в помещении
25. Кнопка установки времени работы таймера
ВНИМАНИЕ!
Для дополнительной защиты целесообразно установить в цепи питания устрой-
ство защитного отключения (УЗО) с
номинальным током срабатывания, не превышающим 30 мА, для установки УЗО обратитесь к специалисту.
МЕРЫ БЕЗОПАСНОСТИ
Перед началом эксплуатации электроприбора
внимательно прочитайте настоящее руководство по эксплуатации и сохраните его для
использования в качестве справочного материала.
Используйте устройство только по его прямому
назначению, как изложено в данном руководстве. Неправильное обращение с устройством
может привести к его поломке, причинению
вреда пользователю или его имуществу.
• Перед включением убедитесь, что напря-
жение электрической сети соответствует
рабочему напряжению устройства.
• Устанавливайте устройство на ровной вла-
гостойкой поверхности. Расстояние до
стен, других предметов мебели и интерьера должно быть не менее 30 см.
• Запрещается устанавливать устройство на
напольные покрытия с длинным ворсом.
• Не размещайте увлажнитель в местах, под-
верженных воздействию прямых солнечных лучей, высоких температур, вблизи
компьютеров или чувствительной электронной техники.
• Запрещается использовать устройство вне
помещений.
• Используйте только те съёмные детали,
которые входят в комплект поставки.
• Не включайте устройство без воды и
отключайте его, как только в резервуаре
закончится вода.
• Не используйте газированную или загряз-
нённую воду, а также парфюмерные
добавки.
• Температура используемой воды не
должна превышать +40°С.
• Не включайте устройство без установлен-
ного резервуара для воды.
• Отключайте устройство от электросети
перед снятием резервуара для воды.
• Не накрывайте устройство.
• Не закрывайте имеющиеся отверстия на
корпусе устройства и не допускайте попадания в них посторонних предметов.
• Не погружайте корпус устройства, сетевой
шнур либо вилку сетевого шнура в воду или
другие жидкости.
8
IM VT-2336.indd 8 28.12.2016 17:46:12
Page 9

русский
• Во время работы устройства не переме-
щайте и не наклоняйте его, а также не снимайте резервуар для воды.
• Обязательно отключайте устройство
от сети и выливайте воду из резервуара
и рабочей камеры во время чистки или
если вы не пользуетесь увлажнителем.
• Прежде чем перенести устройство в дру-
гое место, отключите его от электросети
и слейте воду из резервуара для воды и
рабочей камеры. При переноске устройства держите его обеими руками за корпус.
• Не прикасайтесь к вилке сетевого шнура
мокрыми руками.
• Регулярно проводите чистку устройства.
• Если вы не будете пользоваться пультом
дистанционного управления в течение длительного периода времени, необходимо
извлечь элемент питания из батарейного
отсека.
• При установке элемента питания строго
соблюдайте полярность в соответствии с
обозначениями.
• Своевременно заменяйте элемент питания.
• Не разрешайте детям прикасаться к кор-
пусу устройства и к сетевому шнуру во
время работы устройства.
• Данное устройство не предназначено для
использования детьми.
• Прибор не предназначен для использо-
вания лицами (включая детей) с пониженными физическими, психическими
и умственными способностями или при
отсутствии у них опыта или знаний, если
они не находятся под контролем или не
проинструктированы об использовании
прибора лицом, ответственным за их безопасность.
• Осуществляйте надзор за детьми, чтобы
не допустить использования устройства в
качестве игрушки.
• Из соображений безопасности детей
не оставляйте полиэтиленовые пакеты,
используемые в качестве упаковки, без
присмотра.
Внимание! Не разрешайте детям играть с
полиэтиленовыми пакетами или упаковочной
плёнкой. Опасность удушья!
• Отключая устройство от электросети,
никогда не дёргайте за сетевой шнур,
возьмитесь за сетевую вилку и аккуратно
извлеките её из электрической розетки.
• Не используйте устройство, если имеются
повреждения сетевого шнура или вилки
сетевого шнура, если устройство работает
с перебоями, а также после его падения.
• Запрещается самостоятельно ремонтиро-
вать прибор. Не разбирайте прибор самостоятельно, при возникновении любых
неисправностей, а также после падения устройства выключите его из электрической розетки и обратитесь в любой
авторизованный (уполномоченный) сервисный центр по контактным адресам,
указанным в гарантийном талоне и на
сайте www.vitek.ru.
• Перевозите устройство только в заводской
упаковке.
• В целях защиты окружающей среды, после
окончания срока службы прибора не выбрасывайте его вместе с бытовыми отходами,
передайте прибор в специализированный
пункт для дальнейшей утилизации.
• Храните устройство в местах, недоступных
для детей и людей с ограниченными возможностями.
УСТРОЙСТВО ПРЕДНАЗНАЧЕНО ТОЛЬКО ДЛЯ
БЫТОВОГО ИСПОЛЬЗОВАНИЯ
ПЕРЕД ПЕРВЫМ ИСПОЛЬЗОВАНИЕМ
После транспортировки или хранения
устройства в холодных (зимних) условиях необходимо выдержать его при комнатной температуре не менее трёх часов.
Внутри увлажнителя могут находиться
следы от воды – это нормальное явление,
так как устройство проходило контроль
качества.
– Распакуйте прибор и удалите упаковочные
материалы и любые наклейки, мешающие
работе устройства. Осмотрите прибор
на предмет повреждений. При наличии
повреждений не включайте прибор.
– Перед включением в сеть убедитесь, что
напряжение электрической сети соответствует рабочему напряжению прибора.
Примечания:
– Используйте увлажнитель при темпера-
туре в помещении от +10°C до +40°C и
относительной влажности менее 80%.
– Температура используемой воды не
должна быть выше +40°С.
9
IM VT-2336.indd 9 28.12.2016 17:46:12
Page 10

русский
Установка элементов питания в пульт
дистанционного управления (14)
• Нажмите на фиксатор и выньте держа-
тель элемента питания из пульта (14), установите элемент питания CR2025, строго
соблюдая полярность.
• Установите держатель элемента питания
на место.
Примечание: при наличии изолирующей
прокладки в батарейном отсеке пульта извлеките прокладку.
Замена элемента питания
• Нажмите на фиксатор и выньте держа-
тель элемента питания из пульта (14), установите новый элемент питания CR2025,
строго соблюдая полярность, установите
держатель элемента питания на место.
ИСПОЛЬЗОВАНИЕ УВЛАЖНИТЕЛЯ
ВОЗДУХА
– Снимите сопло (3).
– Поверните ручку фиксатора (12) против
часовой стрелки до упора.
– Возьмитесь за ручку резервуара для
воды (4) и снимите его с корпуса (13).
Примечания:
– используйте ручку (4) только для перено-
ски резервуара (2);
– запрещается использовать ручку (4) для
переноски увлажнителя с установленным
на нём резервуаром (2).
– Переверните резервуар (2), снимите
крышку (6), повернув её против часовой
стрелки до упора.
– Наполните резервуар (2) необходимым
количеством воды, вставьте крышку (6) в
заливочное отверстие (5) и поверните её
по часовой стрелке до упора.
– Установите на место сначала наполненный
резервуар (2), а затем – сопло (3).
– Зафиксируйте резервуар (2) на корпусе
увлажнителя (13), повернув ручку фиксатора (12) по часовой стрелке до упора.
– Подождите некоторое время, пока рабочая
камера (9) заполнится водой.
– Если вы хотите использовать функцию
ароматизации, нажмите на контейнер (8)
«Aroma» и выньте его. Капните на фетр
несколько капель водорастворимого ароматического масла и установите контейнер (8) «Aroma» на место, нажав на него до
щелчка фиксатора.
Примечания:
– используйте только водорастворимые
ароматические масла;
– если вы не планируете использовать функ-
цию ароматизации, извлеките фетр из
контейнера (8), промойте его и установите
на место;
– Вставьте вилку сетевого шнура в электри-
ческую розетку, прозвучит звуковой сигнал, и на дисплее панели управления (1)
отобразятся значения температуры (18) и
относительной влажности (22).
Примечание: - измерения температуры и
уровня влажности в помещении производятся
каждые 15 минут.
– Включите устройство, коснувшись
кнопки (16). Прозвучит звуковой сигнал,
устройство включиться и начнёт работу
на максимальной интенсивности выхода
«пара», при этом увеличится яркость дисплея и на нём отобразятся символы интенсивности выхода «пара» (23).
Примечание: - независимо от установленного режима работы, после последнего прикосновения к кнопкам управления яркость
свечения дисплея снизиться через 15 секунд.
– Вы можете регулировать направление
выхода «пара» поворачивая сопло (3) в
различных направлениях.
– Для завершения работы увлажнителя воз-
духа повторно коснитесь кнопки включения/выключения (16).
– Извлеките вилку сетевого шнура из элек-
трической розетки.
Примечания:
– кнопки режимов работы на панели управ-
ления (1) сенсорные, для включения
нужного режима работы достаточно прикоснуться к кнопке;
– показания уровня влажности (22) могут
несколько отличаться от показаний другого гигрометра;
– показания уровня влажности зависят от
температуры воздуха в помещении;
– сквозняки или другие воздушные потоки
могут существенно влиять на показания
влажности и температуры воздуха в помещении;
– датчик влажности (10) крепиться на сете-
вом шнуре (11), следите за тем, чтобы во
время работы отверстия на корпусе датчика (10) не были закрыты посторонними
предметами.
10
IM VT-2336.indd 10 28.12.2016 17:46:13
Page 11

русский
КНОПКИ НА ПАНЕЛИ УПРАВЛЕНИЯ (1)
И НА ПУЛЬТЕ ДИСТАНЦИОННОГО
УПРАВЛЕНИЯ (14)
Кнопка включения/выключения (16)
– Прикоснитесь/нажмите (на пульте ДУ)
кнопку (16) для включения устройства,
для отключения устройства прикоснитесь/
нажмите кнопку (16) ещё раз.
Панель установки интенсивности
выхода «пара» (15)
– После включения увлажнителя воздуха Вы
можете установить необходимую интенсивность выхода «пара». Для этого коснитесь пальцем панели (15) в нужном месте
или проведите пальцем по панели (15),
интенсивность выхода «пара» будет отображаться на дисплее символами (23).
– Для установки необходимой интенсивно-
сти выхода «пара» с пульта дистанционного
управления нажимайте кнопку (15).
Кнопка включения/выключения
ионизатора и подсветки резервуара
для воды (17)
– Прикоснитесь/нажмите кнопку (17), вклю-
чится генератор отрицательных ионов и на
дисплее загорится символ (20).
– Для выключения режима ионизации при-
коснитесь/нажмите кнопку (17) ещё раз,
символ (20) погаснет.
– Прикоснитесь к кнопке/нажмите и удер-
живайте кнопку (17) в течение 3 секунд,
подсветка (7) резервуара для воды (2)
включиться, для выключения подсветки (7)
резервуара для воды (2) повторно прикоснитесь к кнопке/нажмите и удерживайте кнопку (17) в течение 3 секунд,
подсветка (7) погаснет.
Кнопка установки относительной
влажности в помещении (24)
– Последовательно прикасаясь/нажимая
кнопку (24), вы можете установить желаемый уровень относительной влажности в
помещении в диапазоне от 30% до 75% с
шагом 5%, уровень влажности будет отображаться на дисплее символами (22).
– После установки требуемой влажности
цифровые показания (22) будут мигать
5 раз, после чего отобразятся цифро-
вые показания (22) реальной влажности в
помещении и будет мигать символ «%RH».
– При достижении установленного уровня
влажности увлажнитель отключится, при
уменьшении уровня влажность прибор
снова включится, таким образом осуществляется поддержание установленной
влажности в помещении.
– Для отключения режима поддержания
установленной влажности прикасайтесь/
нажимайте кнопку (24) до тех пор, пока
на дисплее не отобразятся символы «CO»,
режим поддержания влажности выключится и на дисплее отобразятся символы
реальной влажности в помещении (22).
– При необходимости проверки значений
установленной влажности прикоснитесь/
нажмите один раз кнопку (24), значения
установленной влажности (22) отобразятся
на дисплее и будут мигать пять раз, после
чего отобразится реальная влажность (22)
в помещении.
Примечание: измерения уровня влажности
в помещении производятся каждые 15 минут.
Кнопка установки времени работы
таймера (25)
– Последовательно прикасаясь/нажимая
кнопку (25), Вы можете установить время
работы таймера в диапазоне от 1 до 12 часов
с шагом 1 час, что будет отображаться на
дисплее символами (19).
– По достижении установленного времени
устройство выключится.
– Для отключения таймера прикасайтесь/
нажимайте кнопку (25), пока на дисплее не
погаснут символы (19).
Индикация недостаточного количества
воды
– Когда в резервуаре (2) закончится вода,
устройство отключится, будут звучать
звуковые сигналы и на дисплее загорится красным цветом символ окончания
воды (21).
– Выключите устройство кнопкой (16), сни-
мите сопло (3), поверните ручку фиксатора (12) против часовой стрелки до упора
и снимите резервуар (2).
– Наполните резервуар (2) водой (см. раз-
дел «ИСПОЛЬЗОВАНИЕ УВЛАЖНИТЕЛЯ
ВОЗДУХА»).
11
IM VT-2336.indd 11 28.12.2016 17:46:13
Page 12

русский
– Установите на место сначала наполненный
водой резервуар (2), а затем – сопло (3),
зафиксируйте резервуар (2), повернув ручку
фиксатора (12) по часовой стрелке до упора.
– Включите устройство для дальнейшей экс-
плуатации.
Мягкой щёточкой удалите налёт с поверхности «распылителя», после чего промойте
рабочую камеру (9) раствором нейтрального моющего средства.
– Сполосните несколько раз рабочую
камеру (9) и резервуар (2). Протрите рабочую камеру (9) мягкой тканью.
ЧИСТКА И УХОД
ПРЕДУПРЕЖДЕНИЕ! Обязательно выключайте прибор и отключайте его от электросети перед чисткой.
Жёсткая вода вызывает появление минеральных отложений в рабочей камере (9) и
в резервуаре (2), что приводит к ухудшению
работы прибора. Во избежание этого:
– Используйте воду, прошедшую очистку
бытовым фильтром, кипячёную и отстоянную
воду. Если водопроводная вода жёсткая, то
рекомендуется смешивать её с дистиллированной водой в соотношении 1:1. При
очень жёсткой воде смешивайте её с дистиллированной водой в соотношении 1:2 или
используйте только дистиллированную воду.
– Меняйте воду в резервуаре (2) два раза в
неделю.
– Тщательно промывайте рабочую камеру (9)
и резервуар (2) раствором нейтрального
моющего средства два раза в неделю.
– Перед очисткой рабочей камеры (9) сни-
мите защитную крышку нагревательного
элемента.
– Для очистки «распылителя» капните на
него 5-10 капель очищающего средства,
подождите приблизительно 10-15 минут.
– Корпус увлажнителя (13) протирайте мяг-
кой слегка влажной тканью, после чего
вытрите насухо.
– По мере загрязнения отверстий корпуса
датчика влажности (10) очищайте корпус
датчика (10) сухой тканью или используйте
подходящую щётку.
Примечания:
– не погружайте корпус увлажнителя (13) в
воду или в любые другие жидкости;
– не используйте для чистки «распылителя»
и корпуса увлажнителя (13) абразивные
чистящие средства и растворители;
– в качестве очищающего средства для
«распылителя» можно использовать средство для удаления накипи в чайниках,
строго соблюдая рекомендации в инструкции по использованию данного средства.
ХРАНЕНИЕ
– Прежде чем убрать прибор на хранение,
слейте воду из резервуара и убедитесь, что
рабочая камера и «распылитель» – сухие.
– Запрещено хранить прибор при наличии
воды в резервуаре или в рабочей камере.
– Храните увлажнитель в сухом прохладном
месте, недоступном для детей.
УСТРАНЕНИЕ НЕИСПРАВНОСТЕЙ
Неисправность Возможные причины Устранение неисправностей
Нет «пара» Неправильное
подключение устройства
Проверьте, вставлена ли вилка сетевого
шнура в розетку.
Устройство не включено Включите устройство, нажав кнопку (16).
Посторонний
запах во время
работы
Нет воды или недостаточно
воды в резервуаре
Первое использование Отключите устройство от электросети.
Залейте в резервуар достаточное количество
воды.
Снимите резервуар, открутите крышку (6),
слейте воду из резервуара для воды,
поместите резервуар в прохладное сухое
место на 12 часов.
Грязная или застоявшаяся
вода
Отключите устройство от электросети,
снимите резервуар, открутите крышку (6),
слейте воду из резервуара для воды,
проведите чистку резервуара (как описано
в разделе «Чистка и уход»), залейте в него
чистую воду.
12
IM VT-2336.indd 12 28.12.2016 17:46:13
Page 13

русский
Неисправность Возможные причины Устранение неисправностей
Посторонний
шум
Неправильно установлен
резервуар для воды
Недостаточно воды
в резервуаре
Устройство размещено на
неровной поверхности
Проверьте правильность установки
резервуара для воды.
Залейте в резервуар достаточное количество
воды.
Разместите устройство на ровной устойчивой
поверхности.
КОМПЛЕКТ ПОСТАВКИ
Увлажнитель – 1 шт.
Пульт дистанционного управления – 1 шт.
Инструкция – 1 шт.
ТЕХНИЧЕСКИЕ ХАРАКТЕРИСТИКИ
Напряжение питания: 220-240 В ~ 50 Гц
Потребляемая мощность: 30 Вт
Ёмкость резервуара для воды: 5,5 л
Расход воды: ≥ 300 мл/ч
Площадь увлажнения: до 35 м
Производитель оставляет за собой право
изменять характеристики прибора без предварительного уведомления
Срок службы прибора – 3 года
2
Данное изделие соответствует всем
требуемым европейским и российским стандартам безопасности и гигиены.
Изготовитель: АНДЕР ПРОДАКТС ГмбХ,
Австрия
Адрес: Нойбаугюртель 38/7А, 1070 Вена,
Австрия
Информация для связи – email:
anderproduct@gmail.com
Информация об Импортере указана на индивидуальной упаковке.
Информация об авторизованных (уполномоченных) сервисных центрах указана в гарантийном талоне и на сайте www.vitek.ru
Единая справочная служба:
+7 (495) 921-01-70
Сделано в Китае
13
IM VT-2336.indd 13 28.12.2016 17:46:13
Page 14

ҚазаҚша
ЫЛҒАЛДАТҚЫШ VT-2336 BK
Панажайдағы жеткіліксіз ылғалдылық
адамның денсаулығына, үй жануарларына,
өсімдіктерге және жиһаз заттарына өзінің кері
әсерін тигізеді. Панажайлардағы ұсынылатын
салыстырмалы ауа ылғалдылығы 40%-дан
60%-ға дейінгі аралықты құрайды. VT-2336 BK
ылғалдатқышы панажайдағы ауа сапасын
жақсартуға көмектеседі.
СИПАТТАМАСЫ
1. Басқару тақтасы және дисплей
2. Суға арналған сауыт
3. «Бу» шығаратын қосарланған шүмек
4. Суға арналған сауытты тасымалдауға
арналған қолсап
5. Суды құюға арналған саңылау
6. Суға арналған сауыттың қақпағы
7. Суға арналған сауыттың көмескілеуі
8. «Aroma» хош иісті майларына арналған
контейнер
9. «Шашыратқышы» бар жұмыс камерасы
10. Ылғалдылық бергіші
11. Желілік бау
12. Суға арналған сауыт бекіткішінің қолсабы
13. Ылғалдатқыш корпусы
14. Қашықтан басқару пульты
Басқару тақтасындағы (1) және
қашықтан басқару пультындағы (14)
батырмалар
15. «Будың» шығу қарқындылығын белгілеу
тақтасы/батырмасы
16. Іске қосу/сөндіру батырмасы
17. Ионизация/суға арналған сауытты
көмескілеу режимін іске қосу/сөндіру
батырмасы
18. Панажайдағы температураны көрсету
таңбалары
19. Таймердің жұмыс істеу уақытын көрсету
таңбалары
20. Ионизация режимін іске қосу таңбасы
21. Сауытта судың бітуінің таңбасы
22. Панажайдағы салыстырмалы
ылғалдылықтың таңбасы
23. «Буды» шығару қарқындылығының
белгіленген режимінің таңбалары
24. Панажайдағы салыстырмалы
ылғалдылықты белгілеу батырмасы
25. Таймердің жұмыс істеу уақытын белгілеу
батырмасы
НАЗАР АУДАРЫҢЫЗ!
Қосымша қорғаныс үшін қоректендіру
тізбегінде номиналды іске қосылу
тогы 30 мА аспайтын қорғаныс сөндіру
құрылғысын (ҚАҚ) орнатқан дұрыс, ҚАҚ-ны
орнату үшін маманға хабарласыңыз.
ҚАУІПСІЗДІК ШАРАЛАРЫ
Электрлік аспапты пайдалана бастау алдында
берілген пайдалану бойынша басшылықты зейін
қойып оқып шығыңыз жән оны анықтамалық
материал ретінде пайдалану үшін сақтап қойыңыз.
Құрылғыны берілген басшылықта жазылғандай
тек оның тікелей міндеті бойынша ғана
пайдаланыңыз. Құрылғыны дұрыс пайдаланбау
оның бұзылуына, пайдаланушыға немесе оның
мүлігіне зиян келтіруіне әкелуі мүмкін.
• Іске қосу алдында, аспаптың жұмыс істеу
кернеуі желідегі кернеуге сәйкес келетініне
көз жеткізіңіз.
• Құрлығыны түзу ылғалға төзімді бетке
орналастырыңыз. Қабырғаға, басқа жиһаз
және интерьер заттарына дейінгі қашықтық
30 см-ден кем болмауы керек.
• Құрылғыны ұзын талшықтары бар еден
төсеніштеріне орнатуға тыйым салынады.
• Ылғалдатқышты тікелей күн сәулелерінің,
жоғары температуралардың әсері тиетін
жерлерде, компьютерлердің немесе
сезімтал электрондық техниканың қасында
орналастырмаңыз.
• Құрылғыны панажайлардан тыс пайдалануға
тыйым салынады.
• Жеткізілім жинағына кіретін шешілмелі
бөлшектерді ғана пайдаланыңыз.
• Құрылғыны сусыз іске қоспаңыз және
сауытында суы біткенге оны сөндіріңіз.
• Газдалған немесе ластанған суды,
сонымен қатар парфюмерлік қоспаларды
пайдаланбаңыз.
• Пайдаланылатын судың температурасы
+40°С-ден аспауы керек.
• Суға арналған сауытсыз құрылғыны іске
қоспаңыз.
• Суға арналған сауытты шешу алдында
құрылғыны сөндіріңіз.
• Құрылғыны бүркеп жаппаңыз.
• Құрылғы корпусында бар саңылауларды
жаппаңыз және оларға бөтен заттардың
түсуіне жол бермеңіз.
• Құрылғы корпусын, желілік бауды немесе
желілік баудың айыртетігін суға немесе
басқа сұйықтықтарға матырмаңыз.
14
IM VT-2336.indd 14 28.12.2016 17:46:13
Page 15

ҚазаҚша
• Құрылғы жұмыс істеген уақытта оны
тасымалдамаңыз және еңкейтпеңіз,
сонымен қатар суға арналған сауытты
шешпеңіз.
• Ылғалдатқышты тазалау уақытында немесе
сіз оны пайдаланбасаңыз міндетті түрде
құрылғыны желіден ажыратыңыз және суға
арналған сауыт пен жұмыс камерасынан
суды төгіңіз.
• Құрылғы басқа орынға тасымалдағанға
дейін, оны электр желісінен ажыратыңыз
және суға рналған сауыт пен жұмыс
камерасынан суды төгіңіз. Құрылғыны
тасымалдаған кезде оны екі қолыңызбен
корпусынан ұстаңыз.
• Желілік баудың айыртетігін сулы қолмен
ұстамаңыз.
• Құрылғыны тазалауды мезгілімен жүргізіңіз.
• Егер сіз ұзақ уақыт бойы қашықтан басқару
пультын пайдаланбайтын болсаңыз,
батареялық бөліктен қоректендіру элементін
шығару қажет.
• Қоректендіру элементін орнатқан кезде
белгілеулерге сәйкес үйектілікті қатаң
сақтаңыз.
• Қоректендіру элементін уақытылы
ауыстырыңыз.
• Құрылғы жұмыс істеген уақытта балаларға
құрылғы корпусына және желілілк бауға
қолын тигізуге рұқсат етпеңіз.
• Берілген құрылғы балалардың
пайдалануына арналмаған.
• Дене, жүйке немесе сана мүмкіндіктері
төмендетілген тұлғалардың (балаларды
қоса) немесе оларда тәжірибесі немесе
білімі болмаса, егер олар бақыланбаса
немесе олардың қауіпсіздігі үшін жауап
беретін тұлғамен аспапты пайдалану
туралы нұсқаулықтар берілген болмаса,
аспап олардың пайдалануына арналмаған.
• Құрылғыны ойыншық ретінде пайдалануға
жол бермеу үшін балаларға қадағалау
жасаңыз.
• Балалардың қауіпсіздігі мақсатында орау
ретінде пайдаланылатын полиэтилен
қаптарды қараусыз қалдырмаңыз.
Назар аударыңыз! Балаларға полиэтилен
қаптармен немесе орайтын пленкамен
ойнауға рұқсат етпеңіз. Тұншығу қаупі бар!
• Құрылығыны электр желісінен сөндіргенде,
ешқашан желілік баудан тартпаңыз, желелік
айыреттіктен ұстаңыз және оны электрлік
ашалықтан ұқыпты шығарыңыз.
• Егер желілік баудың немесе желілік бау
айыртетігінің бүлінулері болса, егер құрылғы
іркілістермен жұмыс істесе, сонымен
қатар ол құлағаннан кейін құрылғыны
пайдаланбаңыз
• Аспапты өз бетімен жөндеуге тыйым
салынады. Аспапты өз бетіңізбен
бөлшектемеңіз, кез-келген ақаулықтар
пайда болғанда қоректендіру элементтерін
батареялық бөліктен шығарыңыз және
кепілдік талоны мен www.vitek.ru сайтында
көрсетілген хабараласу мекен-жайлары
бойынша кез-келген туындыгерлес
(өкілетті) қызмет көрсету орталығына
хабарласыңыз.
• Құрылғыны тек зауыттық орауда
тасымалдаңыз.
• Қоршаған ортаны қорғау мақсатында,
аспаптың қызмет ету мерзімі аяқталғаннан
кейін оны тұрмыстық қоқыстармен бірге
тастамаңыз, аспапты келесі қайта өңдеу
үшін арнайы пунктке өткізіңіз.
• Құрылғыны балалардың және мүмкіндіктері
шектеулі адамдардың қолы жетпейтін жерде
сақтаңыз.
ҚҰРЫЛҒЫ ТЕК ТҰРМЫСТЫҚ МАҚСАТТАРДА
ПАЙДАЛАНУҒА АРНАЛҒАН
АЛҒАШҚЫ ПАЙДАЛАНУ АЛДЫНДА
Құрылғыны суық (қысқы) жағдайда
тасымалдаған немесе сақтаған
кезде оны кемінде үш сағат бөлме
температурасында ұстау керек.
Ылғалдатқыштың ішінде судың іздері
болуы мүмкін – бұл қалыпты құбылыс,
себебі құрылғы сапа бақылауынан өтті.
– Құрылғыны ораудан шығарыңыз және
құрылғының жұмыс істеуіне кедергі болатын
кез-келген жапсырмаларды жойыңыз.
Құрылғының бүлінбегенін тексеріңіз.
Бүлінулер болған жағдайда аспапты іске
қоспаңыз.
– Құрылғыны іске қосу алдында электр
желісінің кернеуі құрылғының жұмыс
кернеуіне сәйкес келетініне көз жеткізіңіз.
Ескерту:
Ылғалдатқышты панажайдағы температура
+10°C-ден +40°C-ге дейін және салыстырмалы
ылғалдылығы 80% төмен болғанда
пайдаланыңыз.
Пайдаланылатын судың температурасы
+40°С-ден жоғары болмауы керек.
15
IM VT-2336.indd 15 28.12.2016 17:46:13
Page 16

ҚазаҚша
Қашықтан басқару пультына (14)
қоректендіру элементтерін орнату
• Бекіткішке басыңыз және пульттың
қоректендіру элементінің ұстауышын
шығарыңыз, үйектілікті қатаң сақтап,
CR2025 қоректендіру элементін орнатыңыз.
• Қоректендіру элементінің ұстауышын
орнына орнатыңыз.
Ескерту: пульттың батареялық бөлігінде
оқшаулайтын аралық қабат болса, аралық
қабатты шығарыңыз.
Қоректендіру элементін ауыстыру
• Бекіткішке басыңыз және пульттың
қоректендіру элементінің ұстауышын
пульттан (14) шығарыңыз, үйектілікті қатаң
сақтап, жаңа CR2025 қоректендіру элементін
орнатыңыз, қоректендіру элементінің
ұстауышын орнына орнатыңыз.
АУА ЫЛҒАЛДАТЫҚЫШЫН ПАЙДАЛАНУ
– Шүмекті (3) шешіңіз.
– Қолсап бекіткішін (12) сағат тіліне
қарсытірелгенге дейін бұраңыз.
– Суға арналған сауыт қолсабынан (4) ұстаңыз
және оны корпустан (13) шешіңіз.
Ескерту:
– қолсапты (4) тек сауытты (2) тасымалдау
үшін пайдаланыңыз;
– қолсапты (4) сауыты (2) орнатылған
ылғалдатқышты тасымалдау үшін
пайдалануға тыйым салынады.
– Сауытты (2) төңкеріңіз, қақпақты (6) сағат
тіліне қарсы тірелгенге дейін бұрап, оны
шешіңіз.
– Сауытты (2) судың қажетті көлемімен
толтырыңыз, қақпақты (6) құятын саңылауға
(5) салыңыз және оны сағат тілі бойынша
тірелгенге дейін бұраңыз.
– Алдымен толтырылыған сауытты (2), содан
кейін – шүмекті (3) орнына орнатыңыз,
– Бекіткіш қолсабын (12) сағат тілі бойынша
тірелгенге дейін бұрап, сауытты (2)
ылғалдатқыш корпусында (13) бекітіңіз.
– Жұмыс камерасы (9) суға толғанға дейін
біршама уақыт күтіңіз.
– Егер сіз хош иістендіру қызметін пайдаланғыңыз
келсе, «Aroma» контейнеріне (8) басыңыз және
оны шығарыңыз. Фетрге бірнеше тамшы
суға еритін хош иісті майды тамызыңыз
және «Aroma» контейнеріне (8) бекіткіш
шыртылына дейін басып, оны орнына
орнатыңыз.
Ескерту:
– Суға еритін майларды ғана пайдаланыңыз.
– Егер сіз хош иістендіру қызметін
пайдалануды жоспарламасаңыз, фетрді
контейнерден (8) шығарыңыз, оны жуыңыз
және орнына орнатыңыз.
– Желілік баудың айырететігін эленктрлік
ашалыққа салыңыз, дыбыстық сигнал
шығады, және басқару тақтасының (1)
дисплейінде температура (18) және
салыстырмалы ылғалдылық (22) мәндері
көрсетіледі.
Ескерту: - панажайдағы температура және
ылғалдылық деңгейі әр 15 минут сайын
өлшенеді.
– Батырманы (16) басып, құрылғыны іске
қосыңыз. Дыбыстық сигнал шығады,
құрылғы іске қосылады және «будың»
максималды шығу қырқындылығында
жұмыс істей бастайды, осы кезде дисплейдің
жарықтылығы артады және одан «будың»
шығу қарқындылығының таңбалары (23)
көрсетіледі.
Ескерту: - белгіленген жұмыс режиміне
байланыссыз, басқару батырмаларына соңғы
қол тигізгеннен кейін дисплейдің жануының
жарықтығы 15 секундтан кейін төмендейді.
– Сіз «будың» шығу бағытын шмекті (3)
әртүрлі бағытта бұрап ретке келтіре аласыз.
– Ауа ылғалдатқышының жұмысын аяқтау
үшін іске қосу/сөндіру батырмасына (16)
қайталап қолыңызды тигізіңіз.
– Желілік баудың айыртетігін электрлік
ашалықтан шығарыңыз.
Ескерту:
– басқару тақтасындағы (1) жұмыс
режимдерінің батырмалары сенсорлы,
қажетті режимді іске қосу үшін батрмаға
қол тигізу жеткілікті;
– ылғалдылық деңгейінің көрсетілімдері (22)
басқа гинрометрл\дің көрсетілімдерінен
өзгеше болуы мүмкін;
– ылғалдылық деңгейінің көрсетілімдері
панажайдағы ауа температурасына
байланысты болады;
– панажайдағы ызғырықтар мен басқа
ауа ағындары ауа ылғалдылығы мен
температурасының көрсетілімдеріне
бірталай әсерін тигізе алады;
– ылғалдылық бергіші (10) желілік бауда
(11) бекітіледі, жұмыс уақытында бергіш
(10) корпусындағы саңылаулар бөтен
заттармен жыблмауын қадағалаңыз.
16
IM VT-2336.indd 16 28.12.2016 17:46:13
Page 17

ҚазаҚша
БАСҚАРУ ТАҚТАСЫНДАҒЫ (1) ЖӘНЕ
ҚАШЫҚТАН БАСҚАРУ ПУЛЬТЫНДАҒЫ (14)
БАТЫРМАЛАР
Іске қосу/сөндіру батырмасы (16).
– Құрылғыны іске қосу үшін батырмаға (16)
қол тигізіңіз/басыңыз (ҚБ пультында),
құрылғыны сөндіру үшін тағы да батырмаға
(16) қол тигізіңіз/басыңыз.
«Будың» шығу қарқындылығын белгілеу
тақтасы (15)
– Ауа ылғалдатқышын іске қсоқаннан кейін
Сіз «бу» шығуының қажетті қарқындылығын
белгілей аласыз. Бұл үшін тақтаның (15)
қажетті жеріне саусағыңызды тигізіңіз
немесе тақта (15) бойынша саусақпен
жүргізіңіз, «будың» шығу қарқындылығы
дисплейде таңбалармен (23) көрсетіледі.
– «Будың» шығуының қажетті қарқындылығын
қашытан басқару пультынан белгілеу үшін
батырманы (15) басыңыз.
– Қажетті ылғалдылық деңгейіне жеткенде
ылғалдатқыш сөнеді, ылғалдылық деңгейі
төмендегенде аспап қайтадан іске қосылады,
осылайша панажайдағы белгіленген
ылғалдылықтың сақталуы жүзеге асады.
– Белгіленген ылғалдылықты сақтау режимін
сөндіру үшін дисплейде «СО» таңбалары
көрсетілгенше батырмаға (24) қол тигізіңіз/
басыңыз, ылғалдылықты сақтау режимі
сөнеді және дисплейде панажайдағы шын
мәніндегі ылғалдылық таңбалары (22)
жанады.
– Белгіленген ылғалдылық мәндерін тексеру
қажет болған кезде батырмаға (24) бір
рет қол тигіңіз/басыңыз, белгіленген
ылғалдылық мәндері (22) дисплейде
көрсетіледі және бес рет жанып-сөнеді,
содан кейін панажайдағы шын мәніндегі
ылғалыдылық (22) көрсетіледі.
Ескерту: панажайдағы ылғалдылық деңгейін
өлшеу әр 15 минут сайын жүзеге асырылады.
Ионизаторды және суға арналған
сауытты көмескілеуді іске қосу/сөндіру
батырмасы (17)
– Батырмаға (17) қол тигізіңіз/басыңыз, кері
иондар генераторы іске қосылады және
дисплейде таңба (20) жанады.
– Ионизация режимін сөндіру үшін
батырмаға (17) қайтадан қол тигізіңіз/
басыңыз, таңба (20) сөнеді.
– Батырмаға (17) қол тигізіңіз/басыңыз және
3 секунд бойы ұстап тұрыңыз, суға арналған
сауыттың (2) көмескілеуі (7) іске қосылады,
суға арналған сауыттың (2) көмескілеуін (7)
сөндіру үшін қайтадан батырмаға (17) қол
тигізіңіз/басыңыз және 3 секунд бойы ұстап
тұрыңыз, көмсекілеу (7) сөнеді.
Панажайдағы салыстырмалы
ылғалдылықты белгілеу батырмасы (24)
– Батырмаға (24) кезектеп қол тигізіп/
басып, сіз панажайдағы салыстырмалы
ылғалдылықтың қажетті деңгейін 30%-дан
75%-ға дейінгі ауқымда 5%-дық қадаммен
белгілей аласыз, ылғалдылық деңгейі
дисплейде таңбалармен (22) көрсетіледі.
– Қажетті ылғалдылық белгіленгеннен кейін
санды көрсетілімдер (22) 5 рет жанып-сөнеді,
содан кейін панажайдағы шын мәніндегі
ылғалдылықтың санды көрсетілімдері (24)
көрсетіледі және «%RH» таңбасы жаныпсөніп тұрады.
Таймердің жұмыс істеу уақытын белгілеу
батырмасы (25)
– Батырмаға (25) кезектеп қол тигізіп/басып,
Сіз таймердің жұмыс істеу уақытын 1-ден
12 сағатқа дейінгі ауқымда 1 сағаттық
қадаммен белгілей аласыз, бұл дисплейде
таңбалармен (19) көрсетіледі.
– Белгіленген уақытқа жеткенде құрылғы
сөнеді.
– Таймерді сөндіру үшін дисплейде
таңбалар (19) сөнгенге дейін батырмаға (25)
қол тигізіңіз/басыңыз.
Судың жеткіліксіз көлемінің көрсетілімі
– Сауытта (2) су біткенде, құрылғы сөнеді,
дыбыстық сигнал шығады, осы кезде
дисплейде қызыл түспен судың бітуінің
таңбасы (21) жанады.
– Құрылғыны батырмамен (16) сөндіріңіз,
шүмекті (3) шешіңіз, бекіткіш қолсабын (12)
сағат тіліне қарсы тірелгенге дейін бұраңыз
және сауытты (2) шешіңіз.
– Сауытты (2) сумен толтырыңыз («АУА
ЫЛҒАЛДАТҚЫШЫН ПАЙДАЛАНУ» тарауын
қар.).
– Алдымен толтырылыған сауытты (2), содан
кейін – шүмекті (3) орнына орнатыңыз,
бекіткіш қолсабын (12) сағат тілі бойынша
тірелгенге дейін бұрап, сауытты (2) бекітіңіз.
– Құрылғыны келесі пайдалану үшін іске
қосыңыз.
17
IM VT-2336.indd 17 28.12.2016 17:46:13
Page 18

ҚазаҚша
ТАЗАЛАУ ЖӘНЕ КҮТІМ
САҚТАНДЫРУ! Тазалау алдында міндетті
түрде аспапты сөндіріңіз және оны электрлік
желіден ажыратыңыз.
Кермек су жұмыс камерасында (9) және
сауытта (2) минералды шөгінділердің пайда
болуын тудырады, бұл аспап жұмысының
нашарлауына әкеледі. Бұған жол бермеу үшін:
– Тұрмыстық сүзгімен тазартылған суды,
қайнатылған және тұндырылған суды
пайдаланыңыз. Егер су құбыры суы
кермек болса, онда оны дистильденген
сумен 1:1 қатынасында араластыру
ұсынылады. Өте кермек су болғанда оны
дистильденген сумен 1:2 қатынасында
араластырыңыз немесе тек дистильденген
суды пайдаланыңыз.
– Сауыттағы (2) суды аптасына екі рет
ауыстырыңыз.
– Жұмыс камерасы (9) мен сауытты (2)
бейтарап жуғыш заттың ерітіндісімен
аптасына екі рет жақсылап жуыңыз.
– Жұмыс камерасын (9) тазалау алдында
қыздырғыш элементтің қорғаныс қақпағын
шешіңіз.
– «Шашыратқышты» тазалау үшін оған
5-10 тамшы тазартқыш затты тамызыңыз.
Жұмыс камерасын (9) бейтарап жуғыш
заттың ерітіндісімен толтырыңыз,
шамамен 10-15 минут күтіңіз. Жұмсақ
қылшақпен «шашыратқыш» бетінен өңезді
жойыңыз.
– Жұмыс камерасын (9) және сауытты (2)
бірнеше рет шайыңыз. Жұмыс камерасын
(9) жұмсақ матамен сүртіңіз.
– Ылғалдатқыш корпусын (13) жұмсақ сәл
дымқыл матамен сүртіңіз, содан кейін
құрғатып сүртіңіз.
– Ылғалдылық бергіші (10) корпусының
саңылаулары ластанған сайын бергіш (10)
корпусын құрғақ матамен тазалаңыз немесе
сәйкес келетін қылшақты пайдаланыңыз.
Ескерту:
– аспап корпусын (13) суға немесе кез-келген
басқа сұйықтықтарға матырмаңыз;
– «шашыратқышты» және аспап
корпусын (13) тазалау үшін қажайтын
тазалағыш заттарды және еріткіштерді
пайдаланбаңыз;
– «шашыратқышқа» арналған тазалағыш
зат ретінде шайнектердегі қақты жоюға
арналған затты пайдалануға болады,
берліген затты пайдалану бойынша
нұсқаулықтағы ұсыныстарды қатаң
сақтаңыз.
САҚТАУ
– Аспапты сақтауға салып қойғанға дейін,
сауыттан суды төгіңіз және жұмыс камерасы
мен «шашыратқыш» - құрғақ екеніне көз
жеткізіңіз.
– Сауытта немесе жұмыс камерасында
су болғанда аспапты сақтауға тыйым
салынады.
– Ылғалдатқышты құрғақ салқын, балалардың
қолы жетпейтін жерде сақтаңыз.
АҚАУЛЫҚТАРДЫ ЖОЮ
Ақаулық Мүмкін себептері Ақаулықты жою
«Бу» жоқ Құрылғы дұрыс
қосылмаған
Құрылғы іске
Желілік баудың айыртетігі ашалыққа салынғанын
тексеріңіз.
Батырманы (16) басып, құрылғыны іске қосыңыз.
қосылмаған
Сауытта су жоқ
Сауытқа судың жеткілікті көлемін құйыңыз.
немесе су жеткіліксіз
Жұмыс
уақытындағы
бөтен иіс
Алғашқы пайдалану Құрылғыны электр желісінен ажыратыңыз. Сауытты
шешіңіз, қақпақты (6) бұрап алыңыз, сауыттан
суды төгіңіз, сауытты салқын құрғақ жерге 12 сағатқа
қойыңыз.
Лас немесе тұрып
қалған су
Құрылғыны электр желісінен ажыратыңыз, саутты
шешіңіз, қақпақты (6) бұрап алыңыз, сауыттан суды
төгіңіз, сауытты тазалауды жүргізіңіз («Тазалау
және күтім» тарауында жазылғандай), оған таза су
құйыңыз.
18
IM VT-2336.indd 18 28.12.2016 17:46:13
Page 19

ҚазаҚша
Ақаулық Мүмкін себептері Ақаулықты жою
Бөтен шуыл Суға арналған
сауыты дұрыс
орнатылмаған
Сауытта су
жеткіліксіз
Құрылғы түзу
емес бетте
орналастырылған
Суға арналған сауыттың дұрыс орнатылғанын тексеріңіз.
Сауытқа жеткілікті су көлемін құйыңыз.
Құрылғыны түзу бетке орналастырыңыз.
ЖЕТКІЗІЛІМ ЖИНАҒЫ
Ылғалдатқыш – 1 дн.
Қашықтан басқару пульты – 1 дн.
Нұқсаулық – 1 дн.
ТЕХНИКАЛЫҚ СИПАТТАМАЛАРЫ
Электрқорегі: 220-240 В ~ 50 Гц
Тұтынатын қуаты: 30 Вт
Суға арналған сауыт көлемі: 5,5 л
Су шығыны: ≥ 300 мл/ч
Ылғалдау ауданы: 35 м²-ге дейін
Өндіруші аспаптың сипаттамаларын алдынала хабарлаусыз өзгерту құқығын сақтайды
Аспаптың қызмет ету мерзімі – 3 жыл
Гарантиялық мiндеттiлiгi
Гарантиялық жағдайдағы қаралып жатқан
бөлшектер дилерден тек сатып алынған адамға
ғана берiледi. Осы гарантиялық мiндеттiлiгiндегi
шағымдалған жағдайда төлеген чек немесе
квитанциясын көрсетуi қажет.
19
IM VT-2336.indd 19 28.12.2016 17:46:13
Page 20

УКРАЇНЬСКА
ЗВОЛОЖУВАЧ VT-2336 BK
Недостатня вологість у приміщенні негативно
відбивається на здоров’ї людини, домашніх тваринах, рослинах та предметах меблів.
Рекомендований комфортний рівень відносної
вологості повітря у приміщеннях складає від
40% до 60%. Зволожувач VT-2336 BK дозволить поліпшити якість повітря у приміщенні.
ОПИС
1. Панель управління та дисплей
2. Резервуар для води
3. Подвійне сопло виходу «пари»
4. Ручка для перенесення резервуара
для води
5. Отвір для заливання води
6. Кришка резервуара для води
7. Підсвічування резервуару для води
8. Контейнер для ароматичних олій «Aroma»
9. Робоча камера з «розпилювачем»
10. Датчик вологості
11. Мережний шнур
12. Ручка фіксатора резервуара для води
13. Корпус зволожувача
14. Пульт дистанційного управління
Кнопки на панелі управління (1) та на
пульті дистанційного управління (14)
15. Панель/кнопка установлення
інтенсивності виходу «пари»
16. Кнопка увімкнення/вимкнення
17. Кнопка увімкнення/вимкнення режиму
іонізації/підсвічування резервуара для
води
18. Символи відображення температури у
приміщенні
19. Символи відображення часу роботи
таймера
20. Символ увімкнення режиму іонізації
21. Символ закінчення води у резервуарі
22. Символи відносної вологості у приміщенні
23. Символи встановленого режиму
інтенсивності виходу «пари»
24. Кнопка установлення відносної
вологості у приміщенні
25. Кнопка установлення часу роботи
таймера
УВАГА!
Для додаткового захисту доцільно встановити в ланцюзі живлення пристрій захисного вимкнення (ПЗВ) з номінальним
струмом спрацьовування, що не перевищує 30 мА; для установлення ПЗВ зверніться до фахівця.
ЗАХОДИ БЕЗПЕКИ
Перед початком експлуатації електроприладу
уважно прочитайте це керівництво з експлуатації і збережіть його для використання як
довідковий матеріал.
Використовуйте пристрій тільки за його прямим призначенням, як викладено у цьому
керівництві. Неправильне поводження з пристроєм може призвести до його поломки,
завдання шкоди користувачеві або його
майну.
• Перед увімкненням переконайтеся, що
напруга електричної мережі відповідає
робочій напрузі пристрою.
• Встановлюйте пристрій на рівній воло-
гостійкій поверхні. Відстань до стін, інших
предметів меблів і інтер‘єру має бути не
менше 30 см.
• Забороняється встановлювати пристрій
на підлогові покриття з довгим ворсом.
• Не розміщайте зволожувач у місцях, схиль-
них до дії прямих сонячних променів, високих температур, поблизу комп’ютерів або
чутливої електронної техніки.
• Забороняється використовувати пристрій
поза приміщеннями.
• Використовуйте лише ті знімні деталі, які
входять до комплекту постачання.
• Не вмикайте пристрій без води та вими-
кайте його, як тільки у резервуарі закінчиться вода.
• Не використовуйте газовану або забруд-
нену воду, а також парфумерні добавки.
• Температура використовуємої води не має
перевищувати +40°С.
• Не вмикайте пристрій без встановленого
резервуара для води.
• Вимикайте пристрій з електромережі
перед зняттям резервуара для води.
• Не накривайте пристрій.
• Не закривайте присутні отвори на корпусі
пристрою та не допускайте потрапляння у
них сторонніх предметів.
• Не занурюйте корпус пристрою, мережний
шнур або вилку мережного шнура у воду
або будь-які інші рідини.
20
IM VT-2336.indd 20 28.12.2016 17:46:13
Page 21

УКРАЇНЬСКА
• Під час роботи пристрою не переміщайте
та не нахиляйте його, а також не знімайте
резервуар для води.
• Обов’язково вимикайте пристрій з мережі
та виливайте воду з резервуара та робочої камери під час чищення або якщо ви не
користуєтеся зволожувачем.
• Перш ніж перенести пристрій в інше місце,
вимкніть його з електричної мережі та
злийте воду з резервуара для води і робочої камери. При перенесенні пристрою
тримайте його обома руками за корпус.
• Не торкайтеся вилки мережного шнура
мокрими руками.
• Регулярно робіть чищення пристрою.
• Якщо ви не користуватиметься пультом
дистанційного управління протягом тривалого періоду часу, необхідно витягнути
елемент живлення з батарейного відсіку.
• При установленні елементу живлення
строго дотримуйтеся полярності відповідно до позначень.
• Своєчасно заміняйте елемент живлення.
• Не дозволяйте дітям торкатися корпусу
пристрою та мережного шнура під час
роботи пристрою.
• Цей пристрій не призначений для викорис-
тання дітьми.
• Пристрій не призначений для використання
особами (включаючи дітей) зі зниженими
фізичними, психічними та розумовими здібностями або при відсутності у них досвіду
або знань, якщо вони не знаходяться під
контролем або не проінструктовані щодо
використання пристрою особою, відповідальною за їх безпеку.
• Здійснюйте нагляд за дітьми, щоб не допус-
тити використання пристрою як іграшки.
• З міркувань безпеки дітей не залишайте
поліетиленові пакети, що використовуються як упаковка, без нагляду.
Увага! Не дозволяйте дітям грати з поліетиленовими пакетами або пакувальної плівкою.
Небезпека задушення!
• Вимикаючи пристрій з електромережі,
ніколи не смикайте за мережний шнур,
візьміться за мережну вилку і акуратно
витягніть її з електричної розетки.
• Не використовуйте пристрій, якщо є
пошкодження мережного шнура або вилки
мережного шнура, якщо пристрій працює
з перебоями, а також після його падіння.
• Забороняється самостійно ремонтувати
пристрій. Не розбирайте пристрій самостійно, при виникненні будь-яких несправностей, а також після падіння пристрою
вимкніть його з електричної розетки та
зверніться до будь-якого авторизованого
(уповноваженого) сервісного центру за
контактними адресами, вказаними у гарантійному талоні та на сайті www.vitek.ru.
• Перевозьте пристрій лише у заводській
упаковці.
• Для захисту навколишнього середовища
після закінчення терміну служби пристрою
не викидайте його разом з побутовими відходами, передайте пристрій у спеціалізований пункт для подальшої утилізації.
• Зберігайте пристрій у місцях, недоступних
для дітей та людей з обмеженими можливостями.
ПРИСТРІЙ ПРИЗНАЧЕНИЙ ТІЛЬКИ ДЛЯ
ПОБУТОВОГО ВИКОРИСТАННЯ
ПЕРЕД ПЕРШИМ ВИКОРИСТАННЯМ
Після транспортування або зберігання
пристрою в холодних (зимових) умовах
необхідно витримати його при кімнатній
температурі не менше трьох годин.
Всередині зволожувача можуть знаходитися сліди води – це нормальне явище,
оскільки пристрій проходив контроль якості.
– Розпакуйте пристрій та видаліть всі паку-
вальні матеріали та будь-які наклейки, що
заважають роботі пристрою. Огляньте пристрій на предмет пошкоджень. За наявності пошкоджень не вмикайте пристрій.
– Перед увімкненням у мережу переконай-
теся, що напруга електричної мережі відповідає робочій напрузі пристрою.
Примітки:
Використовуйте зволожувач при температурі
у приміщенні від +10° до +40°C та відносній
вологості менше 80%.
Температура використовуємої води не має
бути вище +40°С.
Установлення елементів живлення
у пульт дистанційного управління (14)
• Натисніть на фіксатор та вийміть тримач
елементу живлення з пульта (14), установіть елемент живлення CR2025, строго
дотримуючись полярності.
21
IM VT-2336.indd 21 28.12.2016 17:46:13
Page 22

УКРАЇНЬСКА
• Установіть тримач елементу живлення на
місце.
Примітка: за наявності ізолювальної прокладки у батарейному відсікові пульта витягніть прокладку.
Заміна елементу живлення
• Натисніть на фіксатор та вийміть тримач
елементу живлення з пульта (14), установіть
новий елемент живлення CR2025, строго
дотримуючись полярності,установіть тримач елементу живлення на місце.
ВИКОРИСТАННЯ ЗВОЛОЖУВАЧА ПОВІТРЯ
– Зніміть сопло (3).
– Поверніть ручку фіксатора (12) проти
годинникової стрілки до упору.
– Візьміться за ручку резервуара для води (4)
та зніміть його з корпусу (13).
Примітки:
– використовуйте ручку (4) тільки для пере-
несення резервуара (2);
– забороняється використовувати ручку (4)
для перенесення зволожувача з встановленим на ньому резервуаром (2).
– Переверніть резервуар (2), зніміть
кришку (6), повернувши її проти годинникової стрілки до упору.
– Наповніть резервуар (2) необхідною кіль-
кістю води, вставте кришку (6) у заливальний отвір (5) та поверніть її за годинниковою
стрілкою до упору.
– Установіть на місце спочатку наповнений
резервуар (2), а потім – сопло (3).
– Зафіксуйте резервуар (2) на корпусі зво-
ложувача (13), повернувши ручку фіксатора (12) за годинниковою стрілкою до
упору.
– Почекайте деякий час, поки робоча
камера (9) заповниться водою.
– Якщо ви хочете використовувати функцію
ароматизації, натисніть на контейнер (8)
«Aroma» та вийміть його. Крапніть на фетр
декілька крапель водорозчинної ароматичної олії та установіть контейнер (8) «Aroma»
на місце, натиснувши на нього до клацання
фіксатора.
Примітки:
– використовуйте тільки водорозчинні аро-
матичні олії;
– якщо ви не плануєте використовувати
функцію ароматизації, витягніть фетр з
контейнера (8), промийте його та установіть на місце.
– вставте вилку мережного шнура в елек-
тричну розетку, прозвучить звуковий сигнал, і на дисплеї панелі управління (1)
відобразяться значення температури (18)
та відносної вологості (22).
Примітка: - вимірювання температури та
рівня вологості у приміщенні відбуваються
кожні 15 хвилин.
– Увімкніть пристрій, торкнувшись
кнопки (16). Прозвучить звуковий сигнал,
пристрій увімкнеться та почне роботу на
максимальній інтенсивності виходу «пари»,
при цьому збільшиться яскравість дисплея
і на ньому відобразяться символи інтенсивності виходу «пари» (23).
Примітка: - незалежно від встановленого
режиму роботи після останнього торкання
кнопок управління яскравість світіння дисплея
знизитися через 15 секунд.
– Ви можете регулювати напрямок виходу
«пари», повертаючи сопло (3) у різних
напрямках.
– Для завершення роботи зволожувача
повітря повторно торкніться кнопки увімкнення/вимкнення (16).
– Витягніть вилку мережного шнура з елек-
тричної розетки.
Примітки:
– кнопки режимів роботи на панелі управ-
ління (1) сенсорні, для увімкнення потрібного режиму роботи досить торкнутися
кнопки;
– показання рівня вологості (22) можуть
трохи відрізнятися від показань іншого
гігрометра;
– показання рівня вологості залежать від
температури повітря у приміщенні;
– протяги або інші повітряні потоки можуть
значно впливати на показання вологості та
температури повітря у приміщенні;
– датчик вологості (10) кріпиться на мереж-
ному шнурі (11), наглядайте за тим, щоб
під час роботи отвори на корпусі датчика (10) не були закриті сторонніми
предметами.
22
IM VT-2336.indd 22 28.12.2016 17:46:13
Page 23

УКРАЇНЬСКА
КНОПКИ НА ПАНЕЛІ КЕРУВАННЯ (1)
ТА НА ПУЛЬТІ ДИСТАНЦІЙНОГО
УПРАВЛІННЯ (14)
Кнопка увімкнення/вимкнення (16)
– Торкніться/натисніть (на пульті ДУ)
кнопку (16) для увімкнення пристрою, для
вимкнення пристрою торкніться/натисніть
кнопку (16) ще раз.
Панель установлення інтенсивності
виходу «пари» (15)
– Після увімкнення зволожувача повітря Ви
можете установити необхідну інтенсивність
виходу «пари». Для цього торкніться пальцем панелі (15) у потрібному місці або проведіть пальцем по панелі (15), інтенсивність
виходу «пари» відображатиметься на дисплеї символами (23).
– Для установлення необхідної інтенсив-
ності виходу «пари» з пульта дистанційного
управління натискайте кнопку (15).
Кнопка увімкнення/вимкнення іонізатора
та підсвічування резервуара для води (17)
– Торкніться/натисніть кнопку (17), уві-
мкнеться генератор негативних іонів, і на
дисплеї засвітиться символ (20).
– Для вимкнення режиму іонізації торкніться/
натисніть кнопку (17) ще раз, символ (20)
погасне.
– Торкніться кнопки/натисніть та утримуйте
кнопку (17) протягом 3 секунд, підсвічування (7) резервуара для води (2) увімкнеться, для вимкнення підсвічування
(7) резервуара для води (2) повторно торкніться кнопки/натисніть та утримуйте
кнопку (17) протягом 3 секунд, підсвічування (7) погасне.
Кнопка установлення відносної вологості
у приміщенні (24)
– Послідовно торкаючись/натискаючи
кнопку (24), ви можете установити бажаний рівень відносної вологості у приміщенні у діапазоні від 30% до 75% з кроком
в 5%, рівень вологості відображатиметься
на дисплеї символами (22).
– Після установлення необхідної вологості
цифрові показання (22) блиматимуть
5 разів, після чого відобразяться цифрові
показання (22) реальної вологості у приміщенні та блиматиме символ «%RH».
– При досягненні встановленого рівня воло-
гості зволожувач вимкнеться, при зменшенні рівня вологість пристрій знов
увімкнеться, таким чином здійснюється
підтримання встановленої вологості у приміщенні.
– Для вимкнення режиму підтримання вста-
новленої вологості торкайтеся/натискайте
кнопку (24) до тих пір, поки на дисплеї
не відобразяться символи «CO», режим
підтримання вологості вимкнеться та на
дисплеї відобразяться символи реальної
вологості у приміщенні (22).
– При необхідності перевірки значень вста-
новленої вологості торкніться/натисніть
один раз кнопку (24), значення встановленої вологості (22) відобразяться на дисплеї
та блиматимуть п’ять разів, після чого відобразиться реальна вологість (22) у приміщенні.
Примітка: вимірювання рівня вологості у приміщенні відбуваються кожні 15 хвилин.
Кнопка установлення часу роботи
таймера (25)
– Послідовно торкаючись/натискаючи кноп-
ку (25), Ви можете встановити час роботи
таймера у діапазоні від 1 до 12 годин з кроком в 1 годину, що відображатиметься на
дисплеї символами (19).
– Після досягнення встановленого часу при-
стрій вимкнеться.
– Для вимкнення таймера торкайтеся/натис-
кайте кнопку (25), поки на дисплеї не погаснуть символи (19).
Індикація недостатньої кількості води
– Коли у резервуарі (2) закінчиться вода,
пристрій вимкнеться, звучатимуть звукові
сигнали і на дисплеї засвітиться червоним
кольором символ закінчення води (21).
– Вимкніть пристрій кнопкою (16), зніміть
сопло (3), поверніть ручку фіксатора (12)
проти годинникової стрілки до упору та зніміть резервуар (2).
– Наповніть резервуар (2) водою (див. роз-
діл «ВИКОРИСТАННЯ ЗВОЛОЖУВАЧА
ПОВІТРЯ»).
– Установіть на місце спочатку наповнений
водою резервуар (2), а потім - сопло (3),
зафіксуйте резервуар (2), повернувши
23
IM VT-2336.indd 23 28.12.2016 17:46:13
Page 24

УКРАЇНЬСКА
ручку фіксатора (12) за годинниковою
стрілкою до упору.
– Увімкніть пристрій для подальшої експлу-
атації.
ЧИЩЕННЯ ТА ДОГЛЯД
ПОПЕРЕДЖЕННЯ! Завжди вимикайте пристрій і від’єднуйте його від електромережі
перед чищенням.
Тверда вода викликає з’явлення мінеральних
відкладень у робочій камері (9) та у резервуарі
(2), що призводить до погіршення роботи пристрою. Щоб уникнути цього:
– Використовуйте воду, яка пройшла очи-
щення побутовим фільтром, кип’ячену та
відстояну воду. Якщо водопровідна вода
тверда, то рекомендується змішувати її з
дистильованою водою в співвідношенні
1:1. При дуже твердій воді змішуйте її з
дистильованою водою у співвідношенні 1:2
або використовуйте тільки дистильовану
воду.
– Міняйте воду у резервуарі (2) двічі на тиж-
день.
– Ретельно промивайте робочу камеру (9) та
резервуар (2) розчином нейтрального мийного засобу двічі на тиждень.
– Перед очищенням робочої камери (9) зні-
міть захисну кришку нагрівального елементу.
– Для очищення «розпилювача» крапніть на
нього 5-10 крапель очищувального засобу,
почекайте приблизно 10-15 хвилин. М’якою
щіточкою усуньте наліт з поверхні «роз-
пилювача», після чого промийте робочу
камеру (9) розчином нейтрального мийного засобу.
– Сполосніть декілька разів робочу камеру (9)
та резервуар (2). Протріть робочу камеру
(9) м’якою тканиною.
– Корпус зволожувача (13) протирайте
м’якою, злегка вологою тканиною, після
чого витріть насухо.
– У міру забруднення отворів корпусу дат-
чика вологості (10) очищайте корпус
датчика (10) сухою тканиною або використовуйте відповідну щітку.
Примітки:
– не занурюйте корпус зволожувача (13) у
воду або у будь-які інші рідини;
– не використовуйте для чищення «розпи-
лювача» та корпусу зволожувача (13) абразивні очищувальні засоби та розчинники;
– як очищувальний засіб для «розпилювача»
можна використовувати засіб для усунення
накипу у чайниках, строго дотримуючись
рекомендації в інструкції щодо використання цього засобу.
ЗБЕРІГАННЯ
– Перш ніж забрати пристрій на зберігання,
злийте воду з резервуара та переконайтеся,
що робоча камера та «розпилювач» сухі.
– Забороняється зберігати пристрій з водою
у резервуарі або у робочій камері.
– Зберігайте зволожувач у сухому прохолод-
ному місці, недоступному для дітей.
УСУНЕННЯ НЕСПРАВНОСТЕЙ
Несправність Можливі причини Усунення несправностей
Немає «пари» Неправильне
підмикання пристрою
Перевірте, чи вставлена вилка мережного шнура
у розетку.
Пристрій не увімкнений Увімкніть пристрій, натиснувши кнопку (16) .
Немає води або
Залийте у резервуар достатню кількість води.
недостатньо води у
резервуарі
Сторонній
запах під час
роботи
Перше використання Вимкніть пристрій з електромережі. Зніміть
резервуар, відкрутіть кришку (6), злийте воду
з резервуара для води, помістіть резервуар у
прохолодне сухе місце на 12 годин.
Брудна або застояна
вода
Вимкніть пристрій з електромережі, зніміть
резервуар, відкрутіть кришку (6), злийте воду
з резервуара для води, здійсніть чищення
резервуара (як описано у розділі
«Чищення та догляд»), залийте у нього чисту воду.
24
IM VT-2336.indd 24 28.12.2016 17:46:13
Page 25

УКРАЇНЬСКА
Несправність Можливі причини Усунення несправностей
Сторонній шум Неправильно
встановлений
резервуар для води
Недостатньо води в
резервуарі
Пристрій розміщений
на нерівній поверхні
Перевірте правильність установлення резервуара
для води.
Залийте у резервуар достатню кількість води.
Розмістіть пристрій на рівній стійкій поверхні.
КОМПЛЕКТ ПОСТАЧАННЯ
Зволожувач – 1 шт.
Пульт дистанційного управління – 1 шт.
Інструкція – 1 шт.
ТЕХНІЧНІ ХАРАКТЕРИСТИКИ
Напруга живлення: 220-240 В ~ 50 Гц
Споживальна потужність: 30 Вт
Місткість резервуара для води: 5,5 л
Витрата води: ≥ 300 мл/година
Площа зволоження: до 35 м
Виробник залишає за собою право змінювати
характеристики пристрою без попереднього
повідомлення
2
Термін служби пристрою – 3 роки
Гарантія
Докладні умови гарантії можна отримати в дилера, що продав дану апаратуру.
При пред’явленні будь-якої претензії протягом терміну дії даної гарантії варто пред’явити
чек або квитанцію про покупку.
Даний виріб відповідає вимогам до електромагнітної сумісності, що пред’являються директивою
2004/108/ЕС Ради Європи й розпорядженням 2006/95/ЕС по низьковольтних апаратурах.
25
IM VT-2336.indd 25 28.12.2016 17:46:13
Page 26

КЫРГЫЗ
НЫМДАТКЫЧ VT-2336 BK
Имараттын ичиндеги төмөндөгөн нымдуулук
адамдын, үй жаныбарлардын ден соолугуна,
өсүмдүктөрдүн, эмеректин абалына
негативдүү таасирин эткизет. Имараттандын
ичиндеги рекомендацияланган абанын жайлуу
салыштырмалуу нымдуулугунун деңгээли
40%-60% түзөт. VT-2336 BK нымдаткычы
имараттын ичиндеги абанын сапатын өзгөртүү
мүмкүнчүлүгүн берет.
СЫПАТТАМА
1. Башкарма панели менен дисплей
2. Суу куюла турган резервуары
3. «Буу» чыгуучу эки жактуу чоргосу
4. Суу куюла турган резервуарынын көтөрүп
ташуу үчүн туткасы
5. Суу куюу үчүн тешиги
6. Суу куюла турган резервуардын капкагы
7. Суу куюла турган резервуардын жарыгы
8. «Aroma» жыттуу майлар үчүн контейнери
9. «Чаңдаткычы» менен жарыгы бар иштөө
камерасы
10. Нымдуулук билдиргичи
11. Электр шнуру
12. Суу куюла турган резервуардын
бекитмесинин туткасы
13. Нымдаткычтын корпусу
14. Аралыктан башкаруу пульту
Башкаруу панелинин (1) жана башкаруу
пультунун (14) баскычтары
15. «Буу» чыгуунун интенсивдүүлүгүн таңдоо
панели/баскычы
16. Өчүрүү/күйгүзүү баскычы
17. Ионизация режимин/суу резервуарынын
жарыгын кошуу/өчүрүү баскычы
18. Имараттагы температуранын белгилери
19. Таймердин иштөө мөөнөтүнүн белгилери
20. Ионизация режимин иштетүү белгиси
21. Резервуардагы суу түгөнгөндүн белгиси
22. Имараттагы салыштырмалуу нымдуулуктун
белгилери
23. Коюлган «буу» чыгуунун интенсивдүүлүктүн
белгилери
24. Имараттагы салыштырмалуу нымдуулукту
коюу баскычы
25. Таймердин иштөө мөөнөтүн коюу
баскычы
КӨҢҮЛ БУРУҢУЗДАР!
Кошумча коргонуу үчүн электр тармагында
потенциалдуу иштеткен тогу 30 мА
ашырбаган коргоп өчүрүүчү аспабын
орнотулушу максатка ылайыктуу. Аспапты
орнотуу үчүн адиске кайрылыңыз.
КООПСУЗДУК ЧАРАЛАРЫ
Электр шайманды пайдалануудан мурун
колдонмону көңүл коюп окуп-үйрөнүп,
маалымат катары сактап алыңыз.
Шайманды тике дайындоо боюнча гана,
ушул колдонмодо жазылганга ылайыктуу
колдонуңуз. Шайманды туура эмес
пайдалануу анын бузулуусуна, колдонуучуга
же колдонуучунун мүлкүнө зыян келтирүүгө
алып келиши мүмкүн.
• Шайманды иштеткенден мурун шаймандын
иштөөчү чыңалуусу электр тармагынын
чыңалуусуна ылайык болгонун текшерип
алыңыз.
• Шайманды тегиз суу өткөзбөс беттин үстүнө
коюңуз. Шайман менен дубалдардын,
эмерек жана интерьер буюмдарынын
аралыгы 30 см. кем эмес болуу зарыл.
• Шайманды түгү узун жертамадагы
килемдердин үстүнө коюуга тыюу салынат.
• Нымдаткычты тике күн нурунун, жогорку
температуралардын таасири бар жерлерге,
комьпютер же сезгич электрондук
аспаптардын жанында жайгашпаңыз.
• Шайманды имараттардын сыртында
колдонууга тыюу салынат.
• Жыйынтыгына кирген чечилүүчү бөлүктөрүн
гана колдонуңуз.
• Шайманды суусыз иштетпеңиз, резервуарда
суусу түгөнгөн болсо, шайманды токтоосуз
өчүрүңүз.
• Газдалган же кирделген сууну жана
парфюмерия кошумчаларын колдонбоңуз.
• Колдонулган суунун температурасы +40°С
ашпоо зарыл.
• Суу куюлуучу резервуары орнотулбаган
шайманды иштетпеңиз.
• Суу коюлуучу резервуарын чечүүнүн алдында
шайманды электр тармагынан ажыратыңыз.
• Шаймандын үстүн жаппаңыз.
• Шаймандын корпусундагы тешиктерди
жаппай, аларга башка буюмдар түшүүсүнө
жол бербеңиз.
• Шаймнадын корпусун, электр шнурун
же кубаттучу сайгычын сууга же башка
суюктуктарга салбаңыз.
• Шайман иштегеп турган мезгилинде аны
жылдырбай, эңкейтпеңиз да суу куюлуучу
резервуарын чечпеңиз.
26
IM VT-2336.indd 26 28.12.2016 17:46:13
Page 27

КЫРГЫЗ
• Нымдаткычты тазалоонун алдында же
көпкө чейин колдонбогон учурда шайманды
электр тармагынан милдеттүү түрдө
ажыратып, резервуарындагы жана иштөө
камерасындагы сууну төгүңүз.
• Шайманды башка жерге ташуунун
алдында аны электр тармагынан
ажыратып, резервуарындагы жана иштөө
камерасындагы сууну төгүңүз. Шайманды
ташыганда, эки колуңуз менен корпусунан
кармап көтөрүңүз.
• Кубаттуучу сайгычын суу колуңуз менен
тийбеңиз.
• Шайманды мезгилдүү түрдө тазалап туруңуз.
• Аралыктан башкаруу пульттун көп убакытка
чейин колдонбой турсаңыз, кубаттандыруу
элементин батарея отсегинен чыгаруу
зарыл.
• Кубаттандыруу элементин орноткондо
белгилерине ылайыктуу полярдуулугун
сактаңыз.
• Кубаттандыруу элементин убактылуу түрдө
алмаштырыңыз.
• Шайман иштеп турган учурда балдарга
шаймандын корпусун жана электр шнурун
тийүүгө уруксат бербеңиз.
• Бул шайман балдар колдонгону үчүн
арналган эмес.
• Бул шайман дене күчү, сезими же акыл-
эси жагынан жөндөмдүүлүгү төмөн (ошонун
ичинде балдар да) адамдар же колдонуу
боюнча тажрыйбасы же билими жок болгон
адамдар, эгерде алардын коопсуздугуна
жооптууу адам аларды көзөмөлдөп
же шайманды колдонуу жөнүндө
инструкциялаган болбосо, колдонуу үчүн
ылайыкташтырылбаган.
• Шайманды оюнчук катары колдонбоо үчүн
балдарга көз салыңыз.
• Балдардын коопсуздугу үчүн таңгак катары
колдонулган полиэтилен баштыктарды
кароосуз таштабаңыз.
Көңүл буруңуздар! Полиэтилен баштыктар
же таңгак пленкасы менен ойногонго
балдарга уруксат бербеңиз! Тумчуктуруунун
коркунучу бар!
• Шайманды электр тармагынан сурганда
шнурду кармап эч качан тартпаңыз, сайгычын
кармап, акырын розеткасынан чыгарыңыз.
• Электр шнурунун, кубаттуучу сайгычынын
бузулуулары бар болсо, шайман иштепиштебей турса же кулап түшсө аны
иштетпеңиз.
• Шайманды өз алдынча оңдогонго тыюу
салынат. Шайманды өз алдынча ажыратпай,
ар кыл бузулуулар пайда болгон же
шайман кулап түшкөн учурларда аны
розеткадан суруп, кепилдик талонундагы же
www.vitek.ru сайтындагы тизмесине кирген
автордоштурулган (ыйгарым укуктуу) тейлөө
борборуна кайрылыңыз.
• Шайманды заводдук таңгагында гана
транспорттоо зарыл.
• Айлана чөйрөөну сактоо максатында
шаймандын кызмат мөөнөтү бүткөндөн
кийин аны турмуштук калдыктары менен
чогу ыргытпай, утилизациялоо үчүн
адистештирилген пунктуна тапшырыңыз.
• Шайманды балдар жана жөндөмдүүлүгү
төмөн болгон адамдар жетпеген кургак
салкын жеринде сактаңыз.
АСПАП ТУРМУШ-ТИРИЧИЛИК КОЛДОНУУГА
ГАНА АРНАЛГАН
БИРИНЧИ КОЛДОНУУНУН АЛДЫНДА
Муздак (кыш) шарттарда шайманды
транспорттоодон же сактоодон кийин
аны үч сааттан кем эмес мөөнөткө үй
температурасында сактоо зарыл.
Нымдаткычтын ичинде суунун тактары
болгону мүмкүн – бул нормалдуу көрүнүш,
себеби шайман сыпат контролдон өткөн.
– Шайманды таңгактан чыгарып, таңгак
материалдарын жана шаймандын
иштөөсүнө тоскоолдук кылган ар кандай
чаптамаларды сыйрып алыңыз. Шаймандын
бүтүндүгүн текшерип алыңыз. Бузулуулары
бар болсо, шайманды иштетпеңиз.
– Шайманды электр тармагына кошуунун
алдына иштөө чыңалуусу электр
тармагындагы чыңалуусуна ылайык болгонун
текшерип алыңыз.
Эскертүү:
Нымдаткычты температурасы +10°C-тан
+40°C-ка чейин жана салыштырмалу нымдуулугу
80%-тен кем болгон имараттарда колдонуңуз.
Колдонгон суунун температурасы +40°С
ашык болбоо зарыл.
Аралыктан башкаруу пультуна (14)
кубаттандыруу элементин орнотуу
• Бекитмени басып, кубаттандыруу
элементинин кармагычын пульттун(14)
ичинен чыгарып, CR2025 кубаттандыруу
элементин полярдуулугун сактап орнотуңуз.
27
IM VT-2336.indd 27 28.12.2016 17:46:14
Page 28

КЫРГЫЗ
• Кубаттандыруу элементинин кармагычын
ордуна орнотуңуз.
Эскертүү: батарея отсегинде изоляциялоо
катмары бар болсо, ал катмарды чыгарыңыз.
Кубаттандыруу элементин алмаштыруу
• Бекитмени басып, кубаттандыруу
элементинин кармагычын пульттун (14)
ичинен чыгарып, жаңы CR2025 кубаттандыруу
элементин полярдуулугун сактап орнотуңуз,
кубаттандыруу элементинин кармагычын
ордуна орнотуңуз.
АБА НЫМДАТКЫЧТЫН КОЛДОНУУ
ЭРЕЖЕЛЕРИ
– Чоргону (3) чечиңиз.
– Бекитменин туткасын (12) саат жебесинин
багытына каршы токтогонуна чейин
бураңыз.
– Суу куюлуучу резервуарынын туткасынан
(4) кармап, аны корпустан (13) чечиңиз.
Эскертүү:
– тутканы (4) резервуарды (2) көтөрүп
ташуу үчүн гана колдонуңуз;
– резервуары (2) орнотулган нымдаткычты
көтөрүү үчүн тутканы (4) колдонууга
тыюу салынат.
– Резервуарды (2) көмкөрүп, капкагын (6) саат
жебесинин багытына каршы токтогонуна
чейин бурап ачыңыз.
– Резервуарды (2) суунун керектүү өлчөмү
менен толтуруп, капкагын (6) суу куюу үчүн
тешигине (5) орнотуп, саат жебесинин
багыты боюнча токтогонуна чейин бурап
жабыңыз.
– Биринчи толтурулган резервуарды (2),
андан кийин чоргосун (3) ордуна орнотуңуз.
– Бекитменин туткасын (12) саат жебесинин
багыты боюнча токтогонуна чейин бурап,
резервуарды (2) нымдаткычтын корпусунда
(13) бекитип алыңыз.
– Иштөө камерасы (9) суу менен толтурулганга
чейин бир аз күтүңүз.
– Ароматизациялоо функциясын колдонсоңуз,
«Aroma» жыттуу майлар үчүн контейнерин
(8) басып чыгарыңыз. Сүлгүсүнө сууга
эритүүчү жыттуу майдын бир нече тамчысын
тамсылап, «Aroma» контейнерин (8) ордуна
коюңуз да бекитмеси тырс эткенине чейин
үстүнө басып туруңуз.
Эскертүү:
– сууга эритүүчү жыттуу майларын гана
колдонуңуз;
– ароматизациялоо функциясын колдонбосоңуз,
сүлгүнү контейнерден (8) чыгарып, жууп
ордуна коюңуз;
– Электр шнурунун сайгычын розеткага сайыңыз,
үн белгиси чыгып, башкаруу панелинин
дисплейинде (1) температурасы (18) менен
салыштырмалуу нымдуулугунун (22)
белгилери пайда болот.
Эскертүү: - имараттын ичиндеги
температурасы жана салыштырмалуу
нымдуулугу ар 15 минутанын ичинде өлчөлөнөт.
– Баскычын (16) тийип, шайманды иштетиңиз.
Үн белгиси чыгып шайман күйүп «буунун»
эң жогорку интенсивдүүлүгү менен иштеп
баштайт, ошол учурда дийплейдин жарыгы
көбөйүп, «буунун» интенсивдүүлүктүн
белгилери (23) пайда болот.
Эскертүү: - коюлган иштөө режимине
карабастан, баскычтарды акыркы жолу
тийүүдөн кийин 15 секунда өткөндө
дисплейдин жарыктыгы төмөндөйт.
– Сиз «буу» чыгуунун тарабын чоргосун (3) ар
кайсы жака бурап жөндөтсөңүз болот.
– Шайманды өчүрүү үчүн өчүрүү/күйгүзүү
баскычты (16) кайрадан тийиңиз.
– Электр шнурунун сайгычын розеткадан
суруңуз.
Эскертүү:
– башкаруу панелиндеги (1) баскычтары
сенсордук, керектүү режимин иштетүү үчүн
баскычты тийүү гана жетиштүү болот;
– нымдуулук деңгээлдин көрсөткүчтөрү (22)
башка гигрометрдин көрсөткүчтөрүнөн
бир аз айырмаланышы мүмкүн;
– нымдуулук деңгээлинин көрсөткүчтөрү
имараттагы температурасынан
байланышкан;
– өтмө шамал же башка аба агымдары
имараттагы абанын нымдуулугу жана
температурасынын көрсөткүчтөрүнө чоң
таасирин тийгизет;
– нымдуулук сенсору (10) электр шнурунда
(11) жайгашкан, иштеп турган мезгилинде
сенсордун (10) корпусундагы тешиктери
башка нерселер менен тосулбаганын
байкап туруңуз.
БАШКАРУУ ПАНЕЛИНДЕГИ (1) ЖАНА
АРАЛЫКТАН БАШКАРУУ ПУЛЬТУНДАГЫ
(14) БАСКЫЧТАРЫ
Өчүрүү/күйгүзүү баскычы (16).
– Шайманды иштетүү үчүн баскычты (16)
тийиңиз/басыңыз (башкаруу пультунда),
28
IM VT-2336.indd 28 28.12.2016 17:46:14
Page 29

КЫРГЫЗ
шайманды өчүрүү үчүн баскычын (16)
кайрадан тийиңиз/басыңыз.
«Буу» чыгуунун интенсивдүүлүгүн коюу
панели (15)
– Нымдаткычты иштетип, «буу» чыгуунун
керектүү интенсивдүүлүгүн койсоңуз болот.
Ал үчүн панелди (15) керектүү жеринде
бармагыңыз менен тийип, же бармагыңызды
панелден (15) өткөзүп алыңыз, «буу»
чыгуунун интенсивдүүлүгү дисплейдеги
белгилери (23) менен көрсөтүлөт.
– «Буу» чыгуунун керектүү интенсивдүүлүгүн
аралыктан башкаруу пультунан коюу үчүн
баскычты (15) бир нече жолу басыңыз.
Ионизатор жана суу резервуарынын
жарыгын кошуу/өчүрүү баскычы (17)
– (17) баскычына тийип/ баскычын басып терс
заряддуу иондордун генераторун кошуңуз,
дисплейде (20) белгиси жанат.
– Ионизация режимин өчүрүү үчүн дагы бир
жолу (17) баскычына тийиңиз/баскычын
басыңыз, (20) белгиси өчөт.
– (17) баскычына тийиңиз/баскычын басып
3 секунда ичинде кармап туруңуз, суу
резервуарынын (2) жарыгы (7) жанат, суу
резервуарынын (2) жарыгын (7) өчүрүү үчүн
дагы бир жолу (17) баскычына тийиңиз/
баскычын басып 3 секунда ичинде кармап
туруңуз, жарык (7) өчөт.
Имараттагы салыштырмалуу нымдуулукту
коюу баскычы (24)
– Баскычты (24) бир нече жолу тийип/басып
сиз имаратта 30%-75% диапазонундагы
салыштырмалуу нымдуулуктун керектүү
деңгээлин койсоңуз болот, коюлуу кадамы
5%, нымдуулуктун деңгээли дисплейдеги
белгилери (22) менен көрсөтүлөт.
– Керектүү нымдуулуктун деңгээли
коюлгандан кийин цыфралуу көрсөткүчтөрү
(22) 5 жолу күйүп-өчүп, имараттагы кезектүү
нымдуулуктун цыфралуу көрсөткүчү (22)
көрсөтүлүп «%RH» белгиси пайда болот.
– Коюлган нымдуулук деңгээлине жеткенде
нымдаткыч өчөт, нымдуулуктун деңгээли
төмөндөгөндө шайман кайрадан иштейт,
ошентип имараттын ичинде коюлган
нымдуулуктун деңгээли сакталып турат.
– Коюлган нымдуулукту сактоо режимин
өчүрүү үчүн дисплейде «CO» белгилери
пайда болгонго чейин баскычын (24)
тийиңиз/басыңыз, нымдуулуктун деңгээлин
сактоо режими өчүп, дисплейде имараттын
ичиндеги реалдуу нымдуулуктун
көрсөткүчтөрү (22) пайда болот.
– Коюлган нымдуулуктун деңгээлин текшерүү
керек болгондо баскычын (24) бир жолу
тийиңиз/басыңыз, коюлган нымдуулуктун
көрсөткүчтөрү (22) дисплейде көрсөтүлүп,
беш жолу күйүп-өчөт, андан кийин
имараттын ичиндеги реалдуу нымдуулугу
(22) көрсөтүлөт.
Эскертүү: имараттын ичиндеги нымдуулуктун
деңгээли ар 15 минутанын ичинде ченелет.
Таймердин иштөө мөөнөтүн коюу
баскычы (25)
– Баскычты (25) бир нече жолу тийип/басып,
сиз 1-12 саат диапазонундагы 1 саат кадамы
менен таймердин керектүү иштөө мөөнтүн
койсоңуз болот, бул дисплейде белгилери
(19) аркылуу көрсөтүлөт.
– Коюлган мөөнөт бүткөндө шайман өчөт.
– Таймерди өчүрүү үчүн дисплейде белгилери
(19) өчкөнгө чейин баскычты (25), тийиңиз/
басыңыз.
Суу аз болгонун индикациялоо
– Резервуардагы (2) суусу түгөнгөндө шайман
өчуп, үн сигналдары чыгып, дисплейде
суусу түгөнгөндүн индикатору (21) кызыл
болуп күйөт.
– Шайманды баскычы (16) менен өчүрүп,
чоргосун (3) чечип, бекитменин туткасын (12)
саат жебенин багытына каршы токтогонуна
чейин бурап, резервуарды (2) алып салыңыз.
– Резервуарын (2) суу менен толтуруңуз
(«АБА НЫМДАТКЫЧТЫН КОЛДОНУУ
ЭРЕЖЕЛЕРИ» бөлүмүн караңыз).
– Биринчи суу менен толтурулган резервуарын
(2), андан кийин чоргосун (3) ордуна коюп,
бекитменин туткасын (12) саат жебесинин
багыты боюнча токтогонго чейин бурап,
резервуарын (2) бекитип алыңыз.
– Шайманды кайрадан иштетиңиз.
ТАЗАЛОО ЖАНА ТЕЙЛӨӨ
ЭСКЕРТҮҮ! Тейлөөнүн алдында ар дайым
шайманды өчүрүп, электр тармагынан
чыгарыңыз.
Катуу суу иштөө камерасында (9) жана
резервуарында (2) ) минералдуу катмарларын
жаратат, бул нымдаткычтын иштегенин
начарлатат. Андай болбоо үчүн:
29
IM VT-2336.indd 29 28.12.2016 17:46:14
Page 30

КЫРГЫЗ
– Турмуш-тиричилик чыпкасынан өткөн,
кайнатылган же тундурган сууну
колдонуңуз. Суу түтүктөгү суу «катуу»
болсо аны дистилляцияланган суу менен
1:1 ара катышында кошуу зарыл. Суу
абдан катуу болсо, аны дистилляцияланган
суу менен 1:2 ара катышында кошуп же
дистилляцияланган сууну гана колдонуңуз.
– Резервуардагы (2) сууну бир жумада эки
жолу алмаштырыңыз.
– Жумада эки жолу иштөө камерасын (9)
жана резервуарын (2) нейтралдуу жуучу
каражаттын эритмеси менен жакшылап
жууңуз.
– Иштөө камерасын (9) тазалоо үчүн ысытуу
элементинин коргоо капкагын чечиңиз.
– «Чаңдаткычын» тазалоо үчүн анын үстүнө
тазалоочу каражаттын 5-10 тамчыны
тамчылап 10-15 минутага жакын күтүңүз.
Жумушак щеткасы менен «чаңдаткычтын»
үстүндөгү жука минералдуу кабатын кетириңиз
да иштөө камерасын (9) нейтралдуу жуучу
каражаттын эритмеси менен жууңуз.
– Иштөө камерасын (9) жана резервуарын
(2) бир нече жолу чайкап салыңыз. Иштөө
камерасын (9) жумушак чүпүрөк менен
сүртүңүз.
БУЗУЛУУЛАРДЫ ЖОЮУ
Бузулуу Мумкун себептери Бузулууну жоюу
«Буу» чыкпай
турат
Шайман тармакка
туура эмес кошулган
Шайман иштетилген
Электр шнурунун сайгычы розеткага сайылганын
текшериңиз.
Баскычын (16) басып шайманды иштетиңиз
эмес
Резервуардагы суусу
Резервуарга жетиштүү суунун көлөмүн куюңуз.
жок же аз
Шайман иштеп
турганда
башкача жыт
чыгат
Шайманды биринчи
иштетүүсү
Кир же көпкө туруп
калган суу
Шайманды электр тармагынан чыгарыңыз.
Резервуарын чечип, капкагын (6), алыңыз, суу
резервуарынан суусун төгүп, резервуарды 12 саатка
кургак салкын жерге коюңуз.
Шайманды электр тармагынан чыгарыңыз.
Резервуарын чечип, капкагын (6) чечип, суу
резервуарынан суусун төгүп, резервуарды тазалап
алыңыз («Тазалоо жана тейлөө» бөлүмүндө
жазылгандай), анын ичине таза сууну куюңуз.
Башкача
дүрүлдөө
Суу резервуары туура
эмес орнотулган
Суу резервуары туура орнотулганын текшериңиз.
Резервуардагы суусу азРезервуарга жетиштүү сууну куюңуз.
– Нымдаткычтын корпусун (13) бир аз нымдуу
чүпүрөк менен сүртүп, кургатып сүртүңүз.
– Нымдуулуктун билгизгичинин (10)
корпусунун тешиктери кир болгондо,
билгизгичтын корпусун (10) кургак чүпүрөк
менен же ылайыктуу щетка менен тазалап
туруңуз.
Эскертүү:
– нымдаткычтын корпусун (13) сууга же
башка суюктуктарга салбаңыз;
– «Чаңдаткычты» жана шаймандын корпусун
(13) тазалоо үчүн абразивдүү каражаттарды
же эриткичтерди колдонбоңуз;
– «Чаңдаткычты» тазалоо үчүн чайнектеги
кебээни кетирүүчү каражатын анын
колдонмосуна ылайык колдонсоңуз болот.
САКТОО
– Шайманды сактоо үчүн алып койгондон
мурун резервуардан суусун төгүп, иштөө
камерасы жана «чаңдаткычы» кургак
болгонун текшериңиз.
– Иштөө камерасында жана резервуарында
суусу болсо шайманды сактоого тыюу
салынат.
– Нымдаткычты балдар жетпеген кургак
салкын жерде сактаңыз.
Шайман тегиз эмес
Шайманды тегиз, туруктуу жерде орнотуңуз.
жерде орнотулган
30
IM VT-2336.indd 30 28.12.2016 17:46:14
Page 31

КЫРГЫЗ
ЖАБДЫКТЫН ЖЫЙЫНТЫГЫ
Нымдаткыч – 1 даана.
Аралыктан башкаруу пульту – 1 даана.
Колдонмо – 1 даана.
ТЕХНИКАЛЫК МҮНӨЗДӨМӨСҮ
Кубаттандыруу чыңалуусу: 220-240 В ~ 50 Гц
Иштетүүчү кубаттуулугу: 30 Вт
Суу үчүн резервуарынын көлөмү: 5,5 л
Суунун чыгашасы: ≥ 300 мл/с
Нымдатуу аянты: до 35 м
2
чейин
Өңдүрүүчү шаймандардын мүнөздөмөлөрүн
алдын ала эскертпей өзгөртүү укугун
сактайт
Шаймандын кызмат мөөнөтү – 5 жыл
Кепилдик
Кепилдик берүү шарттары тууралуу толук
маалыматтар буюмду саткан сатуучудан алууга
болот. Кепилдик шарттарына ылайык талап
кылып сатылган товарга чек же дүмүрчөктү
көрсөтүү керек.
31
IM VT-2336.indd 31 28.12.2016 17:46:14
Page 32

GB
A production date of the item is indicated in the serial number on the technical data plate. A serial number is
an eleven-unit number, with the first four figures indicating the production date. For example, serial number
0606ххххххх means that the item was manufactured in June (the sixth month) 2006.
RUS
Дата производства изделия указана в серийном номере на табличке с техническими данными. Серийный
номер представляет собой одиннадцатизначное число, первые четыре цифры которого обозначают дату
производства. Например, серийный номер 0606ххххххх означает, что изделие было произведено в июне
(шестой месяц) 2006 года.
KZ
Бұйымның шығарылған мерзімі техникалық деректері бар кестедегі сериялық нөмірде көрсетілген. Сериялық
нөмір он бір саннан тұрады, оның бірінші төрт саны шығару мерзімін білдіреді. Мысалы, сериялық нөмір
0606ххххххх болса, бұл бұйым 2006 жылдың маусым айында (алтыншы ай) жасалғанын білдіреді.
UA
Дата виробництва виробу вказана в серійному номері на табличці з технічними даними. Серійний номер
представляє собою одинадцятизначне число, перші чотири цифри якого означають дату виробництва.
Наприклад, серійний номер 0606ххххххх означає, що виріб був виготовлений в червні (шостий місяць)
2006 року.
KG
Буюм иштеп чыгарылган датасы сериялык номурунда техникалык маалыматтар жадыбалында көрсөтүлгөн.
Сериялык номуру он бир орундуу сан болот, анын биринчи төрт саны өндүрүш датасын көрсөтөт.
Мисалы, сериялык номуру 0606ххххххх болгон буюм 2006 жылдын июнинде (алтынчы айында) өндүрүлгөн.
ЗАПРЕЩЕНО УТИЛИЗИРОВАТЬ
С БЫТОВЫМ МУСОРОМ.
ОБРАТИТЕСЬ НА СООТВЕТСТВУЮЩИЙ
ПУНКТ ПЕРЕРАБОТКИ ЭЛЕКТРИЧЕСКОГО
И ЭЛЕКТРОННОГО ОБОРУДОВАНИЯ.
IM VT-2336.indd 32 28.12.2016 17:46:14
 Loading...