

Page 1
VITEK
Mighty Dome
Color Dome Camera Series
• 480 and 550 TV Line versions
• True Day/Night function available
• Flush or Surface Mount
• UTP interface, IP Integration, and Heater / Blower Options
Available
• Dual Voltage 12VDC & 24VAC
• Infinity Ball Mount for Any Viewing Angle
• Indoor and Vandal Proof IP 68 Rated Models Available
• Lens options include: 2.9-10mm & 9-22mm
• Available in off white or black color
Page 2
1
BOX CONTENTS
MOUNTING ACCESSORIES
1) Dome Camera
2) Mounting Accessories
3) Instruction Manual & Mounting Template
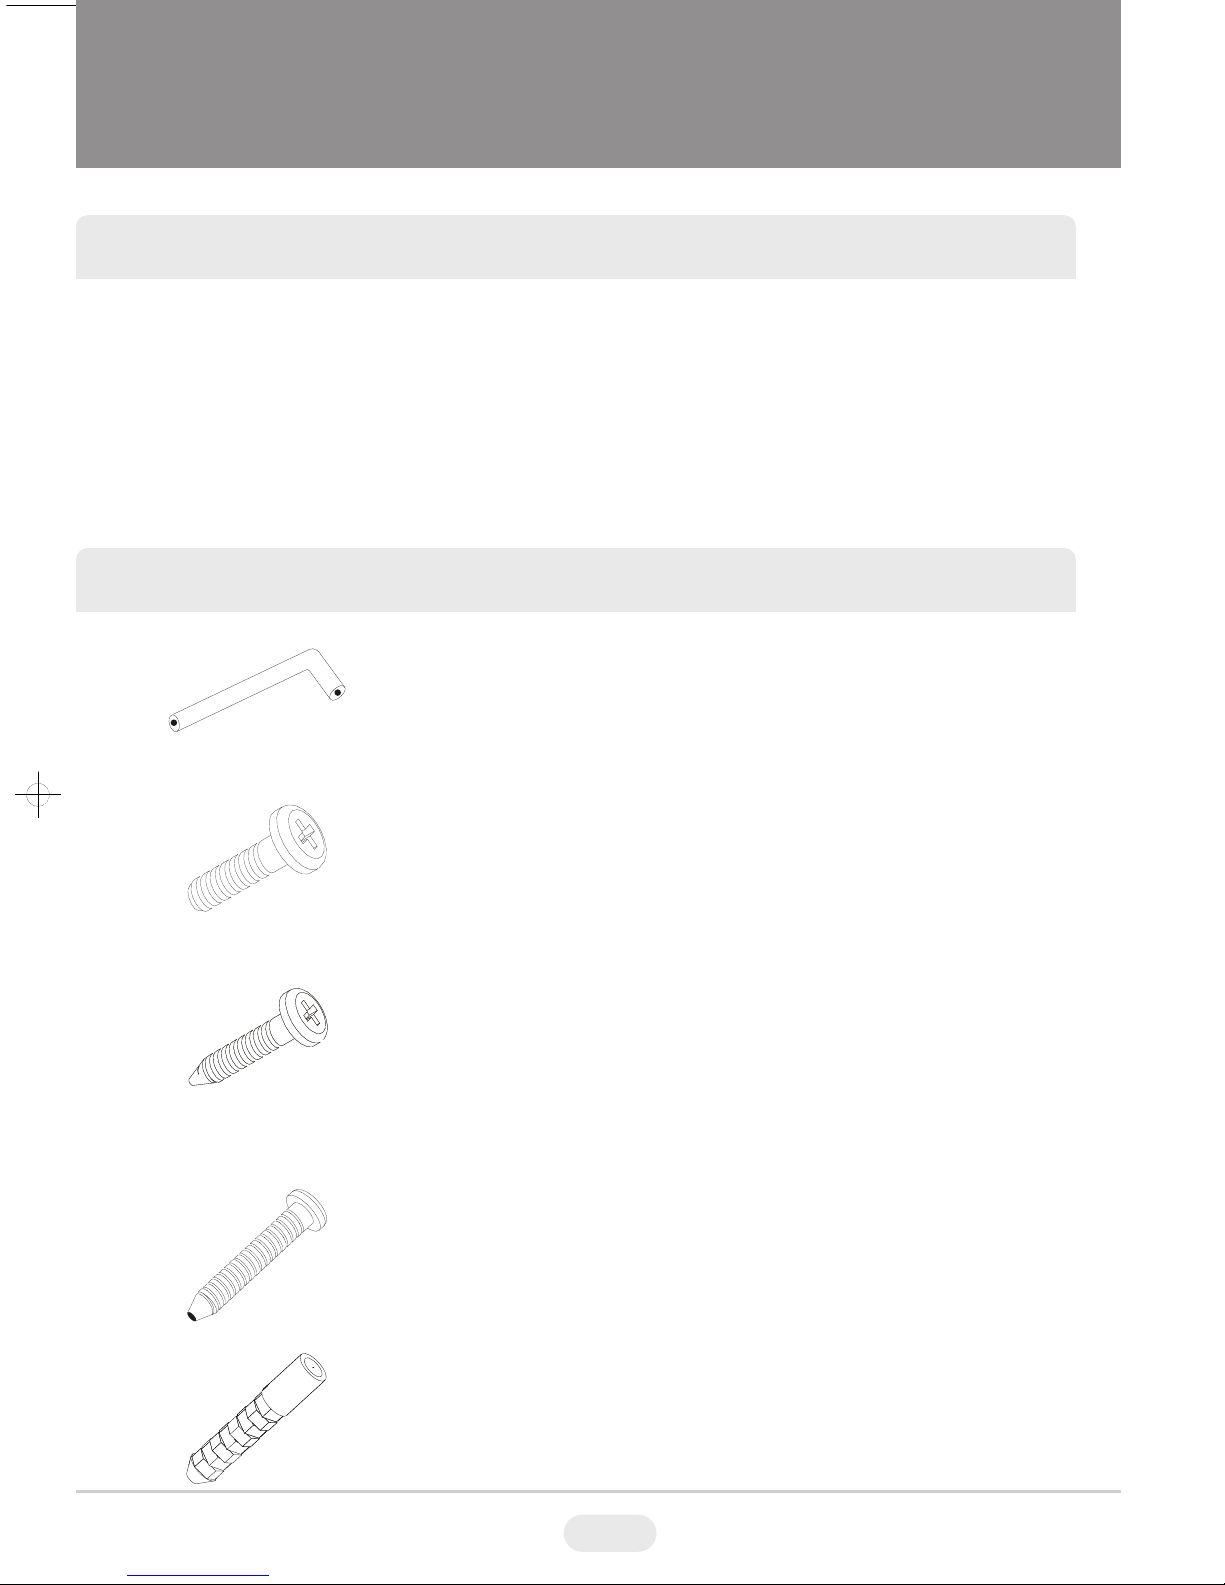
Torx Wrench - (Vandal & IR Versions Only)
Type #: T20
Length: 63mm / Diameter: 4mm
Qty: 1
Phillips head Screws - (Vandal & IR Versions Only)
For attaching the dome cover to the flush housing.
Type #: Phillips head M4x10
Length: 10mm / Diameter: 4mm
Qty: 4
Self Tapping Screws
For attaching the surface mount housing or the the flush
mount base to a solid surface.
Type #: Phillips St4x30
Length: 30mm / Diameter: 4mm
Qty:4
Self Tapping Screws - (Indoor Version Only)
For attaching the dome cover to the flush housing.
Type #: Phillips St4x12
Length: 12mm / Diameter: 4mm
Qty: 4
Dowels
If necessary, use the to help secure the self tapping screws.
Length: 30mm / Diameter: 7mm
Qty: 4
Page 3

2
AVAILABLE MODELS / ACCESSORIES
INDOOR MIGHTY DOME CONFIGURATIONS:
VTD-MH2910 / MH922: Indoor Color Dome Camera w/2.9-10mm or 9-22mm
Varifocal Lens & 480TVL
VTD-MX2910 / MX922: Indoor Color Dome Camera w/2.9-10mm or 9-22mm
Varifocal Lens & 550TVL
IR MIGHTY DOME CONFIGURATIONS:
VTD-MVH2910/L35 / MVH922/L35: Vandal Proof Color Dome Camera
w/2.9-10mm or 9-22mm Varifocal Lens, 480TVL & 35 IR LED's
VTD-MVX2910/L35 / MVX922/L35: Vandal Proof Color Dome Camera
w/2.9-10mm or 9-22mm Varifocal Lens, 550TVL & 35 IR LED's
VANDAL-PROOF MIGHTY DOME CONFIGURATIONS:
VTD-MVH2910 / MVH922: Vandal Proof Color Dome Camera w/2.9-10mm
or 9-22mm Varifocal Lens & 480TVL
VTD-MVH2910DN / MVH922DN: True Day/Night Vandal Proof Color Dome
Camera w/2.9-10mm or 9-22mm Varifocal Lens & 480TVL
VTD-MVX2910 / MVX922: Vandal Proof Color Dome Camera w/2.9-10mm
or 9-22mm Varifocal Lens & 550TVL
VTD-MVX2910DN / MVX922DN: True Day/Night Vandal Proof Color Dome
Camera w/2.9-10mm or 9-22mm Varifocal Lens & 550TVL
WDR MIGHTY DOME CONFIGURATIONS:
VTD-MX2910/922/1850-WDR: Indoor Color Dome Camera w/550 TV Lines
and 2.9-10mm, 9-22mm, or 18-50mm Lens
VTD-MVX2910/922/1850-WDR: Vandal Proof Color Dome Camera w/550
TV Lines and 2.9-10mm, 9-22mm, or 18-50mm Lens
Optional Mounts & Accessories:
VT-MD-2VOC: Secondary Video Output Cable for Mighty Domes
Heater/Blower Option: Heater/Blower Option for Mighty Domes
UTP Option: UTP Option for Mighty Domes
IP Module: IP Option for Mighty Domes
VT-MD/WMT: Mighty Dome Wall Mount
VT-MD/CMT: Mighty Dome Pedestal Ceiling Mount
Page 4

3
MIGHTY DOME LAYOUT
1) Lens
2) Power Input Connector(12VDC /
24VAC)
3) Video Output Connector - BNC
4) Camera Holder and 2nd Video
output
5) Ball with the Camera Assembly
6) Safety Wire
7) Bubble
8) Dome Cover Ring
9) Flush Mount Base
10) Surface Mount Plate
11) Assembly Screws - Torx M4x9
(Vandalproof)
12) Assembly Screws - Phillips ST4x12
(Indoor) / Phillips M4x10
(Vandalproof / IR)
13) Mounting Screws - Phillips ST4x30
Page 5

4
INSTALLATION
1) Dome Cover
1.1 Vandal Proof Domes - Use the provided Torx wrench to unscrew the vandal
proof screws and remove the dome cover.
1.2 Indoor Domes - Turn the dome cover to the left to remove the dome cover.
2) Flush Mount Installation:
Using four St4x30 screws, attach the flush mount base to a sturdy surface.
3) Surface Mount Installation:
Drill pilot holes at the mounting location using the provided mounting template.
Using four St4x30 screws, mount the surface mount housing to a sturdy
surface. Using four ST4x12 (Indoor) screws or M4x10 (Vandal-proof) screws,
attach the flush mount base to the surface mount housing.
Page 6
5
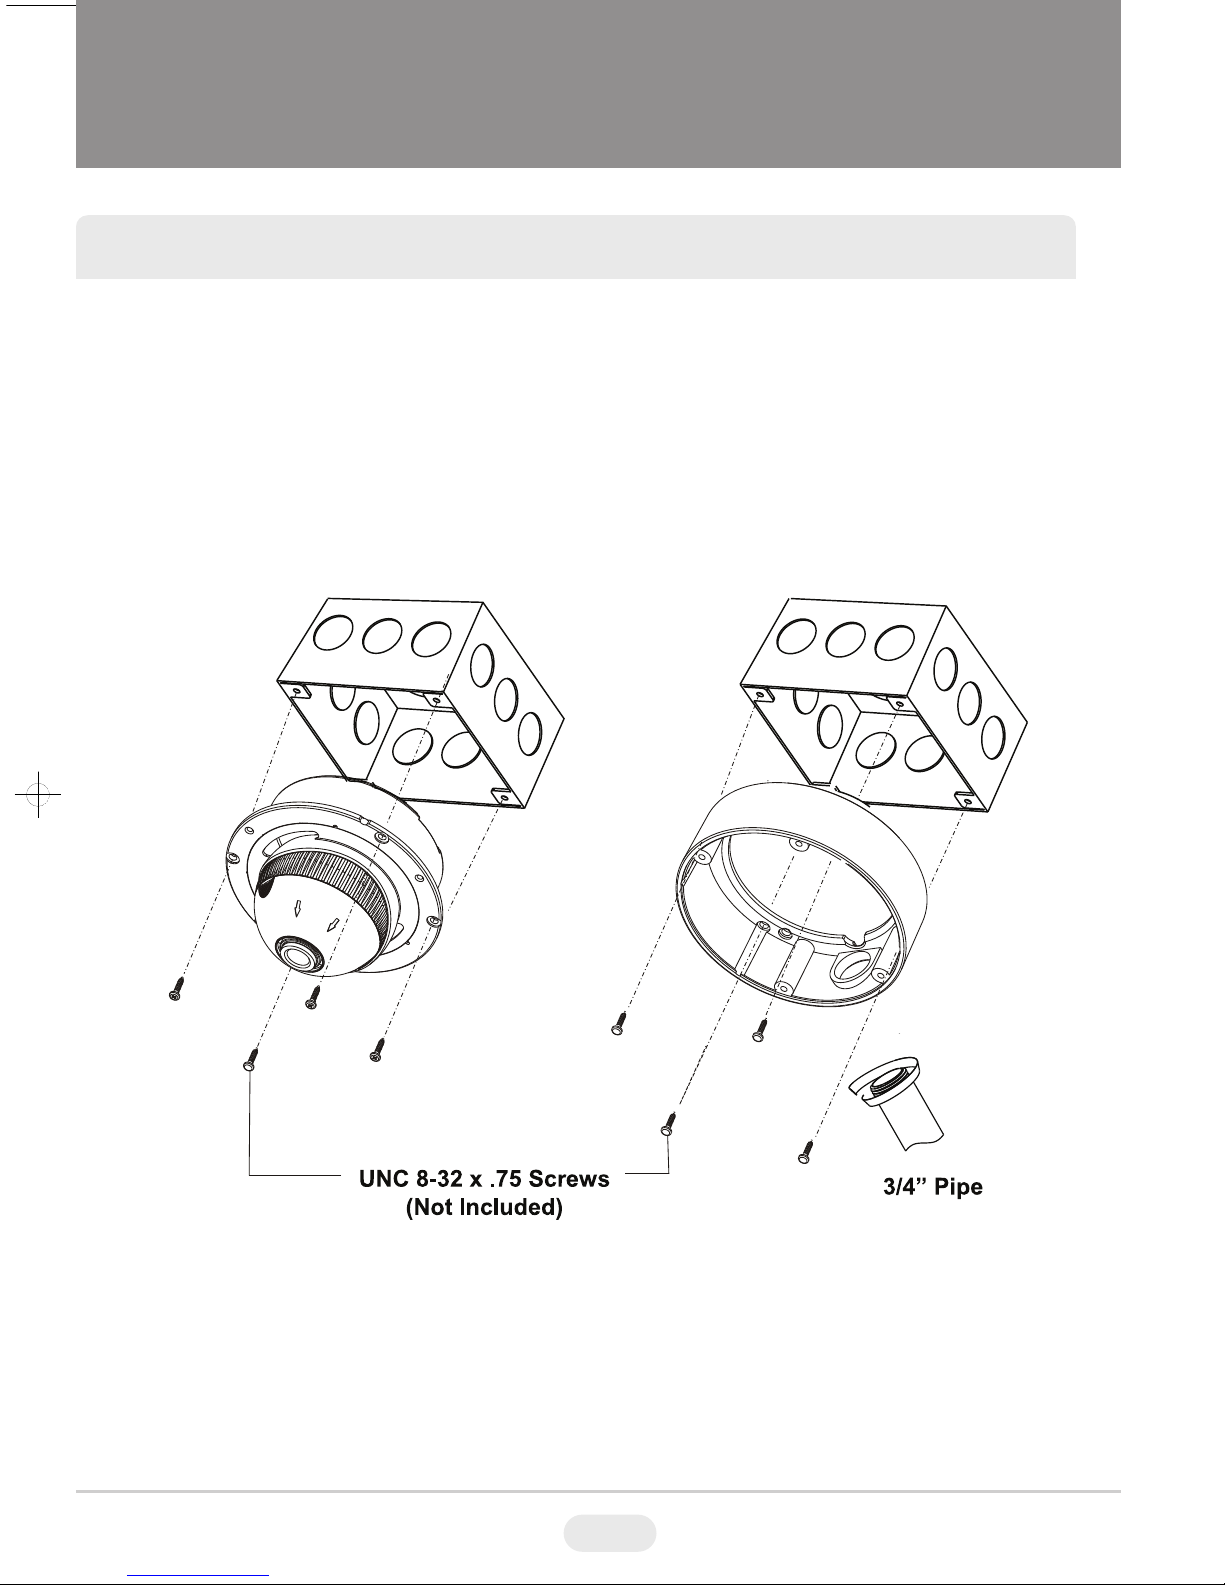
JUNCTION BOX INSTALLATION
Mighty Domes can easily be flush or surface mounted to an electrical junction box
(J-Box) using the pre-drilled mounting holes on either the surface mount housing
or the the flush mount base.
Page 7
6
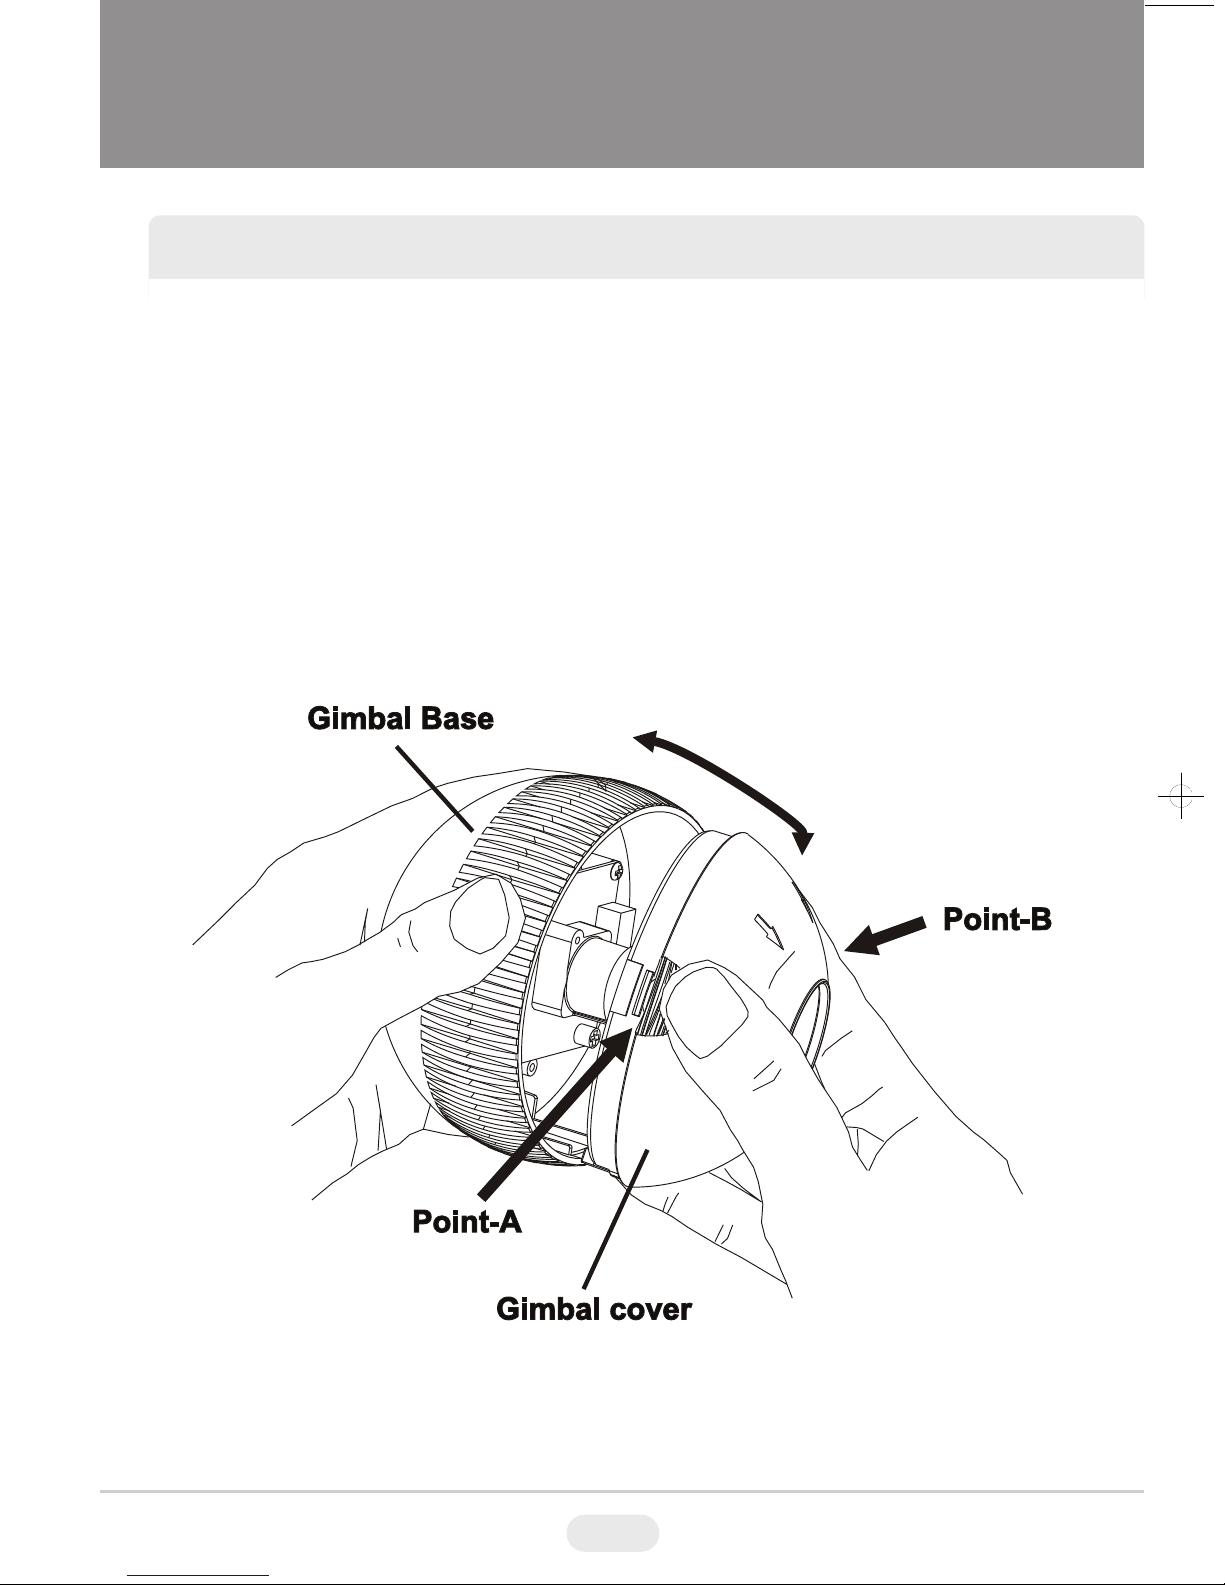
OPEN GIMBAL COVER
To adjust the zoom and the focus, the gimbal needs to be removed temporarily
from its base.
1) Remove the ball gimbal from its socket, and hold the base firmly with one hand.
2) Gently squeeze Point A and B and pull away from the base until the gimbal is
removed from the base.
3) Replace the Gimbal cover by aligning the cover to the base and pressing down
until it snaps back onto the base.
Page 8
7
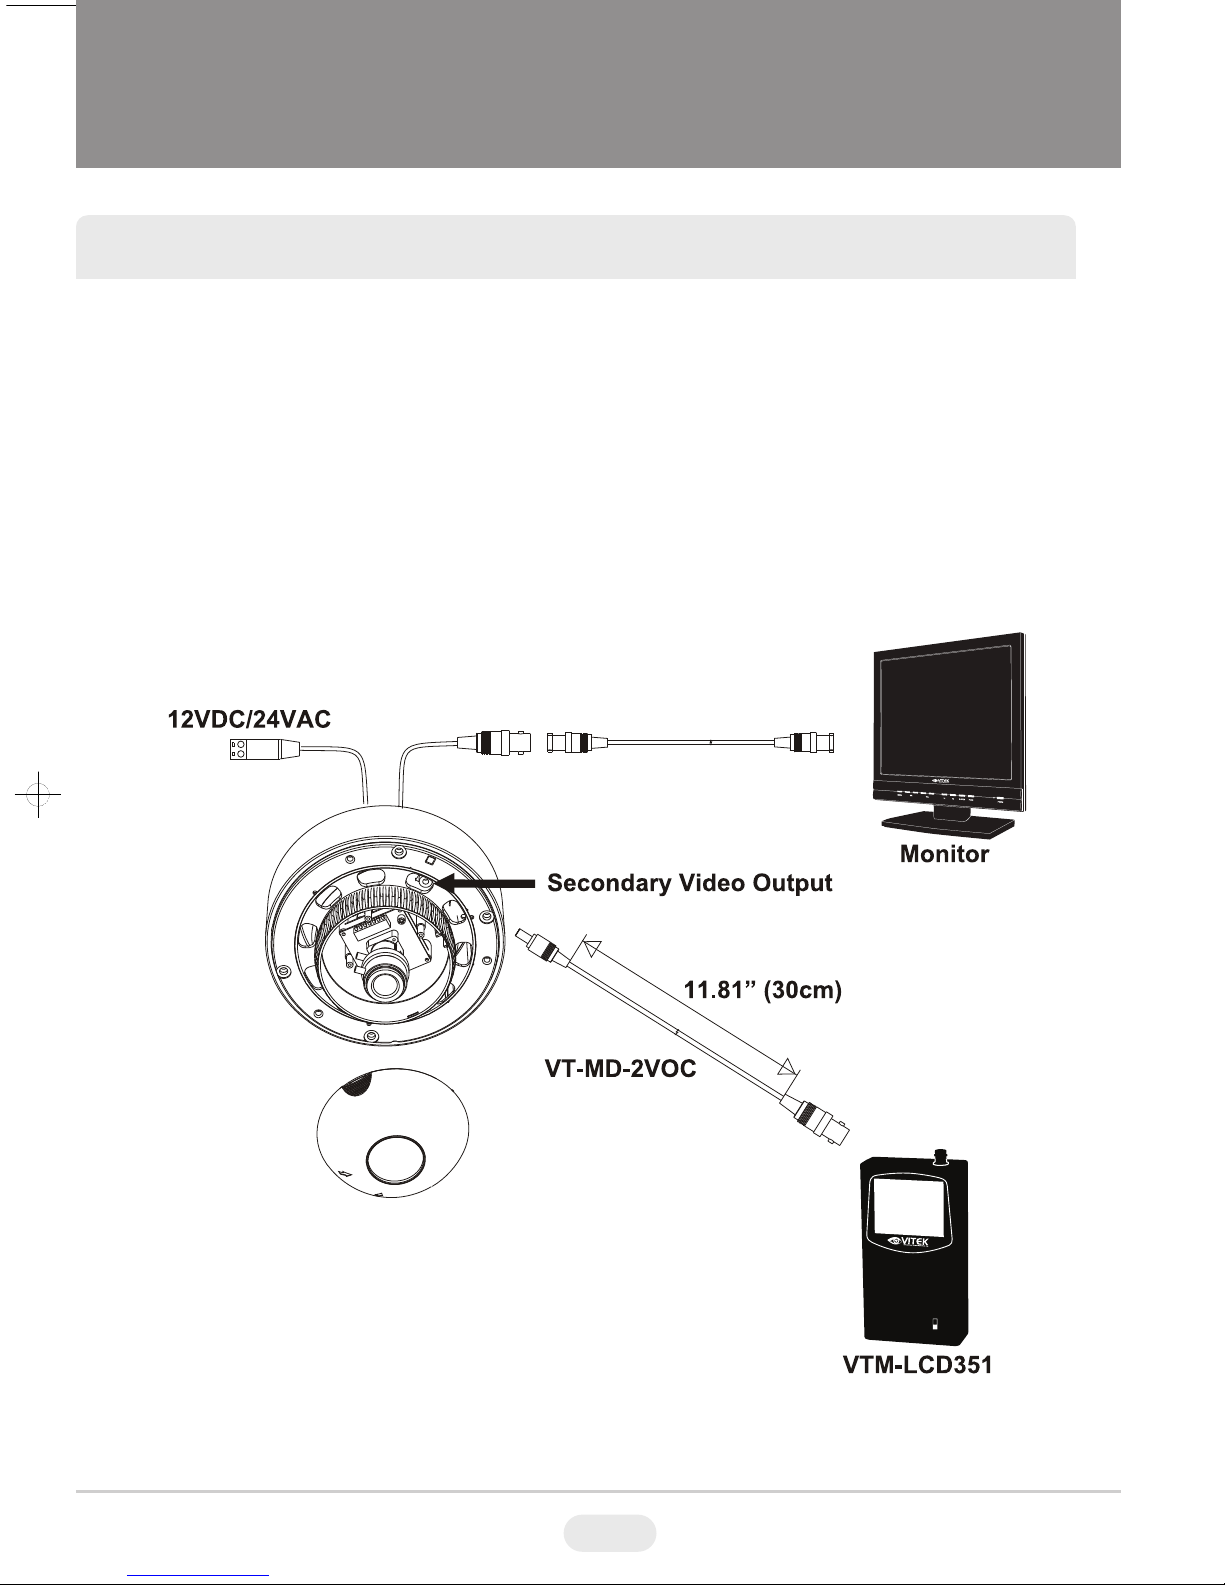
CONNECTIONS
• Power connection: 12VDC and 24VAC dual input.
• All Mighty Dome cameras come standard with a secondary video output. Please
contact your distributor or the VITEK Sales Department for availability of the
optional secondary video cable (VT-MD-2VOC).
Page 9
8
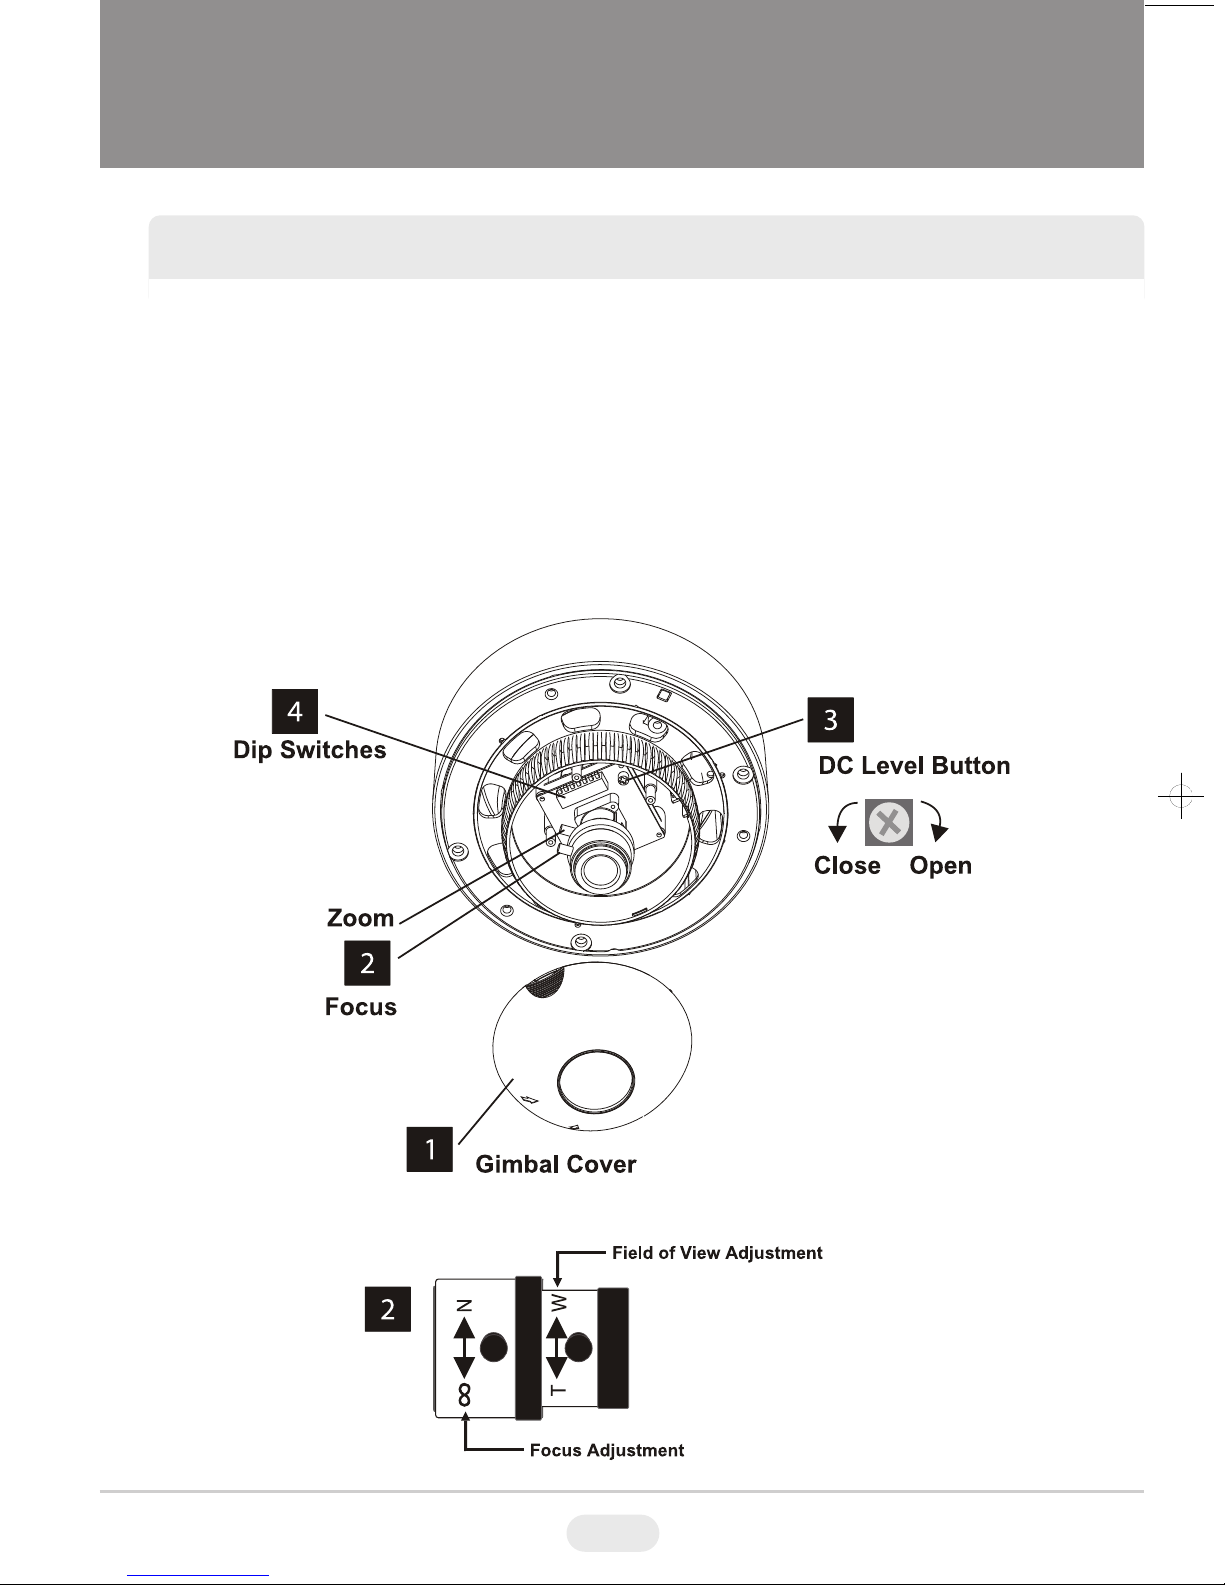
LENS ADJUSTMENT
1) Remove the Gimbal cover from the Gimbal base.
2) Loosen Zoom & Focus screws and make necessary adjustments as shown.
Field of view: Telephoto(T) to Wide(W)
Focus: Near(N) to infinity( )
3) DC Level: Adjust left or right if the picture is too dark.
4) Dip Switches. See Page 9
5) Reattach the gimbal cover to the gimbal base.
8
Page 10

9
DIP SWITCH ADJUSTMENTS
Day/Night & IR Mighty Domes:
Factory Default:
Factory Default:
Function OFF ON
N/A
ELC/ALC
Back Light Control (BLC)
Auto Gain Control (AGC)
Flickerless
Sharpness
Day/Night
IR Mode (IR Model Only)
ALC
Off
Normal
Off
Normal
Day
Off
ELC
On
Turbo
On
Sharp
Auto
On
1
2
3
4
5
6
7
8
Function OFF ON
N/A
ELC/ALC
Back Light Control (BLC)
Auto Gain Control (AGC)
ALC
Off
Normal
ELC
On
Turbo
1
2
3
4
Indoor & Vandal-Proof Mighty Domes (Non-Day/Night):
Page 11

10
3-AXIS GIMBAL ADJUSTMENT
The Gimbal mechanism yields maximum rotation and placement as shown below.
Page 12

11
HEATER / BLOWER SPECIFICATIONS
EXTERNAL DIMENSIONS
Specifications
Power Supply
Power Consumption
Heater
Blower
24 VAC
10W (Heater) / .7W (Blower)
On: at 41ºF / Off at 59ºF
Continuous 24 Hour Operation
Page 13

12
INDOOR MIGHTY DOME SPECIFICATIONS
Specifications
Image Sensor
Sync System
Scanning system
Lens Options
Horizontal Resolution
Min. Illumination
S/N Ratio
Video Output
Effective Pixels
Electronic Shutter
White Balance
Operating Temperature
Operating Humidity
Power Consumption
Power Requirement
Dimensions (H x Dia.)
1/3” Super HAD CCD
Internal
2:1 Interlace
2.9-10mm or 9-22mm
480 TV Lines 550 TV Lines
0.2Lux (F1.2@40IRE)
More than 52dB AGC OFF at 50IRE
1.0Vp-p composite, 75 Ohms
768(H) x 494(V)
1/60 ~ 1/100,000
2000~8000 K Automatic Tracking
14F ~ 122F (-10C ~ +50C)
Within 85% RH
3 Watts
12VDC/24VAC Dual Voltage (500 mA Minimum)
4.45" x 5.71" (113mm x 145mm)
VTD-MH VTD-MX
Page 14

13
VANDAL MIGHTY DOME SPECIFICATIONS
Specifications
Image Sensor
Sync System
Scanning system
Lens Options
Horizontal Resolution
Min. Illumination
S/N Ratio
Video Output
Effective Pixels
Electronic Shutter
White Balance
Weatherproof
Operating Temperature
Operating Humidity
Power Consumption
Power Requirement
Dimensions (H x Dia.)
1/3” Super HAD CCD 1/3”True Day/Night Super HAD CCD
Internal
2:1 Interlace
2.9-10mm or 9-22mm
480 TV Lines 550 TV Lines 480 TV Lines 550 TV Lines
Day/Night: 0.02Lux (F1.2@40IRE) / Standard: 0.2Lux (F1.2@40IRE)
More than 50dB AGC OFF at 50IRE
1.0Vp-p composite, 75 Ohms
768(H) x 494(V)
1/60 ~ 1/100,000
2000~8000 K Automatic Tracking
IP68
14F ~ 122F (-10C ~ +50C)
Within 85% RH
3 Watts
12VDC/24VAC Dual Voltage (500 mA Minimum)
4.45" x 5.71" (113mm x 145mm)
VTD-MVH VTD-MVX VTD-MVH(DN) VTD-MVX(DN)
Page 15

14
IR MIGHTY DOME SPECIFICATIONS
Specifications
Image Sensor
Sync System
Scanning system
Lens Options
Horizontal Resolution
Min. Illumination
S/N Ratio
Video Output
Effective Pixels
Electronic Shutter
White Balance
IR LED’s
Weatherproof
Operating Temperature
Operating Humidity
Power Consumption
Power Requirement
Dimensions (H x Dia.)
1/3” Super HAD CCD
Internal
2:1 Interlace
2.9-10mm or 9-22mm
480 TV Lines 550 TV Lines
Day/Night: 0.02Lux (F1.2@40IRE) / Standard: 0.2Lux (F1.2@40IRE)
More than 50dB AGC OFF at 50IRE
1.0Vp-p composite, 75 Ohms
768(H) x 494(V)
1/60 ~ 1/100,000
2000~8000 K Automatic Tracking
30 LED’s with up to 90’ Range
IP68
14F ~ 122F (-10C ~ +50C)
Within 85% RH
3 Watts (IR LEDs Off) / 6 Watts (IR LEDs On)
12VDC/24VAC Dual Voltage (1000 mA Minimum)
4.45" x 5.71" (113mm x 145mm)
VTD-MVH (L35) VTD-MVX (L35)
Page 16

15
WDR MIGHTY DOME SPECIFICATIONS
Specifications
Image Sensor
Gamma
Sync System
Scanning system
Lens Options
Horizontal Resolution
Min. Illumination
S/N Ratio
Video Output
Effective Pixels
Electronic Shutter
White Balance
WDR Mode
Auto Iris Control
Slow shutter
BLC Zone
Presets
Flicker reduction
OSD
Weatherproof
Operating Temperature
Operating Humidity
Power Consumption
Power Requirement
Dimensions (H x Dia.)
1/3" RGB Color DPS SENSOR (Pixim Orca D1500 series)
0.45
Internal
2:1 Interlace
2.9-10mm / 9-22mm / 18-50mm
550 TV Lines
0.0002Lux with DSS + ICR Modes ON (F1.2 @ 40IRE)
More than 50dB AGC OFF at 50IRE
1.0Vp-p composite, 75 Ohms
768(H) x 494(V)
1/60 ~ 1/100,000
2000~11000ºK Automatic tracking
4 presets (Low / Middle / High / Custom )
DC drive iris control. Level control is fixed internally
2X, 4X, 8X, 16X, 32X ESS
4 areas (CTR SPOT, UPPER 1/3, MIDDLE 1/3, LOWER 1/3)
NORMAL, INDOOR, OUTDOOR, FL-LIGHT, LOBBY, WAREHOUSE
Yes
Yes (Setup menu only)
IP68 (Outdoor Versions)
14F ~ 122F (-10C ~ +50C)
Within 85% RH
3 Watts
12VDC/24VAC Dual Voltage (500 mA Minimum)
4.45" x 5.71" (113mm x 145mm)
VTD-MX (WDR) VTD-MVX (WDR)
Page 17

16
Appendix: WDR Mighty Dome
With CMOS image sensor,
- Provides the best quality image without any blooming or vertical smear even under the spot light.
With Pixim’s DPS technology,
- Offers unparalleled image quality across all lighting conditions especially in high-contrast
environments such as indoor and outdoor elements combined in the same field of view, or other
extreme bright & dark lighting elements combined in the same image.
- Delivers natural color
- Offers high resolution of 540TVL
- Eliminates compromising image noise by blooming or vertical smear
- Eliminates color rolling of the NTSC system by line-lock synchronization (AC24V version)
- Offers on-screen menu
With ICR mechanism,
- Enhances sensitivity about 10x at night time
- Can accept infrared light
With 24VAC/12VDC dual power design,
- Offers flexibility in installation
- Ensures reliability
Main features are;
• 1/3" RGB Color DPS SENSOR (Pixim Orca D1500series)
• All adjustments by OSD menu
• Resolution of 540 Horizontal Lines
• 10x sensitivity enhancement by removing the optical filter
• Switches to B/W and able to accept the infrared spectrum at night mode
• Enhanced sharpness compensation
• Very low noise and superior picture quality
• Sensitivity of 0.0002Lux (B&W)
• Automatically removable IR Cut Filter
• Automatic White Balance (ATW)
• Support DC auto iris lens
• Supply voltage: 12Vdc/24Vac Dual voltage
Page 18

17
Appendix: WDR Mighty Dome
WDR SETUP Menu
1) In the menu
Use , buttons to move menu, , buttons to change the settings and press button
short
to select or enter.
button stands for MENU or ENTER button.
2) Entering menu
Press button longer than 2 sec on the back of camera.
3) PRESET menu
PRESET menu is provided to help the settings with the possible parameters obtained and
assumed by the factory tests for the most common environments.
“PRESETs may not be the best optimized settings for the actual installations.
In such cases, find the optimal settings in CUSTOM setting of EXPOSURE menu”
PRESET Descriptions
<NORMAL>
Produces an image that has average contrast and suitable for normal indoor
or low-contrast outdoor scenes.
INDOOR
Provides better leveling of image for in the darker areas of the scene.
Suitable for indoor scenes that have higher contrast lighting.
OUTDOOR
Optimized for outdoor sunlit applications and provides better leveling for the
brighter areas. Suitable for outdoor scenes having high contrast between sunlit
and shadows.
FL-LIGHT
Reduces the color rolling by fluorescent lights when line-lock is not available
(NTSC). DC auto iris lens is required.
Use Line-lock sync. With AC24V supply for the best result against the color
rolling if possible.
LOBBY Optimized for the common installation at lobby.
WAREHOUSE Optimized for the common installation at warehouse
Page 19

18
Appendix: WDR Mighty Dome
4) EXPOSURE menu
EXPOSURE menu is provided to help the settings with the possible parameters obtained and
Presets are configured by factory tests for most commonly encountered environments.
EXPOSURE presets may not be the best optimized settings for the actual installations.
In such cases, find the optimal settings in CUSTOM setting of EXPOSURE menu
5) CUSTOM menu
To enter CUSTOM menu, press button at <CUSTOM . . . > of EXPOSURE menu.
EXPOSURE Descriptions
<WDR MID> Medium level of the dynamic range control for each PRESET.
WDR HIGH Increases the dynamic range control. Some highlight area may be washed out.
CUSTOM...
Provides more flexible compensation other than WDR MID, WDR LOW, WDR
HIGH
BLC...
Compensates the brightness of main object against the bright back light.
A zone out of CTR SPOT, UPPER1/3, MIDDLE1/3, LOWER1/3 can be set.
Dynamic range control is inoperative if EXPOSURE is set to BLC.
WDR LOW Decreases the dynamic range control.
WDR
CUSTOM
Descriptions
WINDOW
Metering of the dynamic control is weighted to the selected window from SAFE
Page 20

19
Appendix: WDR Mighty Dome
6) ZONE ADJ. Menu
Adjusts the size and the location of the metering zone for the dynamic range control.
Dynamic range control is very sensitive to the size and the location of the zone.
The default window size is SAFE AREA.
To enter ZONE ADJ menu, press button at <ZONE ADJ . . .> of WDR CUSTOM menu.
In ZONE ADJ menu, 'NEXT:MENU-' stands for 'press button short for next menu'
and 'RETURN:MENU---' means 'press button longer than 2 sec for return or exit'.
, , , buttons are used for move, enlarge or reduce the zone.
White zone boundary moves the zone to locate it at the optimal position.
Green zone boundary enlarges the zone.
Red zone boundary reduces the zone.
7) BLC ZONE SELECT menu
To enter BLC ZONE SELECT menu, press button at <BLC . . . > of EXPOSURE menu.
Metering of the back lit compensation control is weighted to the selected window from CTR
SPOT(1/9 of
entire screen), UPPER 1/3, MIDDLE 1/3 and LOWER 1/3.
Page 21

20
Appendix: WDR Mighty Dome
8) DAY / NIGHT menu
9) DAY/NIGHT SETUP menu
DAY/NIGHT Descriptions
<AUTO BW>
IR Cut filter is switched OUT/IN at night/day time automatically.
At night mode, camera outputs the B/W video without the color burst signal.
OFF IR Cut filter is stuck and is NOT switch OUT.
DAY/NIGHT
SETUP
Descriptions
EXIT
THRES
IM P O R T AN T !! !
DAY - > N I G HT an d NI GH T - > DA Y op e ra t i o n s mus t be ex a m in e d an d
verif i e d at th e fin a l step of the in st a l l a t
ion be c au s e the y may be
affec t e d b y t h e s e t t i n gs su c h a s t h e s i z e o r l o c a t i o n of the met e r i n g
wind o w .
Block the lens for a few seconds for NIGHT mode and release it to be returned
to DAY mode. If camera stay at NIGHT mode more than 10sec, increase EXIT
THRES and repeat the fore mentioned steps. If the scene is too dim, it may not
be returned to DAY.
EXIT
DELAY
If set to ON, camera insert 8~10sec delay for NIGHT to DAY transition.
This is to avoid the unnecessary transitions between NIGHT and DAY by the
IMP ORT A NT! !!
Page 22

21
Appendix: WDR Mighty Dome
10) SHUTTER LIMIT menu
11) WHITE BALANCE menu (in PICTURE CONTROL menu)
To enter PICTURE CONTROL sub-menu, press button at PICTURE CONTROL of MENU-1.
SHUTTER
LIMIT
Descriptions
<2X ESS
>
The longest shutter is limited to 2X of 1/60(NTSC)/1/50(PAL) seconds when the
scene illumination becomes dim.
Video refresh rate at 2X ESS is 15(NTSC)/12.5(PAL)frames/sec.
4X ESS ~
32X ESS
The longest shutter is limited to 4X~32X of 1/60(NTSC)/1/50(PAL) sec when the
scene illumination becomes dim.
The higher integration increases the sensitivity but decreases the video refresh
r
ate
.
WHITE
BALANCE
Descriptions
<ATW
NORMAL>
White balance is compensated automatically in range of 2800K-7500K
ATW Desat
White balance is compensated automatically in range of 2000K-11000K. In the
range of 2000-2800K and 7500-11000K, white balance is gradient-compensated.
ATW Xtnd White balance is compensated automatically in range of 2000K-11000K
MANUAL White balance can be adjusted by either KELVIN or R/B.
Page 23

22
Appendix: WDR Mighty Dome
12) MANUAL WHITE BALANCE menu (in PITURE CONTROL menu)
To enter MANUAL WHITE BALANCE menu, press button at <MANUAL...> of WHITE BALANCE
menu.
View plain white paper or a gray card and adjust either KELVIN or R/B so that the color on the
monitor
becomes the most white.
13) BRIGHTNESS, DNR, SHARPNESS, FLIP, COLOR SELECT and SATURATION menus
(in PITURE CONTROL menu)
PICTURE
CONTROL
Descriptions
BRIGHTNESS
BRIGHTNESS level is a kind of video output gain and is different from the iris
level control. It can be set to MID-LOW, MIDDLE, MID-HIGH, HIGH and LOW.
If it is set too high, the dynamic range is decreased.
DNR ON reduces the dynamic noise but effects video SHARPNESS.
SHARPNESS MIDDLE, HIGH, MAX, LOW
FLIP
OFF provides the normal video.
H-FLIP(V-FLIP) provides the horizontally(vertically) flipped video.
H/V-FLIP provides the horizontally and vertically flipped video.
COLOR
SELECT
Four sets of COLOR variance are provided.
SATURATION Color saturation can be adjusted between -2 and +2.
Page 24

23
Appendix: WDR Mighty Dome
14) LENS SELECT menu
DC auto iris lens or MAUAL lens can be used for this camera but DC auto iris lens must be used
in
FL-LIGHT and EFR presets and strongly recommended in other presets when the scene is very
bright.
15) VIDEO SYNC menu
VIDEO
SYNC
Descriptions
<INT > Synchronization is INTERNAL regardless of the power source.
INT2
Synchronization is INTERNAL but sync frequency is modified to simulate linelock.
It is not actually synchronized to the line frequency.
AUTO…
Synchronization mode is decided automatically by the power source.
Line-lock for AC24V and Internal for DC12V
Page 25

24
Appendix: WDR Mighty Dome
16) SAVE / RESTORE / EXIT menu
MENU-2 Descriptions
SAVE AND EXIT Exits menu after saving the parameters.
EXIT NO CHANGES Exits menu with discarding any changes.
RESTORE
FACTORY SETTINGS
Restores and saves all parameters of factory settings.
Camera resets and restarts automatically.
LANGUAGE
English is available only.
Language does NOT change by RESTORE FACTORY SETTINGS.
VIDEO STANDARD
NTSC and PAL can be switched. VIDEO STANDARD does NOT
change by RESTORE FACTORY SETTINGS
Page 26

25
Appendix: WDR Mighty Dome
17) Setup Menu Tree
Page 27

26
NOTES
Page 28

28492 CONSTELLATION ROAD VALENCIA, CA 91355
WWW.VITEKCCTV.COM | 888-VITEK-70
LIMITED LIABILITY WARRANTY
Your new Camera is guaranteed to be free from defects in materials
and workmanship for a period of two years from the date of
purchase.
The product must have been used only for its intended purpose, and
not been subjected to damage by misuse, willful or accidental
damage, caused by excessive voltage or lightning.
The product must not have been tampered with in any way then the
guarantee will be considered null and void.
This guarantee does not affect your statutory rights.
Contact VITEK directly for all servicing.
 Loading...