


Rev 2.0 13530
FOCUS
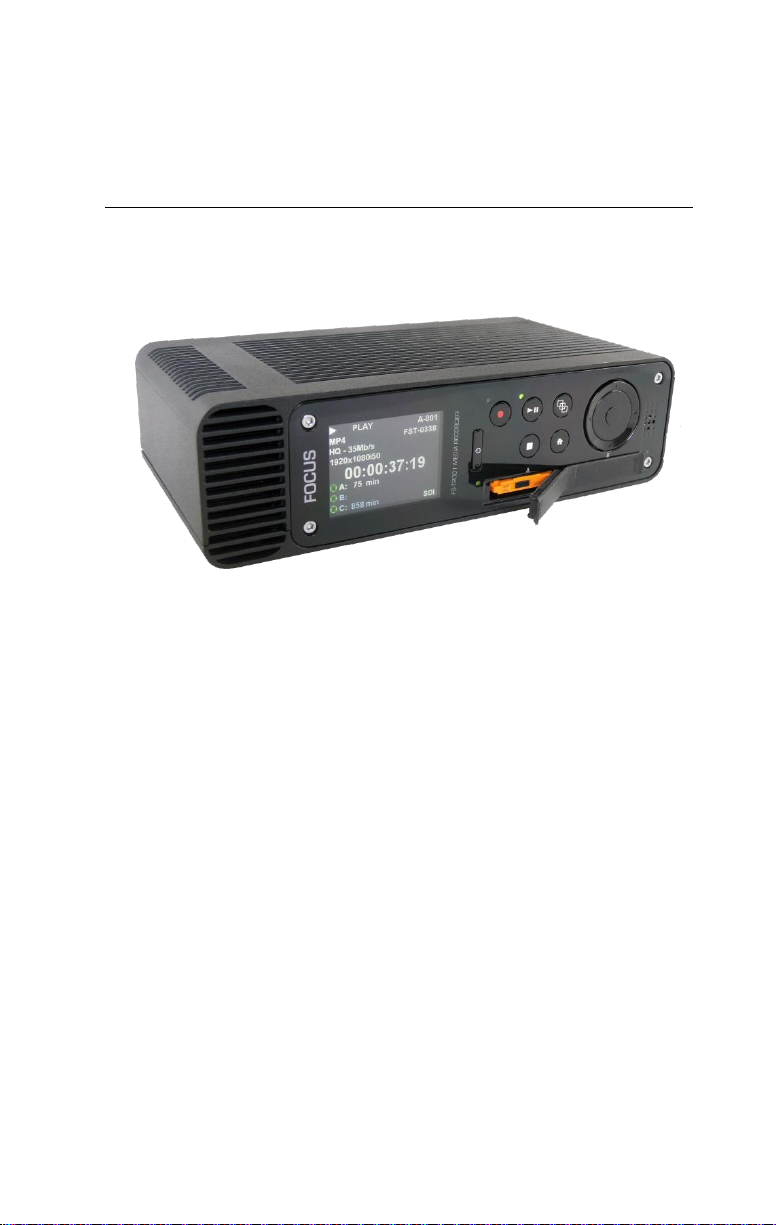
FS-T2001 Media Recorder
User Manual
April 2014

Legal Notices
ii
FS-T2001 Media Recorder

Legal Notices
Legal
THIS DOCUMENT CONTAINS CONFIDENTIAL AND TRADE
SECRET INFORMATION OF VITEC AND ITS RECEIPT OR
POSSESSION DOES NOT CONVEY ANY RIGHTS TO
REPRODUCE OR DISCLOSE ITS CONTENTS, OR TO
MANUFACTURE, USE, OR SELL ANYTHING THAT IT MAY
DESCRIBE. USE IN WHOLE OR IN PART WITHOUT THE
SPECIFIC WRITTEN AUTHORIZATION OF VITEC IS STRICTLY
FORBIDDEN.
EVERY EFFORT HAS BEEN MADE TO ENSURE THAT THE
INFORMATION IN THIS DOCUMENT IS COMPLETE AND
ACCURATE AT THE TIME OF PRINTING; HOWEVER, THE
INFORMATION CONTAINED IN THIS DOCUMENT IS SUBJECT
TO CHANGE.
Copyright 2012 VITEC
All Rights Reserved.
Focus is a Vitec Brand.
The material contained in this document is also protected by copyright
laws of the United States of America and other countries. It may not be
reproduced or distributed in any form by any means, altered in any
fashion, or stored in a database or retrieval system, without express
written permission of VITEC.
VITEC cannot be responsible for unauthorized use of equipment and
will not make allowance or credit for unauthorized use or access.
FS-T2001 Media Recorder iii

Legal Notices
USA
Office Hours
Monday through Friday
7:30 AM to 4:00PM (Pacific Time)
Email
http://www.vitec.com/support/
Telephone
Fax
+1 650 230 2429
+1 408 739 1706
Address
VITEC Inc.
931 Benecia Ave.
Sunnyvale, CA. 94085
Web
www.vitec.com
EMEA (Europe, Middle East, Africa)
Office Hours
Monday through Friday
9:00 AM to 5:00PM
Email
support.germany@vitec.com
Telephone
Fax
+49 43078358 58
+49 43078358 99
Address
COMO GmbH
Lise-Meitner-Str. 15
24223 Schwentinental/ Germany
Web
www.vitec.com
Contacting VITEC
Serial Number
The serial number for this equipment is located on the base of the unit.
Please record this serial number and keep it in a secure area.
iv
FS-T2001 Media Recorder

Legal Notices
Regulations and Safety
FS-T2001 complies with the following standards and country regulations:
USA
FCC Part 15 Class A
This device complies with Part 15 of the FCC Rules. Operation
is subject to the following two conditions: (1) this device may
not cause harmful interference, and (2) this device must accept
any interference received, including interference that may
cause undesired operation.
European Union
EN 55024
EN 61000-3-2 Class A & EN 61000-3-3 WEEE
EN 55022 Class A RoHS 2
Australia and New Zealand
N11765 - AS/NZS CISPR 22 Class A
Japan
VCCI Class A
Canada
ICES-003 Class A
FS-T2001 Media Recorder v
Legal Notices
Caution
This symbol indicates important operating or
maintenance (servicing) information that the user
should read and understand.
Note
This symbol indicates supplementary information about
features, functions, or operations that may be of
interest to the user.
Documentation
Read, Retain, and Follow Instructions
All the safety and operating instructions should be read before
the product is operated.
Retain Documentation
Place documentation in a secure place for future reference on
operating and safety instructions.
Follow All Operating and Safety Instructions
Pay Attention to All Warnings.
Warnings are provided to protect the operator, the equipment, and
content.
Symbols Used in FS-T2001 Documentation
Precautions
SxS card must be inserted with labels facing FS-T2001 slot
name A or B. DO NOT FORCE while inserting the SxS card
in its slot. Damages may occur.
Do Not Expose to Moisture
Do not use this product near water or in an environment where
it is exposed to dampness or there is the possibility of it getting
wet.
SxS Card insertion
vi
FS-T2001 Media Recorder

Legal Notices
Do Not Remove Cover
There are No User Serviceable Parts inside this unit. Servicing
should be done by qualified service personnel.
Lithium battery inside (clock):
CAUTION - Risk of explosion if battery is replaced by an
incorrect type -
Operating Environment
Avoid moisture, dust, extreme heat or cold.
Power Sources
Use only power sources that match those indicated on the
marking label. If unsure of the type of power supply that is
available, consult your dealer or local power company.
Accessories and Replacement Parts
Use only attachments and accessories recommended by VITEC.
Use only replacement parts specified by VITEC or of comparable
quality and characteristics as the original parts.
Unauthorized substitution of parts can result in loss of warranty.
FS-T2001 Media Recorder vii

Contents
Table of Contents
LEGAL ................................................................................................................................. III
CONTACTING VITEC .......................................................................................................... IV
SERIAL NUMBER ................................................................................................................ IV
REGULATIONS AND SAFETY ................................................................................................... V
Documentation ........................................................................................................ vi
Precautions .............................................................................................................. vi
Accessories and Replacement Parts ........................................................................ vii
TABLE OF CONTENTS ....................................................................................................... VIII
INTRODUCTION .................................................................................................................. 1
FEATURES ......................................................................................................................... 2
UNPACKING ...................................................................................................................... 3
Missing or Damaged Components ............................................................................ 3
QUICK START ...................................................................................................................... 4
PHYSICAL DESCRIPTION AND CONTROLS .................................................................................. 4
Front View – Controls ................................................................................................ 4
Rear View – Connections ........................................................................................... 5
Connecting FS-T2001 to Camera's HD-SDI Port ......................................................... 6
INSERTING AND REMOVING SXS MEDIA .................................................................................. 6
Inserting SxS Media Into FS-T2001 ............................................................................ 6
Removing SxS Media from FS-T2001 ......................................................................... 6
POWERING FS-T2001 ........................................................................................................ 7
THE FS-T2001 SCREEN DISPLAY ............................................................................................ 7
Home screen ............................................................................................................. 7
Thumbnail screen ...................................................................................................... 8
Menu screens ............................................................................................................ 9
THE FS-T2001 OPERATION MODES .................................................................................... 10
THE FS-T2001 MENU CONTROLS ....................................................................................... 10
BASIC FS-T2001 SETUP .................................................................................................... 13
Settings ................................................................................................................... 13
Operation Menu Setup ............................................................................................ 13
RECORDING ..................................................................................................................... 17
Clip Thumbnails and List ......................................................................................... 18
STOP RECORDING ............................................................................................................. 18
PLAYBACK RECORDING ...................................................................................................... 19
Selecting a Clip by its Thumbnail ............................................................................. 20
Playback Trick Modes.............................................................................................. 20
UTILIZING FS-T2001’S SXS RECORDED CLIPS IN OTHER DEVICES ................................................ 21
UTILIZING FS-T2001’S SXS RECORDED CLIPS ON A COMPUTER .................................................. 21
ACCESSING FS-T2001'S CLIPS FROM A COMPUTER ................................................................. 23
Hard Drive directory Structure ................................................................................ 23
Accessing FS-T2001 clips located on Hard Drive via FTP ......................................... 24
Accessing FS-T2001 clips via SMB/CIFS ................................................................... 25
EXPORTING AN EDITED CLIP TO FS-T2001 CLIPS VIA ETHERNET (SMB/CIFS)............................... 29
With FCP: ................................................................................................................ 29
viii
FS-T2001 Media Recorder

Contents
With Avid Media Composer: ................................................................................... 30
REMOTE CONTROL YOUR FS-T2001 OVER LAN OR WI-FI ....................................................... 33
Features.................................................................................................................. 33
Accessing the web interface over LAN .................................................................... 34
Accessing the web interface over Wi-Fi .................................................................. 34
Wi-Fi setting configuration ..................................................................................... 34
Resetting the Wi-Fi configuration ........................................................................... 35
HTTP API ................................................................................................................. 35
FS-T2001 MENUS ............................................................................................................. 37
OPERATIONS MENU ...................................................................................................... 37
MODE ..................................................................................................................... 38
CONTROL ................................................................................................................ 38
FORMAT ................................................................................................................. 39
REC MODE .............................................................................................................. 39
REC MEDIA ............................................................................................................. 40
REC FORMAT .......................................................................................................... 40
PSF .......................................................................................................................... 41
HQ 1080i................................................................................................................. 41
TIMECODE .............................................................................................................. 41
USERBITS ................................................................................................................ 42
REC AUDIO .............................................................................................................. 42
TC SUPER ................................................................................................................ 42
VIDEO OUTPUT ....................................................................................................... 43
AUDIO MONITOR .................................................................................................... 43
SETUP MENU ................................................................................................................ 44
NTP ......................................................................................................................... 46
DATE ....................................................................................................................... 46
TIME ....................................................................................................................... 46
TIME ZONE ............................................................................................................. 46
DST ADJUST ............................................................................................................ 46
LCD ......................................................................................................................... 47
LCD BRIGHT ............................................................................................................ 47
KEY BRIGHT ............................................................................................................ 47
KEY CLICKS .............................................................................................................. 47
ORIENTATION ......................................................................................................... 47
ALARM .................................................................................................................... 47
TAKE NUMBER ........................................................................................................ 47
TAKE PREFIX ........................................................................................................... 48
TC SET ..................................................................................................................... 48
UB SET .................................................................................................................... 48
TC MODE ................................................................................................................ 48
RETRO CACHE ......................................................................................................... 49
PLAY MODE ............................................................................................................ 49
NETWORK ............................................................................................................... 49
IP ADDRESS ............................................................................................................. 49
IP MASK .................................................................................................................. 49
BROADCAST ............................................................................................................ 49
GATEWAY ............................................................................................................... 49
NAME SERVER ........................................................................................................ 50
MAC ADD ................................................................................................................ 50
FS-T2001 Media Recorder ix

Contents
SERVER .................................................................................................................... 50
SVR P/W .................................................................................................................. 50
HSTNAME ................................................................................................................ 50
WORKGROUP .......................................................................................................... 50
UTILITIES MENU ............................................................................................................ 51
COPY / CLONE CARD................................................................................................ 51
FORMAT .................................................................................................................. 51
UPGRADE ................................................................................................................ 52
DELETE CLIP............................................................................................................. 52
REPAIR CLIP ............................................................................................................. 52
SYSTEM RESET ......................................................................................................... 53
DIAGNOSTIC ............................................................................................................ 53
VERSION .................................................................................................................. 53
TECHNICAL SPECIFICATIONS ............................................................................................. 54
COMPLIANCE ................................................................................................................... 54
ENVIRONMENT ................................................................................................................ 54
PHYSICAL DESCRIPTION ..................................................................................................... 54
Connections ............................................................................................................ 54
Controls ................................................................................................................... 55
Media Slot ............................................................................................................... 55
Storage ................................................................................................................... 55
Status Display ......................................................................................................... 55
POWER........................................................................................................................... 55
DIMENSIONS AND WEIGHT ................................................................................................. 55
SUPPORTED INPUT, OUTPUT AND RECORDING FORMATS ......................................................... 56
Supported Input Format (SD/HD-SDI)...................................................................... 56
Supported Output Format (SD/HD-SDI / HDMI) ...................................................... 56
Supported Record Formats...................................................................................... 56
WARRANTY ....................................................................................................................... 58
x
FS-T2001 Media Recorder
Introduction
Introduction
Thank you for purchasing the Focus FS-T2001 Media Recorder. The FST2001 is a desktop XDCAM recorder made for use with SD/HD-SDI
camcorders or video feeds, allowing to take advantage of XDCAM
EX/HD workflow.
FS-T2001 records to removable SxS cards or internal 250GB hard drive
in the XDCAM EX/HD (35Mb/s 1080i/720p and 25Mb/s 1080i),
XDCAM HD422 format (HD422 50Mb/s 1080i/720p) or in a SD format
(4:2:2 35Mbps or 4:2:0 25Mbps).
With numerous connectivity possibilities (Ethernet, USB, Wi-Fi), FST2001 is the perfect all in one device to record, manage, share and
playback your video clips.
The unit can be powered by a DC power source as well as by an external
battery (BP-U in desktop configuration).
FS-T2001 Media Recorder 1

Introduction
Features
Record XDCAM Video on SxS Solid-State Recording Media or on
the internal hard drive. Check the Focus FS-T2001 product page
(www.vitec.com) for the latest list of qualified media.
Record in industry standard XDCAM HD422 (50Mbit/s MXF)
directory structure ensuring best in class video quality.
Record in industry standard XDCAM EX directory structure
including HQ (35Mbps) and SP (25Mbps) modes ensuring
maximum compatibility.
Record SD-SDI input in 4:2:2 (35Mbps) or 4:2:0 (25Mbps) MP4
clips (file compatibility limitations apply).
Save on SxS (2 slots available, Media A-B) or on the internal
250GB Hard Drive (Media C).
Use the FS-T2001 to playback and preview clips on a HD-SDI /
HDMI monitor or on its front panel LCD.
Preview the SDI video input on the front panel LCD.
View menus, thumbnails and playback on the built-in 2.4” color
LCD display, from any angle.
Control the FS-T2001 quickly and easily using the intuitive menu
structure or via a web interface.
Never miss a shot with retro-cache recording (up to 10 seconds).
Connect to a wide array of cameras (input) and monitors (output)
using the HD-SDI I/O, HDMI output or Composite output.
Mount SxS cards to a computer (slave mode) and connect
accessories (host mode) using USB ports.
Retrieve your recorded clips through SMB/FTP using the fast
1Gbps Ethernet connection.
Export XDCAM clips to FS-T2001 over network for playback or
storage.
Control FS-T2001 over the network (Wi-Fi or LAN).
2 FS -T2001 Media Recorder

Introduction
Battery or Power Source Required
The FS-T2001 requires a battery or power source, such as
Sony BP-U battery or DC12V 4-pin XLR power supply. These
items are sold separately.
See the VITEC website for qualified devices.
Unpacking
Verify that the FS-T2001 has the following items:
FS-T2001 Media Recorder Unit
Neoprene protective case for transport
User Guide
Missing or Damaged Components
If there are missing or damaged items, contact VITEC Support for
assistance (refer to Warranty section).
FS-T2001 Media Recorder 3
Quick Start
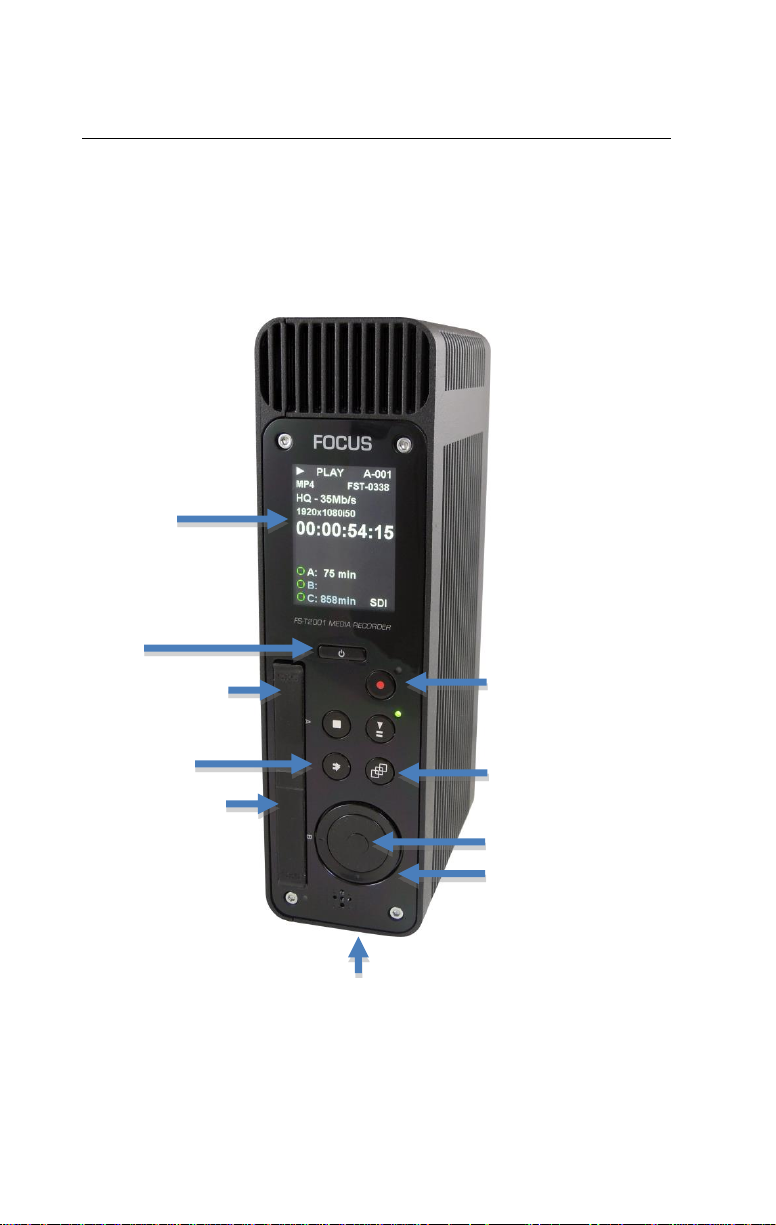
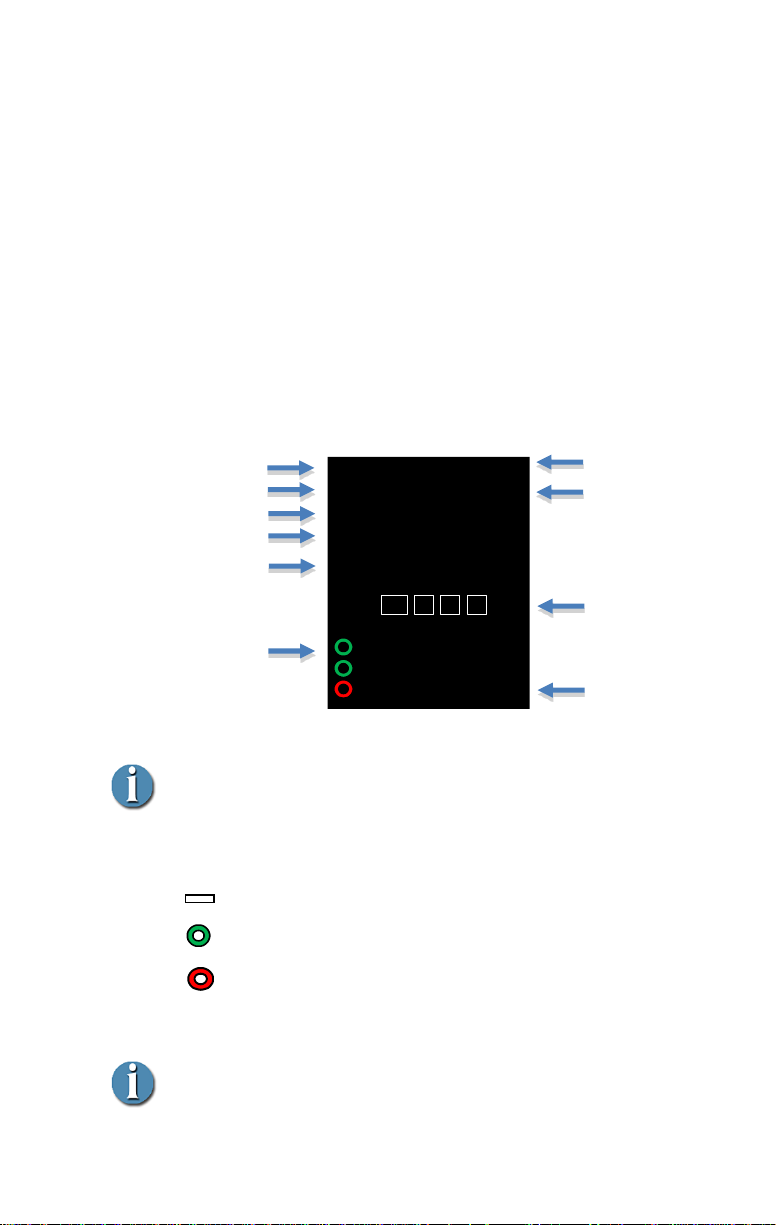
SxS/Express Card Slot A
Power Button
Color LCD Display
2.5", 240x320
Menu, Status, Preview and Clip
Thumbnail
SxS/Express Card Slot B
Scroll-wheel with external 4
axis buttons.
Control Buttons
(Play/Pause, Stop, Rec, Split
REC) with REC/PLAY activity
LEDs
Home/Menu Button
Speaker
Provides warning sound and
feedback during menu navigation.
Thumbnail Button
OK / Preview button
Physical Description and Controls
Front View – Controls
Quick Start
4 FS-T2001 Media Recorder
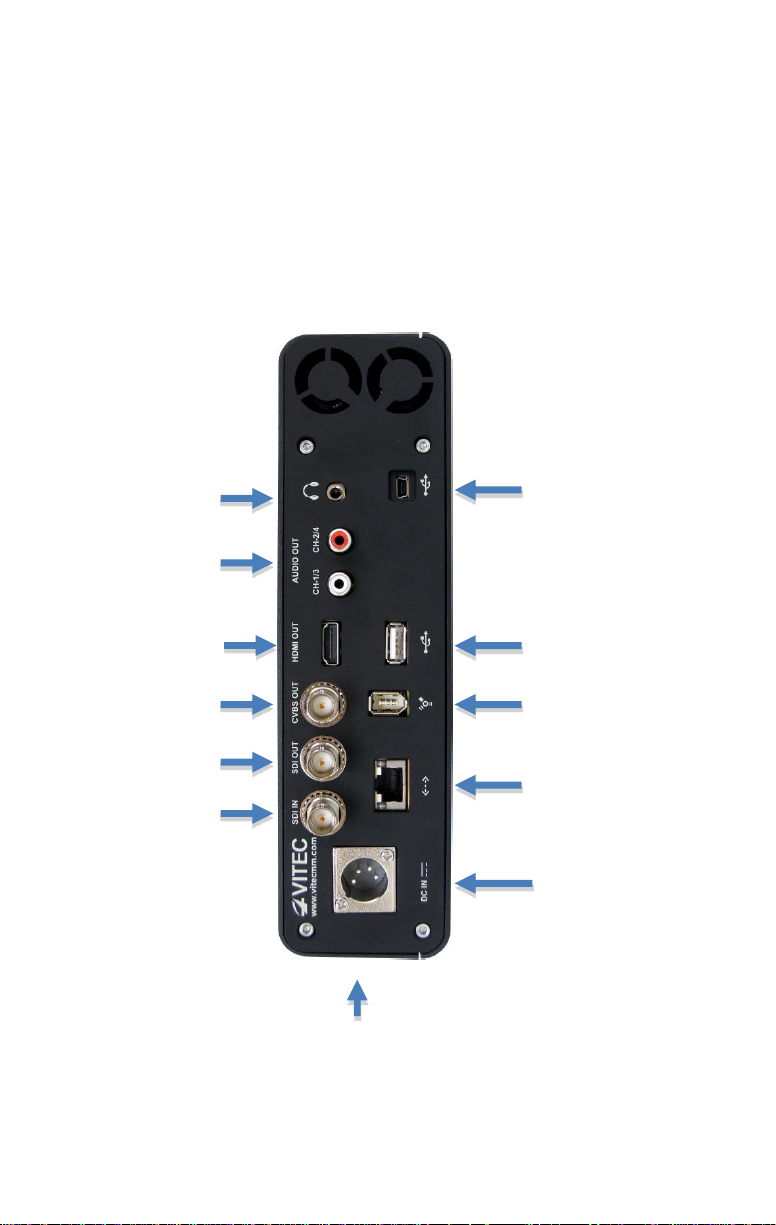
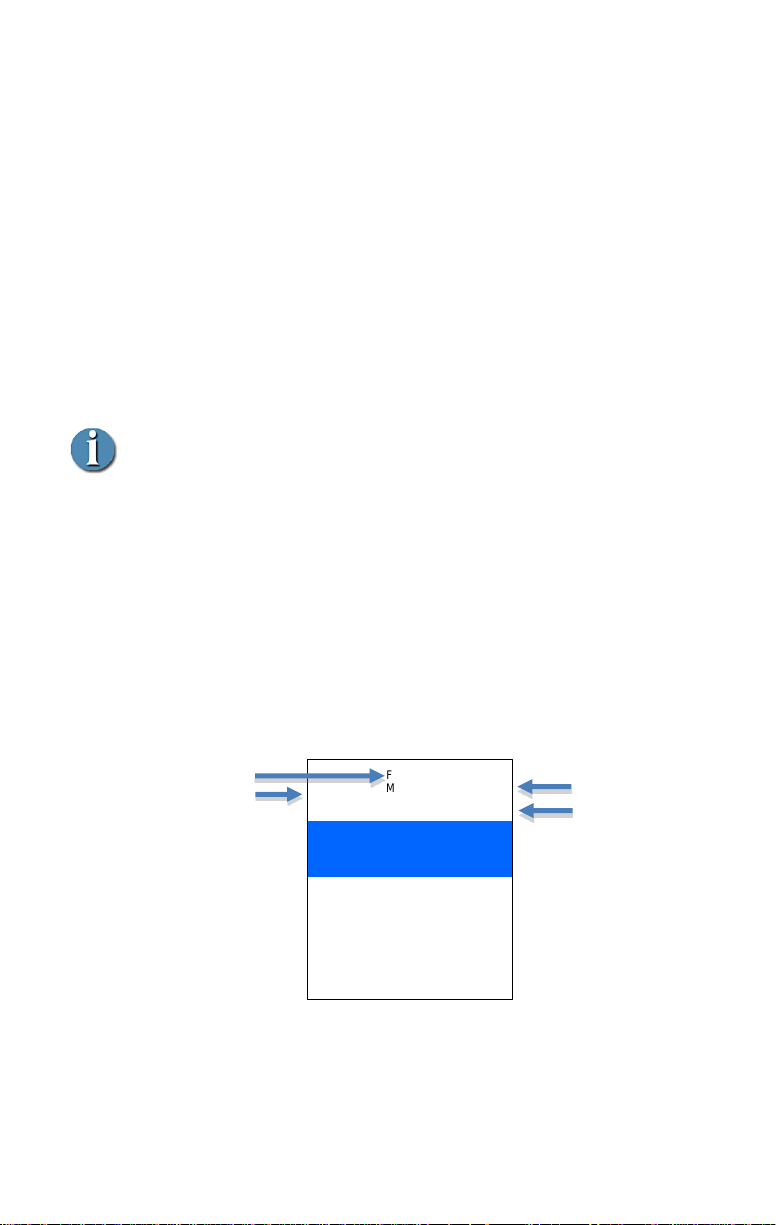
Rear View – Connections
Host / Accessory USB
Port (USB Type A)
Computer USB Port
(mini USB)
SDI input (BNC)
Power: 4-pin XLR DC
input (11-17V)
Battery BP-U Mount location
Gigabit Ethernet
(RJ45)
IEEE 1394 (for future use)
SDI output (BNC)
CVBS output (BNC)
HDMI output(HDMI)
2x Ch. Unbalanced
Audio out (RCA)
Audio out (Jack)
Quick Start
FS-T2001 Media Recorder 5

Quick Start
Safely Ejecting SxS Media
It is necessary to safely eject SxS media in order to avoid
possible corruption of content on the card. To safely eject a
card, please refer to the Media Status information as detailed on
next page.
Connecting FS-T2001 to Camera's HD-SDI Port
To connect the camera and FS-T2001, follow these steps:
1. Locate the HD-SDI port on the camcorder.
Ensure that the HD-SDI output port on the camera is enabled
and outputting a valid SD/HD signal. Refer to the
camcorder's user manual for additional information.
2. Connect one end of the BNC cable to the camera's HD-SDI
output port.
3. Connect the other end of the BNC cable to the HD-SDI input
port on the FS-T2001.
Inserting and Removing SxS Media
Inserting SxS Media Into FS-T2001
FS-T2001 is compatible with SxS media. Check the Focus FST2001 product page (http://www.vitec.com) for the latest list of
qualified media. SxS media can be inserted into the FS-T2001's
Express Card slot A and B. If being used for recording, make sure
the SxS card's write protection feature is switched off.
To insert SxS Media into FS-T2001, follow these steps:
1. Remove the SxS dust cover by lifting it from the lip
2. Insert the SxS card.
The card is keyed so that it will only insert in the correct
orientation. Never force the card into the slot.
3. Replace the dust cover.
Removing SxS Media from FS-T2001
To remove SxS media from FS-T2001, follow these steps:
1. Remove the SxS dust cover by lifting it from the lip.
2. Check the Media status then release the SxS card.
Press on it firmly and release. The card disengages and
springs forward.
3. Grasp the card and pull it from the unit.
4. Replace the dust cover.
6 FS -T2001 Media Recorder
Quick Start
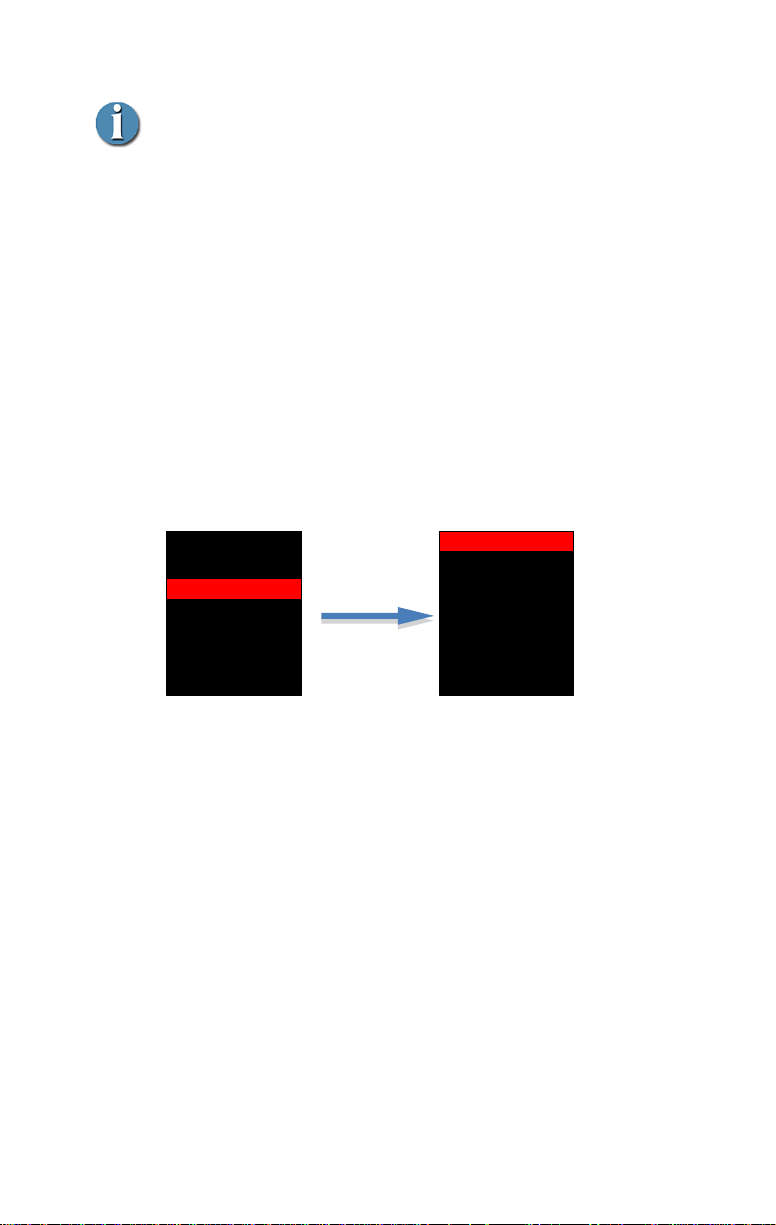
Media Status
A/B/C respectively corresponds to the SxS Slot A / SxS Slot B and the internal
Hard Drive.
Media which are not in use are dimmed (the remaining media is the one used
for the current or next recording)
In front of each of those drive letters, an icon indicates the media status:
SxS card cannot be used for recording (either it is formatted in an
incompatible file format or it is write protected).
SxS and HDD are ready to use. For SxS cards, this logo indicates that
cards can be safely removed.
Media is in use that should not be removed (SxS). The unit should not
be turned off if this logo appears.
Remaining recording time is provided for each media. If “LOCK” appears next
to A/B, it indicates that the SxS card is write protected.
Timecode / User Bit Display / Headphone Level Options
Using the scroll wheel during record/playback/stop, it is possible to cycle
through the different timecode / user bit modes and Headphone Level options:
Input format
Record time
remaining on media
and media status display
Status
Record Mode
Record File Type
Volume Label and
Track Number of clip
TC/counter display
Input
Clip name
Mode indicator
C- 0002
HD422 – 50Mb/s
TC 1920x1080i/60
00:18:00:08
A: 50 min
B: Lock
C: 180 min
C E
P
SD
MXF
FST_0128
STOP
Powering FS-T2001
Start FS-T2001 unit by pressing the power button. The FS-T2001
LCD boot-up screen immediately appears and, after complete boot
up, the HOME screen appears.
To shut down the unit, press the power button for about 3 seconds.
The FS-T2001 screen display
Home screen
The Home screen displays the configuration and media status of the
FS-T2001 unit.
FS-T2001 Media Recorder 7
Quick Start
COUNTER:
Displays current clip duration starting from 00:00:00:00. Detected stream type
is displayed above the TC counter
TC:
Displays source TC being recorded in the stream (EXT TC timecode mode must
be selected). Detected stream type is displayed above the TC counter
USER BIT:
Displays current user bit setting in the stream.
Detected stream type is displayed above the TC counter
Set Headphone Level / Battery Level:
By pressing OK in this screen, user can modify the Headphone level with the
wheel.
Battery Level can be reviewed (if connected to a DC power supply, the
displayed info is not valid).
Clip Thumbnail
Clip Name
FST_0001
MXF
00:40:16:18
00:08:01:18
C-001
FST_0002
MP4
00:52:14:18
01:18:01:18
C-002
FST_0001
MP4
00:5816:18
00:18:01:18
A-001
FST_0001
MP4
00:00:23:04
00:40:01:00
A-002
Clip format and
location on media
Start Timecode
and clip duration
Mode Indicator
Provide information of the current FS-T2001 configuration
SD: Output playback resolution is set to SD (please refer to VIDEO OUT
setting in OPERATION menu)
C: Retro cache recording is activated (please refer to REC MODE setting
in OPERATION menu)
E: External Start/Stop recording synchronization is activated (please refer
to CONTROL MODE setting in OPERATION menu)
P: PsF mode is activated (please refer to PSF setting in OPERATION
menu)
Thumbnail screen
The thumbnail screen is accessible using the THUMBNAIL button. It
displays recorded clips from media A, B and C.
8 FS -T2001 Media Recorder
Quick Start
OPERATION
SETUP
UTILITIES
OK or Right
SETUP
DATE 11/22/2012
TIME
TIMEZONE
DST ADJUST
SETUPMENUS
Quick Access to A, B or C media
Direct access to the clips located on A, B or C can be achieved using the
Left/Right buttons around the scrollwheel or by taping the thumbnail button.
Copied/cloned card on C can also be retrieved using this solution.
Menu screens
Menus can be accessed using the HOME button.
FS-T2001 has three separate menus : OPERATION, SETUP and
UTILITIES.
Navigating inside the menus is performed using the 4 axis buttons or
scrollwheel. The selection is achieved using the OK button inside the
scrollwheel.
To exit menu screens, use the Left or HOME button to return to the
HOME screen.
FS-T2001 Media Recorder 9

Quick Start
The FS-T2001 Operation Modes
The FS-T2001can be used in either vertical or horizontal (desktop)
position.
The unit can automatically detect its orientation and displays the LCD
screen accordingly (portrait or landscape mode).
The FS-T2001 Menu Controls
The FS-T2001 offers 5 main control buttons
REC button to start/split a recording. To select the media on which
the clip will be recorded, use the 9 o’clock button prior starting the
record (Auto, A-B or A, B, C only).
Pressing REC while in record will split the recording in progress:
the clip recorded prior this action will be closed while a new clip
will be created (no frames are lost between the two clips).
STOP button to stop a record/playback.
After a single STOP press during playback, on next play, playback
will resume. Resume function can be disabled by pressing the
STOP button twice.
PLAY/PAUSE button to start or pause a playback.
Used during recording, record will pause until the PLAY/PAUSE
button is pressed again.
HOME button to access or exit FS-T2001 menus.
THUMBNAIL button to access the clip list. To exit, press the HOME
button.
To quickly access clips on drive A,B or C either press the
THUMBNAIL button several times or the 3’oclock (A > B > C)
around the scroll wheel.
FS-T2001 offers a scroll wheel with a center button as well as 4-axis
buttons.
SCROLLWHEEL is mainly used to scroll quickly within a clip list.
It can also be used to navigate into menus and modify a setting
value.
While in the HOME screen, it can also be used to circle through the
different HOME screen views (Timecode / User Bit Display /
Headphone Level Options).
10 FS -T2001 Media Recorder

Quick Start
Previous
Clip
Next Clip
Select
Playback
Media
Select
Record
media
O
K
OK button is used to validate a choice. It can also be used to
quickly display the playback preview or the live SDI video input
on the front LCD panel.
4-axis buttons - Left/Right/Up/Down
o In Menus, it is possible to navigate (Up/Down) and
Enter/Exit a menu setting using respectively the 12/6 or
3/9 o’clock buttons.
o In Home Screen, it is possible to select the next media to
be recorded on as well as the next clip for playback.
Select media for record: 9 o’clock button
select the media on which next clips will be
recorded (Auto, A-B, or A/B/C only).
Select media for playback: 3 o’clock button
can select A, B or C media for playback.
Select clip for playback: 12/6 o’clock
buttons can be used to select the clip from a
specific drive location (respectively
decrement or increment selected clip
number)
o During playback, it is possible to navigate within a clip:
3/9 o’clock buttons allows to Fast Forward/Rewind and
12/6 o’clock buttons allows to skip to the next/previous
clip.
FS-T2001 Media Recorder 11

Quick Start
Portrait/Landscape 4-axis buttons behavior
Buttons follow the orientation of the device so that Left/Right
and Up/Down directions are always respected.
12 FS -T2001 Media Recorder

Quick Start
The FS-T2001 OPERATION menu
provides the basic settings for unit
operation. The most common unit
settings are found in this menu.
Use the scroll-wheel or Up/Down
buttons to move in the Operations
menu.
OPERATION
MODE
CONTROL
FORMAT
REC MODE
REC MEDIA
REC FORMAT
PSF
REC/PLAY
NORMAL
FAT/MP4
NORMAL
AUTO
HQ MODE
OFF
Basic FS-T2001 Setup
Settings
FS-T2001's menu settings are retained on FS-T2001 even through
power cycles.
Set Date and Time
Prior to utilizing FS-T2001, enter the menu and navigate to the
SETUP menu. From the SETUP menu, set FS-T2001's Date and
Time (as well as Time Zone and DST Adjust if desired).
Operation Menu Setup
Set Control Mode
There are three CONTROL modes available:
NORMAL - Control the FS-T2001 from its front panel.
Ancillary record data and timecode start/stop in the
SD/HD-SDI input stream is ignored.
EXTERNAL - The FS-T2001 receives Record and Stop
triggers from ancillary data in the SD/HD-SDI input
stream. This assumes a source that supports ancillary data
FS-T2001 Media Recorder 13
is being used.
TC BREAK - The FS-T2001 monitor's embedded
timecode in the SD/HD-SDI input stream. When a
camera is set to REC-RUN TC mode, recording will
begin on FS-T2001 when timecode is incrementing.
When timecode stops, the recording stops.
NOTE: When this mode is being used, before connecting

Quick Start
While in EXTERNAL or TC BREAK mode, the
home screen will show the following logo:
- SxS cards must be formatted in FAT32.
- HD422 recording is not available in this mode.
- Upper file size limit is 4GB
- Internal Hard Drive has an UDF Sony file structure. MP4
clips are available in Userdata/Vitec-FS/Live/ directory.
- SxS cards must be formatted in UDF.
- Upper file size limit is 20GB
- SD recording is not available in this mode
E
Set Format Mode
Two formats options are available depending on your XDCAM
workflow:
FAT/MP4: For XDCAM EX workflow. In this mode, HQ,
UDF/MXF: For XDCAM HD/HD422 workflow. In this
FS-T2001 to the camera, make sure the camera is set to
REC-RUN mode and not recording.
SP and SD recording are stored in MP4 format.
mode, HD422, HQ / SP are stored in MXF format.
Set Record Mode
NORMAL - In normal record mode, FS-T2001 begins
recording immediately when triggered.
RETRO CACHE - Retro Cache mode continuously
records a constant video loop in the FS-T2001’s RAM.
The length of the video loop can be preset in one-second
intervals, up to 10 seconds. Once record is triggered, the
cached content is added to the beginning of the recording.
See SETUP for presetting the desired retro cache
duration.
Set Record Media Mode
AUTO: In this mode, the record will happen on media A
then B, then C. Seamless record is not ensured from B to
C media.
14 FS -T2001 Media Recorder

Quick Start
Safely remove your media
In order not to corrupt your media, remember to remove it only
when the media status is green.
Media in use
Media used for current or following recording is highlighted.
Media is available when its media status is green.
STOP C- 002
HD422 - 50Mb/s FST_002
MXF
TC 1920x1080i/60
B: 20 min
C: 180 min SDI
OK to remove
A-B: Recordings only happen on SxS cards. If SxS card B
is full and a new SxS card has been inserted in slot A, the
recording will continue on slot A.
A: Recordings only happen on SxS cards slot A.
B: Recordings only happen on SxS cards slot B.
C: Recordings only happen on the internal 250GB Hard
Drive.
A: 50 min
Set Record Format Mode
Three REC FORMAT options are available in HD:
HD422 MODE – Sets the record bit rate to 50Mbit/s in
4:2:2 color sampling mode (422P@HL). Recording mode
is in XDCAM HD422.
This mode only appears if RECORD MODE is set to
FS-T2001 Media Recorder 15
UDF/MXF.
HQ MODE - Sets the record bit rate to 35Mb/s (MP@HL)
recording mode in the XDCAM EX format.
SP MODE - Sets the record bit rate to 25Mb/s (MP@H-
14) recording mode in the XDCAM EX format.
This mode only appears if RECORD MODE is set to
FAT/MP4.
00:00:00:00

Quick Start
SD recording
SD recording are available in FAT/MP4 recording modes only.
MP4 clips are natively compatible with Adobe Premiere and Edius
editing software. For Final Cut Pro users, MP4 clips can be
converted to MOV instantaneously using our desktop conversion
tool available for MAC or Windows OS: “FS-T2001_SD_Converter”
Two REC FORMAT options are available in SD (FAT/MP4):
SD 422 MODE – Sets the record bit rate to 35Mbit/s in
This mode appears if RECORD MODE is set to
SD HQ MODE - Sets the record bit rate to 25Mb/s in
This mode appears if RECORD MODE is set to
Set 1080i Frame Size (HQ Mode Only)
Two HQ 1080i options are available:
1440 - Sets the HQ (35Mb/s) frame size to 1440x1080
1920 - Sets the HQ (35Mb/s) frame size to 1920x1080
4:2:2 color sampling mode.
FAT/MP4
4:2:0 color sampling mode.
FAT/MP4
Set Timecode Mode
Five TIMECODE options are available:
EXT TC - The timecode recorded comes from the RP188
timecode in the SD/HD-SDI input stream (Default TC
display mode)
FREE RUN - The timecode recorded comes from the
internal, constantly incrementing free run timecode
generator in the FS-T2001. It is possible to set the TC
value using the TC Set function in the setup menu.
REC-RUN - The timecode recorded comes from the
internal timecode generator in FS-T2001. Timecode only
increments when a recording is in process.
The first frame of a new recording will have a TC value
+1 from the previous recording.
REGEN - The timecode recorded comes from the internal
timecode generator on FS-T2001. Timecode only
increments when a recording is in process. The first
frame of a new recording will have a TC value +1 from
16 FS -T2001 Media Recorder
the last recording on the media.

CLOCK SET – The timecode is calculated from the FS-
4 channels audio recording
4-channel audio is for use with HQ/HD422 modes only.
C- 0002
HD422 – 50Mb/s
TC 1920x1080i/60
00:18:00:08
A: 50 min
B: Lock
C: 180 min
MXF
FST_0128
REC
T2001 time clock.
FREE RUN, REC-RUN, REGEN and CLOCK SET record
modes ignore the RP-188 timecode in the incoming SD/HDSDI stream. These modes are useful when the RP-188
timecode in the SD/HD-SDI stream is not desired or the source
does not support RP-188 timecode.
Set Audio Mode
There are three REC AUDIO options:
Ch 1/2 - When 2-channel audio recording is desired, this
setting records channels 1 and 2 of the embedded SDI audio
input.
Ch 3/4 - When 2-channel audio recording is desired, this
setting records channels 3 and 4 of the embedded SDI audio
input.
Ch 1/2/3/4 - When 4-channel audio recording is desired,
this setting records channels 1, 2, 3 and 4 of the embedded
SDI audio input.
Quick Start
Recording
To begin recording, press the REC button from any screen or use the EXTERNAL or TC BREAK trigger as defined in “Set Control Mode”.
The FS-T2001 home screen displays the following screen:
FS-T2001 Media Recorder 17

Quick Start
Pausing/Splitting a record
To pause a record, press the Play/Pause button while in record
To split a record, press the Record button while in record.
C- 0002
HD422 – 50Mb/s
TC 1920x1080i/60
00:00:00:00
A: 50 min
B: Lock
C: 180 min
MXF
FST_0128
STOP
The name and track number counters increment when recording is in
process. Available record time on the inserted media is also updated as
recording proceeds.
Clip Thumbnails and List
The FS-T2001 provides a screen to review clips available on each of the
media. It may be used to select clips for playback.
To view clip thumbnails, press the FS-T2001 THUMBNAIL key while
in the home screen.
Use the scroll wheel to select between different clips.
Press the THUMBNAIL key or 3/9 o’clock buttons to directly
access clips recorded on A, B or C drive.
For more information, refer to section “Selecting a Clip by its
Thumbnail” on page 19.
Stop Recording
Press either the camera’s record trigger or the FS-T2001's Stop button
().
The recording is represented as a single clip even if several files have
been created onto the SxS cards or Hard Drive (4GB file limit in FAT).
18 FS -T2001 Media Recorder

Quick Start
Playback of SD clips
If a clip is downscaled in SD for playback (or if the clip has
been recorded in standard definition – future DV support) , the
video is displayed on the SDI output as well as on the
Composite output.
Next
Clip
Previous
Clip
Select
Playback
Media
A-XXX , B-XXX, C-XXX,
Those clips numbers refer to clips respectively stored on the
card located in SxS Slot A / SxS Slot B or stored on the internal
hard drive.
YY-XXX
Those clips refer to clips copied from SxS card to the internal
hard drive
YY – refers to the SxS card copy number (clone)
XXX – refers to the clips from the YY SxS card copied.
Those clips are stored in UserData/Archives hard drive
directory.
Playback Recording
The FS-T2001 provides the ability to playback video simultaneously to
its SD/HD-SDI and HDMI output. At the same time, the video can be
displayed on FS-T2001 LCD screen.
To preview a video clip, connect the FS-T2001 through its SD/HD-SDI,
HDMI port to a camera or SD/HD-SDI, HDMI display device. The
camera must support SD/HD-SDI, HDMI input and preview functions.
To playback and output a clip from FS-T2001's SD/HD-SDI, HDMI
port:
1. On the Home screen, select the clip to playback by its Volume
Label and Track Number or by its Clip Name
Use up/down buttons to list the available clips stored on the FST2001.
Use the right button to change of media (A, B, C)
FS-T2001 Media Recorder 19

Quick Start
Front LCD panel preview
Press OK button to activate/deactivate the preview.
O
K
2. When the clip is located, press the Play/Pause (/ I I) button.
Playback begins over the SD/HD-SDI and HDMI port.
3. To pause the playback, press the FS-T2001 Play/Pause (/ I I)
button.
4. If necessary, use the left/right buttons around the scroll wheel to
rewind/fast forward inside a clip.
5. Stop playback by pressing the FS-T2001 Stop () button.
Selecting a Clip by its Thumbnail
1. Another method for selecting a clip to playback is to pick it from
list of clips that appear on the Thumbnail Preview menu.
2. Go to the Home menu.
3. Press the Thumbnail button.
4. A list of the video clips with thumbnails and clip information
appears. If there are no video clips, no list appears and the Home
menu remains displayed.
5. Locate the file using the Scroll-wheel. You can directly access to
a specific drive (A, B, C) by pressing the thumbnail button or the
left/right button.
6. Press the Play/Pause (/ I I ) to start playback.
7. Press Stop () to end playback and return to the Home screen.
Playback Trick Modes
During playback, using right/left buttons around the scroll wheel
respectively allow to Fast Forward / Rewind.
Using up/down buttons respectively allow seeking to previous or
next file.
20 FS -T2001 Media Recorder

Quick Start
UDF limitation
FS-T2001 is able to read UDF2.5 formatted media from
Sony camera (play and copy clips).
Camera using UDF 2.5 file format will not be able to
read/write UDF formatted card from FS-T2001.
Using XDCAM EX/HD Content on a Computer
It may be necessary to install SxS device drivers and applications
that support XDCAM EX/HD import/playback on your computer
system. Consult XDCAM EX/HD documentation for information on
using XDCAM EX/HD content on your computer system.
Utilizing FS-T2001’s SxS recorded clips in other
devices
Once a recording is complete, it is possible to remove the SxS card and
insert it into other XDCAM EX/HD devices.
Media compatibility is ensured with Sony XDCAM EX/HD camera in
FAT and UDF format (please review limitation for UDF below).
Ingest tool as XDCAM browser are also compatible with FAT and UDF
FS-T2001 formatted media (no limitation).
Utilizing FS-T2001’s SxS recorded clips on a
computer
Once a recording is complete, it is possible to remove the SxS card from
the FS-T2001 and mount it to a Mac or Windows computer system by
inserting it into an Express Card slot/reader or external SxS card reader.
When the SxS card is inserted into a reader, the card mounts to the
computer as an external volume. An SxS card that has been formatted
and recorded by FS-T2001 is compatible with applications that support
XDCAM EX/HD.
FS-T2001 Media Recorder 21

Quick Start
XDCAM EX
FS-T2001's directory is identical in structure to SxS cards used with
other XDCAM EX devices. When mounted to a computer, the FST2001 directory appears as:
XDCAM HD/HD422
FS-T2001's directory is identical in structure to SxS cards used with
other XDCAM HD/HD422 devices. When mounted to a computer, the
FS-T2001 directory appears as:
22 FS -T2001 Media Recorder

Quick Start
MXF clips recorded
on HDD
Copied cards
MP4 clips recorded
on HDD
Exported clip directory
Accessing FS-T2001's clips from a computer
Hard Drive directory Structure
Internal Hard Drive complies with the UDF Sony file structure layout.
MXF Clips recorded directly onto the hard drive are stored in
Clip directory
MP4 Clips recorded directly onto the hard drive are stored in
UserData/ Vitec-FS/Live/BPAV directory
Copied Clips from SxS cards to the hard drive are stored in
UserData/Archives directory
Folder name has the following format YYYYMMDD-HHMMSS-
CardLabel
Since software version 1.2.0, it is possible to copy clips back to FS-
T2001
UserData/Vitec-FS/Shared directory
Shared folder has an UDF Sony file structure. This structure allows
an easy export of MXF clips from Avid Media Composer.
Mount the unit onto a computer
FS-T2001 clips (SxS cards) can be accessed via a desktop computer
using a USB connection.
1. Use a mini-USB to USB Type A cable
FS-T2001 Media Recorder 23

Quick Start
Record while in MEDIA mode
Recordings are not possible while the unit is mounted to a
computer
2. Plug the Mini-USB plug into the FS-T2001 Mini-USB
connector.
3. Connect the USB Type-A connector to a computer
4. In OPERATION menu, set MODE to MEDIA.
5. SxS cards are now accessible (Read and Write).
Accessing FS-T2001 clips located on Hard Drive via FTP
FS-T2001 clips stored on the internal hard drive can be accessed via
FTP. This access is recommended for file transfer better than for
mounting FS-T2001 as a network drive on a computer (refer to
Accessing FS-T2001 clips via SMB/CIFS section below).
1. Configure the Ethernet settings of the FS-T2001 in SETUP
menu.
2. Connect FS-T2001 to an Ethernet network and retrieve its IP
address (IP_address)
3. Enable the FTP access in the SETUP menu, SERVER setting
4. Set a password in SETUP, SVR P/W PASS setting. Default is
fst2
For MAC or Windows platform:
5. Use a FTP client on your computer such as Filezilla FTP
a. Enter Host name of the machine: it is the IP address
that can be found in IP ADDR setting.
b. Enter login: fst2
c. Enter Password : refer to 4.
6. Files are now accessible and can be downloaded locally on
your computer.
For Windows platform only:
5. In Explorer window, enter ftp://IP ADDR
6. Enter Login and password.
Login name is defined as fst2, password is user defined (please
see above).
24 FS -T2001 Media Recorder

Quick Start
FS-T2001 not detected on network
It is possible that FS-T2001 will not be visible on a network if
WORKGROUP setting does not match the actual configuration
of the network.
WORKGROUP setting can be modified in the SETUP menu.
7. Files are now accessible and can be downloaded locally on a
computer.
Accessing FS-T2001 clips via SMB/CIFS
FS-T2001 media (SxS cards and HDD) can be mounted as network
drives on a computer. This type of access is particularly interesting
when user wants to review clips or upload only a sequence from a clip
better than a full clip or directory using FTP. The section below
demonstrates how to map a network drive on MAC and Windows OS
but also retrieve clip using XDCAM browser.
Transfer speed over Gigabit Ethernet is up to 30MB/s allowing smooth
playback of a clip from a remote NLE as well as fast ingest.
For MAC:
1. Refer to step 1 to 4 from previous section to connect and
enable the SAMBA server.
2. From the Finder application under MAC, select “Go To” then
“Connect to server”.
3. Enter “smb://” followed by the IP address or the HOSTNAME
of the recorder (can be found respectively in SETUP menu : IP
ADDR / HSTNAME).
4. Click to connect.
5. The computer will locate FS-T2001 and prompt to enter the
chosen login and password (default is fst2 / fst2).
FS-T2001 Media Recorder 25

Quick Start
6. Once entered, user can select which media he wants to connect
to (Media A/B refers to SxS cards and Media C to the internal
HDD). Media A/B and C can be all selected at the same time.
7. Network drives are now accessible and visible on the MAC
desktop.
8. Using XDCAM Browser, it is possible to import a full clip, a
part of a clip or just preview clips.
The image above shows how the HDD shows up using
XDCAM Browser under MAC platform.
For Windows platform:
1. Refer to step 1 to 4 from previous section to connect and
enable the SAMBA server.
2. Open an explorer window; select “Tools” then “Map Network
Drive”.
3. The window below opens. Select a network drive then either
browse for the unit on the network or directly enter:
“\\HOSTNAME\Media X”.
o HOSTNAME: Hostname of the devive can be found
in SETUP menu HSTNAME).
26 FS -T2001 Media Recorder

Quick Start
o Media X: Media X refers to the media the user wants
to connect to. X value must be replaced with either A,
B or C to respectively connect to the SxS card A / B
or the HDD.
4. The computer locates FS-T2001 unit and prompts to enter the
chosen login and password (default is fst2 / fst2).
“Connect using a different login” may be used in case you are
logged with a different user name/password.
5. Network drive is now accessible and visible in the Windows
drives list (see below)
FS-T2001 Media Recorder 27

Quick Start
6. Using XDCAM Browser, it is possible to import a full clip, a
part of a clip or just preview clips.
The image above shows how the HDD shows up using
XDCAM Browser under Windows platform.
28 FS -T2001 Media Recorder

Quick Start
XDCAM export limitations using FCP
Standard Stereo Audio clips cannot be exported as XDCAM
clips. Only Dual Mono clips can be exported.
To change to Dual Mono, go to Settings -> Audio Options and
select DUAL MONO.
Exporting an edited clip to FS-T2001 clips via
Ethernet (SMB/CIFS)
FS-T2001 offers the capability to upload edited clips to its internal hard
drive as well as playback those edited clips.
From ingest, to edit, to playback no external media are no more
necessary.
FS-T2001 can playback XDCAM EX / HD clips (MP4 or MXF) as well
as XDCAM HD422 (MXF) clips. CBR (Constant Bit Rate) mode
should be used in XDCAM EX.
With FCP:
1. Ensure XDCAM plugin are installed for FCP (Content Browser
software from Sony).
2. Import your clips as described above and edit your sequence.
To export the sequence to FS-T2001:
3. Select Folder/Export/Sony XDCAM (or Sony Content
Browser)
4. Select the Shared folder on FS-T2001 as your Exporting folder
5. Define a name for the exported clip
6. Select the Format and Settings
FS-T2001 Media Recorder 29

Quick Start
7. Click the export button
Once the edit and transfer is complete, it is possible to playback the clip
immediately! Hit FS-T2001’s thumbnail button to display the imported
clip then play to start the playback.
With Avid Media Composer:
On Mac and Windows platform, through AMA linking, Media
Composer (Avid MC) allows to access a network folder filed with
compatible video clips. To access video clips stored onto FS-T2001
hard drive, please follow those steps:
1. Ensure the XDCAM Plug-In for your MC Avid version is
installed (PDZK-MA2 for MC7). This Plug-In can be found on
Sony professional website.
2. On MAC, connect to the internal HDD using SMB server as
decribed in the previous section.
3. Select File/AMA Link within Avid MC and locate the FS-
T2001 hard drive (Media C). Click Open.
Windows / Mac
30 FS -T2001 Media Recorder

Quick Start
At this stage, clips are now listed and accessible for preview and can be
used within a sequence.
To export the edited sequence back to FS-T2001:
1. Link the FS-T2001 Shared folder using AMA linking: Select
File/AMA Link and locate the Media C\UserData\Shared
location as shown below. Click Open.
The below warning screen is displayed:
2. To start the export process, select Output/Export To
Device/XDCAM…
The Shared location must be selected in the Target XDCAM
Disk.
Select XDCAM HD 50Mbits or 35Mbits Video Format.
FS-T2001 Media Recorder 31

Quick Start
8. Click the OK button
Once the edit and transfer is complete, it is possible to playback the clip
immediately! Hit FS-T2001’s thumbnail button to display the imported
clip then play to start the playback.
32 FS -T2001 Media Recorder

Quick Start
Wi-Fi configuration
panel
Status information
Remote control your FS-T2001 over LAN or Wi-Fi
FS-T2001 offers the capability to be controlled over an intuitive web
interface. The web interface is available through wired or wireless
connection (respectively using the Ethernet port or the optional VITEC
USB Wi-Fi adapter).
The web interface allows to:
Display the status of the SDI input resolution or, while in playback,
Display the FS-T2001 status: REC/PLAY/STOP
Start/Stop/Pause recording
Start/Stop/Pause playback
While recording, it is also possible to split the clip being recorded
FS-T2001 Media Recorder 33
Features
the outputted SDI resolution.
without losing any frames between the two clips.
This command is useful to immediately start editing a recorded clip
while still recording.

Quick Start
Default configuration
From factory, the device is configured in Ad-Hoc mode and
uses an internal DHCP server to provide the IP address.
The last four digits/symbols of the network name (FS-T2001XXXX) conform to the last four digits of the dongle’s MAC
address of the FS-T2001 unit (LAN).
FS-T2001 cannot be found
It is likely that the unit got reconfigured in Infrastructure
mode.To reset the Wi-Fi network setting, connect to the unit
over LAN and reconfigure the Wi-Fi settings as desired.
Accessing the web interface over LAN
To access the web interface, simply type the FS-T2001 IP address in
your favorite web browser (http://IP ADDR)
The IP address of the unit can be found in the SETUP menu under the
IP ADDR setting (refer to the SETUP menu section for more details).
Accessing the web interface over Wi-Fi
To control FS-T2001 over Wi-Fi, please use the VITEC USB Wi-Fi
Adaptor only (reference 14324).
By default, FS-T2001 Wi-Fi is configured in AdHoc mode allowing
direct access from your computer, laptop or mobile device.
Wi-Fi SSID is FST2_XXXX where XXXX are the last four MAC
address digits.
First connection:
1. Switch on the Wi-Fi on your PC / Mac or mobile device.
2. Search for available networks.
3. Select the network called FS-T2001-XXXX to connect to it.
4. Open a web-browser and connect to the device at this address
http://10.0.0.1
5. The default login and password are empty. Just click onto the
Login button.
6. You are now connected to your recorder!
Wi-Fi setting configuration
Wi-Fi settings can be configured to match your setup.
34 FS -T2001 Media Recorder

Quick Start
MODE:
- Ad-Hoc: In this mode, device runs DHCP server and give IP
address to clients in range of 10.0.0.240-10.0.0.250
- Infrastructure: In this mode, device connects to an access point
and get its IP address by DHCP or follow the settings specified
by the user (IP Address, Mask, Gateway)
ESSID:
By default ESSID (Network name) consists of FS-T2001 and last four
digits of Wi-Fi dongle’s MAC address.
- It is possible to enter a new network name manually.
- Scan Networks button can locate surrounding available access
point/networks available in Infrastructure mode.
Security Mode:
- No Encryption
- WEP/WPA/WPA2 : to be selected if the infrastructure network
is protected.
IP Mode: Available in Infrastructure mode
- DHCP : IP address will be provided by the router
- Static : IP address must be entered manually.
IP Address : to be entered if IP Mode selected is Static,
Network Mask: to be entered if IP Mode selected is Static,
Default Gateway: to be entered if IP Mode selected is Static,
MAC Address: Provide the MAC address of the Wi-Fi dongle
Adapter
Channel: In case of poor connection in AdHoc, it is possible to
change the Wi-Fi channel in use.
Resetting the Wi-Fi configuration
If the Wi-Fi configuration set is incorrect and access via the web page is
impossible, it is possible to reset the Wi-Fi settings to factory default
using the wired LAN connection.
HTTP API
FS-T2001 control can be totally and easily integrated within a customer
application:
Control commands can be sent using the following code:
http://IP_ADDR/php/query.php?type=COMMANDS
FS-T2001 Media Recorder 35

Quick Start
COMMANDS available are:
status: provide the status of the recorder (in stop/record or
playback mode)
rec_start: to start a record or split a recording in progress
play_pause: to play/pause a clip playback or to pause a
recording
stop: Stop the playback or the recording in progress.
For more information regarding the HTTP API, please contact the
VITEC technical support.
36 FS -T2001 Media Recorder

FS-T2001 Menus
Operation
Default
Options
MODE
REC/PLAY
REC/PLAY
MEDIA
CONTROL
NORMAL
NORMAL
EXTERNAL
TC BREAK
FORMAT
MP4/FAT
FAT/MP4
UDF/MXF
REC MODE
REC MEDIA
REC FORMAT
NORMAL
AUTO
HQ MODE
NORMAL
RETRO
AUTO
A-B
A ONLY
B ONLY
C ONLY
HQ /SD 422 (FAT/MP4)
HQ /SD HQ (FAT/MP4)
SP / SD (FAT/MP4)
HD422 (UDF/MXF)
HQ (UDF/MXF)
PSF
HQ 1080
AUTO
1920
AUTO
ON
OFF
1920
1440
FS-T2001 Menus
OPERATIONS Menu
The FS-T2001 Operations menu contains the basic operation and
recording settings for the FS-T2001. This menu contains settings that
are frequently changed during normal FS-T2001 operation. It is also
designed to provide a snapshot of the current settings for key operation
modes. The Operations menu features the following settings:
FS-T2001 Media Recorder 37

Operations
TIMECODE
EXT TC
EXT TC
FREE RUN
REC RUN
REGEN
CLOCK SET
USERBITS
REC AUDIO
TC SUPER
VIDEO OUTPUT
AUDIO MON
EXT UB
CH 1/2
OFF
NATIVE
CH 1/2
EXT UB
PRESET
CH 1/2
CH 3/4
CH 1/2/3/4
SIZE
POSITION
TRANSPARENCY
VIDEO
NATIVE
HD -> SD H CROP
HD -> SD H SQUEEZE
HD -> SD H LETTERBOX
CH 1/2
CH 3/4
MODE
REC/PLAY Set the FS-T2001 to recorder/player mode. In this mode,
the unit will record input video signals over SD/HD-SDI or playback
recorded content via SD/HD-SDI, HDMI.
MEDIA - Sets FS-T2001 to external drive mode. In this mode, FST2001can be connected via USB to a computer for an easy retrieval of
the clips stored on the SxS cards. In this mode, cards can be read and
write. In order to remain compatible with XDCAM standard, it is
recommended to use Sony plugins to write back edited clips to SxS
cards.
CONTROL
NORMAL – Use this setting to control the FS-T2001 from the unit's
front panel. Ancillary record trigger data in the SD/HD-SDI input
stream is ignored.
EXTERNAL - Use this setting to control the FS-T2001 by receiving
record and stop triggers from ancillary data in the SD/HD-SDI input
stream (assumes a source that supports ancillary data is being utilized).
38 FS -T2001 Media Recorder

While in EXTERNAL or TC BREAK mode, the
home screen will show the following logo:
- SxS cards must be formatted in FAT32.
- HD422 recording is not available in this mode.
- Upper file size limit is 4GB
- Internal Hard Drive has an UDF file structure. MP4 clips are
available in Userdata/Vitec-FS/Live/ directory
- SxS cards must be formatted in UDF.
- Upper file size limit is 20GB
- SD recording is not available in this mode
While retro cache mode, the home screen will
show the following logo:
C
E
TC BREAK control mode triggers the FS-T2001 from the camera
controls (using timecode breaks). FS-T2001 will start recording
record when the timecode is incrementing, and stop when it is
stalled.
The camera must support REC RUN or REGEN timecode and be
set to that mode. In addition, it may also require media to be
inserted and recorded to on the camera: consult the camera’s user
guide for further information. NOTE: When this mode is being
used, before connecting FS-T2001 to the camera, make sure the
camera is set to REC-RUN mode and not recording.
FORMAT
FAT/MP4: For XDCAM EX workflow. In this mode, HQ, SP and
SD recording are stored in MP4 format.
FS-T2001 Menus
UDF/MXF: For XDCAM HD/HD422 workflow. In this mode,
HD422, HQ / SP recording are stored in MXF format.
REC MODE
NORMAL – In normal record mode, FS-T2001 begins recording
immediately when triggered.
RETRO CACHE - In retro cache record mode, the FS-T2001 is
constantly in record mode, caching video to RAM in a loop on the
unit for a predetermined amount of time (set in one second
intervals, up to 10 seconds, in the setup menu). Once record is
triggered (in either normal or external control mode), the cached
content is added to the beginning of the recording.
FS-T2001 Media Recorder 39

Operations
REC MEDIA
AUTO: In this mode, the record will seamlessly happen onto media
A then B. When A/B media are full or absent, the media C is used.
A-B: Recordings only happen on SxS cards. If SxS card B is full
and a new SxS card has been inserted in slot A, the recording will
continue on slot A.
A ONLY: Recordings only happen on SxS cards slot A.
B ONLY: Recordings only happen on SxS cards slot B.
C ONLY: Recordings only happen on the internal 250GB Hard
Drive.
REC MEDIA can also be set directly in the HOME menu using the 9
o’çlock button. Pressing the 9 o’clock will switch the targeted drive
selection.
If A,B or C ONLY options are selected, the media letter will be
highlighted. If AUTO is selected, A/B/C media letters will colored in
red for few seconds. If A-B is selected, only A/B media letters will be
colored.
REC FORMAT
Three REC FORMAT options are available in HD:
HD422 MODE – Sets the record bit rate to 50Mbit/s in 4:2:2 color
sampling mode (422P@HL). Recording mode is in XDCAM
HD422.
This mode only appears if RECORD MODE is set to UDF/MXF.
HQ MODE - Sets the record bit rate to 35Mb/s (MP@HL)
recording mode in the XDCAM EX format.
SP MODE - Sets the record bit rate to 25Mb/s (MP@H-14)
recording mode in the XDCAM EX format.
This mode only appears if RECORD MODE is set to FAT/MP4.
Two REC FORMAT options are available in SD:
SD 422 MODE – Sets the record bit rate to 35Mbit/s in 4:2:2 color
sampling mode.
This mode appears if RECORD MODE is set to FAT/MP4
SD HQ MODE - Sets the record bit rate to 25Mb/s in 4:2:0 color
sampling mode.
This mode appears if RECORD MODE is set to FAT/MP4
40 FS -T2001 Media Recorder

SD recording
SD recording are available in FAT/MP4 recording modes only.
MP4 clips are natively compatible with Adobe Premiere and
Edius editing software. For Final Cut Pro users, MP4 clips can
be converted to MOV instantaneously using our desktop
conversion tool available for MAC or Windows OS: “FS-
T2001_SD_Converter”
While in PsF mode, the home screen will show the
following logo:
P
PSF
AUTO – Based on SDI ancillary data information, FS-T2001 will
automatically detect a PsF format and activate the segmented to
progressive conversion.
If the camera doesn’t provide the PsF flag, ON setting must be used
to ensure PsF stream compatibility.
ON – While in record, FS-T2001 will activate a segmented to
progressive (inverse PsF) format conversion when a 1080-
59.94i/50i/48i signal is detected.
While in playback, a progressive to segmented conversion (PsF)
will happen if a 1080p30/25/24 is file is detected.
OFF – PsF / reverse PsF conversion will not be performed.
FS-T2001 Menus
HQ 1080i
1440 - Sets the HQ (35Mb/s) frame size to 1440x1080
1920 - Sets the HQ (35Mb/s) frame size to 1920x1080
TIMECODE
EXT TC - The recorded timecode comes from the RP188 timecode
in the SD/HD-SDI input stream.
FREE RUN - The timecode recorded comes from the internal,
constantly incrementing free run timecode generator in the
FS-T2001. It is possible to set the TC value using the TC Set
function in the setup menu.
REC-RUN - The timecode recorded comes from the internal
timecode generator in FS-T2001. Timecode only increments when
a recording is in process. The first frame of a new recording will
have a TC value +1 from the previous recording.
FS-T2001 Media Recorder 41

Operations
REGEN - The timecode recorded comes from the internal timecode
generator on FS-T2001. Timecode only increments when a
recording is in process. The first frame of a new recording will
have a TC value +1 from the last recording on the media.
CLOCK SET – The timecode is calculated from the FS-T2001 clock
time.
FREE RUN, REC-RUN, REGEN and CLOCK SET record modes
ignore the RP-188 timecode in the incoming SD/HD-SDI stream.
These modes are useful when the RP-188 timecode in the SD/HDSDI stream is not desired or the source does not support RP-188
timecode.
USERBITS
EXT UB – Recorded UB comes from the SD/HD-SDI input stream.
PRESET – Set recorded UB value to the UB Set in the setup menu.
REC AUDIO
1/2 - When 2-channel audio recording is desired, this setting
records channels 1 and 2 of the embedded SDI audio input.
3/4 - When 2-channel audio recording is desired, this setting
records channels 3 and 4 of the embedded SDI audio input.
1/2/3/4 - When 4-channel audio recording is desired, this setting
records channels 1, 2, 3 and 4 of the embedded SDI audio input.
Note: 4-ch. audio is only possible
TC SUPER
This setting can be used to superimpose the timecode value over the
front panel LCD (during preview/playback), HDMI or/and SDI
video output.
The following settings are available:
TC SUPER – On/Off to enable/disable the TC SUPER function.
SIZE – Three different sizes are available.
POSITION – The TC SUPER can be positioned at the top/center or
bottom of the video.
TRANSPARENCY – Transparency can be used to view the
background content.
VIDEO – TC SUPER can be displayed on the LCD, HDMI or SDI
output (any combination is available).
42 FS -T2001 Media Recorder

Encoded clip
resolution
SDI Video Output
(NATIVE mode)
SDI Video Output
(HD->SD mode)
1080i59.94
1080i59.94
NTSC
1080i50
1080i50
PAL
720p59.94
720p59.94
NTSC
720p50
720p50
PAL
While in HD->SD output mode, the home screen
will display the following logo:
SD
VIDEO OUTPUT
This setting can be used to configure the playback in SD-SDI of a
XDCAM EX/HD clip.
NATIVE – SDI/HDMI outputs the resolution of the encoded clips.
No scaling is performed.
HD -> SD H CROP- In playback mode, the SDI outputs a horizontal
cropped downscaled version of the encoded clips. In this mode, the
Composite output is activated.
HD -> SD H SQUEEZE - In playback mode, the SDI outputs a
squeeze downscaled version of the encoded clips. In this mode, the
Composite output is activated.
HD -> SD H LETTERBOX - In playback mode, the SDI outputs an
horizontal cropped downscaled version of the encoded clips. In this
mode, the Composite output is activated.
FS-T2001 Menus
AUDIO MONITOR
CH 1/2 – Analog audio outputs (RCA and headphone) provide
CH1/2 audio.
CH 3/4 - Analog audio outputs (RCA and headphone) provide
CH3/4 audio.
FS-T2001 Media Recorder 43

Setup
Operation
Default
Options/
NTP
DATE
N/A
08/05/12
TIME
10:24:00
TIME ZONE
UTC
UTC
Africa
America
Antarctica
Arctic
Asia
Atlantic
Australia
Europe
Indian
Pacific
DST ADJUST
AUTOMATIC
AUTOMATIC
STANDARD
ALTERNATE
LCD
ON
ON
AUTO
LCD BRIGHT
11
1 - 16
brightness levels
KEY BRIGHT
KEY CLICKS
11
ON
1 - 16
brightness levels
ON
OFF
Continued on next page.
SETUP Menu
The Setup menu contains the settings for date and time, usability,
timecode, retro cache and play mode. The Setup menu features the
following settings:
44 FS-T2001 Media Recorder

FS-T2001 Menus
Operation
Default
Options
ORIENTATION
ALARM
AUTO
ON
AUTO
LANDSCAPE
PORTRAIT
PORTRAIT REV.
ON
OFF
TAKE NUMBER
0001
0-9999
TAKE PREFIX
FST-
User Defined Upper/lower case
letters or numbers
TC SET
00:00:00:00
User defined.
UB SET
00:00:00:00
User defined.
TC MODE*
NON-DROP
DROP
NON-DROP
RETRO CACHE
5 SEC
0 – 10 seconds
User defined.
PLAY MODE
NETWORK
IP ADDRESS
IP MASK
BRDCST
GATEWAY
NAMESVR
MAC ADD
SERVER
SRV P/W
HSTNAME
WRKGRP
PLAY CLIP
DHCP
X.X.X.X
XXXXXX
X.X.X.X
X.X.X.X
X.X.X.X
XX:XX:XX:XX:XX:XX
DISABLED
fst2
fst2_XXXX
WORKGROUP
PLAY CLIP
LOOP CLIP
PLAY ALL
LOOP ALL
DHCP
MANUAL
User defined if
MANUAL
parameter is set in
NETWORK
7.
ENABLED
DISABLED
User defined
User defined
User defined
* 60Hz record modes only
FS-T2001 Media Recorder 45

Setup
Timezone must be adjusted manually prior updating the
date/time via NTP.
NTP
If connected to an active network, date and time can by retrieved
using the Network Time Protocol (NTP). In such case select NTP to
set date and time automatically.
DATE
Set the FS-T2001 system to the current date.
The date can be either entered manually or automatically.
TIME
Set the FS-T2001 system to the current time.
TIME ZONE
Select the time zone, where the FS-T2001 is to be used.
It is necessary to select the time zone where the FS-T2001 is to
operate so that other time features accurately display local time.
In addition, DST ADJUST, see below, depends on this setting.
Default is UTC, Universal Time Code.
To set the time zone:
1. Select geographical region, such as America or Asia.
2. Use the Scroll-wheel/4 axis buttons and OK button to locate
and pick a geographical region.
3. Selecting a region displays a list of cities in different time
zones within that region.
4. Use the Scroll-wheel to locate a city located in the same time
zone as the recording session.
5. Press the OK key.
The display returns to the SETUP menu.
DST ADJUST
This preference sets the daylight savings settings on FS-T2001 to
either adjust automatically (based on a set date) or based on
standard or alternative settings. There are three settings:
AUTOMATIC - The FS-T2001 Series automatically adjusts to and
from daylight savings time. The TIME ZONE must be set to location
of operation.
46 FS -T2001 Media Recorder

FS-T2001 Menus
Using STANDARD or ALTERNATE
STANDARD and ALTERNATE are useful during a transition
between daylight standard and daylight savings times. Using
either setting for the day of the transition eliminates the
potential time-jump effects when the transition occurs.
STANDARD - Locks the FS-T2001 to Daylight Standard Time for
the location identified in TIME ZONE.
ALTERNATE - Locks the FS-T2001 to Daylight Savings Time for
the location identified in TIME ZONE.
LCD
Use to enable/disable the LCD backlight.
ON - Permanently activates LCD backlight.
AUTO - Automatic mode, the backlight lights when any key is
pressed and remains on for 10 seconds.
LCD BRIGHT
Use to set LCD backlight brightness on FS-T2001(1 – 16)..
KEY BRIGHT
Use to set the brightness of the FS-T2001 control keys and scroll
wheel (1 – 16 (brightest)).
KEY CLICKS
Enable/disable the FS-T2001 audible click sound feedback.
ORIENTATION
AUTO - The LCD Display orientation is modified automatically.
LANDSCAPE - The LCD Display orientation is set to landscape.
PORTRAIT - The LCD Display orientation is set to portrait.
PORTRAIT REVERSE
ALARM
Enable/disable the FS-T2001 audible alarm. The audible clicks
warn the user of low power.
TAKE NUMBER
Sets the second part (4-numeric) of clip names on FS-T2001.
FS-T2001 Media Recorder 47

Setup
PPPPNNNN_01
Take number EXAMPLE: FST_0001_01.MP4
Default is set to "0001".
TAKE PREFIX
Sets the first part (4-alphanumeric) of clip names on FS-T2001.
PPPPNNNN_01
Take prefix
EXAMPLE: FST-0001-01.MP4 s a clip name with TAKE
PREFIX = “FST_” and TAKE NUMBER = “0001”
Default is set to "FST-".
TC SET
Used to preset the TC (timecode) value on FS-T2001. This value is
available for use by the FS-T2001 immediately after exiting TC SET.
This setting is applicable depending on the TIMECODE mode
selected in OPERATION menu:
EXT TC – Preset TC value is not used.
FREE RUN - Preset TC value continuously increments.
REGEN - Preset TC value is not used.
REC RUN – Preset TC value is used as the start value for a new
recording.
UB SET
Use to preset the UB (user bit) value for recordings.
TC MODE
Use to set the timecode mode to either DROP frame or NONDROP frame (60Hz mode only).
48 FS -T2001 Media Recorder

FS-T2001 Menus
When using EXT TC mode this setting has no effect.
RETRO CACHE
Use to set the retro cache record time between 1 and 10 seconds.
Default is 5 seconds.
PLAY MODE
PLAY CLIP - Sets the current clip to play and then stop at the end of
the clip.
LOOP CLIP - Sets the current clip to play until the end of the clip
and then immediately start playing the clip again in an endless loop.
PLAY ALL - This mode plays all clips in order from start to finish.
LOOP ALL - This mode plays all clips on the disk until the end and
then immediately starts playing from the first clip again in an
endless loop.
NETWORK
DHCP – FS-T2001 will connect to network using DHCP protocol. An IP address will be automatically provided by the server. MANUAL – User enters manually the network settings.
IP ADDRESS
In DHCP mode – The IP address of the unit is displayed.
In Manual mode – The desired IP address can be entered.
IP MASK
In DHCP mode – The IP mask of the unit is displayed.
In Manual mode – The desired IP mask can be entered.
BROADCAST
In DHCP mode – The broadcast IP address of the unit is displayed.
In Manual mode – The desired broadcast IP address can be
entered.
GATEWAY
In DHCP mode – The gateway IP of the unit is displayed.
In Manual mode – The desired gateway IP can be entered.
FS-T2001 Media Recorder 49

Setup
NAME SERVER
In DHCP mode – The name server is displayed.
In Manual mode – The desired name server can be entered.
MAC ADD
Provide the Media Access Control address of the unit (MAC).
SERVER
FS-T2001 provides a FTP and SMB/CIFS access to its internal
Hard Drive (FTP and SMB/CIFS) and its SxS cards (SMB/CIFS
only). Use this parameter to activate or de-activate the access.
Login is set to fst2.
Enabled
Disabled
SVR P/W
To configure server password (default is “fst2”).
HSTNAME
FS-T2001 Hostname which will be visible on the connected
network. Format used is fst2_xxxx where xxxx are the last 4 digits
of the MAC address.
WORKGROUP
To configure workgroup name. The WORKGROUP selected must
match the workgroup on which the FS-T2001 unit is connected.
50 FS -T2001 Media Recorder

Operation
Comment
COPY/CLONE
CARD
FORMAT
Copy/clone from media to media.
Formats card.
Backup data before using.
UPGRADE
Upgrades the FS-T2001 software.
DELETE CLIP
Deletes and removes selected clip from unit.
No Undo.
REPAIR CLIP
SYSTEM RESET
To repair damaged clip.
Resets FS-T2001 to factory defaults.
DIAGNOSTIC
Provides data to assist VITEC Technical Support
in diagnosing issues.
VERSION
Displays the current software version for the unit.
Copy of SxS cards to Internal HDD are located in
UserData/Archives directory
Copied clips of an SxS card can be played back by FS-T2001
Clips are indentified in home screen by the following volume
and track number:
XX-YYY XX: Copied SxS Card number, YYY: Clip
number
UTILITIES Menu
FS-T2001 Menus
COPY / CLONE CARD
Use this function to clone a SxS card to another SxS card or to the
Internal Hard Drive.
A to B – Clone content from SxS card - Slot A to SxS card - Slot B
B to A – Clone content from SxS card - Slot B to SxS card - Slot A
A to C – Clone content from SxS card - Slot A to Internal HDD
B to C – Clone content from SxS card - Slot A to Internal HDD
FORMAT
Use this function to format the SxS media and erase any content on
the card. The default SxS directory structure is written to the card.
First, select your media to be formatted (A / B or C) as well as the
format type (UDF or FAT32 for SxS).
FS-T2001 Media Recorder 51

Utilities
Backup your content before Formatting SxS Card.
During formatting, a FORMATTING label will blink next to the
volume name being formatted.
Format SxS card accordingly to the FS-T2001 format type
If an inserted SxS Card format doesn’t match the selected
FS-T2001 file format selected (FAT/UDF), a white horizontal
bar will be displayed next to the volume name.
FORMAT MEDIA – Select the media to be formatted (SxS Card A,
B or the internal Hard Drive) : A, B, C
FORMAT TYPE – FAT32 or UDF format is available for SxS cards
VOLUME LABEL – For SxS card, user can either choose to preserve
the volume name of its media (KEEP) or to erase it (CLEAR).
UPGRADE
Use this function to upgrade the FS-T2001 firmware.
1. Download the upgrade file from http://www.vitec.com
2. Rename the file to “FST2.bin”. Copy the file to an SxS card.
3. Insert card in FS-T2001 and select UPGRADE.
4. Wait for the upgrade to complete then shut down the unit.
DELETE CLIP
This function allows to delete a single clip from a SxS card/HDD or
a complete archive from HDD. If a complete delete is required for
SxS cards, the format menu must be used.
To access to A,B,C-001 clip or YY archives on HDD, use the right
button next to the wheel. Use the wheel to select a specific clip on
A,B,C.
REPAIR CLIP
Use this function to repair a damaged clip located on a SxS card or
on the internal hard drive. The damaged clip must have been
recorded with the FS-T2001 (damaged clip could be the result of a
loss of power during a recording for example).
After entering this menu, user must select the clip to be repair then
press the OK button.
52 FS -T2001 Media Recorder

MXF File repair
A MXF damaged file sometimes may result in a UDF
formatted card damaged. In such case, and even if the MXF
file is repaired, the SxS card will not mount onto a computer. It
is then recommended to clone the damaged card after the file
repair. The cloned SxS card will then mount correctly and the
MXF file will be recovered.
SYSTEM RESET
This function resets the FS-T2001 back to its factory default
settings.
DIAGNOSTIC
For VITEC technical support diagnostic.
VERSION
This function displays the current system firmware version.
FS-T2001 Menus
FS-T2001 Media Recorder 53

Technical Specifications
CAUTION: FS-T2001 can be used in hot environments.
The unit's enclosure can be hot to the touch during
operation in high temperatures.
Technical Specifications
Compliance
CE
FCC Part 15 ,Class A
C-Tick
VCCi
RoHS
Environment
Operating Temperature: +32 to 104o F (0 to 40 o C)
Storage Temperature: -4 to 140 o F (-20 to 60 o C)
Humidity: 10-90% (relative humidity)
Physical Description
Connections
Computer/Accessory/Network I/F: USB 2.0 Type A (x 1) and
Mini USB (x1), RJ45 GigE (x1), Firewire/IEEE1394a (x1).
SD/HD-SDI Input: BNC (x 1), 0.8Vp-p conforms to SMPTE
259M/292M
SD/HD-SDI Output: BNC (x 1), 0.8Vp-p conforms to SMPTE
259M/292M
HDMI Output: HDMI Type A connector (x1)
Composite Output: BNC (x1), 1.0Vp-p, 75 Ohms
Line Audio Output: RCA (x2)
Headset Audio Output: Jack (x1)
DC Power Input: 4-pin XLR (x 1). 11-17V DC and Sony BP-U
battery connection.
For more information, see Rear View – Connections on page 5.
54 FS-T2001 Media Recorder

Technical Specifications
Controls
Power and Recording
Buttons – push buttons with backlight LEDs for:
Power, Record, Stop, Play/Pause, Home, Thumbnail
For more information, see Front View – Controls on page 4.
Menu Navigation
Scroll-wheel with 4-axis buttons and OK button.
For more information, see FS-T2001 Menu Controls on page
10.
Media Slot
Dual SxS card slot with slot gasket cover.
Visit the VITEC website (www.vitec.com) to see the latest list of
qualified cards.
Storage
250GB Internal Hard Drive (UDF formatted).
Status Display
2.5”, 320x240 Color LCD Display
Power
Power Consumption - Less than 20W (nominal).
External DC Input - 11-17V (4-pin XLR).
Battery options – Sony BP-U battery series.
Nominal Voltage = 14.4V.
Dimensions and Weight
Dimensions: LxWxH – 222x116x61mm (8.7x4.6x2.4in) -
desktop configuration.
Weight: 1.5Kg/3.3lbs (unit).
FS-T2001 Media Recorder 55

Technical Specifications
Supported Input, Output and Recording Formats
Supported Input Format (SD/HD-SDI)
1080 59.94i/50i/29.97P/25P/23.98P, 720 59.94p/50p (Note: FS-
T2001 does support 1080i 29.97PsF, 25PsF or 23.98PsF input
signals for 30P, 25P or 24P recording) and 480i59.94 /576i50.
4-channel SD/HD-SDI embedded audio (4-ch or 2-ch: Ch1/2 or 3/4
selectable to record)
Ancillary data from camera (REC/STOP commands)
Any given supported input type (e.g. 1080 59.94i) will be
automatically detected and set the output encode frame rate/frame
size.
SMPTE RP-188 timecode in the SD/HD-SDI stream
Supported Output Format (SD/HD-SDI / HDMI)
1080 59.94i/50i/29.97P/25P/23.98P or 720 59.94p/50p (HD-
SDI/HDMI)
480i59.94 /576i50 (SD-SDI)
4-channel embedded audio
SMPTE RP-188 timecode in the SD/HD-SDI stream
Supported Record Formats
XDCAM EX Format
File System: FAT32
File Format: MP4 wrapper (XDCAM EX directory structure)
Video: MPEG2 Long GOP
Color Sampling: 4:2:0
Audio: Linear PCM (2-ch or 4-ch, 16-bit, 48 kHz) – HD-SDI
input (In 2-ch. mode, Ch.1/2 or Ch.3/4 is selectable)
Recording Formats:
HQ Mode (VBR, max. bit rate 35Mb/s, MPEG2 MP@HL)
1920x1080 @ 59.94i, 50i, 29.97p, 25p, 23.98p
1440x1080 @ 59.94i, 50i, 29.97p, 25p, 23.98p
1280x720 @ 59.94p, 50p
SP Mode (CBR, bit rate 25Mb/s, MPEG2 MP@H14)
56 FS -T2001 Media Recorder

Technical Specifications
1440x1080 @ 59.94i, 50i
XDCAM HD Format
File System: UDF
File Format: MXF wrapper (XDCAM HD directory structure)
Video: MPEG2 Long GOP
Color Sampling: 4:2:0
Audio: Linear PCM (2-ch or 4-ch, 16-bit, 48kHz) – HD-SDI
input (In 2-ch. mode, Ch.1/2 or Ch.3/4 is selectable)
Recording Formats:
HQ Mode (VBR, max. bit rate 35Mb/s, MPEG2 MP@HL)
1920x1080 @ 59.94i, 50i, 29.97p, 25p, 23.98p
1440x1080 @ 59.94i, 50i, 29.97p, 25p, 23.98p
1280x720 @ 59.94p, 50p
XDCAM HD422 Format
File System: UDF File Format: MXF wrapper (XDCAM HD directory structure) Video: MPEG2 Long GOP Color Sampling: 4:2:2 Audio: Linear PCM (4-ch, 24-bit, 48 kHz) – HD-SDI input Recording Formats:
HD422 Mode (CBR, bit rate 50Mb/s, MPEG2 422P@HL)
1920x1080 @ 59.94i, 50i, 29.97p, 25p, 23.98p
1280x720 @ 59.94p, 50p,
SD422/SD HQ Format
File System: FAT File Format: MP4 Video: MPEG2 Long GOP Color Sampling: 4:2:2 / 4.2.0 Audio: Linear PCM (2-ch, 24-bit, 48 kHz) – SD-SDI input Recording Formats:
SD422 Mode (CBR, bit rate 35Mb/s or 25Mb/s)
PAL, NTSC
FS-T2001 Media Recorder 57

Warranty
Warranty
Vitec Limited Hardware Warranty Terms
Subject to the terms and conditions specified below your VITEC product
(the "Product") is warranted against defects in material and workmanship
(the "Warranty") for a period of 12 (twelve) months following the
Delivery Date (the "Warranty Period"). The Warranty provided to you
hereunder supersedes any warranty which may be provided to you by the
original manufacturer of the Product.
Vitec Multimedia will repair or replace (at its option) any defective part
during the Warranty Period, provided that (i) the Warranty remain in
force. Your dated sales receipt or invoice shall be considered as the
delivery date of the Product form Vitec's premises to your designated
address (the "Delivery Date"); (ii) your Product unit carries a serial
number on its rear panel; (iii) you received from Vitec Customer Service
department a Return Materials Authorization (RMA) number. No Product
unit will be accepted for repair without RMA number; and (iv) the entire
Product unit is returned to the company by prepaid shipping in Vitec’s
original packaging.
Vitec will not be responsible for (i) any damages resulting from the use,
maintenance or installation of any Product; or (ii) for the incorporation of
any spare or replacement parts not approved by the company.
Without limiting the generality of the foregoing, The company reserves
the right to refuse to provide any services under the Warranty for any
Product that, in the company opinion, has been subjected to any abnormal
electrical, mechanical, or environmental abuse, or shows signs of
modification by an unauthorized person or company. Call your local
distributor or reseller for out-of-warranty repair charge estimates prior to
returning a product.
58 FS-T2001 Media Recorder

Warranty
59 FS-T2001 Media Recorder
 Loading...