

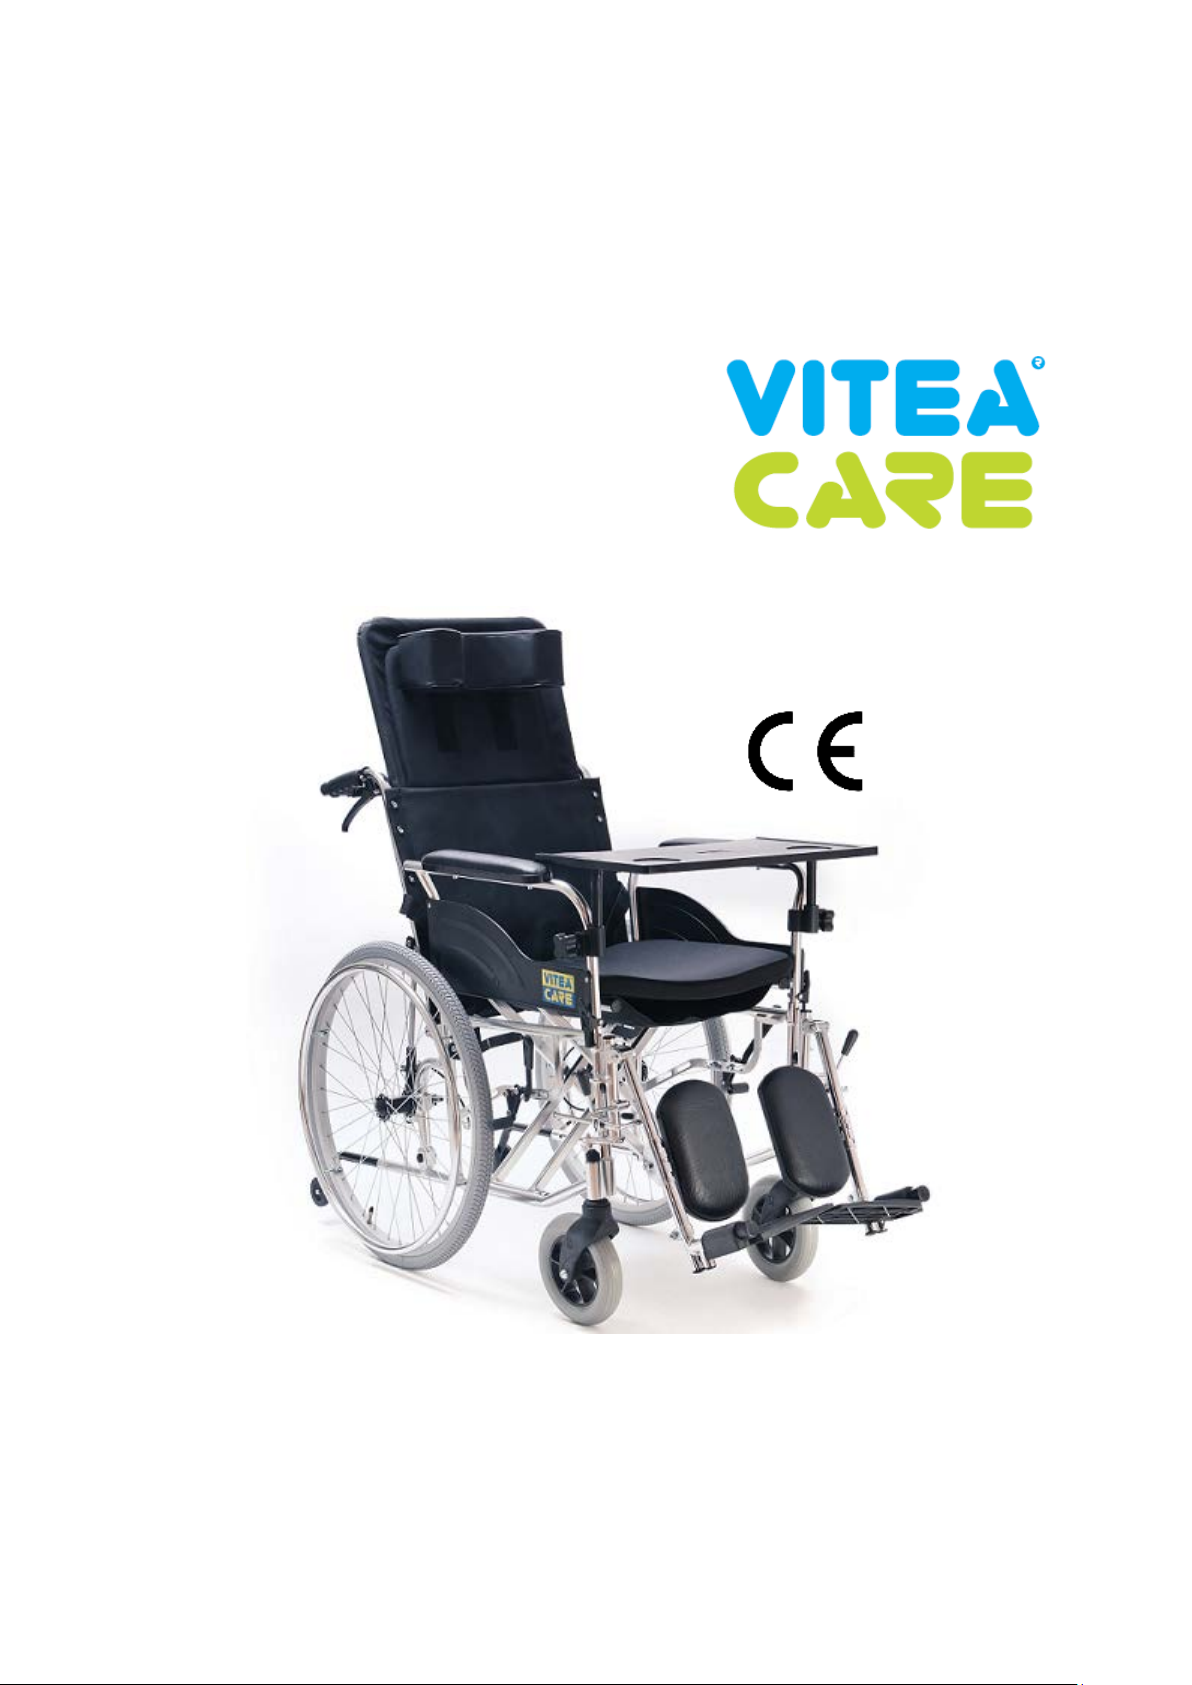
User’s manual
Recliner
Special wheelchair stabilising back and head
VCWK703
Edition MG 11.2015
1

Table of Contents
1. Introduction ..................................................................................................................................... 3
2. Description of product ..................................................................................................................... 3
3. Application ...................................................................................................................................... 6
4. Contraindications ............................................................................................................................ 6
5. Usage. .............................................................................................................................................. 6
6. Safety of use - WARNING! .......................................................................................................... 10
7. Everyday use and maintenance ...................................................................................................... 11
8. Technical parametres ..................................................................................................................... 19
9. Symbols ......................................................................................................................................... 19
10. Contact details ............................................................................................................................... 20
PLEASE READ CAREFULLY BEFORE USING WHOLE OF INSTRUCTIONS
2
1. Introduction
3
8
9
11
10
12
13 4 5 6 7 1 2
15
21
20
18
17
14
16
23
22
19
24
25
Thank you for choosing our product. We are deeply convinced that it will meet your expectations.
Please read this document before first use. This manual was made in order to provide the necessary
information on the safe use of the device. The correct application of the recommendations will
contribute significantly to extend the durability and aesthetics of the product. We want to distinguishe
that to date we are trying to improve the quality of our products, which may result in minor changes
that are not included in the manual.
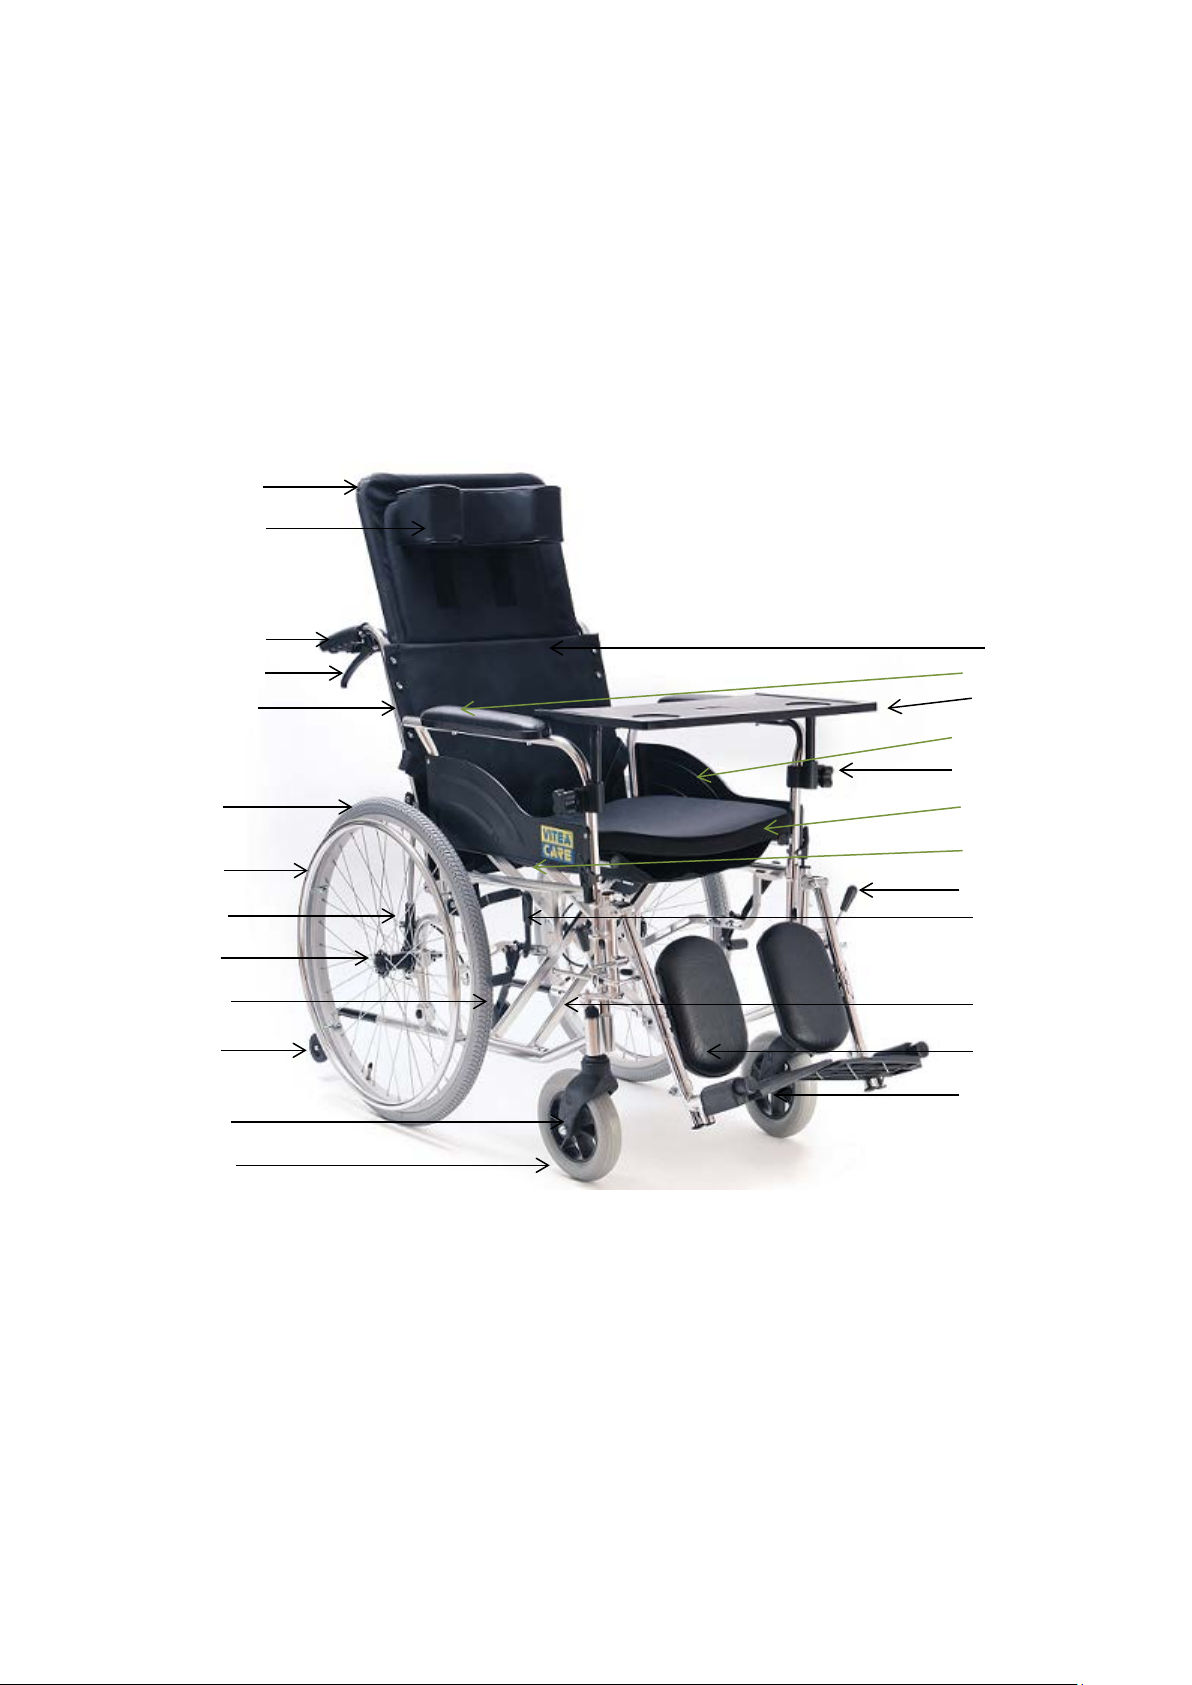
2. Description of product
1. Higher backrest (optional)
2. Headrest
3. Handle holder
4. Backrest angle adjustment lever
5. Bak frame
6.
Rear wheels
7. Metal handrim
8. Fastener rear axle
9. Quick connect handle
10. Brakes
Illustration 1.
3
11.
Anti-tip wheels
12. Front wheel fork
13. Front wheel
14. Nylon seat
15. Removable armrest
16. Tray
17. Side plate of the armrest
18. Fastener stem table.
19. Seat cushion
20. Seat frame
21. Lowering the footrest handle
22. Brake hanle
23. Cross frame
24. Backrest calves
25. Footrest platform
Elements that should be inside the packaging:
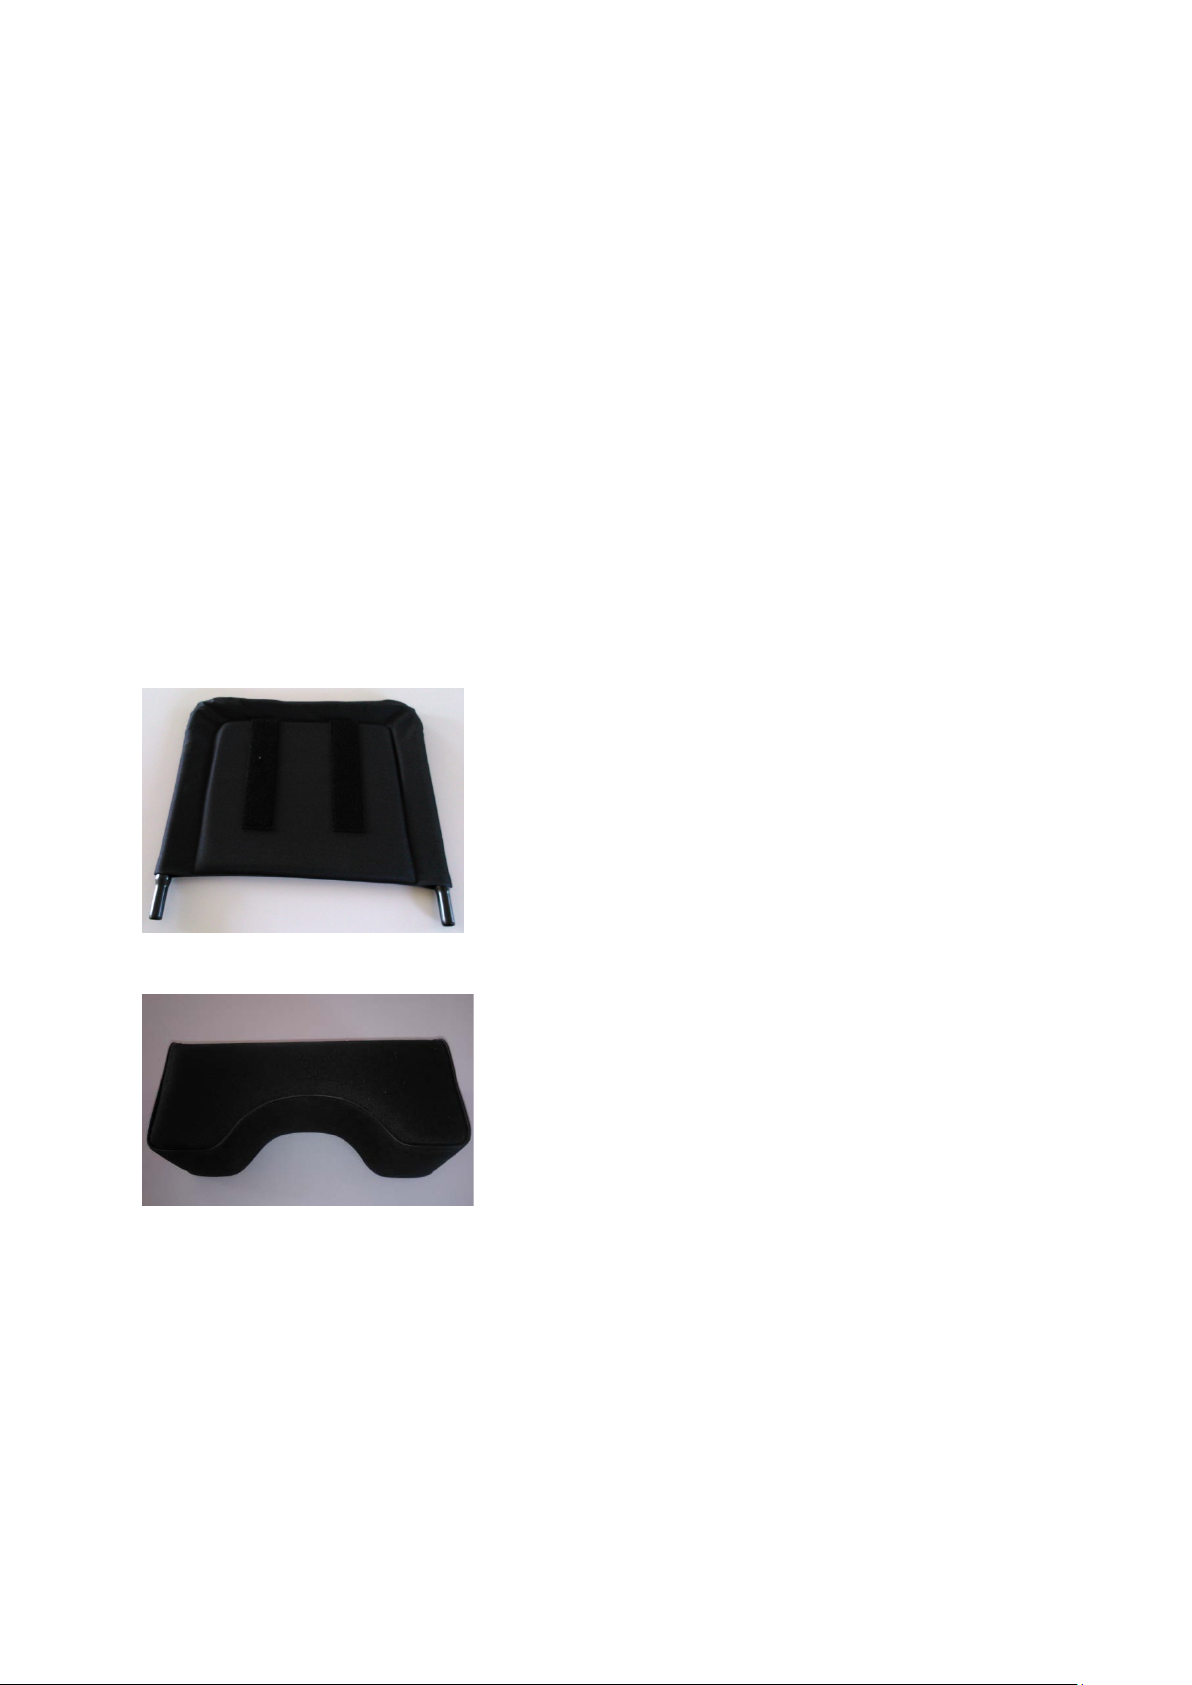
Illustration 2. Higher backrest
Illustration 3. Headrest
4
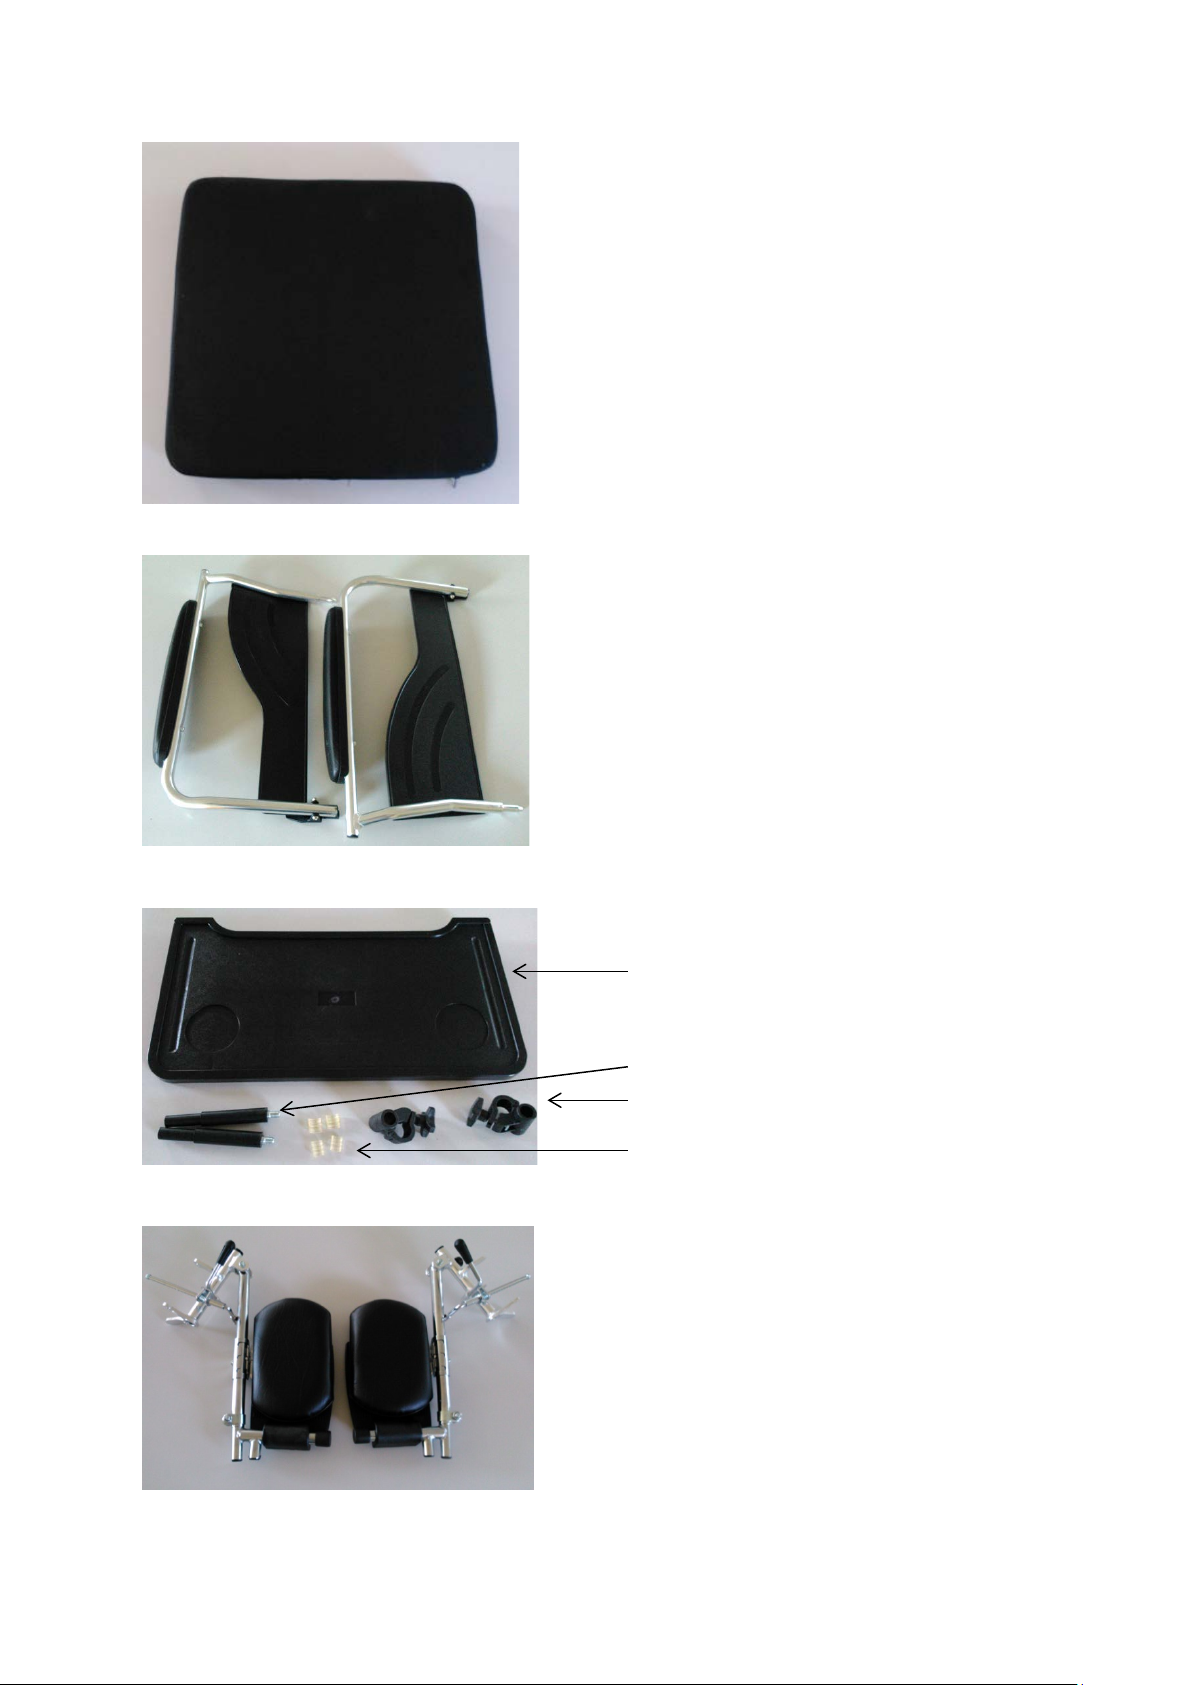
Illustration 4. Seat cushion
Tray
Two legs
Two fasteners
Four washers
Illustration 5.Removable armrest
Illustration 6. Tray with mounting elements
Illustration 7. Two footrests
5

Illustration 8. Wheelchair
Illustration 9. Anti-flip wheels.
3. Application
The wheelchair is used in order to commute by people with disabilities e.g. after the spinal cord
damages, cerebral palsy or various lower limb injuries, neuromuscular diseases, post-traumatic cranial
cerebral or for geriatric patients.
It is also intended for people who want to actively and com fortably participate in everyday life.
4.
Contraindications
Contraindications to a sitting position. Conditions that require stabilization of the upper spine and
head. Patients with mental disorders should not be left unattended in the stroller.
5. Usage.
• After unpacking the package, check if it contains all parts in accordance with the list of
elements set out above.
• Ensure that all components have no visible damage. If any doubts, please contact the
manufacturer.
• Do not use the wheelchair until all parts are properly connected.
6

UNFOLDING THE WHEELCHAIR
• The wheelchair must be placed with rear wheels in front to You.
• Unfold the handle holder towards the outside (Illustration 10.).
• Then place wheelchair with front wheels in front of you.
• Press seat frames, until complete unfolding (Illustration 12 ., 13.)
Illustration 10. Illustration 11. Illustration 12.
Illustration 13.
•
Then spread the stabilizing rail to the moment when will hear a click.
Illustration 14. Illustration 15.
• Armrests mount in openings at a side edge of the seat, in a way that the locking clip armrest
was on the outer side of the wheelchair. (Illustration 16.,17.)
7

Illustration a 16. Illustration 17.
• Then attach the higher backrest into the holes localized in the rear of the backrest. (Illustration
18., 19.)
• Headrest attach to the higher backrest to on the convenient height for the patient by using
velcro. (Illustration 20.)
Illustration 18. Illustration 19. Illustration 20.
• Fasten the seat cushion by velcro.
Illustration 21.
• Install anti flip wheel in the openings of the lower frame wheelchair to the point
where will hear a click.. (Illustration 22., 23.)
8

hanger of
frame
fixing
lowering footrest lever
Footrest
Illustration 22. Illustration 23.
• To install footrests, hang fixing bracket footrest on the hanger of the wheelchair frame
(Illustration 24 .; 25). Then rotate it into wheelchair front until it locks (You will he ar click).
(Illustration 26.)
• Unfold the footrests platform.
lock
the
wheelchair
bracket
footrest
Illustration 24. Illustration 25.
Illustration 26.
9

6. Safety of use - WARNING!
a) Before using the wheelchair refer to this manual and keep it for future reference.
b) While getting o and out of the wheelchair, the brakes always have to be on!
c) Before getting on or getting off the wheelchair, do not stand on the footrest, you must fold or
completely set aside footrests first.
d) Patients who require additional head stabilisation should drive the wheelchair only with
assistance of a caregiver .
e) Lifting the wheelchair together with the user is strictly forbidden!
f) When moving through doors and other passages, make sure that on both sides there is enough
space to avoid injury to the hands or damage the wheelchair.
g) Using public roads, follow accurate traffic regulations.
h) Like other vehicles, do not drive the wheelchair under the influence of alcohol, or drugs. This
also applies to indoor riding.
i) T he wheelchair is not intended for patient transport on stairs, or puling the patient on it. T he
construction of the wheelchair and it joining elements are not designed for such a large
overload if it is used in this way. This can cause weakness or damage of the ent ire structur e
supporting the wheelchair and possible accidents!
j) The wheelchair is designed to use indoors and outdoors only on hard and even surfaces.
k) Using the wheelchair on an unstable surface (covered with ice, wet, greasy, sandy) is
unacceptable- it causes risk of falling,
l) You can only use the wheelchair on surfaces where all four wheels are touching the ground.
m) To overcome architectural barriers (steep or long climbs, thresholds or curbs, etc.) help of
caretaker is needed.
n) If the user does not have sufficient experience in the wheelchair use, should ask caretaker for
help with overcoming obstacles.
o) Do not leave the wheelchair with the user close to open sources of fire.
p) Be aware that the surface temperature of the upholstery and the frame parts may be increased
after exposure to the sun or other heat source. Furthermore, with low temperatures there is a
danger of overcooling metal parts. It may cause burns or frostbite parts of the body.
q) In order to transfer wheelchair, grab the frame. Never transfer the wheelchair by gra bbin g the
armrests or footre st.
r) Never use the wheelchair as a seat for the transportation of people in cars, buses or any motor
vehicles.
s) The wheelchair is designed for people up to 100 kg.
t) Wheelchair must be easy to fold and to unfold. In case of problems with folding, you should
re-read the instruction or contact the manufacturer.
u) K eep caution while moving on sloping surfaces. The maximum allowable slope angle up and
down is 5%.
v) Brakes cannot be slow down the wheelchair during ride, You should use them only to prevent
the unintended movements.
w) Both brakes should be properly adjusted. Incorrect setting one of the brakes, results with
blocking only one rear wheel. On large slopes, it can cause difficulty to control the rotation the
wheelchair around the wheel stopped.
x) Regularly check the tire pressure. With too low tire pressure than recommended, the brake
performance can be significantly reduced!
y) While reaching objects, avoid excessive leaning out the wheelchair because it can cause a fall
(to the side, front, back).
10

z) In order to avoid accidental rolling off the wheelchair, always put on the brakes when the
Leg
stroller is stopped, when patient get in, get off, while changing the position.
aa) Do not leave the patient in the wheelchair (even with turned on both brakes) on the descents,
ramps, landings, etc.
bb) It is necessary to check after each wheel mount if wheel axle connector lock works properly.
While mounting should hear “click” of the latch. Pull strongly the wheel to check if it is
installed correctly.
cc) Using the parking brake while driving may result with an accident with all its consequences.
dd) After each wheelchair adjustment, it is always necessary to check the correct operation of the
brake.
ee) Oil, grease, water or other chemicals, may cause that brakes may have reduced effectiveness.
ff) Stren gth of the breaking i ntensity may be reduced after long exploitation of the wheelchair.
You are allowed to adjust breaks yourself. In order to do that you must loosen the screws
locking the position of the break, move the mechanism of the break towards the wheel so that
the wheel will not rotate when break will be on again (try the adjustment with the user sitting
on the wheelchair). After final adjustment secure back the mechanism with the screws.
gg) It is extremely important to keep all wheelchairs components clean in order to maintain the
product parameters.
hh) Storing the wheelchair in areas with very high humidity (baths, laundry, etc.) or in the open
air, also the lack of hygiene causes rapid loss of operating parameters and aesthetic of the
product.
ii) It is unacceptable to use the wheelchair after discovering any visible or detectable damages or
when the wear of some parts may cause an accident. All the repairs need to be performed by a
skilled personnel and during the warranty period only by the manufacturer's service.
jj) In case of wheelchair fitted with pumped wheels You should not exceed the maximum
permissible inflation pressure of the wheels, the value is indicated on the tire wheels.
kk) During transport (e.g. In the trunk), do not burden stroller, it may weaken or damage its
structure.
ll) Keep out of the reach of children under five years of age.
mm) Keep extreme caution while unfolding / folding the wheelchair, lack of attention may
result in finger trap by elements of the area of:
- joining and removing the footrest,
- brakes,
- while folding the wheelchair around moving parts.
7. Everyday use and maintenance
ASSEMBLING TRAY
Illustration 27.
11

• Before mounting the tray, legs must be screwed.
Fasteners
• Then unscrew the fasteners screw. Put into it two washers (one smaller second bigger), it is
important that the washes were properly pressed into the fastening element..
Illustration 28.
• The fastener must be installed in such a way that the screw after tightening to be directed
forward in relation to the wheelchair, and the table legs mounting holes that they are located
behind the armrest frame. (Illustration 28.)
Illustration 29.
• Feet tray should be placed in the holes mounting legs. (Illustration 29.)
• It is important that the tray gap be located in to the seat wheelchair.
• To remove a tray, pull out the legs of the mounting holes..
• For easy installation of your table, you can leave fasteners with a wheelchair.
SITTING ON THE WHEELCHAIR:
• Place the wheelchair in a position that will make easier transporting patient (by the bed, chair,
close to lifting distance)
• Block both brakes of wheelchair, fold or remove the footrests.
• Depending on the method of moving the patient, remove the correct armrest (it is
recommended to leave the second armrest as a handrail for the patient and prevent slipping out
of the wheelchair).
• Place the patient the wheelchair.
12

• Put on the armrest.
• Install and open the footrests and put on it patient's feet.
• Place the patient on wheelchair so that the patient is in upright sitting position (knees should
be bent at an angle of ~ 90 °).
PUSHING THE WHEELCHAIR BY CARETAKER
• Before use, make sure that no part of the patient's body or his hes clothing is not exposed to
hook with the moving parts of the wheelchair.
• If patient can not sit on one's own, wheelchair should by equipped with stabilizing belts ( b elts ,
which are in standard equipment to p ro tect the patient from sliding off the seat).
• Wheelchair should be pushed with both hands.
MOVING ON SLOPES
• While moving on slopes, use caution and reduce your speed.
• Do not move on too high slopes. The maximum allowable slope angle up and down is 5%.
• Consider the possibility of assistance from the caretaker. If the person on the wheelchair did
not have enough force to control the wheelchair, the brakes must be on.
• To prevent tipping over while moving along the sloping surface, You should be slightly lean
forward to move your centre of gravity forward.
GOING DOWN OF THE THRESHOLD OR CURBS
Ahead without the help of a caretaker
• Experienced wheelchair user can drive on his own from the threshold or curbs.
• With a low curb, you can drive by moving forward. Make sure that the footrests platform does
not touch the ground.
• Please keep balance on the rear wheels to reduce the pressure on the front wheels.
• Then cross the curb.
Ahead with the help of a caretaker
• Higher curbs can be overcome with caretaker help.
• Caretaker should slightly tilt the wheelchair back.
• Cross the curb moving on the rear wheels.
• Then the wheelchair must be paced on all four wheels.
Backwards without the help of a caretaker
• Experienced wheelchair user can cross on his own the threshold or curbs.
• Turn the wheelchair in such a way that both rear wheels were turned toward the curb
• Lean forward to move the centre of gravity in forward.
• Come closer with the wheelchair to the edge of the curb.
• Then, by using the handrim in a controlled manner, user must slide the wheelchair from the
curb.
13

MOVING ON THE THRESHOLD OR CURBS
Ahead with the help of a caretaker
• Experienced wheelchair user can drive on his own from the threshold or curbs.
• Caretaker should slightly tilt the wheelchair back.
• Wheelchair user should keep balance on the rear wheels to reduce pressure on the front
wheels.
• Go with front wheels on the curb and then put the rear wheels over the curb.
Higher curbs can be crossed going backwards with the help of a caretaker
• Turn the wheelchair in such a way that both rear wheels are turned toward the curb.
• Wheelchair user should keep balance on the rear wheels to reduce the pressure on the front
wheels.
• Caretaker should pull the wheelchair over a curb.
• Wheelchair user should return to its normal position on the wheelchair.
Ahead without the help of a caretaker
• Experienced wheelchair user can go down on his own from the threshold or curb.
• Place the front wheels to the edge of threshold or curb.
• It is important to make sure that the footrests do not touch the threshold or curb
• Now, can go with the front wheels on the curb.
• Then, may enter the rear wheels on to the curb.
TRANSPORT IN THE CAR
• In order to make the wheelchair for ease of transportation, you should remove tray, remove the
higher backrest, by pulling them to the top.
• Then fold platforms footrests and remove the footrests.
• To do this, disengage the footrest lock, rotate the footrests out of the wheelchair and pull them
from hangers.
• Then remove the seat cushion.
Illustration 30.
• To submit a wheelchair be possible, move the lock (Illustration 30) which is located on the
wheelchair rail stabilizing and slightly submit the railing toward the wheelchair seat.
• Then pull up the seat cross-frame, it will submit a wheelchair.
14

Backrest angle adjustment lever
Brake lever
Brake
The system of quick release rear wheels
Illustration 31.
• To install or remove the rear wheels, press the system of quick release rear wheels button
(Illustration 31) and pull or push a wheel.
• To remove the Anti-tip wheels, press the lock button and pull the anti-tip wheels.
• The wheelchair must be moved by grasping the frame elements. Never hold the wheelchair by
the armrests or footrests.
REGULATIONS:
BACK
Illustration 32.
• The brake should activated on both wheels before regulating backrest.
• To adjust the backrest angle, the caretaker should push the adjustment lever (Illustration 32)
and pull or push it to the desired position of the backrest.
• To return to the original position of backrest, press the adjustment lever and fold / unfold the
backrest.
• Backrest adjustment can be made with locked brakes only.
BRAKE MECHANISM
Illustration 33.
15

• Illustration 33 shows the brake mechanism.
The footrest leaving handle
Calfrest height
Schrader valve
Prest valve
• To activate the brake, pull the brake lever towards the front wheel to the point where the brake
tightly touches to the rear wheel.
• Make sure that the brake lever does not switch off when you try to move the wheelchair.
• To disable the brake, pull the brake lever toward the rear wheel.
FOOTREST
• To change the height of the footrest, lift it up. In order t o lower it, pull the lever lowering the
footrest (Illust rat ion 34) towards the rear wheel.
• Calfrest has three step adjustment.
• To adjust the calfrest height (Illustration 35) just turn it to the outside and depending on the
need, lift it up or lower it down and then turn it lock to the inside.
regulation
Illustration 34. Illustration 35.
PUMPING TYRE (It applies to stroller fitted with wheels pumped)
Illustration 36. Illustration 37.
• Before pumping the tires, identify the type of valve which is located on the tire. This
may be one of the two valves shown in Illustration 36 and 37.
• Presta valve also has an additional small top, which must be loosened before pumping.
• After identifying the valve, prepare the pump designed to valve type.
• Most of the new pumps are equipped to se rvice both P rest valve and Schrader. Man y
of them let to reverse the ti p. Sm al ler h ol e is P rest valve, Schrader valve gr eat er. If t he
pump does not support Prest, you will need to buy yourself the "adapter Prest", which
is available at any bike store.
16

• At this point, if the wheel is provided with a valve Prest, it will be necessary to
unscrew the top located on the vent. It is a small top, which can be unscrewed with
fingers. When doing this, the top should move upwards. Then valve is considered
open.
• Then remove the plastic top from the valve and set it aside in a safe place. It is
important to not lose it, because the valves will get dirt, leading to difficulties in
pumping and rapid air loss.
• Place the nozzle of the pump to the valve and check if it stick properly. If it is needed,
push the pump to the valve to make sure that the air does not escape to the sides.
• If the pump has a lever with clamp at the nozzle, tighten it. If the nozzle of the pump
and valve have a threaded tip, screw them togeth er. As a result, air will be streamed
directly to the inner tube and the nozzle can not be detached from the valve.
• At the beggining of pumping the pressure in tyres should be checked at some points.
Check tire pressure with your fingers at the end of the tread. If it is possible, make
only a millimeter indentation. It means that the tire has enough air. If necessary
continue pumping.
• After pumping, remove or unscrew the nozzle from the valve outlet while compressing it's
ends by thumb. It is recomended to do this quick enough in order to not loose too much air.
• For Prest valve, tighten previously loosened additional small top.
• Screw the plastic top on the valve.
PRESSURE IN WHEELS AND BRAKING POWER
• Pressure in wheels should be select to the user weight and then with assistance caregiver check
the operation of the parking brakes (wheelchair with user facing toward the fall, can not roll
on a plane with a slope of 15%.)
• After all the adjustments, be sure to thoroug hly check all conn ect ion s.
COMMENTS
• Observe proper tire inflation level with the information provided by the manufacturer on the
sides of the tire.
• Use a pump with a pressure gauge or manual pump cycling.
EVERYDAY USE AND MAINTANCE
• Clean the upholstery and frame with a moist cloth, without the addition of detergents and
other similar chemicals.
• Systematically remove the dirt from the movable elements of the wheelchair (screws,
resistance mechanisms).
• Keep clean all wheelchair elements to save functional parameters of the product.
• Storing in rooms of very high humidity (baths, laundries etc.) or in the open air, in the
combination with the lack of hygiene will cause the fast loss of functional and aesthetic
parameters.
• Do not expose the wheelchair on to extreme weather conditions (rain, snow very strong sun),
because certain parts can change colour.
17

You must not use:
Frequency
Object of control
Comments
Before first
Checking the technical condition and
packaging.
Check if any elements have any
Before each use
Control of wheels, brakes,
The brakes can worn out, check the
condition of the brakes before each
check the
and clean them
from dust and sand.
Every two weeks
Screw and nut control regarding their
Make sure if all the screws and top
Every two months
Cleanliness and general condition.
In case of mechanical damage
Once a month
wheel axles
In case of mechanical damage
Raise the wheelchair so that the test
the wheel should freely but without
Once a month
State connections, threaded, soldered,
pay attention to the cracks on frame
material in connections threaded,
soldered, the system of quick release
Once a month
Condition of the tires
Make sure that the tire tread is not
worn and that the tires have no
• solvents,
• toilet detergents,
• sharp brushes and hard objects,
• detergents tha t co ntain chlorine ,
• corrosive detergents,
Do not clean the exerciser with pressure or steam aggregates!
TECHNICAL REVIEW
The review should be carried out regularly, it should be preceded by thorough cleaning the wheelchair
(so as to reveal any hidden damage).
installation
all the elements within the
correct fixing.
the system of quick release rear
wheels
visible mechanical damag e.
use. You should also
condition of wheels
are fixed tightly .
contact the producer immediately.
contact the producer immediately.
wheel was located above the ground,
backlash rotate on the axle and front
wheels also on the direction axis .
rear wheels.
Repair
• In case of reparation, please contact the producer.
Customer service
• If you have any questions or need help, contact the producer.
visible signs of damage.
18

8. Technical parametres
Permitted user weight
Usage period:
5 years since production date
The height of the wheelchair with a higher
1220 mm
Handle hight
930 mm
Stroller width
700 mm
The maximum length of the truck (with unf olded
1750 mm
The minimum length of the wheelchair
1300 mm
Seat width
460 mm
Seat depth
460 mm
Back width
480 mm
Back lenght
400 mm
The length of the backrest with higher backrest
765 mm
The dimensions of the wheelchair after folded
900 x 940 x 330 mm
Stroller weight
23 kg + / - 5%
Stroller weight without components
16 kg + / - 5%
minimum turning radius
137º
Material
Frame steel; upholstery: polyurethane,
Rear wheels diameter with the system of quick
24”, (diameter 610 mm)
Front wheels diameter
8”, (diameter 200x45 mm)
Maximum safe slope
Description of the environment in which the
temperature of storage and use
The humidity for the storage and use
from 30% to 70%
printed on the product
backrest
footrest and backrest)
100 kg
release rear wheels
product will be used
9. Symbols
Confirmation of compliance with EU standards
Manufacturer
polyethylene; rubber
Date of production
Read the user's manual
Warning
19

Catalog number
Serial number
Protect from hum id ity
Protect from sunlight
Permitted user weight.
Use inside and outside buildings
Maximum safe slope.
The possibility of finge r s ja m ming.
Do not stand on the footrest
The product is intended to transport by car.
The product is not designed for use as a seat to transport in a motor vehicle.
The product is intended to the transport by plane.
Temperature of storage and use
10. Contact details
mdh sp. z o.o.
ks. W. Tymienieckiego 22/24
tel. +48 42 674 83 84
fax. +48 42 636 52 21
www.mdh.pl www.viteacare.com
90-349 Street Łódź, Polska
20
 Loading...