

Page 1
DM INDUSTRIES, LTD.
2320 N.W. 147th Street Miami, Florida 33054
www.dmindustries.com
health and relaxation for life
IMPORTANT SAFETY INSTRUCTIONS
READ ENTIRE MANUAL BEFORE INSTALLING SPA.
PLEASE SAVE THIS MANUAL
OWNER’S MANUAL
for models
xStream • xStreamPro • xStreamDuoPro
Page 2
09D12345BTZ
P817G2DC117ACB
09D12345BTZ
P817G2DC117ACB
L
I
S
T
E
D
C US
CONFORMS TO
ANSI/UL STD 1563
CERTIFIED TO
CAN/CSA C22.2 STD NO.218.1
DM Industries, LTD.
2350 N.W. 147 Street
Miami, FL 33021
(305) 685-5739
www.dmindustries.com
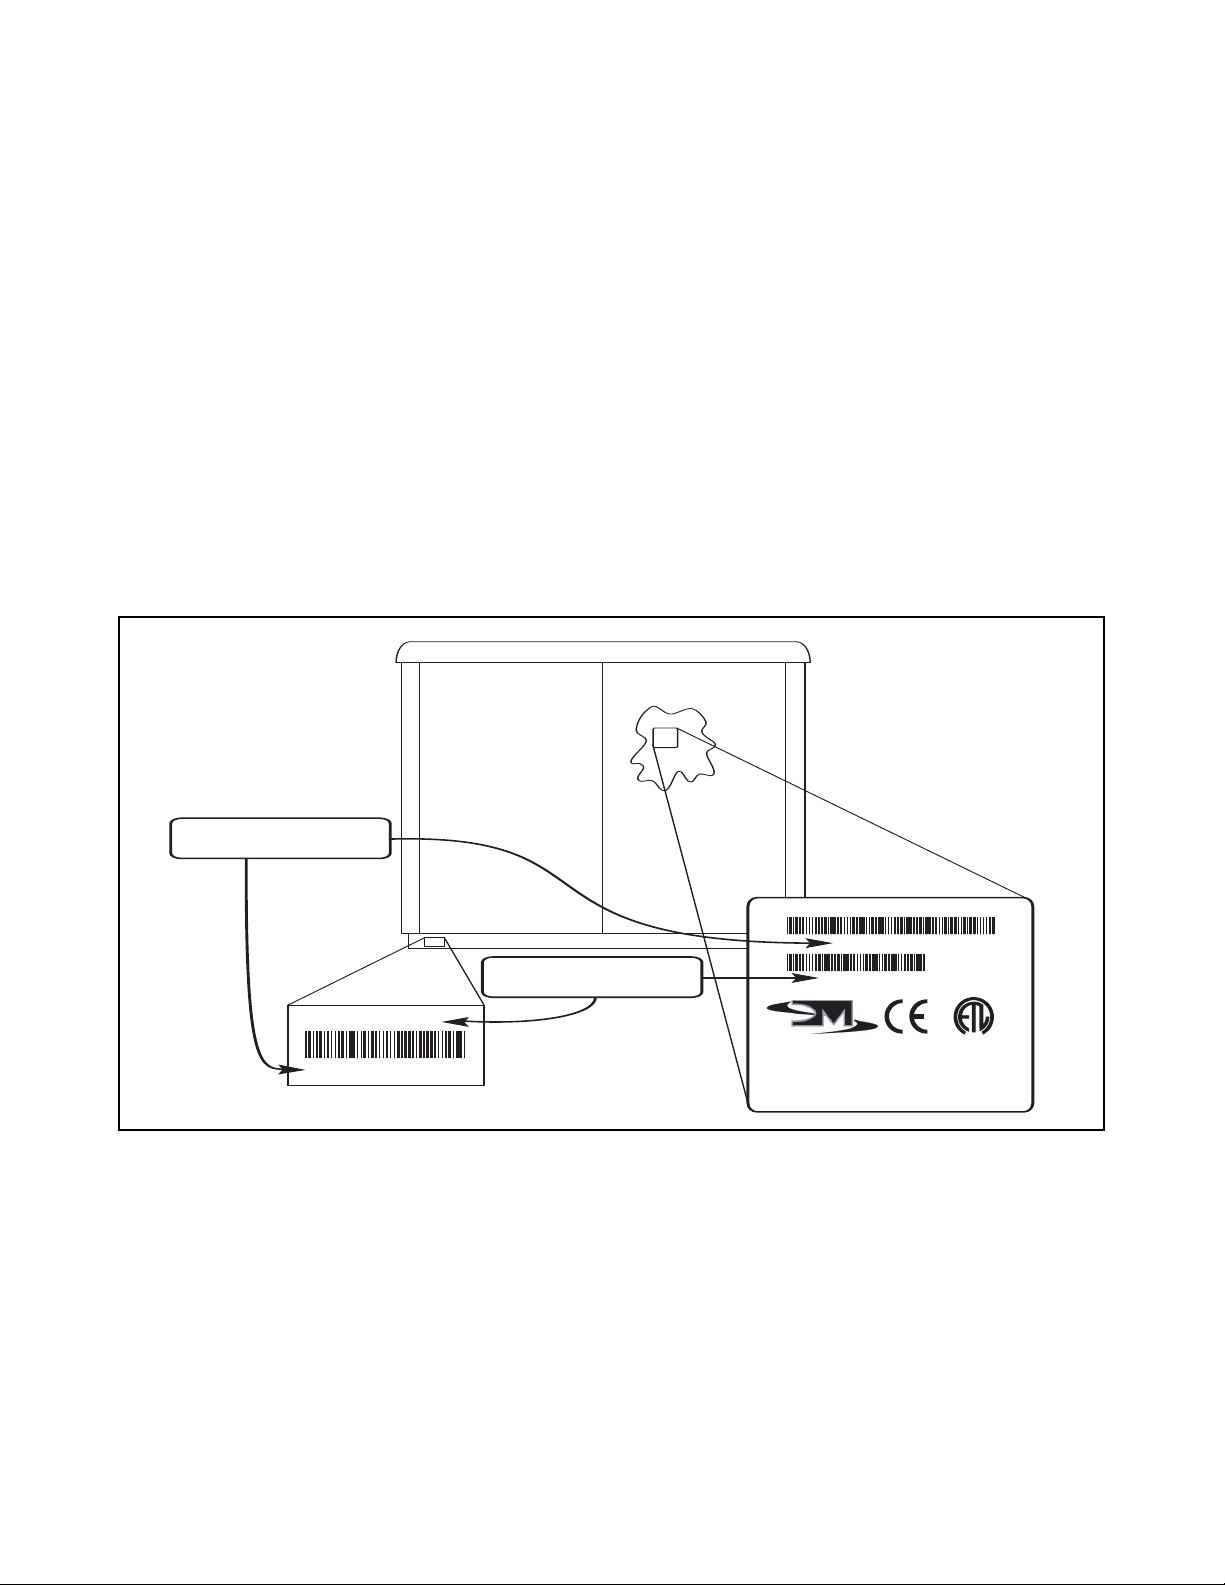
Serial Number
Model Number
ID PLATES ARE LOCATED IN THE FRONT OF THE SPA.
A SMALL ID TAG IS FOUND IN THE BASE OF THE UNIT,
AND A COMPLETE ID TAG IS FOUND ONCE THE FRONT
PANELS ARE REMOVED.
Page 3

OWNER’S RECORD
DATE PURCHASED: ________________________________________
DATE INSTALLED: _________________________________________
DEALER: __________________________________________________
ADDRESS: ________________________________________________
___________________________________________________________
TELEPHONE: ______________________________________________
SERIAL #: _________________________________________________
MODEL #: _________________________________________________
xStream xStream Pro xStream Duo Pro
OWNER’S MANUAL
for models
xStream • xStream Pro • xStream Duo Pro
Page 4

Page 5

GENERAL INFORMATION
• Important Safety Instructions . . . . . . . . . . . . . . 1
• Manufacturer’s Do’s and Don’ts . . . . . . . . . . . . 2
SET UP AND INSTALLATION
• Set Up and Installation Instructions. . . . . . . . . . 2
• Warning Label Installation . . . . . . . . . . . . . . . . . 3
• Cover installation . . . . . . . . . . . . . . . . . . . . . . . . 3
• Spa Schematics and Part Numbers . . . . . . . . . . 4
• Filling the Spa . . . . . . . . . . . . . . . . . . . . . . . . . . . 5
• Testing GFCI . . . . . . . . . . . . . . . . . . . . . . . . . . . . 5
xSTREAM DUO PRO OPERATION
THERAPY OPERATION
• Initial Startup & Operation . . . . . . . . . . . . . . . . 6
• Displaying Time or Temperature . . . . . . . . . . . . 6
• Setting Temperature for the Day . . . . . . . . . . . 6
Therapy Programming Instructions . . . . . . . . . . 7
• Self-Diagnostic Tool . . . . . . . . . . . . . . . . . . . . . . 7
• Heating . . . . . . . . . . . . . . . . . . . . . . . . . . . . . . . 7
• Setting Filtration Cycles . . . . . . . . . . . . . . . . . . . 7
• Setting Heat Days & Temperature. . . . . . . . . . . 8
• F or C Degrees. . . . . . . . . . . . . . . . . . . . . . . . . . 8
• Clock & Calendar Setting. . . . . . . . . . . . . . . . . . 8
• Inverting Display . . . . . . . . . . . . . . . . . . . . . . . . 8
• Therapy Advanced Programming Instructions . . 9
• Therapy Control Programming Chart. . . . . . . . 21
SWIM OPERATION
• Initial Startup & Operation . . . . . . . . . . . . . . 10
• Displaying Time or Temperature . . . . . . . . . . . 10
• Setting Temperature for the Day . . . . . . . . . . 11
• Badu Stream Jets II . . . . . . . . . . . . . . . . . . . . . 11
• V-Stream Jets . . . . . . . . . . . . . . . . . . . . . . . . . . 11
• Operating the Lights . . . . . . . . . . . . . . . . . . . . 12
• Programming AquaBrite/Chromatherapy. . . . . 12
• Operating the Stereo . . . . . . . . . . . . . . . . . . . . 12
SWIM OPERATION
(continued)
Swim Programming Instructions . . . . . . . . . . . 13
• Setting Heat Days & Permanent Temperature 13
• F or C Degrees. . . . . . . . . . . . . . . . . . . . . . . . . 13
• Filtration Cycle . . . . . . . . . . . . . . . . . . . . . . . . . 13
• Clock & Calendar Setting. . . . . . . . . . . . . . . . . 14
• Heater Lock . . . . . . . . . . . . . . . . . . . . . . . . . . . 14
• Panel Lock . . . . . . . . . . . . . . . . . . . . . . . . . . . . 14
• Inverting Display . . . . . . . . . . . . . . . . . . . . . . . 14
• Swim Advanced Programming Instructions . . . . 15
• Swim Control Programming Chart . . . . . . . . . . 22
JET OPERATION
• Euro Cluster Massage Jet . . . . . . . . . . . . . . . . . 16
• Directional Massage Jet. . . . . . . . . . . . . . . . . . . 16
• Air Control . . . . . . . . . . . . . . . . . . . . . . . . . . . . 16
• Waterfall Control . . . . . . . . . . . . . . . . . . . . . . . 16
SAFETY FEATURES
A. Freeze Protection . . . . . . . . . . . . . . . . . . . . . . 17
B. Flow Protection . . . . . . . . . . . . . . . . . . . . . . . 17
C. Overheat Protection . . . . . . . . . . . . . . . . . . . 17
SPA MAINTENANCE
• Filter Maintenance . . . . . . . . . . . . . . . . . . . . . 18
• To Clean Filter . . . . . . . . . . . . . . . . . . . . . . . . . 18
• Excel Plus Cabinet Maintenance . . . . . . . . . . . 18
• Care Of Acrylic Surface . . . . . . . . . . . . . . . . . . 18
• Cover Maintenance . . . . . . . . . . . . . . . . . . . . . 18
• Draining Your Spa . . . . . . . . . . . . . . . . . . . . . . 18
• Winterizing Your Spa . . . . . . . . . . . . . . . . . . . . 19
DIAGNOSTICS & TROUBLESHOOTING
• Resetting Spa . . . . . . . . . . . . . . . . . . . . . . . . . 20
• Diagnostic Messages . . . . . . . . . . . . . . . . . . . 20
• Therapy Control Programming Chart. . . . . . . . 21
• Swim Control Programming Chart . . . . . . . . . . 22
TABLE OF CONTENTS
Page 6

Page 7

PAGE 1
IMPORTANT SAFETY INSTRUCTIONS
WHEN INSTALLING AND USING THIS ELECTRICAL EQUIPMENT, BASIC SAFETY PRECAUTIONS
SHOULD ALWAYS BE FOLLOWED, INCLUDING THE FOLLOWING DANGERS:
1. WARNING - To reduce the risk of injury. Do not permit
children to use this product unless they are closely
supervised at all times.
2. DANGER - Risk of Accidental Drowning.
Extreme caution must be exercised to prevent
unauthorized access by children. To avoid accidents,
ensure that children cannot use this spa unless they are
supervised at all times.
3. DANGER - Risk of injury.
The filter in this spa is sized to match the specific water
flow created by the pump. Should the need arise to replace
the filter or the pump, be sure that the flow rates are
compatible. Never operate the spa if the filter is broken or
missing. Never replace a filter with one rated less than the
flow rate on the original filter.
4. DANGER – Risk of Injury.
Do not remove suction fittings. The suction fittings on this
spa are sized to match the specific water flow created by
the pump. Should the need arise to replace the suction
fittings or the pump, be sure that the flow rates are
compatible. Never operate the spa if the suction fittings are
broken or missing. Never replace a suction fitting with one
rated less than the flow rate marked on the original suction
fitting.
5. DANGER - Risk of electrical shock:
A Ground terminal (pressure wire connector) is provided on
the control box inside the unit to permit connection of a
minimum 8.2mm
2
(No. 8 AWG) solid copper bonding
conductor between this point and any metal equipment,
metal water pipe, metal enclosure of electrical equipment,
or conduit within 1.5 m (5 feet) of the unit.
6. DANGER - Risk of Electric Shock.
Install the spa at least 1.5 m (5 feet) from all metal
surfaces. A spa may be installed within 1.5 m (5 feet) of
metal surfaces if each metal surface is permanently
connected by a minimum 8.2mm
2
(No. 8 AWG) solid copper
conductor to the wire connector on the control box which is
provided for this purpose.
7. DANGER - Risk of Electric Shock.
Do not permit any electric appliance, such as a light,
telephone, radio, or television, within 1.5 m (5 feet) of a spa.
8. WARNING - To reduce the risk of injury:
A. The water in a spa should never exceed 40°C (104°F).
Water temperatures between 38°C (100°F) and 40°C
(104°F) are considered safe for a healthy adult. Lower
water temperatures are recommended for young children
and when spa use exceeds 10 minutes.
B. Since excessive water temperatures have a high
potential for causing fetal damage during the early months
of pregnancy, pregnant or possibly pregnant women should
limit spa water temperatures to 38°C (100°F).
C. Before entering a spa the user should measure the
water temperature with an accurate thermometer since the
tolerance of water temperature-regulating devices varies.
D. The use of alcohol, drugs, or medication before or
during spa use may lead to unconsciousness with the
possibility of drowning.
E. Persons suffering from obesity or with a medical history
of heart disease, low or high blood pressure, circulatory
system problems, or diabetes should consult a physician
before using a spa.
F. Persons using medication should consult a physician
before using a spa since some medication may induce
drowsiness while other medication may affect heart rate,
blood pressure, and circulation.
9. WARNING - Prolonged immersion in water that is
warmer than normal body temperature can result in a
dangerous condition known as HYPERTHERMIA.
The causes, symptoms, and effects of hyperthermia may
be described as follows: Hyperthermia occurs when the
internal temperature of the body reaches a level several
degrees above the normal body temperature of 37°C
(98.6°F). The symptoms of hyperthermia include dizziness,
fainting, drowsiness, lethargy, and an increase in the
internal temperature of the body.
The effects of hyperthermia include:
(1) unawareness of impending hazard,
(2) failure to perceive heat,
(3) failure to recognize the need to exit the spa,
(4) physical inability to exit the spa,
(5) fetal damage in pregnant women, and
(6) unconsciousness resulting in a danger of drowning.
10. WARNING
• The use of alcohol, drugs, or medication can greatly
increase the risk of fatal hyperthermia in hot tubs and spas.
• Persons taking medications which induce drowsiness
such as tranquilizers, antihistamines or anticoagulants
should not use the spa.
• Pregnant women and persons with a medical history of
heart disease, circulatory problems, diabetes or high blood
pressure should consult their physician before using the
spa.
• Children are especially sensitive to hot water. At no time
should children have unsupervised access to the spa. The
use of elevated decking may encourage children to climb
onto the thermal cover — IT IS NOT DESIGNED AS A
SAFETY OR CHILD RESISTANT COVER! The Spa comes
with a thermal cover which is provided with locking straps.
INSTALL the locks for your child’s safety.
11. DO NOT DIVE INTO SPA.
IT WILL CAUSE HARM OR INJURY.
Page 8
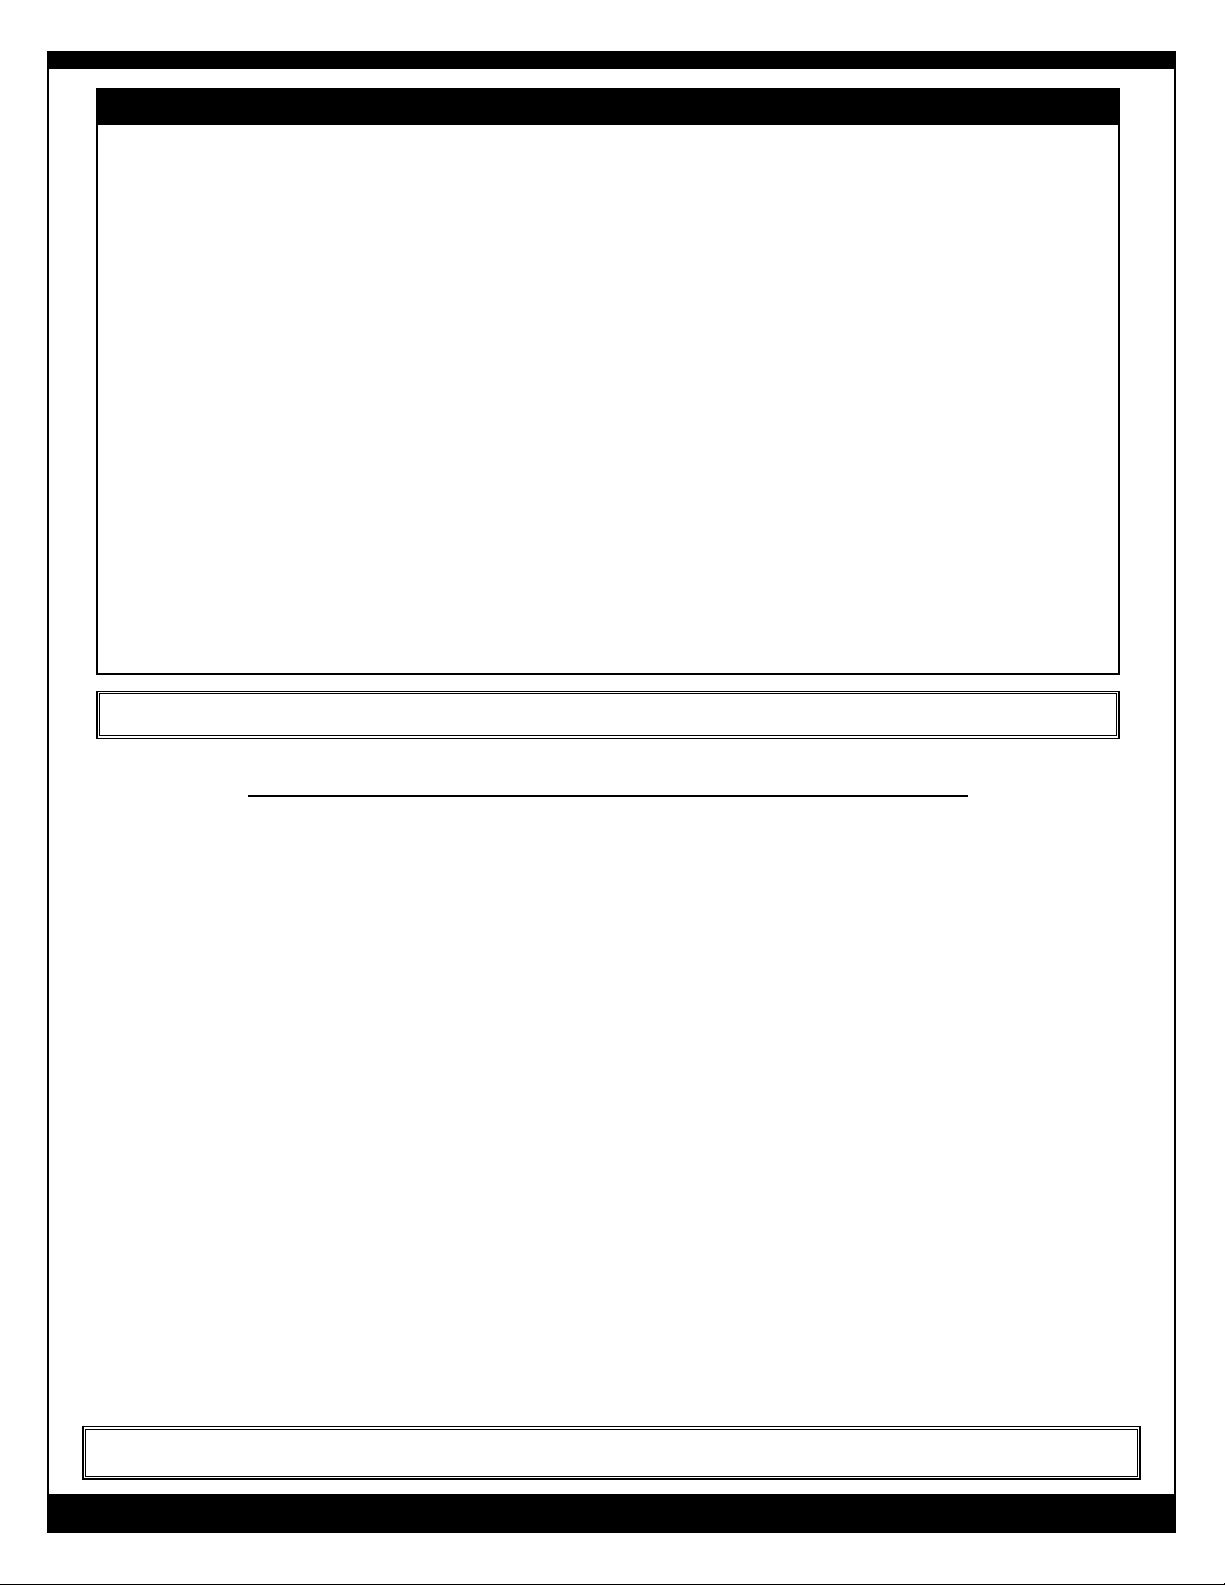
WARNING: The use of alcohol, drugs, or medication can greatly increase the risk of fatal HYPERTHERMIA.
PAGE 2
Reading and understanding these warnings will allow you to reduce the risk of causing inadvertent damage to your spa, your surroundings,
or yourself. Read these warnings carefully.
DO Make sure the spa is connected to a Ground Fault Circuit Interrupter (GFCI). Test the GFCI before each use.
DO Test the water with your hand before entering the spa to be sure it is comfortable.
DO Remember that wet surfaces can be slippery. Take care when entering and existing the spa.
Only enter by way of the step(s) in the spa. Do not step on edges or filter lids.
DO Keep the thermal cover on the spa when it is not in use, empty or full.
DO Maintain proper water pH (7.4-7.6) and clean filter cartridge weekly. Refer to Water Maintenance section.
DO Take steps to prevent the intrusion of sand and dirt into the spa.
DO Maintain water level to 1” above the highest jets. The jets can spray water out of the spa if the water
level becomes too low.
DO Shut off circuit breaker to the spa before draining the spa, while it is empty and while filling it.
DO Place only on surfaces that can withstand the floor loading requirements of your spa.
If you do not know the rating of your floor, consult an architect or engineer before filling.
DO Install the spa only on floors or areas that can withstand repeated exposure to water (tile, brick, etc.)
DO Clean the filter cartridge weekly.
DO NOT Store chemicals in the spa’s equipment compartment.
DO NOT Open the electrical control box. They are no user serviceable parts inside.
DO NOT Operate the pump(s) on hi-speed for extended periods of time with the cover on. Extended hi-speed
pump operation will cause a slow heat build-up due to water friction, which could trip the spa’s hilimit thermostat.
DO NOT DIVE INTO SPA
SAVE THESE INSTRUCTIONS
SITE SELECTION
Structure: The spa should always be placed on a structurally
strong, smooth and level surface. Concrete is preferred.
The xStream spa models have a loading capacity of
850kg/m
2
- 930kg/m2 (175lbs. - 190lbs. /sq. ft).
LOCAL CODES:
There may be certain restrictions and/or requirements that
are particular to your locality.
MAINTENANCE:
Trees, lawn, placement surfaces, etc. can create extra work
in keeping your spa area clean and safe. Please be advised
that placing your spa near dirt or trees may increase the
amount of debris inadvertently brought into the spa water
on the feet of users or by the wind. The intrusion of this
debris into the spa water may cause harm to your equipment as well as the spa surface and is not covered under
warranty.
PRIVACY AND WIND SHIELDING:
A sheltered environment can result in lower operating and
maintenance costs. You may also want to take into consideration
your privacy during times of the year when trees may be barren,
having the spa located where you have a view of a peaceful
sunset, where you may be able to catch soothing breezes,
or your view and the view of your neighbors may also be
something that you should address prior to the final installation of your spa.
CLEARANCES
CHECK THE FOLLOWING AREAS PRIOR TO SPA DELIVERY*
1. TREE BRANCHES
Clearance for spa passage.
2. TIGHT CORNERS
Make sure there is space to maneuver.
3. STORAGE SHEDS, DOG HOUSES, WOOD PILES
Remove out of the way.
4. OVERHANGS AND GUTTERS
Anything overhead, as well as drain pipe locations, must allow for spa passage.
* Most installations require a crane. Estimated
dry weight of spa is 1795kg (3950 lbs).
SET UP AND INSTALLATION INSTRUCTIONS
MANUFACTURER’S DO’S AND DON’TS
Page 9
PAGE 3
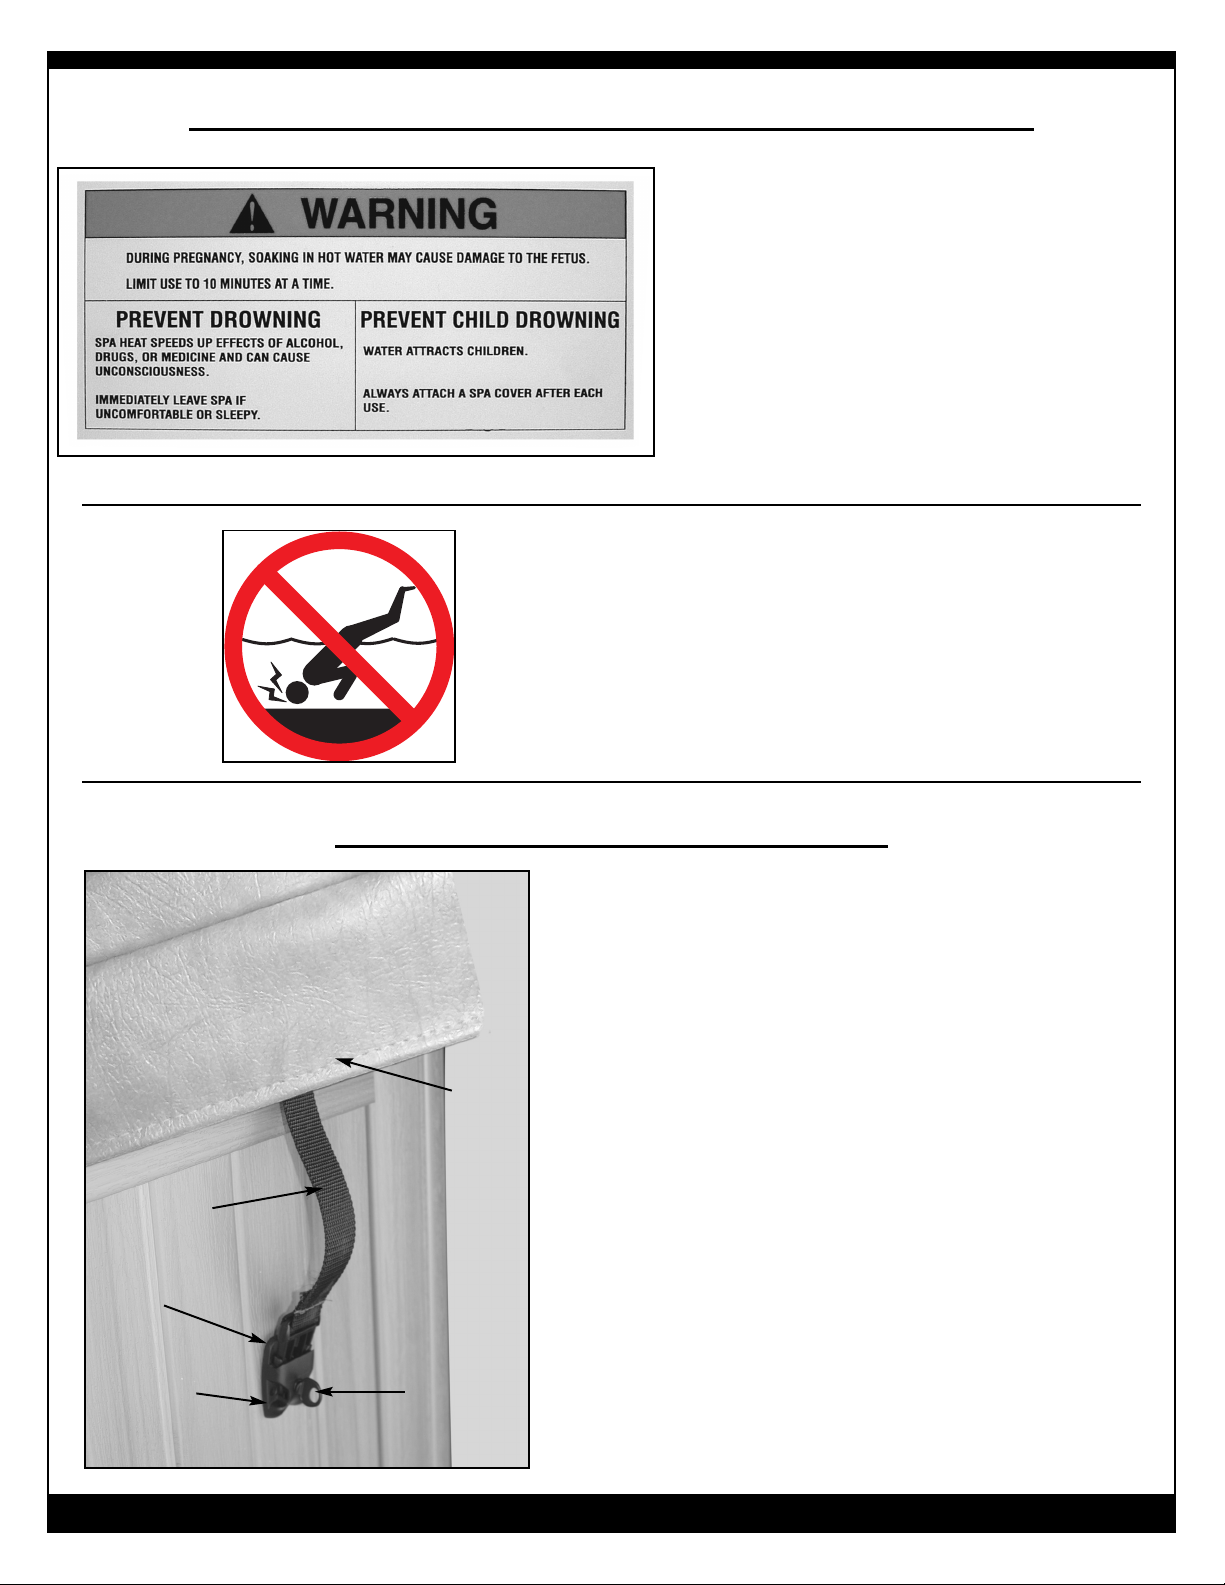
INSTALLING THE SPA COVER
1. Position the cover squarely over the spa.
2. Position the locks for the tie-downs on the sides of the spa. You
should allow approximately 13mm to 20mm (1/2” to 3/4”) slack
in the straps for ease of insertion into the locks and to allow for
material shrinkage during temperature changes.
3. Using the screws provided, attach the locks and insert the cover
tie-down straps. Utilizing the cover anytime the spa is not in use
will reduce heat loss and thereby reduce the amount of running
time required to make up that loss by the heating system.
Keep cover fastened down at all times when not in use.
DANGER - RISK OF INJURY
To reduce the risk of potential injury:
1. Never leave a spa uncovered or unattended.
2. Never leave a spa cover unlocked.
3. Do not stand, sit, or lie on the cover.
ALWAYS REMOVE SNOW FROM THE COVER. THE
COVER HAS NOT BEEN DESIGNED TO SUSPEND THE
WEIGHT OF WET SNOW.
IF YOUR SPA INCLUDES A COVERLIFTER (DUO & DUOPRO),
PLEASE READ INSTALLATION INSTRUCTIONS INSIDE THE BOX
COVER INSTALLATION
Key
Lock
Screws (2)
Cover
Tie Down
Strap
Position warning label in visible area prior to
entry of spa.
For instructions, please refer to posted warnings
located on page 1
If replacements are needed please contact local
dealer and order using part number:
“0461536 - Warning Label”
WARNING LABEL INSTALLATION
NO DIVING WARNING
DO NOT DIVE INTO SPA.
IT CAN CAUSE HARM OR INJURY.
Page 10
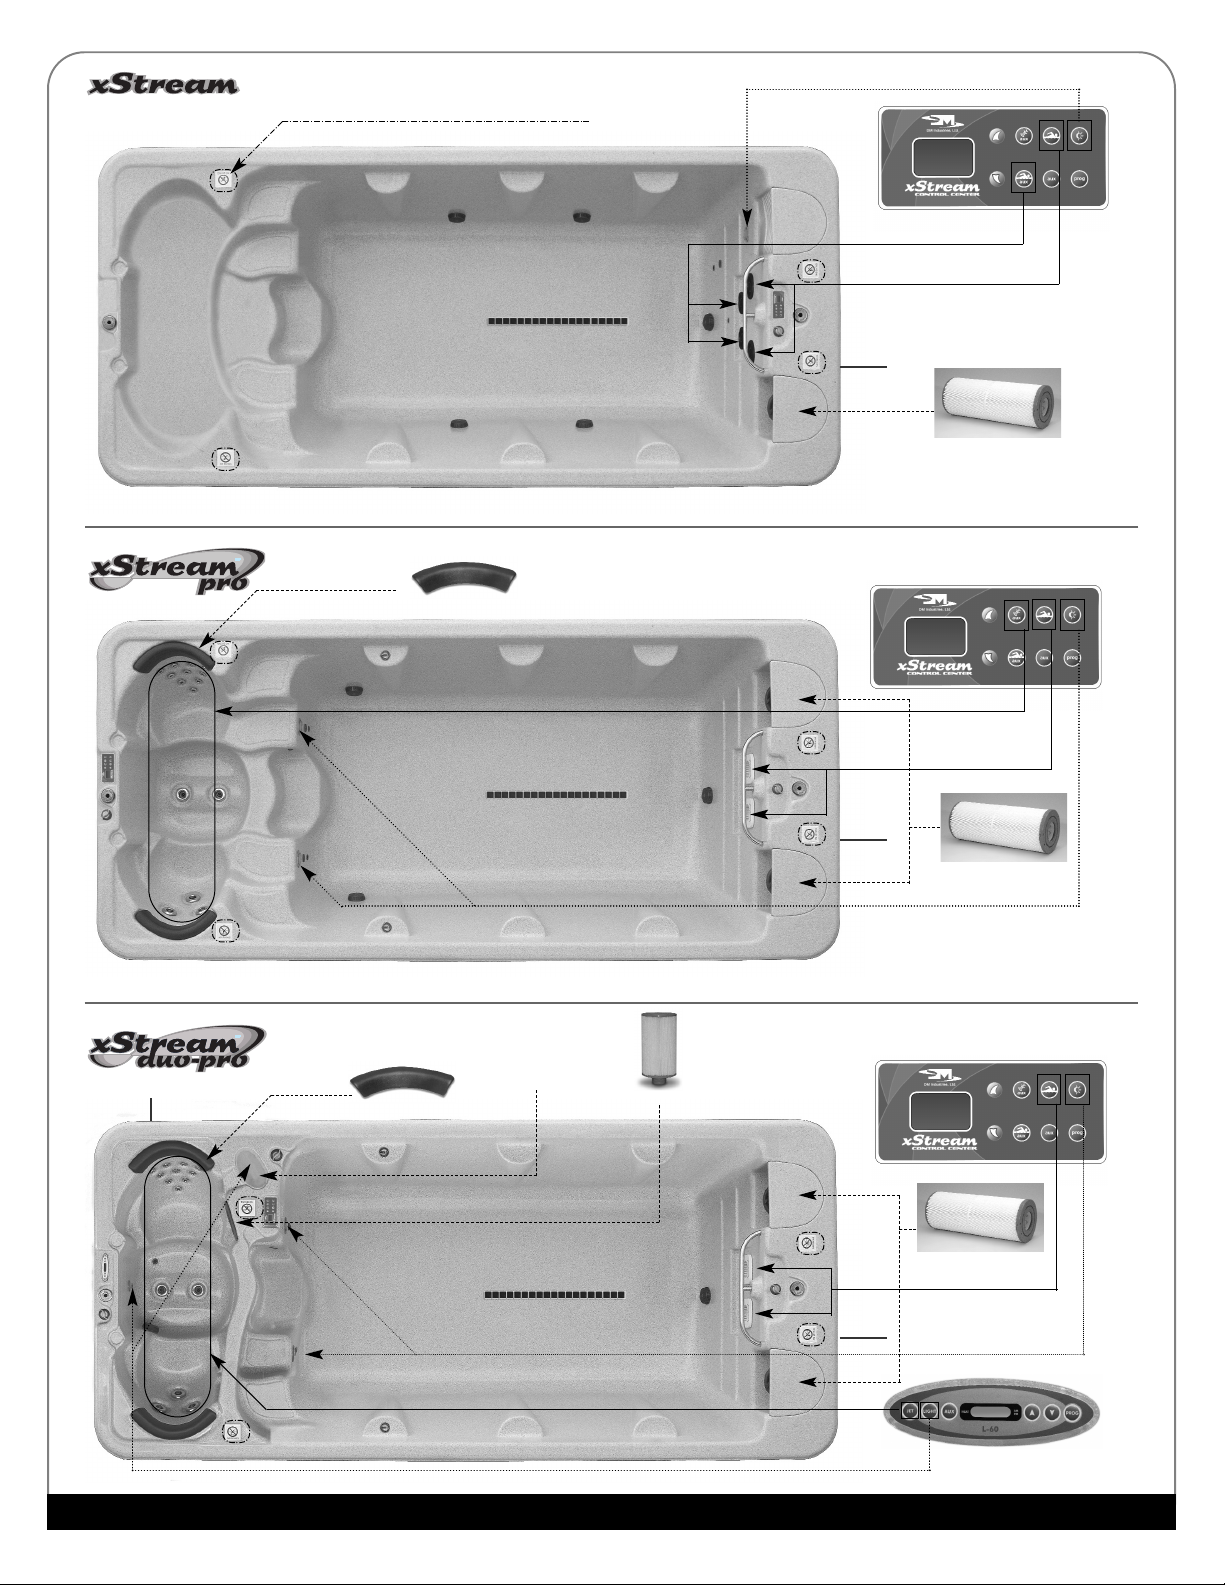
817G2
817G1
817G3
(2 ea) 0212318
(2 ea) 0532064
Cascade Cover Plate
0663005
(1 ea) 0212305-TRB
(2 ea) 0532064
(1 ea) 0212318
(2 ea) 0212318
DRAIN
DRAIN
DRAIN
DRAIN
PAGE 4
NO DIVING TILES
Page 11
NOTE: FOR BEST RESULTS, READ EACH STEP CAREFULLY AND ENTIRELY BEFORE PROCEEDING TO THE NEXT.
FILLING YOUR SPA
Wipe the interior of the spa with a damp, soft cloth to
remove any residue that may be on the surface. Fill with
a garden hose by inserting the nozzle of the hose in the
filter inlet (After filling is complete, remember to put the
filter cartridge in place prior to starting the spa).As the
spa is filling, check in the equipment access area for any
leaks. On occasion, it may be necessary to hand tighten
a union fitting that may have come loose during transit.
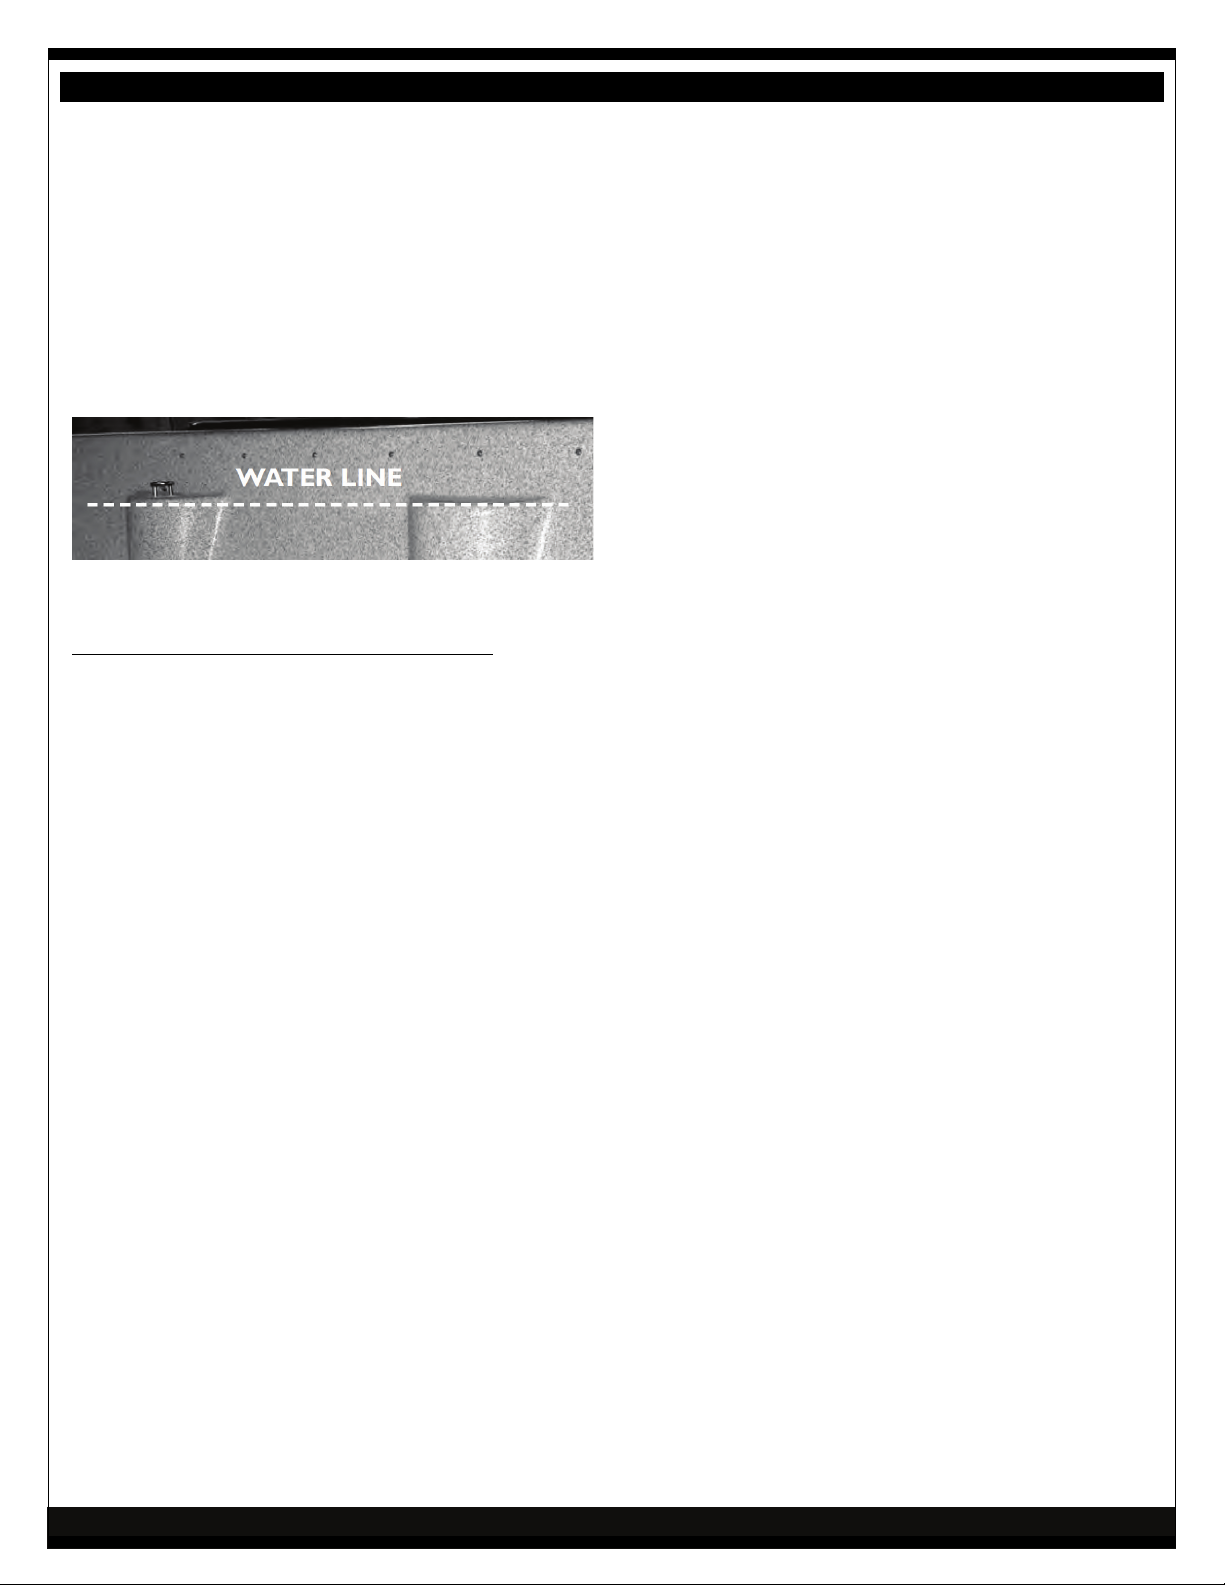
Continue to fill to the water line as marked or top of
baffles in swim area.
NOTE: If your water is extremely hard, it is preferable to
fill the spa halfway with hard water and the rest with
softened water.
Never fill the spa entirely with softened water.
GFCI
The GFCI is a very important safety device and the
National Electric Code requires that all spas are GFCI
protected.
The GFCI shuts off the electricity in a fraction of a
second if there is a short anywhere in the system.
TESTING THE GFCI
It is recommended that the GFCI be tested prior to each
use. Test as follows:
1. Push the TEST button on the GFCI. The RESET button
will trip out, the Spa Control Center(s) display(s) will
go out.
If this does not happen, DO NOT USE spa.
CALL your dealer FOR ASSISTANCE.
2. If the GFCI tests properly, firmly push the RESET
button back into place. The Spa Control Center(s)
display(s) will come back on.
If this does not happen, DO NOT USE spa.
CALL your dealer FOR ASSISTANCE.
If the GFCI trips by itself at any time, firmly press the
RESET button back into place and perform the above
tests.
If this does not happen, DO NOT USE spa.
CALL your dealer FOR ASSISTANCE.
PAGE 5
Page 12
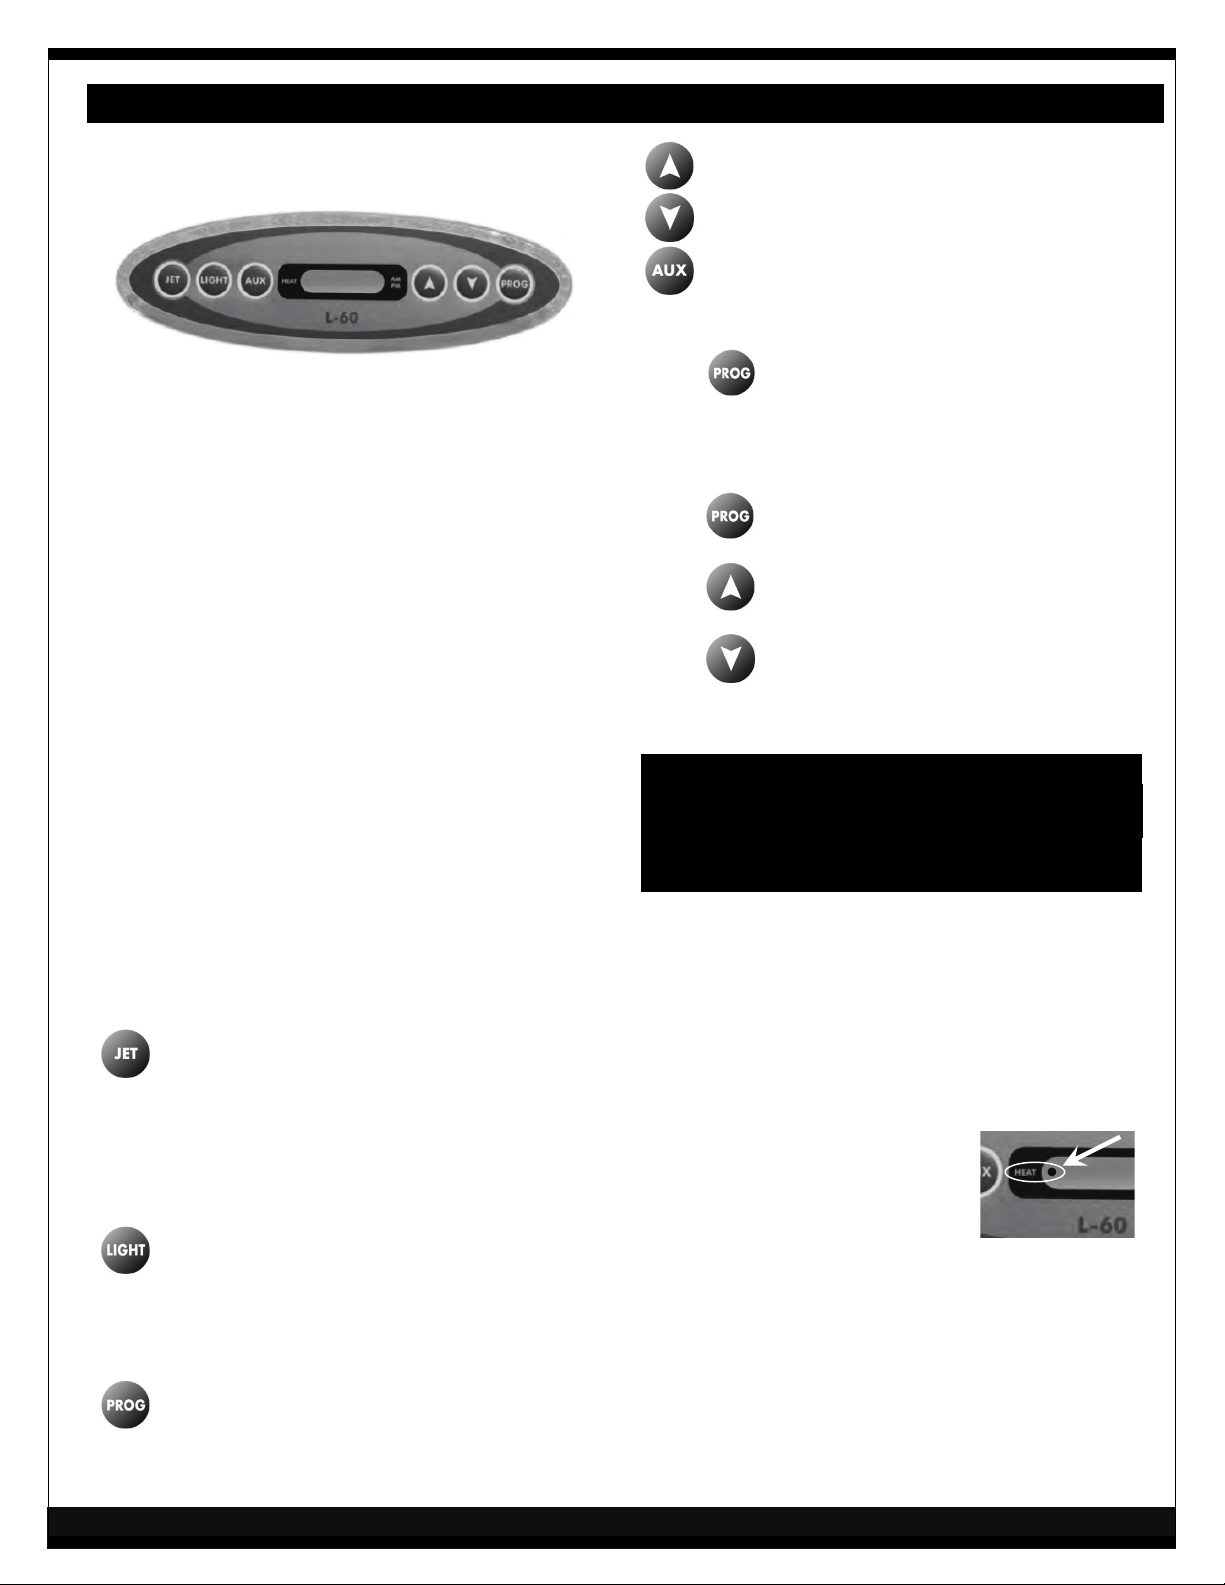
xStream Duo Pro only THERAPY OPERATING INSTRUCTIONS
xStream Duo Pro
This button increases the value on display.
Therapy Control Center
This button decreases the value on display.
This button is not active on this model.
DISPLAYING TIME OR TEMPERATURE
Operates functions on therapy portion of Duo Pro
Press to switch the display between current time
The xStream Duo Pro spa has been designed for your
maximum enjoyment and comfort, with two totally
independent areas, one for swimming exercises and
one for therapy.
It has also been engineered for energy efficiency. The
two areas run independently by two separate ICS
electronic control centers that allow each area to have
their temperatures and filtration cycles individually
controlled.
With the ICS
program for each and every day of the week different
temperatures and filtration cycles, giving you all the
tools for maximum energy savings.
TM
electronic control center you may
TM
INITIAL START UP
Your spa has been programmed for your convenience.
Once properly connected, the pump and heater will
automatically come on and heat the therapy to 102ºF
(39ºC). Date and time must be set at this time by
following the Therapy Programming Instructions, which
also allow all other spa features to be programmed.
The L60 Control Center controls each function directly
with a dedicated button. A brief description of each
button is as follows:
By pressing this button the pump cycles
through a soothing “soaking” mode, to an
invigorating “therapy” mode and then off.
Note: If the spa is in the programmed
filtration cycle or in heating mode, it will
immediately restart running at low speed to
filtrate and/or heat the water.
and current water temperature.
SETTING THE TEMPERATURE FOR A DAY
Press to display water temperature.
Press to increase the set temperature.
Press to lower the set temperature.
NOTE:
This setting only alters the temperature for the
rest of the day.
Go to section “E. HEAT DAYS & TEMPERATURE”
on page 8 to make permanent changes.
IMPORTANT:
When your spa is activated or temperature is
adjusted, the spa goes through a 2-½ minute
calibration cycle. The controller will evaluate the
temperatures at the heater and water in the spa
and will determine proper operation and heating
needs. The calibration process is indicated by the
flashing of the heater LED on the L60 Control Center
display.
This button controls the LED lights. The first
press turns the underwater light on. Second
press turns the waterfall light on. Third press
turns lights off. For color and intensity
programming, please refer to the Aquabrite/
Chromatherapy instructions on page 12.
This button is used to cycle between time
and temperature display and also to enter
and process programming functions.
PAGE 6
Page 13
pag
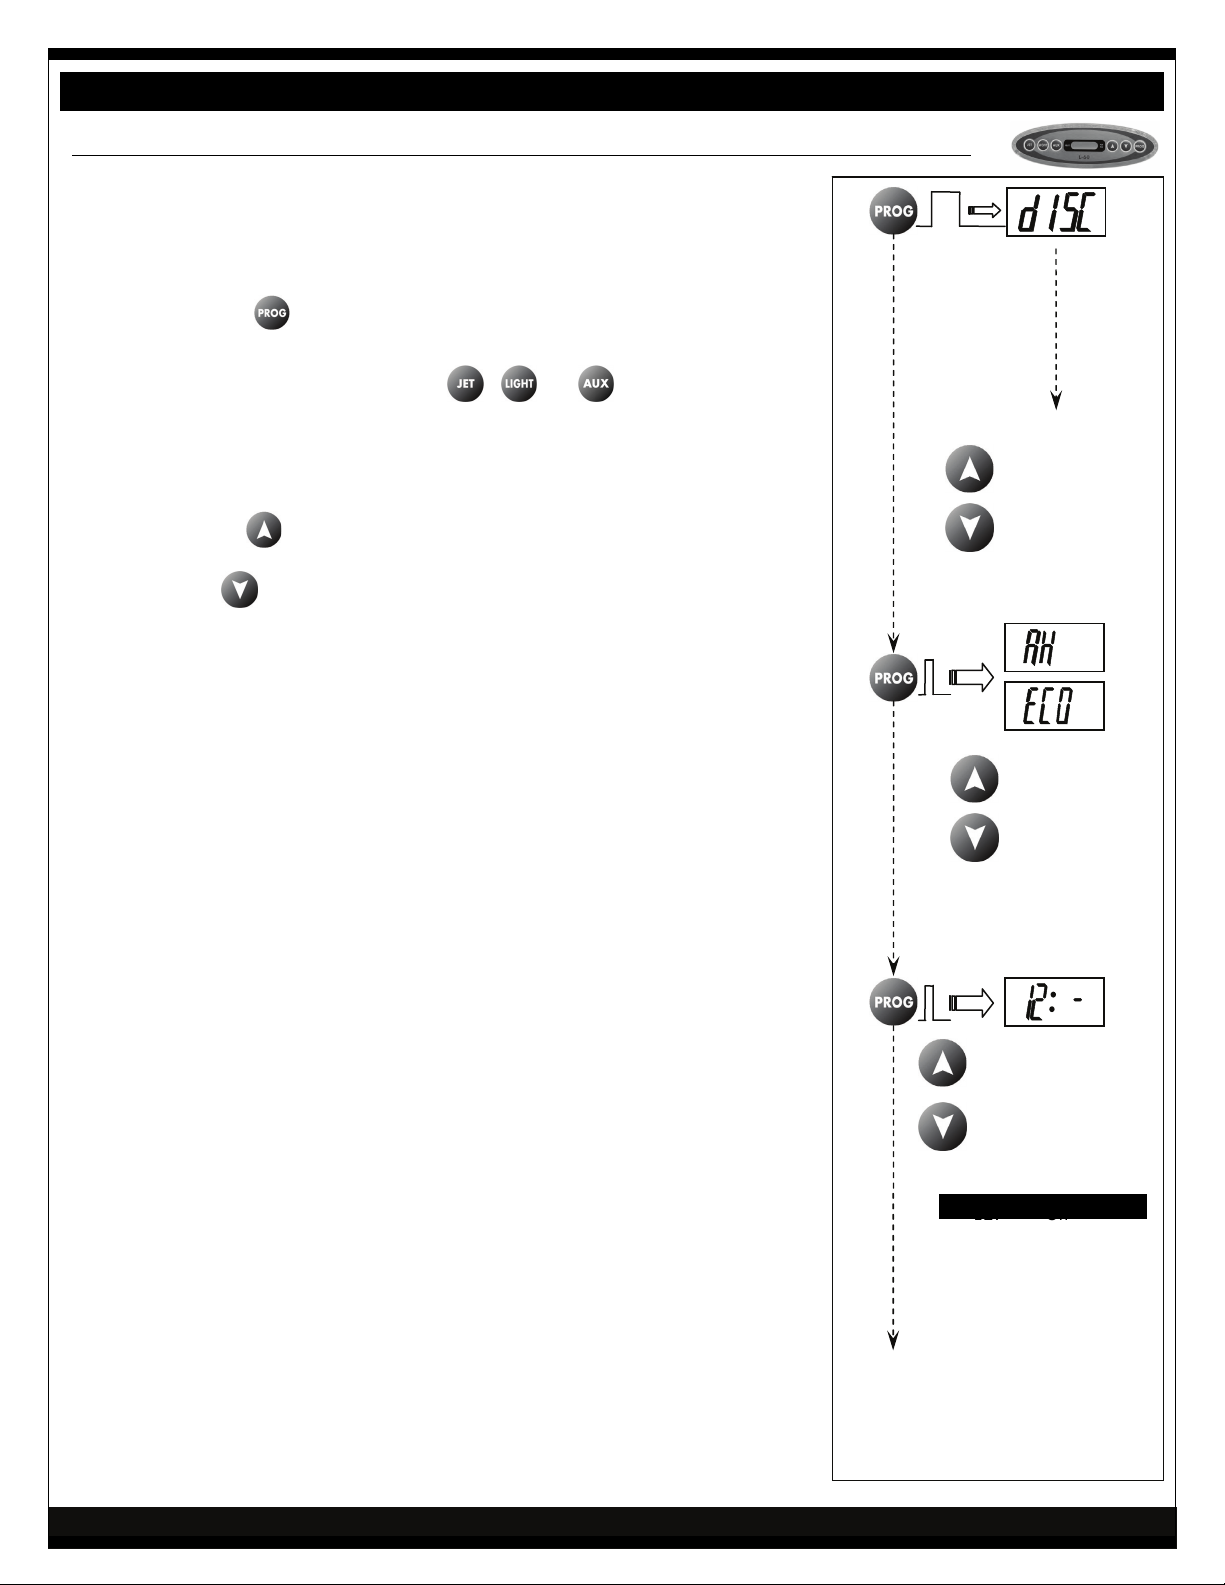
THERAPY PROGRAMMING INSTRUCTIONS
REFER TO PROGRAMMING INSTRUCTIONS ON PAGE 21 FOR QUICK PROGRAMMING STEPS
A. PROGRAMMING MENU .....................................................
Note: All programming functions are shown sequentially. To access any
specific programming step, you have to enter programming from the
beginning, as explained here.
3s
Press and hold
for three (3) seconds until “dISC” is on the screen to
enter the programming menu.
To exit programming mode, press , or at any point in the
sequence or wait for 10 seconds (without pressing any button).
B. SELF - DIAGNOSTIC TOOL ...............................................
Note: This feature is operational on all Control Boards Rev J and up.
Your spa controller offers the latest state-of-the-art diagnostic tool. To start
the test, press
while the display is showing "diSC". This test will run the
equipment sequentially for two (2) minutes. To cancel the self-test at any
time, press
. Once the test is completed, the message "good" will be
displayed if your spa operates properly. If a problem is found, the malfunction
code will be displayed. Please contact your dealer for corrective action.
C. HEATING ..........................................................................
Your spa is pre-programmed from factory to run on AutoHeat mode every day
of the week. That means whenever the temperature of the water falls 1ºF
(0.5ºC) below the set temperature, the ICS
and run it until the temperature reaches 1ºF (0.5ºC) above the set temperature.
Note: Refer to Section E. HEAT DAYS & TEMPERATURE for how to change this setting.
To save even more, you may switch it to ECONOMY mode, where the heating cycle
will only come on during programmed filtration hours. (See “Filtration Cycle” below).
TM
control will start the heating cycle
TO START
SELF TEST
TO CANCEL
SELF TEST
USE ARROWS
TO CHANGE
BETWEEN
MODES
Note: In ECONOMY mode, if at the end of filtration cycle the water has not reached the
set temperature, the heating cycle will stop. This mode is used for energy conservation,
the same way you would control your heat or air conditioning in your house.
D. FILTRATION CYCLE ..........................................................
Your spa is pre-programmed from the factory to run the filtration cycle for
two hours in the morning and two hours in the evening. It is recommended
that filtration hours be set to the minimum necessary to maintain water
quality.
Notes: Please review this setting upon installation.
Some Control Boards programmed for AH may jump the filtration hours
setting. If that happens, change from AH to ECO, program the desired filtration
hours and change back to AH.
During filtration, the water temperature may rise slightly, therefore
to prevent overheating during the warmer months of the year, do not
program filtration for more than 6 hours a day (4 hours in very hot
climates).
Keeping your set temperature a few degrees below your desired
temperature will aid in controlling water temperature.
continues
on next
e
Cycles up through
filtration hours
Turns filtration On/Off
on shown hour.
FACTORY DEFAULTS
12: - Off
12: - AM 12: - PM
12: F Filtering
1: - 1: 2: - 2: 3: - 3: 4: - 4: F
5: - 5: F
6: - 6: 7: - 7: 8: F 8: 9: F 9: 10: - 10: 11: - 11: -
PAGE 7
Page 14
THERAPY PROGRAMMING INSTRUCTIONS
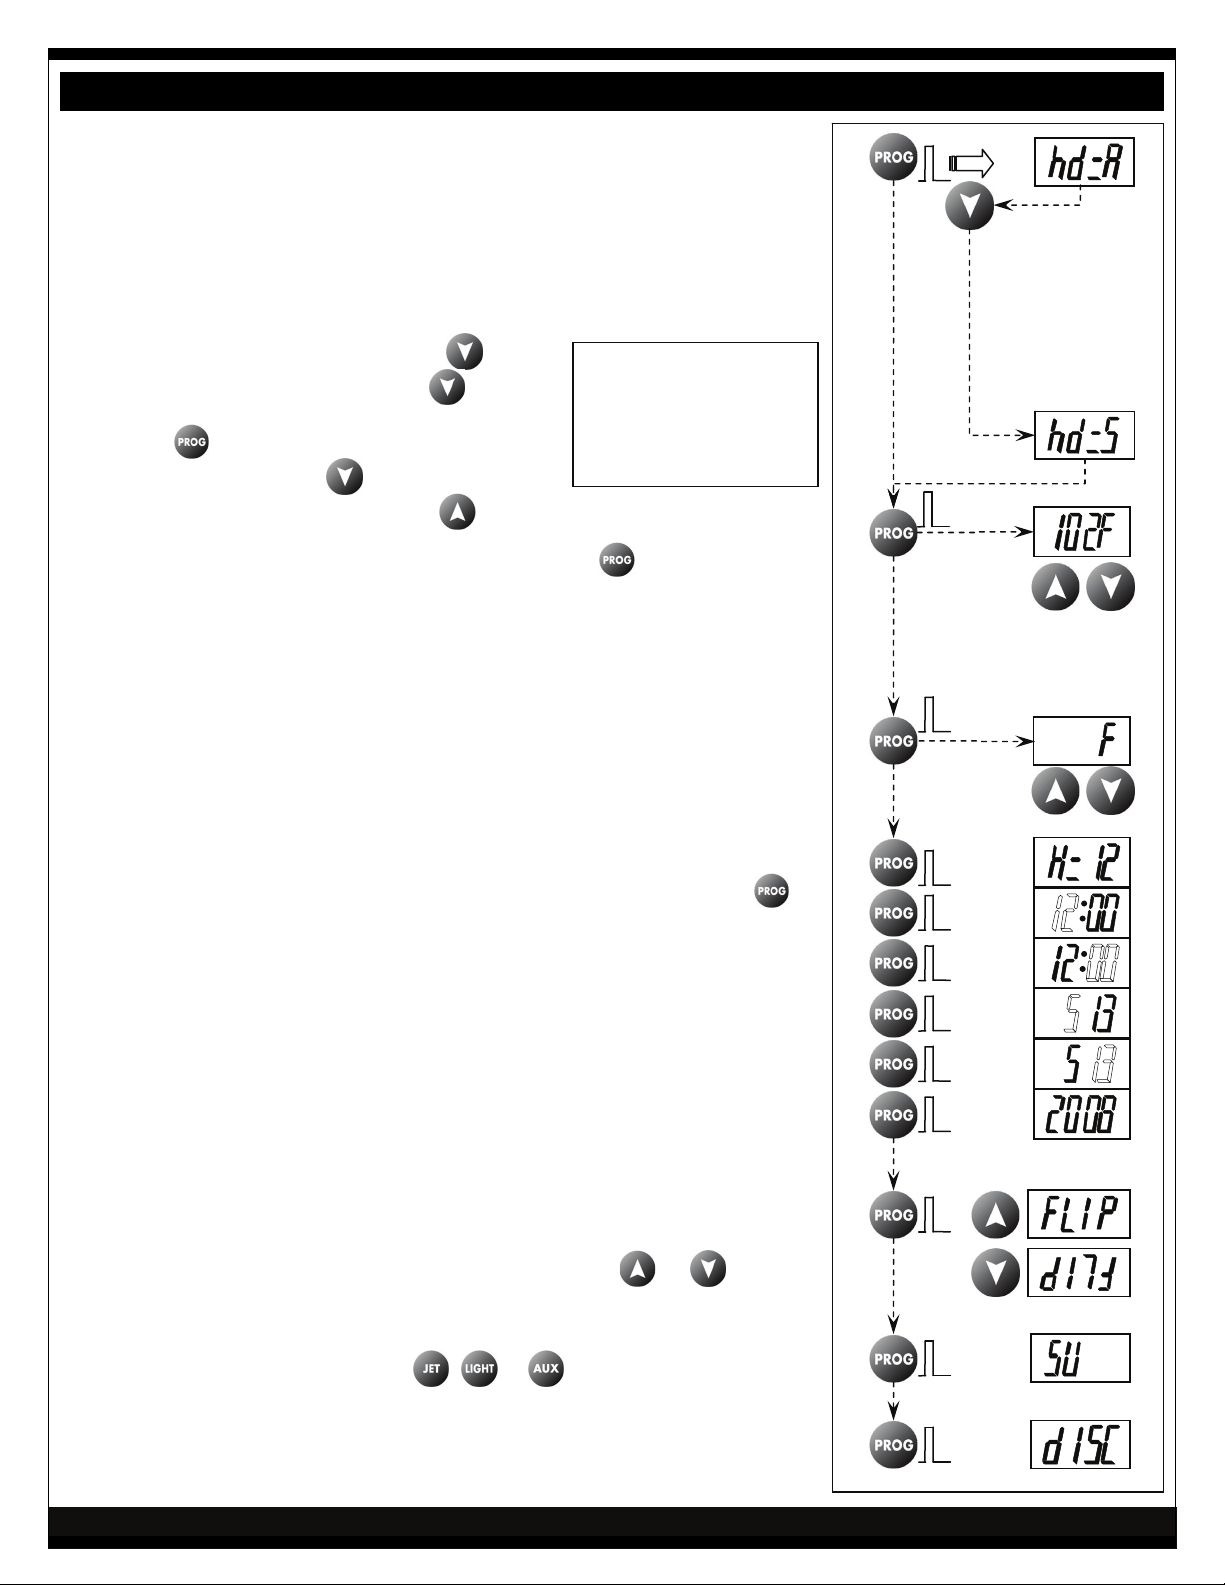
E. HEAT DAYS & TEMPERATURE ............................................
Your spa is pre-programmed from factory to heat “All” days, “hd=A”. It has
however the ability to be programmed for different temperatures on different
days of the week. To do so, follow these steps:
Example: Let's assume that you don’t normally use the spa between Mondays
and Thursdays and you want to save on your electric bill by reducing the
spa’s energy consumption.
1. While the display shows “hd=A” press . The
display will show the heat day. Press
until the desired heat day is selected .......................
2. Press
selected. Press and hold
to, for instance, to 80ºF (27ºC). Press
to display temperature for the day
to lower temperature
again
to increase the temperature.
a. hd=7 Saturday
b. hd=6 Friday
c. hd=5 Thursday
d. hd=4 Wednesday
e. hd=3 Tuesday
f. hd=2 Monday
g. hd=1 Sunday
TO CHANGE TO
INDIVIDUAL DAYS
OF THE WEEK:
7 – Saturday
6 – Friday
5 – Thursday
4 – Wednesday
3 – Tuesday
2 – Monday
1 – Sunday
3. To check or adjust the temperature on another day, press
program until the display shows “hd=A” again. Then repeat steps 1 through 3 to do
the same for Wednesday (hd=4), Tuesday (hd=3) and Monday (hd=2).
NOTE: If you programmed different temperatures at different days, DO NOT alter the
temperature setting after the display shows “hd=A”. If you do so, “All” days will revert
to the newly set temperature.
to cycle through the
F. TEMPERATURE – ºF or ºC..................................................
Your spa is pre-programmed from factory to display temperature in degrees
Fahrenheit (ºF). Use the arrow keys to change between degrees Celcius (ºC)
and degrees Fahrenheit (ºF).
G. CLOCK AND CALENDAR SETTING ......................................
The display will sequence through the time and calendar settings as
pressed.
Sequence is: “H=12” – 12-hr or “H=24” – 24-hr clock
Hours setting
Minutes setting
Month setting
Day setting
Year setting
Use the arrow keys to change the setting of the blinking digits.
is
USE ARROWS TO
CHANGE TEMPERATURE
USE ARROWS TO
CHANGE ºF to ºC
USE ARROWS TO CHANGE
12/24
HOUR
MINUTES
MONTH
DAY
YEAR
H. DISPLAY ...........................................................................
The Control Center display can be inverted to allow easier reading from inside
the spa. To do so, while the display shows “FLIP” use
or
to invert
the display back and forth.
To exit programming mode, press , or at any point in the
sequence or wait for 10 seconds (without pressing any button).
PAGE 8
GOES BACK
TO THE
BEGINNING
continues on next page
Page 15
THERAPY ADVANCED PROGRAMMING INSTRUCTIONS
DO NOT ENTER THIS SECTION UNLESS INSTRUCTED BY A QUALIFIED TECHNICIAN
** IMPROPER CHANGES MAY CAUSE MALFUNCTION OR DAMAGE YOUR SPA AND MAY VOID THE WARRANTY! **
ADVANCED FEATURES SETUP
To exit programming mode, press , or at any point in the sequence or wait for 10 seconds (without
pressing any button).
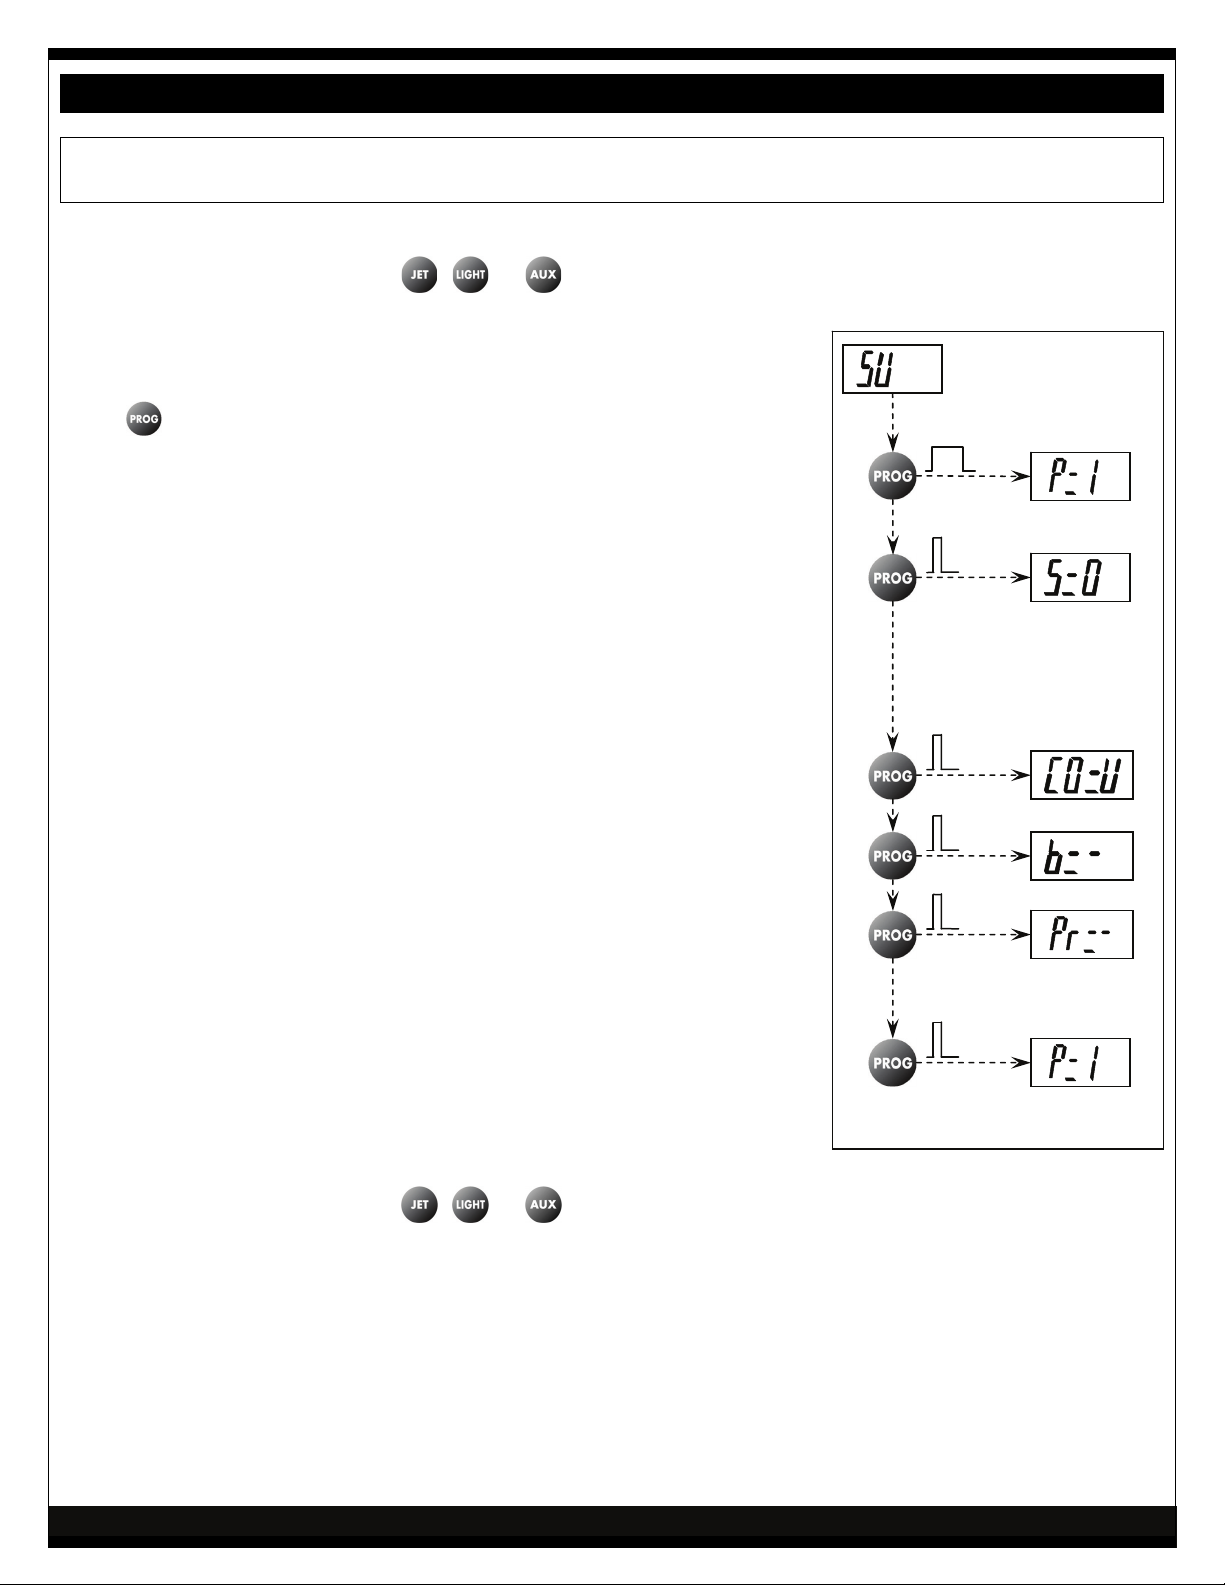
A1. SETUP ("SU") .................................................................
While the display shows “SU” enter the Advanced Programming Menu by holding
down for 8 seconds.
A2. PUMP SETUP...................................................................
The Therapy side of the xStream Duo Pro should be set to “P=1” ONLY.
Changing this setting will cause the pump to follow button commands incorrectly.
A3. POWER SERVICE LEVEL ..................................................
The Therapy side of the xStream Duo Pro should be set to “S=0” ONLY.
This indicates that the heater will shut off when the pump is turned on high
speed.
Warning! Changes to this setting may cause inadvertent breaker
tripping and strain your power connections. If so, this would
void your warranty.
A4. COUNTRY CODE..............................................................
This setting is not applicable to the Therapy Control.
A5. AUX BUTTON (BLOWER) .................................................
This setting is not applicable to the Therapy Control, but should be left at b=-.
A6. PRIME CYCLE AT STARTUP .............................................
This step, if present, turns the pump on for a minute or two every time power is
applied to the spa, to prime the pump.
Default setting is “Pr= -”.
To exit programming mode, press
pressing any button).
, or at any point in the sequence or wait for 10 seconds (without
8s
GOES BACK TO THE BEGINNING OF
THE ADVANCED SETTINGS
PAGE 9
Page 16
SWIM OPERATING INSTRUCTIONS
Swim Control Center
The xStream Series spas have been designed for your
maximum enjoyment and comfort.
They have been engineered for energy efficiency, and the
TM
ICS
electronic control center allows full programming of
temperature and filtration cycles.
With the ICS
TM
electronic control center you may program
different temperatures for each and every day of the
week, giving you all the tools for maximum comfort and
energy savings.
Operates functions on swim portion of spa
INITIAL START UP
Your spa has been programmed for your convenience. Once properly connected, the filtration pump and heater will
automatically come on and heat the swimming portion to 85ºF (29ºC) (please confirm this setting has not been
changed during installation). Date and time must be set at this time by following the Swim Programming
Instructions, which also allow all other spa features to be programmed.
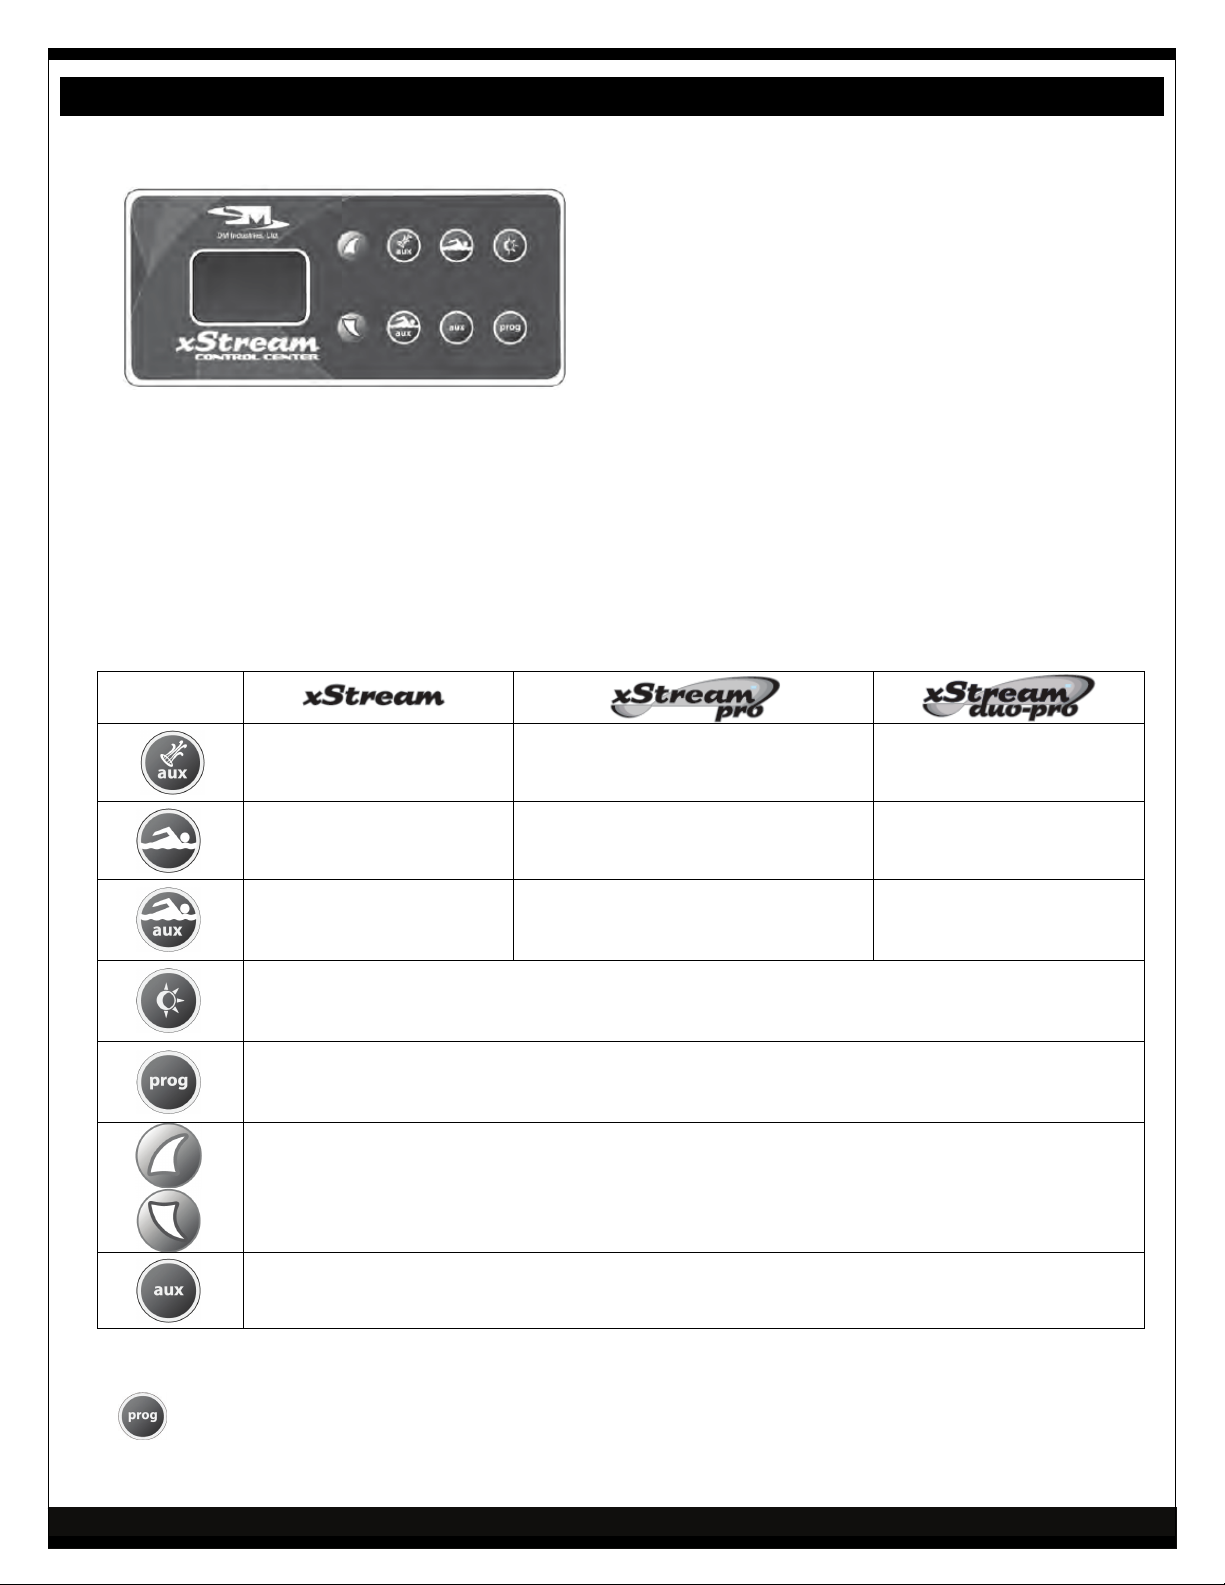
The xStream Control Center controls each function directly with a dedicated button. A brief description of each
button is as follows:
Button
Not active
Pressing this button will turn
the top swim jets on and then
off.
Pressing this button will cycle the therapy
jets through a soothing “soaking” mode,
to an invigorating “therapy” mode and
then off.
Pressing this button will turn the Badu
jets on and then off.
Not active
Pressing this button will turn
the Badu jets on and then off.
Pressing this button will turn
the bottom swim jets on and
then off.
This button operates the lights. Refer to the “TURNING ON THE LIGHT” section for operating instructions.
For spas equipped with Digichromium option, refer to “AQUABRITE/ CHROMATHERAPY” instructions on
page 12 for color and intensity programming.
This button is used to cycle between time and temperature display and also to enter and process
programming functions.
The “UP” button increases the value on display.
The “DOWN” button decreases the value on display.
Not active
Not active Not active
DISPLAYING TIME OR TEMPERATURE
Pressing this button will switch the display between current time and current water temperature.
PAGE 10
Page 17
SWIM OPERATING INSTRUCTIONS
SETTING TEMPERATURE FOR A DAY.
Press this button to display water temperature.
Press these buttons to select the desired temperature.
NOTE: For full instructions on programming your ICSTM controller, go to the SWIM PROGRAMING
INSTRUCTION section on page 13.
NOTE: This setting only alters the
temperature for the rest of the day.
Go to section B. HEAT DAYS &
TEMPERATURE on page 13 to make
permanent changes.
IMPORTANT:
When your spa is activated or temperature is adjusted, the spa goes through a 2-½ minute calibration cycle. The
controller will evaluate the temperatures at the heater and water in the spa and will determine
proper operation and heating needs. The calibration process is indicated by a flashing of
(sun) icon on the Control Center display.
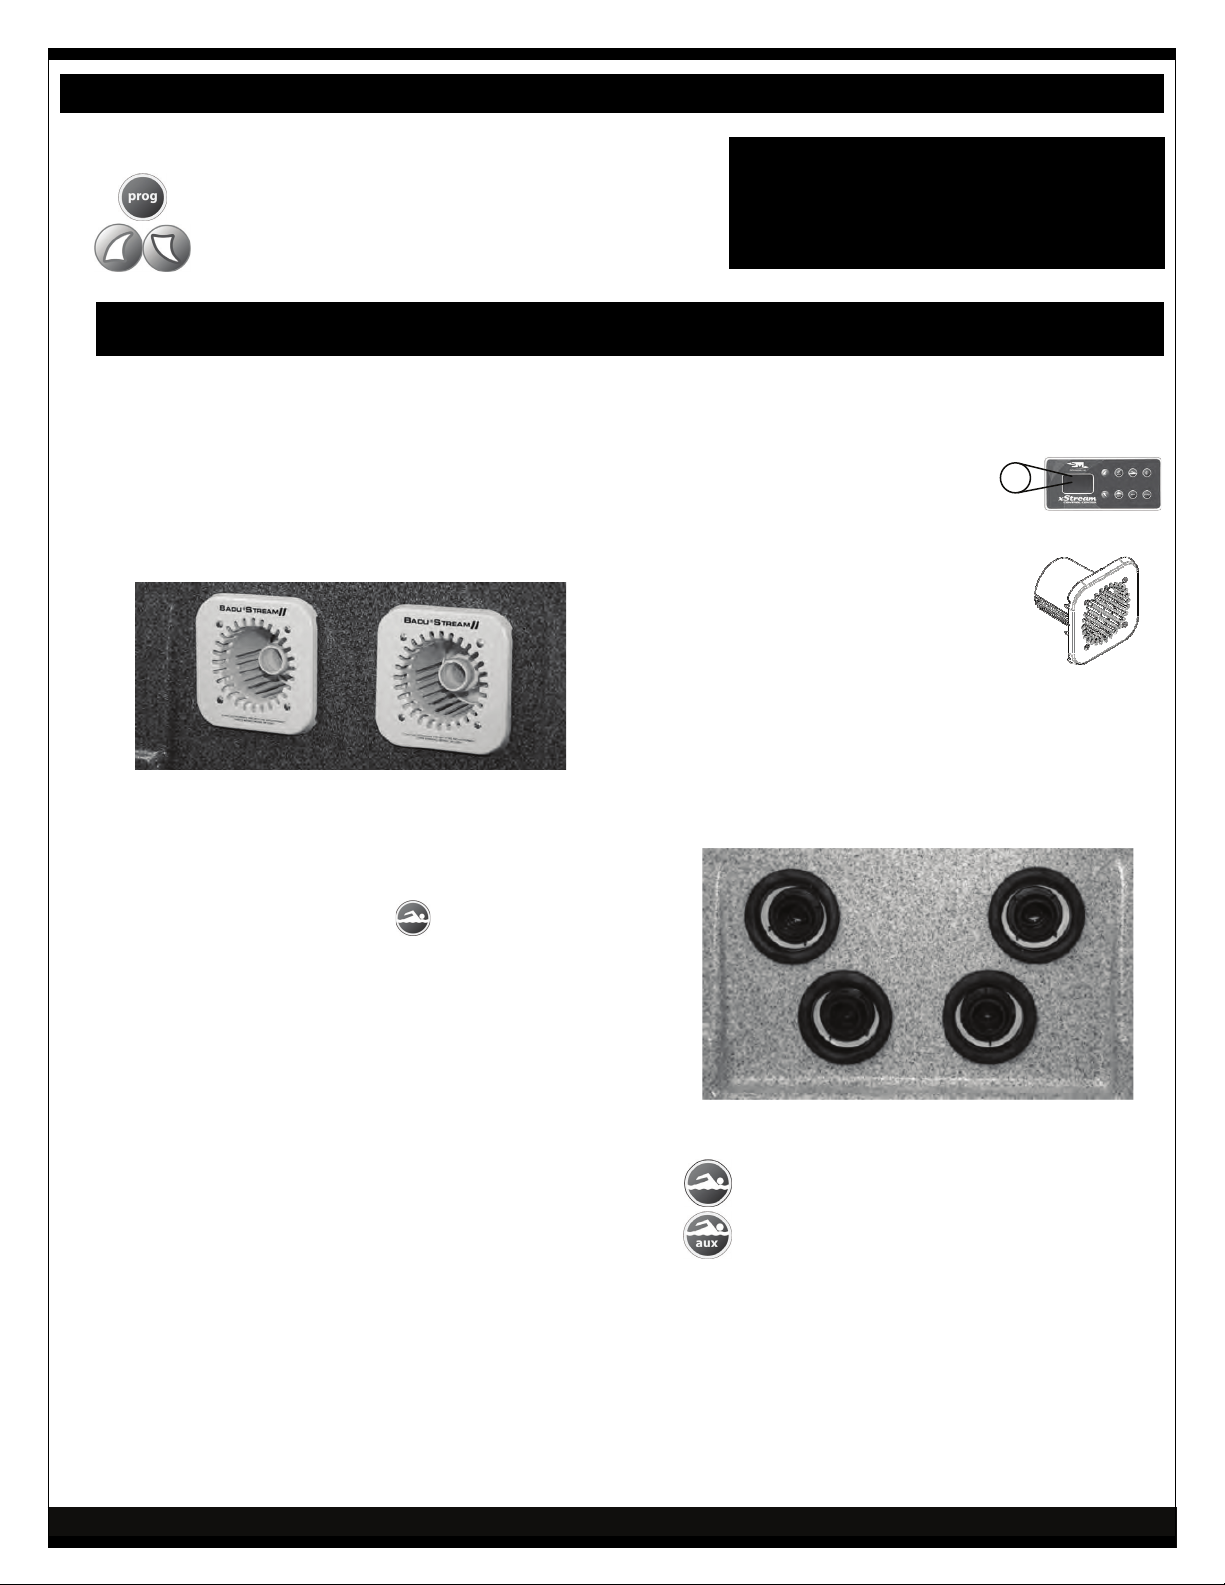
BADU-STREAM II JETS
(Standard on PRO & DUOPRO MODELS • Optional on XSTREAM)
To start swimming, jogging or running it is
suggested that the two nozzles be pointed slightly
inward and slightly upward so that the water
“breaks” approximately 3 feet in front of the
BADU-STREAM II.
WARNING!
• DO NOT USE or operate the
BADU STREAM II if the
square, anti-entrapment
cover is missing, broken, or
loose.
• Consult your physician before attempting
any strenuous exercise.
• The BADU-STREAM II jets do not close
water flow all the way. Overturning Jet
Nozzle can cause breakage.
V-STREAM JETS
the Ò
(STANDARD ON XSTREAM)
Start the jets by pressing the
control water flow strength by adjusting the air
control and jet nozzles.
The air control is located above the jets and varies
the mixture of air into the water flow and creates a
unique, invigorating, bubble bath effect. It will also
add additional resistance to swim against.
BADU-STREAM II's adjustable flow nozzle enables
swimmers to regulate the volume of water
released through the jets. Turning the nozzle
clockwise reduces the flow.
The swivel nozzle of the BADU-STREAM II can be
positioned in various directions, allowing swimmers
to use various swim styles.
Under certain conditions it is possible that the
current “drifts off” the left or the right from the
middle due to water bouncing off the back wall. In
the event that it interferes with your swimming
action, turn the jets off and restart them after the
water flow dies.
button. You can
The V-Stream Jets are powered by two 4HP high
powered pumps.
operates the 2 top jets (Pump 1).
operates the 2 bottom jets (Pump 2).
The V-Stream Jets are adjustable by using the
center nozzle.
PAGE 11
Page 18
SWIM OPERATING INSTRUCTIONS
TURNING ON THE LIGHT
Standard Light: Press to turn light on and off.
LED Light
lights on. Pressing a second time will turn on
Aquabrite/ Chromatherapy, if so equipped.
Pressing a third time will turn lights off.
For color/intensity programming, refer to
Aquabrite/Chromatherapy instructions below.
AQUABRITE/CHROMATHERAPY
(OPTIONAL)
The Aquabrite/Chromatherapy option is activated
by pressing the
center.
Programming the lights can be done once the
display reads “L=XX”.
The
decreases light intensity.
The button is used to select different light
color settings. This selection may be changed at
any time the display reads “L=XX”. If the display
does not read “L=XX”, press the
the spa control center until it does.
: Press once to turn underwater
button on the spa control
button increases and the button
button on
SURROUND STEREO
(OPTIONAL)
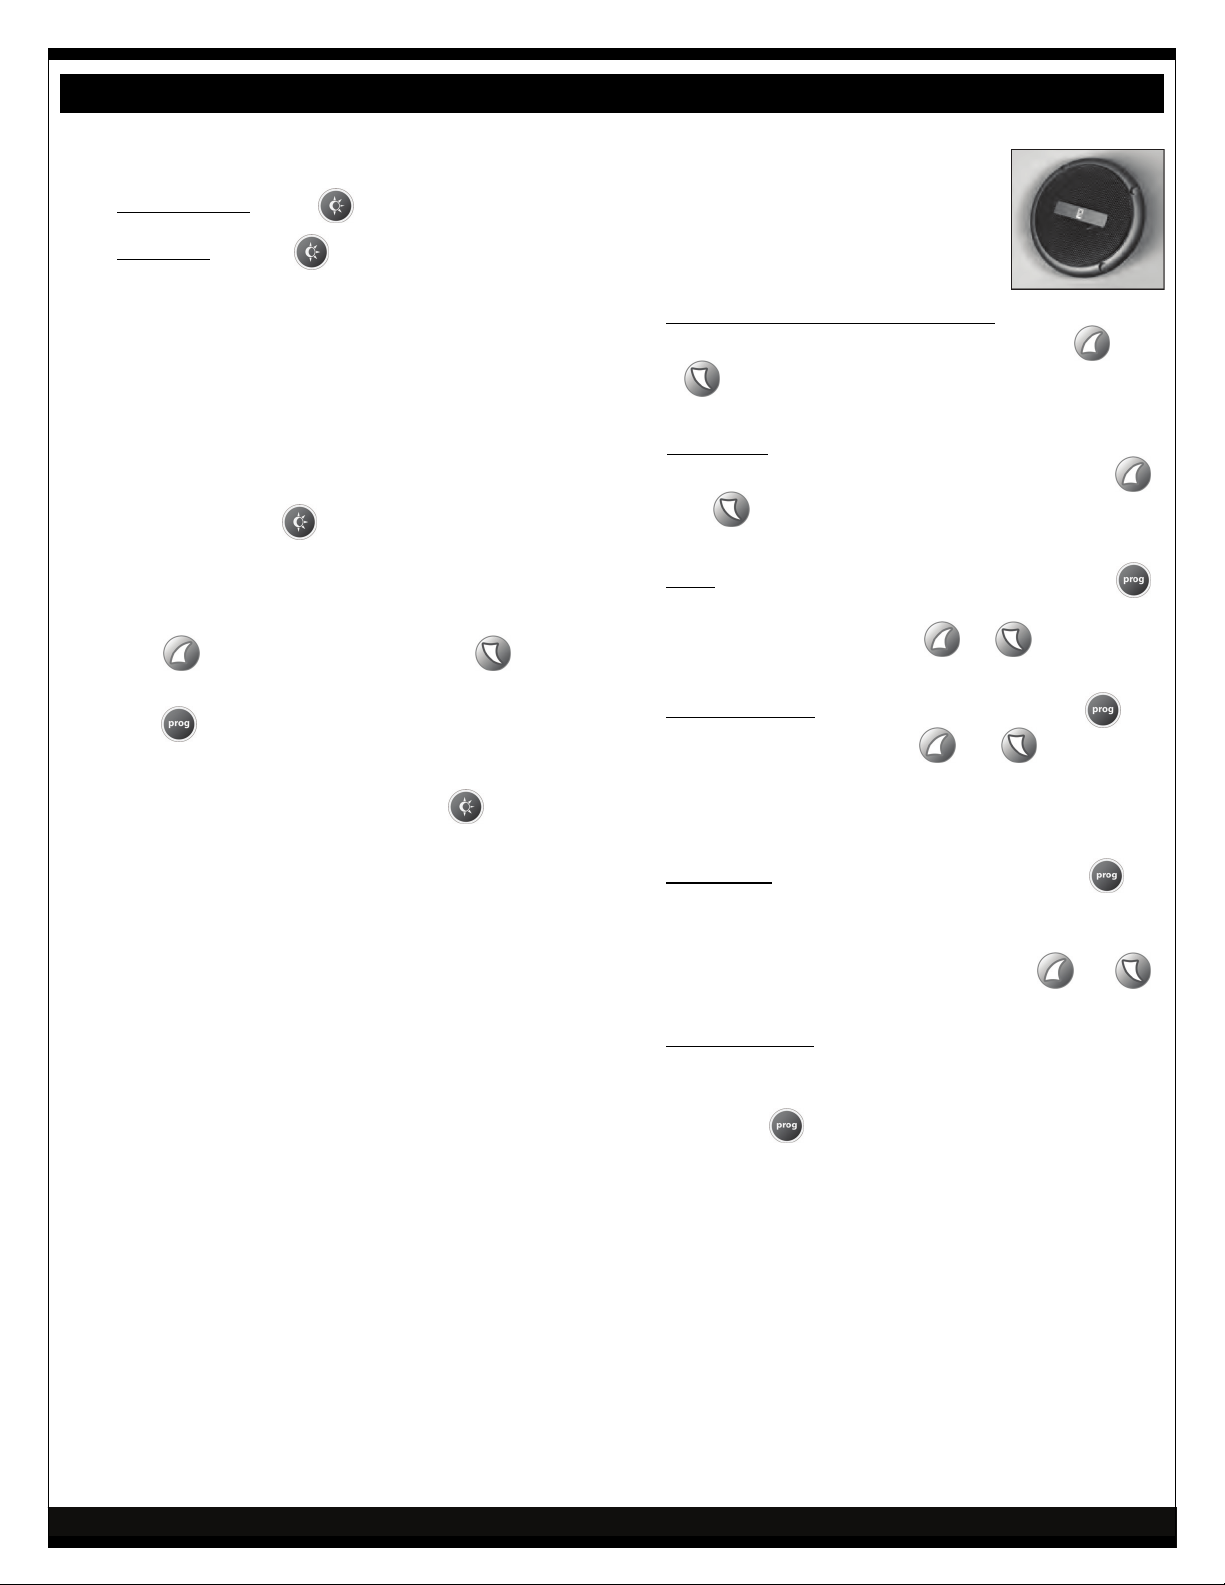
The stereo option allows you to
listen to FM stations or any other
audio source connected to the
“Line” input.
ACTIVATING THE STEREO SYSTEM
turned on by simultaneously pressing the and
will automatically be taken to the volume control.
LOUDNESS
may adjust the volume level by pressing the
or
through L=10 (the loudest volume).
BASS - While in the volume mode, press the
button to change to Bass mode. Bass can now be
adjusted by pressing the or buttons and
ranges from B=00 through B=10.
AUDIO SOURCE
select source (use the or buttons to
change):
- The stereo is
buttons on the spa control center. The stereo
– While the display shows “Loud”, you
buttons. The volume range is L=00 (off)
- From Bass Mode, press to
S=F Stereo will enable FM station tuning.
S=L Stereo line input is enabled.
Available color combination settings:
L=00 Lights Off
L=01 White (Red, Blue and Green LEDs on)
L=02 Blue
L=03 Green
L=04 Red
L=05 Strobe effect Red/Green/Blue
L=06 Gradual change Red/Green/Blue
L=07 Combination Colors: Blue/Green
L=08 Combination Colors: Red/Green
L=09 Combination Colors: Red/Blue
L=10 Music (Stereo must be on to work)
The lighting system will automatically turn itself off
after three (3) hours.
FM TUNING
- If FM source is selected, press to
advance to station tuning. The control pad display
will show the FM frequency.
Station scanning starts by pressing
or
buttons.
CD/MP3 PLAYER
– If source is S=L (Line input), you
can connect an optional CD player or any other
personal stereo device, such as a walkman or MP3.
Pressing
again will make the controller cycle
back to Loudness.
PAGE 12
Page 19
SWIM PROGRAMMING INSTRUCTIONS
REFER TO PROGRAMMING INSTRUCTIONS ON PAGE 22 FOR QUICK PROGRAMMING STEPS
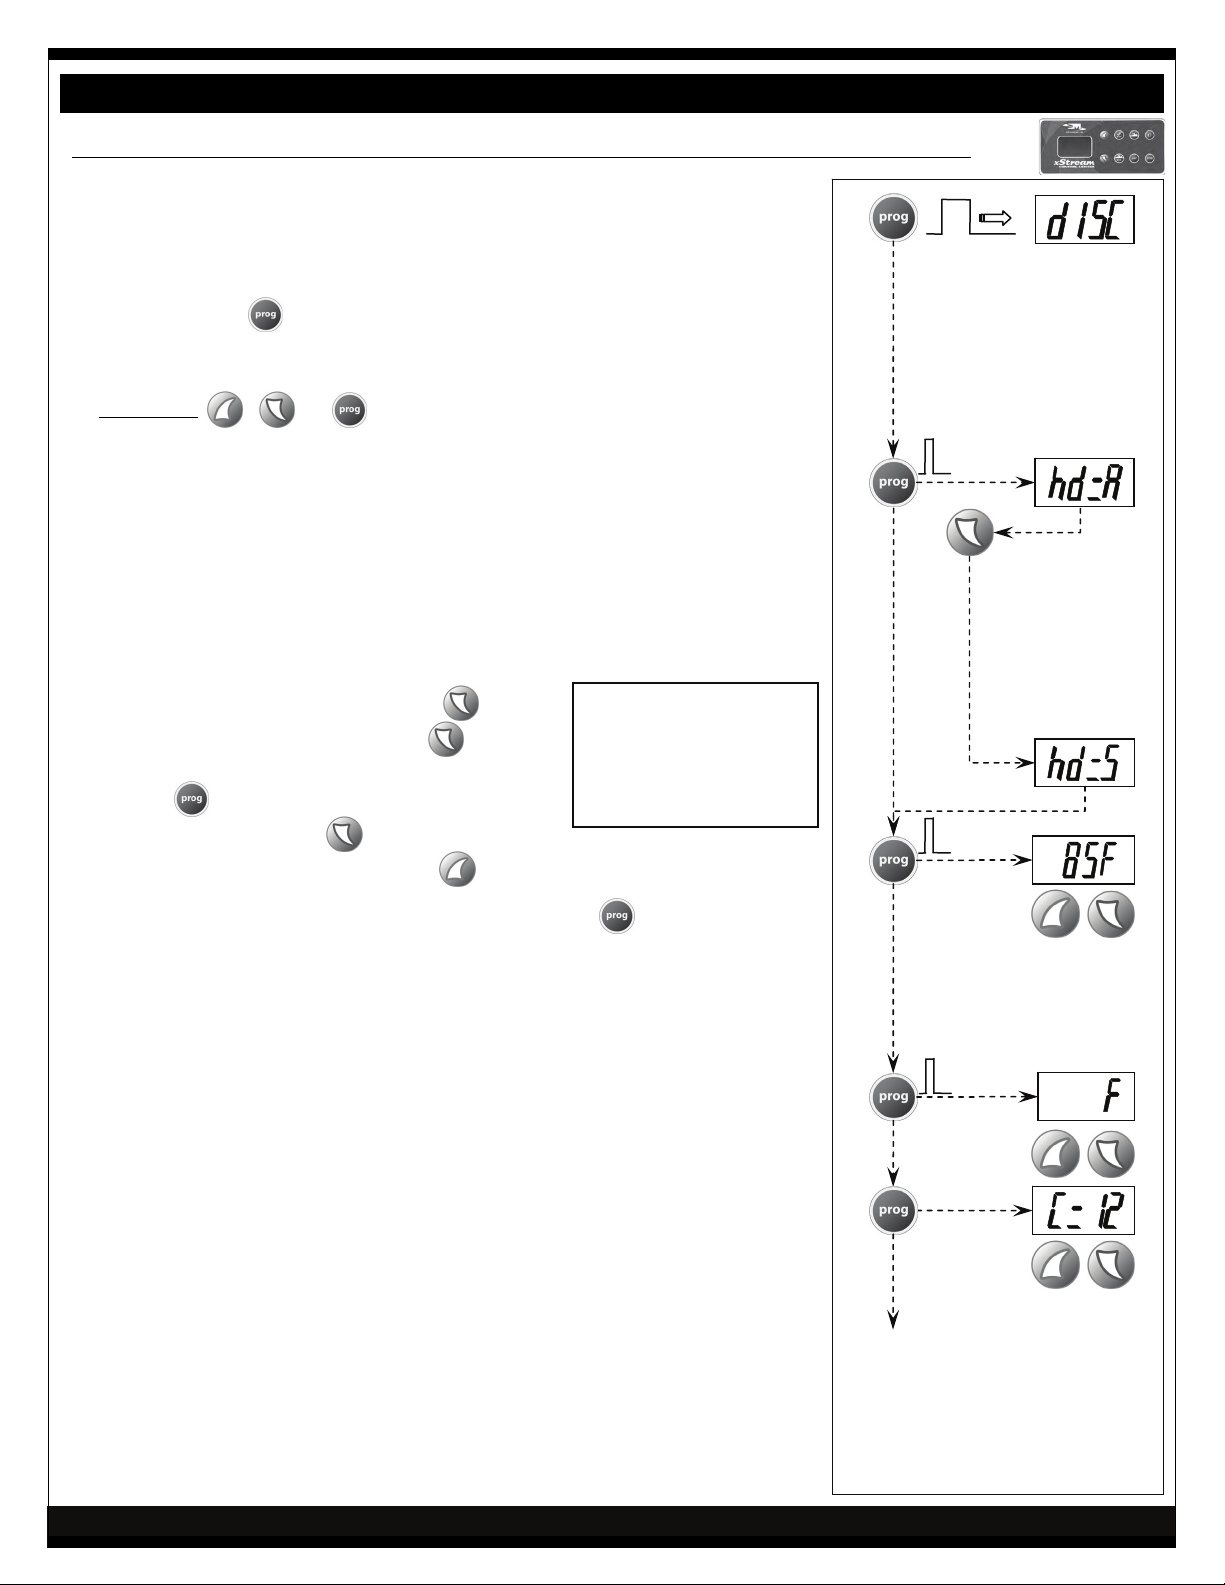
A. PROGRAMMING MENU .....................................................
Note: All programming functions are shown sequentially. To access any
specific programming step, you have to enter programming as explained
here.
Press and hold
enter the programming menu.
To exit programming mode at any point in the sequence, press any button
other than
, or , or wait for 10 seconds (without pressing any
button).
for three (3) seconds until “dISC” is on the screen to
3s
B. HEAT DAYS & TEMPERATURE ............................................
Your spa is pre-programmed from factory to heat “All” days, “hd=A”. It has
however the ability to be programmed for different temperatures on different
days of the week. To do so, follow these steps:
Example: Let's assume that you don’t normally use the spa between Mondays
and Thursdays and you want to save on your electric bill by reducing the
spa’s energy consumption.
1. While the display shows “hd=A”, press . The
display will show the heat day. Press
the desired heat day is selected ..............................
2. Press
selected. Press and hold
to, for instance, to 80ºF (27ºC). Press
3. To check or adjust the temperature on another day, press
program until the display shows “hd=A” again. Then repeat steps 1 through 3 to do
the same for Wednesday (hd=4), Tuesday (hd=3) and Monday (hd=2).
NOTE: If you programmed different temperatures at different days, DO NOT alter the
temperature setting after the display shows “hd=A”. If you do so, “All” days will revert
to the newly set temperature.
to display temperature for the day
to lower temperature
again until
to increase the temperature.
a. hd=7 Saturday
b. hd=6 Friday
c. hd=5 Thursday
d. hd=4 Wednesday
e. hd=3 Tuesday
f. hd=2 Monday
g. hd=1 Sunday
to cycle through the
*
TO CHANGE TO
INDIVIDUAL DAYS
OF THE WEEK:
7 – Saturday
6 – Friday
5 – Thursday
4 – Wednesday
3 – Tuesday
2 – Monday
1 – Sunday
USE ARROWS TO
CHANGE TEMPERATURE
USE ARROWS TO
CHANGE ºF to ºC
C. TEMPERATURE – ºF or ºC ..................................................
Your spa is pre-programmed from factory to display temperature in degrees
Fahrenheit (ºF). Use the arrow keys to change between degrees Celcius (ºC)
and degrees Fahrenheit (ºF).
D. FILTRATION (CIRCULATION) CYCLE ................................
Your spa is pre-programmed from factory to run the filtration cycle for 12
hours a day. You may change this setting to 6 hours or 24 hours a day. It is
recommended that filtration hours be set to the minimum necessary to
maintain water quality.
Notes: During filtration, the water temperature may slightly rise, therefore to
prevent overheating during the warmer months of the year, do not
program filtration for more than 4 hours a day.
Keeping your set temperature a few degrees below your desired
temperature will aid in controlling water temperature
PAGE 13
.
USE ARROWS
TO CHANGE
continues on next page
* If the display shows AH or ECO
instead of hd=A, the swim controller is
programmed incorrectly. Call a service
technician for instruction on
reprogramming.
Page 20
SWIM PROGRAMMING INSTRUCTIONS
USE ARROWS TO CHANGE
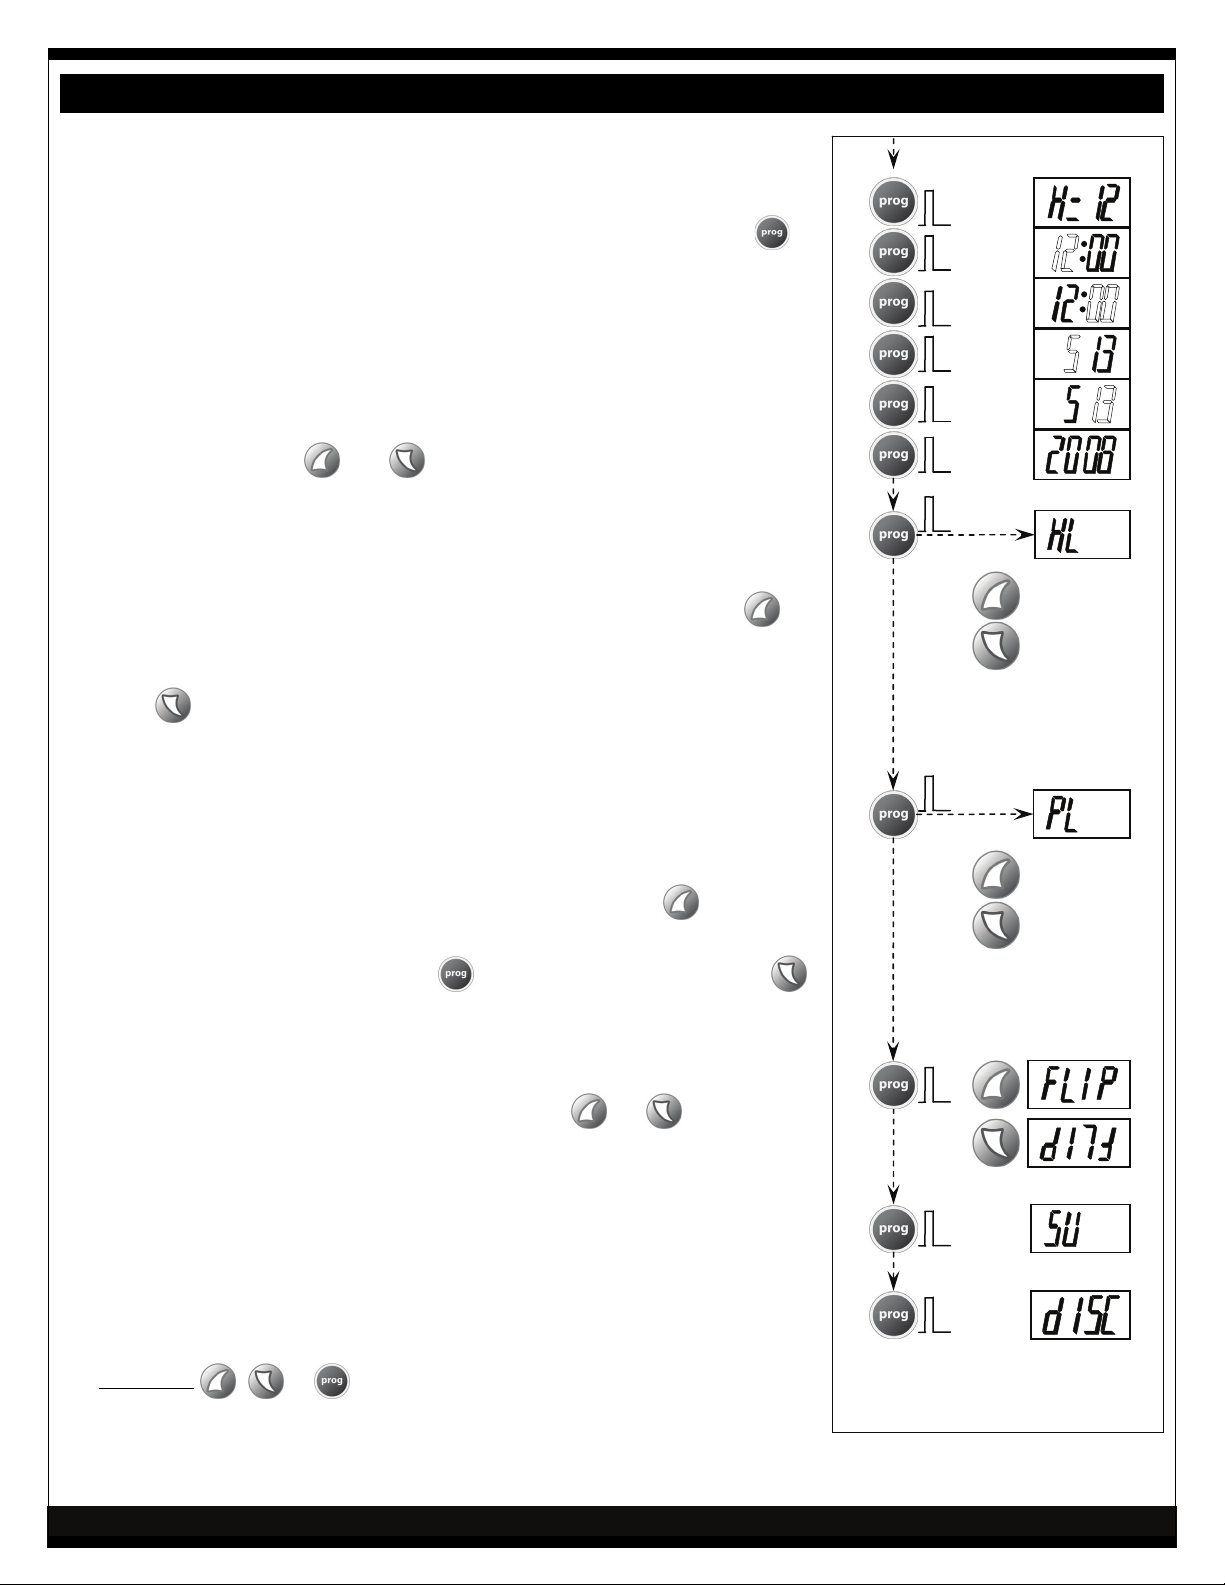
E. CLOCK AND CALENDAR SETTING ......................................
The display will sequence through the time and calender settings as is
pressed.
Sequence is: “H=12” – 12-hr or “H=24” – 24-hr clock
Hours setting
Minutes setting
Month setting
Day setting
Year setting
Use
and
to change blinking digits.
F. HEAT LOCK .......................................................................
The ICSTM controller allows you to prevent anyone from changing the water
temperature you have chosen, while still allowing the use of any of the spa
functions. While the display shows “HL” Heater Lock position. Press
to Lock in the set temperature. Notice the lock icon ±solid on the display.
No temperature changes are allowed.
Press
to remove the “Heat Lock” of the heater. Notice that the lock icon
will disappear. All spa functions, including temperature adjustment will be
accessible.
for
12/24
HOUR
MINUTES
MONTH
DAY
YEAR
± TO LOCK
² TO UNLOCK
G. PANEL LOCK .....................................................................
The ICSTM controller also allows you to lock the spa Control Center to keep
children or others from using any of the spa functions.
To block all buttons, while the display shows “PL” press . Notice the
flashing lock icon ± on the display indicating the Control Center is locked.
To unlock the Control Center, press
again. “PL” will display, press
.
The flashing lock icon will disappear and all spa functions will be accessible.
H. DISPLAY ...........................................................................
The Control Center display can be inverted to allow easier reading from inside
the spa. While the display shows “FLIP”, press
or
to invert the
display back and forth.
I. ADVANCED FEATURES SETUP............................................
Refer to the ADVANCED FEATURES SETUP section.
To exit programming mode at any point in the sequence, press any button
other than
button).
, or , or wait for 10 seconds (without pressing any
GOES BACK
TO THE
BEGINNING
continues on next page
± TO LOCK
² TO UNLOCK
PAGE 14
Page 21
SWIM ADVANCED PROGRAMMING INSTRUCTIONS
DO NOT ENTER THIS SECTION UNLESS INSTRUCTED BY A QUALIFIED TECHNICIAN
** IMPROPER CHANGES MAY CAUSE MALFUNCTION OR DAMAGE YOUR SPA AND MAY VOID THE WARRANTY! **
ADVANCED FEATURES SETUP
To exit programming mode at any point in the sequence, press any button other than , or , or wait for 10
seconds (without pressing any button).
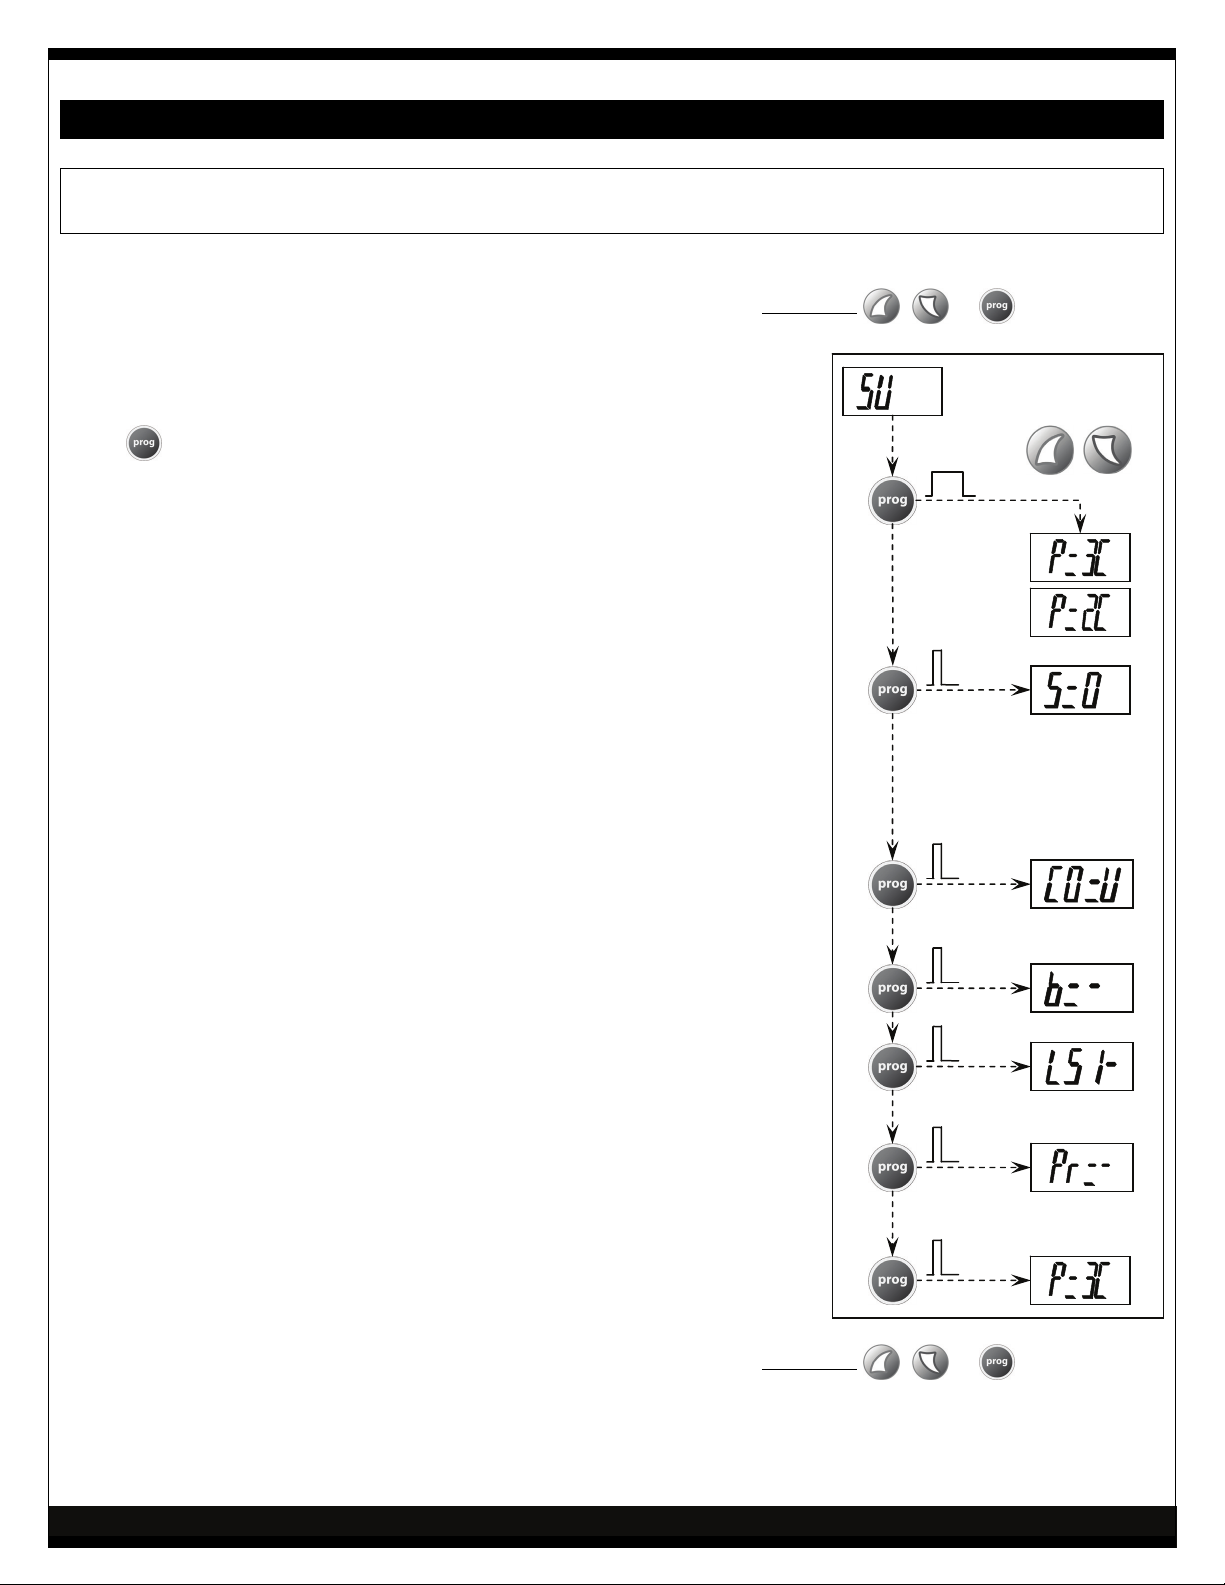
A1. SETUP ("SU") .................................................................
While the display shows “SU” enter the Advanced Programming Menu by holding
down
for 8 seconds.
A2. PUMP SETUP...................................................................
The Swim Control of the xStream spas has been factory programmed, and
should be:
xStream “P=3C” ONLY.
xStream Pro and Duo Pro “P=2C” ONLY.
A3. POWER SERVICE LEVEL ..................................................
The Swim Control of the xStream spas should be set to “S=0” ONLY.
This indicates that the heater will shut off when any pump is turned on high
speed, except for the filtration (circulation) pump.
Warning! Changes to this setting may cause inadvertent breaker
tripping and strain your power connections. If so, this would
void your warranty.
A4. COUNTRY........................................................................
This setting is used for the FM Stereo tuning, if so equipped. It should be set to
“CO=U” for the US and Canada, “CO=E” for Europe and “CO=J” for Japan.
USE ARROWS TO
CHANGE VALUE
8s
xStream
xStream Pro
xStream Duo Pro
A5. AUX BUTTON (BLOWER) .................................................
This setting is not applicable to the Swim Control.
A6. PUMP 2 SPEED SETTING .................................................
This setting should be set to “LS1-” ONLY. Changing this setting will cause swim
pumps to follow button commands incorrectly.
A7. PRIME CYCLE AT STARTUP .............................................
This step, if present, turns the pumps on for a minute or two every time power is
applied to the spa, to prime the pumps.
Default setting is “Pr= -”.
To exit programming mode at any point in the sequence, press any button other than
seconds (without pressing any button).
PAGE 15
GOES BACK TO THE BEGINNING OF
THE ADVANCED SETTINGS
, or , or wait for 10
Page 22
PAGE 16
Your xStream Swim Spa’s therapy section is designed with a unique jet system to allow you to select a wide variety of
massage patterns. The following is a description of the various types of jets and their operation you may use to
tailor your spa to your specific massage needs.
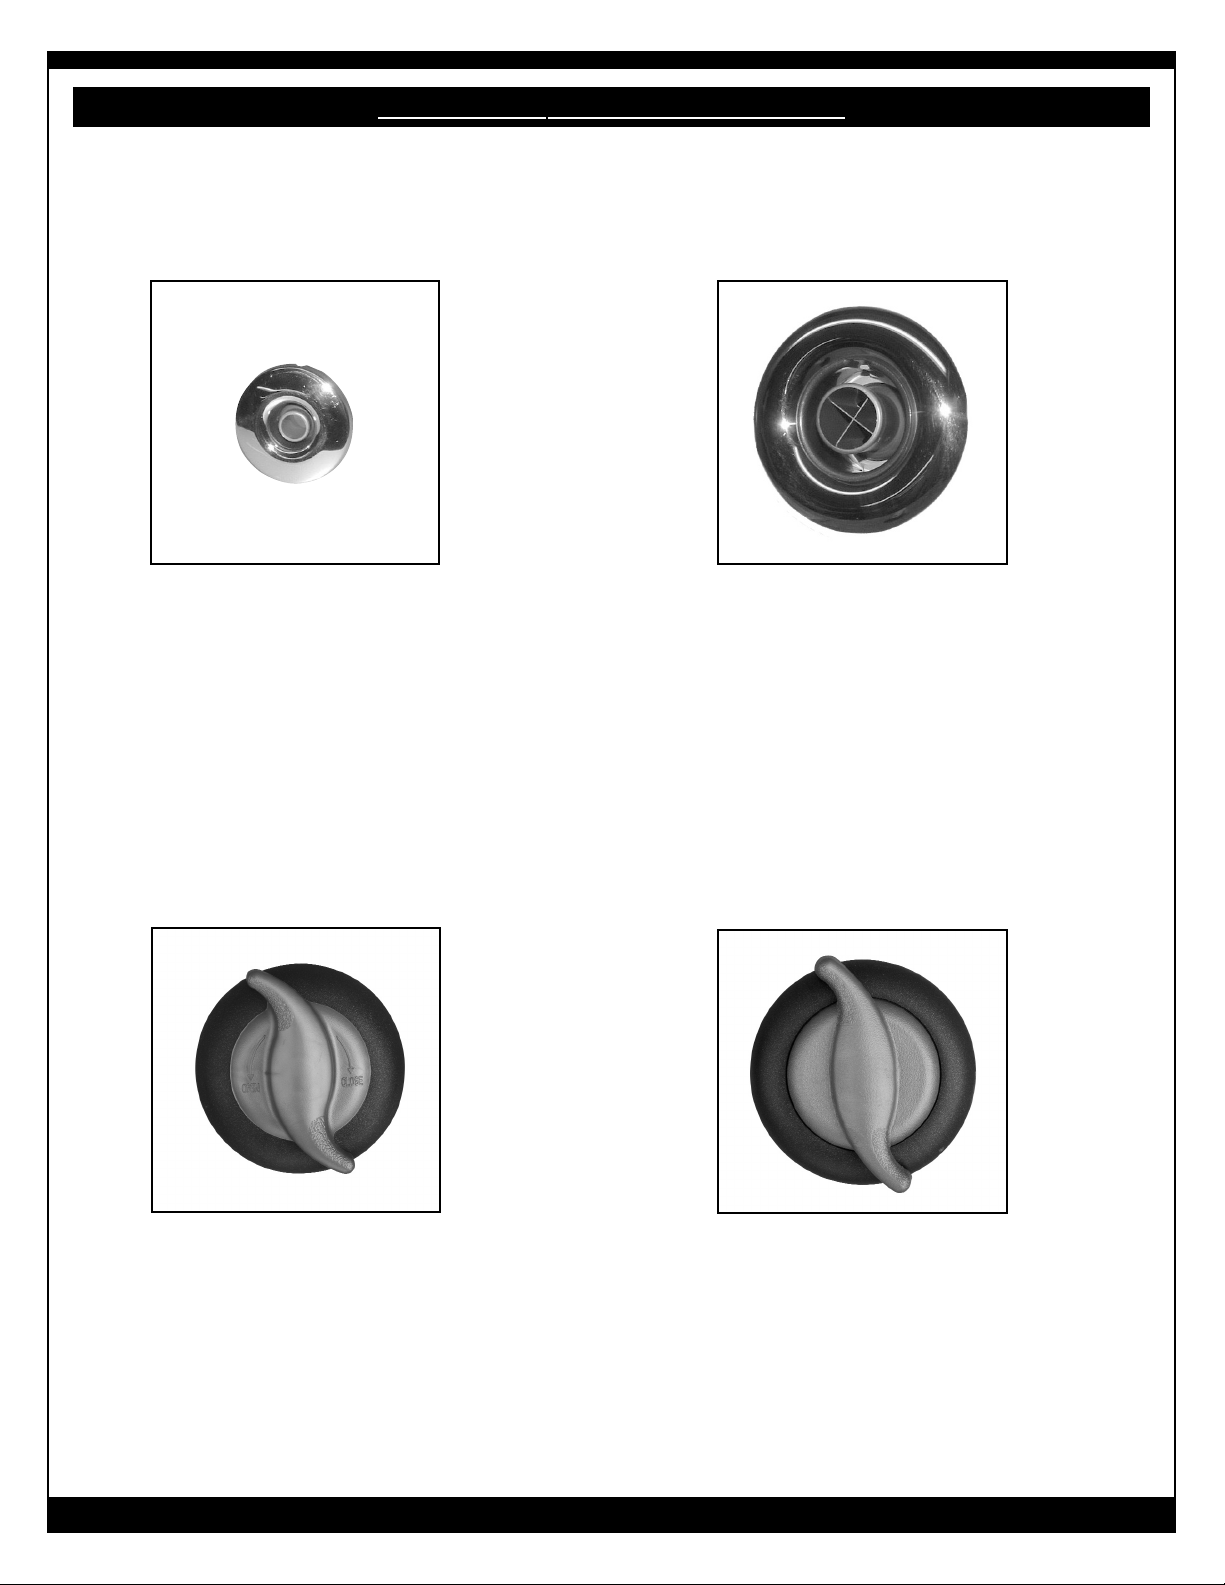
A) EURO CLUSTER MASSAGE JET
These jets are used for back, neck and shoulder massage. They deliver a firm pinpoint jet stream of massaging action that are directed to specific areas of the neck
or shoulders. They can be pressure controlled by rotating the jet face or by opening and closing the air control
valves.
For cleaning purposes, these jet faces can be removed
by grabbing outer face and pulling away from jet body.
Re-install it by pushing the face back in place.
B) DIRECTIONAL MASSAGE JETS
When the pump is on the Directional Quad jets will be
operational. The nozzle of the Directional Quad jets can
be adjusted to direct the flow to specific parts of your
body.
For cleaning purposes, these jet faces can be removed
by depressing locking tab and pulling away from jet
body. Re-install it by pushing the face back in place.
C) AIR CONTROL
The Air Controls are used to introduce air into the water
jet stream. They allow the user to increase (open) jet
pressure or decrease (close) jet pressure as desired.
D) WATERFALL VALVE
The valve operates a water volume control for the lighted waterfall.
THERAPY JET OPERATION
Page 23

PAGE 17
SAFETY FEATURES
A. FREEZE PROTECTION
If the temperature in the spa plumbing falls below 10°C (50°F), the water pump will
turn on low speed and run for 30 seconds. After 30 seconds, if the water is still at
10°C (50°F), the heater will turn on and raise the temperature 2°C (10°F). The top
side control will display the message "ICE" to indicate potential freeze conditions.
B. FLOW PROTECTION
If the flow of water through the heater is insufficient, the spa controller will automatically turn off the heater to prevent overheating. The display will show "FLO",
indicating a flow restriction caused by a clogged filter or pump impeller, a malfunction of the pressure switch or a defective pump motor. Refer to the Trouble Shooting
Chart. If you cannot pinpoint the cause, Call Your Dealer for technical assistance.
C. OVERHEAT PROTECTION.
If a malfunction occurs and the spa water temperature reaches 44.5°C (112°F), the
pump and heater will turn off. DO NOT ENTER THE WATER. Remove the cover and
allow the water temperature to cool down to 40°C (104°F). The system will revert to
normal operation once the temperature comes down below 44.5°C (112°F) and will
obey the temperature set in the program. If this happens a second time in a row, Turn
the power to The spa off and call your dealer for assistance.
If there is an overheat condition where the temperature reaches 47.5°C (118°F), the
display will show the message "HILI".
To remove "HILI" message, you must shut off power to spa and turn on again.
DO NOT ENTER THE WATER:
Remove the cover and allow the water to cool down to 40°C (104°F).
If the "HILI" message returns, turn the power to the spa off and call
your dealer for assistance.
Page 24
FILTER MAINTENANCE
Your Spa is designed with the most efficient top loading filtration
system in the industry. Filter maintenance is the most critical factor in keeping your spa water clean.
TO CLEAN THE FILTER
(NOTE: NEVER RUN THE SPA WITHOUT A FILTER INSTALLED)
Remove the skimmer basket and the cartridge. Spray it with a
garden hose. It will be necessary to rotate the cartridge while
spraying so as to thoroughly remove the debris lodged between
the filter pleats.
After allowing to dry, inspect the cartridge for calcium deposit
(scaling) or an oil film. Rapid mineral build-up from hard water,
or oil build-up from the use of oil-based water scent or body oil
may coat the filter cartridge. A filter cleaner to soak the cartridge
is available from your local Spa dealer and should be used as
part of your spa maintenance. Use a rag to remove any debris at
the bottom of the filter housing. Replace the cartridge in the filter housing. We recommend the use of a spare filter. This way
one can be soaking and cleaning while you continue to enjoy the
use of your spa.
EXCEL-PLUS and
EXCEL-X CABINET MAINTENANCE
The exterior of your xStream Duo Pro Spa cabinet is made from
newly formulated high strength materials that are factory
stained and sealed. Depending on the location and exposure of
the spa to nature’s elements, it is recommended that you clean
the cabinet once or twice a year with warm water and a mild
soap.
CARE OF ACRYLIC SURFACE
To maintain the surface of your spa, simply clean with a soft
damp cloth (a mild detergent is okay) or with any glass cleaner.
DO NOT clean the surface with any type of abrasive as it will dull
the surface and natural luster of the acrylic. DO NOT use any
type of oil based solvent. Such products can be very harmful to
the surface of the spa and will void the surface warranty of the
spa.
COVER MAINTENANCE
Your cover is manufactured from a durable marine grade, UV
resistant material. Even so, monthly cleaning and periodic conditioning is recommended to maintain its beauty. To clean and
condition the vinyl cover: Lightly spray the cover with a garden
hose to rinse it and remove the debris. Using a large sponge or
soft cloth and a mild soap solution (5ml [1 teaspoon] dish washing liquid with 10 liters [2 gallons] of water), scrub lightly in circular motion. Then rinse it thoroughly with plenty of water.
Condition the vinyl after cleaning by applying a thin film of vinyl
conditioner. NOTE: To remove tree saps, use lighter fluid (not
charcoal lighter but the kind used in cigarette lighters). Use
sparingly and rinse with mild soap solution afterwards. Wipe dry.
DRAINING YOUR SPA
Detergent residues from bathing suits as well as soap film from
your body may gradually accumulate in the water. Foam
inhibitors will suppress the foam but will not remove the soap
from the water. Eventually, the soap build-up in the water will
concentrate enough to leave an unclean feeling on the user’s
skin, causing sudsing and make the water impossible to clarify.
Depending on the amount of soap input, the spa water should
last between four to six months.
PAGE 18
SPA MAINTENANCE
Your spa is manufactured with the highest quality and most durable materials available. A spa care and maintenance
program is recommended to increase your comfort, maintain the spa’s reliability, and protect your investment.
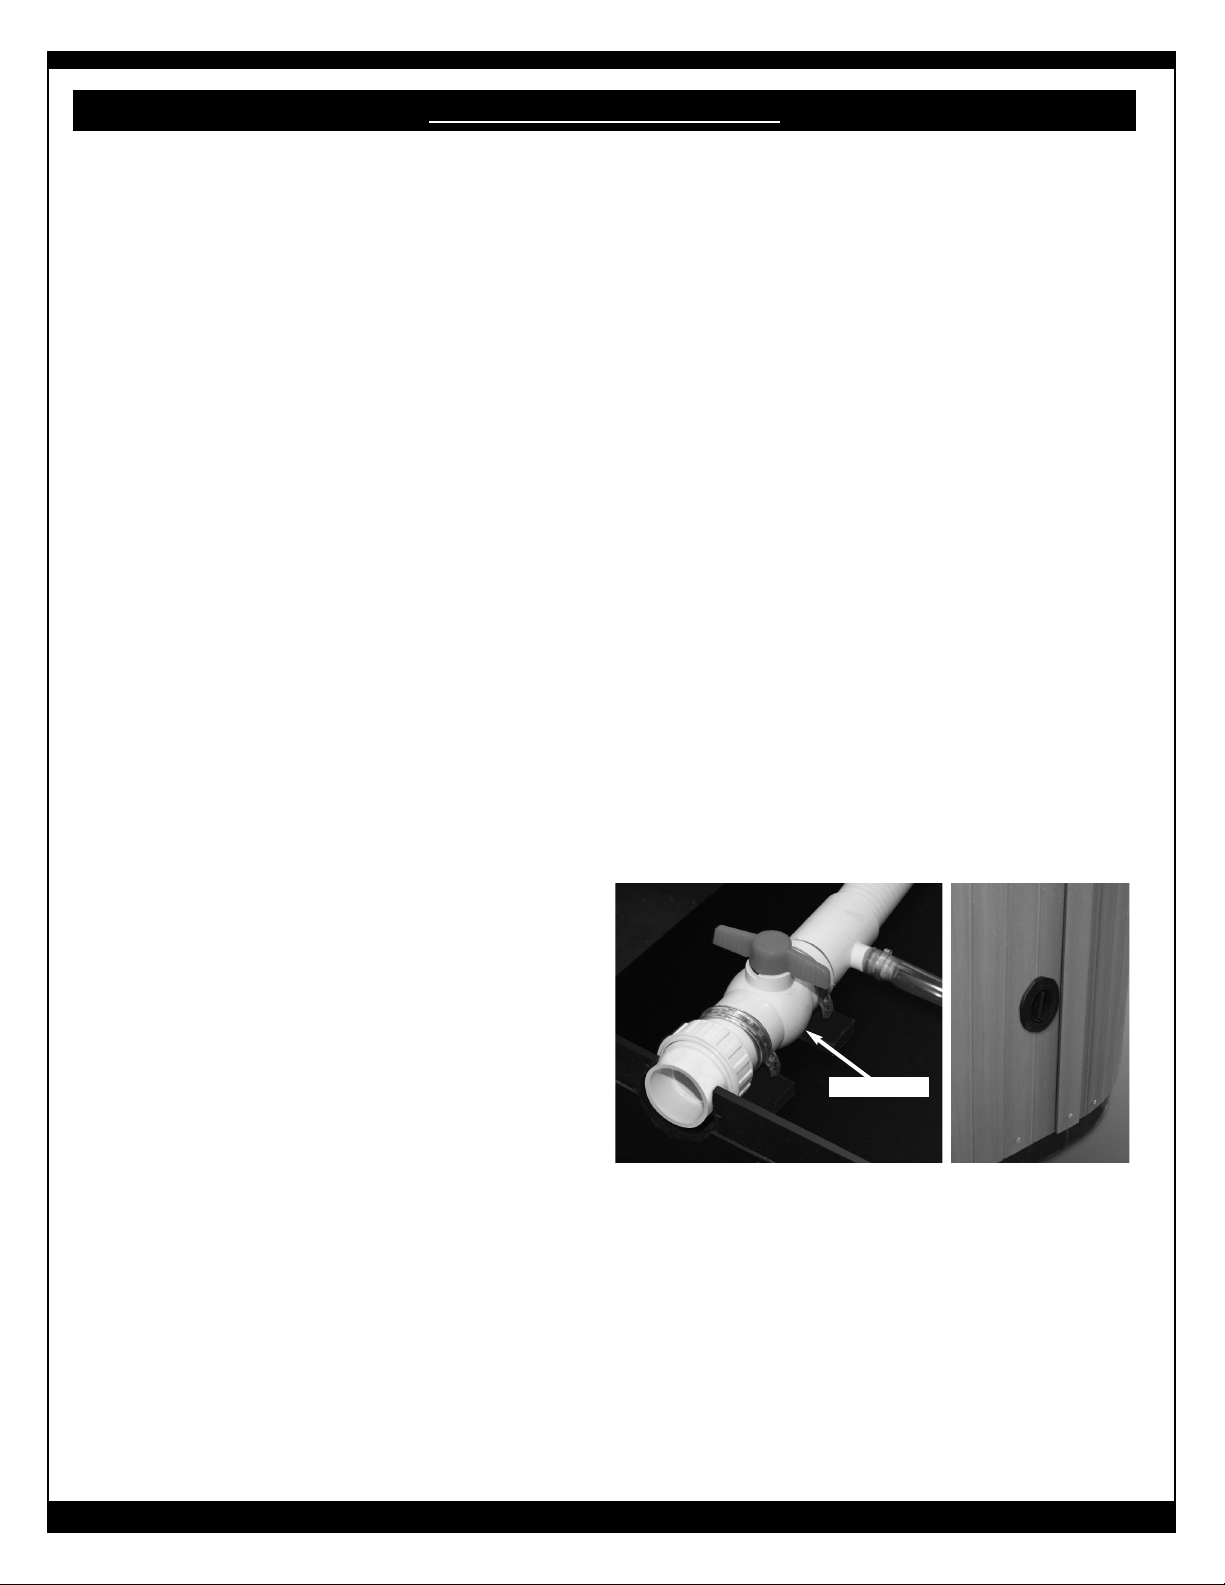
BALL VALVE
Swim Side:
Remove left door panel to access
drain. A union is provided to facilitate
drainage. You may attach a hose to it
and when not in use, it may be
removed to close the panel. Open
valve to drain spa.
SWIM SECTION
DRAIN
DUOPRO THERAPY
DRAIN
Pull cap fully out and
unscrew it. Attach garden hose and push
partially back in to
start flow of water.
Water flow will stop if
fully in or fully out. You
may need to twist it a
bit to push it in or pull
it out.
Page 25

PAGE 19
WINTERIZING YOUR SPA
Most Hot Tub enthusiasts will agree that there is no better time to enjoy their spa then in colder winter months.
Although your Spa has been designed and engineered for
year-round use in any climate, if you chose to leave it
empty in the winter time, there are precautions you
should take.
1. Make sure that all power to the spa is “turned
off”. We recommend shutting off the breaker to
the spa.
2. The next step is to fully drain the spa. To do this,
use the drain outlet located on the outside of the
spa (refer to owners manual for location). If any
water is left in the bottom or in the seats of the
spa, we recommend that this water is also
removed. Some people put a small amount of
anti-freeze in the water before emptying, but if
the water is properly evacuated, this is not necessary.
3. Loosen and remove the union connections to
your spas heater and pumps, this will allow
standing water in these components to further
drain.
4. To further ensure water is removed, you can use
a shop vacuum to either blow or vacuum excess
water from the components of pipes. By doing
this, even if a small amount of water remains, it
is not enough water to cause any damage to the
spa or components during a freezing condition.
5. Put your thermo cover back on the spa shell and
lock using the strap downs. We recommend for
extreme cold conditions that you place a tarp
over your spa and tie it at the bottom. This will
add further insurance against the cold and wind,
but it will also help protect your cabinetry from
the harsh winter elements.
Although this is a fairly simple process, if you have any
doubts, we suggest that you contact your local Vita Spa
Service Tech to have your spa professionally winterized.
SPA MAINTENANCE
Page 26
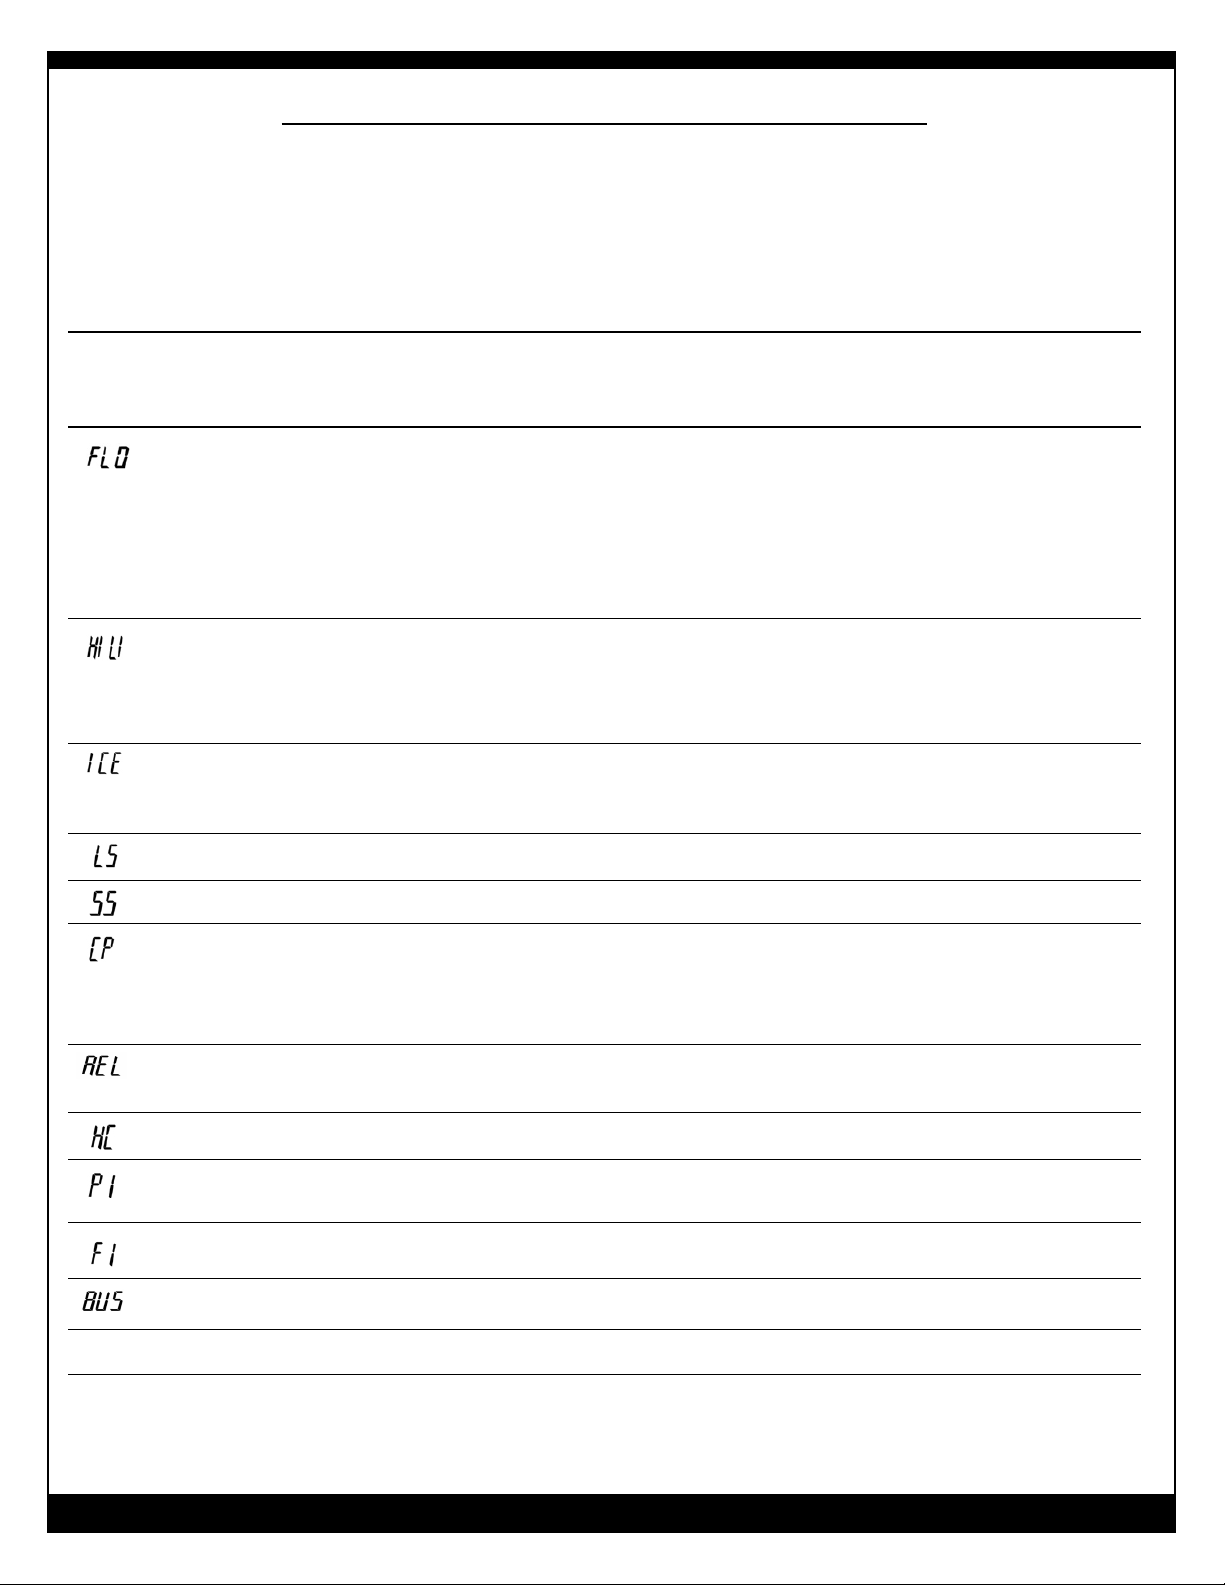
SYMPTOM
Spa Inoperative
MESSAGE
FLO
HILI
ICE
LS
SS
CP
REL
HC
P1/P2/P3
F1/F2/F3/F4
BUS
PAGE 20
DIAGNOSTIC & TROUBLESHOOTING
Resetting Your Spa
Like your PC at home, your spa electronics could get corrupted by electrical surges and operate improperly. If your spa
system is not operating properly or shows any of the following messages, please reset it before calling for service to
see if the malfunction disappears. To reset the spa, shut off the breaker for 5 sec. and turn it back on.
MEANING
Power failure outside of spa.
Insufficient water flow through Heater.
HILI message appears if the high-limit
sensor detects 47.5°C (118°F) at both
the heater and spa water sensors.
DO NOT ENTER THE WATER.
Water in plumbing below 10°C (50°F)
Call for service if spa fails to come on.
Water temperature sensor
High Limit sensor
Circulation pump may be faulty
Relay Error
Heater Error
Pump 1, 2 or 3 fault
Blown Fuse
Communication Problem
ACTION
Check power source Breaker and GFCI; Reset
breaker/GFCI. Call Electrician if it will not start.
Clean/change filter element, (see page 4 for filter
part numbers.
Check pump for flow, on therapy side, check low
speed running. On swim side, check circ pump
running. If ”FLO” remains check need to prime
the pump(s).
Remove the spa cover and let the water temperature
cool down to 40°C (104°F). If your spa reaches
47.5°C (118°F) again, contact your dealer for service.
No action required.
Pump will come on to circulate water and then
heater. Heater will stay on until water reaches
15.5°C (60°F) or set temperature.
Reset spa. If message comes back, call for service.
Reset spa. If message comes back, call for service.
Check that circulation pump is plugged in, or for
possible loose connection. If message comes
back, call for service. This fault will lead to a FLO
message.
Relay not closing or opening correctly. Reset. If
message comes back, call for service.
Call for service. Heater may have to be replaced.
Check* plug for pump shown. Possible loose
connection.
Replace* bad fuse
Reset spa. If message comes back, call for service.
* These procedures should only be performed by persons familiar with electrical work.
ALWAYS SHUT THE POWER OFF AT THE DISCONNECT BEFORE ATTEMPTING THESE PROCEDURES.
Page 27
8
.
.
A
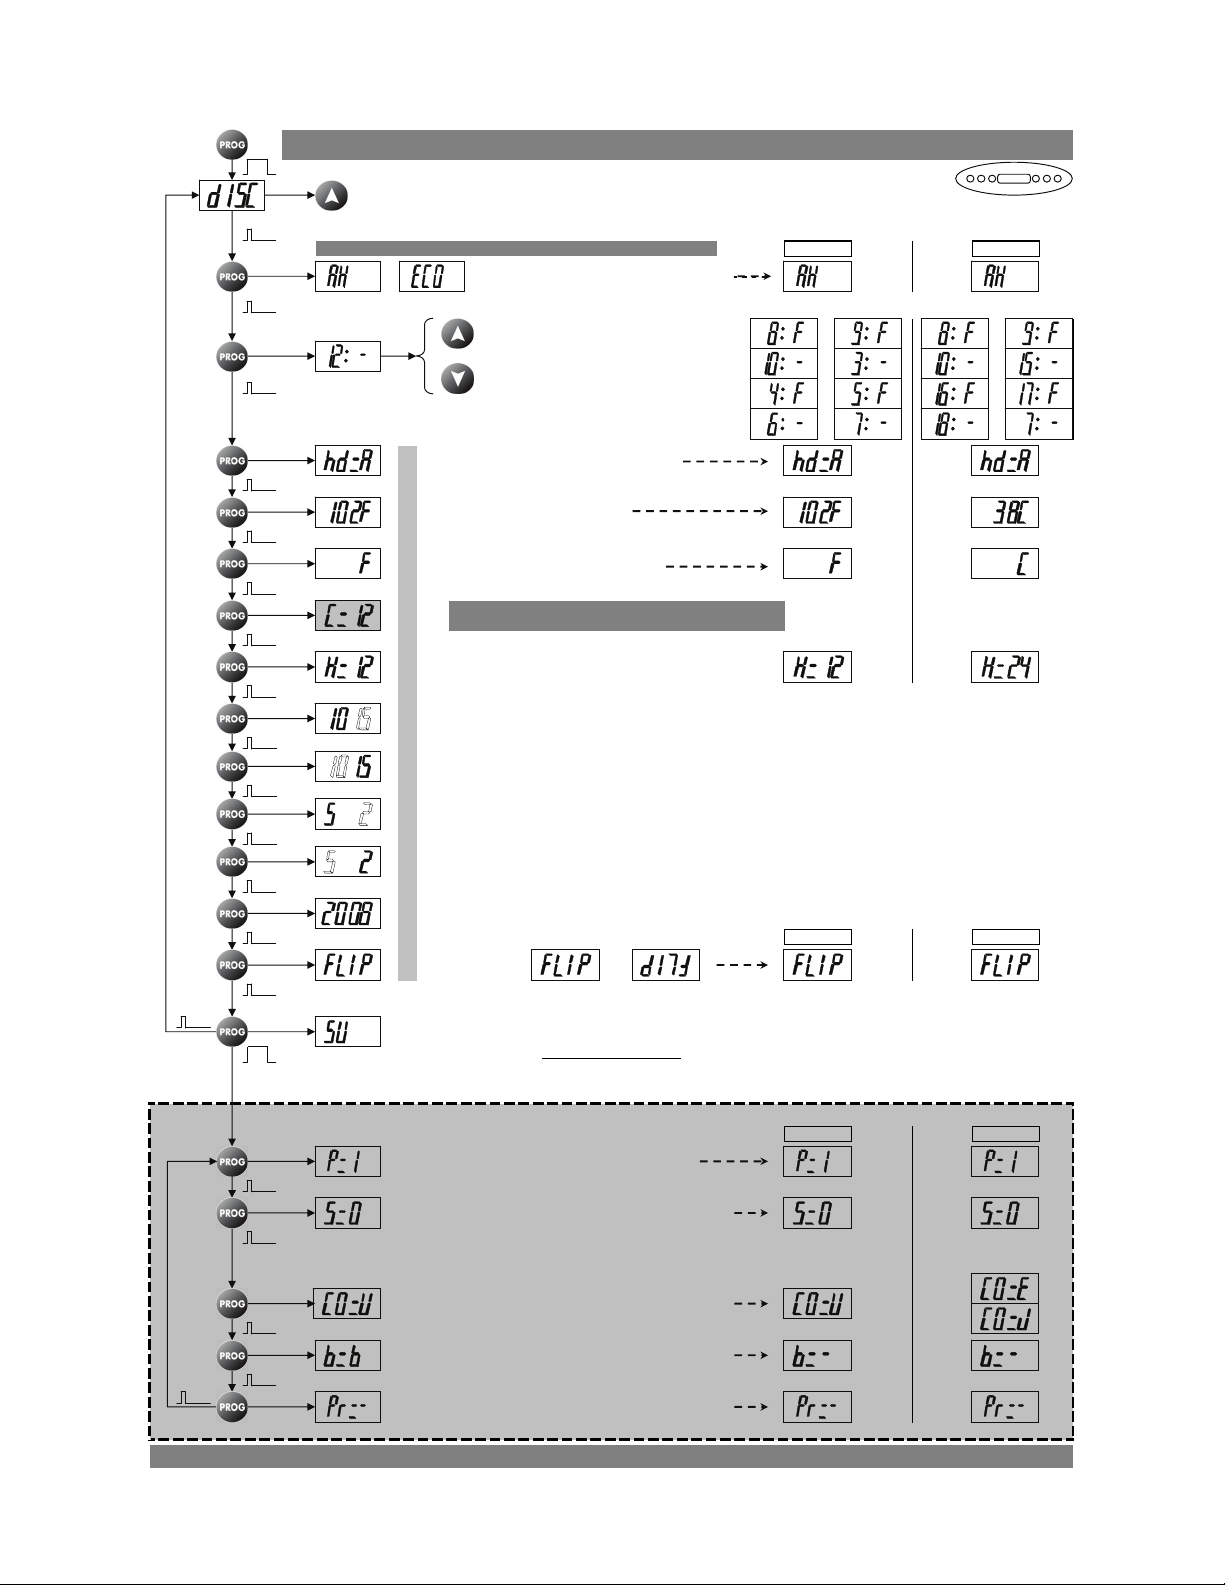
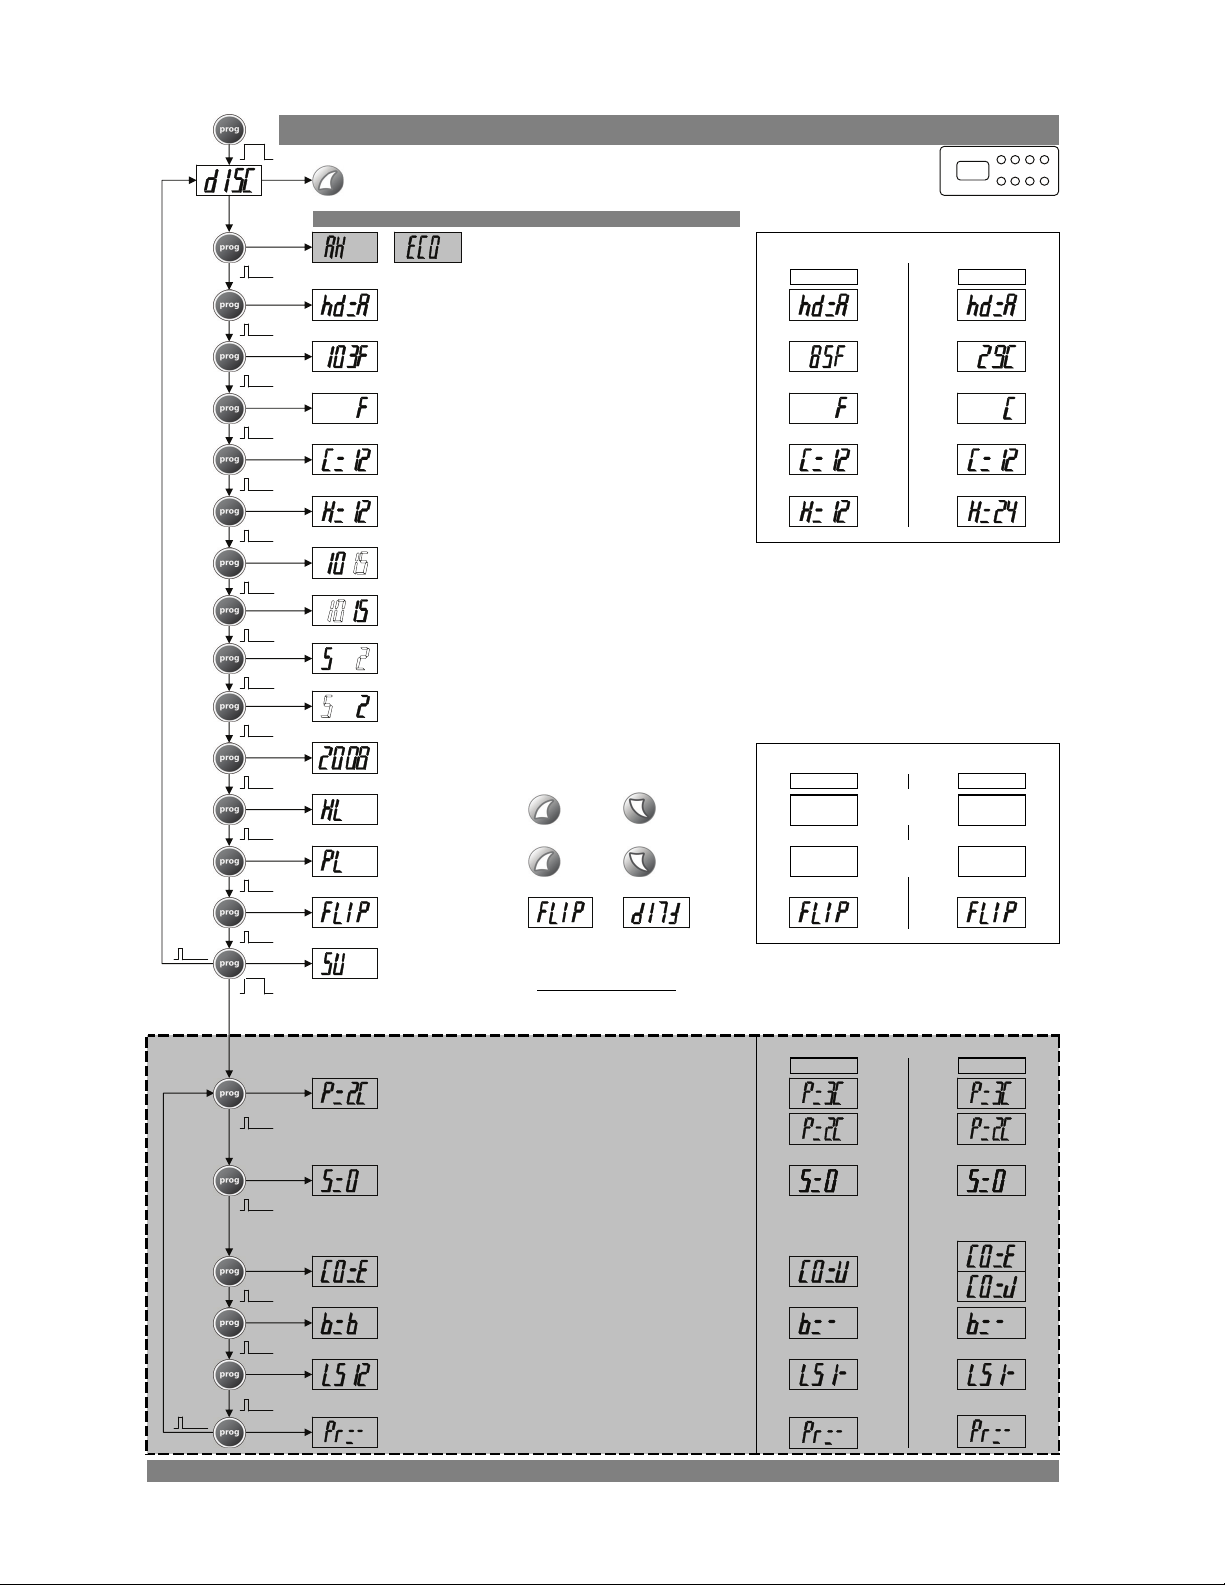
xStream Duo Pro Therapy Pack Programming Instructions
PAGE 21
3s
Self Test (2 min.)
If display does not show AH or ECO, call a service tech
or
Heating Days: 1/2/3/4/5/6/7/A
Temperature in ºF or ºC
Switches between ºF and ºC
Switches clock between 12h and 24h
Clock: Hours Set
Auto-Heat or ECOnomy mode
Cycles through Filtration hours.
Changes between:
Filtration 12: F and
Non-filtration 12: -
If this message appears, call Service Tech!
Rev. Date: 10/17/200
FACTORY DEFAULT SETTINGS
DOMESTIC EXPORT
ssure default hours are:
toto
toto
Clock: Minutes Set
Calendar: Month Set (1~12)
Calendar: Day Set (1~31)
USE ARROW KEYS TO CHANGE VALUE UP OR DOWN
Calendar: Year Set
Display Flip:
or
FACTORY DEFAULT SETTINGS
DOMESTIC EXPORT
Setup Menu - ADVANCED SETTINGS
8s
DISCLAIMER:
DO NOT ENTER THIS SECTION UNLESS INSTRUCTED BY A
QUALIFIED TECHNICIAN.
*** IMPROPER CHANGES MAY CAUSE MALFUNCTION AND DAMAGE YOUR SPA! ***
FACTORY DEFAULT SETTINGS
USE ARROW KEYS TO CHANGE VALUE UP OR DOWN
DOMESTIC EXPORT
Switches between 1 and 2 pumps
Power Service Level:
MUST BE S=0 - DO NOT CHANGE!
Warning! Changes to this setting may cause
inadvertent breaker tripping and strain your
power connections.
Not Applicable, (Country)
U=US
E=Europ
e
Not Applicable, should be set to b=-
Prime cycle at startup: P=Yes –=No
Notice: When set to P=Pr, pumps run for 2
minutes every time power is fed to the spa.
To exit Programming mode press Jet, Light or Aux button, or wait 10 seconds
Page 28
p
.
.
xStream, xStream Pro and xStream Duo Pro Swim Pack Programming Instructions
PAGE 22
3s
Self Test Function not applicable to Swim Packs.
If display shows AH or ECO, call a service tech
or
The Swim Pack has a Circulation Pump.
Auto-Heat and ECOnomy modes do not
apply.
Heating Days: 1/2/3/4/5/6/7/A
Temperature in ºF or ºC
Switches between ºF and ºC
Circulation (filtration) hours:
6h, 12h or 24h
Switches clock between 12h and 24h
Clock: Hours Set
Clock: Minutes Set
Calendar: Month Set (1~12)
Calendar: Day Set (1~31)
Calendar: Year Set
Heat Lock: to ± &to ²
Rev. Date: 10/9/2008
FACTORY DEFAULT SETTINGS
DOM
EXP
FACTORY DEFAULT SETTINGS
DOM
²
Unlocked
EXP
²
Panel Lock: to ± &to ²
Display Flip:
or
²
Unlocked
Setup Menu - ADVANCED SETTINGS
8s
DISCLAIMER:
DO NOT ENTER THIS SECTION UNLESS INSTRUCTED BY A
QUALIFIED TECHNICIAN.
*** IMPROPER CHANGES MAY CAUSE MALFUNCTION AND DAMAGE YOUR SPA! ***
FACTORY DEFAULT SETTINGS
DOM EXP
Switches Pump settings:
xStream
xStream Pro
xStream Duo Pro
Power Service Level:
MUST BE S=0 - DO NOT CHANGE!
Warning! Changes to this setting may cause
inadvertent breaker tripping and strain your
power connections.
Country (for FM tuning)
U=US
E=Europe
J=Ja
an
Not Applicable, should be set to b=-
Not Applicable, should be set to LS1-
Prime cycle at startup: P=Yes –=No
Notice: When set to P=Pr, pumps run for 2
minutes every time power is fed to the spa.
To exit Programming mode press Jet, Light or Aux button, or wait 10 seconds
²
Page 29

Page 30

© 2009 DM INDUSTRIES • ALL RIGHTS RESERVED • SPECIFICATIONS SUBJECT TO CHANGE WITHOUT NOTICE
DM Industries, Ltd.,
2320 Northwest 147th Street, Miami, Florida 33054
Email: [email protected] and [email protected]
www.dmindustries.com
MIAMI FLORIDA
DM Part Number 0463502-8170509
File: xStream_Own_Man_0905a.pdf
 Loading...