

Page 1

PAGE 1
h e a l t h a n d r e l a x a t i o n f o r l i f e
L100 SERIES WITH OPTIONS
OWNER’S MANUAL
IMPORTANT SAFETY INSTRUCTIONS
VITA INTERNATIONAL
2320 N.W. 147th Street Miami, Florida 33054
Page 2

Page 3

L100 SERIES WITH OPTIONS
OWNER’S MANUAL
VITA INTERNATIONAL
2320 N.W. 147th Street Miami, Florida 33054
OWNER’S RECORD
DATE PURCHASED: _____________________________________
DATE INSTALLED: _______________________________________
DEALER: _______________________________________________
ADDRESS: _____________________________________________
_ _ _ _ _ _ _ _ _ _ _ _ _ _ _ _ _ _ _ _ _ _ _ _ _ _ _ _ _ _ _ _ _ _ _ _ _ _ _ _ _ _ _ _ _ _ _ _ _ _ _ _ _ _ _
TELEPHONE: ___________________________________________
SERIAL #: ______________________________________________
MODEL #: _____________________________________________
To contact our Technical Service Department, please write to Vita International, 2320
NW 147th Street, Miami, FL 33054 or call 1-305-685-2063, during normal business
hours, Monday through Friday, 8:30 am to 5pm, EST.
The Serial Number is located along the base of the spa. Please verify that the serial
number is noted on your dealer’s purchase contract.
*
*
Page 4

G E NE R AL INF O RM AT I O N
•Owner's Record and Service Information
frontpiece
•Important Safety Instructions ........... 2-3
•Manufacturer's Do's and Don'ts. . . . . . . . . . . . . . . . . . . . . . . . . . . . . . . . . . 3
• WA R NIN G S . . . . . . . . . . . . . . . . . . . . . . . . . . . . . . . . . . . . . . . . . . . . . . . . . . . . . . . . . . . . . . . . . . . . . . . . . . . . . . . . . . . 4
S E T UP AND IN S TA L L AT I O N
•Site Selection/LOCAL CODES................. 5
•Clearances ...................................................... 6
•Electrical Requirements
and Installation ........................................7-11
•Cover Installation....................................... 12
O PE R ATION IN S T R U C T I O N S
•Filling Your Spa........................................... 13
•Initial Startup............................................... 13
A. Setting Permanent Temperature . 13
B. Auto/Econo Mode...............................13
C. Setting Current Time ....................... 14
D. Setting Filtration Cycles .................. 14
E. Circulation Pump Options................14
•Using Your Spa ...........................................14
A. Displaying Time or Temperature 14
B. Water Jet Therapy ............................. 14
C. Air Injection Therapy ....................... 15
D. Turning on the Light ........................ 15
• Special Features ...................................... 15
A . Automatic Blower and Jets Purge 15
B. Memory ................................................ 15
C. System Reset ..................................... 15
D. Panel Lock ........................................... 15
E. Freeze Protection .............................. 16
F. Flow Protection .................................. 16
G. Overheat Protection ......................... 16
H. Ozone Generator Monitor ............. 16
I. Vita Tunes ..............................................17
• Add Start Up Chemicals ....................... 17
• Jet Operation .............................................18
A. Three Way Power Diverter Valve 18
B. Turbo Massage Jet ........................... 18
C . Directional and Rotational Massage. 19
D. Directional Mini Massage .............. 19
E. Fragrance Injector ............................. 20
F. Air Control ........................................... 20
G. Cluster ................................................... 20
•VitAroma Therapy System .....................21
S P A MAIN T E N A N C E
•Filter Maintenance ....................................22
•Draining Your Spa .....................................22
•Winterizing Your Spa ................................23
•Excel Plus Cabinet ....................................23
•Cover Maintenance ...................................23
•Care of Acrylic Surface and Spa Pillows .23
•Spa Light Colors & Lenses .....................24
•Spa Light Bulb Replacement ................24
•Diverter Valve Cleaning ..........................24
WATER QUA L I TY & MAIN T E N A N C E
•Sanitizing ......................................................25
•pH Control ...................................................25
•Important Maintenance Procedures ..26
•Balancing Spa Water .........................27-29
•Water Maintenance Do’s and Don'ts. . . 30
•Water Troubleshooting .....................31-32
D I A G N O S T I CS & TROUBL ES H O O T IN G
•Diagnostic Messages .............................. 33
•LCD Display ................................................ 34
Warranty ....................................................35-36
Maintenance Log Recording Area.. 37-43
TA B LE OF CON T E N T S
Page 5

Congratulations!
Thank you for the purchase of your new VITA SPA. You are now the proud owner of one
of the most comfortable and therapeutic spas in the world.
This Owner’s Manual has been designed to familiarize you with your Vita Spa operations
and general maintenance. We suggest that you take some time to carefully review it.
Please keep this manual available for reference.
If you have any questions regarding your Vita Spa set-up, operations, or maintenance,
please contact your Authorized Vita Spa Dealer.
Consumer satisfaction is important to us. We welcome your comments and suggestions.
Please share them with us via telephone, letter, or E-mail us at [email protected].
Sincerely,
Eric Dormoy,
President
DM Industries, Ltd.
PAGE 1
Page 6

WARNING – To reduce the risk of injury,
do not permit children to use this product
unless they are closely supervised at all
times.
DANGER – RISK OF ACC I D E N T AL DROW N IN G .
Extreme caution must be exercised to
prevent unauthorized access by children.
To avoid accidents, ensure that children
can not use the spa unless they are
supervised at all times.
A ground te r m i n a l (pressure wire
connector) is provided on the control box
inside the unit to permit connection of a
minimum No. 8 AWG (8.4 mm2) solid
copper bonding conductor between this
point and any metal equipment, metal
water pipe, metal enclosures of electrical
equipment, or conduit within five feet
(1.5m) of the unit.
DANGER – To reduce the risk of injury to
persons, DO NOT remove suction fittings.
The suction fittings on this spa are sized
to match the specific water flow created
by the pump. Should the need arise to
replace the suction fittings or the pump,
be sure that the flow rates are
compatible. Never operate the spa if the
suction fittings are broken or missing.
Never replace a suction fitting with one
rated less than the flow rate marked on
the original suction fitting.
Install the spa – so proper drainage is
provided for the compartment containing
electrical components.
DANGER – RISK OF ELEC T R ICAL SHOCK –
Install at least 5 feet (1.5 m) from all
metal surfaces. (A spa may be installed
within 5 feet of a metal surface if each
metal surface is permanently connected
by a minimum No. 8 AWG (8.42 mm2)
solid copper conductor attached to the
wire connector on the terminal box that is
provided for this purpose). National
Electrical Code ANSI/NMFP A70-1993.
DANGER – RISK OF ELEC T R ICAL SHOCK-
Do not permit any electrical appliances,
such as a light, telephone, radio, or
television within 5 feet (1.5 m) of the
spa.
WA R NING – TO REDUCE THE RI S K
OF INJURY:
A . The water in a spa should never exceed
40 degrees Celsius (104 degrees F).Wa t e r
temperatures between 38 degrees C
( 1 00 F) and 40 degrees C (104 F) are
considered safe for a healthy adult. Lower
water temperatures are recommended for
extended use (exceeding 10 minutes)
and for young children.
IMPORTANT SAFETY INSTRUCTIONS
WHEN INSTALLING AND USING THIS ELECTRICAL EQUIPMENT, BASIC SAFETY
PRECAUTIONS SHOULD ALWAYS BE FOLLOWED, INCLUDING THE FOLLOWING:
SAVE THESE INSTRUCTIONS
PAGE 2
Page 7

PAGE 3
DO A N D DON ’ TS
DO Make sure the spa is connected to a Ground Fault Circuit Interrupter (GFCI)
protected circuit. This GFCI is required by the National Electrical Code (NEC). and
must be installed by licensed electrician. Test the GFCI monthly.
DO Test the water with your hand before entering the spa to be sure it is comfort a b l e .
D O Remember that wet surfaces can be slippery. Take care when entering and exiting
the spa. Only enter by way of the steps in the spa. Do not step on spa edges or
filter lids.
D O Use the thermal cover when the spa is not in use, empty or full.
D O Take steps to prevent the intrusion of sand and dirt into the spa.
D O Maintain proper water chemistry.
D O Clean the filter cartridge weekly.
D O N ’ T Use the spa for long periods of time at temperatures over 10 4 º F.
D O N ’ T Operate the spa without water. Turn the circuit breaker off before emptying the
spa and while it is empty.
D O N ’ T Store chemicals in the spa’s equipment compart m e n t .
D O N ’ T Open the electrical box. There are no user serviceable parts inside.
D O N ’ T Operate the pump(s) on hi-speed for extended periods of time with the cover on.
Extended hi-speed pump operation will cause a slow heat build-up due to water
friction, which could trip the spa’s hi-limit thermostat.
B. Since excessive water temperatures
have a high potential for causing fetal
damage during the early months of
p r e g n a n c y , pregnant or possibly
pregnant women should limit spa
temperature to 38 degrees C (100 F).
C. Before entering a spa, the user should
measure the water temperature with
an accurate thermometer, since the
tolerances of water temperature
regulating devices vary.
D . The use of alcohol, drugs, or
medication, before or during spa
use, may lead to unconsciousness
with the possibility of drowning.
E. Persons suffering from obesity or with
a medical history of heart disease, low
or high blood pressure, circulation
system problems, or diabetes, should
consult a physician before using a spa.
F. Persons using medication should
consult a physician before using a spa
since some medication may induce
drowsiness, while other medication
may affect heart rate, blood pressure
and circulation.
Page 8

PAGE 4
WA R NING S
Prolonged immersion in water that is warmer than normal body temperature can result in a
dangerous condition known as HYPE RT H E RMIA. The causes, symptoms, and effects of
h y p e rthe rmia may be described as follows: Hyperthermia occurs when the internal
temperature of the body reaches a level several degrees above the normal body temperature
of 98.6 degrees F. The symptoms of hyperthermia include dizziness, fainting, drowsiness,
l e t h a r gy, and an increase in the internal temperature of the body. The effects of hypert h e r m i a
include (1) unawareness of impending hazard, (2) failure to perceive heat, (3) failure to
recognize the need to exit the spa, (4) physical inability to exit the spa, (5) fetal damage in
pregnant women, and (6) unconsciousness resulting in a danger of drowning.
WA R NIN G – The use of alcohol, drugs, or medication can greatly increase the risk of fatal
h y p e rthe rmia in spas. Persons taking medications that induce drowsiness such as
tranquilizers, antihistamines or anticoagulants should not use the spa. Pregnant women and
persons with a medical history of heart disease, circulatory problems, diabetes or high blood
pressure should consult their physician before using the spa.
Children are especially sensitive to hot water. At no time should children have unsupervised
access to the spa. The use of elevated decking may encourage children to climb onto the
thermal cover – IT IS NOT DES I G NED AS A SA FETY OR CHILD RES I S TANT COV E R !
Every Vita Spa comes with a thermal cover which is provided with locking straps. Install the
locks for your child’s safety.
Page 9

PAGE 5
INSTA L L AT I ON INST R UCT I ONS
SITE SELECTION / PRE PA R AT I O N :
The spa must be installed on a
structurally strong, solid and reasonably
level surface. The majority of the weight
of the spa is placed under the footwell
area of the spa. This area must be firmly
supported at all times. The site should
allow for drainage away from the
equipment compartment in which the
electrical components are housed. Take
into account the following when
considering prospective sites.
Vita Spas have a loading capacity in the
range of 57lbs/sq ft to 83 lbs/sq ft.
Refer to your actual model for exact
loading requirements.
LOCAL CODES:
There may be certain restrictions and/
or requirements that are particular to
your locality.
DELIVERY PASSAGEWAY:
Doors, halls, stairs, etc. may pose
obstructions to deliver the spa to its
intended site.
MAINTENANCE:
Trees, lawn, placement surfaces, etc. can
create extra work in keeping your spa area
clean and safe. Please be advised that
placing your spa on dirt or grass may
increase the amount of debris inadvert e n t l y
brought into the spa water on the feet of
users or by the wind. The intrusion of this
debris into the spa water may cause harm
to your equipment as well as the spa
s u rface and is not covered under warranty.
PRIVACY AND
WIND SHIELDING:
A sheltered environment can result in
lower operating and maintenance costs.
You may also want to take into
consideration your privacy during times of
the year when trees may be barren, having
the spa located where you have a view of
a peaceful sunset, where you may be able
to catch soothing breezes, or your view
and the view of your neighbors may also
be something that you should address
prior to the final installation of your spa.
Page 10
PAGE 6
Spa
L o c a t i o n
1
2
3
4
5
6
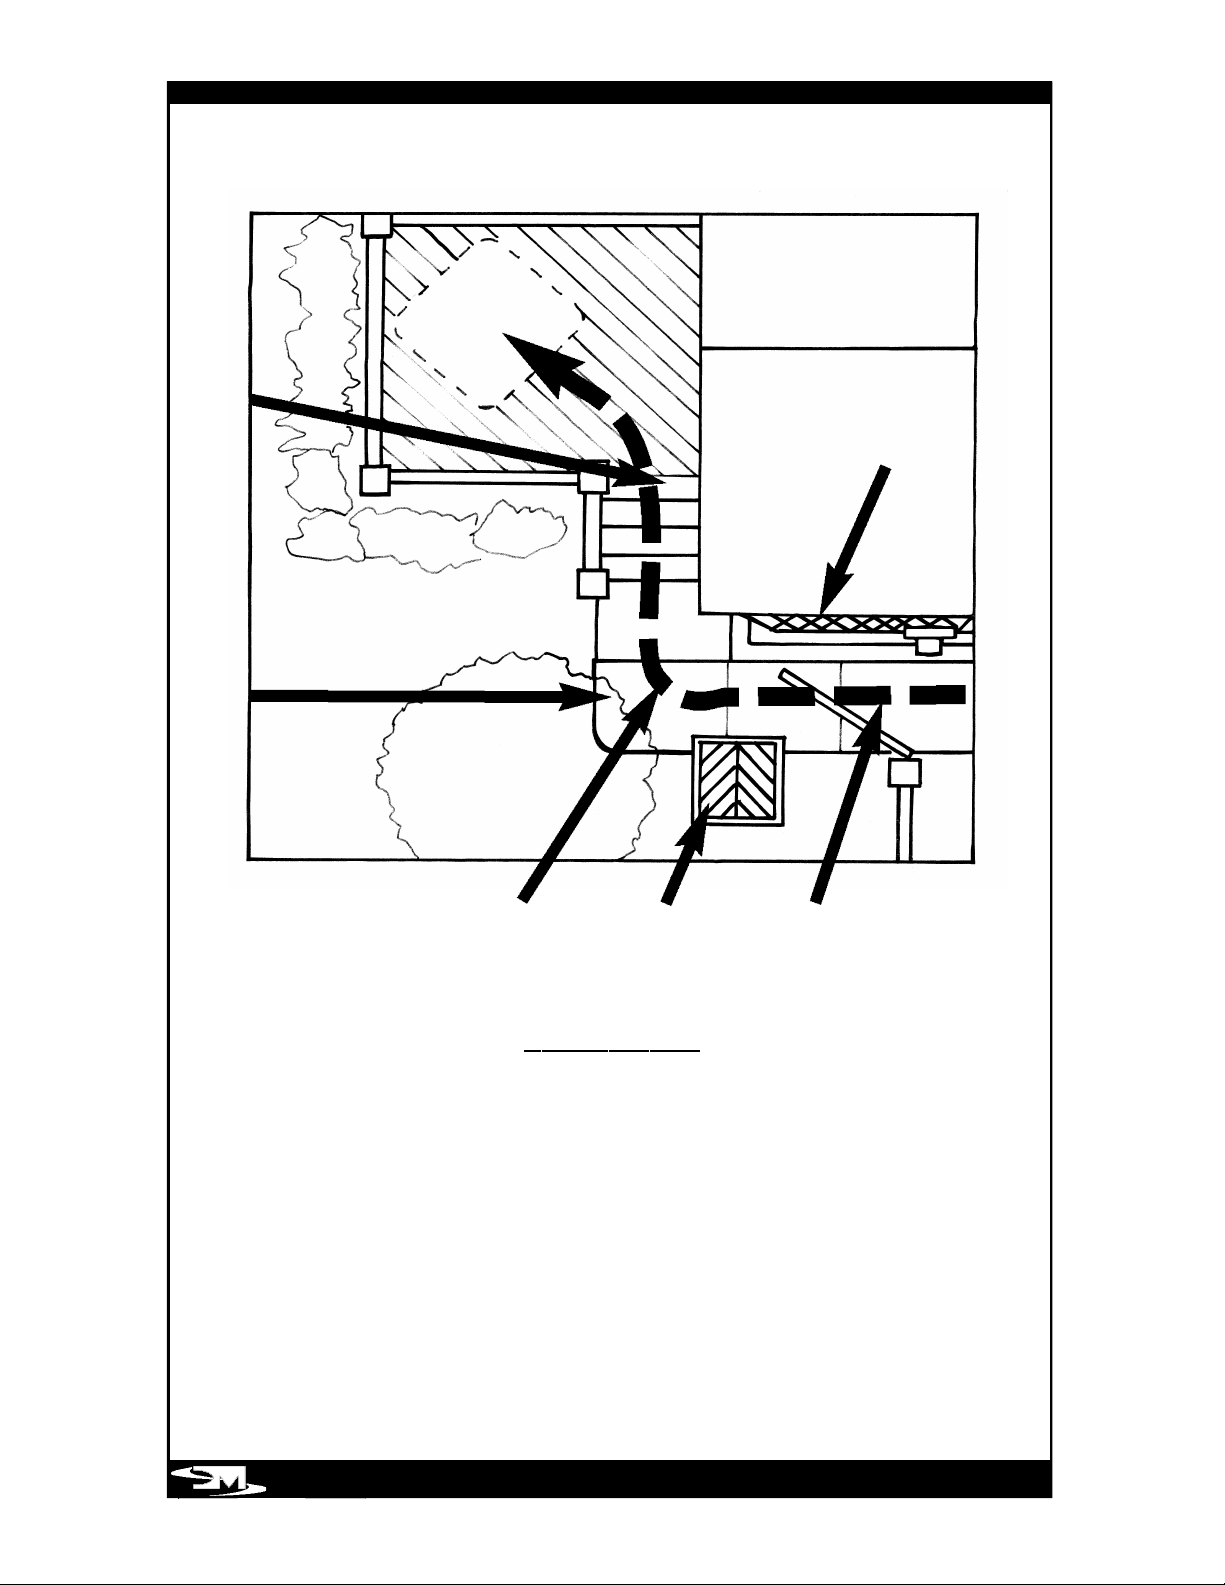
CL E A R A N CES
CHECK THE FOLLOWING AREAS PRIOR TO SPA DELIVERY
1. STEPS - We suggest no more than six without a landing.
2. TREE BRANCHES - Clearance for spa passage.
3. TIGHT CORNERS - Make sure there is space to maneuver.
4. STORAGE SHEDS, DOG HOUSES, WOOD PILES - Remove out of the way.
5. GATES: CLEARANCE FOR PA S S A GE OF SPA - Does gate need to be removed
from hinges?
6. OVERHANGS AND GUTTERS - Anything overhead, as well as drain pipe
locations, must allow for spa passage.
Page 11
PAGE 7
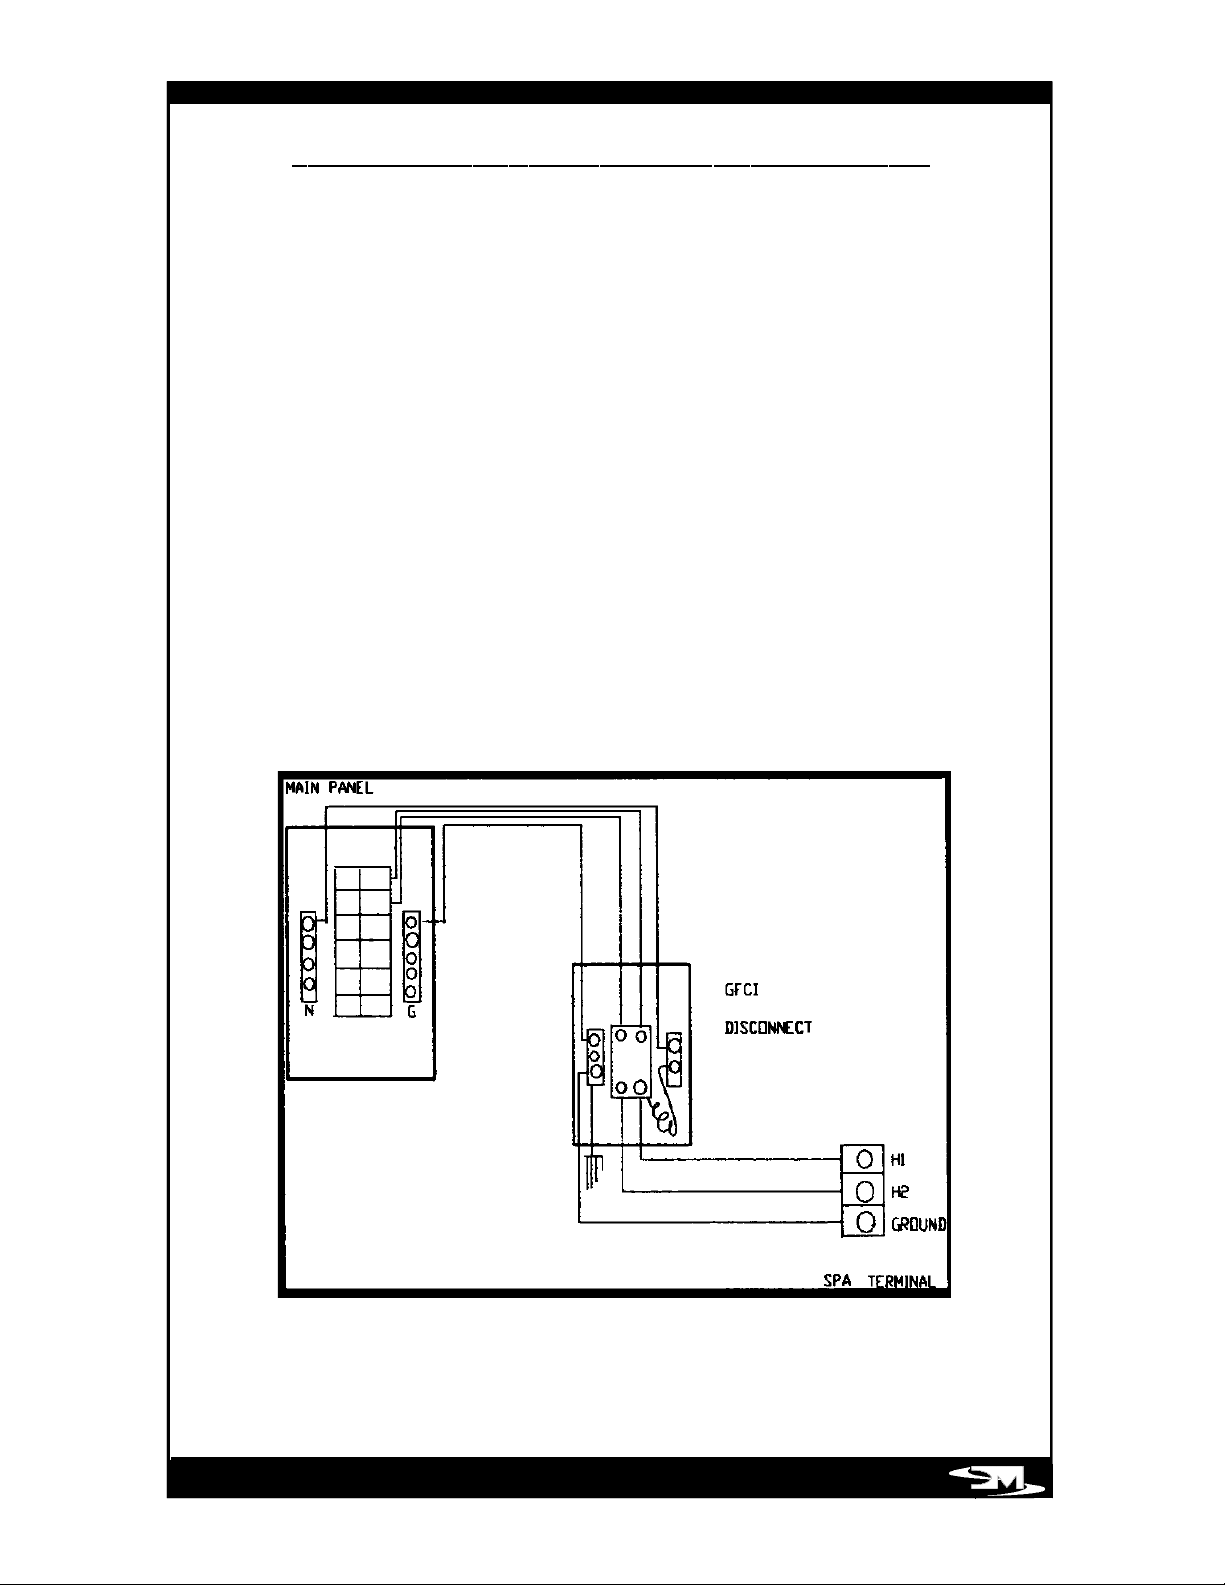
W I RE YO U R SPA PER ONE OF THE DIAG R AMS MOST SIMILAR TO YO U R HOUSE PA NE L
ALL WIRES FEEDING THE SPA ARE TO BE THE SAME GAUGE. GROUND WIRES ARE TO
BE INSULATED AS WELL. WHEN USING A GROUND ROD, THE GROUND WIRE TO THE
ROD SHOULD BE #6 BARE COPPER.
ALL SPAS REQUIRE THE USE OF AN ISOLATED GFCI PROTECTED CIRCUIT. THE
INSTALLATION OF A DISCONNECT IS REQUIRED NO MORE THAN TEN (10) VISUAL
FEET FROM THE SPA AND NOT LESS THAN FIVE (5) FEET.
THIS REQUIREMENT IS TO ASSURE THAT WHEN POWER IS DISCONNECTED FROM THE
SPA, POWER CAN NOT BE INADVERTENTLY TURNED BACK ON.
EL E C T R ICAL RE Q UIREMEN T S AND INSTA L L AT I ON
S E PA RATE NE U T RAL & SO L I D
G R O UND
Page 12
PAGE 8
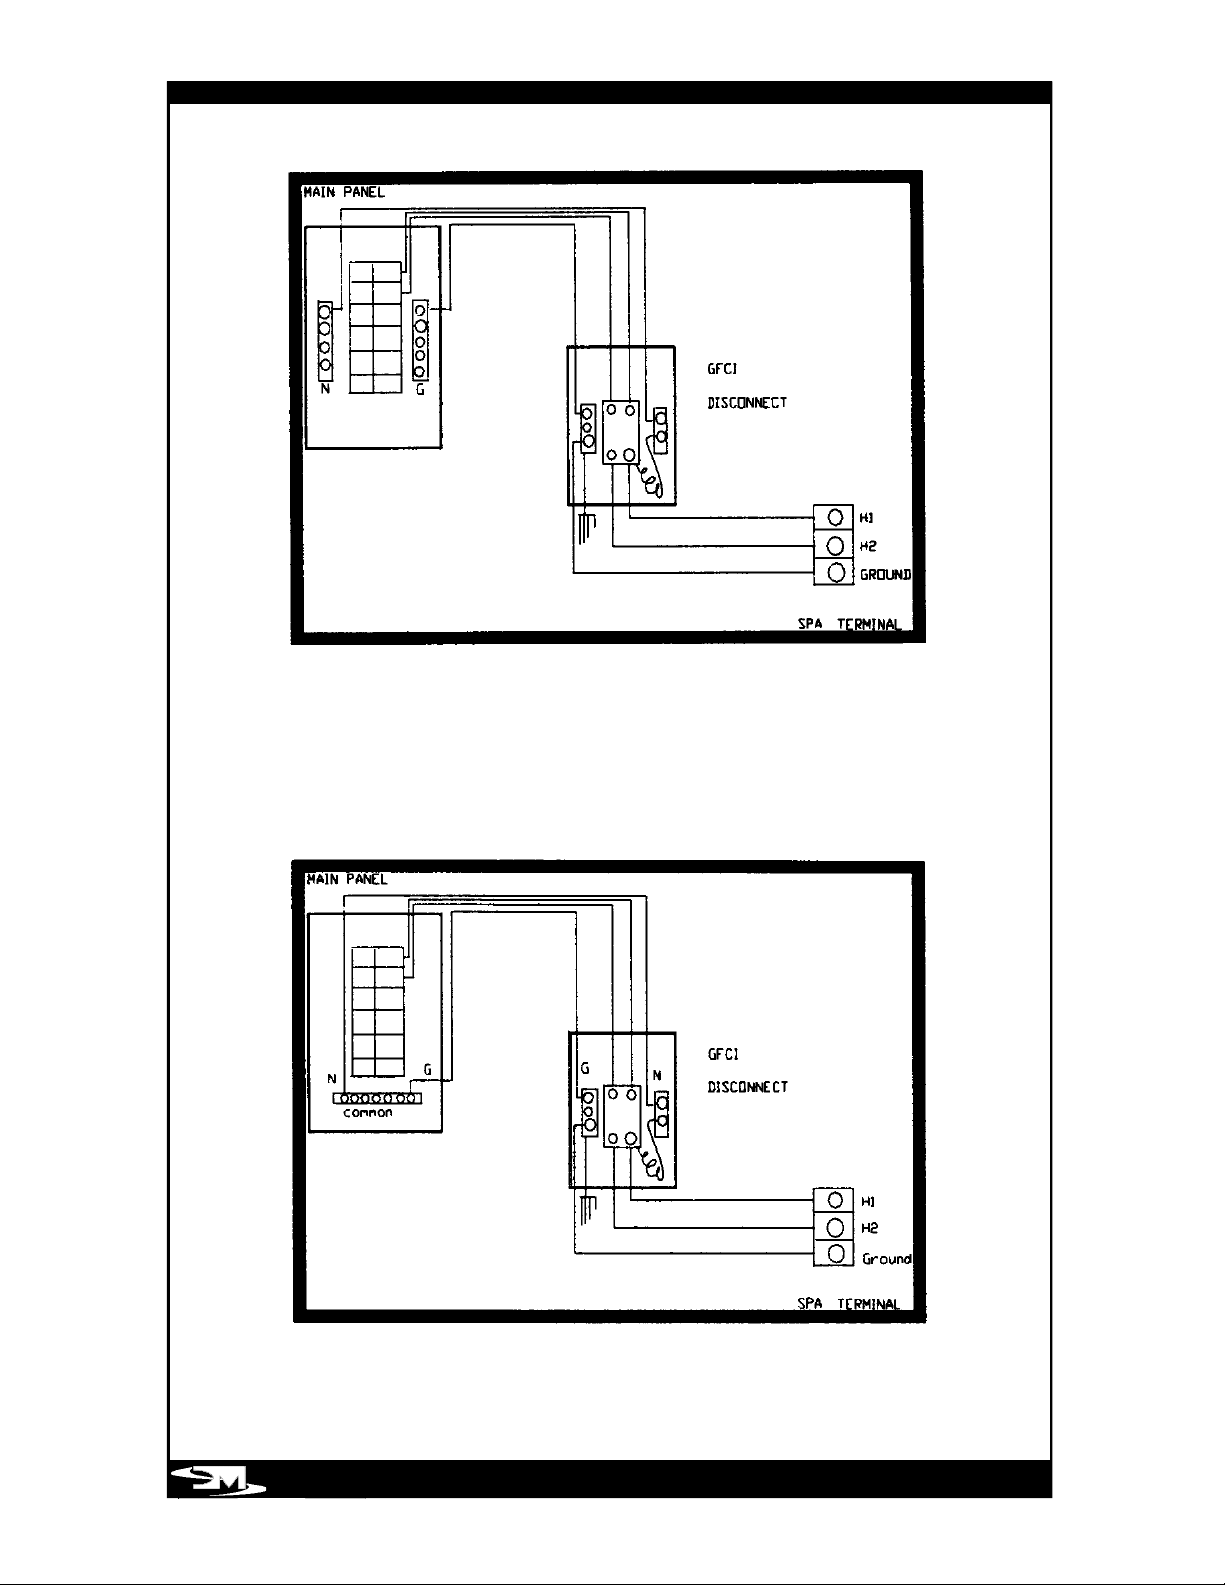
CO M MON NE U T RAL GROUND BAR
IN MAIN
S E PA RATE NE U T RAL & WEAK
G R O U ND OR ROMEX WIRE USED TO
FEED GFCI WITH UND E R S I Z E D
G R O U ND WIRE
Page 13
PAGE 9
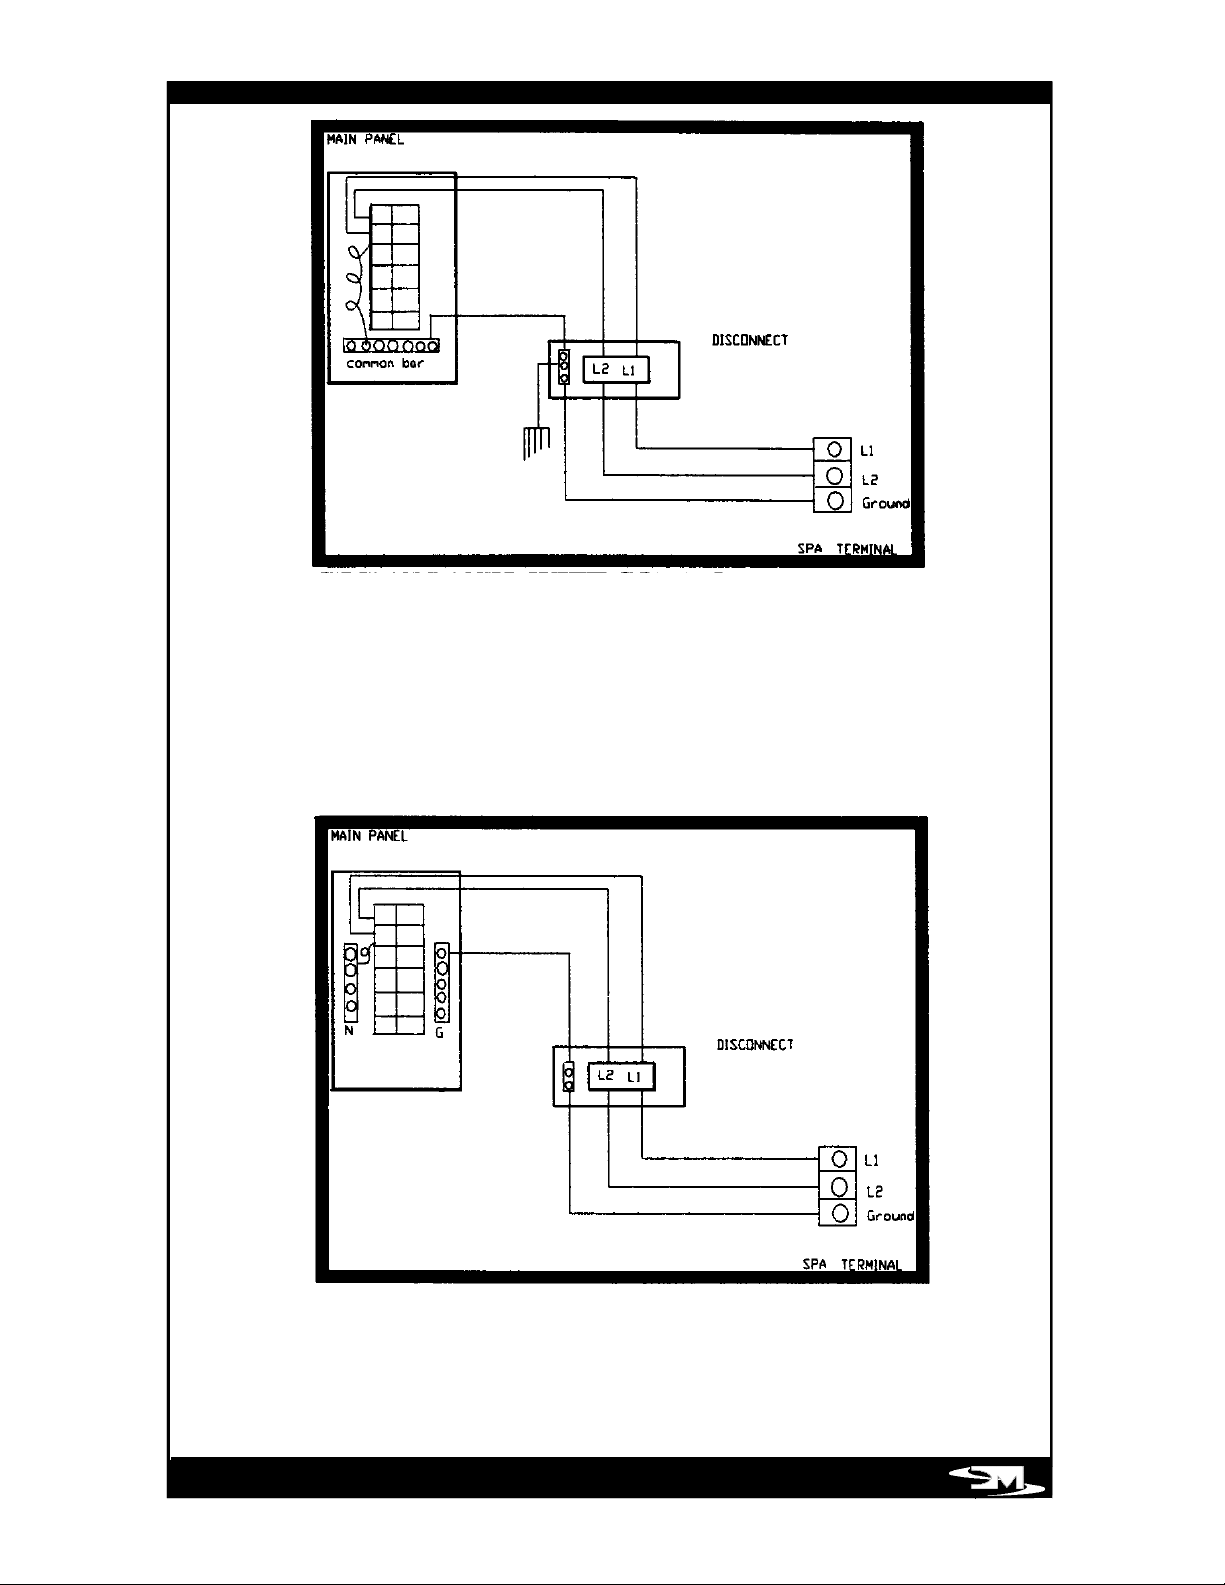
GFCI IN PA NEL WITH SEPA RAT E
NE U T RAL AND SO L I D GROUND TO
PA N E L
GFCI IN PA NEL WITH CO M M O N
NE U T RAL BAR AND/OR ROME X
WITH UNDERSIZED WIRE USED TO
FEED DISCO NNEC T.
Page 14
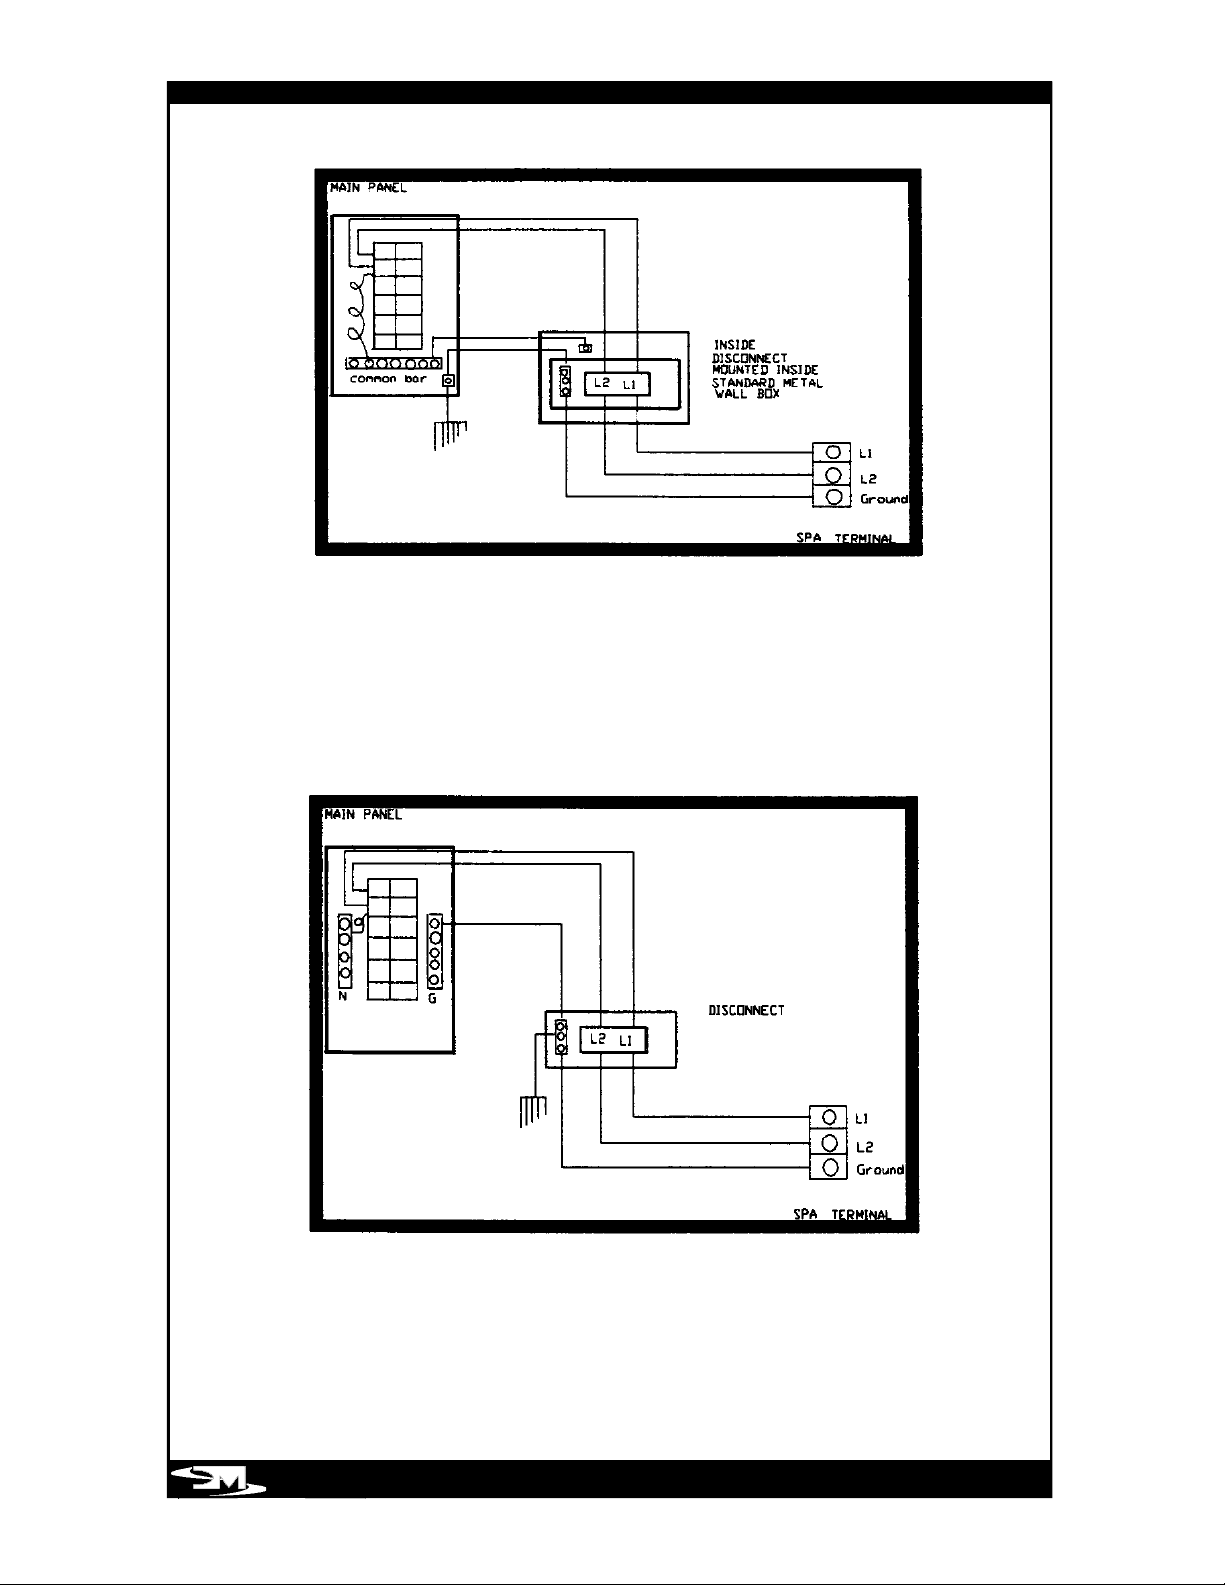
PAGE 10
GFCI MOUNTED IN PA N EL AND
D I S CO NNECT MOUNTED IN S IDE TO
CO MMON WALL WITH META L
ST UDS OR WITH METAL
M O U N T ING BOX .
GFCI IN PA N EL WITH WEAK GROUND
OR ROMEX WITH UND E R S I Z E D
G R O UND WIRE USED TO FEED
D I S CO N NEC T
Page 15

PAGE 11
1. The spa must be permanently
connected (hardwired) to the power
supply. No extension cords or plugtype connections are to be used in
conjunction with the operation of the
spa. Failure to supply power to the
spa that is not in accordance with
these instructions could create a
potential health hazard and will void
both the manufacturer’s warranty and
the independent testing agency
listing.
2 . The National Electrical Code (NEC )
requires that the power supply to
this spa must be a dedicate d ,
ground fault circuit (GFCI) prote c t e d
circuit with no other appliances or
lights sharing power on this circuit.
3. Refer to the wiring diagram posted
inside the electrical equipment door
to determine the current, voltage, and
wire size requirements for your spa.
4. THHN type wire is recommended.
The wire size for the distance of the
wire run must conform to NEC and
local electrical codes.
5. To ensure proper connections use
copper conductors only.
DO NOT USE ALUMINUM WIRE.
6. The spas’ power terminal strip is
located within the electrical control
box.
7. Feed supply conductors through
power supply inlets provided on
the spa and install into the control
b o x. Modifications to the electrical
equipment box are not permitte d .
Drilling holes in the electrical
control box to provide access for
wires in areas other than those
provided for will void the
manufacturer’s warranty and the
independent testing agency listing.
8. Connect wires to terminal block (TBI)
color for color. All wires must be
connected or damage may result.
TIGHTEN SECURELY!
ALL WIRING TO THE SPA SHOULD BE IN ACCORDANCE WITH ALL LOCAL
AND NATIONAL ELECTRICAL CODES. ALL WIRING SHOULD BE PERFORMED
BY A LICENSED ELECTRICIAN KNOWLEDGEABLE IN THE OPERATION AND
WIRING OF A GFCI PROTECTED SYSTEM.
Page 16
PAGE 12
INS TA L L ING THE SPA CO V ER
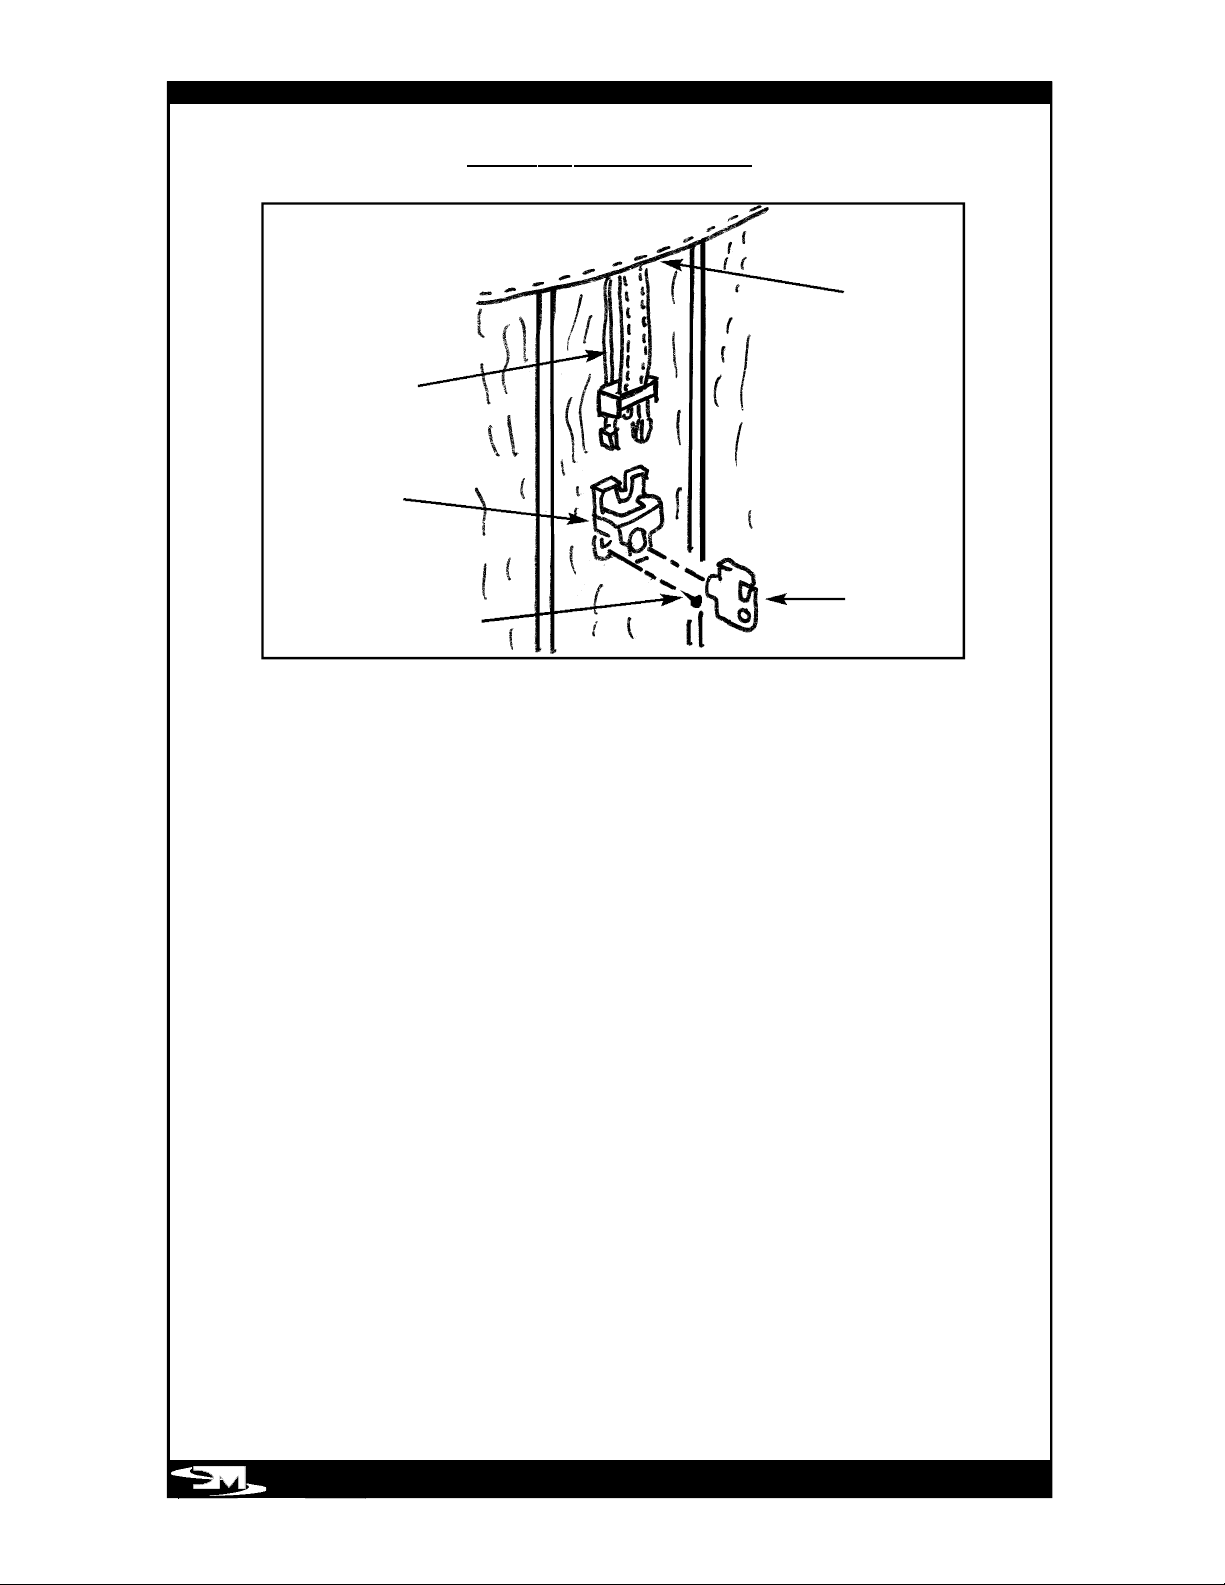
1. Position the cover squarely over the spa.
2. Position the locks for the tie-downs on the sides of the spa. You should allow
approximately 1/2” to 3/4” slack in the straps for ease of insertion into the locks and
to allow for material shrinkage during temperature changes.
3. Using the screws provided, attach the locks and insert the cover tie-down straps.
Utilizing the cover anytime the spa is not in use will reduce heat loss and thereby
reduce the amount of running time required to make up that loss by the heating
system.
Keep cover fastened down at all times when not in use.
DANGER - RISK OF INJURY
To reduce the risk of potential injury:
1. Never leave a spa uncovered or unattended.
2. Never leave a spa cover unlocked.
3. Do not stand, sit, or lie on the cover.
ALWAYS REMOVE SNOW FROM THE COVER. THE COVER HAS NOT BEEN
DESIGNED TO SUSPEND THE WEIGHT OF WET SNOW.
C O V E R INSTA L L AT I ON
Ke y
C o v e r
Tie Down
S t r a p
Lo c k
S c r ews (2)
Page 17

PAGE 13
OPERAT I NG INST RUCT IONS
NOTE: For best results, read each
step carefully and entirely before
proceeding to the next.
FILLING YOUR SPA
Wipe the interior of the spa with a damp,
soft cloth to remove any residue that
may be on the surface. Fill with a garden
hose by inserting the nozzle of the hose
in the filter inlet. (After filling is complete,
remember to put the filter cartridge in
place prior to starting the spa.) As the
spa is filling, check in the equipment
access area for any leaks. On occasion, it
may be necessary to hand tighten a
union fitting that may have come loose
during transit. Also check that the gate
valves are pulled out to the open position
and that the hose bib is closed. Continue
to fill to the water line.
NOTE: If your water is extremely hard, it
is preferable to fill the spa halfway with
hard water and the rest with softened
water. Never fill the spa entirely with
softened water.
INITIAL START UP
Your spa has been programmed for your
convenience. Once properly connected,
the pump and heater will automatically
come on, heat the spa to 102 F. Initial
temperature, day, and time can be set
and changed by following these
instructions.
WATER LINE
A . S E TT I NG TEMPE R AT U RE :
1. Press “ P R O G ” to display water
temperature.
2. Press “UP” or “DOWN” arrows to
choose the desired temperature.
Notice the heater icon flashing.
3. Wait 30 seconds or press any function
buttons (“Jet” or “Light”) to exit the
programming mode.
“F” FAHRENHEIT OR “C” CELSIUS DEGREES
Your spa has been preset to show the
temperature in Fahrenheit “ F ” d e gre es. If you
desire, you can change to Celsius “C” d e gr e e s
by entering the temp set routine (Display
temperature and then touch the up or down
arrow). Then while the numbers are flashing,
hold the light button for 10 sec. When the “ F ”
or “ C ” appears, use the “PROG” button to
toggle. To exit this procedure, wait 30
seconds or press any button.
B. A U T O HE AT AND ECO N O M Y M O D E
( N O T AVA I LA B LE ON MODELS WITH
OPTIONAL CIRCULATION PUMP)
Your spa has been designed to operate
in two heater control modes: A U TO
HEAT (“AH”) and ECONOMY (“ECO”).
In the AUTO HEAT mode, the pump and
heater will turn on whenever the water
temperature falls 1 degree below the
chosen temperature . Your spa has been
preset to start upon activation in the
AUTO HEAT mode. The spa water will be
automatically heated to the temperature you
choose or to the preset temperature of
102 F.
In the ECONOMY mode, the pump and
heater will only come on during
Page 18

PAGE 14
D. SETTING FILTRATION CYCLES
Filtration cycles have been preset at the
factory from 8 AM to 10 AM and from
4PM to 6 PM. They can be changed as
follows.
1. Press and hold the “PROG” button for
5 seconds to enter the programming
mode. “AH” will flash on the display. If
you are already in the programming
mode, go to the step 2 directly.
2. Press “PROG” three times to show
the filter cycle schedule. Notice the
flashing filter icon.
3. Press “UP” and “DOWN” to change
the hour.
4. Press “JET” button to change the filter
from “-” (Off) to “F” (ON) or vice versa.
5. Wait 30 seconds or press the “LIght”
button to exit the programming mode.
CIRCULATION PUMP (OPTION)
E. SETTING CIRCULATION PUMP
You are also given the choice between
12 forced hours of circulation or 24
forced hours, regardless of water
temperature.
1. Press “PROG” until “AH” flashes
2. Press “PROG” 4 times “C=12”
appears.
3. Press “UP” or “DOWN” buttons to
change.
4. Press “LIGHT” button to clear or
wait 30 seconds.
F. SKIM – AWA Y (ONLY AVA I LA B L E
WITH OPTIONAL CIRCULATION PUMP)
S k i m – Away is an automatic skimming
action which takes place each day from
8am until 8:30am each morning and
from 4pm until 4:30pm each afternoon.
The primary and secondary pumps will
activate in low speed mode. This will pull all
surface oils and debris into the filter well
cavity.
This setting permits the skim-away
p r o g rammed hours. (See “Setting
Filtration Hours”). Note that, if at the end
of filtration cycle the water is not at the
chosen temperature, the pump and
heater will not continue to run until that
temperature is reached. This mode is
used for energy conservation, the same
way you would control your heat or air
conditioning in your house. The clock
icon will be displayed when in
ECONOMY mode.
To switch to the ECONOMY mode:
1. Press and hold the “PROG” button for
5 seconds to enter the programming
mode. “AH” will flash on the display.
2. Press “UP” or “DOWN” button to
change between ECONOMY (ECO) and
AUTO HEAT (AH). Observe the clock
icon when in ECONOMY mode.
3. Wait 30 seconds or press “Light”
button to exit the programming mode.
C. SETTING CURRENT TIME
1. Press and hold the “PROG” button
for 5 seconds to enter the programming
mode. “AH” will flash on the display. If
you are already in the programming
mode, go to step 2 directly.
2. Press “PROG” one more time to
show the Hour.Observe the flashing clock
icon and PM indicator. No indicator
means AM.
3. Press “UP” or “DOWN” to select the
current hour.
4. Press “PROG” one more time to
show the minutes.
5. Press “UP” or “DOWN” to select the
current minute.
6. Wait 30 seconds or press the “Light”
button to exit the programming mode.
Page 19

PAGE 15
Note that for safety, all jet modes will
automatically turn off after 30 minutes.
Reactivate any therapy mode as
indicated above.
C. (OPTIONAL) AIR INJEC T I O N
THERAPY AIR BUTTON
This option equips your spa with an air
therapy blower. Press the air button to
activate and de-activate the air therapy
b l o w e r. For safety, the blower will
automatically turns itself off after 30
minutes.
D. TURNING ON THE LIGHT
Your spa is equipped with an underwater
light. Press the light button to activate
and de-activate the light. If left on, the
light will automatically turns itself off after
3 hours.
SPECIAL FEATURES
A. AUTOMATIC BLOWER AND JETS
PURGE
Once each day, at 10 AM the jet
pump(s) will automatically run for one
minute to circulate potential stale water
in the piping. This is a normal function of
the spa. The display will show “BJ2P”
while this takes place.
B. MEMORY
All settings that are entered into your spa
controller will be permanently retained in
its solid-state memory. In the event of a
power failure, the time will be captured
and held until power returns. All settings
existing at the time of the power failure
will be restored when power returns.
feature to operate for 30 minutes each
morning and afternoon for a total of 1
hour each day.
1. Press and hold “PROG” until “AH”
flashes.
2. Press “PROG” three times to show
“SA=1” which is the factory setting.
3.
Pressing the “UP” or “DOWN”
arrows, you can change the skim-away
tim to 2, 4, or 6 hours each day.
The total selected time will be split
between morning and afternoon.
USING YOUR SPA
A. DISPLAYING TIME OR
TEMPERATURE
Pressing the “PROG” button will switch
the display between current time and
current water temperature.
B. WATER JET THERAPY
Your spa is equipped with one or two
therapy pumps that can be activated as
follows.
Jet Button:
SINGLE PUMP SYSTEM
1. Press “JET” to activate the Relaxation
Therapy mode.
2. Press “JET” to activate the Power
Therapy mode.
3. Press “JET” to turn pump off
DUAL PUMP SYSTEM
1. Press “JET” to activate the Relaxation
Therapy mode.
2. Press “JET ” to activate pump#1
Power Therapy mode.
3. Press “JET” to activate pump #2
Power Therapy mode.
4 Press “JET” to de-activate pump #1.
5 Press “JET” to de-activate pump #2.
Page 20

automatically turn the heater off to
prevent overheating. The display will
show “FLO”, indicating a flow restriction
caused by a clogged filter, shut gate
valves or by a malfunction in the
pressure switch. Call for service if you
cannot pinpoint the cause.
G. OVERHEAT PROTECTION
If the water temperature inside the spa
reaches 112 F, the display will show
“HILI” (High Limit) and the heater will be
disabled. If the water temperature
continues to rise and reaches 115 F due
to friction in the pumps and plumbing
system, the entire system including all
pumps will be disabled. In “HIL I ”
condition, DO N OT E N T E R T H E WAT E R .
Remove the cover and allow the water
temperature to cool down to 104 F.
Then, reset the system by holding down
the “PROG” button for 5 seconds while
in time display mode. If the “HIL I”
message returns, call for service.
H. DIAGNOSTIC
When in temperature set mode (
Heat Icon Flashing ), then slowly press the
“PROG” button three times.
When the
screen reads P=2 or P=1 press the “PROG
button once again.
S=3 Indicates that the heater will stay on
when the pumps are on at anytime.
High or Low speed.
S=2 Indicates that the heater will shut off
if either of the large pumps are turned
on high speed
S=1 Indicates that the heater will only run
when the primary pump is on low
speed. Since the heater is associated
with the HEET pump system, the
PAGE 16
C. SYSTEM RESET
Anytime there is reason to believe that
your spa electronic system is not
operating properly, perhaps as a result of
lighting or other interference, like your PC
at home, your spa system can be simply
reset by holding down the “DOWN”
arrow button for 5 seconds while in the
time display mode. The system will be
reset, maintaining all the settings you had
in memory.
D. PANEL LOCK
The spa panel can be locked to keep
children or others from using any of the
spa functions. To deactivate all buttons,
make sure “Time” is displayed. Use
“PROG” button to change to “Time”
display if needed. Then hold the “UP”
arrow button for 5 seconds. Notice the
flashing lock icon. The panel is locked. To
unlock the panel, hold the “UP” arrow
button for 5 seconds again. The flashing
lock icon will disappear and all spa
functions will be accessible.
E. FREEZE PROTECTION
If temperature in the spa plumbing falls
below 50 degrees Fahrenheit (10
degrees Celsius) the water pump(s) will
turn on and run for at least one minute.
The display will show “ICE”. After one
minute, if the water is still below 50
degrees F (10 degrees Celsius), the
heater will turn on and raise the water
temperature 10 degrees F.
F. FLOW PROTECTION
If the flow of water through the heater is
insufficient, the spa controller will
Page 21

primary pump does not need to be on
for the heater to operate. Yet in an
effort to control the amperage draw
and conserve electricity, the heater will
run if the primary pump is turned onto
low speed but then shut off while the
primary pump goes to high speed or if
the secondary pump is turned on high.
Once the power level has been set,
this does not have to be set each
time. It will be entered into the system
memory.
Press the “PROG” button once again.
The diagnostic test will commence and
run for the next three and a half
minutes. Anytime during the first
minute of testing, you can stop the
test by pressing the “PROG” button
once.
Upon completion of the test, if
everything is operating correctly, the
message GOOD will be displayed for
30 seconds.
I. Vita Tunes
Country Code Setting
Advance the programming sequence
to the minute set position.
Hold down the “PROG” for 5 seconds
and observe that the screen shows
CO=X (where X is either U for USA, E
for Europe, or J for Japan)
Use the “UP” or “DOWN” buttons to
change the country, as required
S t ereo Access and Volume Control
To access the stereo, press “UP” and
“DOWN” buttons on the spa control
pad simultaneously. The stereo will
turn on, and you will automatically be
taken to the volume control.
Your volume range is L0 through
L8(L=00 equal off and L=08 is the
loudest).
PAGE 17
To adjust the volume level press “UP”
or “DOWN” arrows.
Bass
While in the volume mode, press
“PROG”
Bass range is B00 through B008
Frequency Source
From Bass Mode, press “PROG” to
select source.
S=A equals A.M., S=F equals F.M., S=L
equals line input.
After source is selected, press “PROG”
to exit selection or use “ U P ” o r
“DOWN” keys to scan stations.
In S=L you can connect optional Vita
CD player, or any other personal stereo
device, such as a walkman or MP3.
The “PROG” button can be pressed to
escape the stereo mode.
ADD START UP CHEMICALS
Carefully follow the directions and add
the start-up chemicals recommended to
you by your dealer. Contact your dealer
to clarify any questions you may have.
Your spa comes ready for the Vi t a
exclusive “Sparkle Clear” n a t u r a l
mineral purification cartridges. Combined
with an ozonator, “Sparkle Clear” offers
an alternative to Bromine or other
chlorine sanitizers. Sparkle Clear and
ozone will make your spa look cleaner,
smell cleaner, feel softer and eliminate
skin or eye irritation. Ask your dealer
about Vita Spa’s “Sparkle Clear” sanitizing
alternative.
Page 22
PAGE 18
JET OPERAT I ON
Your Vita Spa is designed with a unique jet system to allow you to select a wide variety of
massage patterns. The following is a description of the various types of jets and their
operation you may use to tailor your spa to your specific massage needs.
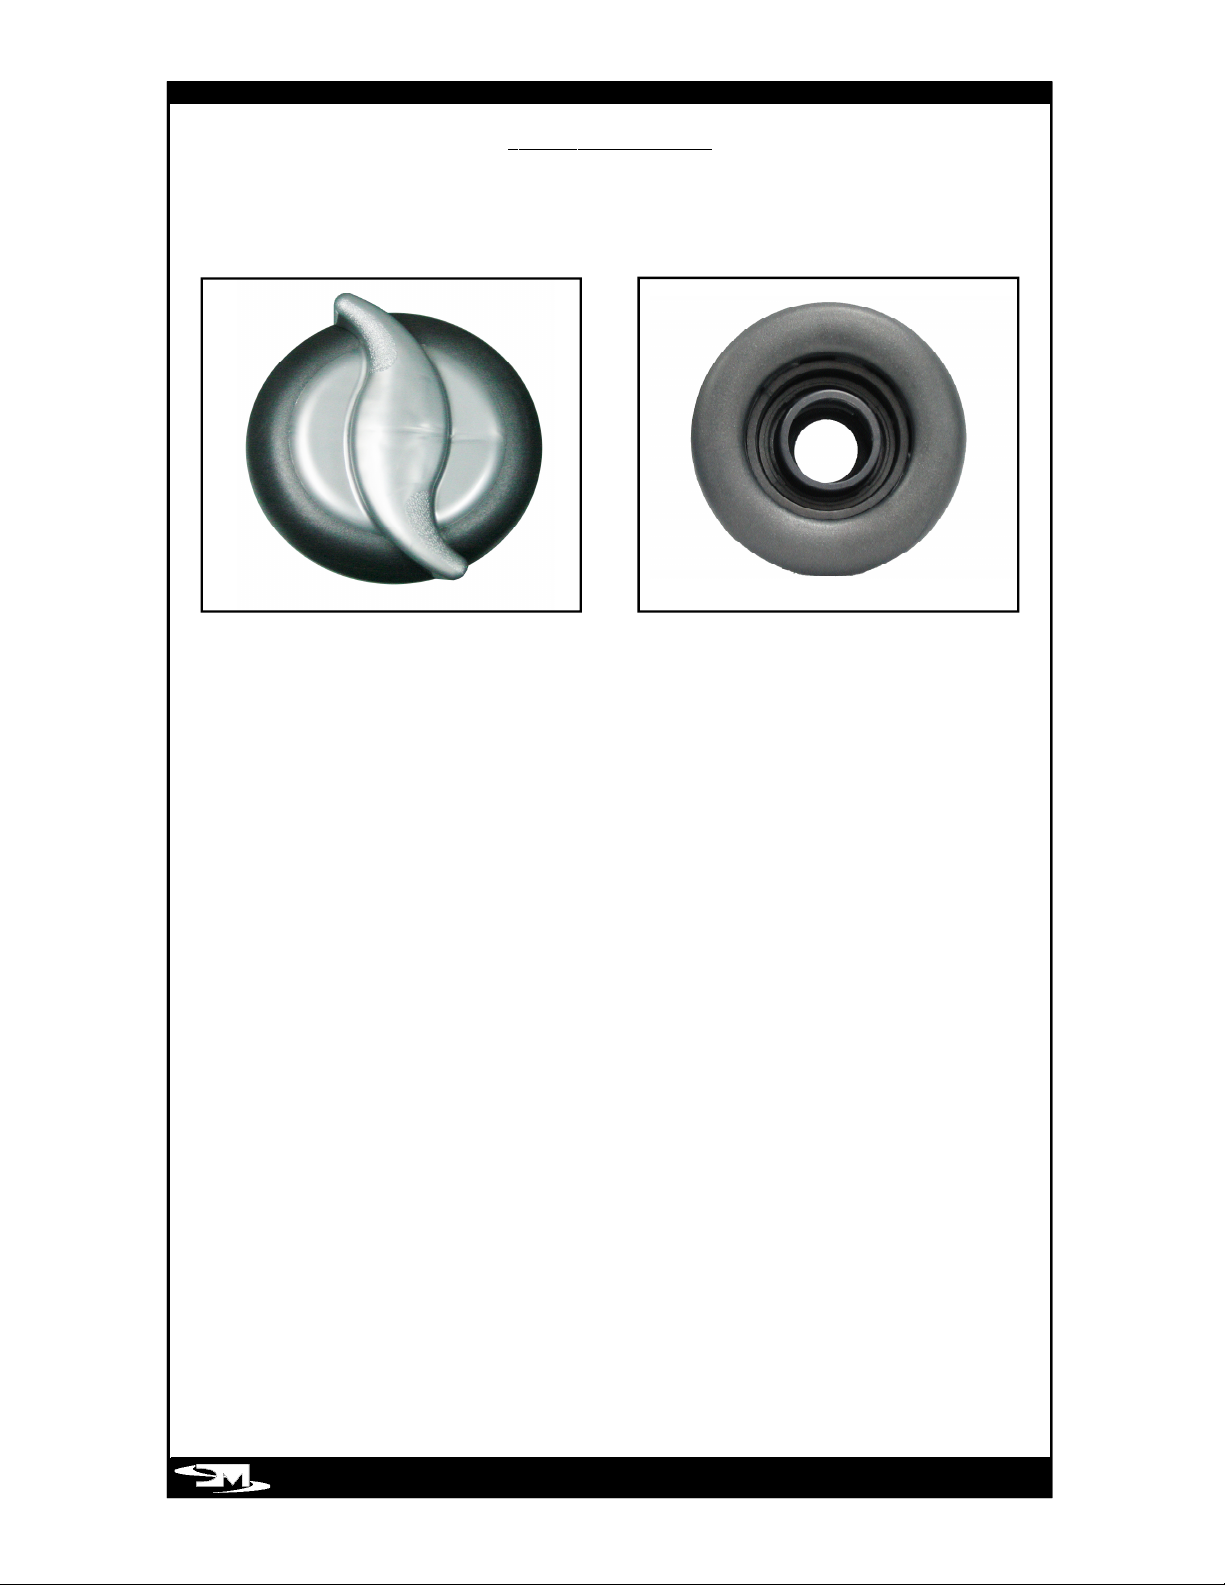
(A) THREE WAY POWER
DIVERTER VALVE
The Power Diverter Valve allows water to
be diverted to a zone of jets or to the
Turbo jet exclusively, or to both
combined. Turning the valve to the left,
water will be diverted to “A” jet(s) giving
that zone the maximum output. Rotating
the valve to the right will give “B” jet(s)
the maximum output. When turned to
the center, both “A” and “B” will operate
simultaneously
(B) TURBO MASSAGE JET
With the Power Diverter Valve turned to
“A” or “B” depending on the spa model,
the water will be delivered exclusively to
the Turbo Massage Jet. The Tu r b o
massage therapy is great for working out
those hard-to-relieve muscle knots and
to create swirling whirlpool effect in the
spa. The Turbo Massage jet pressure can
be adjusted by rotating the Po w e r
D i v e r ter Valve between “A” and “B”
positions.
Page 23
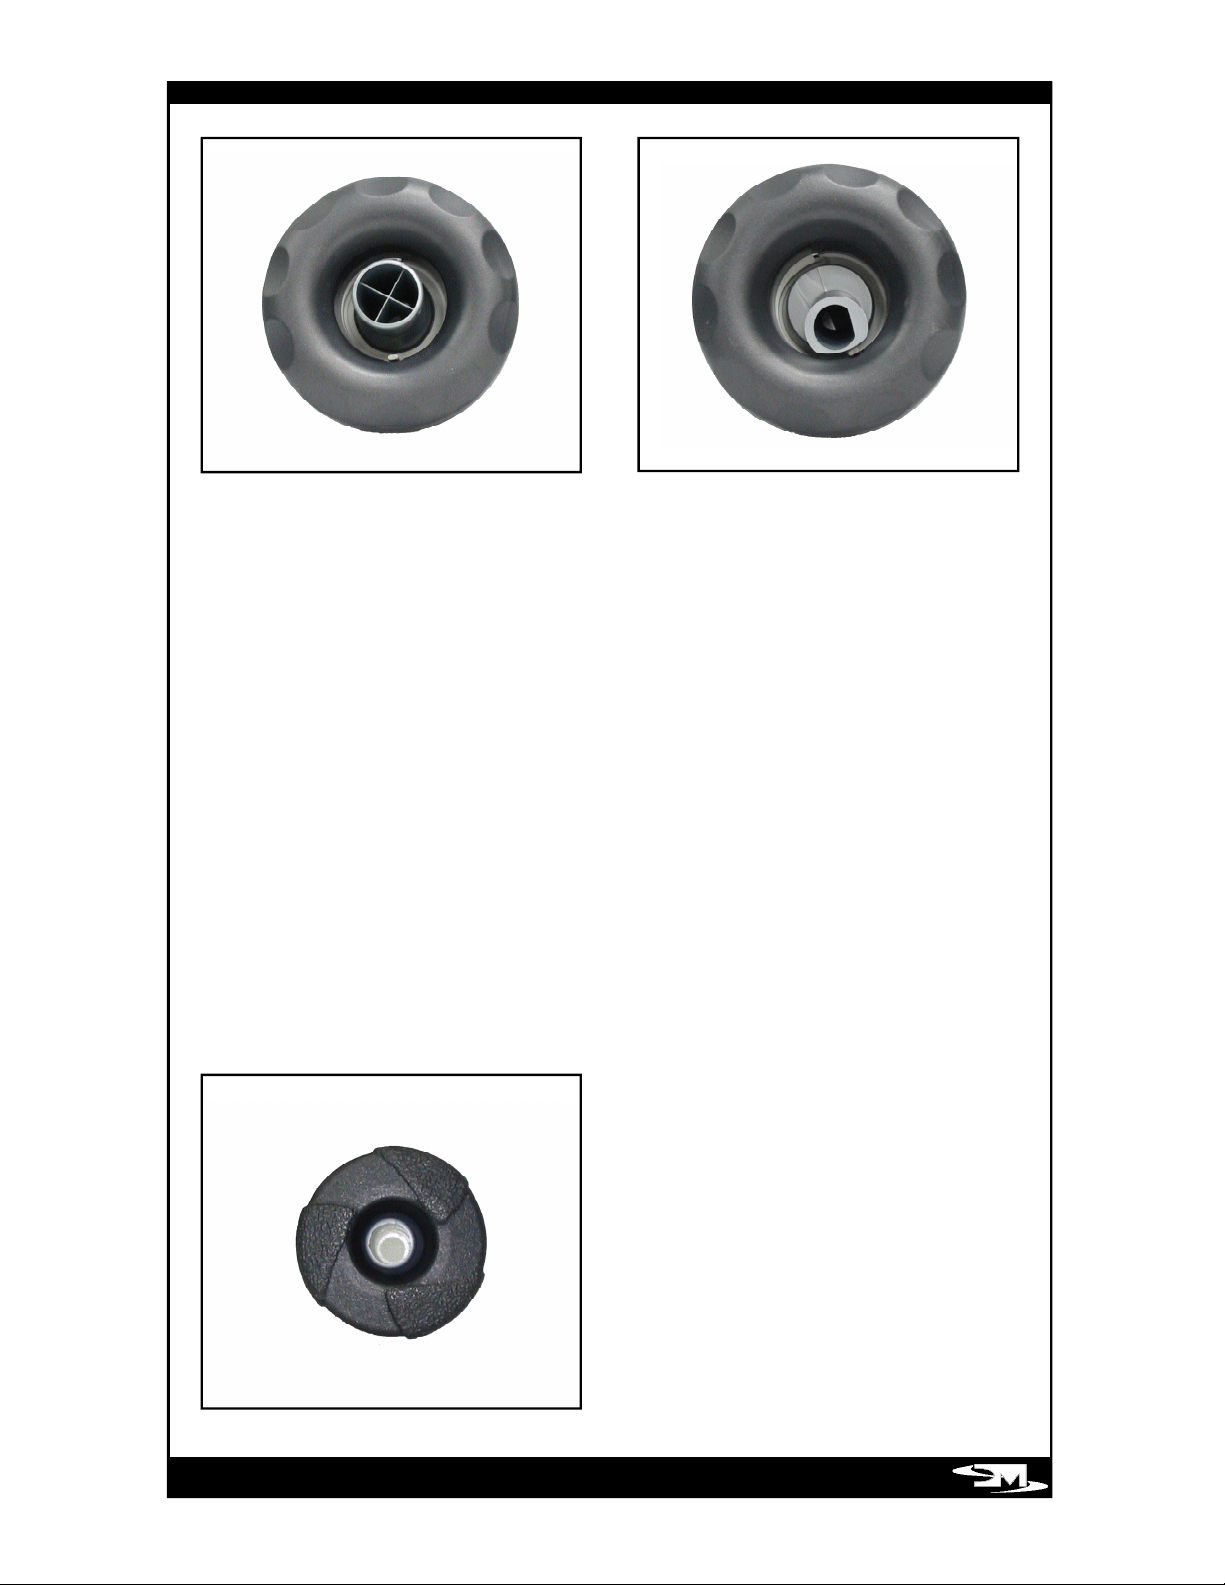
(C) DIRECTIONAL AND ROTATIONAL MASSAGE JETS
When the pump(s) is on and the Turbo massage jet is in the off position, the Directional
Quad jets and Rotational Therapy jets will be operational. The nozzle of the Directional
Quad jets can be adjusted to direct the flow to specific part of your body. The Rotational
jets provide a “swirling” type therapy. The water pressure can be adjusted in both jets by
rotating the outer rim of the jet clockwise for minimum pressure and counter clockwise for
m aximum pressure. Water pressure can also be varied by opening or closing the air control.
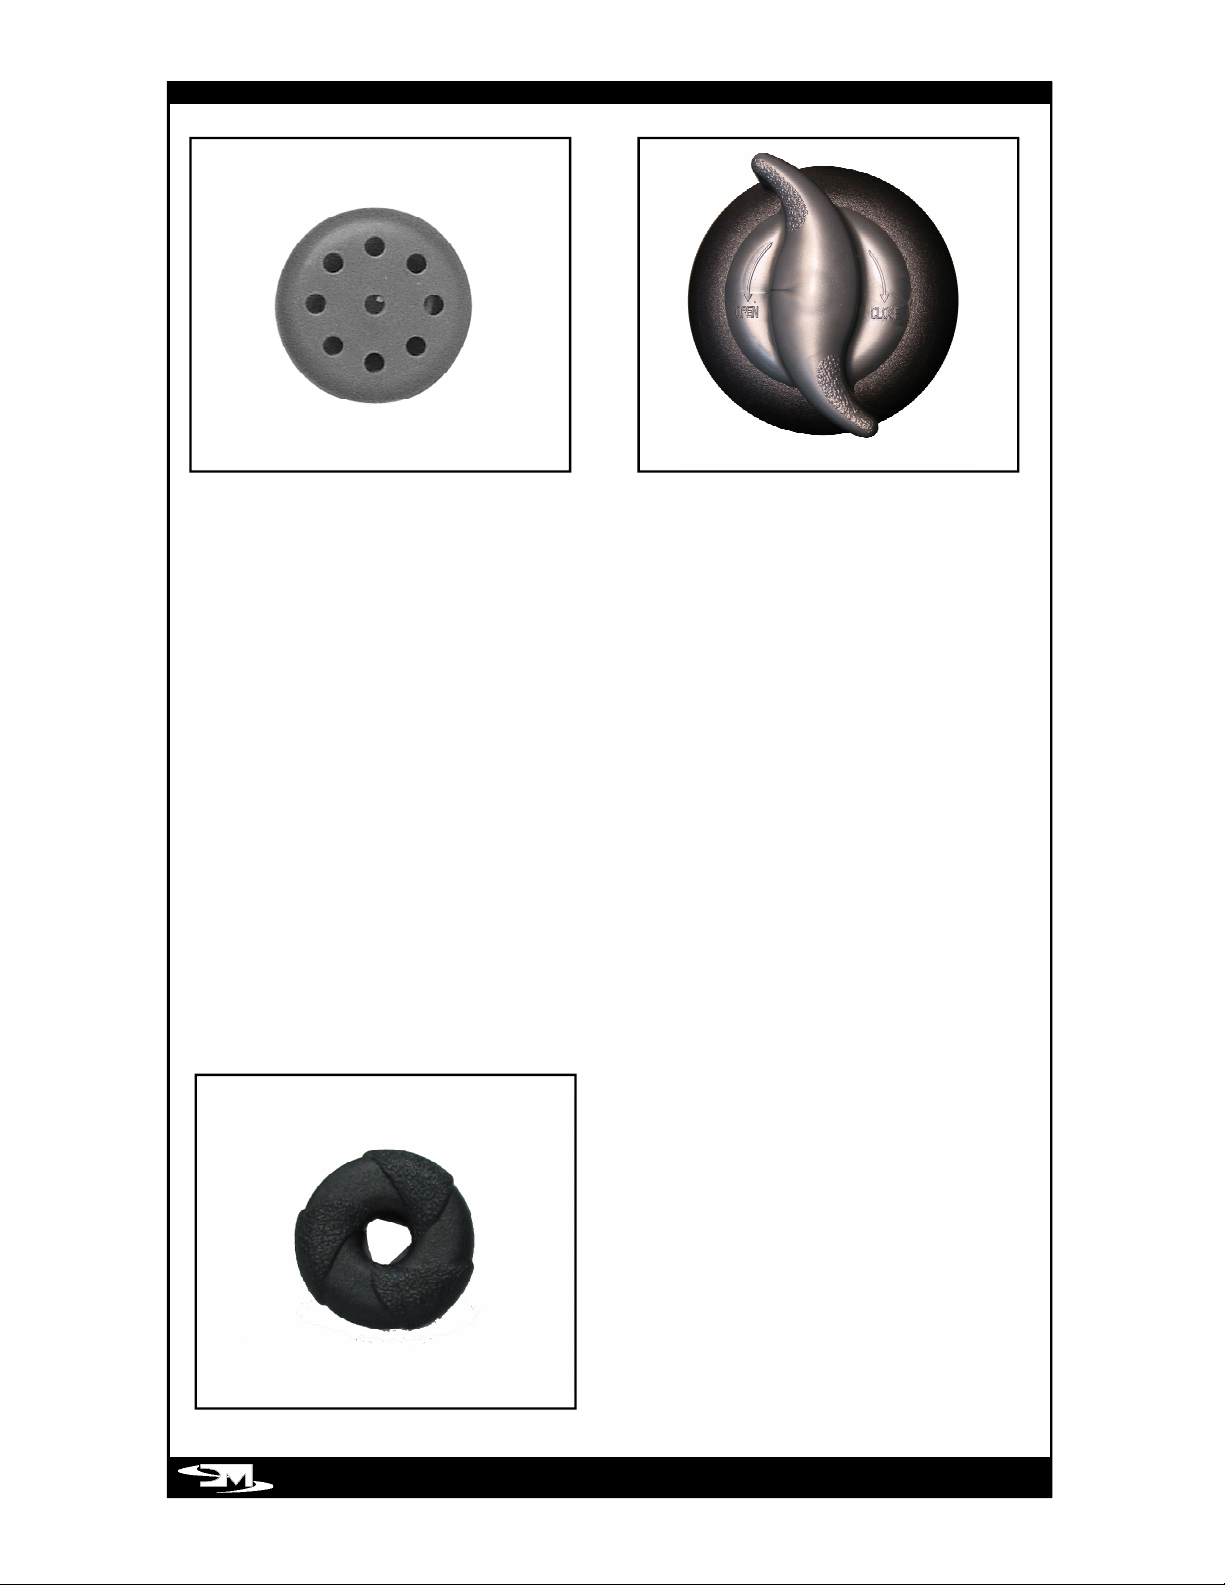
(D) DIRECTIONAL MIDI MASSAGE JET
These jets are used for neck and
shoulder massage. They deliver a firm
pinpoint jet stream of massaging action
that can be directed to specific areas of
the neck or shoulders. They can be
pressure controlled by rotating the jet
face or by opening and closing the air
control valves.
PAGE 19
Page 24
PAGE 20
(F) AIR CONTROL
The Air Controls are used to introduce air
into the water jet stream. They allow the
user to increase (open) jet pressure or
decrease (close) jet pressure as desired.
(E) FRAGRANCE INJECTORS
These injectors blow thousands of air
bubbles while at the same time allowing
the VitAroma scents to be released.
(G) CLUSTER JETS
These jets work as a team, that’s why
they’re usually found in groups of two or
more. They can deliver vigorous pinpoint
action for a therapeutic effect, or you can
turn into soothing massage with just a
twist of your finger.
Page 25
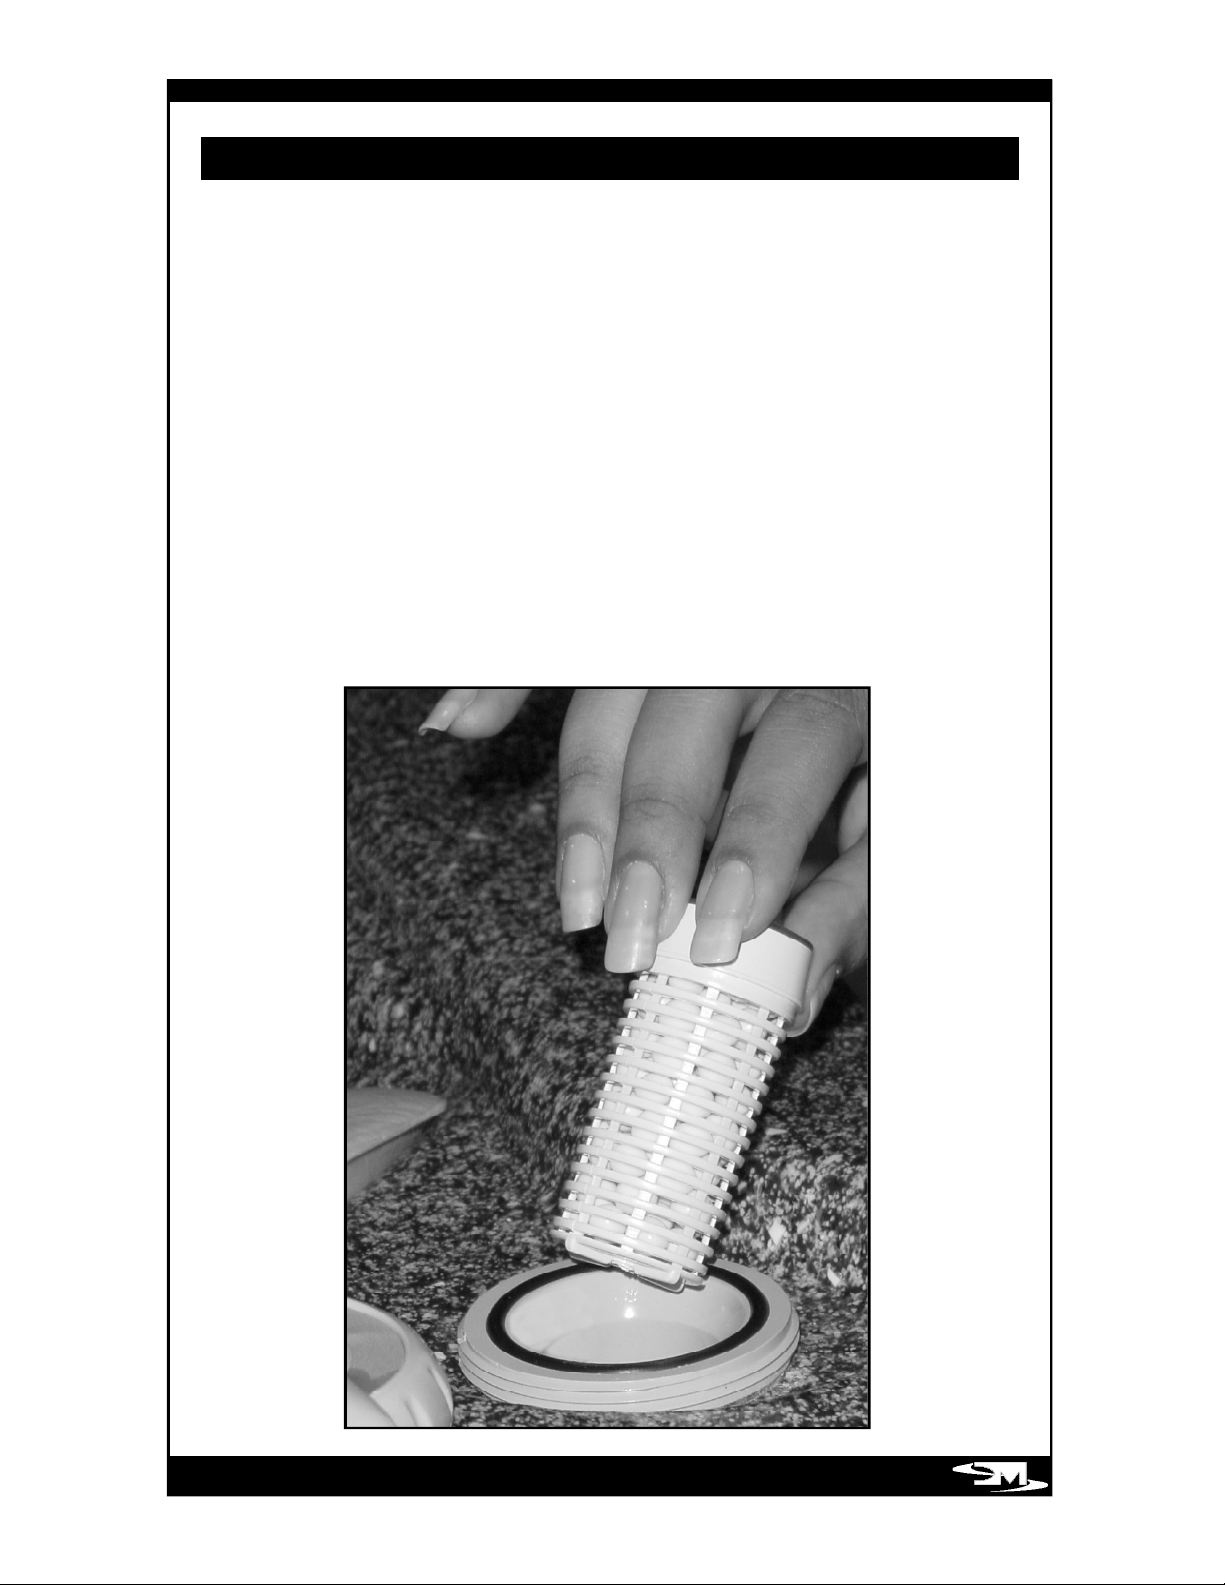
AROMATHERAPY SYSTEM
VitAroma therapy offers the unique benefits of combining Aroma and Hydrotherapy.
Simply defined, aromatherapy is the practice of using pure essential oils – the highly
concentrated extracts of plants, herbs, and flowers – to improve one’s feelings of well
being through the acute sense of smell.
Your spa is equipped with an aroma dispenser located on the lip of the spa. To activate
VitAroma, insert one of Vita Spa’s exclusive aromatherapy scents and turn on the
VitAroma Induction System. You will immediately experience the wonder and pleasure
of aromatherapy. It will soothe your senses and invigorate your spirit.
To extend the lifespan of the VitAroma beads, it is recommended that they be removed
from the spa and stored in the resealable packet after each use. VitAroma aromatherapy
scents are available exclusively from Vita Spa Dealers.
V I TA R O M A
PAGE 21
PAGE 22
Page 26

FILTER MAINTENANCE
Vita Spas are designed with the most
efficient top loading filtration system in
the industry. Filter maintenance is the
most critical factor in keeping your spa
water clean.
TO CLEAN THE FILTER:
(NOTE: Never run the spa without a
filter installed)
Remove the cartridge and spray it with a
garden hose. It will be necessary to rotate
the cartridge while spraying so as to
thoroughly remove the debris lodged
between the filter pleats.
After allowing to dry, inspect the cartridge
for calcium deposit (scaling) or an oil
film. Rapid mineral build-up from hard
water, or oil build-up from the use of oilbased water scent or body oil may coat
the filter cartridge. A filter cleaner to soak
the cartridge is available from your Vita
Spa dealer and should be used as part of
your spa maintenance. Use a rag to
remove any debris at the bottom of the
filter housing and inside the filter screen.
Replace the cartridge in the filter housing.
We recommend the use of a spare filter.
This way one can be soaking and
cleaning while you continue to enjoy the
use of your spa.
DRAINING YOUR SPA
Detergent residues from bathing suits as
well as soap film from your body may
gradually accumulate in the water. Foam
inhibitors will suppress the foam but will
not remove the soap from the water.
Eventually, the soap build-up in the water
will concentrate enough to leave an
unclean feeling on the user’s skin,
causing sudsing and make the water
impossible to clarify. Depending on the
amount of soap input, the spa water
should last between two and three
months.
TO DRAIN YOUR SPA
Turn the power off at the GFCI breaker.
Attach a garden hose to the bib located
in the base directly below the spa
control. Pull out the cover cap from the
base and unscrew it from the bib. Route
the outlet of the hose to an appropriate
draining area. The spa will empty by
gravity. Siphon or scoop out the balance
of the water.
IMPORTANT: Spa water with a high
sanitizer level may harm plants and grass.
If you are draining your spa for the winter,
be sure to fully drain water from the pipe
by disconnecting the two unions at the
gate valves found by each of the two
speed pumps and the two unions found
by the circulation pump. Drain the water
pumps by removing the pump plug.
Then reinstall the pump plugs. Remove
the filter and clean as required. Inspect
the spa shell and clean as required.
Refill the spa BE F O R E restoring power to it.
S PA MAIN T E N A N C E
Your Vita Spa is manufactured with the highest quality and most durable
m a t erials available. A spa care and maintenance program is recommended to
increase your comfort, maintain the spa’s reliability, and protect your investment.
Page 27

WINTERIZING YOUR SPA
Your Vita Spa has been designed and
e n gineered for year-round use in any climate.
If the spa will not be used for prolonged
periods of time, contact your local authorized
service station to properly drain and protect
your spa.
EXCEL-PLUS CABINET MAINTENANCE
The exterior of your Vita Spa cabinet is
made from a newly formulated high
strength material that is factory stained and
sealed. Depending on the location and
exposure of the spa to nature’s elements, it
is recommended that you clean the cabinet
once or twice a year with warm water and
a mild soap.
COVER MAINTENANCE
Your cover is manufactured from a
durable marine grade, UV resistant
material. Even so, monthly cleaning and
periodic conditioning is recommended to
maintain its beauty. To clean and
condition the vinyl cover: Lightly spray
the cover with a garden hose to rinse it
and remove the debris. Using a large
sponge or soft cloth and a mild soap
solution (1 teaspoon dish washing liquid
with 2 gallons of water), scrub lightly in
circular motion. Then rinse it thoroughly
with plenty of water. Condition the vinyl
after cleaning by applying a thin film of
vinyl conditioner. NOTE: To remove tree
saps, use lighter fluid (not charcoal lighter
but the kind used in cigarette lighters).
Use sparingly and rinse with mild soap
solution afterwards. Wipe dry.
CARE OF ACRYLIC SURFACE
To maintain the surface of your spa,
simply clean with a soft damp cloth (a
mild detergent is okay) or with any glass
cleaner. DO NOT clean the surface with
any type of abrasive as it will dull the
surface and natural luster of the acrylic.
DO NOT use any type of oil based
solvent. Such products can be very
harmful to the surface of the spa and will
void the surface warranty of the spa.
CARE OF SPA PILLOWS
The spa pillows will provide years of
comfort if treated with care. Each pillow
has been positioned above the water
level to minimize the bleaching effects of
chlorinated water and other spa water
chemicals. It is recommended that
pillows be removed and cleaned each
time the spa itself is cleaned. A mild soap
and warm water works best in removing
body oils. ALWAYS rinse the pillows off
thoroughly after applying any type of
soap to assure that no residue remains. If
you are winterizing your spa or do not
plan on using it for a while, it is best to
remove the pillows until the next use.
Pillows should always be removed
whenever the spa is being
s u p e r c h l o r i n a t e d .
S PA MAIN T E N A N C E
PAGE 23
Page 28

PAGE 24
SPA LIGHT COLORED LENS REMOVAL
In your owners packet you will find
colored lenses for your spa light. They
can easily be installed or removed by
placing them over the spa light and
gently pushing on the outer edges to
install and pulling along the edges to
remove.
LIGHT BULB REPLACEMENT
1. Turn off the power to the spa.
2. Remove the front panel of the spa.
3. Locate the spa light.
4. Turn the bulb counter - clockwise 1/4
turn to remove from its socket
5. The replacement bulb is locked into
place by turning it clockwise 1/4 turn
6. Close up the cabinet and turn the
power back on.
7. Check the Top Side display and adjust
the time.
DIVERTER VALVE
Over a period of time sand or grit may
intrude into your spa. The diverter valves
may become difficult to turn. It is import a n t
that the debris be removed as soon as
possible to avoid damage to the valve.
1. Turn off the power to the spa.
2. Remove the diverter handle by
pulling upward and gently rocking it.
3. Grasp the collar and turn it counterclockwise.
4. Lift the valve body up.
5. Wipe the valve body and interior walls
of the valve with a soft cloth.
6. Inspect the valve and valve walls for
any grooves caused by the debris.
7. Using a fine grit sandpaper, smooth
down any deep furrows.
8. Wipe the valve and wall down with a
damp cloth and remove any debris
left behind.
9. Lubricate the valve body with a
waterproof lubricant.
10.Reassemble the valve and restore the
power to the spa.
11.Check the Top Side display and adjust
for time.
S PA MAIN T E N A N C E
S PA LIGHT
LIGHT BUL B
Page 29

WAT E R QU A L I T Y AND MAIN T E N A N CE
GENERAL GUIDELINES FOR WATER
QUALITY MAINTENANCE
Maintaining water quality within specific
limits will enhance your enjoyment and
prolong the life of the spa. Safe, comfort a b l e
and clean spa water is a fairly simple task to
achieve, but it does require attention
because of the numerous factors that can
alter it. There is no one formula to be
followed because of the variables, i.e. quality
of the water used to fill the spa, water
temperature, user load, etc. For specific
guidelines for water quality maintenance,
consult your Vita Spa dealer who can assist
you to develop a program based on your
specific needs. Disregard for water
maintenance will result in poor soaking
conditions, damage your spa investment,
and possibly void your warranty.
SPA WATER MAINTENANCE
CONSISTS OF THREE SEPARATE,
EASILY DEVELOPED PROGRAMS:
Sanitizing and maintaining a safe level of
sanitizer in the spa water. Balancing the
pH and maintaining the recommended
mineral content level. Achieving and
maintaining water clarity.
SANITIZING
To destroy bacteria and organic compounds
in the spa water, a sanitizer must be used
r e g u l a r l y . The use of ozone as an oxidizer
has proven to be an effective method to
help maintain water cleanliness, but a
residual chemical sanitizer such as
bromine, the most common sanitizer used
in spas, must be used in conjunction with
ozone. Do not drop bromine tablets
directly in the spa. The use of a floater is
required to dispense safely and properly
the right amount of bromine in the spa
w a t e r . A bromine residual of 2 to 3 PPM is
generally considered desirable. A two-part
bromine system or granular chlorine
(Dichlor) are also acceptable sanitizers.
pH CONTROL
pH is a measure of acidity and alkalinity
of the spa water. The recommended pH
for spa water is 7.4 to 7.6 PPM. Below
7.0 (considered neutral), the spa water is
acidic and can cause damage to the
heating system. Above 7.8 the water is
too alkaline and can result in cloudy
water and scale formation on the spa
shell, heater and cover.
IMPORTANT: NEVER USE CHLORINE
TABLETS (TRICHLOR) IN YOUR SPA.
This chemical can have an extremely
corrosive effect on certain materials in
the spa. Also, the use of liquids, chlorine
or acid, are not recommended. Damage
caused by use of any chemical, is not
covered under the spa warranty.
PAGE 25
Page 30

PAGE 26
IMPORTANT WAT E R MAIN T E N A N CE PR O CEDURE S
DA I LY
3 days a week
Check water level. Keep water above bottom of skimmer door
and a minimum of 1” above highest jet.
Check and adjust chlorine level to 1.0 to 3.0 ppm
if chlorine is used as sanitizer. If Sparkle Clear is used, check weekly.
W EEKLY
Once a week
Test the spa water using 3-way water test strips
Adjust pH and total alkalinity. pH: 7.4 to 7.6 (ideal 7.6).
Total Alkalinity: 80 to 120 ppm
Maintain 1.0 to 3.0 ppm bromine or free chlorine.
Add 1 ounce of additive, such as “Spa Defender,” to
prevent calcium build-up.
Calcium hardness: 120 to 250 ppm.
Spray filter element to remove loose particles.
MON T HLY
Four to six
weeks
Two to three
months
Inspect and clean the spa filter cart r i d g e . It is
important to maintain your spa filter cartridge and keep it
clean and free of particles which can restrict water flow. If
the filter is not cleaned on a regular basis, the filter may clog
and restrict water flow, which causes improper filtration and
poor jet performance. See “Filter Cleaning” instructions.
Drain your spa. Follow the procedures outlined in
“Draining Your Spa” page 21 and clean it following the
procedures on page 22. When refilling your spa, be sure to
follow the procedures outlined in “Balancing Your Spa
Water” on the next page.
Page 31

PAGE 27
Water treatment is an important factor in
the enjoyment of your Vita Spa. Proper
water sanitation is essential to your
health as well as permitting years of
trouble-free use of your spa. The most
common water chemistry problems that
can damage your spa are:
1. Improper pH maintenance. pH
balance is critical to proper water
maintenance. Too low of a pH level
will result in corrosion of the spa’s
components.
2. Not pre-dissolving chemicals before
adding to the water.
3. Use of improper chemicals.
4. Over chlorinization. Sodium dichlor is
the recommended type of sanitizer.
Sodium dichlor dissolves easily and
has a neutral pH, which m i n i m i z e s
the effect that the addition of a
sanitizer has on a pH balance. Trichlor
compounds are not recommended
because they have a very low pH,
and are very potent and difficult to
dissolve.
BALANCING YOUR SPA WATER
The instructions below will assist you
with balancing the spa water for the first
time. You will need the following items to
balance your spa water.
1. “3-WAY TEST STRIPS”
2 . “ P H - U P” and”PH - D O WN” for pH control.
3. “MINERAL SURFACE PROTECTOR” for
Calcium and Scale control.
4. “METAL INHIBITOR” for breakdown of
mineral deposits.
5 . “ P O TA S S IUM PE R O XY MONOSUL FAT E ”
for shock treatment.
6. “ B R O M INE” or “CHLO R INE” for
sanitizing the spa water.
B A LA N CING THE SPA WAT ER
WAT E R MAIN T E N A N CE
Page 32
PAGE 28
5. After the alkalinity is properly
adjusted, the pH is next. If the pH is
above 7.8, use PH-DOWN (1 oz. at a
time) to lower it to the acceptable
range. It is extremely important to
NEVER allow the pH of your spa
water to be under 7.0, as this can
severely damage your equipment
and will void the warranty.
6. Add Sanitizer, either chlorine or
bromine. For Chlorine: Follow the
directions on the bottle. Chlorine
dissolves rapidly; you should get a
reading on the test strip within
minutes of application. For Bromine:
Follow the directions on your floating
brominator. It is necessary to add
sodium bromine only when the spa
is being filled. Bromine tablets erode
slowly, and it may take several hours
before you will get a reading on the
test strip. It may be necessary to
adjust the floating brominator.
7. To properly maintain the chemical
balance of your spa, follow the 3 day
a week program outlined on pages
27 and 29.
Please read “WATER MAIN T E N A N C E ”
then follow these easy ste p s :
1. Fill your spa until the water level is 1
inch above the highest jet. It is NOT
advisable to use softened water in
your spa, as may become corrosive.
2. Add a 1/2 pint of Spa Metal Inhibitor
to prevent iron or copper deposits
from staining the finish of your spa. If
your water is known to contain high
concentrations of these metals it may
be necessary to add an additional
quantity of Spa Metal Inhibitor.
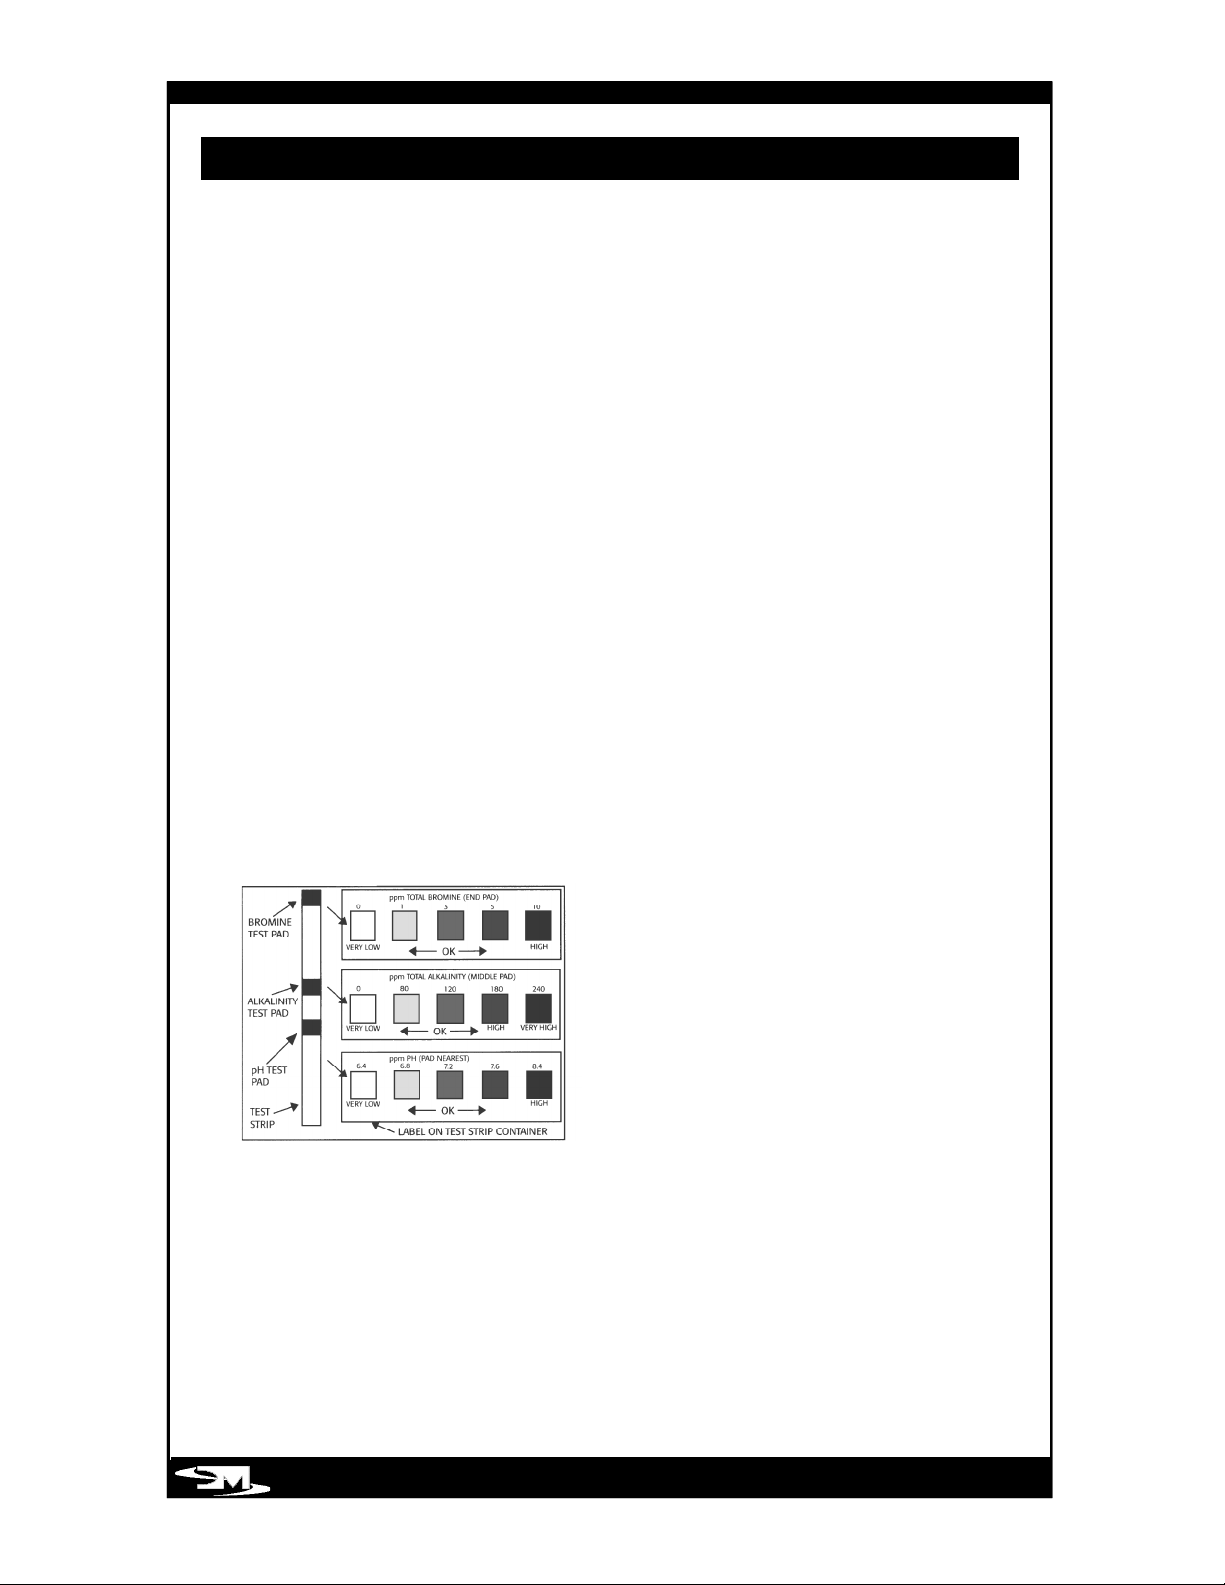
3 . Use a 3-Way Spa Water Test Strip or
test kit to measure the pH and
Alkalinity of your water. The following
instructions utilize test strips for testing.
Immerse the test strip in the spa water,
following the instructions on the test
strip container label. Compare the strip
to the label to determine the condition
of the spa water.
4. If the Alkalinity is not within the
acceptable range (80 to 120 ppm) it
should be adjusted first. If it is low,
raise the alkalinity by adding PH-UP 1
oz. at a time, retesting until the
alkalinity reaches 120 ppm. If the
alkalinity is high, it should be lowered
by using PH-DOWN 1oz. at a time.
B A LA N CING THE SPA WAT ER
Page 33
PAGE 29
MONDAY
1. TEST THE WATER USING
“ 3 - W AY SPA WATER TEST ST R IPS ”.
2 . Adjust pH and total alkalinity -
Refer to pH and total alkalinity on
label of “PH - UP” and “PH - D O W N ”.
3 . Maintain 1.0 to 3.0 ppm Bromine
or free Chlorine.
4 . Add 1 ounce of “METAL SURFAC E
PR OT E C T OR” to prevent calcium
build up.
5. Shock treat with 2 ounces
of “ P OTA S S I U M P E R O X Y
MONOSULFATE”,
a non-chlorine
shock, every week as needed.
WEDNESDAY
1. Nothing required if Bromine is
used as sanitizer. Check and
adjust Chlorine level if Chlorine
is used.
FRIDAY
1. Nothing required if Bromine is
used as sanitizer. Check and
adjust Chlorine level if Chlorine
is used.
B A L A NCI NG THE SPA WAT ER
3 DAY A WEEK SPA CARE PROGRAM
Note: The above table is an
example only. Actual spa usage
will determine the amount of
chemicals required to maintain
proper chemical balance.
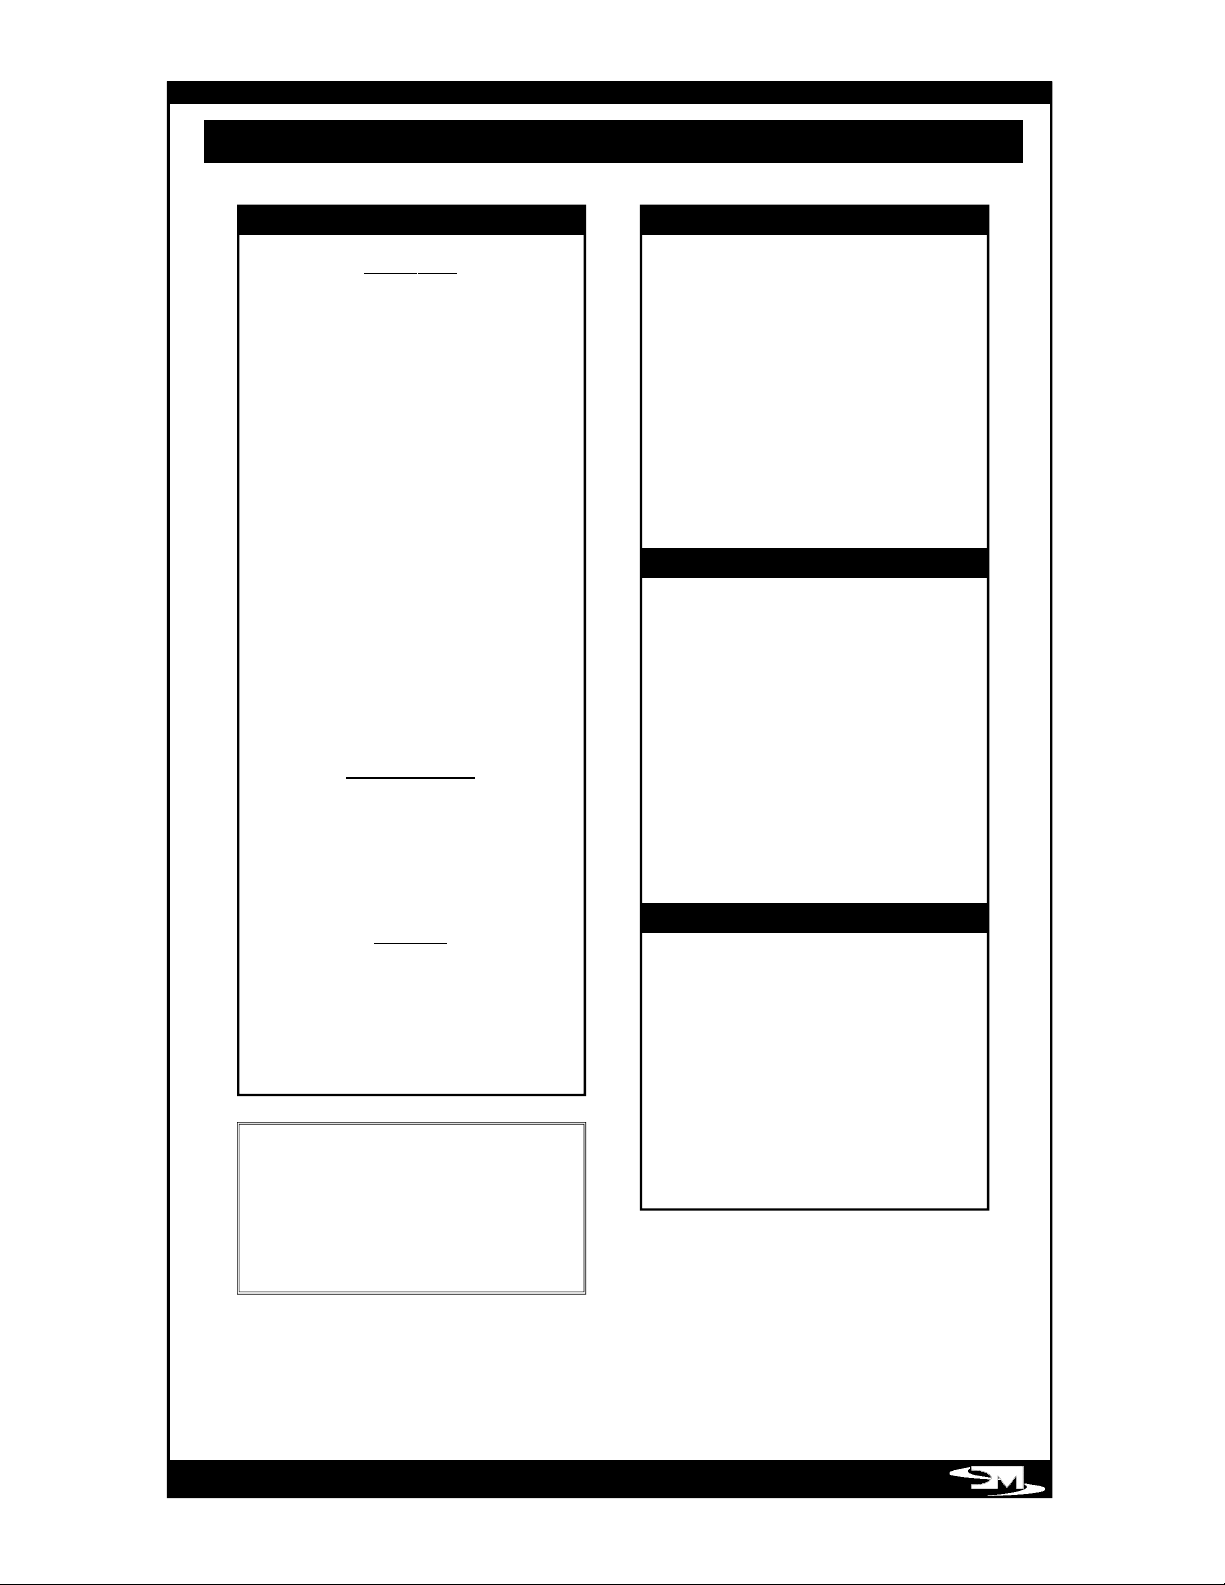
TOO ALKA L INE
S CA L ING ZO NE
CO MF O RT ZO N E
TOO ACID I C
CO RR O SI V E
ZO NE
ADD pH DECREA S ER
TO LO W ER pH
ID EA L
ADD pH IN CREA SER
TO RA ISE pH
8.4
8.2
7.8
7.6
7.4
7.2
7.0
6.8
ALKALINITY
pH LEVEL
DO NOT USE SPA UN T IL TEST KIT
REA D ING IS BELOW 5.0 ppm
RE CO MMEND E D LEV EL
S A FE
DO NOT USE SPA
ADD SANI T IZER TO REACH
RE CO MMEND E D LEV EL
p p m
5 . 0 4 . 0 3 . 0 2 . 0 -
1. 0 0 -
SANITIZER LEVEL
VERY LOW 0 ADD SO D IUM
BI CA RB O N AT E
TO IN C RE A S E
8 0
ACC E P TA B L E
ZO NE ID E A L
120
HI G H 18 0 ADD SO D IUM
BIS U L F ATE TO
VERY HI G H 24 0 D E C RE A S E
Page 34

PAGE 30
DO Add all chemicals slowly with the
hydro jets operating in high speed.
DO Use care when handling chemicals.
DO Store granulated chlorine in a cool,
dry place to maintain the chlorine’s
freshness. Granulated chlorine will
degrade if stored improperly or for a long
period of time. Do not store in sunlight.
DO Maintain total alkalinity level within
the recommended range of 80 to 120
ppm. The calcium hardness level should
be maintained in the 120 to 250 ppm
range.
DO Maintain the pH level within the
recommended range of 7.4 to 7.6.
DO Maintain proper chemical balance to
reduce the risk of catching or spreading
infection.
DO Use granulated chlorine/bromine
produced specifically for portable spas.
DO NOT Use swimming pool chemicals
in your spa.
DO NOT Use household bleach (liquid
sodium hypochlorine).
DO NOT Use swimming pool (muriatic)
acid to lower pH. Many swimming pool
water care products can cause damage
to spa and equipment.
DO NOT Allow anyone to be in the spa
while chemicals are being added or
dissolving.
DO NOT Use incorrect products such as
Tr i c h l o r , which has a very low pH (2.6),
dissolves very slowly, is highly concentrated,
and was designed for concrete or plaster
swimming pools. It will cause damage to
your spa!
CHEMICAL SAFETY INSTRUCTIONS
When using chemicals, read labels
carefully and follow directions precisely.
Though chemicals protect you and your
spa when used correctly, they may be
hazardous in a concentrated form.
Observe these guidelines:
DO Accurately measure and use the
exact quantities specified, never more.
DO Handle all containers with care.
Store in a cool, dry, well ventilated place.
DO Keep chemical containers closed at
all times when not in use. Replace caps
on proper containers.
DO Allow only a responsible person to
handle spa chemicals. Keep them out of
the reach of children.
DO Follow the emergency advice on the
product label in case of accidental
contact, or if the chemical is swallowed.
Call a doctor or local Poison Control
Center. If a doctor is needed, take the
product container along so that the
substance can be identified.
DO NOT Inhale fumes or let chemicals
come in contact with your eyes, nose or
mouth. Wash your hands after use.
DO NOT Let chemicals get on
surrounding surfaces or landscaping.
Don’t use a vacuum cleaner to clean up
chemical spills.
DO NOT Smoke around chemicals.
Fumes may be highly flammable.
WAT E R MAIN T E N A N CE DO’S AND DON ’ T S
Page 35

AGE
SPA WAT E R TROUBL E S HOOT I NG
SYMPTOM
Cloudy Water
Water Odor
Chlorine Odor
Musty Odor
Foaming
PROBABLE CAUSE
Inadequate filtration/dirty filter
Excessive oils/organic matter
Improper sanitation
High pH and/or high alkalinity
Suspended particles/organic matter
Overused or old water
Excessive Organics
Too many chloramines bromamines
- insufficient free available chlorine
Improper sanitation
Low pH
Too many chloramines-insufficient
free available chlorine
Low pH
Bacterial or algae growth
Buildup of body oils,
lotion and chemicals
resulting in soap or detergent
Overused or old water
Excessive organics
SOLUTIONS
Clean filter with a filter cleaner or
degreaser.
Shock the spa with “POTASSIUM
PEROXY MONOSULFATE”.
Increase sanitizer to recommended
l e v e l .
Adjust pH; add “PH-DOWN”.
Use clarifier
Drain the spa, clean and refill.
Shock the spa with “POTASSIUM
PEROXY MONOSULFATE”.
Increase sanitizer level to
recommended level.
Raise pH with “PH-UP”.
Shock the spa with “POTASSIUM
PEROXY MONOSULFATE”.
Adjust pH; raise pH with “PH-UP”
Shock the spa. If problem is
visible, draining and cleaning may
be required.
Add defoamer, or drain and refill.
Drain and refill.
Shock with “POTASSIUM PEROXY
MONOSULFATE”.
PAGE 31
Page 36

PAGE 32
SYMPTOM
Organic Buildup/
Scum Ring
Around The Tub
Algae
Eye Irritation
Skin
Irritation/Rash
Stains
Scale
PROBABLE CAUSE
Body oils and dirt
Inadequate filtration
High pH
Low free chlorine/bromine
Low pH
Insufficient free available
chlorine/bromine
Unsanitary/polluted water.
Chlorine/bromine level too
high (above 5ppm FAC).
pH or total alkalinity too low.
High iron or copper in water
source.
Too much calcium dissolved
in water pH.
SOLUTIONS
Wipe off scum with a clean rag or
use mild detergent. If needed,
drain, refill spa, and adjust water.
Clean filter with a filter cleaner or
degreaser.
Shock with “POTASSIUM PEROXY
MONOSULFATE”, adjust pH.
Shock with “POTA S S I UM PE R OX Y
M O N O S U L F AT E ”, maintain sanitizer
at recommended level.
Raise pH with “PH-UP”.
Shock with “POTASSIUM PEROXY
MONOSULFATE."
Maintain recommended sanitizer
residual at all times; super-chlorinate.
Allow chlorine/bromine level to drop
below 5 ppm before using spa.
Adjust pH and total alkalinity; use
sequestering agent; drain and
clean with appropriate product.
Use sequestering agent for metals;
adjust water
Adjust total alkalinity and pH levels
by adding the appropriate sodium
bisulfate product; with
concentrated scale deposits, drain
the spa, clean the liner (as
outlined in Liner Clean Up), refill
the spa and balance the water.
SPA WAT E R TROUBL E S HOOT I NG
Page 37

DI A G NO S T I C & TROUBL E S HOOT I NG
SYMPTOM
Spa Inoperative
Spa Side Inoperative
MESSAGE
BLO
CP
FLO
CS
F1 or F2
HC
HP
LB
LP
O3U
P1
P2
Pb
PS
SS
LS
ME A N IN G
Power failure outside of spa.
Spa Side could be locked.
Blower Error
HE ET pump may be faulty.
Lack of Flow:Heater disabled
Current Sensor
Blown Fu s e
Heater Error
High Vo l t a g e
Light Error
Low Vo l t a g e
Ozonator Error
Pump 1 Error
Pump 2 Error
Spaside Communication
Pressure Switch Error
Heater Sensor
Water Sensor
AC T I O N
Check power source Breaker and GFCI;
Reset breaker/GFCI. Call Electrician if it
will not start.
If lock icon is visible, unlock by depressing
the “ UP ” button for 5 seconds
Check fuse 3 and then verify that the
blower motor is plugged in.
Check that HE ET pump is plugged in.
Remove filter. If “FLO” disappears, clean
f i l t e r .
Check that current sensor board is plugged
into circuit board.
Replace fuse 1 or fuse 2
Replace heater
High power (voltage) observed. Check
power connections and rerun diagnostic
t e s t
Replace underwater light bulb
Low Power (voltage) observed. Check
power connections and rerun diagnostic
t e s t
Replace oz o n a t o r
Check plug for Pump 1
Check plug for Pump 2
Check topside connection and remote
panel connections to power board.
Replace Pressure Switch
Replace Sensor
Replace Sensor
IF ANY ERRORS ARE FOUND, THE FOLLOW ING MESSAG ES MAY BE DISPLAY E D :
PAGE 33
Page 38
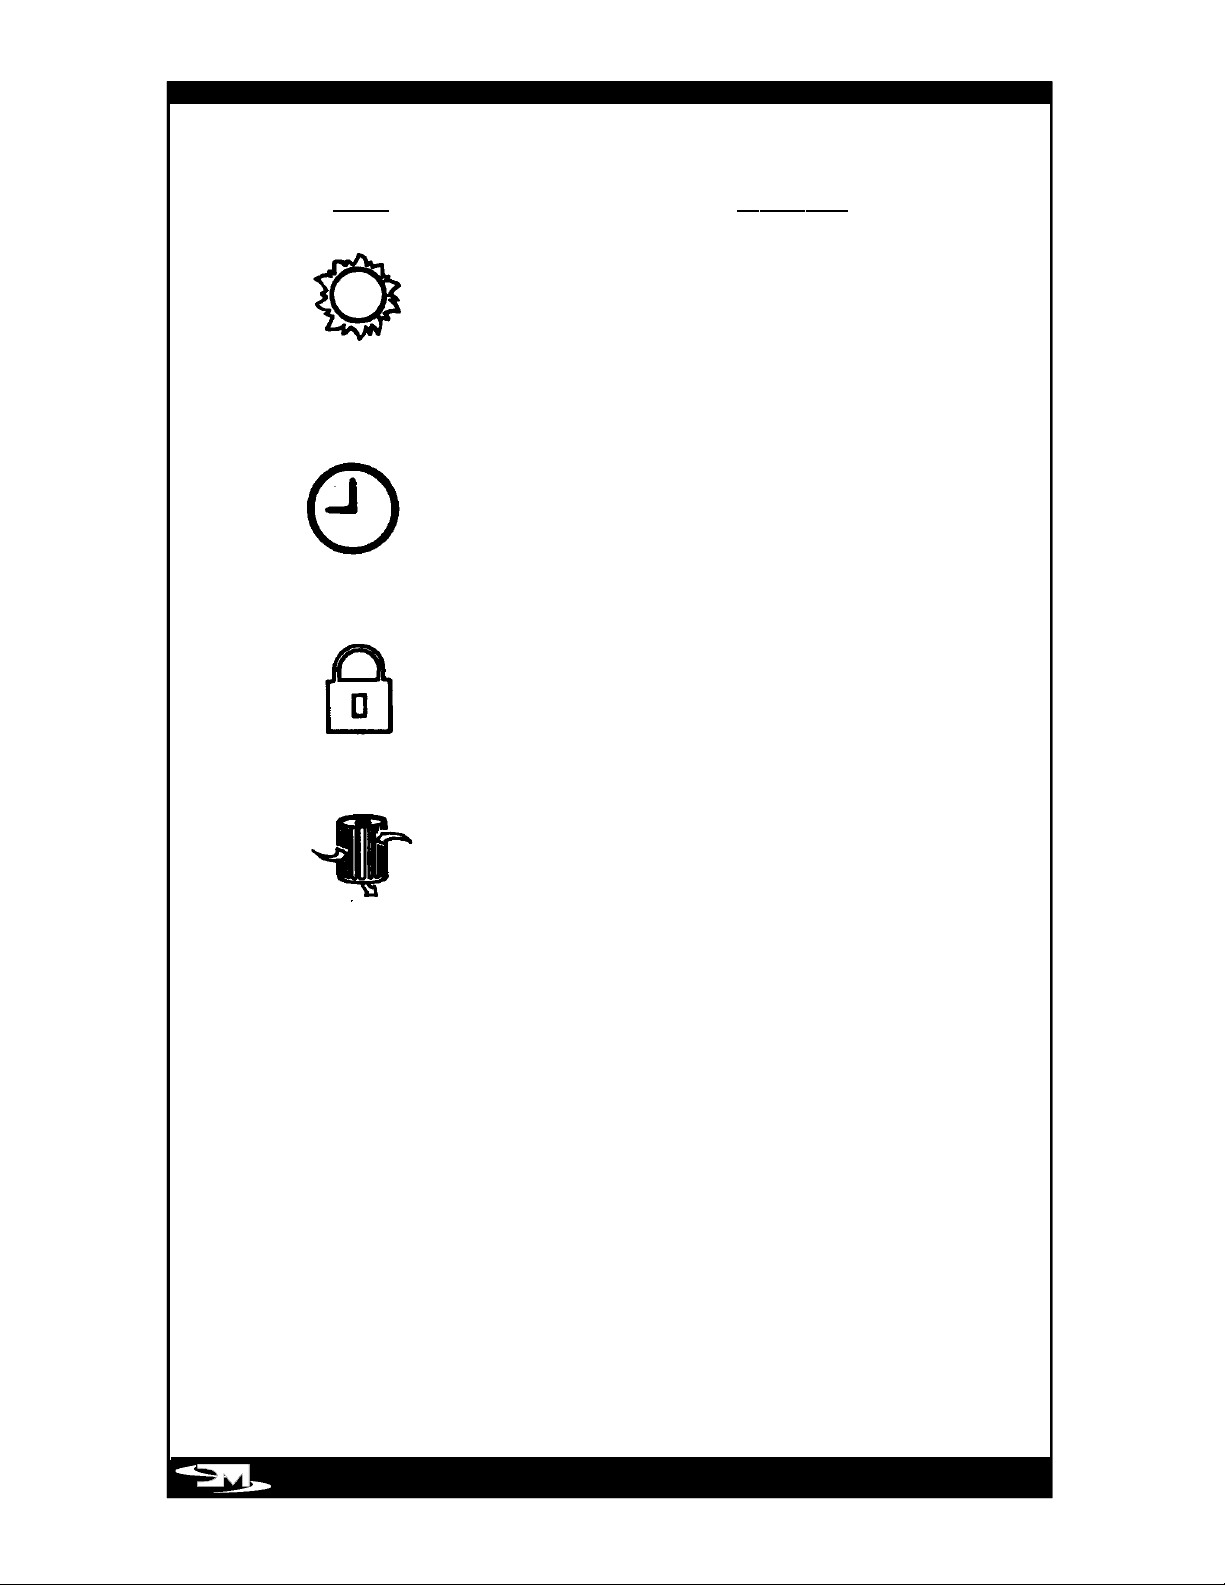
PAGE 34
Still: Heater is on
Flashing: Temperature Adjustment Mode
Still: Economy Mode (No timer Icon
means Standard Mode)
Flashing: Day and Time Adjustment Mode
Still: Heater adjustment is locked
Flashing: Panel lock. All buttons are
deactivated
Still: Filter is On
Flashing: Filter adjustment Mode
IC O N ME A N ING
LCD DISPLAY GLO S S A R Y
Page 39

Maintenance Log
_ _ _ _ _ _ _ _ _ _ _ _ _ _ _ _ _ _ _ _ _ _ _ _ _ _ _ _ _ _ _ _ _ _ _ _ _ _ _ _ _ _ _ _ _ _ _ _ _ _ _ _ _
_ _ _ _ _ _ _ _ _ _ _ _ _ _ _ _ _ _ _ _ _ _ _ _ _ _ _ _ _ _ _ _ _ _ _ _ _ _ _ _ _ _ _ _ _ _ _ _ _ _ _ _ _
_ _ _ _ _ _ _ _ _ _ _ _ _ _ _ _ _ _ _ _ _ _ _ _ _ _ _ _ _ _ _ _ _ _ _ _ _ _ _ _ _ _ _ _ _ _ _ _ _ _ _ _ _
_ _ _ _ _ _ _ _ _ _ _ _ _ _ _ _ _ _ _ _ _ _ _ _ _ _ _ _ _ _ _ _ _ _ _ _ _ _ _ _ _ _ _ _ _ _ _ _ _ _ _ _ _
_ _ _ _ _ _ _ _ _ _ _ _ _ _ _ _ _ _ _ _ _ _ _ _ _ _ _ _ _ _ _ _ _ _ _ _ _ _ _ _ _ _ _ _ _ _ _ _ _ _ _ _ _
_ _ _ _ _ _ _ _ _ _ _ _ _ _ _ _ _ _ _ _ _ _ _ _ _ _ _ _ _ _ _ _ _ _ _ _ _ _ _ _ _ _ _ _ _ _ _ _ _ _ _ _ _
_ _ _ _ _ _ _ _ _ _ _ _ _ _ _ _ _ _ _ _ _ _ _ _ _ _ _ _ _ _ _ _ _ _ _ _ _ _ _ _ _ _ _ _ _ _ _ _ _ _ _ _ _
_ _ _ _ _ _ _ _ _ _ _ _ _ _ _ _ _ _ _ _ _ _ _ _ _ _ _ _ _ _ _ _ _ _ _ _ _ _ _ _ _ _ _ _ _ _ _ _ _ _ _ _ _
_ _ _ _ _ _ _ _ _ _ _ _ _ _ _ _ _ _ _ _ _ _ _ _ _ _ _ _ _ _ _ _ _ _ _ _ _ _ _ _ _ _ _ _ _ _ _ _ _ _ _ _ _
_ _ _ _ _ _ _ _ _ _ _ _ _ _ _ _ _ _ _ _ _ _ _ _ _ _ _ _ _ _ _ _ _ _ _ _ _ _ _ _ _ _ _ _ _ _ _ _ _ _ _ _ _
_ _ _ _ _ _ _ _ _ _ _ _ _ _ _ _ _ _ _ _ _ _ _ _ _ _ _ _ _ _ _ _ _ _ _ _ _ _ _ _ _ _ _ _ _ _ _ _ _ _ _ _ _
_ _ _ _ _ _ _ _ _ _ _ _ _ _ _ _ _ _ _ _ _ _ _ _ _ _ _ _ _ _ _ _ _ _ _ _ _ _ _ _ _ _ _ _ _ _ _ _ _ _ _ _ _
_ _ _ _ _ _ _ _ _ _ _ _ _ _ _ _ _ _ _ _ _ _ _ _ _ _ _ _ _ _ _ _ _ _ _ _ _ _ _ _ _ _ _ _ _ _ _ _ _ _ _ _ _
_ _ _ _ _ _ _ _ _ _ _ _ _ _ _ _ _ _ _ _ _ _ _ _ _ _ _ _ _ _ _ _ _ _ _ _ _ _ _ _ _ _ _ _ _ _ _ _ _ _ _ _ _
_ _ _ _ _ _ _ _ _ _ _ _ _ _ _ _ _ _ _ _ _ _ _ _ _ _ _ _ _ _ _ _ _ _ _ _ _ _ _ _ _ _ _ _ _ _ _ _ _ _ _ _ _
_ _ _ _ _ _ _ _ _ _ _ _ _ _ _ _ _ _ _ _ _ _ _ _ _ _ _ _ _ _ _ _ _ _ _ _ _ _ _ _ _ _ _ _ _ _ _ _ _ _ _ _ _
_ _ _ _ _ _ _ _ _ _ _ _ _ _ _ _ _ _ _ _ _ _ _ _ _ _ _ _ _ _ _ _ _ _ _ _ _ _ _ _ _ _ _ _ _ _ _ _ _ _ _ _ _
_ _ _ _ _ _ _ _ _ _ _ _ _ _ _ _ _ _ _ _ _ _ _ _ _ _ _ _ _ _ _ _ _ _ _ _ _ _ _ _ _ _ _ _ _ _ _ _ _ _ _ _ _
_ _ _ _ _ _ _ _ _ _ _ _ _ _ _ _ _ _ _ _ _ _ _ _ _ _ _ _ _ _ _ _ _ _ _ _ _ _ _ _ _ _ _ _ _ _ _ _ _ _ _ _ _
_ _ _ _ _ _ _ _ _ _ _ _ _ _ _ _ _ _ _ _ _ _ _ _ _ _ _ _ _ _ _ _ _ _ _ _ _ _ _ _ _ _ _ _ _ _ _ _ _ _ _ _ _
_ _ _ _ _ _ _ _ _ _ _ _ _ _ _ _ _ _ _ _ _ _ _ _ _ _ _ _ _ _ _ _ _ _ _ _ _ _ _ _ _ _ _ _ _ _ _ _ _ _ _ _ _
Use this page to keep a record of when you perform any maintenance
on your spa.
PAGE 35
Page 40

Maintenance Log
_ _ _ _ _ _ _ _ _ _ _ _ _ _ _ _ _ _ _ _ _ _ _ _ _ _ _ _ _ _ _ _ _ _ _ _ _ _ _ _ _ _ _ _ _ _ _ _ _ _ _ _ _
_ _ _ _ _ _ _ _ _ _ _ _ _ _ _ _ _ _ _ _ _ _ _ _ _ _ _ _ _ _ _ _ _ _ _ _ _ _ _ _ _ _ _ _ _ _ _ _ _ _ _ _ _
_ _ _ _ _ _ _ _ _ _ _ _ _ _ _ _ _ _ _ _ _ _ _ _ _ _ _ _ _ _ _ _ _ _ _ _ _ _ _ _ _ _ _ _ _ _ _ _ _ _ _ _ _
_ _ _ _ _ _ _ _ _ _ _ _ _ _ _ _ _ _ _ _ _ _ _ _ _ _ _ _ _ _ _ _ _ _ _ _ _ _ _ _ _ _ _ _ _ _ _ _ _ _ _ _ _
_ _ _ _ _ _ _ _ _ _ _ _ _ _ _ _ _ _ _ _ _ _ _ _ _ _ _ _ _ _ _ _ _ _ _ _ _ _ _ _ _ _ _ _ _ _ _ _ _ _ _ _ _
_ _ _ _ _ _ _ _ _ _ _ _ _ _ _ _ _ _ _ _ _ _ _ _ _ _ _ _ _ _ _ _ _ _ _ _ _ _ _ _ _ _ _ _ _ _ _ _ _ _ _ _ _
_ _ _ _ _ _ _ _ _ _ _ _ _ _ _ _ _ _ _ _ _ _ _ _ _ _ _ _ _ _ _ _ _ _ _ _ _ _ _ _ _ _ _ _ _ _ _ _ _ _ _ _ _
_ _ _ _ _ _ _ _ _ _ _ _ _ _ _ _ _ _ _ _ _ _ _ _ _ _ _ _ _ _ _ _ _ _ _ _ _ _ _ _ _ _ _ _ _ _ _ _ _ _ _ _ _
_ _ _ _ _ _ _ _ _ _ _ _ _ _ _ _ _ _ _ _ _ _ _ _ _ _ _ _ _ _ _ _ _ _ _ _ _ _ _ _ _ _ _ _ _ _ _ _ _ _ _ _ _
_ _ _ _ _ _ _ _ _ _ _ _ _ _ _ _ _ _ _ _ _ _ _ _ _ _ _ _ _ _ _ _ _ _ _ _ _ _ _ _ _ _ _ _ _ _ _ _ _ _ _ _ _
_ _ _ _ _ _ _ _ _ _ _ _ _ _ _ _ _ _ _ _ _ _ _ _ _ _ _ _ _ _ _ _ _ _ _ _ _ _ _ _ _ _ _ _ _ _ _ _ _ _ _ _ _
_ _ _ _ _ _ _ _ _ _ _ _ _ _ _ _ _ _ _ _ _ _ _ _ _ _ _ _ _ _ _ _ _ _ _ _ _ _ _ _ _ _ _ _ _ _ _ _ _ _ _ _ _
_ _ _ _ _ _ _ _ _ _ _ _ _ _ _ _ _ _ _ _ _ _ _ _ _ _ _ _ _ _ _ _ _ _ _ _ _ _ _ _ _ _ _ _ _ _ _ _ _ _ _ _ _
_ _ _ _ _ _ _ _ _ _ _ _ _ _ _ _ _ _ _ _ _ _ _ _ _ _ _ _ _ _ _ _ _ _ _ _ _ _ _ _ _ _ _ _ _ _ _ _ _ _ _ _ _
_ _ _ _ _ _ _ _ _ _ _ _ _ _ _ _ _ _ _ _ _ _ _ _ _ _ _ _ _ _ _ _ _ _ _ _ _ _ _ _ _ _ _ _ _ _ _ _ _ _ _ _ _
_ _ _ _ _ _ _ _ _ _ _ _ _ _ _ _ _ _ _ _ _ _ _ _ _ _ _ _ _ _ _ _ _ _ _ _ _ _ _ _ _ _ _ _ _ _ _ _ _ _ _ _ _
_ _ _ _ _ _ _ _ _ _ _ _ _ _ _ _ _ _ _ _ _ _ _ _ _ _ _ _ _ _ _ _ _ _ _ _ _ _ _ _ _ _ _ _ _ _ _ _ _ _ _ _ _
_ _ _ _ _ _ _ _ _ _ _ _ _ _ _ _ _ _ _ _ _ _ _ _ _ _ _ _ _ _ _ _ _ _ _ _ _ _ _ _ _ _ _ _ _ _ _ _ _ _ _ _ _
_ _ _ _ _ _ _ _ _ _ _ _ _ _ _ _ _ _ _ _ _ _ _ _ _ _ _ _ _ _ _ _ _ _ _ _ _ _ _ _ _ _ _ _ _ _ _ _ _ _ _ _ _
_ _ _ _ _ _ _ _ _ _ _ _ _ _ _ _ _ _ _ _ _ _ _ _ _ _ _ _ _ _ _ _ _ _ _ _ _ _ _ _ _ _ _ _ _ _ _ _ _ _ _ _ _
_ _ _ _ _ _ _ _ _ _ _ _ _ _ _ _ _ _ _ _ _ _ _ _ _ _ _ _ _ _ _ _ _ _ _ _ _ _ _ _ _ _ _ _ _ _ _ _ _ _ _ _ _
PAGE 36
Page 41

Maintenance Log
_ _ _ _ _ _ _ _ _ _ _ _ _ _ _ _ _ _ _ _ _ _ _ _ _ _ _ _ _ _ _ _ _ _ _ _ _ _ _ _ _ _ _ _ _ _ _ _ _ _ _ _ _
_ _ _ _ _ _ _ _ _ _ _ _ _ _ _ _ _ _ _ _ _ _ _ _ _ _ _ _ _ _ _ _ _ _ _ _ _ _ _ _ _ _ _ _ _ _ _ _ _ _ _ _ _
_ _ _ _ _ _ _ _ _ _ _ _ _ _ _ _ _ _ _ _ _ _ _ _ _ _ _ _ _ _ _ _ _ _ _ _ _ _ _ _ _ _ _ _ _ _ _ _ _ _ _ _ _
_ _ _ _ _ _ _ _ _ _ _ _ _ _ _ _ _ _ _ _ _ _ _ _ _ _ _ _ _ _ _ _ _ _ _ _ _ _ _ _ _ _ _ _ _ _ _ _ _ _ _ _ _
_ _ _ _ _ _ _ _ _ _ _ _ _ _ _ _ _ _ _ _ _ _ _ _ _ _ _ _ _ _ _ _ _ _ _ _ _ _ _ _ _ _ _ _ _ _ _ _ _ _ _ _ _
_ _ _ _ _ _ _ _ _ _ _ _ _ _ _ _ _ _ _ _ _ _ _ _ _ _ _ _ _ _ _ _ _ _ _ _ _ _ _ _ _ _ _ _ _ _ _ _ _ _ _ _ _
_ _ _ _ _ _ _ _ _ _ _ _ _ _ _ _ _ _ _ _ _ _ _ _ _ _ _ _ _ _ _ _ _ _ _ _ _ _ _ _ _ _ _ _ _ _ _ _ _ _ _ _ _
_ _ _ _ _ _ _ _ _ _ _ _ _ _ _ _ _ _ _ _ _ _ _ _ _ _ _ _ _ _ _ _ _ _ _ _ _ _ _ _ _ _ _ _ _ _ _ _ _ _ _ _ _
_ _ _ _ _ _ _ _ _ _ _ _ _ _ _ _ _ _ _ _ _ _ _ _ _ _ _ _ _ _ _ _ _ _ _ _ _ _ _ _ _ _ _ _ _ _ _ _ _ _ _ _ _
_ _ _ _ _ _ _ _ _ _ _ _ _ _ _ _ _ _ _ _ _ _ _ _ _ _ _ _ _ _ _ _ _ _ _ _ _ _ _ _ _ _ _ _ _ _ _ _ _ _ _ _ _
_ _ _ _ _ _ _ _ _ _ _ _ _ _ _ _ _ _ _ _ _ _ _ _ _ _ _ _ _ _ _ _ _ _ _ _ _ _ _ _ _ _ _ _ _ _ _ _ _ _ _ _ _
_ _ _ _ _ _ _ _ _ _ _ _ _ _ _ _ _ _ _ _ _ _ _ _ _ _ _ _ _ _ _ _ _ _ _ _ _ _ _ _ _ _ _ _ _ _ _ _ _ _ _ _ _
_ _ _ _ _ _ _ _ _ _ _ _ _ _ _ _ _ _ _ _ _ _ _ _ _ _ _ _ _ _ _ _ _ _ _ _ _ _ _ _ _ _ _ _ _ _ _ _ _ _ _ _ _
_ _ _ _ _ _ _ _ _ _ _ _ _ _ _ _ _ _ _ _ _ _ _ _ _ _ _ _ _ _ _ _ _ _ _ _ _ _ _ _ _ _ _ _ _ _ _ _ _ _ _ _ _
_ _ _ _ _ _ _ _ _ _ _ _ _ _ _ _ _ _ _ _ _ _ _ _ _ _ _ _ _ _ _ _ _ _ _ _ _ _ _ _ _ _ _ _ _ _ _ _ _ _ _ _ _
_ _ _ _ _ _ _ _ _ _ _ _ _ _ _ _ _ _ _ _ _ _ _ _ _ _ _ _ _ _ _ _ _ _ _ _ _ _ _ _ _ _ _ _ _ _ _ _ _ _ _ _ _
_ _ _ _ _ _ _ _ _ _ _ _ _ _ _ _ _ _ _ _ _ _ _ _ _ _ _ _ _ _ _ _ _ _ _ _ _ _ _ _ _ _ _ _ _ _ _ _ _ _ _ _ _
_ _ _ _ _ _ _ _ _ _ _ _ _ _ _ _ _ _ _ _ _ _ _ _ _ _ _ _ _ _ _ _ _ _ _ _ _ _ _ _ _ _ _ _ _ _ _ _ _ _ _ _ _
_ _ _ _ _ _ _ _ _ _ _ _ _ _ _ _ _ _ _ _ _ _ _ _ _ _ _ _ _ _ _ _ _ _ _ _ _ _ _ _ _ _ _ _ _ _ _ _ _ _ _ _ _
_ _ _ _ _ _ _ _ _ _ _ _ _ _ _ _ _ _ _ _ _ _ _ _ _ _ _ _ _ _ _ _ _ _ _ _ _ _ _ _ _ _ _ _ _ _ _ _ _ _ _ _ _
_ _ _ _ _ _ _ _ _ _ _ _ _ _ _ _ _ _ _ _ _ _ _ _ _ _ _ _ _ _ _ _ _ _ _ _ _ _ _ _ _ _ _ _ _ _ _ _ _ _ _ _ _
PAGE 37
Page 42

Maintenance Log
_ _ _ _ _ _ _ _ _ _ _ _ _ _ _ _ _ _ _ _ _ _ _ _ _ _ _ _ _ _ _ _ _ _ _ _ _ _ _ _ _ _ _ _ _ _ _ _ _ _ _ _ _
_ _ _ _ _ _ _ _ _ _ _ _ _ _ _ _ _ _ _ _ _ _ _ _ _ _ _ _ _ _ _ _ _ _ _ _ _ _ _ _ _ _ _ _ _ _ _ _ _ _ _ _ _
_ _ _ _ _ _ _ _ _ _ _ _ _ _ _ _ _ _ _ _ _ _ _ _ _ _ _ _ _ _ _ _ _ _ _ _ _ _ _ _ _ _ _ _ _ _ _ _ _ _ _ _ _
_ _ _ _ _ _ _ _ _ _ _ _ _ _ _ _ _ _ _ _ _ _ _ _ _ _ _ _ _ _ _ _ _ _ _ _ _ _ _ _ _ _ _ _ _ _ _ _ _ _ _ _ _
_ _ _ _ _ _ _ _ _ _ _ _ _ _ _ _ _ _ _ _ _ _ _ _ _ _ _ _ _ _ _ _ _ _ _ _ _ _ _ _ _ _ _ _ _ _ _ _ _ _ _ _ _
_ _ _ _ _ _ _ _ _ _ _ _ _ _ _ _ _ _ _ _ _ _ _ _ _ _ _ _ _ _ _ _ _ _ _ _ _ _ _ _ _ _ _ _ _ _ _ _ _ _ _ _ _
_ _ _ _ _ _ _ _ _ _ _ _ _ _ _ _ _ _ _ _ _ _ _ _ _ _ _ _ _ _ _ _ _ _ _ _ _ _ _ _ _ _ _ _ _ _ _ _ _ _ _ _ _
_ _ _ _ _ _ _ _ _ _ _ _ _ _ _ _ _ _ _ _ _ _ _ _ _ _ _ _ _ _ _ _ _ _ _ _ _ _ _ _ _ _ _ _ _ _ _ _ _ _ _ _ _
_ _ _ _ _ _ _ _ _ _ _ _ _ _ _ _ _ _ _ _ _ _ _ _ _ _ _ _ _ _ _ _ _ _ _ _ _ _ _ _ _ _ _ _ _ _ _ _ _ _ _ _ _
_ _ _ _ _ _ _ _ _ _ _ _ _ _ _ _ _ _ _ _ _ _ _ _ _ _ _ _ _ _ _ _ _ _ _ _ _ _ _ _ _ _ _ _ _ _ _ _ _ _ _ _ _
_ _ _ _ _ _ _ _ _ _ _ _ _ _ _ _ _ _ _ _ _ _ _ _ _ _ _ _ _ _ _ _ _ _ _ _ _ _ _ _ _ _ _ _ _ _ _ _ _ _ _ _ _
_ _ _ _ _ _ _ _ _ _ _ _ _ _ _ _ _ _ _ _ _ _ _ _ _ _ _ _ _ _ _ _ _ _ _ _ _ _ _ _ _ _ _ _ _ _ _ _ _ _ _ _ _
_ _ _ _ _ _ _ _ _ _ _ _ _ _ _ _ _ _ _ _ _ _ _ _ _ _ _ _ _ _ _ _ _ _ _ _ _ _ _ _ _ _ _ _ _ _ _ _ _ _ _ _ _
_ _ _ _ _ _ _ _ _ _ _ _ _ _ _ _ _ _ _ _ _ _ _ _ _ _ _ _ _ _ _ _ _ _ _ _ _ _ _ _ _ _ _ _ _ _ _ _ _ _ _ _ _
_ _ _ _ _ _ _ _ _ _ _ _ _ _ _ _ _ _ _ _ _ _ _ _ _ _ _ _ _ _ _ _ _ _ _ _ _ _ _ _ _ _ _ _ _ _ _ _ _ _ _ _ _
_ _ _ _ _ _ _ _ _ _ _ _ _ _ _ _ _ _ _ _ _ _ _ _ _ _ _ _ _ _ _ _ _ _ _ _ _ _ _ _ _ _ _ _ _ _ _ _ _ _ _ _ _
_ _ _ _ _ _ _ _ _ _ _ _ _ _ _ _ _ _ _ _ _ _ _ _ _ _ _ _ _ _ _ _ _ _ _ _ _ _ _ _ _ _ _ _ _ _ _ _ _ _ _ _ _
_ _ _ _ _ _ _ _ _ _ _ _ _ _ _ _ _ _ _ _ _ _ _ _ _ _ _ _ _ _ _ _ _ _ _ _ _ _ _ _ _ _ _ _ _ _ _ _ _ _ _ _ _
_ _ _ _ _ _ _ _ _ _ _ _ _ _ _ _ _ _ _ _ _ _ _ _ _ _ _ _ _ _ _ _ _ _ _ _ _ _ _ _ _ _ _ _ _ _ _ _ _ _ _ _ _
_ _ _ _ _ _ _ _ _ _ _ _ _ _ _ _ _ _ _ _ _ _ _ _ _ _ _ _ _ _ _ _ _ _ _ _ _ _ _ _ _ _ _ _ _ _ _ _ _ _ _ _ _
_ _ _ _ _ _ _ _ _ _ _ _ _ _ _ _ _ _ _ _ _ _ _ _ _ _ _ _ _ _ _ _ _ _ _ _ _ _ _ _ _ _ _ _ _ _ _ _ _ _ _ _ _
PAGE 38
Page 43

Maintenance Log
_ _ _ _ _ _ _ _ _ _ _ _ _ _ _ _ _ _ _ _ _ _ _ _ _ _ _ _ _ _ _ _ _ _ _ _ _ _ _ _ _ _ _ _ _ _ _ _ _ _ _ _ _
_ _ _ _ _ _ _ _ _ _ _ _ _ _ _ _ _ _ _ _ _ _ _ _ _ _ _ _ _ _ _ _ _ _ _ _ _ _ _ _ _ _ _ _ _ _ _ _ _ _ _ _ _
_ _ _ _ _ _ _ _ _ _ _ _ _ _ _ _ _ _ _ _ _ _ _ _ _ _ _ _ _ _ _ _ _ _ _ _ _ _ _ _ _ _ _ _ _ _ _ _ _ _ _ _ _
_ _ _ _ _ _ _ _ _ _ _ _ _ _ _ _ _ _ _ _ _ _ _ _ _ _ _ _ _ _ _ _ _ _ _ _ _ _ _ _ _ _ _ _ _ _ _ _ _ _ _ _ _
_ _ _ _ _ _ _ _ _ _ _ _ _ _ _ _ _ _ _ _ _ _ _ _ _ _ _ _ _ _ _ _ _ _ _ _ _ _ _ _ _ _ _ _ _ _ _ _ _ _ _ _ _
_ _ _ _ _ _ _ _ _ _ _ _ _ _ _ _ _ _ _ _ _ _ _ _ _ _ _ _ _ _ _ _ _ _ _ _ _ _ _ _ _ _ _ _ _ _ _ _ _ _ _ _ _
_ _ _ _ _ _ _ _ _ _ _ _ _ _ _ _ _ _ _ _ _ _ _ _ _ _ _ _ _ _ _ _ _ _ _ _ _ _ _ _ _ _ _ _ _ _ _ _ _ _ _ _ _
_ _ _ _ _ _ _ _ _ _ _ _ _ _ _ _ _ _ _ _ _ _ _ _ _ _ _ _ _ _ _ _ _ _ _ _ _ _ _ _ _ _ _ _ _ _ _ _ _ _ _ _ _
_ _ _ _ _ _ _ _ _ _ _ _ _ _ _ _ _ _ _ _ _ _ _ _ _ _ _ _ _ _ _ _ _ _ _ _ _ _ _ _ _ _ _ _ _ _ _ _ _ _ _ _ _
_ _ _ _ _ _ _ _ _ _ _ _ _ _ _ _ _ _ _ _ _ _ _ _ _ _ _ _ _ _ _ _ _ _ _ _ _ _ _ _ _ _ _ _ _ _ _ _ _ _ _ _ _
_ _ _ _ _ _ _ _ _ _ _ _ _ _ _ _ _ _ _ _ _ _ _ _ _ _ _ _ _ _ _ _ _ _ _ _ _ _ _ _ _ _ _ _ _ _ _ _ _ _ _ _ _
_ _ _ _ _ _ _ _ _ _ _ _ _ _ _ _ _ _ _ _ _ _ _ _ _ _ _ _ _ _ _ _ _ _ _ _ _ _ _ _ _ _ _ _ _ _ _ _ _ _ _ _ _
_ _ _ _ _ _ _ _ _ _ _ _ _ _ _ _ _ _ _ _ _ _ _ _ _ _ _ _ _ _ _ _ _ _ _ _ _ _ _ _ _ _ _ _ _ _ _ _ _ _ _ _ _
_ _ _ _ _ _ _ _ _ _ _ _ _ _ _ _ _ _ _ _ _ _ _ _ _ _ _ _ _ _ _ _ _ _ _ _ _ _ _ _ _ _ _ _ _ _ _ _ _ _ _ _ _
_ _ _ _ _ _ _ _ _ _ _ _ _ _ _ _ _ _ _ _ _ _ _ _ _ _ _ _ _ _ _ _ _ _ _ _ _ _ _ _ _ _ _ _ _ _ _ _ _ _ _ _ _
_ _ _ _ _ _ _ _ _ _ _ _ _ _ _ _ _ _ _ _ _ _ _ _ _ _ _ _ _ _ _ _ _ _ _ _ _ _ _ _ _ _ _ _ _ _ _ _ _ _ _ _ _
_ _ _ _ _ _ _ _ _ _ _ _ _ _ _ _ _ _ _ _ _ _ _ _ _ _ _ _ _ _ _ _ _ _ _ _ _ _ _ _ _ _ _ _ _ _ _ _ _ _ _ _ _
_ _ _ _ _ _ _ _ _ _ _ _ _ _ _ _ _ _ _ _ _ _ _ _ _ _ _ _ _ _ _ _ _ _ _ _ _ _ _ _ _ _ _ _ _ _ _ _ _ _ _ _ _
_ _ _ _ _ _ _ _ _ _ _ _ _ _ _ _ _ _ _ _ _ _ _ _ _ _ _ _ _ _ _ _ _ _ _ _ _ _ _ _ _ _ _ _ _ _ _ _ _ _ _ _ _
_ _ _ _ _ _ _ _ _ _ _ _ _ _ _ _ _ _ _ _ _ _ _ _ _ _ _ _ _ _ _ _ _ _ _ _ _ _ _ _ _ _ _ _ _ _ _ _ _ _ _ _ _
_ _ _ _ _ _ _ _ _ _ _ _ _ _ _ _ _ _ _ _ _ _ _ _ _ _ _ _ _ _ _ _ _ _ _ _ _ _ _ _ _ _ _ _ _ _ _ _ _ _ _ _ _
PAGE 39
Page 44

Maintenance Log
_ _ _ _ _ _ _ _ _ _ _ _ _ _ _ _ _ _ _ _ _ _ _ _ _ _ _ _ _ _ _ _ _ _ _ _ _ _ _ _ _ _ _ _ _ _ _ _ _ _ _ _ _
_ _ _ _ _ _ _ _ _ _ _ _ _ _ _ _ _ _ _ _ _ _ _ _ _ _ _ _ _ _ _ _ _ _ _ _ _ _ _ _ _ _ _ _ _ _ _ _ _ _ _ _ _
_ _ _ _ _ _ _ _ _ _ _ _ _ _ _ _ _ _ _ _ _ _ _ _ _ _ _ _ _ _ _ _ _ _ _ _ _ _ _ _ _ _ _ _ _ _ _ _ _ _ _ _ _
_ _ _ _ _ _ _ _ _ _ _ _ _ _ _ _ _ _ _ _ _ _ _ _ _ _ _ _ _ _ _ _ _ _ _ _ _ _ _ _ _ _ _ _ _ _ _ _ _ _ _ _ _
_ _ _ _ _ _ _ _ _ _ _ _ _ _ _ _ _ _ _ _ _ _ _ _ _ _ _ _ _ _ _ _ _ _ _ _ _ _ _ _ _ _ _ _ _ _ _ _ _ _ _ _ _
_ _ _ _ _ _ _ _ _ _ _ _ _ _ _ _ _ _ _ _ _ _ _ _ _ _ _ _ _ _ _ _ _ _ _ _ _ _ _ _ _ _ _ _ _ _ _ _ _ _ _ _ _
_ _ _ _ _ _ _ _ _ _ _ _ _ _ _ _ _ _ _ _ _ _ _ _ _ _ _ _ _ _ _ _ _ _ _ _ _ _ _ _ _ _ _ _ _ _ _ _ _ _ _ _ _
_ _ _ _ _ _ _ _ _ _ _ _ _ _ _ _ _ _ _ _ _ _ _ _ _ _ _ _ _ _ _ _ _ _ _ _ _ _ _ _ _ _ _ _ _ _ _ _ _ _ _ _ _
_ _ _ _ _ _ _ _ _ _ _ _ _ _ _ _ _ _ _ _ _ _ _ _ _ _ _ _ _ _ _ _ _ _ _ _ _ _ _ _ _ _ _ _ _ _ _ _ _ _ _ _ _
_ _ _ _ _ _ _ _ _ _ _ _ _ _ _ _ _ _ _ _ _ _ _ _ _ _ _ _ _ _ _ _ _ _ _ _ _ _ _ _ _ _ _ _ _ _ _ _ _ _ _ _ _
_ _ _ _ _ _ _ _ _ _ _ _ _ _ _ _ _ _ _ _ _ _ _ _ _ _ _ _ _ _ _ _ _ _ _ _ _ _ _ _ _ _ _ _ _ _ _ _ _ _ _ _ _
_ _ _ _ _ _ _ _ _ _ _ _ _ _ _ _ _ _ _ _ _ _ _ _ _ _ _ _ _ _ _ _ _ _ _ _ _ _ _ _ _ _ _ _ _ _ _ _ _ _ _ _ _
_ _ _ _ _ _ _ _ _ _ _ _ _ _ _ _ _ _ _ _ _ _ _ _ _ _ _ _ _ _ _ _ _ _ _ _ _ _ _ _ _ _ _ _ _ _ _ _ _ _ _ _ _
_ _ _ _ _ _ _ _ _ _ _ _ _ _ _ _ _ _ _ _ _ _ _ _ _ _ _ _ _ _ _ _ _ _ _ _ _ _ _ _ _ _ _ _ _ _ _ _ _ _ _ _ _
_ _ _ _ _ _ _ _ _ _ _ _ _ _ _ _ _ _ _ _ _ _ _ _ _ _ _ _ _ _ _ _ _ _ _ _ _ _ _ _ _ _ _ _ _ _ _ _ _ _ _ _ _
_ _ _ _ _ _ _ _ _ _ _ _ _ _ _ _ _ _ _ _ _ _ _ _ _ _ _ _ _ _ _ _ _ _ _ _ _ _ _ _ _ _ _ _ _ _ _ _ _ _ _ _ _
_ _ _ _ _ _ _ _ _ _ _ _ _ _ _ _ _ _ _ _ _ _ _ _ _ _ _ _ _ _ _ _ _ _ _ _ _ _ _ _ _ _ _ _ _ _ _ _ _ _ _ _ _
_ _ _ _ _ _ _ _ _ _ _ _ _ _ _ _ _ _ _ _ _ _ _ _ _ _ _ _ _ _ _ _ _ _ _ _ _ _ _ _ _ _ _ _ _ _ _ _ _ _ _ _ _
_ _ _ _ _ _ _ _ _ _ _ _ _ _ _ _ _ _ _ _ _ _ _ _ _ _ _ _ _ _ _ _ _ _ _ _ _ _ _ _ _ _ _ _ _ _ _ _ _ _ _ _ _
_ _ _ _ _ _ _ _ _ _ _ _ _ _ _ _ _ _ _ _ _ _ _ _ _ _ _ _ _ _ _ _ _ _ _ _ _ _ _ _ _ _ _ _ _ _ _ _ _ _ _ _ _
_ _ _ _ _ _ _ _ _ _ _ _ _ _ _ _ _ _ _ _ _ _ _ _ _ _ _ _ _ _ _ _ _ _ _ _ _ _ _ _ _ _ _ _ _ _ _ _ _ _ _ _ _
PAGE 40
Page 45

PAGE 36
Maintenance Log
_ _ _ _ _ _ _ _ _ _ _ _ _ _ _ _ _ _ _ _ _ _ _ _ _ _ _ _ _ _ _ _ _ _ _ _ _ _ _ _ _ _ _ _ _ _ _ _ _ _ _ _ _
_ _ _ _ _ _ _ _ _ _ _ _ _ _ _ _ _ _ _ _ _ _ _ _ _ _ _ _ _ _ _ _ _ _ _ _ _ _ _ _ _ _ _ _ _ _ _ _ _ _ _ _ _
_ _ _ _ _ _ _ _ _ _ _ _ _ _ _ _ _ _ _ _ _ _ _ _ _ _ _ _ _ _ _ _ _ _ _ _ _ _ _ _ _ _ _ _ _ _ _ _ _ _ _ _ _
_ _ _ _ _ _ _ _ _ _ _ _ _ _ _ _ _ _ _ _ _ _ _ _ _ _ _ _ _ _ _ _ _ _ _ _ _ _ _ _ _ _ _ _ _ _ _ _ _ _ _ _ _
_ _ _ _ _ _ _ _ _ _ _ _ _ _ _ _ _ _ _ _ _ _ _ _ _ _ _ _ _ _ _ _ _ _ _ _ _ _ _ _ _ _ _ _ _ _ _ _ _ _ _ _ _
_ _ _ _ _ _ _ _ _ _ _ _ _ _ _ _ _ _ _ _ _ _ _ _ _ _ _ _ _ _ _ _ _ _ _ _ _ _ _ _ _ _ _ _ _ _ _ _ _ _ _ _ _
_ _ _ _ _ _ _ _ _ _ _ _ _ _ _ _ _ _ _ _ _ _ _ _ _ _ _ _ _ _ _ _ _ _ _ _ _ _ _ _ _ _ _ _ _ _ _ _ _ _ _ _ _
_ _ _ _ _ _ _ _ _ _ _ _ _ _ _ _ _ _ _ _ _ _ _ _ _ _ _ _ _ _ _ _ _ _ _ _ _ _ _ _ _ _ _ _ _ _ _ _ _ _ _ _ _
_ _ _ _ _ _ _ _ _ _ _ _ _ _ _ _ _ _ _ _ _ _ _ _ _ _ _ _ _ _ _ _ _ _ _ _ _ _ _ _ _ _ _ _ _ _ _ _ _ _ _ _ _
_ _ _ _ _ _ _ _ _ _ _ _ _ _ _ _ _ _ _ _ _ _ _ _ _ _ _ _ _ _ _ _ _ _ _ _ _ _ _ _ _ _ _ _ _ _ _ _ _ _ _ _ _
_ _ _ _ _ _ _ _ _ _ _ _ _ _ _ _ _ _ _ _ _ _ _ _ _ _ _ _ _ _ _ _ _ _ _ _ _ _ _ _ _ _ _ _ _ _ _ _ _ _ _ _ _
_ _ _ _ _ _ _ _ _ _ _ _ _ _ _ _ _ _ _ _ _ _ _ _ _ _ _ _ _ _ _ _ _ _ _ _ _ _ _ _ _ _ _ _ _ _ _ _ _ _ _ _ _
_ _ _ _ _ _ _ _ _ _ _ _ _ _ _ _ _ _ _ _ _ _ _ _ _ _ _ _ _ _ _ _ _ _ _ _ _ _ _ _ _ _ _ _ _ _ _ _ _ _ _ _ _
_ _ _ _ _ _ _ _ _ _ _ _ _ _ _ _ _ _ _ _ _ _ _ _ _ _ _ _ _ _ _ _ _ _ _ _ _ _ _ _ _ _ _ _ _ _ _ _ _ _ _ _ _
_ _ _ _ _ _ _ _ _ _ _ _ _ _ _ _ _ _ _ _ _ _ _ _ _ _ _ _ _ _ _ _ _ _ _ _ _ _ _ _ _ _ _ _ _ _ _ _ _ _ _ _ _
_ _ _ _ _ _ _ _ _ _ _ _ _ _ _ _ _ _ _ _ _ _ _ _ _ _ _ _ _ _ _ _ _ _ _ _ _ _ _ _ _ _ _ _ _ _ _ _ _ _ _ _ _
_ _ _ _ _ _ _ _ _ _ _ _ _ _ _ _ _ _ _ _ _ _ _ _ _ _ _ _ _ _ _ _ _ _ _ _ _ _ _ _ _ _ _ _ _ _ _ _ _ _ _ _ _
_ _ _ _ _ _ _ _ _ _ _ _ _ _ _ _ _ _ _ _ _ _ _ _ _ _ _ _ _ _ _ _ _ _ _ _ _ _ _ _ _ _ _ _ _ _ _ _ _ _ _ _ _
_ _ _ _ _ _ _ _ _ _ _ _ _ _ _ _ _ _ _ _ _ _ _ _ _ _ _ _ _ _ _ _ _ _ _ _ _ _ _ _ _ _ _ _ _ _ _ _ _ _ _ _ _
_ _ _ _ _ _ _ _ _ _ _ _ _ _ _ _ _ _ _ _ _ _ _ _ _ _ _ _ _ _ _ _ _ _ _ _ _ _ _ _ _ _ _ _ _ _ _ _ _ _ _ _ _
_ _ _ _ _ _ _ _ _ _ _ _ _ _ _ _ _ _ _ _ _ _ _ _ _ _ _ _ _ _ _ _ _ _ _ _ _ _ _ _ _ _ _ _ _ _ _ _ _ _ _ _ _
PAGE 41
Page 46

V I TA International extends this limited warranty solely to the
o r i g inal Purchaser of any L- 1 00 Series Vita Spa self-contained spa
installed within the United States or Canada.
25 YEAR ST R UCT URA L
S PA SHELL: Vita International warrants its shells against loss of
water due to defects in materials and workmanship for twentyfive (25) years from the original date of purchase.
7 YEARS SURFA C E
The acrylic surface is warranted against blistering, cracking and
chipping resulting from a defect in the acrylic surface material for
a period of ten (10) years from the original date of purchase.
3 YEAR COMPONENT
WA R RA N T Y
Vita International warrants all factory installed electrical
components—pumps, blowers, heater and control system—and
plumbing components—jets, air injectors, glued joints, pipes and
hoses—to be free from defects in materials and workmanship for
a period of three (3) years from the original date of purchase.
Factory installed options, covers and ozonators are warranted as
noted below.
Covers, as supplied by Vita Spa, are warranted to be free from
manufacturing defects for a period of one (1) year.
Ozonators, installed at the time of manufacture, are warranted to
be free from manufacturing defects for a period of one (1) year.
D i g i -Chromium lighting systems, installed at the time of
manufacture, shall be warranted to be free of any manufacturing
defects for one (1) year.
Stereo systems, installed at the time of manufacture, are
warranted to be free of manufacturing defects for a period of one
(1) year.
Fresh Water Mister Systems, installed at the time of manufacture,
are warranted to be free of manufacturing defects for a period of
(1) year.
The cabinetry is warranted to maintain its structural integrity for a
period of two (2) years from the original date of purchase. Wo o d
staining and normal weathering of the surface of wood panels is
excluded from coverage
There will be no charge for in-home service labor on factory
installed options during the first 90 days.
Dealer added options are excluded from this warranty and are covered under
separate warranties from their respective manufacturers. No Labor Wa r r a n t y.
Wearable components such as filter cartridges, light bulbs, fuses, and
headrests, are not covered under this warranty but are warranted to be free
from defects in material and workmanship at the time of the original delivery.
“ N O BLA M E” HE AT ER EL EMEN T
The element in your L- 1 00 Spa is protected by a special isolation
coating that takes the worry out of maintaining water chemistry
(pH). Please Note: Whereas Vita’s “No Blame” element gi v e s
added protection against corrosion, improperly balanced (pH)
may effect other components of the spa, or may cause harmful
skin irritation. Preventive maintenance is suggested.
WA RRA N T Y PERFORM A N CE
In the event of a defect covered by this warranty, notify your VITA
S PA dealer within 10 days of the time the defect is discovered.
Upon proof of purchase by dated purchase receipt, Vi t a
International or its authorized representative will correct the defect
within the terms and conditions contained in this warranty. Th e r e
will be no charge for in-home service labor during the first three
years. You may be assessed reasonable repairperson travel
charges. Vita International, at its sole option, may elect to
substitute a spa or component of equal value, either new or
reconditioned, to correct a defect. Such replacement shall
assume, as its warranty, the remaining portion of the warranty on
the original product. If the entire spa needs to be substituted
because the repair is not feasible or the repair can not be
p e r formed in the field, reasonable costs to pick up the defective
spa and return it or delivering and installing the replacement spa
will be the responsibility of the spa owner.
E X CL U SIONS
This warranty is void if Vita International or its representative
determines that the spa has been subjected to any alterations or
repairs by anyone other than an authorized representative of Vi t a
International. Vita Spa’s are not approved for commercial
applications. Vita International will not be responsible for the cost
of replacement parts or labor cost of any spa found to be used
in a commercial application. This warranty shall also be voided if
there is evidence that the spa has been subjected to misuses,
abuses, negligence, improper installation or operations other than
in accordance with the instructions in the owner’s manual,
including but not limited to damage to components caused by
improper pH balance or other improper water chemistry
maintenance, (use of chlorine based products other than
dichlorine voids all warranties,) or by failure to maintain and clean
the filtration system; damage to components or spa surf a c e
caused by operating the spa at water temperatures outside the
range of 32 degrees F (freezing) and 120 degrees F (excessive
heat); damage to the surface caused by leaving the spa
uncovered while empty of water and in direct exposure to
sunlight; damage caused by improper or incorrect electrical hookup, modifications to internal electrical assembly boxes and
LIMITED WARRANTY
for L-100 SERIES WARRANTY COVERAGE
Page 47

grounding system, by electrical installations done by anyone
other than licensed professionals in non-conformity with state
and local codes or by power surges or spikes; or damage caused
by Acts of God or conditions beyond the control of Vi t a
I n t e r n a t i o n a l .
DIS CLA IME R
Except as expressly provided, there shall be no other warranty or
obligation, expressed or implied, oral or statutory. No dealer or
other person has the authority to make any warranties or
representations covering Vita International or its products. Vi t a
International and its representatives shall not be liable for any
i n j u r y, loss, cost or other damage, including but not limited to, loss
of use, inconvenience, costs of removal of a permanent deck,
custom fixture, or any other incidental or consequential costs,
expenses or damages. Under no circumstances shall Vi t a
International or any of its representatives be held liable for injury
to any person or damage to any propert y, however arising. Some
states do not allow the exclusion or limitation of incidental or
consequential damages, so the above limitations or exclusions
may not apply to you. This warranty gives you specific legal rights.
You may also have other rights, which vary, from state to state.
CUSTOMER SER V I CE
Contact your dealer or local authorized repair center for service. If
you do not know who your local representative is, contact Vi t a
International’s Technical Service Division at the address listed
b e l o w, or call (305) 685-20 6 3 .
This warranty is effective for spas manufactured after January 1,
20 0 4 .
Vita International
Manufactured by DM Industries, Ltd.
2 3 2 0 N W 1 4 7 t h S t r e e t ,
M i a m i , F l o r i d a 3 3 0 5 4
Page 48

DM Industries, Ltd., 2320 Northwest 147th Street, Miami, Florida 330 54
Phone: (305) 685-2063 or (305) 908-8187 • Toll Free: (877) 24 0 - 9 4 57
FAX: (305) 685-2671
MIAMI FLORIDA
Vita Inte r n a t i o n a l
Division of
Is a Registered Trademark of
SPA L100-04-0617
© 2004 DM INDUSTRIES • ALL RIGHTS RESERVED
 Loading...