

Page 1

IMPORTANT SAFETY WARNINGS
SAVE THESE INSTRUCTIONS.
WARNING:
WARNING:
Children should not use spas or hot tubs
without adult supervision.
Before entering the spa or hot tub measure
the water temperature with an accurate
thermometer.
ENGLISHFRANÇAIS
WARNING:
Do not use spas or hot tubs unless all suction
guards are installed to prevent body and hair
entrapment.
WARNING:
People using medications and/or having an
adverse medical history should consult a
physician before using a spa or hot tub.
WARNING:
People with infectious diseases should not
use a spa or hot tub.
WARNING:
To avoid injury, exercise care when entering
or exiting the spa or hot tub.
WARNING:
Do not use drugs or alcohol before or during
the use of a spa or hot tub to avoid
unconsciousness and possible drowning.
WARNING:
Pregnant, or possibly pregnant, women should
consult a physician before using a spa or hot tub.
WARNING:
Do not use a spa or hot tub immediately
following strenuous exercise.
WARNING:
Prolonged immersion in a spa or hot tub may
be injurious to your health.
WARNING:
Do not permit electric appliances (such as a
light, telephone, radio, or television) within
1.5m of the spa or hot tub.
WARNING:
Maintain water chemistry in accordance with
manufacturer’s instruction.
WARNING:
The use of alcohol or drugs can greatly
increase the risk of fatal hyperthermia in hot
tubs and spas.
WARNING:
Water temperature in excess of 104° F or 40° C
may be injurious to your health.
VITA SPA
1
Page 2

TABLE OF CONTENTS
ENGLISH FRANÇAIS
GFCI Alert 1
Important Safety Warnings 2
Table of Contents 3
Important Safety Instructions 5
Do’s and Don’ts 6
Hyperthermia 7
Spa installation 8
Site and Positioning 8
Outdoor Installation 8
Indoor Installation 8
Water Capacity 8
Spa System Components 10
Spa Components 11
Jets, Air Controls & Valves 12
Jets 12
Cleaning or Replacing Jets 12
Air Controls 13
On / O - Diverter Valve 13
Cleaning or Replacing Valves 13
Electrical Information 14
Important Safety Instructions 14
Ground Fault Circuit Interupter 14
Installation Options 14
Start Up Procedures 16
Priming Your Spa 16
Pr Message 16
Powerworks® 167 Control System 17
Operating Instructions 17
User’s Pads 18
Temperature Controls 18
Jet Operation 18
Standard/Economy/Sleep Modes 19
Filtration Cycles 19
Preset Filter Cycles 19
Changing Filter Cycle Duration 19
Light 20
Panel Messages 43
Troublershooting 43
Ozone Operation 37
Entertainment System (Optional) 34
Powerworks® 460 Control System 21
Powerworks® 760 Control System 22
User’s Pads 23
Temperature Controls 23
Jet Operation 23
Temperature Lock 24
Temperature Unlock 24
Panel Lock 24
Panel Unlock 24
Light 24
Standard/Economy/Sleep Modes 24
Changing Modes 25
Setting the Time 25
Preset Filter Cycles 25
Changing Filter Cycle 26
Clean Up Cycle 26
Inversion Features 27
Ozone Operation 37
Entertainment System (Optional) 34
Powerworks® 504 Control System 28
User’s Pads 29
Temperature 29
Jet Operation 29
Light 30
Operating Modes 30
Standard/Economy/Sleep Modes 30
Preset Filter Cycles 30
2
VITA SPA
Page 3

Changing Filter Cycles 31
Clean Up Cycle 31
Automatic time Outs 31
Light Bulbs 41
Spa Cover Care 41
Thermal Creep 42
Options and Features 32
AquaBurst Lighting System 32
Blower / Champagne Air System 32
VitaRoma Aromatherapy System 32
Circulation (Circ) Pump 33
Inversion Feature 33
Entertainment System 34
Therapy Sequencer Control 35
Therapy Sequencer Program Chart 35
Starting the Sequencer 36
Sequencing Programs 36
Sequencing Speeds 36
Sequencer Pausing 36
SequencerUser Pad 36
Safety Features
Automatic Time Outs (165 & 167) 20
Automatic Time Outs (460 &760) 34
Automatic Time Outs (504) 33
Common LCD Messages (165 &167) 43
Common LCD Messages (460, 504, 760) 43
Maintenance 37
Water Chemistry 37
Sanitizing 37
pH Level 37
Sanitizing With Ozone 37
Specialty Chemicals 38
Draining Your Spa 38
Filter Maintenance 39
Winterizing 39
Spa Cabinet Care 41
Spa Surface Care and Cleaning 41
Panel Messages 43
Common Water Problems 47
Common Hardware Problems 50
Spa Soaking Guidelines 52
167 Series System Wiring Diagram 53
460 Series System Wiring Diagram 54
504 Series System Wiring Diagram 55
760 Series System Wiring Diagram 56
Safety sign 57
Limited warranty summary 57
Copyrights and trademarks 58
Notes 59
ENGLISHFRANÇAIS
VITA SPA
3
Page 4

IMPORTANT SAFETY INSTRUCTIONS
ENGLISH FRANÇAIS
1. READ AND FOLLOW ALL
INSTRUCTIONS
2. WARNING - To reduce the risk of injury,
do not permit children to use this prod uct unless they are closely supervised at
all times.
3. A wire connector is provided on this unit
to connect a minimum 6 AWG (5.15 mm
solid copper conductor between this unit
and any metal equipment, metal enclosu res of electrical equipment, metal water
pipe, or conduit within 5 feet (1.5m) of
the unit.
4. (For cord-connected/convertible units)
DANGER - Risk of injury.
a. Replace damaged cord immedi ately.
b. Do not bury cord.
c. Connect to a grounded, ground ing type receptacle only.
5. DANGER - Risk of Accidental Drown ing. Extreme caution must be exercised
to prevent unauthorized access by
children. To avoid accidents, ensure that
children cannot use this spa unless they
are supervised at all times.
6. DANGER - Risk of injury. The suction
ttings in this spa are sized to match the
speci c water ow created by the pump.
Should the need arise to replace the
suction ttings or the pump, be sure that
the ow rates are compatible.
Never operate spa if the suction ttings
are broken or missing. Never replace a
suction tting with one rated less than
the ow rate marked on the original suc tion tting.
7. DANGER - Risk of Electric Shock. Install at
least 5 feet (1.5m) from all metal surfaces.
As an alternative, a spa may be installed
within 5 feet of metal surfaces if each
2
metal surface is permanently connected
)
by a minimum 6 AWG (5.15 mm
copper conductor to the wire connector
on the terminal box that is provided for
this purpose.
8. DANGER - Risk of Electric Shock. Do not
permit any electric appliance, such as a
light, telephone, radio, or television,
within 5 feet (1.5m) of a spa.
9. WARNING - To reduce the risk of injury:
a. The water in a spa should never
exceed 40°C (104°F). Water tem-
peratures between 38°C (100°F)
and 104°F (40°C) are considered safe for a
healthy adult. Lower water temperatures
are recommended for young children and
when spa use exceeds 10 minutes.
b. Since excessive water temperatures
have a high potential for causing fetal
damage during the early months of preg nancy, pregnant or possibly pregnant
women should limit spa water tempera tures to 38°C (100°F).
c. Before entering a spa the user should
measure the water temperature since the
tolerance of water temperature-regulat ing devices varies.
d. The use of alcohol, drugs, or medica-
2
) solid
4
VITA SPA
Page 5

tion before or during spa use may lead
to unconsciousness with the possibility of
drowning.
e. Obese persons and persons with a
history of heart disease, low or high
blood pressure, circulatory system prob lems, or diabetes should consult a physi cian before using a spa.
10.
SAVE THESE
INSTRUCTIONS
NOTE: Check with your state/local code
enforcement o cer to determine electrical
code requirements and compliance. Use a
quali ed licensed electrician to complete all
spa nal electric connections.
Caution: Risk of electrical shock.
Read and follow all instructions.
TO AVOID RISK OF ELECTRICAL SHOCK:
1. A green colored terminal or a terminal
marked G, GR, Ground, Grounding, or the
international symbol is located on
the side of the supply terminal box or
compartment. This terminal must be
connected to the grounding means
provided in the electric supply service
panel, using a continuous copper wire
equivalent in size to the circuit conductors
supplying this equipment.
*IEC Publication 417, Symbol 5019.
2. At least two lugs marked “BONDING
LUGS” are provided on the external sur face or on the inside of the supply termi nal box or compartment. Connect the
local common bonding grid (house-hold
ground) in the area of the hot tub or spa
to these terminals, using an insulated or
bare copper conductor not smaller than
No. 6 AWG.
3. All eld-installed metal components such
as rails, ladders, drains or similar hard
ware located within 5 ft. of the spa or
hot tub shall be bonded to the equip ment grounding bus with copper con ductors not smaller than No. 6 AWG.
4. Never connect unit to a power supply
with a load controller.
5. Install to provide drainage of compart ment for electrical components.
6. The electrical supply for this product
must include a suitably rated switch
or circuit breaker to open all ungrounded
supply conductors. This disconnecting
means must be readily accessible for
operation but installed at least 1.5m
from the spa. All electrical connections
should comply with local regulations.
Do’s and Don’ts
For years of spa enjoyment:
Do:
• Save these instructions!
• Replace the cover immediately after use.
•
Keep the cover locked when spa is not
in use.
• Be aware of the dangers of a wet and
slippery surface. Use caution when
entering and exiting your spa.
• Have a licensed electrician make all nal
electrical connections.
•
Replace worn, frayed or broken electrical cords.
• Keep the water chemistry correctly
balanced. Untreated spa water will cause
problems with your spa and equipment
as well as being a health risk.
• Clean the spa lter monthly or as needed.
• Position the spa so that all sides remain
ENGLISHFRANÇAIS
VITA SPA
5
Page 6

accessible for maintenance.
• Use a bathing cap for long hair.
ENGLISH FRANÇAIS
• Refer to information on hyperthermia,
next page.
• Use only authorized spa care products
for the best performance and to keep
the water properly balanced.
Don’t:
• Use the spa at 104°F (40°C) for long
periods of time (more than 30 minutes).
See Hyperthermia, below.
• Use an extension cord to power your spa.
• Allow anyone to stand on the spa cover.
It is not designed to support weight.
• Power the spa unless it is lled with water
to 1/8” below the top of the Weir door.
• Operate the pump on high speed for ex tended periods of time with the cover in
place. Extended operation can cause heat
build-up and interfere with spa operation.
Hyperthermia
The causes, symptoms, and e ects of
hyperthermia may be described as follows:
Hyperthermia occurs when the internal
temperature of the body reaches a level
several degrees above the normal body
temperature of 98.6°F (37°C). The symptoms
of hyperthermia include an increase in the
internal temperature of the body, dizziness,
lethargy, drowsiness, and fainting. The e ects
of hyperthermia include:
a. Failure to perceive heat
b. Failure to recognize the need to exit spa
or hot tub
c. Unawareness of impending hazard
d. Fetal damage in pregnant women
e. Physical inability to exit the spa or hot
tub, and
f. Unconsciousness resulting in the danger
of drowning.
WARNING The use of alcohol, drugs,
or medication can greatly increase the
risk of fatal hyperthermia.
6
VITA SPA
Page 7

SPA INSTALLATION
Danger: Electrical shock risk. Install at
least 1.5m from all metal surfaces.
The electrical supply for this product
must include a suitably rated switch or
circuit breaker to open all ungrounded
supply conductors. This disconnecting
means must be readily accessible for
operation but installed at least 1.5m from
the spa. All electrical connections should
comply with local codes and regulations.
The appliance should be supplied through
a residual current device (RCD) with a rated
tripping current not exceeding 30 mA. Means
for disconnection must be incorporated in
the xed wiring in accordance with the wiring
rules. Parts containing live parts, except parts
supplied with safety extra-low voltage not
exceeding 12 V, must be inaccessible to a
person in the bath. Earthed appliances must
be permanently connected to xed wiring.
Site and Positioning
Locate the spa on solid, level foundation or
ooring, keeping in mind the weight of the
lled spa [in excess of
some models]. If you have any doubts about
the load bearing ability of your chosen site,
contact an architect or a building contractor.
The entire perimeter of the spa cabinet and
the spa bottom must be evenly supported.
If your spa is installed outdoors, we
recommend that you provide a concrete pad
for the spa to rest on 8ft x 8ft x 4in (2,5m x
2,5m x 10cm level pad). Failure to provide
a at level surface could structurally
4,000 bls. (1.800 kg.)
on
damage your spa and void the warranty.
The spa must be installed to allow access for
service and maintenance on all four sides;
therefore, below grade level installation is
not recommended.
Outdoor Installation
The following considerations apply when
installing your spa outdoors:
1. Local codes pertaining to fencing.
2. Local electrical and plumbing codes.
3. View from your house.
4. Wind direction.
5. Exposure to sunlight.
6. Location relationship to trees (twigs,
leaves and shade).
7. Dressing and bathroom location.
8. Storage area for maintenance equipment
and chemicals.
9. Location to facilitate adult supervision.
10. Landscaping and nighttime lighting.
11. Accessibility to equipment.
12. Power supply location and foot tra c.
Indoor Installation
The following considerations apply when
installing your spa indoors:
1. Indoor spas promote high humidity. Using
either ventilation fans or commercial
grade de-humidi ers will help to reduce
the humidity. Consult your dealer for
details.
2. Floor drains must be provided near the
spa to drain o water that may cause
falls and /or water damage.
3. Floor area should be at with a non-skid
nish. Carpeting is not recommended.
4. Walls, ceilings, woodwork should be made
of materials capable of withstanding high
ENGLISHFRANÇAIS
VITA SPA
7
Page 8

ENGLISH FRANÇAIS
humidity (redwood, cedar).
5. Be sure oor load bearing capacities are
adequate to support the concentrated
spa weight.
6. Spas should be double checked for leaks
before installing to avoid possible water
damage. Dealer installation may include
this service.
7. Indoor sun rooms are capable of
maintaining high ambient temperatures
which may e ect the spa water
temperature. It is NOT recommended
that you operate your lter cycles for
longer than 4 hours per day under these
conditions.
SEE THERMAL CREEP: page 42
MODEL GALLONS LITERS
JOLI 260 985
CABARET 470 1,781
NUAGE 465 1,762
PASSION 130 492
PROTÉGÉ 365 1,382
CHATEAU 360 1,360
RENDEZVOUS 510 1,933
MYSTIQUE 545 2,063
AMOUR 130 493
IMAGE 280 1058
INTRIGUE 375 1417
ELEGANT 375 1417
MONARQUE 350 1323
PRESTIGE 350 1323
ENVIE 500 1323
GRAND 550 2079
DUET 103 530
8
VITA SPA
Page 9
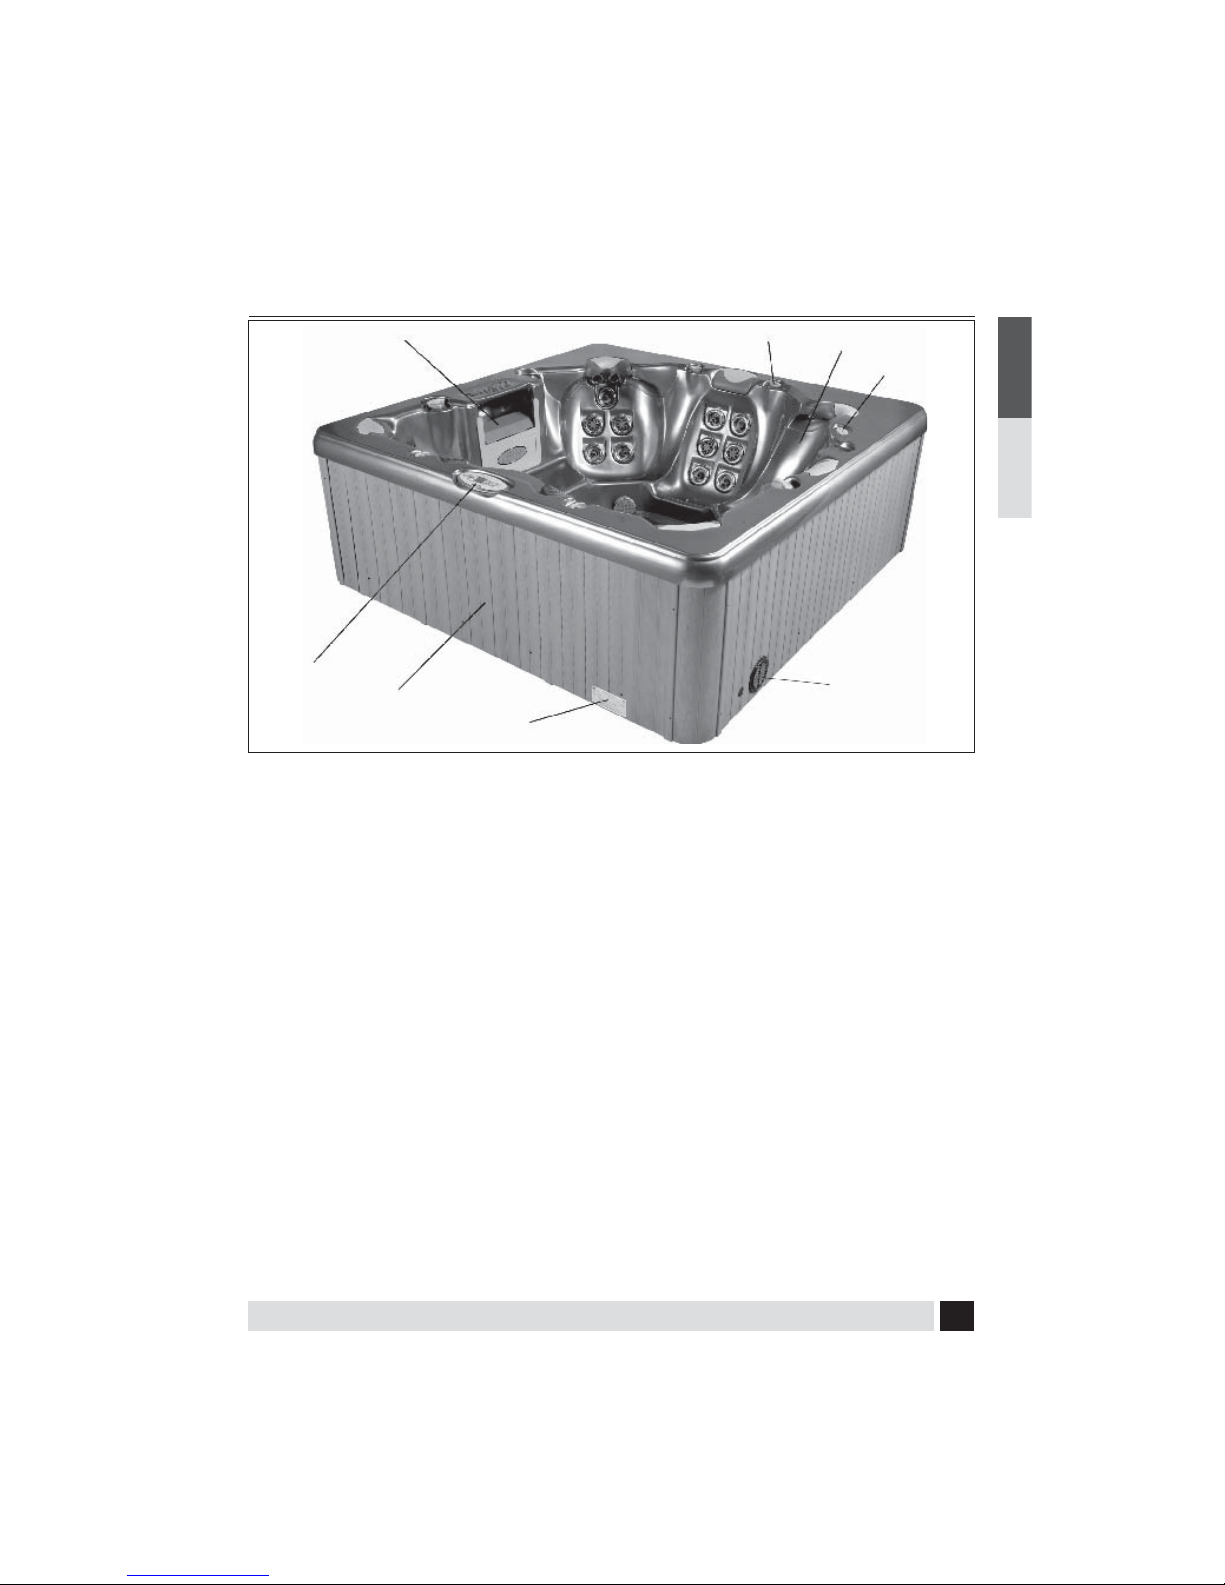
SPA SYSTEM COMPONENTS
A
B
E
H
A. Filter Skimmer/Weir Door: Removes
oating debris from the water surface,
provides a water return path to equipment,
and houses water lter element.
B. Topside Control Panel: Used to control
temperature setting, pump for jets,
and light.
C. Air Controls: Increases or decreases air
entering the jets. Close during heating for
maximum e ciency.
C
G. AquaBurst Lighting: Lighting
system that displays multiple colored
lights in pre-programmed random, solid or
alternating colours (not shown).
H. Manufacturer’s Identi cation Label:
Contains identi cation information
for warranty service (serial number, model
number, etc.) and electrical information
(ampere rating and ampere requirements).
J. Wave Seat : Ultimate relaxation seat.
J
I
F
ENGLISHFRANÇAIS
E. Equipment Pack Service Panel (no user
serviceable parts): Spa support system
consisting of pump(s), heater, optional
blower and associated electrical controls
(not shown).
F. Drain Access: (Adjacent to the equipment
service panel) Spa drain faucets.
VITA SPA
K. Stereo/Speakers (not shown).
L. Sequencer Controls (not shown).
9
Page 10
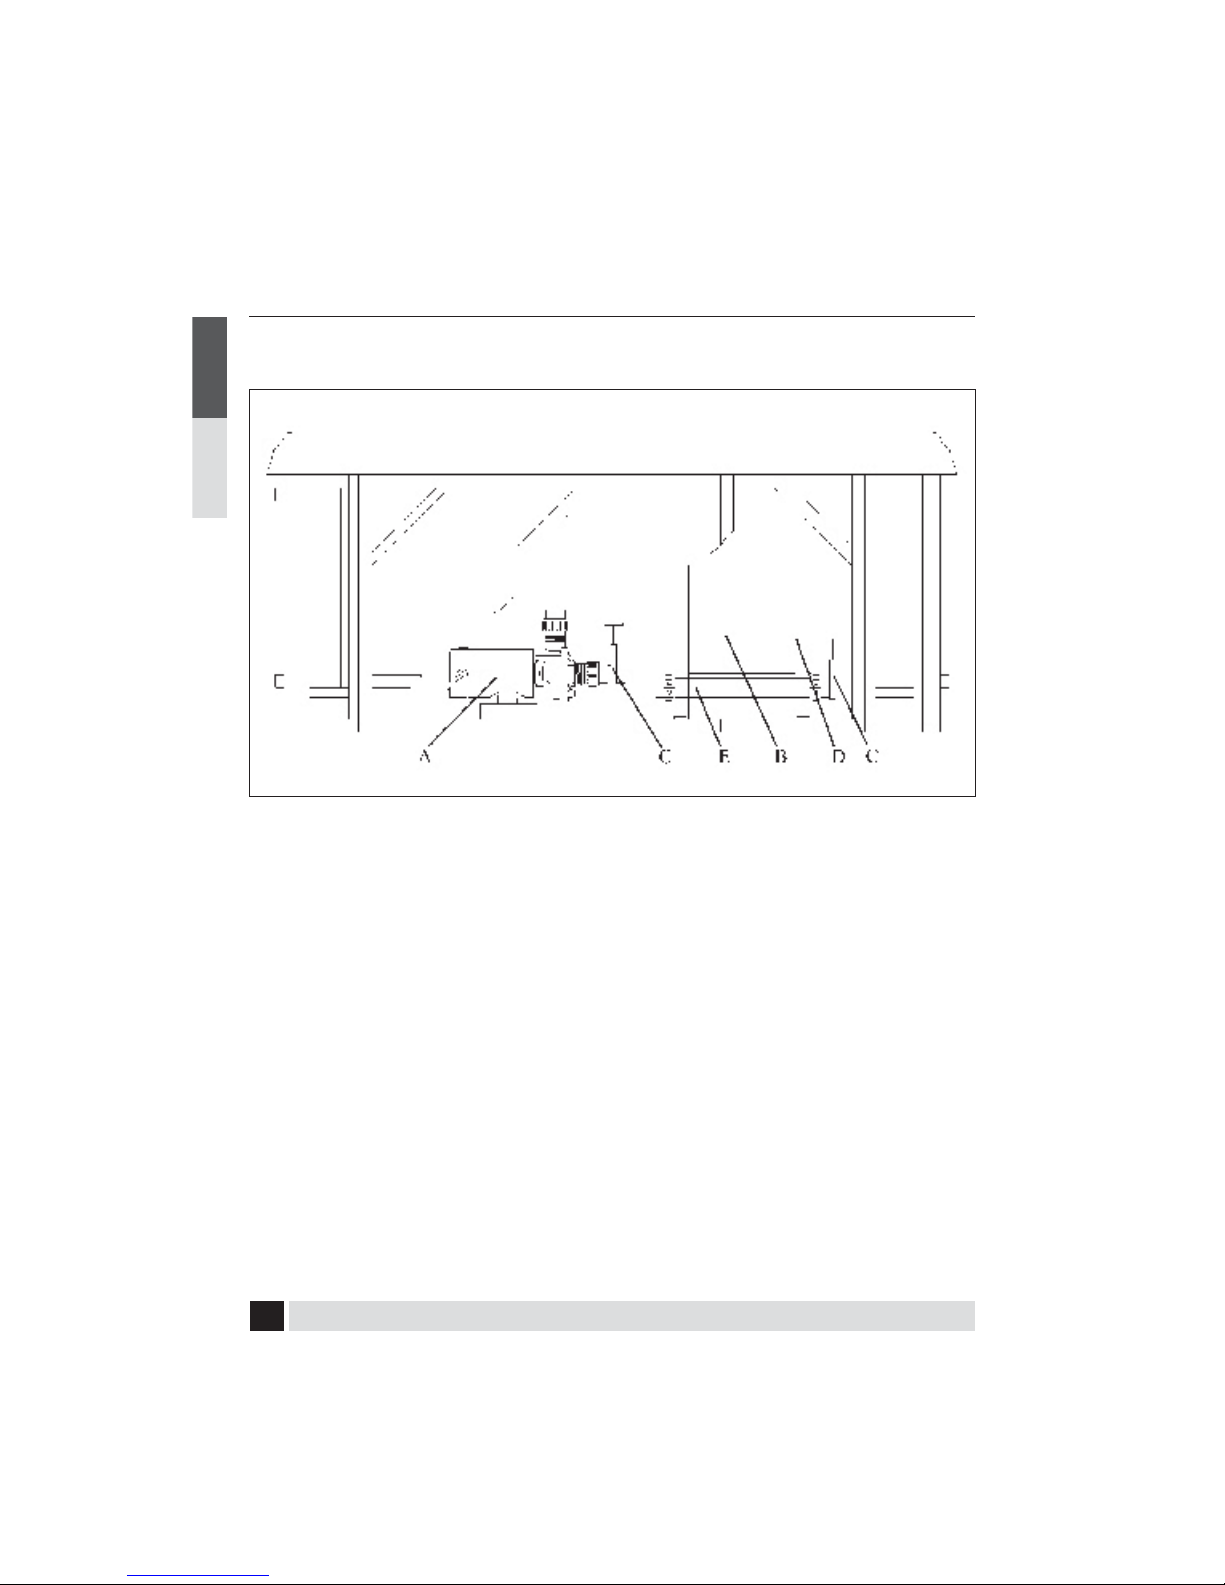
SPA COMPONENTS
ENGLISH FRANÇAIS
Reference only. Equipment is not always as shown
A. Pumps (one or more pumps,
depending on model): Low speed for
e cient water circulation during ltration
and heating; high speed for maximum
action of the jets. The pump functions are
activated by topside controls. Circ Pump –
Continuous Filtration – See Circ Pump
details on pg 31
B. Warning and Installation Label:
Contains important safety information
and installation instructions.
C. Slice Valve: Used to shut o water ow
from the spa to the equipment while
servicing. Quantity will vary depending
on model. All should be open during
normal operations.
10
D. Spa Pack: Houses the electronic circuit
board. All equipment and incoming power
connections are made here .
E. Heater Assembly: Thermostatically
controlled and equipped with an
overheat safety shut-o .
Note: No consumer serviceable parts.
Do NOT attempt to service any of these
components yourself. Contact your dealer
for assistance.
VITA SPA
Page 11

JETS, AIR CONTROLS & VALVES
Jets
All spa jets are individually engineered
to provide a unique hydro-massage.
Depending on the model, your spa will have
a combination of the following jets:
Directional Therapeutic
(200, 300, and 400 Series Wave Style):
Positioned to focus on large muscle groups,
these jets deliver a concentrated, high
volume stream of water for a deep massage.
Each jet is fully adjustable, allowing users to
set the water ow to the most comfortable
setting. The nozzle can be rotated to target
sore muscle areas.
Note: Ozone production is suspended when
other functions are activated on the control
panel by the spa user.
NOTE: In spas equiped with a circ pump
the ozonator can not be shut o and will
remain on as long as the circ pump is
running.
Many full sized jets are adjustable from a fully
open to closed position. It is very important
that you NEVER SHUT ALL FULL SIZED JETS
OFF AT ONE TIME! WHEN EXITING THE SPA,
OPEN ALL CLOSED JETS.
ENGLISHFRANÇAIS
Rotational or Spinning Jets
(200, 300, and 400 Series Wave Style):
Positioned to focus on muscle tension
zones, these jets deliver a spinning water
stream for a gentle, pulsating massage.
Each jet is fully adjustable, allowing users to
set the water ow to the most comfortable
setting.
Swim Jet( non-adjustable):
Positioned to create overall water
circulation, this multi-purpose, high volume
jet provides whirlpool action throughout
the entire spa.
Euro Jets:
Positioned in the foot well or shoulder areas
of the spa, these jets deliver a penetrating
massage to dissolve tension. This jet may be
the entry point for ozone produced during
the automatic ltration cycles, and, as such,
is not adjustable.
VITA SPA
Cleaning or Replacing Jets
Hard water can cause calcium/mineral
buildup that can restrict or bind the jets. A jet
consists of a face plate and a nozzle. Rotate
these parts weekly and remove/clean monthly
to ensure free movement.
NOTE: It is not necessary to drain the spa to
clean or remove the jets.
Rotating the jet face plate and nozzle
• Rotate the jet face left and right
(open and closed).
• Return the face plate to the full open
position.
• Turn the jets on to high speed.
• Twist the nozzle left and right.
• Rotate the nozzle in the socket.
NOTE: If the jet insert disengages from the
spa housing, see steps to reinstall below.
11
Page 12

Cleaning the jets
ENGLISH FRANÇAIS
To remove the jet insert, use the palm of your
hand to exert pressure on the face of the jet.
Turn counterclockwise until the jet ‘clicks’.
Gently pull the jet assembly from the housing.
To clean the jet insert and housing, use a
pressurized hose and spray the inside of
the jet housing. Soak the jet in a diluted spa
cleaning solution, rinse. Wipe the inside of the
housing to remove any debris.
To reinstall the jet, line up the tab on the
backside of the barrel with the groove in the
body. Use the palm of your hand to gently tap
the jet until it snaps into position.
Air Controls
The intensity of the jet action can be
controlled by altering the amount of air
injected with water through the jets. Your spa
has 2 to 4 air controls located on the lip of
the spa. Each control activates air to speci c
jets in the spa allowing you to create various
combinations and levels of jet action to
suit individual preferences. Turn the control
counter- clockwise to turn the air o and
clockwise to turn air on.
On / O Valve: Turns on or shuts o the ow
of water to multiple jets or the waterfall.
Diverter Valve: Diverts water from one set
of jets to another. The diverter valve should
be tested weekly to clean the lines and to
help prevent debris from building up.
NOTE: The diverter and on / o valve(s) should
be cleaned regularly. Power spa o at the
breaker or disconnect. Remove the handle by
pulling upward and rocking it back and forth,
unscrew the cap and pull the valve stem out.
To clean the valve stem and housing use a
pressurized hose and spray the inside of the
valve housing. Soak the valve stem in a diluted
spa cleaning solution, rinse. Wipe the inside of
the housing to remove any debris.
WARNING: Never operate spa while valve
caps are removed. Valve should be fully
assembled before supplying power to the
equipment.
NOTE: Air controls should be closed
during heating cycles for maximum
energy e ciency.
NOTE: At the start of a ltration cycle,
the Champagne Air System is activated
to purge the lines and ensure complete
ltration. Ensure that at least one air control
is always fully open.
12
VITA SPA
Page 13

ELECTRICAL INFORMATION
Caution: Risk of electrical shock.
Read and follow all instructions.
Important Safety Instructions
All electrical connections to this spa package
MUST be accomplished by a quali ed licensed
electrician in accordance with local electrical
codes in e ect at the time of installation.
NOTE: Prior to performing any service to
the spa equipment, turn OFF all primary
electrical power at the main circuit breaker
or disconnect panel.
To make spa electrical connections, remove
the exterior equipment access panel, locate
the electrical control box, remove the control
box cover and follow the wiring diagram on
the inside of the control box cover.
Connections should be made using copper
conductors only. Connecting wires, circuit
breakers, or fuses must all be sized to
accommodate the Total Ampere load as
speci ed on the equipment label.
This equipment is designed to operate on
50Hz alternating current only, at 230 volts.
NOTE: All unions must be hand-tight and
all slice valves must be locked in the OPEN
position before lling or re lling spa!
A clip is provided to help keep the slice
valve open. Run spa and check for union
water leaks before reinstalling exterior
panel.
Important Safety Instructions
All electrical connections to this spa package
MUST be accomplished by a quali ed licensed
electrician in accordance with locall codes in
e ect at the time of installation.
NOTE: Prior to performing any service to
the spa equipment, turn OFF all primary
electrical power at the main circuit breaker
or disconnect panel.
Note: Copper wire is strongly recommended
for all electrical connections.
ENGLISHFRANÇAIS
VITA SPA
13
Page 14

START UP PROCEDURES
ENGLISH FRANÇAIS
Follow recommendations for site location
and electrical connection. The water line on
the weir door is the level at which the water
should be maintained.
1. Fill the spa through the lter hole to
1/8” below the top of the Weir door. with
tap water. Never use ‘softened’ water in
your spa. Softened water can impact the
chemical balance of the water and lead to
degradation of metal plumbing ttings.
2. Turn power on to unit at circuit breaker or
disconnect panel.
3. Open the air controls, located on the top
lip, and cycle the jets from high to low.
Water should come from the therapy jets.
If water ow is not established, turn o jets
and see Priming Your Spa (this page).
4. Add chemicals. Ask your dealer for
additional information.on start up or
getting the water balanced.
Priming Your Spa
When lling your spa for the rst time or,
after draining and re lling the spa, you
may need to bleed air from the system.
Should you experience an air-lock on
Pump 1, remove the lter cover,
insert a garden hose through each center
hole that holds the lter as far as possible
without using force. Hold the hose in place
and turn on the water. Cycle pump 1 from
low to high several times, this forces water
into the pump and forces the air out. If this
does not work or you experience an air-lock
on Pump 2, remove the side panel and
locate the pump. With the pump on high
speed, slowly loosen the discharge (top)
pump union until water starts to trickle out.
Once water is trickling out, hand tighten
the union (do not over tighten as this could
cause the union to crack) and replace the
side panel
Follow Operating Instructions for your
particular model to set heat to the desired
temperature. Initially, you may nd that
the spa requires 12 to 14 hours on 230 Volt
installations to reach temperature. Keep your
thermal cover on the unit and close the air
controls to help the heating process.
NOTE: At the start of a ltration cycle, the
Air System is activated to purge the lines
and ensure complete ltration. If you have
the air system ensure that at least one air
control is always fully open.
Important: Do not operate the spa
without full water ow.
14
Pr - This is Not an Error Message
The Spa has just been powered up and is in
Priming Mode for 4 Minutes. Pumps can be
turned ON and OFF to remove any air from
the plumbing lines and the Heater. Cycle
the pumps on and o to verify good water
ow and wait 4 minutes or press any temp
related button to exit Priming Mode.
VITA SPA
Page 15
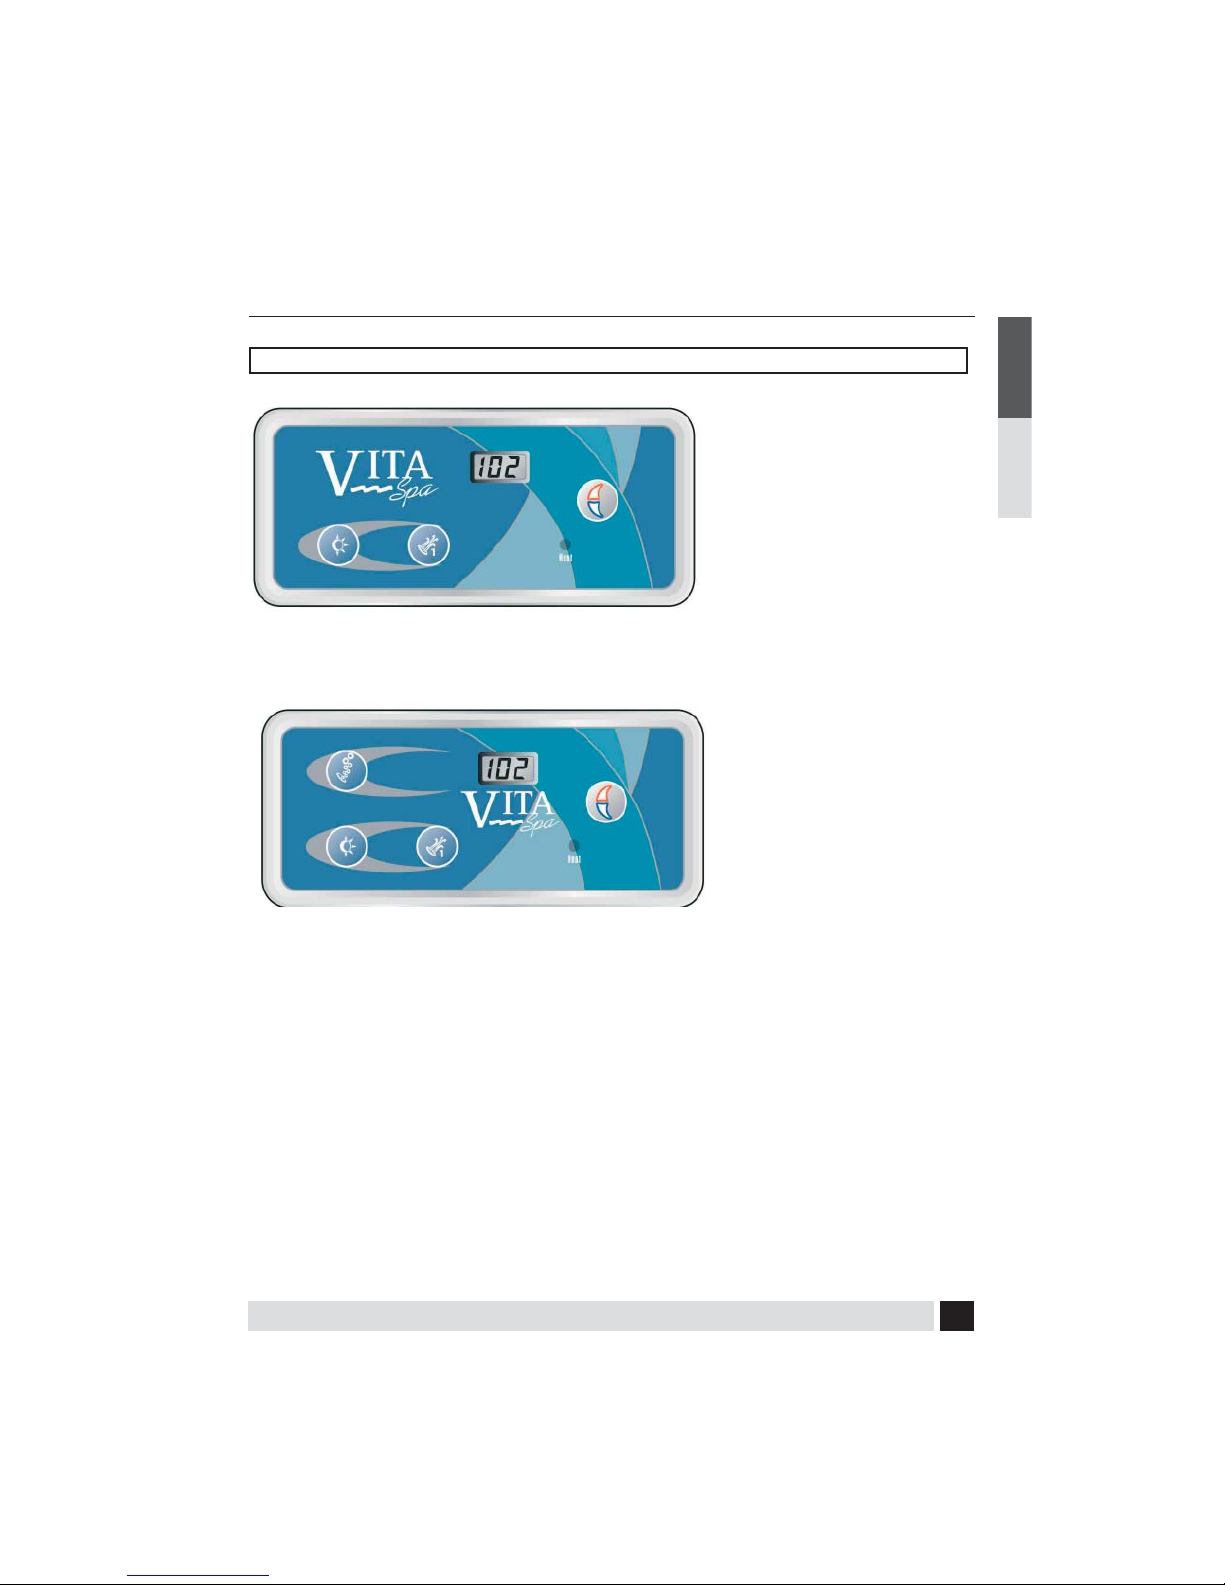
POWERWORKS ® 167 CONTROL
Amour, Image, Intrigue & Duet
ENGLISHFRANÇAIS
If your Topside Control looks
like this, your spa has the
following features:
• Internal Light
• 1 Dual Speed Pump
If your Topside Control looks
like this, your spa has the
following features:
• Internal Light
• 1 Dual Speed Pump
• Champagne Air System
The 167 Series Powerworks™ Controls o er
you the ultimate in spa control. The backlit,
Liquid Crystal Display (LCD) displays current
temperature, set water temperature, and
operating mode settings. Each feature is
actuated through the control panel pad.
Touch the appropriate button to activate
the desired function.
NOTE: The CIRC PUMP option will change the
operation of the factory default settings and
modes of operation of your spa. All ltration
and heating is now controlled by the CIRC
PUMP. If your spa has a CIRC PUMP see speci c
CIRC PUMP information on page 31
VITA SPA
At start up, when power is supplied to the spa,
the controls will operate properly and safely
under the factory settings. The spa will be in
Standard mode, have a temperature setting of
100°F (38°C), and a ltration cycle duration of
2 hours. To fully utilize the unique capabilities
of the control system, it is important to know
how to set the temperature, operate the
pumps, operate the light, adjust the mode
setting, and change the ltration cycle.
15
Page 16
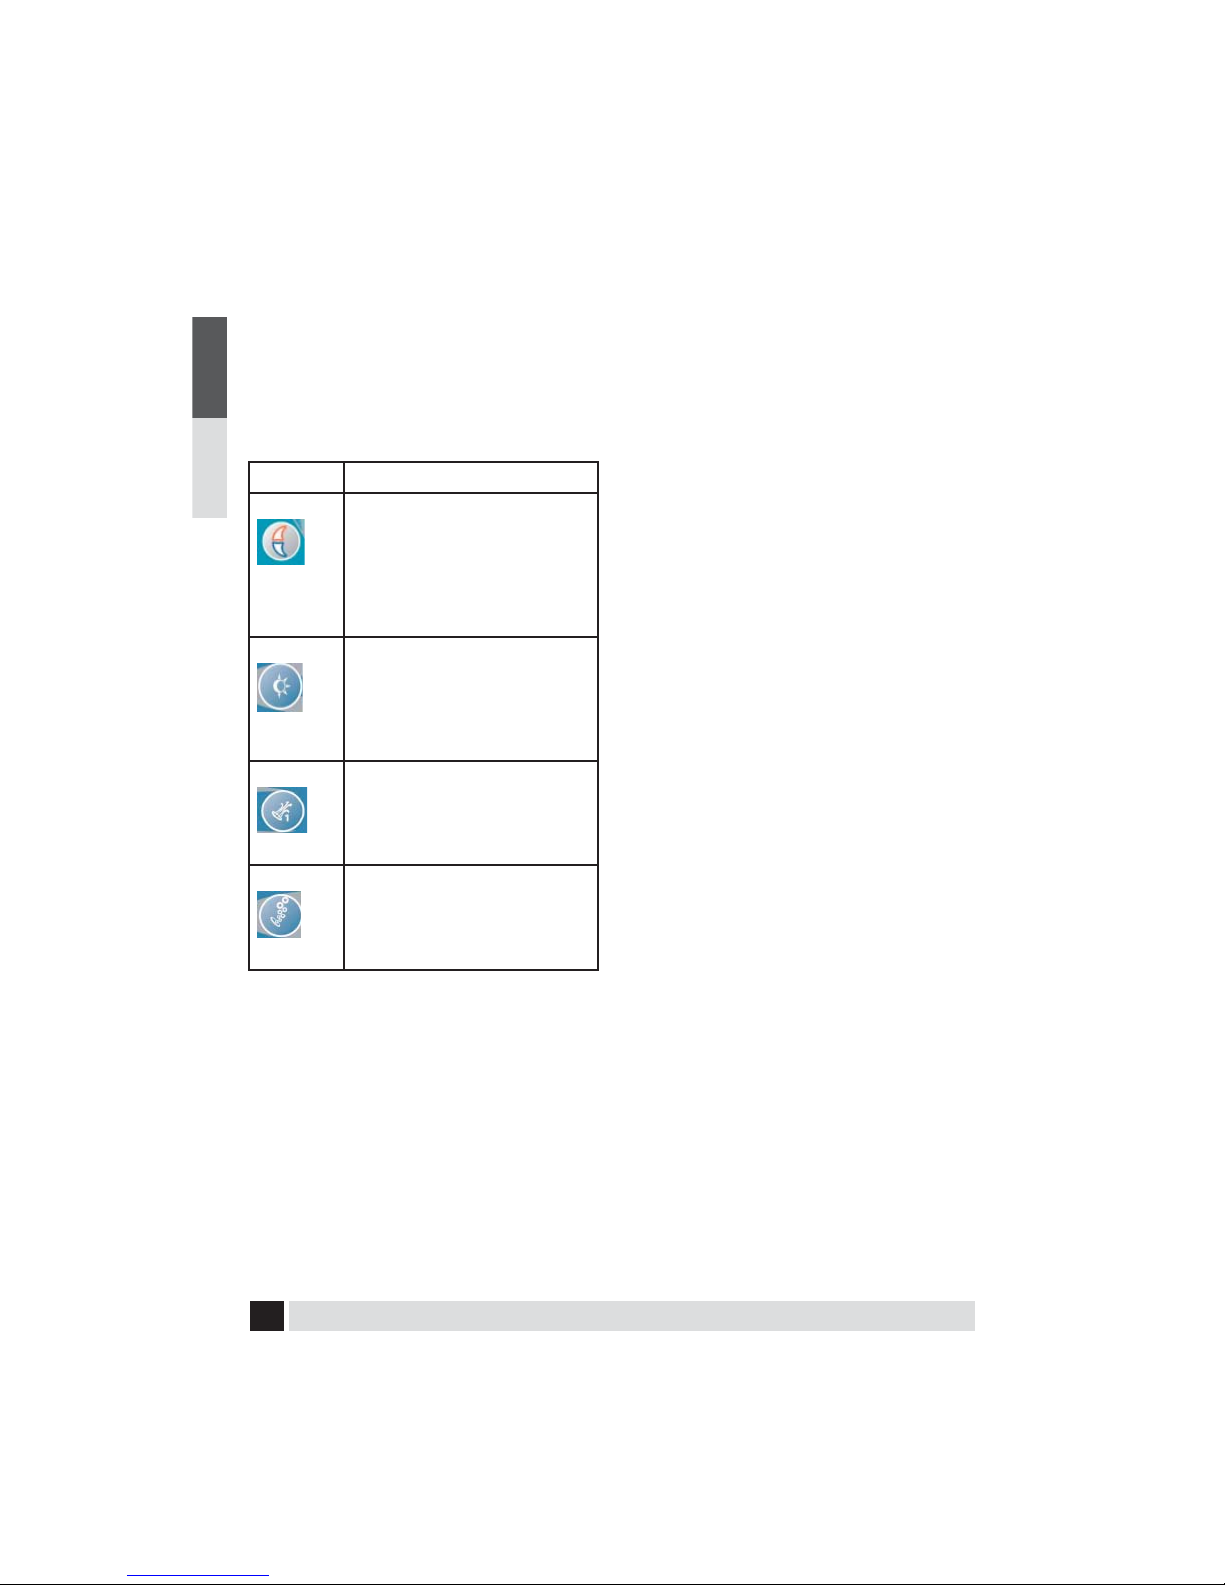
User’s Pads
User’s Pads are the buttons located on the
ENGLISH FRANÇAIS
topside control panel and are used to program
various spa functions (i.e., turn on spa light, set
temperature, etc.). The following table de nes
the buttons:
Pad Use
• Decrease temperature
• Increase temperature
Temp
• Switch modes
• Change ler cycle durations
• Turn internal spa light on or o
• Switch modes
Lght
• Activate therapy pump
• Set duration of lter cycles
Jets
• Activate Champagne Air
System
Air
Temperature
The maximum set temperature is 104°F (40°C)
and the minimum set temperature is 80°F
(26°C). The current water temperature or, if
the pump has not been running, two dashes,
will show on the display. If dashes are
displayed, you must rst start the pump by
pressing the PUMP 1 pad. Wait until the water
temperature is displayed (approximately 2
minutes).
The set temperature of your spa may easily
be increased or decreased at any time using
the ‘TEMP’ pad. Press the ‘TEMP’ pad; the
set temperature will be displayed in the
LCD window. The next touch of ‘TEMP’ will
change the set temperature either up or
down 1°F (0,5°C). If you want to increase
the temperature and the displayed indicates
the temperature was increased by 1°F (0,5°C),
continue to press the ‘TEMP’ pad until the
desired set temperature is reached.
If you want to decrease the set temperature
and the LCD indicates that the temperature is
increasing, STOP. Wait a few seconds until the
actual temperature is displayed. Then press
the ‘TEMP’ pad again. The set temperature
will be displayed. Press it again and the set
temperature will decrease by 1°F (0,5°C).
Continue pressing the ‘TEMP’ pad until the
desired set temperature is reached.
If the spa is set in Standard mode or in a
ltration cycle, increasing the set temperature
may result in activating the heater. Decreasing
the set temperature will turn the heater o .
When the heater is operating, the LED below
the ‘HEAT’ icon will be lit.
Pump 1
Touch the ‘JETS’ pad to activate the primary
ltration pump. The sequence of the jet action
is:
1 touch = Low therapy jets
2 touches = High therapy jets
3 touches = O
The low speed operation of Pump 1 is timed
to automatically turn o after two hours
of operation. The high speed operation of
Pump 1 is timed to automatically turn o
after 30 minutes of operation.
16
VITA SPA
Page 17

NOTE: With the standard con guration,
pump 1 will automatically operate in
low speed whenever the spa calls for a
ltration cycle or heat. When this automatic
activation occurs, the low speed of Pump
1 cannot be turned o ; however, all other
control functions can be activated.
MODES OF OPERATION:
In the standard con guration (NO circ pump
option) your spa can be switched among
Standard, Economy, and Sleep modes by
touching the ‘TEMP’ pad and then the ‘LIGHT’
pad. If your spa is in the
Standard mode,
the low speed of Pump 1 and the heater will
come on automatically to maintain the set
temperature of the water. The pump will
circulate for approximately two minutes
several times throughout the day to sample
water temperature. If your spa is set in the
Economy mode,
the heater will operate ONLY during the
ltration cycles. If your spa is set in the
Sleep mode,
The spa will heat to within 20°F (11°C) of the
set temperature only during lter cycles.
The pump will operate either during a normal
ltration cycle or, the heater and pump
will be activated when the heater housing
temperature drops below 45°F (7.2°C).
The selected mode will be displayed in the
LCD window of the control panel.
When in Standard mode, the letters ‘ST’
are displayed beie y, followed by the water
temperature. When in Economy mode, the
letters ‘EC’ are
displayed alternately with the
water temperature.
When in Sleep mode, the letters ‘SL’ are
displayed alternately with the water temperature.
Setting the Time and Filtration Cycles
You can decide when your lter cycles start
and you also have choices on how long they
run.
ENGLISHFRANÇAIS
Preset Filter Cycles. The spa control system
is designed with two lter cycles. The rst
lter cycle turns on 6 minutes after power is
supplied to the spa. The second lter cycle
turns on 12 hours later. Filter cycles are pre-set
for a two hour duration.
Note: To properly clean and maintain spa,
a total lter time of at least four hours per
day is recommended. If an ozonator is
installed, 6 hours is recommended.
Changing Filter Cycle Start Time
The start/stop times of the lter cycle begin 6
minutes after the spa set time is established.
Set time is based on the time of day that
the spa is powered up. Set time may only be
changed by disconnecting power from the
spa and re-connecting it at the desired start
time. For example, if you want the lter cycle
to begin at 9:00 PM,turn o the spa breaker
and turn it back on at 8:54 PM (remember
the 6 minute wait period). The cycle will begin
at 9:00 PM and will repeat beginning at 9:00
AM. Each cycle will run for the prescribed
number of hours.
Changing Filter Cycle Duration
The duration of a lter cycle can be set in
hour increments of 2, 4, 6, 8, or continuous.
For example, a 2 hour cycle will complete once
every 12 hours for a total of 4 hours per day.
The amount of time needed to lter you spa
will depend on usage and ambient conditions.
You will need to program you lter cycles
based upon your personal use.
To change the duration of the lter cycles
VITA SPA
17
Page 18

touch the ‘TEMP’ pad and then touch the
Accessory Mode Shuts o in...
‘J ET S’ pad. Touch the ‘TEMP’ pad to adjust
ENGLISH FRANÇAIS
the cycle duration to the desired setting. After
each press, the duration of the cycle will be
displayed in the LCD window as follows:
F2 2 Hours for each cycle, 4 hours per day
F4 4 Hours for each cycle, 8 hours per day
F6 6 Hours for each cycle, 12 hours per day
F8 8 hours for each cycle, 16 hours per day
FC Continuous ltration, 24 hours per day
To exit the lter-set procedure, touch ‘JETS’.
The LCD window will display the current water
temperature.
If a change is made to the duration while the
spa is in a ltration cycle, it will take e ect
immediately. If the change is made outside a
ltration cycle, it will take e ect at the start of
the next scheduled cycle.
NOTE: When power to the spa is denied
(disconnect, power outage), the controls
may revert to the default factory settings.
Any adjustments to set temperature
or lter cycle duration may need to be
reprogrammed.
Light
Touch the ‘LIGHT’ pad to turn all lights on and
o . The lights will automatically turn o after 4
hours of operation.
Automatic Time Outs
Your Vita Spa is equipped with an automatic
Time Out feature designed to protect both the
equipment and the user. To reduce unnecessary use of the pumps and lights, the Time Out
feature turns selected accessories o
autmatically.
Accessory Mode Shuts o in...
Blower 30 minutes
Pump 1 Low 2 hours
Pump 1 High 30 minutes
Pump 2 High / Low 30 minutes
Circ Pump Never
Light 4 hours
THERMAL CREEP: see page 40
OZONE OPTION: see page 35
VITAROMA OPTION: see page 30
CIRC PUMP OPTION: see page 33
ENTERTAINMENT SYSTEM OPTION: see page 32
CHAMPAGNE AIR SYSTEM OPTION: see page 30
AQUABURST LIGHTING SYSTEM OPTION: see
page 30
18
VITA SPA
Page 19
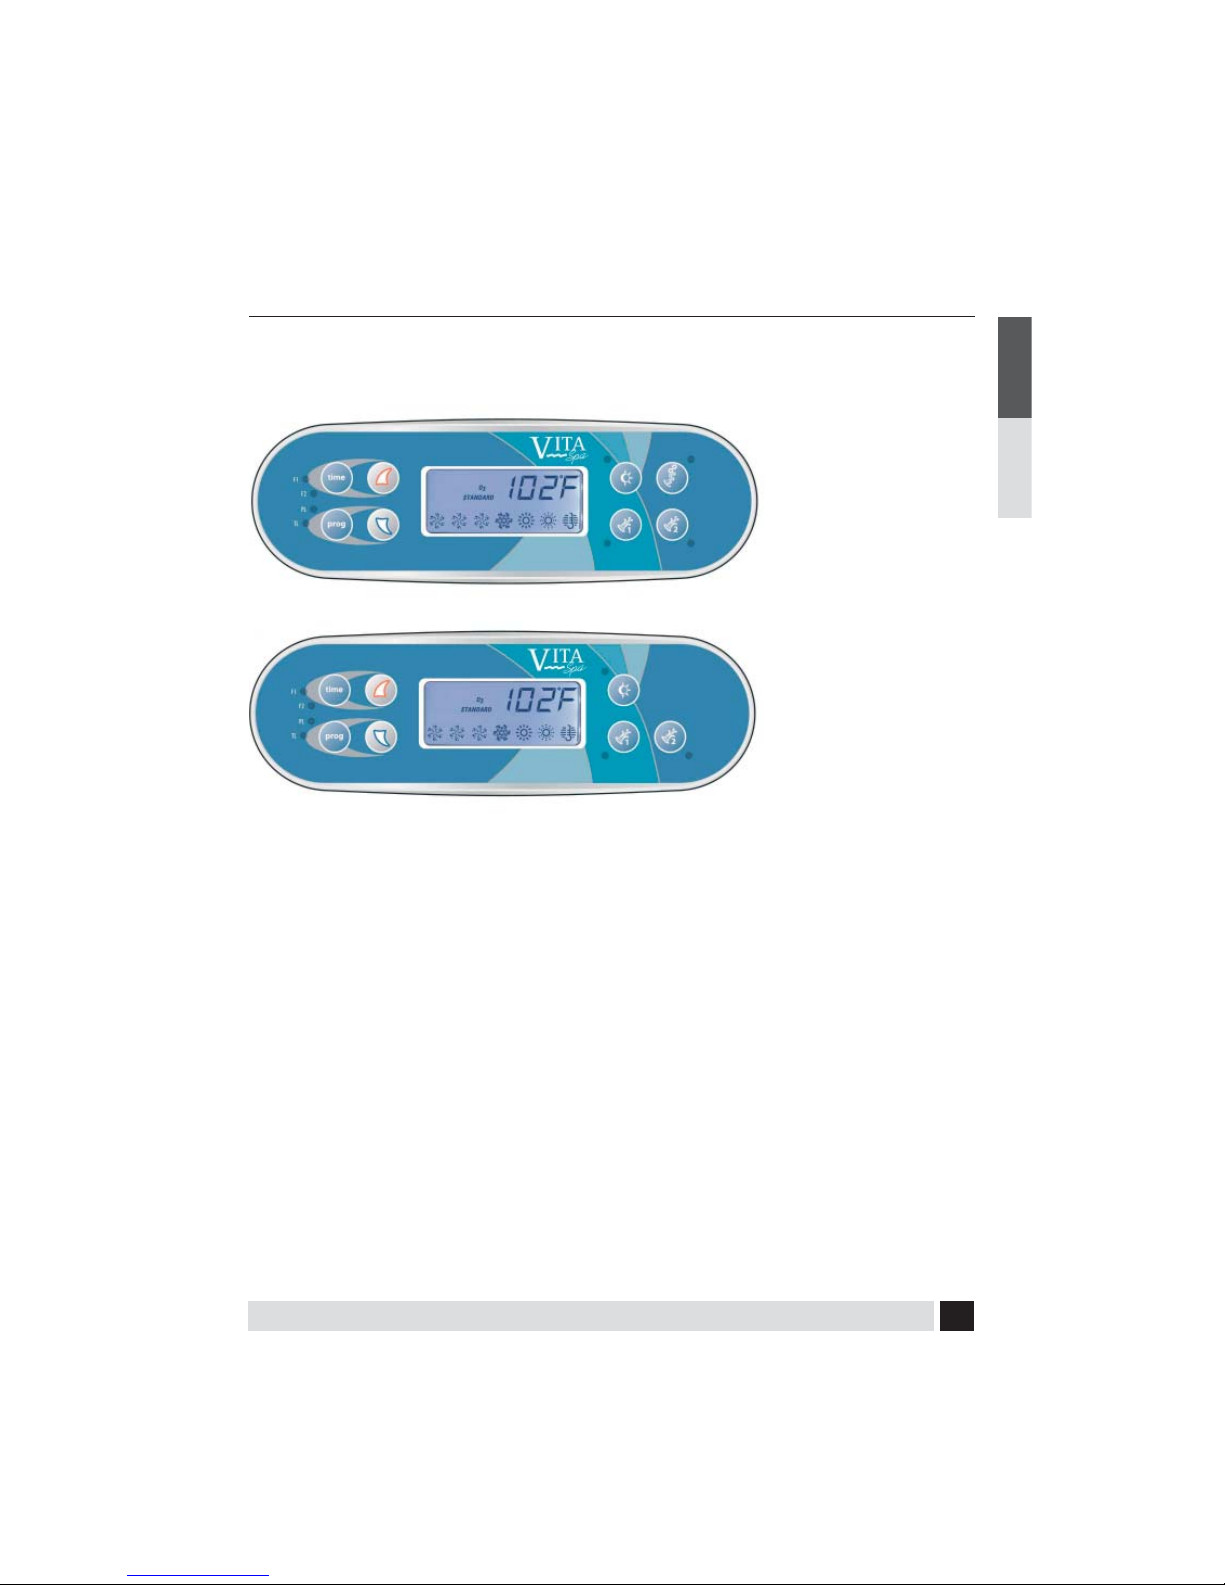
POWERWORKS ® 460E CONTROL
460E Series Control System for Spa Models Joli, Cabaret, Nuage, Passion, Chateau
If your Topside Control
looks like this, your spa
has the following features:
• Internal Lights
• Champagne Air System
• 2 Pumps
If your Topside Control
looks like this, your spa
has the following features:
• Internal Lights
• 2 Pumps
ENGLISHFRANÇAIS
The 460 Control System o ers you the
ultimate in spa control. The backlit, Liquid
Crystal Display (LCD) displays current water
temperature, set point water temperature,
time, and operating mode settings.
Each feature of the system is actuated
through a control panel touch pad.
Touch the appropriate pad to activate the
desired function.
NOTE: The CIRC PUMP option will change the
operation of the factory default settings and
modes of operation of your spa. All ltration
and heating is now controlled by the CIRC
PUMP. If your spa has a CIRC PUMP see speci c
CIRC PUMP information on page 31.
VITA SPA
At start up, when power is supplied to the spa,
the controls will operate properly and safely
under the factory settings. The spa will be in
Standard Mode, have a temperature setting of
100°F (38°C), and a ltration cycle duration of
2 hours. To fully utilize the unique capabilities
of the control system, it is important to
know how to set the temperature, operate
the pumps, operate the light, adjust the mode
setting, and change the ltration cycles.
Note: In event of a power outage or failure,
the 460 Series Control System may retain
settings. If settings are lost, re-program per
the instructions in this manual.
19
Page 20
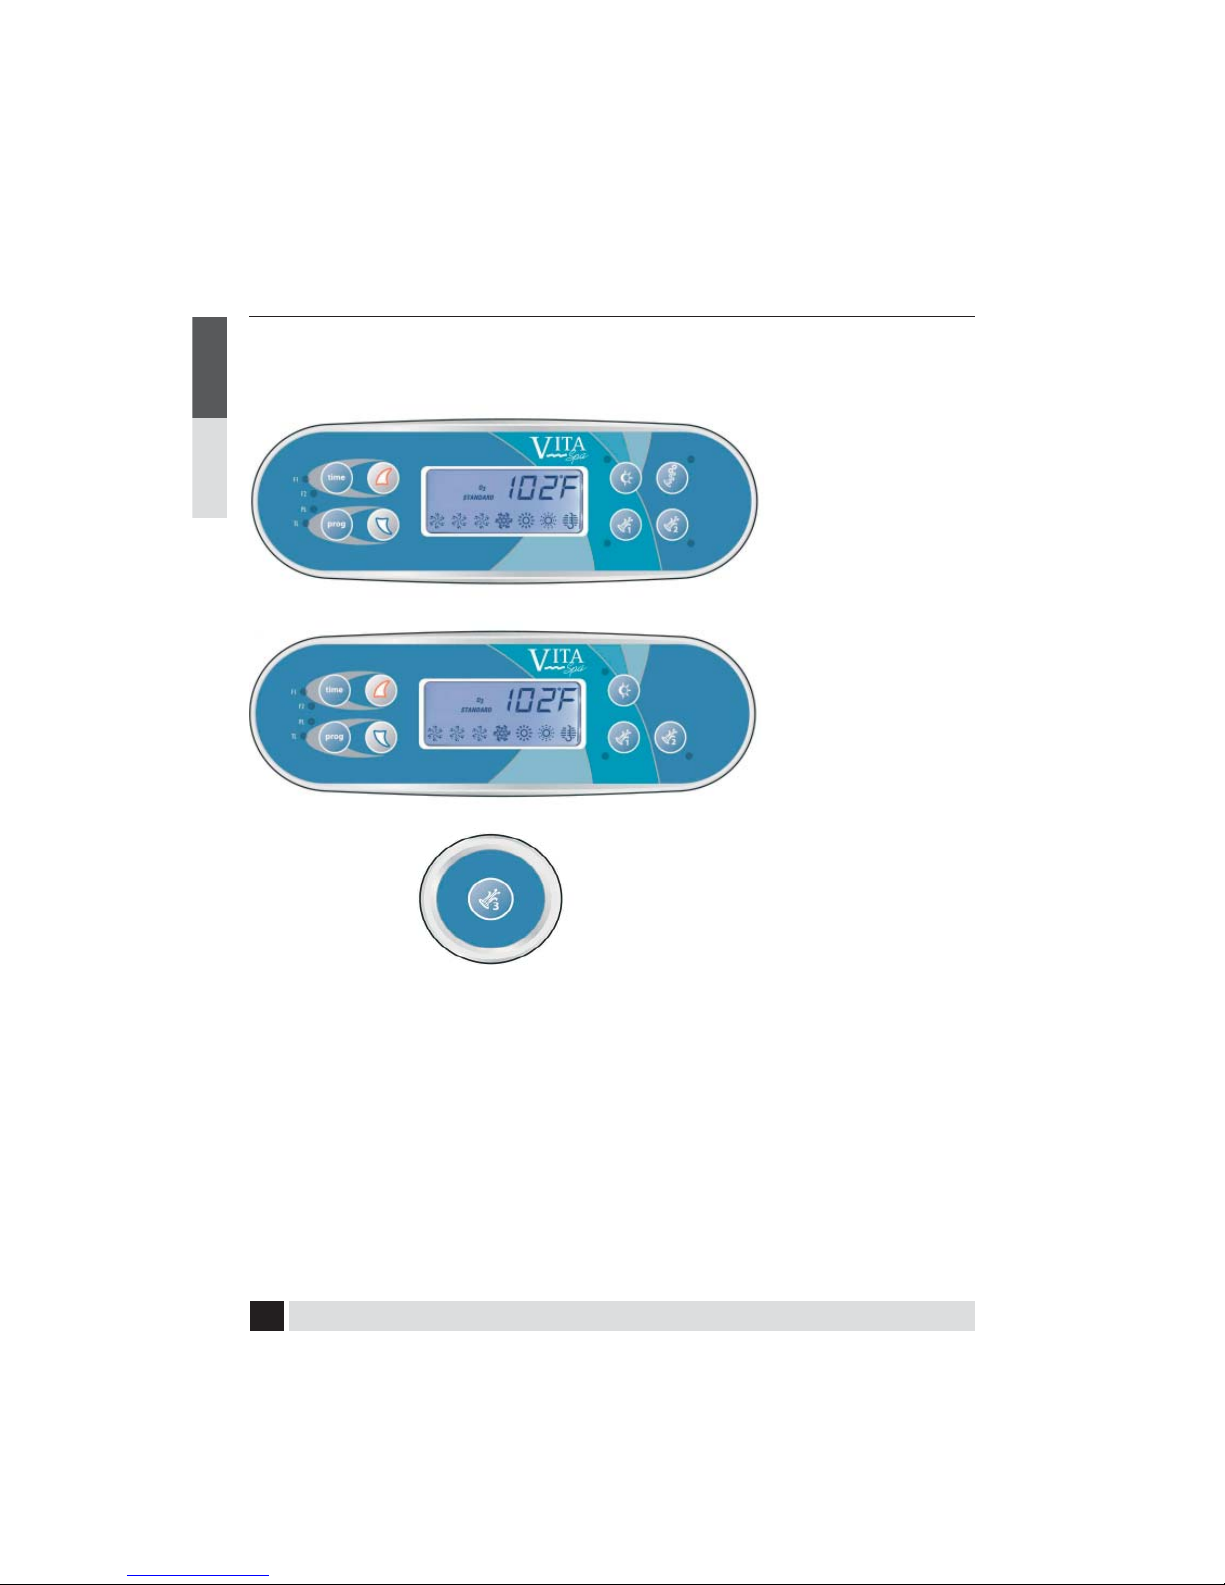
POWERWORKS ® 760E CONTROL
ENGLISH FRANÇAIS
760E Series Control System for spa models Rendezvus and Mystique
If your Topside Control looks like this, your spa
has the following feature:
If your Topside Control
looks like this, your spa
has the following features:
• Internal Lights
• Blower
• 2 Dual Speed Pumps
If your Topside Control
looks like this, your spa
has the following features:
• Internal Lights
• 2 Dual Speed Pumps
The Powerworks™ 760 Series Control System
o ers you the ultimate in spa control. The
backlit, Liquid Crystal Display (LCD) displays
current water temperature, set point water
temperature, time, and operating mode
settings. Each feature of the system is actuated
through a control panel touch pad. Touch
the appropriate pad to activate the desired
function.
At start up, when power is supplied to the spa,
the controls will operate properly and safely
under the factory settings. The spa will be in
Standard mode, have a temperature setting of
20
• 1 Additional Single Speed Pump
100°F (38°C), and a ltration cycle duration of
2 hours. To fully utilize the unique capabilities
of the control system, it is important to know
how to set the temperature, operate the
pumps, operate the light, adjust the mode
setting, and change the ltration cycles.
Note: In event of a power outage or failure,
the 760 Series Control System may retain
setngs. If settings are lost, re-program per
the instructions in this manual.
VITA SPA
Page 21
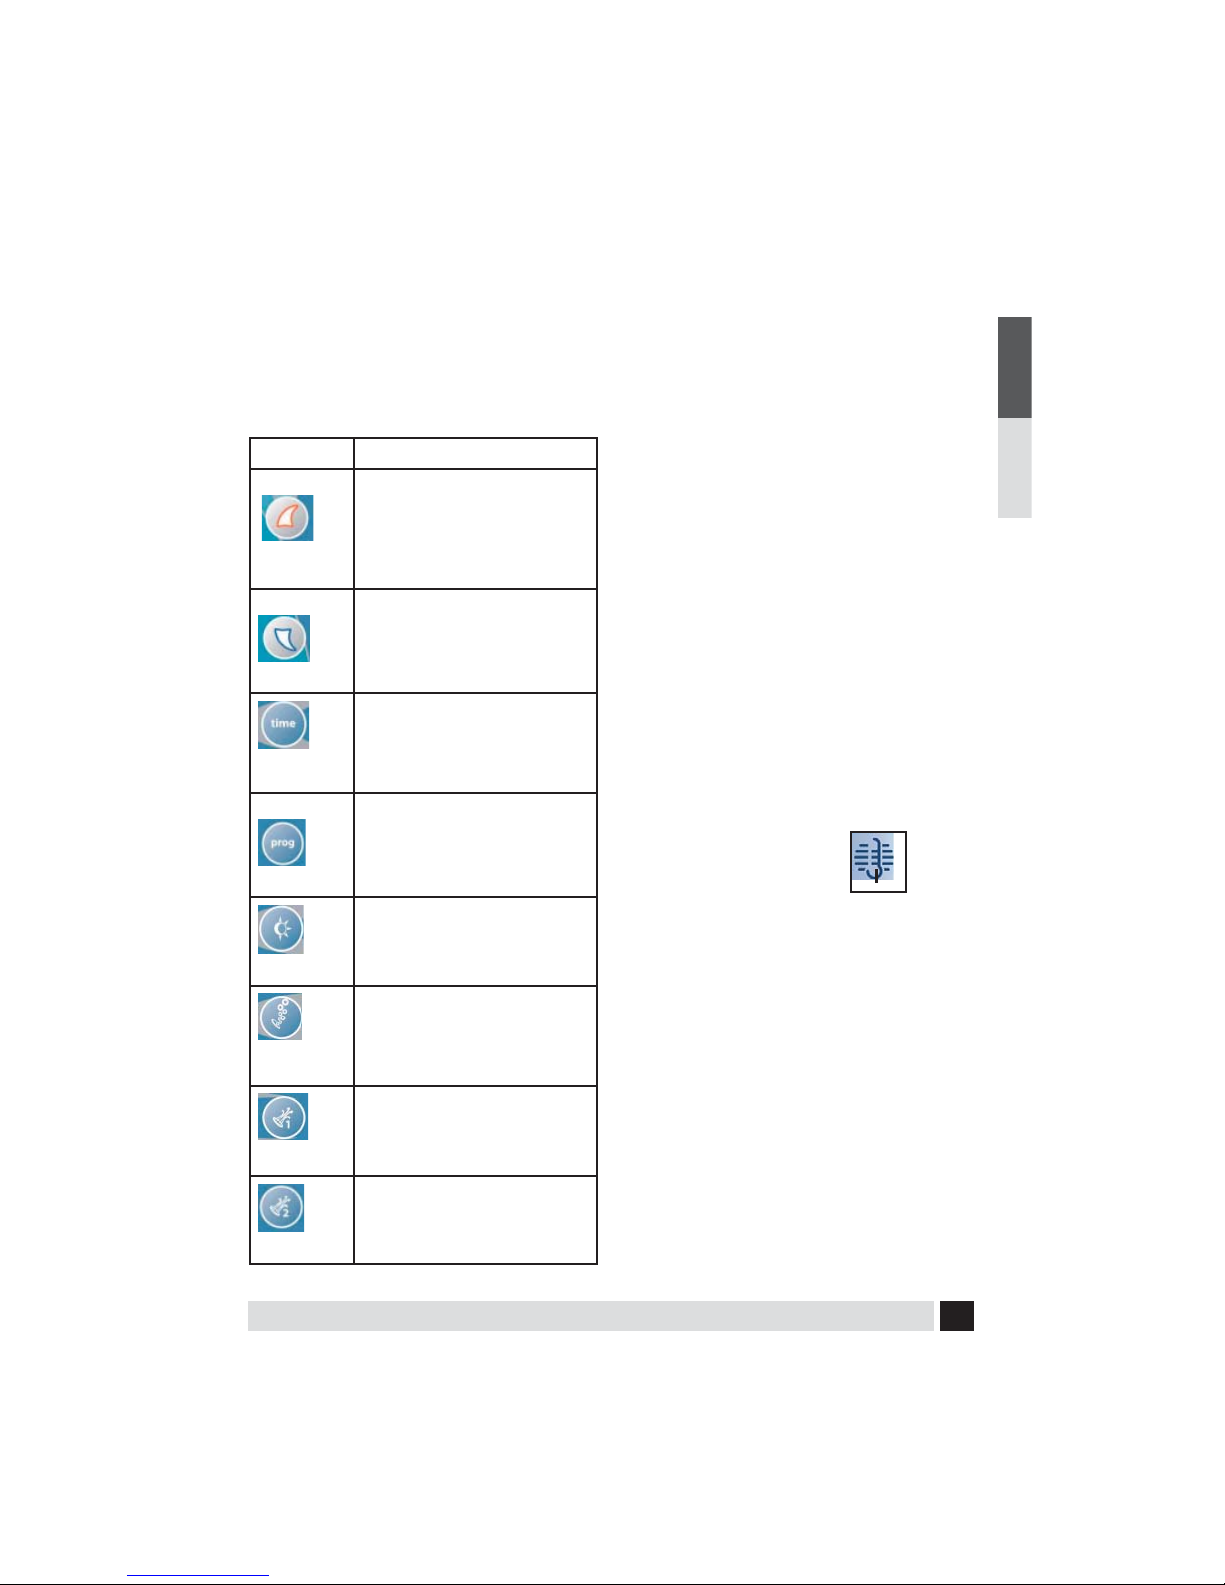
User’s Pads
User’s Pads are the buttons located on the
topside control panel and are used to program
various spa functions (i.e., turn on spa light, set
temperature, etc.). The following table de nes
the pads:
Pad Use
• Increase temperature
UP
Down
Time
• Change time settings
• Used in alternate programming
sequences
• Decrease temperature
• Change time settings
• Used in alternate programming
sequences
• Used in alternate programming
sequences
• Exit programming
• View the Time
• Switch modes
• Set time and ltration cycles
Prog
• Turn all spa light on or o
Light
• Activate Champagne Air
Air
Jets 1
System
• Activate primary pump
•Used in alternate programming
sequances
Temperature
The maximum set temperature is 104°F (40°C)
and the minimum set temperature is 80°F
(26°C). The current water temperature or, if
the pump has not been running, two or three
dashes, will show on the display. If dashes are
displayed, you must rst start the pump by
pressing the ‘JETS 1’ pad.
Wait until the water temperature is displayed
(approximately 2 minutes).
The set temperature of your spa may easily
be increased or decreased at any time using
the ‘UP’ or ‘DOWN’ pads. When either of these
pads is touched, the set temperature will be
displayed in the LCD window. Each successive
touch will change the set temperature 1°F
(0,5°C) in the chosen direction. After 3 seconds
the LCD will automatically display the water
temperature or dash lines.
If the spa is set in Standard mode or in a
ltration cycle, adjusting the set temperature
may result in activating the heater.
When the heater is operating, the heat icon
will be displayed in the LCD.
JETS 1
Touch the ‘JETS 1’ pad to activate the primary
ltration pump. The sequence of the jet action is:
1 touch = Low therapy jets
2 touches = High therapy jets
3 touches = O
JETS 2
Touch the ‘JETS 2’ pad to activate the therapy
pump. The sequence of jet action is:
1 touch = Low therapy jets
2 touches = High therapy jets
3 touches = O
ENGLISHFRANÇAIS
• Activate therapy pump
Jets 2
VITA SPA
21
Page 22

JETS 3
Touch the ‘JETS 3’ pad to activate the therapy
ENGLISH FRANÇAIS
pump in conjunction with the sequencer.
The sequence of jet action is:
1 touch = High therapy jets
2 touches = O
The low speed operation of Pump 1 is timed
to automatically turn o after two hours of
operation. The high speed operation of Pump
1 and the low and high speed of Pumps 2 &
3, are timed to automatically turn o after 15
minutes of operation.
The low speed of Pump 1 runs when the
blower or any other pump is on. In the
STANDARD mode it will also activate for at
least 2 minutes every 30 minutes to detect
the spa water temperature and then remain
on to heat to the set temperature if needed.
When this automatic activation occurs, the
low speed of Pump 1 cannot be turned o ;
however, all other control functions can be
activated.
Light
Touch the ‘LIGHT’ pad to turn all lights on and
o . The lights will automatically turn o after 4
hours of operation.
Spa Control Locks
The corresponding lights on the spa panel
will illuminate to show the spa control locks
or lter cycles that are currently active.
Temperature Lock (TL)
Once you have set the desired water
temperature, you may lock-in the new
setting to prevent unauthorized
temperature adjustments to your spa.
To lock the set temperature: Touch ‘UP’ or
‘DOWN’, then touch ‘TIME’, ‘JETS 1’ and ‘UP’
within 3 seconds. The ‘TL’ indicator will light
when the set temperature is locked.
Temperature Unlock
To unlock the temperature, touch either
‘UP’ or ‘DOWN’, then touch ‘TIME’, ‘JETS 1’,
and ‘DOWN’ within 3 seconds. The ‘TL’
indicator light will go out when the set
temperature lock is cleared.
Panel Lock (PL)
To help prevent unauthorized use of your
spa, the control system has a unique panel
locking system. To lock the panel, touch
‘TIME’, ‘JETS 1’, then ‘UP’ within 3 seconds.
When locked, the ‘PL’ indicator light will be
on. Except for the time button, everything
will be frozen. When the control panel lock
is engaged, all automatic spa functions will
operate normally but cannot be altered.
Panel Unlock
To unlock the panel, touch the ‘TIME’,
‘JETS 1’, and ‘DOWN’ within 3 seconds.
The ‘PL’ indicator light will go out when the
panel lock is cleared.
Operating Modes
Your Vita Spa comes with three
primary operating modes.
Standard Mode maintains the water at
the desired set temperature. Note that the
last measured spa temperature displayed
is current only when the pump has been
running for at least 2 minutes. The ‘STD’ icon
will be brie y displayed in the LCD window
when this mode is selected. The word
standard will constantly be displayed on the
panel
Economy Mode heats the water to the
22
VITA SPA
Page 23

desired set temperature ONLY during lter
cycles. The ‘ECN’ icon may be displayed in
the LCD window and the word economy will
be displayed on the panel when this mode
is selected. While in the Economy mode,
pressing the ‘JETS 1 ’ button will put the spa
into the Standard-In-Economy mode, which
operates the same as the Standard Mode,
then reverts back to the Economy mode after
1 hour. The spa can be immediately reverted
back into the Economy mode at any time by
simply pressing the ‘PROG’ button.
Sleep Mode heats the spa to within 20°F
(11°C) of the set temperature only during
lter cycles. The ‘SLP’ icon may be displayed
in the LCD window and the word sleep will
be displayed on the panel when this mode is
selected.
Standby Mode: While in this mode, all
spa functions are temporarily suspended
to allow for lter changes or other routine
maintenance tasks.
take full advantage of the unique capabilities
of your new spa, you should rst set the time
and establish your ltration cycles.
Setting the Time
When the time of day has not been
programmed, the icon will be ashing on
the LCD window. To set the time of day, rst
press the ‘TIME’ button then press the ‘PROG’
button. The hour digit(s) will be ashing on
the LCD window. Press the ‘UP’ or ‘DOWN’
button to advance the hours up or down to
the desired set point. Press the
‘PROG’ button to enter the time hour. The
minute digits will now be ashing on the LCD
window. Press the ‘UP’ or ‘DOWN’ button
to advance the minutes up or down to the
desired set point. Press the ‘PROG’ button to
enter the time minutes. At this point you can
either proceed with setting the ltration cycles
as described in the following ‘Changing Filter
Cycle’ section, or press the ‘TIME’ button to
save the settings and exit the programming
sequence.
ENGLISHFRANÇAIS
Changing Modes
To change the operating mode, press the
‘PROG’ button. The operating mode will be
ashing on the LCD window. Press the ‘DOWN’
button to cycle through to the desired mode,
and then press the ‘PROG’ button to con rm
selection. Pressing
Pressing ‘UP’ or ‘DOWN’ then ‘JETS2’ will put the
spa into the Standby Mode. Press any button
to exit the Standby mode.
Time and Filtration Cycles
The control system on your spa has been
designed to function properly and safely at
104F (40°C) after connecting the electrical
wires and installing the proper grounds. To
VITA SPA
Preset Filter Cycles
Once the time of day has been set, your spa
will automatically lter the water for a 2-hour
period every 12 hours.
The rst lter cycle comes preset to operate
from 8:00AM to 10:00AM, and the second
lter cycle comes preset to operate from
8:00PM to 10:00PM. The F1 indicator light
will be lit whenever the spa is in the rst
lter cycle. The F2 indicator light will be lit
whenever the spa is in the second lter cycle.
During a lter cycle, the primary ltration
pump will operate in low speed and can not
be turned o unless the spa is put into the
Standby mode. At the beginning of each
ltration cycle, the other equipment in the
spa will turn on for 30 seconds to purge all
23
Page 24

plumbing lines and ensure complete ltration.
ENGLISH FRANÇAIS
Changing Filter Cycles
The control system allows you to adjust the
start time and duration of each lter cycle
independently to best suit your schedule. The
amount of time needed to lter your spa will
vary depending upon usage and ambient
conditions, but a total lter time of at least
four hours per day is recommended to properly
clean and maintain the water.
To initiate the programming sequence to
change the lter cycles, press ‘TIME’, ‘PROG’,
‘PROG’, and ‘PROG’ within 3 seconds.
If you are setting the lter cycles as a
continuance from setting the time then
proceed to the next paragraph.
press ‘PROG’
You should now see the ‘PROGRAM’, ‘FILTER
1’, and ‘START TIME’ icons on the LCD display
window. The hour digit(s) will be ashing on
the LCD window. Press the ‘UP’ or ‘DOWN’
button to advance the hours up or down to
the desired set point. Press the ‘PROG’ button
to enter the time hour. The minute digits will
now be ashing on the LCD window. Press
the ‘UP’ or ‘DOWN’ button to advance the
minutes up or down to the desired set point.
Press the ‘PROG’ button to enter the time
minutes.
You should now see the ‘PROGRAM’, ‘FILTER 1’,
and ‘END TIME’ icons on the LCD display
window. Adjust the hours and minutes for
the end time of the rst lter cycle as
described above.
After pressing the ‘PROG’ button to enter
the end time of the rst lter cycle, you
should now see the ‘PROGRAM’, ‘FILTER 2’,
and ‘START TIME’ icons on the LCD display
window. Adjust the hours and minutes for
the start time of the second lter cycle as
described above.
After pressing the ‘PROG’ button
to enter the start time of the second lter
cycle, you should now see the ‘PROGRAM’,
‘FILTER 2’, and ‘END TIME’ icons on the LCD
display window. Adjust the hours and minutes
for the start time of the second lter cycle as
described above.
After pressing the ‘PROG’ button to enter the
end time of the lter cycle, the new ltration
times will be saved into the system and
the LCD window will revert back to display
the current water temperature. Pressing
the ‘TIME’ button at any time during the
above programming sequence will save the
values entered up to that point and exit the
programming sequence. To set the spa for
continuous ltration, set the start and end times
of the rst lter cycle to the exact same time.
Note: To properly clean and maintain spa,
a total lter time of at least four hours per
day is recommended. If an ozonator is
installed, 6 hours is recommended.
Clean Up Cycle
After periods of heavy use, you can manually
start a clean-up cycle by turning Pump 1 on in
low speed. The pump will operate for 2 hours
and then automatically turn o . The heater
will also operate during this period if the
controls are set in the Standard mode.
NOTE: Activating the low speed of Pump 1
for a clean-up cycle will initiate ltration,
but not ozone production, unless the spa
enters a timed lter cycle during the 2 hour
period.
24
VITA SPA
Page 25

Inversion Feature
The Control System includes an Inversion
feature that makes it easy to read the LCD
from inside or outside the spa. To invert the
LCD display, touch the ‘UP’ or ‘DOWN’ button,
followed by the ‘AIR’ button. Repeat the
sequence to reverse the inversion process.
If your spa is not equipped with the optional
Champagne Air feature, locate the position of
the AIR button (next to the LIGHT button) and
press in that general location
Automatic Time Outs
Your Vita Spa is equipped with an automatic
Time Out feature designed to protect both the
equipment and the user. To reduce unnecessary use of the pumps and lights, the Time Out
feature turns selected accessories o
autmatically.
Accessory Mode Shuts o in...
Blower 15 minutes
Pump 1 Low 2 hours
Pump 1 High 15 minutes
Pump 2 Lo / Hi 15 minutes
Pump 3 High 15 minutes
Circ Pump Never
Light 1 hour
THERMAL CREEP: see page 40
OZONE OPTION: see page 35
VITAROMA OPTION: see page 30
CIRC PUMP OPTION: see page 33
ENTERTAINMENT SYSTEM OPTION: see page 32
CHAMPAGNE AIR SYSTEM OPTION: see page 30
AQUABURST LIGHTING SYSTEM OPTION: see
page 30
THERAPY SEQUANCER : see page 33
ENGLISHFRANÇAIS
VITA SPA
25
Page 26
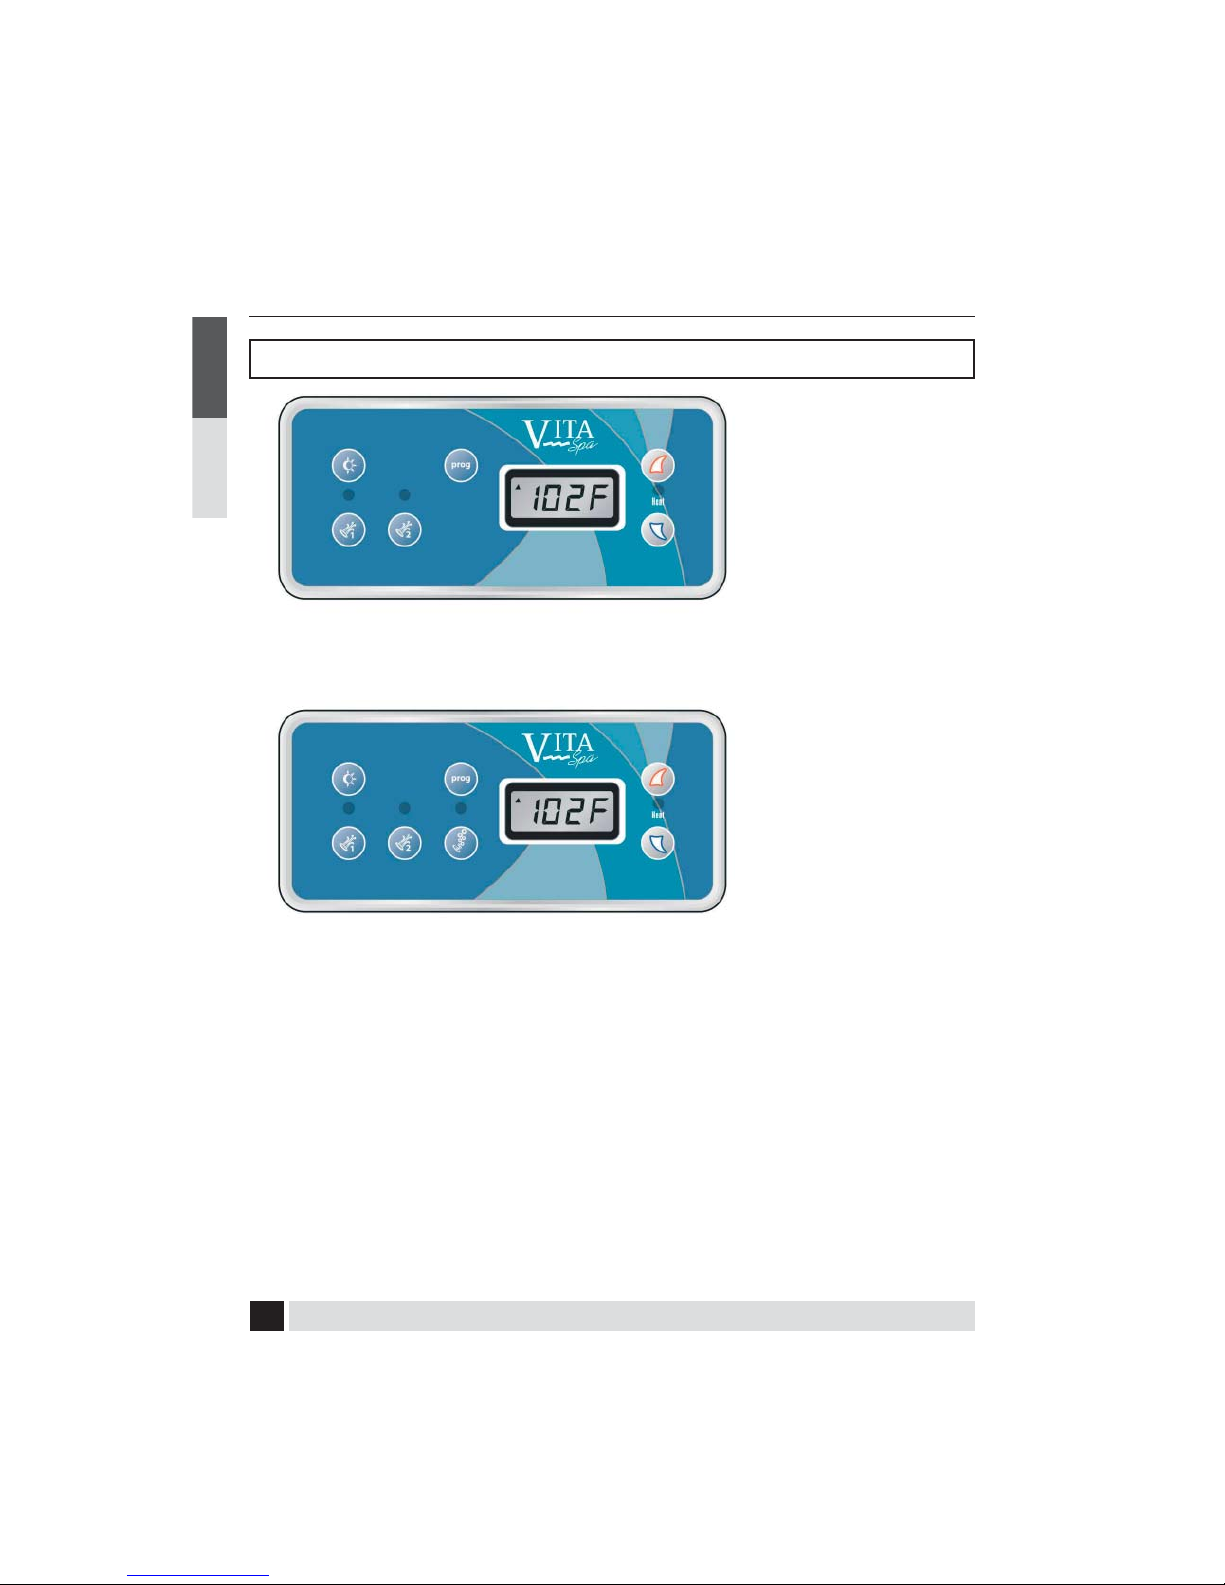
POWERWORKS ® 504 CONTROL SYSTEM
ENGLISH FRANÇAIS
Intrigue, Elegant, Monarque, Prestigue, Envie, & Grand
If your Topside Control
looks like this, your spa
has the following features:
• Internal Lights
• 1 Dual Speed Pump
• 1 Single Speed Pump
If your Topside Control
looks like this, your spa
has the following features:
• Internal Lights
• Blower / Champagne
Air System
• 1 Dual Speed Pump
• 1 Single Speed Pump
The Powerworks™ 504 Series Control System
o ers you the ultimate in spa control. The
backlit, Liquid Crystal Display (LCD) displays
current water temperature, set point water
temperature and operating mode settings.
Each feature of the system is actuated
through a control panel touch pad. Touch
the appropriate pad to activate the desired
function.
At start up, when power is supplied to the spa,
the controls will operate properly and safely
under the factory settings. The spa will be in
Standard mode, have a temperature setting of
26
100°F (38°C), and a ltration cycle duration of
2 hours. To fully utilize the unique capabilities
of the control system, it is important to know
how to set the temperature, operate the
pumps, operate the light, adjust the mode
setting, and change the ltration cycles.
Note: In event of a power outage or failure,
the 504 Series Control System may retain
settings. If settings are lost, re-program per
the instructions in this manual.
VITA SPA
Page 27
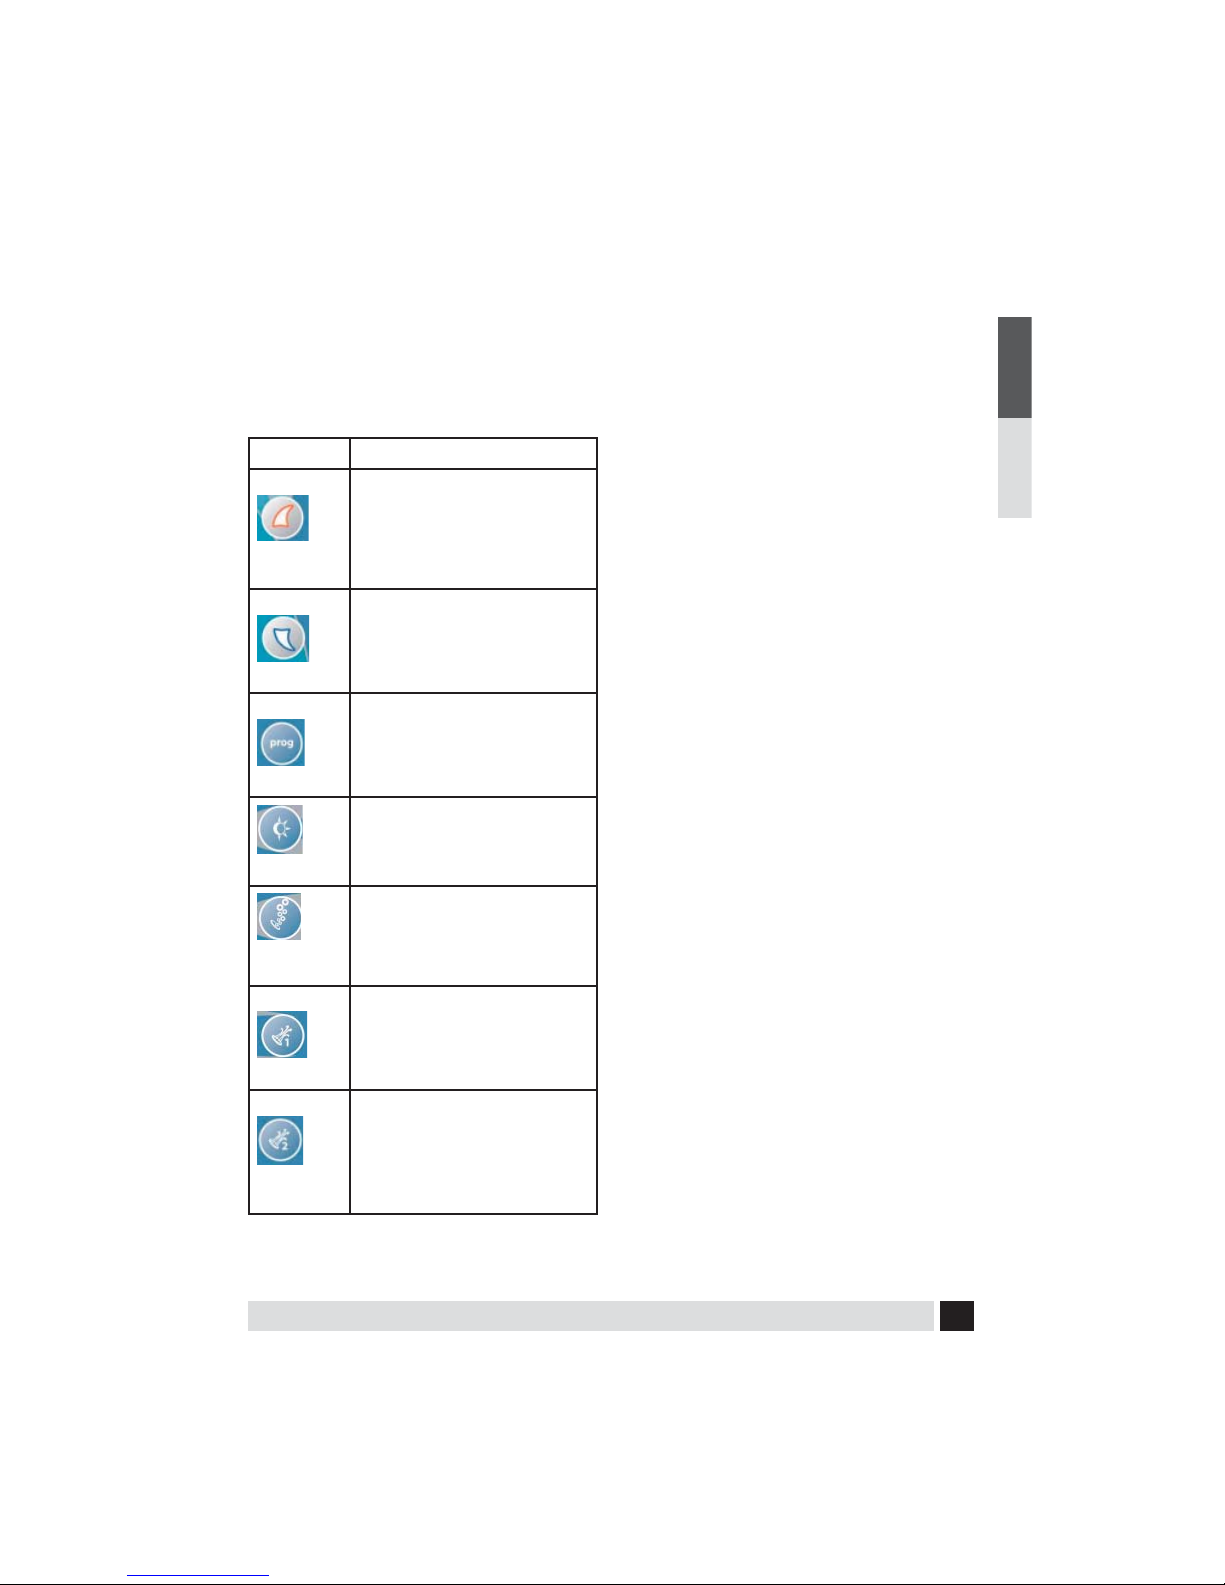
User’s Pads
User’s Pads are the buttons located on the
topside control panel and are used to program
various spa functions (i.e., turn on spa light, set
temperature, etc.). The following table de nes
the pads:
Pad Use
• Increase temperature
• Change time settings
Up
Down
•Used in alternate programming
sequences
• Decrease temperature
• Change time settings
•Used in alternate programming
sequences
• Switch modes
Prog
• Turn internal spa light on or o
Light
• Activate Champagne Air
Air
Jets 1
System
• Activate primary ltration pump
•Used in alternate programming
sequences
• Activate therapy pump
Jets 2
Temperature
The maximum set temperature is 104°F (40°C)
and the minimum set temperature is 80°F
(26°C). The current water temperature or, if the
pump has not been running, two dashes, will
show on the display. If dashes are displayed,
you must rst start the pump by pressing the
‘JETS 1’ pad. Wait until the water temperature
is displayed (approximately 2 minutes).
The set temperature of your spa may easily be
increased or decreased at any time using the
‘UP’ or ‘DOWN’ pads. When either of these
pads is touched, the set temperature will be
displayed in the LCD window. Each successive
touch will change the set temperature 1°F
(0.5°C) in the chosen direction. After 3 seconds
the LCD will automatically display the water
temperature or dash lines.
If the spa is set in Standard mode or in a
ltration cycle, adjusting the set temperature
may result in activating the heater. When
the heater is operating, the heat icon will be
displayed in the LCD.
Note: 230-Volt spas that are wired with the
low Amp option will not heat when Pump
1 is on in high speed, or when Pump 2 is in
operation.
JETS 1
Touch the ‘JETS 1’ pad to activate the primary
ltration pump. The sequence of the jet action is:
1 touch = Low jets
2 touches = High jets
3 touches = O
JETS 2
Touch the ‘JETS 2’ pad to activate the therapy
pump. The sequence of jet action is:
1 touch = High jets
2 touches = O
ENGLISHFRANÇAIS
VITA SPA
27
Page 28

The low speed operation of Pump 1 is timed
to automatically turn o after 4 hours of
ENGLISH FRANÇAIS
operation. The high speed operation of Pumps
1 & 2 and the low speed of pump 1 are timed
to automatically turn o after 15 minutes of
operation.
NOTE (NON-Circ Pump Systems): The low
speed of Pump 1 runs when the blower or
any other pump is on. In the STANDARD
mode it will also activate for at least 2
minutes every 30 minutes to detect the
spa water temperature and then remain on
to heat to the set temperature if needed.
When this automatic activation occurs, the
low speed of Pump 1 cannot be turned o ;
however, all other control functions can be
activated.
Light
Touch the ‘LIGHT’ pad to turn all lights on and
o . The lights will automatically turn o after 4
hours of operation.
Changing Modes
To change the operating mode, press the ‘UP’
or ‘DOWN’ and the press the ‘PROG’ button.
The operating mode will be ashing on the
LCD window. Press the ‘DOWN’ button to
cycle through to the desired mode.
Time and Filtration Cycles
The control system on your spa has been
designed to function properly and safely at
100°F (38°C) after connecting the electrical
wires and installing the proper grounds. To
take full advantage of the unique capabilities
of your new spa, you should rst set the time
and establish your ltration cycles.
Preset Filter Cycles
The spa control system is designed with two
lter cycles. The rst lter cycle turns on 6
minutes after power is supplied to the spa. The
second lter cycle begins 12 hours later. Filter
cycles are pre-set for a two hour duration.
Operating Modes
Your Vita Spa comes with three primary
operating modes.
Standard Mode maintains the water at
the desired set temperature. Note that the
last measured spa temperature displayed
is current only when the pump has been
running for at least 2 minutes. The ‘STD’ icon
will be brie y displayed in the LCD window
when this mode is selected.
Economy Mode heats the water to the
desired set temperature ONLY during lter
cycles. The ‘ECN’ icon will be displayed in
the LCD window when this mode is selected.
Sleep Mode heats the spa to within 20°F
(-6.6°C) of the set temperature only during
lter cycles. The ‘SLP’ icon will be displayed in
the LCD window when this mode is selected.
28
Note: To properly clean and maintain spa,
a total lter time of at least four hours per
day is recommended. If an ozonator is
installed 6 hours is recommended.
Changing Filter Cycle Start Time
The start/stop times of the lter cycle begin 6
minutes after the spa set time is established.
Set time is based on the time of day that the
spa is powered up. Set time may only be
changed by disconnecting power from the
spa and reconnecting it at the desired start
time. For example, if you want the lter cycle
to begin at 9:00 PM, turn o the breaker or
disconnect the spa and reconnect it at 8:54
PM (remember the 6 minute wait period). The
cycle will begin at 9:00 PM and will repeat
beginning at 9:00 AM. Each cycle will run for
VITA SPA
Page 29

the prescribed number of hours.
Changing Filter Cycle Duration
The duration of a lter cycle can be set in hour
increments of 2, 4, 6, 8, or continuous. For
example, a 2 hour cycle will complete once
every 12 hours for a total of 4 hours per day.
The amount of time needed to lter your spa
will depend on usage and ambient conditions.
You will need to program your lter cycles
based upon your personal use.
To change the duration of the lter cycles
press the ‘UP’ or ‘DOWN’ button and then
touch the ‘JETS 1’.
Press the ‘UP’ or ‘DOWN’ button to adjust the
cycle duration to the desired setting. After
each press, the duration of the cycle will be
displayed in the LED window as follows:
FIL2 = 2 Hours for each cycle, 4 hours per day
FIL4 = 4 Hours for each cycle, 8 hours per day
FIL6 = 6 Hours for each cycle, 12 hours per day
FIL8 = 8 hours for each cycle, 16 hours per day
FILC = Continuous ltration, 24 hours per day
NOTE: At the start of each lter cycle all
equipment is activated for 5 minutes or less
to clear the water in the pipes and ensure
complete ltration.
Clean Up Cycle
After periods of heavy use, turn “PUMP 1” on
for a four-hour clean up cycle.
Automatic Time Outs
Your Vita Spa is equipped with an automatic
Time Out feature designed to protect both
the equipment and the user. For your safety
and to reduce unnecessary use of the pumps
and lights, the Time Out feature turns selected
accessories o automatically, as follows:
Accessory Mode Shuts O In...
Accessory Mode Shuts o in...
Pump 1 Low 4 hours
Pump 1 High 15 minutes
Pump 2 High 15 minutes
Blower 15 minutes
DOL Light 4 hour
ENGLISHFRANÇAIS
To exit the lter-set procedure, touch ‘JETS 1’.
The LCD window will display the current water
temperature.
If a change is made to the duration while the
spa is in a ltration cycle, it will take e ect
immediately. If the change is made outside a
ltration cycle, it will take e ect at the start of
the next scheduled cycle.
VITA SPA
THERMAL CREEP: see page 40
OZONE OPTION: see page 35
VITAROMA OPTION: see page 30
CIRC PUMP OPTION: see page 33
ENTERTAINMENT SYSTEM OPTION: see page 32
CHAMPAGNE AIR SYSTEM OPTION: see page 30
AQUABURST LIGHTING SYSTEM OPTION: see
page 30
29
Page 30

OPTIONS & FEATURES
ENGLISH FRANÇAIS
AquaBurst Lighting
For the Vita Spa that is equipped with a
AquaBurst Lighting System.
This system has di erent color settings
(sequences) to enhance your overall spa
experience. Each time the AquaBurst system is
turned ON by pressing the ‘LIGHT’ pad, it will
begin a color lighting sequence.
Accessing Di erent Light Sequences
To change Sequences, press the ‘LIGHT’
button O and On within a 5 second time
period. The light will advance to the next
color sequence mode. Continue until the
desired color sequence mode is selected. The
sequence will revert to the rst sequence each
time the light is turned o for more than 5
seconds.
When cycling through colors on the control
panel, this is the program sequence for the
AquaBurst lighting system.
1. Color-Wheel. This mode transitions the
di erent colors.
2. White (All LEDs On).
3. Aqua (Green & Blue)
4. Purple (Red & Blue)
5. Blue
6. Amber (Red & Green)
7. Green
8. Red
9. Color Flash. This mode switches colors
every few seconds.
10. Strobe. This mode ashes the LEDs on
and o like a strobe light.
performance and therapeutic action of the
jets. To turn the Air or Champagne Air system
on and o , touch the ‘AIR’ button.
NOTE: The Champagne Air System will shut
o automatically after 15 minutes.
NOTE: At the start of a ltration cycle,
the Champagne Air System is activated
to purge the lines and ensure complete
ltration. Ensure that at least one air control
is always fully open.
VitAroma / AROMATHERAPY SYSTEM
VitAroma Therapy o ers the unique bene ts of
combining Aroma and Hydrotherapy. Simply
de ned, aromatherapy is the practice of using
pure essential oils – the highly concentrated
extracts of plants, herbs and owers – to
improve one’s feelings of well being through
the acute sense of smell
Your spa is equipped with an aroma
dispenser located on the lip of the spa.
VitAroma is standard on Spa Models Joli,
Cabaret, Nuage, Passion, Chateau and
Mystique. It will operate whenever Pump 1
is operated and will involve opening the air
controls. On Spa Models Amour, Intrigue,
Elegant, Monarque, Prestigue, Envie, and
Grand the the VitAroma Induction System is
an option that can be activated by touching
the AIR button. You will immediately
experience the wonder and pleasure of
aromatherapy. It will soothe your senses
and invigorate your spirit.
Air / Champagne Air System Option
Your spa may be optionally equipped with
Air or Champagne Air system to increase the
30
VITA SPA
Page 31

OPTIONS & FEATURES
To activate VitAroma, insert one of the Vita
Spa’s exclusive aromatherapy scents and
turn on the VitAroma Induction System. In
some models this will involve touching the
AIR button in other models this will involve
opening the air controls, contact your local
Vita Spa dealer for speci c information on
your spa.
To extend the lifespan of the VitAroma beads,
it is recommended that they be removed from
the spa and stored in the resealable packet
after each use. VitAroma aromatherapy scents
are available exclusively from Vita Spa Dealers.
CIRCULATION PUMP OR CIRC PUMP
OPTION:
Circulation pump (CIRC PUMP): 504 system
The circ pump may turn on immediately upon
power up; the prime mode (Pr) does not apply
to this feature. All other equipment will turn
on brie y at the beginning of each ltration
cycle to purge the plumbing lines.
If your spa is con gured with the circ pump
option it is designed to run constantly ltering
the water. The circ pump will turn o when
the water temperature is detected to be 3F
above the set temperature to reduce overheat
conditions. During the summer months or
when the ambient air temperatures are above
90F it is important to monitor the water
temperature to identify and manage potential
thermal creep or overheat situations. See
THERMAL CREEP on pg 40
Circulation pump (CIRC PUMP): 460 & 760
systems
The circ pump will turn on once you exit the
the prime mode (Pr). All other equipment
will turn on brie y at the beginning of each
ltration cycle to purge the plumbing lines.
The circ pump operates continuously (24
hours) with the exception of turning o for 30
minutes when the water temperature reaches
3°F (1.5°C) above the set temperature (most
likely to happen in warm climates). During
the summer months or when the ambient air
temperatures are above 90F it is important to
monitor the water temperature to identify and
manage potential thermal creep or overheat
situations. See THERMAL CREEP on pg 40
The mode settings will now work with circ
pump. When your spa is in the Standard
mode the heater will turn on as needed to
maintain the set temperature. When it is in
the Economy Mode, the heater will only be
activated during the programmed ltration
cycle time and will heat the water to the set
temperature. In the Sleep mode the heater will
only activate if the water temperature is 20°F
(11°C) below the set temperature
Inversion Feature ( 460 & 760 systems )
The Control System includes an Inversion
feature that makes it easy to read the LCD
from inside or outside the spa. To invert the
LCD display, touch the ‘UP’ or ‘DOWN’ button,
followed by the ‘AIR’ button. Repeat the
sequence to reverse the inversion process.
If your spa is not equipped with the optional
AIR feature, locate the position of the AIR
button (next to the LIGHT button) and press in
that general location
ENGLISHFRANÇAIS
VITA SPA
31
Page 32

OPTIONS & FEATURES
ENGLISH FRANÇAIS
Entertainment System (Optional)
Certain models are equipped with an audio
system designed to provide the ultimate
spa entertainment experience. Power to
the entertainment system is supplied at
spa start-up so it is always ready for your
enjoyment.
Refer to the stereo Owner’s Manual
included in the Vita Spas Owner’s pack for
instruction on programming and using the
entertainment system. Read all instructions
carefully before using the entertainment
system and SAVE THE INSTRUCTIONS.
The system includes a wireless remote. To
operate the wireless remote, point it at the
side skirt panel of the spa where the stereo
is located.
Note: The wireless remote control is water
resistant, not waterproof. Do not submerge
the wireless remote control. It is not
recommended to use the wireless remote
from within the spa.
CAUTION: Risk of electrical shock.
Do not leave stereo compartment door
open.
CAUTION: Risk of electrical shock.
Replace components only with identical
components.
a quali ed service technician.
WARNING: Prevent Electrocution.
Do not connect any auxiliary components
(for example cable, additional speakers,
headphones, additional audio/video
components, etc.) to the system.
WARNING: Prevent Electrocution.
Do not service this product yourself as
opening or removing covers may expose you
to dangerous voltage or other risk of injury.
Refer all servicing to quali ed personnel.
WARNING: Prevent Electrocution.
These units are not provided with an outdoor
antenna. When provided it should be installed
in accordance with Article 810 of the National
Electric Code, ANSI/NFPA 70.
WARNING: Prevent Electrocution.
This unit should be subjected to periodic
routine maintenance (for example once
every 3 months) to make sure the unit is
operating properly.
CAUTION: Risk of electrical shock.
When the power supply connections or
power supply cord(s) are damaged; if
water is entering the electrical equipment
compartment area; if the protective shields or
barriers are showing signs of deterioration; or
if there are signs of other potential damage to
the unit, turn o the unit and refer servicing to
32
VITA SPA
Page 33
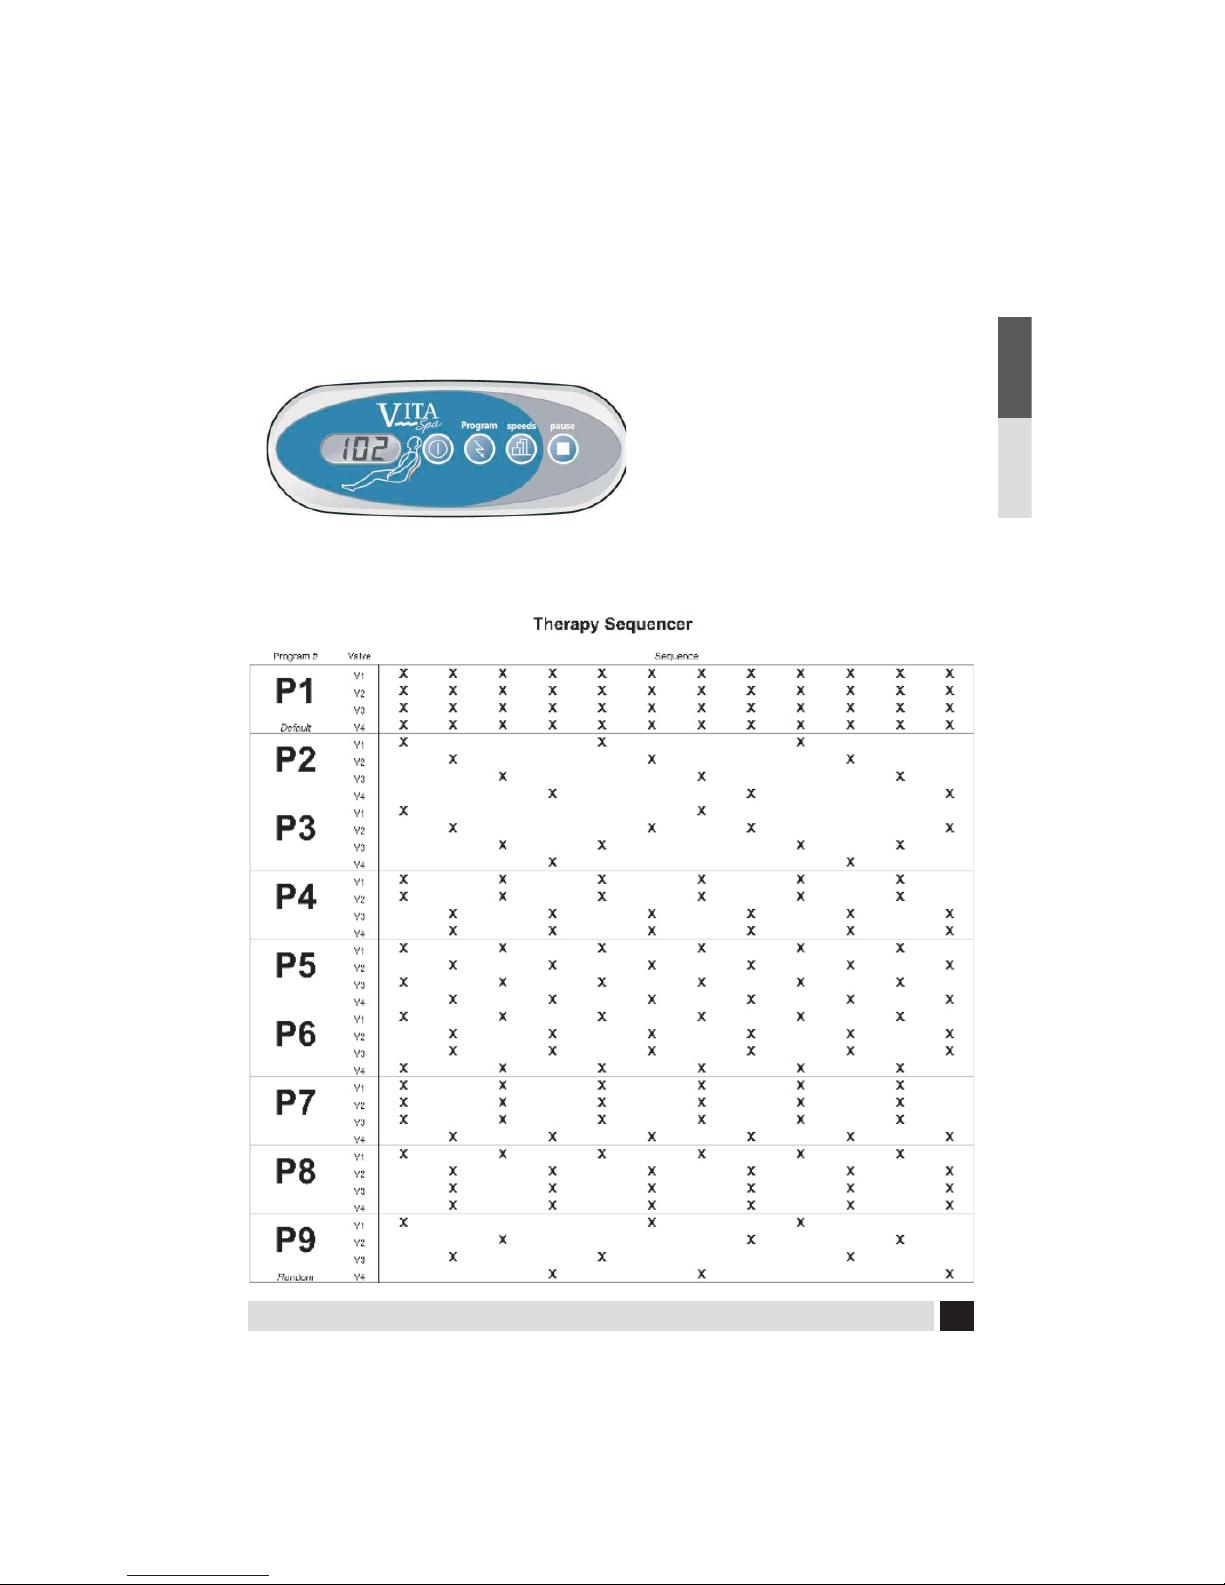
If your Control looks like this, your spa has the
following features:
• Therapy Sequencer
ENGLISHFRANÇAIS
VITA SPA
33
Page 34
ENGLISH FRANÇAIS
Therapy Sequencer
Certain models are equipped with a Jet
Sequencer System that opens and closes a
series of four solenoid valves to provide a
therapeutic sequencing massage.
The control panel for the system allows you
to start or stop operation, change programs,
change speeds, or pause the system at any
point in the program.
Starting the Sequencer
To energize the sequencing system, press the
‘JETS 3’ button on the topside control panel.
Once energized, the sequencer will open all 4
solenoid valves and water will ow through all
open jets. Two dashed lines will be displayed
in the LCD window.
Push the ‘ON/OFF’ button one time and the
LCD display will now show ‘On’. This indicates
that the system has been activated, but no
changes will occur until a sequencing program
has been selected.
Sequencing Programs
To start the sequencing program, push
the PROG button one time. The LCD will
momentarily display ‘P2’, and then alternate
between ‘P2’ and ‘S1‘’. The system is now
running program 2 and sequencing speed 1.
To change programs, push the ‘MODE/PROG’
button to step through the programs. The LCD
will momentarily display the selected program
(P3, P4, P5, etc.), and then alternately display
the selected program with the sequencing
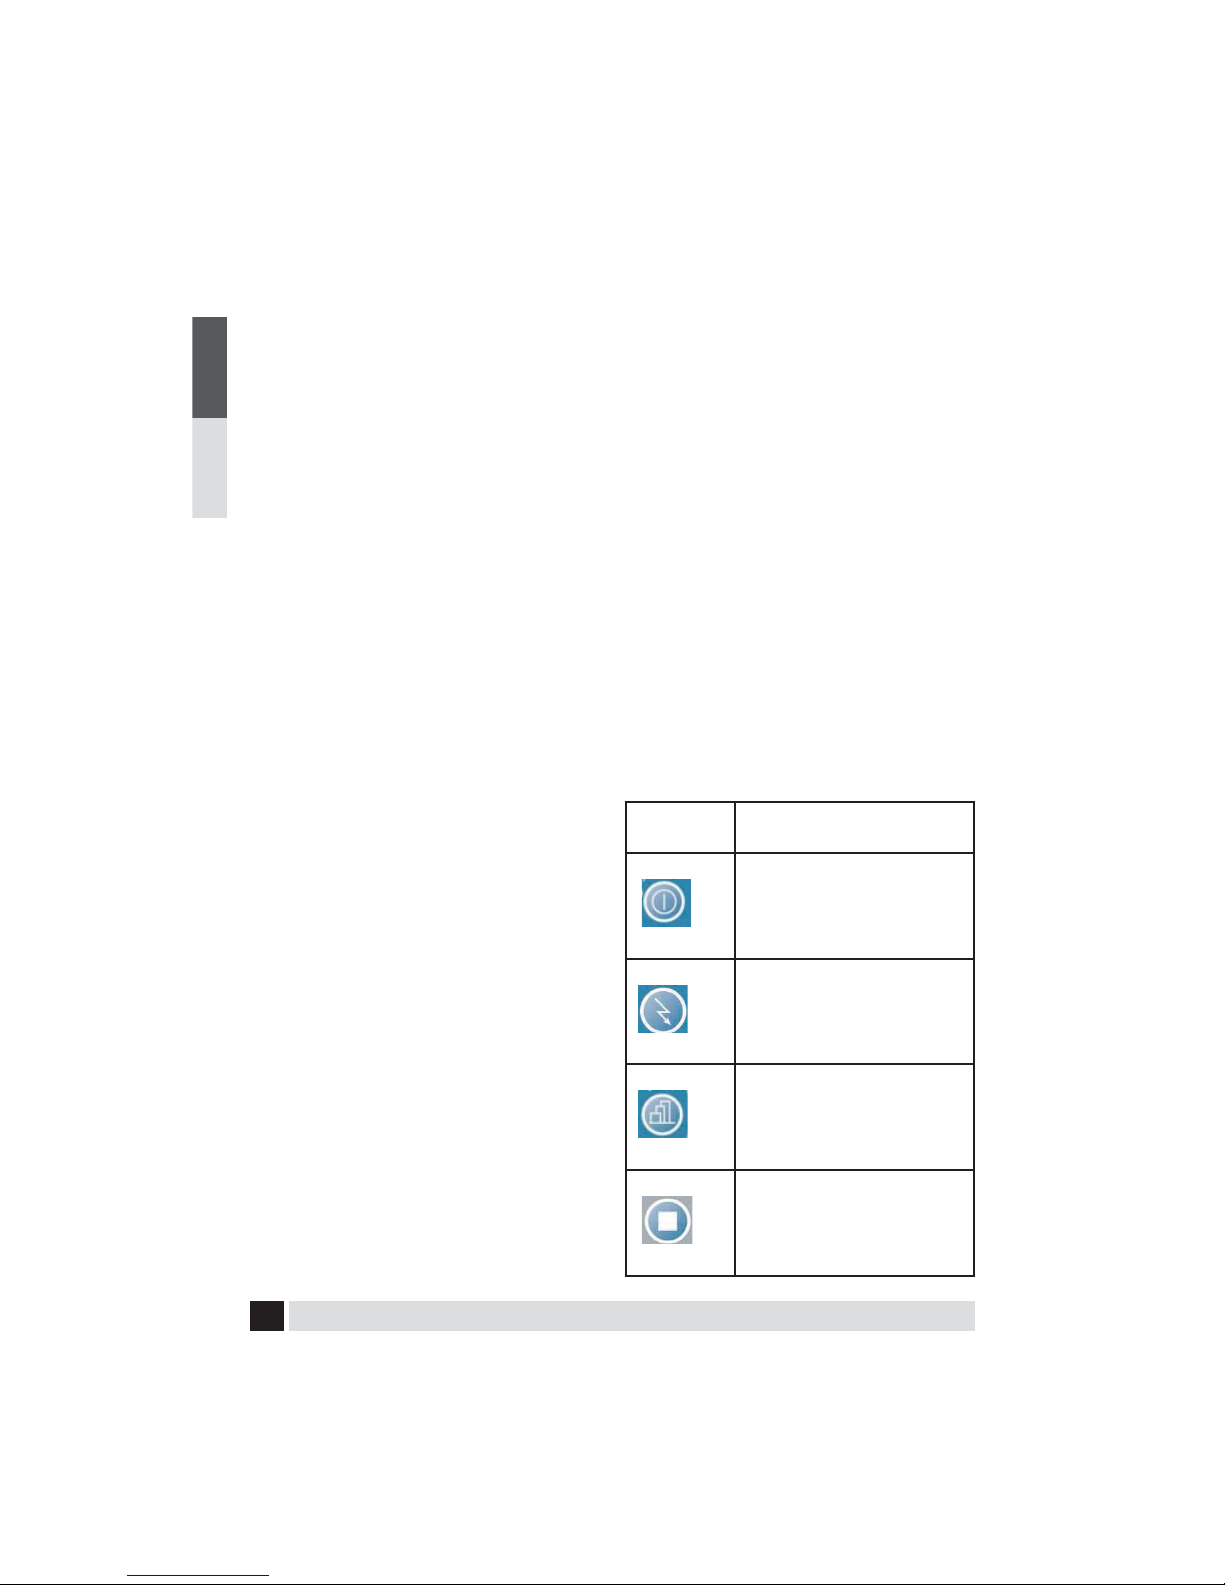
speed. Refer to the Therapy Sequencer chart
to see the order in which the valves will open
and close for each program.
Sequencing Speeds
When rst energized, the sequencing program
will automatically go to the default speed,
or ‘S1’. To change the sequencing speed,
push the ‘SPEED’ button once. The LCD will
momentarily display the selected speed (S1,
S2, or S3), and then alternately display the
current program and the sequencing speed.
Pausing
To pause the sequencing action of the system
at any point, simply press the ‘PAUSE’ button.
This will suspend the operation of the valves
and hold them either until the sequence is
resumed or until the system is de-energized.
The LCD display will alternate between ‘PA’
and the current program number. Press the
‘PAUSE’ button again to resume normal
operation.
Pad Use
• Activates the Sequencer
ON/OFF
• Navigates between the nine
therapy sequencer programs
PROGRAM
• Navigates between the three
therapy sequencer speeds
SPEEDS
• Pauses the therapy sequencer
PAUSE
34
VITA SPA
Page 35

MAINTENANCE
Water Chemistry
Water chemistry is critical in a spa system.
Chemicals are used to sanitize the water and
control the pH balance. The combination
of high water temperature and small water
volume means that the chemical balance must
be watched carefully. It is recommended that
you purchase a chemical start up kit, and
the additional chemicals needed to maintain
the proper/optimum chemical balance, from
your dealer.
Sanitizing
Sanitizing the water destroys harmful
organisms and keeps your spa healthy and
safe. Three commonly used spa sanitizer or
oxidizing agents are bromine, chlorine and
ozone. Chlorine or bromine are chemicals that
you add to the water. Ozone is a gas that is
produced by an ozonator and injected into
the water. It is important that a residual of
sanitizer remain in your water. High water
temperature, aeration and use will increase
the need for sanitizer.
In addition to maintaining a residual,
it is important to ‘shock’ your spa water
periodically and after heavy use. This addition
of substantial amounts of sanitizer superchlorinates the water and oxidizes non lterable organic residue. Allow the sanitizer
level to drop back to the residual amount
before using. Also use your Clean Up Cycle
after heavy use for additional ltration. Tests
should be done daily with your test kit to keep
a chlorine or bromine residual of 3.0 to 5.0
ppm.
pH Level
pH is the balance of acidity and alkalinity
in the water. Maintaining proper pH is
important for the e ectiveness of your
sanitizer, for user comfort, and to prevent
corrosion of the spa equipment.
Caution: Never mix two chemicals together.
Caution: Never store chemicals in the
equipment compartment.
Caution: Do not use muriatic acid to balance
pH as it will damage your spa surface and
equipment.
Recommended Levels
pH: 7.2–7.6
(Ideal 7.4–7.6)
Sanitizer Residual: 3.5–5.0 ppm
Total Dissolved Solids: 100–200 ppm
Free Available Sanitizer: 3.0–5.0 ppm
Total Alkalinity: 80–100 ppm
ideal for dichlor,
trichlor, and
bromine
NOTE: Make sure you use fresh test kit
strips/chemicals. Test kits and test
chemicals should be stored in a cool,
dry location. Check the manufacturer’s
instructions to determine shelf life and
expiration date.
Ozone:
Equipping your spa with the Powerworks ™
Ozonator is a smart decision. The use of ozone
in conjunction with spa sanitizing and water
balancing chemicals helps to provide you with
a cleaner, healthier spa and reduces chemical
usage.
ENGLISHFRANÇAIS
VITA SPA
35
Page 36

Sanitizing with Ozone
ENGLISH FRANÇAIS
Spas vary in size, as well as frequency and
conditions of use. For this reason you will need
to establish your sanitizing program based
upon your own personal use. When using
ozone, you should start by balancing your
water chemistry as you normally would. A spa
should run and be ozonated a minimum of six
hours per day. If your spa is heavily used, this
time should be increased. Your spa produces
ozone during the ltration cycles. The amount
of a residual sanitizer (chlorine or bromine)
that you maintain in the water will also vary
depending on use. It is recommended that you
maintain a residual of 3.0-5.0 ppm. Periodically,
and after periods of heavy use, it is necessary to
‘shock’ your spa with large amounts of sanitizer.
Draining your Spa
NOTE: Always turn the circuit breaker o
when you drain your spa. Do not turn the
spa heater back on until you have full ow
coming from the jets for several minutes..
Changing your spa water, cleaning the spa
surface and lter are necessary because high
concentrations of impurities caused by water
evaporation, body oils, perfumes, and other
contaminants may accumulate in the spa that
cannot be ltered out.
NOTE: It is advisable to drain your spa and
re ll it with fresh water every six to eight
weeks or more often, depending on the
amount of use.
NOTE: The ozonator is programed to turn
on during a programed lter cycle and will
be disabled if any button other than the
light is pushed durring this cycle.
NOTE: In spas equiped with a circ pump
the ozonator can not be shut o and will
remain on as long as the circ pump is
running.
NOTE: Extra ltration can be provided by
manually starting a clean-up cycle. Turn
Pump 1 on in low speed. The pump will
operate for 2 - 4 hours (depending on spa
system) and then automatically turn o .
Specialty Chemicals
While ozone may signi cantly reduce the
usage of specialty chemicals it is not a
substitute for these chemicals. All chemicals
should continue to be monitored, especially
during periods of heavy usage and when
changing or replenishing the spa water.
36
All spas are equipped with both external and
internal drains. The external drain is used for
draining the spa. The internal drain(s) are used
to remove water from internal hoses when
winterizing your spa (See pg. 39) or if the
water is severely contaminated.
NOTE: Use a standard garden hose to direct
the water to an appropriate disposal area.
The external drain valve is located in a
compartment on the front panel. Open the
compartment, pull the valve out, remove the
outer black cap and connect a garden hose
to the tting. Turn the ring on the back of the
valve counter-clockwise until it stops, then
pull out to open the valve. Water will begin to
ow. When ow stops, push in the valve, turn
ring clockwise until it stops, remove hose and
replace the cap.
The internal drain hose(s) is (are) located
behind the front access panel. Remove the
VITA SPA
Page 37

access panel screws and the access panel.
Locate the drain hose(s). For each hose drain
valve, remove the cap, attach the garden
hose, and turn the valve body 90° counterclockwise. Water will begin to ow. When all
water has been evacuated, turn the valve
handle clockwise until it stops. Remove the
garden hose and replace the cap. Repeat for
each internal drain hose.
NOTE: Do NOT attempt to use the
pump to drain the spa.
NOTE: Close all drain valves and replace
caps prior to re lling the spa.
clockwise while lifting upwards.
5. Soak lter in a commercial lter cleaner/
degreaser, available from your Vita Spa
dealer, per manufacturer’s instructions.
Hose out lter cartridge or replace with
new cartridge, if needed.
6. Place lter cartridge back into lter canister,
, screw in clockwise DO NOT OVER TIGHTEN.
7. Replace the skimmer lid.
8. Turn the pump ON.
Replacing the lter cartridge annually
is recommended to maintain optimum
performance. Filter maintenance depends
on usage.
ENGLISHFRANÇAIS
NOTE: When re lling the spa, you may
need to bleed air from the system. Refer to
Priming Your Spa, pg. 16 for instructions.
Filter Maintenance
NOTE: It is not necessary to drain the
spa in order to clean the lter.
The removable lter cartridges are located in
the lter canister behind the weir door.
The lter should be inspected / cleaned
monthly during normal use, and more often
when spa use is heavy.
Keep the lter cartridge clean! Clean the
lter cartridge at least once every 90 days.
A clogged lter decreases performance and
degrades water quality.
To clean the lter cartridge:
1. Turn the pump o .
2. Remove skimmer lid on top of spa.
4. Remove lter cartridge from the lter canister
by grasping the top and unscrew counter-
Winterizing
In cold climates where freezing temperatures
occur, special care is required to prevent the
possibility of damage to the spa and equipment
due to freezing. If you plan on using your spa
during cold months, be sure your pump and
heater are in good working order. The spa
shell has been insulated to provide e cient
operation in cold weather areas.
NOTE: If you elect not to drain your spa
and the temperature is going to be below
freezing for extended periods of time, it
is best to operate the spa in the standard
mode with the temperature set at the
maximum high temperature of 104°F
(40°C), especially if there is a power outage
threat. This will help keep the spa water
from freezing if you have a power failure.
If you do not intend to use your spa during the
winter months and there is danger of freezing,
use the following steps to winterize your spa:
Winterizing a spa if done properly is a
complicated procedure. When at all possible
VITA SPA
37
Page 38

this should be done by a spa service center.
ENGLISH FRANÇAIS
A freeze damaged spa can be expensive to x.
With that in mind here are some basic
winterizing tips that will help you remove
enough of the water and add enough RV
Antifreeze to keep your plumbing from
freezing.
What you will need;
1. A wet /dry (shop vac) vacuum.
2. 1 to 3 gallons or RV antifreeze (nontoxic,
used in Recreational Vehicles water tanks)
3. Channel lock pliers (16” works best for most
tubs)
4. A funnel
5. Time, expect two to three hours.
Now that you have those things,
• Drain the spa
• Vacuum all of the jets and injectors, until
there is no more water coming out.
• Remove your lter and vacuum at the lter
plumbing.
• If you have air injectors, turn power on ,
and make sure the pump(s) are NOT running
and the heater is not ring; (generally this
can only be accomplished by unplugging
the pumps from the control box and
removing the connections from the heater)
then turn your air blower on until water no
longer comes out of air holes. Then turn the
power back o .
• Loosen the plumbing connections at your
pump and at your heater and remove the
freeze plugs on the front
face of the pump(s). Vacuum up any water
that comes out.
• Reconnect the plumbing to the heater,
the freeze plugs and the lower of the two
connections on your pumps.
• Add RV antifreeze to the pump using your
funnel. Most pumps will take approx. 4 oz.
• Reattach your pump unions.
• Add approximately 1oz. of RV anti-freeze to
each of the jets. (use funnel)
• Add RV anti-freeze to the plumbing that is
attached to your lter until it runs out of
the intakes in the foot well of the spa. (This
is not possible in all spas)
• Add anti-freeze to the air injectors, this can
be tedious but is worth the e ort.
In climates that get heavy snows it is a
good idea to place some plywood over
your cover to help reinforce it.
Then cover the spa with a tarp, and strap
the tarp down, this will help keep winter
winds from getting to your cover.
In the spring, or when you are ready to
start the tub back up.
• Make sure that all ttings are tight.
• Fill with cool water
• Turn the power on.
• Run the jets on high speed for 30 minutes.
• Several times during the 30 minutes that
you are running your pump, turn your air
blower on and o . This will purge the air
lines.
• Drain the spa through all drain lines
supplied
• Put your lter in the spa.
• Re ll and treat chemically like you would
during a water change.
38
VITA SPA
Page 39

Spa Cabinet Care:
The cabinets are made of Excel-X™, a high
quality alternative to wood that is virtually
maintenance free, requiring no staining,
sealing, or waxing.
To clean the spa cabinet, rinse dirt and dust
regularly with clear water. To remove stubborn
dirt, grime, and mild discoloration, wash with
a mild detergent and warm water.
Protect spa nish - always keep cover
on the spa when not in use.
Spa Surface Care and Cleaning
Your spa shell surface is made of acrylic. A
minimum amount of care and cleaning will
keep your spa looking new for years. Use a
spa cleaner for residue and lime build-up at
the water level of the spa surface. It may be
necessary to lower the water level 5-7 cm
before cleaning to avoid polluting the spa.
Cleaner can be applied to the acrylic surface
with a soft cloth and wiped clean. Use a nonabrasive household cleaner to clean your spa
shell or use a mild dishwashing detergent.
Rinse well and dry with a clean cloth.
Never use abrasive cleaners.
NOTE: Do not allow the acrylic surface to
come in to contact with products such as
acetone (nail polish remover), nail polish,
dry cleaning solution, lacquer thinners,
gasoline, pine oil, solvents, etc.
Remove dust and dry dirt with a soft, damp
cloth. Avoid using razor blades or other sharp
instruments that might scratch the surface.
Light Bulbs / LED Lights
The Spa light bulb / LED lights are serviceable
from inside the spa cabinet. Remove the side
panel and insulation closest to the light; locate
the bracket that holds the bulb. Turn the black
bulb holder 90 degrees counter-clockwise;
remove from bracket. Pull bulb straight out
and replace. Insert bulb holder back into
bracket and turn 90 degrees clock-wise to
secure.
Spa Cover Care:
Proper care is easy: Once a month, clean
and condition the cover according to the
maintenance instructions that came with your
cover.
Even if you don’t condition your top vinyl
every month, we recommend you give one
good treatment just before snow or ice. If
possible, treat during the winter too.
After every snow fall or ice storm, use a soft
broom to remove the accumulation from your
Spa cover — this will help preserve your foam
cores, and a broom won’t damage the vinyl.
Handle tie-down straps and handles with care,
because in really cold climates, vinyl can crack,
since it will not stretch.
For added security in windy and storm
conditions, consider using additional tie down
straps which lock down tight.
Remove foam cores from the vinyl
encasement. Mix two gallons of water, a
teaspoon of mild dishwashing soap and one
cup of bleach. With a soft bristle brush, scrub
the inside of the encasement thoroughly.
Then take a wash cloth and wipe down
each foam core. Rinse both well. Place the
ENGLISHFRANÇAIS
VITA SPA
39
Page 40

encasement in the sun and foam cores in the
ENGLISH FRANÇAIS
shade to dry. (Do not put foam cores in the
sun – they will melt!)
Once everything is dry, spray the cores and
inside the encasement with a mildew inhibitor
like Pine Sol®. Allow all to dry completely, and
then reassemble. The key here is to maintain
proper water chemistry to avoid mildew.
If you are using WD-40 to free the Sure-Locs,
try using a Q-tip to keep the WD-40 away from
your cabinet. (It can damage the nish.)
Thermal Creep
Your Vita spa is manufactured with energye cient components and systems that
capture heat generated by the equipment,
then transfer that heat back to the spa water.
In warmer climates or in situations with
extended run times, “Thermal Creep” may
occur. Thermal Creep is a condition whereby
the actual water temperature is higher than
the set temperature.
To manage “Thermal Creep” you may:
Vent your cover
Open all air controls
Set your ltration cycles to run during the
cooler times of the day or at night
Reduce the length of your lter cycles
Visit your local Vita Spa distributor for
additional guidance
Thermal Creep only occurs in well-insulated
hot tubs. It is not an indication that
something is wrong with your spa or its
equipment.
40
VITA SPA
Page 41
COMMON PANEL MESSAGES
Message... What it is... What it means...
Pr Priming mode Spa is in normal Priming Mode operation
SLP or SL Sleep mode Spa is in normal Sleep Mode operation
ECN or EC Economy mode Spa is in normal Economy Mode operation
STD or ST Standard mode Spa is in normal Standard Mode operation
ICE or IC Freeze condition Heater will come on to keep water above 45°F
- - - or - - Water temperature Current water temperature not measured
Message Meaning What Happens… Possible Causes Action Required
No message on
Display Power
has been cut
o to the spa
HH
or
OHH
* - Even when the spa is shut down, some equipment will turn on if freeze protection is needed.
“Overheat”
- *One of the
sensors has
detected 118F
/ 47.8C at the
heater
The spa will shut
down and will
automatically
reset once the
water tempature
has cooled to 108F
(42C)
~ L o w W a t e r F l o w
~ Faulty Equipment
Verify power going to
spa. Check for tripped
breaker or blown fuse.
The control panel will
be disabled until power returns. Spa setting
will be preserved until
the next power up.
DO NOT ENTER THE
WATER. Remove the
spa cover and allow
water to cool. ~
Verify all slice valves
are locked open ~
Verify Actual water
tempature with a
digital Thermometer ~ Verify normal
operation of pump 1
~ Verify all spa jets are
open. Once the heater
has cooled, reset by
pushing any button. If
the spa does not reset,
shut o the power
to the spa and call
your dealer or service
organization.
ENGLISHFRANÇAIS
VITA SPA
41
Page 42
Message Meaning What Happens… Possible Causes Action Required
ENGLISH FRANÇAIS
OH
or
OHS
“Overheat” The spa has
shut down.
* One of the
sensors has
detected that
the spa water is
110F / 43.5C
The spa will shut
down and will
automatically
reset once the
water tempature
has cooled to 108F
(42C)
~ L o w W a t e r F l o w
~ Faulty Equipment
~ Extended Filtration Cycles FC - or
Continious
Filtration
~ Thermal Creep
DO NOT ENTER THE
WATER. Remove the
spa cover and allow
water to cool. At 107F
/ 41.7C, the spa should
automatically reset. ~
Verify all slice valves
are locked open ~ Verify Actual water tempature with a digital
Thermomiter ~ Verify
normal operation of
pump 1 ~ Verify all spa
jets are open This condition can be caused
by “thermal creep”,
additional information
on ways to manage
and prevent thermal
creep are located in
this manual. If the spa
does not reset, shut o
the power to the spa
and call your dealer or
service organization.
SA or
SnA
Sb
or
Snb
42
Spa is shut
down. * The
sensor that is
plugged into
the “A” jack is
not working
Spa is shut
down. * The
sensor that is
plugged into
the Sensor
“B” jack is not
working
The spa will shut
down
The spa will shut
down
~ Disconnected
or defective sensor
~ Disconnected
or defective sensor
If the problem persists,
contact your dealer or
service organization.
May appear temporarily in an over heat or
freeze condition
If the problem persists,
contact your dealer or
service organization.
May appear temporarily in an over heat or
freeze condition
VITA SPA
Page 43
Message Meaning What Happens… Possible Causes Action Required
Sn
or
SnS
Sensors are out
of balance.
If alternating with
spa temperature,
it may just be a
temporary condition. If ashing by
it itself, spa is shut
May appear temporarily in an over
heat or freeze
condition
If the problem persists,
contact your dealer or
service organization.
May appear temporarily in an over heat or
freeze condition
down*
HL
or
HFL
A signi cant
di erence
between temperature sensors has been
detected. This
could indicate a
ow problem
Heater will shut
down while spa
continues to function normally
~ Low water level
~ Dirty spa lter(s)
~ Closed spa jets
Verify water level is
within 1/8” from top of
weir door - make sure
all jets are open, all
pumps are operating
normally and the spa
lter(s) are clean. If
the problem persists
contact your dealer or
service organization
LF Persistent low
ow problems.
(Displays on the
fth occurrence
of HL message within 24
hours) Heater is
Heater will shut
down while spa
continues to function normally
~ Low water level
~ Dirty spa
lter(s)
~ Closed spa jets
Follow action required
for HL message.
Heating capability of
the spa will not reset
automatically; you
may press any button
to reset.
shut down, but
other spa functions continue
to run normally
ENGLISHFRANÇAIS
dr Lack of water
owing
through the
heater
VITA SPA
Spa is shut down
for 15 minutes
Low water Level,
poor ow, or air
bubbles detected
in the heater.
Verify water level is
within 1/8” from top of
weir door - make sure
all jets are open, all
pumps are operat-
ing normally and the
spa lter(s) are clean.
Spa will reset in 15
minutes, if the prob-
lem persists contact
your dealer or service
organization
43
Page 44
Message Meaning What Happens… Possible Causes Action Required
dy Inadequate
ENGLISH FRANÇAIS
water detected
in the heater
(Displays on
the third occurrence of dr
message) Spa is
shut down.*
Spa is shut down. Possible inad-
equate water,
poor ow, or air
bubbles detected
in the heater.
Verify water level is
within 1/8” from top of
weir door - make sure
all jets are open and
all pumps are operat-
ing normally - verify all
jets are open and the
spa lter(s) are clean.
Spa will not automati-
cally reset, press any
button to reset manu-
ally. If the problem
persists contact your
dealer or service orga-
nization
IC
or
ICE
HOt
or
StU
“ICE” - Potential
freeze condition detected
A pump has
been running
too long.
All Pumps and
Blower are ON for
at least 4 Minutes
After Temp is 45°F
(7.2°C) or Above
You will not have
control of the
components
during freeze protection. If you spa
is con gured for
“low” amperage
your heater may
not activate until
the freeze condition has cleared.
This could contribute to over heat
conditions
Cold water - common at start up
when the water
tempature is below 45°F (7.2°C)
No action required.
All equipment will
automatically activate
regardless of spa
status.
SHUT THE POWER
TO THE SPA OFF
AND CONTACT YOUR
DEALER OR SERVICE
CENTER.
44
VITA SPA
Page 45

COMMON WATER PROBLEMS
Problem
Cloudy Water
Water Odor
Usual Cause
- Inadequate ltration/
dirty lter
- Excessive oils/organic
matter
- Improper sanitation/
bacteria
- High pH and/or
high alkalinity
- Excessive organics or
chloramines; insu cient
free available sanitizer
- Improper sanitation
- Inadequate ltration
- Low pH
Solution
ENGLISHFRANÇAIS
- Check to make sure the lter is running
properly; clean lter with a lter cleaner
of degreaser
- Shock the spa with a chlorine or bromine
sanitizer, or other shock treatment product
- Increase sanitizer level to balance water
and shock if needed
- Adjust pH; add appropriate sodium bisulfate
product
- Use clari er
NOTE: If using an ozone generator, consult
with your dealer before using polymer
based clari ers
- Depending on the severity, drain the spa
completely, clean and re ll
- Shock the spa with a chlorine or
bromine sanitizer/shock, or other shock
treatment product
- Increase sanitizer level to balance water;
shock if needed
- Check to make sure the lter is running
properly; clean lter with a lter cleaner
or degreaser
- Raise pH with sodium bicarbonate product.
If metals are present, add chelating agent.
Chlorine Odor
Bromine Odor/
Yellow Water
VITA SPA
- Too many chloramines/
insu cient free
available chlorine
- Low pH
- Low pH
- Shock the spa with a chlorine sanitizer/
shock, or non-chlorine shock treatment
- Adjust pH; raise pH with sodium bicarbonate
product
- Adjust pH; raise pH with sodium bicarbonate
poduct
45
Page 46

Problem
Usual Cause
Solution
ENGLISH FRANÇAIS
Musty Odor
Foaming/ Scum
Ring Around
the tub
Algae
Eye Irritation
Skin Irritation/
Rash
Scale
- Bacterial or
algae growth
- Build up of body oils,
lotion and chemicals
resulting from soap or
detergent
- pH Imbalance
- Low free chlorine or
bromine
- Low pH
- Insu cient free
available chlorine
- Unsanitary/polluted
water
- Soaking too long
- Chemicals not balanced,
excessive ozone
- Too much calcium
dissolved in water
- pH and total alkalinity
too high
- Shock spa with a chlorine or bromine sanitizer/
shock, of equivalent shock treatment product.
If problem is visible, drain, clean, re ll and
balance spa
- Skim foam o using your leaf net or
drain and re ll
- Adjust pH
- Shock with a chlorine of bromine
- Raise pH with sodium bicarbonate product
- Shock with a chlorine sanitizer/shock or
other shock treatment product
- Keep recommended sanitizer residual at all
times; superchlorinate or use a non-chlo
rine shock treatment
- Soak for smaller intervals, such as 15 minutes
- Correct chemical imbalance
- Add a scale control product. Adjust total
alkalinity and pH levels by adding the
appropriate sodium bisulfate product; for
concentrated scale deposits
- Drain spa, scrub the scale o , re ll the spa
and balance the water
Erratic pH Test
Results/Unusual
- Sanitizer level too high
- Old pH indicator dye
pH Test Color
46
- Test the pH, when the sanitizer level is
below 5 ppm
- Replace the pH indicator dye / test strips
VITA SPA
Page 47

Problem
Usual Cause
Solution
Sanitizer
Dissipating
Too Rapidly
- Excessive organics in
water
- Temperature too high
- Low pH
- Low calcium hardness
- Low total alkalinity
- Increase shock dosage; add sanitizer;
shower before entering spa
- Reduce temperature
- Raise pH with sodium bicarbonate product
- Use chelating agent if metals are present.
Keep proper pH level (7.2 to 7.6).
- Use chelating agent if metals are present.
Maintain minimum 150-200 ppm calcium
hardness
- Use chelating agent if metals are present.
Maintain proper alkalinity for type of
sanitizer used.
NOTE: If your source water has a high metal or mineral content, a specialty chemical should
be used to avoid staining or accumulation of deposits. These guidelines cover the most
common water problems. Contact your dealer for furtherinformation regarding chemical
control issues.
ENGLISHFRANÇAIS
VITA SPA
47
Page 48

COMMON HARDWARE PROBLEMS
ENGLISH FRANÇAIS
Problem
Usual Cause
Solution
System not
operating
Heater not
operating
Water not clean
Abnormal
water usage
Overheating
- House circuit breaker tripped or
in OFF position
- Water level too low
- Heater mode not selected
- No power to heater
- Clogged or blocked oor suction
or skimmer
- Filter clogged (dirty)
- Poor water chemistry
- Insu cient ltering time
- Improper maintenance
- High content of solids in water
- Excessive evaporation
and/or splashing
- High ambient temperature
- Reset circuit breaker on house
breaker panel
- Add water to reach 1/8” below
the top of the weir door
- Refer to temperature/heater
functioning. See Control
instructions pg. 20, 26, or 31
- Check house circuit breaker
- Contact dealer
- Clean oor suction/skimmer.
Remove blockage
- Clean or replace
- See Maintenance section
pg. 41
- Run ltration mode longer
- Contact dealer
- Use clari er or drain and re ll spa
- Use spa cover and re ll
as necessary
- Contact dealer
Low water ow
from jets
Noisy pump
and motor
48
- Operating in FILTER mode-low speed
- Clogged or blocked suction or skimmer
- Dirty lter
- Jets in OFF position
- Slice valves closed
- Clogged oor suction or skimmer
- Low water level
- Damaged or worn motor bearings
- Select hi-speed jets
- Clean oor suction/skimmer.
Remove blockage
- Clean or replace
- Open jets
- Contact dealer
- Clean oor suction/skimmer
- Add water to normal water level
(15cm below lip)
- Contact dealer
VITA SPA
Page 49

Problem
Usual Cause
Solution
No water ow
from jets
Water leakage
from under spa
No air ow
from jets
Motor will
not operate
Black powder
lm around
water line
- Pump not primed
- Adjustable jets turned o
- House circuit breaker tripped,
no power to system
- Faulty pump or motor
- Pump surges
- Slice valves closed
- Check unions & drain hoses
- Air control not open
- Jet nozzle not seated properly
- Jet nozzle missing
- House circuit breaker tripped or in
OFF position
- Improper or defective wiring or
electrical supply
- Thermal Overload Protection switch
tripped
- Wearing in of turbo/blower brushes
- See Priming section, pg. 16
- Turn on jets
- Reset circuit breaker at
house panel
- Low water. Check level on
Weir door
- Contact dealer
- Close or tighten as necessary
- Open control
- Check jet nozzles
- Inspect jets and replace
as needed
- Reset circuit breaker
- Contact dealer
- Auto reset after motor has
cooled. Contact dealer if
motor continues to cycle
- Will disappear after use
ENGLISHFRANÇAIS
The spa will
not shut o
VITA SPA
- Spa trying to heat
- Spa is in lter cycle
- Spa is in Standard Mode
- Check ‘Set Temperature’ in
Standard Mode
- Normal. No need to change
- Check mode setting
49
Page 50

SPA SOAKING GUIDELINES
ENGLISH FRANÇAIS
1. Persons with heart disease, diabetes,
blood pressure or circulatory
abnormalities, a serious illness, or
pregnant women should not enter a
spa without prior consultation with
their doctor.
2. People with skin, ear, genital or other body
infections, open sores, or wounds should
not use the spa because of the possibility
of spreading infection.
3. Before entering, look at the water in your
spa. If there is cloudiness, foaming, or if a
strong chlorine smell is present, the
water needs treatment. Properly
maintained water will greatly reduce
potential skin rash (pseudomonas).
Ask your Authorized Vita Spa Dealer
for guidance.
4. Shower with soap and water before and
after using the spa. Showering before use
removes many common skin bacteria,
perspiration, lotions, deodorants, creams,
etc. that may reduce the e ectiveness of
the sanitizer and lessen the ability of the
lter to work e ciently. Showering after
use will help reduce skin irritation that
may result from contact with spa
chemicals.
6. Soaking for too long may cause some
users to feel nauseous, dizzy, or
light-headed. If you wish to soak in high
temperature water (104°F, 40°C), leave the
spa after 15 minutes, shower, cool
down and then return for another brief
stay. In lower temperatures (e.g. 98.6°F,
37°C, normal body temperature) most
people can comfortably and safely soak for
longer periods at one sitting. If you have
any questions about what’s right for you,
your family, or other guests, consult
your doctor.
7. Be sure you check the water temperature
before entering, and while using the spa.
8. Never use the spa while under the
in uence of alcohol.
9. Consult your doctor about potential
harmful e ects of using drugs or
medications while hot water soaking.
10. Never use the spa when you are alone.
11. Never allow children or elderly adults to
use the spa unsupervised.
5. Enter the spa slowly and cautiously. Be
careful of your footing, and allow your
body to gradually adjust to the water
temperature. Exit slowly to accommodate
relaxed leg muscles and possible
light-headedness.
50
VITA SPA
Page 51
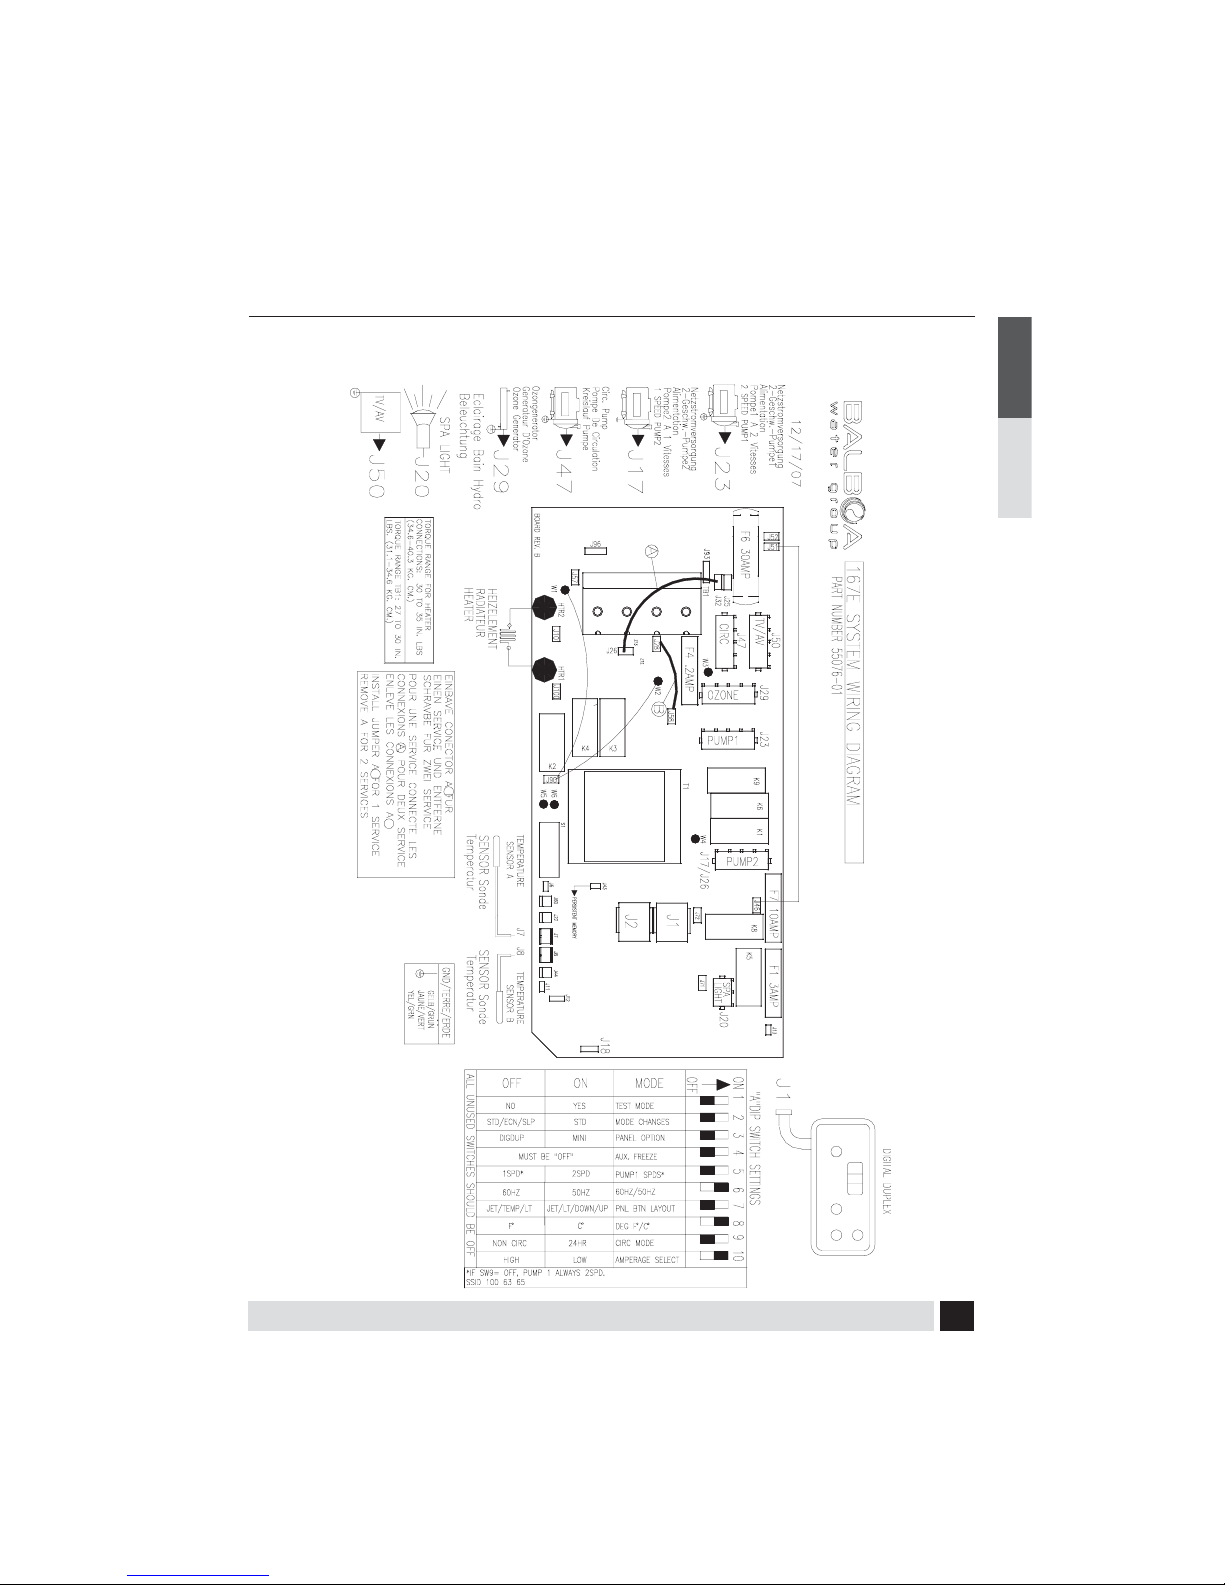
167 SERIES SYSTEM WIRING DIAGRAM
Wiring Diagram For Spa Models Amour, Image, Intrigue, & Duet (240VAC)
ENGLISHFRANÇAIS
VITA SPA
51
Page 52
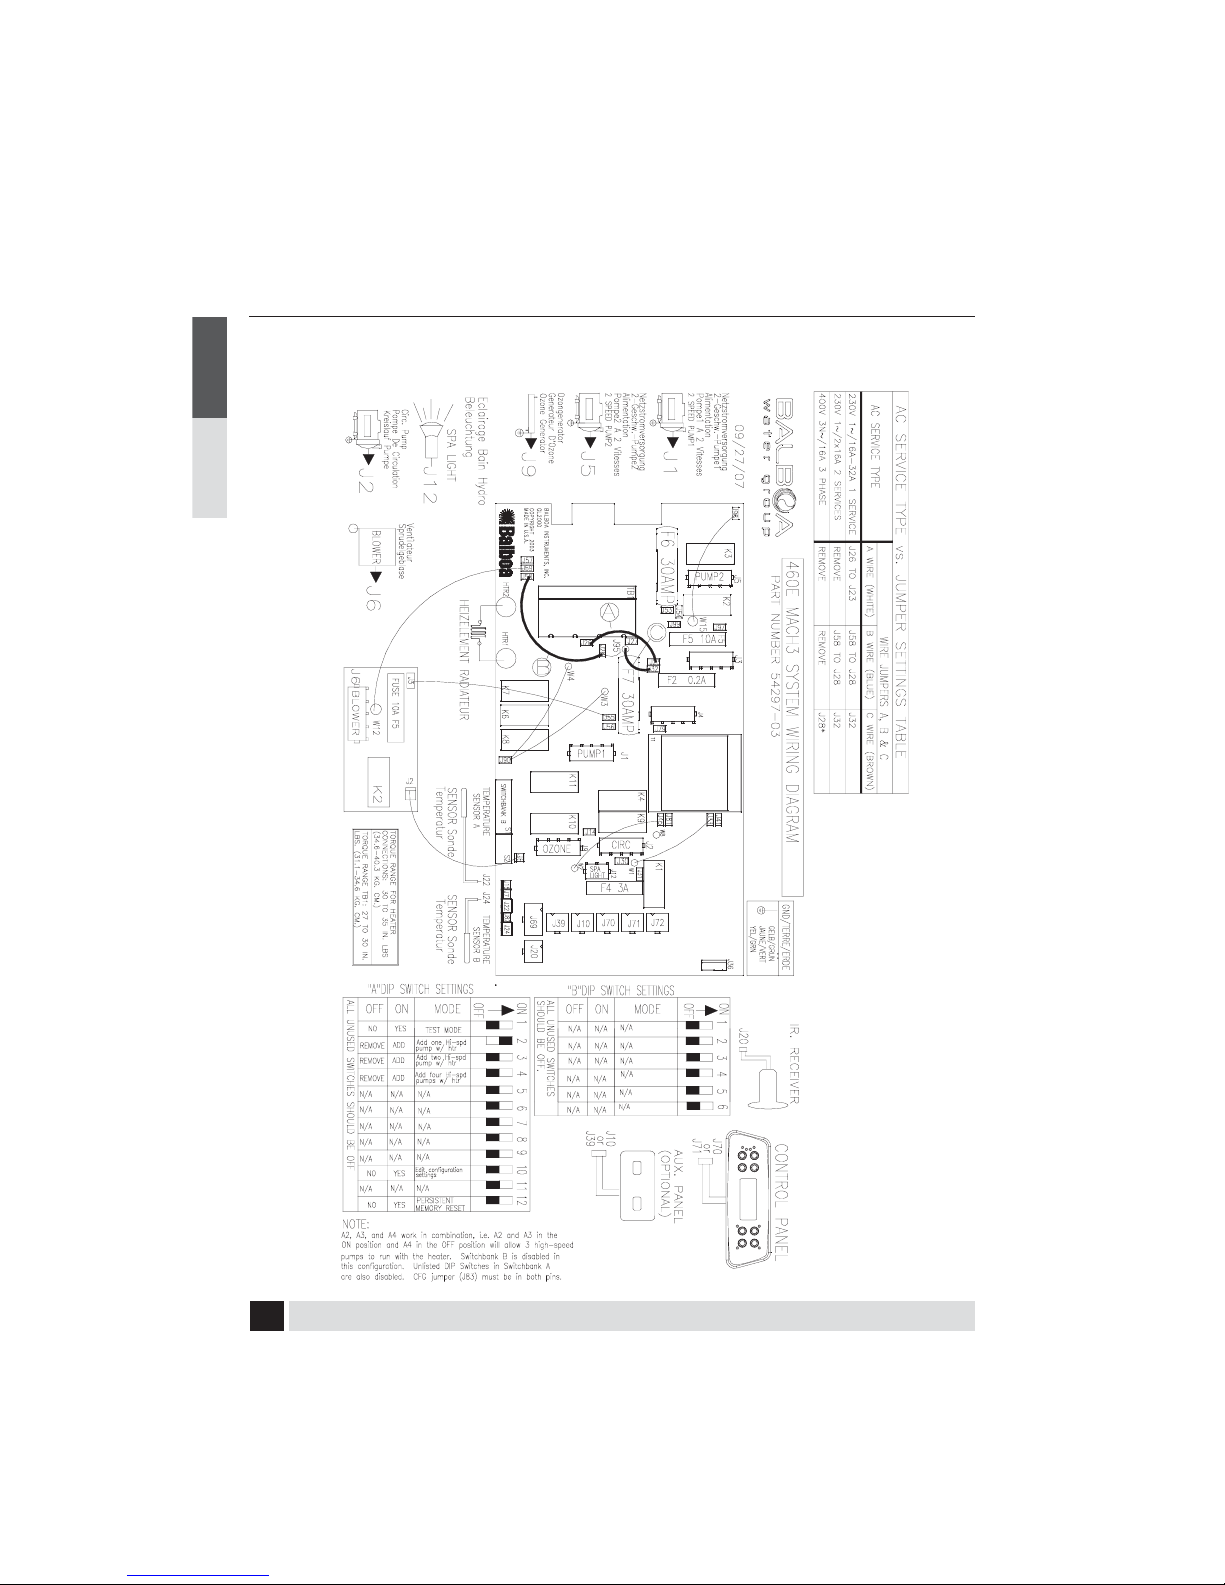
460 SERIES SYSTEM WIRING DIAGRAM
ENGLISH FRANÇAIS
Wiring Diagram For Spa Models Joli, Cabaret, Nuage, Passion, Chateau (240VAC)
52
VITA SPA
Page 53
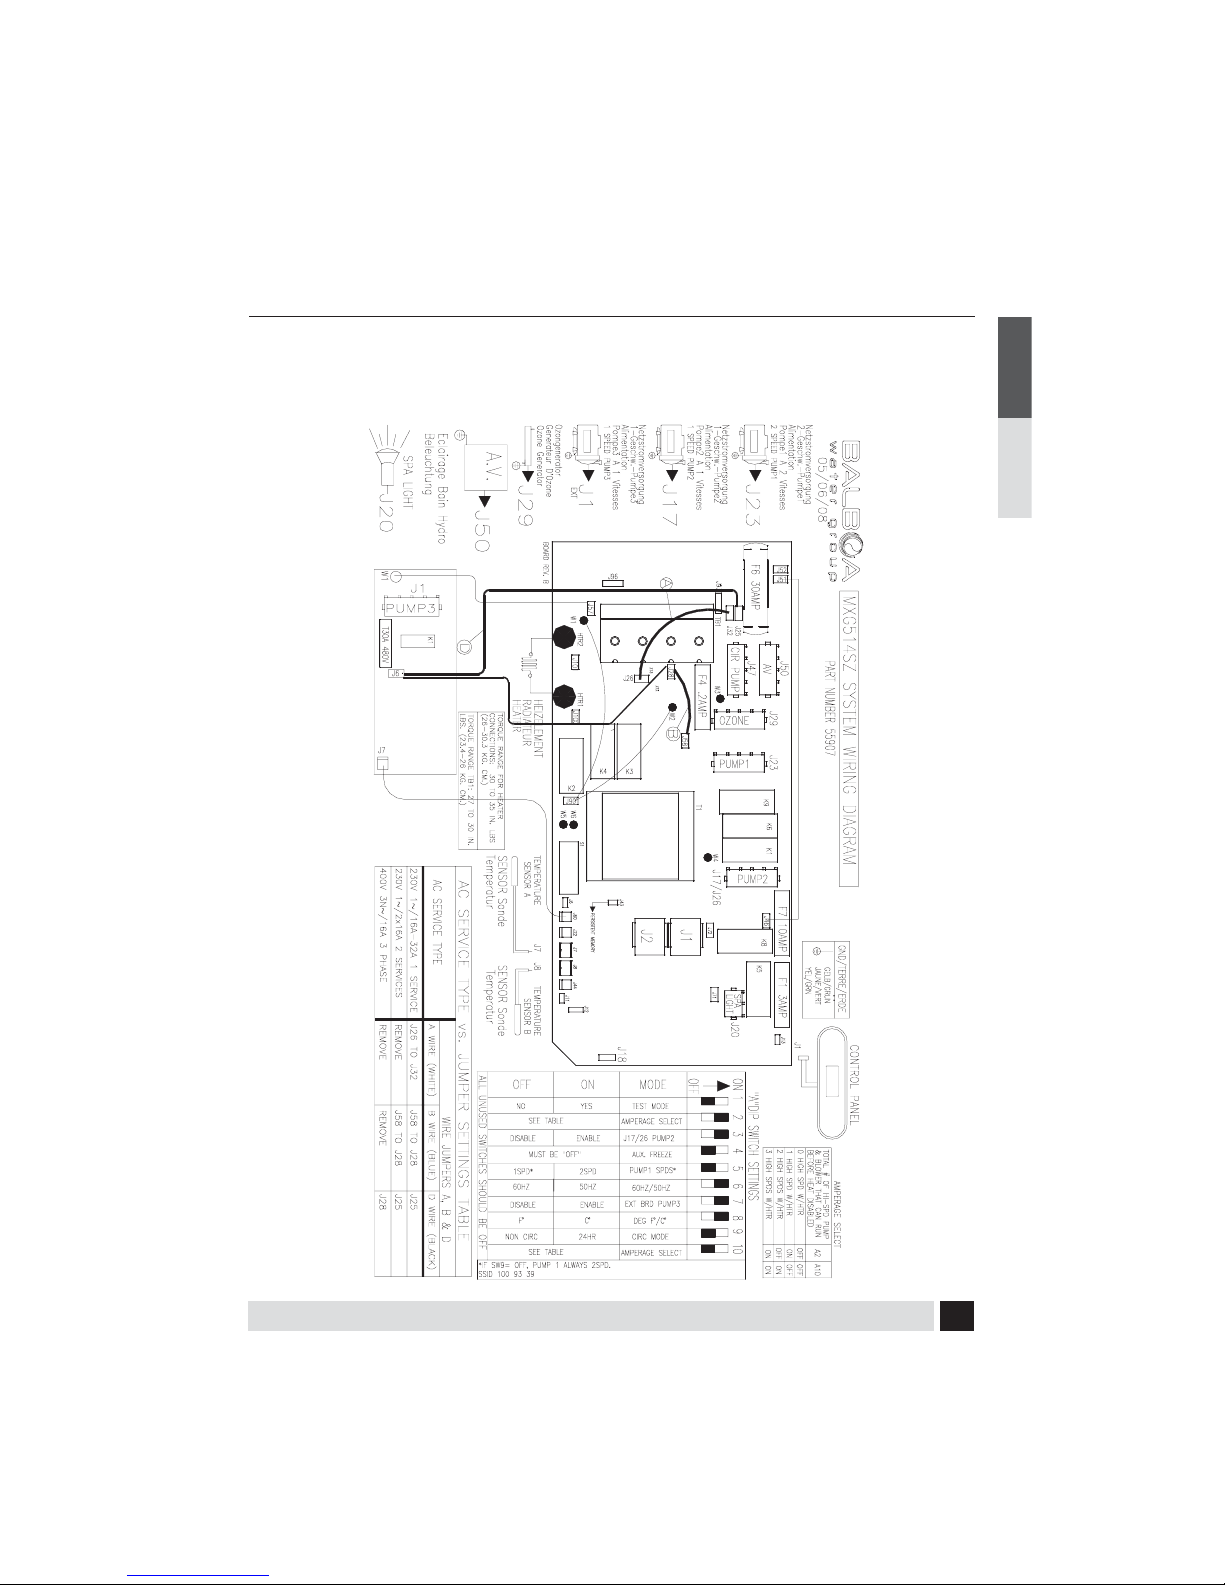
504 SERIES SYSTEM WIRING DIAGRAM
Wiring Diagram For Spa Models Intrigue, Elegant, Monarque, Prestigue, Emvie, & Grand
(240VAC)
ENGLISHFRANÇAIS
VITA SPA
53
Page 54
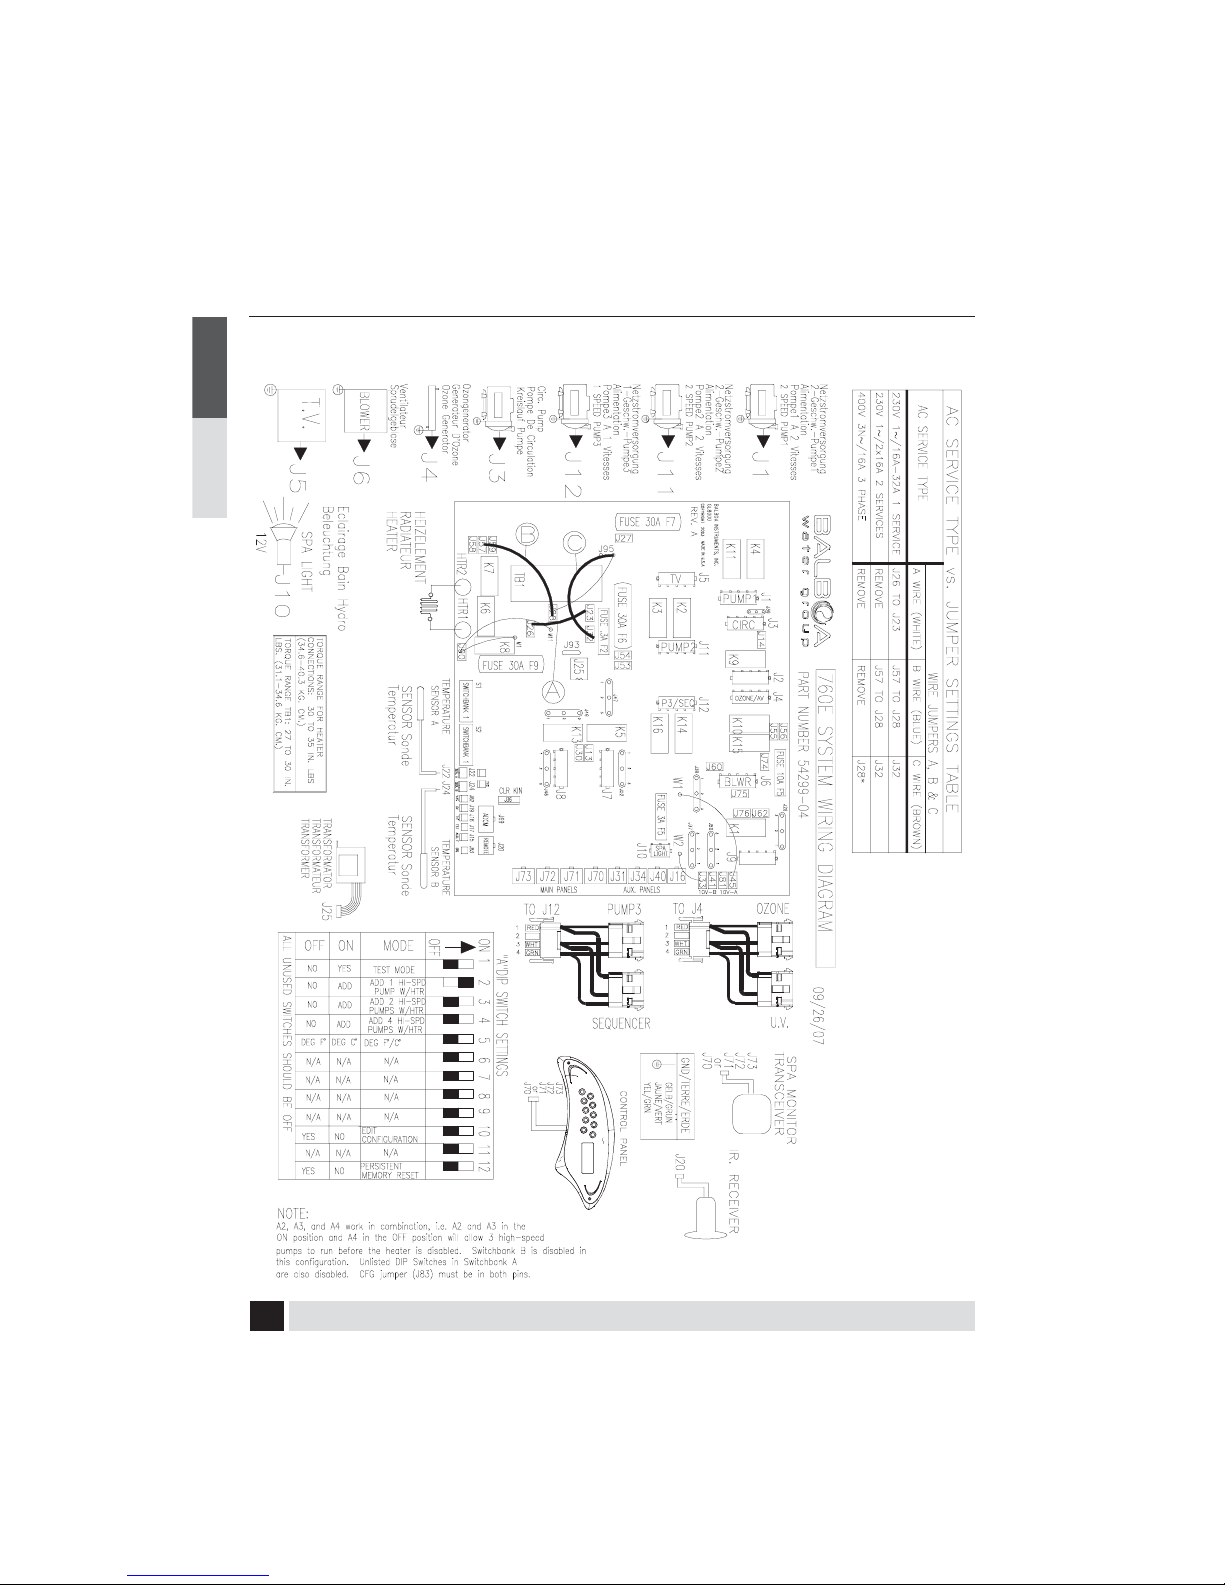
760 SERIES SYSTEM WIRING DIAGRAM
ENGLISH FRANÇAIS
Wiring Diagram For Spa Models Rendezvous & Mystique (240VAC)
54
VITA SPA
Page 55

ENGLISHFRANÇAIS
VITA SPA
55
Page 56

SAFETY SIGN
ENGLISH FRANÇAIS
The safety sign enclosed with your Owner’s Manual should be permanently installed where visible
to all users of the spa. This sign is adhesive backed and includes four screws for mounting the
sign on rough surfaces. It is very important that you, as a spa owner, review the important safety
instructions and warnings before you operate your spa. It is equally important that you instruct all
users, even occasional ones, as to the warnings associated with spa use.
You may obtain additional signs by contacting :
USA: MAAX Spas Industries Corp..
Customer Service
25605 South Arizona Avenue
Chandler, Arizona 85248
www.maaxspas.com
LIMITED WARRANTY SUMMARY
Please refer to the Warranty Card included with your product for complete warranty information.
In order to receive prompt warranty service, you must return your warranty card, completed with
model and serial number, to your dealer immediately upon completion of the spa installation.
MAAX Spas Industries Corp.. provides a limited warranty to our customers. It applies to the spa
structure, surface, plumbing, pumps, heater, blower, and controls. The limited warranty does not
cover damage resulting from improper maintenance, improper installation, misuse, abuse, neglect,,
accident, re, normal wear and tear, or improper water maintenance. Unauthorized modi cations
of the spa may void the warranty. Replacement cost associated with transportation, removal and
reinstallation are the sole responsibility of the spa owner. This manual refers to only year 2010 Vita
model spas. MAAX Spas Industries Corp., reserves the right to make changes in design or material
of its products at any time without incurring liability. This limited warranty applies to the rst retail
purchaser and terminates upon any transfer of ownership.
56
VITA SPA
Page 57

COPYRIGHTS AND TRADEMARKS
©Copyright 2010 MAAX Spas Industries Corp.. All rights reserved. No parts of this publication
may be reproduced, stored in a retrieval system, or transmitted, in any form or by any means
(electronic, mechanical, photocopying, recording or otherwise), without prior written permission.
Vita Spa
Disclaimer:
The information in this manual is accurate to the best of MAAX Spas Industries Corporations’
knowledge. However, MAAX Spas Industries Corporation assumes no responsibility for errors or
omissions. Nor is any liability assumed for damages resulting from use of the information contained
herein. Speci cations subject to change without notice. Spas shown at percentage of actual size.
Congratulations on your purchase of an Vita Spa from MAAX® Spas. Your Owner’s Manual
provides installation, operation and maintenance instructions.
Please review it and keep it for future references.
TM
, Powerworks TM, are registered trademarks of MAAX® Spas.
ENGLISHFRANÇAIS
Save These Instructions
Owner’s Record Information
Date Purchases :
Purchased From :
Phone Number :
Installed By :
Serial Number : Model :
VITA SPA
57
Page 58

NOTES
ENGLISH FRANÇAIS
58
VITA SPA
 Loading...