


1
proDAD
Vitascene
© proDAD GmbH
Autor : Uwe Wenz

2
Content
Welcome
5
Copyright / legal Information
5
Further Info's
6
Philosophy
7
What is new in Vitascene 3.0?
8
Workshops & Training for Vitascene
9
Installation, Registration, Help, Support, Technology and System requirements
10
Installation and Registration
10
Help
11
Technical Support - Support
12
Technology and System requirements
12
Program start and Plug ins
14
Vitascene stand -alone
14
Adobe Premiere Elements
15
Plugin as video effect
15
Plugin as video transition
18
Adobe Premiere
21
Plugin as video effect
21
Plugin as video transition
22
Avid MediaComposer
23
Plugin as video effect
23
Plugin as video transition
23
Grass Valley Edius
24
Plugin as video effect
24
Plugin as video transition
26
MAGIX Vegas
28
Plugin as video effect
28
Plugin as video transition
30
Corel Video Studio
32
Plugin as video effect
32
Plugin as video transition
34
Pinnacle Studio
36
Plugin as video effect
36
Plugin as video transition
38
Avid Studio
40
Plugin as video effect
40
Plugin as video transition
42
MAGIX
44
Plugin as video effect
44
Plugin as video transition
46
Workshops for familiarization
48
Text with Ray filter and Key frames
48
Apply Sparkle filter to an image
58
Apply Shape Wipe transition effect
66
How to create a miniature landscape in a real video
75
User interface/introduction
83
Start page
83
Navigation
85
Filter-Presets
86
Preview
88
Export
90
Export - Animation - AVI
90

3
Export - Single frames
93
Settings
96
Search path for images/animations
97
Alternative video sources
98
Specialization customization
99
Video format
102
Background / borders
104
Duration
104
Language - User interface
105
Undo
105
Save
106
Manual
106
Control elements
107
Preview area / Timeline / Keyframes
107
Menu description
109
Shortcuts...
110
Apply templates
110
Filter-Presets
111
Own templates
113
Filter group / Sparkle
114
Filter
115
Color Adjustment
116
Source / Video A
117
Transition group / Glow Wipes
119
Mask-Presets
121
Customize effect
123
Customize mask
125
Texture
128
Filter
129
Source / Video A
130
Source / Video B
134
See also
137
Export
137
Settings
138
Edit
139
Operators
141
Geometry
141
Rotation
141
Scale
141
Position horizontal
142
Position vertical
143
Avoid edges, through may enlarge
143
Pixel-Aspect
144
Adjust by
144
Aspect Ratio
145
Attributes
146
Flip
146
Invert
147
Color Adjustment
148
Brightness
148
Contrast
148
Saturation
149
Hue
149
Gamma
150

4
Blur
150
Gauss Blur (3x3...11x11)
150
Gauss Blur
151
Horizontal Gauss Blur
151
Vertical Gauss Blur
152
Center Blur
152
Zoom Blur
153
Disc Blur
153
Direction Blur
153
Annulus Blur
154
Cross Blur
155
Blur + Expand white
155
Blur + Expand black
156
Frequence Blur
156
Cycle Frequence Blur
157
Filter
158
Bright Bloom
158
Bright Direction Bloom
159
Bright Cross Bloom
160
Saturation Bloom
161
Saturation Direction Bloom
162
Defocus
163
Defocus + Bokeh
164
Hollywood Night
165
Color Blur
166
Sparkle
166
Glim
168
Starburst
169
Rays
173
Dust
180
Motion Dust
181
Zoom Dust
182
Cross Dust
183
Color Composite
184
Edge Contrast
190
Bevel
191
Light
193
Tilt Shift
194
Effect Parameter
196
A/B Sharpness
196
A/B Tint
197
Fade Point
197
X / Y-axis for Wrap
198
Hor. / Vert. displacement for Wrap
199
Opacity
200
blend luminance
200
Loops
201
Waveform
201
Rotation
202
Iris
202
swap direction
202

5
Welcome
Welcome to Vitascene Version 3.0!
Effects and transitions with the aid of deliberate blurring, expertly selected color matches
and understated lighting create sophisticated visual moods on film, e nabling glamour, flair,
charm and drama to be perfectly accentuated - which is why it is barely possible to imagine
a professional production without these kinds o f effects:
Vitascene makes a perfect quality stylistic device available to everyone - it’s amazingly easy
to use and, thanks to the latest GPU technology, lightning fast!
We hope you enjoy Vitascene 3.0 and always produce results that are full of effects!
Coppyright / legal Information
Copyright proDAD GmbH. All rights reserved.
Licensing Conditions
Please read these licensing conditions carefully before installing the software.
Licensing agreement
When setup starts, a licensing agreement is show n, which you should read carefully.
By installing the software, you stale that you accept the copyright conditions, the licensing
agreement and the licensing procedure.
License Guaran tee
proDAD GmbH grants the user the right to use this product for its proper and permitted
purpose. The present product may only be installed on one computer. proDAD hereby
guarantees to provide a license key free of charge. By installing this product, the user
acknowledges and accepts the license guarantee , the copyright terms, and the limitation of
liability.
Trademarks
All products and trademarks mentioned in association with this product are trademarks that
belong to the respective owners. All trademarks are used without any gua rantee that they
may be used freely, and they may be registered trademarks.
Limitation of Liability
The extent of liability for any one claim is limited to a replacement of the product. This
applies to proDAD GmbH, all licensees and retailers. Claims shall only be recognize d if the
software is returned in an orderly manner, together with the returned goods number that
has to be previously arranged with proDAD GmbH. The goods must also be accompanied by
proof of purchase. This guarantee becomes void if a malfunction of this product is due to
improper use, mistreatment, an accident or improper handling. proDAD GmbH, its sales
partners and licensees, shall not be held liable for damages or subsequent damages arising
from the impossible usage of this product. L iability is limited in all cases to the purchase
price of the product.
Documentation
The greatest of care has been taken in compiling and translating the handbook. However,

6
the possibility of errors cannot be fully excluded. proDAD GmbH shall assume no
responsibility or liability whatsoever for the consequences of any incorrect statements or
information which the documentation or translation may contain. Subject to technical and
optical modifications. Information regarding any inaccuracies is always welcome.
Copyright
The software and the individual components of this product are the property of proDAD
GmbH. By installing this product, the licensee agrees to refrain from unauthorized use and
duplication.
proDAD GmbH does not accept any responsibility for the usage of this program and the
publication of its contents and data that has been created with this program.
proDAD GmbH * Gauertstr. 2 * 78194 Immendingen * Deutschland * HRB 1077
Further Info's
FURTHER INF O R M ATION ABOUT VITASCENE
Workshops and FAQs : www.prodad.com
Trainin g and Learning-products :
The company Vidcom 30th-century S.L. / Uwe Wenz is proDAD Vitascene’s official training
partner. Interested parties can obtain detailed information on advanced seminars at
www.30th-century.com.

7
Philosophy
•
A greatly abbreviated insight into the various featur es of the application, User interfaces
can be viewed simultaneously wherever possible: Almost all elements a re visible in an
overview in relation to one another.
•
Complete interactivity: all parameters entered can be viewed immediately without
annoying confirmations .
•
Real-time preview: the preview is interactive and can be adjusted to the performance of
your computer, which s implifies things when experimenting, en
confirmed unnecessarily.
•
User navigation based on the modern Windows systems for quicker comprehension.
•
Shortcut menus (right mouse button) are provided wherever possible for quicker
performance.
•
Ident ical or similar functions can be used in different areas of the application to a ct
according to one's own preferences.
•
Help via the mouse in short form for quick tips while working.
•
Menu navigation in tree form or as structure. Options are shown in the respective option
window for schematic and orderly user navigation and the greatest possible extendibility.
•
Dynamic GUI system for summarizing user habits and making functions available in just a
few single steps.
•
Limitless layout ar ea for infinite freedom when editing roller titles, extra-dimensional
graphics etc.
•
Innovative layout features for interactive alignment, scaling etc.
•
Object
•
Object-oriented effect engine for maximum scalability of results by combining individual
effect settings.
•
User-oriented preview functions for impressive, result-like previews (instead of wire
frame models ), interactiv ely and qualitatively adjustable.
•
Diverse export functions for extensive user possibilities.
•
Future-oriented rendering methods designed for use on standardized systems. These
make additional hardwa re useable in the future and can be continually optimized in line
with increasing hardware performance.
•
Modern plug-in structure for NLE host applications.
•
Modern plug
•
Internal object
Vitascene is a modern software based on an innovative architecture. The advantage it has
in comparison to similar products is that it free from old development concepts. At the same
time, this fortunate circumstance also offers the opportunity to incorporate new concepts,
which may at first glance appear to be unusual, but which are, or will be, advantageous.
tries do not need to be
-oriented layout features for unlimited structure and diversity.
-in structure as host application for other manufacturers and plug-ins.
-oriented program structure, ultra-scalable and future-safe.
By purchasing this product, you have not only made a go od decision for the present, but you
can also be assure d that you will continue to have an application available in future that is
always compatible with your environment and which attains performance and perfection by
contin ually imp r o ving its e lf.
An advantage that should not be underestimated, during and particularly following
the acquisition of an innov ativ e sof tware!
8
What is new in Vitascene 3.0?
Visit the following website for further information on the supported NLE-versions as Plugin
(transition and effect): www.prodad.com
Vitascene 2.0 includes the following new filter templates:
and transition templates.

9
Workshops & Training for Vitascene
Instructions for be g inne rs and advanced users of Vitascene :
The company 30th century/Uwe Wenz is proDAD Vitascene’s official training partner.
Interested parties can obtain detailed information on advanced seminars at
www.30th-century.com (powered by proDAD).
Digital Video Training-Center
10
Installation, Registration, Help, Support,
Technology and System requirements
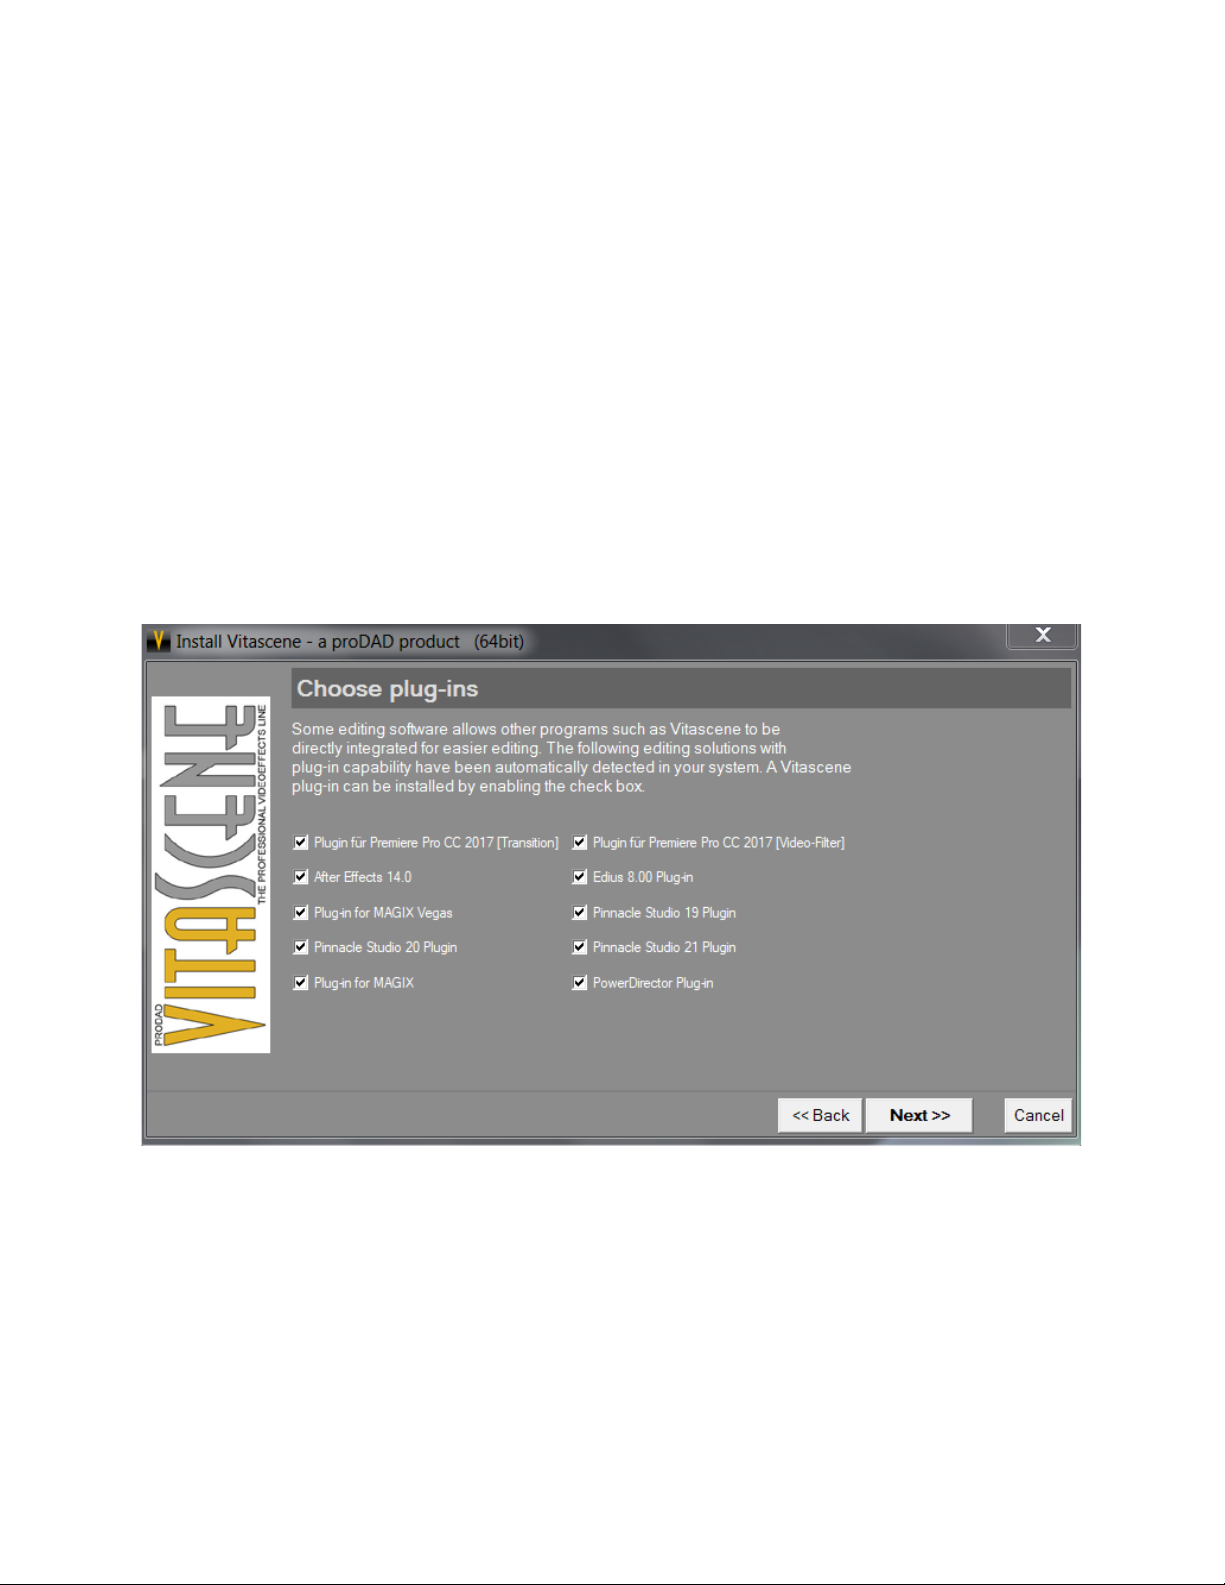
Installation and Registration
1. Installation
To start the installation, double-click the setup file. By installing the program, you agree to
the terms and conditions in the legal notice section and to the license terms. If you ha ve
downloaded Vitascene, the archive file will first be decompressed and then the installation
will start. Select the target folder where Vitascene should be installed. Now follow the
installation instructions. During installation, you are prompted to enter a license key (serial
number). If you have received the software via download, this license key was included with
the e-mail sent to you providing download instructions. If you have received the software on
DVD, you will find the li cense key in the box.
Please make sure that your Plug-in is correctly installed.
After installing Vitascene, you can either use it as a stand-alone version or as a Plug-in
(transition and effect) in different v ideo editing software programs.
2. Registering Vitascene
Please register your proDAD Mercalli at http://www.prodad.de/register.html.

11
Help
•
Workshops
•
Supplementary instructions
•
Tutorials
•
Information about new plug-ins (that have been create d after this manual had been
compiled)
•
Other information about proDAD
Instructions for beginners and advanced users of
The company
partner. Interested parties can obtain detailed information on advanced seminars at
www.30th-century.com (powered by proDAD).
Vitascene, Stylish transition effects and filters! 100% GPU processing power! 100%
interactive!
For discerning professionals who are look ing for the best quality in the shortest time!
Of course, being multifunctional also means that it is much more demanding both in terms
of the quality and for the user. Although the operation o f Vitasc ene has been designed very
intuitively, a certain period of familiarization is always required for h igh-performance
multimedia programs. We therefore recommend that you initially read this manual to get a
feeling for the program. You should definitely work through the tutorials. The worked
examples that are described there are specially tailored to help you learn how to use the
program and understand the systematic behind it. Only after completing the tutorials will
you have obtained a feeling for the hidden possibili ties, many of which can o n ly be achieved
by combining several program features. Once yo u have grasped the basic principles of the
tutorials, you should be in a position to create complex and demanding results after just a
few days. Further assistance is always available in the p rogram help, which giv es yo u an
overview of the comprehensive parameters and options that are available.
Help
Questions will always arise while working with programs. In Vitascene, you can get the
answers quickly and easily. The key is the integral program help , which is always available,
easily found and quickly leads you to a result. Simply ope n the menu Help.
Here, you also find an index for quick reference in a modern electronic form.
The manual supplied with the program (with the exception of OEM versions and demo
versions) as well as downloads or CD versions of this product) is actually only intended to be
an introduction to the program. The primary source of information and assistance, together
with a full overview of the software, can be found in the program's online help.
This manual shows you how t o use the software and provides you with diverse systematic
information. For in-depth detailed information, you should refer to the aforementioned
online help.
Further Info's :
If you require further information about the program, visit the
Here you will find :
Website www.prodad.com .
Vitascene :
Vidcom 30th century S.L / Uw e Wenz is proDAD Vitascene’s official training

12
Technical Supp ort - Support
proDAD Support
We at proDAD are happy to answer any que stions you may have about our program.
Simply contact us
· by email at support@prodad.com
· by telephone: +49 (0)7462 9459 0
· by fax: +49 (0)7462 9459 79
· by post: proDAD GmbH, Gauertstr. 2, 78194 Immendingen, Germany
Pleas e provid e us with the following infor mation:
· Version number and date of the program (menu Help)
· Your operating system
· Name and version number of your video editing program (if applicable)
· Any program updates you have already installed (if applicable).
Ideally you will send us your request by menu Help, in case of problems send an
email....
Then the installation and user protocol is also sent to us automatically as a zip file.
You do not need to do anything else. By the way, the transferred data does not include any
personal information.
Note:
In Vitascene’s Help Menu you will find the option Service Update, which will take you to the
www.prodad.com service page to download Service Updates (Service Packs) of the
software. When installed, the latest version of Vitascene offers enhancements and will solve
possible problems.
Technology and System requirements
At the moment, you are provided with basic infor m a tion on the technology by proDAD
Vitascene. One aspect that is particularly important for correct use is compliance with the
requirements in terms of your PC.
What is a GPU (graphics processin g u nit)?
Modern graphics cards have an extremely high level of computing power, which is vastly
superior to that of the CPUs used in PCs. With Vitascene this power is used to create effects!
Digital processing is carried out by the gr a phics card, speeding up the whole procedure
enormously.
Brand new technology – 50 times faster than it used to be – with an accelerated
GPU!
The advantages of GPU processing:
• up to 50 times faster than using a CPU
• perfect quality using 16 bit and 32 bit IEEE
• more precise processing for improved quality and sharper details

13
Is your computer suitable for GPU processing?
Click here to check your PC: GPU-Test
System requirements:
• Windows 64-Bit Vista, Win7, Win8, Win8.1, Win10, 2G B-memory (RAM)
• recommended: i7-cpu, 6 GB memory (RAM)
Possible limitations in terms of performance:
• An out of date graphics hardware driver
• An out of date version of DirectX
Tip:
Always keep your PC system up to date in terms of driver software for graphics cards and
your version of DirectX. We also recommend taking the GPU-Test to determine the capacity
of your graphics card.

14
Program start and Plug ins
The following chapters contain information on the use of proDAD Vitascene as a stand-alone
version as well as for plug-in operation with the various video editing applications below:
• Vitascene stand-alone
• Adobe Premi er e El em ents
• Adobe Premi er e
• Avid MediaComposer
• Grass Valley Edius
• MAGIX Vegas
• Corel Video Studio
• Pinnacle Studio
• Avid Studio
• MAGIX
Please n ote:
To check which version of your editing software is supported, refer to the Vitascene section
at www.prodad.com.
For information purposes and for the sake of completeness, the following plug-in
descriptions include all p otentially available plug-ins. Your licence may not include the use of
a particular plug-in, in which case you will not be able to use that plug-in.
Even if the description refers to use of the standalone version, this does not mean that the
plug-in is covered by your licence.
Vitascene stand-alone
Starting the independent version of the program:
Click on the Vitascene icon on your desktop by double-clicking
or via the Windows start menu / Programs / proDAD / Vitasc ene 3.0 .
15
Adobe Premiere Elements
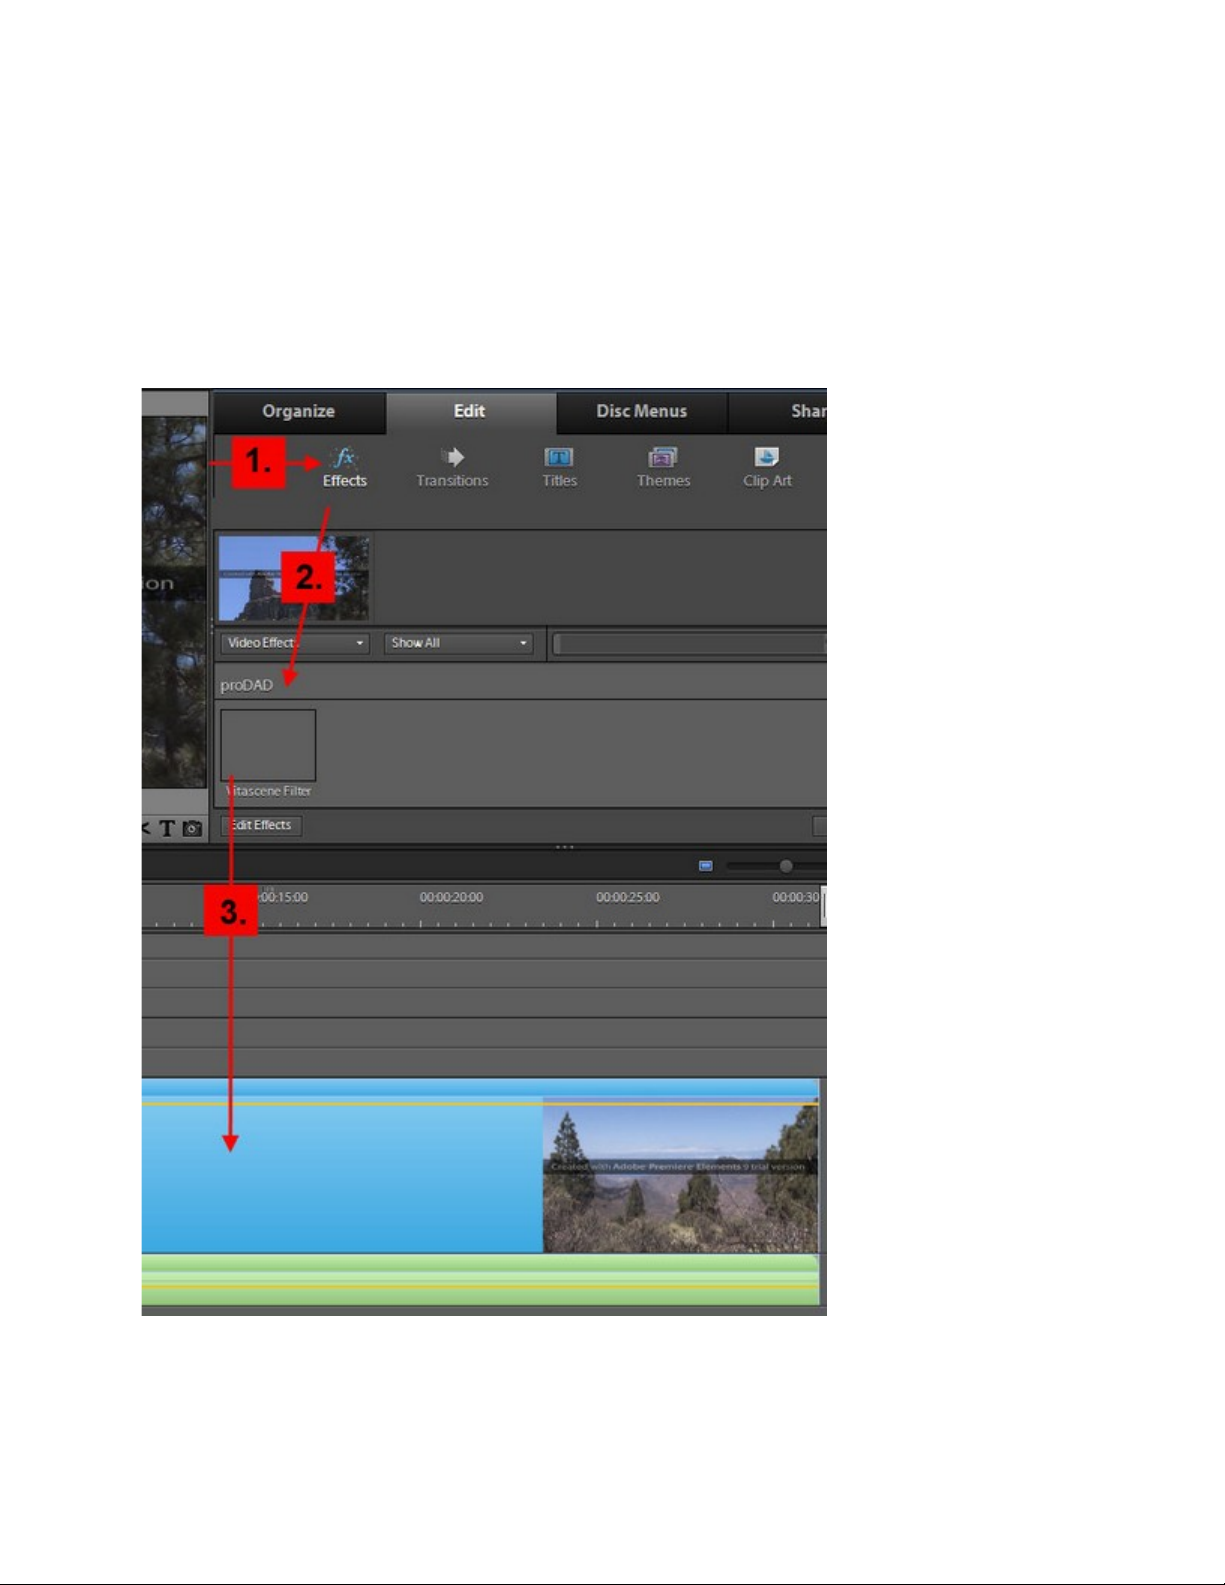
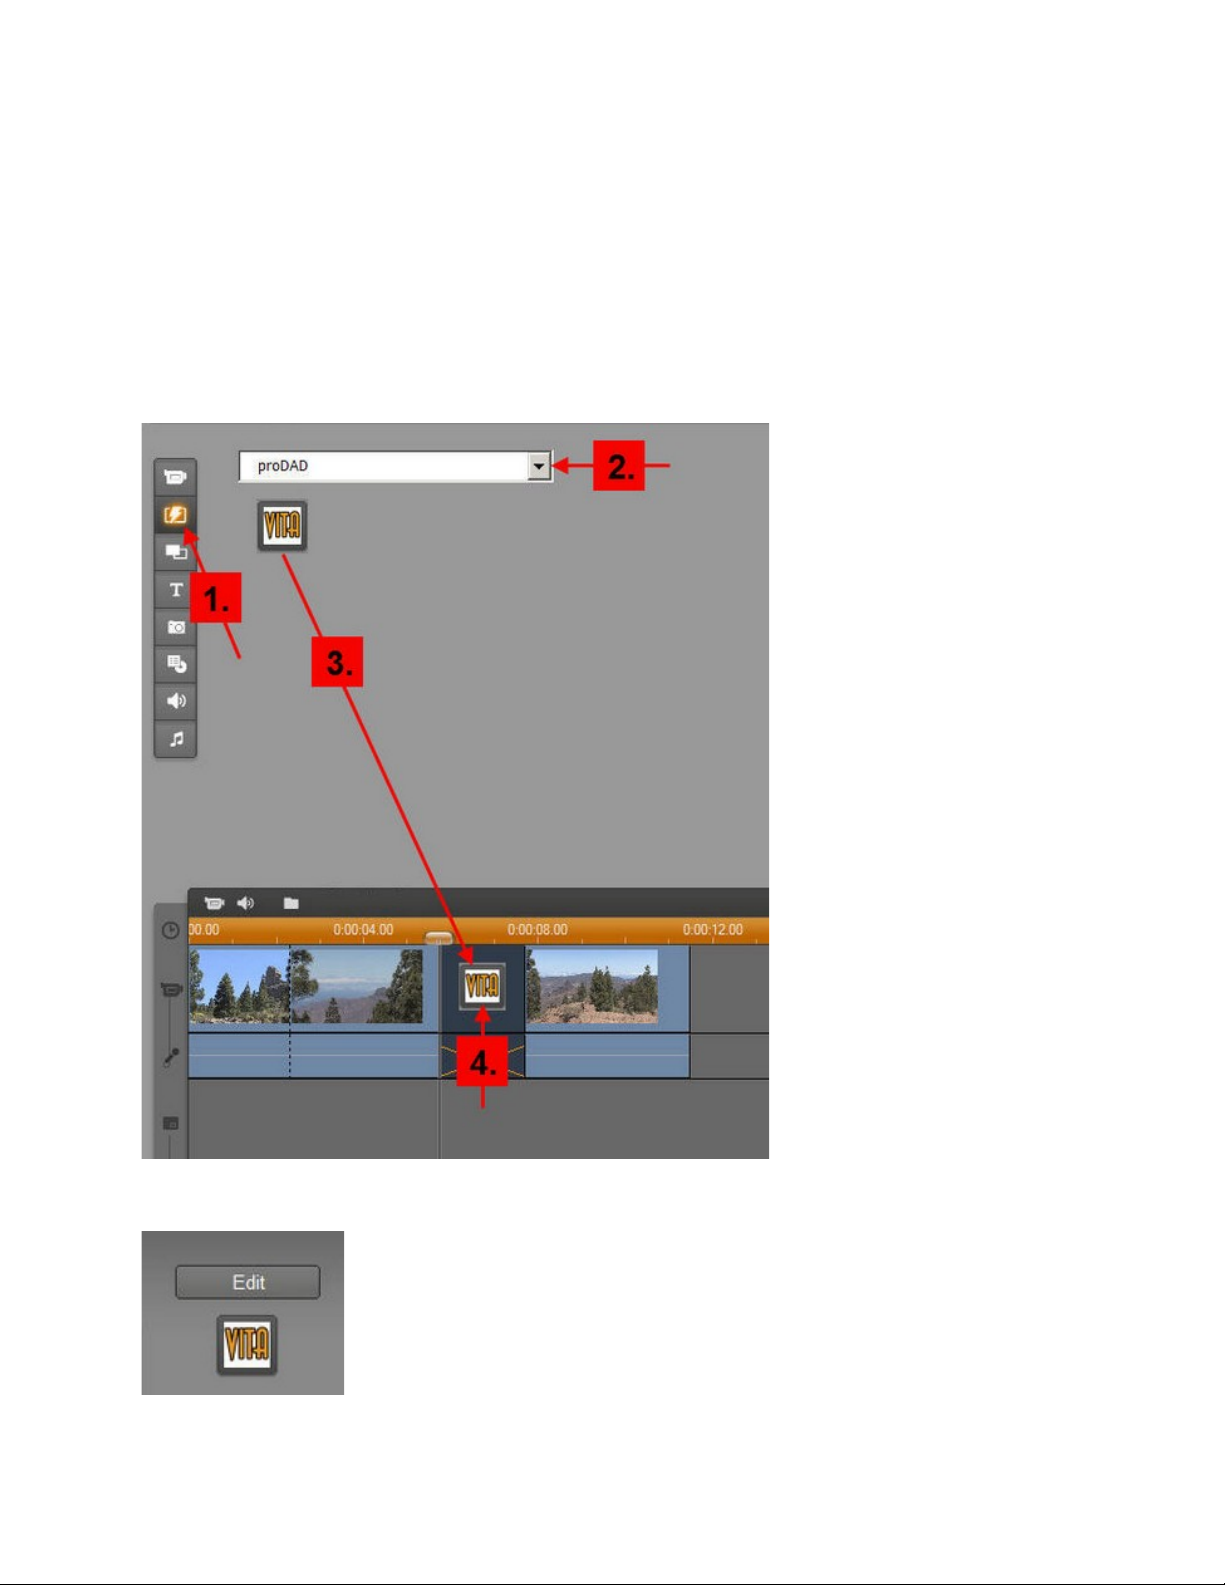
Plugin as video effect
This is what you do:
1. Locate the Effects.
2. Select the proDAD directory.
3. Click the item Vitascene Filter and drag it onto the required clip in the timeline.
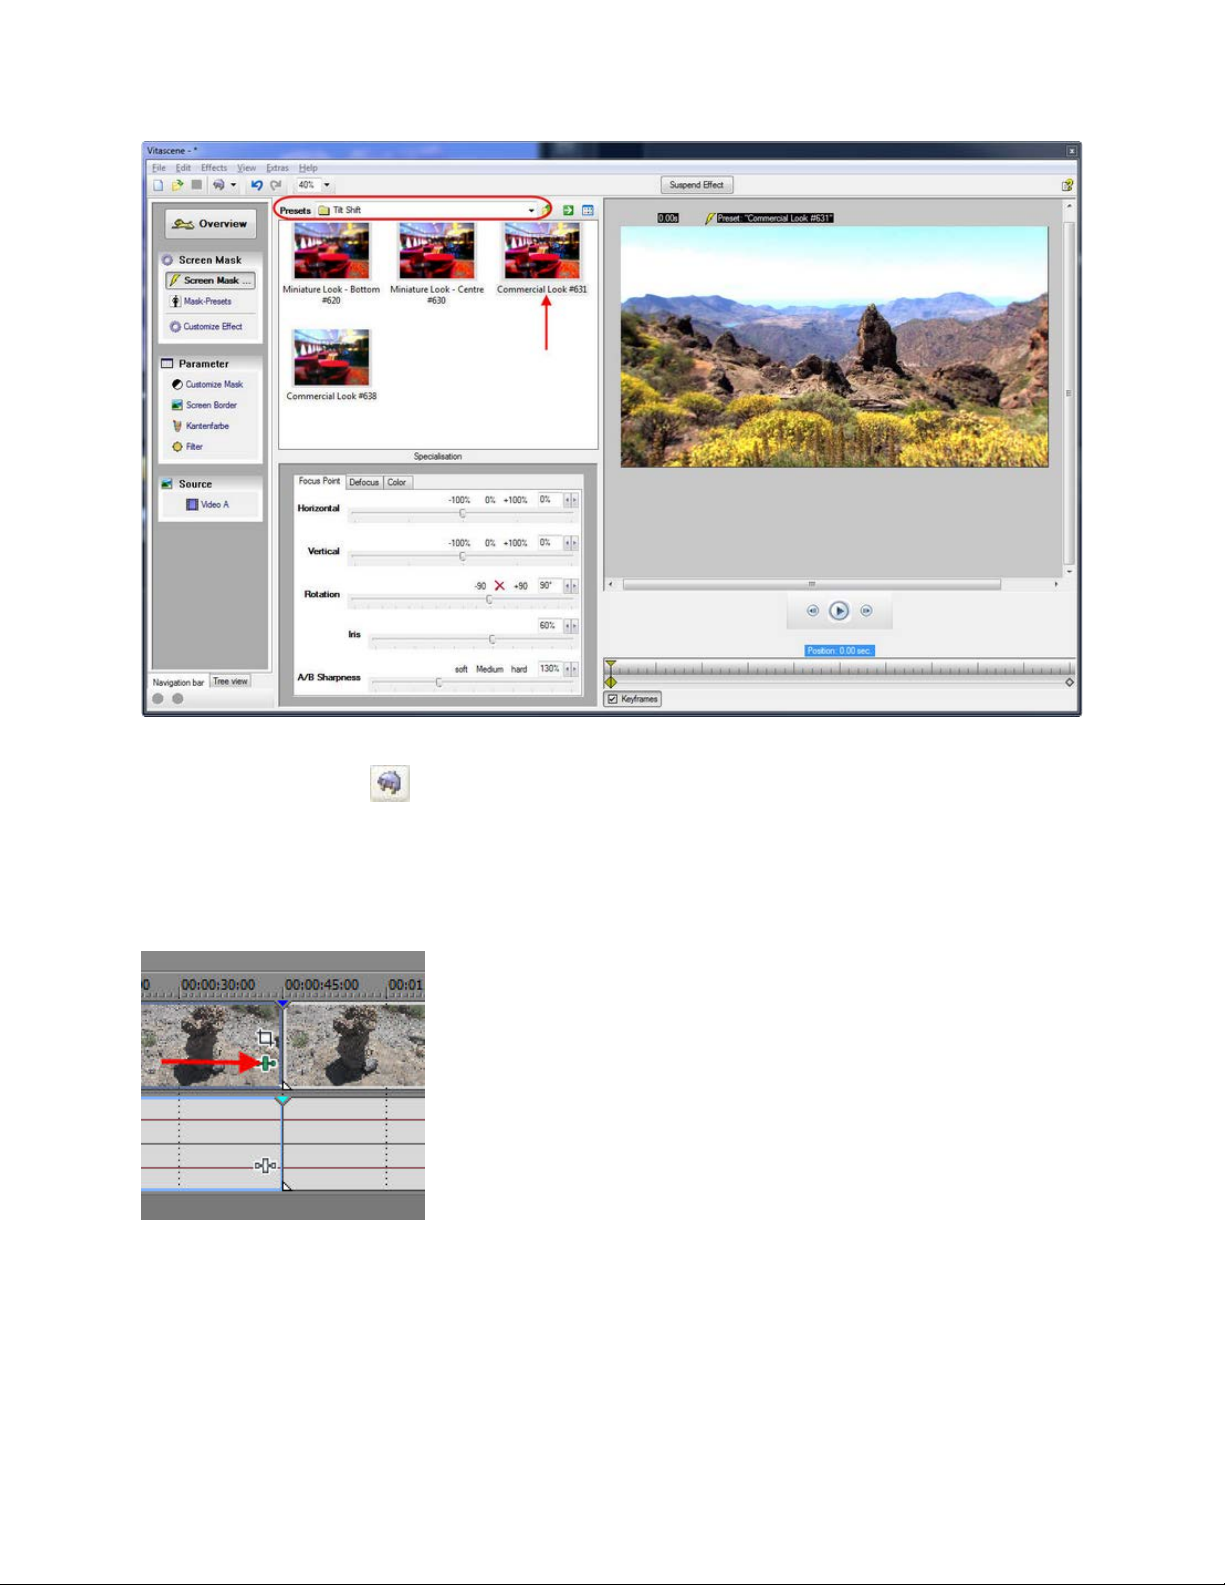
4. Vitascene starts, now choose a suitable video effect from the Filter Templates (e.g. Tilt
Shift / Commercial Look 631). A playback of the current video clip with the selected v ideo
effect will appear in the Vitascene preview window, and, of course, you can modify the
selected effect in Vitascene to suit you.

16
5. Once the project has been edited and completed in Vitascene, simply press the F12 key
or click on the symbol
This will automatically save the Vitascene project.
6. If you want to start Vitascene again, select the clip in the timeline.
7. Now click the Edit Effects button.
to return to Premiere Elements.

17
8. The Vitascene Filter effects list appears, click the Setup... button and Vitascene starts
again.
Note:
If you want to delete the Vitascene effect, right-click Vitascene Filter and choose the
Delete option.

18
Plugin as video transition
This is what you do:
1. Locate the Transitions.
2. Select the proDAD directory.
3. Hold down your left mouse button and drag this Vitascene Transition between the two
clips in the Timeline.
4. Click the Edit Transition Button.
5. This opens the Vitascene Transition dialog.
6. Click on the Custom button.

19
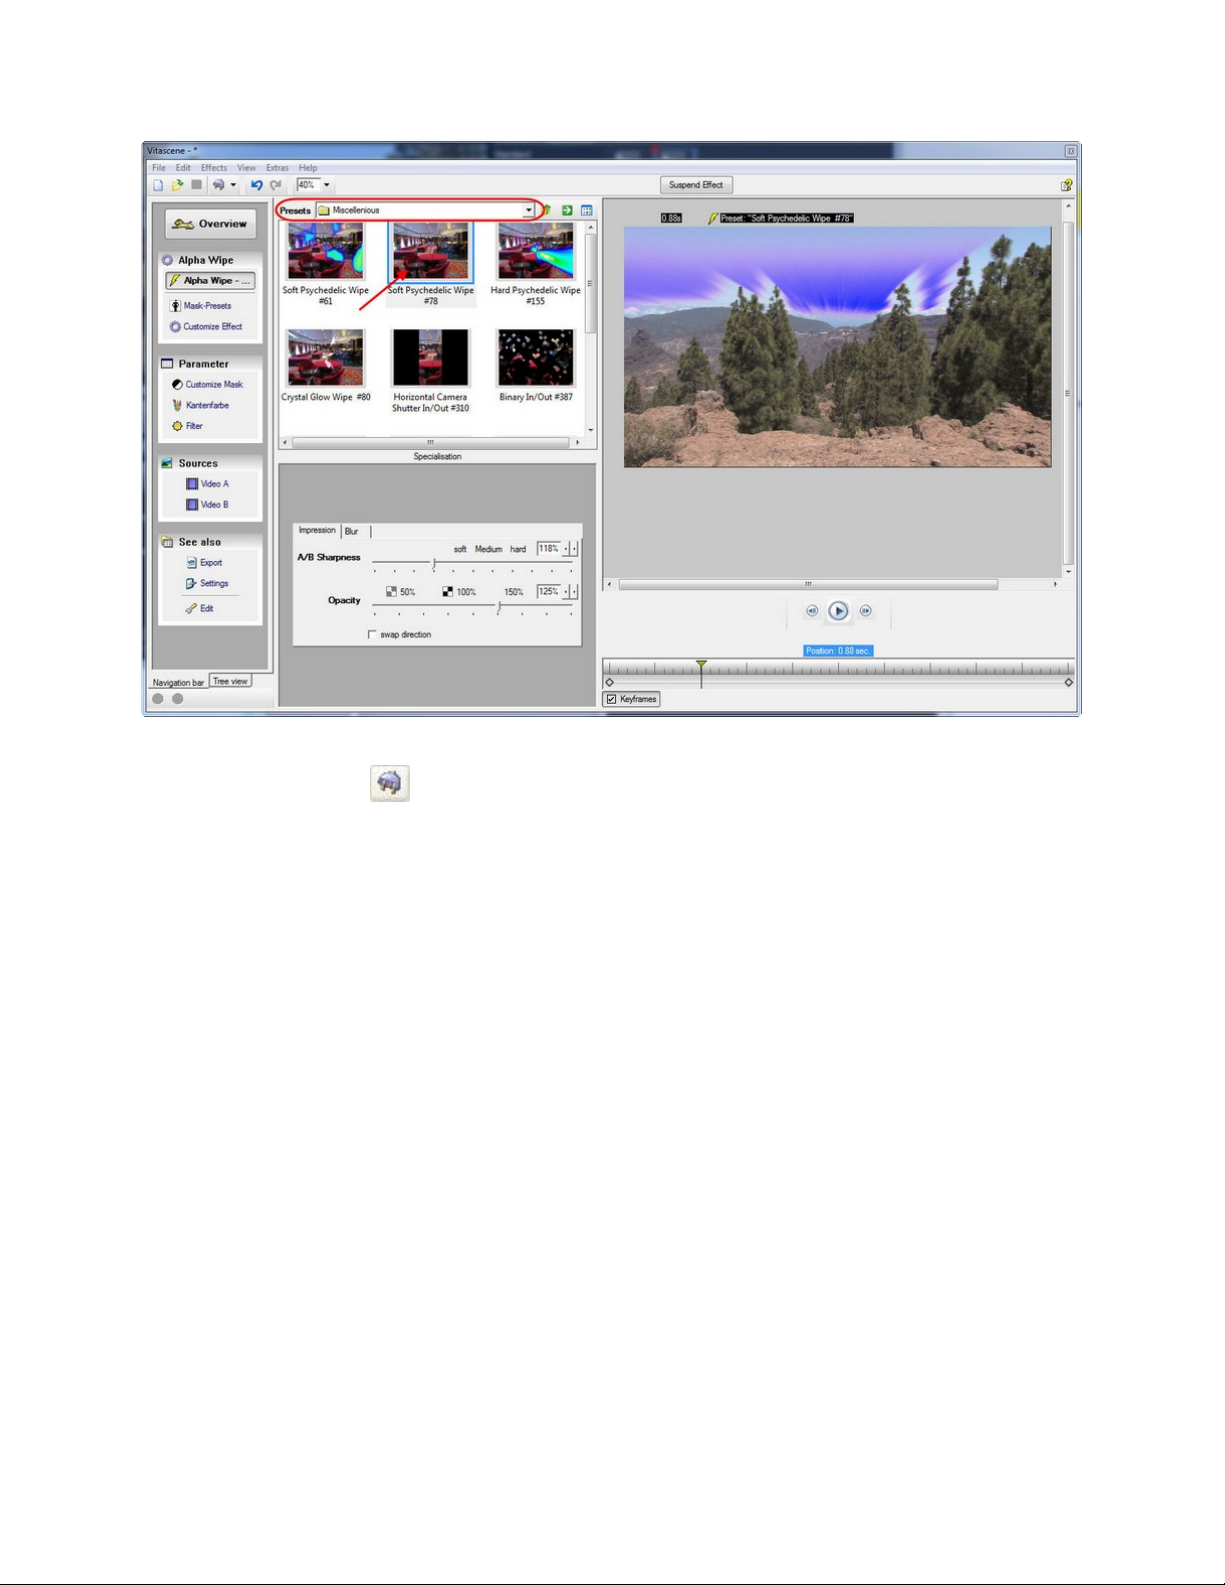
7. Vitascene starts, choose a suitable transition from the Transition Templates (e.g. Soft
Psychedelic wipe). A playback with the selected transition will appear in the Vitascene
preview window and, of course, you can modify the selected transition in Vitascene to suit
you.

20
8. Once the project has been edited and completed in Vitascene, simply press the F12 key
or click on the symbol
Vitascene project.
to return to Premiere Elements. This will automatically save the

21
Adobe Premiere
Plugin as video effect
This is what you do:
1. Go to the vid eo filt e rs (Effec ts) and click the proDAD directory to open it.
2. Click the item Vitascene Filter and drag it onto the required clip in the timeline.
3. Vitascene starts, now choose a suitable video effect from the Filter Templates (e.g. Tilt
Shift / Commercial Look 631). A playback of the current video clip with the selected video
effect will appear in the Vitascene preview window, and, of course, you can modify the
selected effect in Vitascene to suit you.
4. Once the project has been edited and completed in Vitascene, simply press the F12 key
or click on the symbol
This will automatically save the Vitascene project.
5. If you want to start Vitascene Filter again, go to the Effect Controls/Vitascene Filter
register and click the Setup-Button.
to return to Adobe Premiere.

22
Plugin as video transition
This is what you do:
1. Locate the Effects.
2. Locate the Video Transitions and there the proDAD directory.
3. Hold down your left mouse button and drag this Vitascene Transition between the two
clips in the Timeline.
4. Vitascene starts, choose a suitable transition from the Transition Templates (e.g. Soft
Psychedelic wipe). A playback with the selected transition will appear in the Vitascene
preview window and, of course, you can modify the selected transition in Vitascene to suit
you.
5. Once the project has been edited and completed in Vitascene, simply press the F12 key
or click on the symbol
This will automatically save the Vitascene project.
6. If you want to start Vitascene Transition again, click the transition area in the Timeline
and go to the Effect Controls/Vitascene Transition register and click on the Custom...
button.
to return to Adobe Premiere.

23
Avid MediaComposer
Plugin as video effect
Start Media Composer. After successful installation of the Vitascene - Media Composer
plug-in, Vitascene will be available via the Media Composer Effects dialogue box (Effects
Editor).
Now drag and drop the Vitascene Filter into the Timeline and click on the Edit Effect
option. This will start Vitascene. A playback of the current video clip with the chosen video
effect will appear in the Vitascene preview window and, of course, you can modify the
selected effect in Vitascene to suit you.
Once the project has been edited and completed in Vitascene, simply press the F12 key or
click on the symbol
This will automatically save the Vitascene project.
to return to Media Composer.
Plugin as video transition
Start Media Composer. After successful installation of the Vitascene - Media Composer
plug-in, Vitascene will be available via the Media Composer Effects dialogue box (Effects
Editor).
Now drag and drop the Vitascene Filter into the Timeline and click on the Edit Effect
option. This will start Vitascene. A playback w ith the selected transition will appear in the
Vitascene preview window in real time and, of course, you can modify the selected transition
in Vitascene to suit you.
Once the project has been edited and completed in Vitascene, simply press the F12 key or
click on the symbol
This will automatically save the Vitascene project.
to return to Media Composer.

24
Grass Valley Edius
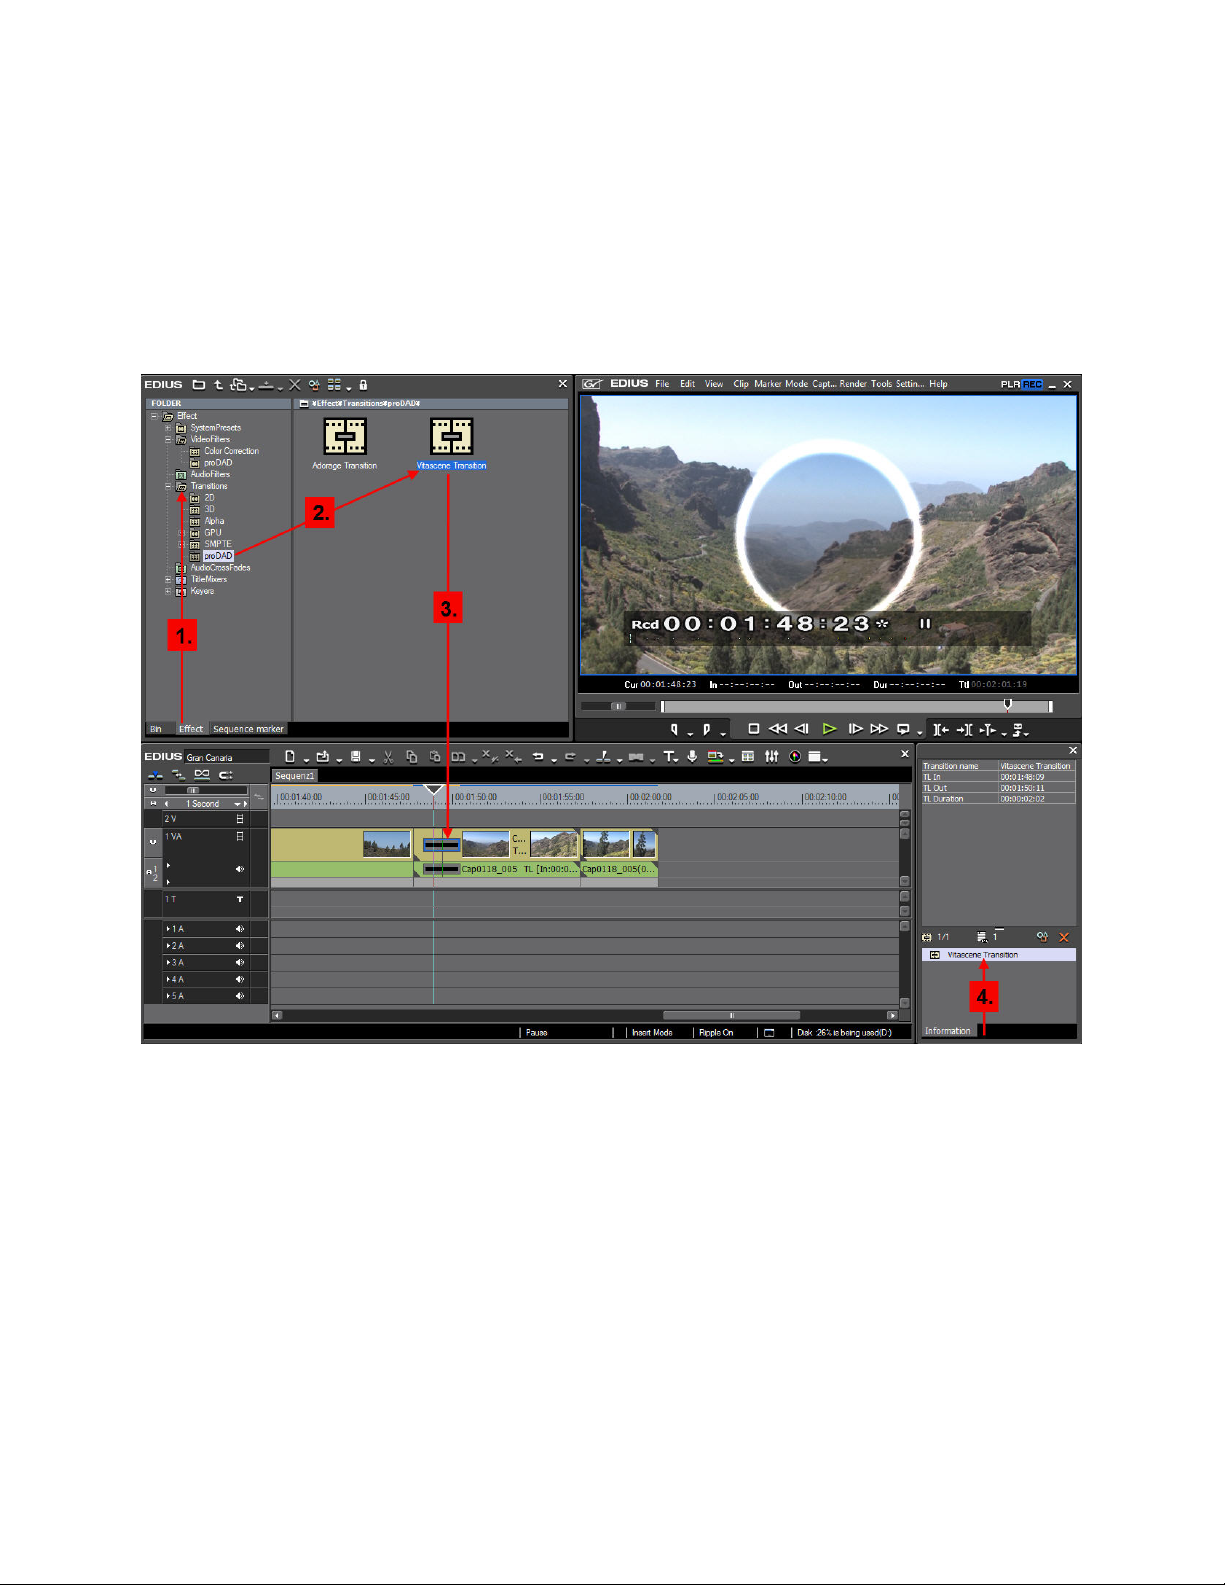
Plugin as video effect
This is what you do:
1. Go to the vid eo filt e rs (Effec ts).
2. Click on the proDAD folder.
3. Click the item Vitascene Filter in the folder and drag it onto the required clip in the
EDIUS timeline.
4. To start Vitascene, double-click the item Vitascene Filter in the information panel.
5. Vitascene starts, now choose a suitable video effect from the Filter Templates (e.g. Tilt
Shift / Commercial Look 631). A playback of the current video clip with the selected v ideo
effect will appear in the Vitascene preview window, and, of course, you can modify the
selected effect in Vitascene to suit you.

25
6. Once the project has been edited and completed in Vitascene, simply press the F12 key
or click on the symbol
Vitascene project.
to return to Canopus Edius. This will automatically save the
26
Plugin as video transition
This is what you do:
1. Locate the transitions (in the Effects register).
2. Click on the proDAD folder.
3. Hold down your left mouse button and drag this Vitascene Transition between the two
clips in the Timeline.
4. Double-click the Vitascene Transition entry in the Information panel.
5. Vitascene starts, choose a suitable transition from the Transition Templates (e.g. Soft
Psychedelic wipe). A playback with the selected transition will appear in the Vitascene
preview window and, of course, you can modify the selected transition in Vitascene to suit
you.
27
6. Once the project has been edited and completed in Vitascene, simply press the F12 key
or click on the symbol
Vitascene project.
to return to Canopus Edius. This will automatically save the

28
MAGIX Vegas
Plugin as video effect
This is what you do:
1. Go to the Effects library Video FX.
2. Click the item proDAD Vitascene Filter and drag it onto the required clip in the timeline.
3. The dialog proDAD Vitasc en e will be included in Vegas (Videoevent-FX).
4. Click the Edit Filter... button.
5. Vitascene starts, now choose a suitable video effect from the Filter Templates (e.g. Tilt
Shift / Commercial Look 631). A playback of the current video clip with the selected v ideo
effect will appear in the Vitascene preview window, and, of course, you can modify the
selected effect in Vitascene to suit you.
29
6. Once the project has been edited and completed in Vitascene, simply press the F12 key
or click on the symbol
Vitascene project.
Note:
If you want to open Filter Vitascene again, click the Event-FX... button (green) in the
videoclip (with Vitascene-effect) in the Timeline.
You can then open Vitascene via the dialog Videoevent-FX.
to return to Sony Vegas. This will automatically save the
30
Plugin as video transition
This is what you do:
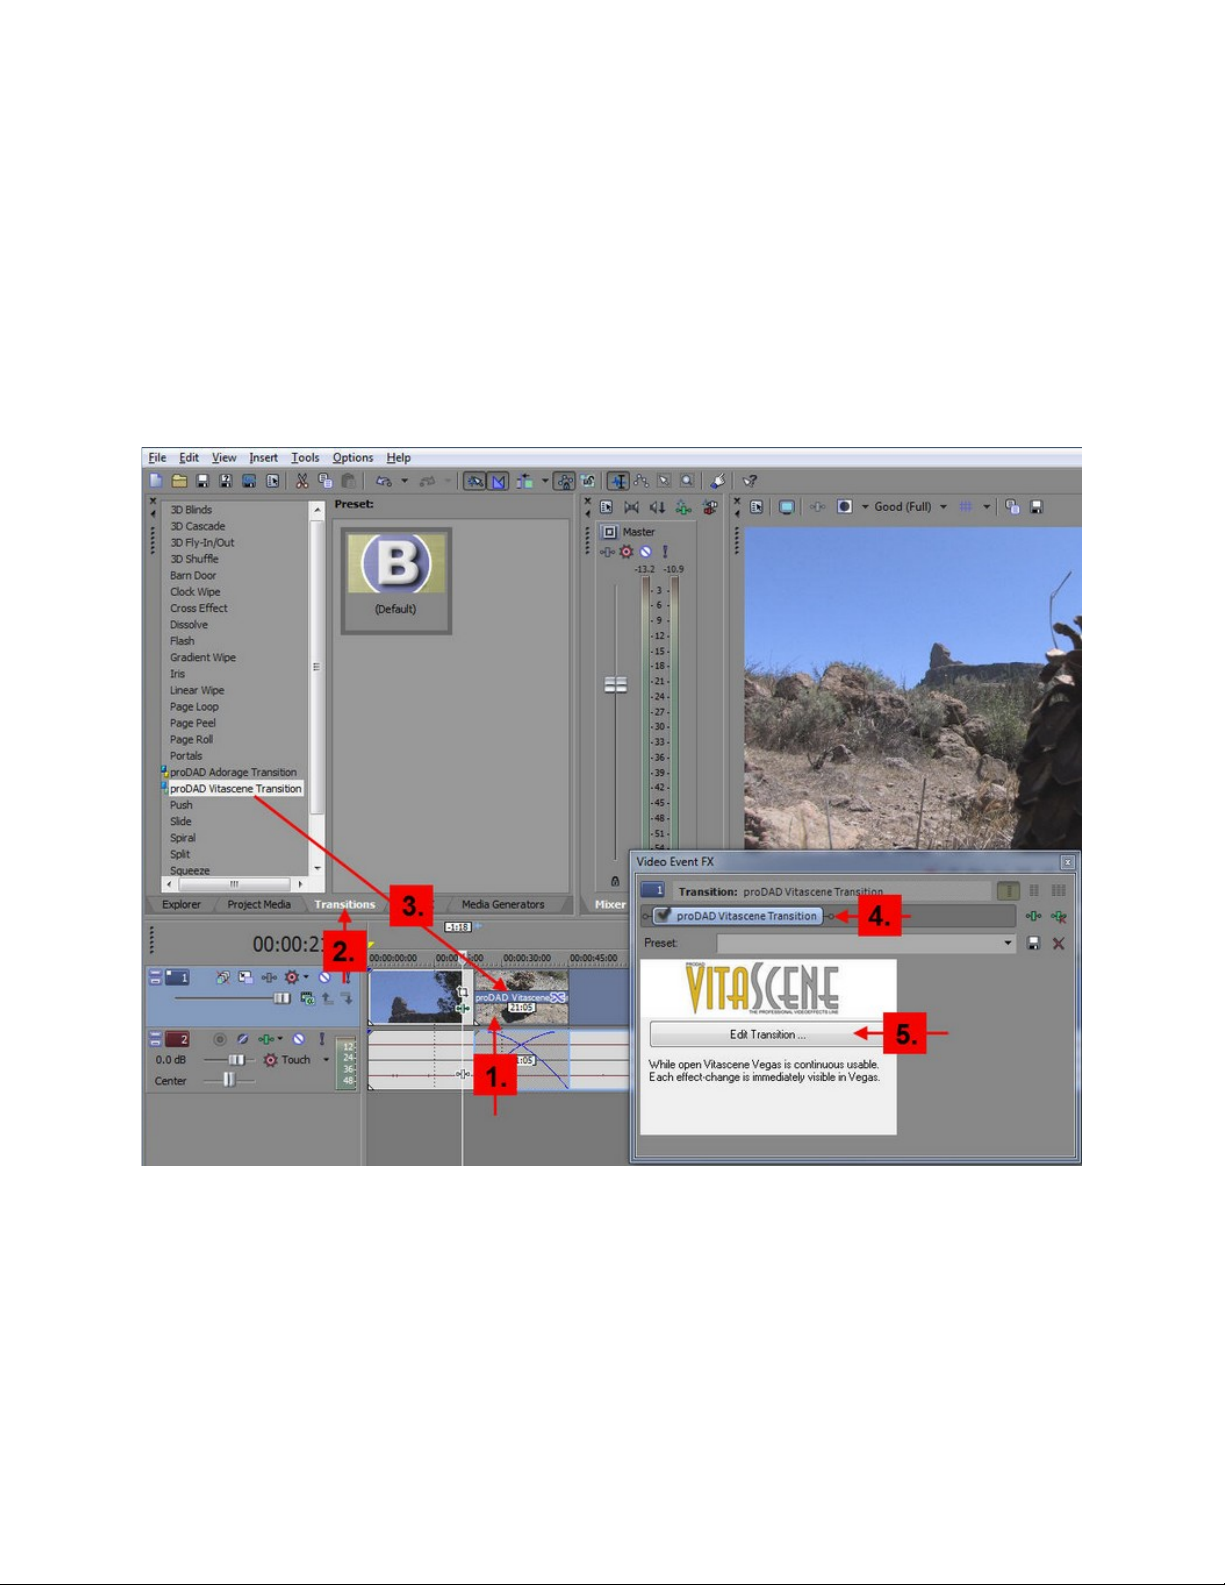
1. Start Vegas, place two video clips in the Timeline, superimposing them (i.e. arranging
the two clips in the Timeline so that they overlap).
2. Locate the Transitions.
3. Hold down your left mouse button and drag this Vitascene Transition between the two
clips in the Timeline.
4. The dialog proDAD Vitascene Transition will be included in Vegas (Videoevent-FX).
5. Click the Edit Transition... button.
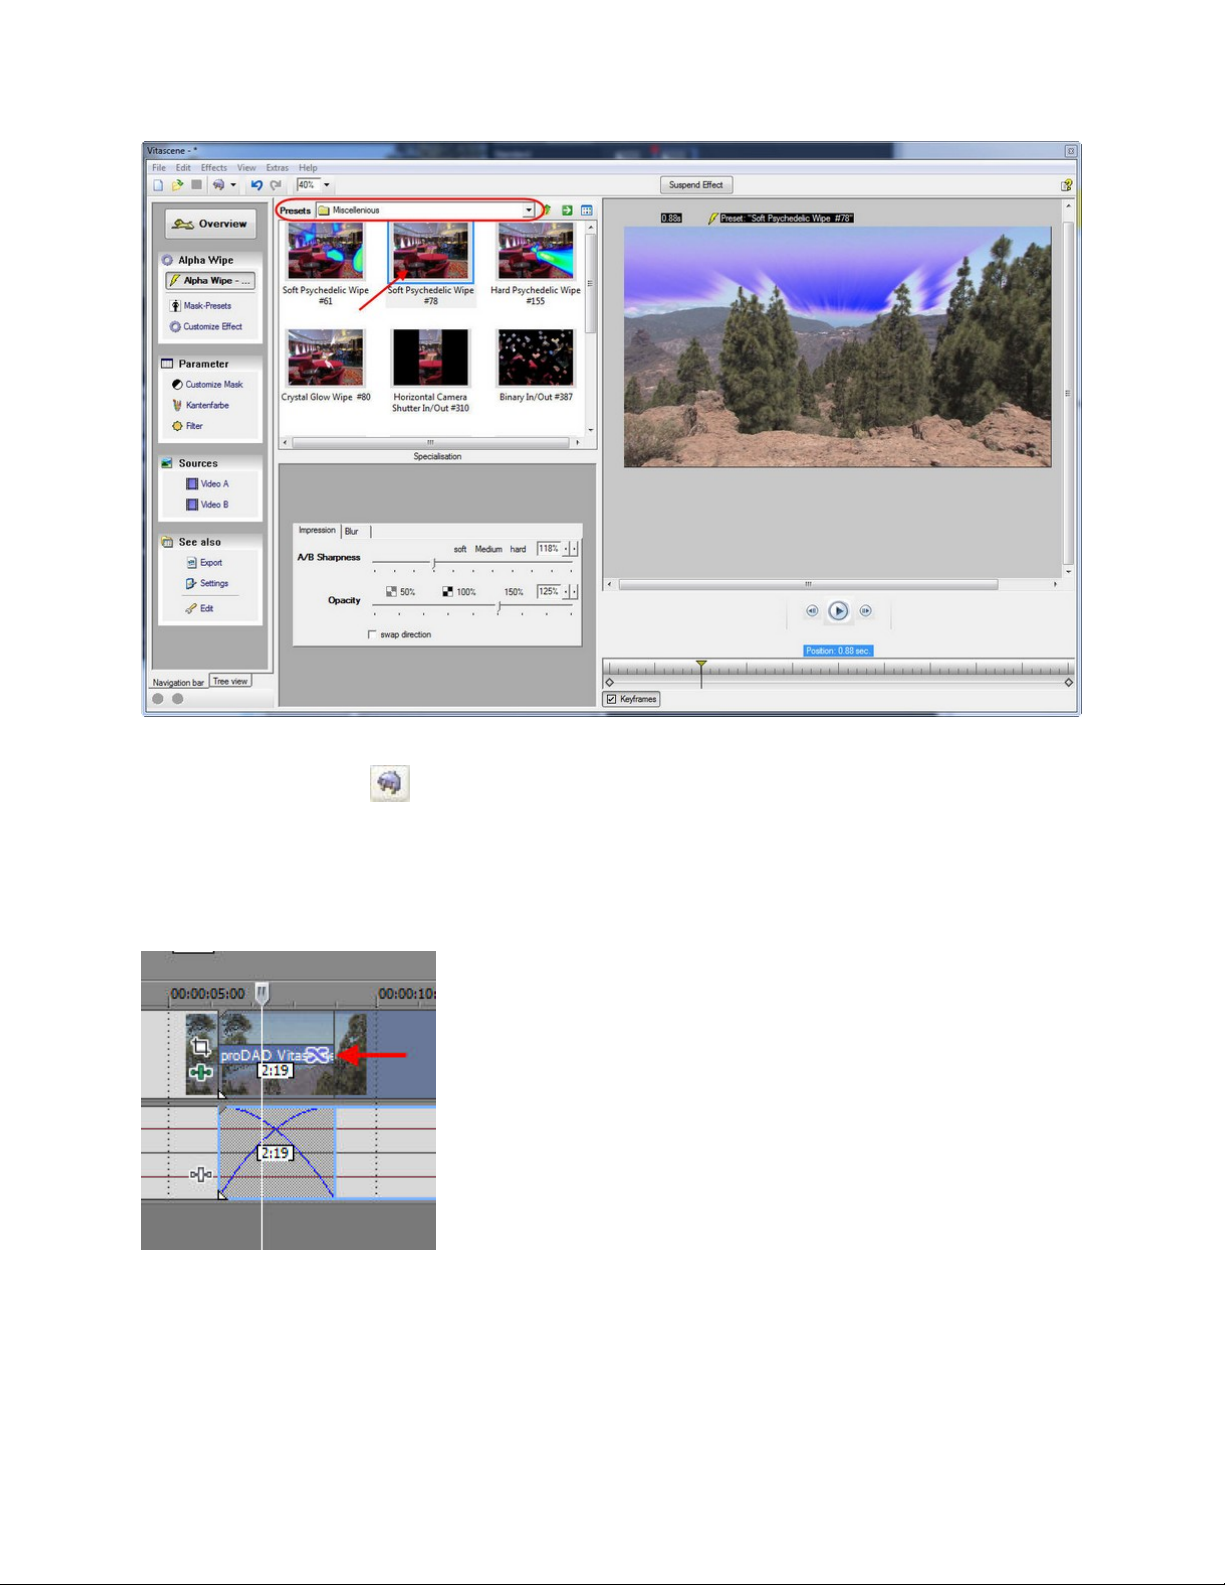
6. Vitascene starts, choose a suitable transition from the Transition Templates (e.g. Soft
Psychedelic wipe). A playback with the selected transition will appear in the Vitascene
preview window and, of course, you can modify the selected transition in Vitascene to suit
you.
31
7. Once the project has been edited and completed in Vitascene, simply press the F12 key
or click on the symbol
This will automatically save the Vitascene project.
Note:
If you want to open Vitascene Transition again, click the Transition Properties... button
in the transition area of the videoclip (in the Timeline).
You can then open Vitascene via the dialog Videoevent-FX.
to return to Sony Vegas.

32
Corel Video Studio
Plugin as video effect
This is what you do:
1. Locate the FX.
2. Activate your clip in the timeline by double-clicking it.
3. In FX, click proDAD.
4. Drag the Vitascene 2. 0 entry to the selected video clip (via drag & drop) in the Corel
Video Studio timeline.
5. Now click on the Customize Filter button.
6. Vitascene starts, now choose a suitable video effect from the Filter Templates (e.g. Tilt
Shift / Commercial Look 631). A playback of the current video clip with the selected video
effect will appear in the Vitascene preview window, and, of course, you can modify the
selected effect in Vitascene to suit you.

33
7. Once the project has been edited and completed in Vitascene, simply press the F12 key
or click on the symbol
This will automatically save the Vitascene project.
8. If you want to start Vitascene 2.0 again, activate the clip again (double-click), go to FX
/ proDAD / Vitascene 2.0 and cl ick the Customize Filter button.
Note:
If you want to delete the Vitascene effect from the clip, go to FX / proDAD / Vitascene
2.0 and click the button Delete filter (X).
to return to Corel Video Studio.

34
Plugin as video transition
This is what you do:
1. Start Corel, place two video clips in the Timeline, superimposing them (i.e. arranging the
two clips in the Timeline so that they overlap).
2. Locate the Transition A/B .
3. Click on the proDAD-button.
4. Hold down your left mouse button and drag this Vitascene Transition between the two
clips in the Timeline.
5. Click on the Customize button .
6. Vitascene starts, choose a suitable transition from the Transition Templates (e.g. Soft
Psychedelic wipe). A playback with the selected transition will appear in the Vitascene
preview window and, of course, you can modify the selected transition in Vitascene to suit
you.

35
7. Once the project has been edited and completed in Vitascene, simply press the F12 key
or click on the symbol
This will automatically save the Vitascene project.
8. If you want to start Vitascene again, double-click on the transition area in the timeline, go
to Transition (A/B) / proDAD / Vitascen e and click on the Customize-button.
Note:
If you want to delete Vitascene as transion, righ t -click on the transition area in the timeline
and select Delete.
to return to Corel Video Studio.

36
Pinnacle Studio
Note:
As of now, proDAD Vitascene 2.0 for Studio will be included in it's full version (Vitascene
2.0). Since it is delivered as an activated Plugin, there is no need to activate it on the part of
Pinnacle/Avid.
Plugin as video effect
This is what you do:
1. Open the video toolbox in Studio.
2. Open the list of video effects.
3. Click the item proDAD.
4. Click Vitascene.
5. To assign the plug-in, click OK. The following button appears:
To start Mercalli, click Edit Vitascene.
6. Vitascene starts, now choose a suitable video effect from the Filter Templates (e.g. Tilt
Shift / Commercial Look 631). A playback of the current video clip with the selected video

37
effect will appear in the Vitascene preview window, and, of course, you can modify the
selected effect in Vitascene to suit you.
7. Once the project has been edited and completed in Vitascene, simply press the F12 key
or click on the symbol
Vitascene project.
to return to Pinnacle Studio. This will automatically save the
38
Plugin as video transition
This is what you do:
1. Start Pinnacle Studio and place two video clips in the Timeline. Now go to the
Transition library,
2. Here you will find the proDAD directory with Vitascene Transition.
3. Hold down your left mouse button and drag this Vitascene transition between the two
clips in the Pinnacle Stud io Timeline.
4. Vitascene will not start automatically. Highlight the transition in the Timeline by double
clicking with your mouse.
5. Go to the V it a sc ene transition dialogue box. Click on the Edit Button.
6. This will open Vitascene, choose a suitable transition from the Transition Templates (e.g.
Soft Psychedelic wipe). A playback with the selected transition will appear in the

39
Vitascene preview window and, of course, you can modify the selected transition in
Vitascene to suit you.
7. Once the project has been edited and completed in Vitascene, simply press the F12 key
or click on the symbol
Vitascene project.
to return to Pinnacle Studio. This will automatically save the

40
Avid Studio
Plugin as video effect
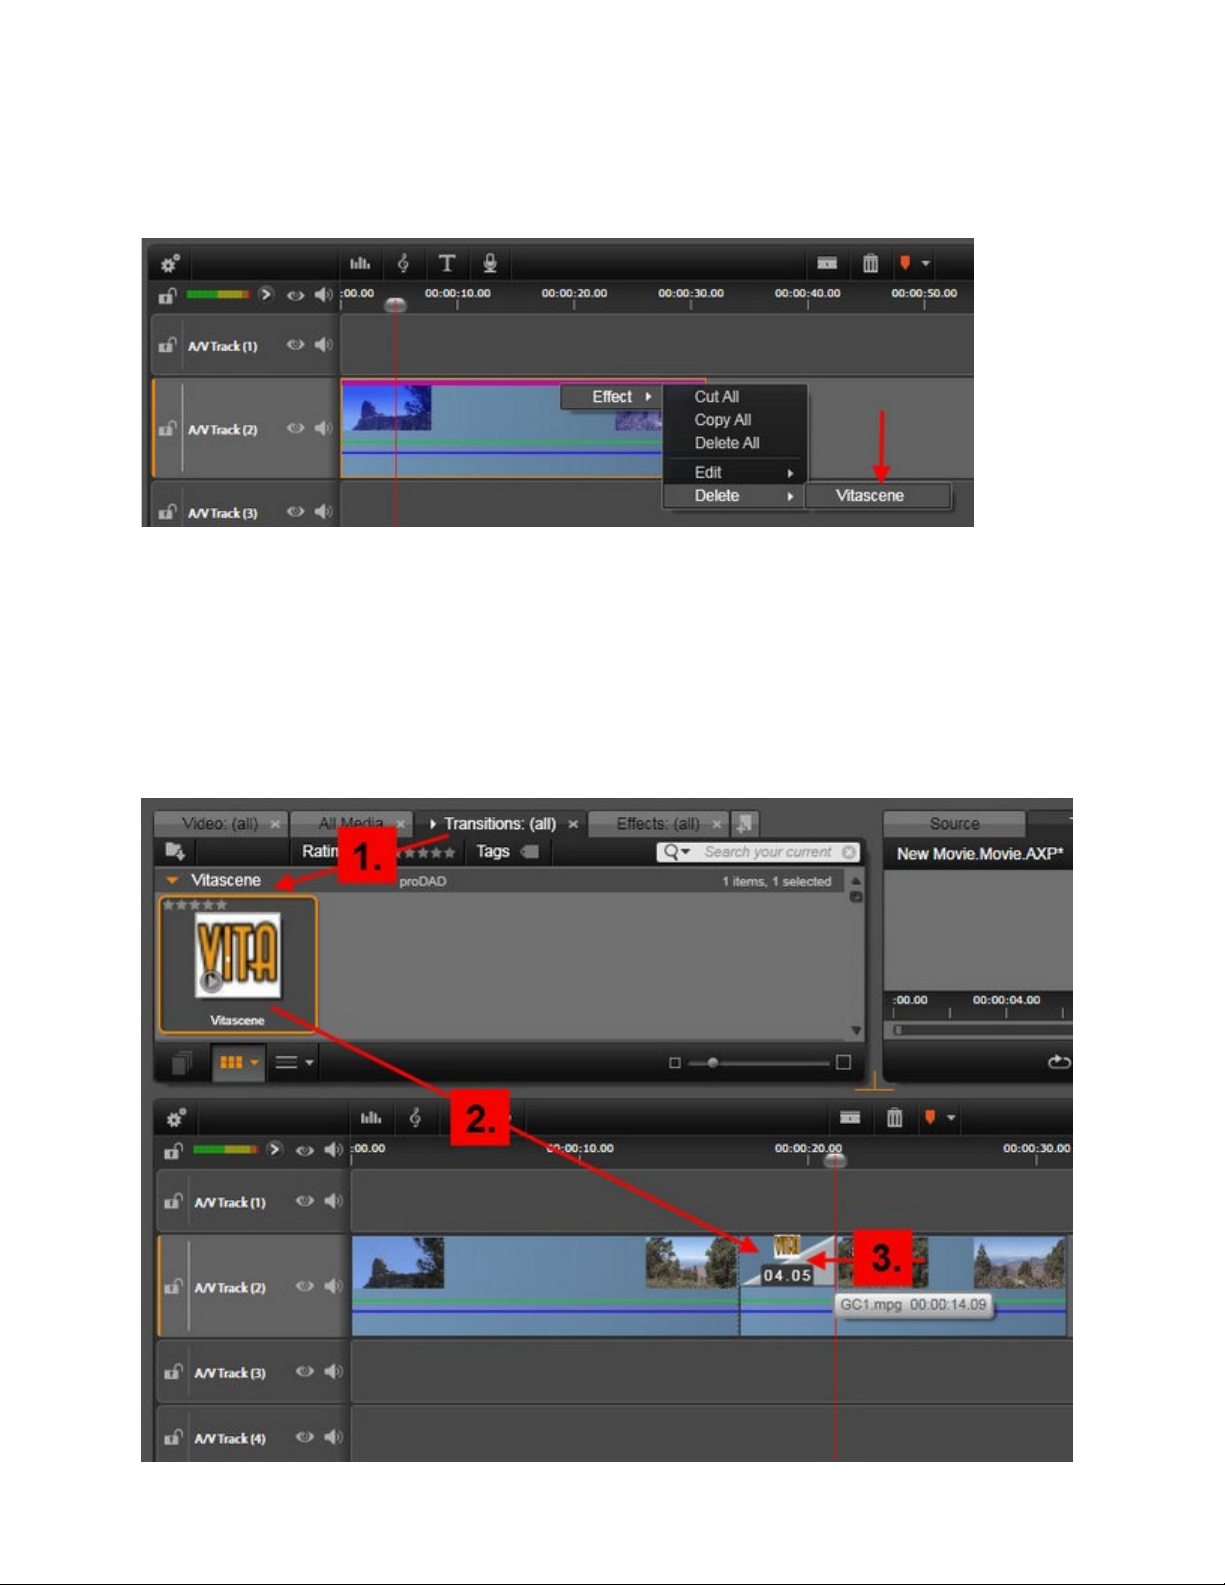
This is what you do:
1. Locate Effects/proDAD and there the Vitascene directory, open it.
2. Hold down your left mouse button and drag the Vitascene entry onto the selected
videoclip in the timeline.
3. The effect will be depicted as a magenta-colored line in the clip. Double-click to open it.
4. A new dialog opens with the Effects register activated.
5. On the right appears the selected Vitascene effect, click on the Edit button.

41
6. Vitascene starts, now choose a suitable video effect from the Filter Templates (e.g. Tilt
Shift / Commercial Look 631). A playback of the current video clip with the selected v ideo
effect will appear in the Vitascene preview window, and, of course, you can modify the
selected effect in Vitascene to suit you.
7. Once the project has been edited and completed in Vitascene, simply press the F12 key
or click on the symbol
Vitascene project.
8. Click OK to confirm the Vitascene effect in the Effects register. The eff ect w i l l be applied
in the timeline.
to return to Avid Studio. This will automatically save the
42
Note:
If you want to delete Vitascene as an effect from the clip, right-click the magenta-colored
line in the clip and choose the Effect/Delete/Vitasceneoption.
Plugin as video transition
This is what you do:
1. Locate the Transitions/proDAD and open the Vitascene directory.
2. Hold down your left mouse button and drag this Vitascene Transition between the two
clips in the Timeline.
3. Now right-click the transition area and choose the Transitions/Edit option.

43
4. This opens the Vitascene dialog, wh ich - among other settings - allows you to determine
the duration of the transition. Click the Edit button to start Vitascene.
5. Vitascene starts, choose a suitable transition from the Transition Templates (e.g. Soft
Psychedelic wipe). A playback with the selected transition will appear in the Vitascene
preview win d ow and, of course, you can modify the selected transition in Vitascene to suit
you.
6. Once the project has been edited and completed in Vitascene, simply press the F12 key
or click on the symbol
Vitascene project.
7. Then click OK to confirm the Vitascene dialog (in Studio), the transition appears in the
Studio preview.
Note:
If you want to delete Vitascene as a transition from the clip, right-click the transition area
in the clip and choose the Transition/Remove option.
to return to Avid Studio. This will automatically save the

44
MAGIX
Plugin as video effect
This is what you do:
1. Start MAGIX Movie Edit Pro and place a video clip in the timeline, making sure it is
highlighted (orange).
2. Now go to the Effects menu.
3. After opening the Effects register, you will find the Additional effects / proDAD
directory.
4. Click on proDAD Vitascene.
5. Vitascene starts, now choose a suitable video effect from the Filter Templates (e.g. Tilt
Shift / Commercial Look 631). A playback of the current video clip with the selected video
45
effect will appear in the Vitascene preview window, and, of course, you can modify the
selected effect in Vitascene to suit you.
6. Once the project has been edited and completed in Vitascene, simply press the F12 key
or click on the s ymbol
project.
to return to MAGIX. This will automatically save the Vitascene
46
Plugin as video transition
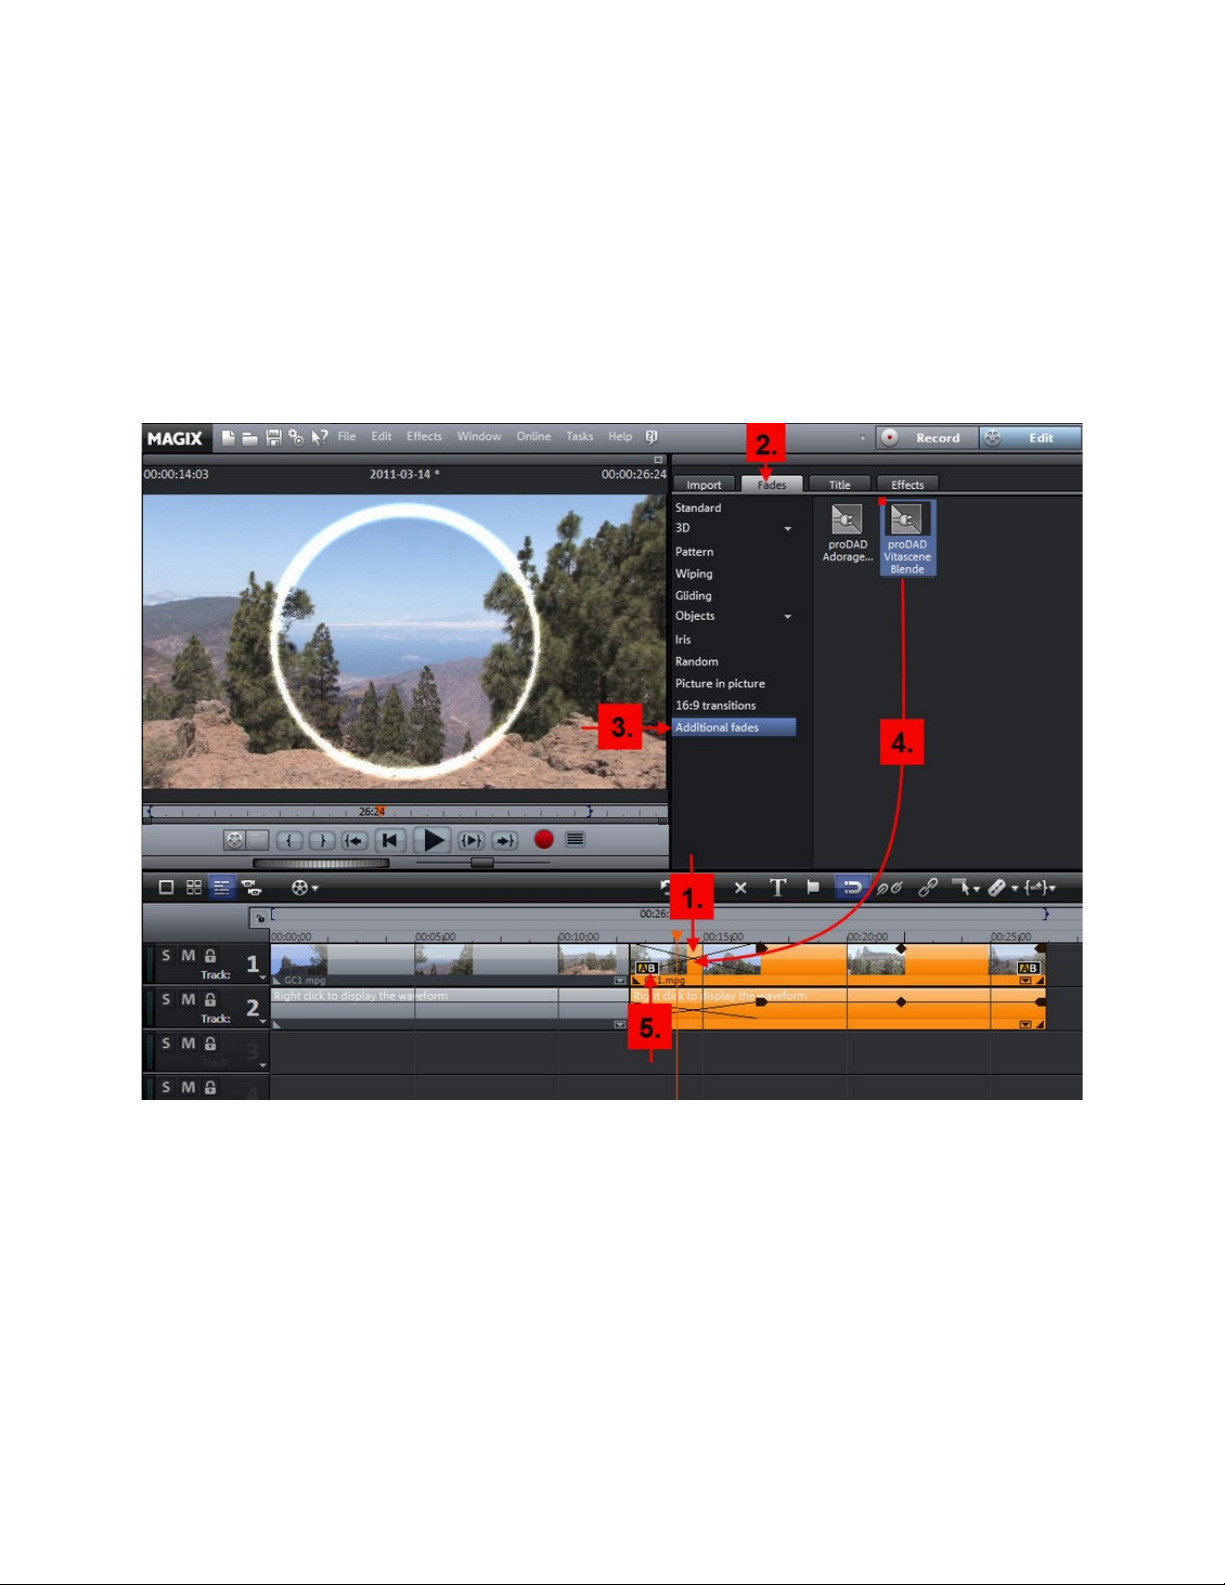
This is what you do:
1. Start MAGIX Movie Edit Pro, place two video clips in the Timeline, superimposing them
(i.e. arranging the two clips in the Timeline so that they overlap).
2. Go to the Fades register.
3. After opening the Fades register, you will find the Additional-fades directory.
4. Hold down your left mouse button and drag this Vitascene Transition between the two
clips in the Timeline.
5. Now right-click on A/B in the transition area and choose the Settings option.
6. Vitascene starts, choose a suitable transition from the Transition Templates (e.g. Soft
Psychedelic wipe). A playback with the selected transition will appear in the Vitascene
preview window and, of course, you can modify the selected transition in Vitascene to suit
you.

47
7. Once the project has been edited and completed in Vitascene, simply press the F12 key
or click on the symbol
project.
to return to MAGIX. This will automatically save the Vitascene

48
Workshops for familiar ization
Here you can find some applications in a step-by-step guide.
Working through these examples takes approx. 30 minutes. Af terwards, you will know how
to carry out projects with Vitascene and realize your own ideas. If you work through the
examples you will save time later when exploring the logic and application.
Have fun getting to know the program!
The company 30th century/Uwe Wenz is proDAD Hero g lyph ’s official training partner.
Interested parties can obtain detailed information on advanced seminars at
www.30th-century.com.
Text with Ray filter and Key frames
The colorful title that is packed with effects (w ith text) has already been created with
proDAD Heroglyph using Alpha Keys (saved as a *.tif file).
Use the following settings for single frame export in Heroglyph.
Stand-alone use:
Or import the title direct into Vitascene, in order to apply the Ray filter or to modify the title
with drifting light reflections by using Key frames.

49
First start Vitascene, then go to the Filter-Presets and select the Ray filter (e.g. effect
#390) by double clicking in the Vitascene preview w indow. The effect is applied to the title
(created in proDAD Heroglyph) and light reflections are visible at the preview stage.
After saving the effect, the desired background (image o r clip) will no longer be visible in the
preview window. To import our previously created image, go to the Navigation Menu in the
Source field and click on the Video A option.
This opens the Video A dialogue box. In the Source field click o n the Type of fill option,
this opens a drop-down menu; select the Image / animation option. Then click on the
Folder button - to the right next to the Image drop-down menu - to select our image file,
for example, and import the file with the help of the Image option. The format 720x576
Pixel RGB + Alpha is displayed within the details of the gr aphics used.
The image file appears immediately in the Vitascene preview window (with the Ray filter
already integrated).

50
The Video A dialogue box also contains setting options for imported images (or clips) for
pixel-aspect, attributes and geometry.
For this workshop, use the original image without additional settings.
Now go to the Navigation menu in the Parameter field and click on the Filter option.
This opens the Filter dialogue box with various settings for the active Ray filter.

51 52

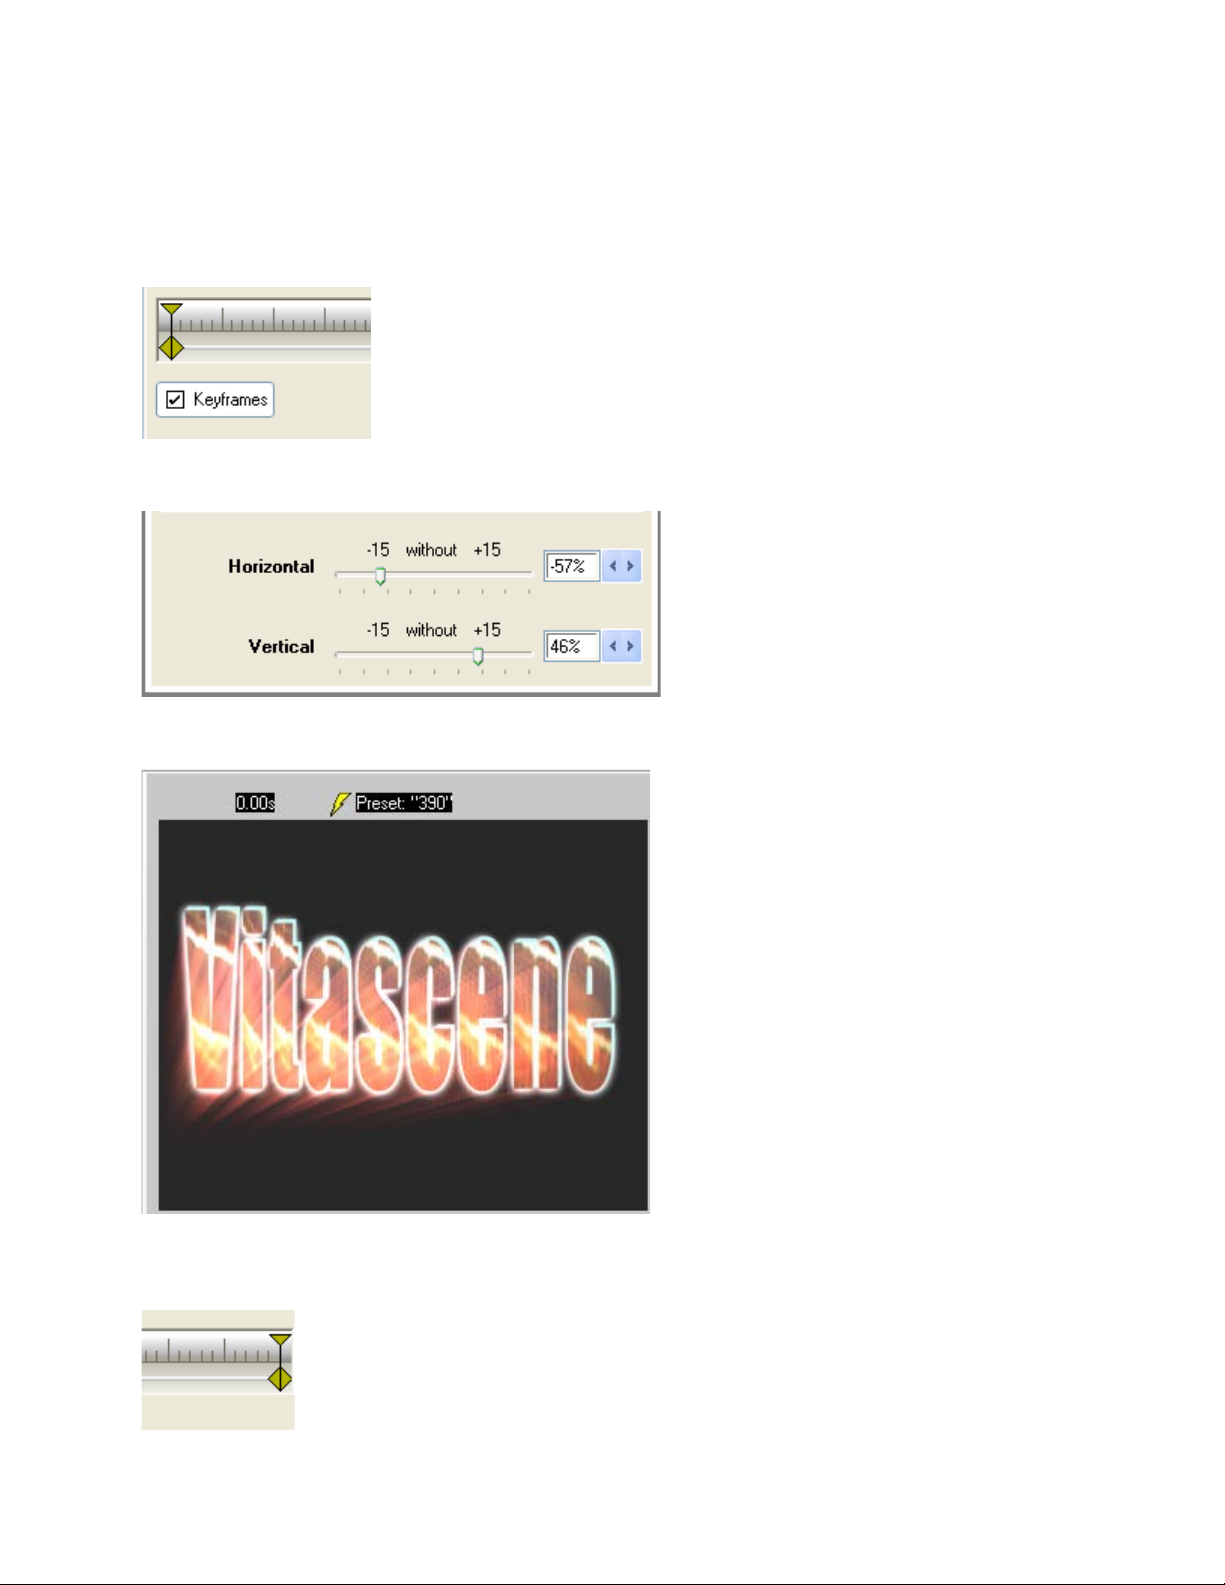
Here you can modify the settings for the Ray filter, but first go to the preview window and
check whether the Keyframes option is activated (key points during the course of an
animation, which have various properties at pre-determined times).
Without activation of the Keyframes option no changes in the effect, in relation to the
progress of an animation, will be shown. In this case, the settings will a p ply to all points in
time during an animation.

53
Now alter the setting for the Length option, selecting a value of 24%, for example, and set
the reduce flic ker controller to 35%.
Now select the Bright Edge setting from the Scan Mode drop-down menu.
In addition, set the Threshold controller to 20% and, in the Method drop-down menu,
select the Moti on Be a m setting.
Set the Exposure controller to 4.50 and the Zoom controller to 1%.

54
The preview window will now display the effect of the Ray filter on the image used as
follows. Cle ar light reflections are visible within the Vitascene text, which run from the
centre of the image to the edge of the text.
Now alter the Ray effect with the help of the controller :
Composite = 0%
Scene-Intensity = 100%
And set the Glow-Intensity = 55%.

55
Leave the Highlight Color option as white and Highlight -Intensity at 25%.
Now select the Tint-Color Red (in relation to the rays of light), set the Tint-Intensity to
200% and Exposure Tint to 1.15.
The preview window will now display the effect of the Ray filter on the image used as
follows. Cle ar light reflections as well as Red discoloration is visible within th e Vitascene
text.
56
Finally alter the po sition of the source of the ra ys of light in a horizontal and vertical
direction, use Key frames to do this (at the beginning and end o f the animation).
First place the slider (position in the time axis beneath the preview) at the beginning of the
animation.
Then move the Horizontal controller to -57% and the Vertical controller to 46%.
The preview appears as follows.
Now place the slider (position in the time axis beneath the preview) at the end of the
animation.

57
Then move the Horizontal controller to 57% and the Vertical controller to 46%.
The preview appears as follows.
Now start an animation in the preview window with the help of t he Play button. You will
notice that the light reflections move during the course of the animation. This movement is
created by placing a beginning Key frame and an end Key frame. Of course, you can position
further Key frames during the course of the animation. To do this, you need to place the
slider in the required position and then alter the effect properties using the controller.
Repeat this for each Key frame within the animation.
Note:
Naturally, you can shift Key frames within the Timeline, to do this place your mouse on a
Key frame, hold down the left mouse button and drag it to a new position in the Timeline .
You can also delete Key frames during the course of an animation, to do this place the slider
on the corresponding Key frame and press the Delete key on your keyboard.
To round off, click on the Color Adjustment option in the Navigation menu.

58
This opens the Color adjustment dialogue box, which provides a cc ess to the following display
settings for the image or video material used.
Apply Sparkle filter to an image (including by using
Key frames)
This tutorial provides information on the application and adjustment of a Sparkle filter in
relation to a selected image (or clip) in Vitascene. The use of Key frames is also discussed
here. To do this, for example, Sparkle rays are presented as an animation in the background
image (set in motion).
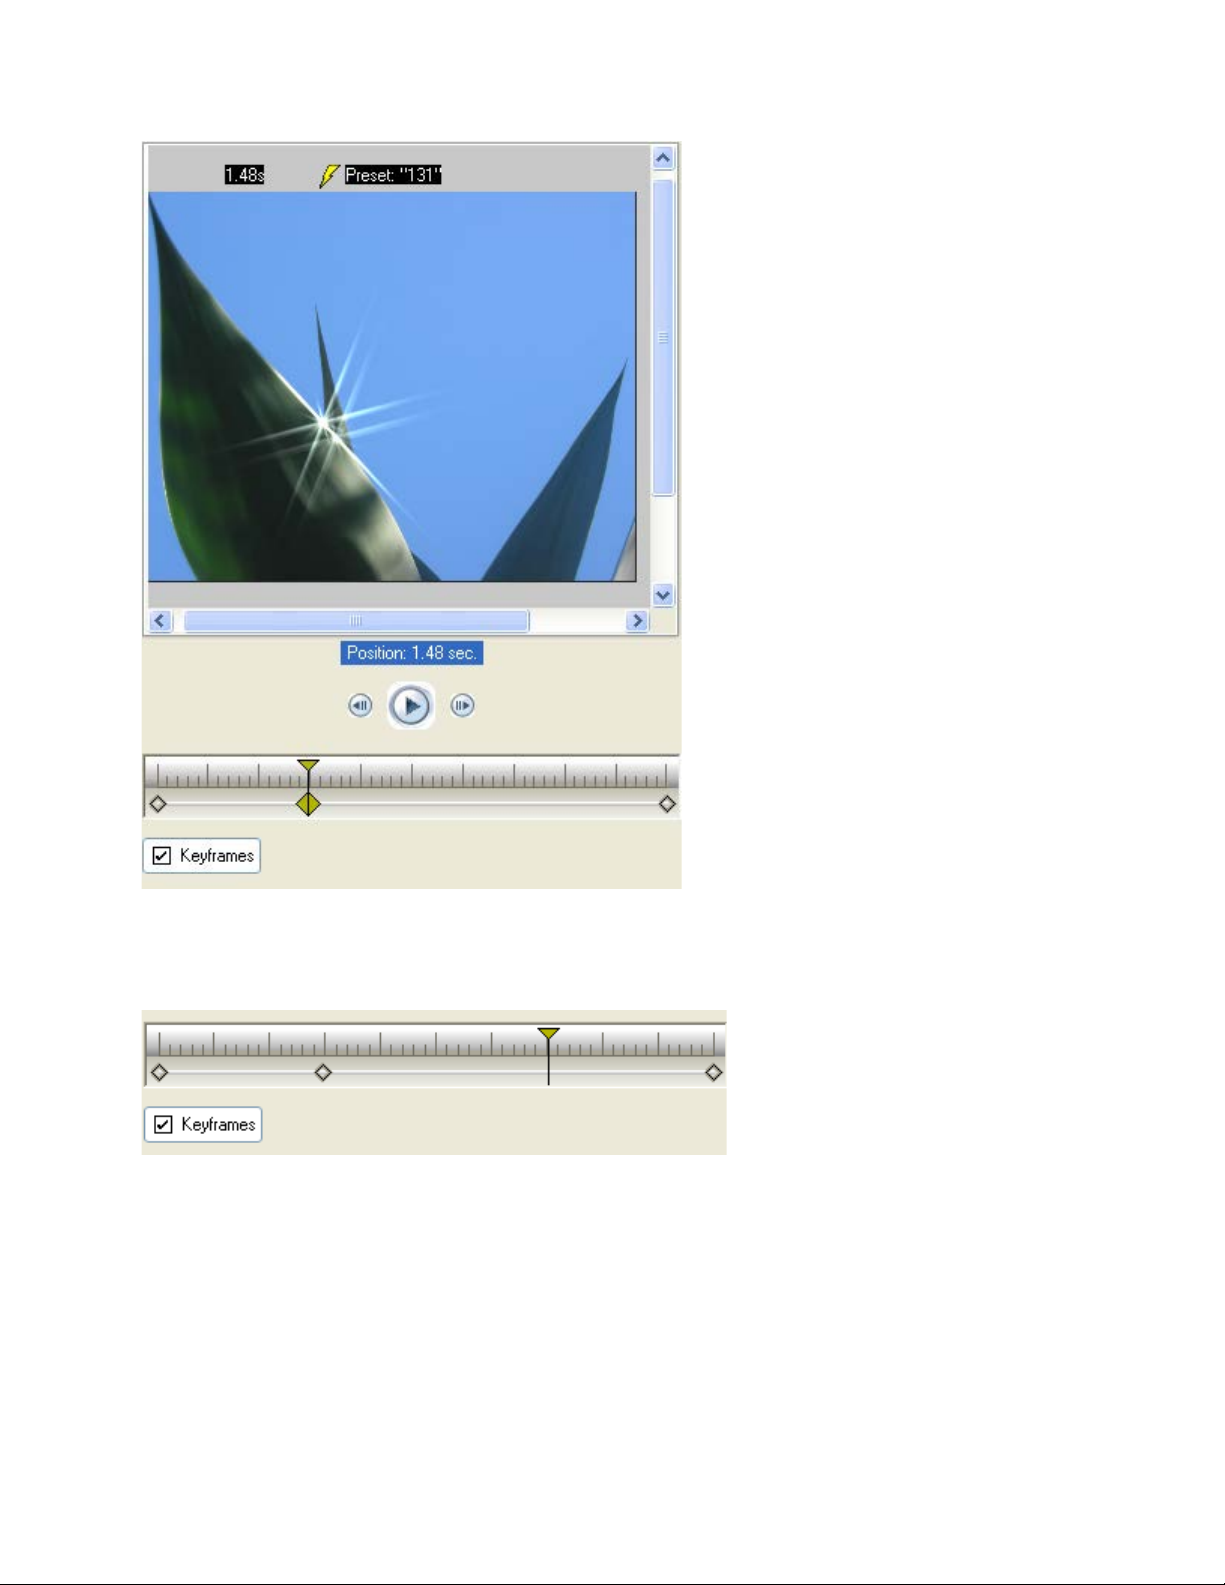
First start Vitascene, then go to the Filter Templates and select the Sparkle filter (e.g.
Effect #131) by double clicking in the Vitascene preview window.
Should you be running Vitasc ene in a stand-alone format, after saving the effect, the

59
desired background will no longer be visible in the preview window (but rather an example
image). To import our image, go to the Navigation Menu in the Source field and click on
the Video A option.
This opens the Video A dialogue box. In the Source field click on the Type of fill option,
this opens a drop-down menu; select the Image / animation option.
Then click on the Folder button - to the right next to the Image drop-down menu - to
select our image file, for example, and import the file with the help of the Image option.
The image file appears immediately in the Vitascene preview window (with the Sparkle filter
already integrated).
The Video A dialogue box also contains setting options for imported images (or clips) for
pixel-aspect, attributes and geometry.
For this workshop, use the original image without additional settings.

60
Now go to the Navigation menu and click on the Filter-Presets option.
This opens the Filter-Presets dialogue box with various templates and settings for the
active Sparkle filter.
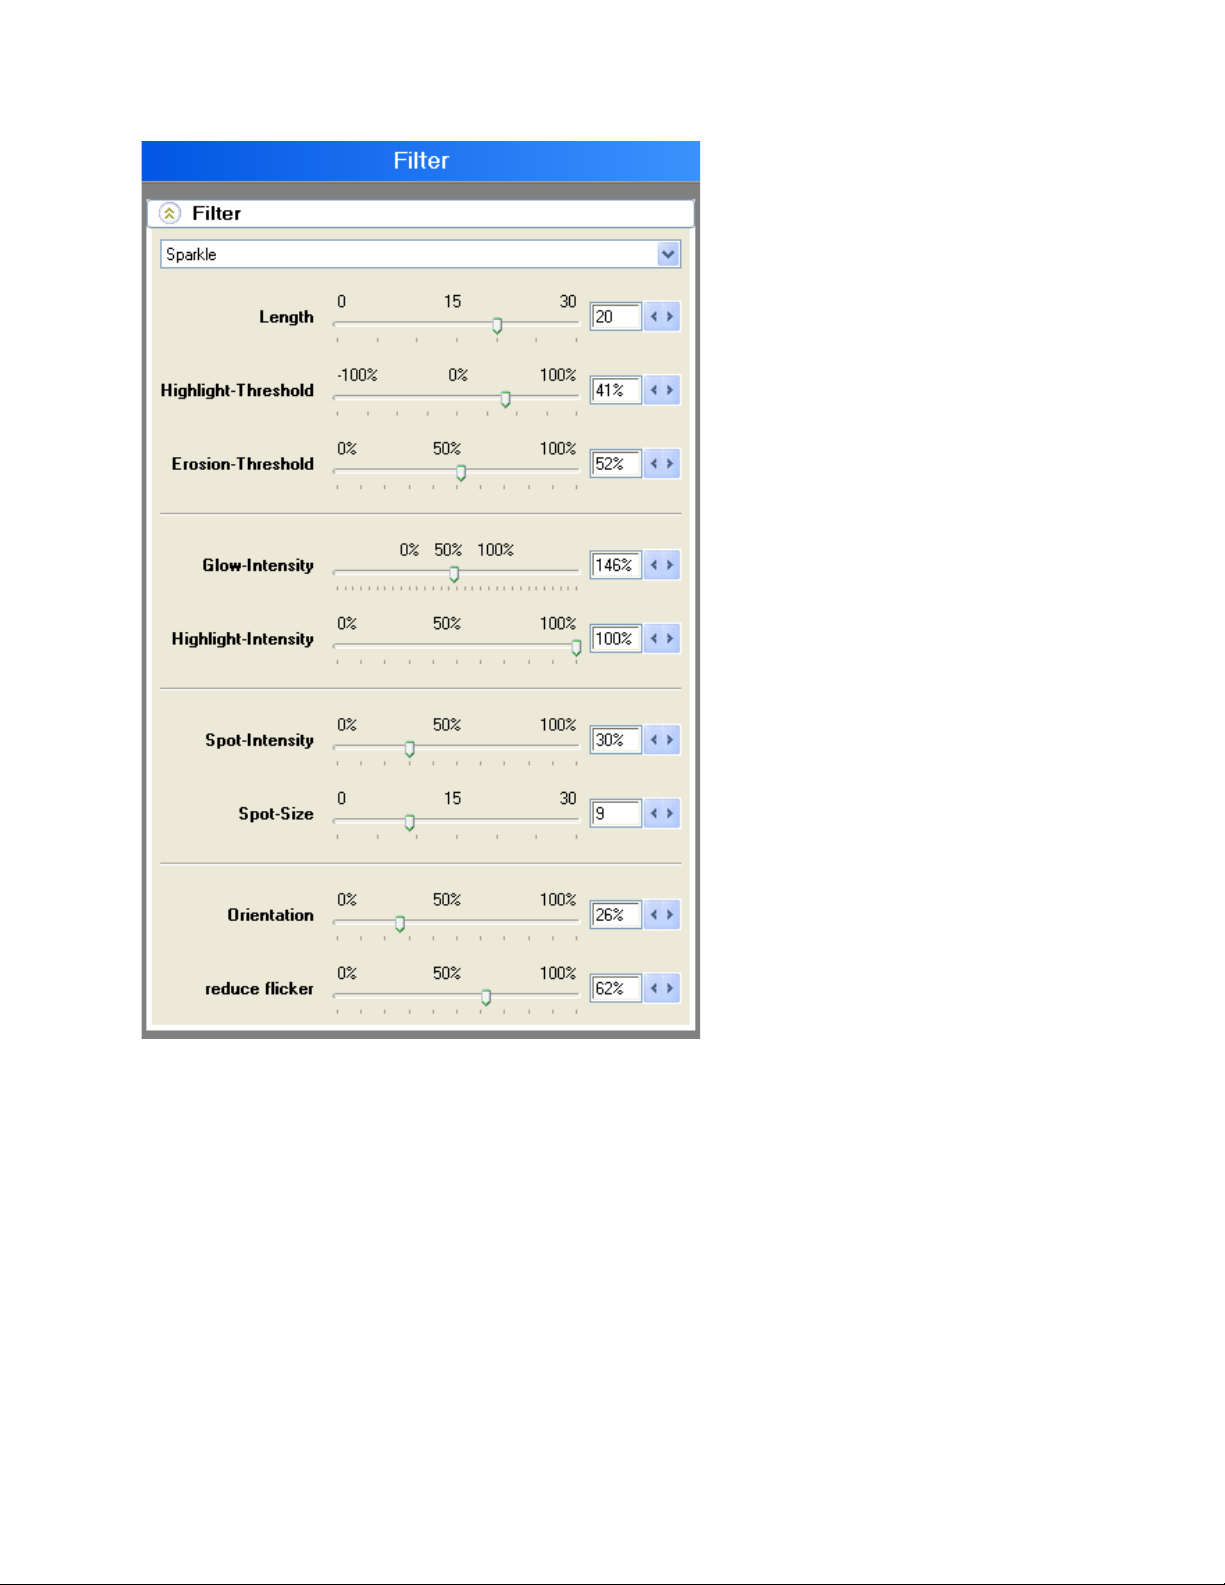
Now go to the Navigation menu in the Parameter field and click on the Filter option.
This opens the Filter dialogue box with various settings for the active Sparkle filter
(without filter templates, since a template is already applied in the preview window).
61
Here you can modify the settings for the Sparkle filter, but first go to the preview window
and check whether the Keyframes option is activated (key points during the course of an
animation, which have various properties at pre-determined times).
Without activation of the Keyframes option no changes in the effect, in relation to the
progress of an animation, will be shown. In this case, the settings will a p ply to all points in
time during an animation.

62
Now stop the preview by clicking on stop. Leave the beginning Key frame with its current
settings (see preview or current controller position). Next, move the slider to a new position
during the course of an animation. No new Key frames will be placed, unless you enter the
first setting in the Sparkle dialogue box, in relation to the current position in the Timeline.
Now alter the following settings using the controller:
Glow-Intensity = 70%
Spot-Intensity = 0%
Orientation = 60%
and reduce flicker = 54%
nd
This will create the following preview for the 2
effect with the help of the Play button.
Key frame. Start the preview to look at the
63
Now stop the preview by clicking on stop. Now move the slider to a new position during the
course of an animation.
in the Sparkle dialogue box, in relation to the current position in the Timeline.
Now alter the following settings using the controller:
Length = 25
Erosion-Threshold = 91%
Glow-Intensity = 70%
Spot-Intensity = 0%
Orientation = 80%
and reduce flicker = 30%
This will create the following preview for the 3. Key frame. Start the preview to look at the
effect with the help of the Play button.
No new Key frames will be placed, unless you enter the first setting

64
Now stop the preview by clicking on stop. Now move the slider to the end position during
the course of an animation.
Now alter the following settings using the controller:
Length = 20
Highlight-Threshold = 20%
Erosion-Threshold = 13%
Glow-Intensity = 30%
Spot-Intensity = 0%
Orientation = 90%
and reduce flicker = 20%
This will create the following preview for the End-Key frame.
effect with the help of the Play button.
Start the preview to look at the

65
Now stop the preview by clicking on stop.
Now you can process the animation as a video clip in preview, with the help of Export.
Note:
Naturally, you can shift Key frames within the Timeline, to do this place your mouse on a
Key frame, hold down the left mouse button and drag it to a new positi on in the Timeline.
You can also delete Key frames during the course of an animation, to do this place the slider
on the corresponding Key frame and press the Delete key on your keyboard.
This completes application of the Sparkle filter in connection with the use of Key frames in
the Timeline.

66
Apply Shape Wipe transition effect (with integrated
Sparkle effec t )
This tutorial focuses on the use of a transition effect from the Shape Wipe Gallery.
Vitascene is used as a plug-in to video editing software (e.g. Pinnacle Studio).
Double click on the Vitascene Transition in the Timeline (appearing in grey between the
clips), Vitascene will start, the video m a terial from the video editing software will appear in
the preview window.
Choose a suitable transition from the Filter Templates (e.g. Sparkle Circle Wipe #46). A
playback with the selected transition will appear in the Vita scene preview window in real
time. Video A is faded into v ideo B. Of course, you can modify the transition in Vitascene to
suit you.

67
Now go to the Timeline beneath the preview window, stop playback and place the slider in
the position of your choice.
Leave the Beginning Key frame with its original settings, as the fade out is no longer
visible in the preview window and the process should start f rom zero (centered).

68
Now go to the lower section of the Templates dialogue box, where there are 3 folders
(Impression, Location and Filter).
Select the following settings in the Impression folder, in relation to the Key frame
positioned during the course of an animation:
A/B Sharpness = 150%
Opacity = 30%
There will be no settings in the Location folder, as the position of the circle remains
centred.
In the Filter folder select the following settings for the Sparkle effect.
Length = 10
Highlight-Threshold = 60%
Erosion-Threshold = 30%
and Orientation = 30%

69
This will create the following preview for the 2
the effect with the help of the Play button.
nd
Key frame. Start the preview to look at
Parallel to the circle (template) additionally placed rays (Sparkle) are visible.
No new Key frames will be set, unless you enter the first setting in one of the Impression,

70
Location or Filter folders, in relation to the current position in the Timeline.
Select the following settings in the Impression folder, in relation to the Key frame
positioned during the course of an animation:
A/B Sharpness = 160%
Opacity = 40%
There will be no settings in the Location folder, as the position of the circle remains
centered.
In the Filter folder select the following settings for the Sparkle effect.
Length = 10
Highlight-Threshold = 80%
Erosion-Threshold = 30%
Glow-Intensity = 100%
Orientation = 60%
and reduce flicker = 70%
This will create the following preview for the 3. Key frame. Start the preview to look at the
effect with the help of the Play button.

71
nd
Parallel to the enlarged circle (increased by the time passed since the 2
Key frame) a
greater number and more powerful rays (Sparkle) are visible.
The End-Key frame is not modified any further as it is no longer visible (at this point in
time the circle has gone beyond the visible area of the preview window).
This completes creation of the Shape Wipe transition effect (as the basis for Sparkle Circle
Wipe #46).
Simply return to Pinnacle S t udio using the F12 key or by clicking on the symbol.
This will automatically save the Vitascene project.

72
The Navigation menu contains more additional effect options.
1. Template-Presets
Of course, it is also possible to change the templates (here a circle) within the project by
using the Template-Presets dialogue box.
2. Customize effect
This is where you can alter the settings for Crossing, Wrap, Emphasis, Geometry and
Iris Control.

73
3. Customize mask
This is where you can alter the settings for Source, Blur, Pixel-Aspect, Attributes and
Geometry.
4. Texture
This is where you can alter the settings for Source and Geometry.

74
5. Filter
These settings have already been entered (application of the Sparkle effect).

75
How to create a miniature landscape in a real video
This tutoria l provides informat ion on the use of an effect from the T i lt Sh ift -gallery.
Vitascene will be used as a Plug-in to a video editing software (e.g. Sony Vegas). Our aim is
to create an animated Focus Point on people appearing in the foreground while the other
areas of the image are depicted blurred. Apart fr om that, we want to intensify Color and
Contrast. We will also use keyframes. In order to put all this into practice, we will use the
effect combi nation Tilt Shift.
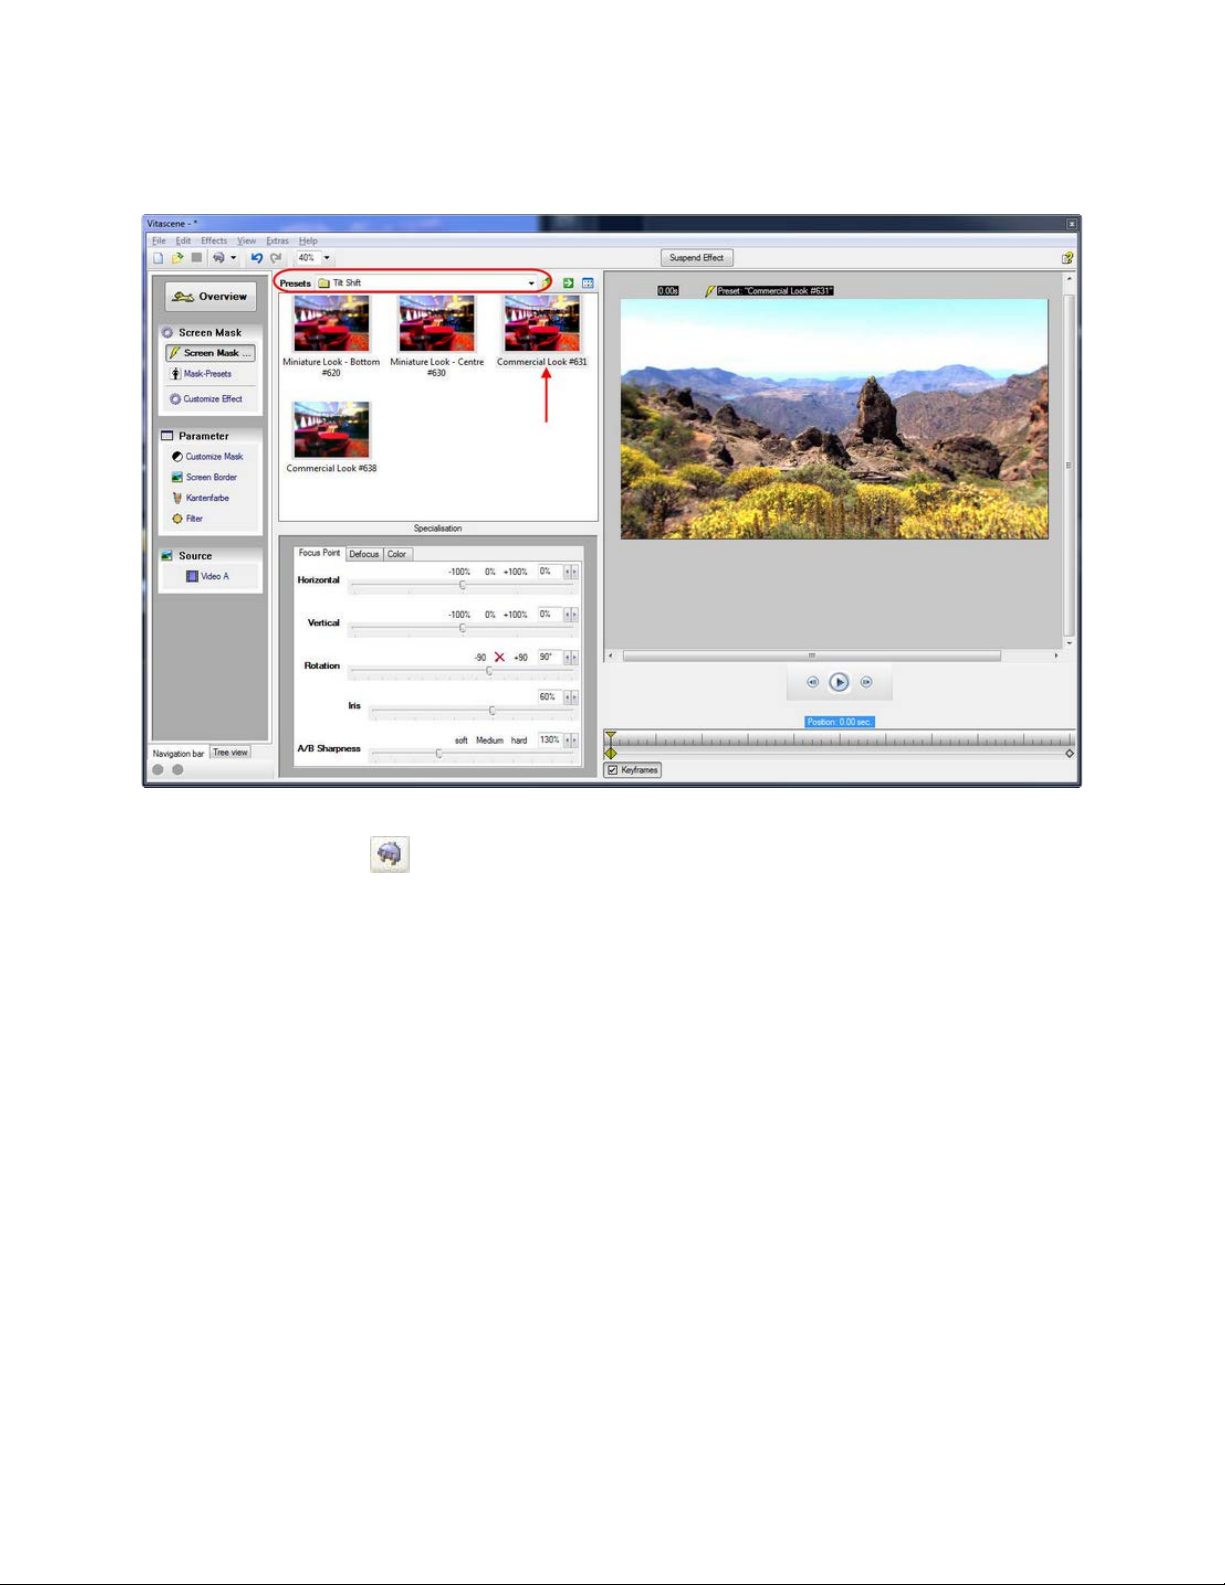
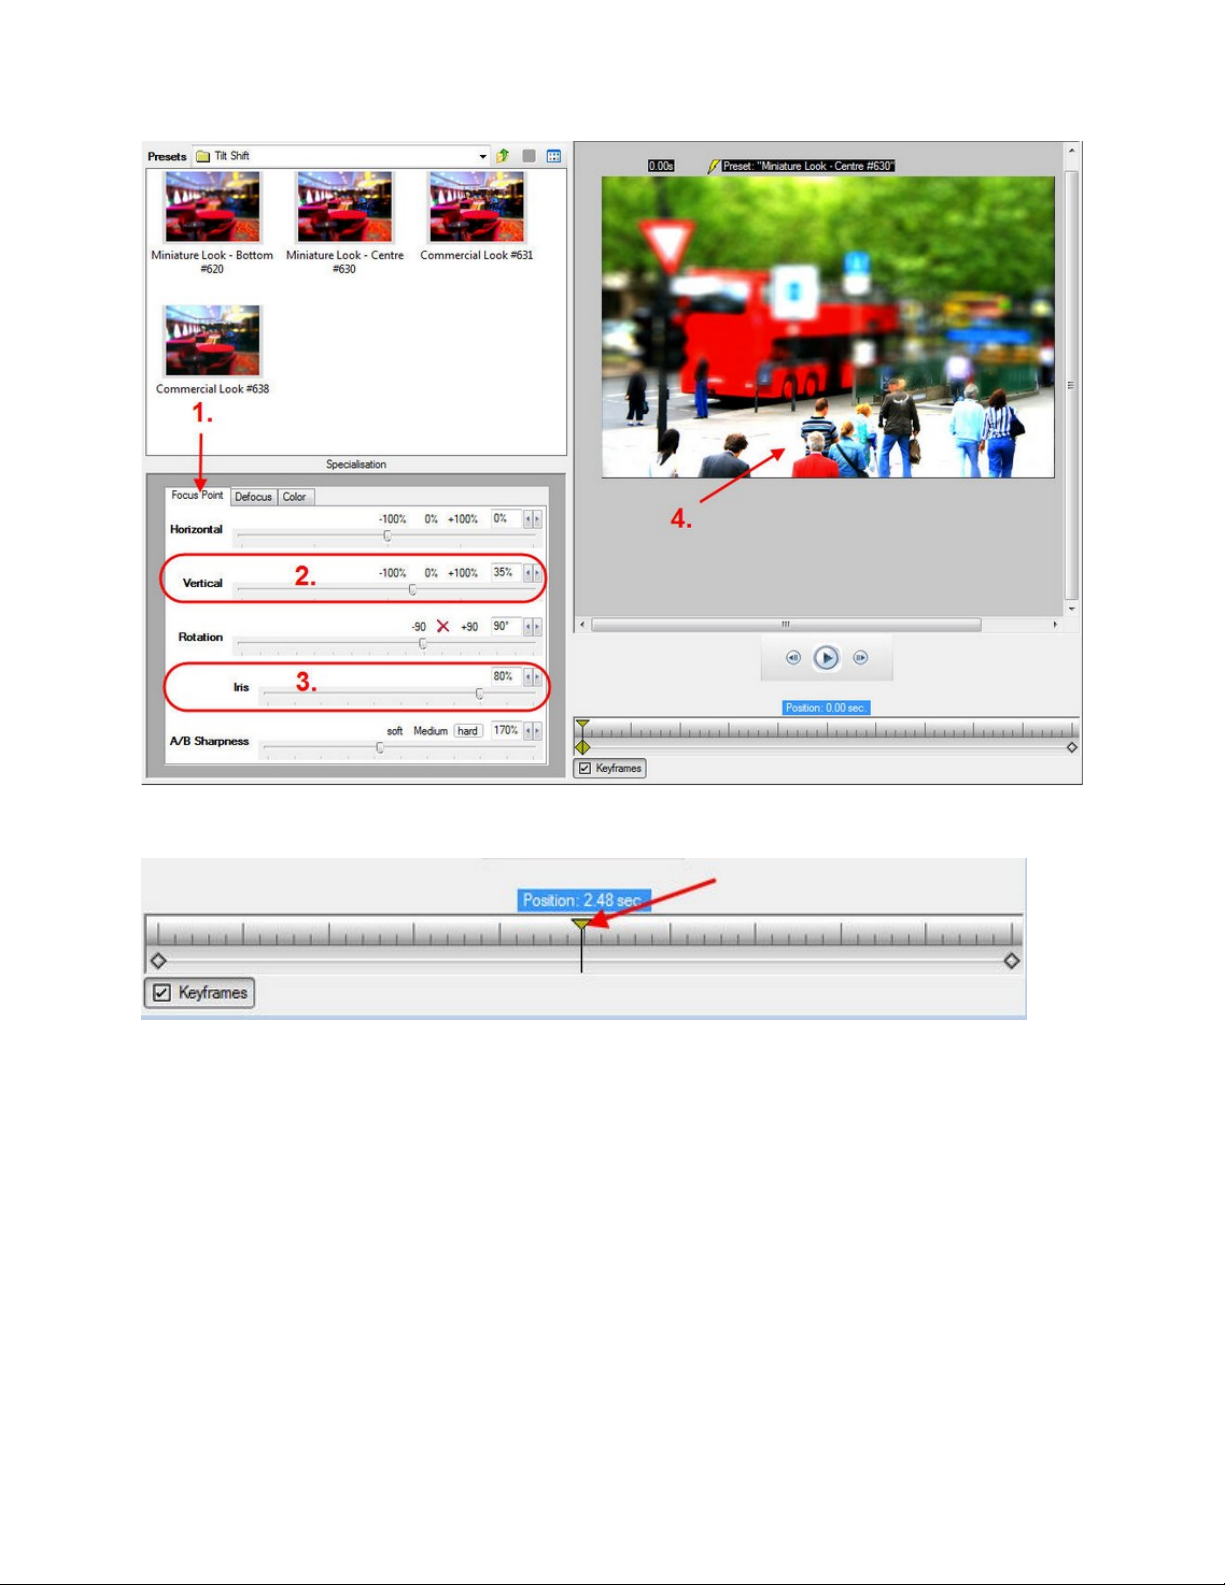
After putting the clip/frame into the timeline of Vegas, apply the Vitascene Filter (from the
register Effects in Vegas) in your material. Start Vitascene and go to Filter-Presets (1)
and choose the Tilt Shift filter, e.g. the Miniature Look Centre #630 effect (2) by
double-clicking it. You can see the selected effect with the default setting immediately in the
Vitascene preview (3).
First of all, we place the beginning keyframe to the clip. Move the slider in the timeline to
the beginning. Make sure the Keyframes option is activated.
The Keyframes enable us to create an additional animation of the Tilt Shift effect in the
video. We will set 3 Keyframes - one at the beginning, one in the middle and one at the end.

76
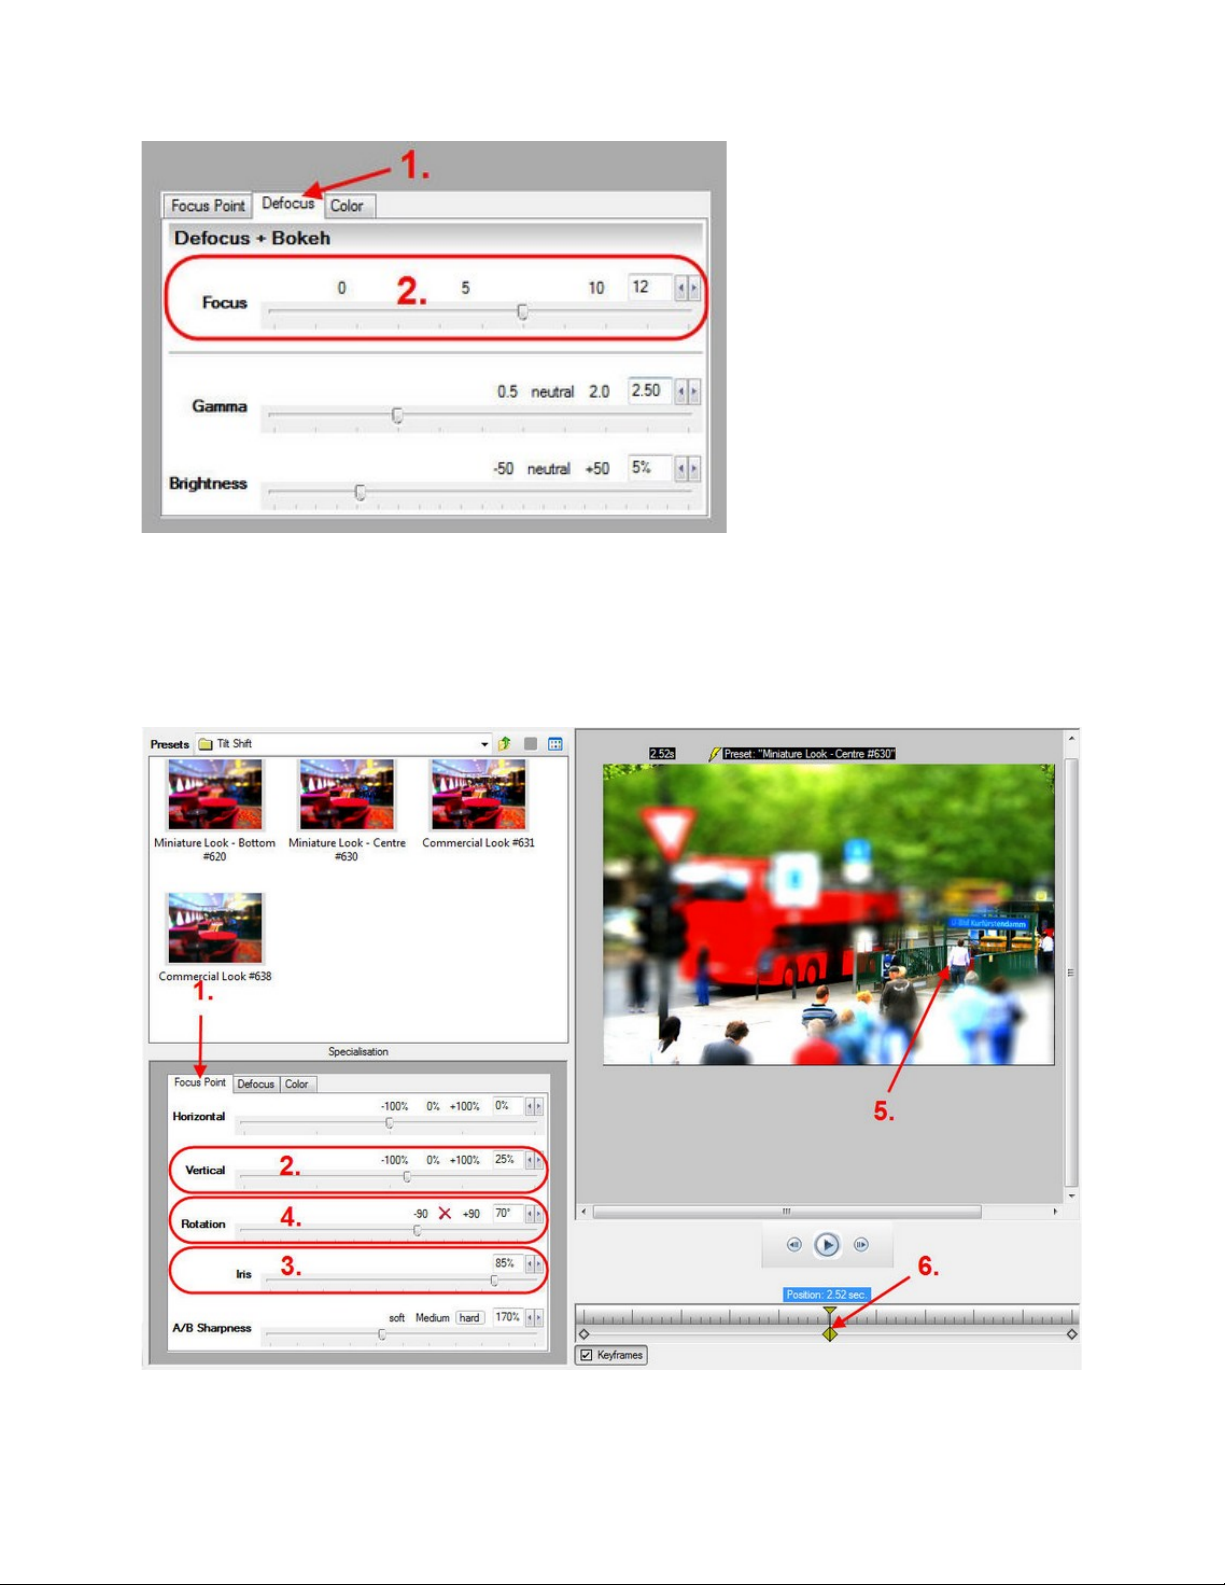
First go to the Defocus register(1) to increase Focus (2) to 10. As a consequence, we will
discern much better the areas with a high sharpness level from those which are blurred (3).
Now go to the Focus Point register(1) to put the focus on the people. To achieve this aim,
move the Vertical slider (2) to 35%. Then move the Iris slider (3) to 80%. This increases
the extension of the Focus Point. You will see the changes instantly in the Preview (4).
77
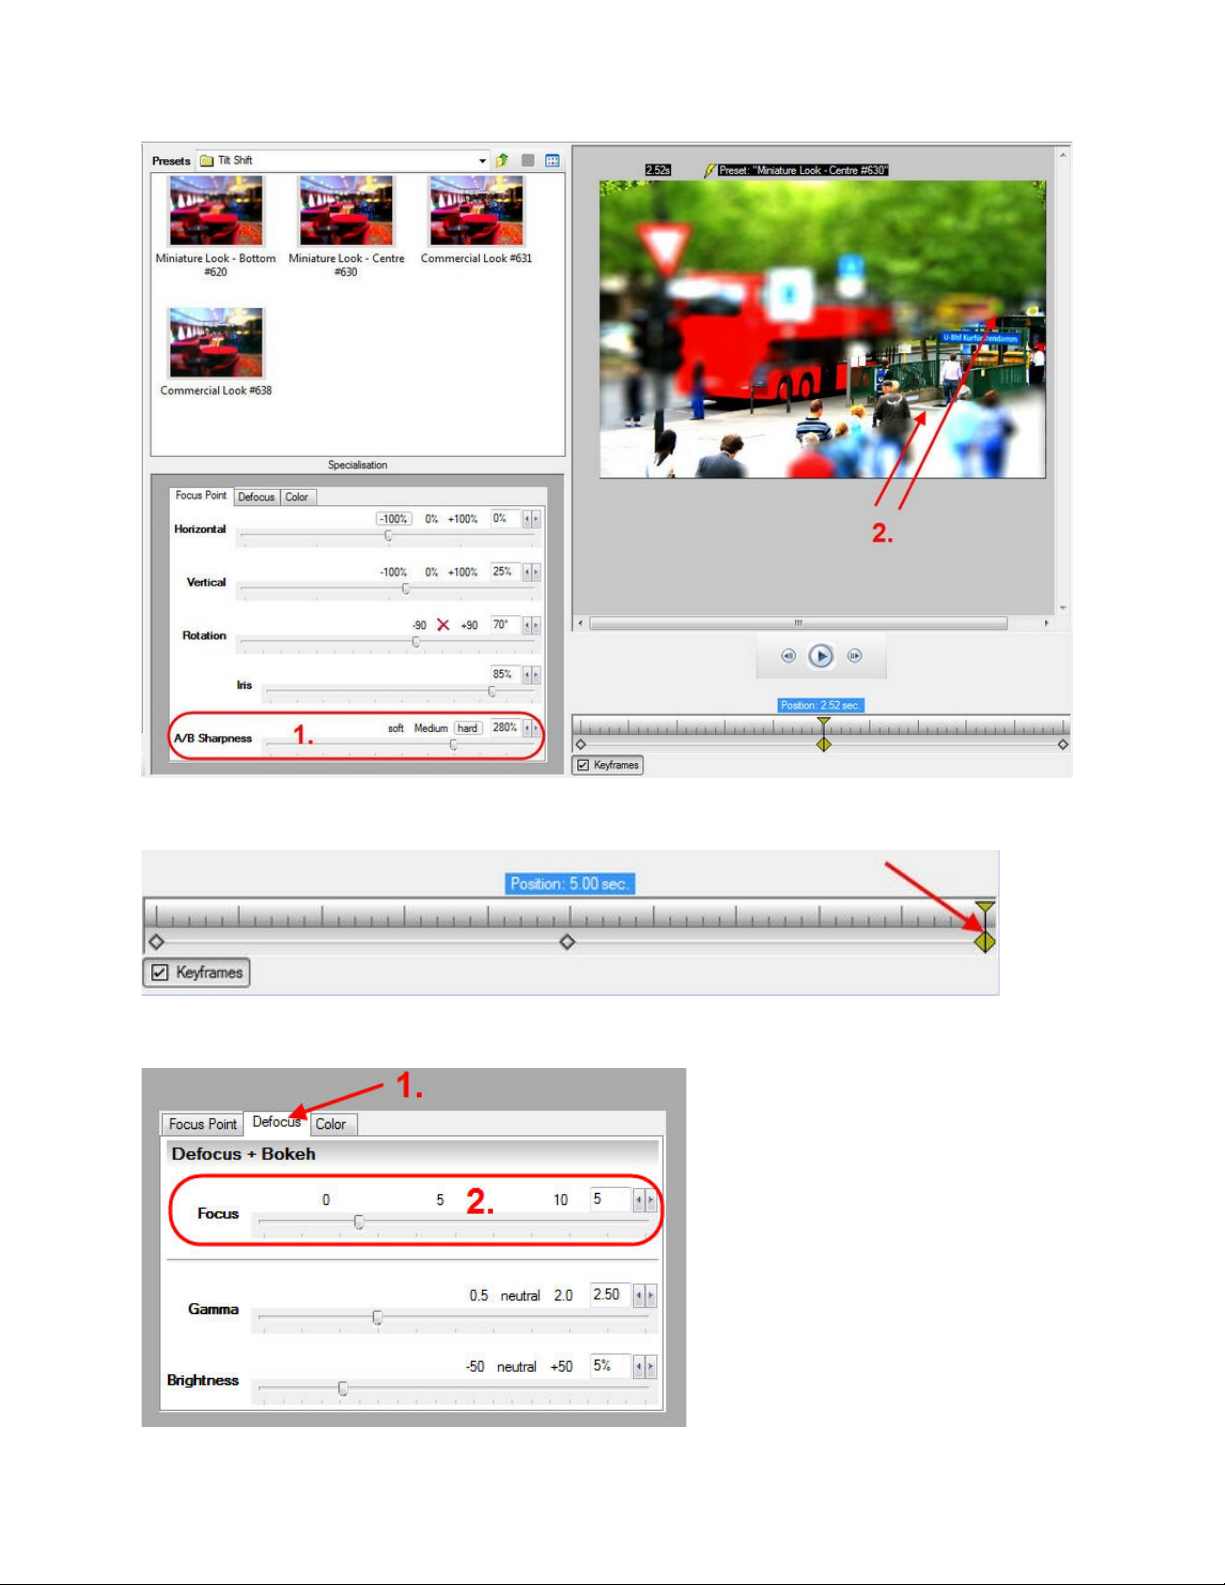
Now move the keyframe slider in the Vitascene timeline to the middle pos ition.
Go again to the Defocus register (1) to increase the Focus (2) to 12.
78
Now go back to the Focus Point register(1) to alter the position of the Focus Point in the
video. Move the Vertical control button (2) to 25% in order to put the focus on the people
at the entrance of the subway station. T hen move the Iris slider (3) to 85% to make the
Focus Point smaller. Now alter the Rotation value (4) to 70. The change of the part with
a high sharpness level can be seen immediately in the Preview (5). This completes the
setting of a new Keyframe (6) in the middle position.
Now increase the A/B Sharpness (1) value to 280% to make the transition between areas
with a high sharpness level and those with a low sharpness level appear harder. You can see
this immediately in t he Preview (2).
79
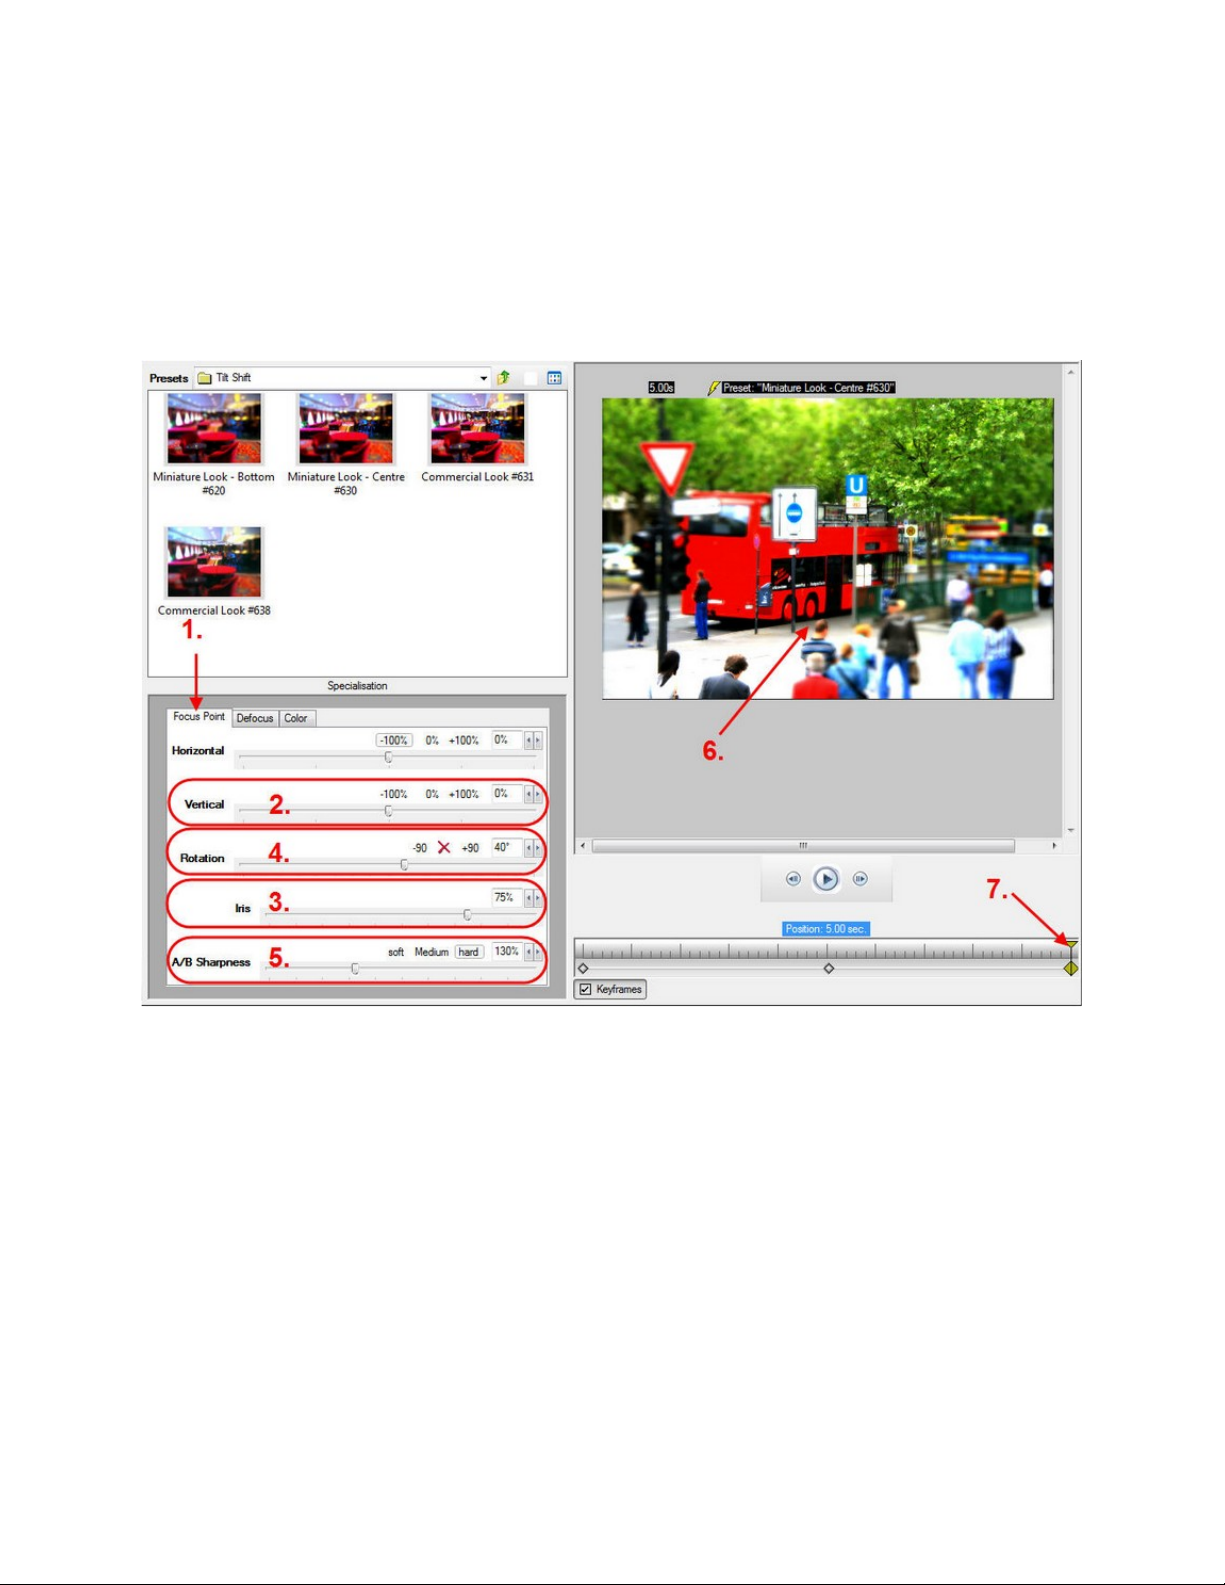
Now move the Slider to the ending position of the Vitascene timeline.
Go again to the Defocus register (1) and increase the Focus (2) to 5.
80
Now go back to Focus Point register (1) to change the position of the Focus Point in the
video.
Set the Vertical slider button (2) to 0% to put the focus on the center part of the bus.
Then move the Iris slider (3) to 75% in order to increase the Focus Point which now
occupies the area where the people are. Now alter the Rotation value (4) to 40 as well as
the A/B Sharpness value (5) to 130%. You will notice the change of the sharply depicted
middle part of the bus immediately in the Preview (6). This completes the setting of a new
Keyframe (7) at the ending position of the timeline.
Finally, we will change the Color and the Contrast setting at every Keyframe. In order to
do so, go to the Color register (1).
Move the Contrast (2) and Saturation (3) control buttons according to your preferences.
You will see the changes immediately in the Preview (4).

81
Note:
The settings for Color and Contrast that you can see in the screenshot above are only the
ones that have been carried out in the ending keyframe. In order to put the settings of the
other keyframes, it is necessary to move the slider to the middle- and to the beginning
keyframe where you repeat the procedure.
This completes the settings for the effect combination Tilt Shift. Press the F12-Key or click
on the symbol
to return to Sony Vegas.
82
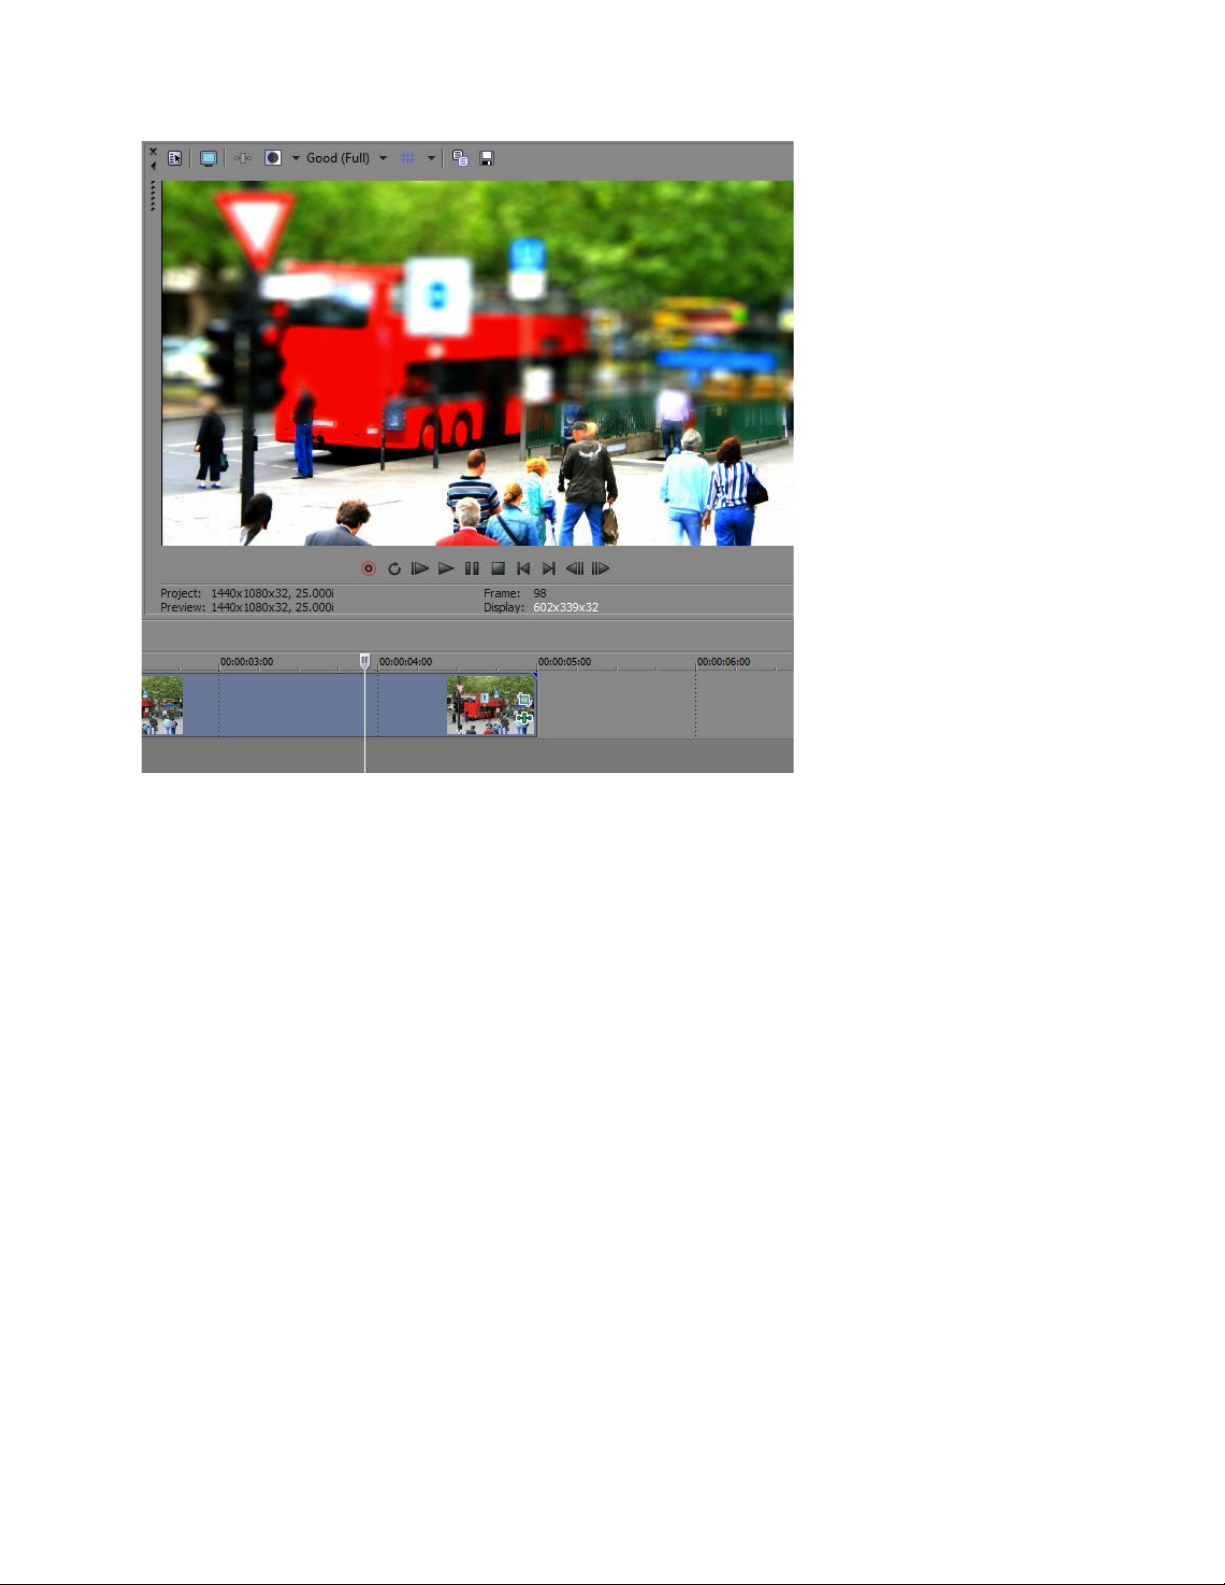
The effect will be applied to the video in the Vegas timeline and can be seen in the Preview.
Note:
If you are using Vitascene as a stand-alone version, you can now save this Tilt Shift
animation via Export/Animation as an AVI file.

83
User interface/introduction
In this chapter you can read important infor mation about the structure of the Vitascene user
interface.
In addition, this is where you can obtain all the information on applying numerous effects
and options for modifying and combining them.
Start page
The options that are useful at the start of the program are presented in an overview.
1. Start
2. Most recently opened projects
To create a new project, click on the new project option in the Edit projects area :
Using the Open option, you can open (saved) projects that have already been created.

84
The proDAD Vitascene navigation bar can be changed; you can work in either a Structure
screen or a Segmentation screen, adjusting the software interface to your way of working.
The change can be made in the lower section of the navigation menu.
The Vitascene navi ga t ion bar (screen / struct ur e ), is switchable in the lower sectio n of
the navigation menu to Structure / Segmentation.
The Vitascene navigation bar (screen / Segmentation), is switchable in the lower
section of the navigation menu to Structure / Segmentation.

85
Navigation
In the Navigation menu click on the Overview option
the dialogue box Start page / Navigation overv iew is displayed a s follows:
In the Navigation menu of Vitascene are further options available :

86
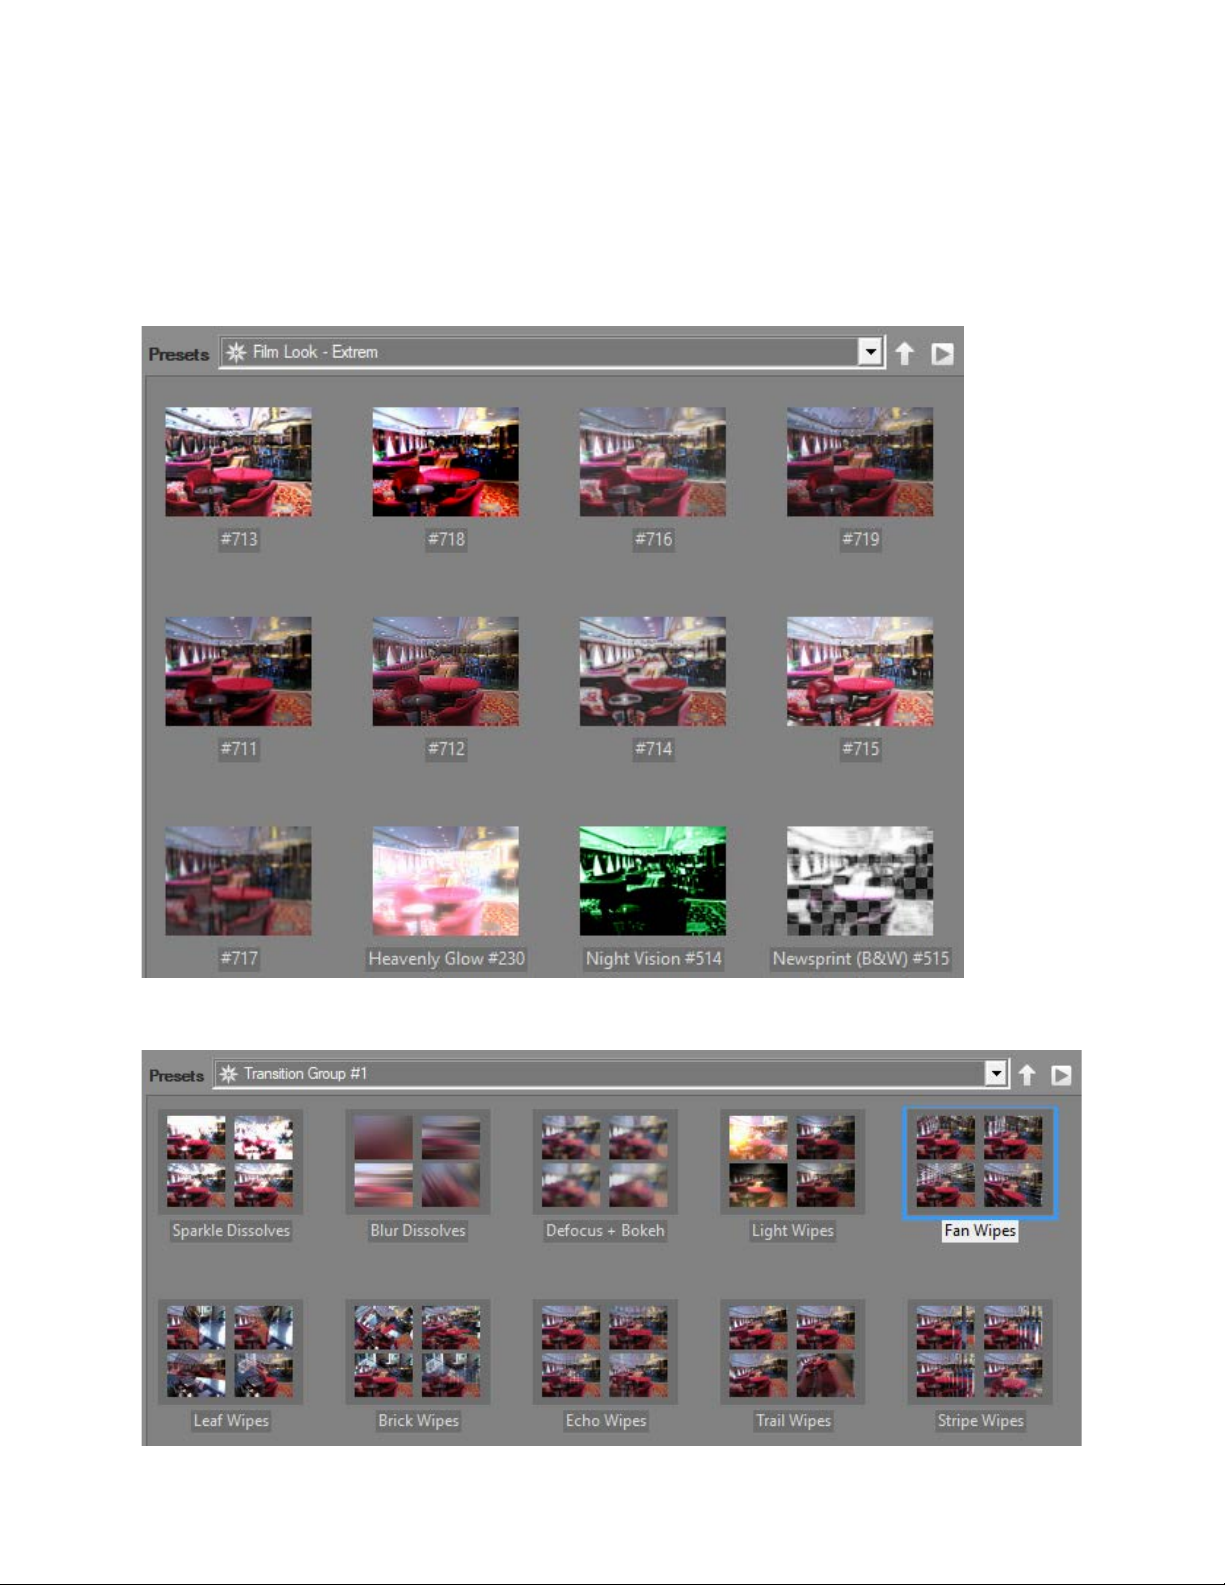
Filter-Presets
The Filter Templates dialogue box contains 2 groups in the Root folder, sorted by Filter
group and Transition group.
The Filter gro up contains further Folders, which in turn contain numerous effect templates
that are ready for use.
The Transition group contains further Folders, which in turn contain numerous effect
templates that are ready for use.
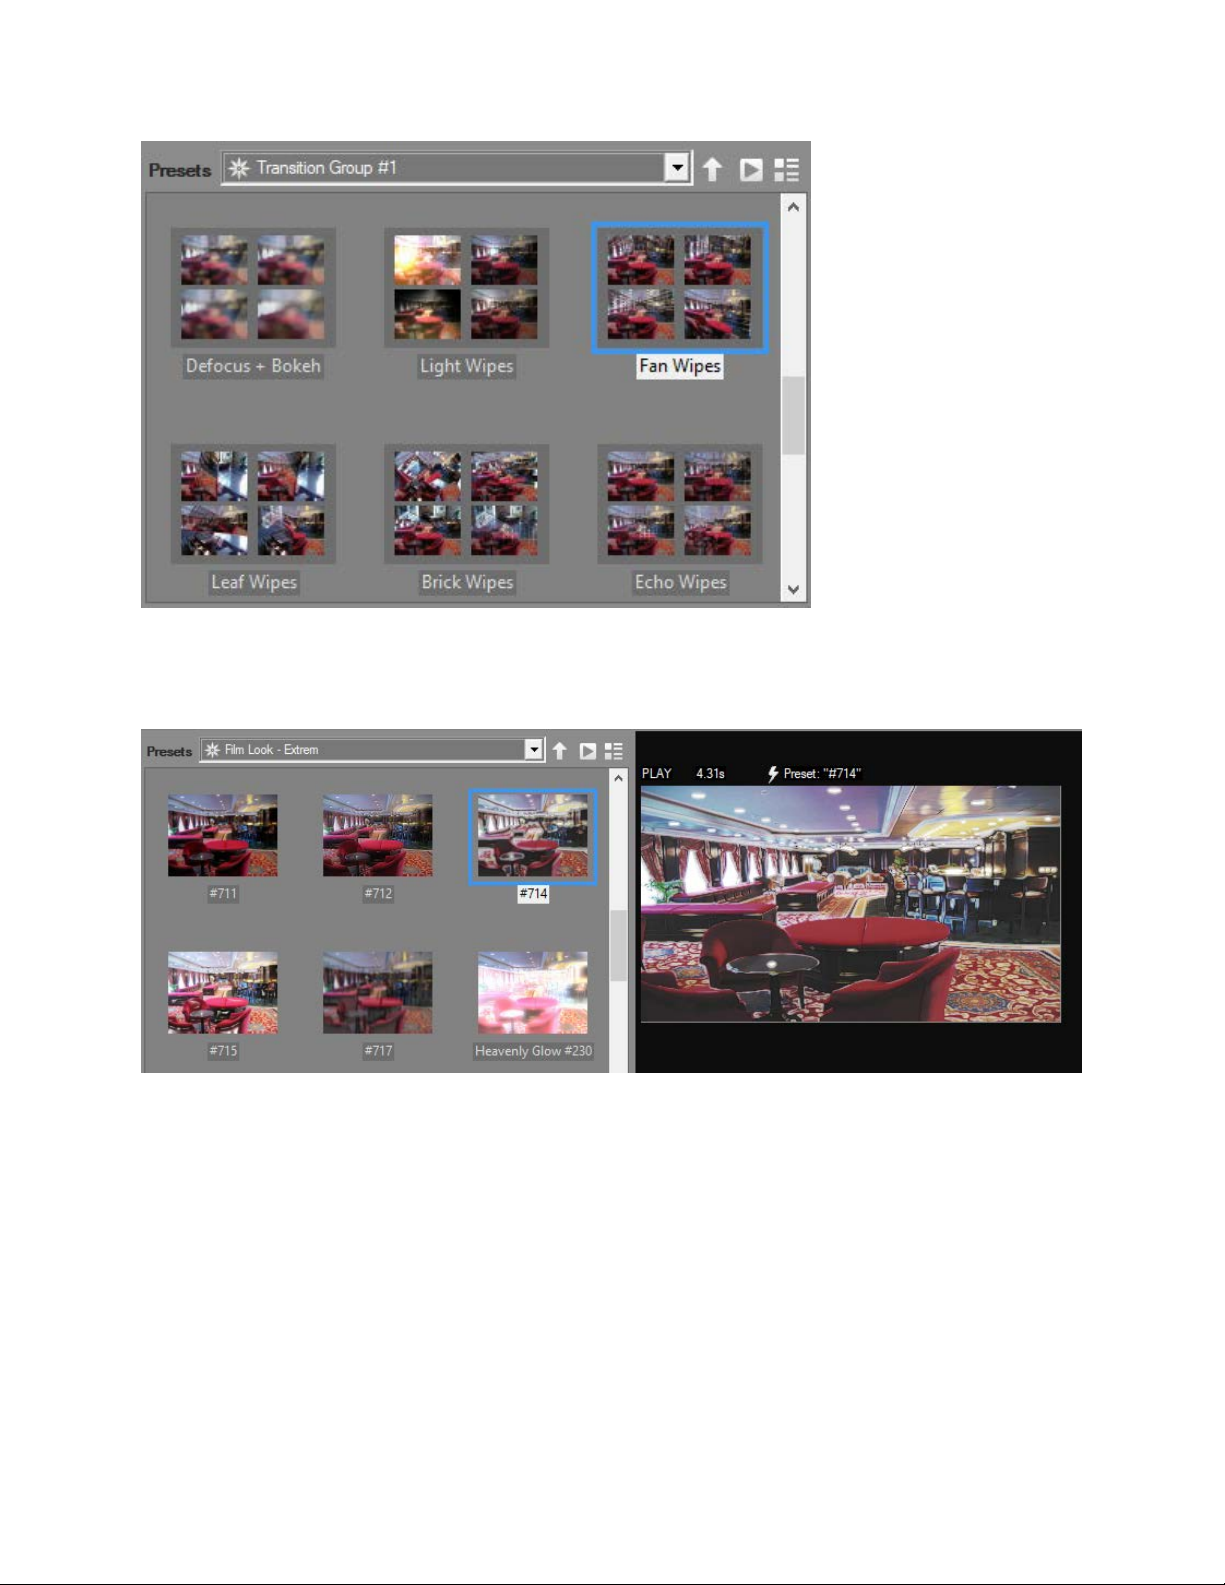
87
To select a Filter template, go to a Template folder (e.g. Filter group / Film Look - Extrem),
where effect templates are displayed. By double clicking on the effect of your choice, you
will transfer it into the preview window.

88
Preview
For a short time, show the current status of the project as a rendered preview.
Let's assume that you have created a Sparkle effect and want to watch the current status as
a rendered preview animation, you can carry this out here easily.
Create as
Animation as preview = Rendering an animation file with immediate playing options
Control
Display of the current status in the real time preview
Playback
Display of the currently created timeline area in the animated real time preview
Click on Create as
this opens the Animation as preview dialogue box.

89
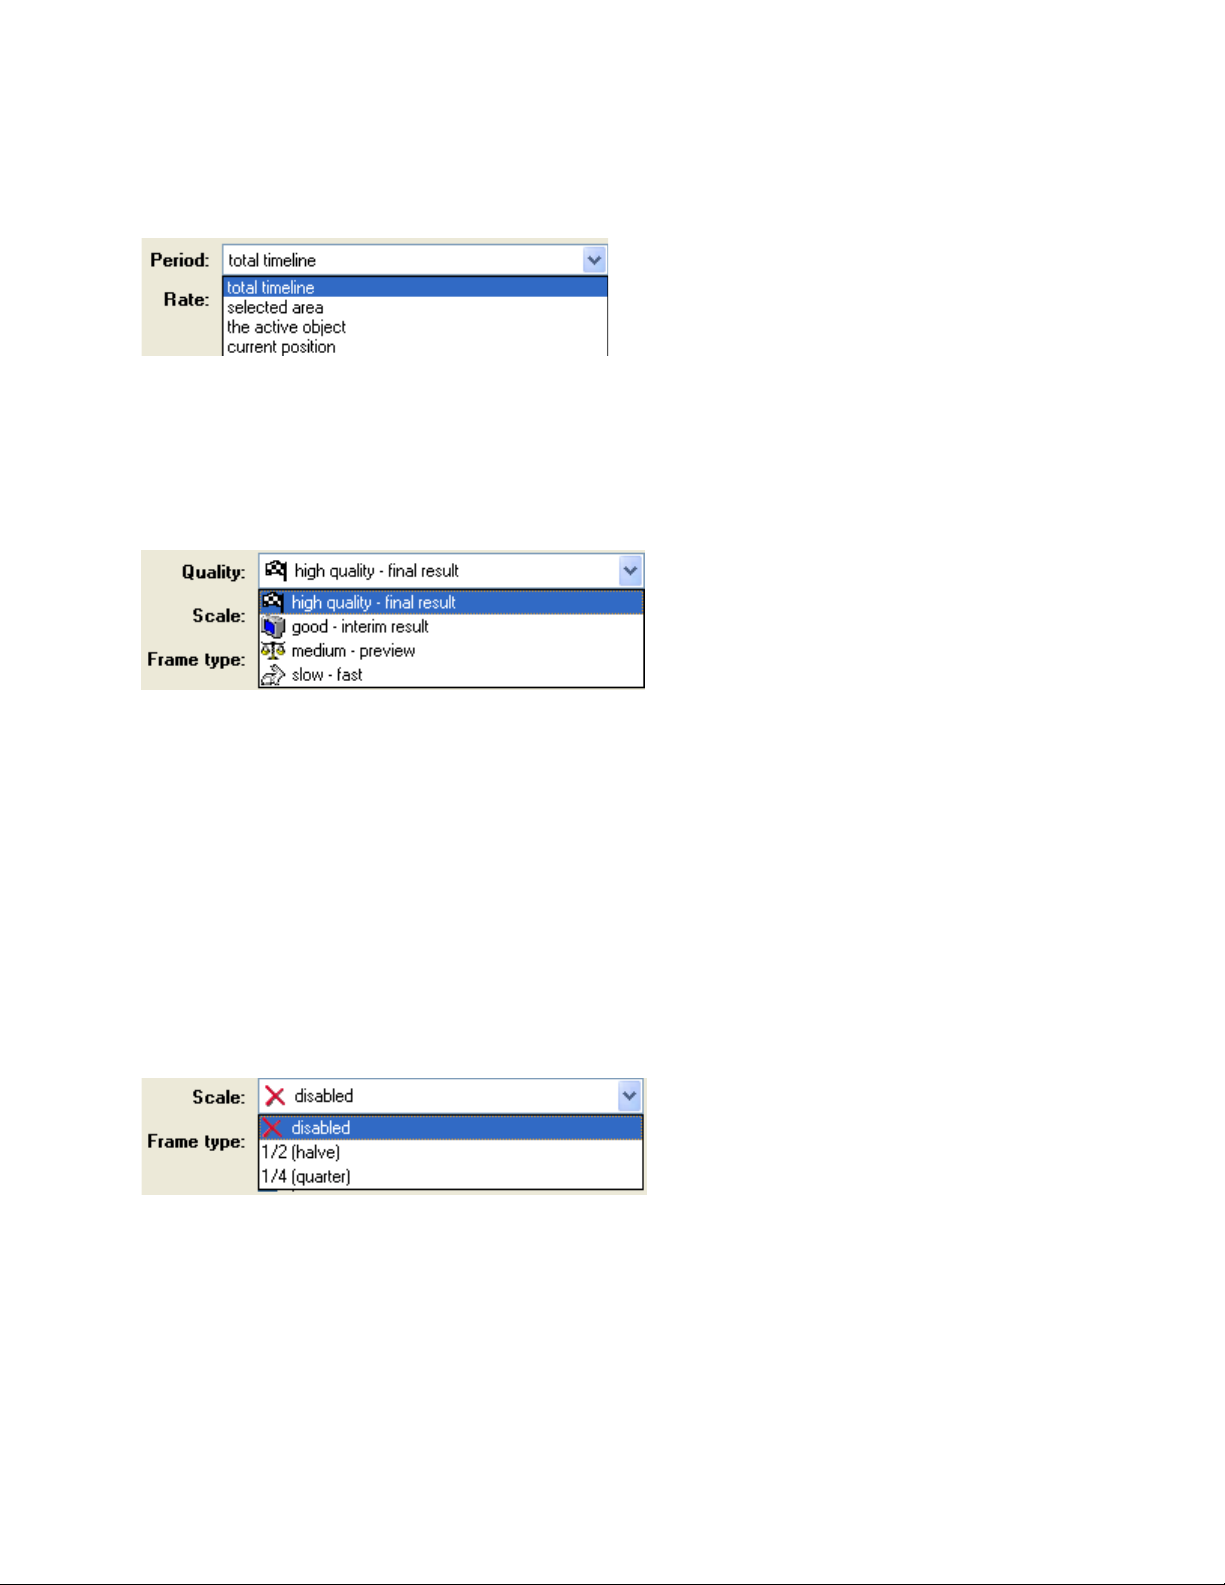
preview settings for :
Period, Rate, Quality, Scale, Frame type, Rendering, Codec, Driver, Key frames and file
directory
90
Export
Here you can choose your desired type of export:
Animation = Animation file (e.g. AVI, MPG, WAV, etc.)
Single frames = Export into an index of one pict ure or a continuous picture sequence
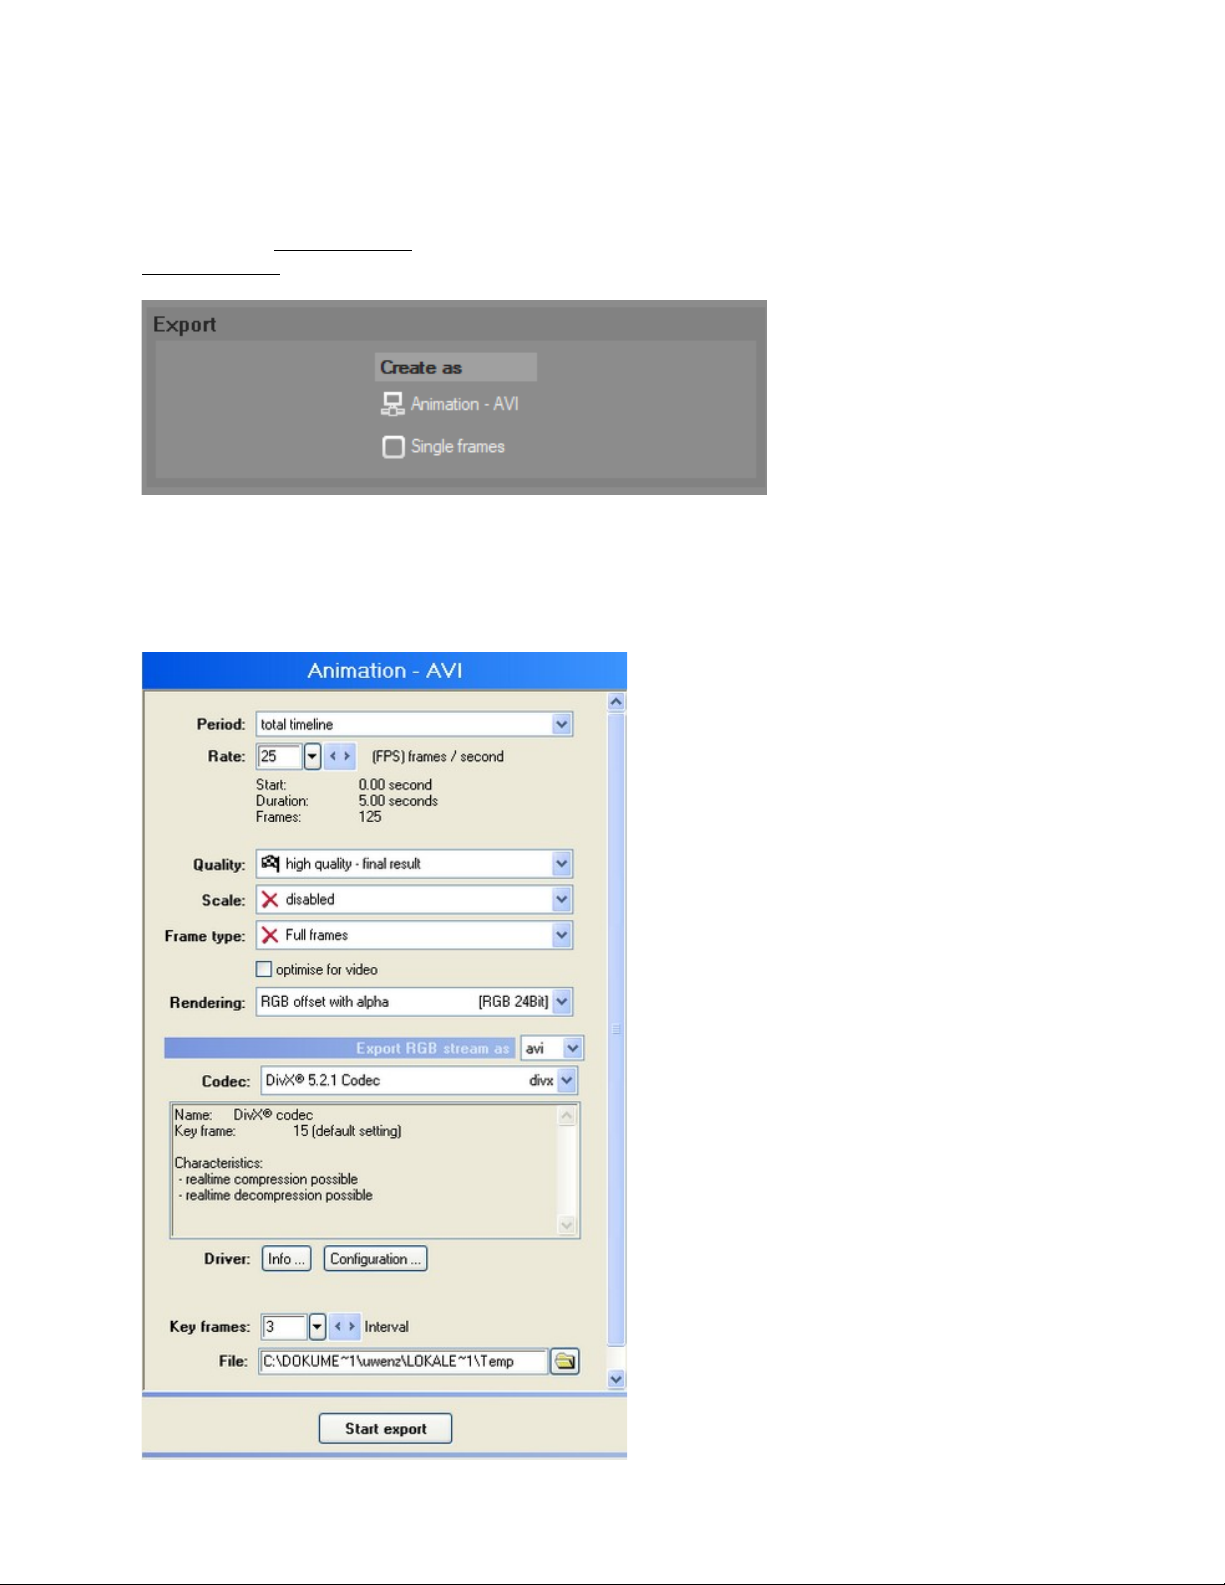
Export - Animation - AVI
The following parameter en ables the individual display of animation ( see below for settings)

91
Time period
•
low: produces the fastest, but qualitatively poorest results when
working, i.e. for previews, ideal for
when using complicate d animations in objects
•
medium: produces somewhat softer results than low
•
good: best possible display of glyphs, but only crude display o f
graphics/animations
•
premium: best possible preview quality, soft glyphs and sharp textures.
A interference reducing device is additionally used in case of small
contours.
This is where you can adjust the temporal data for the active timeline object using the
keyboard.
Rate
This is where the frames per second are modified. Pre-selections for PAL and NTSC are
available for easy access.
Quality
This is where the quality level is chosen:
This setting requires the most rendering time, especially if animations are used.
Scale
This parameter is used to quickly halve the set format values. It is also ide al for calculating
an animation rendering of the highest quality, but to reducing it by decreasing the rendering
time.
Frame type
Here you can set the half or full frame parameters.
If you want to export a result, but either the editing software's project settings or the video
hardware requires a change of the half frame sequence, this can be adjusted simply.
"Full frames" is especially required for Web animations or results that are to be used
elsewhere other t han in the video application.
low-performance computers or
92
If a comb effect is evident in the rendered result, this probably means that the incorrect half
•
Upper first = even
•
Lower first = odd
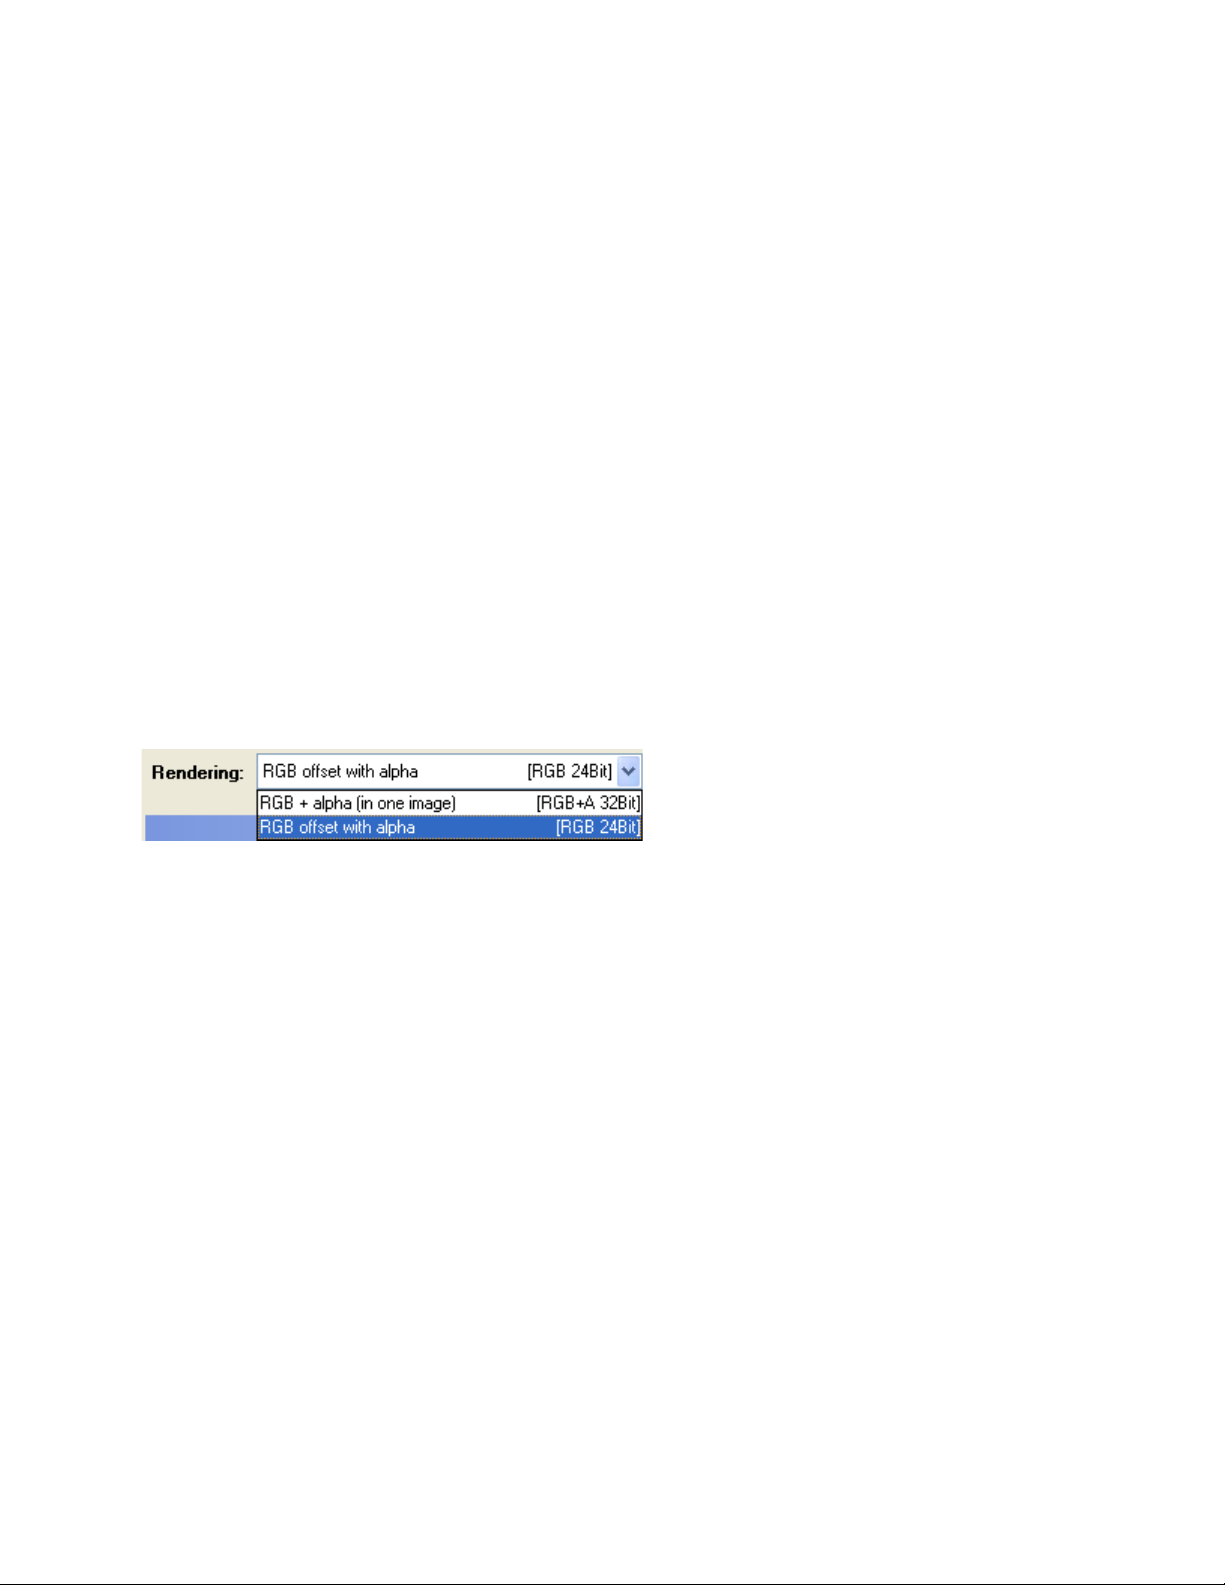
•
RGB+Alpha computation (in a graphic): 24 Bit RGB color data as well
as 8Bit alpha channel data is stored in a file. The data can nevertheless
be called up separately and is not yet offset.
•
RGB offset with alpha: 24 Bit RGB color data as well as 8Bit alpha
channel data is stored in a file (already offset).
frame type is selected. If the result is slightly jerky, it may be necessary to change the
settings from Full frame to Half frame.
In some parameters of other cutting products these half frame settings have a different
name:
Optimizing for video
This filter should always be selected if the end result is designed for video output.
Advantage: less picture interference, optimized color spectrum.
When the filter is switched off there is a speed advantage in calcu lating of about 20%, but
with this it brings a lower quality during video usage.
Rendering
This is where you can es t ablish the format in which an animation will be used (AVI) and how
the Alpha channel should be controlled.
Export RGB-Stream as
This is where the animation output format (AVI) is determined.
File
This is where the path, together with the output folder, in which the individual image
sequence is issued, are determined.
Codec
the codecs available are already checked on selection. Why? Some codecs do not register
correctly in the system. If the export process is then started, a system error appears that
looks as though Heroglyph could not export with this codec. The real reason, however, is
usually an insufficient system integration of the codec - or of course a different alignment to
other media (e.g. special media players, etc.). If error checking brings up results these will
be shown in the codec's info window (codec does not support format, etc.)
Important: as some codecs transmit a default error code in this checking the real cause for
error can not always be determined correctly. Even an incorrect data path can cause an
export process to fail. Therefore, please always check the export path's validity (especially if
removable media, RAM discs, etc. are used).
Important Note:
Raw format : ideal for uncompressed animation files (AV) for usage in studios without
possible plug-ins. Supports RGB-A (inclusive of alpha channel!)
93
The Button
•
The codecs registered in the system that allow data to be written are
always offered fo r export.
•
without applying the scaling option the format of animations is always
equal to the format in export/format
•
AVI animations cannot contain an alpha channel and are therefore not
to be used, if in the final
possible. The possibility of single frame sequence export via TIFF or
TGA 32 can be applied here.
By clicking this button the animation rendering will start.
usage the Keying per alpha channel is
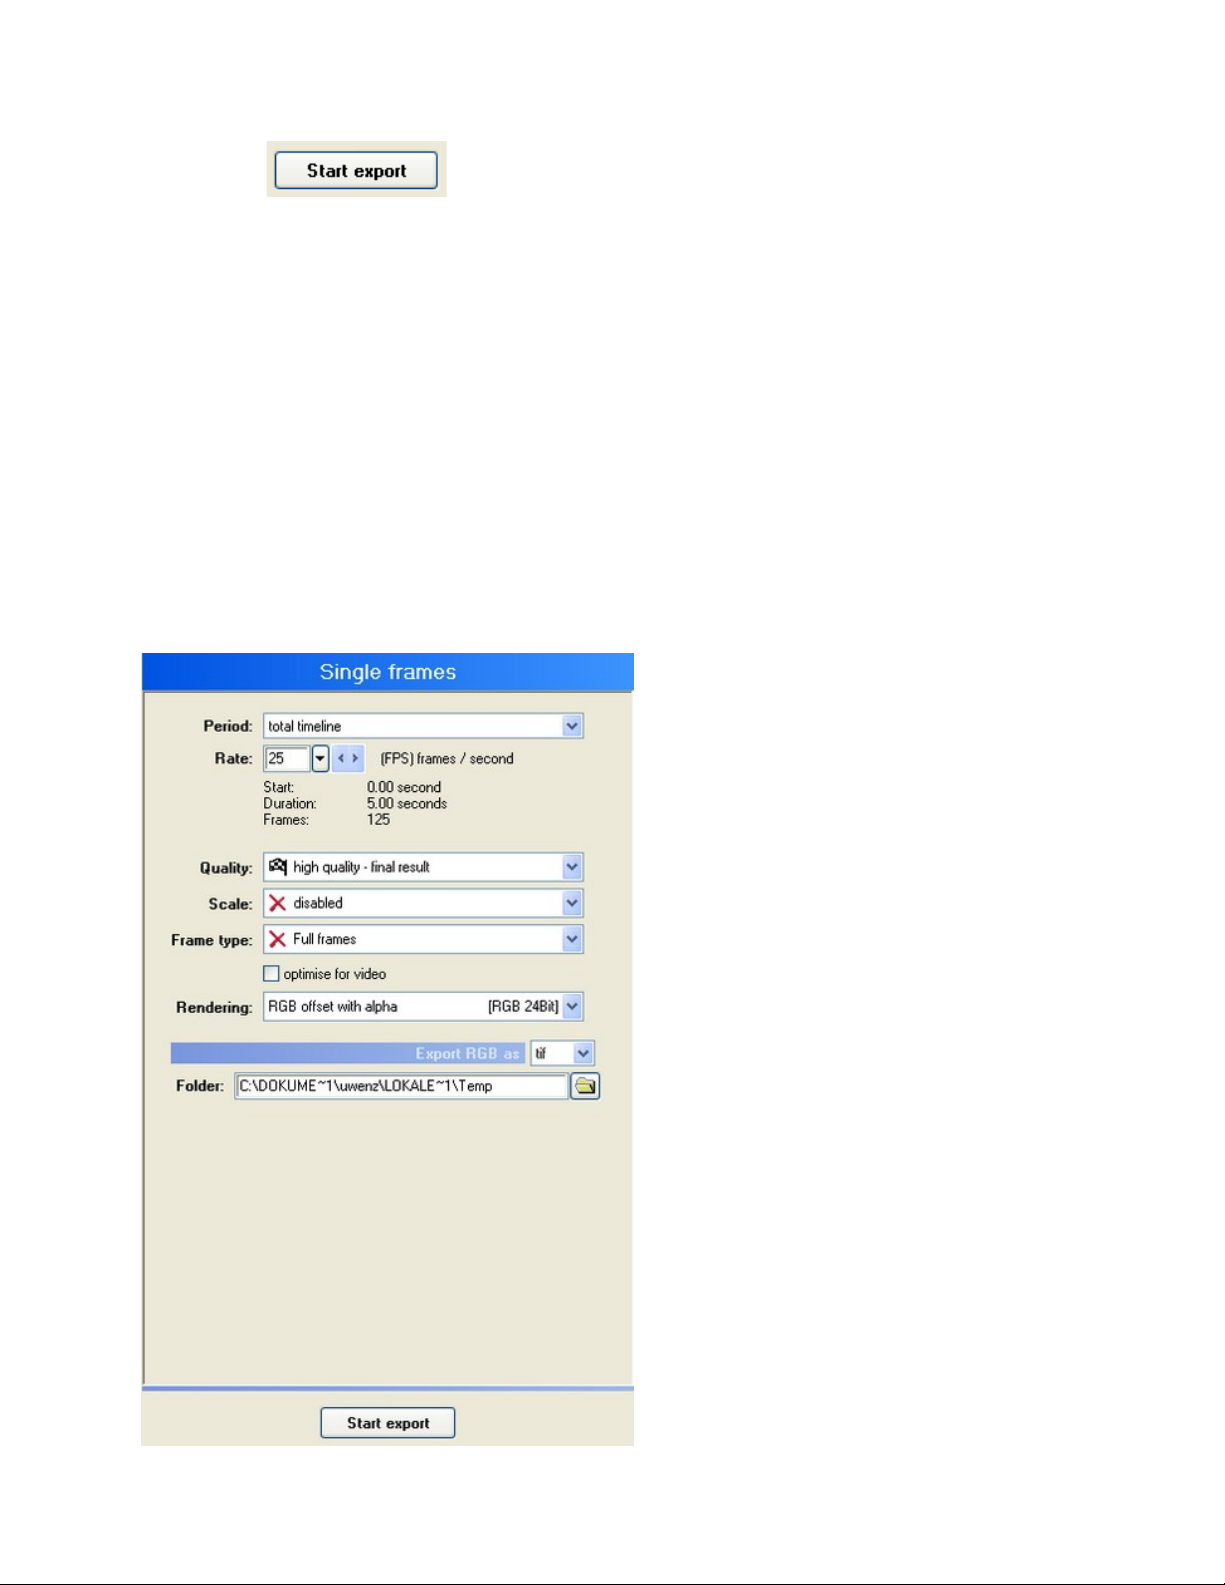
Export - Single frames
This is where the settings are set for rendered single frames sequences that are to be
exported.
The following options are availab le:
94
Time period
•
low: produces the fastest, but qualitatively poorest results when
working, i.e. for previews, ideal for low
when using complicate d animations in objects
•
medium: produces somewhat softer results than low
•
good: best possible display of glyphs, but only crude display o f
graphics/animations
•
premium: best possible preview quality, sof t glyphs a nd sharp textures.
A interference reducing dev
contours.
This is where you can adjust the temporal data for the active timeline object using the
keyboard.
Rate
This is where the frames per second are modified. Pre-selections for PAL and NTSC are
available for easy access.
Quality
This is where the quality level is chosen:
This setting requires the most rendering time, especially if animations are used.
Scale
This parameter is used to quickly halve the set format values.
It is also ideal for calculating an animation rendering of the highest quality, but to reducing
it by decreasing the rendering time.
Frame type
Here you can set the half or full frame parameters.
ice is additionally used in c ase of small
-performance computers or

95
•
Upper first = even
•
Lower first = odd
•
Calculation RGB+alpha (in one graphic) : 24 bit RGB color data as well as 8Bit alpha channel
data is saved in a file. However, the data can be opened separat ely and is not yet rendered.
•
RGB + alpha (as two images): 24-bit RGB color data and 8-bit alpha channel data are stored in
two files.
•
RGB rendered with alpha: rendered 24-bit RGB color data and 8-bit alpha channel data are
stored in a sin gle file.
•
only RGB (ignore alpha): 24-bit RGB color data is stored.
•
only alpha (ignore RGB): 8-bit alpha channel data is saved.
If you want to export a result, but either the editing software's project settings or the video
hardware requires a change of the half frame sequence, this can be adjusted simply.
"Full frames" is especially required for Web animations or results that are to be used
elsewhere other t han in the video application.
If a comb effect is evident in the rendered result, this probably means that the incorrect half
frame type is selected. If the result is slightly jerky, it may be necessary to change the
settings from Full frame to Half frame.
In some parameters of other cutting products these half frame settings have a different
name:
Optimizing for video
This filter should always be selected if the final result is to be use d fo r video output.
Advantages: less picture interference, optimized color spectrum.
Although deactivating this filter will increase the rendering speed by approx. 20%, this will
diminish the quality when using the result for video productions.
Rendering
This is where the format that is used for the single frame sequence (TIF, JPG, PNG, TGA,
PPM, SGI) is defined and also how the alpha channels ar e to be controlled.
Export RGB as
this is where the single frame display format is defined. The following are av ailable: tiff, jpg,
tga, png, ppm and sgi.
Folder
this is where the path and the target folder are defined in which the single frame sequence
is distributed.

96
By clicking on this button the export proce ss starts.
Settings
General settings for the
Specialization customization
Display:
Video format, Background / borders, Duration
Here you will find settings for project templates :
Undo and Save
Search path for images/animations, Alternative video sources and
and Language - User interface

97
Search path for ima ges/animati on s
The global search paths are defined here. When loading a project the corresponding
components, such as graphics or animations are searched for. In principle, these
components are not embedded in a project file. This has the advantage that the project file
can be kept much more compact.
However, the disadvantage that comes up is that an uploaded graphic must always be
stored in the location that is pointed at. This can create pro blems if you want to transfer the
project to another PC, for example. However, this parameter eliminates the problem:
If a project is opened on another PC that has a different drive environment, the components
only have to be located in one of the search paths selected here in order to be found.
You can create a search path by clicking New.
Please note: No sub-folders will be searched.

98
Alternative video sources
This setting dialogue box is used to determine video source A and/o r vi d eo source B.
You can import the follo wing formats into Vitascene, to do this click on the customize
option:
Note:
In plug-in operation, it is not possible to choose the source, as the Vitascene filter is
applied directly to a clip (host video) from the video editing software, for example. The same
applies to the use of Vitascene as a transition.
99
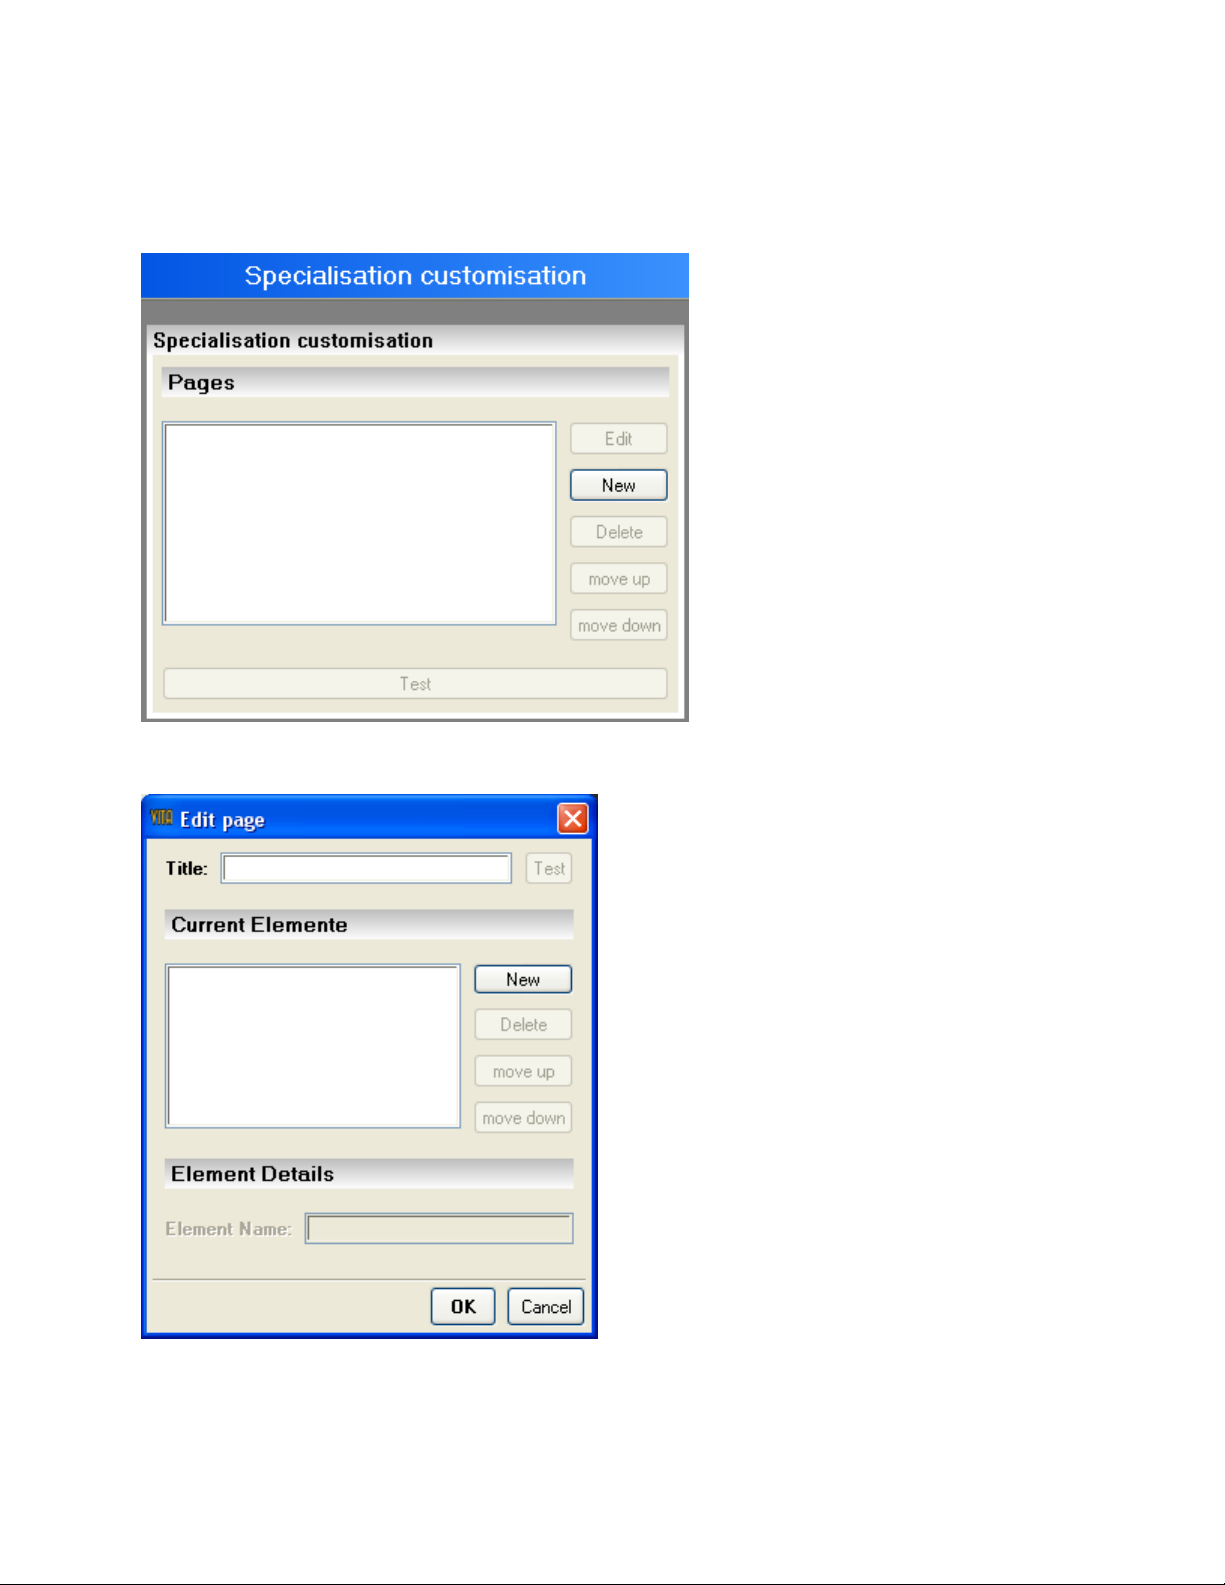
Specialization customization
This setting dialogue box is used to compile the setting options for an effect.
To select an effect, cli ck on the New button, it appears in the dialogue box.
Click on the New button again, this opens a list of effects.

100
Now select the Video Filter / Color Adjust effect.
This will be transferred into the Edit page dialogue box and displayed as follows:
Under Category you will see the following options:
 Loading...