

Vita-Mix Inc. PORTION BLENDING SYSTEM Operation Manual
All Models
PORTION BLENDING
SYSTEM
TM
Portion Control Ice Shaver Blender
Owner ’s Manual
Read And Save These Instructions
FOODSERVICE

2
1. Read all instructions.
2. To protect against risk of electrical shock, do not put shaver base in water
or other liquid.
3. Close adult supervision is necessary when appliance is used by or
near children.
4. Unplug the power cord from the wall outlet when the Portion Blending
System
TM
(PBS) is not in use, before putting on or taking off parts, and
before cleaning other than washing the container.
5. Appliance must be positioned so the power cord plug is accessible.
6. The PBS must be plugged into its own dedicated power supply or outlet.
7. Never contact moving parts.
8. Do not operate any appliance that malfunctions, has a damaged cord, or
plug, or that has been dropped or damaged in any manner. Call Vita-Mix
®
Service, (1-800-886-5235) or 440-235-0214 at once for possible replace-
ment, examination, repair, electrical or mechanical adjustment.
If you live outside the US, contact your local Vita-Mix Distributor,
or phone the Vita-Mix International Division at +1(440) 235-5494 or email at
international
@vitamix.com for a distributor in your country.
9. The use of attachments not recommended or sold by Vita-Mix
Corporation may cause fire, shock, or injury.
10. Do not use outdoors.
11. Do not let the power cord hang over edge of table or counter,
or touch hot surfaces.
12. Keep hands and utensils out of the ice bin and container while motor is running to prevent the possibility of severe personal injury and/or damage to
the PBS. Arubber scraper may be used in the container, but only when the
PBS is not running.
13. Do not fill ice bin with any other substance but ice.
14. CAUTION:Ice shaver blade is sharp.Handle carefully. Do not
operate with loose, nicked or damaged blades.
15. Do not disconnect ice bin interlock. Doing so may lead to serious injury.
16. CAUTION:Container blade is sharp.Handle carefully.
• Never try to remove blade while container is sitting on the shaver base.
• Do not operate with loose, nicked or damaged blades.
•To reduce the risk of personal injury, never place blade assembly on
shaver base without blender container properly attached.
IMPORTANT SAFEGUARDS

17. The maximum capacity is equivalent to the ounces (liters) listed on the
container, i.e. 64 oz. (2 liters), 48 oz. (1.4 liters), and substantially less
with thick mixtures.
18. Do not use more then 5 cups (1.3 liters) of cleaning solution when
cleaning the ice bin. See Care and Cleaning Instructions, page 20.
19. Always operate the blender with the splash guard or two piece lid in place.
20. Display window area will scratch when contacted with a scouring pad or
sharp object. Use a soft cloth to wipe the control panel area clean.
Enjoy the safety of this grounded appliance. The Portion Blending System
TM
US power cord comes equipped with a three-prong (grounding) plug which
mates with a standard three-prong wall outlet (Figure A). This cord will vary
for countries outside the United States.
Adapters (Figure B) are available for two-prong outlets. Do not cut or
remove the third (ground) prong from the plug or power cord.
Consult your electrician if you are not sure if the wall outlet is grounded
through the building wiring. With a properly grounded two prong wall outlet,
ground the PBS by attaching the tab on the adapter to the wall outlet cover
by means of the screw in the center of the cover (Figure B).
The Portion Blending System
TM
(PBS) is for commercial use ONLY.
SAVE THESE INSTRUCTIONS
Figure A
Figure B
THREE PRONG
ADAPTERS
ARE NOTTO
BE USEDIN
CANADA.
3
4
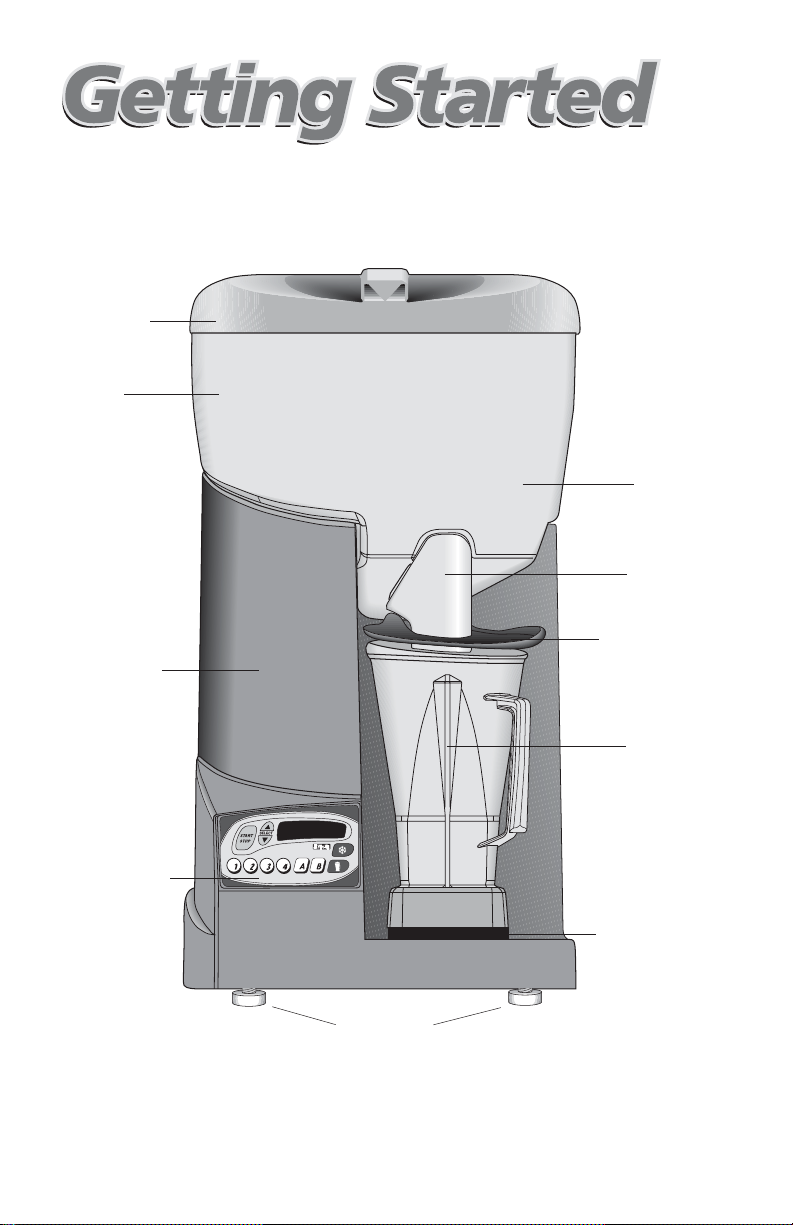
Ice Bin Lid
Ice Bin
Control Panel
Leveling Feet
64 oz. (2 L)
Polycarbonate
Container
Splash Guard
Container Pad
Ice Chute
Ice Shelf
Shaver Base
5
CONTINUED ON PAGE 6
Setting Up The PBS
Place the PBS on a sturdy, level surface or counter.
Packaged inside the Ice Bin are items necessary for the operation of the PBS. Remove the
Ice Bin Lid and take out the following items:
• Container • Container Lid with Lid Plug
• Ice Chute • Drain Kit
• Splash Guard • Drive Socket Kit
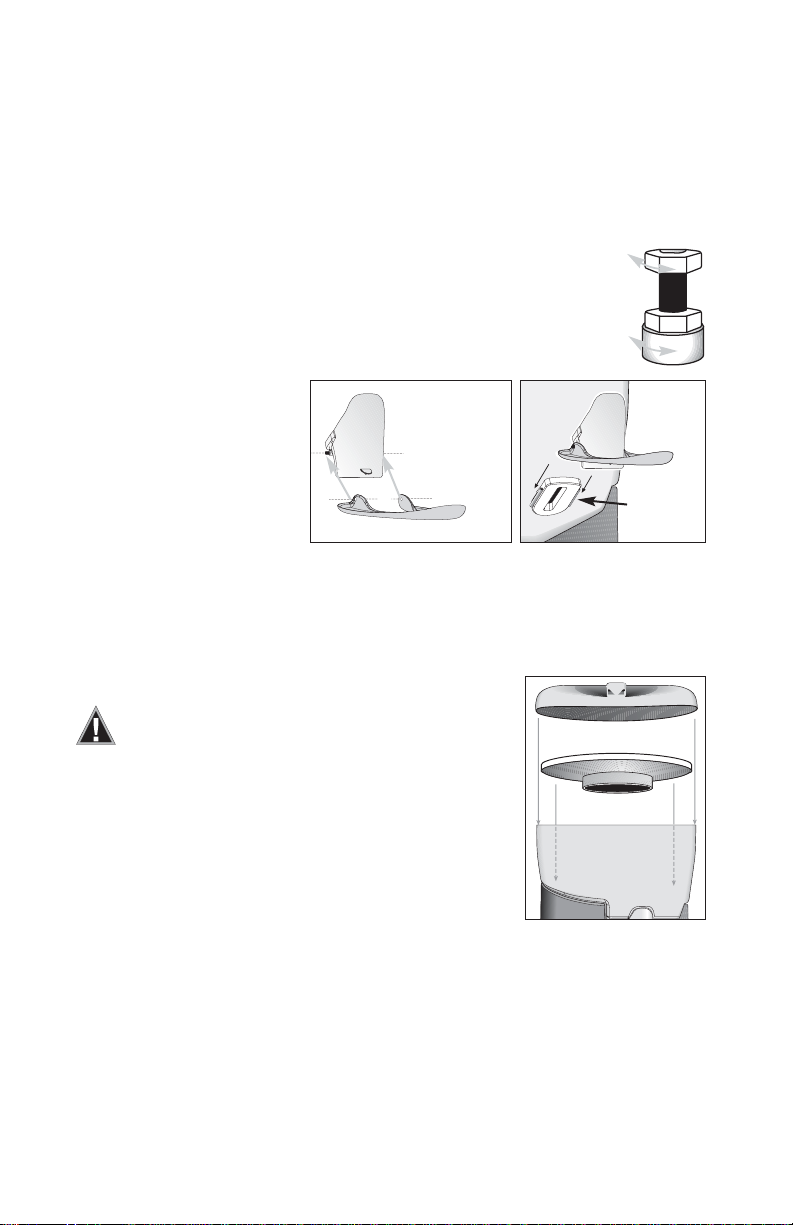
Level Feet Adjustment - Use a level and adjust the feet on the bottom of the
machine to level your PBS on the counter. With the Ice Bin Lid removed place
a level on top of the Ice Bin while adjusting the feet. Turn the feet to raise or
lower the machine and use the adjustment nut to tighten and lock them in
place.
DO NOTunscrew the feet so
that the threads of the feet
become exposed.
Splash Guard - The Splash
Guard attaches to the Ice Chute
and is used to loosely cover the
container during operation
(Figure A). The Splash Guard
should not touch the container.
Ice Chute - Slide the Ice Chute and Splash Guard over the
Blade Cartridge located on the underside of the Ice Bin (Figure B). The Ice Chute and Blade
Cartridge will click and lock together indicating proper placement.
Ice Shelf Placement
WARNING:
To reduce the risk of injury
unplug the unit before reaching inside the ice
bin. Do not operate without lid in place.
The Ice Shelf rests inside the Ice Bin and helps separate and
distribute the ice cubes for shaving. The shelf may have shifted during shipping and unpacking and should rest level
inside the Ice Bin with the inner lip facing down. The Ice
Shelf will be removed for cleaning but should always be properly replaced before adding ice.
Drain Hose Installation
Drain Hose - The drain hose is attached to the bottom of the machine. The opposite end of
the hose extends about 5’(1.5 m) and will need to be placed in a sink or bucket. The end of
the hose must not be submerged in water at any time.Also, the drain hose must be free
of kinks and bends and must not rest above the level of the drain hole located just behind the
container.See ‘Using the Drain Hose Kit’ on the next page, for further instructions.
Ice Chute
Figure A
Splash Guard
Ice Bin Lid
Ice Shelf
Ice Bin
Blade
Cartridge
Figure B
CONTINUED FROM PAGE 5
6
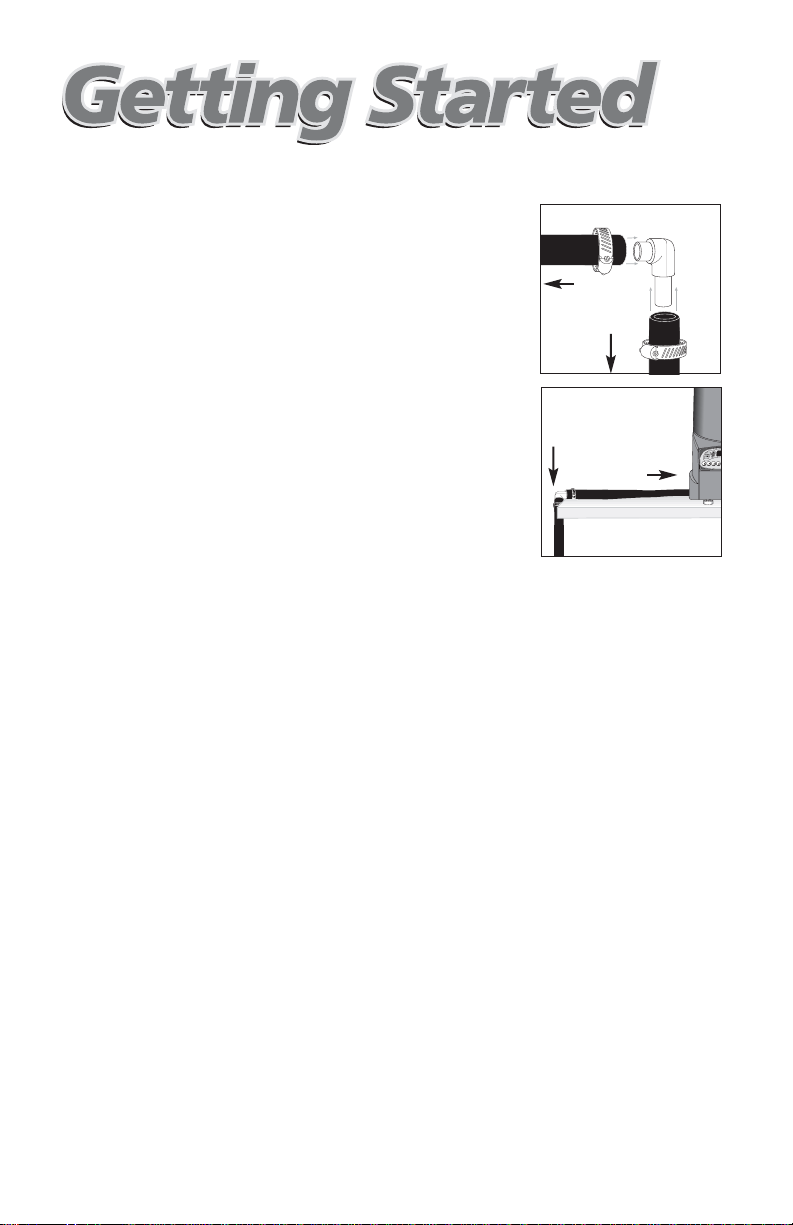
Using the Drain Hose Kit
The Drain Hose Kit contains one 90˚ elbow and two hose
clamps. When routing to a sink, bucket, or similar receptacle use the Drain Hose Kit to eliminate possible kinking of
the drain hose. Kinking can be caused by a sharp 90
˚
bend
created by the edge of a counter.
1. Once the machine is positioned on the counter, run the
drain hose from under the machine to a proper drain
receptacle.
2. Cut the hose at the point it reaches the end of the counter.
3. Place one clamp over the end of the hose coming from the
machine. Connect the two ends of the drain hose onto the
elbow of the Drain Hose Kit. The elbow should rest over the
edge of the counter.
4. Place the other clamp over the end of the hose and slide it up to the newly positioned
elbow. Position both clamps at each end of the elbow and tighten with a screw driver.
5. Reposition the PBS so that the elbow rests properly against the edge of the counter.
NOTE:If the position of the machine on the counter changes it may be necessary to replace
the Drain Hose to avoid kinks. Readily available, standard 1/2” (13 mm) plastic pipe and
fittings may be used for more complex installations.
Cleaning the Ice Bin
After removing the contents packed in the Ice Bin, an initial cleaning and sanitizing will be
necessary before adding ice. Make sure the Drain Hose is connected, and that there is
power to the machine before cleaning the Ice Bin.
• Follow steps 2-11 on page 20 ‘Care & Cleaning: Ice Bin’
Once dry, replace the Ice Shelf, Ice Chute and Splash Guard.
Filling The Machine With Ice
With the Ice Bin Lid removed and the Ice Shelf in place, you can fill the Ice Bin with up to
5 gallons (19 liters) of cubed ice.
• Using ice from an ice-making machine works best in the PBS.
• Shape and size of the ice cube will not affect the machines operation.
• Do NOT use block ice.
Clamps
Elbow
To machine
To bucket
or drain
To machine
Counter
To bucket
or drain
7
• Avoid using bagged ice that has been stored in a freezer at extremely low temperature.
Use of this type of ice may result in freeze-up of the shaver. When you must use
bagged ice, it should be stored in an ice chest for a least an hour before use.
Replace the Ice Bin Lid and your machine is ready for use.
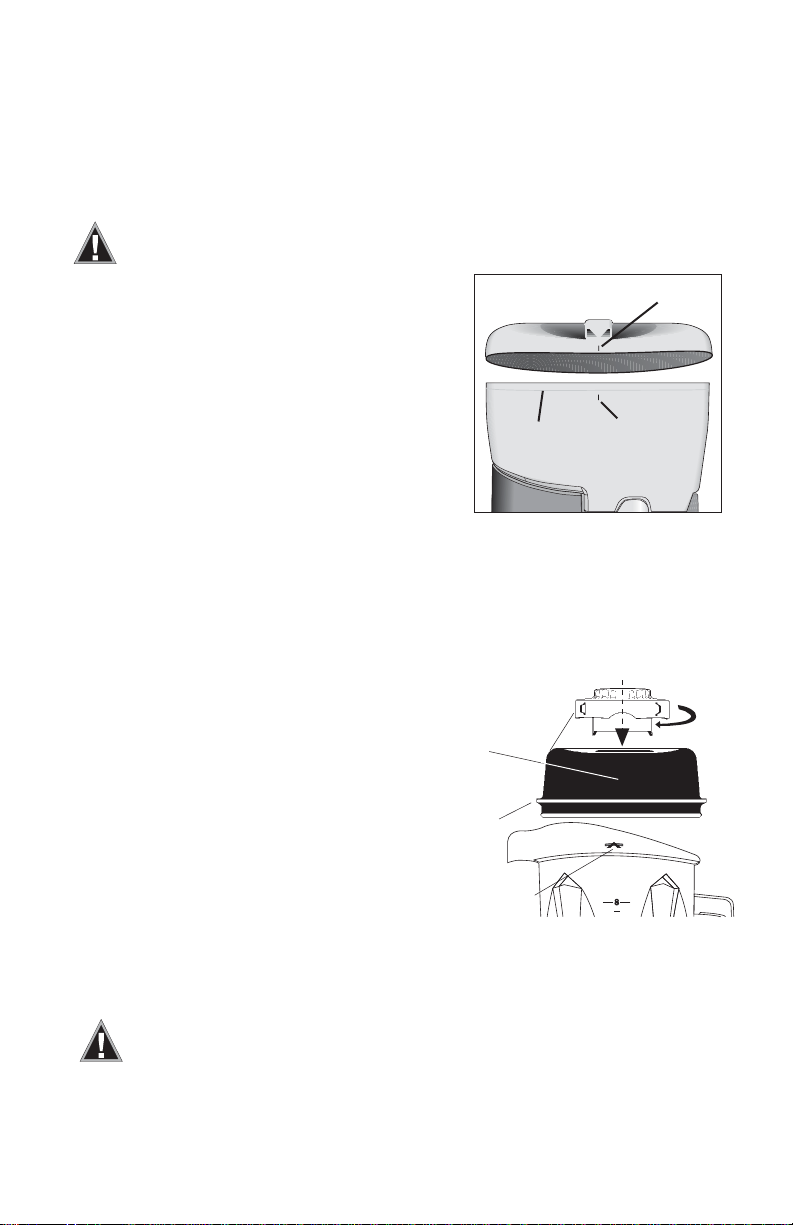
Ice Bin Lid
NOTE:For the Ice Shaver to work the Ice Bin Lid must be positioned
properly on top of the Ice Bin.
Each time ice is added to the Ice Bin or when the Ice
Bin is cleaned the lid must be replaced properly or the
machine will not shave ice. Asafety interlock switch is
located on the Ice Bin and is deactivated when the lid
is placed in its correct position on top of the bin.
1. When replacing the lid align the mark on the front
of the lid with the mark on the ice bin.
2. With both hands press down on two sides of the lid.
3. Check to make sure the back of the lid is flush with
the lip of the Ice Bin.
Container Two-Piece Lid Assembly
The Two-Piece Lid is used when cleaning the container
or using the PBS as a variable speed blender only.
(See page 11 for instructions on using the PBS as a
variable speed blender.)
The Two-Piece Lid is easy to clean and easy to put
on and take off. (
NOTE: Brand new lids are a little
stiff. This is temporary.)
• The lid has a continuous rim which latches inside
the container tabs. Push one side of the rim under
one tab, and with the heel of your hands push down,
over the opposite tab, to snap lid into position.
• To remove lid, place hands around the lid, pressing
thumbs above one of the container tabs. Push in
and lift off.
• Twist the center Lid Plug to fasten or remove.
Container Pad
Make sure the Container Pad is positioned correctly by firmly pressing down on all four sides.
Do not remove the container pad unless it is damaged. See page 20 for cleaning
around the Container Pad.
For instructions on using the Control Panel turn to page 8.
For Operating Instructions turn to page 10.
CUPS
Figure B
To secure lid plug,rotate it
so one tab locks between the
stops on top of rubber lid.
Press in
above
container
tab to
remove
lid
Rim
Container
Tab
Ice Bin Mark
Ice Bin Lip
Ice Bin Lid Mark

Portion Blending System
TM
ON/OFF switch - Located on the back of the machine the ON/OFF switch controls
the power to the PBS. With the machine plugged in, switch the machine to ON to
ready the machine for shaving ice and blending.
START/STOP button -Pressing START/STOP once starts and runs only the blender on the
PBS. While the blender is running you may add ice by pressing and holding the SHAVE
ONLYbutton. Release the SHAVE ONLY button to stop adding ice. Press the START/STOP
button again to stop the blender and the container blades.
(
NOTE:Pressing one of the PRE-SET PROGRAM buttons or the PRE-SET SPECIALTY
DRINK buttons, while the motor is running, will also stop the machine.)
BLENDER SPEED CONTROL button - Press the ▲ button to gradually increase the
speed of the blender blades in increments of 1%, up to 100%. Press the ▼ button to gradually decrease the speed of the blender blades in increments of 1%, down to 7%. SPEED
CONTROLis used to set the blending speed of the BLEND ONLYbutton and the
START/STOP button.
NOTE:These settings will reset if the power is shut off.
PRE-SET PROGRAM buttons - These buttons, numbered 1 thru 4, are pre-programmed
blending cycles designed for your most commonly made drinks. These four buttons would
commonly be programmed to produce from one to four 12 oz. (355 ml) drinks. (Button 1
builds one 12 oz. (355 ml) drink, Button 2 builds two 12 oz. (355 ml) drinks, etc.)
Pressing one of the four PRE-SET PROGRAM buttons will run the machine for a full cycle.
The machine will stop by itself when the cycle is complete.Acycle varies in ice weight and in
speed and length, see Instructions on page 10 for a complete description of the range of each
PRE-SETbutton. See page 12 for information on Custom Programming these four buttons.
PRE-SET SPECIALTY DRINK buttons - These buttons, A thru B, are also pre-programmed
blending cycles designed for specialty drinks, drinks of the week, and secret recipe drinks.
See page 10 for instructions on using the SPECIALTY DRINK buttons. See page 12 for
information on Custom Programming these buttons.
TM
READY
Start/Stop
Blender Speed Control
Four Factory
Pre-Set
Programs
Pre-Set Specialty Drink Buttons
Owner Controls
Blend Only
Shave Only
Display Window
8
OFF
ON
 Loading...