

Page 1
Electronic Muscle Stimulator Manual
BACKSPORT HEALTH PRODUCTS
VITALITYWEB.COM
Vitalityweb.com, Inc.
Attn: Repairs
13820 Stowe Dr
Poway, CA 92064
© 2007 Vitalityweb.com, Inc
EMS 4000 and 4000R
© 2007 Vitalityweb.com, Inc
Page 2

CONTENTS
It is recommended that you read this entire manual thoroughly before using your EMS unit. EMS can be
used safely in the clinic or in the comfort and privacy of your home. If you have questions related to an
injury or condition please consult your doctor for specific directions and instructions on how to use this
EMS Unit.
GENERAL CAUTIONS
1. DO NOT use near or in water.
2. DO NOT use on the front of your neck.
3. DO NOT use with a pacemaker without manufacturer (pacemaker) approval.
4. DO NOT use if you suffer from a heart condition.
5. DO NOT use if you are pregnant.
6. DO NOT use on genitals.
7. DO NOT use on undiagnosed conditions or cancerous lesions.
8. DO NOT use over wounds, moles, varicose veins or healing fractures.
9. DO NOT use on children. Kept out of the reach of children.
10. DO NOT use with or in conjunction with other electronic devi ces or
equipment.
11. DO NOT use while operating motor vehi cles or other machinery.
12. DO NOT use with nervous tissue disorders, epilepsy, diabetes or MS.
13. Consult your physician for all specific directions and Usage
PRECAUTIONS/SIDE EFFECTS
Long-term stimulation at the same electrode site may cause skin irritation. Should this occur, remove the
electrodes and discontinue stimulation. Consult your physician to determine the cause of the irritation.
Pregnancy – The safety of stimulation for use during pregnancy or delivery has NOT BEEN established.
Adequate precautions should be taken with suspected heart problems or epilepsy. Take precaution when
stimulating over menstruating uterus or where sensory nerve damage is present by a loss of normal skin
sensation.
The user’s psychological state and use of drugs will influence treatment outcome.
- 1 -
LIMITED WARRANTY
VITALITYWEB.COM, Inc. warrants each new VITAL EMS unit only (excluding lead
wires, carbon electrodes and battery) for one year from defects in materials and
workmanship. This warranty only applies to the original purchaser and starts from the
date of purchase (invoice date).
This warranty covers parts and labor for one year from the date of purchase. This
warranty does not cover abuse, accident and damage resulting from failure to follow
operating instructions and alteration/disassembly other than by VITALITYWEB.COM,
Inc.
The defective VITAL EMS unit must be returned to VITALITYWEB.COM, Inc.
postage prepaid and insured. Please include $10 return shipping for the unit can be
returned to you.
VITALITYWEB.COM, Inc. shall not be liable for any direct or indirect consequential
damages resulting from the use and/or misuse of this EMS unit. Maximum liability will
never exceed the original invoice amount. The user of the EMS unit will accept all
responsibility for its proper use and care.
Vitalityweb.com, Inc.
Attn: Repairs
13820 Stowe Dr
Poway, CA 92064
- 14 -
Page 3

TROUBLE SHOOTING:
If the EMS Unit does not work or turn on:
Disconnect the power supply from the wall outlet and check the fuse in the back of the unit.
Replace the fuse with an exact duplicate (available at most electronic stores) and try turning the
unit on again. Be sure that the Russian Stim and Wave switch are both off (down) before turning
on.
Please note: Even though a fuse may look okay, it may not be.
If your unit continually burns fuses:
Disconnect the wires, replace the fuse, turn off Russian Stim, turn off Wave switch and try
turning on the unit. If the power comes on, make sure all the intensity controls are turned down
and reconnect the lead wires. If the power light still does not come on, please contact
Vitalityweb for troubleshooting at 800-796-9656.
Please note: Do not put the Russian Stimultion and Wave switches up (on) at the same time.
Russian is an independent mode and having both switches in the on position will blow a fuse.
If the EMS Unit turns on but does not function properly:
1. Check all control settings. Are the electrodes in the proper position?
2. Check lead wires. Make sure all connectors are firmly seated.
3. Make sure the electrode pads have a good connection to your skin. If using the rubber
electrodes, be sure to use water or a conductive gel to maintain the contact between your
skin and the electrode pad.
4. Replace the lead wire cord set with another lead to check for broken wires.
If one channel is on and can not be turned off:
Disconnect and do not use. Contact Vitaltiyweb to have the unit repaired immediately.
If you feel a sharp tingling sensation when stimulating:
Make sure you have a good connection between your skin and the electrode pad. When using
the rubber pads, be sure to use a conductive agent such as water or a conductive gel between
your skin and the electrode pads. Make sure the pads are located over the muscle belly (thick
areas of muscle). Try repositioning the electrode pads.
- 13
GENERAL INFORMATION
Neuromuscular stimulation is achieved by sending small electrical impulses through the skin to
the underlying motor units (nerves and muscles) to create an involuntary muscle contraction.
Involuntary muscle contractions by electronic muscle stimulation can help to improve and
maintain muscle tone without physical activity. This passive exercise can also be used for
therapeutic treatment to minimize the degeneration that occurs following partial denervation or
immobilization The electrical impulses are “ramped” (slow, gradual and comfortable muscle
contraction) so that they closely emulate natural muscle contractions.
TECHNICAL SPECIFICATIONS
Channels: 4(EMS4000 and 4000R)
Waveform: Bi-phasic and Mono-phasic
Frequency: 2-140 Hertz
Reciprocation: Yes
Pulse Width: 300 microSeconds
Ramp Time: 3 seconds
Contraction Time: Variable 3-45 seconds
Relaxation Time: Variable 3-45 seconds
Power Output: 0-34.3 microColumbs
Power: AC-DC Power Adapter
Dimensions: 3 ¼”(H) x 8”(W) x 8”(L)
COMMON APPLICATIONS OF EMS
1. Relaxation of the muscles.
2. Increasing range of motion.
3. Reduction or prevention of muscle atrophy.
4. Re-education of muscles.
5. Increasing blood circulation.
6. Muscle toning.
7. Reduction of muscle pain.
- 2 -
Page 4

OPERATING MODES
Normal:
Normal Operation of this unit is with all it’s toggle switches in the off postion (down). The unit
works as a Bi-phasic device, meaning thet there in an electrical pulse on both sides of the pads
thereby allowing an even distribution of electrical stimulation on both pads for symmetrical
development of the muscle. All Channels are active and the FREQUENCY knob controls how
many pulses per second are delivered to the pads. The STIM knob controls how long pulses are
on (between 3-45 seconds) and the REST knob controls how long the pulses are off (3-45
seconds). Stimulation occurs when you see the red light (between the channel knods) come on.
WHEN TURNING ON THE UNIT BE SURE ALL CHANNEL CONTROL KNOBS ARE
TURNED OFF (Counter-clockwise to the left). The unit will not start unless both
channels are in the off position and then slowly turned on.
Mono-Phasic Mode:
Mono-phasic is when the electrical pulses are active on one pad (current flows in one direction).
This can be activated by pressing the WAVE switch to on. This mode is commonly used for
neck/back pain with a low frequency setting of 2-23 Hz. Do not use Mono-phasic and Russian
Stim (switch up-on) at the same time.
Reciprocation Mode:
Pressing the RECIP switch to ON activates the Reciprocation mode. This mode is used for
stimulating antagonistic muscle groups (i.e. Biceps and Triceps or Quadriceps and Hamstrings).
This is done by turning on two channels during one STIM cycle and the other channels during
the next STIM cycle. The Reciprocation mode can also be used to exercise upper/lower
abdominals, upper/lowerback muscles, and abdominals/obliques. The Reciprocation channels
are 1 & 2 and 3 & 4.
- 3 -
DO’S AND DON’TS
DO Follow the advise of you Physician/Health care professional.
DO Turn all intensity knobs off (counterclockwise to left) before turning on the EMS
unit.
DO Keep the stimulator clean.
DO Make sur you use a conductive agent such as water or a conductive gel.
DO Clean the cables only with water and mild soap. Do not use rubbing alcohol or any
other solvents.
DO Remove the electrodes and discontinue stimulation if you experience skin irritation,
until the source of that irritation is determined by your physician.
DO Follow the advise of your physician/Health care professional.
DO See your physician if you have any problems or questions regarding your EMS unit.
DO NOT Damage your EMS unit by bumping, dropping or rough use.
DO NOT Get the EMS unit wet or use the EMS unit near or in water.
DO NOT Pull or Kink the cables.
DO NOT Clean the cables with alcohol or Freon
DO NOT Let children use the EMS unit.
DO NOT Give the EMS unit to other individuals
DO NOT Store the unit below 32 degrees or above 100 degrees F.
DO NOT Use on the front of your neck.
DO NOT Use with or in conjunction with a pacemaker
DO NOT Use if you suffer from a heart condition.
DO NOT Use if you are pregnant.
DO NOT Use on genitals.
DO NOT Use on undiagnosed conditions.
DO NOT Use over wounds or healing fractures.
DO NOT Use on children. Keep out of the reach of children.
DO NOT Use with or in conjunction with other electronic devices or equipment.
DO NOT Use while operating motor vehicles or other heavy machinery.
As is true with any new exercise, precautions should be observed.
- 12 -
Page 5
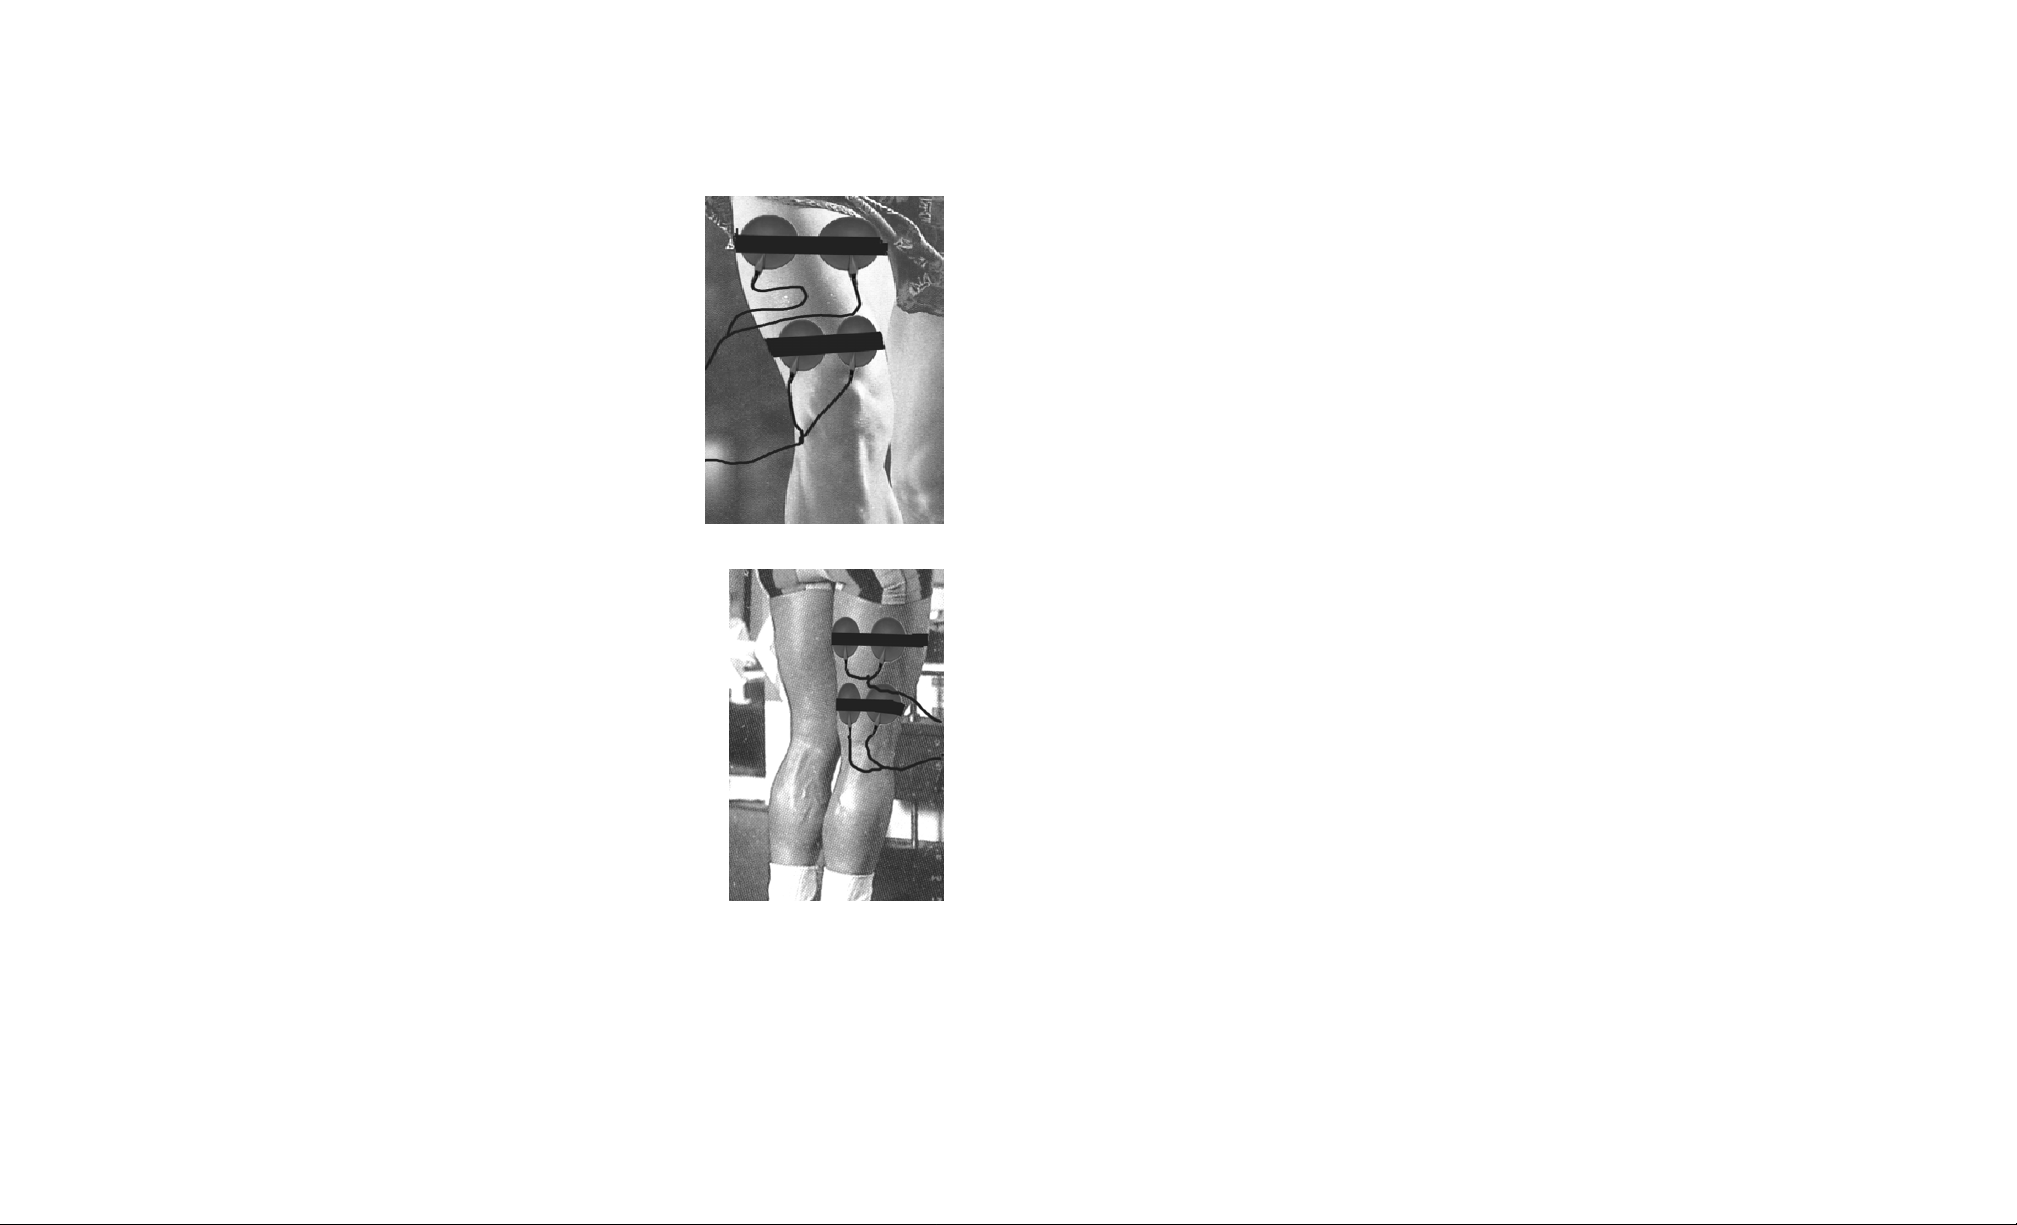
QUADRICEPS:
Place your medium strap about 3” from the top of your leg and your
other strap about 3 “ above your knee. Draw an imaginary line from
the center of your knee to the top of the leg. Place one pad on one side
of the imaginary line and the other pad on the opposite side. Make
sure there is about a ¼” gap between the pads. You are now ready to
adjust the unit for stimulation.
HAMSTRINGS:
Place your straps as you did for your quadriceps. Draw an im aginary line
from the center of your knee to the top of the leg (back of the leg). Place
one pad on one side of the imaginary line and the other pad on the other
side of the opposite side. Make sure there is about a ¼” gap between the
pads. You are now ready to adjust the unit for stimulation.
This can be very effective in toning your leg by using the Reciprocation
(A Mode) feature on your unit. Make sure that channel 1 is on the
quadriceps and channel 2 is on the hamstrings/obliques.
- 11-
Russian Stimulation Mode
Russian stimulation is 2500 hertz at 50 pulses per second. The purpose of this frequency is to allow a
deeper penetration of the muscles by the electrical pulses and is often used by bodybuilders, scoliosis
patients and chronic pain sufferers. Russian stimulation is a higher frequency and more intense than the
normal operating mode. You must use caution when using this mode by reducing time durations and
power levels. Please consult your physician for specific recommendations and usage. This mode is
activated by pressing the RUSSIAN STIM switch to ON(switch turned on). Generally the control settings
are 10s Stim – 10s Stim – 45s relax. This mode is for the experienced user of muscle stimulators, or under
the close direction of a doctor or physical therapist.
General Operating Settings:
(For use as a guide only – consult your physician)
Back/Neck Pain: 6 seconds on 3 seconds off with the frequency set from 2-23Hz. Use small
gel adhesive pads on the back of the neck/back (DO NOT USE ON THE FRONT OF YOUR
NECK) and mono-phasic mode (WAVE switch up – on). Use a light stimulation similar to
thumping on the neck. Please consult your physician for specific recommendations. Please see
pad placement chart on page 7.
Scoliosis/Bodybuilding/Chronic Pain: Generally the control settings are 10s Stim – 10s Relax
or 10s Stim – 45s Relax depending on the muscle group. Russian Stimulation switch in ON.
Wave switch is OFF (Down). Please consult your physician for specific recommendations
- 4 -
Page 6
BASIC TIPS
1. Make sure all channel knobs are turned off (counterclockwise to the left and all switches are
OFF/Down) before turning on/plugging in the EMS unit.
2. Be sure to have a good contact between your skin and the electrodes with the electrodes from the
same channel 1-2” apart.. When using the non-adhesive rubber electrodes, be sure to use water or a
conductive gel as a conductive agent use the straps to hold the rubber pads on the skin. Do not force
the Lead Wire connectors into the corresponding female socket on the EMS unit (Forcing will damage
the unit).
3. Start with the REST and STIM times set to 20 seconds. This is about 20 seconds on 20 off. The
channel intensity control knobs should be turned all the way off (counter clockwise to 0)/
4. Only Set the channel control knobs as you are being stimulated (light on the top of the unit is on).
This gives you a better feeling of the contractions and you can adjust the knob up or down for
comfort. The channel control knobs should be set at zero (0) counterclockwise to the left when
starting/connecting the unit.
5. Set the FREQUENCY to the fifth notch. This is about 50 pulses per second and should be
comfortable. If not, adjust to the next notch or adjust the knob until you find a frequency that is
comfortable for you.
6. DO NOT OVER STIMULATE. Only use the EMS unit for 5 - 10 minutes at a time for the first few
days. You can then gradually increase to longer intervals. To much stimulation in the beginning can
make your muscles sore, much like going to the gym and lifting weights that are too heavy for you.
We do not subscribe to or promote the “No pain, no gain” myth.
7. CONTACT US if you have a problem or question. We generally can solve 99% of the problems over
the telephone or by e-mail. ([email protected]) We are here to answer any questions that will
allow you optimize the effectiveness of your NEW VITAL EMS unit.
- 5 -
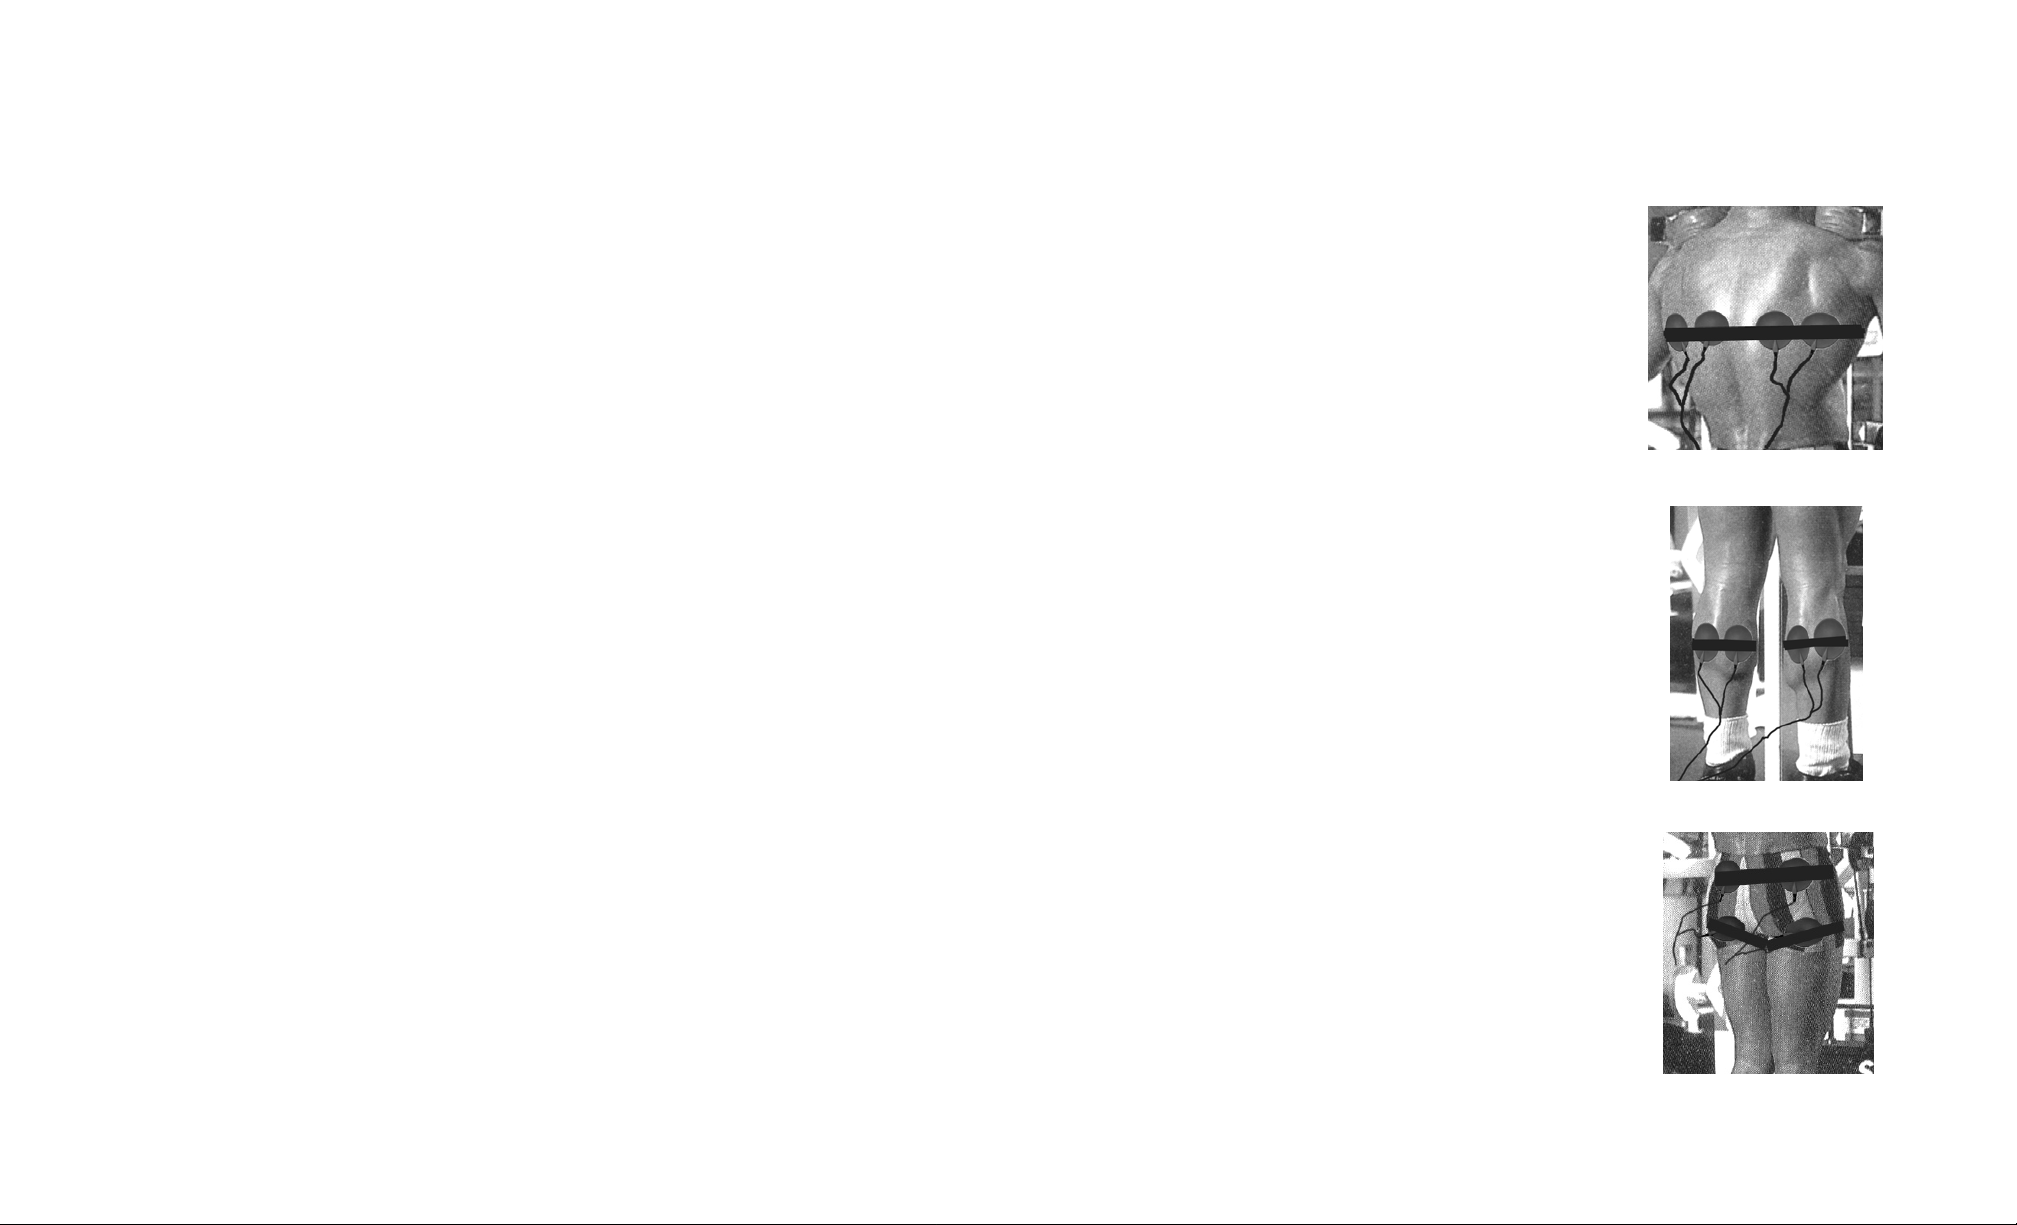
UPPER BACK:
Place a large Velcro strap across the upper back, going under the arm
pits. Draw an imaginary line down the center of the back. Using one
channel, place the pads on the right side of the centerline. Put one pad
one inch from the centerline, and the other pad ¼” to the right. Now
repeat the process for the left side using a different channel. Make sure
the 2 center pads are about one inch from the center of the back. This
will give you a 2-inch space between the pads on either side of the back.
You are now ready to adjust the unit for stimulation.
CALVES:
Use the small Velcro straps and place around the center of the calf
muscle. Place large or small pads on either side of the center of the
calf muscle. Make sure there is a ¼” separation between the pads.
You are now ready to adjust the unit for stimulation.
BUTTOCK:
Use 1 large strap and 2 medium straps. Place the large strap around the
buttock and the 2 medium straps around the upper leg about 1 inch below
the buttock. Using any channel, place 1 pad on one side of the buttock and
the other pad just below it on the leg. Using a different channel do the
same thing on the other side. You are now ready to adjust for stimulation.
- 10 -
Page 7
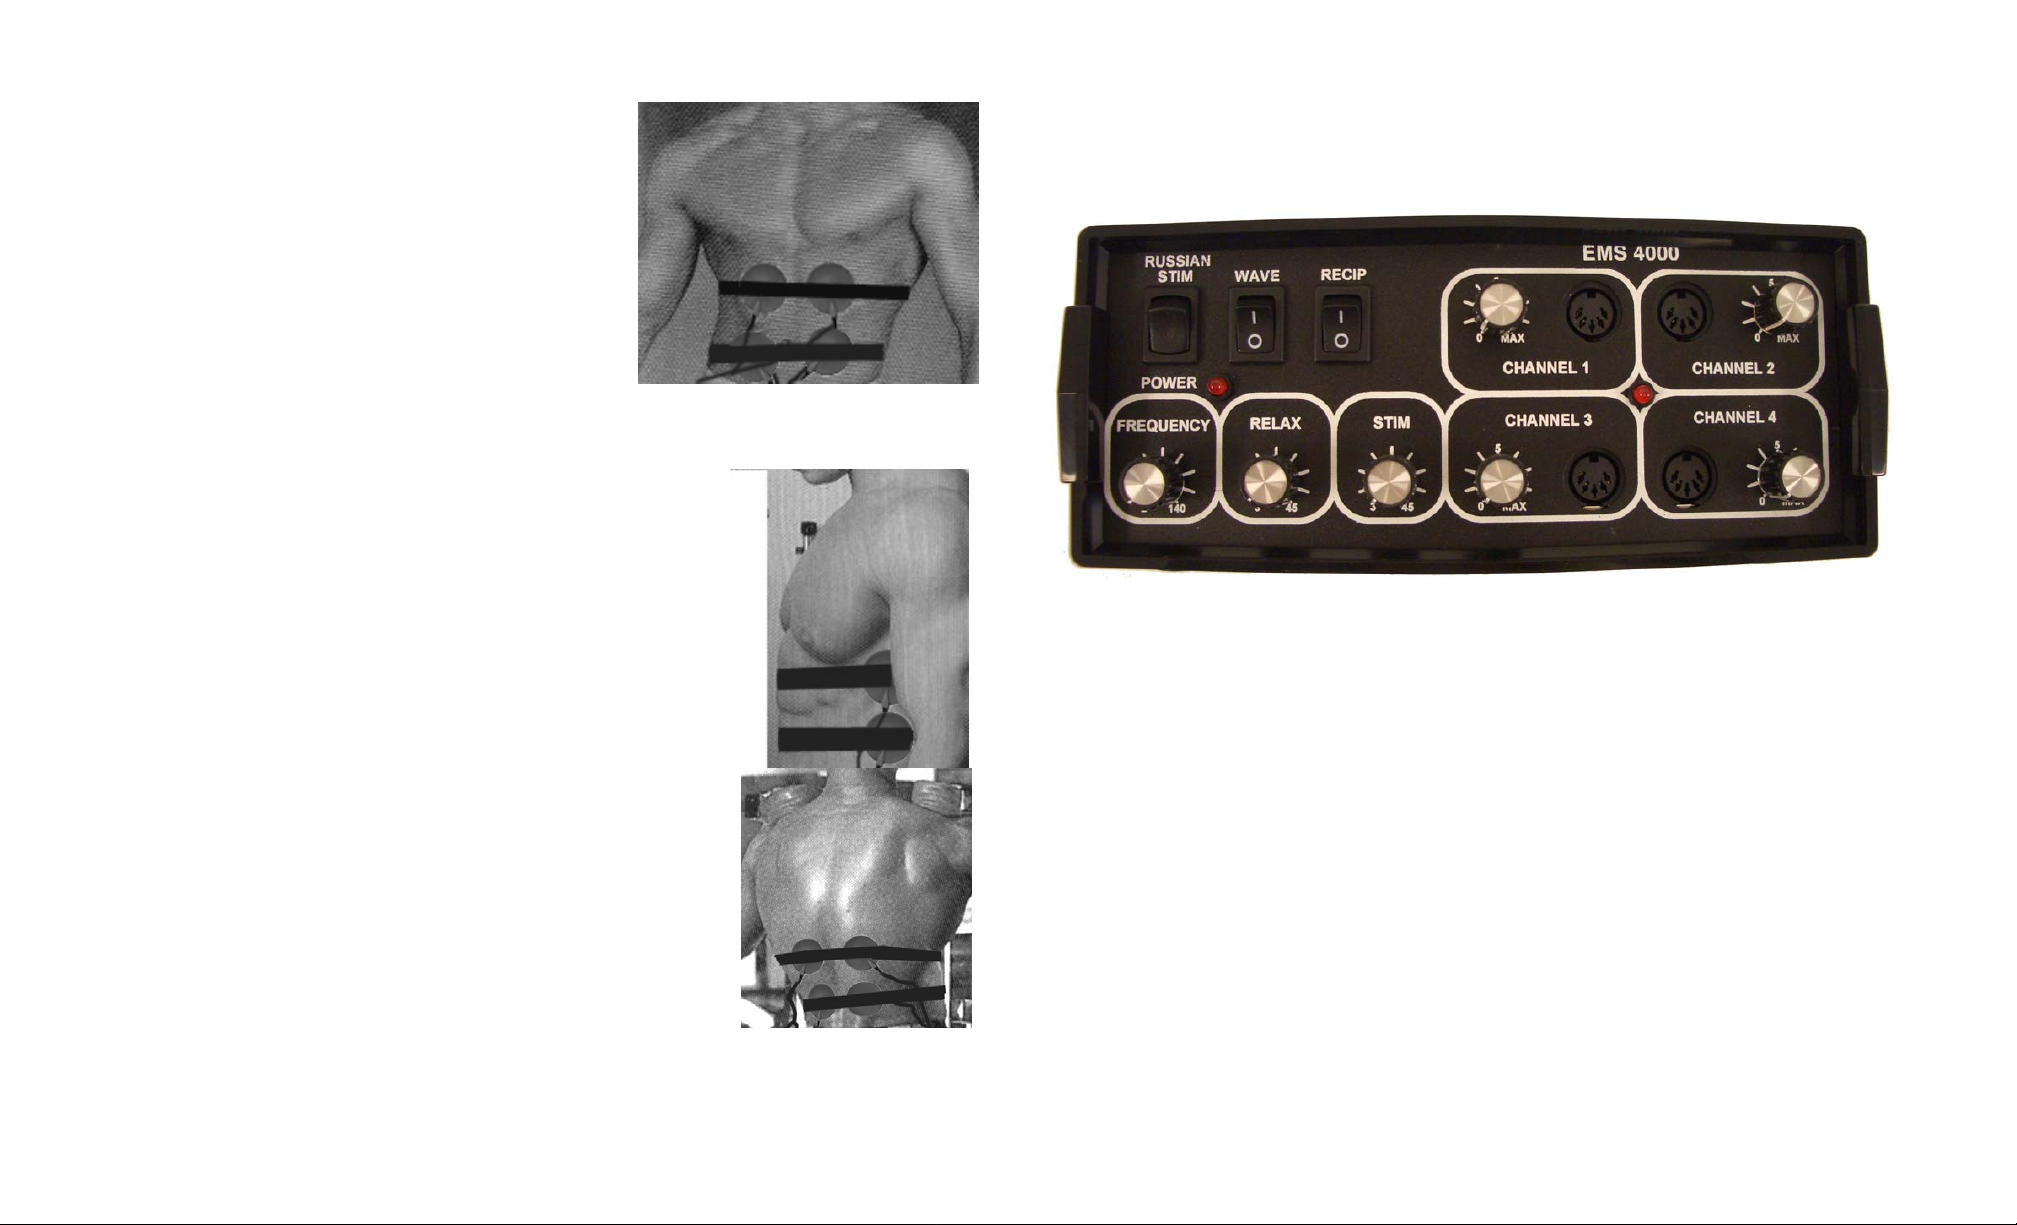
ABDOMINALS:
You will need two large Velcro straps. Place one strap about 3
inches above your belly button. Make sure the strap is below
the breast bone. Now place the other strap I inch below the
belly button. Draw an imaginary line from your belly button to
your chin. Place one pad on one side of the imaginary line
and the other pad on the opposite side. Now do the same for
the other pads. Make sure there is about a ¼” gap between the
electrode pads. You are now ready to adjust the unit for
stimulation.
OBLIQUES:
Place the straps as you did for the abdominals. Place the pads on the side of
your body as shown in the picture. Make sure there is about a ¼” gap between
the pads. You are now ready to adjust the unit for stimulation. This can be
very effective in reducing waistline by using the Reciprocation (A) feature of
your unit. Make sure that Channels 1 electrodes are on the abdominals, and
Channels 2 electrodes are on the obliques.
LOWER BACK:
Place the straps as you did for the abdominals. Place the straps as
described in the abdominal section. Draw an imaginary line down the
center of the back. Using one channel place the pads on the right side of
the centerline. Put one pad on the top and one pad on the bottom. Now
repeat the process for the left side using the second channel. Make sure the
pads are each about one inch from the center of the back. You may now
adjust the unit for stimulation.
- 9 -
CONTROLS
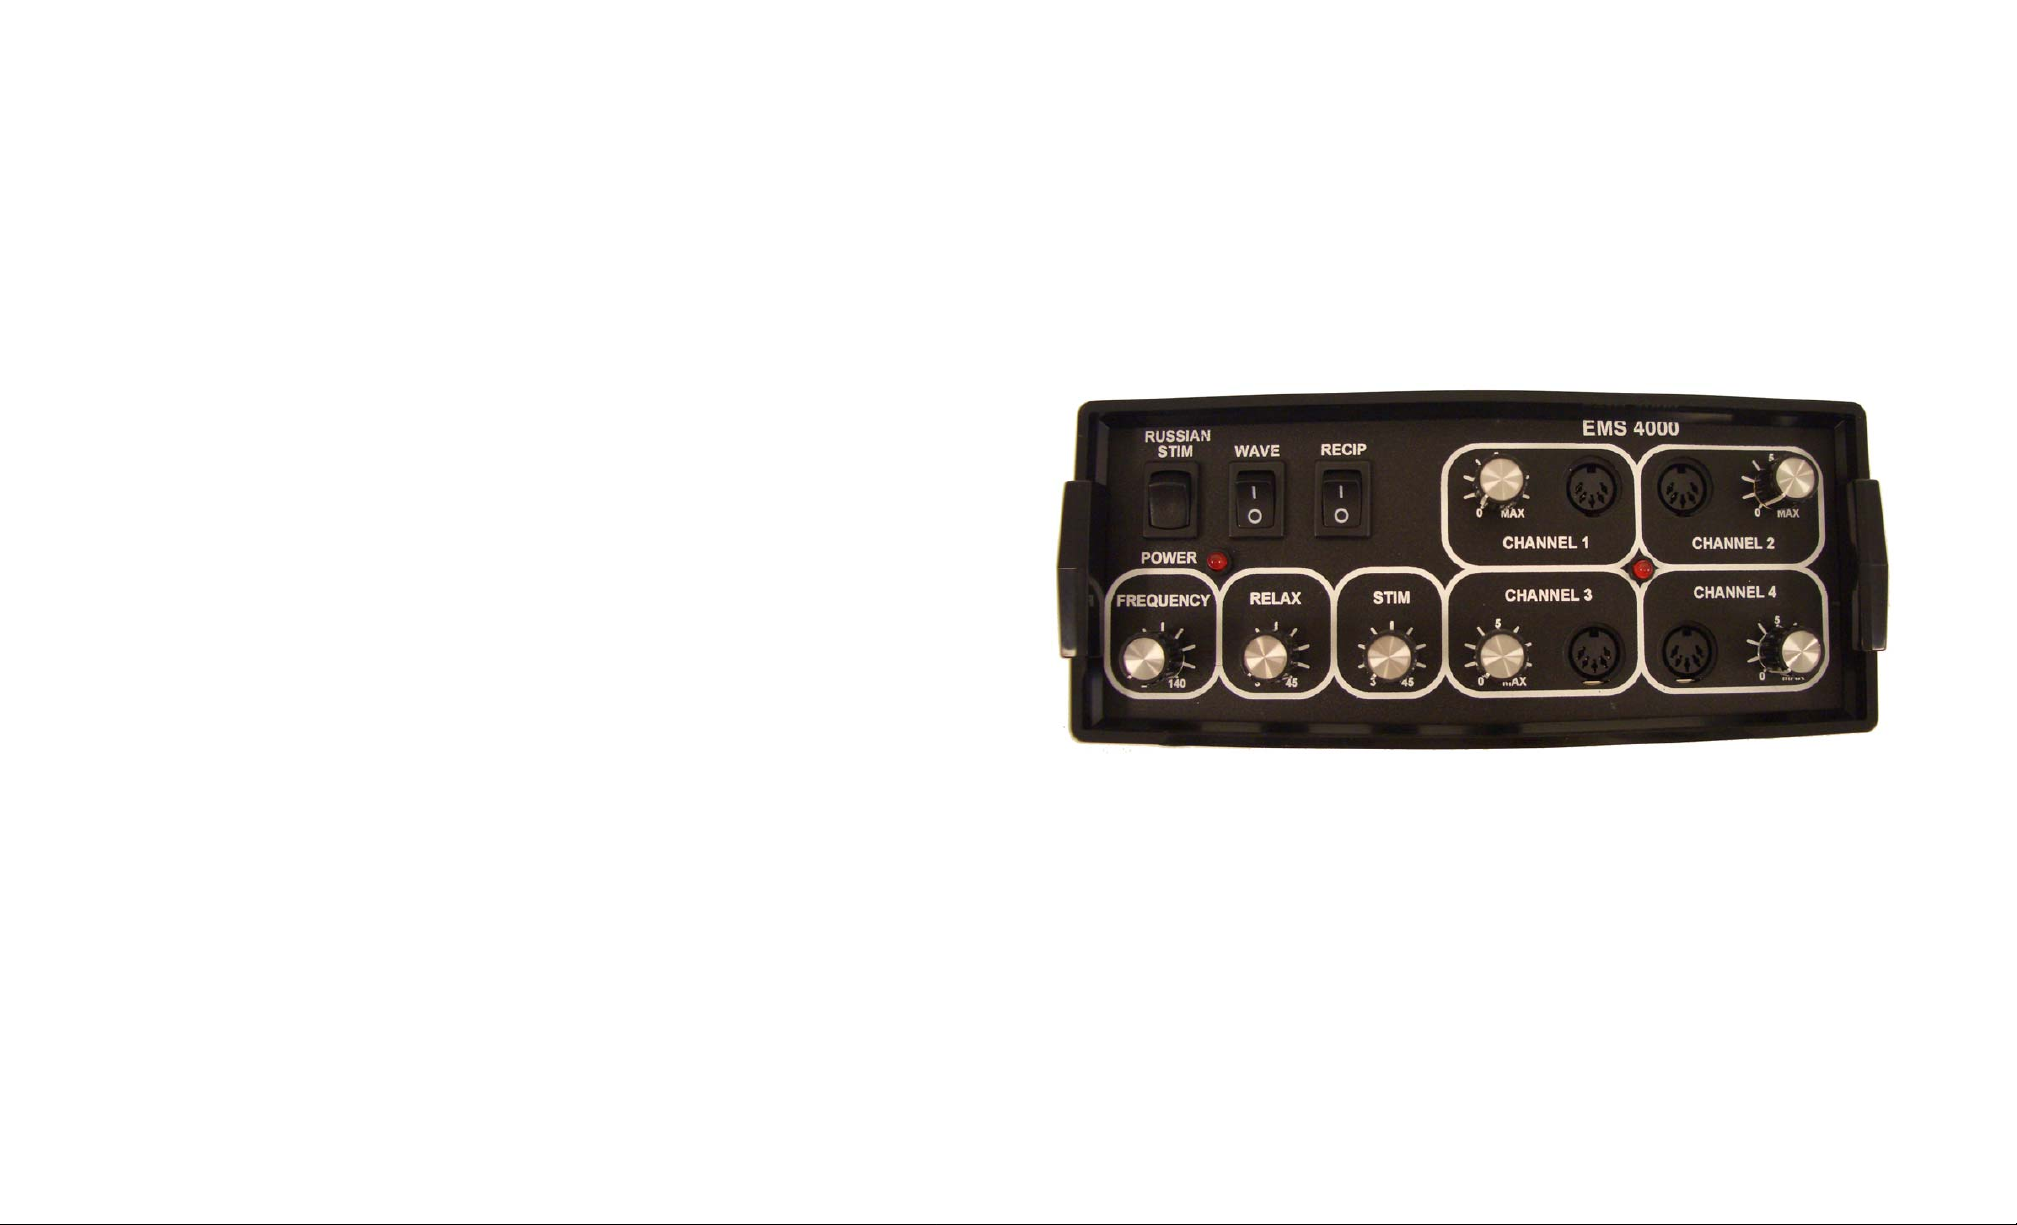
1. Frequency Knob: This controls the frequency level or how many pulses per second are sent to the
electrode pads. The frequency can be sent between 2-14 0 puls es per second.
2. Rest Knob: This controls how long the pulses are off. This setting adjust the length of the rest
period after each stimulation (between 3 – 45 seconds).
3. Stim Knob: This controls how long the pulses are on. It adjust the duration of the muscle contraction
period (3 – 45 seconds)
4. Channel Intensity Knobs: These are your power control Knobs. They determine the intensity of
the muscle contraction. (Turn slowly only while contraction light between the channel control knobs
is on.)
5. Wave Switch: ON is mono-phasic (on pad per channel is active), OFF is bio-phasic (two pads per
channel are active – symmetrical muscle contraction).
6. Recip Switch: ON is reciprocation mode (please see operating secti on on page 3)
7. Russian Stim: Optional Russian Stimulation Mode. DO NOT use Russian and Wave at the same
time.
- 6 -
Page 8
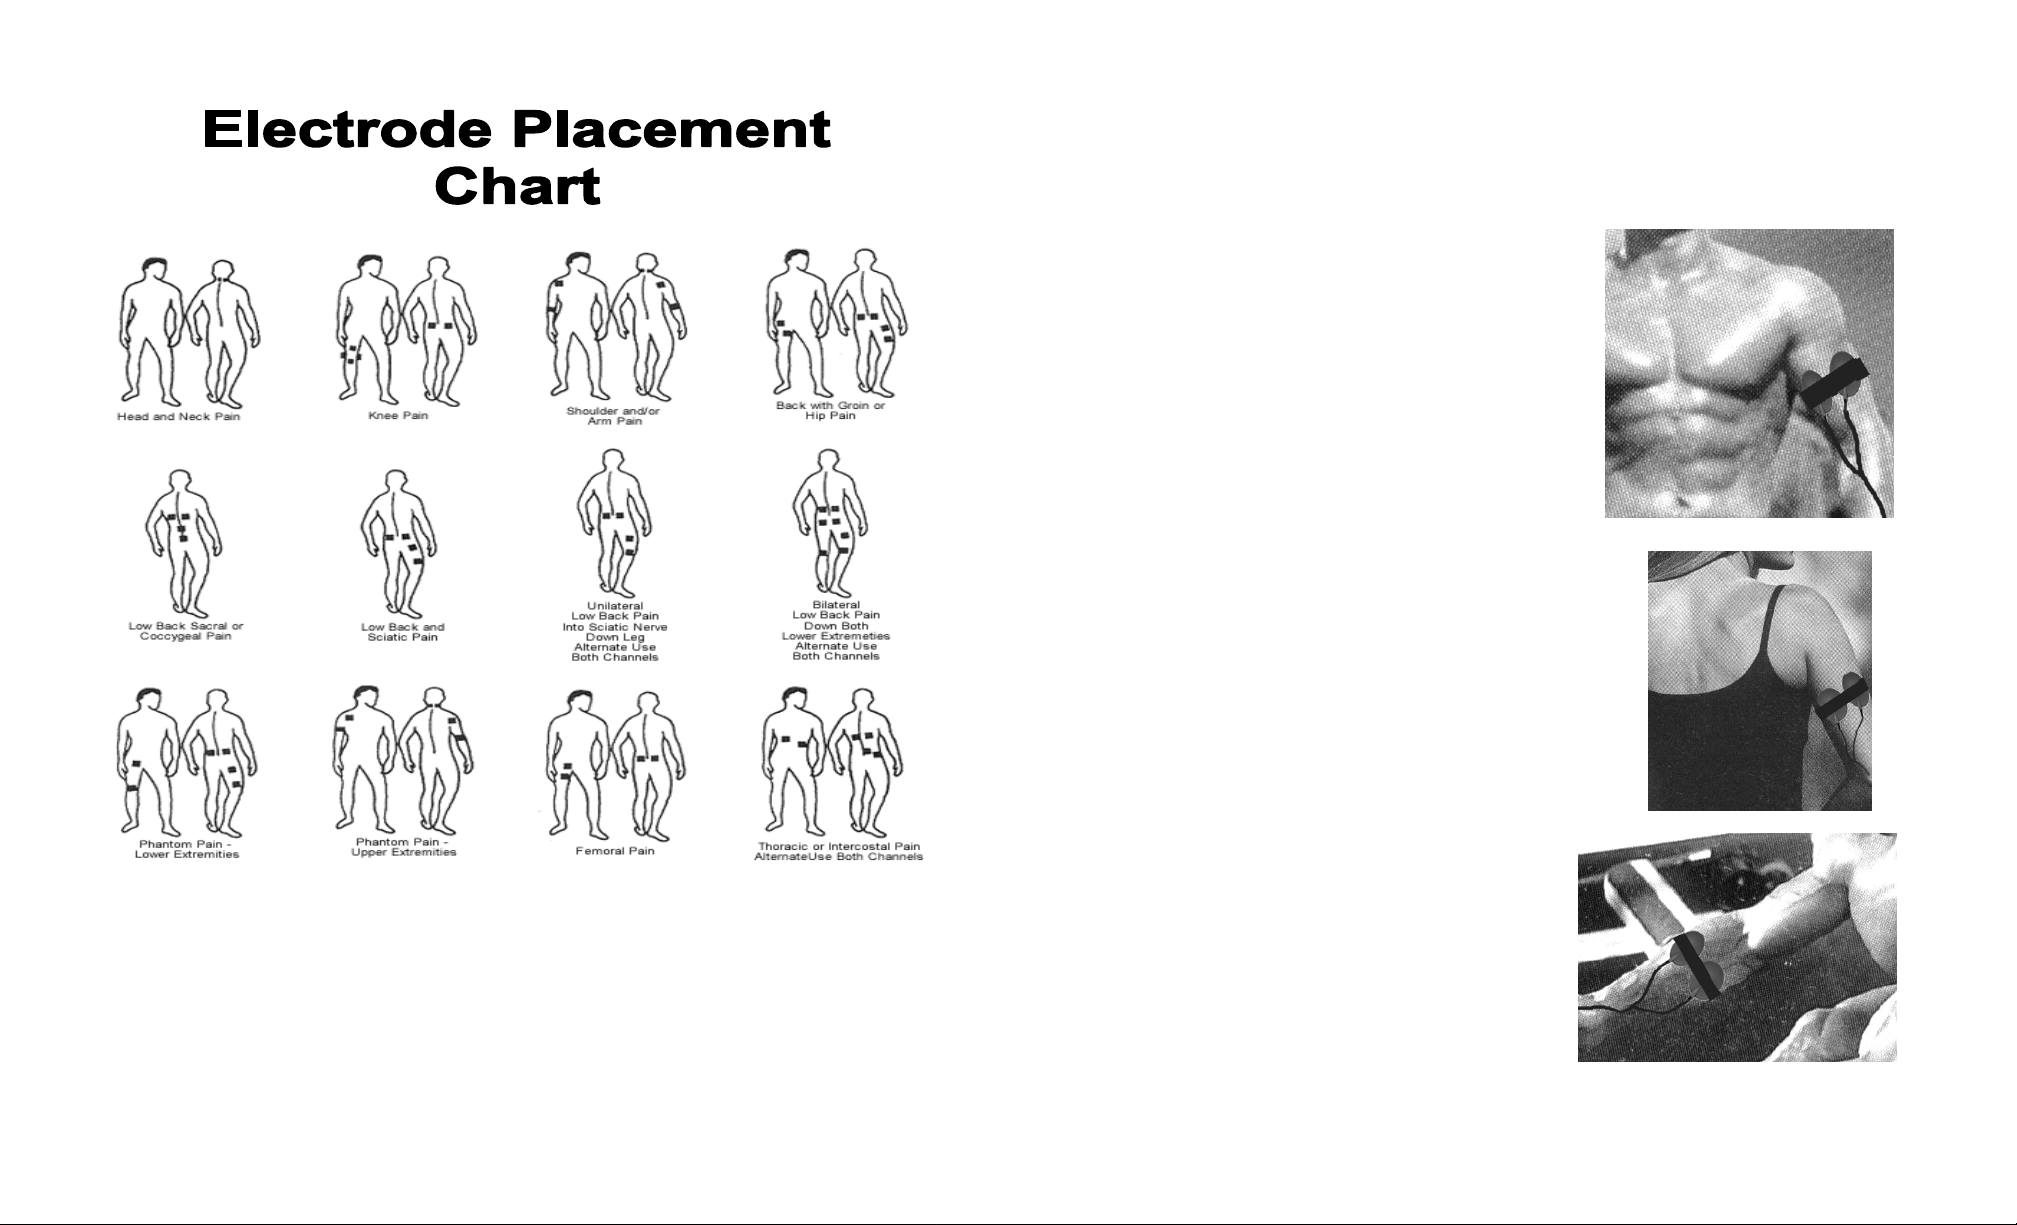
The representations above are to be used as a guide only to electrode placement. Electrode placement should be determined
by and under the supervision of a trained medical professional. The electrodes should be placed directly on the pain site. The
sensation of the stimulation should be comfortable, not just tolerable. Never allow prolonged muscle reaction such as
twitching or spasm with stimulation.
- 7 -
ELECTRODE PLACEMENT GUIDE
Please consult your physician for specific recommendations
BICEPS:
Place the small Velcro strap around the middle of the biceps.
Extend your arm with the palm of your hand facing up. Draw an
imaginary line from your middle finger along your arm to your
shoulder. Place one pad on one side of the imaginary line and the
other pad on the opposite side. Make sure there is about a ¼” gap
between the pads. You are now ready to adjust the unit for
stimulation.
TRICEPS:
Place the small Velcro strap around the middle of the biceps or a little
above the middle. Extend your arm downward with the palm of your
hand facing towards the back. Draw an imaginary line from the center
of your elbow to the top of the shoulder. Place one of the small pads on
one side of the imaginary line and the other small pad on the opposite
side. Make sure there is about a ¼” gap between the pads. You are now
ready to adjust the unit for stimulation.
FOREARM:
Extend your arm. With the palm facing upward, draw an
imaginary line from your middle finger to the center of the
elbow. Place the pads, with a ¼ “ space, on either side of that
line. Make sure that the pads are in the center of the forearm.
- 8 -
 Loading...