

Page 1
VistaPoint 2.1 QuickStart
and Instructions for Use
WelcomeContents
Getting Started
Setting Up VistaTablet ........................2
Checking VitalPatch Hours and VistaTablet Battery . 2
Removing Previous VitalPatch..................3
Applying the VitalPatch .......................3
Wearing the VitalPatch........................4
Applying the Adhesive Overlay .................5
Monitoring Using VistaPoint
Pairing VitalPatch with VistaPoint ...............6
Using the VistaPoint Dashboard ................8
When Monitoring is Complete ..................9
Routine Events During Monitoring..............10
Recalibrating Body Temperature ...............12
Entering Vital Signs Manually
Oxygen Saturation..........................12
Blood Pressure ............................13
Weight ...................................13
Uploading Vital Signs Using Bluetooth Devices
Oxygen Saturation (Fingertip) .................14
Oxygen Saturation (Wrist) ....................15
Blood Pressure ............................17
Weight ...................................18
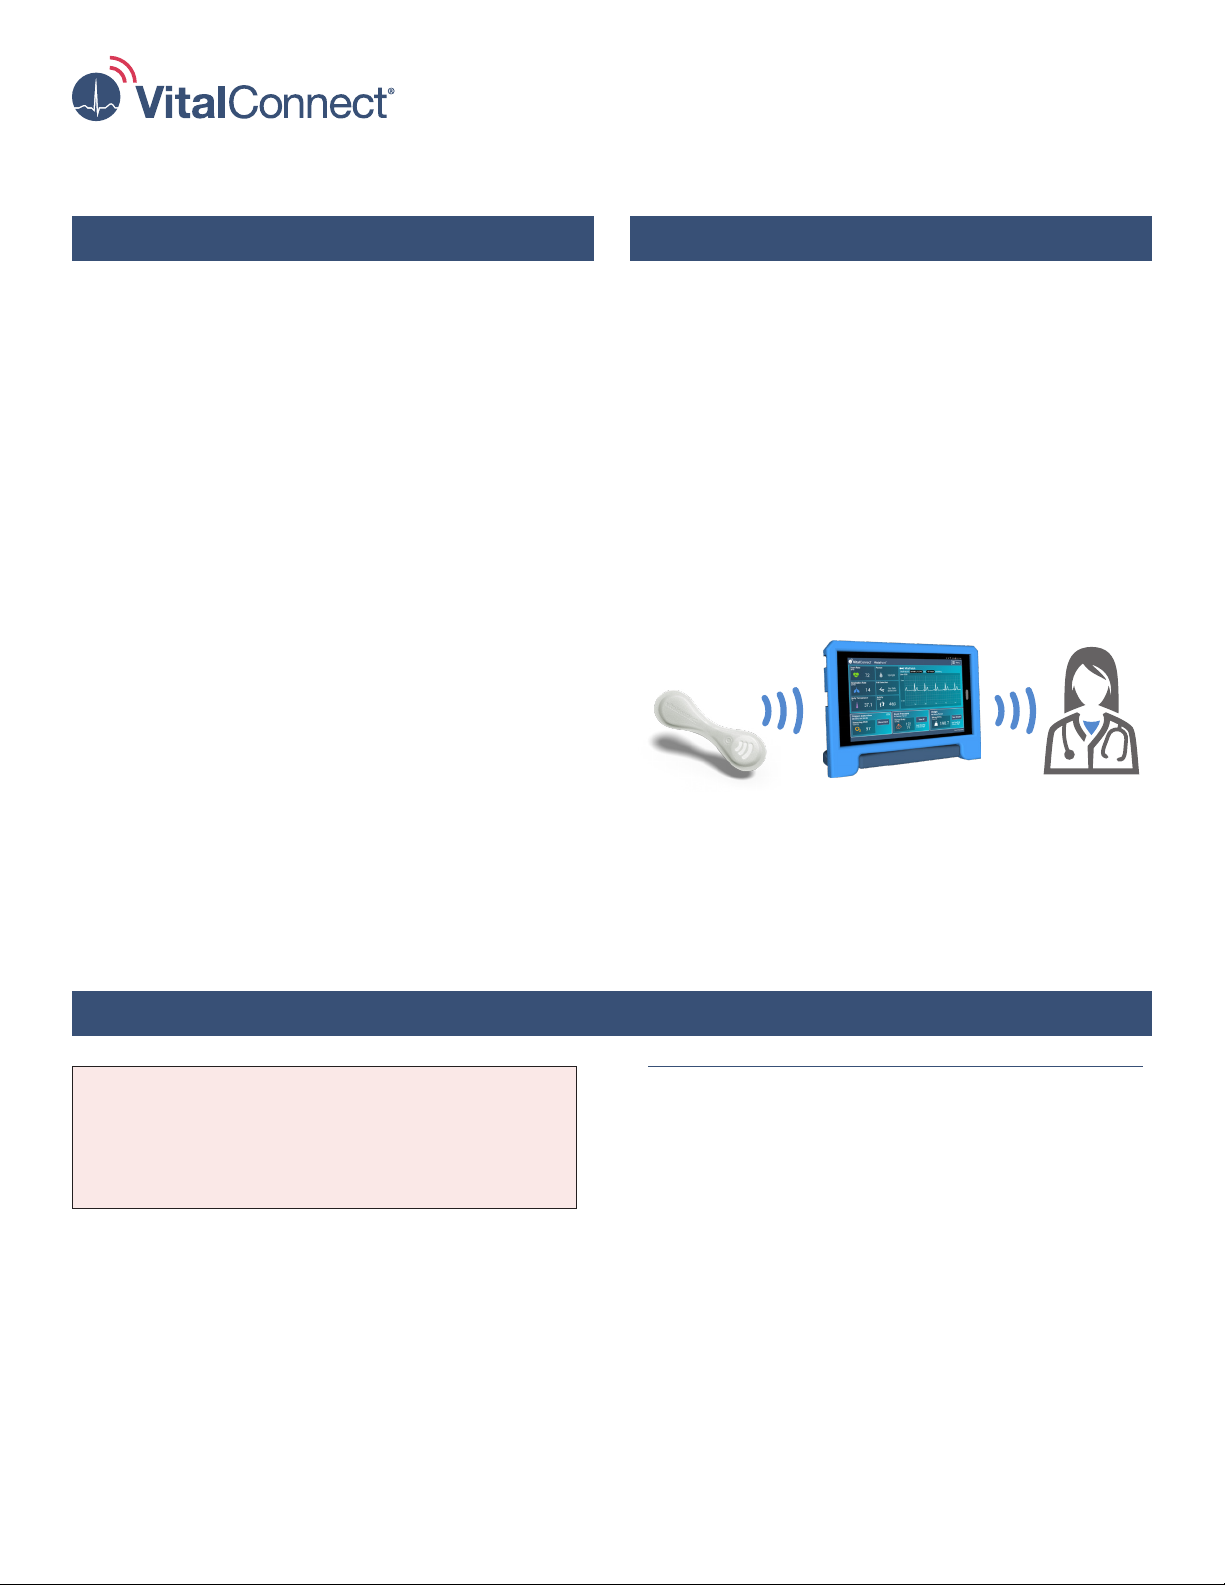
This guide will help you get started with monitoring
using the VistaPoint™ application and the VitalPatch®
biosensor.
The VitalPatch biosensor (referred to as “VitalPatch” in
this document) is an adhesive device worn on the
chest to measure and record vital signs. Refer to the
VitalPatch Instructions for Use (IFU-02 or IFU-06) for
detailed clinical instructions.
The VistaPoint application collects and uploads vital
signs from the VitalPatch and approved third-party
devices to your care team.
VistaPoint runs on the portable VistaTablet™ device.
VitalPatch VistaPoint on VistaTablet Care Team
Troubleshooting .............................19
Indications for Use
Contraindications (When not to use)
Do not use the VistaPoint application as a
standalone diagnostic monitor. However, the data
may be applicable for use in diagnosis.
VistaPoint is a software Graphical User Interface
intended for use by healthcare professionals to
display physiological data collected by the Vista
Solution wireless remote monitoring system in home
and healthcare settings. VistaPoint is a secondary,
adjunct patient monitor and is not intended to replace
existing standard-of-care patient monitoring practices.
Refer to the VitalPatch Instructions for Use (IFU-02 or
IFU-06) for additional indications, warnings and
precautions.
VistaPoint Precautions
• Invalid posture data (shown as “?”) indicates a
non-calibrated state where respiration rate, posture,
and fall data are considered invalid.
• Body movements and contact with the VitalPatch
may produce motion artifacts that aect the
displayed, measured values for ECG and heart rate.
• After applying VitalPatch, it may take 45 seconds
for heart rate to stabilize and respiration rate 120
seconds to stabilize. During the stabilization period
VistaPoint will display “--” for those vital signs.
• After applying VitalPatch, it may take several
minutes for skin temperature to register an accurate
value (for VitalPatch with rmware 1.4.0.x).
IFU-15 Rev. A (September 2019)
1
Page 2

Section 1: Setting Up VistaTablet
Before you begin your monitoring session, unpack the
VistaTablet device and become familiar with its parts.
Keep the packaging that was provided with the
VistaTablet.
Identifying VistaTablet Parts
Become familiar with the parts of the VistaTablet
(see gure to the right).
Turning VistaTablet On and Off
The VistaTablet should always be ON when you are
wearing a VitalPatch. Note that the screen will go to
sleep (but VistaTablet will remain ON) after a period of
inactivity.
• Turn ON: Press and hold the Power Key until the
VistaTablet vibrates and the screen lights up.
• Check if ON: Tap the Home Key. The screen will
display.
• To Unlock: See Step 1 of Section 7 on page 6.
• Turn OFF: Press and hold the Power Key until the
Options menu displays, and then select Power Off.
Charging
Port
Device
Name
Power Key Volume Up/Down
VistaTablet Device
Charger
and Cable
Status Bar
Menu
Home
Key
Section 2: Checking VitalPatch Hours and VistaTablet Battery Level
VitalPatch Hours
VitalPatch Hours Remaining
Each VitalPatch will last up to 5 days (120 hours) or 7 days
(168 hours), depending on model. To check how many
hours are remaining on your VitalPatch, start the
VistaPoint application and look for the hours
remaining displayed. See Section 8 on page 8 for
information on the VistaPoint application.
VistaTablet Battery Level
To check the VistaTablet battery level, look at the
battery indicator in the status bar (see gure above).
Do not let the battery run out. When the battery is low,
the VistaTablet will sound a warning tone and then
turn o. If this occurs, charge the VistaTablet for an
hour before turning it on again.
VistaTablet Battery Level
When the VitalPatch has only a few hours remaining,
you will see warnings on the VistaPoint dashboard.
Replace the VitalPatch before it expires.
2
Use only the provided cable and charger to charge the
VistaTablet. Keep the VistaTablet plugged into the
charger. You can use the VistaTablet device while it is
charging.
Page 3
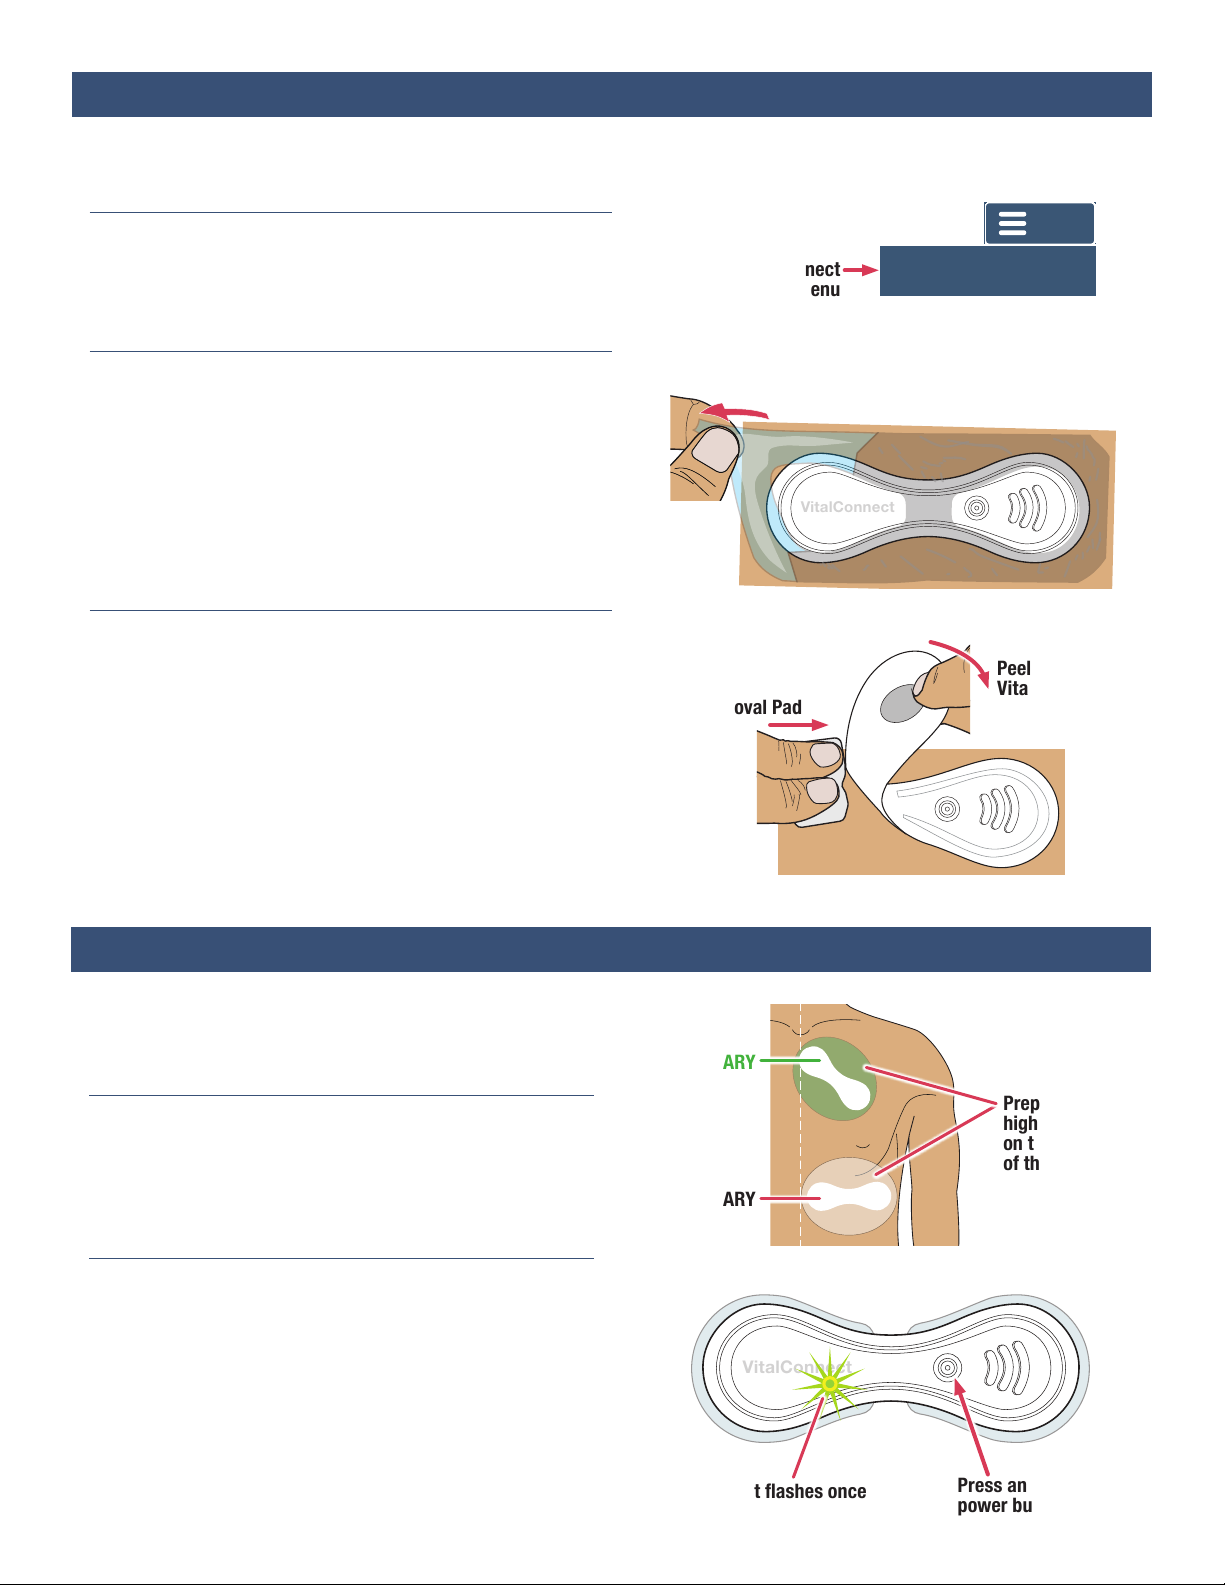
Section 3: Removing Previous VitalPatch
VitalConnect
VitalConnect
Disconnect Patch
Before applying a new VitalPatch, use the following steps
to remove a previously applied VitalPatch (if necessary).
1. Disconnect from VistaPoint
IMPORTANT: If the VitalPatch is still connected to VistaPoint,
tap the Menu and then tap Disconnect Patch. See Section 9
on page 9 for more information.
2. If Overlay Was Used, Peel off
If there is a clear adhesive overlay applied over the
VitalPatch, it must be removed rst. If no overlay is
present, continue to Step 3 below.
a. Grasp a corner of the overlay and peel it o the skin.
b. Continue pulling the overlay o. Stretch the overlay
horizontally to help release it from the skin.
Note: The VitalPatch may begin pulling o with the overlay.
3. Peel off VitalPatch
a. Wipe an adhesive removal pad along the edge of the
VitalPatch.
b. Grasp a corner of the VitalPatch (or the middle where
there is no adhesive) and peel it o the skin while
continuing to sweep the adhesive removal pad
underneath.
c. Dispose the VitalPatch according to local laws for
routine electronic waste.
d. Clean skin with an alcohol pad and allow to dry.
Tap “Disconnect
Patch” from the Menu
Grasp a corner of the overlay and
stretch horizontally to remove
Sweep Adhesive
Removal Pad
Menu
Peel Off
VitalPatch
Section 4: Applying the VitalPatch
VitalPatch must be placed on one of two areas on the
upper left chest, PRIMARY (recommended) or SECONDARY.
See Step 3 on page 4 for more details on the location.
1. Prepare Chest
a. If there is body hair on the site, shave the site before
cleaning. Prepare an area larger than the VitalPatch.
See gure to the right.
b. Clean site with an alcohol wipe and allow to dry.
2. Remove from Pouch and Power-On
DO NOT remove the adhesive backings until Step 4!
a. Make sure your hands are clean and dry. Tear open
the pouch at the notch and remove VitalPatch.
b. Place VitalPatch on a at surface. Press and release
the power button. See gure to the right. A green
light below the logo will ash once to let you know
the VitalPatch is ON.
PRIMARY
SECONDARY
Light ashes once
Prepare one
highlighted area
on the LEFT side
of the chest
Press and release
power button
3
Page 4
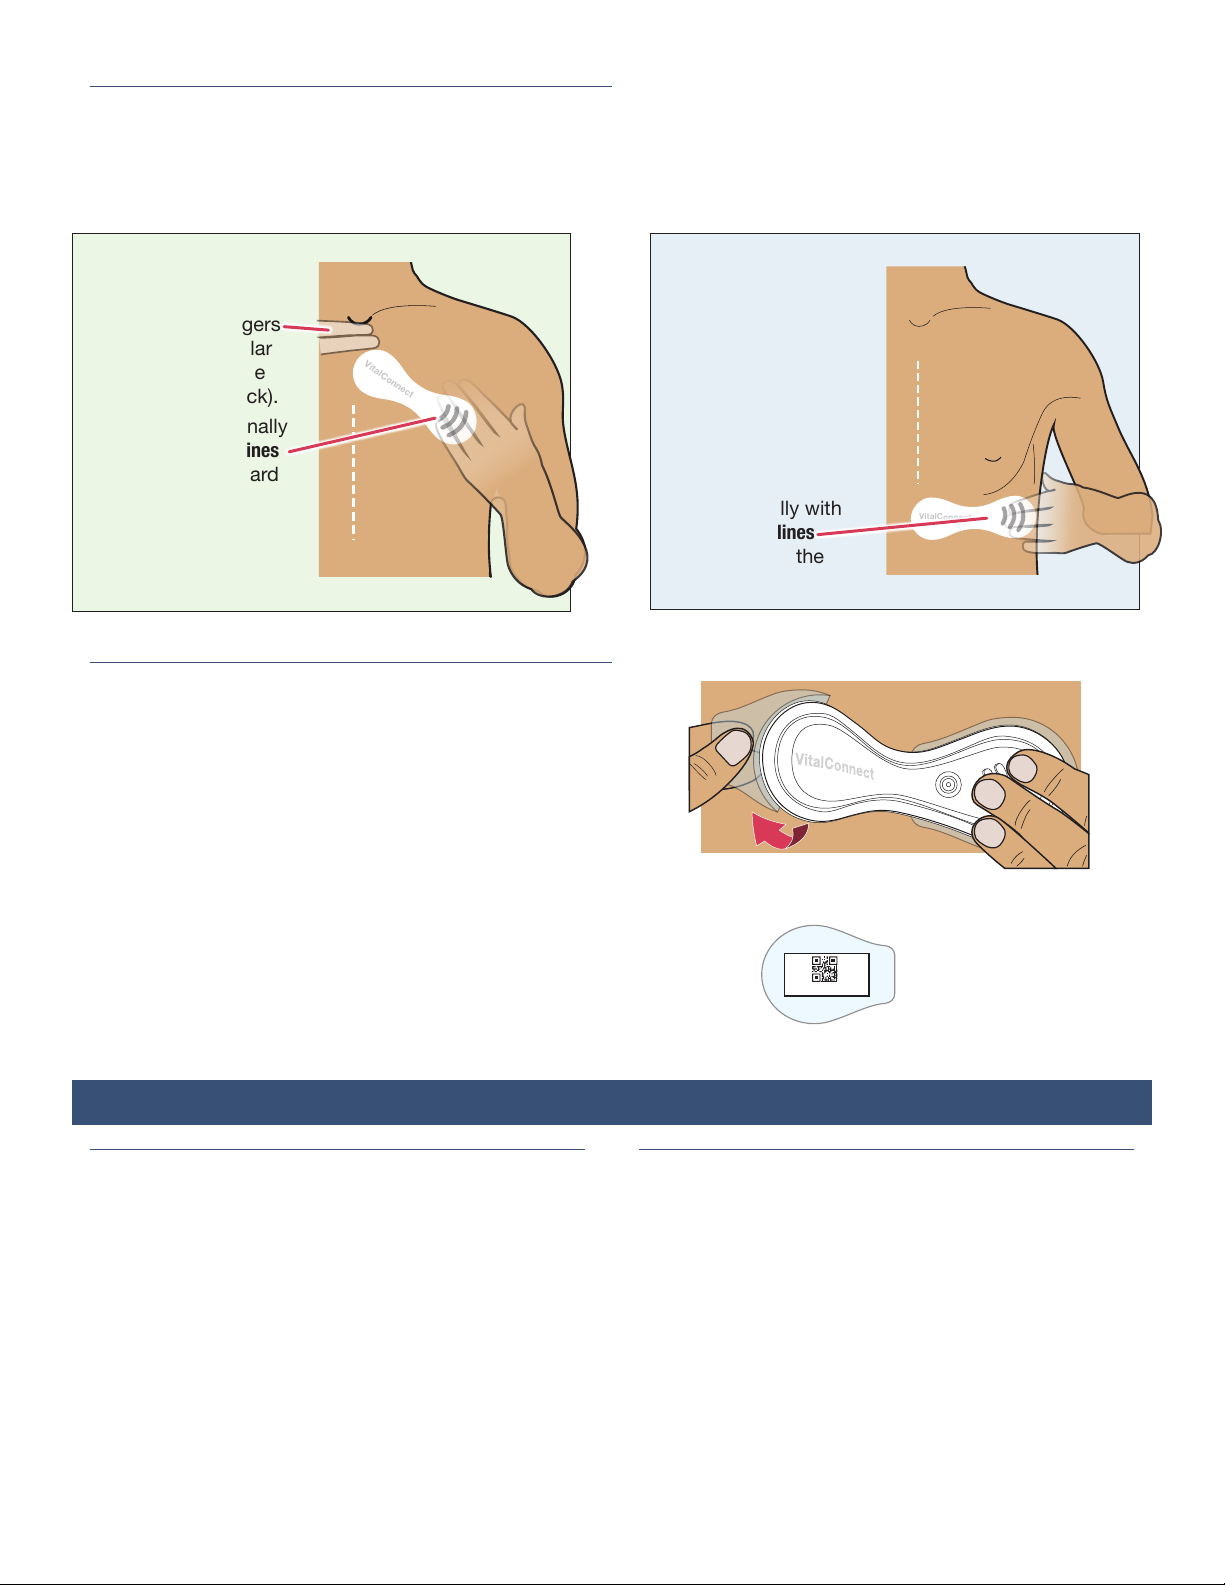
3. Hold VitalPatch Against Chest on Selected Site
AVC2B008BF_0032EA
VitalConnect
VitalConnect
DO NOT remove the adhesive backings until Step 4!
Hold the VitalPatch against the chest in the correct
position (PRIMARY or SECONDARY). See gures below.
PRIMARY Site
(Recommended)
a. Space two ngers
below the jugular
notch (dip at the
base of the neck).
b. Position diagonally
with the three lines
angled downward
away from the
midline.
Midline
LEFT Side
– OR –
Left
Hand
4. Remove Backings and Apply
DO NOT touch the adhesive with your ngers!
a. Hold one side of the VitalPatch down against the skin.
b. Lift the opposite side, and peel the backing o from
the center. Press against skin.
c. Peel the backing o from the other side of the
VitalPatch.
d. Firmly press down both sides to attach to skin.
e. Keep the backing with the ID number. You will need
this to pair the VitalPatch with VistaPoint. See Section 7
on page 6 for the pairing process.
SECONDARY Site
This site is not
recommended for
obese persons.
a. Hold the
VitalPatch below
the left chest on
the rib cage.
b. Position
horizontally with
the three lines
away from the
midline.
Peel off backing
from center
LEFT Side
Midline
Left
Hand
Hold VitalPatch
down
Retain backing
with ID number
Section 5: Wearing the VitalPatch
Things to Avoid
• DO NOT shower or exercise for 30 minutes after
applying the VitalPatch.
• DO NOT expose the VitalPatch directly to the shower
head, and avoid excessive contact with soap or
scrubbing. Gently pat the VitalPatch dry after
showering.
• DO NOT swim with the VitalPatch or use in a sauna,
steam room or hot tub.
• DO NOT wear more than one VitalPatch at a time.
Always remove the old VitalPatch before applying a
new one.
4
How Long to Wear Your VitalPatch
• Each VitalPatch will last up to 5 days (120 hours) or 7 days
(168 hours). To preserve data recorded by the
VitalPatch, make sure you are connected to the
VistaPoint application before the VitalPatch expires.
• See Section 2 on page 2 for information on checking
how many hours are left on your VitalPatch.
• If discomfort or irritation occurs, the VitalPatch (and
the optional adhesive overlay) should be removed.
Contact your healthcare provider immediately.
• If the VitalPatch begins to fall o or lift from the skin,
contact your healthcare provider immediately.
Page 5
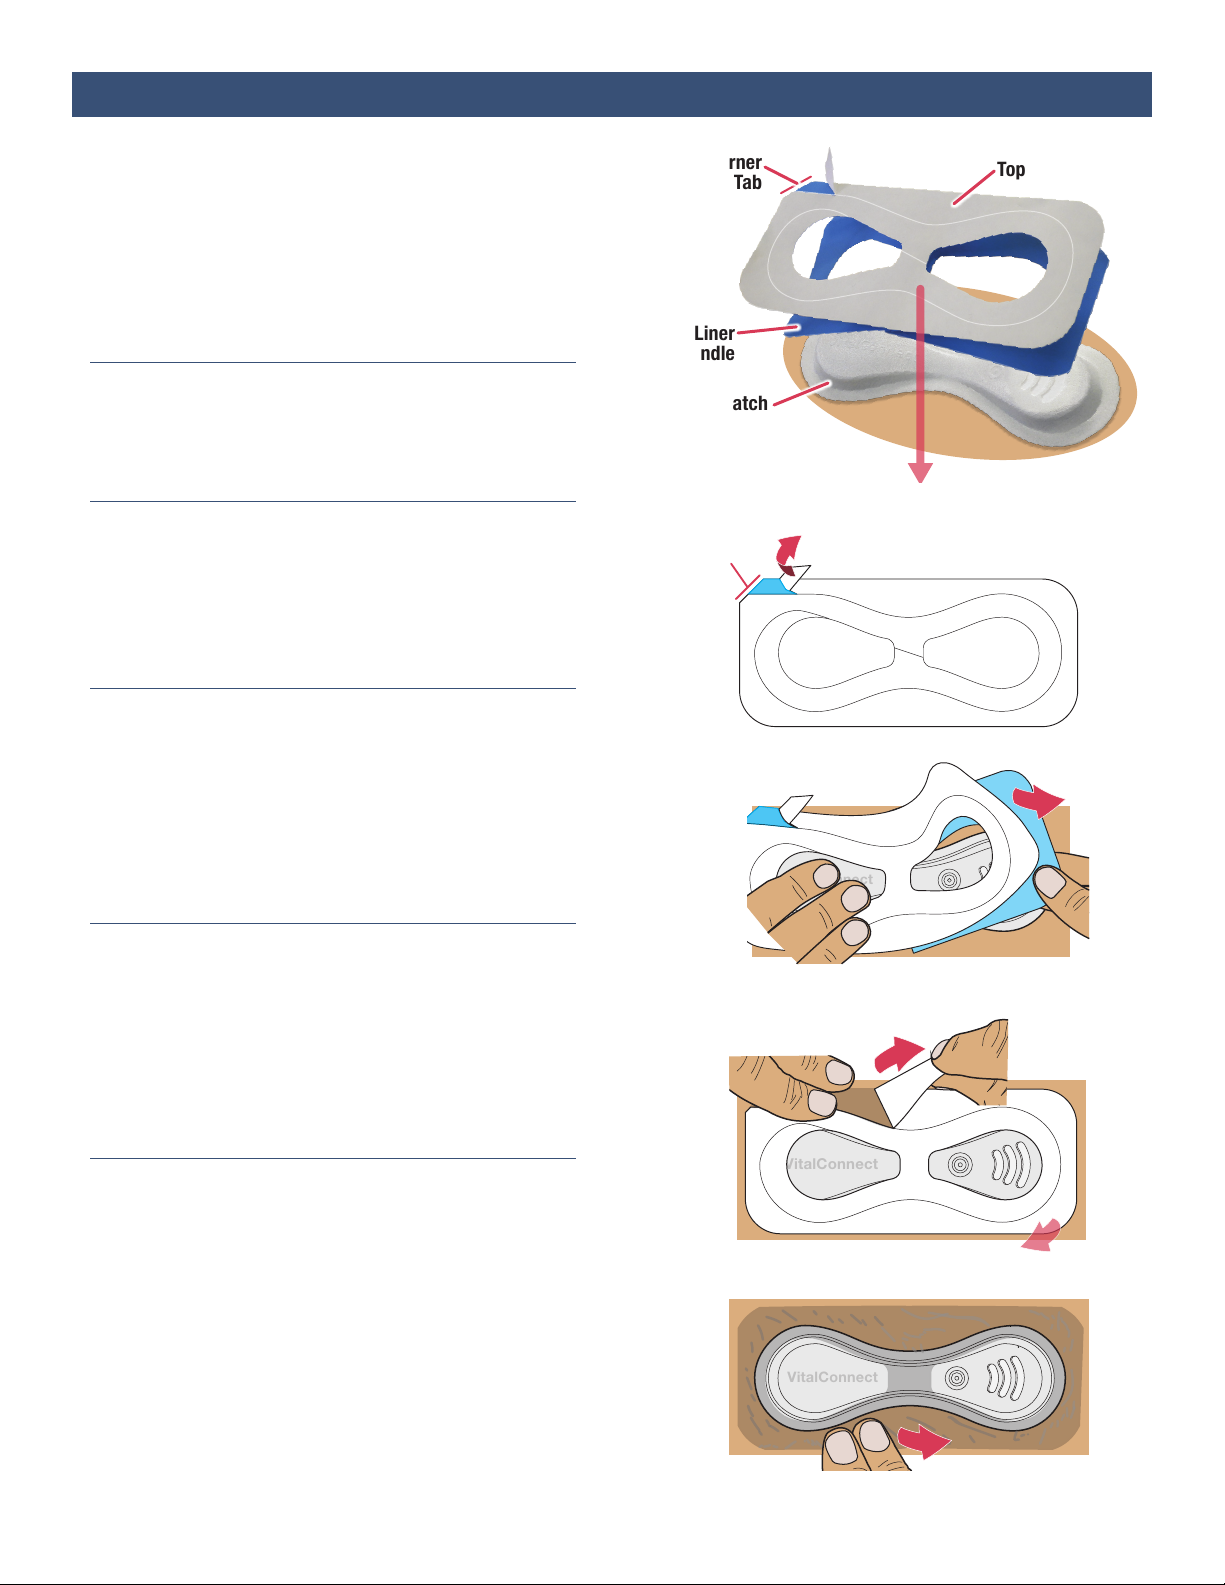
Section 6: Applying the Adhesive Overlay (Optional)
VitalConnect
VitalConnect
VitalConnect
If you are not using an Adhesive Overlay, skip to Section 7 on
page 6 to pair your new VitalPatch with VistaPoint.
Your healthcare provider may recommend that you
apply an optional adhesive overlay to help the
VitalPatch stay adhered to the skin. Use only the
provided adhesive overlays.
DO NOT use other adhesives, overlays or tape.
1. Prepare Skin
Clean the skin around the VitalPatch with an alcohol
pad.
2. Peel Up One Corner of White Liner
Before applying the overlay, peel up one corner of the
white top liner, and bend it back. This creates a tab
that will help you remove the top liner later. See gure
to the right.
3. Place the Adhesive Overlay Over VitalPatch
a. Position the adhesive overlay over the VitalPatch,
with the blue liners against the chest. The raised
portions of the VitalPatch should be aligned with
the cutouts of the overlay. See gure to the right.
b. Ensure the tab you created in the previous step is
on the top side (pointing towards your head).
Notched Corner
wi th Tab
Blue Liner
with Handle
VitalPatch
Notched
Corner
Top White Liner
Place over
VitalPatch
Bend Tab Up
Remove
blue liner
4. Remove Blue Liners
a. Hold the overlay against your chest with one hand
and peel away the lower blue liner. Press the
overlay against the skin as the liner is removed
b. Repeat to remove the second blue liner. After both
blue liners are removed, press rmly on the entire
surface of the overlay.
5. Peel Off Top White Liner and Seal Edges
a. Peel o the top white liner starting with the tab you
created in Step 2 above. Gently press the overlay
against the skin with your other hand as you
remove the liner.
b. Press rmly down on the overlay to seal all edges.
c. Discard the blue and white liners.
Peel off top white liner
starting with tab
Press down on overlay
to seal all edges
5
Page 6
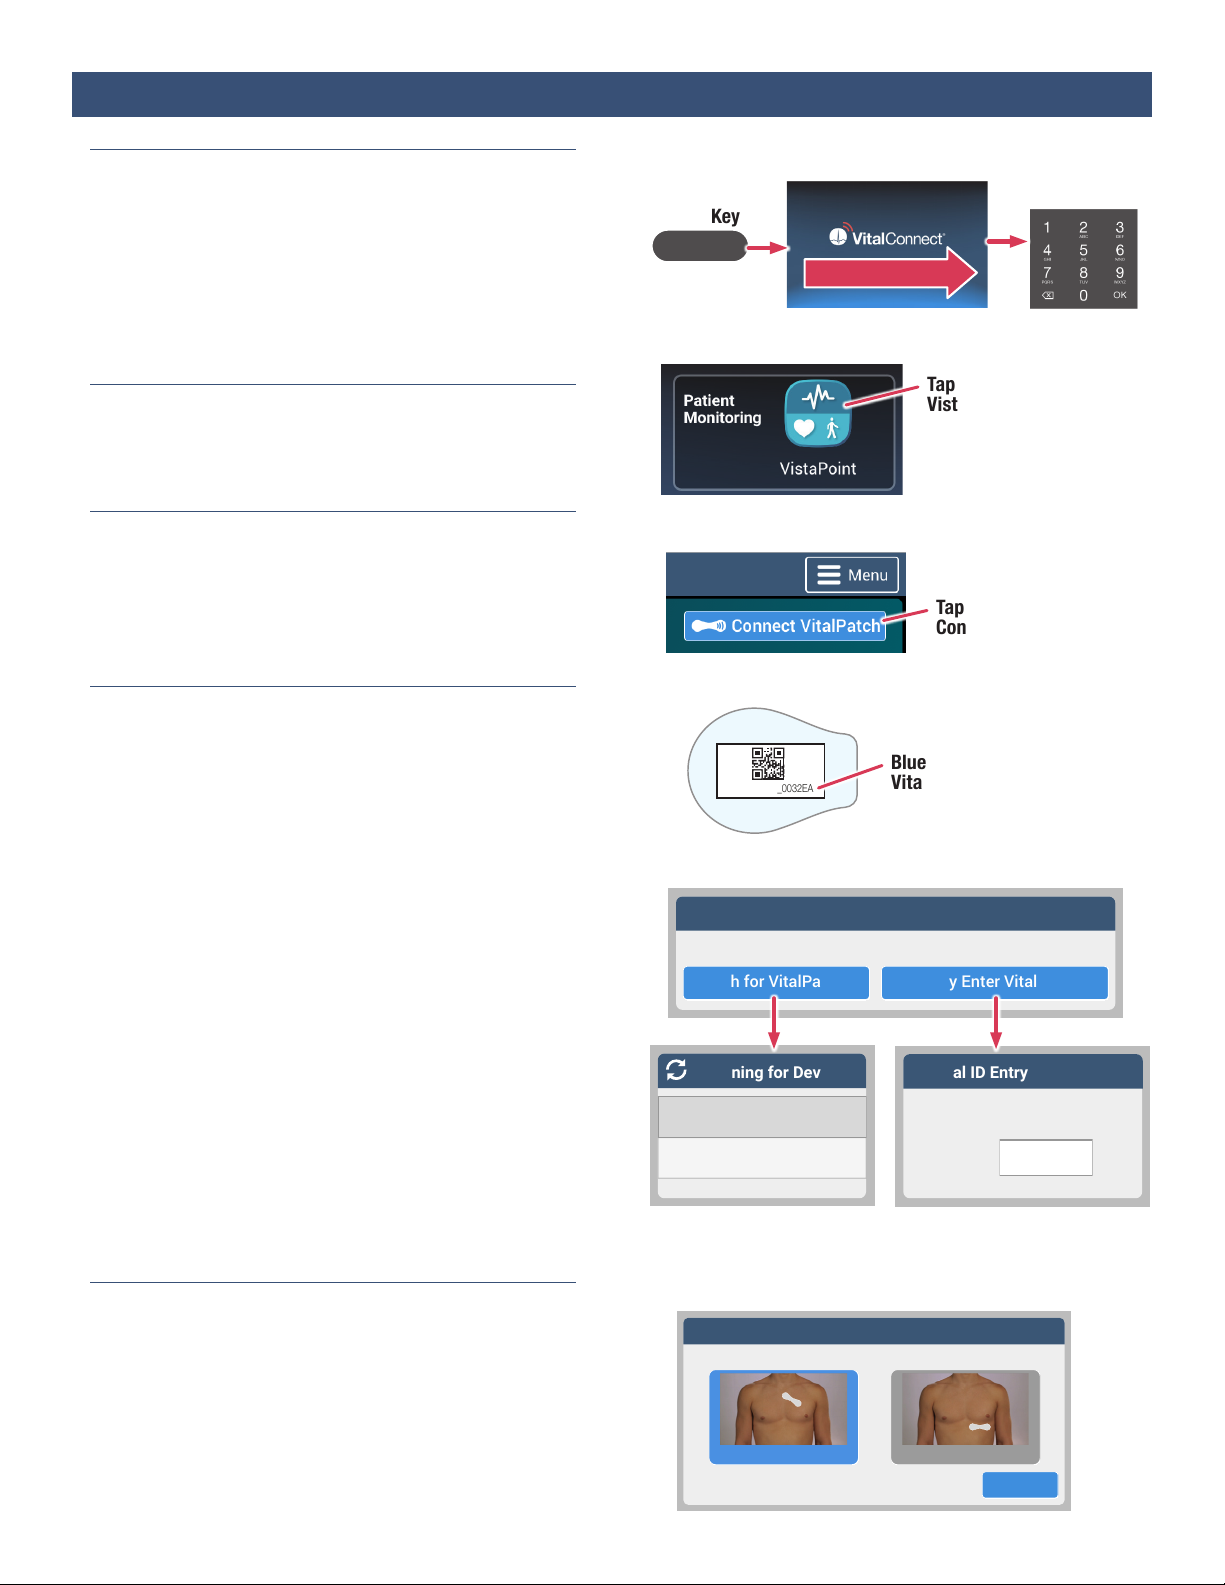
Section 7: Pairing VitalPatch with VistaPoint
Scanning for Devices
Manual ID Entry
AVC2B008BF_0032EA
1. Unlock VistaTablet
If the VistaTablet is asleep (black screen), unlock and
start the VistaPoint application:
Enter PIN
Home Key
a. Press the Home Key on the VistaTablet.
b. Swipe nger across the screen and enter the PIN
provided by your care team.
2. Start VistaPoint
Tap the VistaPoint icon from the home screen.
3. Begin the Pairing Process
Tap Connect VitalPatch from the VistaPoint dashboard. If
a previous VitalPatch is still connected, disconnect it
before continuing (see Section 9 on Page 9).
4. Connect to a VitalPatch ID
The Bluetooth ID is printed on the VitalPatch pouch
and on the adhesive backing. You will need this ID to
pair the VitalPatch with VistaPoint.
Use one of the following methods to connect the
VitalPatch:
• Tap Search for VitalPatch ID to search for nearby
VitalPatch biosensors. Find the Bluetooth ID of the
VitalPatch and tap it. If the Bluetooth ID does not
appear in the list, you may tap the Rescan button at
the top to repeat the search. If the VitalPatch is still
not listed, press the power button on the
VitalPatch again and press the Rescan button
again.
OR
• Tap Manually Enter VitalPatch ID and then enter the
last 6 characters of the Bluetooth ID.
SWIPE
Tap
VistaPoint Icon
Tap
Connect VitalPatch
Bluetooth ID from
VitalPatch
Choose how you want to connect
Connect to VitalPatch
How do you want to connect?
Search for VitalPatch ID Manually Enter VitalPatch ID
VC2B008BF_003C3C
VC2B008BF_0014D2
Please enter the last 6 characters
of the VitalPatch ID.
VC2B008BF_
Enter ID
5. Posture Calibration — Patch Position
After connecting, the Posture Calibration screen
appears. Select the position where you applied the
VitalPatch (Primary or Secondary) and then tap Next.
6
Select ID from list Enter ID Manually
Select Patch Position
Posture Calibration
Step 1 Select Patch Position
SecondaryPrimary (preferred)
Next >
Page 7
Step 2
0.00.0
Calibrate
6. Posture Calibration — Body Position
Posture Calibration
Temperature Calibration Required
The VitalPatch Biosensor requires temperature
calibration. Select “Calibrate” to begin
Step 2
98.9
Select the body position:
• Standing or Sitting (preferred) — Patient must sit as
upright as physically capable.
• Supine — Patient must lie down in a supine position
as at as physically capable.
• Elevated — Patient must be laying on a bed that
can be elevated. Position the bed angle at 30°.
(Note that “Elevated” posture may not be available
depending on your VitalPatch model. If the
Elevated option is not available, ensure the patient
is in the Standing/Sitting or Supine position when
calibrating).
Instruct patient to remain still in body position and tap
Calibrate.
A pop-up will display asking you to conrm that the
VitalPatch and body position selections are correct.
Tap Ye s if they are correct, and No to change your
selections.
Select Body Position
Posture Calibration
Step 2 Select Current Body Position
Standing or Sitting
(preferred)
Elevated
Bed Angle 30°
Conrm Selections
Please confirm that your selections are correct:
- VitalPatch in Primary Position
- Standing or Sitting Posture
Supine
Bed is Flat
Calibrate< Back
YesNo
7. Calibrate Body Temperature
If your VitalPatch supports body temperature (requires
VitalPatch rmware release 3.2.0.0 or later), a
Temperature Calibration screen will appear, and you
will be prompted to calibrate the body temperature. If
the Temperature Calibration screen does not appear,
the VistaPoint dashboard will be displayed after you
perform the posture calibration.
a. Measure temperature with a clinical-grade
thermometer.
b. Select the units (Celsius °C or Fahrenheit °F).
c. Enter the temperature and tap Calibrate. The
VistaPoint dashboard will be displayed once
calibration is complete.
If you plan to calibrate the body temperature at a later
time, tap Not Now. The Body Temperature display will
not show a value.
The VistaPoint dashboard will be displayed after
performing (or skipping) the temperature calibration.
See Section 8 on Page 8 for more information.
Begin Temperature Calibration
Select Units
Temperature Calibration
Step 1 Select Units
Take Temperature
Use a clinical-grade thermometer to take the
patient’s temperature. Enter value here and select Calibrate.
Fahrenheit (°F)Celsius (°C)
Enter Temperature
Temperature Calibration
Step 1 Select Units
Take Temperature
Use a clinical-grade thermometer to take the
patient’s temperature. Enter value here and select Calibrate.
Fahrenheit (°F)Celsius (°C)
Calibrate
CalibrateNot Now
Cancel
Cancel
8. Recalibrate Body Temperature
30 minutes after calibrating the body temperature (see
previous step), you must calibrate the body temperature
again. See Section 11 on Page 12 for the complete
procedure.
The body temperature must be recalibrated once per
day between the hours of 09:00 and 21:00.
7
Page 8

VistaPoint
™
1s2s3s4s5s
Live ECG
VitalPatch
Posture
Fall Detection
No falls
detected
Steps
Activity
463
BPM
Heart Rate
72
BrPM
Respiration Rate
14
°C
Body Temperature
37.1
%SPO2
Streaming Mode
97
00:0B:57:AC:66:DA
mmHg
Manual Entry
122
79
Last Reading:
2 Hours Ago
No Device Paired
Pounds
Manual Entry
190.7
Last Reading:
2 Hours Ago
No Device Paired
Section 8: Using the VistaPoint Dashboard
VitalPatch ID
VitalPatch
Hours Remaining
VistaTablet Battery Life
Heart Rate
Upright
Current Posture
Respiration Rate
Fall Detection
Body or Skin
Temperature
Activity (Steps)
Vi s t aTablet
Device Name
Oxygen Saturation
Disconnect
device-name
Oxygen Saturation
See Section 12, 15, or 16
Blood Pressure
Blood Pressure
See Section 13 or 17
Use the VistaPoint Application
When pairing is complete, you will be shown the
VistaPoint dashboard with vital signs (see gure
above). Do the following, as directed by your care
team:
• Keep the VistaTablet device powered on and
charged (see Section 1 on page 2). Keep the
VistaTablet device near you as much as possible
(less than 30 feet) to ensure constant monitoring.
• Use the dashboard to observe vital signs and
monitor VitalPatch battery life.
• If directed by your care team, take oxygen
saturation, blood pressure, or weight readings (see
Section 12-18).
Verify Correct Display of Vital Signs
After pairing and calibrating, verify that data is owing
from the connected VitalPatch and is displaying on
the dashboard. Ensure that the VitalPatch ID above
the ECG display matches the identier on the
VitalPatch adhesive backing and/or pouch. A
matching ID provides conrmation that the correct
VitalPatch is connected. Additionally, verify that the
posture reected on the dashboard matches the
patient’s current posture.
VitalPatch ID b008bf_012792 has 109 hours remaining.
2 mv
-2 mv
Weight
Take BP
Dashboard Features
• Heart Rate (BPM, beats per minute)
• Respiration Rate (BrPM, breaths per minute)
• Body or Skin Temperature (Celsius or Fahrenheit)
– If using a VitalPatch with rmware 1.4.0.x or
earlier, the Skin Temperature will be displayed.
– If using a VitalPatch with rmware 3.2.0.x or
later, the Body Temperature will be displayed.
• Activity (Steps)
• Posture. Can be: Lying Down, Leaning, Running,
Standing, Walking, or Unknown.
• Fall Detection. Displays either “No Falls Detected” or
“Fall Detected” if a fall event is detected. To clear
(acknowledge) the event, tap the Acknowledge
button in the Fall Detection tile.
• Live ECG (mV/s, scale 10mm/mV at 25mm/s). ECG
data is a deployment option controlled by the care
provider and therefore may not be displayed here.
The following are displayed when data are collected
from supported devices or entered manually:
• Blood Oxygen Saturation (as %SpO2)
• Blood Pressure (mmHg, systolic and diastolic)
• Weight (pounds or kilograms)
Menu
Take Weight
Weight
See Section 14 or 19
Main Menu
Live ECG from
VitalPatch
8
To refresh the application at any time, swipe from the
top of the screen down.
VistaTablet Device Name
Find the device name in the lower-right corner of the
dashboard, or from the Menu (About VistaPoint).
Page 9

Disconnect Patch
Calibrate Posture
Calibrate Temperature
Flash Patch LED
Start New Patient
Discharge Patient
About VistaPoint
Help
Disconnect Patch
Main Menu
Green
LED
Discharge or Disconnect
Disconnect Vital
continue moni
Discharge patient f
moni
The Menu is in the top-right corner of the dashboard. It
has the following options:
• Disconnect Patch: Use when monitoring is complete
or to pair a new VitalPatch. This option maintains
the pairing with third-party devices.
• Calibrate Posture: Use this to recalibrate posture if
the display does not match the actual posture.
• Calibrate Temperature: Use this to recalibrate the
body temperature. If using a VitalPatch that does
not support body temperature, selecting this menu
option will display a unit setting screen.
• Flash Patch LED: See below.
• Start New Patient: End monitoring session and
restart with new devices.
• Discharge Patient: End monitoring session and
disconnect all devices.
• About VistaPoint: Show information about the
VitalPatch, the VistaTablet (including device name),
and the VistaPoint application.
• Help: Displays an instruction that help is available
from the home screen (accessed by pressing the
Home button).
Flash Patch LED
The pairing between VistaPoint and the VitalPatch can
be checked by selecting Flash Patch LED from the Menu.
Tap Begin Flash LED and watch for the light on the
VitalPatch. It will ash for several seconds. If you do
not see the LED ash on the VitalPatch, you may need
to disconnect and reconnect by following the steps in
Section 7 on Page 6.
Flash LED
The Flash LED procedure can help
identify a VitalPatch by temporarily
flashing the green LED on the patch.
Begin Flash LED
Menu
Recalibrate posture
Recalibrate body
temperature
Cancel
Flash Patch LED
Section 9: When Monitoring is Complete
1. Disconnect VitalPatch in VistaPoint
When monitoring is complete, select Disconnect
VitalPatch from the VitalPatch menu. Select one of the
following options:
• Disconnect VitalPatch: Choose this option if you will
be applying a new VitalPatch.
• Discharge Patient: Choose this option if you will NOT
be applying a new VitalPatch. All devices will be
disconnected.
2. Remove VitalPatch
To remove the VitalPatch, see Section 3 on page 3.
If a new VitalPatch will not be applied, turn o the
VistaTablet by pressing and holding the Power Key on
the VistaTablet until the Options menu displays, and
then select Power Off. See Section 1 on page 2 for more
information.
Menu
Tap “Disconnect
Patch”
Choose one of the following discharge/disconnect options:
Patch and
toring patient.
toring system.
Choose a Disconnect Option
Cancel
rom the
9
Page 10

Section 10: Routine Events During Monitoring
If the VitalPatch is okay, select “Wait
for Reconnect”.
If the VitalPatch has been removed
from the body, or is no longer needed,
select “Disconnect Patch”
Check that the VitalPatch biosensor is properly adhered to the skin.
Message: “VitalPatch Off Body”
Indicates that the VitalPatch detects that it was
removed.
• If removal was intentional, tap Disconnect Patch to
end the monitoring session.
• If removal was not intentional, inspect the
VitalPatch for adhesive peel-o or lifting on the
edges. If the adhesive looks intact, press the
VitalPatch down against the skin to re-adhere and
tap Wait for Reconnect.
Successful Reconnection After “VitalPatch Off Body”
If reconnection after “VitalPatch O Body” is
successful, a “Posture Calibration Required” message
will be displayed (see gure below). Tap Calibrate to
begin the posture recalibration process. See Step 5 and
6 beginning on Page 6.
Posture Calibration Required
The VitalPatch Biosensor requires
calibration. Select “Calibrate” to begin the
process.
Calibrate
If you do not recalibrate, VistaPoint will not provide
you with respiration rate or posture while out of
calibration. Accuracy of fall detection and body
temperature is also considered invalid. Heart rate and
live ECG will continue to update continuously.
When to Replace VitalPatch After “VitalPatch Off Body”
Replace the VitalPatch if:
• The VitalPatch does not reconnect after several
minutes.
• The “VitalPatch O” message continues.
• The VitalPatch cannot be reapplied by pressing
down to re-adhere.
• The VitalPatch partially or completely falls o the
skin.
If replacing the VitalPatch, select Disconnect Patch from
the Menu. See Section 9 on page 9.
Calibration Required
after “VitalPatch Off
Body”
VitalPatch b008bf_012345 Off Body
Wait for Reconnect Disconnect Patch
Waiting for VitalPatch
Waiting for VitalPatch to be reattached to
the skin.
More Information...
Waiting for VitalPatch
to be reattached
Using the Optional Adhesive Overlay
to Prevent “VitalPatch Off Body”
If the VitalPatch will be exposed to conditions where
lifting and patch-o may occur, you may apply an
optional adhesive overlay to help keep the VitalPatch
adhered to the skin. See Section 6 on Page 5.
Use only the approved adhesive overlay described in
IFU-09, Adhesive Overlay Instructions for Use. The
use of other adhesives or tape is not recommended
and will prevent proper operation of the VitalPatch
and will void the warranty of the VitalPatch. DO NOT
use the adhesive overlay if the VitalPatch has already
lifted o the skin. The overlay may be used if the
VitalPatch begins to peel up at the edges but has not
lost contact with the skin.
Overlay
VitalPatch
Skin
10
VitalPatch with Adhesive Overlay Applied
Page 11

Message: “VitalPatch Not Detected”
FALL
Detected
If the Patch is Out of Range
If the Patch Has Been Removed
Make sure the VitalPatch is in range.
The VitalPatch biosensor will autoreconnect when back in range.
If the VitalPatch biosensor has been
removed from the body, or autoreconnect does not occur, select
“Disconnect Patch”.
Posture
Temperature Calibration Required
The VitalPatch Biosensor requires temperature
calibration. Select “Calibrate” to begin
Indicates that the VitalPatch is out of range and/or has
lost Bluetooth connection.
• If disconnection was intentional, tap Disconnect
Patch to end the monitoring session.
• If disconnection was not intentional, check that the
VitalPatch is within Bluetooth connection range,
and then tap Wait for Reconnect. Wait for up to one
minute for the VitalPatch to automatically
reconnect. When the VitalPatch returns within
range of the tablet, it will automatically reconnect.
This message may also be cleared by choosing
Disconnect Patch and then repeating the connection
process in Section 7 on page 6.
Note: When the VitalPatch disconnects from the
VistaTablet, the VitalPatch will continue to save vital
sign data for up to 10 hours. After reconnecting, this
saved data will automatically be uploaded to the
VistaTablet.
VitalPatch b008bf_012345 Not Detected
Wait for Reconnect
Waiting for Patch to Reconnect
Waiting for patient to return to connection
range. The VitalPatch biosensor will autoreconnect when back in range.
More Information...
Waiting for VitalPatch
to return to connection
range
Disconnect Patch
Message: “Patch Expires” or “Replace
VitalPatch”
When the remaining hours on the VitalPatch are low,
the dashboard will display “Patch Expires” warnings
that show how many hours remain. Replace the
VitalPatch before the expiration time. If the time limit is
exceeded, the VitalPatch will be disconnected and the
dashboard will display a “Replace VitalPatch”
message. See Section 9 on page 9 for more information.
Message: Posture Calibration Required
If posture becomes “Unknown”, VistaPoint will direct
you to perform the posture calibration procedure
again. Additionally, if the displayed posture does not
match the actual posture, you must recalibrate the
posture. To do this, select Posture Settings from the
VitalPatch menu and then tap Calibrate.
Message: Body Temperature Needs Calibration
If the body temperature displays “Needs Calibration”,
you must perform a recalibration. See Section 11 on
page 12.
WARNING: Patch Expires in 2 Hours
The VitalPatch Biosensor has less than 2
hours of battery life remaining. Replace as
soon as possible.
Replace VitalPatch
The VitalPatch Biosensor has expired and
needs to be replaced. Select “Disconnect
Patch” below and dispose of patch properly.
Calibration Required
The VitalPatch Biosensor requires
calibration. Select “Calibrate” to begin the
process.
Calibrate
OK
CalibrateNot Now
VitalPatch Life
is Low
VitalPatch
Expired
Disconnect Patch
Unknown
Message: “Fall Detected”
If the VitalPatch detects a fall, VistaPoint displays a
yellow “FALL Detected” alert on the dashboard. If this
occurs, contact your care team.
To clear the fall notication, tap the Acknowledge
button on the dashboard only when directed by your
care team.
Acknowledge
11
Page 12
Confirm Recalibration
Do you want to recalibrate the temperature?
This will require you to take a manual
temperature reading.
Step 2
Take Oxygen Saturation
Use Bluetooth
SpO2 Value (0-100)
%
98
Take Oxygen Saturation
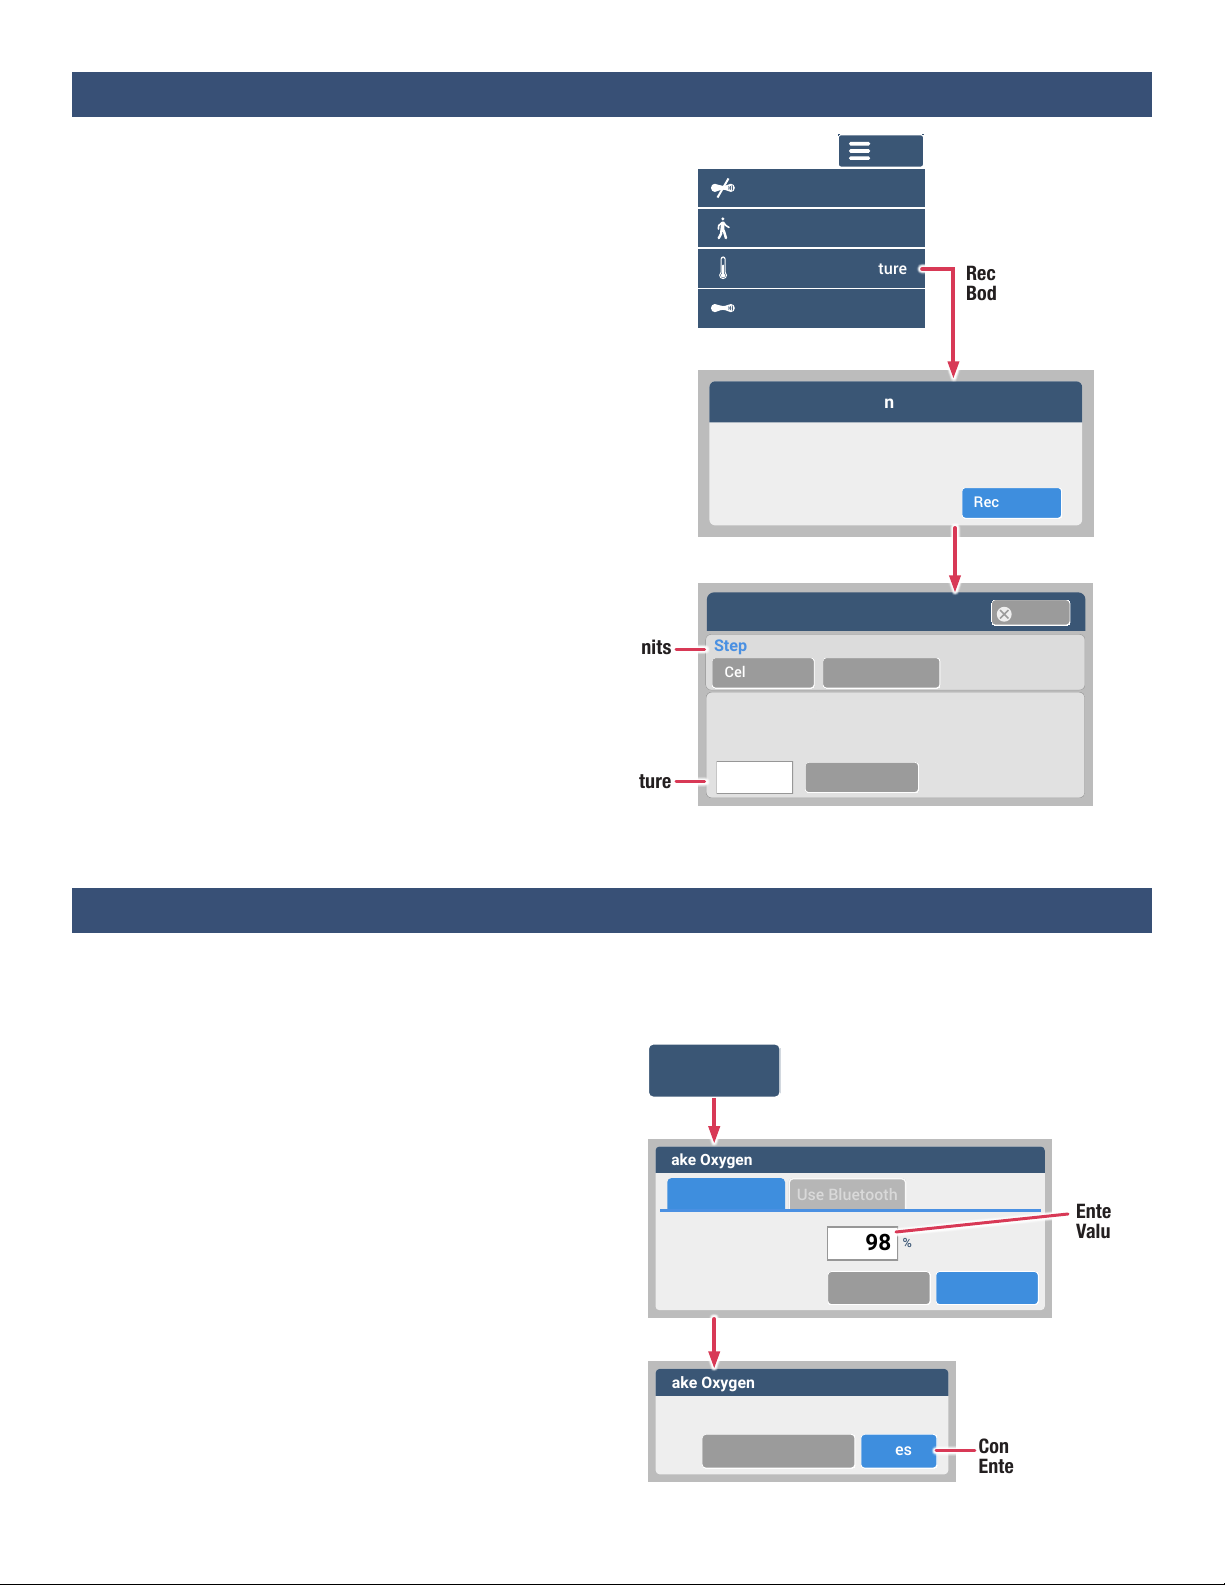
Section 11: Recalibrating Body Temperature
Calibrate Posture
Calibrate Temperature
Flash Patch LED
Disconnect Patch
When using a VitalPatch that supports the body
temperature feature, you should recalibrate body
temperature each day between the hours of 09:00 and
21:00. The VistaPoint dashboard may also prompt you
to recalibrate the body temperature as necessary.
To recalibrate the body temperature:
1. Measure temperature with a clinical-grade
thermometer.
2. Tap the Menu button and then tap Calibrate
Temperature (or tap the Body Temperature tile on
the dashboard).
3. Tap the units (Celsius °C or Fahrenheit °F).
4. Enter the temperature and tap Calibrate. The
VistaPoint dashboard will be displayed once
calibration is complete.
Enter Temperature
Select Units
Menu
Recalibrate
Body Temperature
Recalibrate
Temperature Calibration
Step 1 Select Units
Fahrenheit (°F)Celsius (°C)
Take Temperature
Take patient’s temperature using a clinical-grade
thermometer. Enter value and select Calibrate.
Calibrate
Cancel
Section 12: Entering Oxygen Saturation Manually
This procedure is for manual entry only. If you are
performing automatic entry with a paired Bluetooth
device, refer to Section 15 on page 14 (for Nonin 3230) or
Section 16 on page 15 (for Nonin 3150).
1. Use a pulse oximeter to measure your blood
oxygen saturation (%SpO2).
2. Tap Take SpO2 in the Oxygen Saturation tile.
3. Tap Manual Entry (if not already selected).
4. Tap the entry eld. Use the on-screen keyboard to
enter the measured value then tap Enter. If you
make a mistake, tap Clear Values to start over.
5. Conrm the entered value:
– If the value displayed is correct, tap Yes .
– If the value is not correct, tap No, Re-enter value
and then re-enter the value.
Begin Manual Entry
Take SPO2
Manual Entry
Confirm SpO2 value of 98%?
No, Re-enter value Yes
Tap Take SpO2
Enter
Value
Clear Values Enter
Conrm
Entered Value
12
Page 13
Take Blood Pressure
Use Bluetooth
Systolic BP (0-299)
Diastolic BP (0-299)
mmHg
mmHg
126
84
Take Blood Pressure
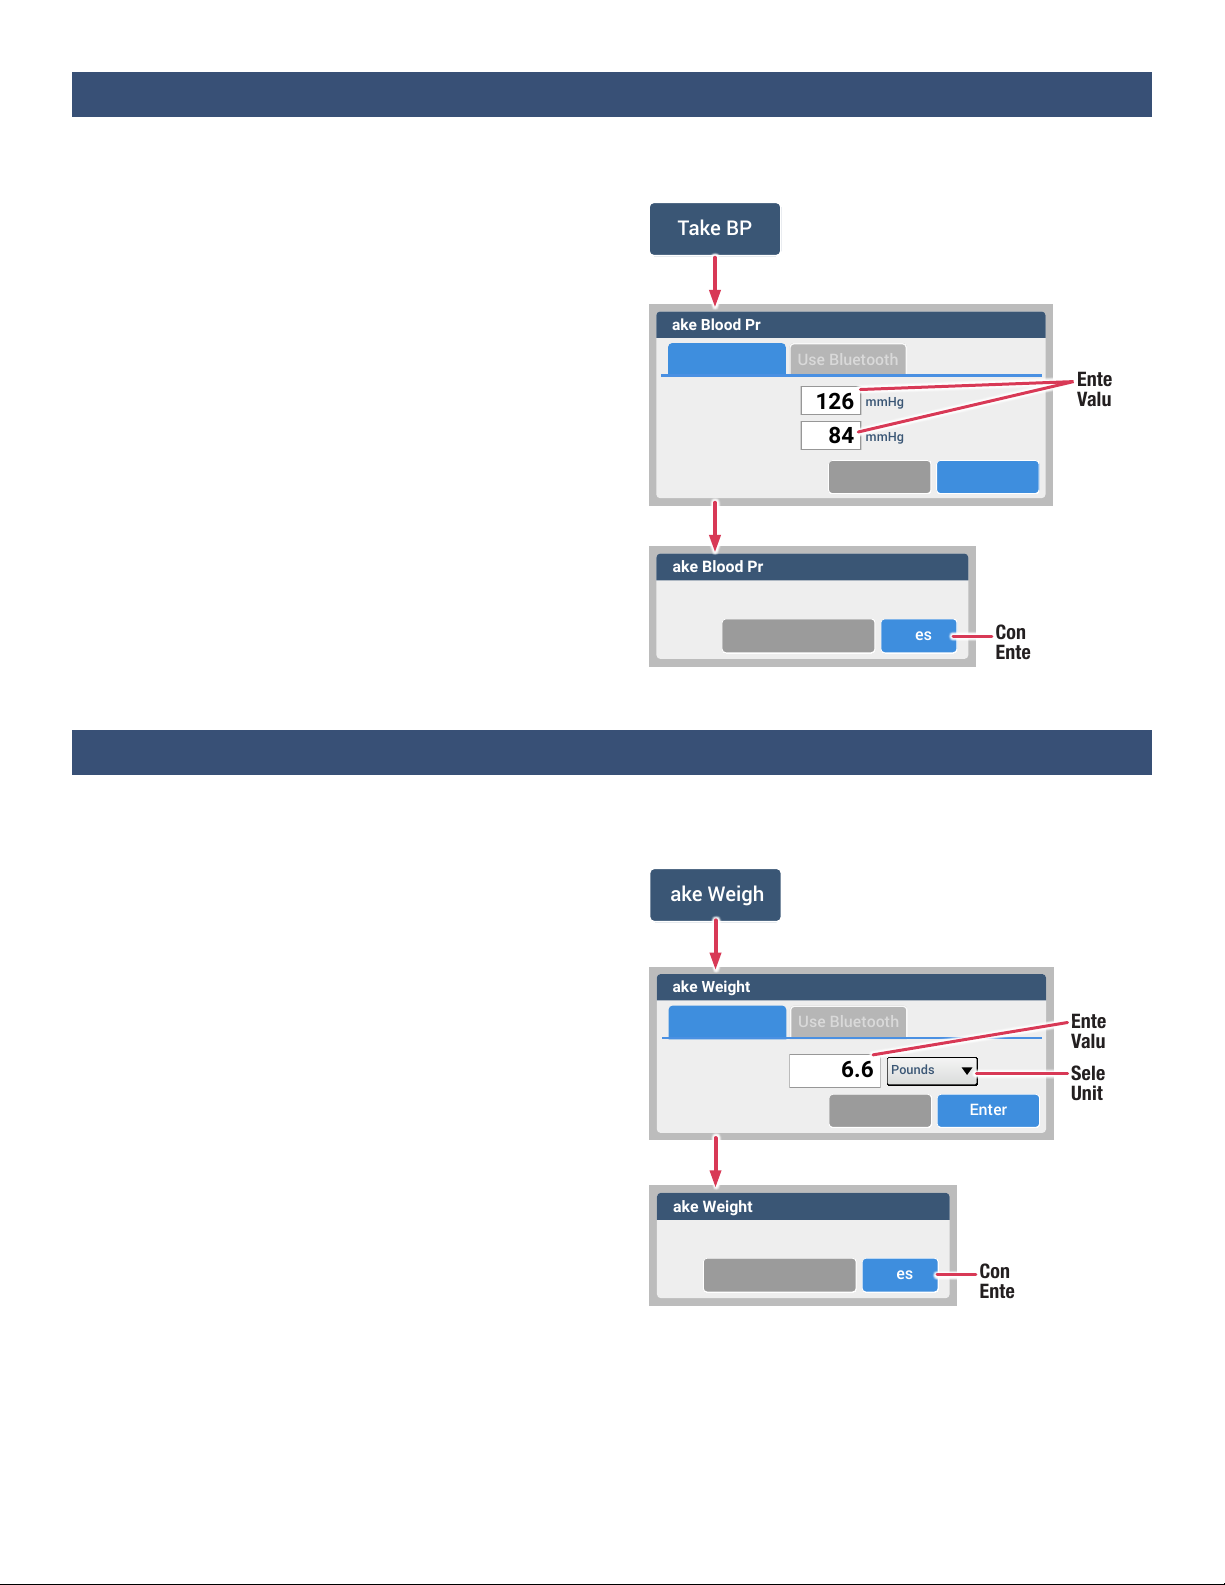
Section 13: Entering Blood Pressure Manually
Take Weight
Use Bluetooth
Weight value
206.6
Take Weight
This procedure is for manual entry only. If you are
performing automatic entry with a paired Bluetooth
device, refer to Section 17 on page 17.
1. Use a blood pressure device to measure your
blood pressure.
2. Tap Take BP in the Blood Pressure tile.
3. Tap Manual Entry (if not already selected).
4. Tap the rst entry eld. Use the on-screen
keyboard to enter the two measured values and
then tap Enter. If you make a mistake, tap Clear
Values to start over.
5. Conrm the entered values:
– If the values displayed are correct, tap Yes .
– If the values are not correct, tap No, Re-enter
value and then re-enter the value.
Begin Manual Entry
Take BP
Manual Entry
Confirm Blood Pressure value of126/84 mmHg?
Tap Take BP
Clear Values Enter
Enter
Values
Section 14: Entering Weight Manually
This procedure is for manual entry only. If you are
performing automatic entry with a paired Bluetooth
device, refer to Section 18 on page 18.
1. Use a weight scale to measure your weight in
pounds or kilograms.
2. Tap Take Weight in the Weight tile.
3. Tap Manual Entry (if not already selected).
4. Select the correct weight units (pounds or
kilograms).
5. Tap the entry eld. Use the on-screen keyboard to
enter the measured value then tap Enter. If you
make a mistake, tap Clear Values to start over.
6. Conrm the entered value:
– If the value displayed is correct, tap Yes .
– If the value is not correct, tap No, Re-enter value
and then re-enter the value.
No, Re-enter value Yes
Begin Manual Entry
Take Weight
Manual Entry
Confirm Weight value of 206.6 lbs?
No, Re-enter value Yes
Tap Take Weight
Clear Values Enter
Pounds
Conrm
Entered Value
Enter
Value
Select
Units
Conrm
Entered Value
13
Page 14

Take Oxygen Saturation
Manual Entry
Scanning for Devices
Section 15: Using a Bluetooth Device to Upload Oxygen Saturation (Fingertip)
NOTE: If the device has already been paired, go directly
to Step 3 “Take A Reading” below.
Apply to
Finger
The Nonin Model 3230 is an optional pulse oximeter
device that measures blood oxygen saturation
(%SpO2) and uploads readings automatically using
Bluetooth. It is clipped onto your ngertip. Use only as
directed by your care team.
Refer to the Nonin Medical Model 3230 Operator’s
Manual for basic instructions on setting up the device,
usage instructions, and error messages.
1. Find the Bluetooth ID (Optional)
Note: This step is optional, and is only necessary when
using the Model 3230 in an environment where
multiple similar devices are being used (such as a
hospital).
To nd the Bluetooth ID, turn the unit on its side and
nd the etched numbers on the clip. The Bluetooth ID
begins with “BDA”.
Bluetooth ID
2. Pair New in VistaPoint
a. Tap Take SpO2 in the Oxygen Saturation tile.
b. Tap Use Bluetooth.
c. Tap Pair New.
d. Tap Nonin Model 3230 as the model.
e. Apply the Model 3230 to the nger. This will
automatically turn on the device and place it in
pairing mode (indicated by a white Bluetooth
symbol on the display).The unit will begin
measuring.
f. “Scanning for Devices” will display. Tap the
Bluetooth ID of the pulse oximeter when it
appears. It should match the ID in Step 1 above.
After you tap the Bluetooth ID, the current oxygen
saturation value will be measured, you will be
returned to the dashboard.
Note: If you see a message asking you to conrm
the device pairing, tap Conrm.
g. Pairing is now complete. Remove Model 3230 from
nger.
Begin Pairing
Take SPO2
Use Bluetooth
Currently using Bluetooth Upload.
No device is currently paired. Select
Pair New to begin the pairing process.
Nonin Model 3230 (Fingertip)
Apply to
Finger
Devices Found:
00:0B:57:AC:0B:13
Tap Use Bluetooth
Pair New
Tap Nonin
Model 3230
Tap Bluetooth ID
Tap Pair New
14
Page 15

%SPO2
Standby Mode (Spot)
97
Nonin 3230 00:0B:57:AC:66:DA
Last Reading:
2 Minutes Ago
3. Take a Reading (After Pairing)
Take
a. Tap Take SpO2 in the Oxygen Saturation tile.
Take a Reading
Take SPO2
b. Tap Use Bluetooth (if not already selected).
c. Tap Take Reading.
d. Apply the Model 3230 to the nger. The unit will
Reading
automatically turn on and being measuring.
e. VistaPoint displays “Please wait connecting...”
while it retrieves the current reading. When the
Apply to
Finger
reading is complete, the oxygen saturation will be
displayed on the dashboard, with an indicator of
when the reading was taken.
Oxygen Saturation
If the oxygen saturation value is not displayed,
repeat the pairing process (Step 2 on previous page).
Take SpO2
f. Remove from nger when reading is complete.
Section 16: Using a Bluetooth Device to Upload Oxygen Saturation (Wrist)
NOTE: If the device has already been paired, go directly
to Step 4 “Start Continuous Measurement” below.
Reading
Complete
The Nonin Model 3150 is an optional pulse oximeter
device that measures blood oxygen saturation
(%SpO2) and uploads readings automatically using
Bluetooth. It is worn continuously on the wrist and
uses a separate ngertip sensor. Use only as directed
by your care team.
Refer to the Nonin Medical Model 3150 Operator’s
Manual to perform the following tasks:
• Unpack the device and install batteries.
• Attach the wristband.
• Attach the sensor. Note that dierent sensor types
are available. Use only the type recommended by
your care team.
1. Find the Bluetooth ID (Optional)
Note: This step is optional, and is only necessary when
using the Model 3150 in an environment where
multiple similar devices are being used (such as a
hospital).
Turn the Model 3150 wrist unit over and examine the
label. The Bluetooth ID begins with “BDA”. You will
need this for Step 4 below.
Fingertip Sensor
Model 3150 Wrist Unit
Bluetooth ID
2. Put Device in Pairing Mode
Remove and reinstall the batteries on the Model 3150
wrist unit. This places the Model 3150 in pairing mode
(the wrist unit display turns on and displays a
Bluetooth Symbol). The unit will remain in pairing
mode for 2 minutes.
Bluetooth Symbol
15
Page 16

Please wait connecting...
Cancel
%SPO2
Streaming Mode
98
Nonin 3150 00:0B:57:AC:66:DA
3. Pair New in VistaPoint
Take Oxygen Saturation
Manual Entry
Scanning for Devices
Take
a. Put device in pairing mode (previous step).
b. Tap Take SpO2 in the Oxygen Saturation tile.
c. Tap Use Bluetooth.
d. Tap Pair New.
e. Tap Model 3150 as the model.
f. “Scanning for Devices” will display. Tap the
Bluetooth ID of the pulse oximeter when it
appears. It should match the ID in Step 1 above.
Note: If you see a message asking you to conrm the
device pairing, tap Conrm.
Begin Pairing
Take SPO2
Use Bluetooth
Currently using Bluetooth Upload.
No device is currently paired. Select
Pair New to begin the pairing process.
Nonin Model 3150 (Wrist)
Devices Found:
00:0B:57:AC:0B:13
Tap Use Bluetooth
Pair New
Tap Nonin
Model 3150
Tap Bluetooth ID
Tap Pair New
4. Start Continuous Measurement
(After Pairing)
a. Tap Take SpO2 in the Oxygen Saturation tile.
b. Under “Use Bluetooth” check that the correct
pulse oximeter is displayed (if not correct, tap Pair
New). Tap Take Reading.
c. Apply the Model 3150 wrist unit to the wrist. Attach
the ngertip sensor to the nger.
d. VistaPoint displays “Please wait connecting...” and
then beings to display a continuous (streaming)
oxygen saturation value on the dashboard.
If the oxygen saturation value is not displayed,
repeat the pairing process (Step 3 above).
e. Monitor battery life and replace as necessary. With
continuous use a set of batteries will last up to 24
hours.
If the Model 3150 monitoring session is complete, tap
Disconnect in the Oxygen Saturation tile. This will
remove the pairing between VistaPoint and the Model
3150.
Start Continuous
Measurement
Take SPO2
Apply to Wrist
and Fingertip
Reading
Connecting to Nonin 3150 with Device
Address 00:0B:57:AC:66:DA
To cancel reading, click
Cancel Reading
Streaming
Begins
Oxygen Saturation
Reading
Disconnect
16
Page 17

mmHg
Standby Mode
136 /
83
A&D UA-651 - 3C:A3:08:07:98:59
Last Reading:
2 Minutes Ago
Take Blood Pressure
Manual Entry
Section 17: Using a Bluetooth Device to Upload Blood Pressure
Scanning for Devices
NOTE: If the device has already been paired, go directly
to Step 4 “Take A Reading” below.
The A&D UA-651 is an optional blood pressure monitor
that can upload blood pressure readings automatically
using Bluetooth. Use only as directed by your care
team.
Refer to the A&D Model UA-651 Instruction Manual for
basic instructions on setting up the device, including
installing batteries and using the blood pressure cu.
1. Find the Bluetooth ID (Optional)
Note: This step is optional, and is only necessary when
using the UA-651 in an environment where multiple
similar devices are being used (such as a hospital).
To nd the Bluetooth ID, turn the base unit over and
nd the label above the battery compartment. The
Bluetooth ID begins with “BT”. You will need this for
Step3 below.
2. Put Device in Pairing Mode
On the base unit, hold down the START button until “Pr”
is displayed. It is now in pairing mode.
Blood Pressure Cuff
Begin Pairing
Take BP
Model UA-651 Base Unit
START
Button
Bluetooth ID
Tap Use Bluetooth
3. Pair New in VistaPoint
a. Put base unit in pairing mode (previous step).
b. Tap Take BP in the Blood Pressure tile.
c. Tap Use Bluetooth.
d. Tap Pair New.
e. Tap Model UA-651 as the model.
f. “Scanning for Devices” will display. Tap the
Bluetooth ID of the blood pressure device when it
appears. It should match the ID in Step 1 above.
Note: If you see a message asking you to conrm the
device pairing, tap Conrm.
4. Take a Reading
a. Tap Take BP in the Blood Pressure tile.
b. Tap Use Bluetooth (if not already selected).
c. Tap Take Reading.
d. Put on the blood pressure cu and press the START
button on the base unit to take a reading.
VistaPoint displays “Please wait connecting...” while it
retrieves the current reading. When the reading is
complete, the blood pressure will be displayed on the
dashboard, with an indicator of when the reading was
taken. If the blood pressure is not displayed, repeat the
pairing (Steps 2 and 3 above).
Use Bluetooth
Currently using Bluetooth Upload.
No device is currently paired. Select
Pair New to begin the pairing process.
Model UA-651-BLE
Select UA-651-BLE
Take a Reading
Take BP
Take
Reading
Apply Cuff and
Press START
Blood Pressure
Take BP
Pair New
Devices Found:
00:0B:57:AC:0B:13
Select Bluetooth ID
Reading
Complete
Tap Pair New
17
Page 18
Pounds
Standby Mode
190.4
A&D UC-352 - 98:08:57:AC:66:DA
Last Reading:
2 Minutes Ago
Take Weight
Manual Entry
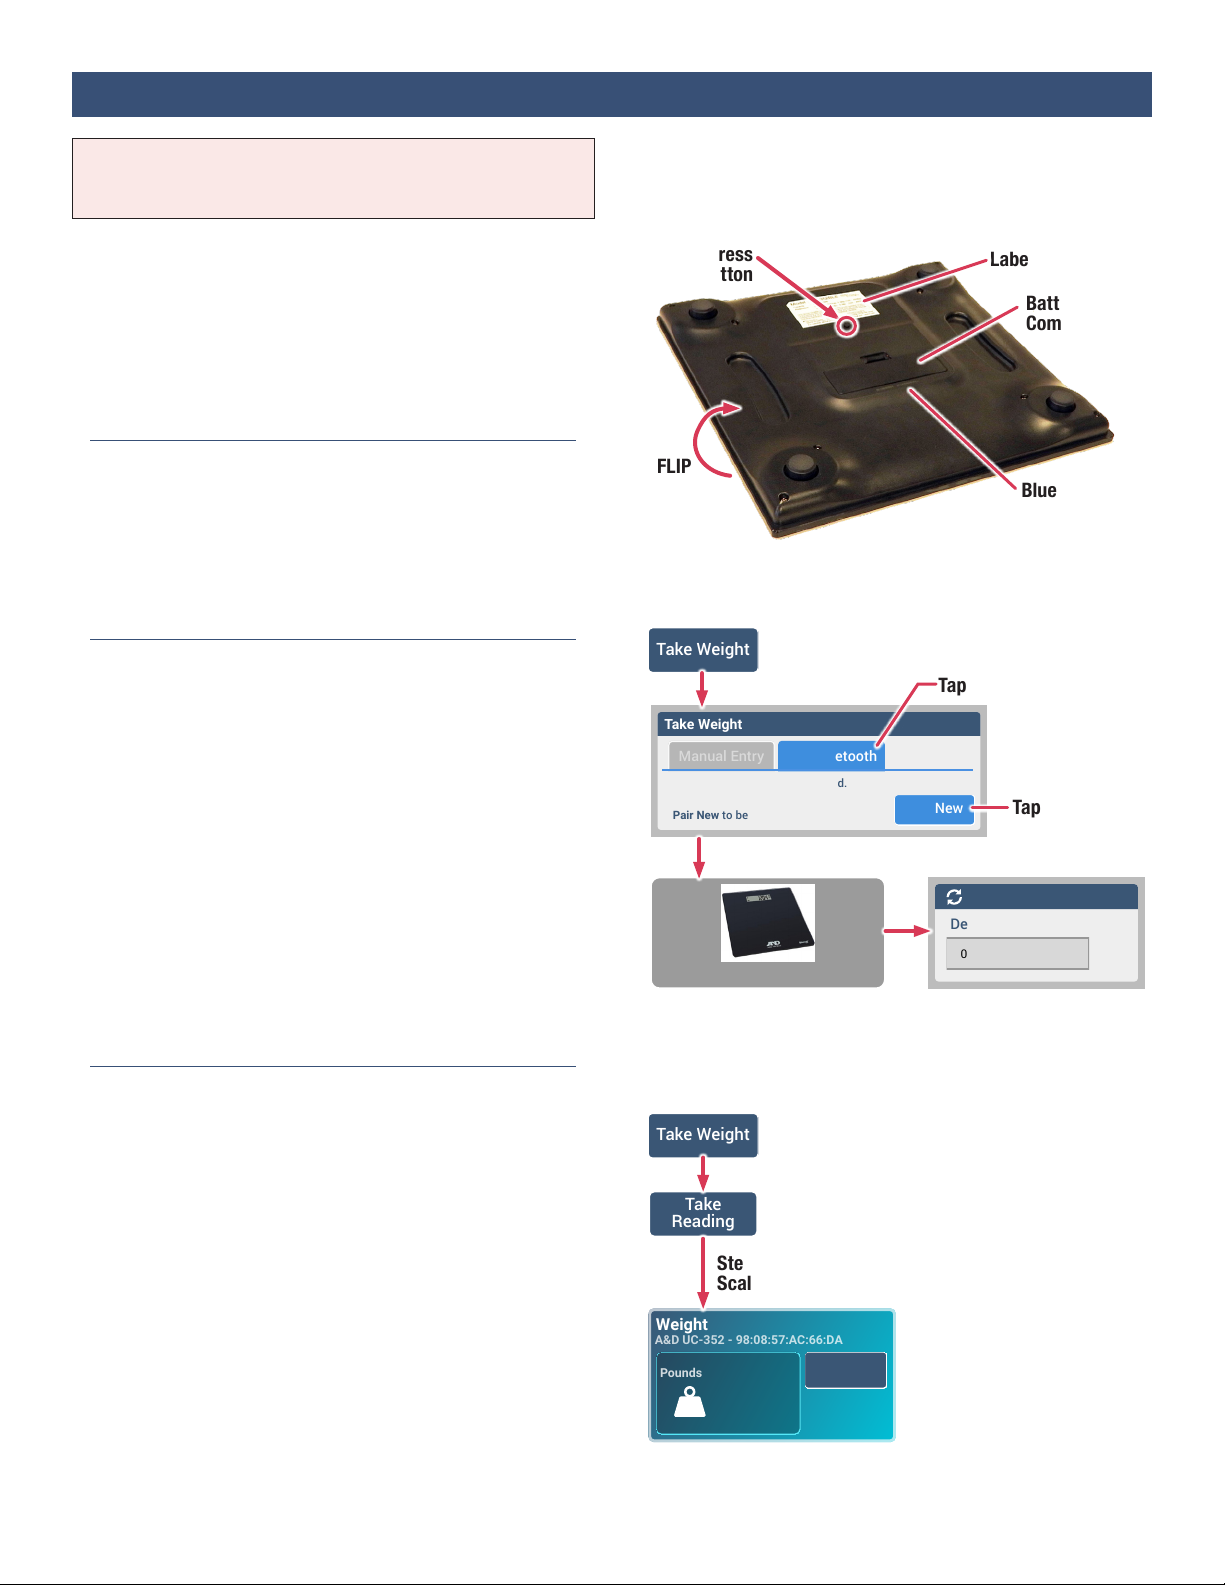
Section 18: Using a Bluetooth Device to Upload Weight
Scanning for Devices
NOTE: If the device has already been paired, go directly
to Step 3 “Take A Reading” below.
The A&D UC-352 is an optional weight scale that can
upload weight readings automatically using Bluetooth.
Use as directed by your care team.
Refer to the A&D Model UC-352 Instruction Manual
for basic instructions on setting up the scale,
including installing batteries and selecting weight
units.
1. Put Scale in Pairing Mode
Flip the scale over and hold down the SET button until
“Pr” is displayed on the front. The SET button can be
found between the label and the battery
compartment. The scale is now in pairing mode.
2. Pair New in VistaPoint
a. Put scale in pairing mode (previous step).
b. Tap Take Weight in the Weight tile.
c. Tap Use Bluetooth.
d. Tap Pair New.
e. Tap Model UC-352 as the model.
f. “Scanning for Devices” will display. Tap the
Bluetooth ID of the scale when it appears.
Note: If you see a message asking you to conrm the
device pairing, tap Conrm.
Press
SET Button
FLIP
Begin Pairing
Take Weight
Use Bluetooth
Currently using Bluetooth Upload.
No device is currently paired. Select
Pair New to begin the pairing process.
Model UC-352-BLE
Select UC-352-BLE
Label
Tap Use Bluetooth
Pair New
Devices Found:
00:0B:57:AC:0B:13
Select Bluetooth ID
Battery
Compartment
Bluetooth ID
Tap Pair New
3. Take a Reading
a. Tap Take Weight in the Weight tile.
b. Tap Use Bluetooth (if not already selected).
c. Tap Take Reading.
d. Step on the scale. Step o the scale when it beeps
and displays “Step O”.
VistaPoint displays “Please wait connecting...” while it
retrieves the current reading. When the reading is
complete, the weight will be displayed on the
dashboard, with an indicator of when the reading was
taken. If the weight is not displayed, repeat the pairing
process (Steps 1 and 2 above).
18
Take a Reading
Take Weight
Take
Reading
Step on
Scale
Weight
Take Weight
Reading
Complete
Page 19

Section 19: Troubleshooting
5:45 PM
100%
5:45 PM
100%
Message: Cloud Service Down
If you see this message, it indicates that the cloud
service is not operational at this time. Tap OK to
dismiss the message. No additional action is
necessary; the issue will be resolved as soon as
possible by the service provider.
Message: Cloud Connection Lost
Message: No Wireless Connection
Message: Vital Sign Data Loss
If you see one of these messages, it indicates that the
VistaTablet does not have a wireless connection, and
cannot upload vital sign data to the cloud. See
instructions below for Checking Your Wireless Connection.
If these problems persist, contact your care team for
further guidance.
Cloud Service Down
The cloud service is currently down. This
problem will be resolved soon.
Cloud Connection Lost
The VistaTablet device is not currently
uploading data to the cloud. Check that your
device has a good wireless signal (WiFi or
cellular). If this problem persists, contact
your healthcare provider.
No Wireless Connection
Vital sign data may be lost because the
memory on your VistaTablet device is almost
full. To resolve this issue, restore your wireless
connection (WiFi or cellular) as soon as
possible.
WARNING: Vital Sign Data Loss
Vital sign data is being lost because the memory on your
VistaTablet device is full. To resolve this issue, restore your
wireless connection (WiFi or cellular) as soon as possible.
If this problem persists, contact your
healthcare provider.
OK
OK
OK
OK
Checking Your Wireless Connection
If you use a cellular connection:
Check the cellular signal indicator in the status
bar. If there is no signal, move the VistaTablet to a
place with good signal.
Cellular Signal
Indicator
Good
Signal
No
Signal
Adding a Wi-Fi Connection
1. Press the Home Key and then tap the Wi-Fi Center
icon.
2. If Wi-Fi is OFF, tap the Turn ON Wi-Fi button to turn
Wi-Fi ON.
3. Tap the name of the network you want to connect
to. Enter the password (if asked) and tap CONNECT.
4. Tap Back to close the Wi-Fi Center.
– OR –
If you use a Wi-Fi connection:
Check the Wi-Fi signal indicator in the status bar.
If there is no Wi-Fi, you will need to connect to a
Wi-Fi network. See Adding a Wi-Fi Connection below.
Wi-Fi Signal
Indicator
Good
Wi-Fi
Home Key
Are you sure you want to turn on WiFi?
Yes No
No
Wi-Fi
Select network and enter password
19
Page 20
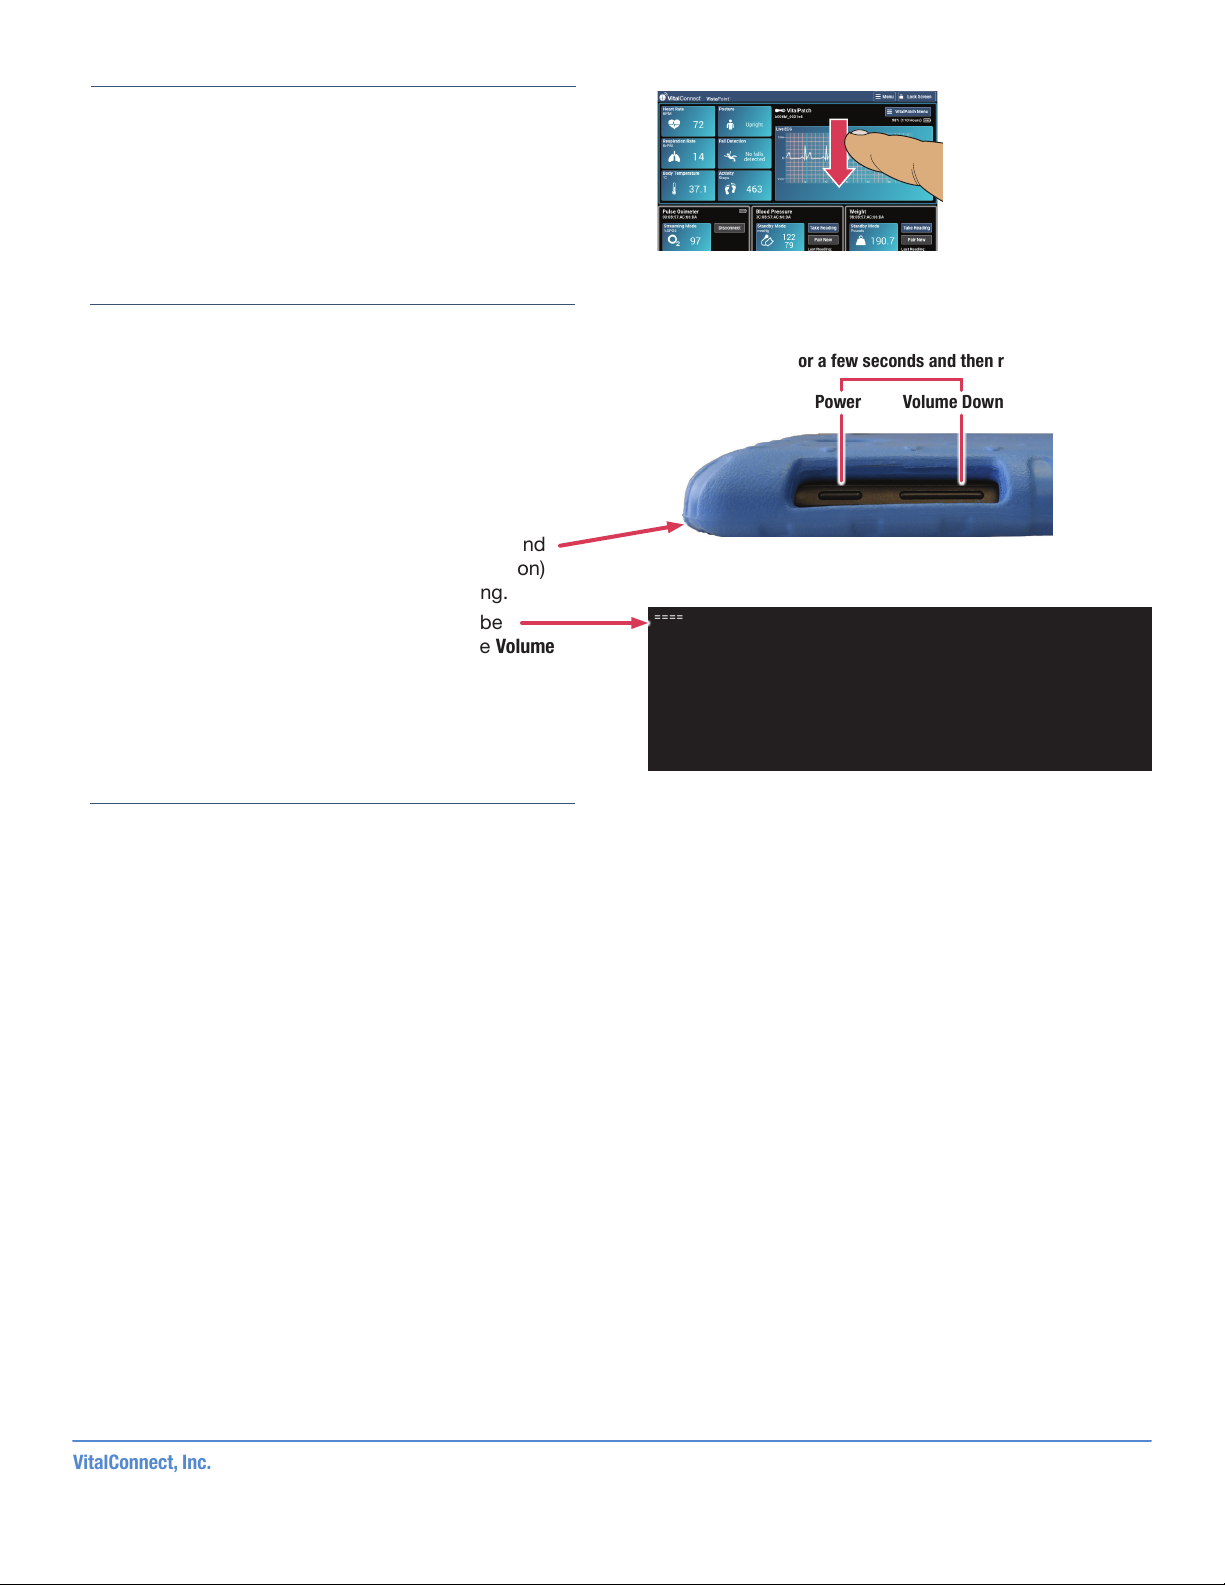
Dashboard Stops Responding
If vital signs do not appear to be updating or the
screen becomes unresponsive (for example, when
pairing devices), you can refresh the current view by
dragging your nger across the display and then
releasing.
Drag nger down
display to refresh
Cannot Power-On VistaTablet
If the VistaTablet does not turn on by pressing the
power key (see Section 1 on Page 2), perform a restart
as follows:
1. Plug VistaTablet into the charger. If the battery is
completely discharged, the VistaTablet may need
several minutes to recharge before you can restart
the device (next step).
2. Restart the VistaTablet by holding the Power and
the Volume Down keys (next to the Power button)
down for a few seconds and then releasing.
3. A “Maintenance Boot Mode” screen will be
displayed (see gure to the right). Use the Volume
Up and Volume Down keys to highlight “1. Normal
Boot”.
4. Press the Home key to conrm your selection. The
VistaTablet will now start normally.
Bluetooth Connection Issues
If VistaPoint has issues connecting to or
disconnecting from the VitalPatch, the following steps
are recommended:
Hold both Power and Volume Down keys
down for a few seconds and then release
Power
==================================================================
Use the volume up/down keys to move highlight
==================================================================
(*) 1. Normal Boot : Restart your device normally.
( ) 2. Factory Reset : Warning!, Erases all data and application
( ) 3. Safe Mode : Temporarily disable third party application.
( ) 4. Power down : Turn off your device.
Use Volume Up and Volume Down to change selection.
Press the Home key to conrm.
Maintenance Boot Mode
and the home key to select.
Volume Down
• Ensure that the VitalPatch is turned ON. Note that
you cannot connect to a VitalPatch that has
reached the end of its lifespan. Replace the
VitalPatch as necessary.
• Reattempt connection to the VitalPatch through
VistaPoint. See Section 7 on page 6.
• If you are still unable to connect to the VitalPatch,
consider moving to a location that may have less
Bluetooth interference.
VitalConnect, Inc.
224 Airport Parkway, Suite 300, San Jose, CA 95110 | (408) 963-4600 | www.vitalconnect.com | support@vitalconnect.com
© 2019 VitalConnect. A list of our trademarks can be found at www.vitalconnect.com. All other marks may be trademarks of their respective companies.
20
 Loading...