

Vitachef VC001-12-120 User Manual
TM
THE VITACHEF
STEAMER SKILLET Model # vC001-12-120
The VitaChef 12-inch Electric Steamer Skillet
• Steams, roasts, pan fries, grills, stews, bakes and more.
• Luxurious tempered glass lid lets you see what’s inside.
• Removable base for easy cleaning and storage.
• Great for use as a buffet server.
Instructions ©2012 VitaChef / To view video instructions, visit the website at www.vitachef.com

This is a listed appliance. The following important safeguards are recommended
by most portable appliance manufacturers.
IMPORTANT SAFEGUARDS
To reduce the risk of personal injury or property damage, when using electrical
appliances basic safety precautions should always be followed, including the following:
1. Read all instructions.
2. To reduce the risk of re, do not plug in with base/leg assembly removed.
3. Be sure that handles are assembled and fastened properly before using this
appliance. See instructions regarding handles on page 4.
4. Do not touch hot surfaces. Use handles or knobs. Do not touch hot surfaces
with your bare hands.
5. To protect from electrical shock, do not immerse heat control, cord, or plug in
water or other liquid.
6. Close supervision is necessary when any appliance is used by or near children.
7. Unplug the heat control from outlet when not in use and before cleaning. Allow
to cool before putting on or taking off parts, and before cleaning the appliance.
8. The use of accessory attachments that are not recommended by the
manufacturer of this appliance may cause injuries.
9. This appliance is not intended for deep frying foods.
10. Do not use outdoors.
11. The reversible steamer plate and extension ring are not intended for use
while pan-frying foods. Use only the electric skillet portion when pan frying.
12. Do not let cord hang over edge of table, counter or touch hot surfaces.
13. Do not place unit on or near a hot gas or electric burner or in a heated oven.
14. It is recommended that this appliance not be moved when it contains hot oil or
other hot liquids. If it must be moved when it contains hot oil or other hot liquids
use extreme caution.
15. Always attach heat control to appliance rst, then plug cord into the wall outlet.
To disconnect, turn control to “OFF” then remove plug from wall outlet.
16. Do not operate any appliance with a damaged cord or plug or in the event the
appliance malfunctions or has been damaged in any manner. Return the
appliance to the VitaChef Service Department for examination, repair, or
electrical or mechanical adjustment.
17. Do not use appliance for other than intended use.
SAVE THESE INSTRUCTIONS
THIS PRODUCT FOR HOUSEHOLD USE ONLY.
1

IMPORTANT CORD INFORMATION
This appliance has a polarized plug (one blade is wider than the other). To reduce the
risk of electric shock, this plug is intended to t into a polarized outlet only one way. If
the plug does not t fully into the outlet, reverse the plug. If it still does not t, contact a
qualied electrician. Do not attempt to modify the plug or your outlet in any way.
A short power supply cord (or cord set) is provided to reduce the risk resulting from
becoming entangled in or tripping over a longer cord. An extension cord may be used
if care is properly exercised in its use.
If an extension cord is used, the marked electrical rating of the extension cord should
be at least as great as the electrical rating of the appliance. The extension cord should
be arranged so that it will not drape over the countertop or tabletop where it can be
pulled on by children or tripped over unintentionally.
Connect the power supply cord to a 120VAC electrical outlet only. Always attach
heat control to appliance rst, then plug cord into the wall outlet. To disconnect, turn
control to “OFF” then remove plug from wall outlet. Unplug from outlet when not in
use and before cleaning. Allow to cool before putting on or taking off parts, and before
cleaning the appliance.
Warning: Do not leave the cord plugged into the electrical outlet when the appliance
end of the cord is not connected to the unit, as this may create a safety hazard; always
unplug the cord from the electrical outlet when not in use.
To protect against electrical shock, do not immerse heat control, cord or base unit in
water or other liquid while plugged in.
Do not let cord hang over edge of table, counter or touch hot surfaces. Do not let the
cord touch hot surfaces such as a stove burner, as this poses the danger that the cord
could be burned through, exposing the electric wires within the cord and creating
the hazard of electric shock to anyone who then comes in contact with it or the
surrounding surface.
Do not operate any appliance with a damaged cord or plug or in the event the
appliance malfunctions or has been damaged in any manner. Return the appliance
to the VitaChef Factory Service Department for examination, repair, or electrical or
mechanical adjustment.
To view video instructions, visit the website at www.vitachef.com
2

CONGRATULATIONS ON YOUR NEW PURCHASE!
Your new VitaChef Steamer Skillet is bound to become one of the most versatile
and exciting appliances in your kitchen. You can cook perfect healthy meals every
time, steam many varieties of foods, make terric soups and stews, or use
it as a food warmer. You can also fry, bake and roast. The VitaChef Steamer Skillet
is quick and simple to use. You’ll nd yourself using your new Steamer Skillet to
prepare many of your favorite dishes and even create new and exciting recipes.
Have fun!
Please visit the website at www.Vitachef.com to register your warranty.
BEFORE THE FIRST USE
As received, the Skillet Base and Lid will be nested inside the pan. The Reversible
Steamer Plate, Extension Ring, Handles and Fittings will also be inside the pan,
wrapped in paper. Remove all packing material and wash the skillet, steamer
plate, extension ring and lid according to the “Care and Cleaning” instructions on
pages 7-8.
Important: Before using your skillet, it must be fully assembled as instructed
on the next page.
3
HOW TO ASSEMBLE
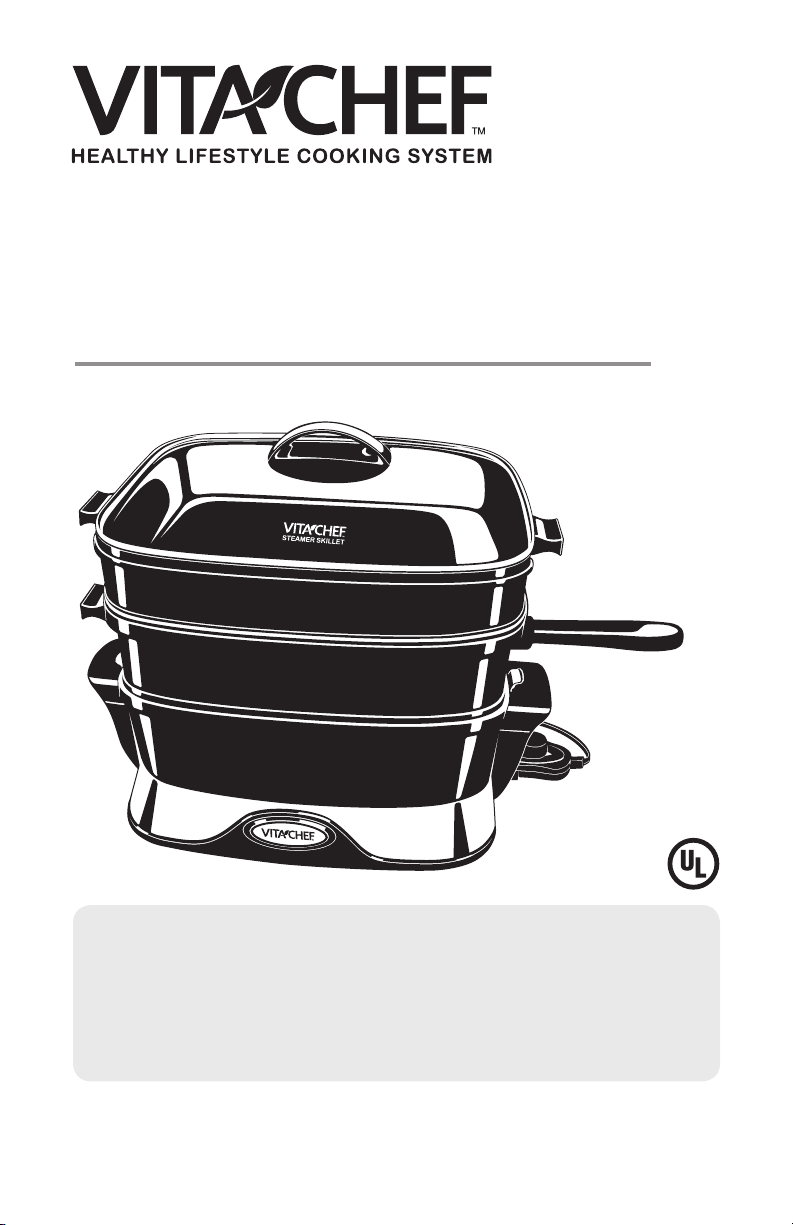
Fig. A
Recessed Areas
1. Place the removable base on a at surface
with the rubber feet down. The VitaChef logo
should be right side up and facing you. Lift the
handles and fold them out to the fully extended
position (Fig. A).
2. Set the skillet pan onto the base so the heat
VitaChef Logo
Fig. B
Handle extended
position
control is on the right. The supports should t
into the recessed areas on the base (Fig. B).
3. Attach the base to the pan by rotating the
handles towards the pan until you hear the
latches lock into place (Fig. C). When properly
assembled, you should not be able to lift the
pan off of the base.
4. Attach the lid handle to the lid. Remove
Supports Recessed Area
the two screws from the handle. For easiest
alignment, hold the handle so the screw holes
Fig. C Handle locking
mechanism
are facing up. Position the inverted lid over
the handle and align the lid holes with the
handle holes. Insert the two screws through
the holes. Using a Phillips type screwdriver,
fasten handle to lid until it is secure. Note:
Continuing to tighten handle, once it is secure,
can result in stripping of screws or cracking of
handle or lid.
5. Attach the long handle to the Reversible Steamer Plate. Remove the handle and
screws from packaging. Note the two permanently mounted fasteners protruding
from the wall of the steamer plate. Align the holes of the handle with the
fasteners. Make sure the projection on the mating surface of the handle lines up
with the depression in the wall of the steamer plate. Place one of the screws
through the recessed hole of the handle, loosely tighten the rst screw with a
Phillips type screwdriver, and repeat the process with the second screw. Now
tighten the handle until it is secure. Note: Continuing to tighten the handle, once it
is secure, can result in stripping of screws or cracking of the handle.
To view video instructions, visit the website at www.vitachef.com
4
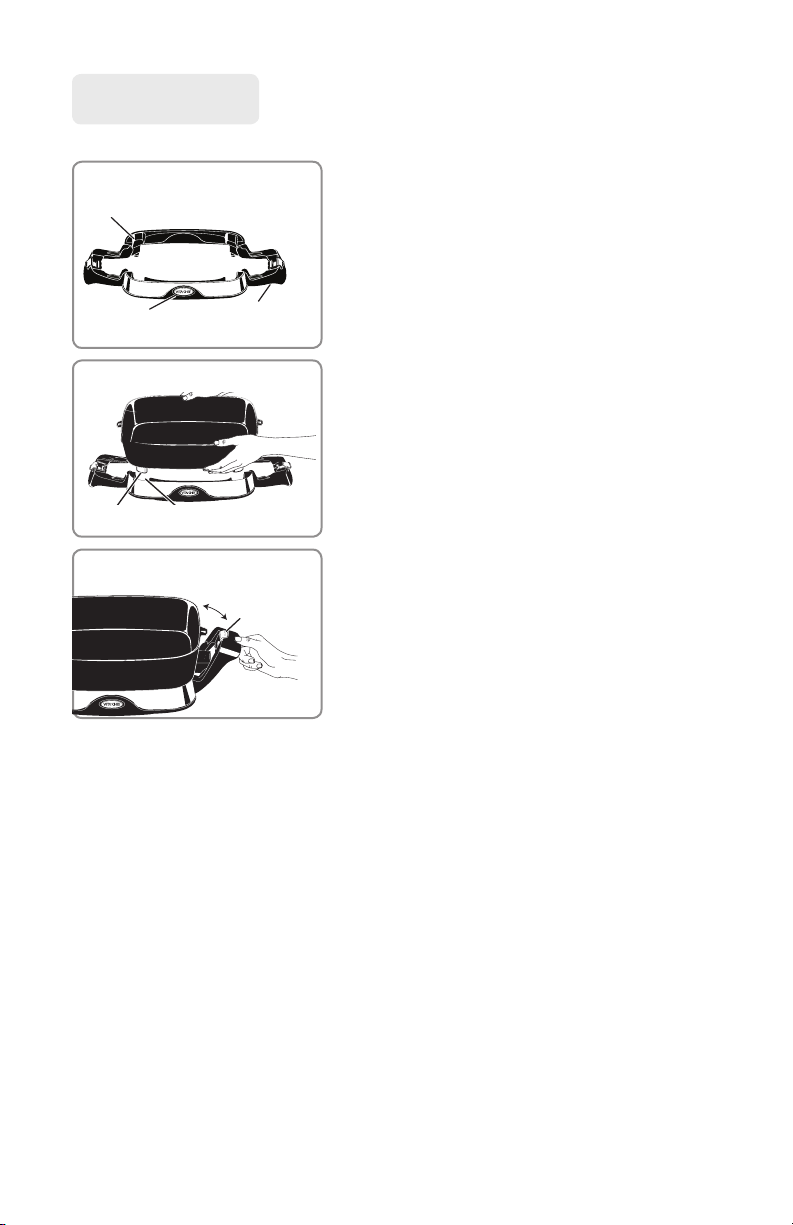
CONFIGURATIONS
Fig. 1
Fig. 3
Fig. 5
Fig. 2
Fig. 4
Fig. 6
1. Pan frying, sautéing,
baking, soups
2. Steaming
3. Baking, roasting
4. Steaming larger
quantities
5. Burger former/Portion
control
6. Flat cooking surface
5

HOW TO USE
Caution: This product is not intended to melt wax, gels, plastics, glue, or
other materials for making candles or for other hobbyist activities, or
in any commercial or business application.
1. Place assembled skillet on a dry, level, heat resistant surface.
2. Plan cooking methods to be used. If desired, “season” the nonstick cooking
surface by rubbing lightly with cooking oil. Remove excess oil with a paper towel.
3. Insert the temperature control probe into the skillet so the two electrical pins
on the skillet are fully inserted into the heat control. Connect cord to a 120VAC
electrical wall outlet only.
4. When setting temperature, the temperature light will turn on. Preheat skillet.
Temperature light goes off when the selected temperature has been reached
(this takes approximately 5 to 10 minutes). Depends on cooking method.
5. Prepare food for cooking. Because the skillet features a nonstick nish, food
may be prepared with little or no oil.
6. Place food in skillet and cook according to the Temperature Timetable
(pages 9-10). Heat should be adjusted according to personal preference and
particular food being cooked. During cooking, temperature light will go on and
off indicating desired temperature is being maintained.
7. For best results use heat-resistant nylon, plastic, or wooden utensils in the skillet.
Do not use metal utensils as they may scratch the nonstick surface.
Do not cut foods on the cooking surface.
8. Turn heat control to OFF when cooking is completed. Unplug heat control from
wall outlet then from appliance. Allow skillet to cool before cleaning.
9. It is not recommended to place the unit directly under cabinets when operating
as this product produces steam.
10. Caution: When the lid is placed on the skillet and the contents are steaming,
it is normal for some steam to vent from the unit. Use caution when reaching for the
handles when steam is venting, as contact with steam can cause burns.
11. Avoid reaching over the Steamer when operating.
12. Caution: To avoid steam burns, especially when checking foods while cooking,
keep hands and face away from the steam vent. When removing the lid, be careful
to lift it slowly and lift it so that the steam will rise in a direction away from
your body.
13. To avoid possible scalding or injury from hot steam, lift and open lid carefully in a
direction away from you. Hold lid until the steam has escaped and the hot
condensed water has drained from the lid back into the steamer.
14. Steaming times will vary depending on desired doneness and food quantity, size
and arrangement. The cooking times in the Steaming Guide are suggested times.
You may want to lengthen/shorten cooking times to suit your taste.
15. To steam food, ll the skillet with a minimum of three (3) cups of tap water or to the
appropriate ll line. Do not exceed the level of the ll line. Take care not to get
water on or near the heat control.
To view video instructions, visit the website at www.vitachef.com
6
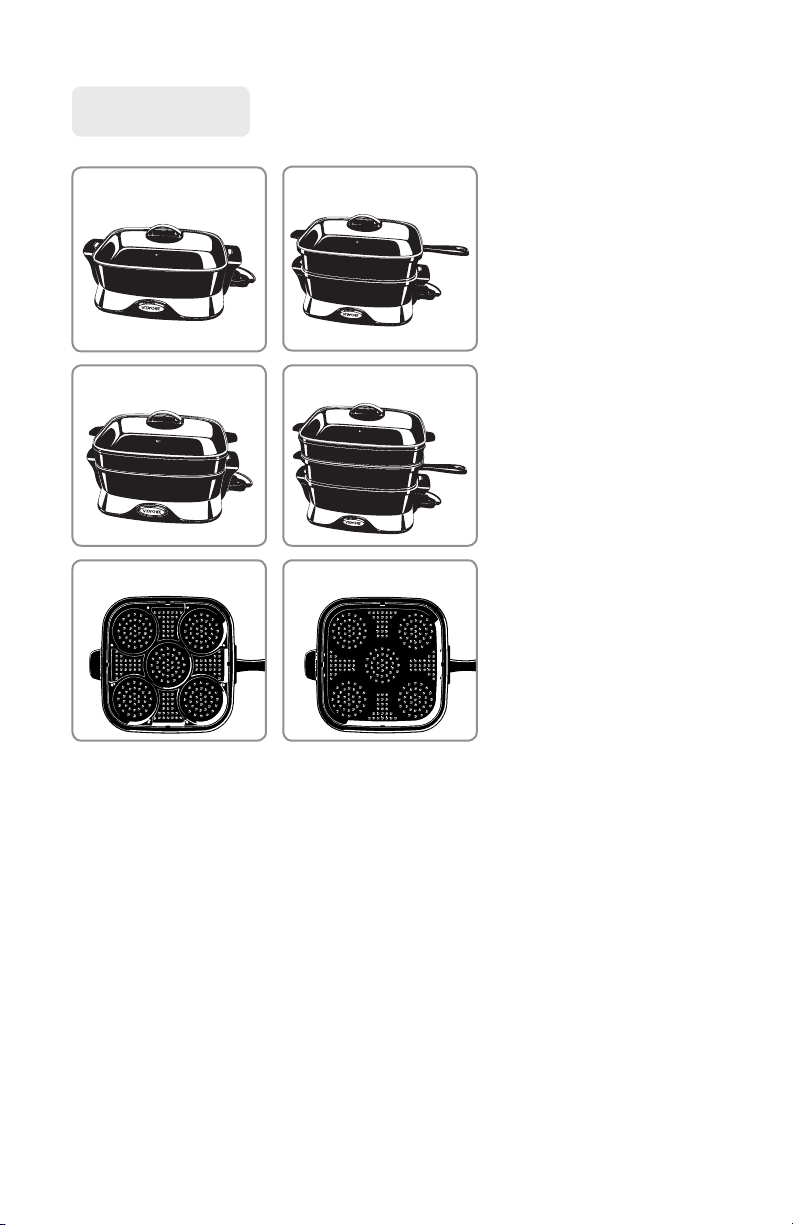
Caution: Filling and Checking the Water Level
To steam food in the Steamer Skillet, ll the skillet with a minimum of three (3) cups of
tap water. Do not exceed the level of the ll line. Take care not to get water on or
near the heat control.
Note: You can safely mix seasonings with the water without damaging the unit.
During cooking, periodically (about every 10-15 minutes) check the water level.
• Avoid reaching across the skillet to avoid
contact with escaping steam.
• Stand to the side of the long handle.
• Lift the long handle from the underside at the
end away from the reversible plate and view
the water level between the skillet and the
reversible steamer plate.
• If the water level is low, use the long handle
to lower the reversible plate onto the skillet.
Carefully, lift the lid by the handle so the
steam escapes away from you. Allow any
condensation to drip from the lower edge of
the lid back onto the steamer plate. Avoid
dripping liquid on food items if possible. Pour
the estimated amount of liquid needed to nish
the cooking process onto the steamer plate.
Do not exceed the level of the ll line.
CARE AND CLEANING
CAUTION: Unplug cord from both the electrical outlet and from the unit, and allow
Steamer Skillet to cool before washing.
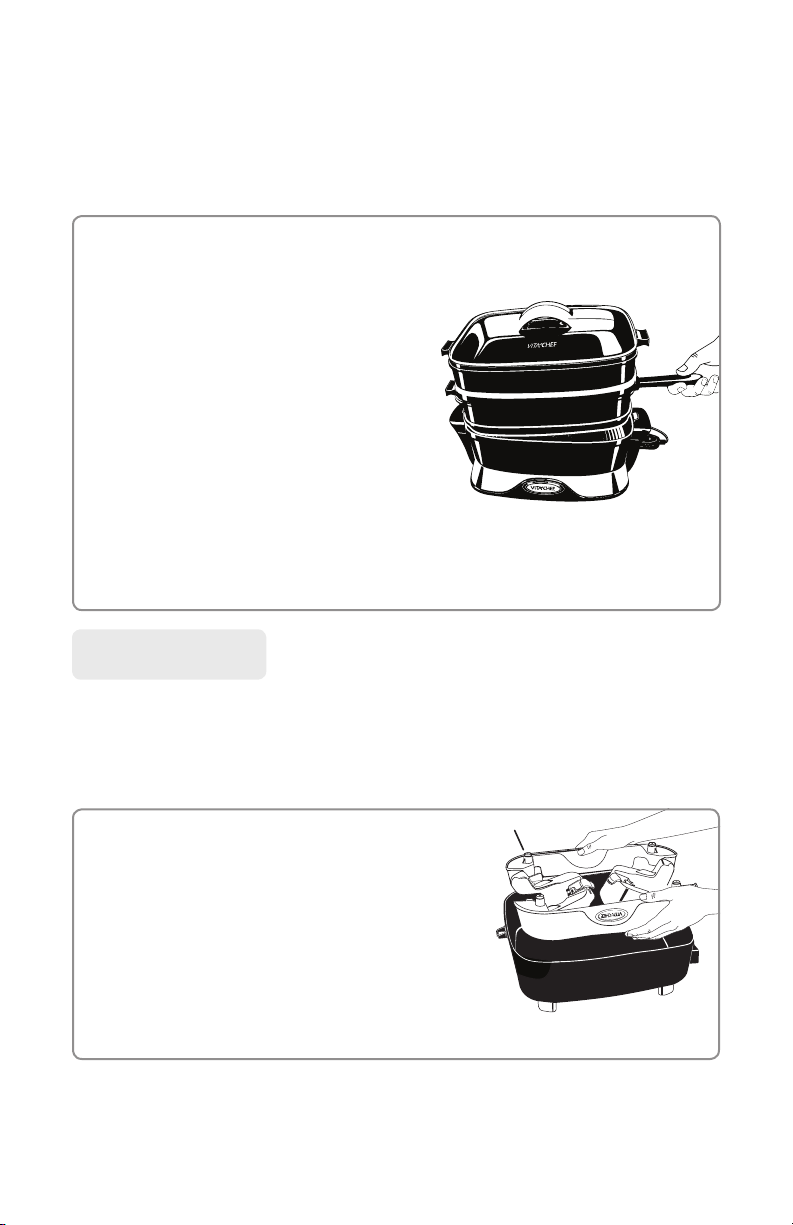
To disassemble the skillet for cleaning and storage:
1. Using your thumbs, push the handle latches away
from the skillet and rotate the handles down until
they rest on the counter.
2. Lift the skillet pan off of the base and clean
as described below.
3. For compact storage, rotate the handles up and
inward and place the base in the pan inverted so the
rubber feet are facing up. Then place the lid
upright onto the pan.
7
 Loading...