

Page 1

VITA VMKMaster
VITA shade control
VITA shade reproduction
VITA shade communicationVITA shade taking
Working Instructions
®
For veneering metal-ceramic substructures in
the conventional CTE range (13.8 - 15.2).
Available in VITA SYSTEM 3D-MASTER and
VITA classical A1-D4 shades.
Edition: 07.12
VITA shade, VITA made.
Page 2

VITA VMKMaster
®
Table of contents
Competence in ceramics 3
Material properties 4
Facts worth knowing about the CTE 6
Light and color 7
Indication range 8
Degree of firing for veneering ceramics 9
Preparation information 10
Substructure design of a bridge 12
Substructure design of a ceramic shoulder 13
General information on the opaque 14
Application of the opaque 15
Application of the opaque for
a ceramic shoulder 17
Processing of VITA MARGIN material 26
Application of a ceramic shoulder 27
Individualized layering
based on the example of a single crown 30
Firing chart 36
Equipment 37
Shade selection tools 38
Classification tables 39
Explanation of the materials 40
Sets 42
Liquids 45
Accessories 46
Hazard information 47
STANDARD layering using
the example of a bridge 18
2
Page 3

VITA VMKMaster
®
Competence in ceramics
VMK – the story of success continues
VMK 68 – VMK 95 – VMK Master
®
The first metal-ceramic system developed in Europe was
launched into the market by VITA Zahnfabrik in 1962.
This VMK (VITA Metall Keramik) system which is still in
use today includes dental ceramic materials of VITA
Zahnfabrik which were fired to a precious metal alloy of
Degussa Co.
Today continuously growing requirements on function and
esthetics of metal-ceramic restorations confront us with
the task to develop materials which do not only provide
numerous individualization options but also enable us to
achieve a convincing result with little effort.
To ensure a well-balanced combination of advanced
materials and easy handling, the excellent processing
characteristics of VMK 95 were combined with consequently perfected materials.
The result of this development process is VITA VMK
Master - a material without any compromises.
Simplicity and dependability achieved through experience.
VITA VMK Master offers the user all possibilities to
restore lost hard tooth substance in a natural and esthetic
manner.
From solving rather simple problems to more complex
patient cases - a single material is available which takes
all our development goals into account.
Based on a classic and proven layering method, the use
of VITA VMK Master allows to fabricate restorations with
a natural appearance. Any challenge can be met individually thanks to the wide range of additional materials
and a truly natural restoration can be obtained.
VITA VMK MASTER is a veneering ceramic for metal
substructures made of high gold content, reduced gold
content or palladium-based alloys in the conventional CTE
range. The ceramic is particularly suitable for veneering
non-precious metal substructures thanks to its firing
temperature and chemical-physical properties.
VITA VMK Master is available in VITA SYSTEM
3D-MASTER and the original VITA classical A1-D4
shades.
3
Page 4

VITA VMKMaster
®
Material properties
VITA VMK Master is a conventional metal ceramic.
Optimized manufacturing processes and a new distribution of particle sizes provide the development basis to
obtain a product featuring good stability, low shrinkage
as well as simple and economic processing for the
fabrication of high-quality, esthetic restorations.
The structure of VITA VMK Master consists of two
principal constituents: natural potassium (KAISi3O8),
orthoclase and sodium bicarbonate feldspars (NaAISi3O;
albite) constitute the largest proportions and are
frequently referred to as tectosilicates in literature since
they form three-dimensional networks in the veneering
ceramic. Potassium feldspar, which is essential for
manufacturing the VITA ceramics, helps to achieve ideal
abrasion on the antagonist tooth and chemical stability
for the oral system.
Orthoclase melts incongruently, i.e. melt and solid reveal
different compositions. When using this type of feldspar,
a melt is obtained which forms the glass phase and the
leucite (KAISi2O6) during solidification.
Leucite represents the crystalline phase of the VMK
materials and is essential for the ceramic materials in
two respects: on the one hand, it ensures the stability,
i.e. it guarantees that the shape of firing object remains
unchanged even at high temperatures. On the other hand,
the coefficient of thermal expansion (CTE) of the veneering ceramic is controlled by the proportion of leucite.
Moreover the crystals cause increased strength of the
veneer and reduce crack propagation.
With 15 - 25 %, quartz is another main constituent and is
added to increase the proportion of the glass phase and
hence the traslucency.
Metal oxides are also added to the veneering ceramics to
optimize the optical properties. Accordingly, metal oxides
are used as opacifiers and thus the translucency and the
opalescence are adjusted. In addition to the metal oxides,
pigments are added to the VITA metal ceramics, which
are produced in a special fritting process; these pigments
are not burned and remain unchanged over the years but
determine the final shade of the fired ceramic and thus
provide the restoration with long-term shade stability.
Physical properties Value
CTE (25 – 500°C) - OPAQUE
Softening point - OPAQUE
Transformation point - OPAQUE
CTE (25 – 500°C) - DENTINE
Softening point - DENTINE
Transformation point -DENTINE
Solubility - DENTINE
3-point flexural strength -DENTINE
Average particle size - DENTINE
Adhesive bond
Density - DENTINE
Unit of
measure
10-6· K
°C
°C
-6
· K
10
°C
°C
µg/cm
MPa
µm
MPa
3
g/cm
-1
-1
2
13,6–14,0
approx. 670
approx. 575
13,2–13,7
approx. 660
approx. 565
<10
approx. 90
approx. 19
> 50
approx. 2,4
4
Page 5

ISO- VMK A B
C
0
20
40
60
80
100
MPa
1
VITA VMKMaster
limit Master Competitor
®
Material properties
Physical properties
In addition to excellent bonding to metal and perfect thermal stability,
VITA VMK MASTER features extremely low solubility in acids. Moreover,
compared to materials of competitors and the ISO limit according to ISO 6872,
VITA VMK MASTER exhibits outstanding flexural strength values.
2
Figures 2 and 3 show a fired opaque material. The dark layer is the fired
ceramic and the light one is the metal substructure.
The highly homogeneous opaque layer of VITA VMK MASTER between these
two layers can be seen in figure 2. Uniform distribution of the individual
opaque components can be clearly recognized.
Bubbles and small cracks in the non-homogeneous opaque of a competitor
can be seen in figure 3.
3
Thanks to a special processing step, a very homogeneous structure of the
opaque could be achieved. Bonding to the metal alloy could also be
considerably improved by the homogeneous distribution; the application
behavior was optimized to ensure that a creamy consistency is obtained after
mixing with the opaque liquid. The mixed opaque can be agitated onto the
sandblasted substructure even more easily and the homogeneous, creamy
surface eliminates the formation of bubbles. Bonding to the metal
substructure is considerably facilitated and improved.
Fig. 1: 3-point flexural strength values according
to ISO 6872
Fig. 2: SEM photo of the very homogeneous
VITA VMK Master opaque structure
Fig. 3: SEM photo of a poor opaque structure
5
Page 6

VITA VMKMaster
m
a
r
i
c
e
C
r
e
u
t
m
c
a
u
r
Horizontal
section
through a
schematic
crown
t
e
r
t
s
b
u
S
®
Facts worth knowing about the CTE
Our practical experience in the CTE range of 13,8–15,2·10-6·K-1has shown that
good results can be achieved when the CTE of the alloy (measured at 25 600°C) is within the range 14.0 -14.4·10-6·K-1.
In the case of alloys with a CTE range (measured at 25 -600°C) ≥ 14.5 · 10-6·K-1,
slow cooling should be used from the 1st dentine firing onwards. Normally the
veneering ceramic is cooled down quickly at a temperature at which it is
viscous or liquid. During cooling stress is formed in the glass matrix since the
outer layer cools down more quickly than the inner layer of the metal ceramic.
As a result, the inner side of the veneering ceramic is exposed to tensile stress
and the surface to compressive stress. If there are additional large differences
in the CTE (alloys >14.0 -14,4·10-6·K-1), the stress that is normally formed during
cooling can be minimized by long-term cooling. If the alloy has a higher
thermal expansion coefficient, cooling from 900°C – 700°C must not be
completed in less than 3 minutes.
If the CTE of the substructure material is considerably lower than the CTE of
1
the veneering ceramic, tangential tensile stress will increase and form cracks
that run to the outside. This may result in late cracks (fig. 1).
i
a
l
If the CTE of the substructure material is considerably higher than the CTE of
the veneering ceramic, tangential compressive stress will increase and form
cracks that run almost parallel to the substructure.This may result in flaking
(fig. 2).
S
S
b
u
b
u
C
r
t
s
C
r
t
s
a
r
e
r
u
t
c
u
Horizontal
section
through a
schematic
crown
a
r
e
r
u
t
c
u
Horizontal
section
through a
schematic
crown
The ideal tangential and radial tensile stress is ensured if the CTE of the cera-
m
i
c
e
m
a
2
t
e
r
i
a
l
mic has been optimally matched with the CTE of the substructure material
(fig. 3).
Optimal preconditions are given if the veneering material features a somewhat
lower CTE value than the substructure material. Due to adhesive bonding, the
ceramic must follow the thermal behavior of the substructure material. If cooled down, the ceramic is exposed to slight tangential compressive stress.
If a substructure material is veneered with ceramic, the thickness of the veneer
m
i
c
e
m
a
3
t
e
r
i
a
l
is a decisive factor in addition to the CTE value. Accordingly, differences in
strain (radial tensile stress) are obtained, which will grow in case of increasing
layer thickness.
6
Page 7

VITA VMKMaster
®
Light and color
Natural dentine exhibits various shades and degrees of opacity.
Natural enamel, however, may be translucent and opaque.
The shade effect is produced by reflection of light.
Light is not only reflected on the surface but - due to the translucency
of natural teeth - also from the depth, i.e. translucent elements of teeth
are also subject to ambient influences. The color impression can be
noticeably changed through different lighting conditions.
The more translucent a body, the deeper light will penetrate into
it and the greyer it will appear. If the opacity increases, the level
of grey will decrease and the lightness will increase.
Translucency
transparent = pervious to light
translucent = milky, not transparent
opaque = impervious to light
Opalescence
opal-like, reddish-bluish iridescence
Appears to be reddish in transmitted light and bluish in incident light
Fluorescence
Property of some materials to shine after exposure to light. Dental ceramics
are colored with bluish-whitish fluorescences and subsequently have
a blue-white or yellow-green glow. This phenomenon can be clearly
observed in black light, diffuse light (fog) and sunlight.
7
Page 8

VITA VMKMaster
®
Indication range
Indication
metal-ceramic full veneers
metal-ceramic partial veneers
Contraindication
Bruxism
Firing temperature
When using dental ceramics, the firing result largely depends on the individual
firing procedure and the substructure design of the user. The type of furnace,
the location of the temperature sensor, the firing tray as well as the size of the
object during the firing cycles are essential factors for the quality of the firing
result. Our application-technical recommendations (regardless whether they
have been provided orally, in writing or in the form of practical instructions) are
based on extensive experience and tests. The user, however, should consider
this information only to provide basic values. If surface, transparency and
degree of gloss should not correspond to the firing result that is achieved under
optimal conditions, the firing procedure must be adjusted correspondingly.
The crucial factors for the firing procedure are not the firing temperature
displayed by the furnace but the appearance and the surface condition of the
ceramic after the firing process.
Note: Firing trays may also have a major influence on the result.
All firing temperatures for VITA VMK Master are based on the use of black
ceramic firing trays. When using light firing trays, the temperature must
be raised by 10 – 20 °C depending on the type of furnace that is used.
8
Page 9

920
940
980
T
468
10
Zeit [min]
960
VITA VMKMaster
®
Degree of firing for veneering ceramics
Temperature [°C]
Fig. 1: Schematic view of the fired firing samples
In addition to the firing temperature, the correct degree of firing of
a veneering ceramic depends on other parameters such as:
– Preheating temperature and time
– Heat-up time until firing temperature is reached
– Holding time of the ideal firing temperature
– Vacuum (level and duration)
– Position of the firing object in the furnace
Time [min]
Figure 1 shows that firing samples with the same degree of firing can be
prepared at different firing temperatures by changing the holding time and
the heat-up time. Of course, firing temperature and the heat-up times need
to be adapted to the respective veneering ceramic and furnace.
This test clearly demonstrates that the same degree of firing can be achieved
both with higher temperatures and shorter heat-up times and lower temperatures and longer heat-up times.
The temperature and the heat-up time for the furnace in use have been
correctly adjusted, if the firing sample is transparent and has an intensive
shade and sharp edges.
If the end temperature is too high, the sample will have a "greasy" gloss and
rounded edges (to the right, above the diagonal).
If the end temperature is too low and the heat-up time too short, the firing
sample appears to be milky and "dull" (to the left, below the diagonal).
Fig. 2
During laboratory use, correct firing is indicated if the surface of the ceramic
has a slight gloss (fig. 2, to the right). If the ceramic appears to be milky and
non-homogeneous, the correct degree of firing could not be achieved
(fig. 2, to the left). If the desired result is not achieved, approach the correct
firing temperature in steps of 5-10°C.
9
Page 10

VITA VMKMaster
®
Preparation information
General information
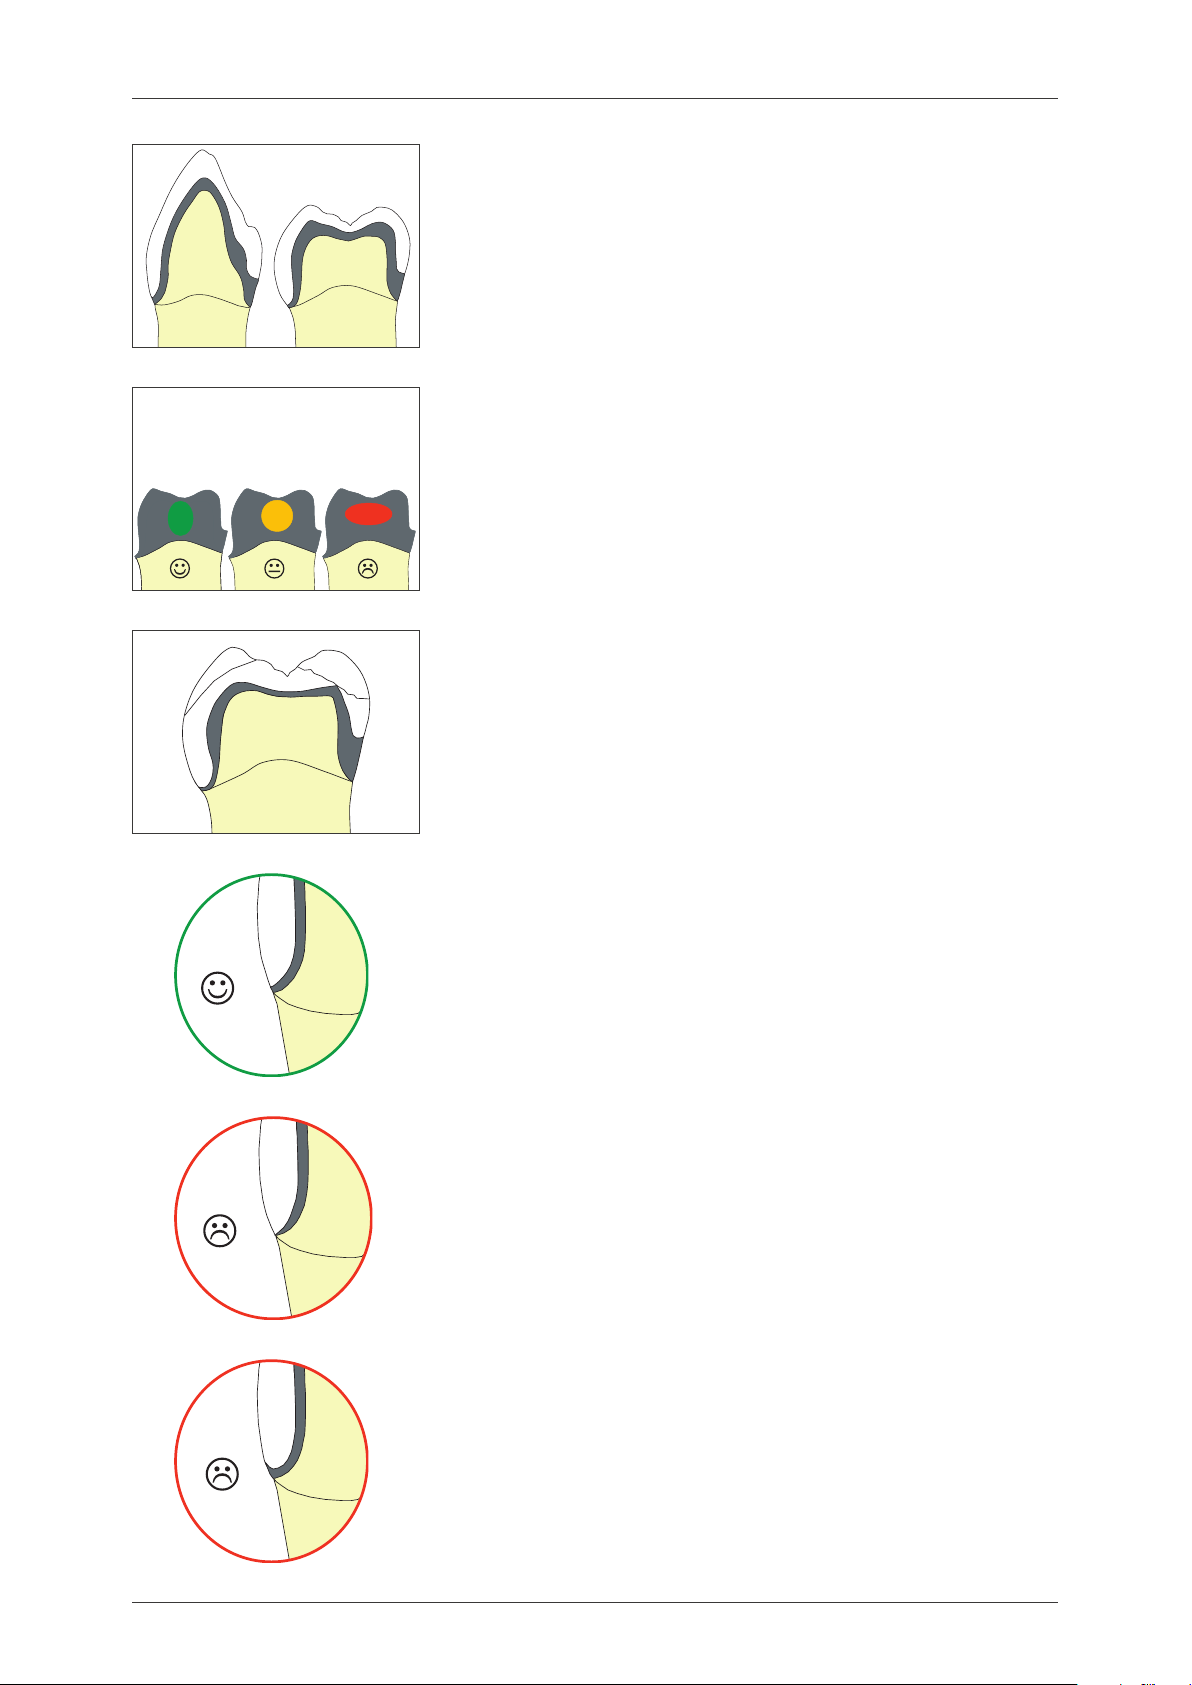
A chamfer or shoulder with rounded inner angle should be prepared for crowns.
The aim should be a circumferential cutting depth of one millimeter.
The vertical preparation angle should be at least 3°.
All transitions from the axial to the occlusal or incisal surfaces
should be rounded. Uniform and smooth surfaces are recommended.
Shoulder preparation or chamfer preparation
Tangential preparation - contraindicated for ceramic shoulders
Incorrect chamfer preparation - generally contraindicated
10
Page 11
VITA VMKMaster
®
Preparation information
Substructure design
The substructure reflects the shape of the tooth in a reduced size (design
supporting the tooth shape). It must be ensured to apply the ceramic material
in a uniform layer thickness (max. 2 mm). During the application, the requirements for the various alloys must be observed:
– Substructures with insufficient dimensions cause higher shrinkage of the
veneering ceramics and hence require additional firing processes.
– Substructures with insufficient dimensions do not provide adequate support
for the veneering ceramic which may result in cracks and chippping in the
case of very thick layers.
Cross-section of connectors
The cross-section of the interproximal connectors has a major influence on the
stability of the restoration. Therefore the interproximal connectors must have
adequate dimensions depending on the alloy in use!
Crown substructures and bridge units to be veneerd with ceramic materials
must be designed in a way to ensure that wall thicknesses of crowns are at
least 0.3 mm and wall thicknesses of bridges are at least 0.5 mm.
For more information, refer to the working instructions of the respective alloy.
Transition areas between metal and veneering ceramic must not be located in
the area of contact points and on surfaces involved in masticatory function.
The transition area in the interproximal area should be designed in a way to
allow careful cleaning.
Design of a metal margin
The transition area of the metal substructure to the veneering material must be
clearly defined and a right angle should be prepared whenever it is possible.
Transitions between metal and veneering ceramic should not be in the vicinity
of contact points and on occlusal surfaces.
When preparing the interdental space, the transition should be designed
in a way to allow easy cleaning.
11
Page 12

VITA VMKMaster
®
Substructure design of a bridge
The modelled bridge substructure from the labial side: the interproximal
connectors are located at the level of the contact points and should be
designed in a way to enable the fabrication of highly esthetic restorations
and allow careful hygiene.
To achieve sufficient stability between the bridge pontic and bridge
abutments, a palatal or lingual collar is recommended.
Moreover, to ensure uniform cooling of the bridge pontic which
absorbs most of the heat, cooling fins are advantageous.
Cross-cut tungsten carbide burs are recommended for finishing.
After removal of the investment material, the cast substructure
must be ground from all sides before firing on the ceramic material
to ensure a perfectly clean surface.
After finishing, the substructure needs to be carefully sandblasted with
aluminium oxide (Al
). To avoid inclusions of abrasive material, it is
2O3
recommended to sandblast the alloys with the indicated pressure while
keeping the nozzle at a flat angle to the object surface. The pressure and
the particle size to be used depend on the type of alloy. Then the
substructure must be cleaned with a brush under running water or using
a steam jet.
Note: Use only pure Al2O3for sandblasting the alloy surface.
A contaminated metal surface may result in the formation of bubbles during
ceramic firing. Please observe the information in the working instructions of
the manufacturer of the respective alloy. Sandblasting improves the
mechanical bond. Consequently, the surface of the object is roughened
and considerably enlarged.
12
Page 13
VITA VMKMaster
®
Substructure design of a ceramic
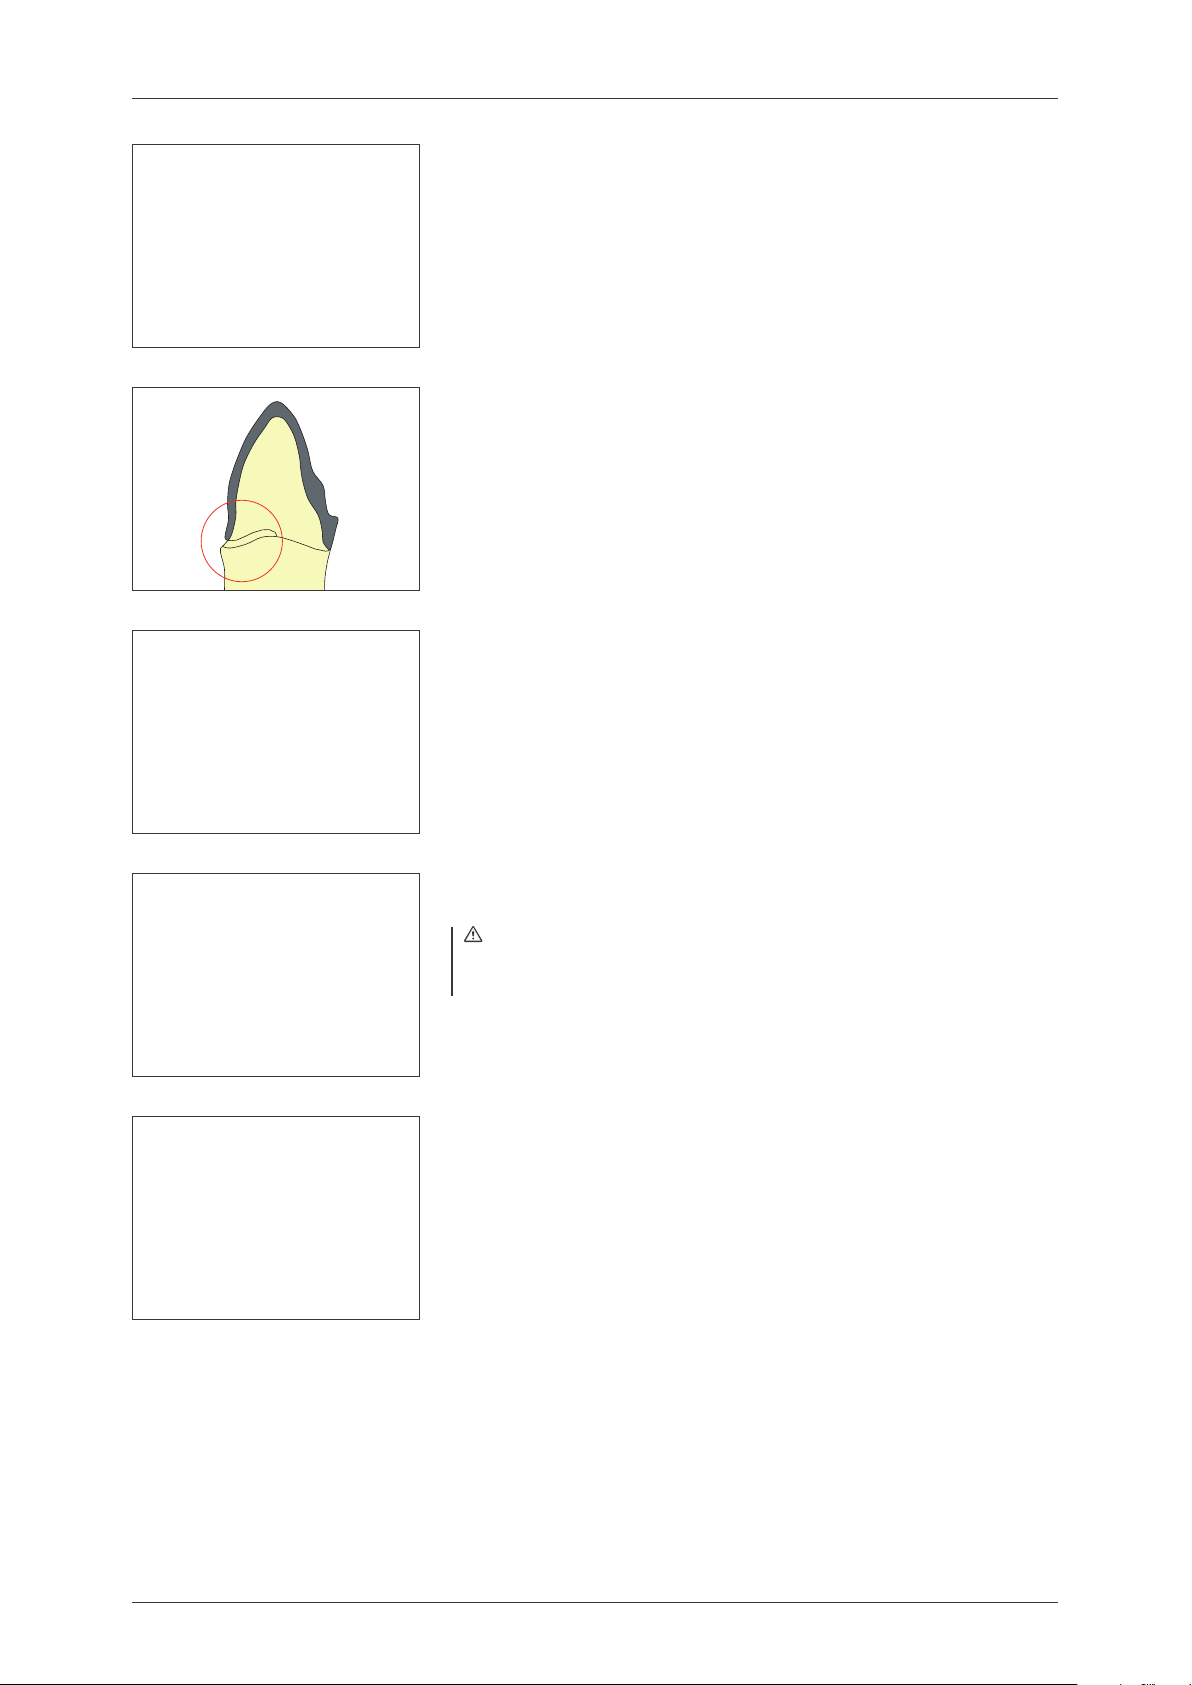
Substructure after finishing - prepared to fabricate a ceramic shoulder.
When fabricating ceramic shoulders, it must be ensured that the substructure
(not the veneer) is supported by the prepared tooth (stump). Therefore the
substructure is reduced exactly to the inner edge of the chamfer or shoulder
preparation. This way, functional support of the substructure is achieved.
To achieve perfect, esthetic integration of the crown into the relevant esthetic
areas and to avoid shadow areas, sufficient reduction of the substructure,
in particular in the interproximal area, is required. Make sure to obtain
a round and thin metal edge after the reduction.
To achieve even contours, it is recommended to use a pen to mark the
reduction of the shoulder on the substructure (black line in the figure).
Completely reduced crown.
Note: It must be ensured that the shoulder
is adequately supported by the metal
substructure.
Substructure sandblasted with Al2O3.
Compare also with the information on the preparation
of the bridge substructure.
13
Page 14
VITA VMKMaster
®
General information on the opaque
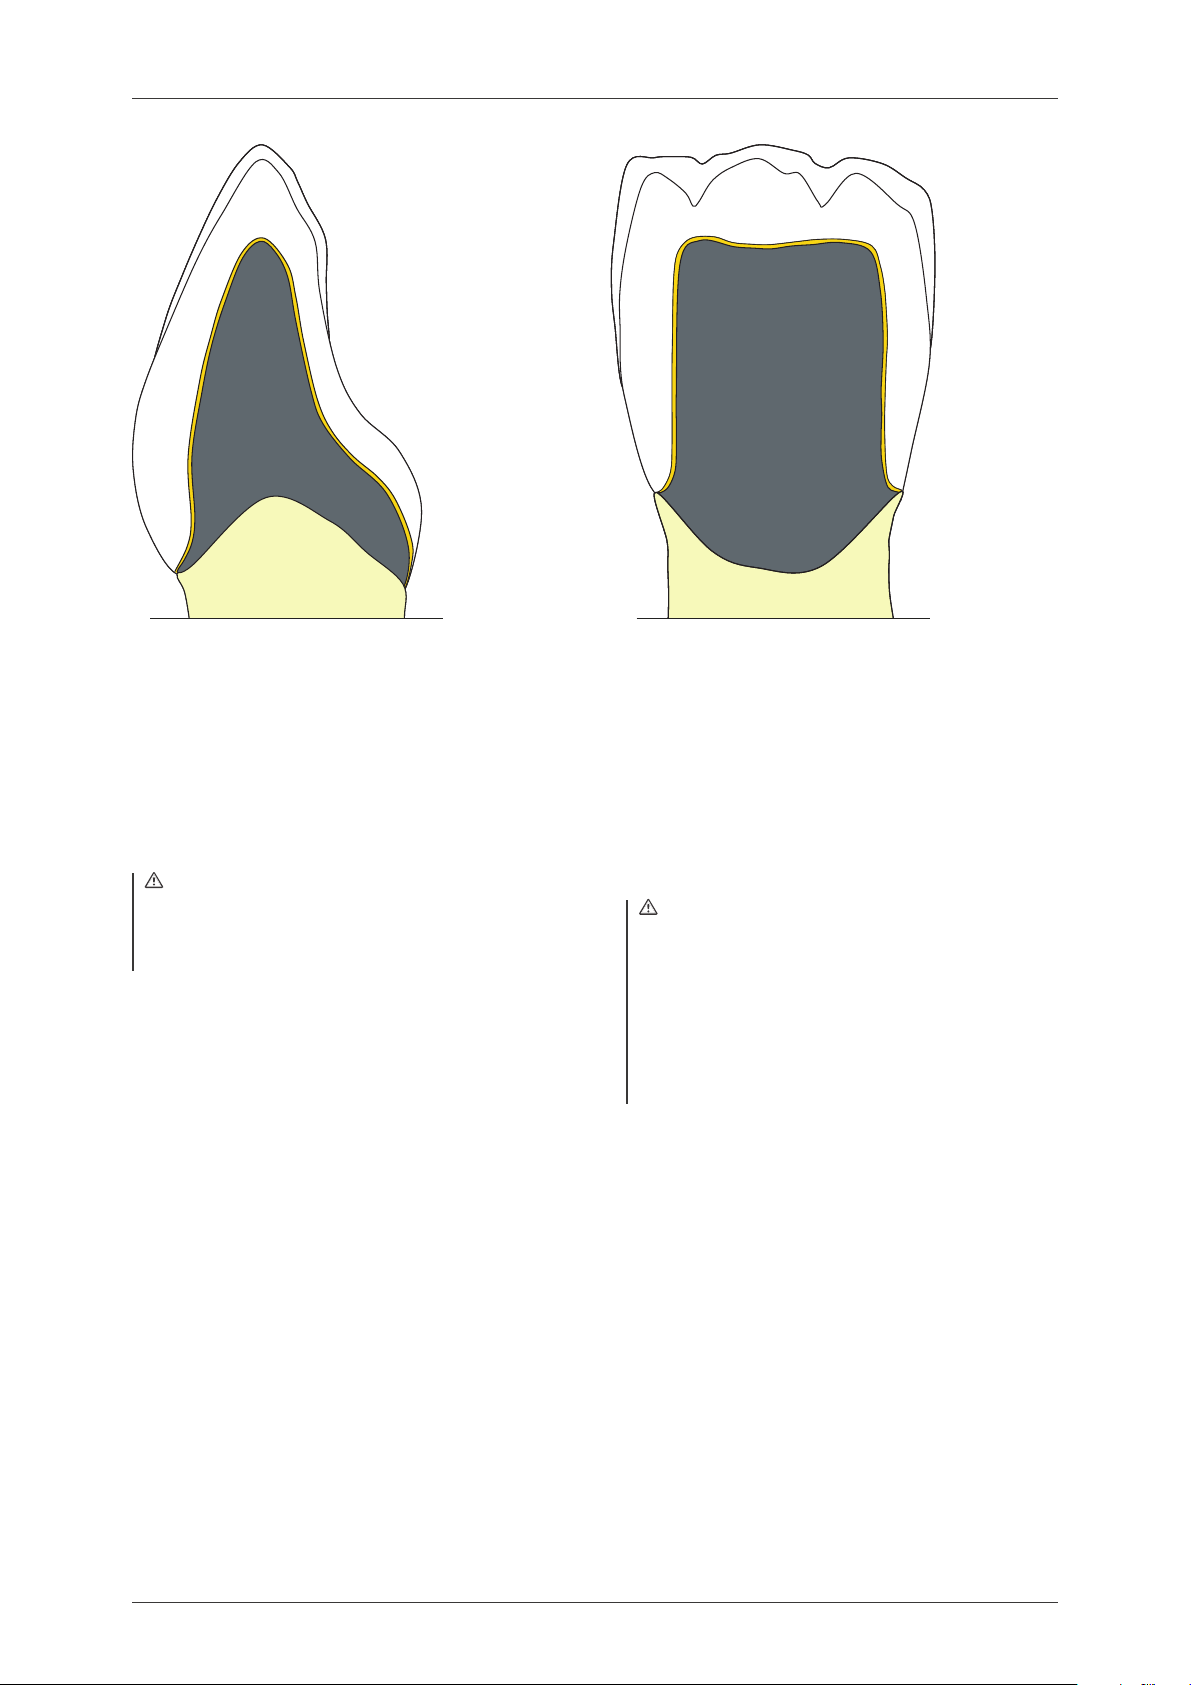
To mask the shade of the alloy and to ensure perfect
bonding to the metal substructure, opaque material is
applied. The decisive element in the chain of processes
is the combination of washbake and opaque firing which
has a decisive influence on the quality of the bond.
The opaque material is used to create the basis of the
shade of an esthetic restoration.
Note: To achieve a more intense and warmer shade,
the respective OPAQUE can be mixed with wash opaque
(WO). However, the final result of the restoration may
differ from the shade sample.
Gold-colored wash opaque and the respective opaque
material (OP) are available for the washbake. One opaque
material is required for reproducing the VITA SYSTEM
3D-MASTER shades (one for each lightness level) and the
VITA classical A1-D4 shades (one for each shade).
WO and OP have the same chemical-physical properties
and hence are perfectly suitable for the washbake.
Function - washbake:
– Obtaining the bonding oxides and supporting
the chemical bond
– Creating ceramic zones on the surface and
strenghtening the retentions for the ceramic
– Coloring
Three variations are available for the application of
the wash opaque or opaque materials:
– Powder: the opaque powder is mixed with the
VITA OPAQUE FLUID and applied to the clean and dry
substructure using a brush or glass instrument.
– Pastes: The paste opaque is supplied in a ready-to-use
consistency and can also be applied using a brush or
glass instrument.
Note: Pastes must be stirred with an instrument
before they are used. If the paste can no longer be
stirred after extended storage, the original consistency
can be restored by adding a specific quantity of
VITA PASTE FLUID. Please make sure that the paste
opaque will not come into contact with water to avoid
the formation of bubbles and cracks in the opaque
during firing.
– VITA SPRAY-ON technique: the opaque powder is mixed
with VITA SPRAY-ON LIQUID in the respective glass jar
and then sprayed evenly onto the substructure surface.
Please observe the information in the separate working
instructions for VITA SPRAY-ON (No. 492).
14
Page 15
VITA VMKMaster
®
Application of the opaque
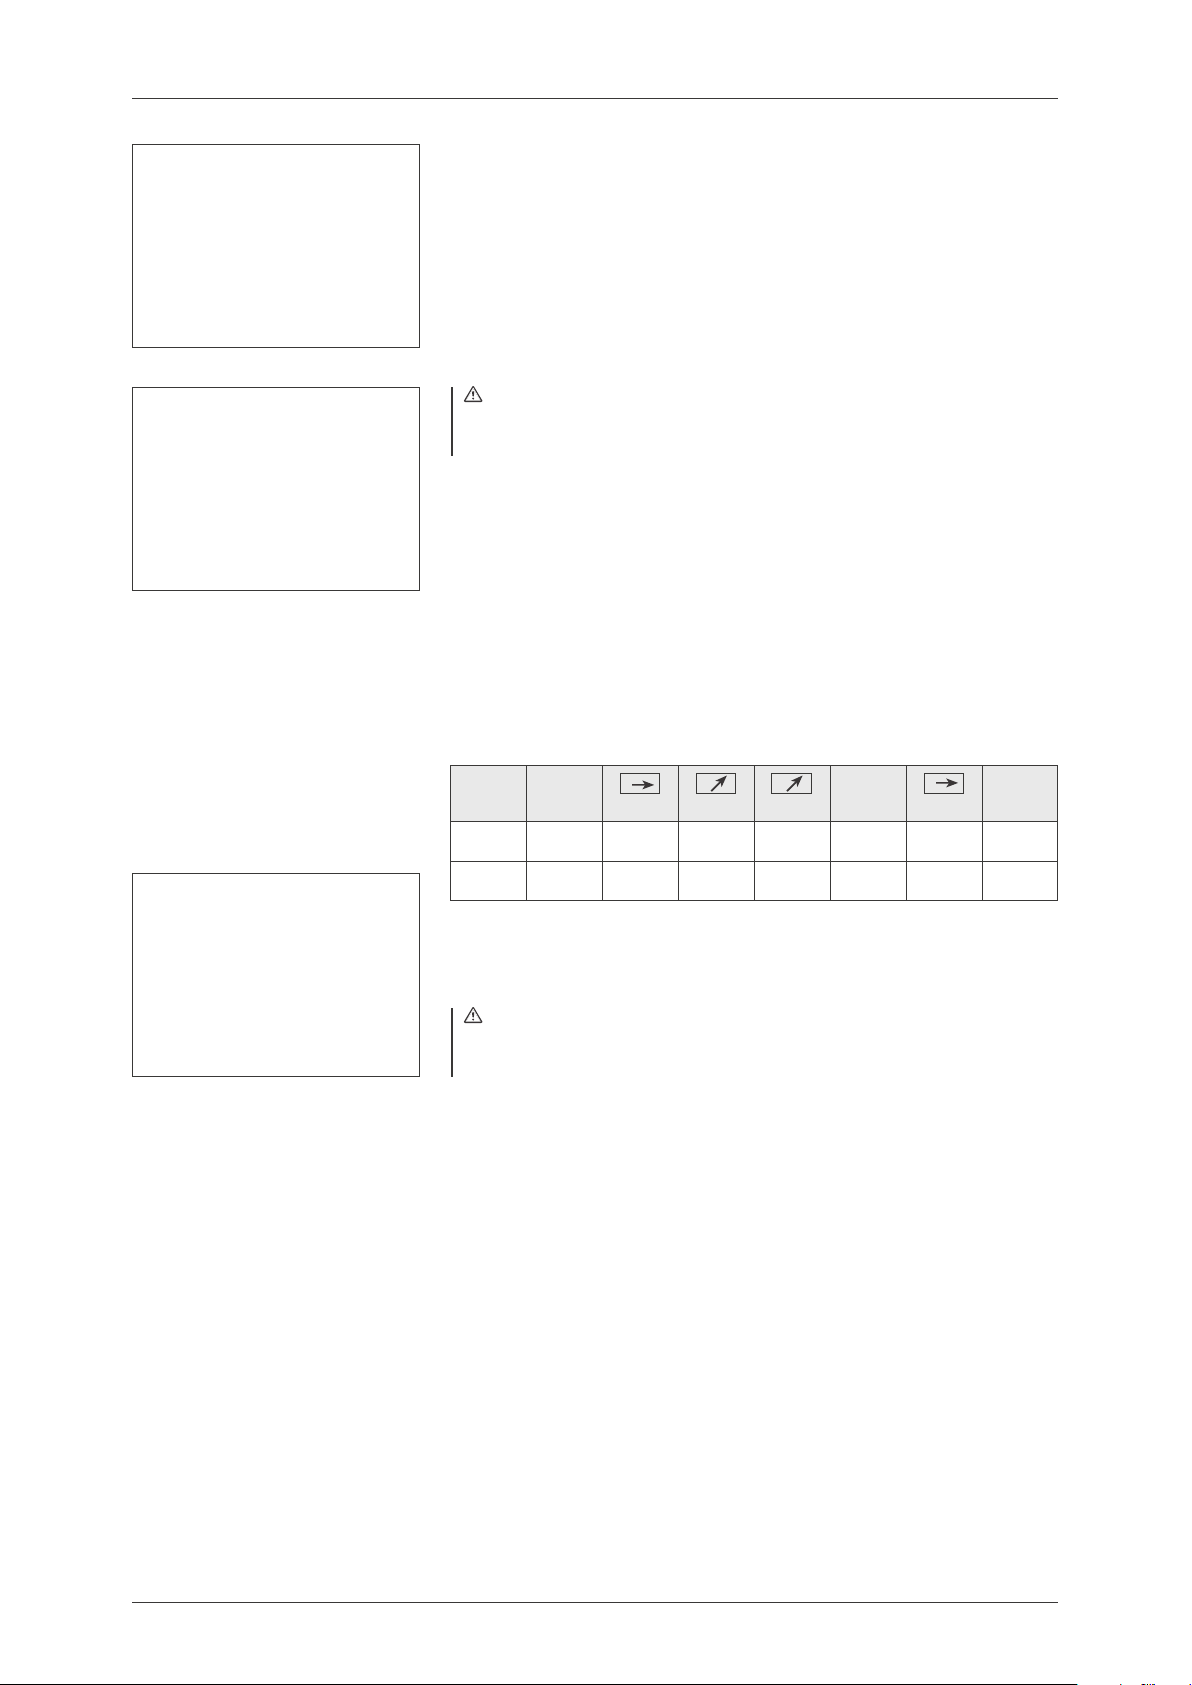
The substructure that has been pretreated and oxidized in accordance
with the parameters given by the alloy manufacturer.
The information of the respective alloy manufacturer must be observed!
Prior to further processing, clean the metal substructure
under running water using a brush.
Then, thoroughly clean it with steam.
Note: After cleaning, the substructures must not
be picked up with the fingers but with clean tweezers
or clips.
Wash bake
A thin coat of paste opaque must be brushed on the surface of the
substructure and an extended predrying time is required for drying the paste.
Alternatively, the mixed opaque powder can be applied thinly and evenly
(semi-masking) on the bridge substructure or sprayed on thinly using the
VITA SPRAY-ON technique. Please make sure not to apply a first layer
too thick.
Recommended firing Wash bake
Paste
Powder
Predr.
temp. °C
500
500
min.
6.00
2.00
min. °C/min. min.
5.45
5.45
80
80
Temp.
approx. °C
960
960
1.00
1.00
Completely fired wash opaque.
Note: Substructures which reveal considerable formation of oxides
need to be cleaned with a toothbrush under running water or with the
steam jet after each firing process.
VAC
min.
5.45
5.45
15
Page 16
VITA VMKMaster
®
Application of the opaque
Opaque firing
Mix powder opaque to a creamy consistency with OPAQUE FLUID. Apply with
a brush or a glass instrument to mask the surface of the veneer and fire
according to the appropriate firing cycle. Paste opaque is applied in the same
way to mask the surface of the clean and dry substructure or, alternatively,
sprayed on with VITA SPRAY-ON.
Avoid excessive condensation and avoid thick opaque layers from flowing
into the occlusal, approximal or marginal areas especially when fabricating
bridges. Thick opaque layers may crack during firing.
Before opaque firing, it must be ensured that the material is applied evenly
and the entire metal substructure is adequately covered. After firing,
the metal structure must be no longer visible; if required, the opaque
must be applied and fired again.
Recommended firing OPAQUE firing
Paste
Powder
Predr.
temp. °C
500
500
min.
6.00
2.00
min. °C/min. min.
5.38
5.38
80
80
Temp.
approx. °C
950
950
1.00
1.00
Note: Problems can also occur if the opaque is dried too quickly.
If the recommended pre-drying and drying times are not adhered to,
small cavities may form or the opaque may flake off.
In such cases the opaque liquid or the paste were converted
too quickly from the liquid to the gaseous state.
The correct surface of the fired opaque exhibits
a slight "egg shell" luster.
VAC
min.
5.38
5.38
16
Page 17
VITA VMKMaster
®
Application of the opaque for a ceramic shoulder
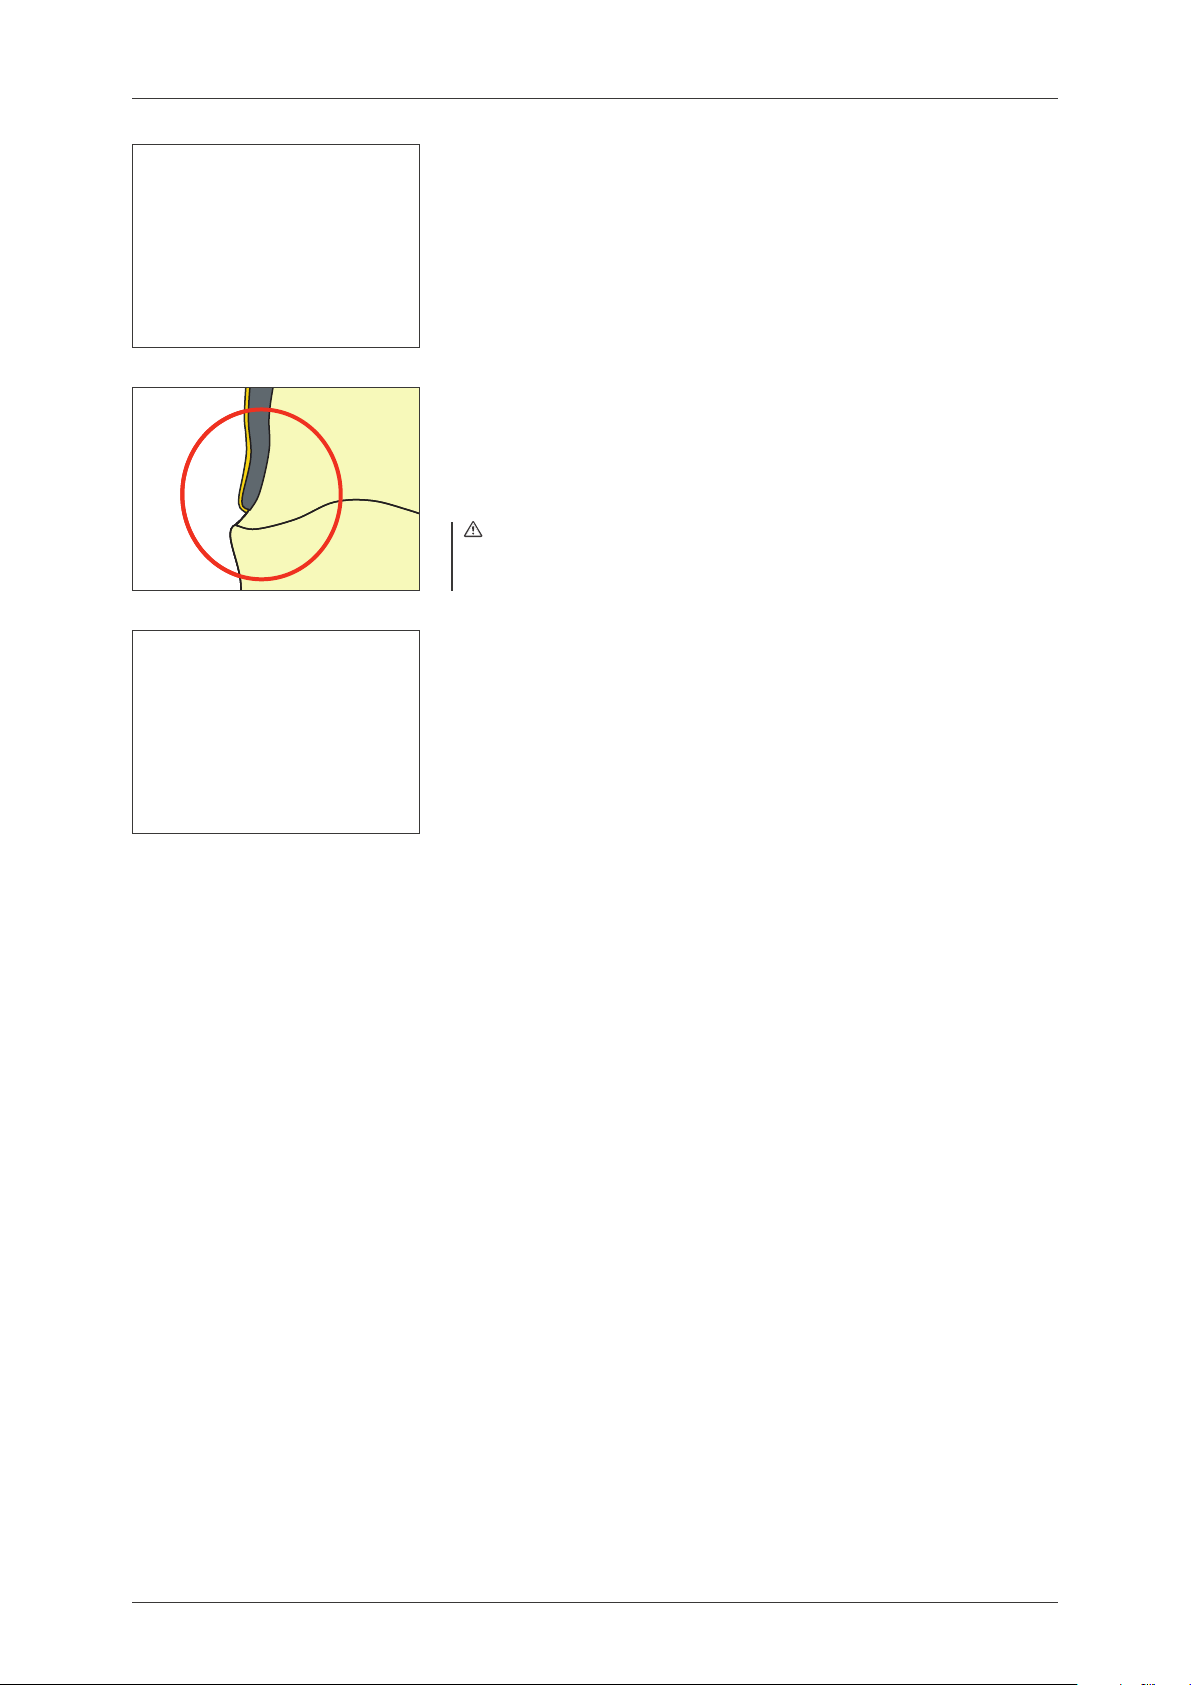
The WASH material is applied in the same way
as for a bridge.
Difference to the opaque firing
To achieve good bonding to the shoulder material,
the opaque needs to be applied across the reduced
metal margin (see graphic).
Note: Excess opaque material must not
penetrate into the crown in order
not to affect the fit.
Substructure with completely applied opaque - prepared
for the application of shoulder material.
The application of a shoulder material is explained
in the section "Application of a ceramic shoulder".
17
Page 18

VITA VMKMaster
®
STANDARD layering
The shade sample can be reproduced using the
STANDARD layering comprising the DENTINE and
ENAMEL materials. These materials are mixed with
VITA MODELLING FLUID or VITA MODELLING FLUID RS.
VITA MODELLING FLUID avoids fast drying of the ceramic
material. The fluid increases the plasticity during layering.
The smooth consistency of the red RS fluid allows extended processing (also under wet conditions) and ensures
good stability and hence the fluid is particularly suitable
for large-sized restorations and multi-unit bridges.
If only little space (> 0.6 mm) is available, the shade
effect can be enhanced by the use of OPAQUE DENTINE.
OPAQUE DENTINE can also be used to avoid loss in color
of the pontics, in particular in the area of the gingiva.
It is also suited to reproduce shade-intensive areas,
such as occlusal surfaces of molars.
When veneering with VITA classical A1-D4 shades, the
shade reproduction in the cervical area can be supported
by the use of NECK materials.
Since natural teeth frequently exhibit higher chroma
in the gingival area, NECK materials are also suitable
to achieve such higher chroma (intensity) and opacity.
18
Page 19

VITA VMKMaster
®
STANDARD layering using the example of a bridge
Bridge coated with opaque on the model.
To allow easy removal of the restoration later on, the model is previously
insulated with VITA Modisol.
OPAQUE DENTINE
To avoid differences in the shade of abutment crowns and pontics,
OPAQUE DENTINE is applied to the basal surface and to the cervical area
of the pontic.
Frequently, cuspids do not provide sufficient space for dentine and enamel
materials. Therefore a thin layer of OPAQUE DENTINE is applied in this area
to ensure that the correct shade is maintained, in particular for layer
thicknesses below 0.8 mm.
DENTINE
Starting from the mesial and distal ridges …
19
Page 20

VITA VMKMaster
®
STANDARD layering using the example of a bridge
… the complete tooth shape is built up in DENTINE.
This way a useful basis with regard to the size,
shape and position of the teeth is obtained.
A thin layer of DENTINE is applied on the layer of
OPAQUE DENTINE that has already been applied to the cuspid
and the shape is completed.
To obtain sufficient space for the enamel, the DENTINE
is reduced in the incisal third.
To achieve a uniform level of moisture, the material should be carefully
wetted with a brush in the interproximal areas from the palatal side before
the enamel material is applied. It is not necessary to wet the material from
both sides since the modelling fluid is spread across the entire interproximal
area thanks to the capillary effect. The resulting adhesion forces are obtained
thanks to the perfectly adjusted particle distribution in the material structure.
ENAMEL
To complete the crown shape, enamel is applied in small quantities.
20
Page 21

VITA VMKMaster
®
STANDARD layering using the example of a bridge
To compensate firing shrinkage, the bridge must have
a slightly larger size.
Using a slightly wetted separating knife …
… the individual units of bridges are separated interproximally
down to the opaque prior to the first dentine firing.
After removing the bridge from the model, the contact points need to be
completed using DENTINE and ENAMEL.
Then the bridge is placed on a firing tray for the subsequent firing process.
Recommended firing 1stdentine firing
Predr.
temp. °C
500 6.00 7.49 55
min.
min. °C/min. min.
Temp.
approx. °C
930
1.00 7.49
VAC
min.
21
Page 22

VITA VMKMaster
®
STANDARD layering using the example of a bridge
After firing, the bridge is placed on the model
and the contact areas are adjusted.
A diamond disc is used to separate the interproximal areas
after the first dentine firing.
A small diamond tool is used to correct the shape.
Prior to the second dentine firing, grinding particles
must be carefully removed from the restoration.
It is recommended to clean the substructure with steam.
2nddentine firing
First the interproximal areas are filled with DENTINE.
Once the interproximal areas have been slightly condensed,
the basal surface of the pontic is filled with OPAQUE DENTINE.
Note: To avoid drying of the materials applied in the
interproximal areas, it is recommended to wet the interproximal
areas with VITA MODELLING FLUID RS or VITA INTERNO FLUID
when fabricating large-span bridges.
22
Page 23
VITA VMKMaster
®
STANDARD layering using the example of a bridge
Before it is placed on the model, it is recommended to insulate
the bridge with VITA Modisol. This way, any material applied
in the basal area will not stick to the model.
Corrections of the shape are carried out starting from the neck using DENTINE …
… and ENAMEL.
Recommended firing 2nddentine firing
Predr.
temp. °C
500 6.00 7.38 55
min.
min. °C/min. min.
The contact points are checked again.
Temp.
approx. °C
920
VAC
min.
1.00 7.38
23
Page 24

VITA VMKMaster
®
STANDARD layering using the example of a bridge
Finishing the marginal ridges using a fine diamond tool.
Note: The contours of the ridges were marked with a pen
for enhanced control.
Then a natural surface structure is prepared, for example with growth lines
and convex and concave areas.
Before processing is continued, grinding particles are carefully
removed from the restoration using a toothbrush under
running water or the steam jet.
If required, the entire restoration can be coated with VITA AKZENT glaze.
VITA AKZENT stains are available to create shade nuances
and individual characteristics.
24
Page 25

VITA VMKMaster
®
STANDARD layering using the example of a bridge
Recommended firing Glaze firing VITA AKZENT
Predr.
temp. °C
500 4.00 5.15 80
min.
min. °C/min. min.
®
Temp.
approx. °C
920
Completed restoration after glaze firing.
Corrections after glaze firing.
For corrections after glaze firing, the CORRECTIVE material
features a clearly lower firing temperature.
The contours of the completed restoration will no longer
be affected at this temperature.
VAC
min.
1.00 –
Recommended firing CORRECTIVE
Predr.
temp. °C
500 6.00 6.33 55
min.
min. °C/min. min.
Temp.
approx. °C
860
VAC
min.
1.00 6.33
25
Page 26

VITA VMKMaster
®
Processing of VITA MARGIN material
The ceramic shoulder supports the natural effect of light in the transition
area from the prepared tooth to the gingiva. The gingival margin of
metal-ceramic restorations, which is frequently grey, can be rarely attributed
to metal that is shining through but in most cases to the "shadow" caused
by the missing light effect of the gingiva. Thanks to high fluorescence,
VITA shoulder (MARGIN) materials support the natural distribution of light
in the gingival area.
The MARGIN powders feature clearly different plastification than all
other VITA VMK Master powder materials. Thanks to the patented procedure
for the manufacture of VITA shoulder (MARGIN) materials, the veneering
ceramic can be processed in a similar way as acrylic materials.
The plasticity of the mixed material is almost identical to that of veneering
resins/composites so that a spatula is perfectly suitable for the application.
Thanks to plastification, no special liquid is required for mixing.
The material is mixed with the VITA MODELLING FLUID enclosed
in the assortment. To achieve a homogeneous mixing ratio of the
MARGIN materials, it is recommended to mix the powders first
(see "Classification tables").
The modelling fluid is repelled due to plastification of the
MARGIN materials (hydrophobic effect).
Therefore the material must be mixed with the liquid using a spatula
to obtain a dough-like consistency.
Note: The use of an ever-wet tray is not recommended
since the capillary effect of the tray may be adversely
affected by the plastification. Dried MARGIN material
can not be mixed again.
26
Page 27
VITA VMKMaster
®
Application of a ceramic shoulder
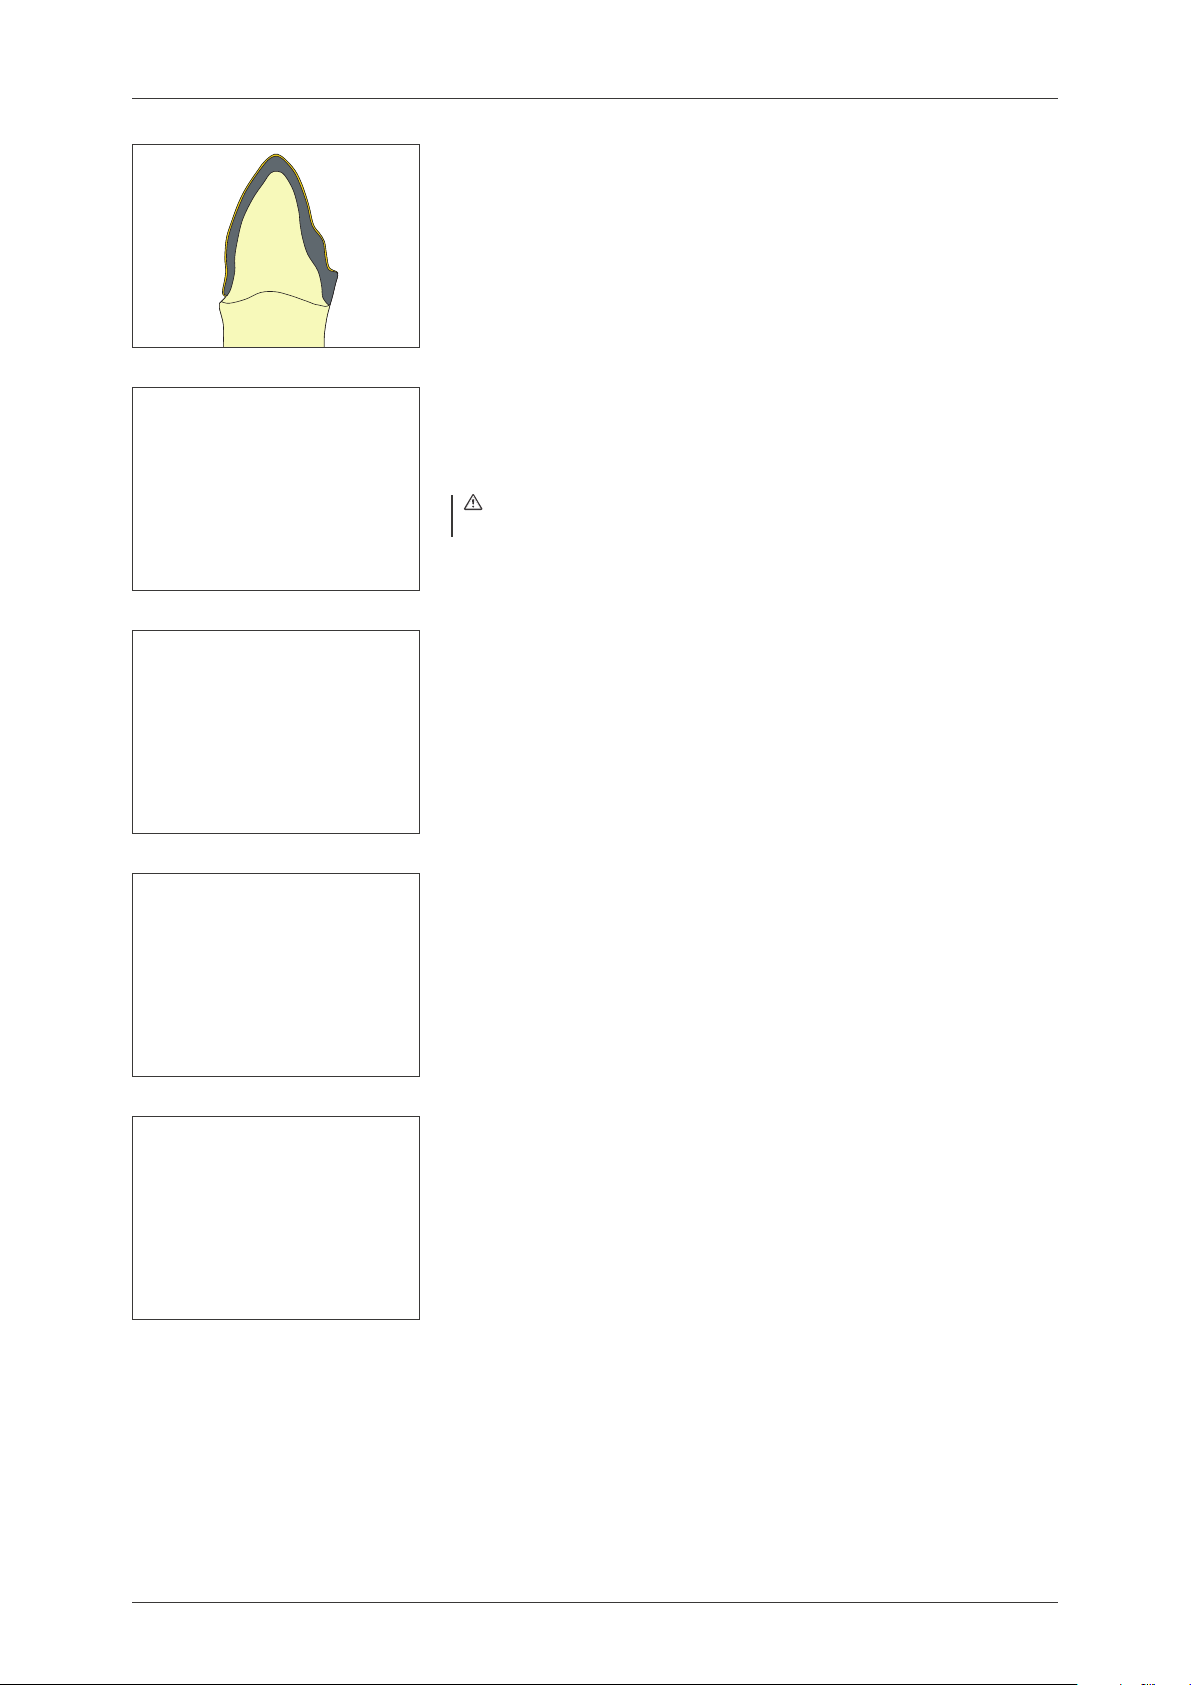
The opaque material is applied as shown in the figure.
See also the information in the section "Application of the opaque
for a ceramic shoulder".
It is recommended to seal the plaster die before the shoulder
materials are applied.
Then the dry and pretreated die is carefully insulated
with VITA Modisol and the prepared coping is placed
on the model.
Note: Make sure that the surface to be veneered will not come
into contact with the insulating agent.
Opaque-coated coping on the model.
It is recommended to apply and evenly spread the material
(dough-like consistency) using a plastic or ceramic spatula
before the first MARGIN firing is carried out.
The material should be slightly condensed on the model.
27
Page 28
VITA VMKMaster
®
Application of a ceramic shoulder
To ensure accurate fit after firing, the shoulder material
must not be applied beyond the preparation margin.
Consequently, any excess material must be removed.
Then the crown is completely dried with a hairdrier
or with radiated heat at the furnace chamber.
Note: Excess liquid can be absorbed using a paper towel.
Recommended firing MARGIN firing
Predr.
temp. °C
500 6.00 8.00 55
min.
min. °C/min. min.
Temp.
approx. °C
940
1.00 8.00
Check the shoulder area in the inside of the crown and carry out
minor corrections without exerting any pressure.
Then place the fired crown carefully on the model.
The model is insulated with VITA Modisol again.
A creamy consistency is required for a second firing process.
VAC
min.
28
Use a brush to apply small amounts of material to the bottom
of the shoulder and place the crown (coping) on the model.
Page 29
VITA VMKMaster
®
Application of a ceramic shoulder
Then complete the missing areas by carefully applying
the shoulder material in the space resulting from
the 1st shoulder firing, thus providing optimum accuracy
of fit of the ceramic shoulder. Then the shoulder is completed.
Samples of the shoulder materials
Dry the coping (crown) as described, carefully remove it from the model
and place it on a ceramic firing tray.
Note: The shoulder (MARGIN) material must not come into contact
with the firing tray.
Recommended firing MARGIN firing
Predr.
temp. °C
500 6.00 8.00 55
min.
min. °C/min. min.
Temp.
approx. °C
940
After the second MARGIN firing, the fired coping may have
to be adjusted to the model.
Completely fired shoulder on the model.
VAC
min.
1.00 8.00
29
Page 30
VITA VMKMaster
®
Individualized layering based on the example of a single crown
Note: Individual layering is based on the natural residual teeth
of the patient. Accordingly, the following layering procedure
is only an example.
An overview of the materials described in the following can be found
in the section "Explanation of the materials" on pages 40 and 41.
The coping prepared with shoulder material.
LUMINARY
A thin coat of LUMINARY materials is applied (similar to the application of an
OPAQUE DENTINE material) to increase the fluorescence and to achieve adequate
support of the shoulder material applied in the neck area. Moreover these
materials ensure good coverage of the opaque in thin areas.
Note: To cover the incisal crown coping, the LUMINARY materials
can be applied slightly beyond the edge.
Samples of the LUMINARY materials
Recommended firing LUMINARY firing
Predr.
temp. °C
500 6.00 8.00 55
min.
min. °C/min. min.
Temp.
approx. °C
940
VAC
min.
1.00 8.00
30
Page 31

VITA VMKMaster
®
Individualized layering based on the example of a single crown
The coping fired with LUMINARY …
… under black light.
DENTINE
The dentine body is built up step by step
until the desired shape is obtained.
For this purpose, depending on the tooth shade, various DENTINE
materials can be used to achieve natural refraction of light.
Note: To "compensate" for shadow areas, a dentine material
of the next lightness level or - in thin areas - a DENTINE
with higher chroma can be used.
TRANSLUCENT / ENAMEL
The incisal or approximal length of the crown can already be determined
with translucent materials. The natural reflection of the crown is supported
by alternating layers and light is "added" to the restoration.
Moreover the application of the incisal DENTINE MODIFIER
materials is facilitated.
31
Page 32
VITA VMKMaster
®
Individualized layering based on the example of a single crown
DENTINE MODIFIER
A mamelon structure is created in the incisal area using DENTINE MODIFIER
materials and the shade of specific areas is intensified.
The DENTINE MODIFIER materials can be "washed in" in their unmixed
state or mixed with DENTINE.
Samples of the DENTINE MODIFIER materials
ENAMEL
To obtain lighter shades of mesial and distal areas, ENAMEL materials
are applied. Darker areas of misaligned teeth can be adjusted.
Intermediate firing based on the parameters of the first dentine firing
is recommended for visual control of an individual layering.
Recommended firing 1stdentine firing (intermediate firing)
Predr.
temp. °C
500 6.00 7.49 55
min.
min. °C/min. min.
Temp.
approx. °C
930
1.00 7.49
VAC
min.
32
Page 33

VITA VMKMaster
®
Individual layering based on the example of a single crown
CERVICAL
Apply CERVICAL material in the body area to complete the crown shape.
As a result the effect of depth is increased in this area.
Moreover, the CERVICAL materials add a warm shade to the crown.
Samples of the CERVICAL materials
ENAMEL / TRANSLUCENT
Incisal layering is carried out by applying alternating layers of different
ENAMEL (EN) and TRANSLUCENT (T) materials.
The alternating layers of various translucent materials support the natural
refraction of light of the crown and create various shade reflections.
Samples of the TRANSLUCENT materials
Recommended firing 1stdentine firing
Predr.
temp. °C
500 6.00 7.49 55
min.
min. °C/min. min.
Temp.
approx. °C
930
1.00 7.49
VAC
min.
33
Page 34
VITA VMKMaster
®
Individual layering based on the example of a single crown
Crown (coping) on the model after the first dentine firing.
The final shape can be obtained by using TRANSLUCENT (T),
OPAL TRANSLUCENT (OT) or PEARL TRANSLUCENT (PLT) materials.
The use depends on the patient's age and the individual appearance
of the residual teeth.
Note: T6 and T8 have an intense shade and may influence
the shade result considerably.
Recommended firing 2nddentine firing
Predr.
temp. °C
500 6.00 7.38 55
min.
min. °C/min. min.
The diamond abrasive tools and rubber polishers
used for processing.
Following the example of the natural tooth,
the surface structure is contoured.
Temp.
approx. °C
920
VAC
min.
1.00 7.38
34
Page 35

VITA VMKMaster
®
Individual layering based on the example of a single crown
Especially in older patients, it is recommended
to smooth ridges or anomalies with a rubber polisher
prior to glaze firing.
Recommended firing Glaze firing
Predr.
temp. °C
500 0.00 5.15 80
min.
min. °C/min. min.
Temp.
approx. °C
920
1.00 –
VAC
min.
For glaze firing, the degree of gloss and the structure of the surface can
be controlled by the temperature rise rate, the end temperature and the holding
time. Surface treatment and preparation before firing are additional factors
of influence. Accordingly, the information on glaze firing can only be used
as a reference. Moreover, mechanical polishing is also possible to achieve
different degrees of gloss. Diamond-coated rubber polishers, high-gloss
polishers, pumice, etc. are suitable for mechanical polishing.
Completed crown with natural gloss (without the use of glaze material).
35
Page 36

VITA VMKMaster
®
Firing chart
Oxide firing
WASH bake
PASTE WASH bake
OPAQUE firing
st
dentine firing
Predr.
temp. °C
Please adhere to the instructions of the manufacturer of the alloy!
500 2.00 5.45 80 960 1.00 5.45
500 6.00 5.45 80 960 1.00 5.45
500 2.00 5.38 80 950 1.00 5.38
500 6.00 5.38 80 950 1.00 5.38PASTE OPAQUE firing
500 6.00 8.00 55 940 1.00 8.00MARGIN firing
500 6.00 8.00 55 940 1.00 8.00LUMINARY firing
500 4.00 4.45 80 880 1.00 4.45Stains fixation firing
500 6.00 7.49 55 930 1.00 7.491
500 6.00 7.38 55 920 1.00 7.382nddentine firing
500 0.00 5.15 80 920 1.00 –Glaze firing
500 4.00 5.15 80 920 1.00 –Glaze firing - VITA AKZENT
min. °C/min.
Temp.
approx. °C
min.
VAC
min.min.
500 6.00 6.33 55 860 1.00 6.33Correction firing with COR
Please note:
When using dental ceramics, the firing result largely
depends on the individual firing procedure of the user,
i.e. among other aspects on the type of furnace,
the location of the temperature sensor, the firing tray as
well as the size of the workpiece during the firing cycles.
Our application-technical recommendations for the firing
temperatures (regardless whether they have been
provided orally, in writing or in the form of practical
instructions) are based on numerous experiences
and tests. The user, however, should consider this
information only to provide basic values.
If surface, transparency and degree of gloss should not
correspond to the firing result that is achieved under
optimal conditions, the firing procedure must be adjusted
correspondingly. The crucial factors for the firing procedure are not the firing temperature displayed by the
furnace but the appearance and the surface condition
of the firing object after the firing process.
36
Page 37

VITA VMKMaster
®
Equipment
VITA VACUMAT "New Generation"
The new modular firing system permits perfect individual solutions and is
extremely economically efficient. The system comprises the premium furnace
VITA VACUMAT 6000 M, three freely selectable control units (vPad easy,
vPad comfort and vPad excellence), which enable up to four furnaces to be
controlled with one control unit as well as various useful extras.
The fully automatic VITA VACUMAT 6000 M for all dental ceramic firings,
available in a modern compact and ergonomic design, offers consistent firing
results of convincing quality thanks to the innovative firing technology.
Explanation of the firing parameters
Predr. °C
min.
min.
°C/min.
Temp. approx. °C
min.
VAC min.
Start temperature
Predrying time in min, closing time
Heating time in min.
Temperature rise rate in degrees Celsius per minute
End temperature
Holding time for the end temperature
Vacuum holding time in minutes
37
Page 38

VITA VMKMaster
®
Shade selection tools
VITA Linearguide / VITA Toothguide 3D-MASTER
®
With the VITA Linearguide 3D-MASTER you can determine the correct tooth
shade swiftly and accurately. The modern design and the linear arrangement
enable quick determination of the suitable tooth shade.
The VITA Linearguide 3D-MASTER is an alternative to the proven
VITA Toothguide 3D-MASTER and features different linear arrangement
of the shade tabs.
VITA Easyshade®Advance
VITA Easyshade Advance enables the user to determine the respective tooth
shade quickly and to verify ceramic restorations. The cordless, portable and
lightweight unit features simple handling and displays the tooth shade in just
a few seconds. Its high measuring accuracy of VITA SYSTEM 3D-MASTER and
VITA classical A1–D4 shades is based on its spectrophotometric measuring
technology, which is the prerequisite for perfect results.
VITA classical A1–D4 shade guide
The original – for the determination of the tooth shade
in VITA classical A1-D4 shades.
VITA VMK Master®shade indicators
Overview of shade samples of the materials included in the STANDARD
assortment, such as OPAQUE, OPAQUE DENTINE, DENTINE and ENAMEL.
VITA VMK Master®shade guides
Prefabricated shade samples of the effect materials for the determination
of individual shade characteristics.
38
Page 39

VITA VMKMaster
®
Classification tables
The classifications below may only be used as references!
OPAQUE MARGIN LUMINARY NECK CERVICAL ENAMELVITA SYSTEM 3D-MASTER®shades
0 M1
0 M2
0 M3
1 M1
1 M2
2L1.5
2L2.5
2 M1
2 M2
2 M3
2R1.5
2R2.5
3L1.5
3L2.5
3 M1
3 M2
3 M3
3R1.5
3R2.5
4L1.5
4L2.5
4 M1
4 M2
4 M3
4R1.5
4R2.5
5 M1
5 M2
5 M3
OP0
OP0
OP0
OP1
OP1
OP2
OP2
OP2
OP2
OP2
OP2
OP2
OP3
OP3
OP3
OP3
OP3
OP3
OP3
OP4
OP4
OP4
OP4
OP4
OP4
OP4
OP5
OP5
OP5
M1
M1
M1/M2*
MN/M2*
M1/M3*
MN/M3*
M2/M3*
MN/M2*
M2/M3*
M3
M2/M3*
M3
M2/M5*
M3/M5*
M1/M5*
MN/M5*
M3/M5*
MN/M5*
M3/M5*
M5
M3/M5*
M2/M5*
M5
M3/M5*
M2/M5*
M3/M5*
M5
M3/M5*
M3/M5*
LM1
LM1
LM1/LM2*
LM1/LM2*
LM2
LM2
LM1/LM3*
LM2
LM2/LM3*
LM2/LM3 *
LM2
LM2/LM3*
LM2/LM6*
LM3/LM6*
LM2
LM2/LM3*
LM3
LM2
LM3/LM6*
LM2/LM6*
LM3/LM5*
LM6
LM2/LM5*
LM3/LM5*
LM2/LM5*
LM3/LM5*
LM5/LM6*
LM3/LM5*
LM3/LM5*
–
–
–
N1
N1
N1
N1/N2*
N1
N1/N2*
N1/N2*
N1
N1/N2*
N1/N5*
N1/N3*
N1/N5*
N2
N2/N3*
N1/N5*
N2/N3*
N1/N5*
N3
N1/N5*
N1/N5*
N3/N4*
N1/N5*
N3/N4*
N1/N5*
N3/N5*
N3/N4*
–
–
–
CE1
CE1/CE2*
CE1/CE2*
CE2
CE1
CE2
CE2
CE1/CE2*
CE2
CE2
CE2/CE3*
CE2
CE1/CE3*
CE2/CE3*
CE2
CE1/CE3*
CE2
CE1/CE3*
CE2
CE1/CE3*
CE3
CE2
CE1/CE3*
CE1/CE3*
CE2/CE3*
CE3
EN1
EN1
EN1
EN1
EN1
EN1
EN1
EN1
EN1
EN1
EN1
EN1
EN1
EN1
EN1
EN1
EN1
EN1
EN3
EN1
EN1
EN1
EN3
EN3
EN1
EN3
EN1
EN3
EN3
VITA classical A1–D4 shades
A1
A2
A3
A3,5
A4
B1
B2
B3
B4
C1
C2
C3
C4
D2
D3
D4
* Mixing ratio 1:1
OPAQUE MARGIN LUMINARY NECK CERVICAL ENAMEL
OP A1
OP A2
OP A3
OP A3,5
OP A4
OP B1
OP B2
OP B3
OP B4
OP C1
OP C2
OP C3
OP C4
OP D2
OP D3
OP D4
M1/M3*
MN/M3*
M3
M3/M5*
MN/M5*
MN/M2*
M2/M3*
M3
M3
MN/M2*
M2/M5*
M2/M5*
M5
M2/M5*
M3/M5*
M2/M3*
LM2
LM2
LM3/LM6*
LM3/LM6*
LM2/LM5*
LM1/LM2*
LM2
LM3/LM6*
LM3/LM6*
LM2
LM2/LM6*
LM6
LM5/LM6*
LM2/LM6*
LM6
LM3/LM6*
N1
N1/N2*
N1/N3*
N3
N1/N5*
N1
N1
N1/N2*
N1/N3*
N1
N1/N5*
N1/N5*
N5
N1/N5*
N1/N5*
N1/N5*
CE1
CE1/CE2*
CE2
CE1/CE3*
CE3
CE1
CE1/CE2*
CE2
CE2/CE3*
CE1
CE1
CE1/CE2*
CE3
CE1/CE2*
CE2
CE2/CE3*
EN1
EN1
EN1
EN2
EN2
EN2
EN2
EN2
EN2
EN2
EN2
EN1
EN1
EN2
EN2
EN2
39
Page 40
VITA VMKMaster
®
Explanation of the materials
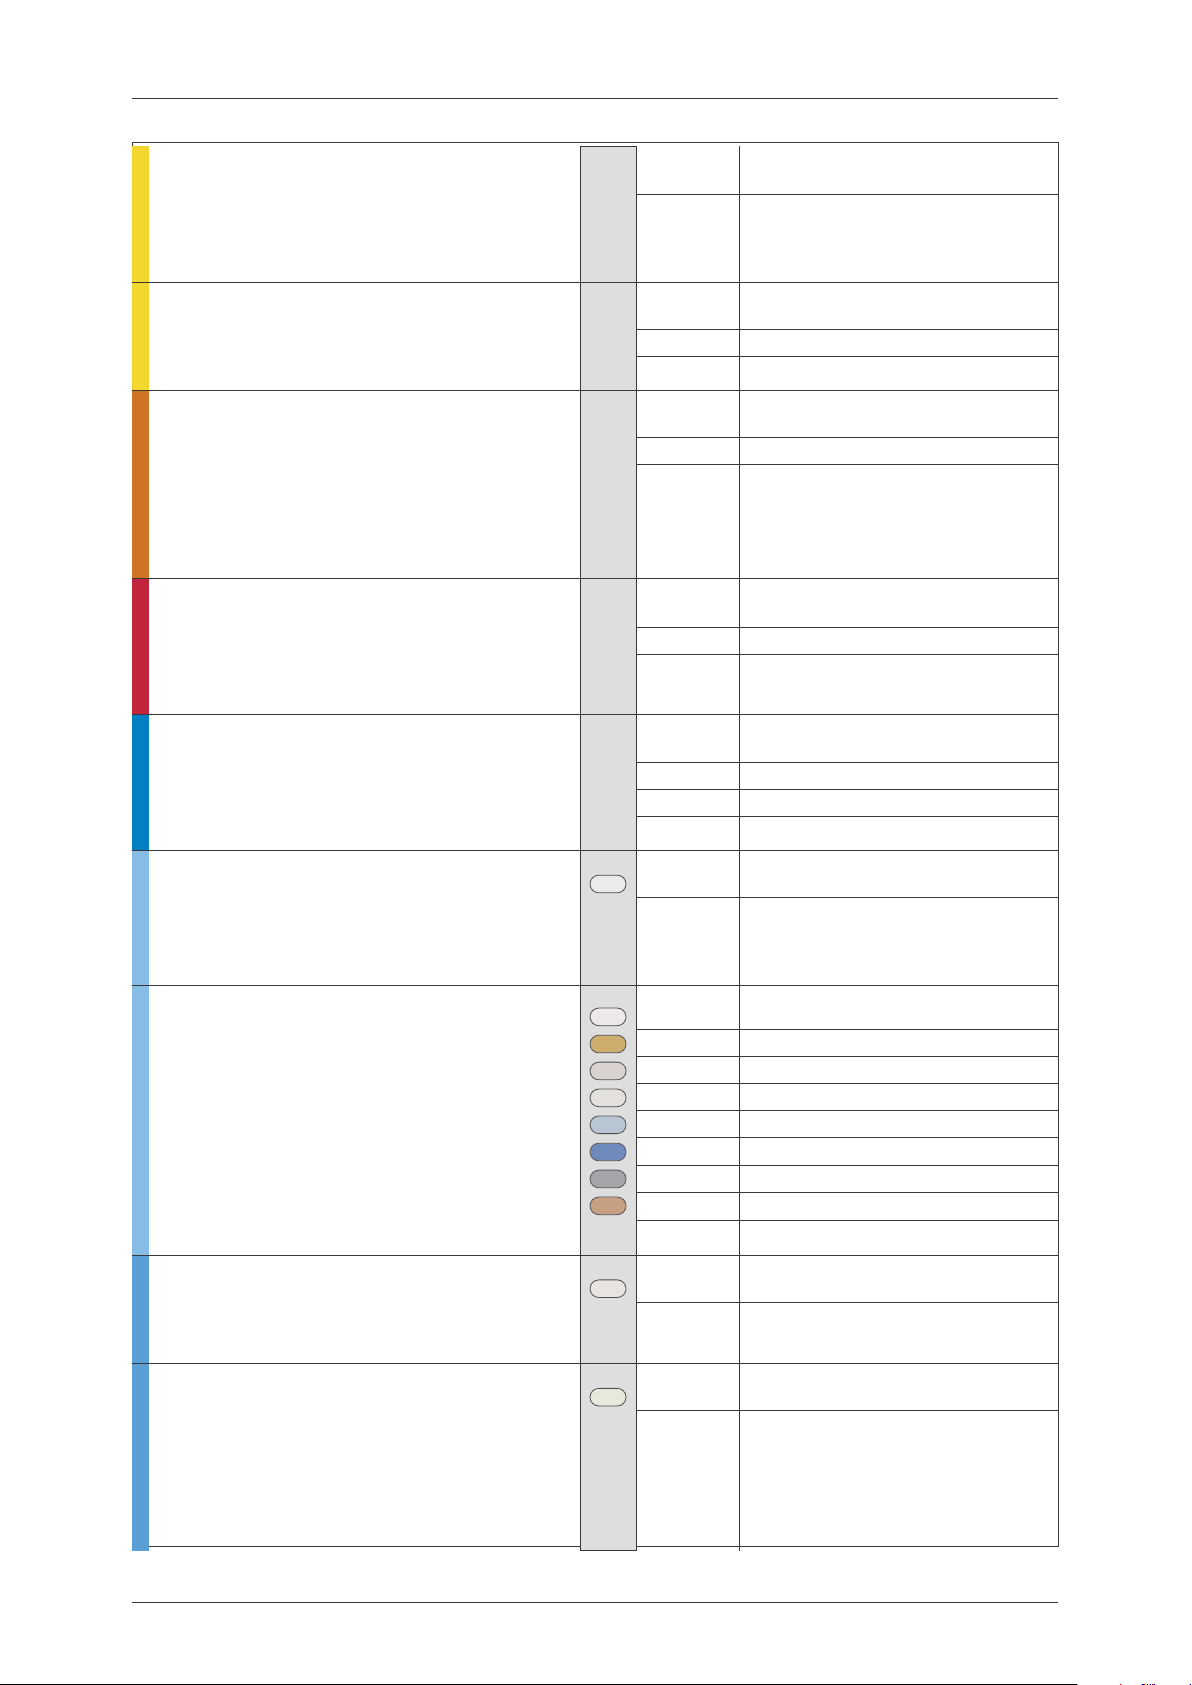
VITA VMK Master®WASH OPAQUE
– suitable for masking substructures and achieving
restorations with more intense or warmer shades
VITA VMK Master®OPAQUE
– for masking the substructure material
VITA VMK Master®OPAQUE DENTINE
– supports the shade effect if only little space
is available
– to be used in the gingival area to avoid loss
in color of pontics
VITA VMK Master®DENTINE
– shade-bearing material to build up the
ceramic restoration according to natural teeth
VITA VMK Master®ENAMEL
– incisal materials with matched shades to reproduce
the shade effect of natural enamel
WO
OP0–OP5
A1– D4
0M1–5M3
A1– D4
0M1–5M3
A1– D4
EN1
EN2
EN3
golden-orange
VITA SYSTEM 3D-MASTER
VITA classical
VITA SYSTEM 3D-MASTER
VITA classical
VITA SYSTEM 3D-MASTER
VITA classical
whitish
yellowish-neutral
reddish
VITA VMK Master®WINDOW
– to increase the translucency and reduce the intensity
of the shade, to be used in the unmixed or mixed state
VITA VMK Master®TRANSLUCENT
– to reproduce various levels of transparency of the
natural enamel and various translucent areas,
8 translucent shade nuances are available for
individualization and characterization
– these materials can be used for marginal ridges,
wedges or discolorations of enamel
VITA VMK Master®OPAL TRANSLUCENT
– translucent material with natural opalescence
VITA VMK Master®PEARL TRANSLUCENT
– pearly shine on the surface
– especially for the reproduction of young
and bleached teeth
– is mixed with WINDOW and applied to the surface
to brighten the dentine body
WIN
T1
T2
T3
T4
T5
T6
T7
T8
OT1
PLT1
transparent
whitish
yellowish-brownish
pink
neutral
light blue
blue
grey
reddish
neutral
pearly-cream
40
Page 41
VITA VMKMaster
®
Explanation of the materials
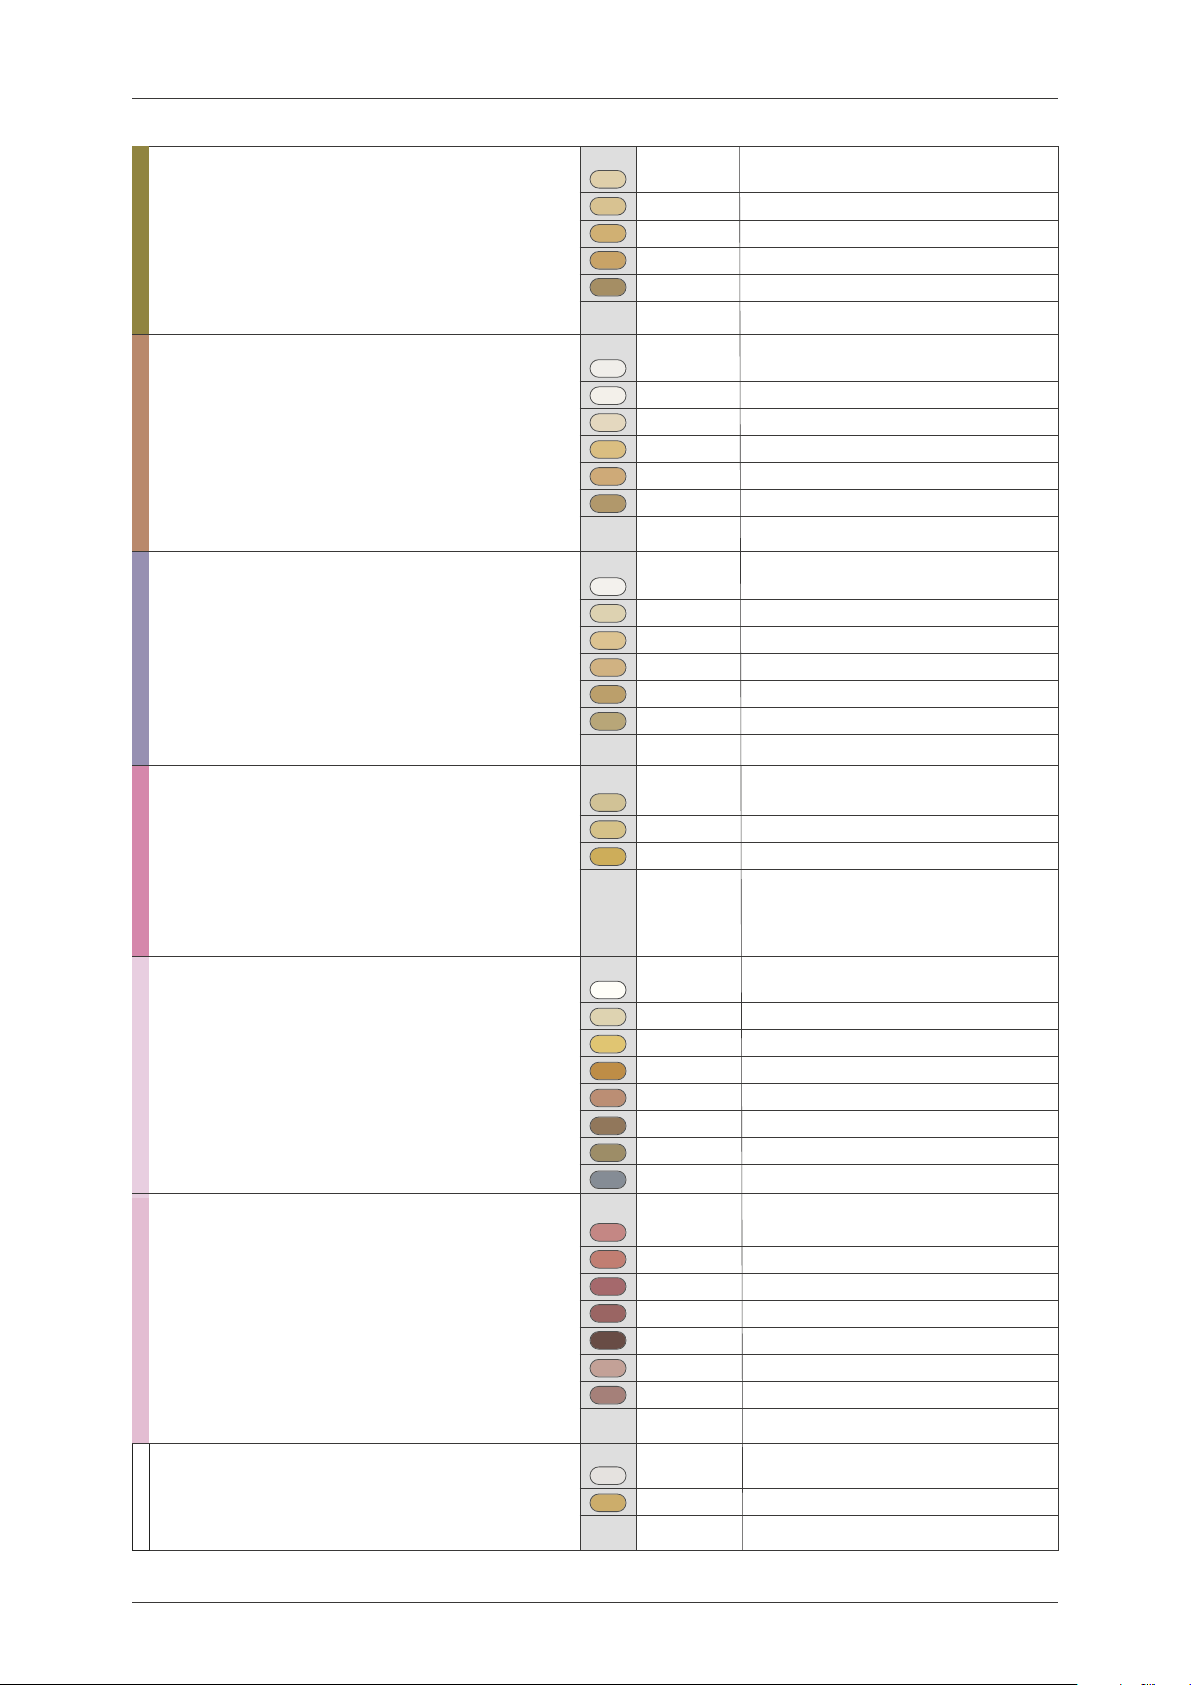
VITA VMK Master®NECK
– perfect shade reproduction in the cervical area can be
supported with the NECK materials
– the use of NECK materials allows to achieve higher
intensity of the shade and opacity
VITA VMK Master®MARGIN
– for creating an esthetic transition zone of labially
reduced metal copings
– can be intensified with VITA INTERNO materials
– (please read the information in the section
"Application of a ceramic shoulder")
VITA VMK Master®LUMINARY
– highly fluorescent material to support and control
the natural fluorescence, in particular in cases
of thin layers
N1
N2
N3
N4
N5
MN
M1
M2
M3
M4
M5
LM1
LM2
LM3
LM4
LM5
LM6
beige
yellow
yellow-orange
orange
khaki
neutral
white
beige
yellow
orange-reddish
light brown
white
sand
yellow
light brown-orange
light brown
light khaki
VITA VMK Master®CERVICAL
– the materials can be placed on the dentine
or incisally on the enamel above the neck up
to the approximal area to increase the effect of depth
VITA VMK Master®DENTINE MODIFIER
– "washed" in the dentine to intensify the shade
– for coloring the inside to obtain effects of depth
– for preparing mamelons in the incisal area
and creating age-specific abrasion characteristics
VITA VMK Master®GINGIVA
– for accurate restoration of losses of soft tissue
- can be used in the unmixed state or mixed
with one another
– materials are fired based on the parameters
of the first and second dentine firing
CE1
CE2
CE3
DM1
DM2
DM3
DM4
DM5
DM6
DM7
DM8
G1
G2
G3
G4
G5
GOL
GOD
light yellow
light orange
golden yellow
white
cream
yellow
orange
reddish
brownish-reddish
khaki
grey
dusky pink
orange-pink
pink-red
brown-red
reddish-black
light
dark
VITA VMK Master®CORRECTIVE
– for corrections after glaze firing
COR1
COR2
neutral
beige
41
Page 42

VITA VMKMaster
®
Sets
VITA VMK Master
®
STANDARD SET 3D-MASTER*
Basic set
Quantity Content Material
1
5
26
26
2
1
1
3
5
2
2
1
12g
12g
12g
12g
12g
12g
12 g
12g
12g
12g
50 ml
50 ml
1
1
1
–
1
* also available as VITA VMK Master 10-COLOR SET with the following
10 most common VITA SYSTEM 3D-MASTER shades:
1M2, 2L1.5, 2M1, 2M2, 2R2.5, 3L1.5, 3M1, 3M2, 3M3, 4M2
** each also available with PASTE OPAQUE
WASH OPAQUE WO
OPAQUE OP1– OP5
OPAQUE DENTINE 1M1–5M3
DENTINE 1M1–5M3
ENAMEL EN1, EN3
TRANSLUCENT T4
WINDOW WIN
CERVICAL CE1–CE3
NECK N1–N5
CORRECTIVE COR1– COR2
Modelling fluid
Opaque fluid
Shade guide STANDARD
–
Shade indicator 3D-MASTER
–
VITA Linearguide 3D-MASTER
–
Accessories
–
Working instructions
–
VITA VMK Master
®
STARTER SET 3D-MASTER*
Two-color set (2M2, 3M2)
Quantity Content Material
2
2
2
1
1
1
1
12 g
12 g
12 g
12 g
12 g
50 ml
50 ml
2
1
*also available with PASTE OPAQUE
VITA VMK Master
OPAQUE OP2, OP3
OPAQUE DENTINE 2M2, 3M2
DENTINE 2M2, 3M2
ENAMEL EN1
TRANSLUCENT T4
Modelling fluid
Opaque fluid
Shade tabs 2M2, 3M2
–
Working instructions
–
®
BLEACHED COLOR SET*
Ultra-bright colors for the reproduction of bleached teeth
Quantity Content Material
1
3
3
1
1
1
1
12 g
12 g
12 g
12 g
12 g
50 ml
50 ml
1
1
*also available with PASTE OPAQUE
OPAQUE OP0
OPAQUE DENTINE 0M1–0M3
DENTINE 0M1– 0M3
ENAMEL EN1
TRANSLUCENT T4
Modelling fluid
Opaque fluid
BLEACHED SHADE GUIDE 0M1-0M3
–
Working instructions
–
42
Page 43

VITA VMKMaster
®
Sets
VITA VMK Master
®
STANDARD SET classical*
Basic set
Quantity Content Material
1
16
16
16
2
1
1
3
5
2
2
1
12g
12g
12g
12g
12g
12g
12 g
12g
12g
12g
50 ml
50 ml
1
1
1
–
1
*also available with PASTE OPAQUE
WASH OPAQUE WO
OPAQUE A1–D4
OPAQUE DENTINE A1– D4
DENTINE A1– D4
ENAMEL EN1, EN2
TRANSLUCENT T4
WINDOW WIN
CERVICAL CE1–CE3
NECK N1–N5
CORRECTIVE COR1– COR2
Modelling fluid
Opaque fluid
Shade guide STANDARD
–
Shade indicator
–
VITA classical A1– D4 shade guide
–
Accessories
–
Working instructions
–
VITA classical A1–D4
VITA VMK Master
®
STARTER SET classical*
Two-color set (A2, A3)
Quantity Content Material
2
2
2
1
1
1
1
12 g
12 g
12 g
12 g
12 g
50 ml
50 ml
2
1
*also available with PASTE OPAQUE
VITA VMK Master
OPAQUE A2, A3
OPAQUE DENTINE A2, A3
DENTINE A2, A3
ENAMEL EN1
TRANSLUCENT T4
Modelling fluid
Opaque fluid
Shade tabs A2, A3
–
Working instructions
–
®
ADDITIONAL SET
For individual effects and characteristics
Quantity Content Material
8
8
6
6
1
1
1
12 g
12 g
12 g
12 g
12 g
12 g
50 ml
1
1
TRANSLUCENT T1– T8
DENTINE MODIFIER DM1– DM8
LUMINARY LM1–LM6
MARGIN MN, M1–M5
OPAL TRANSLUCENT OT1
PEARL TRANSLUCENT PLT1
Modelling fluid
TRANSLUCENT shade guide
–
DENTINE MODIFIER /
–
LUMINARY shade guide
1
MARGIN / GINGIVA shade guide
–
43
Page 44

VITA VMKMaster
®
Sets
®
VITA VMK Master
GINGIVA SET*
Gingiva materials with a natural appearance
Quantity Content Material
5
2
12g
12g
1
*also available with PASTE OPAQUE
GINGIVA G1–G5
GOL, GOD
MARGIN / GINGIVA shade guide
–
The following quantities are also available individually:
Materials
WASH OPAQUE
OPAQUE
OPAQUE DENTINE, DENTINE
5g 12g 50 g
7g
x
–
x
x
x
x
x
x
ENAMEL, TRANSLUCENT T4,
WINDOW
TRANSLUCENT, LUMINARY,
–
–
x
PEARL TRANSLUCENT, NECK,
OPAL TRANSLUCENT, MARGIN,
CERVICAL, DENTINE MODIFIER,
GINGIVA, CORRECTIVE
GINGIVA OPAQUE
x
–
x
44
Page 45

VITA VMKMaster
®
Liquids
VITA MODELLING FLUID
For mixing all dentine, incisal and additional materials.
VITA MODELLING FLUID avoids rapid drying of the ceramic material.
Moreover increased plasticity during layering is achieved.
VITA MODELLING FLUID RS
Red special liquid for mixing all dentine, incisal and additional materials.
The smooth consistency of VITA MODELLING FLUID RS allows extended
and wet processing whilst ensuring good stability and the fluid is therefore
particularly suited for large-sized restorations and multi-unit bridges.
VITA OPAQUE FLUID
For mixing all powder opaque materials.
Note: Do not use for mixing
the dentine materials!
VITA PASTE OPAQUE LIQUID
Liquid for diluting the consistency of the paste and,
if required, for re-mixing the paste opaque materials.
VITA HIGH SILVER MODELLING LIQUID
Anti-greening liquid for high silver content alloys (silver content >30%).
Not included in the assortment!
45
Page 46

VITA VMKMaster
®
Accessories
VITA AKZENT
®
For reproducing natural shade effects and anomalies during surface
characterization. The stains feature a fine-grain structure, intense shade
and are slightly fluorescent and particularly stable and can be mixed
with one another.
VITA AKZENT FLUID
For mixing VITA AKZENT stains,
VITA AKZENT GLAZE and VITA FINISHING AGENT.
VITA FINISHING AGENT
Finishing agent with very fine consistency for natural surface luster.
The finishing agent produces a transparent coat and
a translucent shade. It has a considerably lower masking
capacity than a glaze material.
VITA INTERNO
®
Materials for perfect reproduction of in-depth shade effects.
They feature intense shades and high fluorescence to achieve
tremendous brilliance of the shades. VITA INTERNO materials
can be "washed" in (in the non-mixed state) or mixed with
OPAQUE DENTINE, DENTINE, ENAMEL and TRANSLUCENT.
VITA INTERNO FLUID
For mixing the VITA INTERNO materials.
46
Page 47
VITA VMKMaster
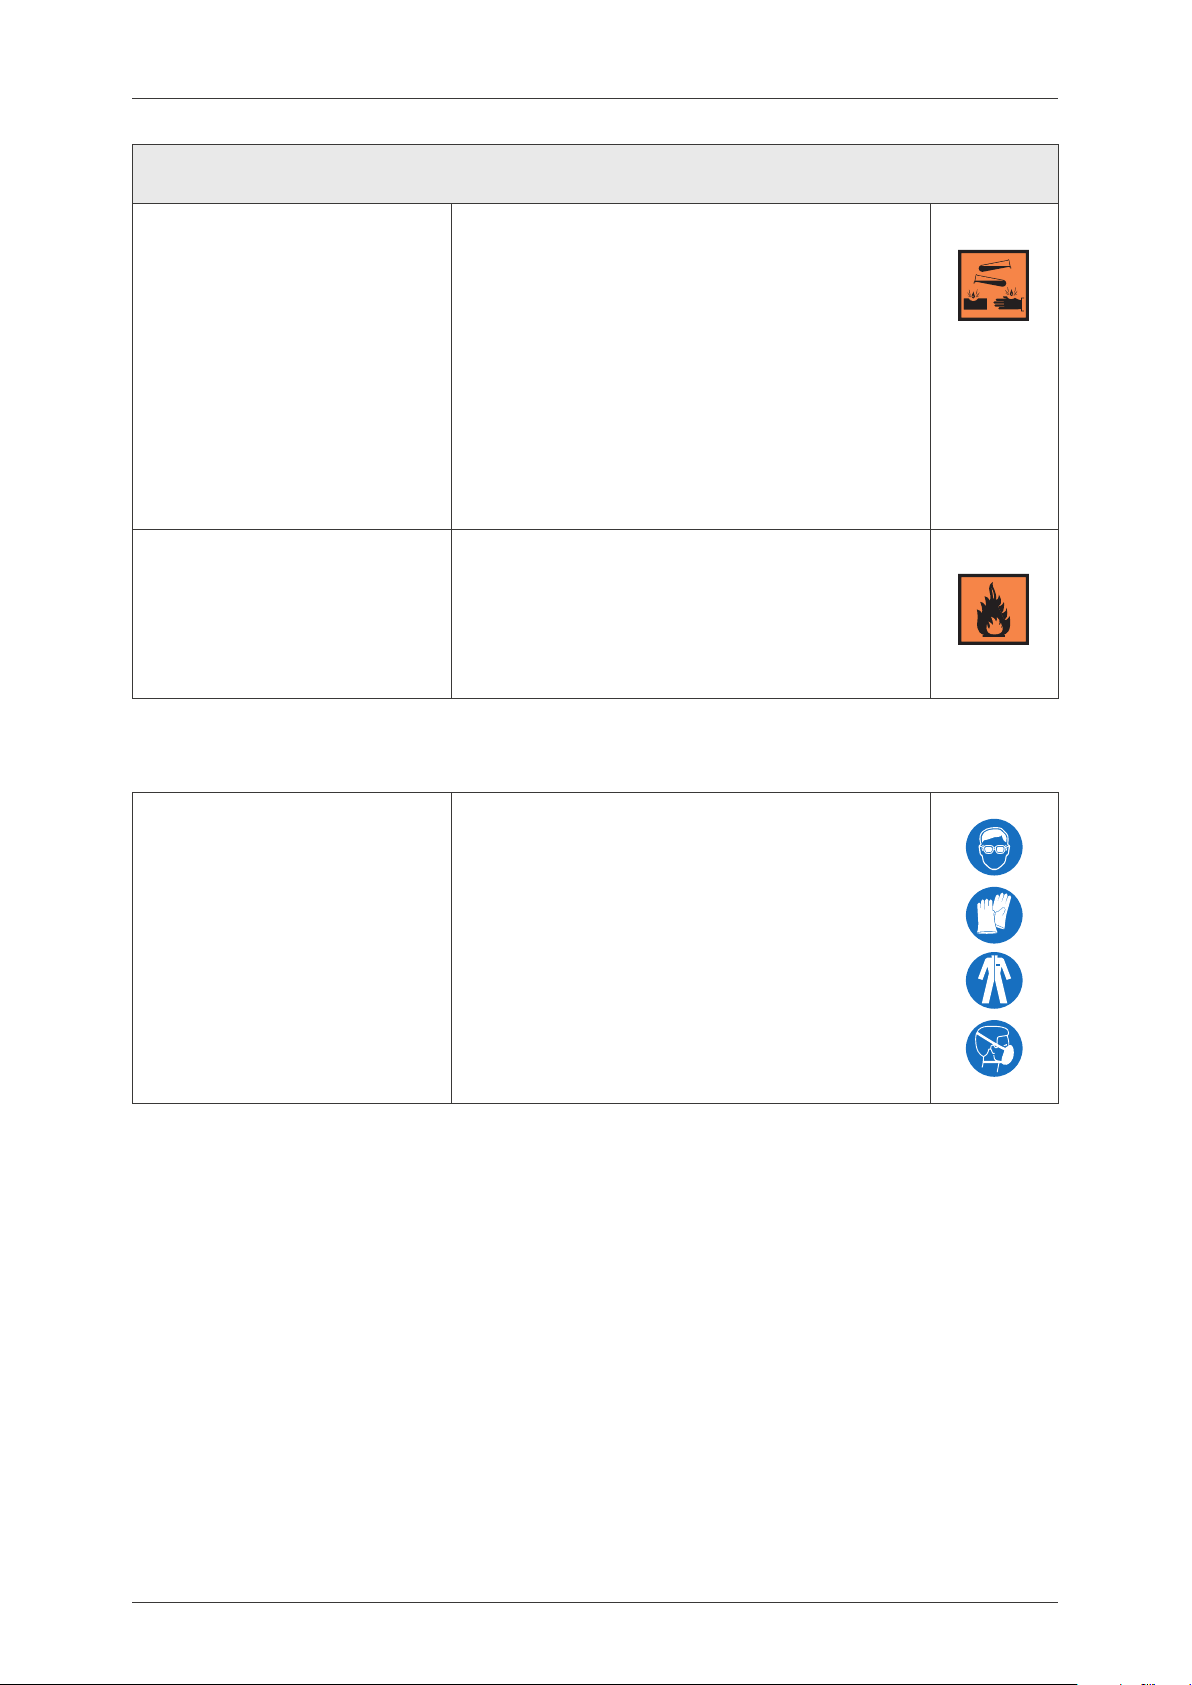
The following products require hazard label information:
®
Hazard information
VITA OPAQUE FLUID
VITA SPRAY-ON LIQUID
VITA SPRAY-ON INDICATOR LIQUID
For detailed information please refer to the respective safety datasheets!
Information on the subject can be found on our website under FAQs about metal-ceramics.
Caustic
Causes burns. Keep product well sealed and out of children's
reach. When using, do not eat or drink. In case of contact
with eyes, rinse immediately with plenty of water and seek
medical advice. Do not empty into drains; dispose of this
material and its container at hazardous or special waste
collection point. Wear suitable protective clothing,
gloves and eye / face protection. In case of accident
or if you feel unwell, seek medical advice immediately
(show the label where possible).
Highly flammable
Keep container tightly closed at a well-ventilated place.
Keep away from sources of ignition - no smoking.
Do not empty into drains. This material and its container
must be disposed of as hazardous waste.
Safety clothing
Wear suitable safety goggles / face protection,
gloves and safety clothing.
In case of formation of dust, use an extraction system
or wear a face mask.
47
Page 48

VITA VMK MASTER veneering ceramic is available in VITA
SYSTEM 3D-MASTER and VITA classical A1-D4 shades. Shade
compatibility with all VITA SYSTEM 3D-MASTER and VITA
classical A1-D4 materials is ensured.
With the unique VITA SYSTEM 3D-MASTER all natural tooth
shades are systematically determined and completely reproduced.
Please note: Our products should be used according to the working instructions.
We cannot be held liable for damages resulting from incorrect handling or usage.
The user is furthermore obliged to check the product before use with regard to its
suitability for the intended area of applications. We cannot accept any liability if the
product is used in conjunction with porcelains and equipment from other manufacturers which are not compatible or not authorized for use with our product.
Furthermore, our liability for the correctness of this information is independent of the
legal ground and, in as far as legally permissible, is limited to the invoiced value of
the goods supplied excluding turnover tax. In particular, as far as legally permissible,
we do not assume any liability for profit loss, for indirect damages, for consequential
damages or for claims of third parties against the purchaser. Claims for damages
based on fault liability (culpa in contrahendo, breach of contract, unlawful acts, etc.)
can only be made in the case of intent or gross negligence. The VITA Modulbox is not
necessarily a component of the product.
Date of issue of these working instructions: 07.12
After the publication of these working instructions any previous versions become
obsolete. The current version can be found at www.vita-zahnfabrik.com
VITA Zahnfabrik is certified according to the Medical Device Directive
and the following products bear the CE mark :
VITA VMK Master
VITA AKZENT
VITA INTERNO
US 5498157 A · AU 659964 B2 · EP 0591958 B1
VITA Zahnfabrik H. Rauter GmbH & Co.KG
Postfach 133 8 · D-79704 Bad Säckingen · Germany
Tel. +49(0)7761/562- 0 · Fax +49(0)7761/562-299
Hotline: Tel. +49(0)7761/562-222 · Fax +49(0) 7761/ 562 -446
www.vita-zahnfabrik.com · [email protected]
®
®
®
1645 E – 0712 (X.) S
 Loading...