

Page 1
Working Instructions
VITA Farbkommunikation
VITA Farbkommunikatio n
VITA shade communicat ionVITA shade taking
For veneering metal substructures in the
conventional CTE range.
Available in VITA SYSTEM 3D-MASTER and
VITA classical A1–D4 shades.
VITA shade reproducti on
VITA shade, VITA made.
VITA shade control
Date of issue: 07.13
Page 2

Page 3

Table of contents
Patient case 4
VITA SYSTEM 3D-MASTER 5
Fine-structure ceramic 6
Data – facts 7
Indication range 8
Facts worth knowing about the CTE 9
Firing result 10
Substructure design and layer thicknesses 11
OPAQUE layering 12
Processing of the opaque
for precious metal alloys 13
Processing of the opaque
for precious metal-free alloys 15
BASIC layering 16
BUILD UP layering 20
Firing chart 25
Classification tables 26
VITA modelling liquids 27
Additional materials 28
Assortments 31
Information 34
3
Page 4

Patient case
Restoring oral harmony.
The result of the teamwork of the dentist, Dr. Enrico Poli (Padua/Italy) and the
dental technician, Maurizio Buzzo (Venice/Italy).
Photo courtesy of: M. Buzzo
Situation after preparation of teeth 11 and 21.
Metal crown copings; cervical reduction for shoulder.
Crown copings prepared with opaque and shoulder material.
Restoration in harmony with the patient's natural dentition.
4
Page 5

VITA SYSTEM 3D-MASTER
®
Competence for more than 80 years
Shade management is more than just shade determination. At VITA, shade management means incorporating the best solutions into a complete process. The
key question we have always asked ourselves is: How can we improve shade
determination and reproduction? The answer: By establishing standardized
process steps to increase the efficiency, we can help dental specialists achieve
better results while spending less time and money.
VITA shade taking
The accurate determination of the basic shade of a tooth is the key
prerequisite for patient acceptance. The basic shade is generally found
in the dentine center.
The determination of the effects
Natural teeth are unique and a perfect creation of nature. Therefore, after
determining the base shade, details of a tooth (translucent zones or anomalies,
for example) need to be recorded to obtain a perfect match. We recommend
the use of a digital photo to analyze details or effects.
VITA shade communication
To ensure perfect reproduction of the determined shade, it is essential to
ensure that all parameters are communicated accurately to the dental laboratory. Any misunderstanding leads to expensive and unnecessary extra work.
For this reason we recommend using the color communication form to describe
the basic shade and a digital photo for the analysis of effects or details. The
software of VITA Easyshade Advance 4.0 provides a template to have all data
on a single sheet – a laboratory communication form. This information will
enable you to create a restoration that matches the remaining teeth perfectly
in a quick and reliable manner.
VITA shade reproduction
The most important step in reproducing a tooth is to ensure that the determined tooth shade is accurately reproduced. Then the shade effects of the
tooth can be reproduced to obtain a high-quality restoration.
You can be sure that whichever VITA materials you choose, you will be able to
achieve this objective without time-consuming mixing or testing.
VITA shade control
In the final step, qualitative shade evaluation should not be left to the
subjective opinion of an individual. Within the VITA process, objective control
of the final restoration is the most important prerequisite for ensuring satisfied
patients and avoiding additional work.
5
Page 6

Fine-structure ceramic
VITA VM 13 was designed as a feldspar veneering ceramic
for metal substructures made of conventional alloys in
the CTE range of 13.8 – 15.2. The CTE range and the firing
temperature of VITA VM 13 are optimally matched to high
gold content, reduced gold content and palladium based or
precious metal-free alloys. With these firing temperatures
distortion of the alloy can be virtually ruled out.
VITA VM 13 is a ceramic, which in terms of structure features
considerably more homogeneous distribution of the crystalline and glass phase than traditional ceramics. This type of
structure is described as a "fine structure". In figs. 1 and 2
the fine structure of VITA VM 13 is compared with that of a
traditional structure.
Fig. 1
The etched surface (etched for 20 seconds with VITA
CERAMICS ETCH) of a conventional metal ceramic shows
agglomerations of leucite crystals of up to 30 μm in diameter. The differences between the CTE values of the leucite
agglomerations and those of the glass phase can lead to
stress cracks.
Fig. 2
The etched surface of VITA VM 13 (etched for 20 seconds
with VITA CERAMICS ETCH) shows an extremely fine distribution of the leucite crystals in the glass matrix.
By means of localized balancing of the differing CTE values of
the leucite and the glass phase it is possible to avoid larger
stress cracks.
Good surface structure
In addition to improved physical properties, the fine structure
of VITA VM 13 offers the dental technician and the patient
a whole set of advantages. Since VITA VM 13 demonstrates
excellent grinding and polishing characteristics after firing,
it is possible to achieve very smooth surfaces. This reduces
plaque adhesion to the ceramic surface and results in a
pleasant sensation of cleanliness for the patient.
Fig. 1: SEM image of the surface of
a conventional metal ceramic
(magnification 5000 x).
6
Fig. 2: SEM image of the surface of
VITA VM 13 (magnification 5000 x).
Page 7
120
Data – facts
Improved physical properties
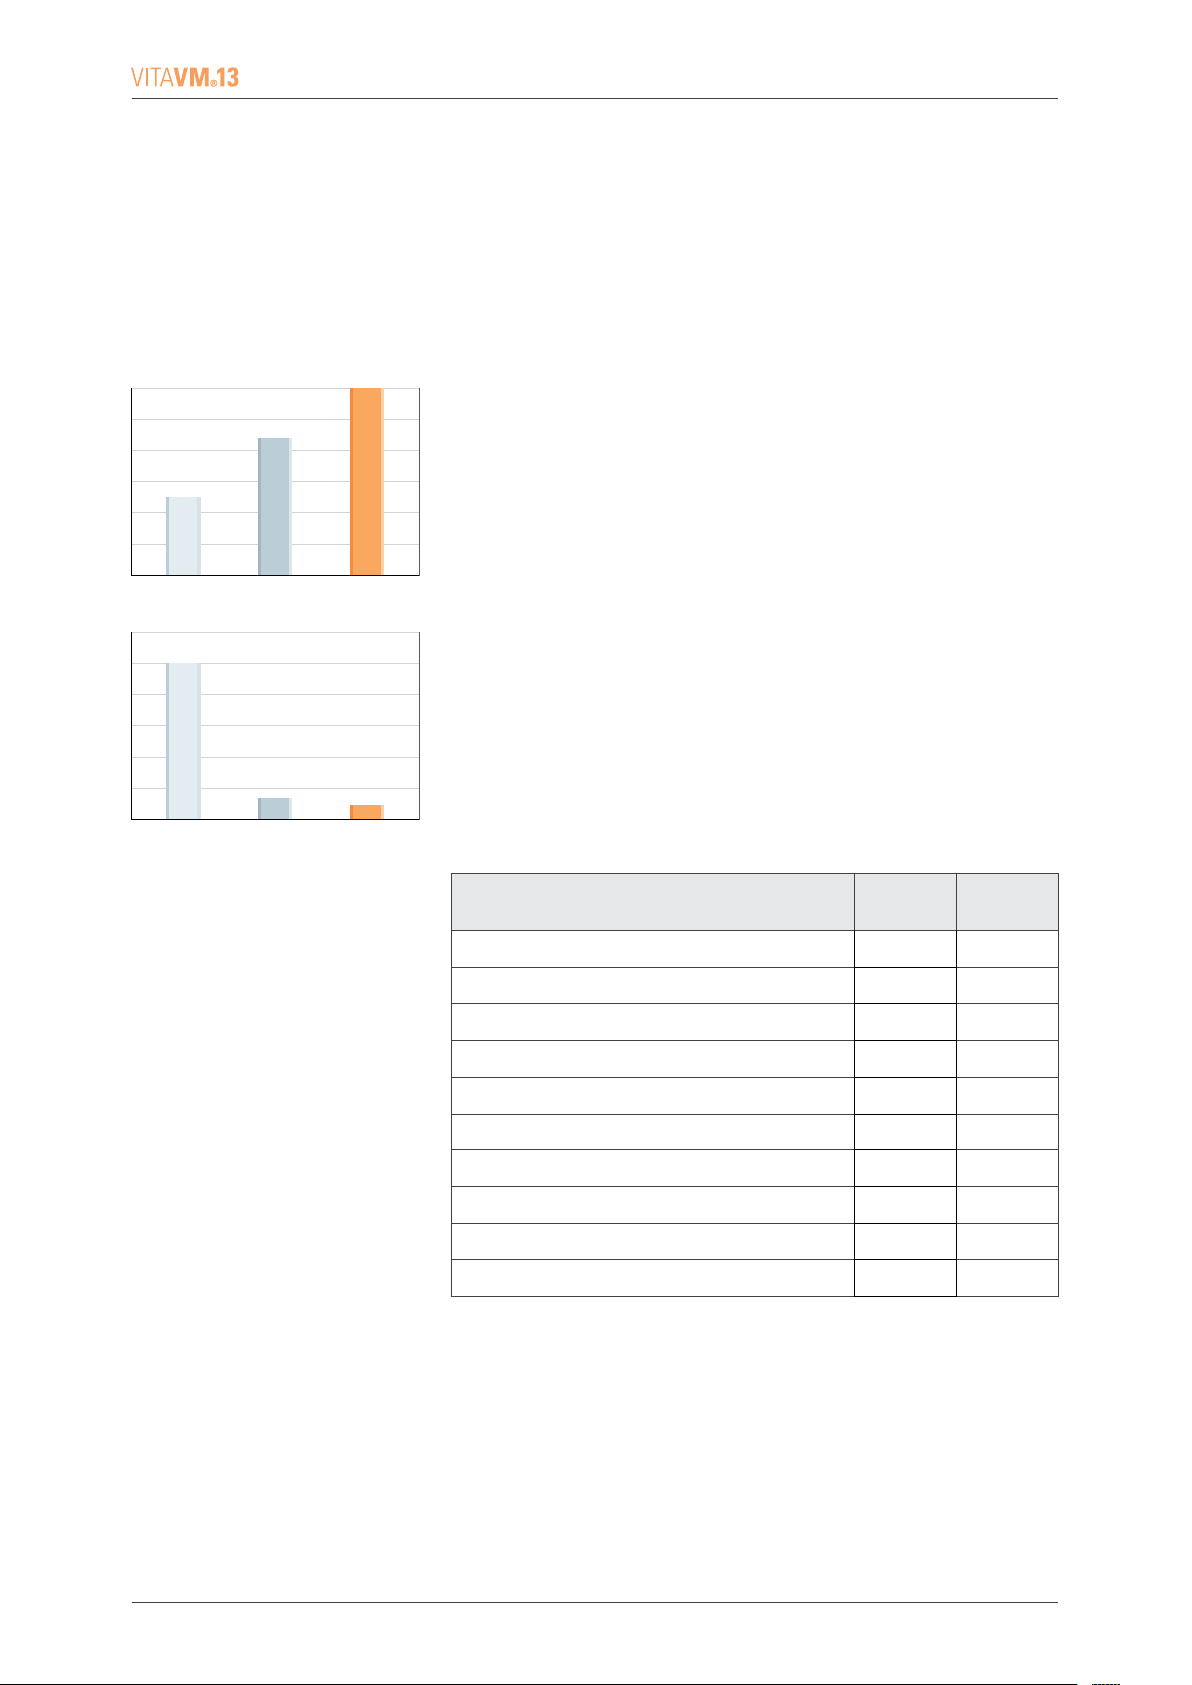
In addition to the lower firing temperature, VITA VM 13 demonstrates an
improvement in flexural strength, its adhesive bonding and resistance to thermal
cycling while retaining the same, low degree of solubility in acid compared with
conventional metal ceramics.
120
3-point flexural strength [MPa]
Biegefestigkeit [MPa]
100
80
60
40
20
ISO limit
Solubility in acid [μg/cm2]
Säurelöslichkeit [µg/cm2]
100
80
60
40
20
ISO limit
conventional
Ceramic
conventional
Ceramic
VITA VM 13
VITA VM 13
Flexural strength
Flexural strength of VITA VM 13 compared with that of a conventional metal
ceramic and the ISO limit according to ISO 6872.
Solubility
Solubility in acid of VITA VM 13 compared with that of a conventional ceramic and
the ISO limit according to ISO 6872.
VITA VM 13 – Physical properties
CTE (25-500°C) of OPAQUE 13.6–14.0
Unit of
measure
10-6 · K
Value
-1
Transformation temperature of OPAQUE
CTE (25-500°C) of BASE DENTINE 13.1–13.6
Softening point of BASE DENTINE approx. 635
Transformation temperature of BASE DENTINE
Solubility of BASE DENTINE approx. 12
Density of BASE DENTINE approx. 2.5
3-point flexural strength of BASE DENTINE approx. 120
Average particle size of BASE DENTINE approx. 18
Adhesive bond testing (according to ISO 9693) of BASE DENTINE
°C
-6
10
°C
°C
μg/cm
g/cm
MPa
μm
MPa
· K
-1
2
3
approx. 570/577
approx.
60/565
approx. 43
Enamel-like properties
Like all VITA fine-structure ceramics, VITA VM 13 demonstrates behavior very
similar to that of natural tooth enamel. This is confirmed by studies carried out with
VITA VM 7 by the Dental Clinic of the University of Zurich in Switzerland and
Dr. Giordano from the Goldman School of Medicine of the University of Boston.
Literature: E. A. McLaren, R. A. Giordano II, R. Pober, B. Abozenada „Zweiphasige Vollglas Verblendkeramik“,
(Quintessenz Zahntech 30, 1, 32-45 [2004])
7
Page 8
Application area
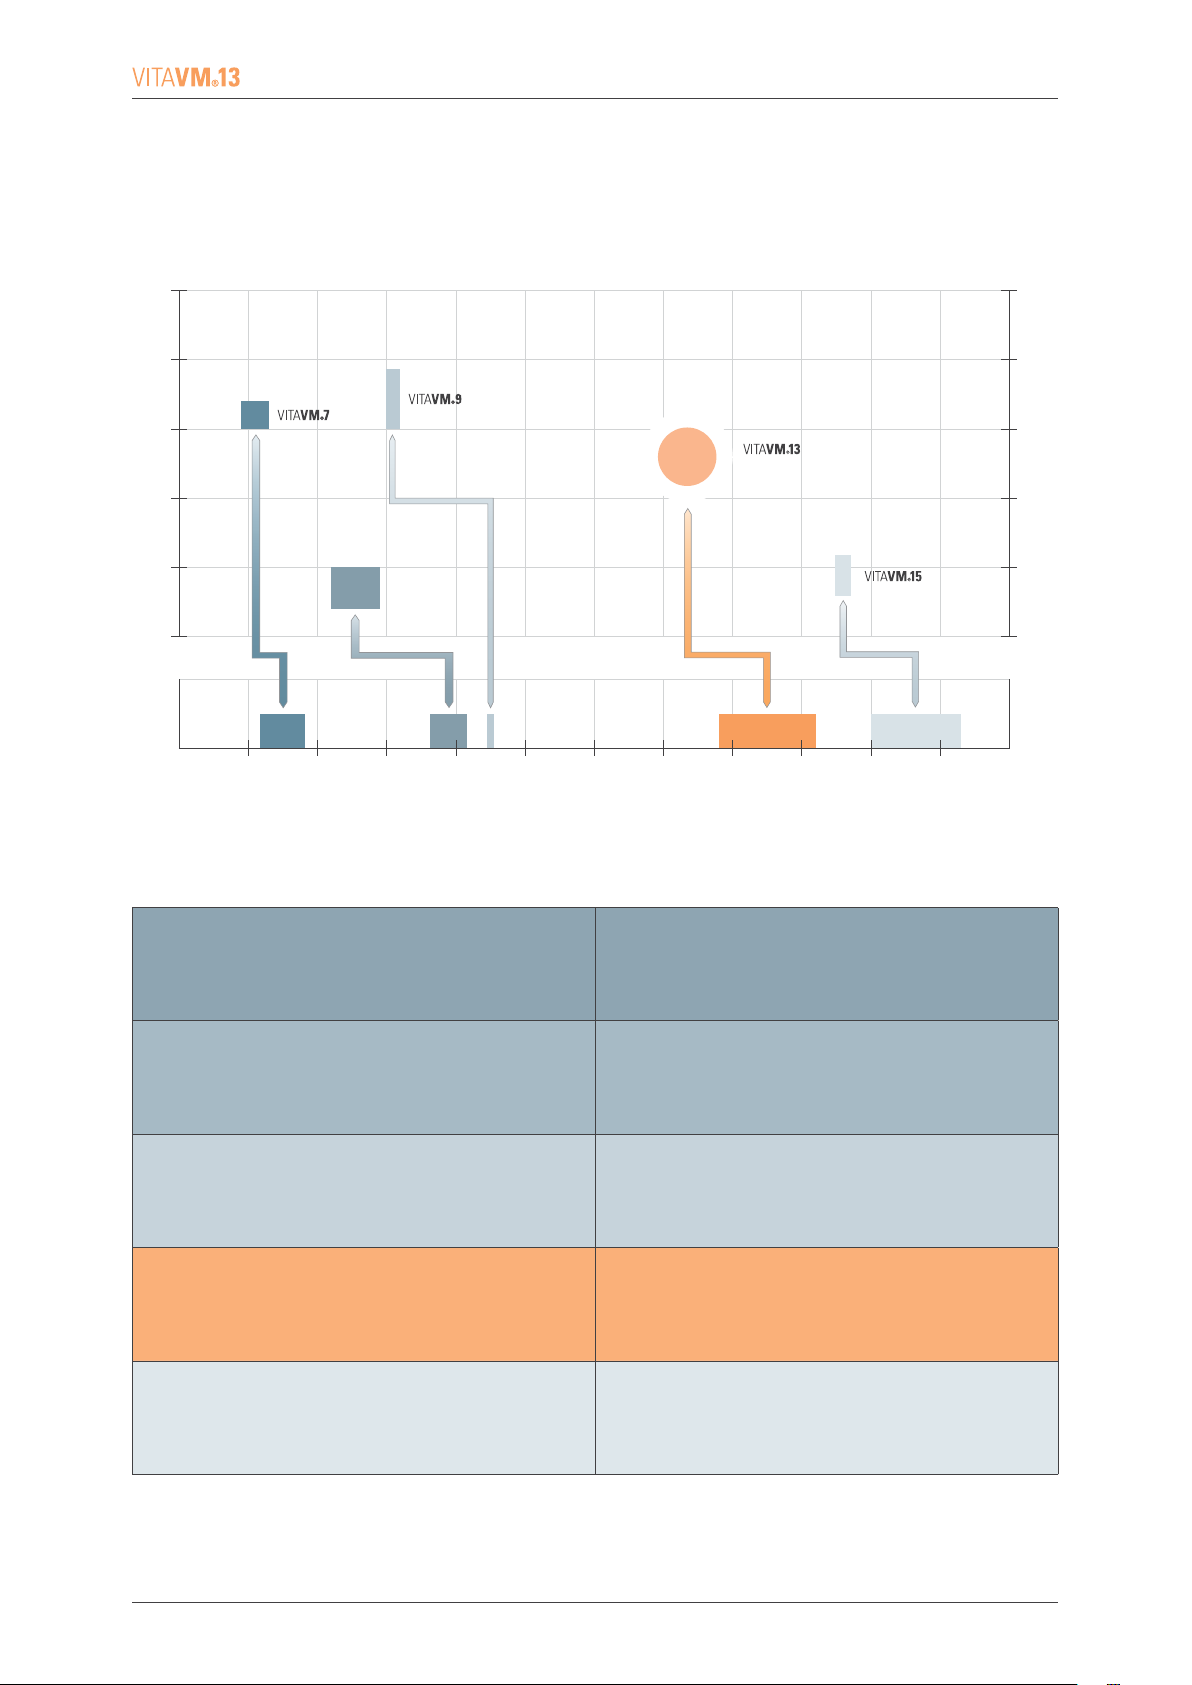
For veneering alloys in the CTE range of 13.8–15.2 10
-6
-1
K
Firing temperature of
ceramic [°C]
1000
900
750
7
Firing temperature of
Linear coefficient of thermal expansion of the ceramic, measured at 25–500°C
VITA TITANIUM
PORCELAIN
substructure substructure substructure substructure substructure
98
16151413121110
17
ceramic [°C]
1000
950950
900
850850
800800
750
Linear coefficient of thermal expansion of the ceramic substructure material, measured at 25–500°C
(alloys measured at 25–600°C)
VITA VM 7
CTE (25–500°C) 6.9–7.3 · 10
VITA TITANIUM PORCELAIN
CTE (25–500°C) 8.2–8.9 · 10
VITA VM 9
CTE (25–500°C) 9.0–9.2 · 10
VITA VM 13
CTE (25–500°C) 13.1–13.6 · 10
VITA VM 15
CTE (25–500°C) 15.5–15.7 · 10
-6
-1
· K
-6
-1
· K
-6
-1
· K
-6
-1
· K
-6
-1
· K
VITA In-Ceram ALUMINA, CTE (25–500°C) 7.2–7.6 · 10-6 · K
VITA In-Ceram ZIRCONIA, CTE (25–500°C) 7.6–7.8 · 10-6 · K
for titanium and titanium alloys
Titanium (grade 1) CTE (25–500°C), approx. 9.6 · 10
Ti6AI4V CTE (25–500°C), approx. 10.2 · 10-6 · K
VITA In-Ceram YZ
CTE (25–500°C), approx. 10.5 · 10
High gold content-, reduced precious metal content,
palladium based and non-precious alloys
CTE (25–600°C) 13.8–15.2 · 10
Multi-indication alloys
CTE (25–600°C) 16.0–17.3 · 10
-1
-1
-6
-1
· K
-1
-6
-1
· K
*
-6
-1
· K
*
-6
-1
· K
* visit the download section of our website for more information about alloys
8
Page 9
Facts worth knowing about the CTE
m
a
r
i
e
c
b
u
S
b
u
S
b
u
S
C
u
r
t
s
C
u
r
t
s
C
u
r
t
s
r
e
u
t
c
Horizontal
section
through a
schematic
crown
m
a
r
e
r
e
u
t
c
Horizontal
section
through a
schematic
crown
m
a
r
e
r
e
u
t
c
Horizontal
section
through a
schematic
crown
m
a
t
e
r
i
a
l
i
c
m
a
t
e
r
i
a
l
i
c
m
a
t
e
r
i
a
l
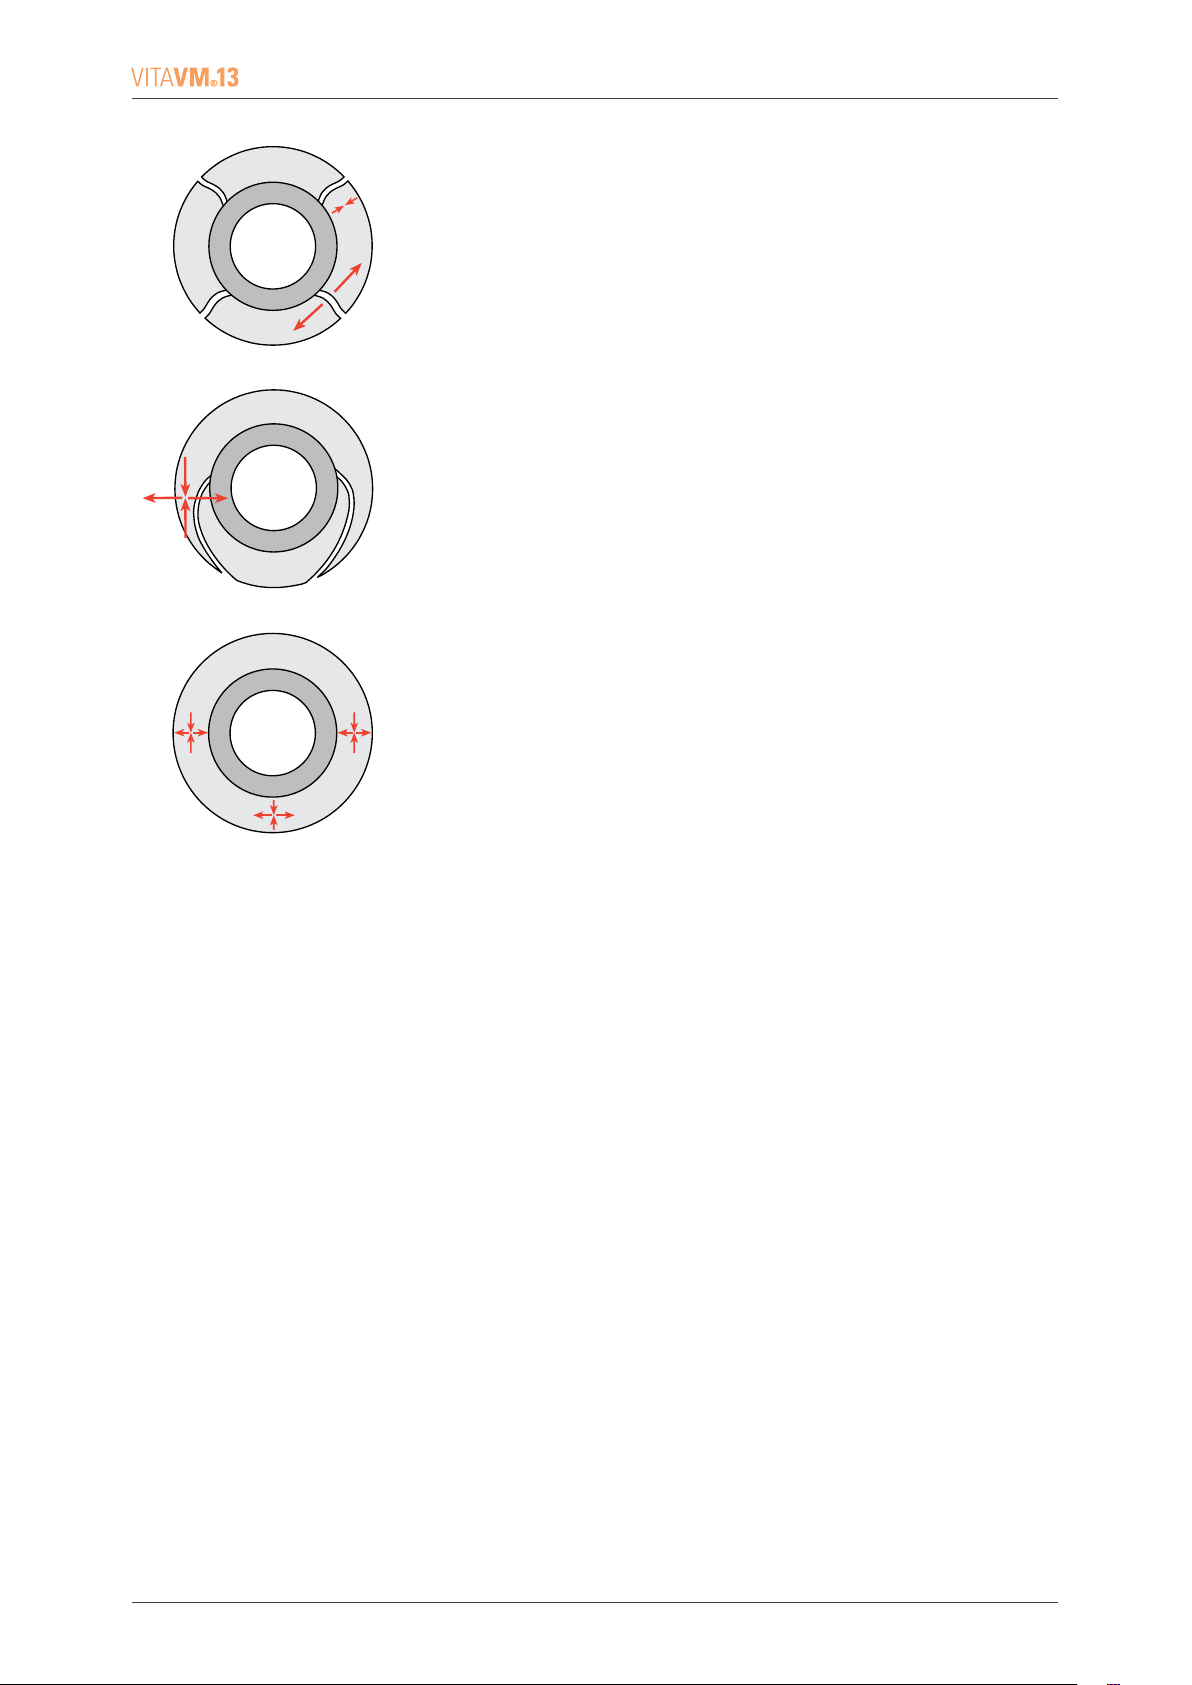
If the CTE of the substructure material is considerably lower than the CTE of the
veneering ceramic, tangential tensile stress will increase and form radial cracks
that run to the outside. This may result in late cracks.
If the CTE of the substructure material is considerably higher than the CTE of the
veneering ceramic, tangential compressive stress will increase and form cracks that
run almost parallel to the substructure.
This may result in chipping.
The ideal tangential and radial tensile stress is ensured if the CTE of the ceramic
has been optimally matched with the CTE of the substructure material.
Optimal preconditions are given if the veneering ceramic features a somewhat
lower CTE value than the substructure material. Due to adhesive bonding, the
ceramic must follow the thermal behavior of the substructure material. If cooled
down, the ceramic is exposed to slight tangential compressive stress.
If a substructure material is veneered with ceramic, the layer thickness of the
veneer is a decisive factor in addition to the CTE value. Accordingly, differences
in strain (radial tensile stress) are obtained, which will grow in case of increasing
layer thickness.
9
Page 10

Firing result
The firing result obtained with dental ceramics depends to a great extent on the
individual user's firing procedure and substructure design. The type of furnace, the
location of the temperature sensor, the firing tray and the size of the workpiece
during the firing cycles are decisive for the result of firing.
Our application-technical recommendations for the firing temperatures (regardless
of whether they have been provided orally, in writing or in the form of practical instructions) are based on extensive experience and tests. The user, however, should
consider this information only as a reference. Should the surface quality or the
degree of transparency or glaze not correspond to the result that is achieved under
optimum conditions, the firing procedure must be adjusted correspondingly.
The crucial factors for the firing procedure are not the firing temperature displayed
by the furnace but the appearance and the surface condition of the ceramic after
the firing process.
Note: Firing trays may also have significant influence on the result. All
firing temperatures for VITA VM are based on the use of dark-colored ceramic
firing trays. When using light-colored firing trays, the temperature may vary by
10–20°C - in some cases even by up to 40° - from the reference value given
depending on the type of furnace that is used and needs to be adjusted correspondingly.
A slight luster of the ceramic surface is an evidence for correct firing. If the
ceramic, however, appears to be milky and non-homogeneous, the firing
temperature is too low. Approach the correct firing temperature in steps of 5–10°C.
10
Page 11

Substructure design and layer thicknesses
Substructure design
Crowns and bridge units which are to be veneered with ceramic must be modeled
in reduced anatomical size. A minimum wall thickness of 0.4 mm is required in
order to ensure a minimum wall thickness of 0.3 mm after finishing. Avoid sharp
edges, undercuts and deep grooves. The stability can be further increased by means
of metal collars or inlay-type supports in the palatal area.
Regarding the substructure, investing, casting, etching, finishing, sandblasting and
oxidation please follow the alloy manufacturer's instructions.
Note: Our practical experience in the CTE range of 13.8–15.2 · 10-6 · K-1
has shown that good results can be achieved when the CTE of the alloy
(measured at 25–600 °C) is within the range of 14.0–14.4 · 10-6 · K-1. In the
case of alloys with a CTE (25–600°C) >14.5 · 10-6 · K-1 slow cooling should be
used from the first dentine firing onwards. If the alloy has a higher CTE value,
cooling in the 900°C–700 °C range should not be completed in less than 3
minutes. For further information see the list of alloys tested in combination
with VITA VM 13. This list can be found at www.vita-zahnfabrik.com under
Download/Veneering Materials/Alloy List.
Layer thicknesses for ceramics
When preparing a ceramic veneer, a uniform layer thickness across the entire
surface to be veneered must be ensured. The entire thickness of the ceramic
layer, however, should not exceed 2 mm (the optimum layer thickness ranges
from 0.7 to 1.2 mm).
11
Page 12
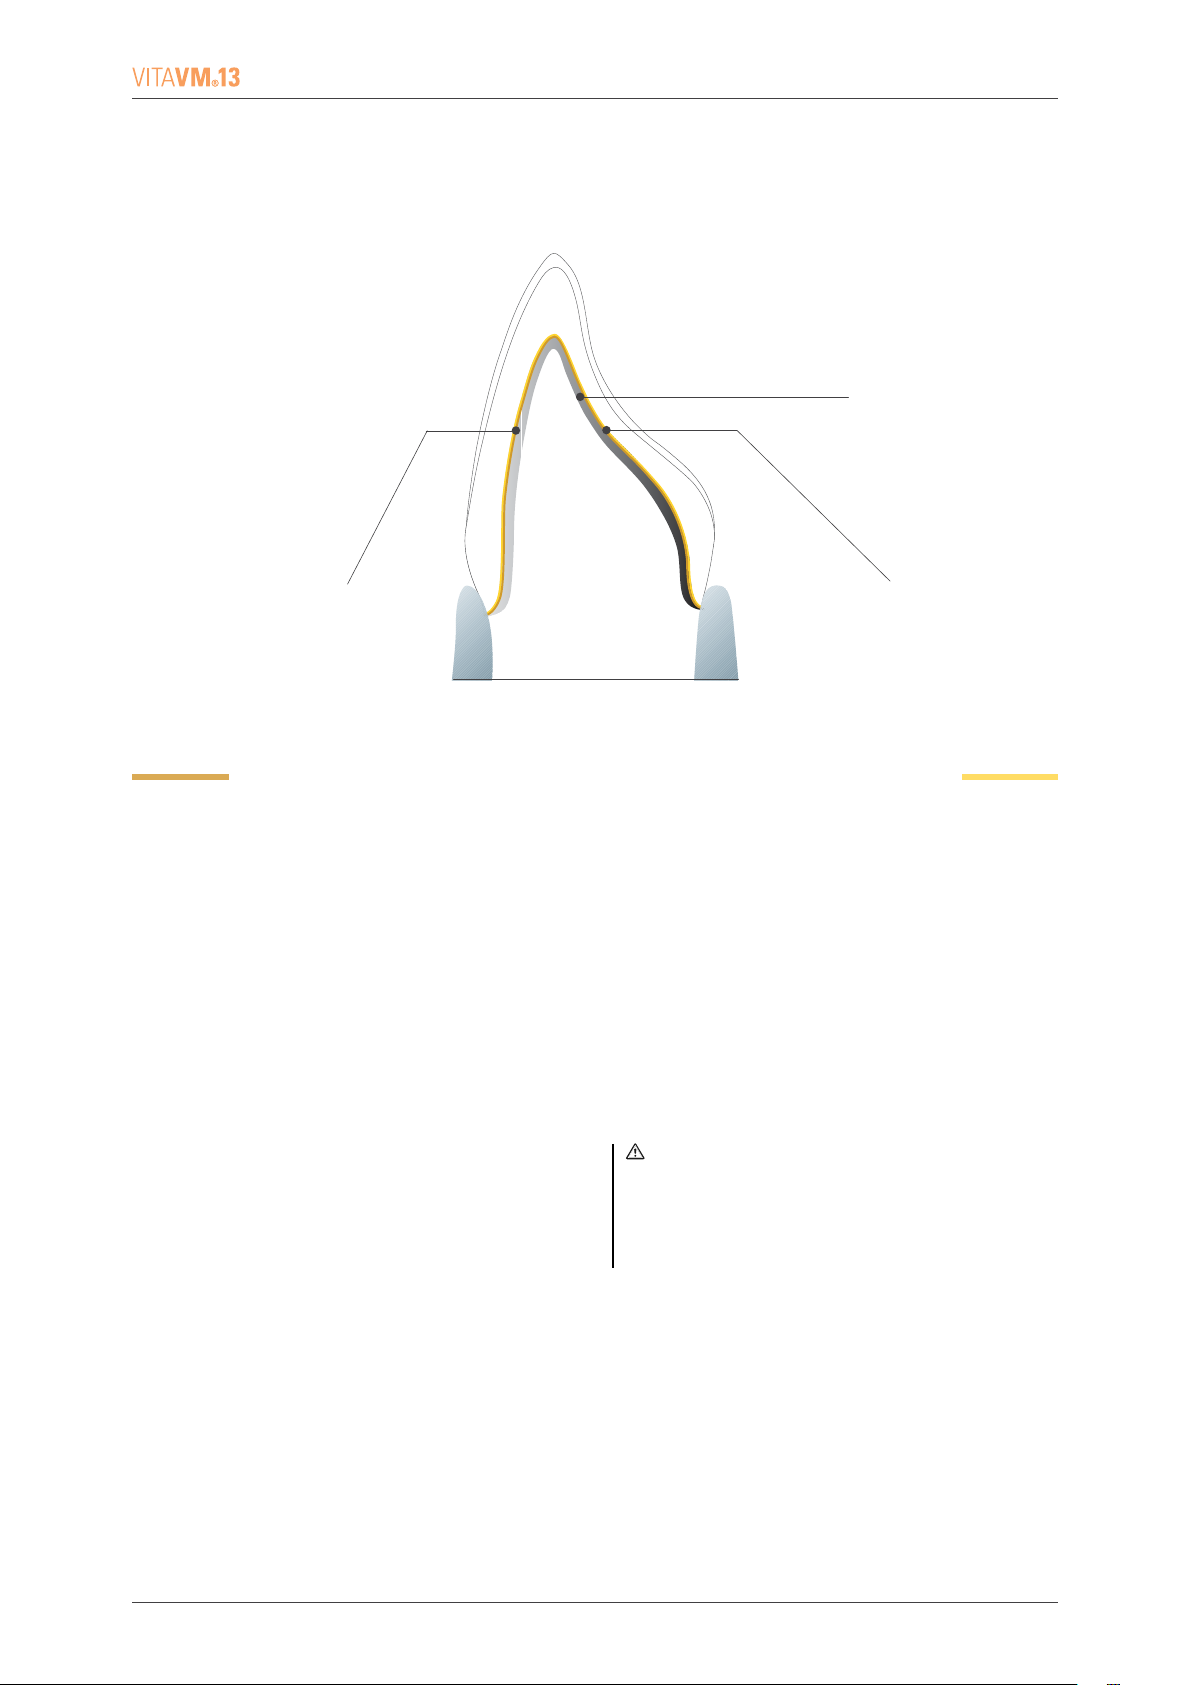
OPAQUE layering
Metal substructure in the CTE
range of 13.8 to 15.2
VITA VM 13 WASH OPAQUE
To prepare the VITA VM 13 BASIC and BUILD UP layering,
first apply WASH OPAQUE and OPAQUE to the substructure.
WASH OPAQUE fulfills the following functions:
1. Formation of the required adhesive oxides
2. Formation of a bond to the alloy surface
3. Enhancing the chroma of the restoration;
particularly in the case of precious metal-free alloys
VITA VM 13 OPAQUE
Wash opaque (WO) and the respective opaque material
(OP) or SUN OPAQUE (SO) materials are available for the
washbake. WO, OP and SO have the same chemical-physical
properties and hence are perfectly suitable for the washbake.
For opaque firing, one opaque material is required for
reproducing the VITA SYSTEM 3D-MASTER shades (one for
each lightness level OP0-OP5) and the VITA classical A1–D4
shades (one for each shade).
Note: To produce a more intense and warmer shade,
the respective OPAQUE can be mixed with Wash Opaque
(WO golden-orange) or SUN OPAQUE (SO1 yellowish, SO2
orange and SO3 reddish). However, the final result of the
restoration may differ significantly from the shade sample.
12
Page 13

Processing of the opaque for precious metal alloys
Substructure preparation
The substructure before sandblasting, processed with a fine, cross-cut tungsten
carbide bur.
Sandblast the substructures with 125 μm aluminum oxide at a pressure of
2 bar. Use a grit size of 250 μm and a pressure of 3–4 bar for precious metalfree alloys. Please adhere precisely to the manufacturer's instructions for
preparation of the substructure.
The substructure oxidized according to the manufacturer's instructions.
Important: Bonding alloys containing zinc (Zn) must be sandblasted, oxidized,
and after oxidation firing etched in a clean, warm acidic bath for approx. 5 min.
Any etching residue must be removed with steam.
Wash opaque firing
Powder opaque
Mix the powder opaque with VITA VM OPAQUE FLUID to a thin, watery consistency
and apply to the clean, dry substructure with a brush suitable for opaque materials.
VITA SPRAY-ON procedure
The wash opaque can also be applied using the VITA SPRAY-ON procedure.
Mix the powder wash opaque with VITA SPRAY-ON LIQUID in the appropriate glass
container and spray homogeneously onto the substructure surface. See separate
working instructions for VITA SPRAY-ON (No. 492M).
Paste opaque
Alternatively, paste wash opaque can be used.
To apply, massage it into the surface of the substructure in a thin layer.
Note: The pastes should be stirred before use with a glass or plastic instru-
ment. Should the OPAQUE PASTE be difficult to stir after longer periods of storage, its original consistency can be regained by adding VITA VM PASTE FLUID.
The paste opaque requires a longer predrying time in order to dry.
Please observe the recommended firing cycles. The paste opaque must not come
into contact with water, since this may result in cracks and bubble formation in
the opaque during firing.
13
Page 14
Processing of the opaque for precious metal alloys
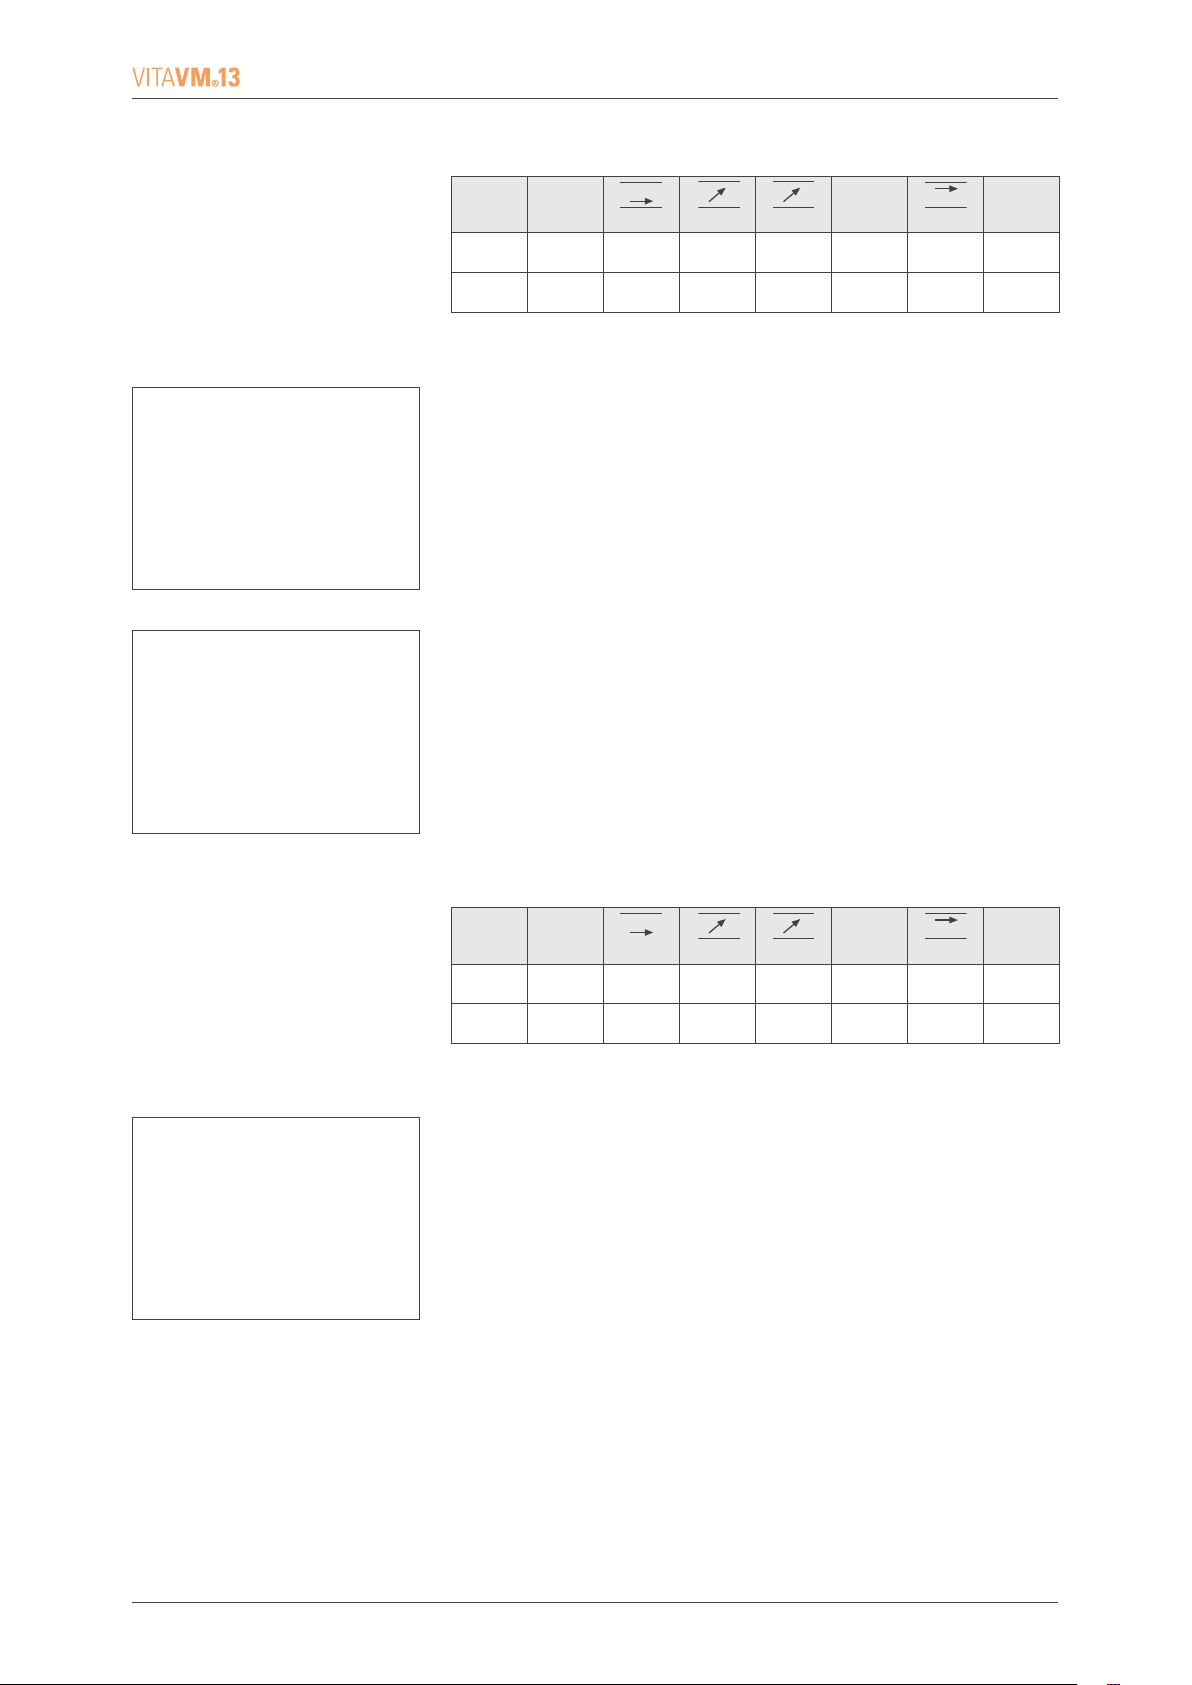
Recommended firing - wash firing:
Powder
Paste
Predry.
°C
500 2.00 5.12 75 890 2.00 5.12
500 4.00 5.12 75 890 2.00 5.12
min. min. °C/min.
approx.
temp.°C min.
VAC
min.
The fired wash opaque on a ceramic firing tray.
Opaque firing
Mix the opaque powder to a creamy consistency with VITA VM OPAQUE FLUID,
apply with a brush or glass instrument to mask the surface to be veneered and fire
as recommended.
As an alternative the opaque paste can be applied to the dry substructure.
The opaque can also be applied using the VITA SPRAY-ON procedure.
The classification table for the OPAQUE materials can be found on page 26.
Recommended firing - opaque firing:
Powder
Paste
Predry.
°C
500 2.00 5.12 75 890 1.00 5.12
500 4.00 5.12 75 890 1.00 5.12
min. min. °C/min.
approx.
temp.°C min.
The opaque on a ceramic firing tray shows a light surface glaze after firing.
VAC
min.
14
Page 15
Processing of the opaque for precious metal-free alloys
Guidelines for reliable veneering of precious metal-free alloys
Since substructures made of precious metal-free alloys are poor heat conductors
and demonstrate a different behavior to precious metal alloys, the following points
must be observed when veneering non-precious metal alloys with VITA VM 13:
– Use only special ceramic crucibles when casting precious metal-free alloys.
– Use only new material for casting.
– Sharp edges must be avoided when finishing the frameworks.
– Sandblast with 250 μm aluminum oxide at a pressure of 3 – 4 bar.
Please observe the alloy manufacturer's instructions!!!
– To avoid discoloration, all surfaces not to be veneered should be sandblasted
or polished with rubber polishers after each firing process. Then the substructure
needs to be cleaned thoroughly.
– In order to achieve secure bonding between a non-precious metal alloy and
VITA VM 13, the wash opaque firing temperature must be increased by 50 °C and
the opaque firing by 30 °C. This allows better coating of the surface and improves
bonding.
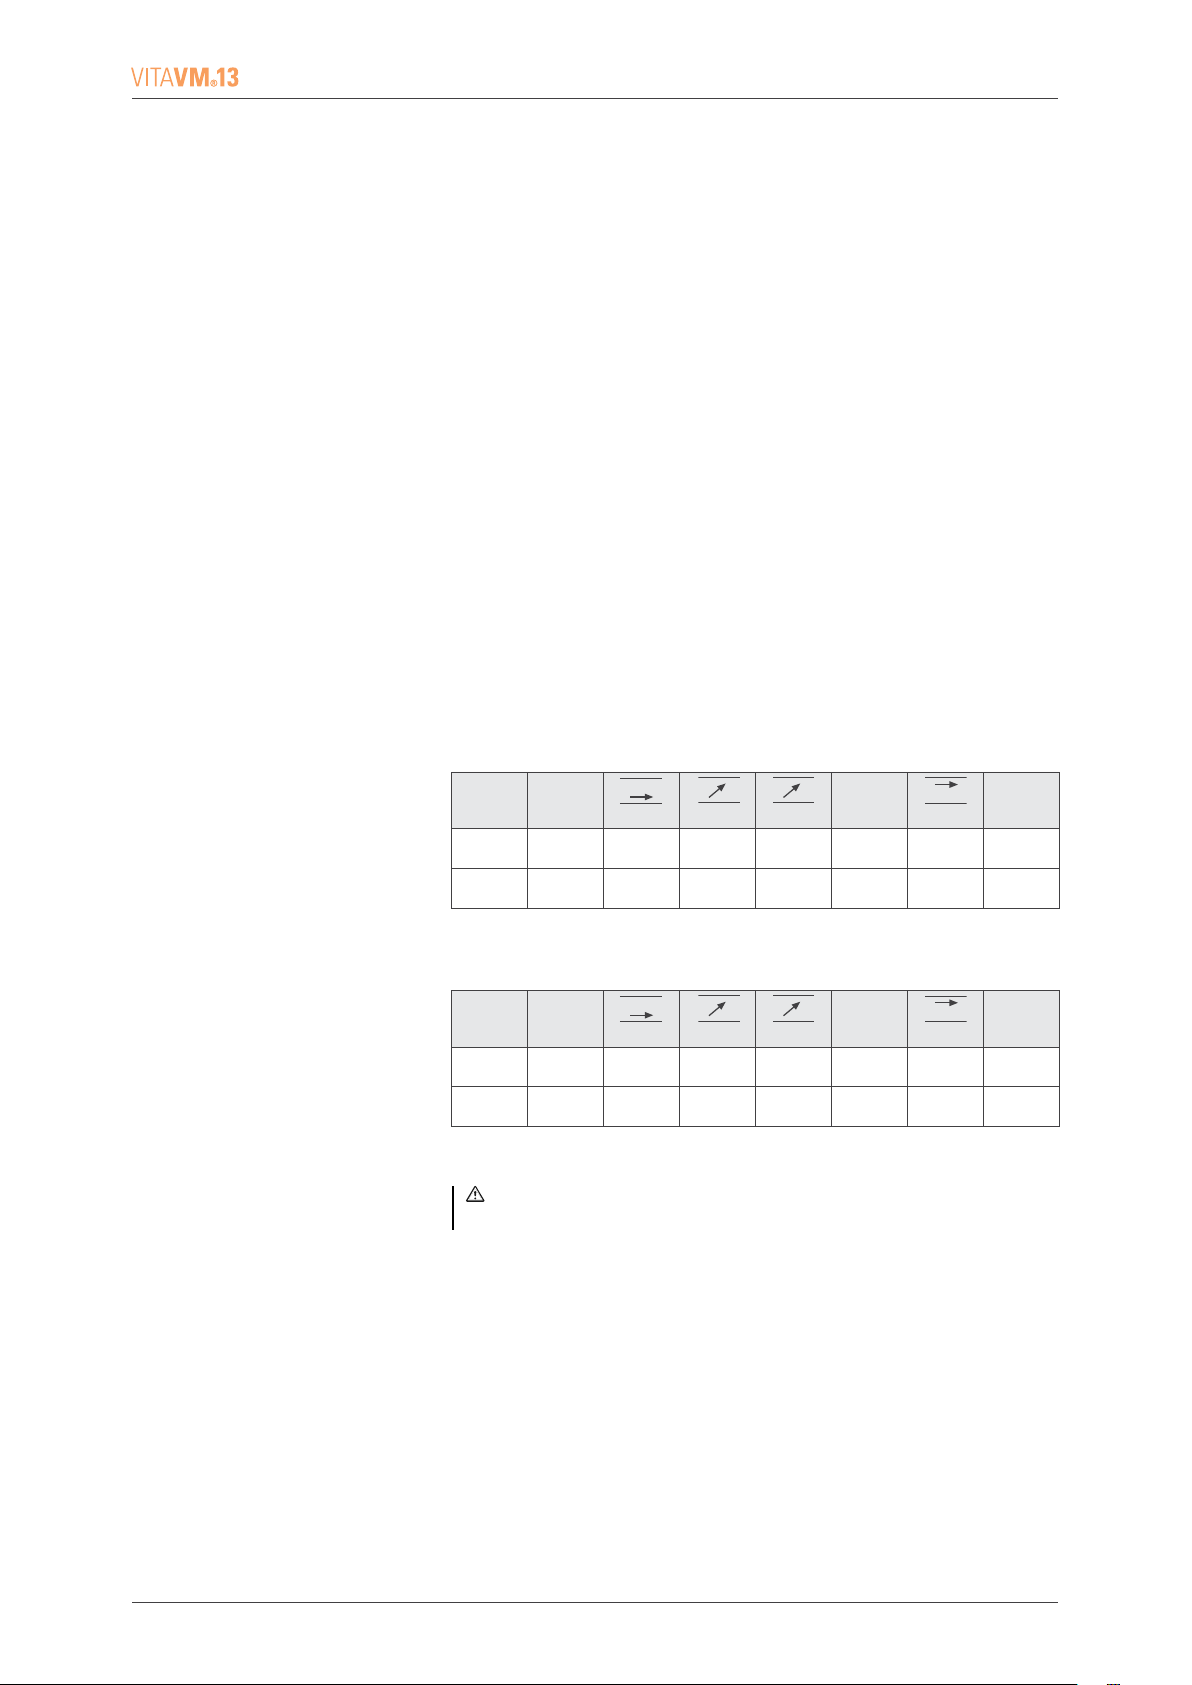
Recommended firing – wash opaque firing of precious metal-free alloys:
Powder
Paste
Predry.
°C
500 2.00 5.52 75 940 2.00 5.52
500 4.00 5.52 75 940 2.00 5.52
min. min. °C/min.
approx.
temp.°C min.
VAC
min.
Recommended firing - opaque firing for precious metal-free alloys:
Powder
Paste
Predry.
°C
500 2.00 5.36 75 920 1.00 5.36
500 4.00 5.36 75 920 1.00 5.36
min. min. °C/min.
approx.
temp.°C min.
VAC
min.
Note: The fired opaque demonstrates a high degree of surface glaze and a
glassy, transparent appearance.
15
Page 16
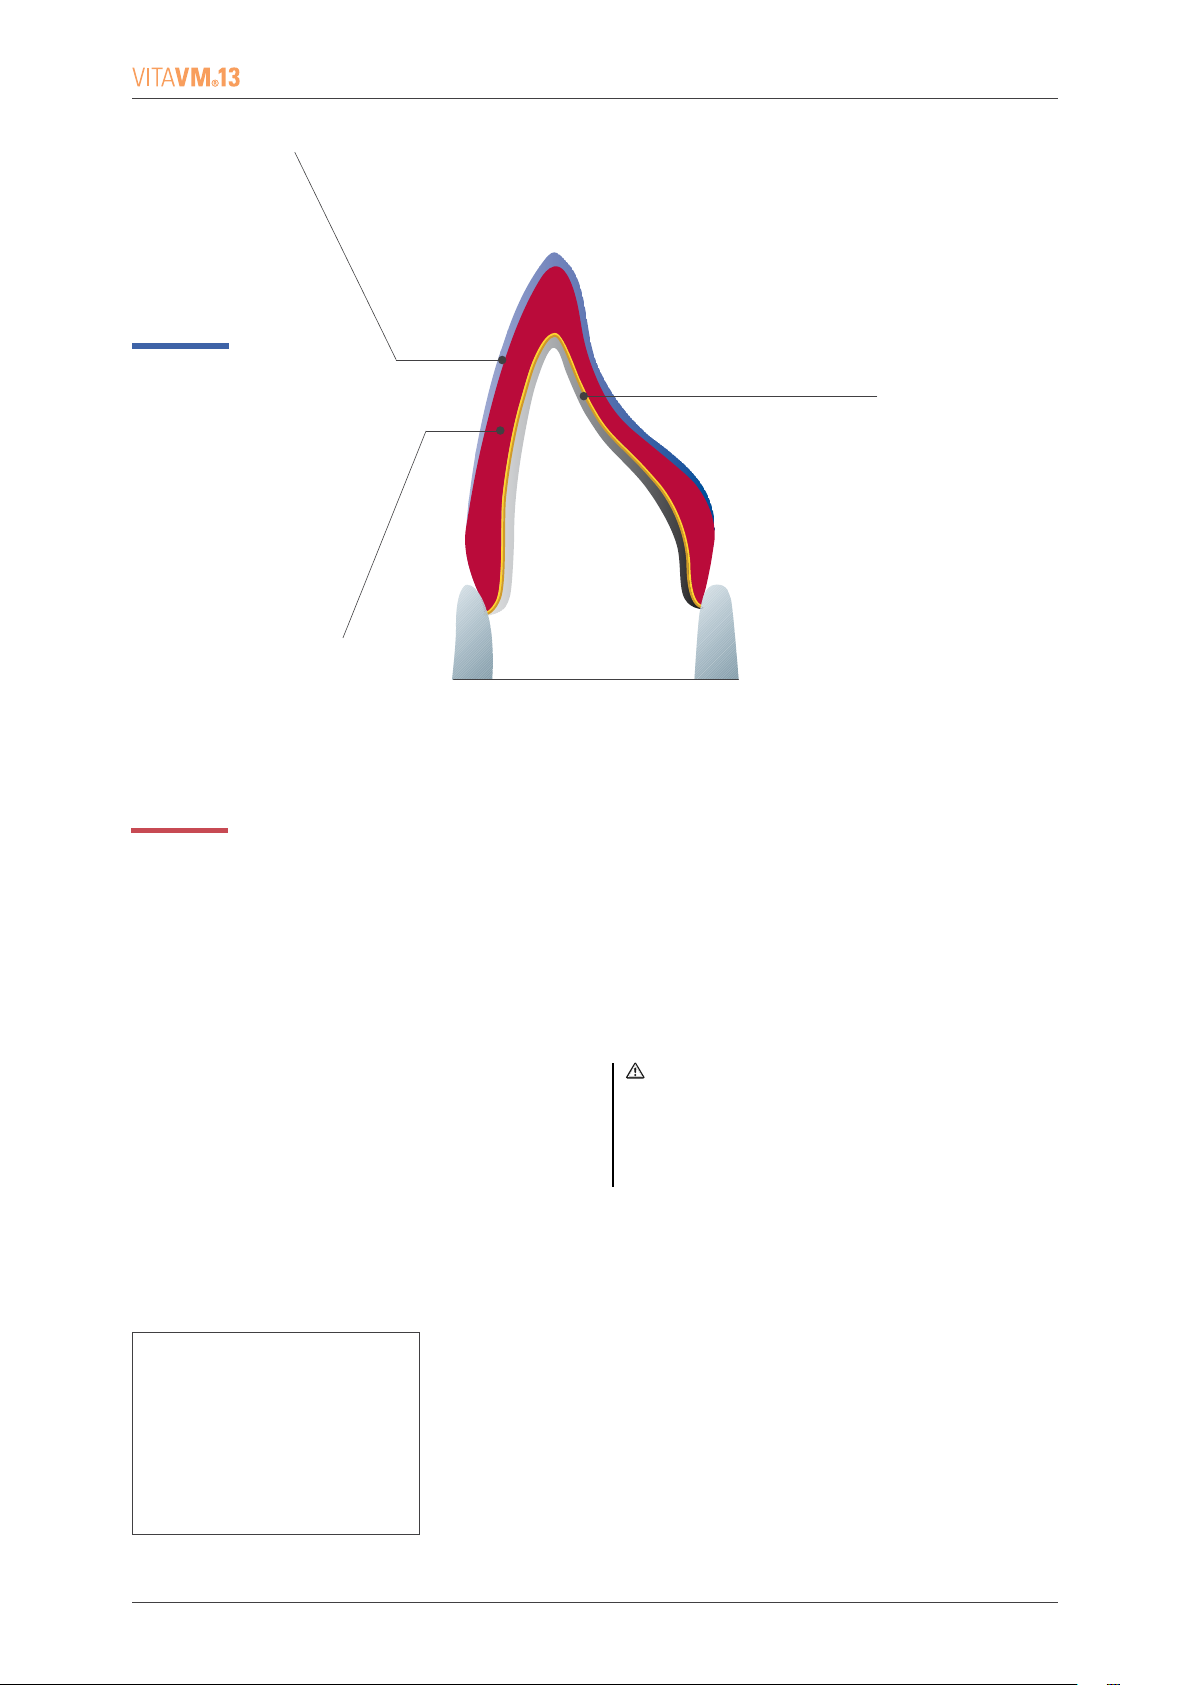
BASIC layering
VITA VM 13 ENAMEL
VITA VM 13 BASE DENTINE
OPAQUE-coated metal
substructure in the CTE
of 13.8–15.2
After applying WASH OPAQUE and OPAQUE, VITA VM 13
BASIC layering consists of the application of BASE DENTINE
and ENAMEL.
The color-bearing BASE DENTINE materials, which provide
good coverage, offer the perfect precondition for the preparation of veneers with intensive shades.
With this two-layer alternative VITA offers an ideal solution
for the reproduction of optimal shade results in case of thin
walls.
Additionally, the intensive shade effect of the BASE DENTINE
materials permits generous use of the ENAMEL materials
which create the desired translucency.
After applying OPAQUE material, the user is able to prepare
a natural restoration with a lifelike appearance with only two
layers.
Note: The intensity of the restoration can be varied with
different layer thicknesses of BASE DENTINE and ENAMEL.
The thicker the BASE DENTINE layer, the more intensive is
the shade of the restoration. The thicker the ENAMEL layer,
the paler is the shade of the restoration.
The use of CHROMA PLUS materials helps to achieve perfect
shade reproduction in the cervical area.
To obtain a brighter or warmer shade, the respective BASE
DENTINE can either be mixed with SUN DENTINE or replaced
by SUN DENTINE. When using Chroma Plus or Sun Dentine
materials, the final result of the restoration may differ significantly from the shade sample.
16
Page 17

BASIC layering
Metal substructures coated with OPAQUE
To allow easy removal of the restoration later on, the model must be previously
insulated using the VITA Modisol pen.
Application of VITAVM
®13 BASE DENTINE
Apply the desired shade of BASE DENTINE starting from the neck to obtain the
required complete tooth shape.
The centric, lateral and protrusive occlusion should be checked in the articulator
already during this stage.
To obtain adequate space for the enamel, removal of corresponding amount of the
BASE DENTINE material according to the layering pattern is required.
Application of VITAVM
®13 ENAMEL
Apply several small portions of ENAMEL to complete the crown mould beginning
from the middle third of the crown. To compensate firing shrinkage, the size of the
mould must be prepared somewhat larger.
The classification tables for the VITA VM 13 ENAMEL materials can be found on
page 26.
17
Page 18
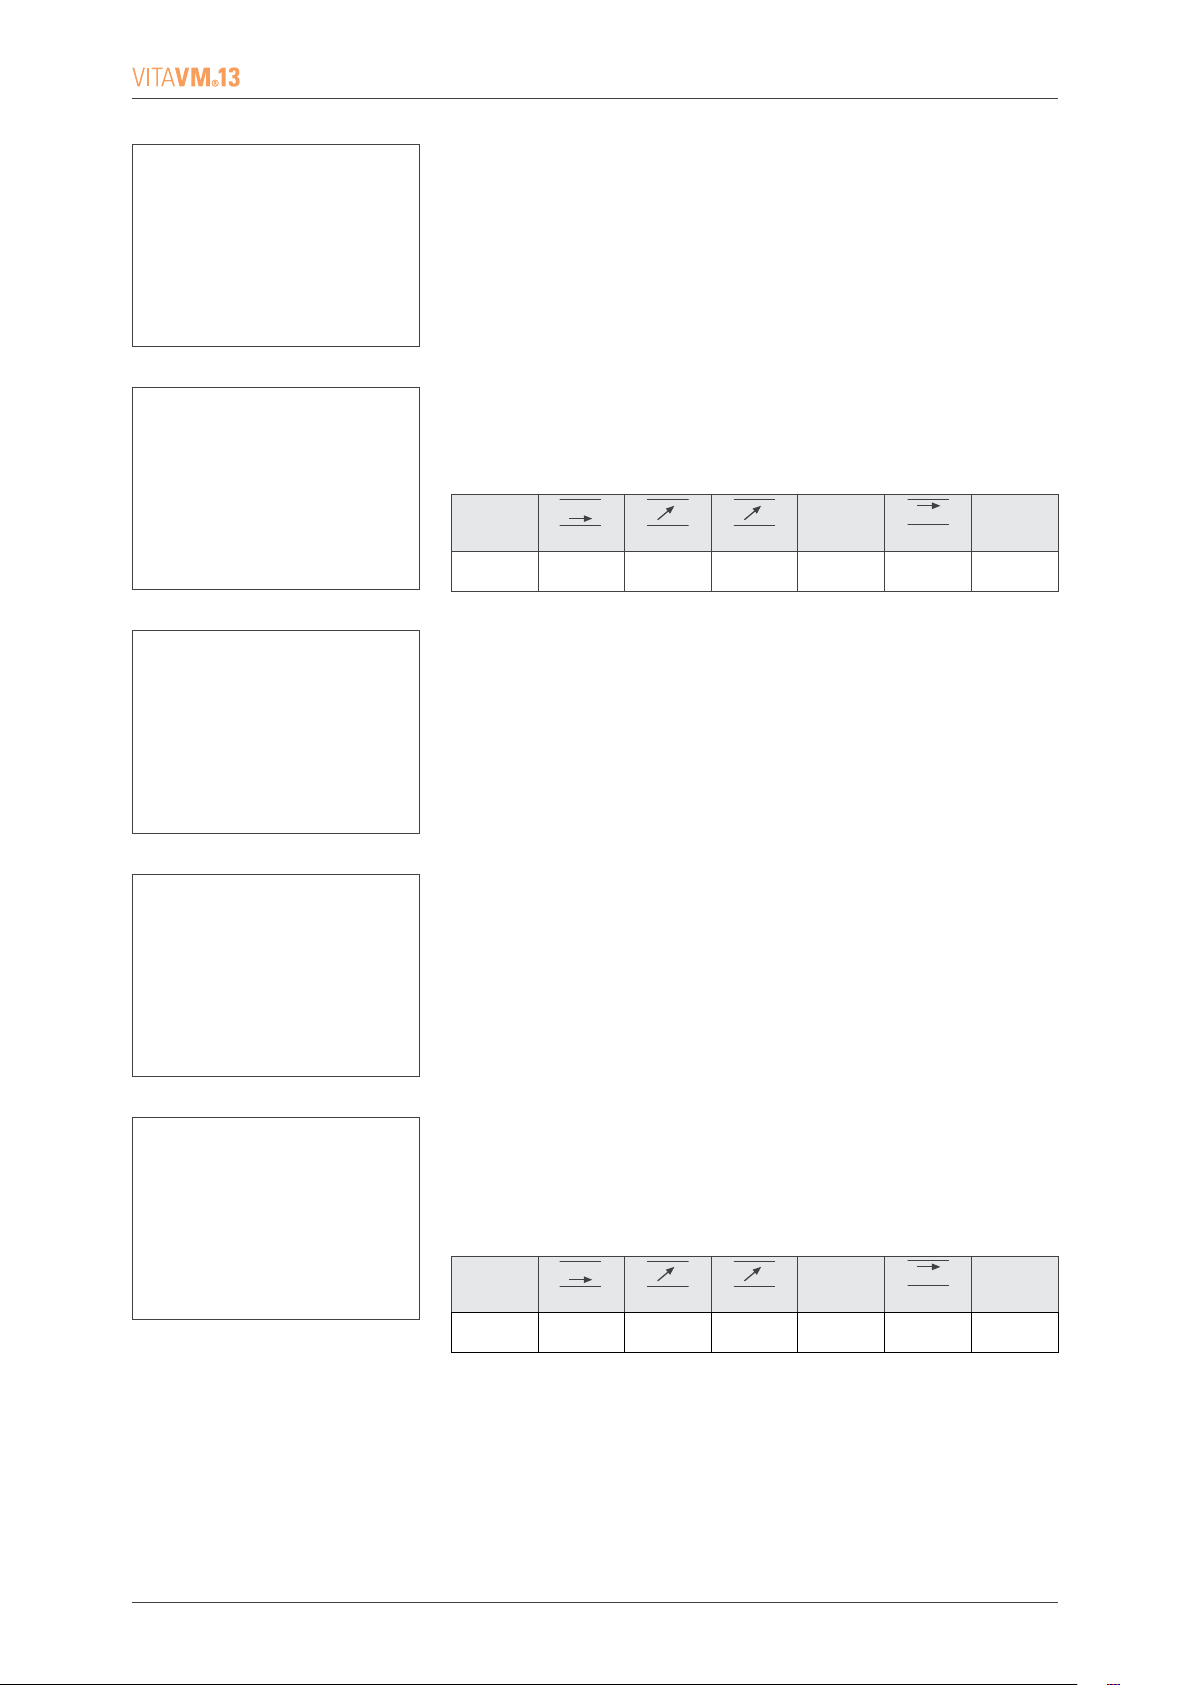
BASIC layering
Prior to the first dentine firing, the individual units of bridges must be separated in
the interproximal areas down to the substructure.
Restoration after completion of layering, ready for first dentine firing.
Recommended firing - first dentine firing
Predry. °C
min. min. °C/min.
500 6.00 6.55 55 880 1.00 6.55
approx.
temp.°C min.
Restoration after first dentine firing.
Corrections of shape/further layering
Insulate the model once more with the VITA Modisol pen.
The interdental spaces and the basal surface of the pontic must be filled
with BASE DENTINE.
VAC
min.
18
Apply BASE DENTINE starting from the neck and add ENAMEL in the body area
up to the incisal area to perform subsequent corrections of the shape.
Recommended firing - second dentine firing
Predry. °C
min. min. °C/min.
500 6.00 6.44 55 870 1.00 6.44
approx.
temp.°C min.
VAC
min.
Page 19
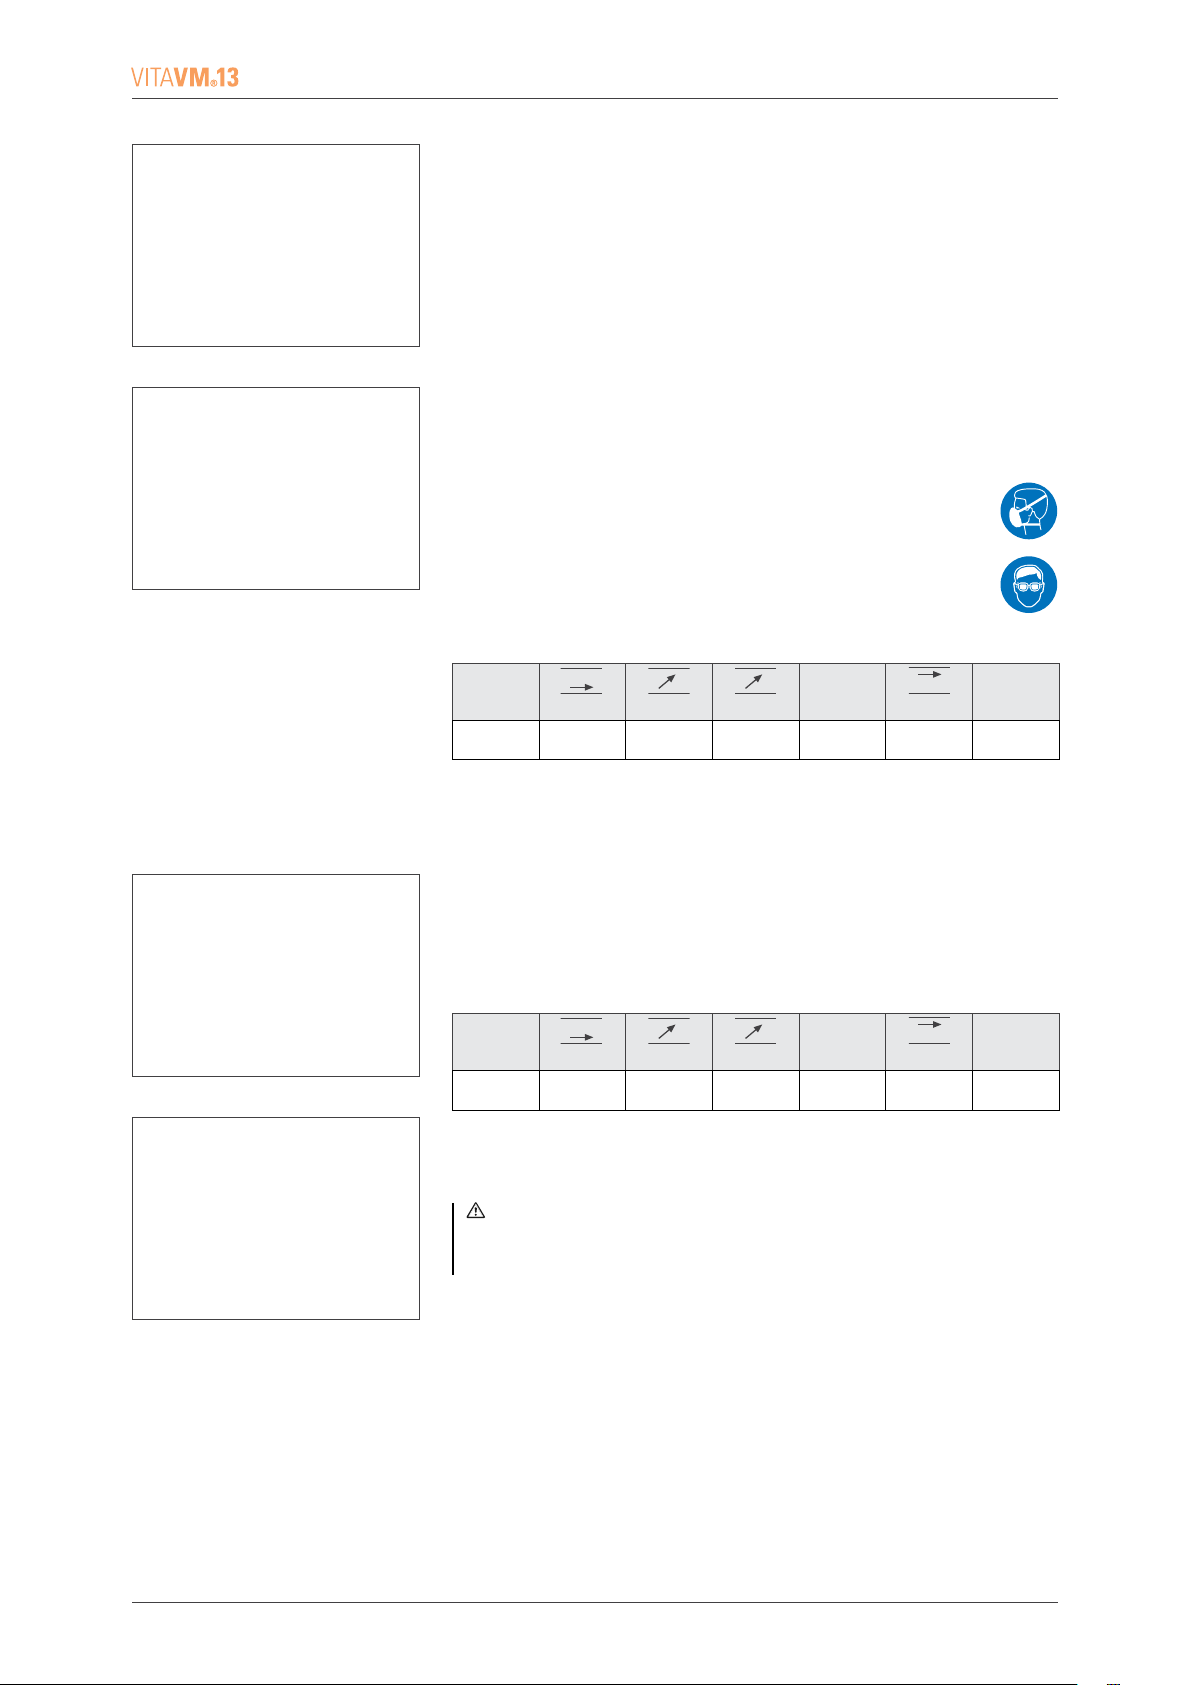
BASIC layering
Bridge and crown after second dentine firing.
Finishing
Finish the bridge or crown respectively. For glaze firing, the entire
surface must be ground evenly and grinding particles must be removed
carefully.
In case of formation of dust, use an extraction system or wear a face
mask. Additionally, protective goggles must be worn when grinding
the fired ceramic.
Recommended firing – glaze firing
Predry. °C
min. min. °C/min.
500 0.00 4.45 80 880 2.00 –
approx.
temp.°C min.
VAC
min.
If required, the entire restoration can be coated with VITA AKZENT Plus GLAZE and
then individualization can be carried out using the VITA AKZENT Plus stains.
(see VITA AKZENT Plus working instructions, No. 1925)
®
Recommended firing - glaze firing with VITA AKZENT
Predry. °C
min. min. °C/min.
500 4.00 4.45 80 880 1.00 –
approx.
temp.°C min.
Plus
VAC
min.
Completed restoration on the model.
Note: If the restoration needs to be adjusted (ground) when it is tried in,
it must be smoothed again. Polishing or glaze firing have proved to be very
suitable.
19
Page 20
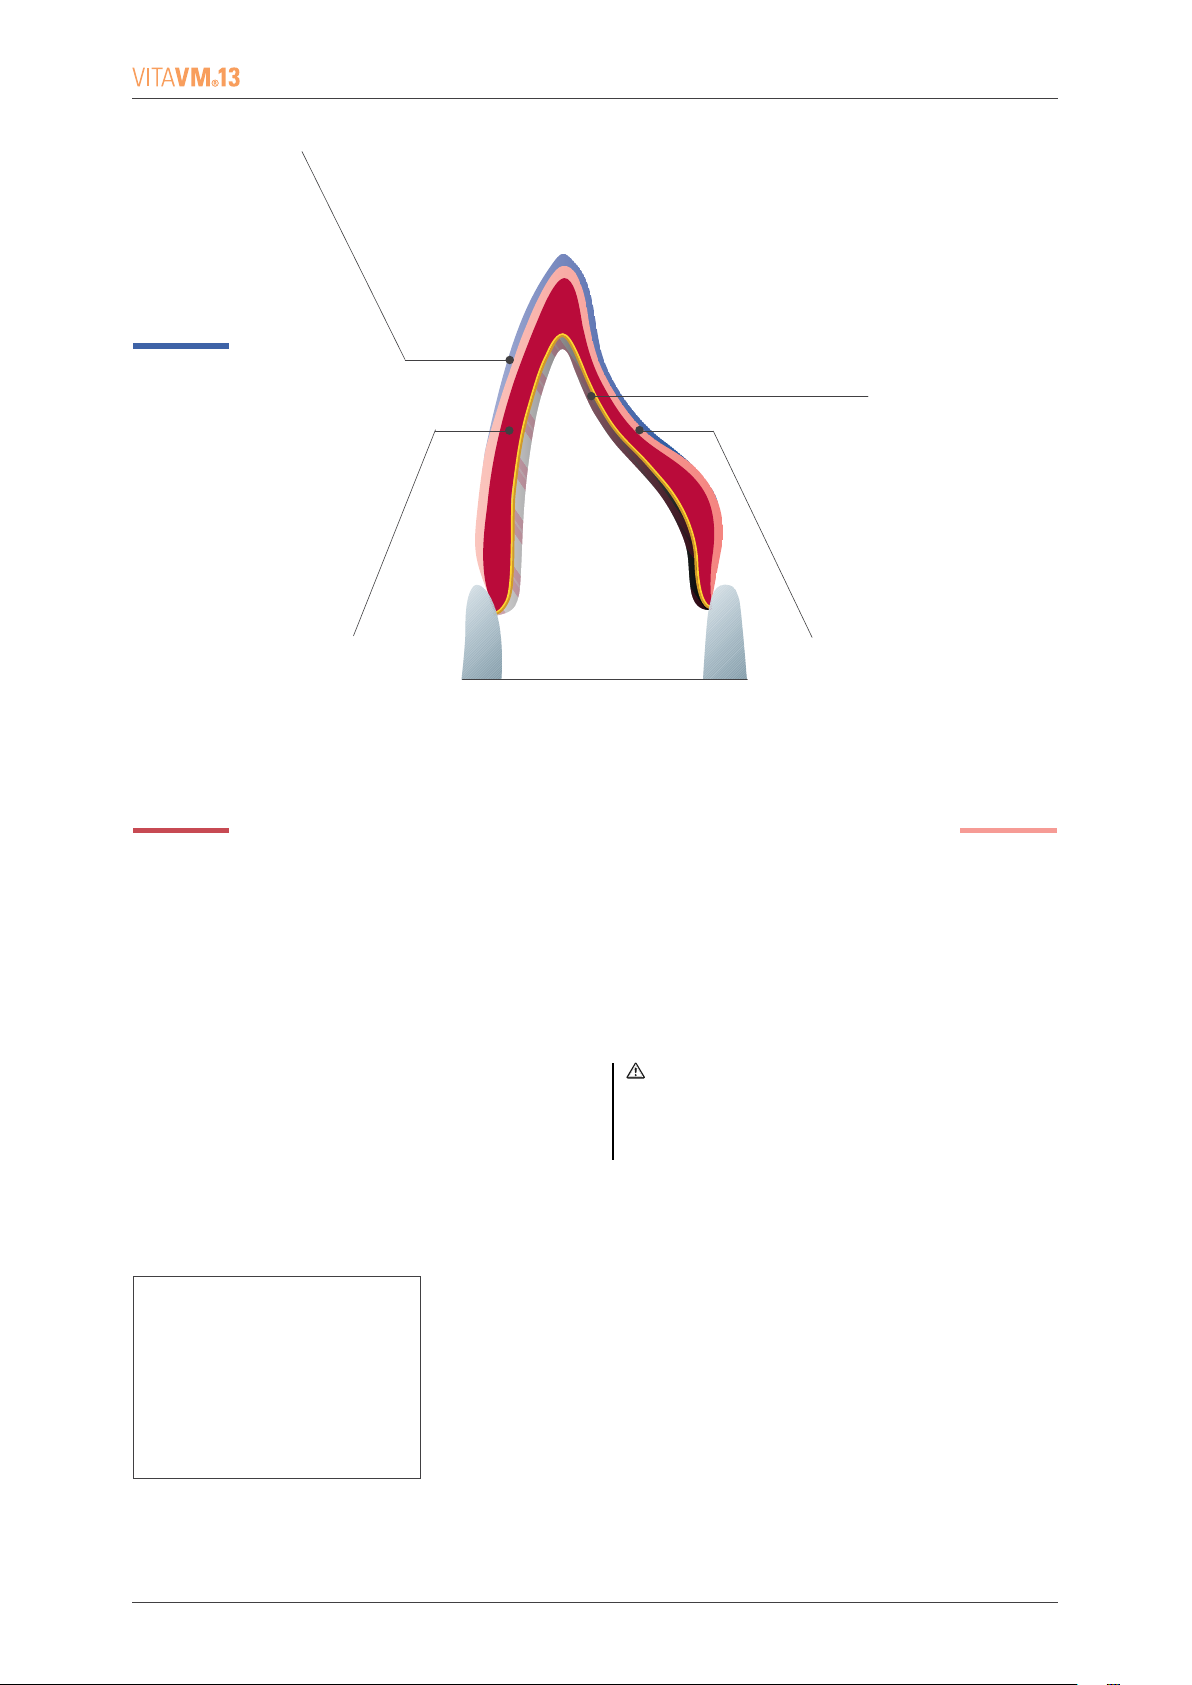
BUILD UP layering
VITA VM 13 ENAMEL
OPAQUE-coated metal
substructure in the CTE of
13.8–15.2
VITA VM 13 BASE DENTINE VITA VM 13 TRANSPA DENTINE
After applying WASH OPAQUE and OPAQUE, VITA VM 13
BUILD UP layering consists of the application of BASE
DENTINE, TRANSPA DENTINE and ENAMEL.
The combination of color-bearing BASE DENTINE and translucent TRANSPA DENTINE in the BUILD UP layering creates
an enhanced effect of depth in the restoration. The use of
the three-layer method permits reduced and more individual
application of the ENAMEL materials.
As a result, restorations have a lifelike and natural
appearance.
By combining ENAMEL and TRANSPA DENTINE according
to the layer thickness of BASE DENTINE, the intensity of the
shade can be individualized.
An increased proportion of BASE DENTINE results in an
intensified shade whereas larger quantities of TRANSPA
DENTINE and ENAMEL will reduce the intensity of the shade.
Note: The shade effect of the restoration is mainly
influenced by BASE DENTINE. Analogously to natural teeth,
the TRANSPA DENTINE materials create a harmonious
transition to the enamel.
The use of CHROMA PLUS materials helps to achieve perfect
shade reproduction in the cervical area.
To obtain a brighter or warmer shade, the respective BASE
DENTINE can either be mixed with SUN DENTINE or replaced
by SUN DENTINE. When using Chroma Plus or Sun Dentine
materials, the final result of the restoration may differ significantly from the shade sample.
20
Page 21

BUILD UP layering
Metal substructures coated with OPAQUE
To allow easy removal of the restoration later on, the model must be previously
insulated using the VITA Modisol pen.
Application of VITAVM
®13 BASE DENTINE
Apply the desired shade of BASE DENTINE starting from the neck
to obtain the required complete tooth shape.
The centric, lateral and protrusive occlusion should be checked
in the articulator already during this stage.
Application of VITAVM
®13 TRANSPA DENTINE
TRANSPA DENTINE is applied in the required complete tooth shape.
To obtain sufficient space for the enamel, the volume of the TRANSPA DENTINE
must be reduced correspondingly.
Application of VITAVM
®13 ENAMEL
To complete the crown, apply several small portions of ENAMEL to the upper
third of the crown. To compensate firing shrinkage, the size of the mould must
be prepared somewhat larger.
The classification tables for the VITA VM 13 ENAMEL materials can be found
on page 26.
21
Page 22
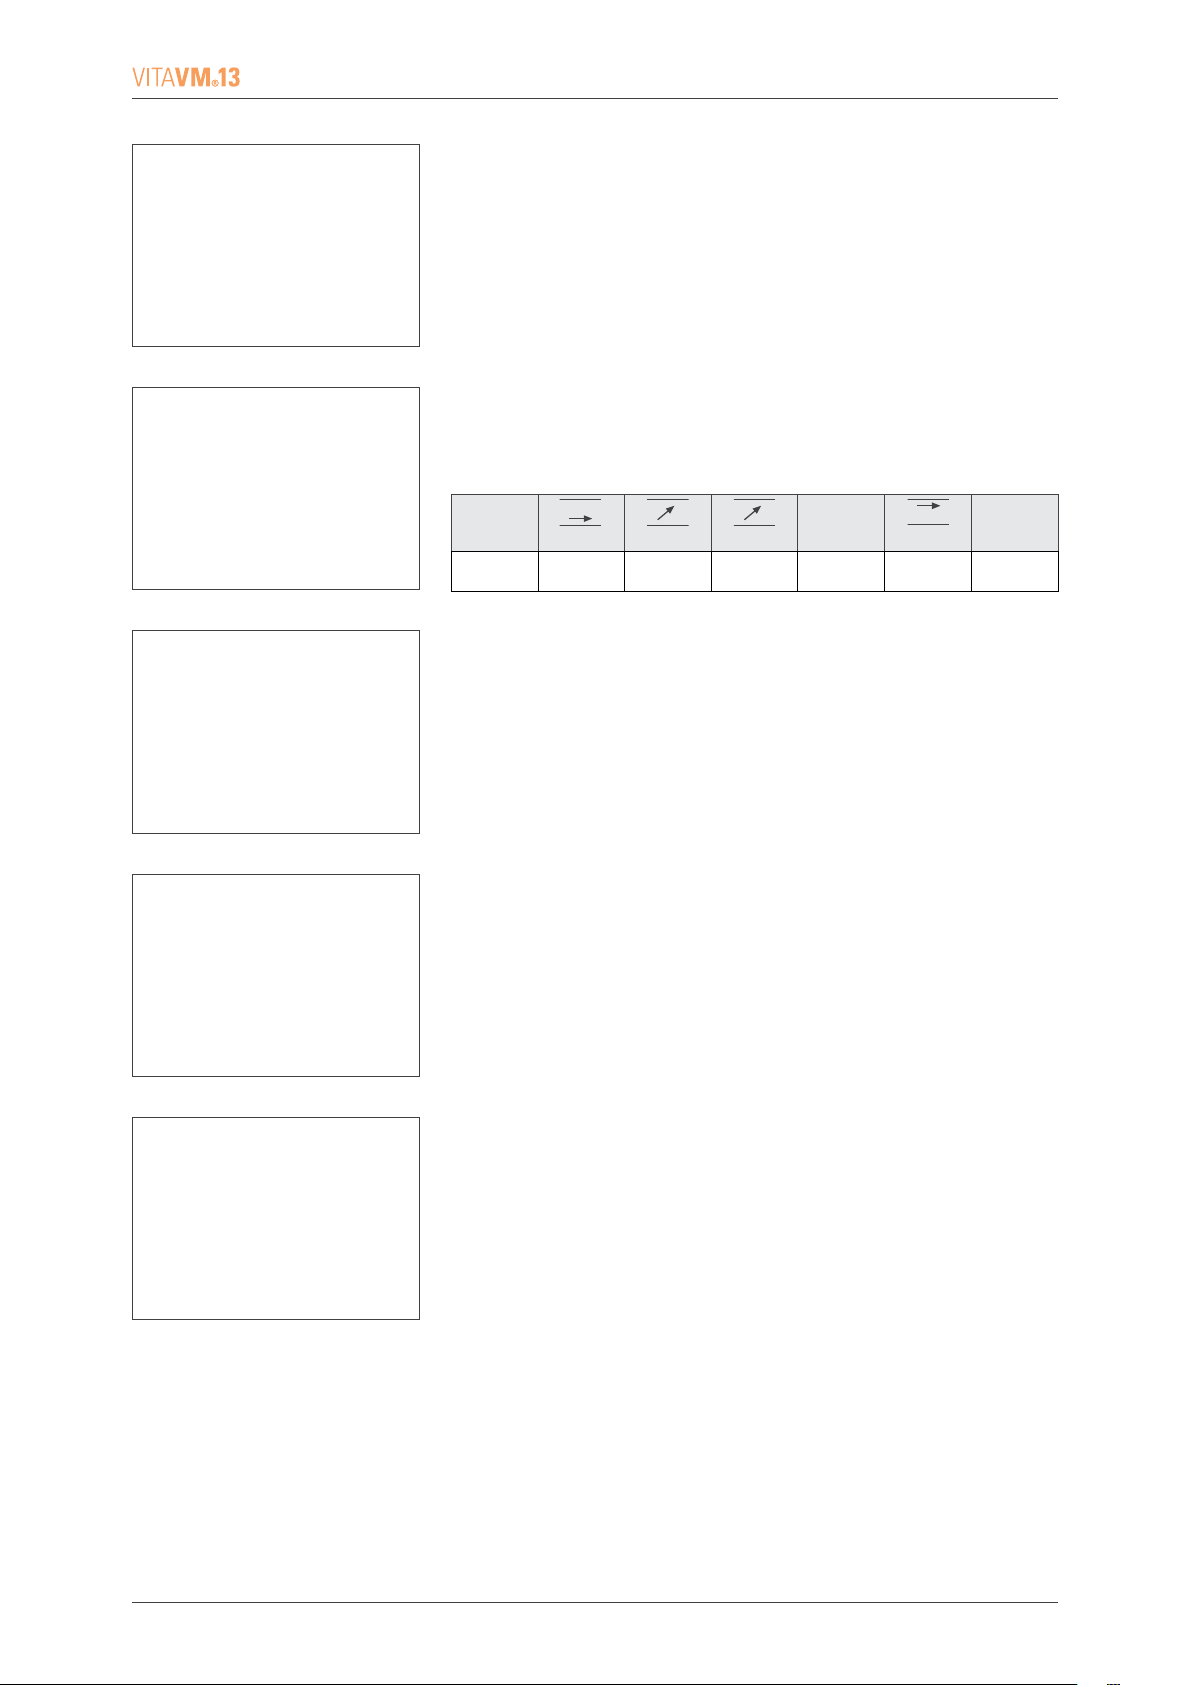
BUILD UP layering
Prior to firing, the individual units of bridges must be separated in the interdental
areas down to the substructure.
Restoration prior to first dentine firing.
Recommended firing - first dentine firing
Predry. °C
min. min. °C/min.
500 6.00 6.55 55 880 1.00 6.55
approx.
temp.°C min.
VAC
min.
Restoration after first dentine firing.
Corrections of shape/further layering
Insulate the model once more at the pontic with the VITA Modisol pen.
The interdental spaces and the basal surface of the pontic must be filled with
BASE DENTINE.
22
Subsequent corrections of the shape in the body area are carried out using
TRANSPA DENTINE ...
Page 23
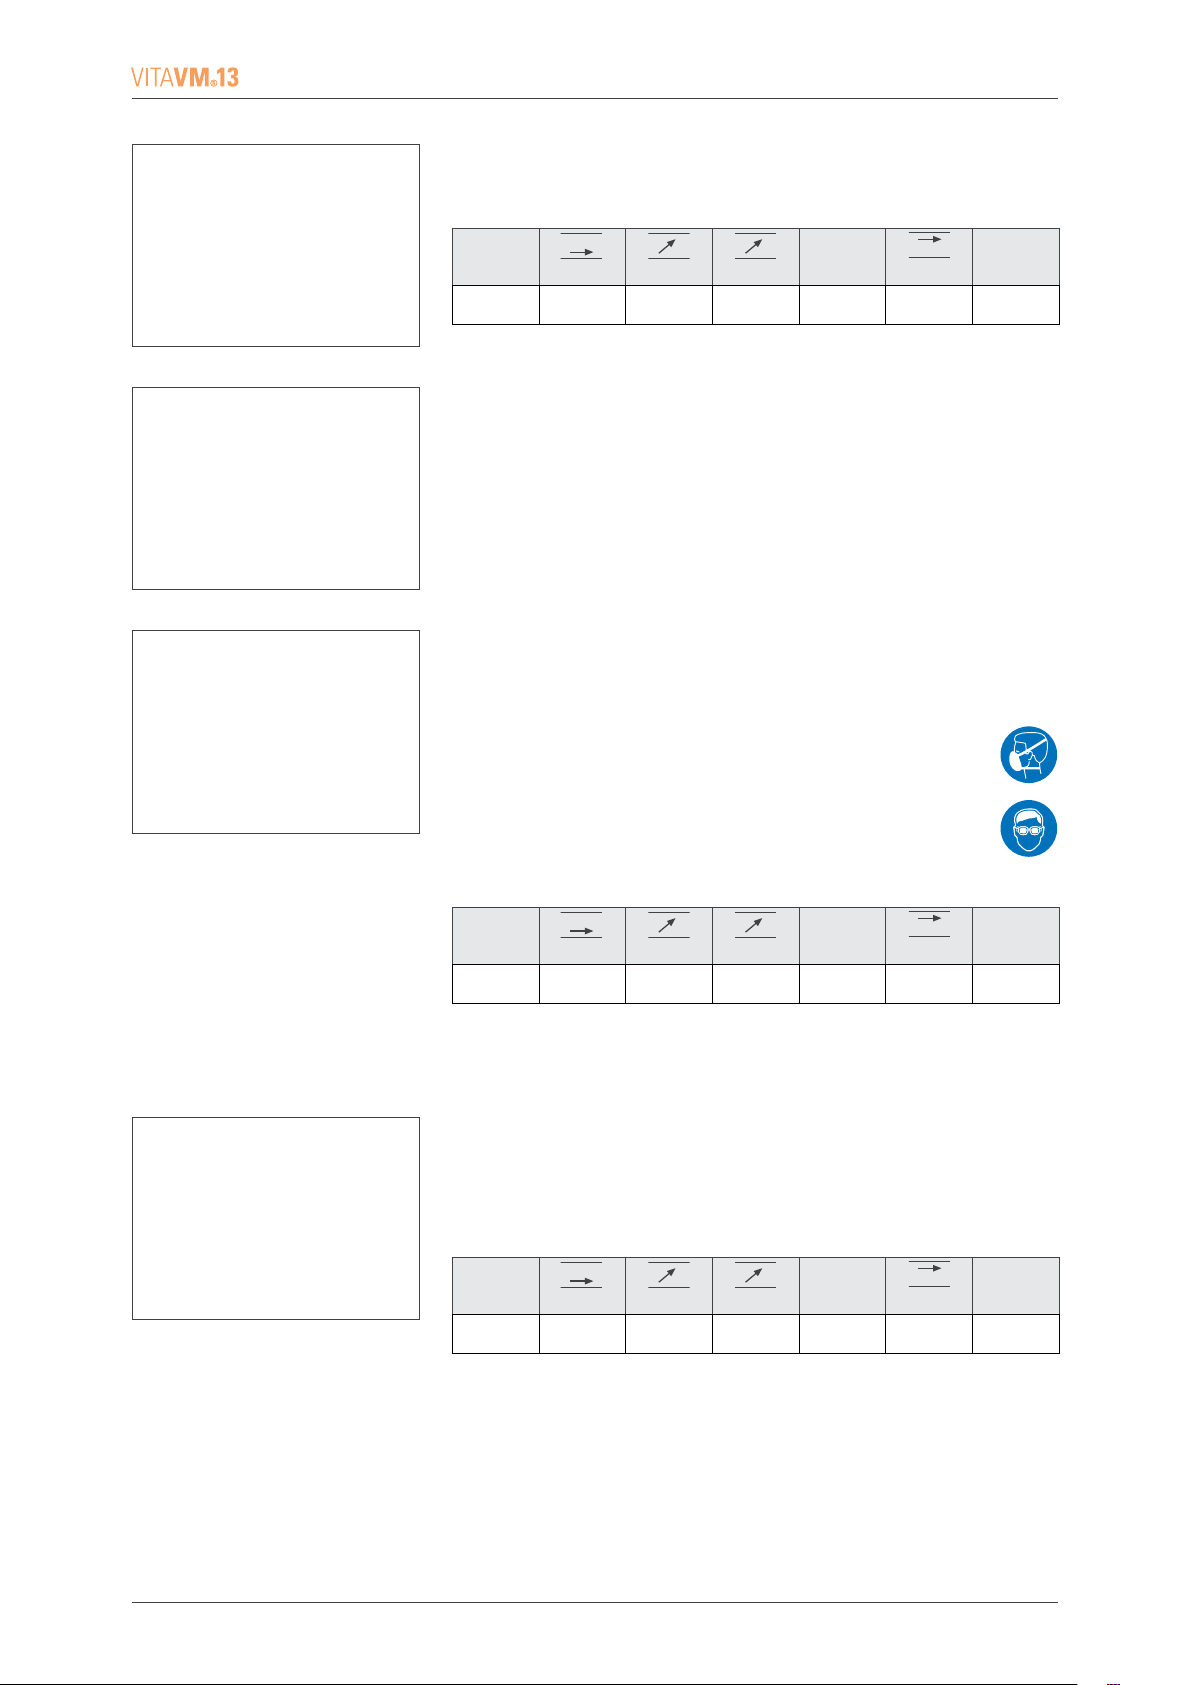
Firing chart
… and ENAMEL in the incisal area.
Recommended firing - second dentine firing
Predry. °C
min. min. °C/min.
500 6.00 6.44 55 870 1.00 6.44
approx.
temp.°C min.
Bridge and crown after second dentine firing.
Finishing
Finish the bridge or crown respectively. For glaze firing, the entire
surface must be ground evenly and grinding particles must be removed
carefully.
In case of formation of dust, use an extraction system or wear a face
mask. Additionally, protective goggles must be worn when grinding the
fired ceramic.
VAC
min.
Recommended firing – glaze firing
Predry. °C
min. min. °C/min.
500 0.00 4.45 80 880 2.00 –
approx.
temp.°C min.
VAC
min.
If required, the entire restoration can be coated with VITA AKZENT Plus Glaze
and then individualization can be carried out using the VITA AKZENT Plus stains.
(see VITA AKZENT Plus working instructions, No. 1925)
®
Recommended firing - glaze firing with VITA AKZENT
Predry. °C
min. min. °C/min.
500 4.00 4.45 80 880 1.00 –
approx.
temp.°C min.
Plus
VAC
min.
23
Page 24

BUILD UP layering
Completed restoration on the model.
Note: If the restoration needs to be adjusted (ground) when it is tried in,
it must be smoothed again. Polishing or glaze firing have proved to be very
suitable.
24
Page 25
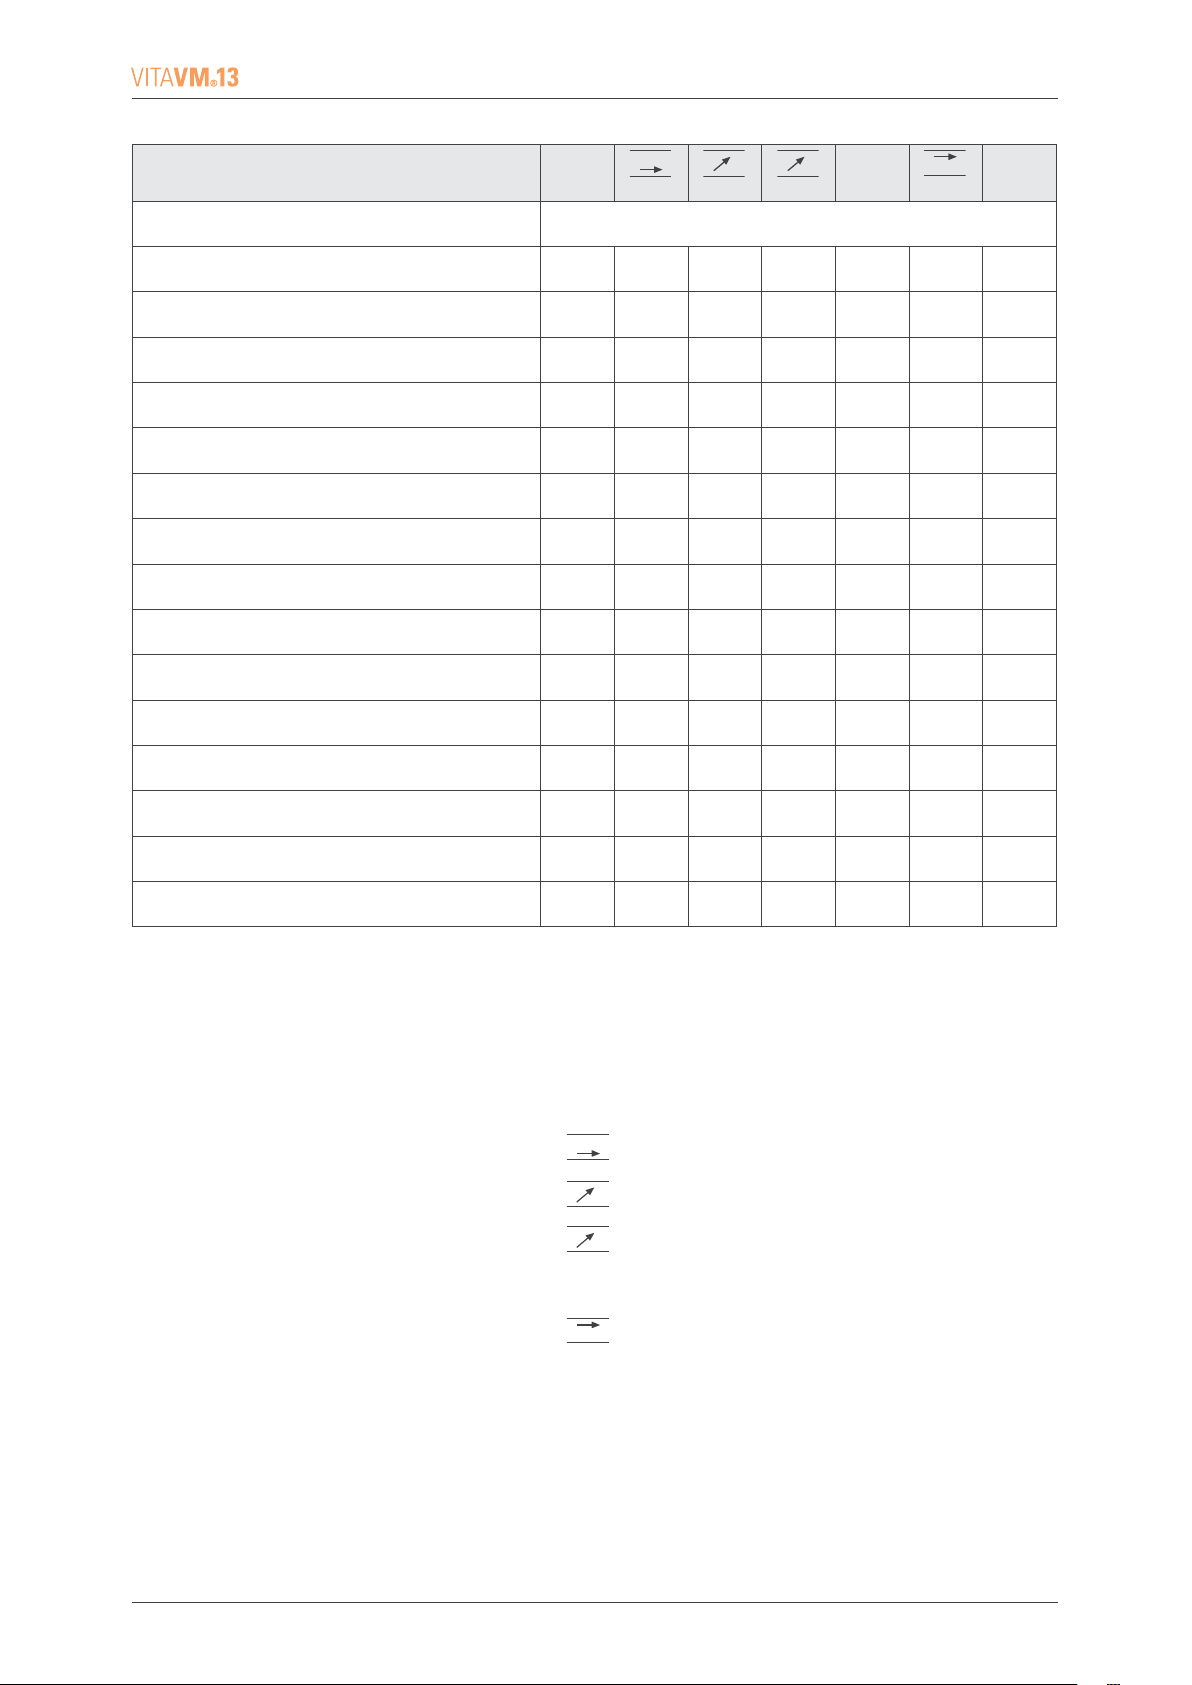
VITA modelling liquids
Oxidation firing Please observe alloy manufacturer's instructions !!!
WASH OPAQUE firing
WASH OPAQUE PASTE firing
OPAQUE firing
OPAQUE PASTE firing
WASH OPAQUE firing for precious metal-free alloys**
WASH OPAQUE PASTE firing for precious metal-free alloys
OPAQUE firing for precious metal-free alloys**
OPAQUE PASTE firing for precious metal-free alloys
MARGIN* firing
EFFECT LINER* firing
First dentine firing
Predry. °C
min. min. °C/min.
approx.
temp.°C min.
500 2.00 5.12 75 890 2.00 5.12
500 4.00 5.12 75 890 2.00 5.12
500 2.00 5.12 75 890 1.00 5.12
500 4.00 5.12 75 890 1.00 5.12
500 2.00 5.52 75 940 2.00 5.52
**
500 4.00 5.52 75 940 2.00 5.52
500 2.00 5.36 75 920 1.00 5.36
500 4.00 5.36 75 920 1.00 5.36
**
500 6.00 7.05 55 890 2.00 7.05
500 6.00 7.05 55 890 1.00 7.05
500 6.00 6.55 55 880 1.00 6.55
VAC
min.
Second dentine firing
Glaze firing
Glaze firing VITA AKZENT Plus
Corrective firing with CORRECTIVE*
*Indication range, see pages 28/29
**Note: For further information on the procedure with substructures made of precious metal-free alloys
see page 15.
Please note:
The firing result obtained with dental ceramics depends to
a great extent on the individual user's firing procedure and
substructure design. The type of furnace, the location of
the temperature sensor, the firing tray and the size of the
workpiece during the firing cycles are decisive for the result
of firing.
Our application-technical recommendations for the firing
temperatures (regardless of whether they have been
provided orally, in writing or in the form of practical instructions) are based on extensive experience and tests.
The user, however, should consider this information only
as a reference.
500 6.00 6.44 55 870 1.00 6.44
500 0.00 4.45 80 880 2.00 –
500 4.00 4.45 80 880 1.00 –
500 4.00 6.00 50 800 1.00 6.00
Explanation of the firing parameters
Predry. °C Start temperature
Temp. approx. °C End temperature
VAC min. Vacuum holding time in minutes
Should the surface quality or the degree of transparency
or glaze not correspond to the firing result that is achieved
under optimum conditions, the firing procedure must be
adjusted correspondingly. The crucial factors for the firing
procedure are not the firing temperature indicated on the
furnace display, but the appearance and the surface quality
of the firing object after firing.
Predrying time in minutes, closing time
Heating time in minutes
Temperature rise rate in degrees Celsius per minute
Holding time for end temperature
25
Page 26
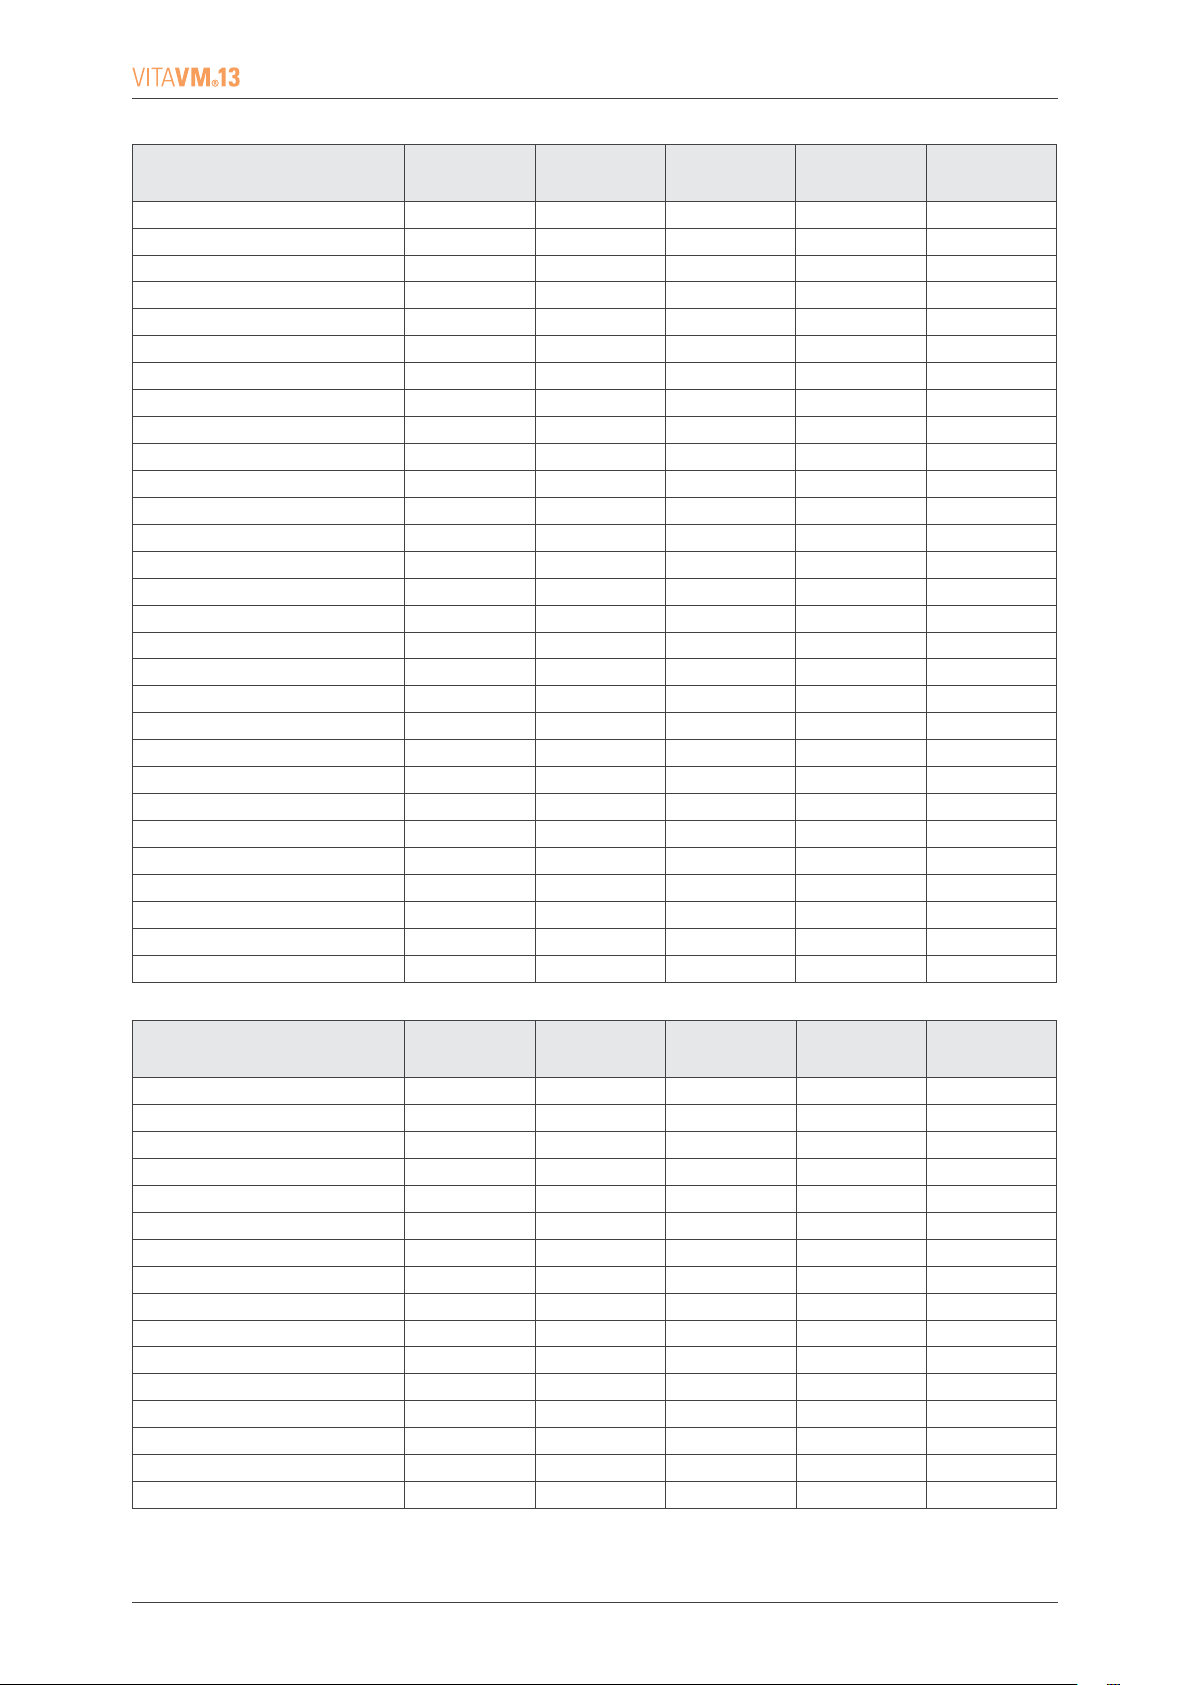
Classification tables for VITA SYSTEM 3D-MASTER® and VITA classical A1–D4 shades
The classifications given below are only intended to provide reference values!
VITA SYSTEM 3D-MASTER shades
0M1 OP0 M1 EL1 – ENL
0M2 OP0 M1 EL1 – ENL
0M3 OP0 M1 EL1/EL2* – ENL
1M1 OP1 M1/M7* EL1/EL2* CP1 ENL
1M2 OP1 M1/M7* EL2 CP1/CP2* ENL
2L1.5 OP2 M1/M7* EL1/EL2* CP1/CP2* ENL
2L2.5 OP2 M1/M4* EL1/EL3* CP2/CP3* ENL
2M1 OP2 M1/M4* EL1/EL6* CP1/CP5* ENL
2M2 OP2 M1/M4* EL1/EL3* CP1/CP3* ENL
2M3 OP2 M4 EL2/EL4* CP3 ENL
2R1.5 OP2 M1/M7* EL1/EL6* CP1/CP5* ENL
2R2.5 OP2 M1/M4* EL2/EL4* CP1/CP3* ENL
3L1.5 OP3 M4/M7* EL2/EL6* CP2/CP5* ENL
3L2.5 OP3 M4/M7* EL4/EL6* CP2/CP5* ENL
3M1 OP3 M7 EL1/EL6* CP1/CP5* ENL
3M2 OP3 M4/M7* EL2/EL6* CP3/CP5* ENL
3M3 OP3 M4/M9* EL4/EL6* CP4/CP4* ENL
3R1.5 OP3 M7 EL2/EL3* CP1/CP5* ENL
3R2.5 OP3 M4/M7* EL5/EL6* CP4/CP5* ENL
4L1.5 OP4 M7 EL6 CP5 END
4L2.5 OP4 M4/M9* EL3/EL4* CP4/CP5* END
4M1 OP4 M7 EL6 CP5 END
4M2 OP4 M4/M9* EL2/EL3* CP3/CP5* END
4M3 OP4 M9 EL5/EL6* CP4/CP5* END
4R1.5 OP4 M7/M8* EL2/EL3* CP5 END
4R2.5 OP4 M7/M9* EL3/EL4* CP4/CP5* END
5M1 OP5 M7/M8* EL3/EL6* – END
5M2 OP5 M7/M9* EL5/EL6* – END
5M3 OP5 M5/M9* EL3/EL4* – END
OPAQUE MARGIN** EFFECT LINER**
CHROMA
PLUS**
ENAMEL
VITA classical A1–D4 shades
A1 A1 M1/M7* EL2 CP1 ENL
A2 A2 M4/M7* EL1/EL3* CP2 ENL
A3 A3 M4 EL4/EL6* CP2/CP3* ENL
A3,5 A3,5 M4/M9* EL5/EL6* CP2/CP3* END
A4 A4 M4/M9* EL1/EL3* CP2/CP4* END
B1 B1 M1/M4* EL1/EL2* CP1 END
B2 B2 M1/M4* EL1/EL4* CP1 END
B3 B3 M4 EL2/EL4* CP2/CP3* END
B4 B4 M4/M9* EL4/EL6* CP3 END
C1 C1 M1/M4* EL1/EL6* CP1 END
C2 C2 M4/M7* EL2/EL6* CP1/CP5* END
C3 C3 M4/M7* EL6 CP1/CP5* ENL
C4 C4 M4/M7* EL3/EL6* CP5 ENL
D2 D2 M1/M9* EL2/EL6* CP1/CP5* END
D3 D3 M4/M7* EL2/EL3* CP2/CP5* END
D4 D4 M1/M4* EL2/EL6* CP2/CP5* END
* Mixing ratio 1:1
** Indication range, see pages 28/29
OPAQUE MARGIN** EFFECT LINER**
CHROMA
PLUS**
ENAMEL
26
Page 27

VITA modelling liquids
VITA VM MODELLING LIQUID
For mixing BASE DENTINE, TRANSPA DENTINE, ENAMEL and additional materials.
VITA VM MODELLING LIQUID provides excellent stability characteristics
during layering and allows faster evaporation of the liquid.
Perfectly suitable for the fabrication of small restorations or for processing without
the permanent use of an extraction unit.
VITA VM OPAQUE FLUID
Especially for mixing the VITA VM powder opaque materials.
VITA VM PASTE FLUID
Liquid for mixing the VITA VM paste opaque materials
VITA MODELLING FLUID (not included in the assortment)
For mixing all dentine, incisal and additional materials.
VITA MODELLING FLUID avoids rapid drying of the ceramic material.
Moreover increased plasticity during layering is achieved.
Note: Cannot be used for
mixing the dentine materials!
VITA MODELLING FLUID RS (not included in the assortment)
Red special liquid for mixing all dentine, incisal and additional materials.
The smooth consistency of VITA MODELLING FLUID RS allows extended
and wet processing while ensuring good stability. The fluid is therefore
particularly suited for large-sized restorations and multi-unit bridges.
VITA HIGH SILVER MODELLING LIQUID (not included in the assortment)
Special anti-greening liquid for high silver content alloys
(silver content > 30 %).
27
Page 28
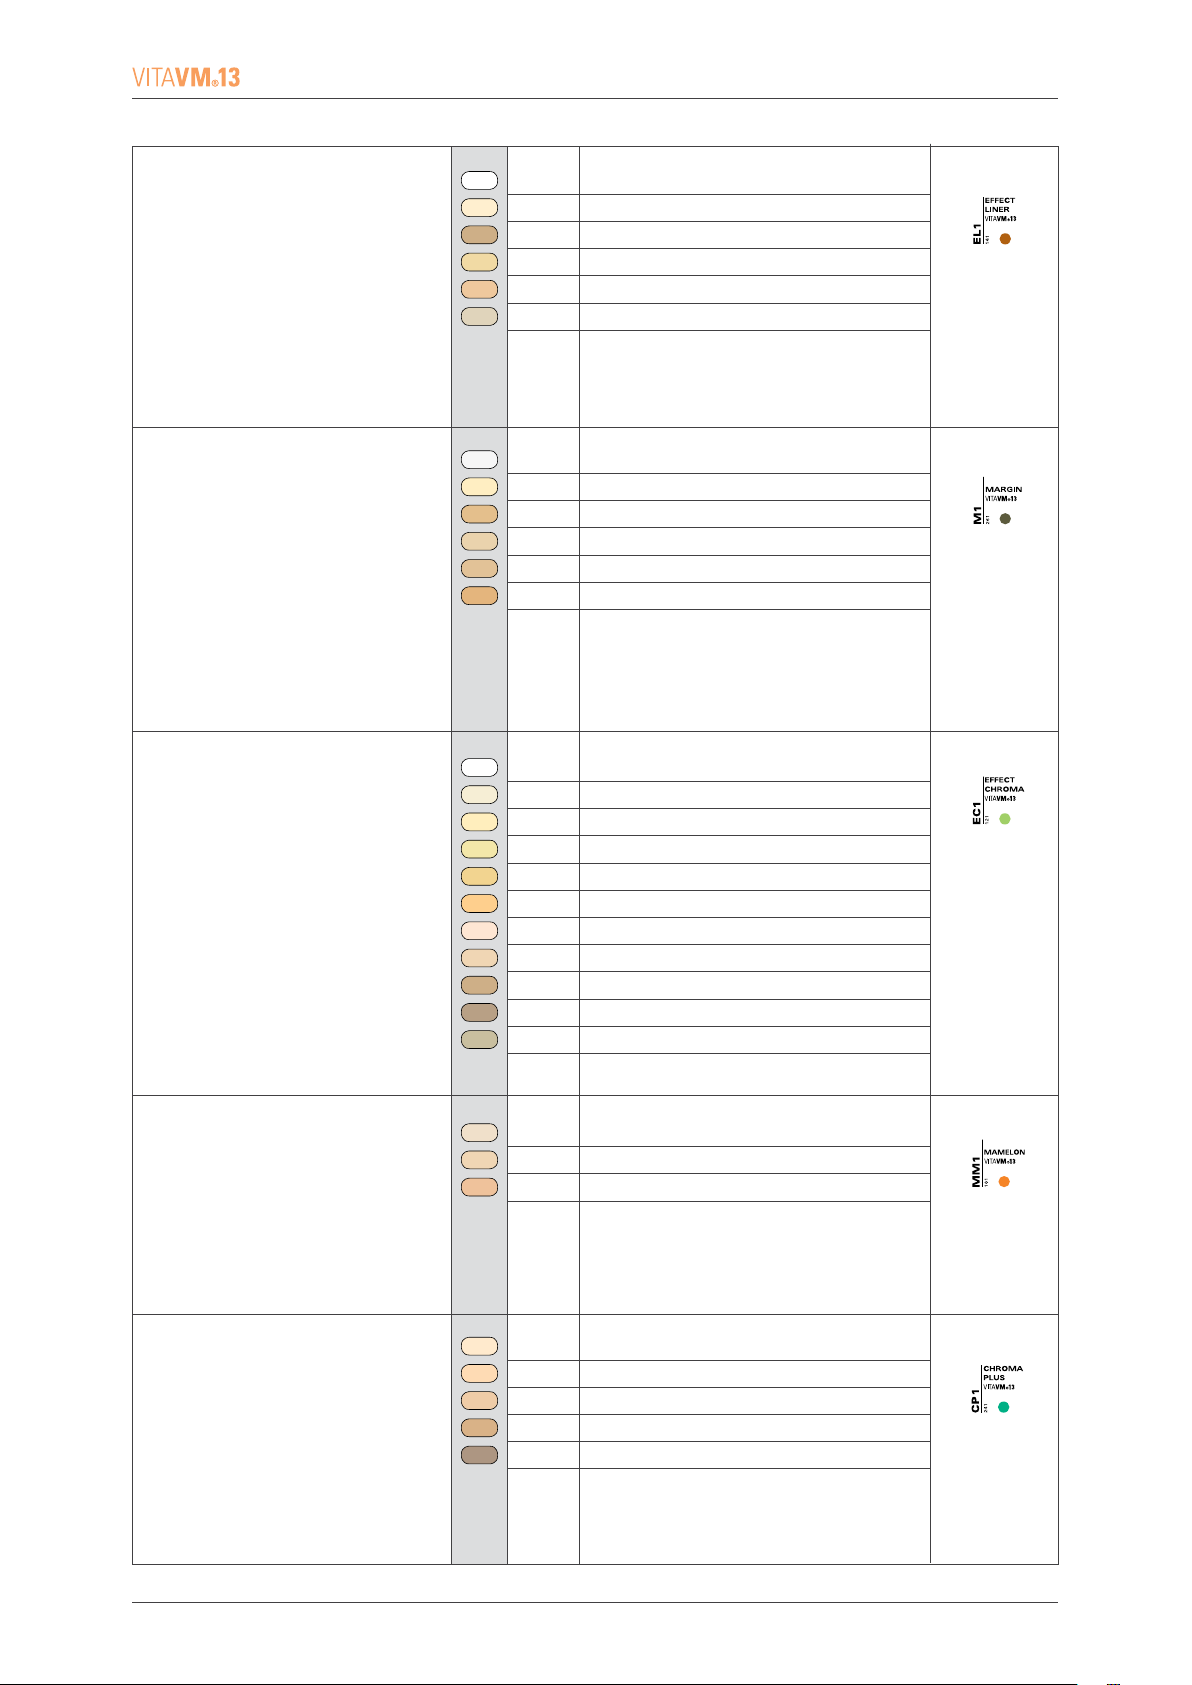
Additional materials
VITA VM 13 EFFECT LINER
– to control the fluorescence from the
depth of the restoration
– universally suitable to support and
intensify the base shade
– applied in the gingival area,
they enhance the distribution of light
VITA VM 13 MARGIN
– to create an esthetic transition in the
case of a labially shortened metal coping
– after the application, the plastified
MARGIN material must be hardened
through the supply of heat; it is
recommended to use a hairdryer
or radiated heat from the furnace
to stabilize the shoulder
EL1 snow
EL2 cream
EL3 tabac
EL4 golden fleece
EL5 papaya
EL6 sesame
M1 icy beige
M4 wheat
M5 amber
M7 seashell
M8 tan
M9 beach
white
beige
brown
yellow
orange
green-yellow
white
yellow
amber
light beige
pastel-brown
light orange
VITA VM 13 EFFECT CHROMA
– color-intensive modifier porcelains
– to accentuate certain color
areas of the tooth
– to vary the lightness value in the neck,
dentine and enamel areas
VITA VM 13 MAMELON
– highly fluorescent material
which is mainly used in the incisal area
– for shade characterization
between incisal edge and dentine
VITA VM 13 CHROMA PLUS
– Chroma Plus materials can be used to
achieve more intensive shade repro-
duction in the cervical region (especially
with VITA classical A1–D4 shades)
– in case of thin walls, they enhance
the shade in an efficient manner
EC1 ghost
EC2 linen
EC3 pale banana
EC4 lemon drop
EC5 golden rod
EC6 sunflower
EC7 light salmon
EC8 toffee
EC9 doe
EC10 larch
EC11 gravel
MM1 ecru
MM2 mellow buff
MM3 peach puff
CP1 ivory
CP2 almond
CP3 moccasin
CP4 caramel
CP5 burlywood
white
sand-beige
light yellow
tender lemon yellow
light orange
orange
pink
beige-brown
brown
green-brown
green-grey
beige
warm yellow-brown
tender orange
ivory
beige
light orange-brown
orange
green-brown
28
Page 29
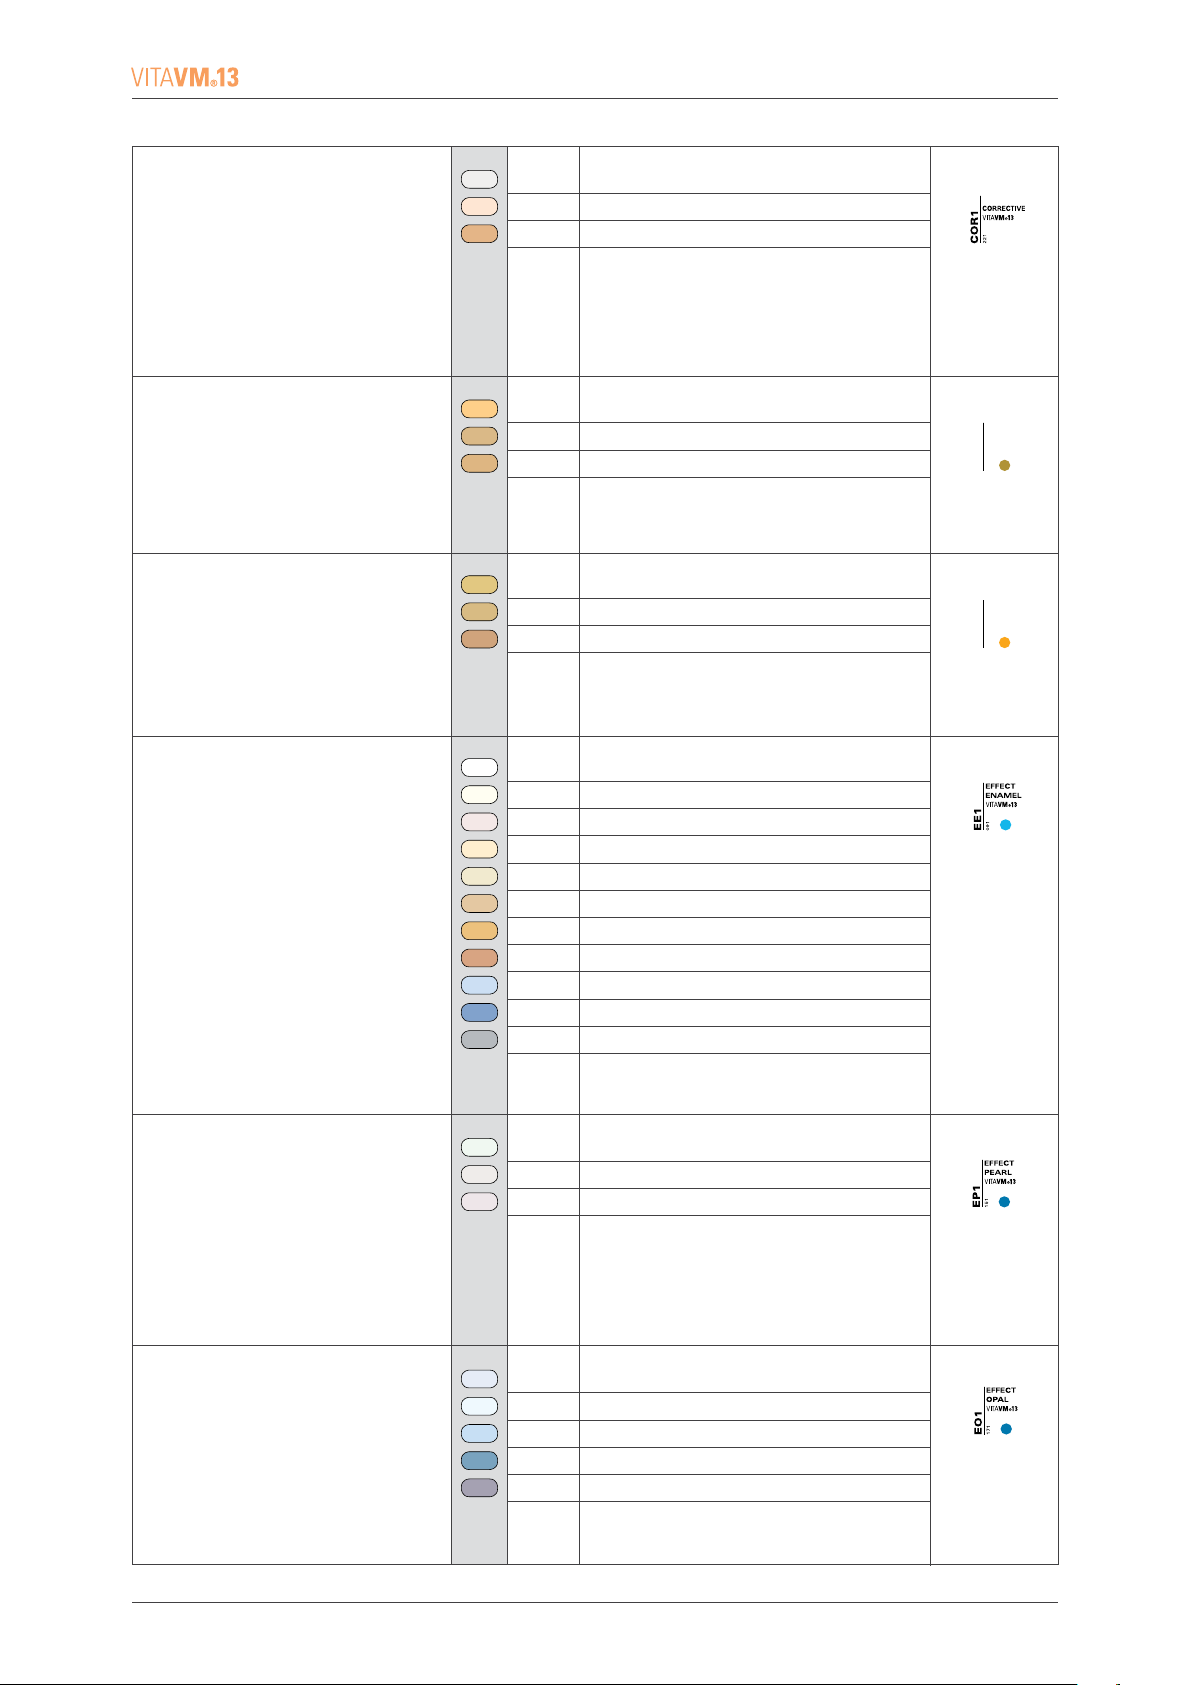
Additional materials
VITA VM 13 CORRECTIVE
– with reduced firing temperature
(830°C) for corrections after
glaze firing
– in three nuances for neck,
dentine and enamel areas
VITA VM 13 SUN OPAQUE
– for mixing the respective opaque shades
– in three different nuances
VITA VM 13 SUN DENTINE
– for a "sunnier" and warmer shade result
– to be used in the dentine and body area
COR1 neutral
COR2 sand
COR3 ochre
SO1 yellowish
SO2 medium
SO3 reddish
SD1 sun light
SD2 sun rise
SD3 sun set
neutral
beige
brown
yellowish
orange
reddish
light yellow
light orange
orange-red
SUN
OPAQUE
VITAVM®13
291
SO1
SUN
DENTINE
VITAVM®13
361
SD1
VITA VM 13 EFFECT ENAMEL
– can be used for all enamel areas of the
natural tooth
– universally suitable translucent enamel
effect material
– to achieve a natural effect of depth
VITA VM 13 EFFECT PEARL
– only suitable for effects on the surface,
not for layering in
– perfectly suitable for bleached
restorations
– to obtain nuances of yellow and red
EE1 mint cream
EE2 pastel
EE3 misty rose
EE4 vanilla
EE5 sun light
EE6 navajo
EE7 golden glow
EE8 coral
EE9 water drop
EE10 silver lake blue
EE11 drizzle
EP1 pearl
EP2 pearl blush
EP3 pearl rose
whitish-translucent
pastel
pink-translucent
yellowish
yellowish-translucent
reddish-translucent
orange-translucent
red-translucent
bluish translucent
blue
greyish-translucent
shade in pastel-yellow
shade in pastel-orange
shade in pastel-rosé
VITA VM 13 EFFECT OPAL
– to create the opal effect
in restorations of young and
highly translucent teeth
EO1 opal
EO2 opal whitish
EO3 opal bluish
EO4 opal blue
EO5 opal dark violet
neutral, universally suitable
whitish
bluish
blue
dark violet
29
Page 30
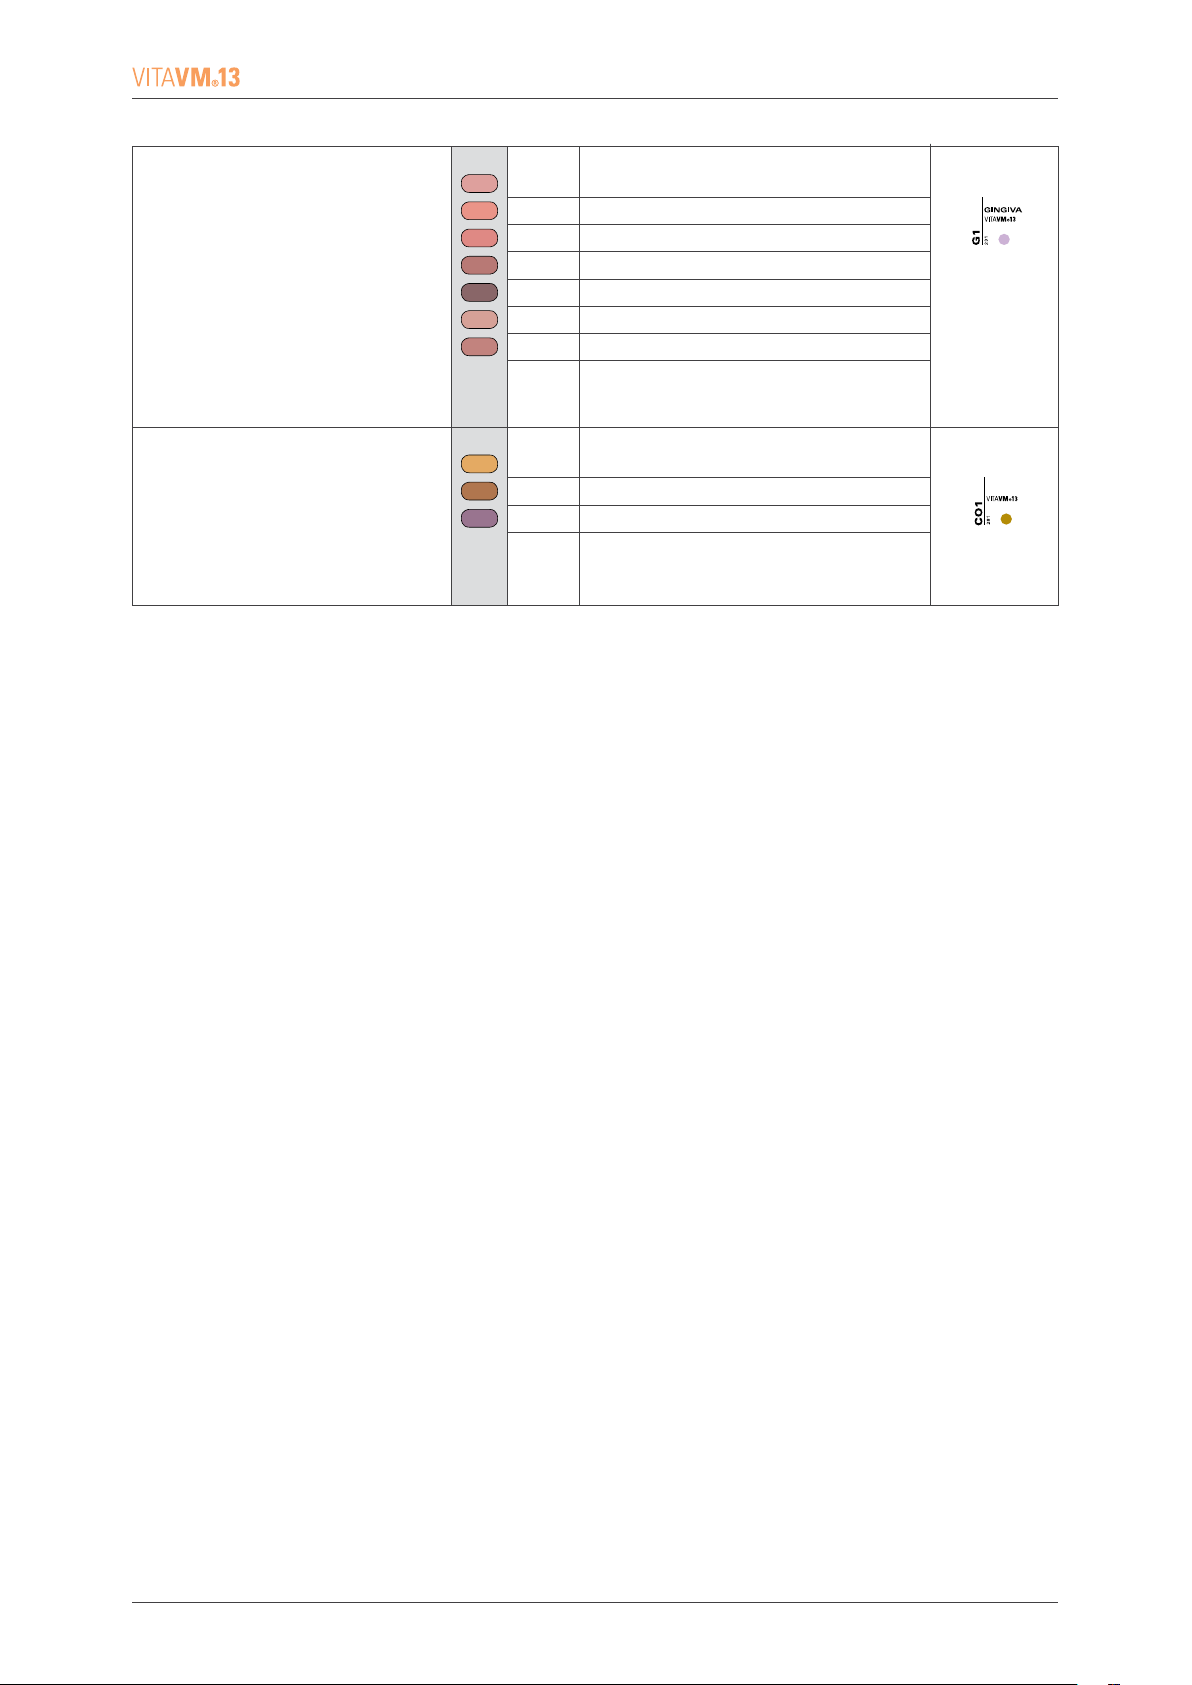
Additional materials
VITA VM 13 GINGIVA
– to restore the original
gingival situation
– are applied and fired during the first
and / or second dentine firing
– color nuances range from
orange-red and reddish to brown-red
VITA VM 13 COLOR OPAQUE
– shade-intensive opaque materials for
the characterization of enamel and
cervical areas
G1 rose
G2 nectarine
G3 pink grapefruit
G4 rosewood
G5 cherry brown
GOL light flesh
GOD dark flesh
CO1 gold
CO2 brown
CO3 lilac
dusky pink
orange-pink
pink
brown-red
dark red
light pink
dark pink
orange
brown
lilac
COLOR
OPAQUE
30
Page 31
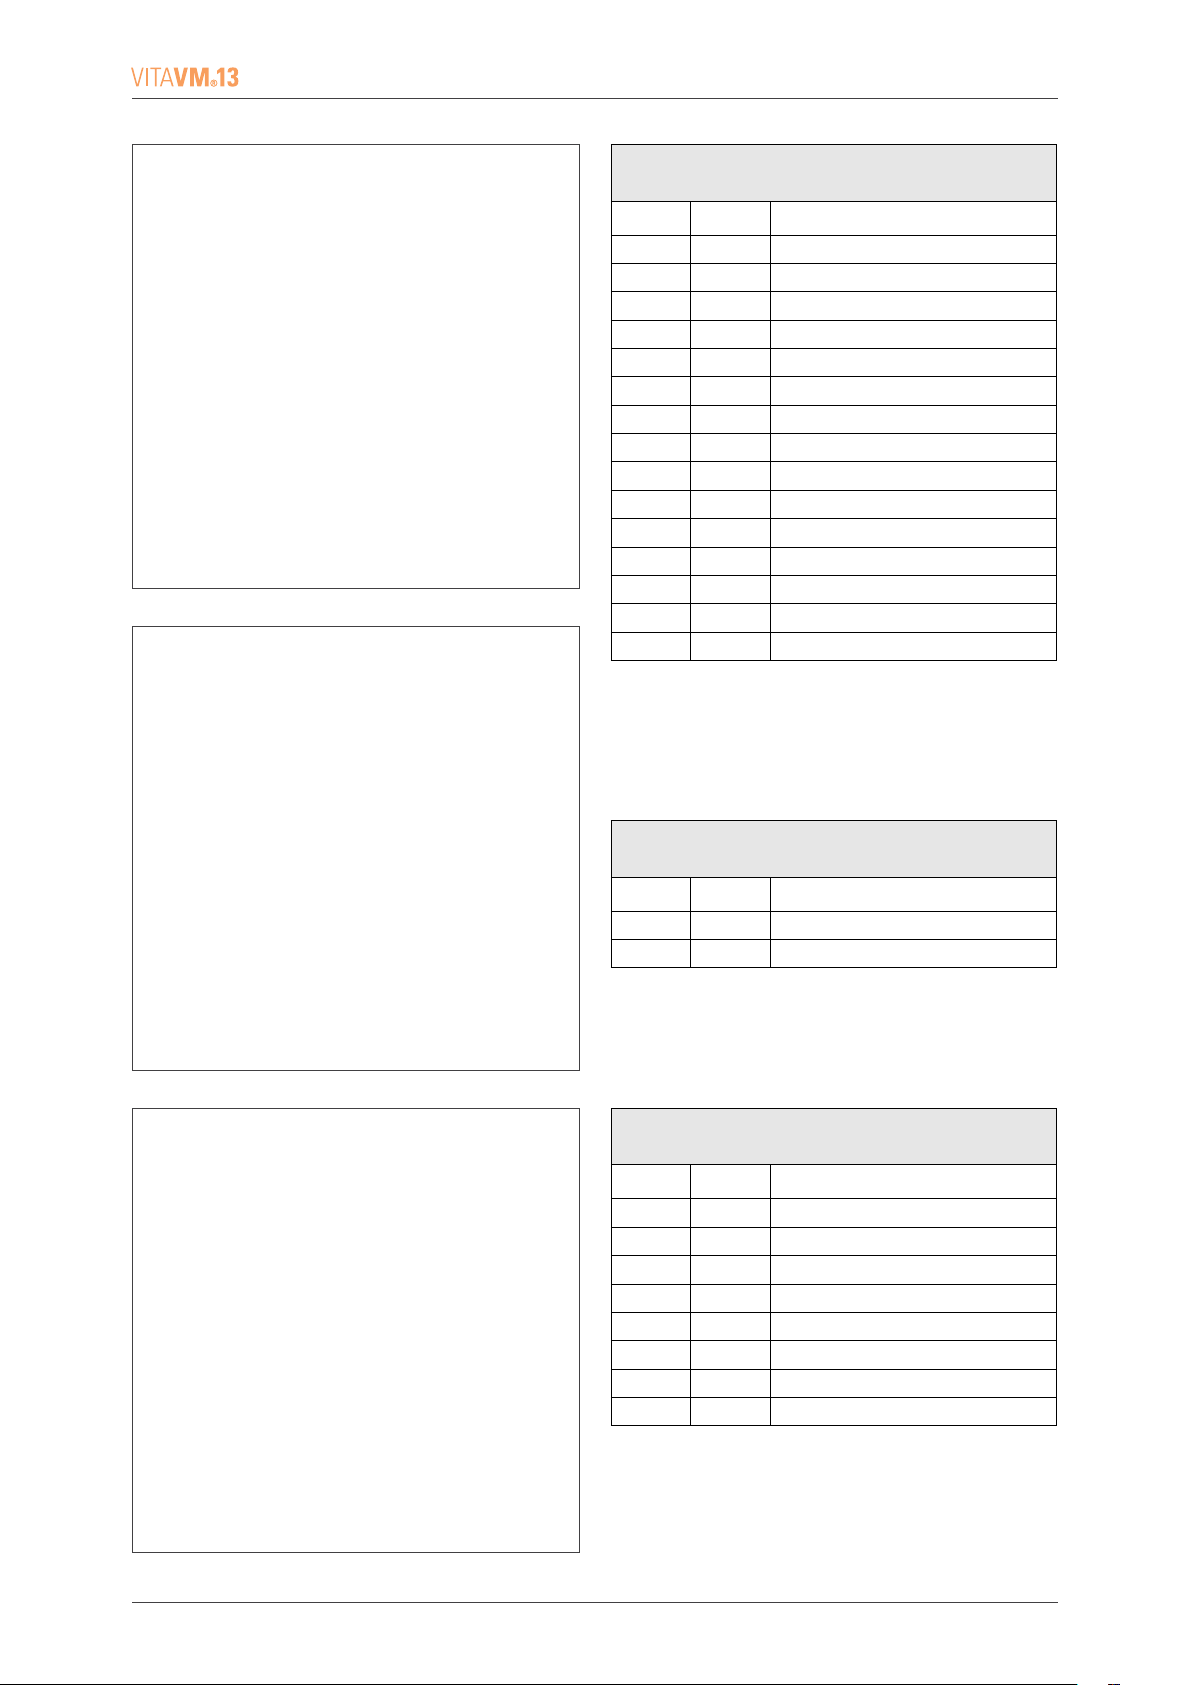
Assortments
VITA VM 13 BASIC KIT*/**/****
BASIC assortment for BASIC layering
Quantity Content Material
1 12 g WASH OPAQUE WO
5 12 g OPAQUE° OP1 – OP5
3 12 g SUN OPAQUE SO1– SO3
5 12 g CHROMA PLUS CP1– CP5
26 12 g BASE DENTINE° 1M1– 5M3
3 12 g SUN DENTINE SD1–SD3
2 12 g ENAMEL° ENL, END
1 12 g NEUTRAL° NT
1 12 g WINDOW° WIN
3 12 g CORRECTIVE COR1– COR3
1 50 ml VITA VM MODELLING LIQUID
1 50 ml VITA VM OPAQUE FLUID
1 – Shade indicator
1 – VITA Toothguide 3D-MASTER
1 Working Instructions
....*also available as BASIC KIT SMALL with reduced range of materials.
** also available as BASIC KIT classical in the VITA classical A1–D4 shades and as
BASIC KIT SMALL classical in the following six shades: A1, A2, A3, A3.5, B3, D3
*** each assortment also available with PASTE OPAQUE
° also available in 50 g
VITA VM 13 BUILD UP KIT*
Add-on assortment for BUILD UP layering
Quantity Content Material
26 12 g TRANSPA DENTINE° 1M1– 5M3
1 50 ml VITA VM MODELLING LIQUID
* also available as BUILD UP KIT SMALL in the following fifteen shades: 1M1, 1M2,
2M1, 2M2, 2M3, 3L1.5, 3L2.5, 3M1, 3M2, 3M3, 3R1.5, 3R2.5, 4M1, 4M2, 4M3
** also available as BUILD UP KIT classical in the VITA classical A1–D4 shades and
as BUILD UP KIT SMALL classical with 6 shades
° also available in 50 g
VITA VM 13 CLASSICAL COLOR KIT*/**
Add-on assortment for 3D-MASTER users
Quantity Content Material
16 12 g OPAQUE A1–D4
16 12 g BASE DENTINE° A1–D4
16 12 g TRANSPA DENTINE° A1–D4
1 50 ml VITA VM MODELLING LIQUID
1 50 ml VITA VM OPAQUE FLUID
1 – Shade indicator
1 – VITA classical A1–D4 shade guide
1 – Working Instructions
* also available with OPAQUE PASTE
** Assortment for 3D-MASTER customers who wish to add
VITA classical shades to their assortment
° also available in 50 g
31
Page 32
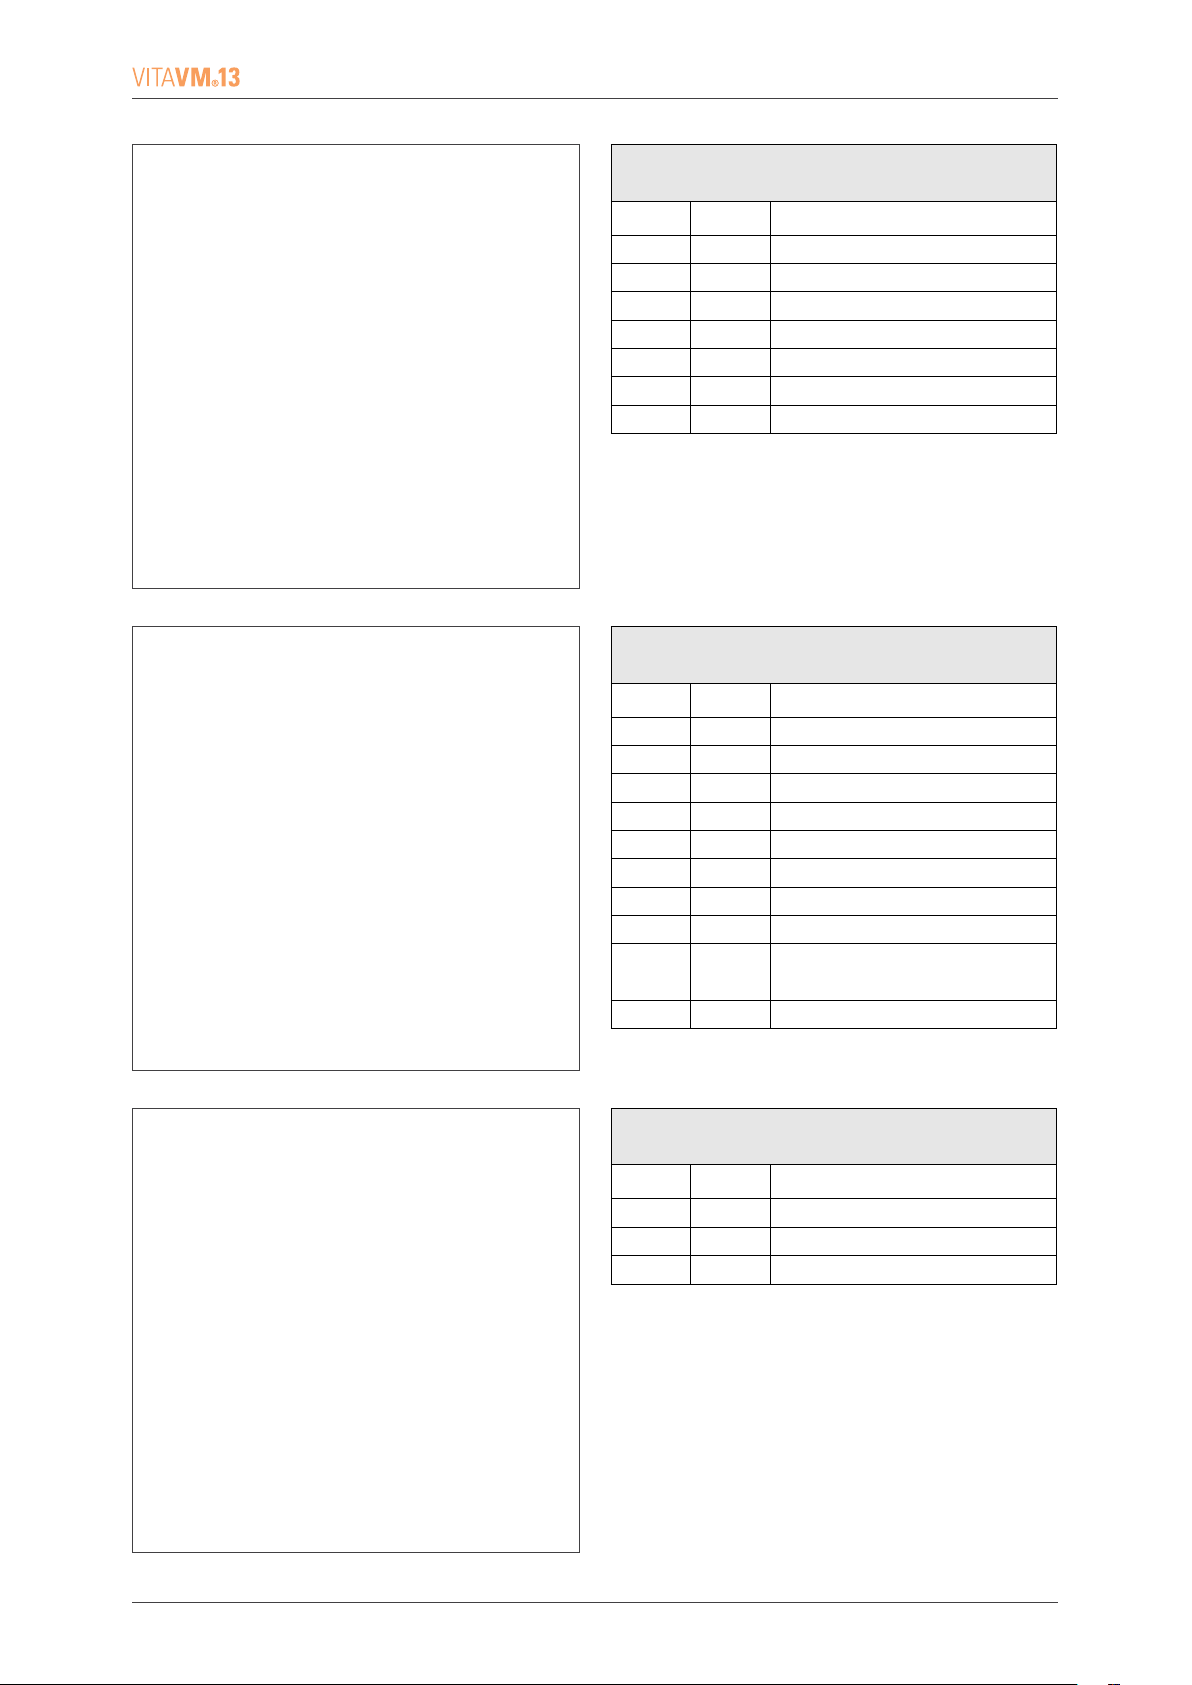
Assortments
VITA VM 13 PROFESSIONAL KIT*
For incorporating natural effects and characteristics
Quantity Content Material
11 12 g EFFECT CHROMA EC1–EC11
3 12 g MAMELON MM1–MM3
3 12 g EFFECT PEARL EP1–EP3
5 12 g EFFECT OPAL EO1–EO5
11 12 g EFFECT ENAMEL EE1–EE11
6 12 g EFFECT LINER EL1–EL6
4 – Shade guides
* also available as PROFESSIONAL KIT SMALL in the following shades:
EC1, EC4, EC6, EC8, EC9, MM2, EP1, EO2, EE1, EE3, EE7, EE8, EE9, EE10, EE11
VITA VM 13 BLEACHED COLOR KIT
Ultra-bright shades for the reproduction of bleached teeth
Quantity Content Material
1 12 g OPAQUE OPO
3 12 g BASE DENTINE 0M1–0M3
3 12 g TRANSPA DENTINE 0M1– 0M3
1 12 g ENAMEL ENL
1 12 g NEUTRAL NT
1 12 g WINDOW WIN
1 50 ml VITA VM MODELLING LIQUID
1 50 ml VITA VM OPAQUE FLUID
1 –
BLEACHED SHADE GUIDE
SHADE GROUP 0M
1 – Workin Instructions
* also available with OPAQUE PASTE
VITA VM 13 GINGIVA KIT*
Gingiva materials with natural effects
Quantity Content Material
5 12 g GINGIVA G1– G5
2 12 g GINGIVA OPAQUE GOL, GOD
1 – GINGIVA shade guide
* also available with OPAQUE PASTE
32
Page 33

Assortments
VITA VM 13 MARGIN KIT
For ceramic shoulder design
Quantity Content Material
6 12 g MARGIN M1, M4, M5, M7, M8, M9
1 – MARGIN shade guide
33
Page 34
Information
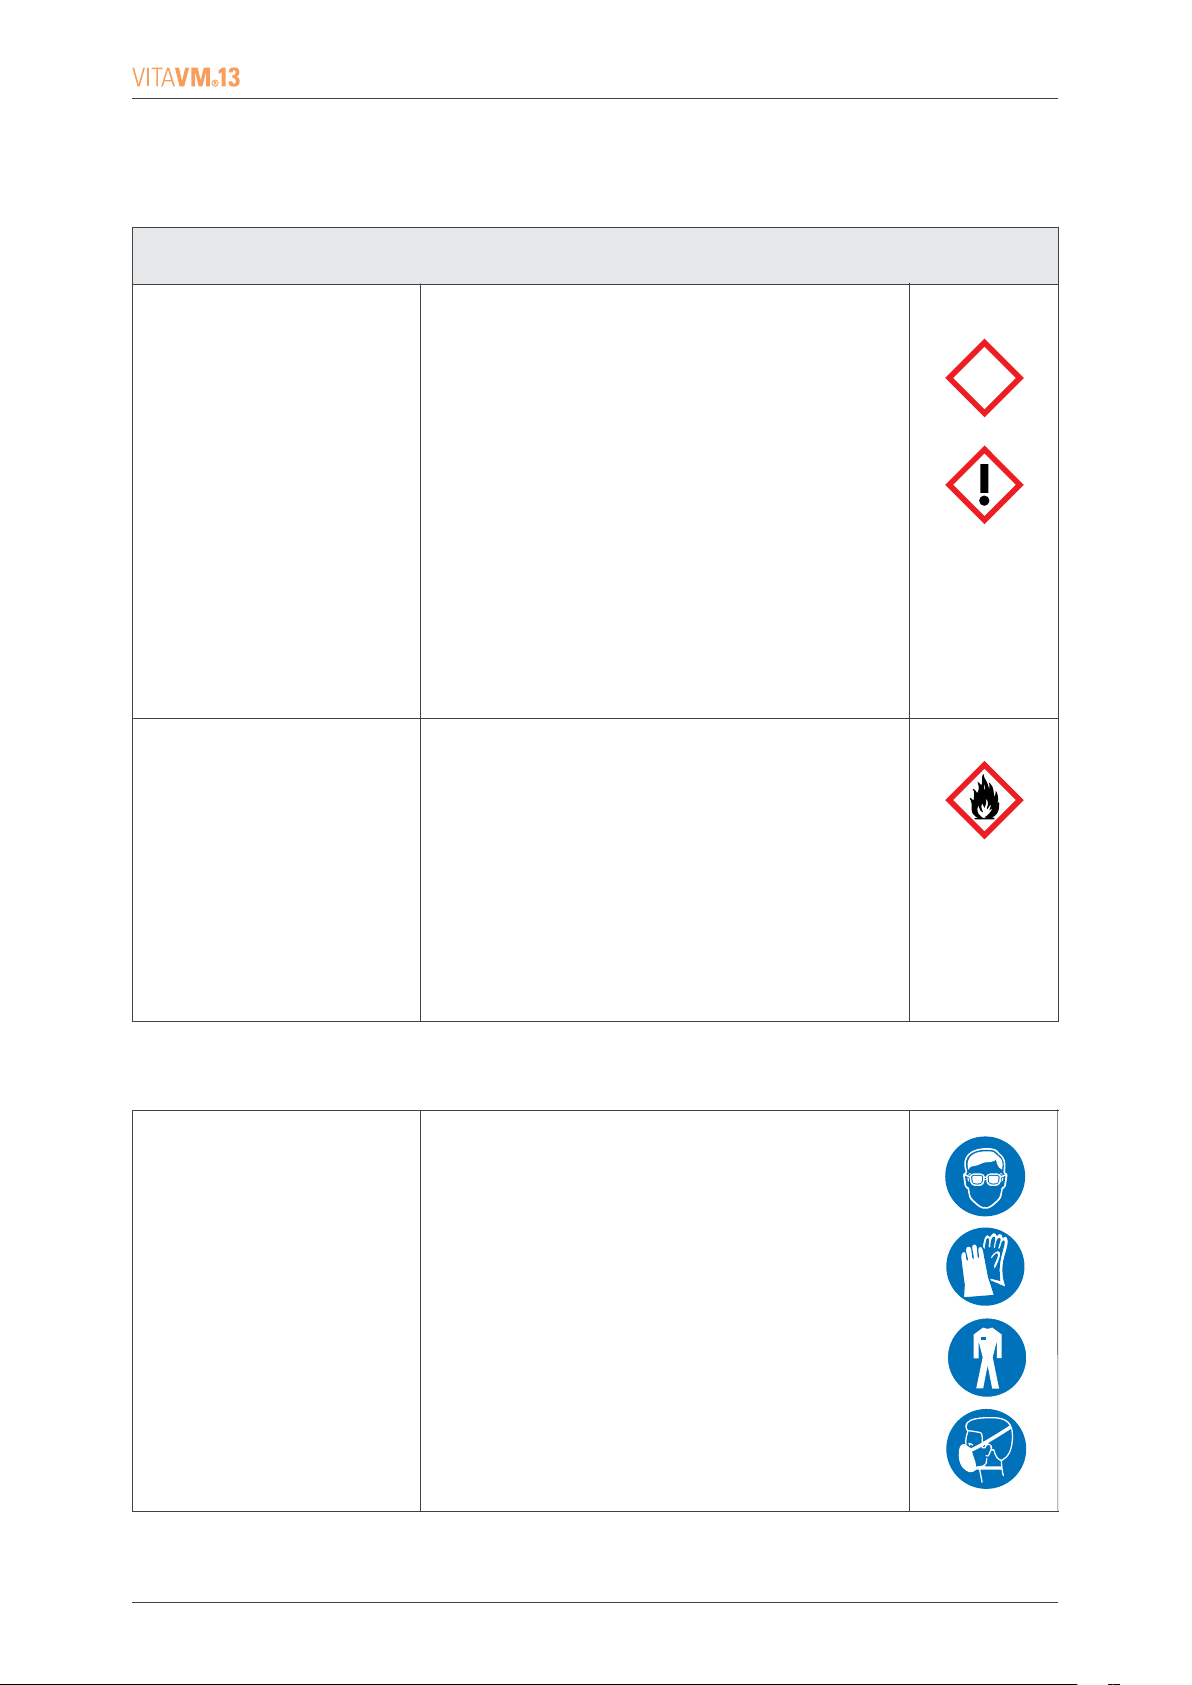
IMPORTANT INFORMATION:
Information on troubleshooting can be found under FAQs - metal ceramics - on our website.
The following products require hazard identification:
VITA VM OPAQUE FLUID
VITA SPRAY-ON
INDICATOR LIQUID and
VITA SPRAY-ON LIQUID
Causes severe skin burns and damage to eyes.
May be corrosive to metals.
Causes severe eye irritation.
When working with the product, do not eat and drink.
In case of contact with eyes: rinse carefully with water for
some minutes.
In case of contact with skin: rinse thoroughly with water.
Do not empty into drains.
This product and its container must be disposed of as
hazardous waste.
Highly flammable liquid and vapor.
Keep container tightly closed.
Keep away from ignition sources. - No smoking.
Use only in well-ventilated areas. Store container tightly closed
at an adequately ventilated place. Do not empty into drains.
This product and its container must be disposed of as
hazardous waste.
Please refer to the safety data sheet for detailed information!
Safety at work and health
protection
34
When working with the product, wear suitable safety
goggles/face protection, gloves and safety clothing.
In case of formation of dust, use an extraction system or
wear a face mask.
Page 35

Page 36
VITA VM 13 veneering material is available in VITA
SYSTEM 3D-MASTER and VITA classical A1–D4 shades.
Shade compatibility with all VITA SYSTEM 3D-MASTER and
VITA classical A1–D4 materials is guaranteed.
With the unique VITA SYSTEM 3D-MASTER, all natural
tooth shades can be systematically determined and perfectly reproduced.
Pleas e note: Our products must be used in accordance with the instructions for use.
We accept no liability for any damage resulting from incorrect handling or usage.
The user is furthermore obliged to check the product before use with regard to its
suitability for the intended area of application. We cannot accept any liability if the
product is used in conjunction with materials and equipment from other manufacturers that are not compatible or not authorized for use with our product. Furthermore,
our liability for the accuracy of this information is independent of the legal basis
and, in as far as legally permissible, shall always be limited to the value as invoiced
of the goods supplied, excluding value-added tax. In particular, as far as legally
permissible, we do not assume any liability for loss of earnings, indirect damages,
ensuing damages or for third-party claims against the purchaser. Claims for damages
based on fault liability (culpa in contrahendo, breach of contract, unlawful acts, etc.)
can only be made in the case of intent or gross negligence. The VITA Modulbox is not
necessarily a component of the product.
Date of issue of this information: 07.13
After the publication of these working instructions any previous versions become
obsolete. The current version can be found at www.vita-zahnfabrik.com
VITA Zahnfabrik has been certified in accordance to the Medical Device Directive
and the following products bear the mark :
®13 · VITA AKZENT
VITAV M
US 5498157 A · AU 659964 B2 · EP 0591958 B1
VITA Zahnfabrik H. Rauter GmbH & Co.KG
Postfach 1338 · D-79704 Bad Säckingen · Germany
Tel. +49 (0) 7761/ 562-0 · Fax +49 (0) 7761/ 562 -299
Hotline: Tel. +49 (0) 7761/ 562-222 · Fax +49 (0) 7761/ 562- 446
www.vita-zahnfabrik.com · [email protected]
facebook.com/vita.zahnfabrik
®
Plu s
1180 E – 0713 (X.) S – Version (01)
 Loading...