

vita Easyshade Advance 4.0, DEASYAS4 Operating Instructions Manual
VITA Easyshade®Advance 4.0
VITA shade, VITA made.
Model Number: DEASYAS4
Date of issue: 04.13
VITA shade control
VITA shade reproduc tion
VITA shade communic ation
VITA shade taking
Operating Instructions

3
VITA Easyshade®Advance 4.0
VITA Easyshade Advance 4.0 Medical equipment, With respect to electric shock, fire and
mechanical hazards only in accordance with UL 60601-1,
IEC/EN 60601-1, CAN/CSA C22.2 No. 601.1
Attention, consult accompanying documents
Type B applied part
Single patient use only
Class II equipment
Definition of symbols
Warning
1. Attention! Use only with enclosed power supply
(GlobTek GTM41076-0605).
2. Never look directly into the VITA Easyshade Advance 4.0
probe tip when the lamp is on.
3. Do not immerse the VITA Easyshade Advance 4.0 hand piece
or base unit in water or any other liquid.
4. Follow the instructions in Section 1.4 to properly apply
an infection control shield.
5. Follow the instructions in Section 9 to properly clean
and disinfect VITA Easyshade Advance 4.0.
6. Do not expose the unit to temperatures above 60° C.
7. The general recommendations for the use of the
VITA Easyshade Advance 4.0 instrument in dentist practices
and dental laboratories must be followed.
8. Infection control shields are for single patient
use only.
9. Protect the instrument against direct sunlight.
10. The temperature to perform measurements must be
between 15°C and 40°C.
11. Do not drop the instrument to avoid the risk of breakage
or electric shocks.
Important information on electromagnetic compatibility
Portable and mobile radio frequency (RF) communications
equipment can affect medical electrical equipment. This product
is intended for use in the electromagnetic environments
specified. The user of this product should assure it is used
in such an environment.
1. Portable and mobile RF Communications equipment
(cell phones) should not be used at close distances.
2. Power frequency magnetic fields should be at levels
characteristic of a typical location in a commercial
or hospital environment.
Safety information
4
VITA Easyshade®Advance 4.0
This instrument and any accessory components are subject
to regulation 2002/96/EC (WEEE) and applicable national laws
and must not be disposed of with unsorted household waste
within the European Union (EU).
The VITA Easyshade Advance 4.0 instrument complies with
the applicable regulations of the European Union (EU).
The declaration of conformity can be requested from
VITA Quality Management at
www.vita-zahnfabrik.com
Disposal of equipment
Important copyright information
© Copyright 2011, VITA Zahnfabrik. All Rights Reserved.
This document and/or the software, data and information
referenced or contained herein contain confidential and
proprietary information of VITA Zahnfabrik. This document
does not convey or represent any right or license to use
any software, data or information, any right or license to
use any intellectual property rights, or any obligation on the
part of VITA Zahnfabrik to provide support or other services
in connection therewith. Any right or license to use any
software data, information or other intellectual property
rights of VITA Zahnfabrik or any obligation to provide support,
must be conveyed by separate written agreement with
VITA Zahnfabrik.
Safety information

5
VITA Easyshade®Advance 4.0
1 Getting started 6
1.1 Package contents 6
1.2 Product information 6
1.3 System setup / Features 7
1.4 Applying an infection control shield 8
1.5 Power-on 9
1.6 Calibrating 9
1.6.1 Automatic calibration 9
1.6.2 Manual calibration 11
1.6.3 Monitoring the calibration 11
2 Menu navigation 12
2.1 Tables of icons 12
3 Correct measurement of a tooth 13
4 Modes of operation 15
4.1 Short descriptions of the modes
of operation 15
4.1.1 Measurement of the basic shade 15
4.1.2 Averaged measurement 15
4.1.3 Measurement of tooth area 15
4.1.4 Measurement on a ceramic
restoration 15
4.2 Measuring the basic shade
on the natural tooth 16
4.2.1 Display natural tooth shade 16
4.2.2 Display VITABLOCS shade 17
4.2.3 Display bleached shade 18
4.3 Averaged measurement on the natural
tooth 19
4.4 Measurement of areas on the natural
tooth 19
4.5 Measuring on ceramic restorations 20
4.5.1 Comparison of the shade
with the VITA standard 21
4.5.2 Comparison of the shade
with the user standard 23
4.5.3 Determining the shade
of a ceramic restoration 23
5 Training mode 24
6 Recording the measurements 25
7 Extended color information 26
7.1 VITA classical A1– D4 shades 26
7.2 VITA SYSTEM 3D-MASTER shades 26
7.3 VITA SYSTEM 3D-MASTER mixed shades 27
8 Bluetooth interface 28
9 Battery level 29
10 Power off / Automatic power off 30
11 Cleaning and disinfecting 31
12 Appendix 32
12.1 Replacement parts and accessories
for users 32
12.2 Error messages 33
12.3 Troubleshooting 35
12.4 Technical data 36
12.5 Storage and transport conditions 36
12.6 Glossary 37
12.7 Patents and trademarks 38
12.8 Limitation of liability for
subsequent errors 38
12.9 Warranty 38
Table of contents
6
B
D
F
G
C
H
E
VITA Easyshade®Advance 4.0
Date of purchase:
Serial number of the VITA Easyshade Advance 4.0
hand piece / calibration block holder:
Serial number of the VITA Easyshade Advance 4.0
base unit:
1 Getting started
Thank you for your purchase of the VITA Easyshade Advance 4.0 instrument
which provides accurate shade determination for natural dentition and
a variety of restorations. The instrument can measure a broad range of shades,
including VITA Linearguide 3D-MASTER shades, VITA Toothguide 3D-MASTER
shades including the BLEACHED SHADE GUIDE shades and VITA classical A1–D4
shades. For accurate shade matching results, please read these instructions
completely before using your instrument.
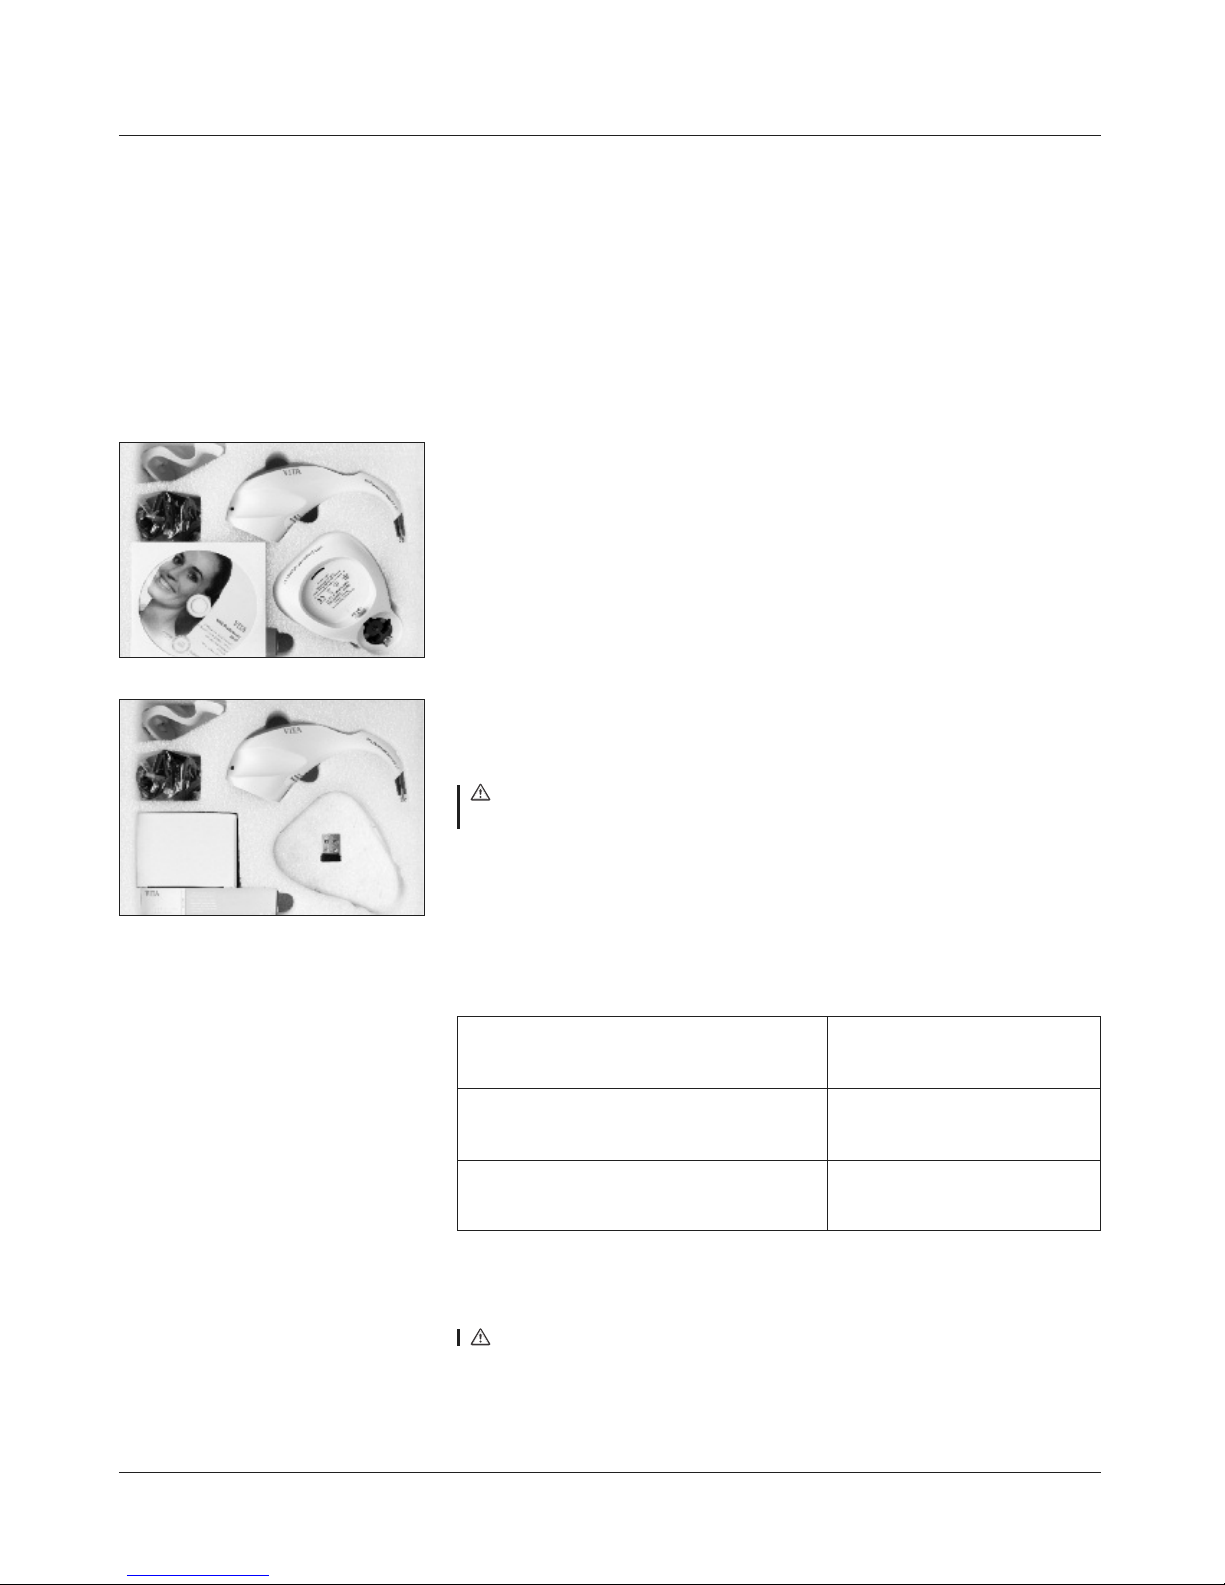
1.1 Package contents
A Operating instructions and Quick User Guide (not shown)
B CD with VITA Assist CD-ROM
C Package of infection control shields
D VITA Easyshade Advance 4.0 hand piece
E VITA Easyshade Advance 4.0 base unit
F Calibration block holder
G Power supply with universal adapter kit
H USB Bluetooth module
Note: If any items are missing,
contact VITA Zahnfabrik or Vident (North America only) immediately.
1.2 Product information
Please record the following information in the table below.
Getting started
Software to transfer and document the natural tooth shade measured
Note: Operating system: Windows XP SP2 or later versions
7
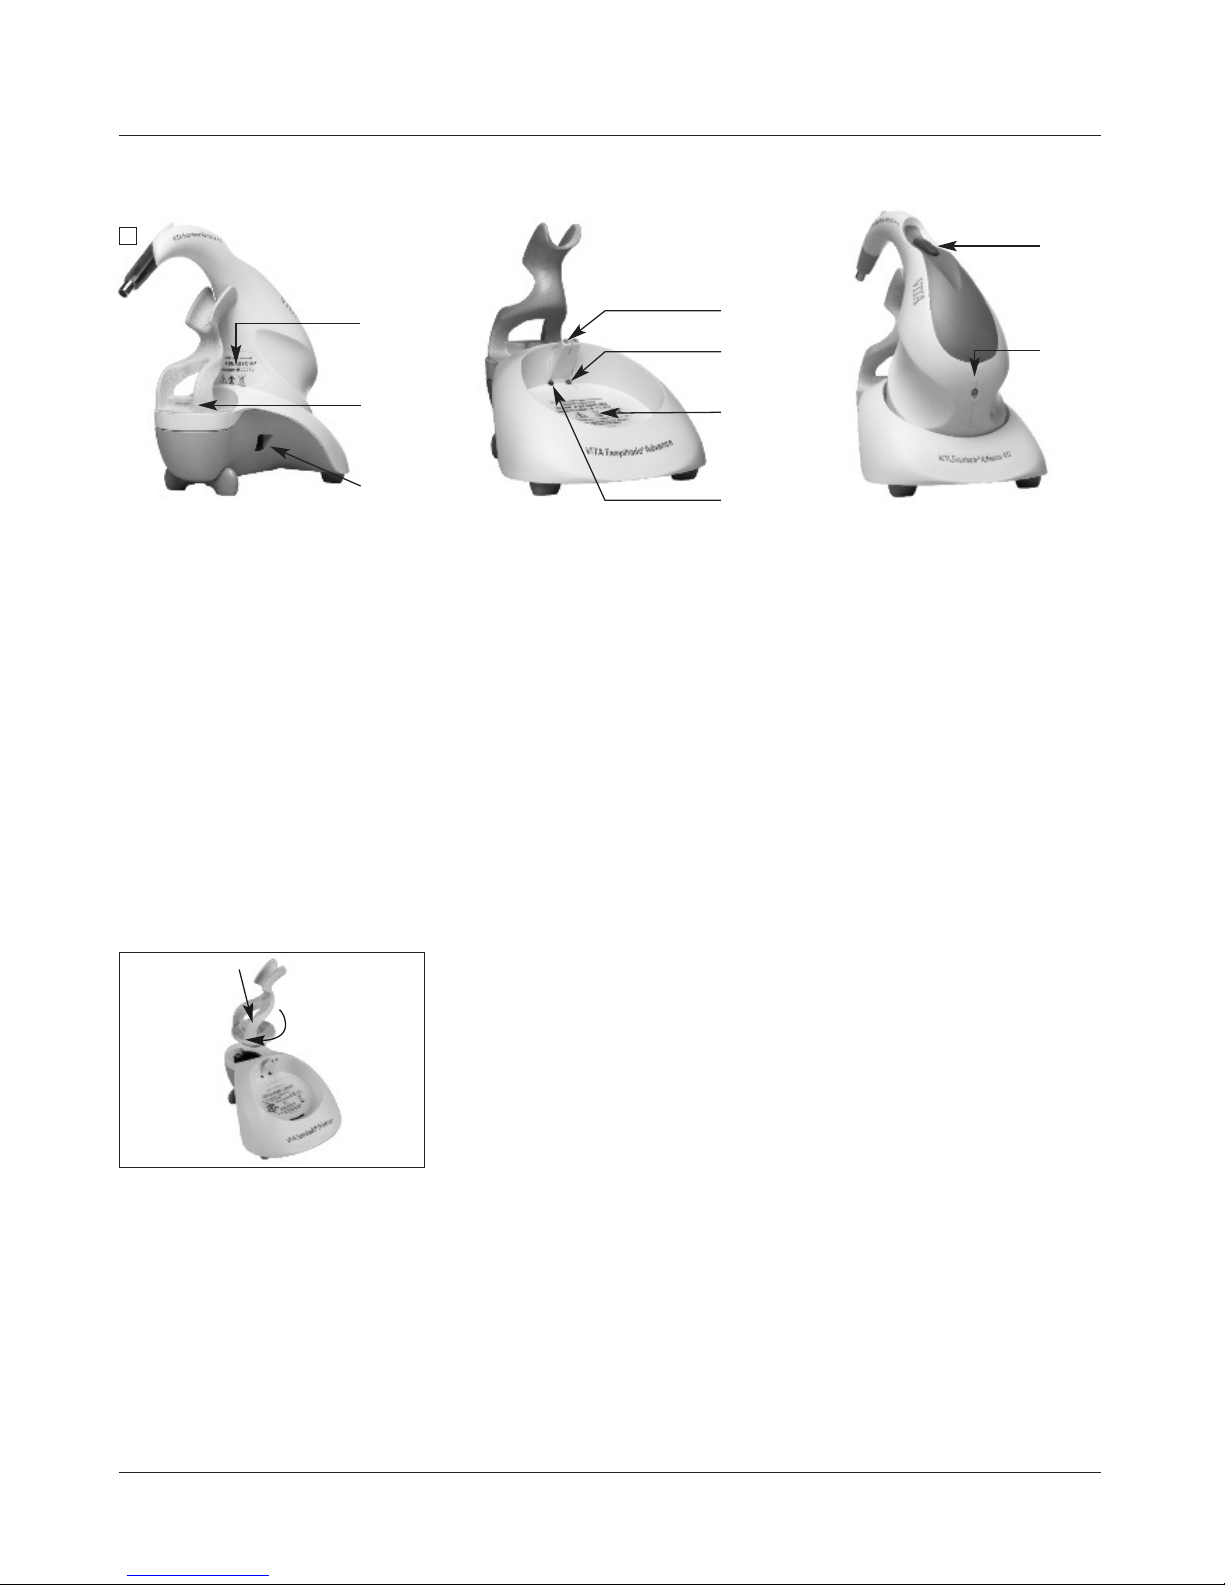
1
2
VITA Easyshade®Advance 4.0
C
harging LED
i
ndicator light
Measurement
s
witch
Serial number
of base unit
IR LED for
a
utomatic
c
alibration
Charging pins
Power LED flashes green
Serial number
of calibration
b
lock holder
Serial number
o
f hand piece
Input for
power unit
into the base unit so that the battery charging port fits over
the charging pins. The green LED on the hand piece (charging
indicator for the battery) flashes after the instrument has
been connected to the power supply. Let the battery of the
hand piece charge for a minimum of five hours before initial
use.
Important:
The hand piece and the calibration holder will have
the same serial number (fig. 1); if not, contact VITA (Vident
for North America only) immediately. The base unit has
a different serial number.
1.3 System setup
Open the packaging of VITA Easyshade Advance 4.0 and
remove the Quick Guide, the CD-ROM containing the
Operating Instructions and VITA ShadeAssist, the Easyshade
Advance 4.0 hand piece, base unit, the calibration block holder and power supply. Attach the calibration block holder as
shown in fig. 2. The green power LED flashes on the base
unit once the power supply is connected to the wall electrical outlet with a suitable adapter. Place the base unit on a
flat surface. Insert the Easyshade Advance 4.0 hand piece
Getting started
8
3
4
VITA Easyshade®Advance 4.0
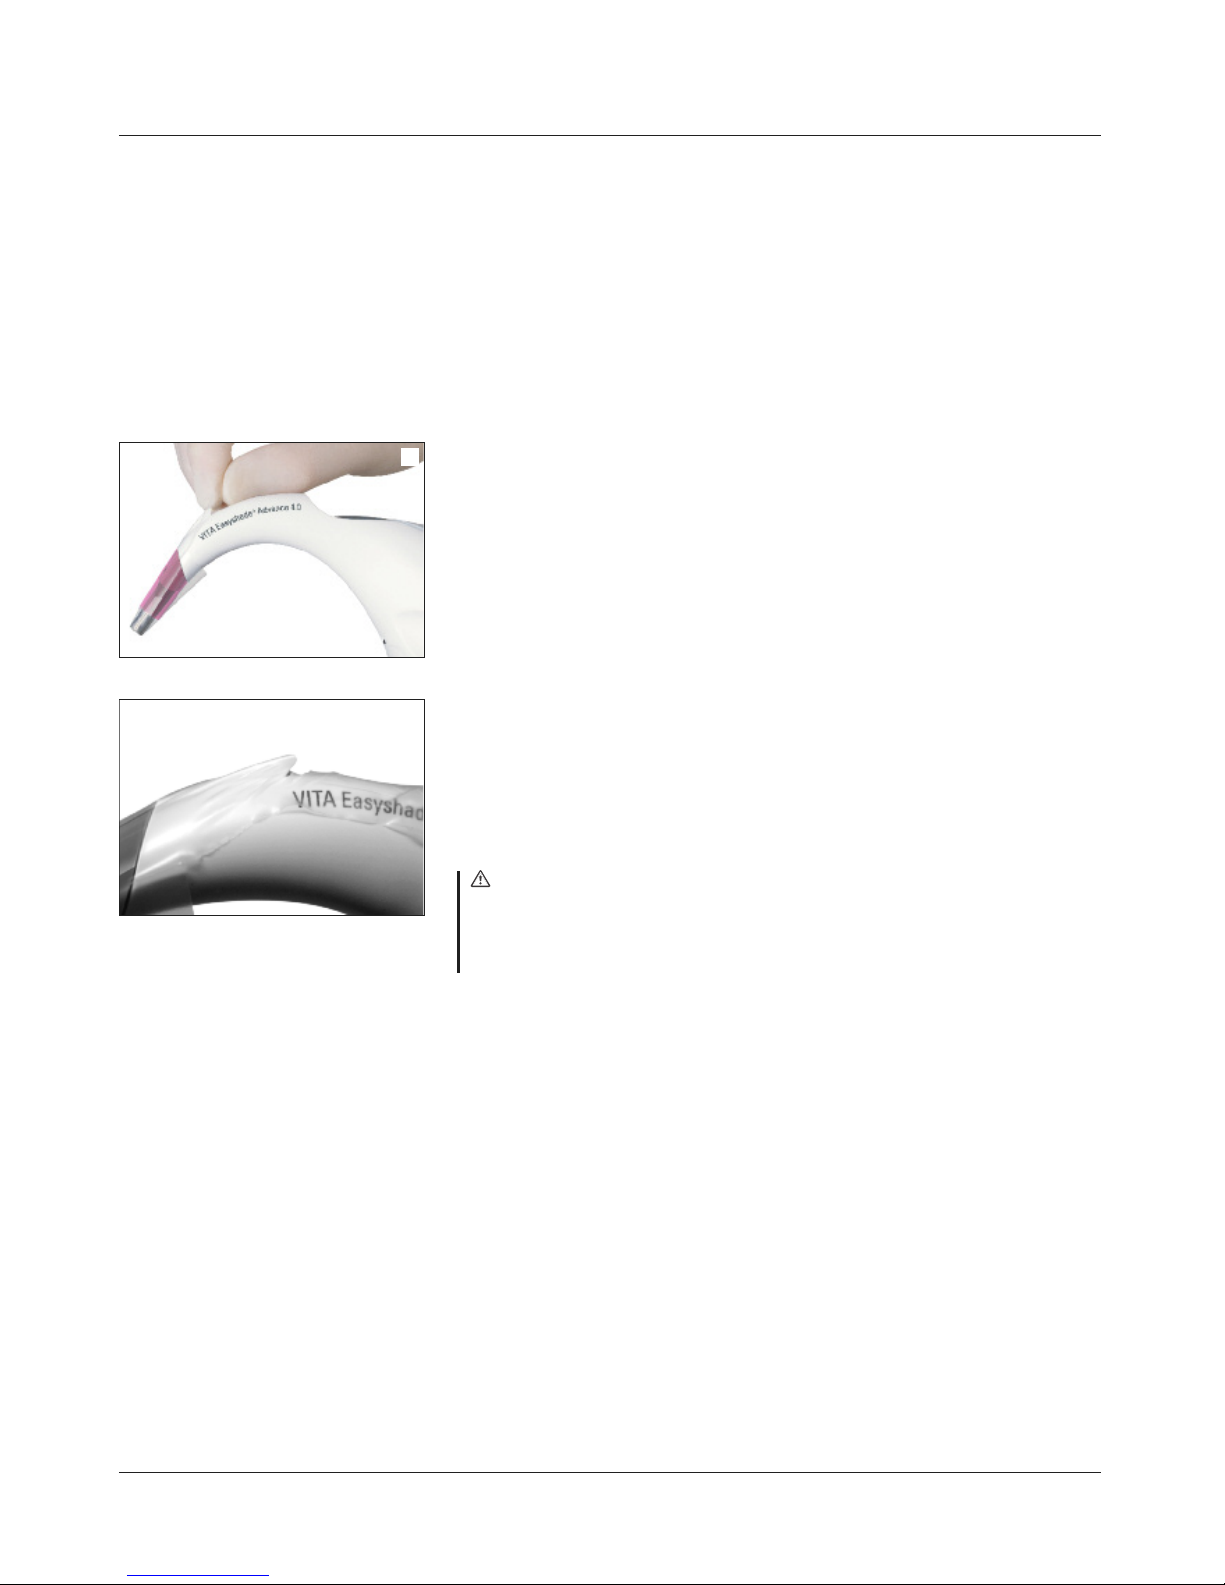
1.4 Applying an infection control shield.
It is important to properly clean and disinfect the instrument between patient
uses and to use a new Easyshade infection control shield for each patient
to prevent patient cross-contamination.
The infection control shield also protects the fiber optics in the instrument
from damage.
1. Insert the tip of the hand piece into the shield
2. Remove paper backing from the shield
3. Pull shield carefully over the hook
4. Secure shield on the hook
Verify that the infection control shield is stretched uniformly
and flat over the face of the probe tip, and is not torn
during application (fig. 3+4).
Then calibrate the instrument as described in section 1.6.
The infection control shield should remain in place for all
measurements with the same patient.
These non-sterile covers are for single patient use only and should
be properly disposed of.
Note: An infection control shield that has come into contact
with a patient must not contact the calibration block assembly.
If contact occurs, follow the instructions for cleaning and
disinfection of the calibration block assembly in section 11.
Getting started
9
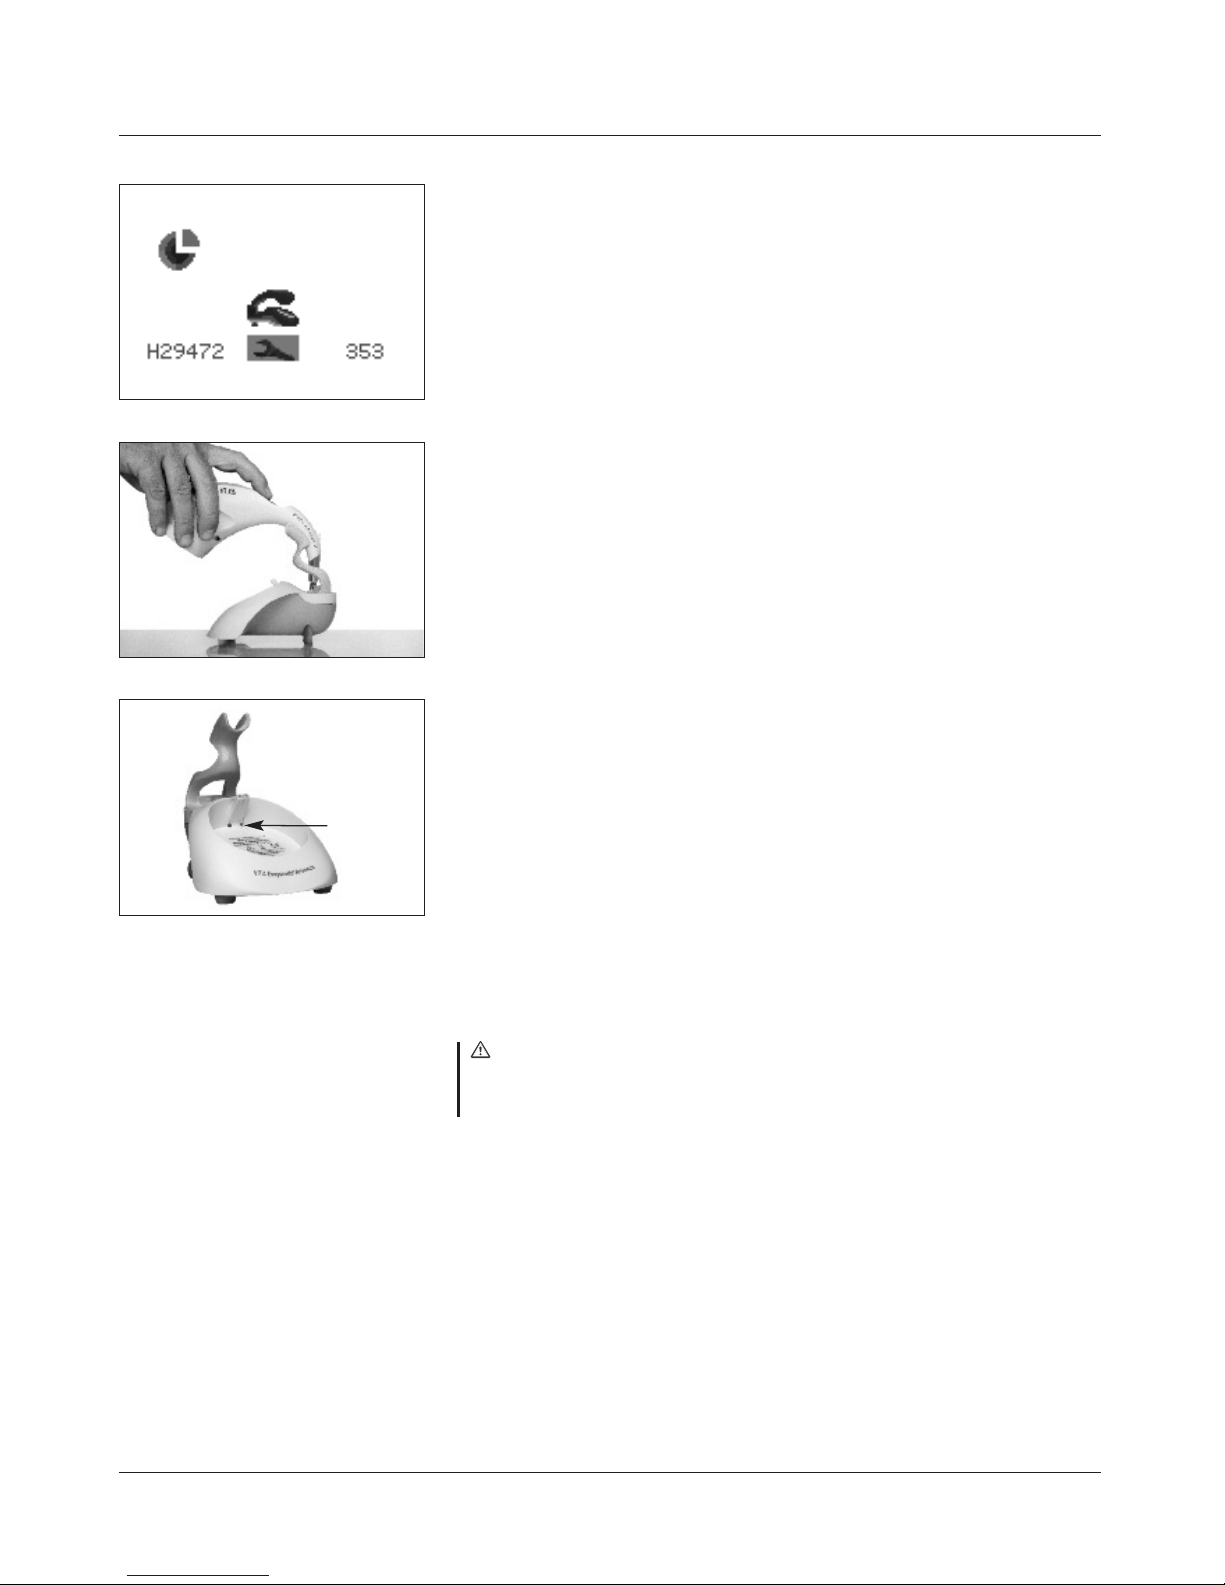
6
7
5
VITA Easyshade®Advance 4.0
Green LED
1.5 Power-on
Turn on the VITA Easyshade Advance 4.0 by pressing and holding any button
on the handpiece for at least two seconds.
1.6 Calibration
The unit may only be calibrated with a new anti-infection cover in order
to prevent patient to patient cross-contamination.
1.6.1 Automatic calibration
If the base unit is connected to a power source, the calibration procedure
is carried out automatically.
Place the instrument in the calibration block holder so that the probe tip
is flush with and perpendicular to the calibration block and depresses
the calibration block (fig. 6). Make sure that the hand piece is fully seated
in the calibration holder. Do not press the measurement switch when the unit
is calibrated automatically.
A green LED in the center of the base unit is lit and shortly afterwards
the hand piece probe will illuminate the calibration block (fig. 7).
Initial calibration may take a few seconds after the unit is switched on.
Two short beeps indicate completion of calibration.
Note: Before carrying out any measurement, the unit must
be calibrated. If power is not available to the base unit,
the unit must be calibrated manually (section 1.6.2).
Getting started
10
9
10
8
VITA Easyshade®Advance 4.0
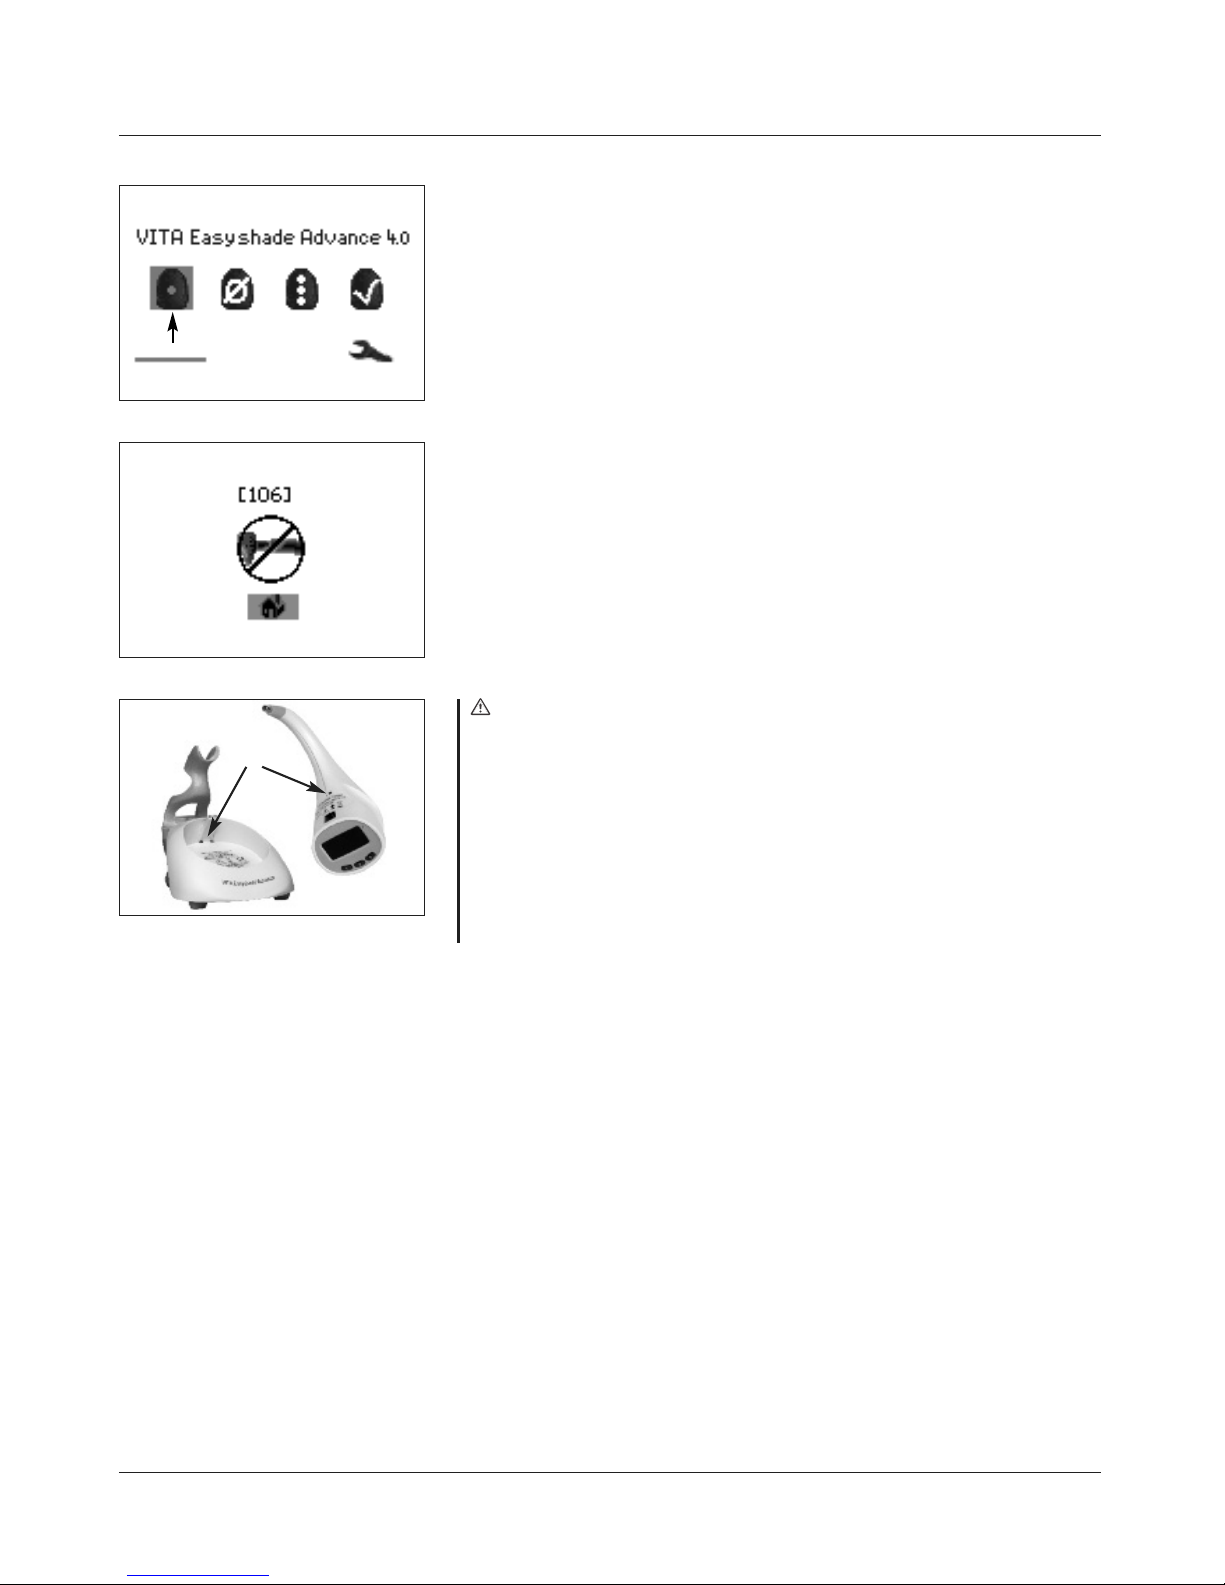
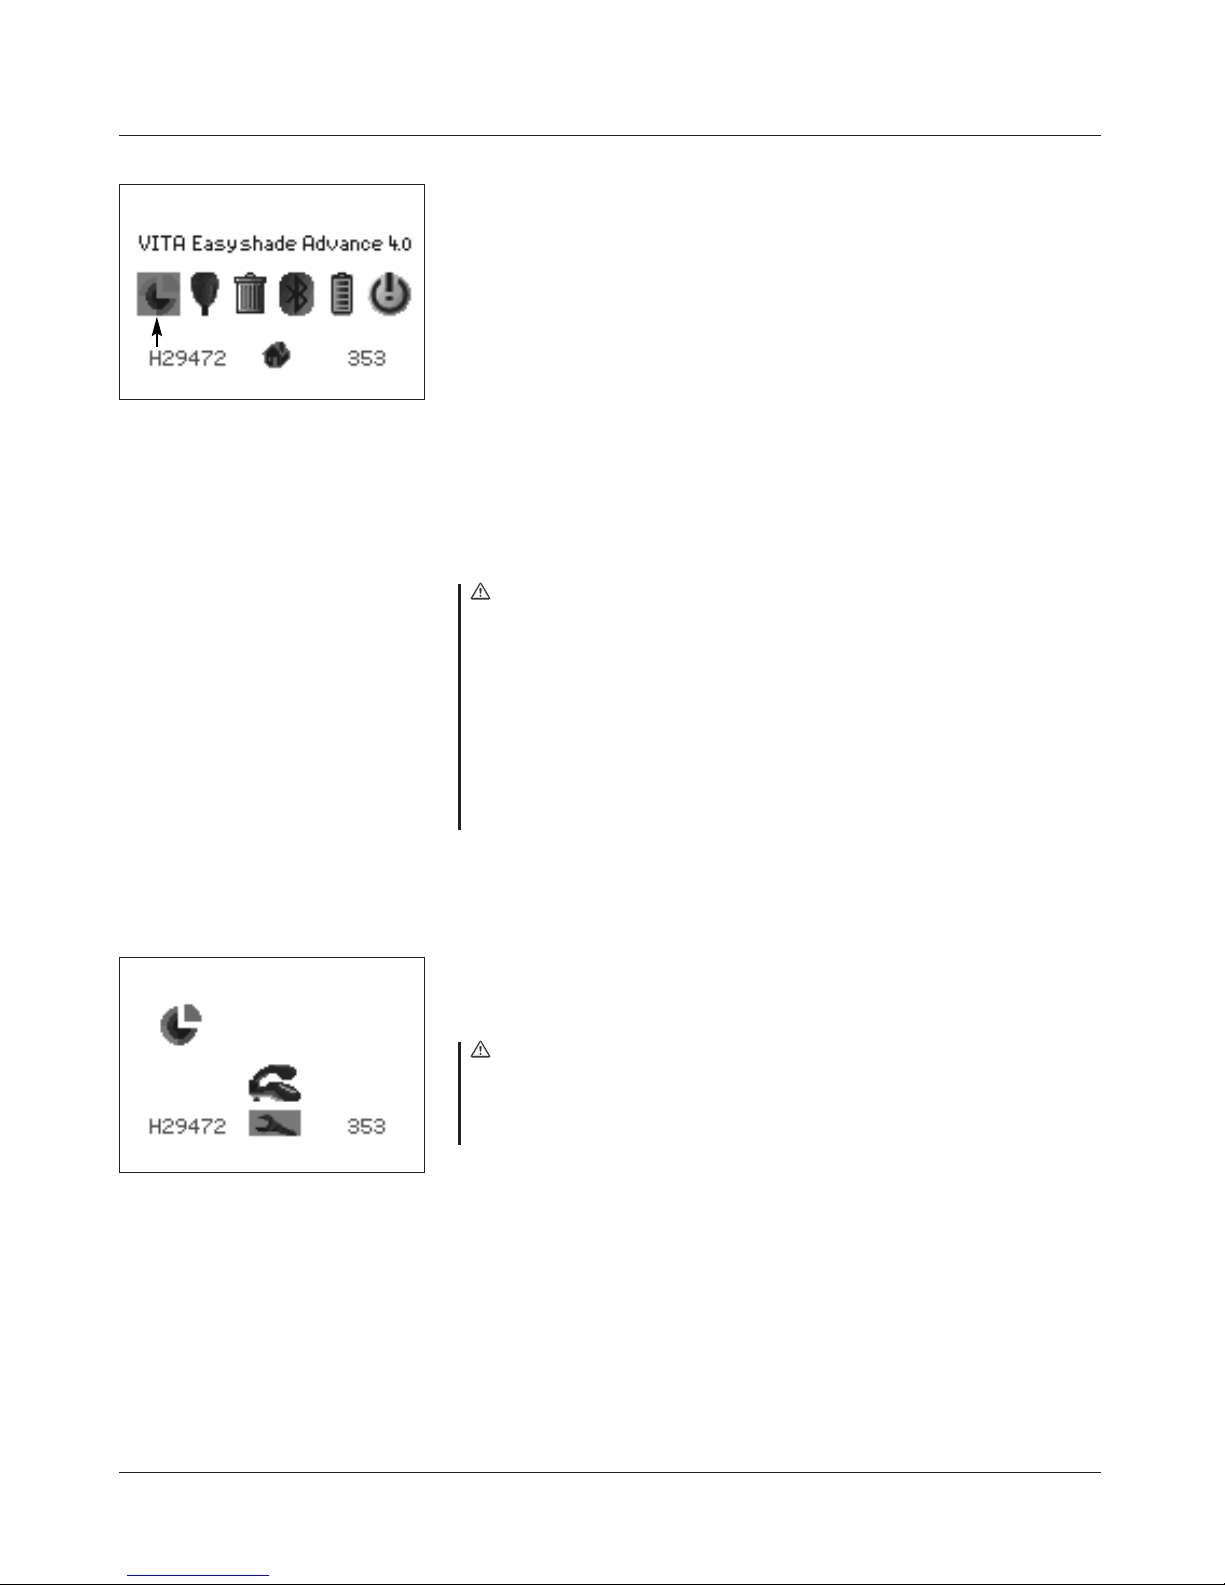
After successful calibration, the measurement menu is displayed (fig. 8)
and the unit is ready for use. The measurement mode used last is highlighted and activated after pressing the Select key.
If a single "beep" sounds, an error message is displayed
on the screen as shown (fig. 9).
Calibration has failed and must be repeated (see section 12.2).
Note: Make sure not to block the IR ports above the labels
located on the hand piece and the base unit (see IR ports, fig.10).
Avoid placing the base unit in the vicinity of a powerful infrared
light source (such as sunlight or an incandescent light),
which may interfere with the signal transmission between
the base unit and the hand piece.
During automatic calibration, do not press the measurement button.
Getting started
IR Port
11
13
12
11
VITA Easyshade®Advance 4.0
1.6.2 Manual calibration
The instrument can also be calibrated when a power source is not available for
the base unit (the green Power LED is not flashing). For this purpose select the
Calibration icon in the Settings menu (fig. 11), which you can access from the
Toolbar icon.
Place the hand piece in the calibration block holder and press the measurement
switch to activate the calibration procedure. The beeps indicate that the unit
has been calibrated successfully.
Note: VITA Easyshade Advance 4.0 is pre-calibrated at the factory for the
calibration block that is shipped with the instrument and may only be used
with this calibration block. If you own more than one VITA Easyshade
Advance 4.0, care must be taken not to switch calibration blocks between
VITA Easyshade Advance 4.0 units, which may adversely affect the accuracy
of measurements.
Make sure that the serial number on the hand piece matches the serial
number on the calibration block holder (see section 1.2).
1.6.3 Monitoring the calibration
Due to environmental changes or after repeated use, it may be necessary
to re-calibrate the instrument when performing repeated measurements.
The animated Calibration icon, as shown in figure 12, indicates that
the instrument must be re-calibrated.
Note: An anti-infection cover that has come into contact
with a patient must not contact the calibration block assembly.
If this occurs, follow the instructions for cleaning and disinfection
of the calibration block assembly in section 11.
If error No. 106 is displayed, the instrument must be re-calibrated.
Getting started
12
1
3
VITA Easyshade®Advance 4.0
Enter
b
utton
Arrow
buttons
D
isplay
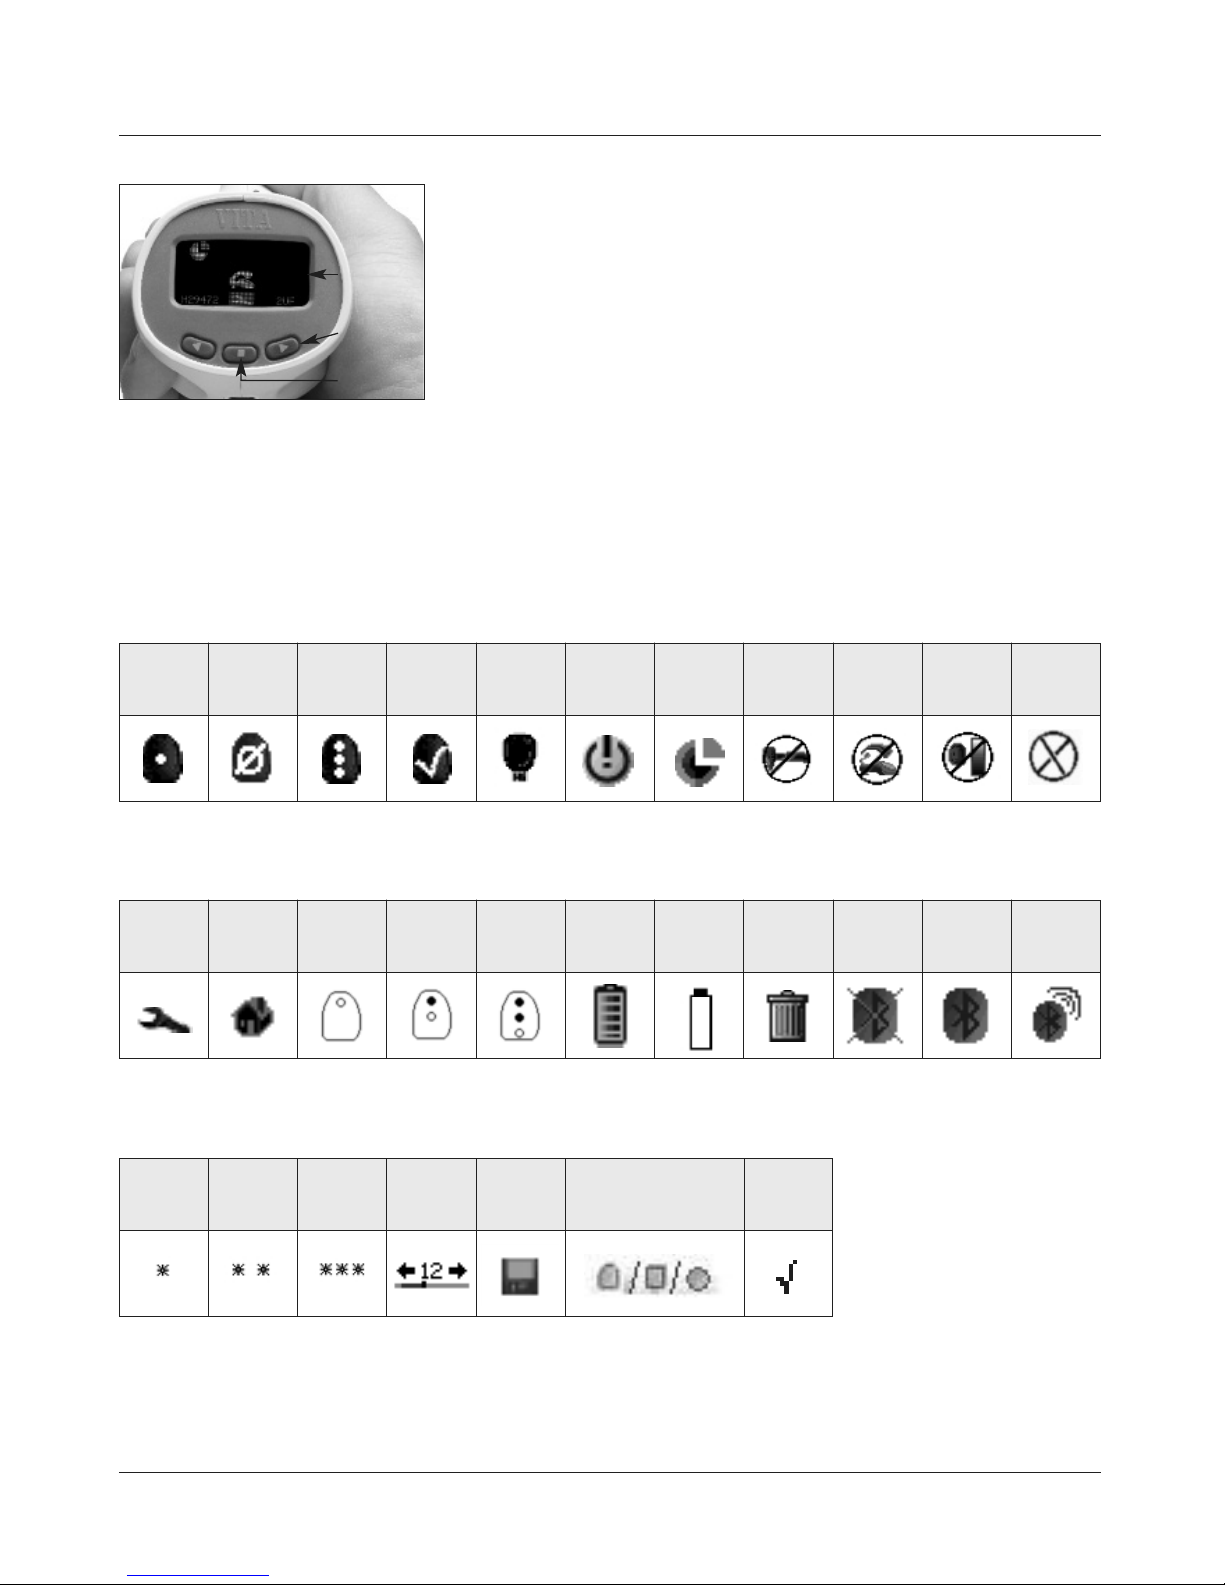
2 Menu navigation
The two arrow buttons located below the display (fig. 13)
move the cursor left or right respectively to navigate
the instrument’s menus.
Pressing the Enter button will select the highlighted icon.
Menu navigation
2.1 Tables of icons
Basic shade
measurement
Toolbar
Verify
restoration
Adjust
Averaged
measurement
Measurement
menu
Verify
restoration
Fair
Measurement
of tooth
areas
Measure
cervical
tooth area
Verify
restoration
Good
Verify
restoration
Measure
central
tooth area
Recording
memory
Shade tab
Measure
incisal
tooth area
Save User
standard
Off
Battery fully
charged
VITA Tooth shades,
VITA Block shades,
Bleached shade
Measure-
ment
failed
Recycle bin
Calibration
failed
Bluetooth
off
BluetoothonBluetooth
connected
Shade
match
failed
General
error
Calibration
Battery
empty
 Loading...