


VisuNet XT
9700 Series
PROCESS AUTOMATION
USER MANUAL

With regard to the supply of products, the current issue of the following document is ap-
plicable: The General Terms of Delivery for Products and Services of the Electrical Indu-
stry, published by the Central Association of the Electrical Industry (Zentralverband
Elektrotechnik und Elektroindustrie (ZVEI) e.V.) in its most recent version as well as the
supplementary clause: "Expanded reservation of proprietorship"
VisuNet XT 9700 Series

VisuNet XT 9700 Series
1
1 Safety ....................................................................................... 5
1.1 Validity .............................................................................................. 5
1.2 Symbols Used ................................................................................. 5
1.3 Target Group/Personnel ................................................................. 5
1.4 Reference Documentation .............................................................. 5
1.5 Delivery, Transport, and Storage ................................................... 6
1.6 Marking ............................................................................................ 6
1.7 Intended Use ................................................................................... 6
1.8 Warnings and Cautions .................................................................. 7
1.9 Disposal ........................................................................................... 7
2 Introduction ............................................................................. 9
2.1 Certification ..................................................................................... 9
3 Product Description ............................................................. 11
3.1 General Overview .......................................................................... 11
3.2 Component Overview ................................................................... 12
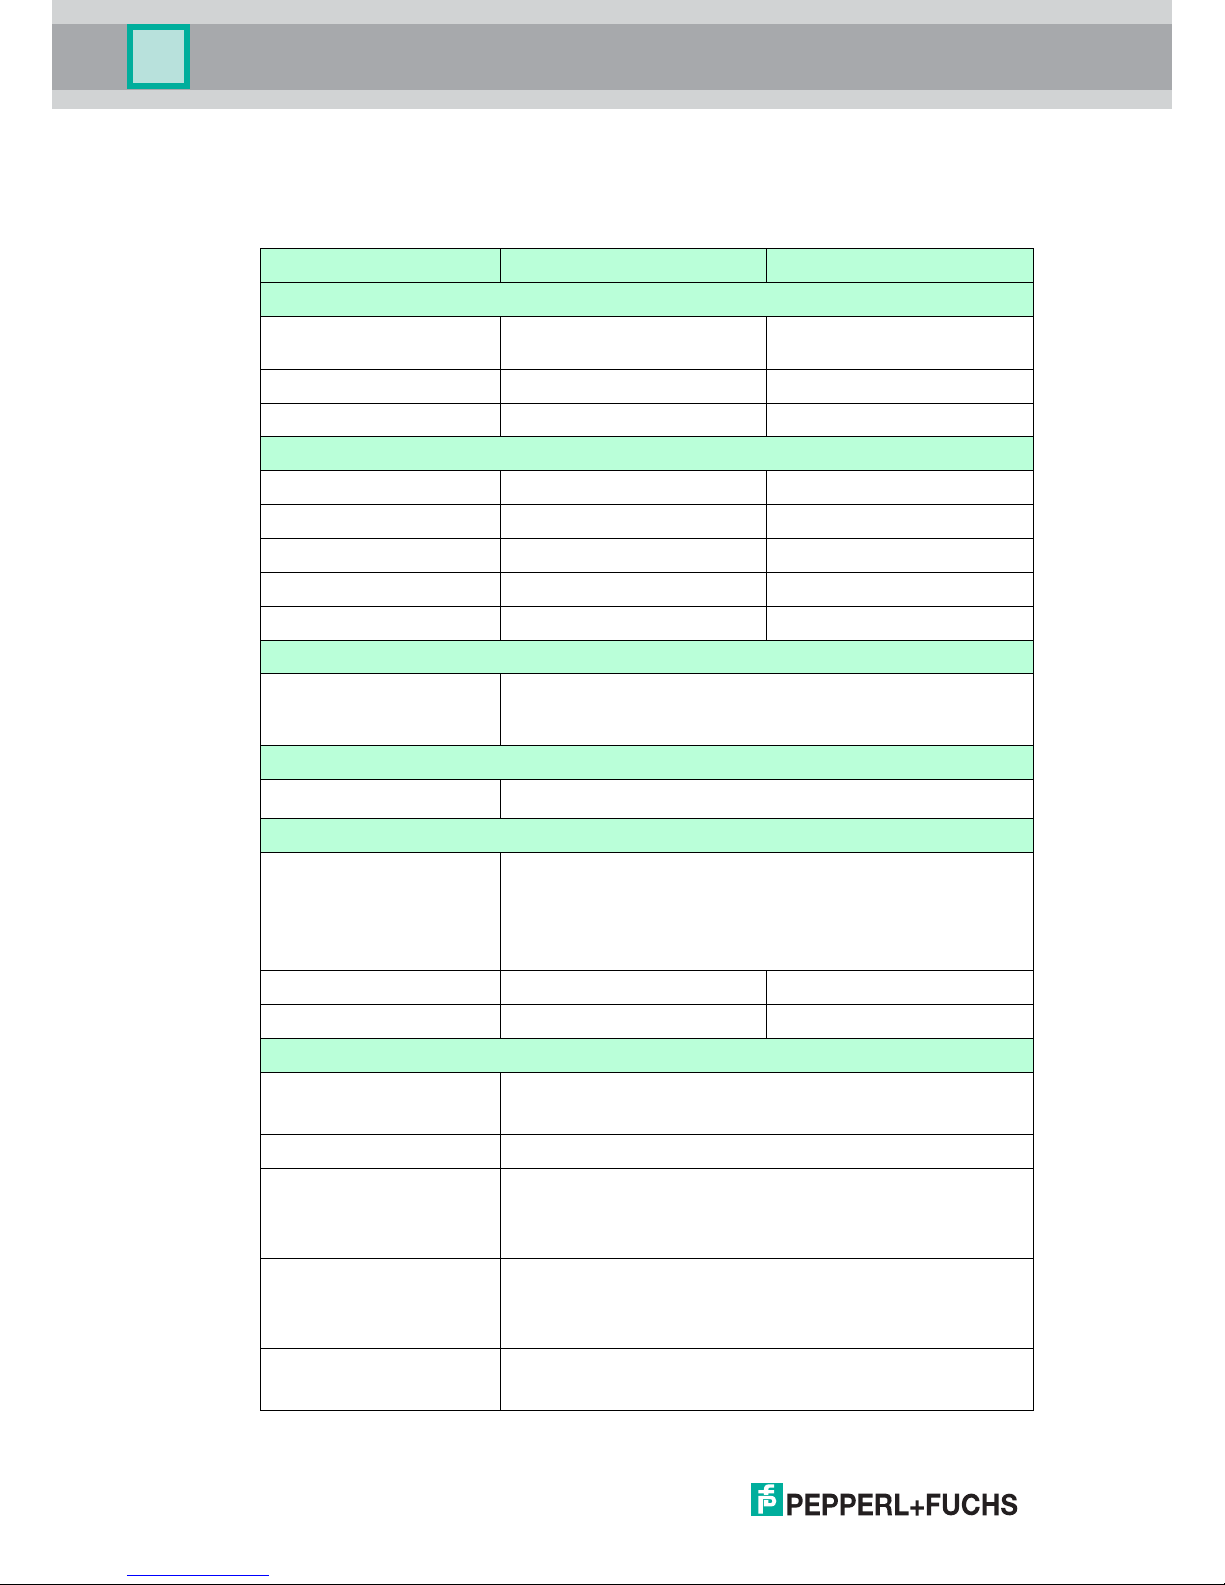
3.3 Specifications ................................................................................ 14
3.4 Agency Markings, Standards, and Certifications ...................... 15
3.4.1 UL ............................................................................................... 15
3.4.2 ATEX ........................................................................................... 16
3.4.3 IEC and IECEX ............................................................................ 16
3.4.4 FCC ............................................................................................ 17
4 Hardware Installation ........................................................... 19
4.1 General Warnings .......................................................................... 19
4.2 Mounting the VisuNet XT .............................................................. 19
4.2.1 Selecting a Mounting Location .................................................... 19
4.2.2 Mounting Options ........................................................................ 19

2
VisuNet XT 9700 Series
5 Connectors and Cabling ...................................................... 27
5.1 Junction Box ..................................................................................27
5.1.1 With Quick Disconnects and Cable Glands ................................. 27
5.1.2 With Cable Glands ...................................................................... 28
5.1.3 Removing the Junction Box ......................................................... 28
5.1.4 Routing Cables Through the Junction Box .................................. 28
5.1.5 Installing the Junction Box ...........................................................28
5.2 I/O Plates ........................................................................................29
5.2.1 X1 - Power ................................................................................... 30
5.2.2 X2 - USB 2.0 (x2) ........................................................................ 31
5.2.3 Rear non-incendive/intrinsically safe USB (optional) ................... 31
5.2.4 X3 - Serial Port (RS232) .............................................................. 31
5.2.5 X4 - Digital In/Out (I/O) ................................................................ 31
5.2.6 X5 - Serial Port (RS485) .............................................................. 32
5.2.7 X6 - Audio In/Out (I/O) ................................................................. 32
5.2.8 X7 - VGA .....................................................................................32
5.2.9 X8 - LAN ...................................................................................... 32
5.2.10 X9 - LAN/Fiber ............................................................................. 33
5.2.11 Fuses ...........................................................................................34
5.2.12 Blanking Plugs ............................................................................. 34
5.2.13 Front non-incendive/intrinsically safe USB (optional) ................... 35
5.3 External Grounding ....................................................................... 35
5.4 SD Card Reader Option .................................................................36
6 Calibration and Operation ................................................... 37
6.1 Touch Screen Interface .................................................................37
6.1.1 Introduction ................................................................................. 37
6.1.2 Touch Screen Calibration ............................................................ 37
6.2 Membrane Keypads .......................................................................39
6.2.1 System Power Up with Heaters ................................................... 40
6.2.2 Keypad Disable ............................................................... /Enable 40
6.2.3 Heater Fault ................................................................................. 41
6.2.4 Computer Fault ............................................................................ 41
6.3 LED Quick Reference Guide .........................................................42

VisuNet XT 9700 Series
3
7 Field Maintenance and Repair ............................................. 43
7.1 Inspection ...................................................................................... 43
7.2 Field Serviceable Components ................................................... 43
7.2.1 AC Power Supply Removal and Replacement
43
7.2.2 DC Power Supply Removal and Replacement ............................ 48
7.2.3 Solid-State Drive (SSD) Removal and Replacement
53
7.2.4 Fuse Replacement ...................................................................... 56
8 Replacement Parts ............................................................... 57
8.1 I/O Panel Connectors .................................................................... 57
8.2 Fuses .............................................................................................. 57
8.3 Solid State Drive (SSD) ................................................................. 57
8.4 Power Supply ................................................................................. 57
9 Appendix ............................................................................... 59
9.1 Factory Restore Guide .................................................................. 59
9.1.1 Method A .................................................................................... 59
9.1.2 Method B .................................................................................... 64
9.2 Digital I/O Setting .......................................................................... 68
10 Glossary ................................................................................ 77

4
VisuNet XT 9700 Series
THIS PAGE IS INTENTIONALLY LEFT BLANK
VisuNet XT 9700 Series
Safety
VisuNet XT 9700 Series
5
1Safety
1.1 Validity
This document contains information that you must read for your own personal safety and to
avoid property damage. Depending on the hazard category, the warning signs are displayed in
descending order as follows:
1.2 Symbols Used
Safety Symbols
Informative Symbols
Action
This symbol indicates a paragraph with instructions.
1.3 Target Group/Personnel
The system operator is responsible for planning, mounting, commissioning, operating, and
maintenance.
Assembly, commissioning, operation, maintenance, and disassembly of any device must be
performed by trained, qualified personnel only. The instruction manual must be read and
understood.
1.4 Reference Documentation
Laws, standards, or directives applicable to the intended use must be observed. In relation to
hazardous areas, Directive 1999/92/EC must be observed.
The corresponding data sheets, Declarations of Conformity, EC type-examination certificates,
certificates and control drawings, if applicable (see data sheet), are an integral part of this
document. This information can be found at www.pepperl-fuchs.com.
Due to constant revisions, this documentation is subject to continual change. Please refer only
to the most up-to-date version at www.pepperl-fuchs.com.
Danger!
Danger notices emphasize that hazardous conditions may exist in the equipment, or may be
associated with its use. Failure to comply with danger notices may result in serious personal
injury or death.
Warning!
Warning notices indicate a warning about a possible fault or danger.
Failure to comply with warning may result in personal injury or equipment damage.
Caution!
Caution notices indicate a warning about a possible fault.
Ignoring the devices and any connected facilities or systems may cause interruption, or
complete failure of components or the entire system.
Note!
Notes call attention to information that is especially significant to understanding or operating
the diagnostic module.
VisuNet XT 9700 SEries
6
VisuNet XT 9700 Series
Safety
1.5 Delivery, Transport, and Storage
Check the packaging and contents for damage. Inform the shipper and contact the supplier if
any damage is found.
Make sure the item received is the correct item ordered. Contact Pepperl+Fuchs with
questions or concerns.
Keep the original packaging. Always store and transport the device in the original packaging.
Always store the device in a clean and dry environment. The permitted storage temperature
(see data sheet) must be considered.
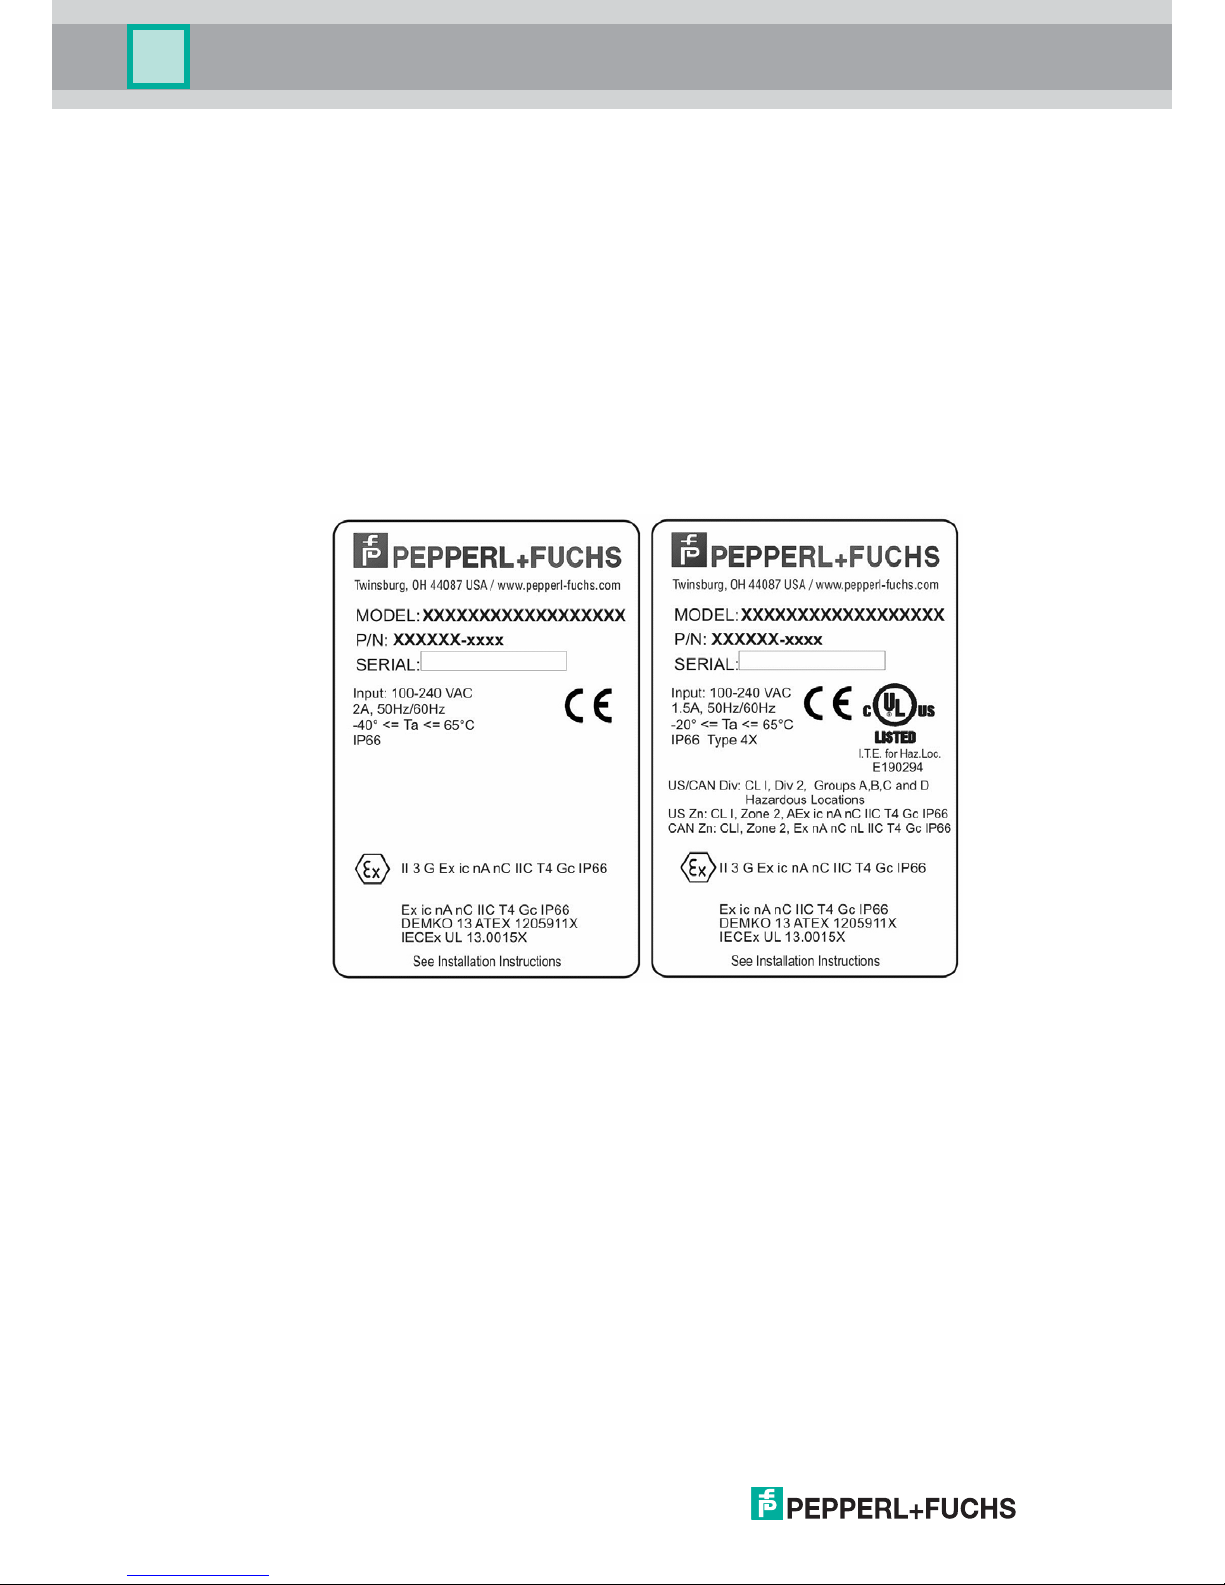
1.6 Marking
Examine the model number nameplate to identify the appropriate approvals, area
classification, and type, as shown in Figure 1.1.
Figure 1.1 XT Identification Labels: Zone 2 only ("L2") and
Dual rated Zone 2 & Class I/Div 2 ("W3")
1.7
Intended Use
The device is only approved for appropriate and intended use. Ignoring these instructions will
void any warranty and absolve the manufacturer from any liability.
The device must only be operated in the ambient temperature range and at the relative
humidity (non-condensing) specified.
Connect interfaces using shielded cables ONLY.
The lead data cable and power circuit line mus
t be in separate cable channels.
Check all cables and connectors before commissioning the system.
Wiring methods must be done in accordance with the authority having local jurisdiction.
Protection of the operating personnel and the overall system is not ensured if the product is not
being used according to its intended purpose.
Never expose LCD screen to direct sunlight. Always use protective sun shield.

VisuNet XT 9700 Series
Safety
VisuNet XT 9700 Series
7
For installations in a Restricted Access Location or equivalent, the user must comply with the
Restricted Access Location requirements of UL60950-1.
1.8 Warnings and Cautions
When so labeled, this equipment is suitable for use in Class I/Div 2, Groups A, B, C and D,
Class I/Zone 2, ATEX/IEC-Ex Zone 2 or non-hazardous locations only. Please consult local
electrical codes for hazardous location installation guidelines.
Power, input and output (I/O) wiring must be in accordance with Class I/Division 2 wiring
methods [Article 501.4(B) of the National Electrical Code, NFPA 70] and in accordance with
the authority having jurisdiction. The cabinet for installations in Division 2 must be suitable for
Division 2 wiring.
The Declaration of Conformity, Certificate of Compliance, and the data sheets are considered
an integral part of this user manual. The data sheets contain the electrical data of the
Declaration of Conformity and the Certificate of Compliance. Laws and/or regulations
governing the use or intended use must be observed.
1.9 Disposal
Disposing of devices, packaging material, and possibly contained batteries must be in
compliance with the applicable laws and guidelines of the respective country.
Warning!
EXPLOSION HAZARD - DO NOT DISCONNECT EQUIPMENT UNLESS POWER HAS BEEN
SWITCHED OFF OR THE AREA IS KNOWN TO BE NON-HAZARDOUS.
Warning!
EXPLOSION HAZARD - SUBSTITUTION OF COMPONENTS MAY IMPAIR SUITABILITY
FOR CLASS I / ZONE 2.
Warning!
EXPLOSION HAZARD - DO NOT OPEN OR REPAIR UNIT WHILE POWER IS CONNECTED.
Warning!
EXPLOSION HAZARD - ALL UNUSED CABLE GLANDS MUST HAVE A PROTECTIVE
BLANKING PLUG IN PLACE. Refer to Section 5.2.12.

VisuNet XT 9700 SEries
8
VisuNet XT 9700 Series
Safety
THIS PAGE IS INTENTIONALLY LEFT BLANK

VisuNet XT 9700 Series
Introduction
VisuNet XT 9700 Series
9
2Introduction
The VisuNet XT-9700 Series is a self-contained, Windows®-based personal computer with a
built-in hardened, resistive touch screen and front keypad overlay designed primarily for use in
hazardous and harsh environments.
The unit is housed in a rugged, cast aluminum alloy enclosure (Type 4x/IP66) to protect the
system against dust, water, and damage.
VisuNet XT computers are available as either 24 V DC units that accept a range of 18 ... 30 V
DC, or as 115/230 V AC units that accept a range of 100 ... 240 V AC. VisuNet XT computers
provide an enhanced feature set including configurable heaters for extended temperature
operation and a front keypad overlay. The unit is supplied completely assembled and requires
only mounting and connecting.
2.1 Certification
The VisuNet XT-9700 series is ATEX and IECEx certified for Zone 2, as well as UL Class I/Div 2
and AEx Class I/Zone 2 environments. See Section 3.4 for a complete list of agency markings,
standards, and certifications.

VisuNet XT 9700 Series
10
VisuNet XT 9700 Series
Introduction
THIS PAGE IS INTENTIONALLY LEFT BLANK

VisuNet XT 9700 Series
Product Description
VisuNet XT 9700 Series
11
3
3.1
Product Description
General Overview
The VisuNet XT product family is a series of extremely rugged, PC-based operator
workstations for the oil and gas industry based on an Type 4X/IP66 rated, impact-esistant cast
aluminum housing.
The VisuNet XT PC9700 series features either a high bright 15 inch or 19 inch TFT LED-backlit
LCD display. Both models come with a 5-wire hardened resistive touch screen. The PC9700
is
available as either a Class I/Division 2 or a ATEX/IECEx Zone 2 rated device.
The key component of the PC9700 is the powerful Intel® i7 quad core processor, running the
Windows® 7 Ultimate operating system with the option of a 32-bit or 64-bit system.
The following options are available.
■ Multi-mode fiber optic LAN option.
■ Intel
®
i7 Quad Core or Celeron processor options.
■ 120 GB SSD (Solid state Drive).
■ Windows
®
7 Ultimate (32-bit or 64-bit).
■ Up to 8 GB RAM.
■ Wireless Ethernet IEEE 802.11a/b/g/n.
■ Complete fanless design.
■ Heater option for -40° C (-40° F) operation.
■ 100 ... 240 VAC, 50-60 Hz, 18 ... 30 VDC.
■ Three mounting options: VESA mount, yoke mount, or panel mount.
■ NEMA 4X and IP66 rated.
■ Class I/Division 2, Class I/Zone 2, ATEX Zone 2, IECEx Zone 2
VisuNet XT 9700 Series
12
VisuNet XT 9700 Series
Product Description
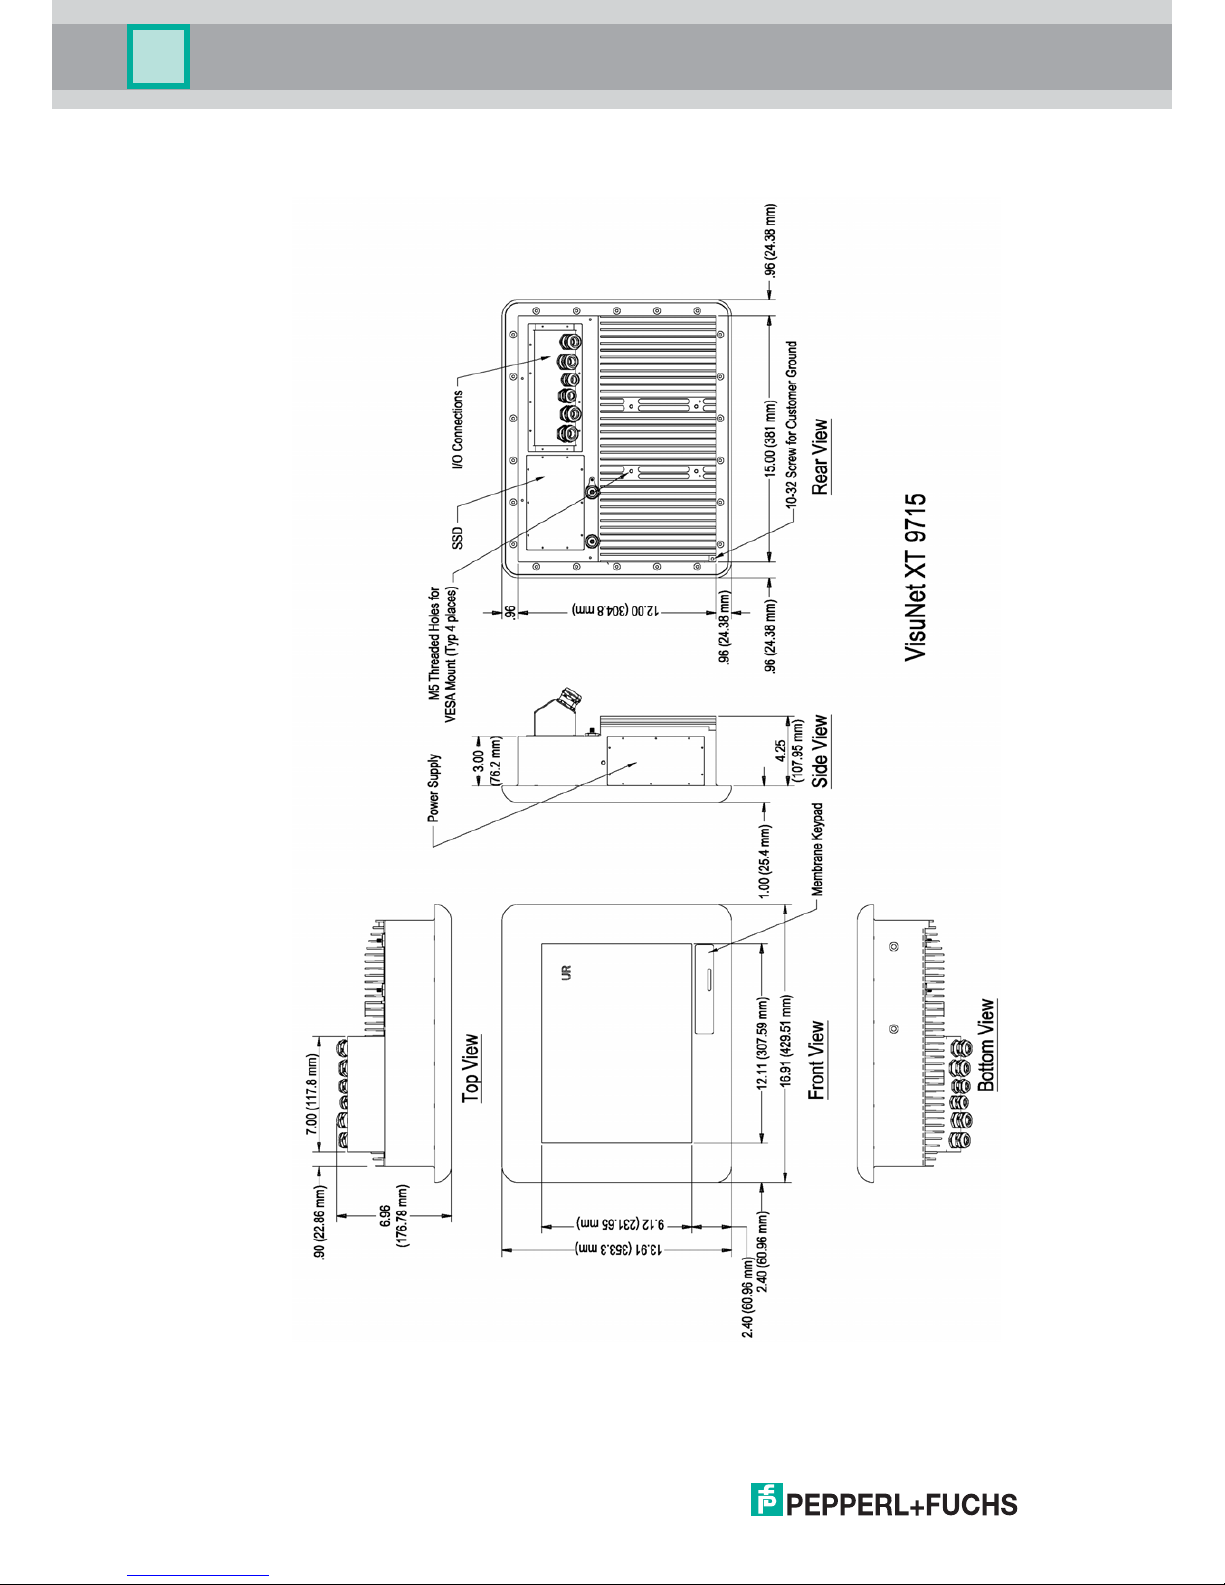
3.2 Component Overview
Figure 3.1 VisuNet XT 9715
VisuNet XT 9700 Series
Product Description
VisuNet XT 9700 Series
13
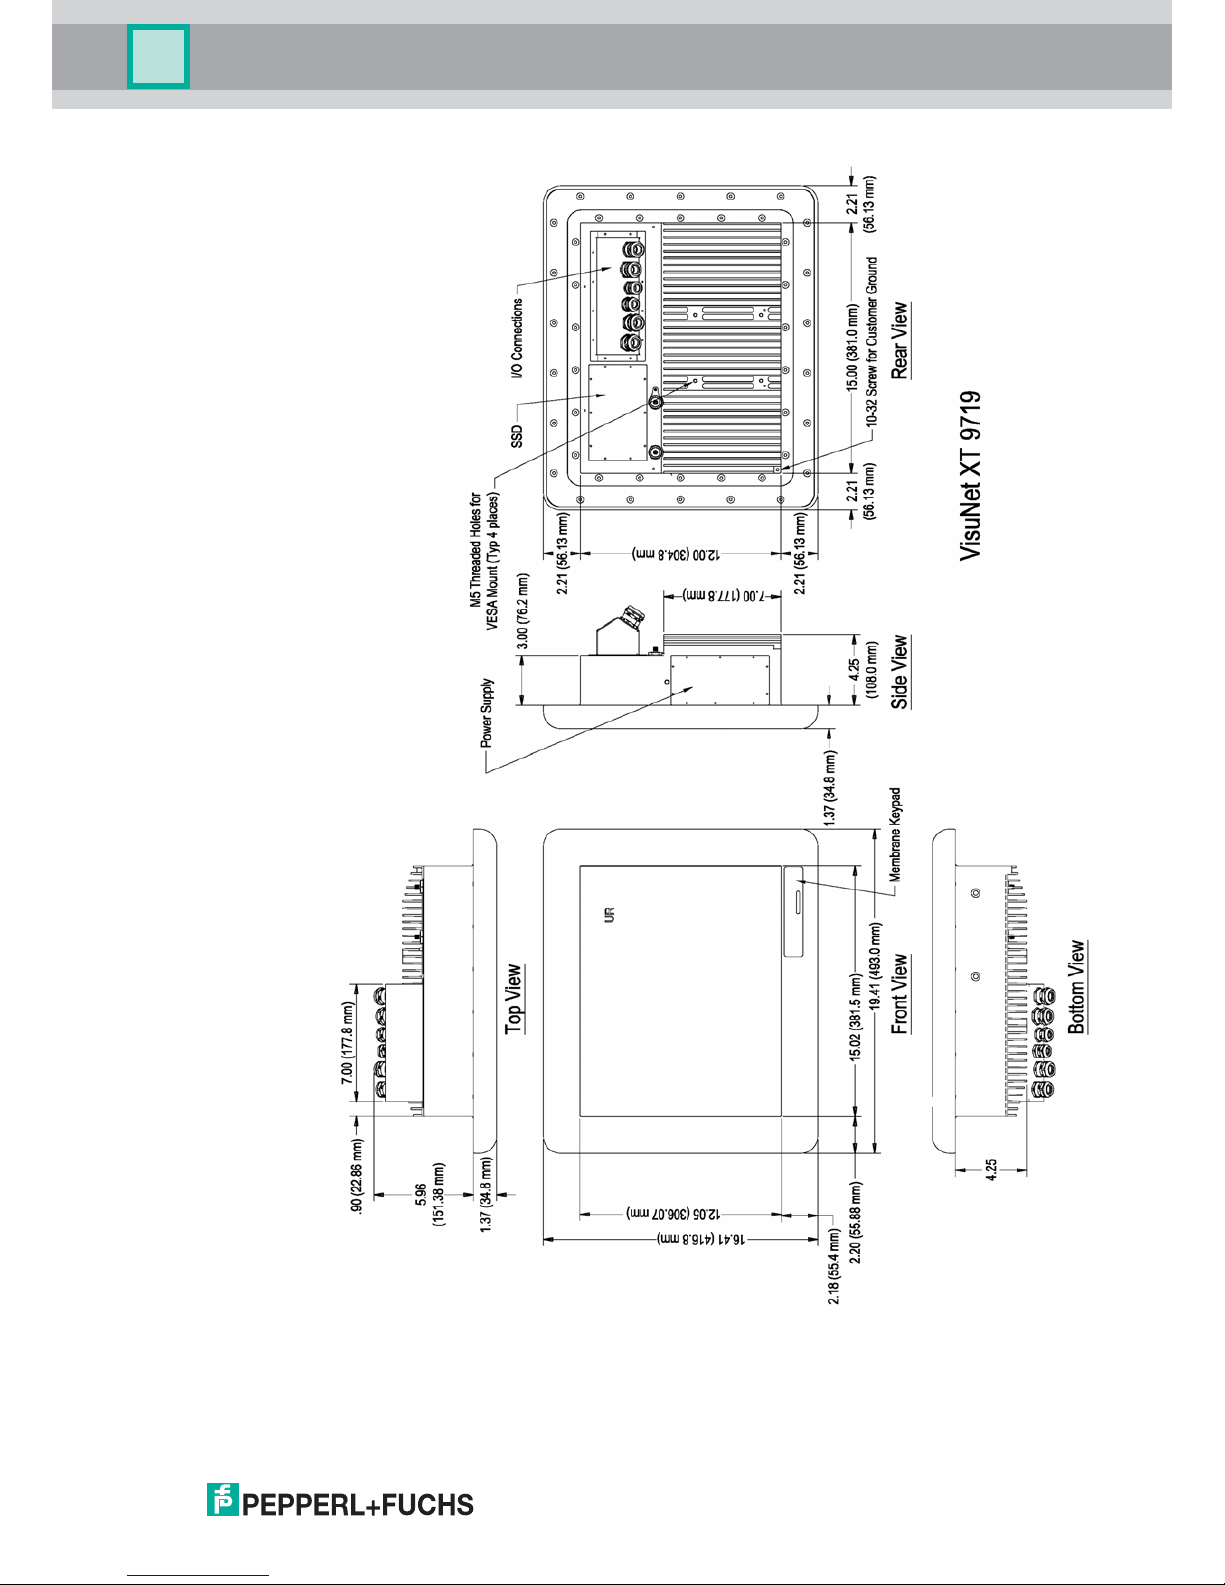
Figure 3.2 VisuNet XT 9719
VisuNet XT 9700 Series
14
VisuNet XT 9700 Series
Product Description
3.3 Specifications
Table 3.1 General Specifications
Type XT 9715 XT 9719
Hardware
Processor Intel i7 quad core processor,
2.2 GHz / Celeron 1.6 GHz
Intel i7 quad core processor,
2.2 GHz / Celeron 1.6 GHz
RAM 4 GB/8 GB 4 GB/8 GB
Hard Disk/SSD 120 GB SSD 120 GB SSD
Display
Type TFD, LCD TFD, LCD
Screen Diagonal 15 inches 19 inches
Resolution 768 x 1024 pixels 1280 x 1024 pixels
Contrast 800:1 800:1
Brightness Sunlight readable Sunlight readable
I/O
Interface Type 1 x RS232, 1 x RS485, 2 x USB, 2 x LAN, 1 x VGA,
1 x audio out, 1 x audio in, 2 x ST-fiber (when fiber option is
selected), 1 x DI, 1 x DO
Software
Operating System
Microsoft Windows
®
7 Ultimate, 32-bit or 64-bit
Electrical Specifications
Power Supply AC: 100 ... 240 VAC, 56 ... 60 Hz, 1.5 A Max.
AC with Heater: 100 ... 240 VAC, 50 ... 60 Hz, 4 A Max.
DC: 18 ... 30 VDC
DC with heater: 10 ... 30 VDC, 20 A Max.
Power Consumption 100 W Max 125 W Max
Electrical Isolation (I/O’s) 1.5 Kv 1.5 Kv
Ambient Conditions
Operating Temperature -20 °C ... +65 °C (-4 °F... +149 °F
)
-40 °C ...
+65 °C (-40 °F... +149 °F) with heater
Storage Temperature -40 °C ... +70 °C (-40 °F... +158
°F)
Vi
bration Resistance MTL-STD-810G
Operational: 2.2G RMS, 20-2000 Hz, 1 hr per axis
Storage: 3.1G RMS, 20-2000 Hz, 1 hr per axis
Shock Resistance MTL-STD-810G
Operational: 40G peak, 11ms, 3-axis
Storage: 40G peak, 11ms, 3-axis
Humidity 0 ... 95 % non-condensing
VisuNet XT 9700 Series
Product Description
VisuNet XT 9700 Series
15
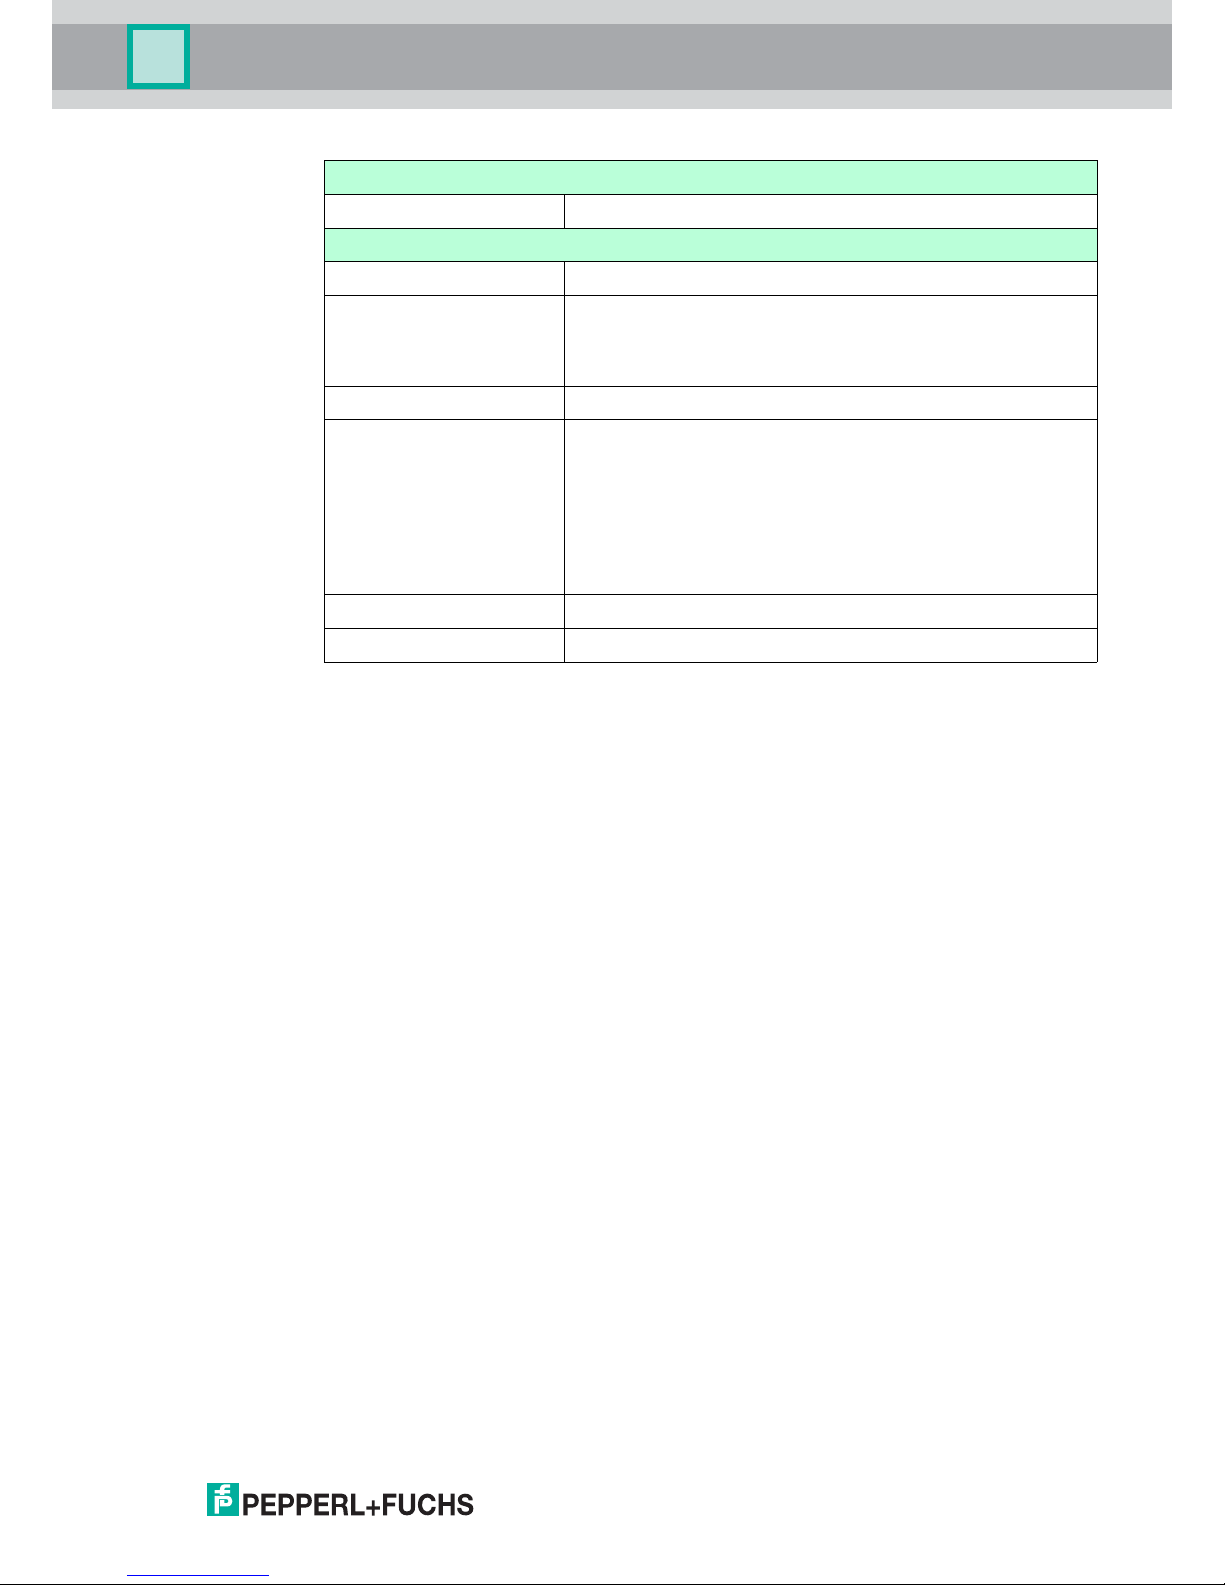
3.4 Agency Markings, Standards, and Certifications
3.4.1 UL
USA
UL 60950-1 (2ND EDITION + AMENDMENT 1) - INFORMATION TECHNOLOGY
EQUIPMENT - SAFETY - PART 1: GENERAL REQUIREMENTS - Edition 2 - Revision Date
2011/12/19 UL 60950-22 - INFORMATION TECHNOLOGY EQUIPMENT - SAFETY - PART
22: EQUIPMENT TO BE INSTALLED OUTDOORS - Edition 1 - Revision Date 2011/12/19.
Canada
CSA C22.2 NO. 60950-1-07 (2ND EDITION + AMENDMENT 1) - INFORMATION
TECHNOLOGY EQUIPMENT SAFETY PART 1: GENERAL REQUIREMENTS - Edition 2 Revision Date 2011/12/19 CSA C22.2 NO. 60950-22-07 - INFORMATION TECHNOLOGY
EQUIPMENT - SAFETY - PART 22: EQUIPMENT TO BE INSTALLED OUTDOORS - Edition 1
-
Revision Date 2011/12/01.
Products designated USL have been investigated using requirements contained in:
ANSI/ISA-12.12.01-2012, Nonincendive Electrical Equipment for Use in Class I and II, Division
2 and Class III, Division 1 and 2 Hazardous (Classified) Locations, dated 2012-07-09. UL
60079-0, 5th Edition, Explosive atmospheres - Part 0: Equipment - General Requirements,
dated 2009-10-21. UL 60079-11, 6th Edition, Explosive Atmospheres - Part 11: Equipment
Protection by Intrinsic Safety "i", dated 2013-02-15. UL 60079-15, 3rd Ed., Electrical Apparatus
for Explosive Gas Atmospheres - Part 15: Construction, Test and Marking of Type of
Protection "n" Electrical Apparatus, dated 2009-07-17. UL50, 12th Edition, Enclosures for
Electrical Equipment, Non-Environmental Considerations, dated 2007-09-04. UL50E, 1st
Edition, Enclosures for Electrical Equipment, Environmental Considerations, dated 2007-09-
04.
Products designated CNL have been investigated using requirements contained in:
C22.2 No. 213-M1987, Non-incendive Electrical Equipment for Use in Class I, Division 2
Hazardous Locations CAN/CSA C22.2 No. 60079-0:11, 2nd Edition, Explosive atmospheres Part 0: Equipment - General Requirements, dated December 2011. CAN/CSA-C22.2 No.
60079-11:11, Explosive Atmospheres - Part 11: Equipment Protection by Intrinsic Safety "i",
dated 2011-12-01. CAN/CSA-C22.2 No. 60079-15:12, 1st Edition, Electrical Apparatus for
Explosive Gas Atmospheres - Part 15: Construction, test and marking of type of protection "n"
Mechanical Specification
Protection Degree Type 4/4X, IP66
Standards
EMC Immunity Standards meet EN 61000 Sections 3-2,3-3,6-2
CE 2004/108/EC (EMC Directive)
2006/95/EC (Low-Voltage Directive)
94/9/EU (Guidance for Ex-Protection)
ATEX EN 60079-0, EN 60079-11, EN 60079-15
cULus UL508 (Industrial Control Equipment)
UL60950 (IT Equipment)
ANSI/ISA-12.12.01-2007 (Hazardous Location)
CSA C22.2 142 (Process Control Equipment)
CSA 213 (Hazardous Location)
Class I / Div 2, Class I / Zone 2
IECEx 60079-0, 60079-11, 60079-15 Zone 2
ATEX II 3G Ex ic nA nC IIC T4 Gc IP66
VisuNet XT 9700 Series
16
VisuNet XT 9700 Series
Product Description
electrical apparatus, dated January 2012 Enclosures for Electrical Equipment, NonEnvironmental Considerations, dated 2007-09-04. CSA C22.2 No. 94.1-07, 1st Edition,
Enclosures for Electrical Equipment, Non-Environmental Considerations - First Edition CSA
C22.2 No. 94.2-07, 1st Edition, Enclosures for Electrical Equipment, Environmental
Considerations, dated 2007-09-01.
US Divisions: Class I, Division 2, Groups A, B, C and D Standards ANSI/ISA-12.12.01-2012,
dated 2012-07-09.
Canadian Divisions: Class I, Division 2, Groups A, B, C and D Standards C22.2 No. 213M1987.
US Zones: Class I, Zone 2, AEx ic nA nC IIC T4 Gc IP66 Standards UL 60079-0, 5th Edition,
dated 2009-10-21. UL 60079-11, 6th Edition, dated 2013-02-15 UL 60079-15, 3rd Ed., dated
2009-07-17.
Canadian Zones: Class I, Zone 2, Ex nA nC nL IIC T4 Gc IP66 Standards CAN/CSA C22.2
No. 60079-0:11, 2nd Edition, dated December 2011. CAN/CSA-C22.2 No. 60079-11, 1st
edition, 2011-12-01 CAN/CSA-C22.2 No. 60079-15:12, 1st Edition, dated January 2012.
3.4.2 ATEX
EN60950-22:2006 + A11:2008 INFORMATION TECHNOLOGY EQUIPMENT - SAFETY PART 22: EQUIPMENT INSTALLED OUTDOORS - Edition N/A - Revision Date 2008/01/01.
ATEX Cert: DEMKO 13 ATEX 1205911X
Markings
Standards
EN 60079-0:2009
EN 60079-11:2012
EN 60079-15:2010
3.4.3 IEC and IECEX
IEC 60950-1 (2ND EDITION + AMENDMENT 1) INFORMATION TECHNOLOGY
EQUIPMENT - SAFETY - PART 1: GENERAL REQUIREMENTS - Edition 2 - Revision Date
2011/12/19.
IEC 60950-22 INFORMATION TECHNOLOGY EQUIPMENT SAFETY PART 22:
EQUIPMENT TO BE INSTALLED OUTDOORS - Edition 1 - Issue Date 2005/10/01.
IECEx UL 13.0015X
Markings
Ex ic nA nC IIC T4 Gc IP66
Ex ic nA nc [ic] IIC T4 Gc IP66
Standards
IECEx 60079-0 (5th Edition)
IECEx 60079-11 (6th Edition)
IECEx 60079-15 (4th Edition)
II 3G Ex ic nA nC IIC T4 Gc IP66
II 3G Ex ic nA nc [ic] IIC T4 Gc IP66

VisuNet XT 9700 Series
Product Description
VisuNet XT 9700 Series
17
3.4.4 FCC
Federal Register CFR 47, Part 15, subpart B: 2007
■ Radiated Emissions, Part 15.109(b), Class A
■ Conducted Emissions, Part 15.107(b), Class A
This device complies with Part 15 of the FCC Rules. Operation is subject to the following two
conditions: (1) This device may not cause harmful interference, and (2) this device must accept
any interference received including interference that may cause undesired operations.

VisuNet XT 9700 Series
18
VisuNet XT 9700 Series
Product Description
THIS PAGE IS INTENTIONALLY LEFT BLANK
VisuNet XT 9700 Series
Hardware Installation
VisuNet XT 9700 Series
19
4 Hardware Installation
Become familiar with the device and carefully read the instruction manual prior to the
mounting, installation, and commissioning of the device.
The Statement of Conformity and Certificate of Compliance of the VisuNet XT-9700 must be
observed. It is especially important to pay attention to any special conditions for safe use that
are indicated.
Avoid electrostatic discharges while operating the installed device.
Connection or disconnection of energized non-intrinsically safe circuits is only permitted in the
absence of a hazardous atmosphere.
4.1 General Warnings
■ Input and output wiring methods and cable types must be in accordance with ordinary
location wiring methods and in accordance with the authority having jurisdiction.
■ Power must be removed from the unit before performing any service procedures.
■ Dangerous
power levels may be present in the computer or on power input terminals
while power is connected, even if the power has been turned off. The proper method for
removing power from the unit is to switch off power at the circuit breaker.
■ (DC version) Connect the power supply to an isolated secondary voltage that is
separated from the primary circuit by reinforced or double insulation. The power supply
shall be properly bonded to the main grounding terminal in the end product. Make sure
there is a proper connection between protective earth and negative somewhere in the DC
Power Net. The power supply shall be connected to a circuit that does not exceed 30 A.
■ (AC version) The power supply shall be connected to branch circuit that does not exceed
20 A.
■ Never expose LCD screen to direct sunlight. Always install with sun shield.
The touch screen, control buttons and function keys are intended for use with hands or gloved
hands. Do not use tools that have metal parts, such as screwdrivers, as these may damage the
touch screen and controls.
4.2 Mounting the VisuNet XT
4.2.1 Selecting a Mounting Location
■ The VisuNet XT-9700 Series is designed to operate in an outdoor environment.
■ The mounting method must be able to support the weight of the unit under shock and
vibration conditions for the given application.
■ To insure proper operation, do not install the unit in tight, confined areas where heat
buildup can cause the unit to overheat and shut down until temperatures fall back to
normal operating conditions.
4.2.2 Mounting Options
The VisuNet XT can be mounted three different ways.
■ Yoke Mount: An adapter for mounting on a yoke can be fastened to threaded holes on
the left and right sides of the unit. Refer to 4.2.2.1.
■ VESA Mount: Mounting points according to the VESA Mounting Interface Standard are
located on the rear of the unit. Refer to 4.2.2.2, Figure 4.11. Use M5 x 12 mm screws to
mount the VisuNet XT.
Caution!
DO NOT attempt to remove the LCD monitor from the computer housing. Removal of
the monitor by unauthorized persons may void all warranties. This procedure must
only be performed by a qualified Pepperl+Fuchs Service Technician.
VisuNet XT 9700 Series
20
VisuNet XT 9700 Series
Hardware Installation
■ Panel Mount: The VisuNet XT can be mounted in a panel opening using a Panel Mount
Kit. Refer to 4.2.2.3.
Each method requires its own accessory components to assist in mounting.
4.2.2.1 Yoke Mount Installation
Shield Assembly
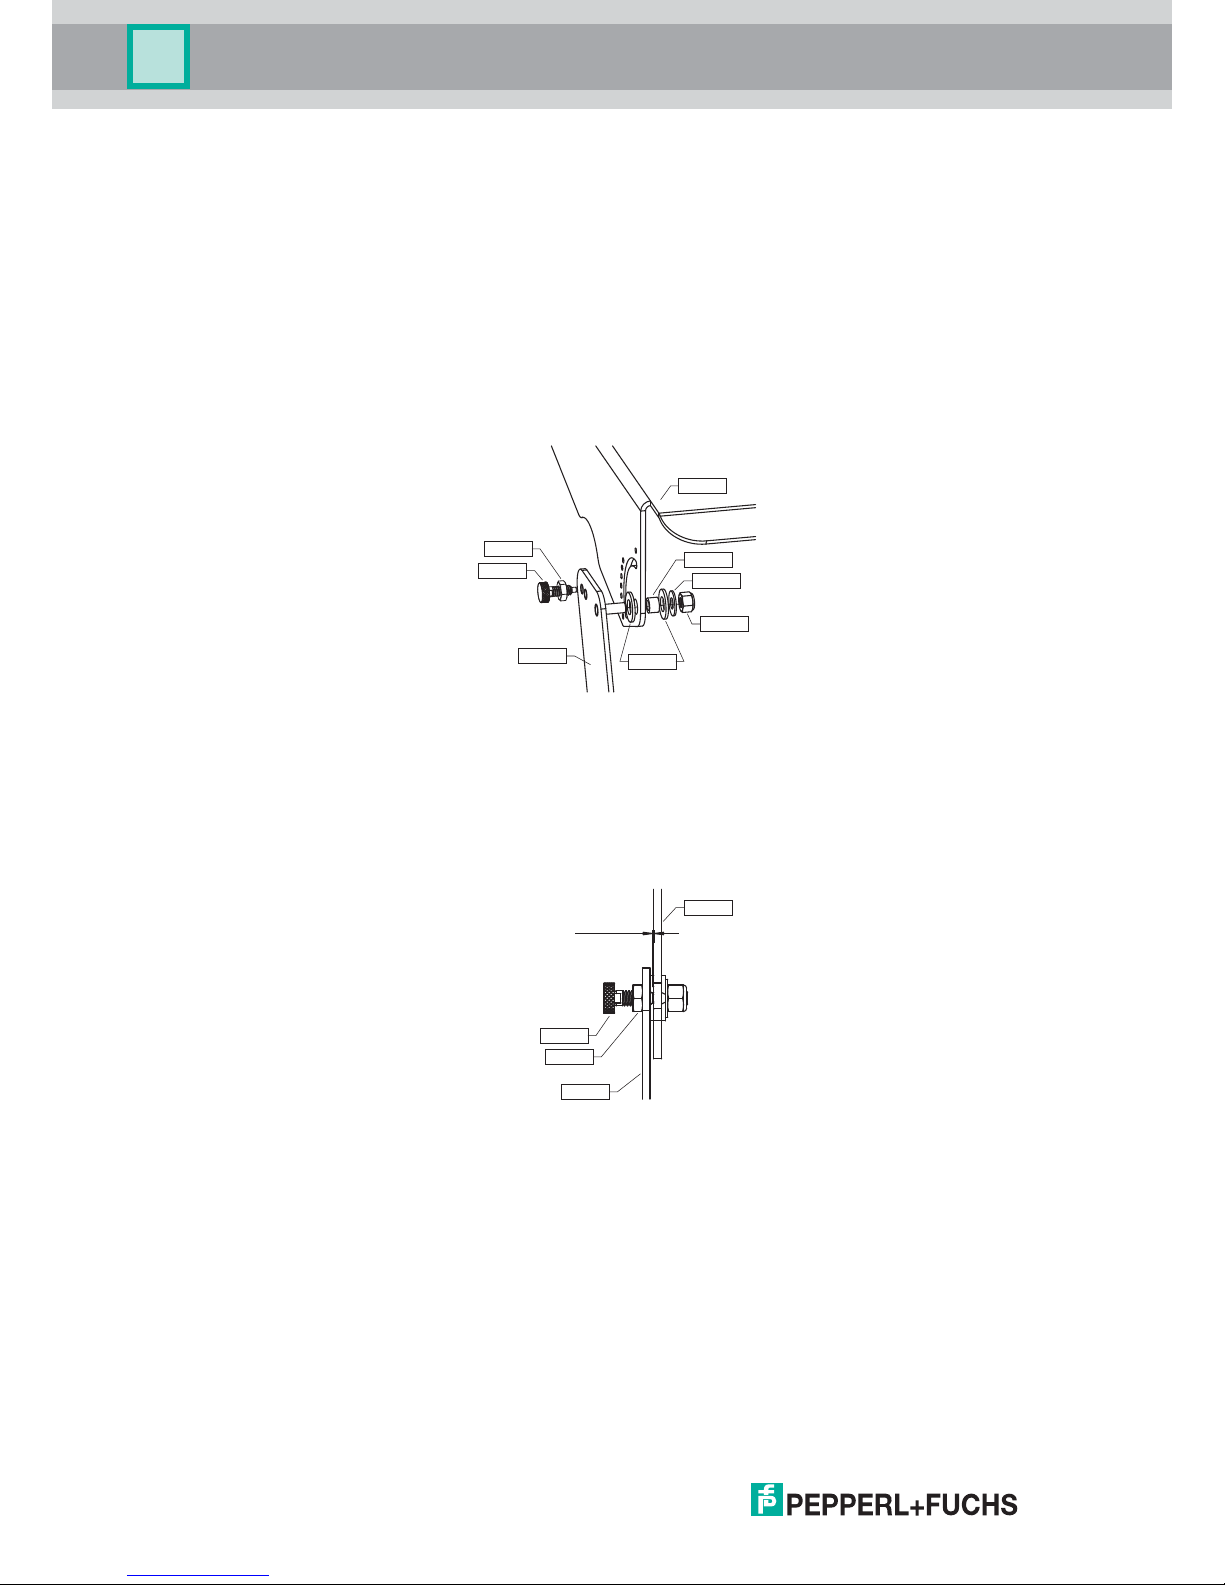
1. Attach side plates (#547303 and #547302) to the shield (#547309) through the pivot hole location, aligning stop pin into the guide slot. Place two thrust bushings on each side
(4x
#
547642) on both sides of the shield flanges and insert the pivot bearing (2x #547640) through the shield and thrust bushings. Place one washer (2x #547646) and one locknut (2x
#547647) on each stud and tighten to 14in-lb. See Figure 4.1.
Figure 4.1 Shield Assembly
2. Using one retractable plunger (2x #547644) per side, inert jam nuts (2x #547650) onto the
plu
nger threads then install into threaded hole on shield side plates. Apply Included Loctit
e
243 (#547659) to the thr
eads of the plungers. Adjust the depth such that the thre
ad end of
eac
h plunger (the nose when the plunger is retracted) leaves a .03"-.05" gap from the shie
ld
side
s as shown. Tighten jam nuts to 30in-lb to secure in place. Refer to Figure 4.2
.
Figure 4.2 Shield lock gap adjustment
Yo ke A d a p te r A ss em bly
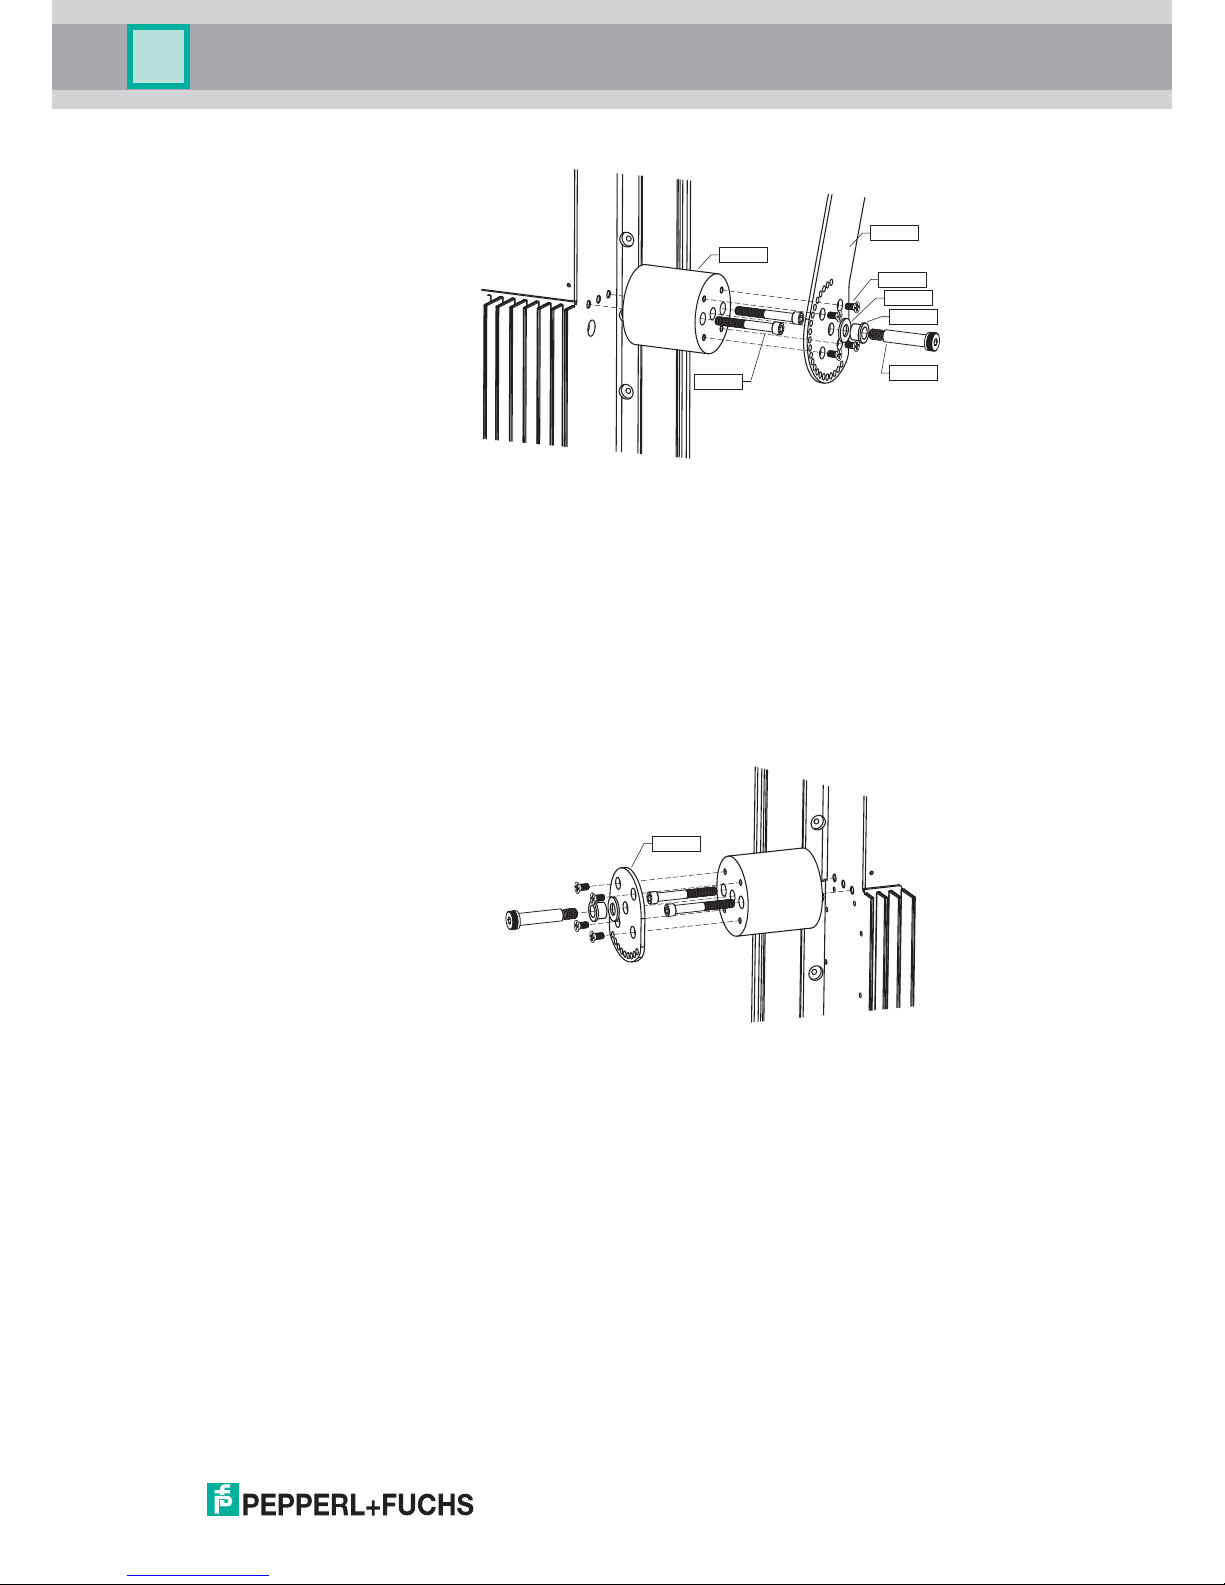
1. Attach adapter blocks (2x #547304) to the side of the XT using two socket cap sc
rews (4x
#
547654) for each block. Apply Loctite 243 (#547659) to threads prior to engagement. Insert into the two outer through holes and the outer two threaded holes on the side of the XT.
Using a 3/16" hex socket, tighten each to 36in-lb. NOTE: Orient the right side block to ensure
the pockets are aligned to the XT side cover screws to allow proper fit. See Figure 4.3.
547309
547646
547640
547647
547642
547650
547644
547303
547309
547650
547644
547303
.01-.03 Gap
VisuNet XT 9700 Series
Hardware Installation
VisuNet XT 9700 Series
21
Figure 4.3 Yoke mounting adapter assembly
2. Inserting from the back side, attach the shield brackets to each adapter block using four flat
head screws (8x #547648) per side. Apply Loctite 243 (#547659) to each of the screws and
tighten to 24in-lb using a #2 Phillips driver.
3. Insert shoulder bushing (2x #547643) and thrust bushing (2x #547642) onto each shoulder
screw hinge (2x #547651). Apply Loctite 243 (#547659) to the shoulder screw threads, then
insert hinge into adapter block and start 1-2 threads to temporarily hold the shoulder screw
before installation to the yoke frame.
4. If no sun shield is used, install adapter plates (2x #547308) similarly to the sun shield
installation. Rotate the plate to the position which matches the yoke orientation. Refer to
Figure 4.4.
Figure 4.4 Adapter plate installation for no shield
Yoke Frame Assembly
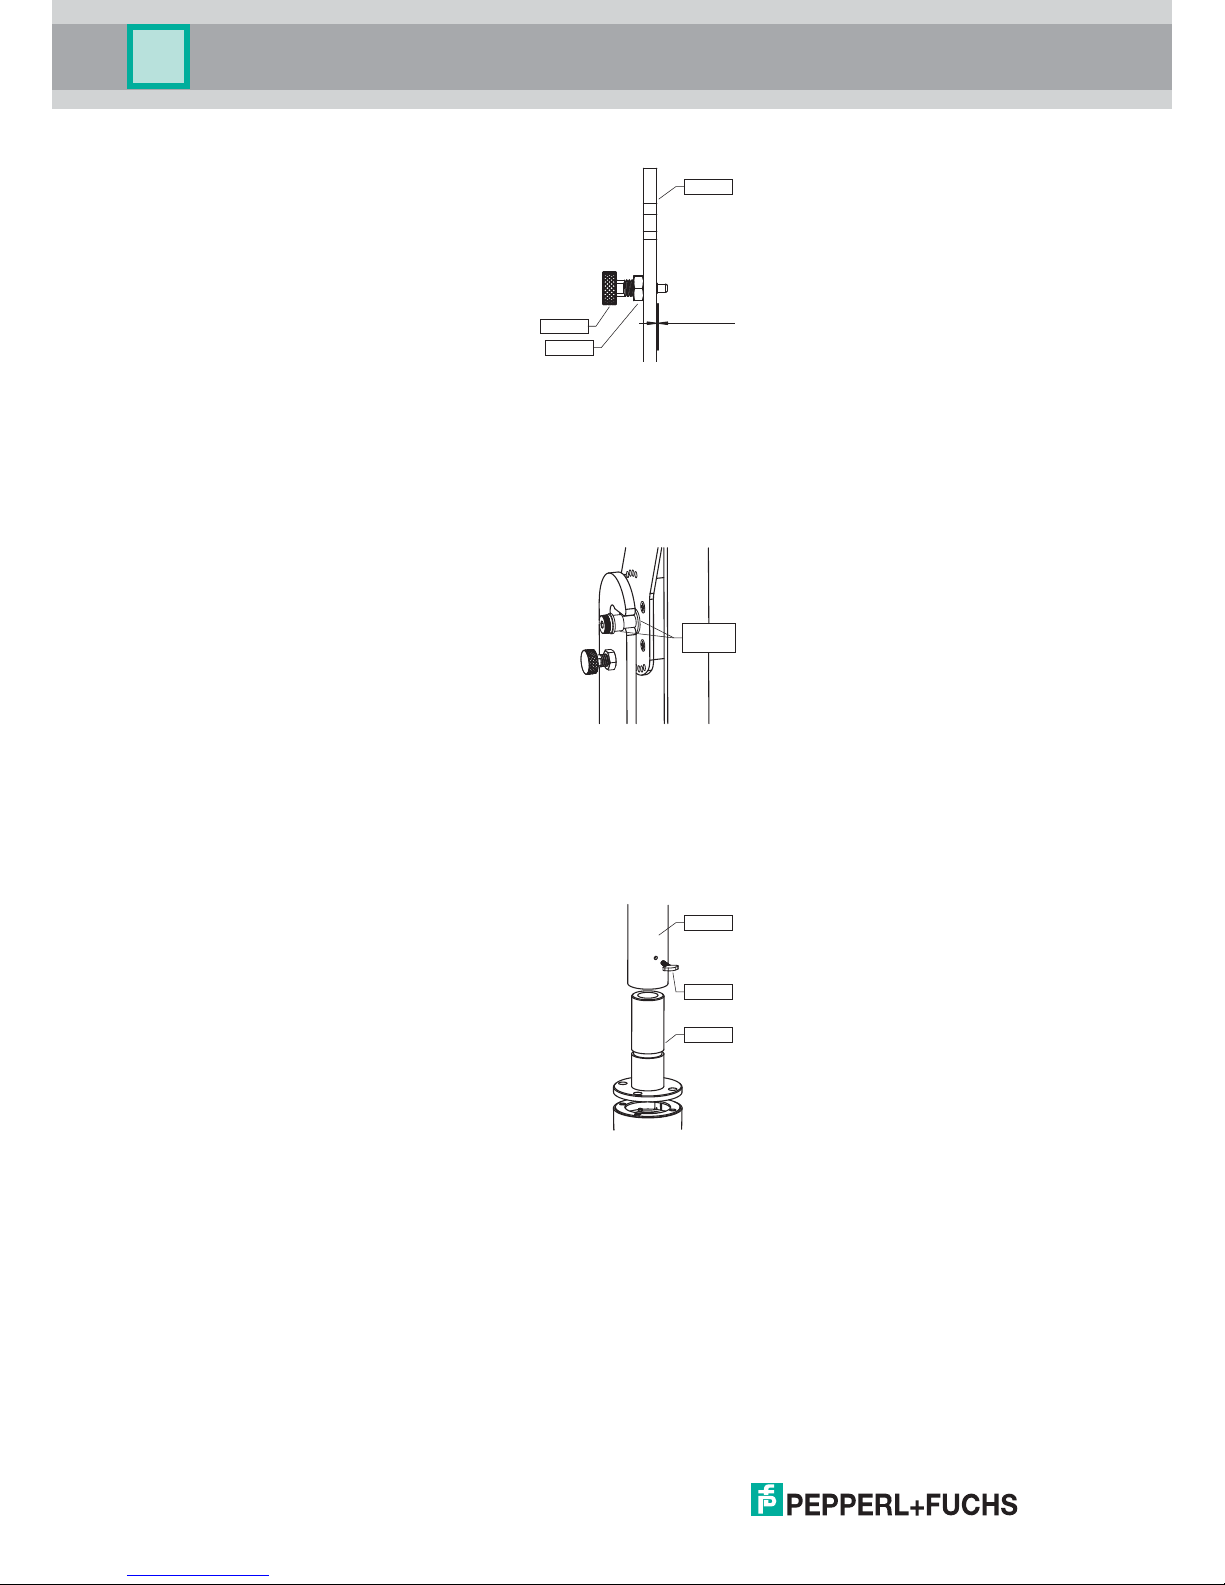
1. Insert two larger jam nuts (2x #547656) on the two larger plungers (2x #547645). Apply Loctite 243 (#547659) to the threads of the plunger. Install into the threaded holes near the pivot
channel on the yoke frame (#547306). Set the nose end of the plunger when retracted to be
protruding no more than .05". once installed, retract the plungers into the open position. Refer to Figure 4.5.
547304
547654
547302
547643
547642
547648
547651
547308
VisuNet XT 9700 Series
22
VisuNet XT 9700 Series
Hardware Installation
Figure 4.5 Yoke frame clearance setup
2. Install the yoke by spacing the bearings as shown in the figure. Once placed within the
circular cutout, push in each sleeve bearing to lock the assembly in place. The plungers
can be locked in place to further aid installation.
3. Fasten the hinge shoulder screws using a 3/16" hex socket to 100in-lb. Refer to Figure 4.6.
Figure 4.6 Yoke frame attachment
4. Install yoke base (#547305) to desired location. Thread the three thumb screws (3x
547638) into the tube section of the yoke frame.
5. Insert the frame into yoke base and tighten thumb screws by hand in desired position. Refer
to Figure 4.7.
Figure 4.7 Yoke base
Yoke Keyboard Tray Assembly
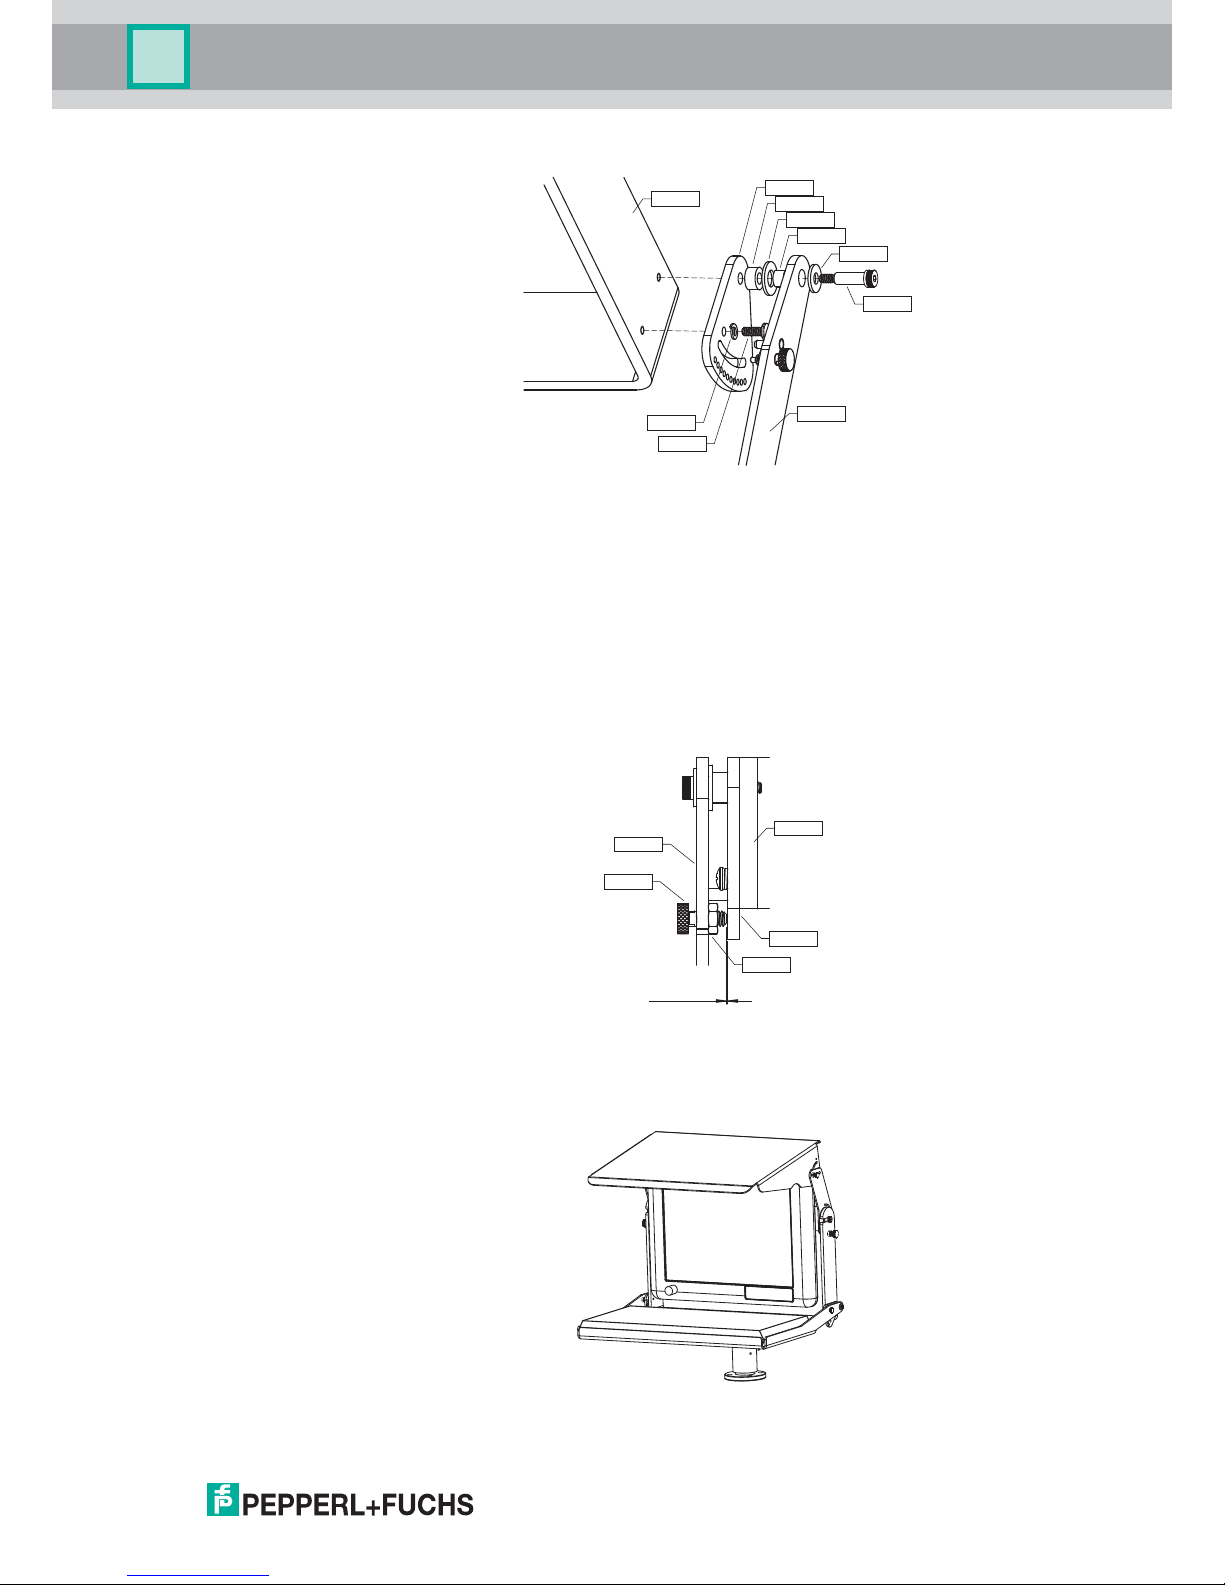
1. Thread the plungers onto each threaded hole on the keyboard tray (547308). Insert a jam nut
(2x #547650) onto each plunger (2x 547644). Apply a small amount of Loctite 243
(#547659).
2. Place two of the smaller thrust bushings (2x 547641) onto each of the smaller shoulder
screws (2x #547657). Place one bushing (2x #547640) on each shoulder screw. Install
inwards on each side to the hinge hole on the keyboard tray.
3. Insert one thrust bushing (2x 547642) on each side. Next, place a spacer (2x 547655) on
each shoulder screw. See Figure 4.8.
547306
547656
547645
.05 max.
Protrusion
Separate
bearings
547306
547638
547305
VisuNet XT 9700 Series
Hardware Installation
VisuNet XT 9700 Series
23
Figure 4.8 Keyboard tray flange assembly
4. Place one keyboard flange (2x 547307) on each shoulder screw, aligning the stop pin to the
guide channel.
5. Apply Loctite 243 (#547659) to the threads of the shoulder screw.
6. With the keyboard tray in the lowest setting (against the bottom of the channel), fasten each
shoulder screw to the yoke frame. Tighten each shoulder screw using a 1/8" hex socket to
24in-lb.
7. Align the other mounting hole on each flange to the second hole on the yoke. Insert two pan
head screws (2x 547652) (one on each side), with a lock washer (2x 547653) on each
screw, into each of the remaining threaded holes. See Figure 4.9.
Figure 4.9 Keyboard tray clearance adjustment
8. Once secured, set the plunger depth to a retracted nose clearance gap of .03"-.05". Tighten
each jam nut to 30in-lb. See Figure 4.10.
Figure 4.10 Complete yoke assembly with shield and keyboard tray
547641
547308
547657
547652
547653
547306
547640
547642
547655
547307
547306
547307
547308
547645
547650
.01-.03 Gap

VisuNet XT 9700 Series
24
VisuNet XT 9700 Series
Hardware Installation
4.2.2.2 VESA Mount Installation
On the back side of the XT unit is a 100 mm VESA mount for attachment to pedestals, wall
arms, ceiling arms, or wall mount brackets. Use M5 x 12 mm long hex head screws (item 1)
and lockwashers (item 2) for VESA mounting. Refer to Figure 4.11.
Figure 4.11 VESA Mount
4.2.2.3 Panel Mount Installation
The VisuNet XT unit is designed for easy panel mounting in a control or machine cabinet. Use
the provided mounting accessory kit to secure the monitor from the inside of the cabinet. The
outer dimensions of the front bezel are as follows.
■ 15-inch Display: 16.9 in. W x 13.9 in. H (430 mm x 353 mm)
■ 19-inch Display: 19.4 in. W x 16.4 in. H (493 mm x 417 mm)
■ Maximum enclosure wall thickness: 0.375 in. (9.5 mm)
■ Panel cutout is 15.2 in. x 12.2 in. (386 mm x 310 m)
Prepare the panel cutout to the dimensions above and perform the following steps to install the
XT unit. Refer to FIG.
1. Install the gasket sections to the back of the XT unit, as shown in Figure 4.12. The top and
bottom gaskets (item 2) are reversible , and the left and right gaskets (item 1) are
reversible.
2. Secure the right panel mount bracket (item 4) and left panel mount bracket (items 3)
together with #6-32 Phillips pan head screws (item 6) threaded into the Pemserts (item 5).
Tighten the screws to 1.2 Nm (11 in.-lb.). See Figure 4.13.
Note!
A customer-supplied VESA steel mounting plate must be a minimum of 12 ga. thickness.

VisuNet XT 9700 Series
Hardware Installation
VisuNet XT 9700 Series
25
3. Thread sixteen #10-32 Phillips pan head screws (item 7) into the threaded holes in the
frame until they just protrude from the other side. Do not thread them in all of the way.
4. Look at the back of the XT unit and find the six threaded mounting holes. There are two
along the top, two along the bottom, and one on each side. Refer to Figure 4.14.
5. Look at Figure 4.13 and Figure 4.14 to see the proper orientation of the panel mount
bracket assembly.
6. Install the XT unit (item 1) through the panel cutout (item 2) from the front side.
7. From the back side of the panel, place the panel mount bracket assembly over the XT unit
and secure the bracket assembly to the XT unit with six #6-32 Phillips pan head screws.
Tighten the screws to 1.2 Nm (11 in.-lb.).
8. Secure the XT unit to the panel by tightening the sixteen #10-32 Phillips pan head screws
(item 7) against the back side of the panel. Tighten the screws to 1.2 Nm (11 in.-lb.).
Figure 4.12 XT Unit Gasket
Note!
make sure the surface is clean and free of any surface contaminants before installing the XT
unit.

VisuNet XT 9700 Series
26
VisuNet XT 9700 Series
Hardware Installation
Figure 4.13 Panel Mount Assembly
Figure 4.14 Panel Mount Frame Assembly Mounted to XT Unit

VisuNet XT 9700 Series
Connectors and Cabling
VisuNet XT 9700 Series
27
5 Connectors and Cabling
This section describes the connectors and cabling on the VisuNet XT-9700.
Connectors are located on the rear I/O plate. All cables to the I/O plate must be routed through
the cable glands on the junction box.
Input and output wiring methods must be in accordance with local wiring methods and codes,
the authority having jurisdiction, and the manufacturer recommendations.
All cables brought through the cable glands must be supported to avoid forces or movement of
the cables in the glands. Mount cable supports to the VisuNet housing or to the mounting
supports.
All cabling is to be routed in grounded conduit.
All high voltage lines above 300 V must be separated from low voltage lines.
5.1 Junction Box
The VisuNet XT provides different pass through cable glands for cable connections (required
to maintain the enclosure protection rating). These glands are gas and water tight and must be
tightened with a torque described in the manufacturer’s instructions. Figure 5.1 identifies the
available I/O glands.
5.1.1 With Quick Disconnects and Cable Glands
Figure 5.1 Junction Box with quick disconnects and cable glands
Caution!
Modifying the junction box or the cable glands invalidates enclosure protection and
certification.
No. Description No. Description
1 WIFI antenna connectors (SMA) 4 USB Type A
2 M20 cable gland for power 5 USB Type A
3 M16 cable gland for customer choice 6 RJ45 LAN connection

VisuNet XT 9700 Series
28
VisuNet XT 9700 Series
Connectors and Cabling
5.1.2 With Cable Glands
Figure 5.2 Junction Box with cable glands
5.1.3 Removing the Junction Box
Remove the junction box by performing the following steps.
1. Loosen the twelve (12) captive Phillips-head screws securing the junction box to the
housing, as shown in Figure 5.3.
2. Carefully remove the junction box from the housing. Make sure not to strain the cables
connecting the two (2) USB connectors to the USB ports.
5.1.4
Routing Cables Through the Junction Box
All connectors on the I/O plate must be properly secured to prevent accidental unplugging by
shock or vibration. Use the securing feature of the connector when available.
5.1.4.1 Cable Gland Torque Values
Refer to the manufacturer’s instructions for proper torque values according to gland type, cable
type, and cable diameter.
5.1.5 Installing the Junction Box
Install the junction box by performing the following steps.
1. Inspect the junction box seal for cuts, tears, or abrasion. Make sure the seal is clean and
dry, and free from any dirt or foreign substances.
No. Description No. Description
1 WIFI antenna connectors (SMA) 5 M16 for USB/COM
2 M20 cable gland for power 6 M20 for customer choice
3 M20 cable gland for customer choice 7 M20 for customer choice
4M16 for USB/COM
Note!
It may be necessary to loosen any gland having a cable passing through it to prevent straining
the cables and I/O connectors inside the junction box. Only loosen glands if necessary.
Caution!
Do not use lubricants or sealants on any of the cover plate seals. Using lubrication or sealing
materials may cause seal degredation that can result in loss of enclosure protection.

VisuNet XT 9700 Series
Connectors and Cabling
VisuNet XT 9700 Series
29
2. Place the junction box on the housing and tighten the captive screws to 0.8 Nm (7 in.-lb.)
in an inside-to-outside crisscross pattern using the incremental order shown in Figure 5.3
to ensure the plate seals correctly.
Figure 5.3 Junction Box Incremental Screw Tightening Order
5.2 I/O Plates
Table 5.1 lists all the possible available I/O connections.
Table 5.1 Available I/O Connections
Figure 5.4 shows I/O plate details and connector locations.
Caution!
Do not use thread locker products on any screw thread.
Do not over-tighten the screws.
Failure to install the cover plate in the manner described may result in loss of enclosure
protection.
I/O Quantity Form Factor Rating
VGA 1 15 pin D-SUB
USB 2.0 2 Terminal Block Isolated
(Non-Incendive optional)
Serial Ports (RS232) 1 Terminal Block Isolated
Serial Ports (RS485) 1 Terminal Block Isolated
Ethernet CAT5 2 RJ45
Ethernet Fiber 1 (Duplex) ST Connector
Power 1 Terminal Block
Audio I/O 1 of each Terminal Block
Digial I/O 1 of each Terminal Block
Wireless Antenna 2 SMA Coax

VisuNet XT 9700 Series
30
VisuNet XT 9700 Series
Connectors and Cabling
Figure 5.4 I/O Plate Details
5.2.1 X1 - Power
A power connection is provided by removable terminal block. The VisuNet XT has the option to
accept either Universal AC input, or 18-30 VDC input.
Wire size: Use a minimum of 18 AWG (8 AWG Max) wire for AC power, and 16 AWG wire for
DC power input.
Tightening torque: The recommended tightening torque is 0.7 Nm (6 in.-lb.).
X1 Terminal - Power
Note!
Customer wiring used to power the main input terminals must use conductors rated for 75° C
(167° F) or higher.
AC DC
X1.1 Hot +
X1.2 Neutral X1.3 Ground

VisuNet XT 9700 Series
Connectors and Cabling
VisuNet XT 9700 Series
31
5.2.2 X2 - USB 2.0 (x2)
Dual USB connections are provided on rear side of panel.
Wire size: 16-28 AWG.
Tightening torque: Recommended tightening torque is 0.24 Nm (2 in-lbs).
X2 Terminal - USB
5.2.3
5.2.4
Rear non-incendive/intrinsically safe USB (optional)
The rear USB ports can be ordered as
intrinsically safe for Div 2/Zone 2 installation of P+F
EXTA3 keyboards. Must follow connection per control drawing 116-B017. Entity parameters
are as follows:
Voc = 4,92 V
Isc = 183 mA
Ca = 52 µF
La = 800 uH
X3 - Serial Port (RS232)
Serial RS232 port is available via a 5-pin removable terminal block. The RS232
communication line is an isolated line providing 1.5 KV of isolation.
Wire size: 16-28 AWG.
Tightening torque: Recommended tightening torque is 0.24 Nm (2 in-lbs).
X3 Terminal - RS232
5.2.5 X4 - Digital In/Out (I/O)
Digital output is available via an internal form "C" relay capable of 2A at 30 VDC, or 240 VAC
into a resistive load. Digital output provided with 1.5 KV isolation. Digital input also provided
with 1.5 KV isolation.
Wire size: 14-30 AWG.
Tightening torque: Recommended tightening torque is 0.24 Nm (2 in-lbs).
X4 Terminal - Digital I/O
X2.1 V+
X2.5 V+
X2.2 D-
X2.6 D-
X2.3 D+
X2.7 D+
X2.4 Ground
X2.8 Ground
X3.1 Tx
X3.2 Rx
X3.3 RTS
X3.4 CTS
X3.5 Ground
X4.1 + (DI)
X4.2 - (DI
)
X4.3 N.O. (DO)
X4.4 Common (DO)
X4.5 N.C. (DO)

VisuNet XT 9700 Series
32
VisuNet XT 9700 Series
Connectors and Cabling
5.2.6 X5 - Serial Port (RS485)
An RS485 port is available via a 4-pin removable terminal block. The RS485 communication
line is an isolated line providing 1.5 KV of isolation.
Wire size: 16-28 AWG.
Tightening torque: Recommended tightening torque is 0.24 Nm (2 in-lbs).
X5 Terminal - RS485
5.2.7 X6 - Audio In/Out (I/O)
Audio connection is done via removable terminal blocks. Terminal block pin-out is as follows.
Wire size: 14-30 AWG.
Tightening torque: Recommended tightening torque is 0.24 Nm (2 in-lbs).
X6 Terminal - Audio In/Out
5.2.8 X7 - VGA
Video output is provided by a standard 15-pin D-sub VGA connector (Figure 5.5).
Figure 5.5 X7 - VGA
5.2.9 X8 - LAN
There are three different LAN communication configurations. Each LAN connection is 1.0 GB
Fast Ethernet. See Figure 5.6.
■ 2 x RJ45
■ 1 x RJ45 and 1 x ST Fiber (multi-mode)
■ 1 x LAN and 1 x WiFi.
X5.1
Tx
X5.2 Rx
X5.3 Ground
X5.4 Not Used
X6.1 + (In)
X6.2 - (Out)
X6.3 + (In)
X6.4 - (Out)
Pin Assignment Pin Assignment
X7.1 Red X7.9 Key/Pwr
X7.2 Green X7.10 GND
X7.3 Blue X7.11 N/A
X7.4 N/A X7.12 ID1/SDA
X7.5 GND X7.13 HSync
X7.6 Red_RTN X7.14 VSync
X7.7 Green_RTN X7.15 ID3/SCL
X7.8 Blue_RTN

VisuNet XT 9700 Series
Connectors and Cabling
VisuNet XT 9700 Series
33
Figure 5.6 X8 LAN
5.2.10 X9 - LAN/Fiber
This connector can either be an RJ45 or a 2 x ST fiber optic (multi-mode). If the standard LAN
option is chosen, refer to the pin-out for X8 in Figure 5.6. If the fiber option is chosen, use a 50
or 62.5/125 um fiber cable.
5.2.10.1 Fiber Optic (optional)
When fiber optic LAN output is selected as an option, there is 1 x RJ45 connection and 1 x ST
fiber optic connection (multi-mode). Fiber optic Ethernet output complies with the IEEE 802.3u
standard (100 Mbps Fast Ethernet).
5.2.10.2 WLAN Port (optional)
VisuNet XT offers an 802.11 a/b/g/n with speed up to 300 Mbps via two external SMA
connectors. SMA connectors are protected internally by a gas tube lightning arrestors having a
breakdown voltage of 90 V +/- 20%.
X8.1 DA+ X8.5 DCX8.2 DA- X8.6 DBX8.3 DB+ X8.7 DD+
X8.4 DC+ X8.8 DD-
Note!
IP66 protection is only maintained if antenna, extension cable, or dust cap is attached.

VisuNet XT 9700 Series
34
VisuNet XT 9700 Series
Connectors and Cabling
5.2.11 Fuses
There are two field replaceable fuses located on the I/O plate. The junction box must be
removed to access the fuse holders. Table 5.2 lists the fuse ratings. Refer to Figure 5.4 for the
locations of the F1 and F2 fuses holders.
Reinstall the junction box following the procedure in Section 5.1.5.
Table 5.2 Fuses
5.2.12 Blanking Plugs
A blanking plug must be installed and properly tightened into any unused cable gland. Refer to
the manufacturer’s instructions for proper torque values according to gland type, cable type,
and cable diameter. See Figure 5.7. Refer to Section 8 for replacement parts.
Figure 5.7 Blanking Plug
Fuse Rating
F1 (AC unit) 250 VAC, 2 A
F1 (DC unit input) 250 V, 10 A
F2 (DC-DC Output Fuse) 250 V, 12.5 A

VisuNet XT 9700 Series
Connectors and Cabling
VisuNet XT 9700 Series
35
5.2.13
Front non-incendive/intrinsically safe USB (optional)
Front USB connector for Ex-rated USB memory s
tick. USB connector is Type 4x/IP66 rated
when cover is used. Installation must be in accordance to control drawing 116-B017. Entity
parameters are as follows:
Voc = 5.0 V
Isc = 240 mA
Ca = 60 uF (Group IIB)/12 uF (Group IIC)
La = 24 μH
Figure 5.8 Front USB (non-incendive/intrinsically safe)
5.3 External Grounding
An external #10-32 grounding screw is located on the corner of the case near the power supply
cover plate. See Figure 5.9. The grounding cable and ring terminal are the responsibility of the
customer.
Use a minimum 10 AWG (approximate 4 mm
2
) copper stranded green with yellow stripe wire,
and connect the wire to the unit using a stainless steel ring lug suitable for a #10 screw.
Figure 5.9 External Grounding Screw

VisuNet XT 9700 Series
36
VisuNet XT 9700 Series
Connectors and Cabling
5.4 SD Card Reader Option
The Visunet XT has the option for a USB 2.0 SD card reader, located in the same compartment
as the removable SSD. The optional SD card reader supports SDHC (high capacity), SD or
microSD (with adaptor) cards up to 32 GB. The SD card reader allows for read and write
function, allowing you to download or store critical files, data, or software programs.

VisuNet XT 9700 Series
Calibration and Operation
VisuNet XT 9700 Series
37
6 Calibration and Operation
6.1 Touch Screen Interface
6.1.1 Introduction
The integrated touch screen uses 5-wire hardened resistive technology that provides long time
use without the need to recalibrate. The touch screen can be manipulated with either a finger, a
glove, or a stylus. The hardened resistive glass provides exceptional resistance to scratches,
impacts, chemicals, and excessive heat.
6.1.2 Touch Screen Calibration
The VisuNet XT touch screen is factory-calibrated and uses factory-installed Elo touch screen
software. Calibration\Alignment of the newly installed touch screen should not be necessary.
However, over a period of time the alignment points may wander slightly and you may notice
the cursor does perform properly. This is a good indication that touch screen calibration may
be necessary to realign the screen. As a rule of thumb, it is recommended that you calibrate
the touch screen if the cursor is more than 0.25 inch from the exact center of the point of touch.
Doing this will increase the accuracy of touch response and make it easier to touch objects
with pinpoint accuracy.
An Elo Touchsystems icon can be found on the computer’s desktop or in the taskbar, and in
the control panel. See Figure 6.1.
Figure 6.1 Elo Icon
There are 29 calibration target points: 25 main screen targets and four (4) small corner targets.
Figure 6.2 shows the pattern for the 5 x 5 main targets and four (4) corner targets.
Figure 6.2 Calibration Target Points

VisuNet XT 9700 Series
38
VisuNet XT 9700 Series
Calibration and Operation
Perform the following steps to realign the touch screen using the Elo touch screen software.
1. Close any open programs prior to initiating the Elo program.
2. Right-click the Elo icon and select Align from the dialog box, or double click the Elo Touch
screen icon, select the General tab and click the Align button.
3. A white screen appears with a target in the top left corner of the screen. See Figure 6.3.
4. The target calibration points are presented one at a time. (25 main screen target points and
4 corner target points) Touch and then release each of the targets as they appear.
Figure 6.3 Calibrating the Targets
5. After the target points have been calibrated, you are prompted to touch the screen in
different areas to check calibration and cursor response. The cursor should jump to your
fingertip. See Figure 6.4.
6. Run your finger around the screen to make sure the cursor stays with your fingertip.
7. If the cursor responds correctly, touch the green check mark.
8. If cursor response is questionable, press the Repeat icon and repeat the calibration
procedure.
Figure 6.4 Check Cursor Response

VisuNet XT 9700 Series
Calibration and Operation
VisuNet XT 9700 Series
39
6.2 Membrane Keypads
Figure 6.5 Membrane Keypad
1. Power Button: The main power switch for the system. When pressed, the computer
powers up and boots into the Windows
®
environment.
The computer should be shut down properly following the normal Windows
®
Start > Shut
down protocol. In an emergency situation, press and hold the power button to force a quick
computer shut down.
2. Power LED: The LED flashes once for two seconds when the power button is initially
pressed during start up, and then remains illuminated green as long as there is 12VDC
power to the main motherboard.
The power LED flashes on and off in slow, two-second intervals when the system is in
sleep mode.
3. Touch Disable LED: The touch disable LED illuminates blue when the touch screen is
disabled.
4. Heater LED: The heater LED illuminates red when the heaters are on.
1 Power Button 6 Touch Disable ON/OFF Button
2 Power LED - Green 7 LCD Display ON/OFF Button
3 Touch Disable LED - Blue 8 Mouse Right-Click Button
4 Heater LED - Red (optional) 9 Keyboard Function Buttons (optional)
5 Brightness Increase/Decrease Buttons

VisuNet XT 9700 Series
40
VisuNet XT 9700 Series
Calibration and Operation
5. Brightness Increase/Decrease Buttons: Momentarily pulse the buttons up or down to
make incremental changes in brightness, or press and hold the buttons up or down for
quick changes in brightness.
6. Touch Disable Button: Disables the touch screen function for cleaning purposes. The
button toggles either ON or OFF while the computer is still operating. The LCD screen
remains on when touch disable is activated.
7. LCD Display ON/OFF Button: Turns the LCD display on or off while leaving the computer
running and operational. Touch disable automatically activates when the LCD display is
turned off. No input can take place through the touch screen when the display is turned off.
Return to normal operating conditions by pressing the LCD Display button (item 7)
followed by the touch disable button (item 6).
8. Mouse Right-Click Button: Pressing this button opens the appropriate right mouse
functions of a program.
9. Keyboard Function Buttons: Optional feature. These buttons operate the same as the
F1 to F4 keys on a keyboard.
6.2.1 System Power Up with Heaters
1. Press the power button (item 1) to initiate computer cold start up.
2. If the temperature inside of the cabinet is below -20°C (-4°F), the internal heaters will cycle
ON first to bring the inside temperature of the housing up to a safe startup temperature
before allowing the computer to power up.
3. On the keypad, the red heater LED (item 4) illuminates solid when the heaters are working,
and the green power LED (item 2) flashes in quick, half-second intervals to show that the
computer is on standby waiting to power up.
4. The computer powers up and the heaters cycle OFF when the temperature reaches -20°C
(-4°F).
5. The red heater LED (item 4) turns off and the power LED (item 2) changes from flashing to
solid green when the computer is powered up and ready.
6. In the unlikely event the temperature inside of the cabinet drops below -20°C while the
computer is on, the heaters will cycle on and off as necessary to maintain a safe operating
temperature while the computer remains operational.
6.2.2 Keypad Disable/Enable
The keypad can be disabled for cleaning purposes without affecting the computer. When the
keypad is disabled, the touchscreen is also disabled. Disabling the keypad and touch screen
does not impede or affect computer programs running at the time.
1. Press and hold the touch disable button (item 6) for four seconds to disable both the
keypad and touchscreen.
The blue touch disable LED (item 2) illuminates at the end of four seconds to show that the
keypad and touchscreen are disabled.
2. Press and hold the touch disable button (item 6) for another four seconds to enable the
keypad and touchscreen. The blue touch disable LED (item 2) will turn off at the end of four
seconds.
Note!
If the red heater LED (item 4) is lit, the heaters are either ON or cycling.

VisuNet XT 9700 Series
Calibration and Operation
VisuNet XT 9700 Series
41
6.2.3 Heater Fault
If the heaters fail to come on during a cold start up, the green power LED (item 2) and the red
heater LED (item 4) will flash in quick, half-second intervals to signal a heater problem.
Press and hold the power button (item 1) for four seconds to clear the LED fault indicators, and
try to power up the computer again.
If the heater fault persists, repairs must be made by a qualified Pepperl+Fuchs service
technician. Contact the Pepperl+Fuchs Customer Service Department.
6.2.4 Computer Fault
If the computer fails to power up, the green power LED (item 2) and the blue touch disable LED
(item 3) will flash in quick, half-second intervals to signal a computer start-up issue.
Press and hold the power button (item 1) for four seconds to clear the LED fault indicators, and
try to power up the computer again.
If the computer fault persists, there are only three components the customer can easily remove
and replace; 1) the solid-state drive (SSD), 2) the fuses, and, 3) the power supply board.
Refer to Section 7, Field Maintenance and Repair for instructions. All other component repairs
must be made by a qualified Pepperl+Fuchs service technician. Contact the Pepperl+Fuchs
Customer Service Department.
Note!
If the touchscreen was previously disabled, the blue LED (item 2) will already be lit. When you
press and hold the touch disable button (item 6) for four seconds to disable the keypad, the
blue LED will blink ONCE for a half-second to acknowledge that the keypad disable command
was initiated, and then the blue LED will remain lit.
Also, when you press and hold the touch disable button for four seconds to enable the keypad,
the illuminated blue LED with blink ONCE for a half-second to acknowledge the keypad enable
command was initiated, but the blue LED will remain lit because the LCD screen is still
disabled.
Caution!
DO NOT attempt to remove the LCD monitor in order to gain access to the inside of the
computer housing. Removal of the monitor by unauthorized persons may damage the
unit and void all warranties. This procedure must only be performed by a qualified
Pepperl+Fuchs Service Technician in a clean room environment.
Caution!
While servicing the unit, make sure no liquids or dust penetrate the unit.

VisuNet XT 9700 Series
42
VisuNet XT 9700 Series
Calibration and Operation
6.3 LED Quick Reference Guide
Below is a quick reference guide of Power, Touch Disable, and Heat conditions.
Power
LED
Touch
Disable
LED
Heat
LED
Condition
Power LED stays lit as long as there is power to the
motherboard.
Power LED flashes in slow, two-second intervals when
the computer is in sleep mode.
Touch LED stays lit when the touch screen is disabled.
Ambient temperature is below -20°C (-4°F) and is too
cold to allow safe computer startup:
■ Heat LED is lit as heaters bring ambient
temperature up to -15°C (5°F).
■ Power LED flashes in quick, half-second intevals
to show computer startup is on standby until safe
temperature is reached.
Heater failure during cold computer startup.
■ The power LED and heat LED both flash in quick,
half-second intervals.
Computer failure during startup.
■ The power LED and the touch disable LED both
flash in quick, half-second intervals.

VisuNet XT 9700 Series
Field Maintenance and Repair
VisuNet XT 9700 Series
43
7 Field Maintenance and Repair
7.1 Inspection
The VisuNet XT enclosure is watertight and dusttight with an Type 4x/IP66 enclosure rating.
Care must be taken to insure the enclosure is not damaged due to mishandling, etc. that could
compromise the seal.
The gaskets and seals are integral parts of the watertight seal. When removing a cover plate,
inspect the gasket or seal for defects before reinstalling the cover plate to insure the gasket
has not been damaged.
7.2 Field Serviceable Components
7.2.1 AC Power Supply Removal and Replacement
Remove the power supply by performing the following steps.
1. Loosen the ten (10) #4-40 captive screws securing the power supply cover plate in place.
See Figure 7.1.
2. Pull the power supply straight out of the housing. See Figure 7.2.
3. Check the cover gasket for damage.
Note!
Do not open or remove any plates, covers, or connections that are not described in this
manual.
Caution!
Field maintenance procedures must be performed in a clean, non-hazardous environment free
of dust and contaminants. No maintenance shall be performed unless power is disconnected
from the unit. Remove power at the breaker box.
Caution!
While servicing the unit, make sure no liquids or dust particles penetrate the unit.
Caution!
Remove power to the unit before beginning this procedure.
This procedure must be performed in a clean, non-hazardous environment free of dust
and contaminants. Make sure no liquids or dust penetrate the unit.
It is highly recommended that the service technician be properly grounded using a
grounding strap during this procedure.
Note!
The power supply is attached to a mounting bracket, and the mounting bracket is attached to
the inside surface of the cover plate.

VisuNet XT 9700 Series
44
VisuNet XT 9700 Series
Field Maintenance and Repair
Figure 7.1 Power Supply Cover Plate
Figure 7.2 Remove the Power Supply

VisuNet XT 9700 Series
Field Maintenance and Repair
VisuNet XT 9700 Series
45
Figure 7.3 Power Supply Removed
4. Disconnect the wiring on the primary and secondary side of the power supply. Refer to
Figure 7.4.
Figure 7.4 Power Supply Wiring Connections
5. Refer to Figure 7.5. Loosen the four (4) mounting bracket screws and remove the cover
plate. The screws stay captured on the mounting bracket.
Note!
Do not remove the power supply from the mounting bracket.

VisuNet XT 9700 Series
46
VisuNet XT 9700 Series
Field Maintenance and Repair
Figure 7.5 Loosen the Mounting Screws
Figure 7.6 Cover Plate is Removed
6. Attach the new power supply with mounting bracket assembly to the back side of the cover
plate using the four (4) screws.

VisuNet XT 9700 Series
Field Maintenance and Repair
VisuNet XT 9700 Series
47
7. Connect the wiring to the primary and secondary sides of the power supply. Refer to Figure
7.4.
8. Slide the power supply into the housing.
9. Secure the cover plate in place by tightening the 4-40 cover screws to 0.7 Nm (6 in-lbs) in
an inside-to-outside crisscross pattern using the incremental order shown in Figure 7.7 to
ensure the plate seals correctly.
Figure 7.7 Power Supply Cover Plate Incremental Screw Tightening Order
Caution!
Do not use thread locking products on any screw thread.
Do not over-tighten the screws.
Failure to install the cover plate in the manner described may result in loss of enclosure
protection.

VisuNet XT 9700 Series
48
VisuNet XT 9700 Series
Field Maintenance and Repair
7.2.2 DC Power Supply Removal and Replacement
Remove the power supply by performing the following steps.
1. Loosen the ten (10) #4-40 captive screws securing the power supply cover plate in place.
See Figure 7.8.
Figure 7.8Power Supply Cover Plate
2. Pull the power supply straight out of the housing.
Caution!
Remove power to the unit before beginning this procedure.
This procedure must be performed in a clean, non-hazardous environment free of dust
and contaminants. Make sure no liquids or dust particles penetrate the unit.
It is highly recommended that the service technician be properly grounded using a
grounding strap during this procedure.
Note!
The power supply is attached to a mounting bracket, and the mounting bracket is attached to
the inside surface of the cover plate.

VisuNet XT 9700 Series
Field Maintenance and Repair
VisuNet XT 9700 Series
49
Figure 7.9 Power Supply Removed
3. Check the cover gasket for damage.
4. Disconnect the wiring on the input and output side of the power supply. Refer to Figure
7.10.
Figure 7.10 Power Supply Wiring Connections

VisuNet XT 9700 Series
50
VisuNet XT 9700 Series
Field Maintenance and Repair
5. Refer to Figure 7.11. Loosen the four (4) mounting bracket screws and remove the cover
plate. The screws stay captured on the mounting bracket.
Figure 7.11 Loosen the Mounting Screws
Note!
Do not remove the power supply from the mounting bracket.

VisuNet XT 9700 Series
Field Maintenance and Repair
VisuNet XT 9700 Series
51
Figure 7.12 Cover Plate is Removed
6. Attach the new power supply with mounting bracket assembly to the back side of the cover
plate using the four (4) screws.
7. Connect the wiring to the primary and secondary sides of the power supply. Refer to Figure
7.10.
8. Slide the power supply into the housing.
9. Secure the cover plate in place by tightening the 4-40 cover screws to 0.7 Nm (6 in-lbs) in
an inside-to-outside crisscross pattern using the incremental order shown in Figure 7.13
to ensure the plate seals correctly.
Caution!
Do not use thread locking products on any screw thread.
Do not over-tighten the screws.
Failure to install the cover plate in the manner described may result in loss of
enclosure protection.

VisuNet XT 9700 Series
52
VisuNet XT 9700 Series
Field Maintenance and Repair
Figure 7.13 Correct inside-to-outside crisscross pattern

VisuNet XT 9700 Series
Field Maintenance and Repair
VisuNet XT 9700 Series
53
7.2.3 Solid-State Drive (SSD) Removal and Replacement
Perform the following steps to properly remove and replace the solid-state drive.
1. Loosen the ten (10) each 4-40 captive screws securing the SSD cover plate in place, and
remove the cover. See Figure 7.14.
2. Check the cover gasket for damage.
Figure 7.14 Remove the SSD Cover Plate
3. Loosen (do not remove) the three mounting clip screws. Retract the long mounting bracket
and carefully remove the SSD. See Figure 7.15 and Figure 7.16.
4. Disconnect the power and data cables from the SSD.
5. Install the new SSD and secure in place with the mounting clips.
Caution!
Power down the the VisuNet unit before beginning this procedure.
This procedure must be performed in a clean, non-hazardous environment free of dust
and contaminants. Make sure no liquids or dust particles penetrate the unit.
It is highly recommended that the service technician be properly grounded using a
grounding strap during this procedure.

VisuNet XT 9700 Series
54
VisuNet XT 9700 Series
Field Maintenance and Repair
Figure 7.15 Loosen the Bracket Screws

VisuNet XT 9700 Series
Field Maintenance and Repair
VisuNet XT 9700 Series
55
Figure 7.16 Remove the SSD and Disconnect the Power and Data Cables
6. Secure the cover plate in place by tightening the 4-40 cover screws to 0.7 Nm (6 in-lbs) in
an inside-to-outside crisscross pattern using the incremental order shown in Figure 7.17
to ensure the plate seals correctly.
Figure 7.17 SSD Cover Plate Incremental Screw Tightening Order
Caution!
Do not use thread locking products on any screw thread.
Do not over-tighten the screws.
Failure to install the cover plate in the manner described may result in loss of enclosure
protection.

VisuNet XT 9700 Series
56
VisuNet XT 9700 Series
Field Maintenance and Repair
7.2.4 Fuse Replacement
The fuse holders are located on the I/O panel behind the junction box.
Remove the junction box by performing the following steps.
1. Loosen the twelve (12) captive Phillips-head screws securing the junction box to the
housing. Refer to Figure 5.1, if necessary.
2. Carefully pull the junction box away from the housing enough to gain access to the fuse
holders. Make sure not to strain the cables connecting the two (2) USB connectors to the
USB ports.
3. Remove the fuse holder by turning it counter-clockwise with a flat blade screwdriver and
pulling it out of the unit.
4. Pull the damadged fuse out of the holder and install a new fuse.
5. Insert the fuse holder into the unit and turn it clockwise to secure it.
6. Reinstall the junction box by following the procedure in Section 5.1.5.
Figure 7.18 Fuse Removal
Caution!
Power down the the VisuNet unit before beginning this procedure.
This procedure must be performed in a clean, non-hazardous environment free of dust
and contaminants. Make sure no liquids or dust particles penetrate the unit.
It is highly recommended that the service technician be properly grounded using a
grounding strap during this procedure.
Caution!
Failure to install the cover plate in the manner described may result in loss of enclosure
protection.

VisuNet XT 9700 Series
Replacement Parts
VisuNet XT 9700 Series
57
8Replacement Parts
8.1 I/O Panel Connectors
8.2 Fuses
8.3 Solid State Drive (SSD)
8.4 Power Supply
Connector P+F Part Number Mfgr Part Number
3-Pole TB 914605 Phoenix Contact 1828525
4-Pole TB 524095 Phoenix Contact 1827729
5-Pole TB 523164 Phoenix Contact 1827732
6-Pole TB 914686 Phoenix Contact 1827745
8-Pole TB 914603 Phoenix Contact 1827761
Fuse Position Fuse Value Product Type P+F Part Number
F1 10 A DC Non-Heater Unit XT-F10.0A-01
F2 12.5 A AC and DC Unit XT-F12.5A-01
SSD P+F Part Number
SSD (32-bit) XT-SSD-120-W7.32.1
SSD (64-bit) XT-SSD-120-W7.64.1
Power Supply P+F Part Number
DC Supply XT-PS-DC-1
AC Supply XT-PS-AC-1

VisuNet XT 9700 Series
58
VisuNet XT 9700 Series
Replacement Parts
THIS PAGE IS INTENTIONALLY LEFT BLANK

VisuNet XT 9700 Series
Appendix
VisuNet XT 9700 Series
59
AAppendix
A.1 Factory Restore Guide
A.1.1 Method A
1. Make sure all cables are securely connected (power, USB, monitor).
2. Power on the PC.
3. From the Windows 7 desktop, click the Start button.
4. Type “recovery”.
5. Click on the item entitled Recovery at the top of the list.

VisuNet XT 9700 Series
60
VisuNet XT 9700 Series
Appendix
6. In the window that is displayed, click the link that says Advanced recovery methods.
7. Select Reinstall Windows.
8. Click Back up now and follow the instructions to back up any personal data that you wish to
keep. (You can also choose Skip if you do not want to back up any data.)
9. Click Restart. The system will now reboot to the recovery environment.

VisuNet XT 9700 Series
Appendix
VisuNet XT 9700 Series
61
10.Please wait until the device has completely rebooted. At the System Recovery Options
window, click Next>.
11.Click Yes at the Reinstall Windows box. This message explains that the current (possibly
corrupt) Windows system files will be saved to a backup folder that is accessible once the
restore process is finished.
12.Windows setup will start.
13.Windows will install. After the installation is complete, the device will reboot.

VisuNet XT 9700 Series
62
VisuNet XT 9700 Series
Appendix
14.After the reboot, Windows 7 will walk you through the first boot procedure. Follow the
prompts as instructed.
15.After Windows 7 loads to the desktop for the first time, a Window will display asking you to
restore back up files. If you chose to back up your data in step 8, use this wizard to restore it
by clicking Restore my files; otherwise, click Cancel.
16.From the Windows 7 desktop, click the Start button.
17.Type “activate windows”.

VisuNet XT 9700 Series
Appendix
VisuNet XT 9700 Series
63
18.Click on the item entitled Activate Windows at the top of the list.
19.Click Activate Windows online now. NOTE: In order to complete this step, the device must
be connected to the internet.
20.Enter the Windows 7 product key included with your device. Click Next.
21.Windows will verify the product key you entered. When finished, click Ok.
For more help activating Windows see: http://windows.microsoft.com/enus/windows7/activate-windows-7-on-this-computer

VisuNet XT 9700 Series
64
VisuNet XT 9700 Series
Appendix
22.The factory restore process is now complete.
A.1.2 Method B
1. Make sure all cables are securely connected (power, USB, monitor).
2. Power on the PC.
3. As the device boots, hold down the F1 key.
4. A loading bar will display with the words Windows is loading files… above it.
5. At the System Recovery Options window, click Next>.
6. At the first window, enter the credentials for the device’s administrator account and click OK.
Here John Doe is used as an example.

VisuNet XT 9700 Series
Appendix
VisuNet XT 9700 Series
65
7. Select the last item on the menu: Reinstall Windows.
8. Click Yes at the Reinstall Windows box. This message explains that the current (possibly
corrupt) Windows system files will be saved to a backup folder that is accessible once the
restore process is finished.
9. Windows setup will start.
10.Windows will install. After the installation is complete, the device will reboot.

VisuNet XT 9700 Series
66
VisuNet XT 9700 Series
Appendix
11.After the reboot, Windows 7 will walk you through the first boot procedure. Follow the
prompts as instructed.
12.After Windows 7 loads to the desktop for the first time, a Window will display asking you to
restore back up files. Click Cancel.
13.From the Windows 7 desktop, click the Start button.
14.Type “activate windows”.

VisuNet XT 9700 Series
Appendix
VisuNet XT 9700 Series
67
15.Click on the item entitled Activate Windows at the top of the list.
16.Click Activate Windows online now.
NOTE: In order to complete this step, the device must be connected to the internet.
17.Enter the Windows 7 product key included with your device. Click Next.
18.Windows will verify the product key you entered. When finished, click Ok.
For more help activating Windows see: http://windows.microsoft.com/enus/windows7/activate-windows-7-on-this-computer

VisuNet XT 9700 Series
68
VisuNet XT 9700 Series
Appendix
19.The factory restore process is now complete.
A.2 Digital I/O Setting
Below are the source codes written in C, please take them for Digital I/O application examples.
The default I/O address is 6Eh.

VisuNet XT 9700 Series
Appendix
VisuNet XT 9700 Series
69

VisuNet XT 9700 Series
Appendix
VisuNet XT 9700 Series
70

VisuNet XT 9700 Series
Appendix
VisuNet XT 9700 Series
71

VisuNet XT 9700 Series
Appendix
VisuNet XT 9700 Series
72

VisuNet XT 9700 Series
Appendix
VisuNet XT 9700 Series
73

VisuNet XT 9700 Series
74
VisuNet XT 9700 Series
Appendix

VisuNet XT 9700 Series
75
VisuNet XT 9700 Series
Appendix

VisuNet XT 9700 Series
76
VisuNet XT 9700 Series
Appendix

VisuNet XT 9700 Series
Glossary
VisuNet XT 9700 Series
77
B Glossary
A – Ampere, Amps
AC – Alternating Current
Apk – Peak Amperage.
ATEX – Derived from the French term, ATmospheres EXplosibles, it is a directive that applies
to connectors intended for safe operation in and around potentially explosive
atmospheres and was originally a European Union Directive, although it is now
recognized in many parts of the world, including North America.
AWG – American Wire Gauge: A standardized wire gauge system used since 1857
predominantly in the United States and Canada for the diameters of round, solid,
nonferrous, electrically conducting wire.
BUS – A subsystem that transfers data between components inside a computer, or between
computers.
° C – Degrees Celsius (temperature measurement)
Cable Gland– A metal or plastic wire cable pass thru device that seals on the outer cable
sheath to prevent dust and moisture from entering the electrical or instrument
enclosure.
CCW – Counter-clockwise
cfg – Configuration
CU – Copper
CW – Clockwise
DC – Direct Current
EC – European Commission: The executive body of the European Union (EU) responsible
for proposing legislation, implementing decisions, upholding the Union's treaties, and
day-to-day running of the EU.
EDDL – Electronic Device Description Language: Technology used by major manufacturers
to describe the information that is accessible in digital devices.
Ethernet – A system for connecting a number of computer systems to form a local area network
(LAN), with protocols to control the passing of information.
° F – Degrees Fahrenheit (temperature measurement)
FCC – Federal Communications Commission: The FCC regulates interstate and
international communications by radio, television, wire, satellite and cable.
Fuse – A type of low resistance resistor that acts as a sacrificial device to provide overcurrent
protection by interrupting excessive current so that further damage by overheating or
fire is prevented from either the load or source circuit.
HV – High Voltage
IEC – International Electrotechnical Commission: A nonprofit organization headquartered in
Geneva, Switzerland, that develops and publishes standards concerning electrical
technologies. The world’s leading standards organization, the IEC standards reach
over 150 countries.
IECEx – The IECEx is the IEC system for the certification to standards for electrical equipment
for explosive atmospheres.

VisuNet XT 9700 Series
78
VisuNet XT 9700 Series
Glossary
IEEE – Institute of Electrical and Electronics Engineers: A professional association
headquartered in New York City that is dedicated to advancing technological
innovation and excellence.
IP66 – IP stand for Ingress Protection. It is a rating that describes the protection a fitting or
housing has from intrusion of solid and liquid material.
Junction Box– A dust and moisture proof covering that protects the I/O connectors, and also
provides a mounting surface for the Cable Glands.
kHz – Kilohertz (unit of Alternating Current)
kg – Kilogram
kW – Kilowatt (unit of power)
LAN – Local Area Network: A computer network that interconnects computers in a limited
area such as a home, school, computer laboratory, or office building.
LCD – Liquid Crystal Display
LED – Light Emitting Diode
LV – Low Voltage
NEMA – National Emergency Management Association: A nonpartisan, nonprofit association
dedicated to enhancing public safety by improving the nation's ability to prepare for,
respond to, and recover from all emergencies, disasters, and threats to our nation's
security.
OV – Over Voltage
OHT – Over Heat
OC – Over Current
PFC – Power Factor Correction: Also known as a Power Factor Controller; A feature
included in some computer and other power supply boxes that reduces the amount of
reactive power generated by a computer.
Power Supply – There are various definitions for power supply. In this application it pertains to
a device controlling the output voltage or current to a specific value; the controlled
value is held nearly constant despite variations in either load current or the voltage
supplied by the power supply's energy source.
RMS – Root Mean Square deviation
SOA – Safe Operating Area
SSD – Solid-State Drive: A computer hard drive
TFT LED-Backlit LCD Display – A flat panel LCD display using LED backlighting instead of
cold cathode flourescent (CCFL) backlighting used by most LCDs. LED-backlit LCD
uses the same TFT LCD (thin film transfer liquid crystal display) technologies as
CCFL-backlit displays.
UL – Underwriters Labratories: A safety consulting and certification company
headquartered in Northbrook, Illinois.
USB – Universal Serial Bus: An industry standard developed in the mid-1990’s that defines
the cables, connectors and communications protocols used in a bus for connection,
communication and power supply between computers and electronic devices.

Subject to modifications
Copyright PEPPERL+FUCHS
• Printed in Germany
www.pepperl-fuchs.com
Worldwide Headquarters
Pepperl+Fuchs GmbH
68307 Mannheim
· Germany
Tel. +49 621 776-0
E-mail: info@de.pepperl-fuchs.com
For the Pepperl+Fuchs representative
closest to you check www.pepperl-fuchs.com/contact
PROCESS AUTOMATION –
PROTECTING YOUR PROCESS
DOCT-B0H0D 04/17 04
 Loading...