

Visual Land PRESTIGE 7L User Manual
Android
Internet
Tablet
- User's Manual
TABLE OF CONTENTS
4.Wl~I
1. GETIING STAR
TED
T
um
On
and Connect
to
W
i~i.
............
Page
23
Understanding This
User
Manual..
....
Page
2
Add/Forget
a
Wi~
i
Ne
two
rk
..............
Page
24
Batte
ry
.........................................
Page
3
Configure
Proxy/Set
Options
..............
Page
25
Tum
ing your Device
On/Off
..............
Page
4 5.
CONNECTIONS
Memory
Card
................................
Page
5
Connect
to
PC
.................................
Page
27
Lock Screen
..................................
Page
5
Connect
to
VPN
...............................
Page
28
2. UNOERSTNOING
YOUR
DEVICE
6. ACCOUNTS ANO SYNC
Package
Contents
..........................
Page
7
Add/Remove
Accoun
ts
.....................
Page
30
Key Features
.................................
Page
7
Configure Sync Settings
....................
Page
32
The Device
....................................
Page
B
7.
BACKUP.
RESET&.
SECURITY
Navigating Your Device
....................
Page
10
Change Backup
&.
Reset Options
.........
Page
34
Touch
&.
Type
................................
Page
12
Use
the
Lock
Scre
en
........................
Page
35
Status
Bar
....................................
Page 13
Set
Screen Lock
.....................
......... Page
36
Home Screen
................................
Page
14
Encrypt Your Device
.........................
. Page
37
Wallpaper ..
.................................
.. Page
15
Certificates
.........
.........
...................
Page
39
3. USING
APPS
Keyboard Usage
......................
...... Page
17
SAF
ETY
INFORM
ATI
ON
..........
.........
...
... Page 42
Optimize Memo
ry
Usage ..
.......
.......
..
Page
1 B
Use
the
Apps Screen .
.....................
Page
19
Use Your Camera
........................... Page
21
Manage Your Calendar
..............
.... ..
Page
21
02
012
Visual Land Inc.
www
.
viaue~land
.
com
P
age
1

Android
Internet
Tablet
-
User's
Manual
SECTION
1:
Getting
Started
1.
1 : : Understanding This
User
Manual
The sections
of
this
manual generally follow
the
features
of your device. This manual gives
navigation
instructions
according
to
the
default display settings. If you
select
other
settings, navigation
ste
ps may be different. Unless
otherwise
specified, all
instructions
in
this
manual assume
that
you are
starting
from
a Home screen.
Note
: Instructions in
this
manual
are
based on default settings,
and
may
vary
from
your
device, depending on
the
software
version on
your
device.
and
any
changes
to
the
device's
Settings. Unless
state
d otherwise,
instructions
in
this
User
Manual
start
with
the
device
unlocked,
at
the Home screen. All
screen
images
in
this
manual
are
simulated.
Actual
displays
may
vary, depending on
the
software
version
of
your device
and
any changes
to
the
device's settings.
->
Arrows
represent
the
sequence
of
selecting successive options
in
longer,
or
repetitive,
procedures. For example: "From a Home screen,
press
the
Menu Key -> Settings ->
Wireless
and Ne
twork
->
Wi-Fi
Settings."
C2012
Visual Land
Inc.www.viaua~land
.
com
Page 2
Android
Internet
Tablet
-
User's Manua
l
1.2
::
Battery
You
r device is powerd by a rechargeable, standard Li-ion
battery
. A
charger
has been in-
cluded
to
charge your device.
It
can also be charged
by
connecting
the
device
to
a PC wi
th
the
included USB cable. However, charging via USB takes longer than using
the
included
charger.
Note
: The
battery
comes
partially charged.
You
must
fully charge
the
battery
before
using
your device
for
the
first
time.
After
the
first
charge, you
can
use
the
device while charging.
1.3
::
Battery
Indicator
In
the
status
bar
at
the
botom
right
of
the
screen,
there
is a battery
icon whic
h shows
the
battery
power level.
When
battery
power is
15%
or
less, your device will
prompt
you
to
charge
the
battery
. If you continue
to
operate
the
device
without
charging,
the
device will
power
off.
1.4
::
Charging
the
Battery
Connect
the
included charger
to
your device and plug
the
charging head into a standard AC
power outlet. Or connect your device
to a PC
(make sure
the
PC
is
powered on) with
the
in-
cluded
USB cable. Your device should show a
battery
indicator on
the
screen showing
the
unit is charging. Once charging is complete, unplug
the
charging head
from
the
power
C20
12 Visual Land
Inc.www.llisua~land
.
com
Paga 3

Android
Internet
Tablet - User's Manual
outlet
or
unplug
the
USS
cable
from
the
PC
and remove
the
cable
from
the
device.
Important
: Do
not
leave your
battery
charging
for
more
than one week. Doing so
runs
the
risk
of
overcharging
the
battery
and
shortening
its
total
life span.
If
the device
is
not
used
for
an extended
period
of
time.
the
battery
will slowly discharge
and
the
device will need
to
be recharged
before
using again. Unplug
the
charger
from
the
wall when
it
is
not
being
used. Use only a Visual Land
battery
in
the
device
and
a Visual Land
charger
to
charge your
device.
1.5
:: Turning Your Device On and
Off
To
power
on
the
device,
press
and hold
the
Power Key located
at
the
top
right
of
the
device
for
2-3 seconds. The loading
scren
will appear and
it
will
take a few
minutes
to
load up
the
Home screen.
To
power
off your device,
press
and hold
the
Power Key located
at
the top
right
of
the
device
for
2-3 seconds.
At
the
prompt,
select
"Ok".
The device will
take
a couple seconds
to
fully
power
off.
C20
12 Visual Land
Inc.www.llisua~land.com
Paga 4
Android
Internet
Tablet - U
ser's
Manual
1.6
:: Memory Card
Your device
supports
removable MicroSD and MicroSDHC
memory
cards (up
to
32GB)
for
storage of music, pictures, videos and
other
files.
To
load a
memory
card
into
the
device,
with
the
gold
contacts
facing up
for
the
Pres
-
tige 7 and
7L/gold
contacts
facing down
for
the
Connect, carefully slide
the
memory
card
into
the
slot,
pushing gently
until
it
clicks in place.
To
remove
the
memory
card ,
from
the
Home screen. touch
the
clock
to
bring up
that
window and then touch
the
settings icon
in
the lower
right
corner
. This will expand
the
menu
further
. Touch "Settings•. Select "Storage· under Device then scroll down on
the
right
side
to
EXTSD.
Touch "Unmount SD
card"
. Select "OK"
at
the
prompt
. The device will unmount
the
SD card.
Wait
until
it
shoulds
"Mount
SD card" under
EXTSD.
Once
it
does,
the
card
is
now ready
to
be removed. Gently press down on
the
memory
card, so
that
it
pops
out
from
the
slot. and carefully pull
the
card out.
1 . 7 : : Lack
Screen
By default,
the
device locks automatical
ly
when
the
screen
times
out,
or
you can lock
it
man-
ually.
To
lock
it
manually, press
the
Power
key
at
the
top
right
of
the
device.
To
unlock
the
device,
press
the
Power
key
. then
touch
and drag
the
Unlock icon
to
the
right
of
the
screen.
C20
12
Visual Land
Inc.www.llisua~land
.
com
Paga 5
Android
Internet
Tablet -
User's
Manual
Note
: For added security you
can
set
up a
pattern
, PIN
or
password lock.
To
do
this
, see
the
section
later
in this manual
about
how
to
·set
Screen Lock·.
IMPORTANT
:
You
must
remember
your
pattern.
PIN
or
password you
set
.
If
you
forget it,
there
is no
way
of
retrieving
or
resetting it.
You
will have
to
factory
reset
your device and
will lose your settings. any apps you have installed
as
well
as
any files you have saved.
C20
12 Visual Land
Inc.www.llisua~land.com
Paga 6
Android
Internet
Tablet
- U
ser's
Manual
SECTION
2:
Understanding
Your
Device
2.1
::
Package
Contents
• Visual Land
Android
Internet Tablet
• Power Supply
• USB cable
• Headphones
• This
User
Manual
2.2
::
Key
Features
• Android Operating Sys
tem
•
7"
5 Point
Multi-tou
ch Capacitive Screen
(800x480)
• ARM Cortex AB Proces
sor
!Connect/Prestige
7: 1.
2GHz;
Prestige 7L
: 1 G
Hzl
•
BGB
Internal
Memory
with MicroSDHC expandable card
slot
(up to 32GBJ
•
802
.11
b/g/n
Wi-Fi
•
Front
Facing Camera (Still I Video I Webcam)
• Internal Rechargeable Li-ion
Battery
• HO Video Player supporting
H.263,
H.264,
MPEG4, 3GP and
WMV
(v9)
formats
•
Mu
sic Player supporting
WAV,
MP3,
AAC, AAC+ and
WMA
(v9/10)
formats
• Picture Gallery supporting
JPEG,
PNG,
GIF
and
BMP
formats
C20
12 Visual Land
Inc.www.visua~land
.
com
P
age
7

Android
Internet
Tablet - U
ser's
Manual
2 .3 :: The Device -
CONNECT
Model
1.
Power Key: Press and hold
to
power device
on/off
. Press
to
lock device
or
to
wake
screen
for
unlocking.
2. Menu Key: Press
to
display options
for
the
current
screen.
3.
Home Key: Press
to
go
to
the Home screen.
4.
Back Key: Press
to
return
to
previous screen
or
option.
5.
Volume
Up/Down
Keys: Press
to
raise
or
lower volume.
6.
camera:
Used
for
taking
still/video
or
as a webcam .
7. 3.
5mm
Headset Jack: Plug in an option headset
or
nY
equipment.
8.
External Speaker: Used in music
or
video playback.
9.
Memory Card Slot: Install
a memory
card
for
storage
of files.
10 . DC-IN:
5V
/2A
11 . Mini USS
Port:
Connect
your device
to a PC.
12.
Reset
Key:
Reset
the
device.
©2011
Visual Land I
nc.
www
.
visua~land.com
Page
8

Android
Internet
Tablet - User's Manual
2.4
::Navigating
Your
CONNECT
Use
command
keys and
the
touch
screen
to
navigate.
Command Keys
1.
Menu
Key
Press
the
Menu
Key
to
display
options
for
the
current
screen
or
feature
.
2.
Home
Key
Press
the
Home
Key
to
display
the
Home
screen
.
3 .
Back
Key
Press
the
Back
Key
to
return
to
the
previous
screen,
option or
step
.
4. Recent apps: Opens a
list
of
thumbnail
images
of
apps
you've
work
ed
with
recently.
To
open an app,
touch it.
To
remove a thumbnail
from
the
list, swipe
it
left
or
right.
You can navigate using
the
physical
button
s on
the
side of
the
unit
or
from
the
status
bar
at
the
bottom
left
of
the
screen
.
When
r!Jnning apps, you may
often
find
the
on-screen
Menu
key
at
the
top
right
of
the
screen
msteai:J
of in
the
Status
Bar.
Physical
Buttons
--
Menu
Ho
me
Back
©2012
Visual Land I
nc.
www
.
visua~land.com
Status
Bar
Back Home Recent M
enu
Aoos
Page
9

Android
Internet
Tablet -
User
's Manual
2 .3
::
The Devic
e·
PRESTIGE 7
Model
1. Power Key: Press and hold
to
power device
on/off
. Press
to
lock device
or
to
wake
screen
for
unlocking.
2. Volume
Up/Down
Keys: Press
to
raise
or
lower volume.
3. Camera: Used
for
taking
still/video
or
as
a webcam.
4. 3.
5mm
Headset Jack: Plug in an
option headset
or
TIY equipment.
5. Mini
USB
Port
: Connect your
device
to a PC
.
6 . Mini HOMI
Port
: View your
device
on
an
HO
capable
lV
.
!Not
available
on
Prestige
7LJ
7. Memory Card Slot: Install a
memory card
for
storage
of
files.
8.
DC.
IN:
5V/2A
9.
Mic: Used
for
recording
or
VoIP
apps .
10
. External Speaker: Used
in
music
or
video playback.
11. Reset Key: Reset the device.
02
012
Visual Land Inc.
www
.
viaue~land.co
m
1 0 (on back of un
it
)
1 2
11
(on back
of unit
)
4
5
6
7
8
9
Page
10
Android
Internet
Tablet
- U
ser's
Manual
2.4
:: Navigating Your PRESTIGE 7
In
the
status
bar
at
the
bottom
left of
the
screen, you'll find
three
Navigation buttons .
They're always available. No
matter
what
you're doing with your device, you can always
get
back
to
the
main Home screen
or
return
to
previous screens .
After a short
time
without
getting used, these
buttons
may shrink
to
dots
or
fade
away,
depending on
the
current
app.
To
bring
them
back,
touch
their
location.
Ill
Back: Opens
the
previous screen you
were
working in, even
if
it
was
in a different
app. Once you back up
to
the
Home screen, you
can't
go back any
further
in
your history.
1111
Home: Brings you
to
Home Screen. If you're viewing a
left
or
right
Home screen,
opens
the
central
Home screen.
II
Recent apps: Opens a
list
of thumbnail images of apps you've worked with recently.
To
open an app, touch it.
To
remove a thumbnail
from
the
list, swipe
it
left
or
right.
II
Menu: Located next
to
the
three
navigation buttons,
this
will bring up
further
tools
you can use on
the
home screen.
You
will also frequently see
this
icon in apps,
usually
at
the top
right
of
the
screen,
to
bring up menu options
for
the
current
app you are running.
C2
012 Visual La
nd
Inc.
www.llisua~la nd.co
m
Paga 11

Android
Internet
Tablet - User's Manual
2.5
::
Touch & Type
Us
e your
fingers
to
manipulate icons,
buttons
, menus,
the
onscreen keyboard, and
other
items
on
the touchsc
reen .
You
can also change
the
screen's
orientation .
To
sel
ect
or
acti
-
vate so
mething, touch it.
To
type something, such as a name , pass
word
, or
search
terms,
just
touch
where
you
want
to
type. A keyboard pops up
that
lets
you type into
the
field .
Other common gestures include:
• Touch
& Hold: Touch and hold an
item
on
the
screen
by
touching
it
and
not
lifting your finger until
an
action occurs.
• Drag: Touch and hold
an
item
for a moment
and then,
without
lifting your finger, move your
finger
on
the
screen until you reach
the
target
position. For example ,
you
can
drag
to
reposition
shortcuts
on
the
Home screen.
• Swipe
or
Slide: Quickly move your
finger
across
the
surface
of
the
screen,
wit
hout
pausing when you
first touc
h (so you
don't
drag
something instead). For example, you can slide a Home screen
left
or
right
to
view
the
other
Home screens.
• Double-tap:
Tap
quickly twice on a webpage,
map, or
other
screen
to
zoom. For example, double-tap
a webpage in
Brow
ser
to
zoom in. and double-
tap
again
to
zoom
out
.
• Pinch: In some apps (such
as Maps.
Browser
. and Gallery). you can zoom in and
out
by
placing
two
fingers on
the
screen
at
once and pinching
them
together
(to zoom out)
or
spreading
them
apart
(to
zoom in).
• Rotate
the
Screen:
On
most
screens,
the
orientation
of
the
screen
rotates
with your
device
as
you
turn
it.
You
can change this
Display setting.
©2012
Visual Land I
nc.
www
.
visua~land.com
Page
12
Android
Internet
Tablet - User's Manual
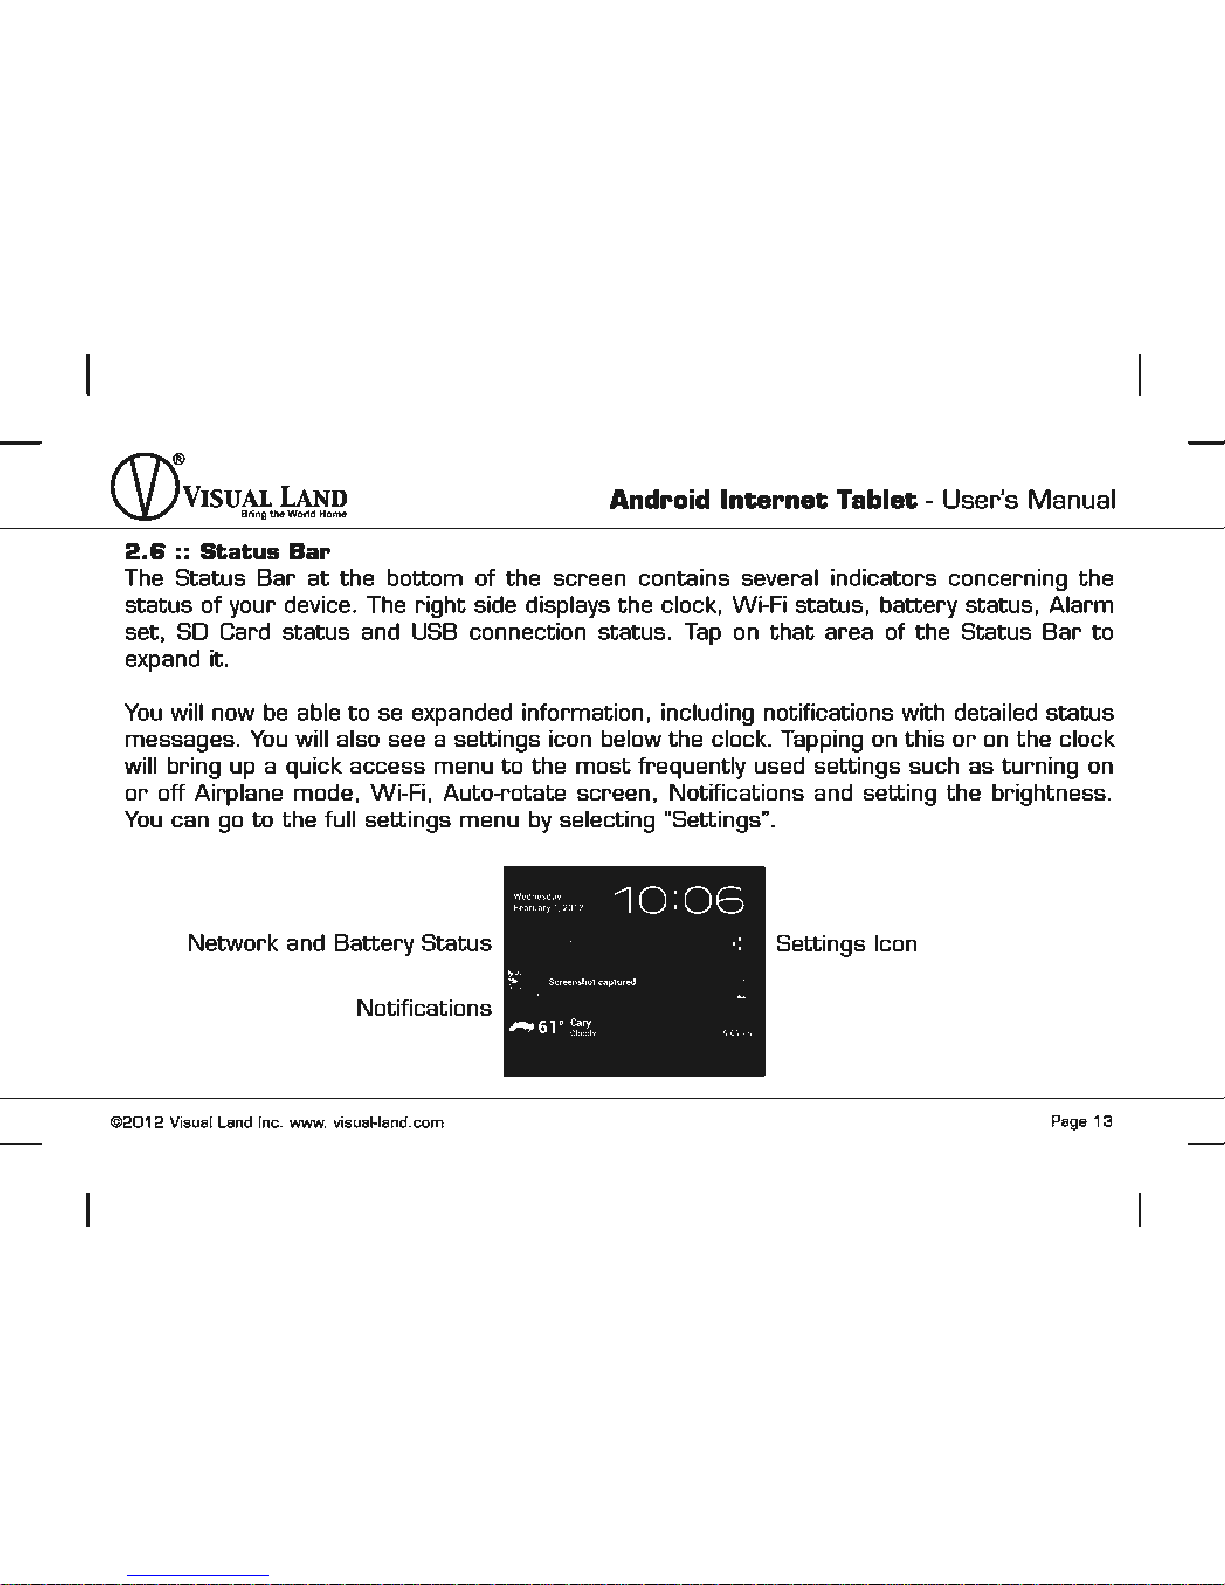
2.6
::
Status
Bar
The
Status
Bar
at
the
bottom
of
the
screen contains several indicators concerning
the
status
of
your device. The
right
side displays
the
clock, Wi-Fi
status,
battery
status,
Alarm
set, SO
Card
status
and USS connection status. Tap on
that
area
of
the
Status
Bar
to
expand it.
You
will now
be
able
to
se expanded information, including notifications with detailed
status
messages.
You
will also see a
sett
ings icon below
the
clock. Tapping on
this
or
on
the
clock
will bring up a quick
access
menu
to
the
most
frequently used
settings
suc
h as
turn
ing on
or
off
Airplane mode, Wi-Fi, Auto-rotate screen, Notifications and
setting
the
brightness.
You
can go
to
the
full
settings
menu
by selecting "Settings".
Network
and
Battery
Status
Settings Icon
Notifications
©2012
Visual Land I
nc.
www
.
visua~land.com
Page
13
 Loading...