

Visual Land DAZE Quick Start Manual
Quickstart Guide
Thank you for purchasi ng this Visual L and
Player. Please rea d t hrough the user
manual in order to understa nd t he
funct ions of your n ew player.
Adding Your File s to the Player
When connec ted t o a PC, t he pl ayer acts
as a standa rd USB-Disk drive, supportin g
Window s 98SE/ME/2000/X P/Vis ta.
Once your player is detect ed, you simply
drag and drop or cu t and paste the files
that you wish to save to the playe r’s internal
memor y.
Charging th e Player
Your play er can b e charge d throu gh eithe r
a USB wall charger or by bei ng directl y
connec ted to the computer. Please note
that char ging times va ry betwe en these
two methods, t he wall charger is the
quicker m ethod.
NOTE: M ake sure that yo ur playe r is in t he
“ON” po sition in ord er for charging to t ake
place.
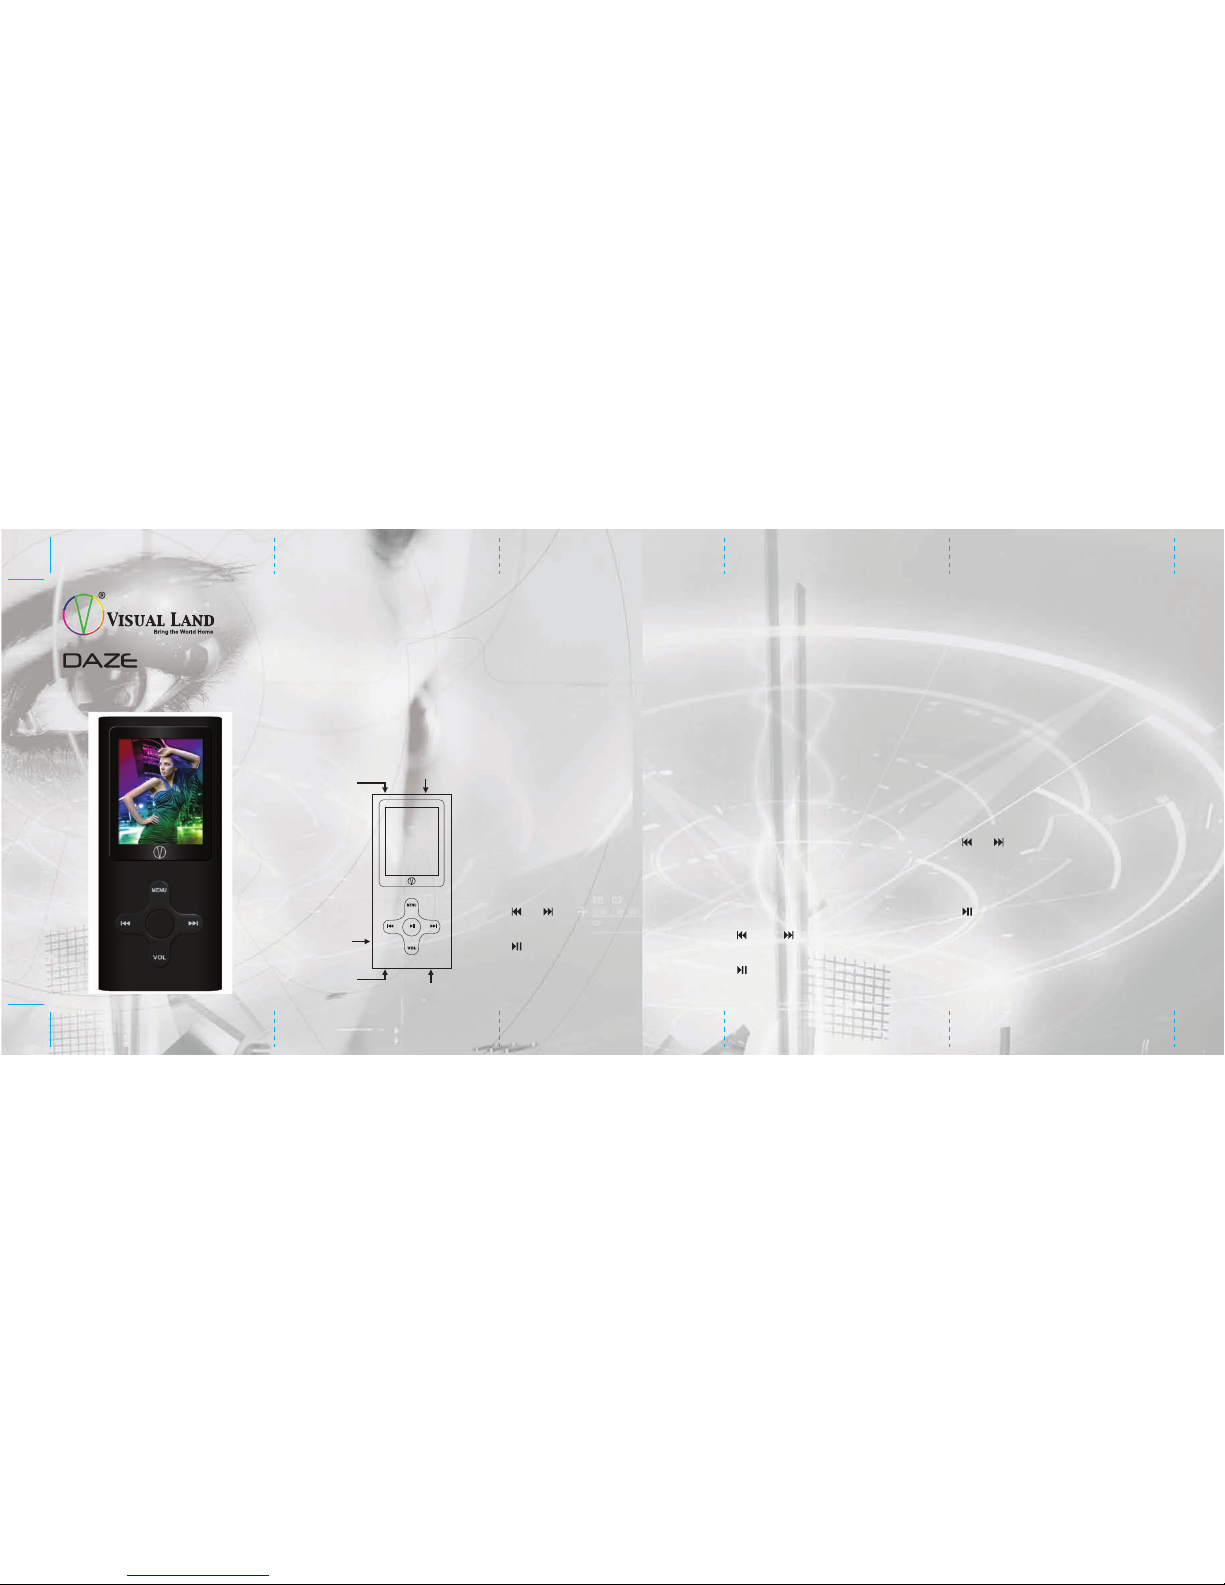
Buttons
To access the vario us functio ns of the
player, simply hol d down or press the player
butt ons as descr ibed below :
MENU: Ent er sub men us or selec t optio ns.
Holding down th e menu button will let you
retu rn to the main m enu.
and : Scroll t hrough yo ur music, vid eo
and othe r options.
VOL: Adjus t the volume.
: Star t and stop music or vi deos. Holding
down th is butto n will shut down the pla yer.
GENERAL O VERVIEW
Video Pla yback
MP3/WMA Play back
Jpeg Pic ture View er
Voice Reco rding
Various Pl ayback Mode s
Multip le Language Su pport
•
•
•
•
•
•
BASIC FE ATURES:
Turning on the Playe r
To turn on the player, simply swi tch the
player to the “ON ” positi on. The on/off
swit ch is located on the top lef t of the
player. If your playe r is already swit ched on,
hold dow n the play but ton.
Main Menu
Below are the sub menu’s that can be found
on your pla yer’s main menu :
Music: Li sten to yo ur music fil es
Movie: P lays the vi deos you have s aved
Record : Record with the bui lt-in
microp hone
Voice: Pla ys your rec ordings
Photo : Displays yo ur pictur es
Setup : Change the se ttings o n your player
E-Book : Read tex t files
To se lect an option from the ma in m enu,
scroll to the option and press the MENU
butt on. To enter t he sub menus, p ress the
menu but ton afte r selecting an opt ion from
the main me nu.
Music
To En ter the Music S ub Menu, press the
MENU butt on on ce, t o se lect any option s
while in the Music Sub M enu, also press
the MENU bu tton.
and : Scroll throug h your music
selec tion.
VOL: Allow s you to ent er the volum e menu.
: Star ts and paus es your music
Changing Fold er/Playback Funct ions
While music play back is stopped, pres s
the MENU butt on once, this will take you to
the folder se lect option. The MENU butt on
is used to select any fold er and or song you
wish to pl ayback. While music is play ing,
press ing the MENU b utton w ill take y ou to
the p layback options menu. You can
change the repeat options and equalize r
sett ings. Use t he MENU button to select
optio ns.
Movie
NOTE: In or der to view yo ur video file s, you
must first conver t the f ile and movie s ize.
Please see t he se ction titled “Video
Conver sion” for mo re inform ation.
To Ent er t he Mo vie Sub M enu, pr ess the
MENU but ton once, to s elect any op tions
while in the Music Sub M enu, al so p ress
the MENU bu tton.
and : Scro ll through y our video f iles.
VOL: Pr ess onc e to enter the men u, then
using the s croll butto ns to raise or l ower
the v olume, fi nd your desired sett ing, and
press VOL agai n to exit. You can only enter
this men u when a video is n ot playing.
: Star t and pause yo ur video.
Sub Menu
You can select a fol der to play or delete
files fr om the sub menu by press ing MENU
once whi le music is not p laying.
Power Sw itch
Headphon e
Jack
Speaker
(Back)
USB Port
Mic
Record
Press the MENU but ton to ente r t he
Record Sub Menu. Hold to return to the
main menu. Pres s MENU in record Sub
Menu to confirm an option. Press MENU
aft er record ing to save y our recor ding.
and : Sub men u only. Scroll through
optio ns.
: Start and pause recordin g. From this
sub men u, you can s elect w here you would
like fil es to be save d and the reco rd type.
Record Type s
Fine Recording: WAV For mat, high sound
qualit y.
Long Record ing: ACT Format, consis tent
qualit y.
Fine VOR: WAV Forma t, sound cont rol.
Long VOR: AC T Format, so und contr ol.
(VOR mode i s a sound act ivated r ecording)
Photo
Press t he MENU butt on to enter t he Photo
Sub Menu. Hold MENU to return to the
main menu.
Press the MENU button in the Photo Sub
Menu to co nfirm an op tion.
and : Scro ll through y our pictu res.
: View th e current s elected p icture.
From this sub men u, you can select a
diff erent folde r to view, delet e files, and
star t the sli deshow op tion thr ough Play
Set.
E-Book
Press the MENU but ton to enter the E-book
Sub Menu. When the desired text file has
been highli ghted pres s the MENU button to
view it .
and : Scro ll through t he text .
: Read the cu rrent te xt file
Set Up
Below are br ief descrip tions of the set tings
that can be ch anged fr om the Set Up
menu.
Date & Ti me: set the t ime and date
LCD Set: change the bright ness and the
time (in second s) before the scree n will
turn dar k when idle.
Languag e: cha nge t he lan guage of the
player
Power Sav ing: change the time (in seconds)
befor e the player w ill turn of f when idle.
Replay M ode: choos e betwe en manual an d
auto r eplay
Memory Info : vi ew h ow m uch m emory
remain s.
Firmw are Version: view the f irmware
versi on.
Video Co nversion
In o rder to be able to play vi deo f iles, y ou
will need to use the pro gram that is locat ed
in th e playe r. Connect your pl ayer to yo ur
comput er via the USB c able. Once your
player is de tected, loc ate the AMV
Conver sion Tools folde r in the playe r and
simply r un the SETUP f ile to inst all the
progr am.
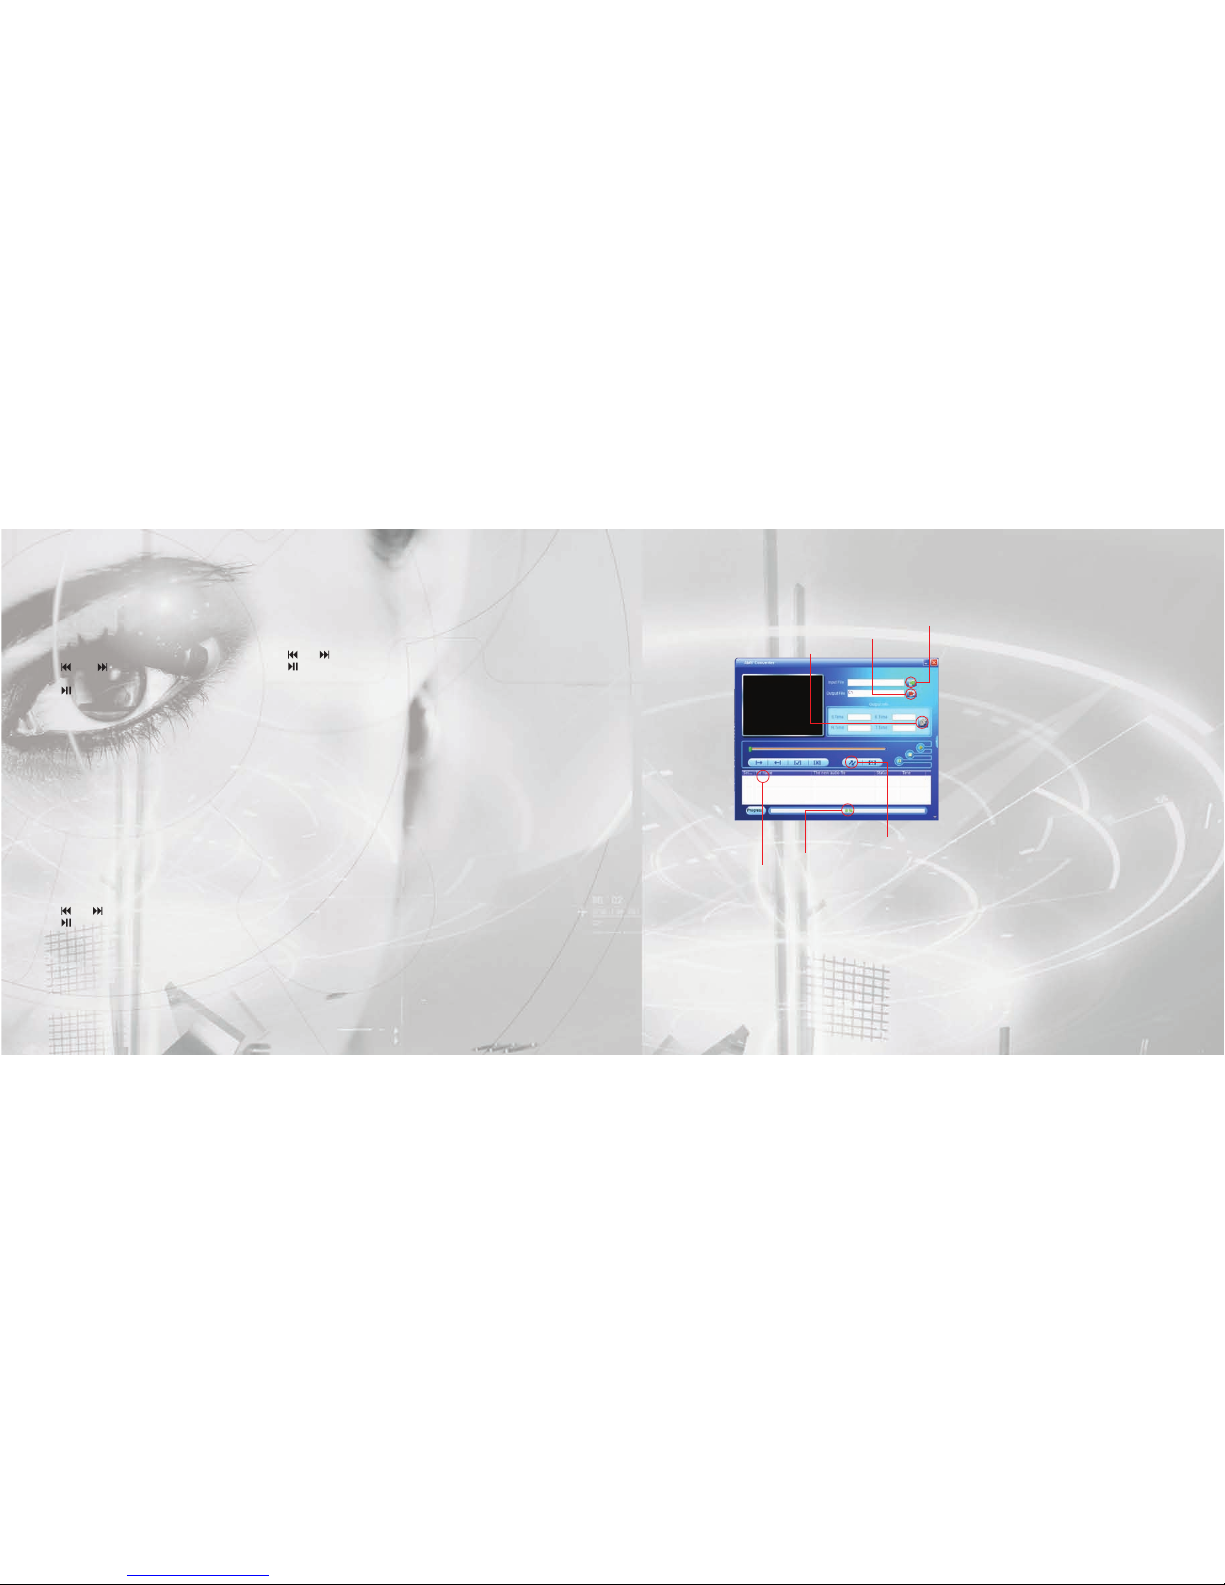
1. Once the setup is c omplete, locate the
newly instal led MP3 Pl ayer Ut ilities in your
Star t Menu and clic k on AMV conve rt tool.
2. Cl ick o n the "Input file" icon to f ind the
file that you are look ing to convert and click
on the “Outpu t file” icon and save the file to
your com puter.
3. Now click on the icon with two arrow
(tool tip will show "Begin" if you put your
curso r on the ar rows) to s tart the
conver sion. Once the conversion is done
the pro gram will pla yback the A MV file.
Note: Pleas e cli ck on help for furt her
infor mation; it is the squa re box next to the
two ar rows.
4. To transfe r the converte d AMV file onto
your player, f irst connect the Visual Land
player to yo ur compute r and copy and
past e the AMV file i nto the pla yer folder.
5. To access t he AMV fil e from yo ur Visual
Land player, go into the "Movie" menu of the
player, the file sh ould show up. Press "Pla y"
to view y our file.
AMV Conve rter Soft ware
Troubleshoot ing
Cannot f it more than 99 file s onto the
player:
To fix thi s problem, c reate a new folder on
your pl ayer and ins ert you r files th ere.
Please do no t i nsert a subf older withi n a
subfol der, as the player w ill not read i t.
Short b atter y life:
The scr een can drain t he batt ery life o f
your player. To incre ase the batter y life, we
sugges t that yo u change th e bright ness to
a lo wer se tting & low er the time i t tak es
for the p layer scre en to turn o ff when idl e.
Unable to d ownload mu sic files:
Check whe ther the USB is conn ected
prope rly or damage d.
Try rest arting th e computer o r using a
diff erent USB po rt.
Ensure t he player’s me mory is not f ull.
For fur ther det ails on how to use y our
player, con sult the full PDF man ual locat ed
inside the p layer or downloa d it from our
websi te: http://www.visual- land.com
If you ha ve a proble m with yo ur player
please visi t o ur w ebsite and view our
suppor t pages.
Copyr ight © 2011 Visual Land Inc.
Click to s elect “Input Fil e” to be conve rted
Click to s elect “Outpu t Folder” and “File name”
Click to c hange “Setti ngs”
Click to b egin “Convers ion”
“Conve rsion” pro gress st atus
Files to b e converted
 Loading...