

Page 1
WE RECOMMEND INSTALLATION OF THIS LIGHTING FIXTURE BE DONE BY A LICENSED ELECTRICIAN.
WARNING *** SWITCH OFF THE MAIN ELECTRICAL SUPPLY FROM THE MAIN FUSE BOX/CIRCUIT
BREAKER BEFORE INSTALLATION.
INSPECT ITEM CAREFULLY BEFORE ATTEMPTING TO INSTALL. IF THERE IS ANY DAMAGE OR
OBVIOUS DEFECT, DO NOT INSTALL.
ITEM MAY NOT BE RETURNED ONCE IT HAS BEEN INSTALLED.
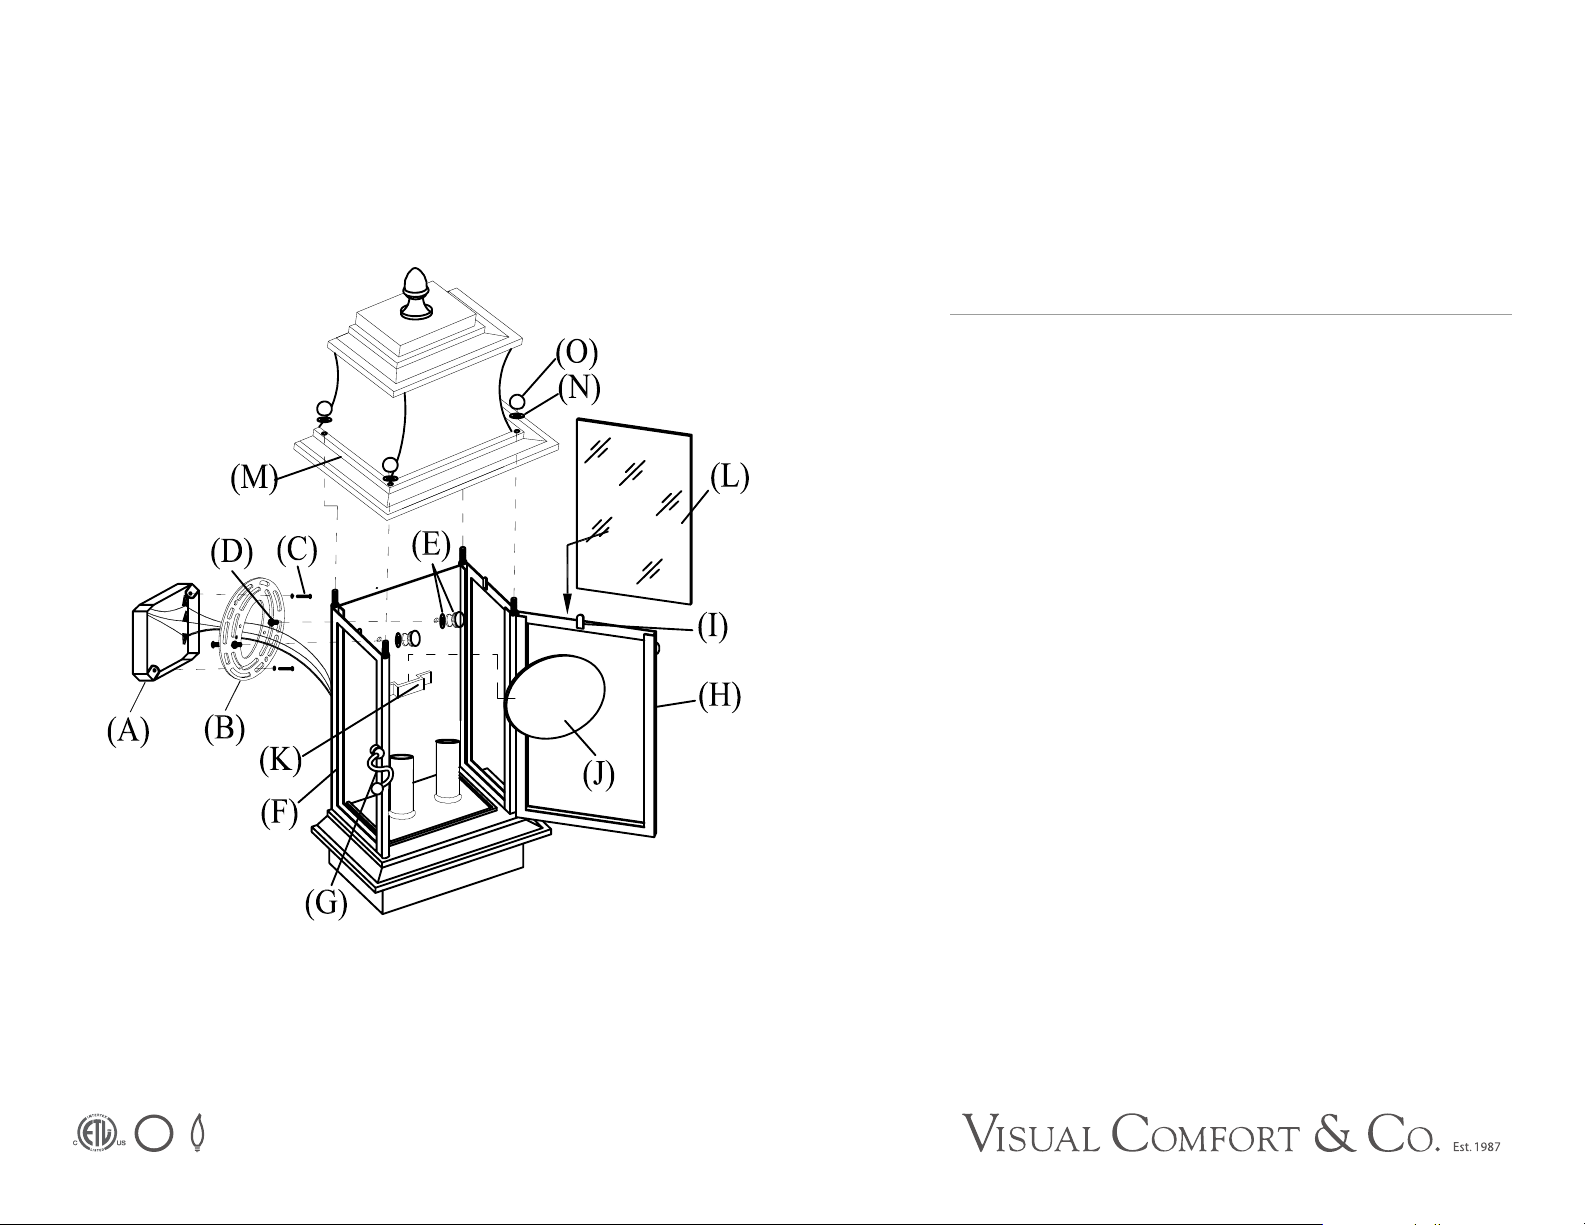
1. Position mounting plate (B) diagonally so that the holes of mounting plate (B) and wall outlet (A) are aligned. Tighten
mounting plate (B) onto wall outlet (A) with screws (C).
2. Attach the ground (green) wire to the ground wire from the wall outlet box (usually green or copper in color), and
fasten together with a plastic wire connector. Tightly wrap the wire connector with electrical tape so the end of the
connector is sealed. IT IS IMPERATIVE THAT THE OUTLET BOX IN YOUR HOME BE PROPERLY GROUNDED.
3. Connect neutral (white) fixture wires to neutral (usually white) wire from wall outlet box (A). Fasten both wires
together with a plastic wire connector and tightly wrap the wire connector with electrical tape.
4. Repeat the procedure with the hot (black) wires. Always make sure that no wire strands are left outside
the connectors. DO NOT REVERSE THE HOT AND NEUTRAL CONNECTIONS OR SAFETY WILL BE
COMPROMISED.
5. Gently push lantern box (F) onto outlet box (A), letting rods (D) pass through the holes on back plate of lantern box
(F).
6. Position the light fixture and tighten by screwing washers/cap nuts (E) to the exposed part of rods (D) in clockwise
direction. Remove lantern box cap (M) by unscrewing cap nut (0) & washer (N).
7. To install glass panel (L) provided to front section, make sure the metal tab (I) is flipped up. Place glass panel to the
frame, secure the glass panel by bending back the metal tab (I) downwards. Repeat this procedure for the other two
sides of lantern box (F).
8. Attach light reflector (J) to hook (K). Note: Insert from the top opening of lantern box (F).
9. Replace lantern box cap (M) on top of lantern box (F) and secure with cap nut (0) & washer (N).
10. Insert light bulbs (not included) into sockets. Close front door (H) and secure with key (G).
11. INSTRUCTIONS FOR MOUNTING FIXTURE OUTDOORS AND/OR IN WET LOCATION:
WET
ASSEMBLY INSTRUCTIONS
Club Door Small Lantern
Item # CHO2401
WE RECOMMEN D INSTALLATION OF THIS LIGHTI NG FIXTUR E BE DON E BY A
LICENSED E LECTRICIAN.
WARNING *** SWITCH OFF THE MAIN ELECTRICAL SUPPLY FROM THE MAIN
FUSE BOX/CIRCUIT BR EAKER B EFOR E INSTALLATION.
INS PECT ITEM CAREFULLY BEFORE ATTEMPTING TO INSTALL. IF THE RE IS
ANY DAMAGE OR OBVIOUS DE FECT, DO NOT INSTALL.
ITEM MAY NOT BE RETURN ED ONCE IT HAS B EEN INSTALLED.
1. Position mounting plate (B) diagonally so that the holes of mounting plate (B)
and wall outlet (A) are aligned. Tighten mounting plate (B) onto wall outlet (A)
with screws (C).
2. Attach the ground (green) wire to the ground wire from the wall outlet box
(usually green or copper in color), and fasten together with a plastic wire
connector. Tightly wrap the wire connector with electrical tape so the end of the
connector is sealed. IT IS IMPERATIVE THAT THE OUTLET BOX IN YOUR
HOME BE PROPERLY GROUNDED.
3. Connect neutral (white) fixture wires to neutral (usually white) wire from wall
outlet box (A). Fasten both wires together with a plastic wire connector and
tightly wrap the wire connector with electrical tape.
4. Repeat the procedure with the hot (black) wires. Always make sure that no wire
strands are left outside the connectors. DO NOT REVERSE THE HOT AND
NEUTRAL CONNECTIONS OR SAFETY WILL BE COMPROMISED.
5. Gently push lantern box (F) onto outlet box (A), letting rods (D) pass through the
holes on back plate of lantern box (F).
6. Position the light fixture and tighten by screwing washers/cap nuts (E) to the
exposed part of rods (D) in clockwise direction. Remove lantern box cap (M) by
unscrewing cap nut (0) & washer (N).
7. To install glass panel (L) provided to front section, make sure the metal tab (I)
is flipped up. Place glass panel to the frame, secure the glass panel by bending
back the metal tab (I) downwards. Repeat this procedure for the other two sides
of lantern box (F).
Page 2
WE RECOMMEND INSTALLATION OF THIS LIGHTING FIXTURE BE DONE BY A LICENSED ELECTRICIAN.
WARNING *** SWITCH OFF THE MAIN ELECTRICAL SUPPLY FROM THE MAIN FUSE BOX/CIRCUIT
BREAKER BEFORE INSTALLATION.
INSPECT ITEM CAREFULLY BEFORE ATTEMPTING TO INSTALL. IF THERE IS ANY DAMAGE OR
OBVIOUS DEFECT, DO NOT INSTALL.
ITEM MAY NOT BE RETURNED ONCE IT HAS BEEN INSTALLED.
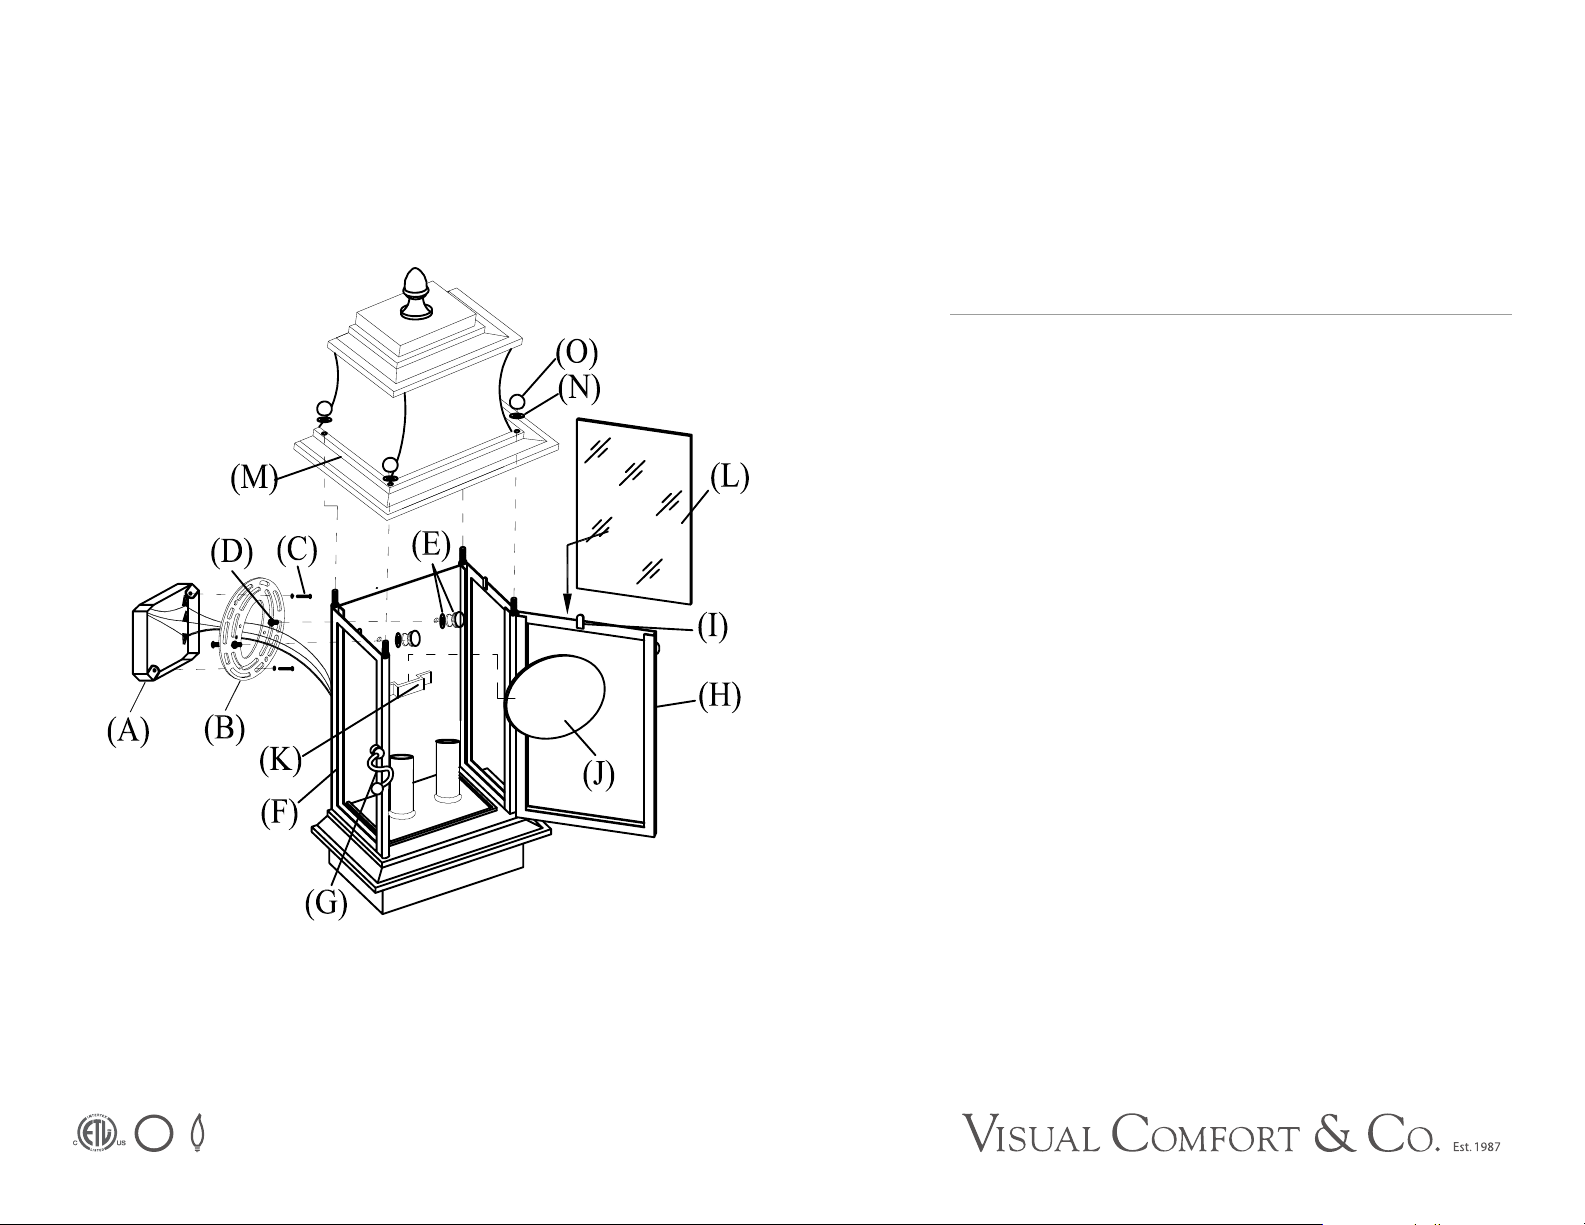
1. Position mounting plate (B) diagonally so that the holes of mounting plate (B) and wall outlet (A) are aligned. Tighten
mounting plate (B) onto wall outlet (A) with screws (C).
2. Attach the ground (green) wire to the ground wire from the wall outlet box (usually green or copper in color), and
fasten together with a plastic wire connector. Tightly wrap the wire connector with electrical tape so the end of the
connector is sealed. IT IS IMPERATIVE THAT THE OUTLET BOX IN YOUR HOME BE PROPERLY GROUNDED.
3. Connect neutral (white) fixture wires to neutral (usually white) wire from wall outlet box (A). Fasten both wires
together with a plastic wire connector and tightly wrap the wire connector with electrical tape.
4. Repeat the procedure with the hot (black) wires. Always make sure that no wire strands are left outside
the connectors. DO NOT REVERSE THE HOT AND NEUTRAL CONNECTIONS OR SAFETY WILL BE
COMPROMISED.
5. Gently push lantern box (F) onto outlet box (A), letting rods (D) pass through the holes on back plate of lantern box
(F).
6. Position the light fixture and tighten by screwing washers/cap nuts (E) to the exposed part of rods (D) in clockwise
direction. Remove lantern box cap (M) by unscrewing cap nut (0) & washer (N).
7. To install glass panel (L) provided to front section, make sure the metal tab (I) is flipped up. Place glass panel to the
frame, secure the glass panel by bending back the metal tab (I) downwards. Repeat this procedure for the other two
sides of lantern box (F).
8. Attach light reflector (J) to hook (K). Note: Insert from the top opening of lantern box (F).
9. Replace lantern box cap (M) on top of lantern box (F) and secure with cap nut (0) & washer (N).
10. Insert light bulbs (not included) into sockets. Close front door (H) and secure with key (G).
11. INSTRUCTIONS FOR MOUNTING FIXTURE OUTDOORS AND/OR IN WET LOCATION:
WET
ASSEMBLY INSTRUCTIONS
Club Door Small Lantern
Item # CHO2401
WE RECOMMEN D INSTALLATION OF THIS LIGHTI NG FIXTUR E BE DON E BY A
LICENSED E LECTRICIAN.
WARNING *** SWITCH OFF THE MAIN ELECTRICAL SUPPLY FROM THE MAIN
FUSE BOX/CIRCUIT BR EAKER B EFOR E INSTALLATION.
INS PECT ITEM CAREFULLY BEFORE ATTEMPTING TO INSTALL. IF THE RE IS
ANY DAMAGE OR OBVIOUS DE FECT, DO NOT INSTALL.
ITEM MAY NOT BE RETURN ED ONCE IT HAS B EEN INSTALLED.
8. Attach light reflector (J) to hook (K). Note: Insert from the top opening of lantern
box (F).
9. Replace lantern box cap (M) on top of lantern box (F) and secure with cap nut
(0) & washer (N).
10. Insert light bulbs (not included) into sockets. Close front door (H) and secure
with key (G).
INSTRUCTIONS FOR MOUNTING FIXTURE OUTDOORS AND/OR IN WET
LOCATION:
1. Mounting surface should be clean, dry, flat and 1/4” larger than the backplate
on all sides. Any gaps between the mounting surface and backplate exceeding
3/16” should be corrected as required.
2. With silicone (ex. GE-108) caulking compound, caulk completely around where
back of the backplate meets the wall surface to prevent water from seeping into
outlet box.
 Loading...