

Page 1
CHC2149
ASSEMBLY & INSTALLATION GUIDE
WARBY ALABASTER PENDANT
WE RECOMMEND INSTALLATION OF THIS LIGHTING FIXTURE BE DONE BY A LICENSED ELECTRICIAN.
WARNING *** SWITCH OFF THE MAIN ELECTRICAL SUPPLY FROM THE MAIN FUSE BOX/CIRCUIT
BREAKER BEFORE INSTALLATION.
INSPECT ITEM CAREFULLY BEFORE ATTEMPTING TO INSTALL. IF THERE IS ANY DAMAGE OR
OBVIOUS DEFECT, DO NOT INSTALL.
ITEM MAY NOT BE RETURNED ONCE IT HAS BEEN INSTALLED.
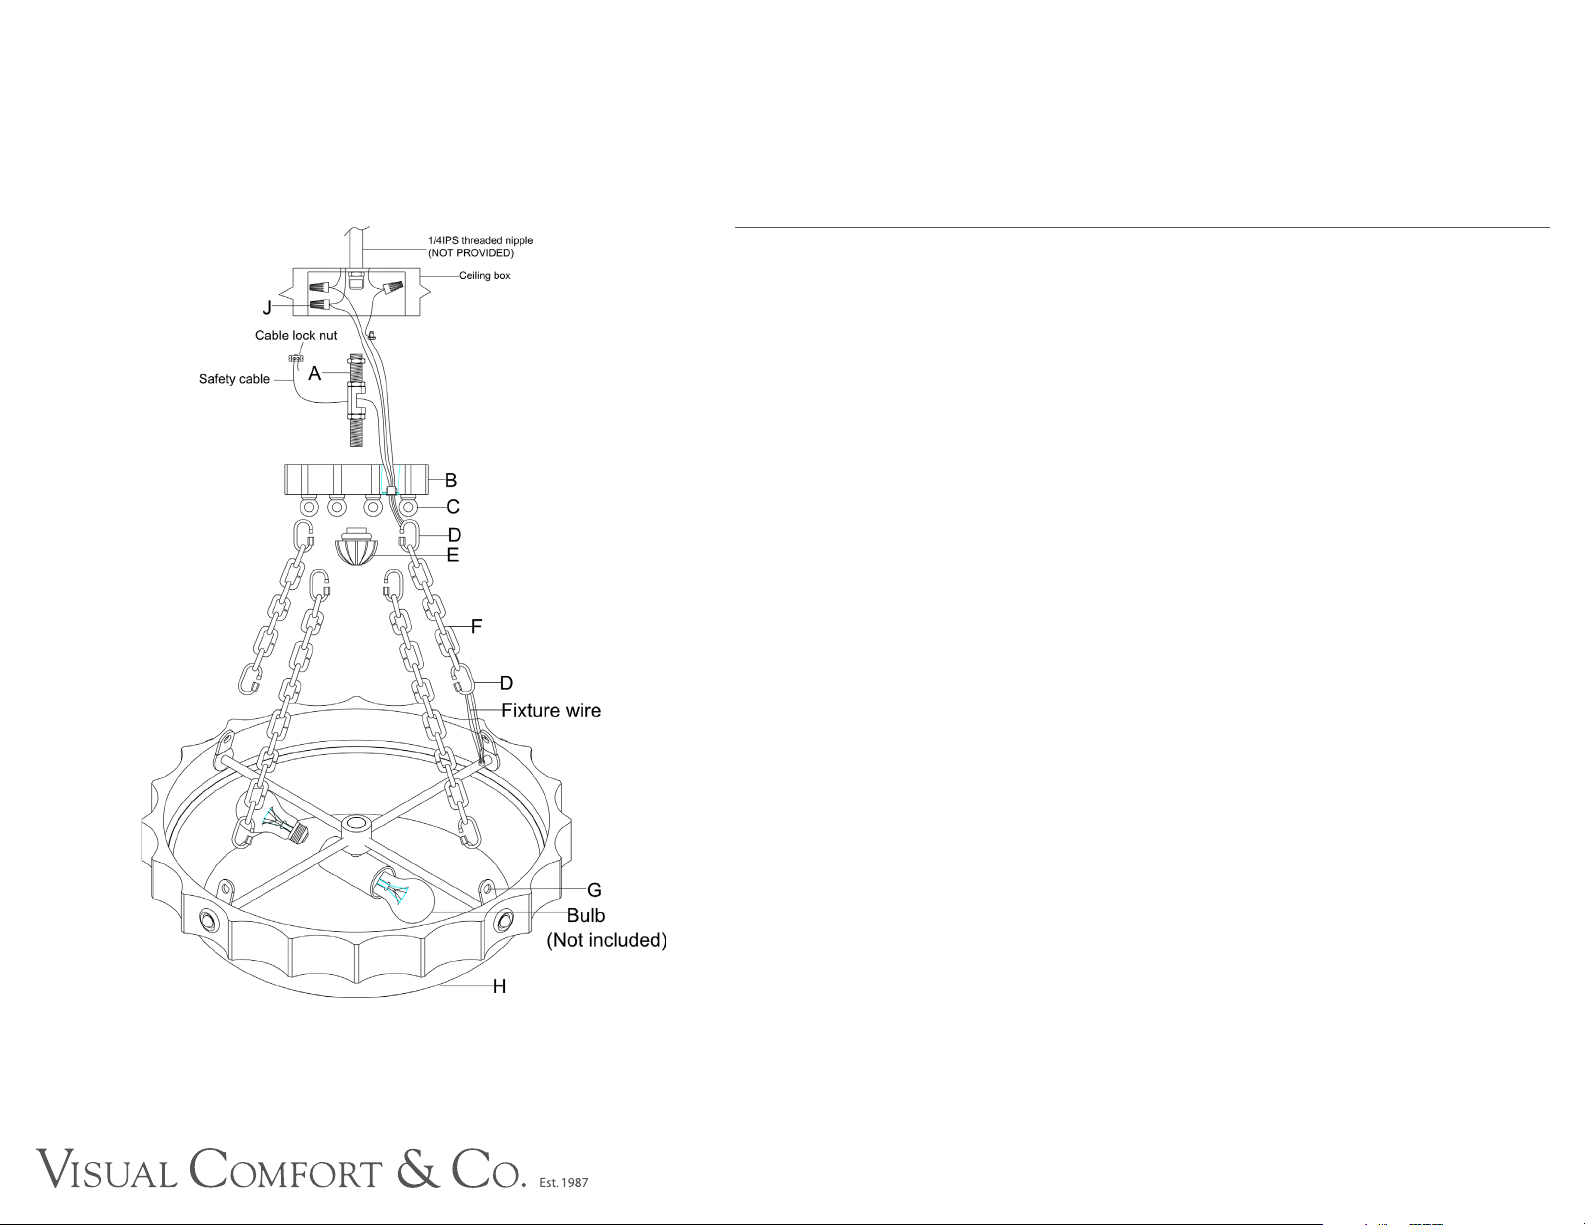
1. Install the threaded nipple (A) with hickey and nut into the top ceiling box. You must provide a 1/4 IPS threaded
nipple which will go through the top of ceiling box and through a structural member of building.
2. Unscrew the quick link (D) on the chain end. Attach the whole chain (F) to the ring(C) on canopy (B), then close.
3. Unscrew the quick link (D) on the other chain end and attach to the hole (G) on alabaster bowl (H), then close.
4. While holding the whole assembly fixture, weave the power supply cord, ground wire and safety cable through the
chain (F). When you have reached the canopy (B), measure the wire and cut. Be certain to leave enough to connect
inside the canopy (B).
5. Strip the insulation on the two power supply wires about 5/8”.
6. Twist the power supply cord, ground wires and safety cable together and push through the hole near ring (C).
7. Put safety cable through the hold on hickey of nipple (A), install into cable lock nut as shown in the diagram.
8. Connect the Neutral (ribbed edge, no markings, or white) fixture wire with the Neutral (usually white) wire from your
outlet box using the appropriate wire connector (J) and wrap with electrical tape.
9. Connect the Hot (smooth edge, markings, or black) fixture wire with the Hot (usually black) wire from your outlet box
using the appropriate wire connector (J) and wrap with electrical tape.
10. Connect the Ground (bare) fixture wire with the ground (usually bare) wire from your outlet box using the appropriate
wire connector (J) and wrap with electrical tape. If you house has no bare wire (ground) attach this wire to the green
grounding screw inside the outlet box.
11. IT IS IMPERATIVE THAT THIS FIXTURE BE GROUNDED
12. Tuck these wire connections neatly into the ceiling outlet box.
13. Raise the canopy (B) and thread the decoration finial (E) to secure.
14. Install the light bulbs (not included) in accordance with the fixture’s specifications.
DO NOT EXCEED THE MAXIMUM WATTAGE RATING!
15. Your installation is now complete. Return power to the outlet box and enjoy.
 Loading...