

Page 1
ASSEMBLY INSTRUCTIONS
DRY
AH5210
ASSEMBLY & INSTALLATION GUIDE
WE RECOMMEND INSTALLATION OF THIS LIG HTING FIXTURE BE DONE BY A LICENS ED ELECTRICIAN.
WARNING *** SWITCH OFF THE MAIN E LECTRICAL SUPPLY FROM THE MAIN FUSE BOX/CIRCUIT
BREAKER BEFOR E INSTALLATION.
INSPECT ITEM CARE FULLY BEFORE ATTEMPTING TO INSTALL. IF THER E IS ANY DAMAGE OR
OBVIOUS DEFECT, DO NOT INSTALL.
ITEM MAY NOT BE RETURNED ONCE IT HAS BEEN INSTALLED.
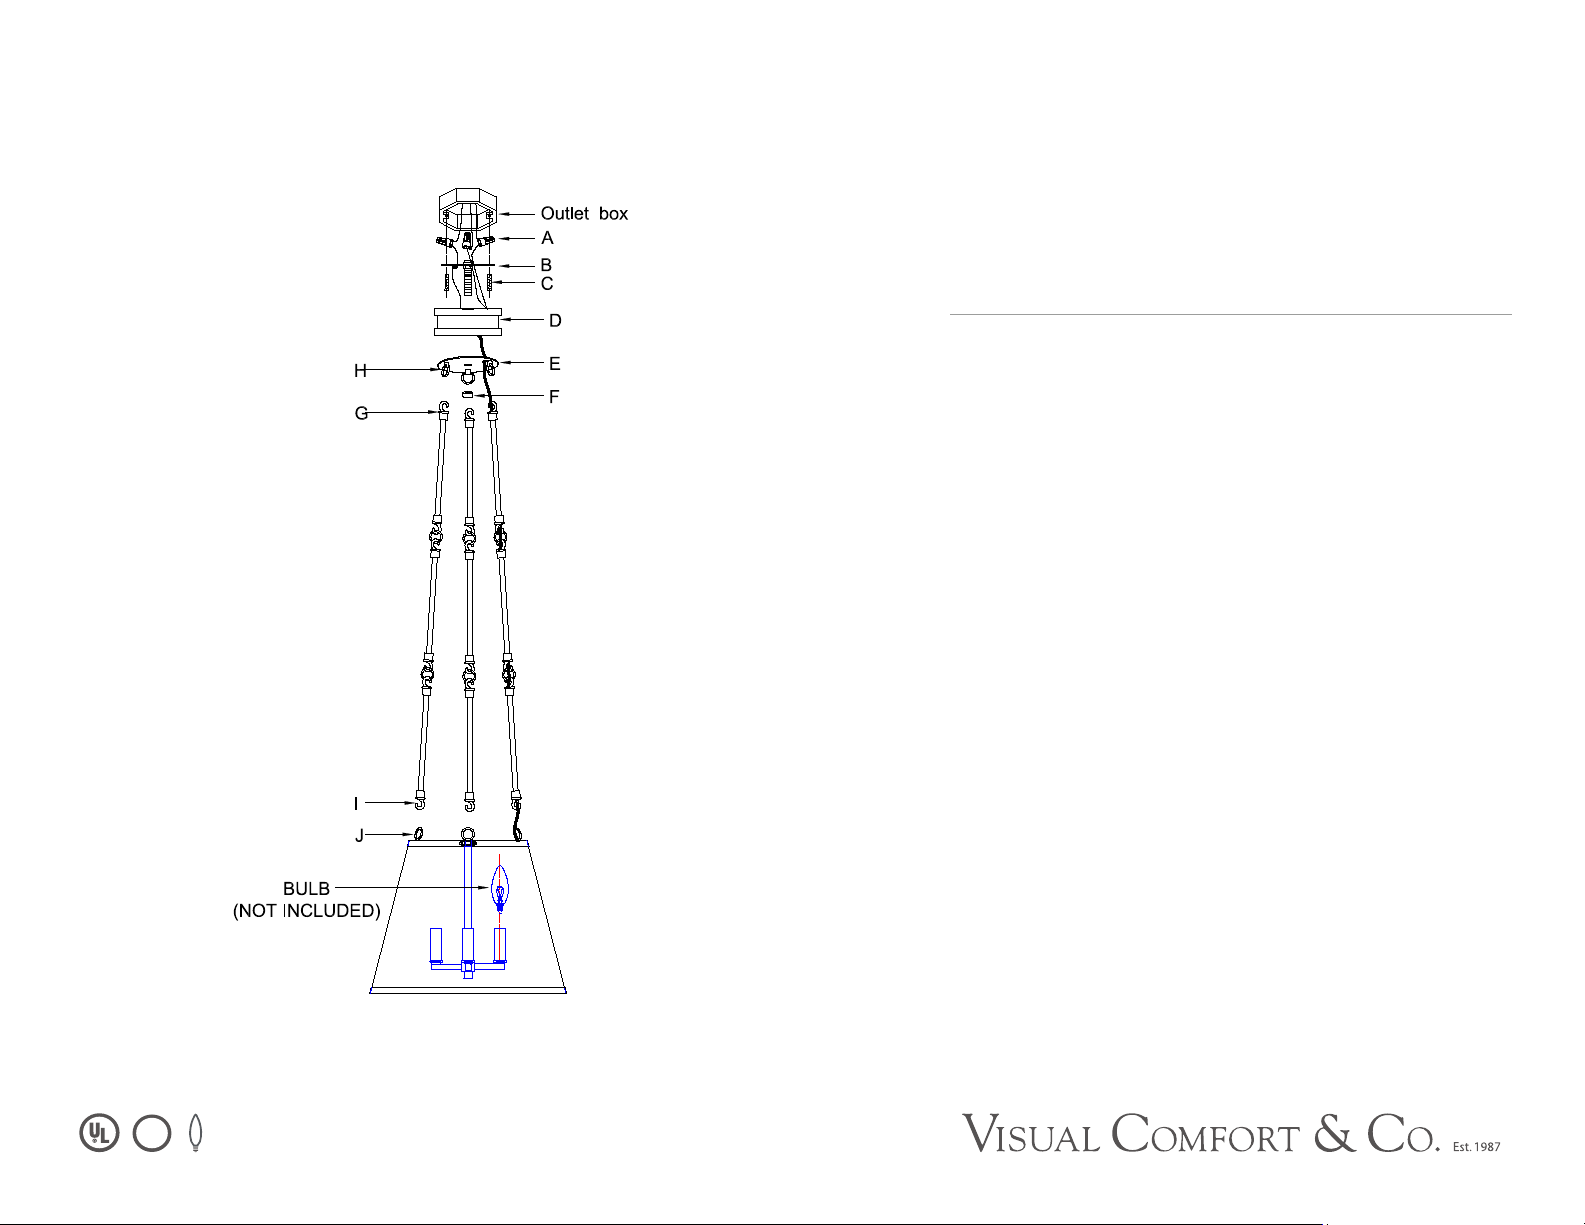
1. Install the crossbar (B) to outlet box by using mounting screws (C) provided.
2. Pull the cord & ground wire carefully up into the outlet box.
3. Separate the two cords carefully and identify the Hot &Neutral wire.
4. Attach the ground wire from the fixture (Green or bare copper) to ground wire from outlet box.
IT IS IMPERATIVE THAT THIS FIXTURE BE GROUNDED.
5. Connect the Hot wire from the fixture (Black ) to the hot wire from outlet box .Fasten them together with the wire nut
(A)
6. Repeat this procedure for the White neutral wire from the light fixture to the wire from outlet box.
DO NOT REVERSE THE HOT AND NEUTRAL CONNECTIONS OTHERWISE SAFETY WILL BE COMPROMISED
7. Tuck these wire connections neatly into canopy (D) to secure.
8. Put metal plate (E) into canopy (D), and secure them onto the threaded nipple with finial (F).
9. Attach the hook (G) to the loop (H). Attach the hook (I) to the loop (J).
10. Install the light bulbs (not included) into sockets.
11. Installation is complete, turn on power at fuse or circuit breaker.
Lily Hanging Shade
Item # AH5210
WE RECOMMEN D INSTALLATION OF THIS LIGHTI NG FIXTUR E BE DON E BY A
LICENSED E LECTRICIAN.
WARNING *** SWITCH OFF THE MAIN ELECTRICAL SUPPLY FROM THE MAIN
FUSE BOX/CIRCUIT BR EAKER B EFOR E INSTALLATION.
INS PECT ITEM CAREFULLY BEFORE ATTEMPTING TO INSTALL. IF THE RE IS
ANY DAMAGE OR OBVIOUS DE FECT, DO NOT INSTALL.
ITEM MAY NOT BE RETURN ED ONCE IT HAS B EEN INSTALLED.
1. Install the crossbar (B) to outlet box by using mounting screws (C) provided.
2. Pull the cord & ground wire carefully up into the outlet box.
3. Separate the two cords carefully and identify the Hot & Neutral wire.
4. Attach the ground wire from the fixture (Green or bare copper) to ground wire
from outlet box.
IT IS IMPERATIVE THAT THIS FIXTURE BE GROUNDED.
5. Connect the Hot wire from the fixture (Black ) to the hot wire from outlet box.
Fasten them together with the wire nut (A)
6. Repeat this procedure for the White neutral wire from the light fixture to the
wire from outlet box.
DO NOT REVERSE THE HOT AND NEUTRAL CONNECTIONS
OTHERWISE SAFETY WILL BE COMPROMISED
7. Tuck these wire connections neatly into canopy (D) to secure.
8. Put metal plate (E) into canopy (D), and secure them onto the threaded nipple
with finial (F).
9. Attach the hook (G) to the loop (H). Attach the hook (I) to the loop (J).
10. Install the light bulbs (not included) into sockets.
11. Installation is complete, turn on power at fuse or circuit breaker.
 Loading...