

Page 1

Mantis
Media Gateway
™
User Manual
Page 2

Trademarks
Focus Enhancements, Visual Circuits, and Mantis logos are
registered trademarks in the United States and other countries. All
other products, services or company names mentioned herein are
claimed as trademarks and trade names by their respective
companies.
© Focus Enhancements
1999-2005
All rights reserved. No portion of this manual may be copied by
any means without the prior consent of Focus Enhancements.
Focus Enhancements, Midwest Heaquarters
5155 East River Road, Suite 401
Minneapolis, MN 55421 USA
http://www.visualcircuits.com
Publication Number: 813-0053b
All specifications, notices and warnings are subject to change
without notice.
Page 3

i
Mantis MG™ Safety Requirements
IMPORTANT SAFETY INSTRUCTIONS:
The following safety instructions apply to the Mantis
Media Gateway (MG):
1. Read and follow all warning notices and instructions marked on the
product or included in this manual. Opening or removing covers and/
or components may expose you to dangerous high voltage points or
other risks. Only qualified personnel should perform all servicing.
2. The maximum ambient temperature for the Mantis is 114 degrees
Fahrenheit (45 degrees Celsius). Care should be given to allow
sufficient air circulation or space between units when the Mantis is
installed in a closed or multi-unit rack assembly because the
operating ambient temperature of the rack environment must be
greater than room ambient temperature.
3. Slots and openings in the cabinet (chassis) are provided for
ventilation. To ensure reliable operation of the product and to protect
it from overheating, maintain a minimum of 1-inch (2.5-cm)
clearance on the top and sides.
4. Installation of the Mantis in a rack without sufficient airflow can be
unsafe.
5. If installed in a rack, the rack should safely support the combined
weight of all equipment it supports. A fully loaded Mantis weighs 15
pounds (6.8 kg).
6. The connections and equipment of the Mantis should be capable of
operating safely with the maximum power requirements of the
Mantis. In the event of a power overload, the supply circuits and
supply wiring should not become hazardous.
7. Models with AC power inputs are intended to be used with the threewire grounding type plug (a plug that has a grounding pin). This is a
safety feature. Equipment grounding is vital to ensure safe operation.
Do not defeat the purpose of grounding type plugs by modifying the
plug or using an adapter.
8. If a three-wire grounding type power source is not available, consult
a qualified electrician to determine another method of grounding the
equipment.
9. Install only in restricted areas in accordance with Articles 110-16,
100-17 and 110-18 of the National Electrical Code, ANSI/NFPA 70.
Page 4
ii
10. Do not allow anything to rest on the power cord and do not locate the
product where persons will walk on or come in contact with the
power cord.
POWER AND GROUND REQUIREMENTS:
Determine that the cumulative power requirements of the Mantis
plus other equipment in the rack do not overload the supply circuits
and/or wiring.
CAUTION
If using a power strip or similar supply, make sure
the power requirements of the chassis, plus the
cumulative power draw of any other equipment in
the rack, do not overload the supply circuit.
WARNING
For safe operation, this equipment must be properly
grounded.
The chassis should be reliably earth grounded to the
rack equipment. This earth ground connection must be
maintained when supply connection is other than direct
connection to the branch circuit.
Page 5

iii
RACK MOUNTING AND
VENTILATION REQUIREMENTS:
If you are rack-mounting the Mantis base unit:
1. Always stack the rack from the bottom up to ensure a stable and safe
rack.
2. The installation of the Mantis and other units within the rack should
not reduce the airflow within the rack. The maximum recommended
ambient temperature for the Mantis is 100.4 degrees Fahrenheit (38
degrees Celsius).
3. Determine that the cumulative power requirements of the Mantis plus
the other equipment in the rack do not overload the rack supply
circuit and/or wiring.
4. When installing, consider the location or locations of the Mantis
players in relation to other devices located in an adjacent rack. Ensure
that the Mantis air intake is not drawing directly upon heated air from
another unit. Rack Depth: The minimum rack depth required to
install the Mantis is 16 inches (41 cm). If cables are used, the rack
should be EMI/RFI shielded. Ensure that the cables used meet EMI/
R F I re q u i r em e n t s a n d a r e sh i e l d ed i f e x po s e d .
Side Rails: The Mantis has side rails provided for mounting. If
different rail mounts or sliding rails are used, consult the original
manufacturer of this equipment to confirm they meet the weight and
stress requirements in order to support the Mantis chassis.
Page 6
iv
User Manual Regulatory Documentation
CAUTION
The CD-ROM/DVD-ROM drive contains a laser
system and is a ‘Class 1 Laser Product’ under a U.S.
Department of Health and Human Services (DHHS)
Radiation Performance standard, according to the
Radiation Control for Health and Safety Act of 1968.
Should a unit ever require maintenance, contact an
authorized repair location.
CAUTION
There is danger of explosion if the battery is
incorrectly replaced.
A lithium battery on the product provides backup power
for the device’s timekeeping capability. The battery has
an estimated life expectancy of ten years. When the
battery starts to weaken, the date and time may become
incorrect. If the battery fails, the unit must be sent back
to Focus Enhancements - Midwest for battery
replacement.
WARNING
An improperly grounded power supply can result in
electrical shock.
The AC power cord provided with your system has a
grounded plug. Always use a grounded power cord with
a properly grounded wall outlet.
Page 7
v
Class A Statement
FCC Part 15 (EN61000-3-2)
This equipment has been tested and found to comply with the limits
for a Class A digital device, pursuant to Part 15 (EN61000-3-2) of the
FCC Rules. These limits are designed to provide reasonable
protection against harmful interference when the equipment is
operated in a commercial environment. This equipment generates,
uses, and can radiate radio frequency energy
and, if not installed and used in accordance
with this instruction manual, may cause
harmful interference to radio communications.
Operation of this equipment in a residential
area is likely to cause harmful interference in which case the user will
be required to correct the interference at his or her own expense.
The Mantis complies with Part 15 (EN61000-3-2) of the FCC rules.
Operation is subject to the following two conditions:
1. This device may not cause harmful interference.
2. This device must accept any interference that may cause undesired
operation.
Industry Canada
This Class A digital apparatus meets all requirements of the
Canadian Interference-Causing Equipment Regulations.
Cet appareil numerique de la classe A respecte toutes les
exigences du Regulement sur le materiel brouilleur du Canada.
WARNING
Changes or modifications to this unit not expressly
approved by the party responsible for compliance
could void the user’s authority to operate the
equipment.
Page 8

vi
EMC and Safety Directive Compliance
The CE mark is affixed to this Visual Circuits product to confirm
compliance with the following European Community Directives:
Council Directive 89/336/EEC of 3 May 1989 on the approximation
of the laws of Member States relating to electromagnetic
compatibility.
And
Council Directive 73/23/EEC of 19 February 1973 on the
harmonization of the laws of Member States relating to electrical
equipment designed for use within certain voltage limits:
Each amended by Council Directive 93/68/EEC of 22 July 1993 on
the harmonization of CE marking requirements.
Class A Warning (EN55024, EN55022)
In a domestic environment this product may cause radio
interference in which case the user may be required to take
adequate measures.
All specifications are subject to change without notice.
WARNING
Failure to provide adequate surge protection may
cause damage to the Mantis.
Focus Enhancements does not warranty damage
caused by electrical surges to the system. Surge
protection should be provided when connecting any
peripheral device and power to the system.
Page 9

1
CONTENTS
Mantis Media Gateway™ Quick Start . . . . . . . . . . . . . . . . 1
Introduction . . . . . . . . . . . . . . . . . . . . . . . . . . . . . . . . . . . . . . . 1
Media Messenger and Webview . . . . . . . . . . . . . . . . . . . . 1
Mantis MG System . . . . . . . . . . . . . . . . . . . . . . . . . . . . . . . . . 2
Plug and Play . . . . . . . . . . . . . . . . . . . . . . . . . . . . . . . . . . . . . . 3
Mantis MG Connections Guide . . . . . . . . . . . . . . . . . . . . 4
Video/VGA Cable . . . . . . . . . . . . . . . . . . . . . . . . . . . . . . 5
Audio Connections . . . . . . . . . . . . . . . . . . . . . . . . . . . . . . 6
Configuring for a Network . . . . . . . . . . . . . . . . . . . . . . . . . . . 7
Attaching a Laptop or PC . . . . . . . . . . . . . . . . . . . . . . . . 7
Changing TCP/IP Settings . . . . . . . . . . . . . . . . . . . . . . . . 8
Front Panel . . . . . . . . . . . . . . . . . . . . . . . . . . . . . . . . . . . . . . 10
Display . . . . . . . . . . . . . . . . . . . . . . . . . . . . . . . . . . . . . . 10
Menu Control Buttons . . . . . . . . . . . . . . . . . . . . . . . . . . 10
Encoding Requirements and Recommendations . . . . . 15
Standard Definition (SD) Encoding Requirements . . . . . . . . 15
SD Encoding Recommendations . . . . . . . . . . . . . . . . . . 16
High Definition (HD) Encoding Requirements . . . . . . . . . . 19
HD Encoding Recommendations . . . . . . . . . . . . . . . . . . 20
Encoding Software . . . . . . . . . . . . . . . . . . . . . . . . . . . . . 20
Smart Card . . . . . . . . . . . . . . . . . . . . . . . . . . . . . . . . . . . . 23
Overview . . . . . . . . . . . . . . . . . . . . . . . . . . . . . . . . . . . . . . . . 23
Optional Features . . . . . . . . . . . . . . . . . . . . . . . . . . . . . . 23
Using the Smart Card . . . . . . . . . . . . . . . . . . . . . . . . . . . . . . 24
Inserting the Smart Card . . . . . . . . . . . . . . . . . . . . . . . . . 24
Saving a Configuration to the Smart Card . . . . . . . . . . . 25
Loading a Configuration from the Smart Card . . . . . . . . 26
Eject the Smart Card . . . . . . . . . . . . . . . . . . . . . . . . . . . . 27
If Smart Card Does Not Eject . . . . . . . . . . . . . . . . . . . . . 27
Storing the Smart Card . . . . . . . . . . . . . . . . . . . . . . . . . . . . . 27
Page 10

2
Contents
WEBVIEW™ . . . . . . . . . . . . . . . . . . . . . . . . . . . . . . . . . . . . . 29
Overview . . . . . . . . . . . . . . . . . . . . . . . . . . . . . . . . . . . . . . . . 29
Accessing WebView . . . . . . . . . . . . . . . . . . . . . . . . . . . . . . . 31
Step 1: Connect to the Network . . . . . . . . . . . . . . . . . . . 31
Step 2: Determine the IP Address of the Mantis . . . . . . 32
Step 3: Establish Communications with the Mantis . . . . 34
Step 4: Enter User Name and Password . . . . . . . . . . . . 34
Using WebView . . . . . . . . . . . . . . . . . . . . . . . . . . . . . . . . . . 35
Transferring Media . . . . . . . . . . . . . . . . . . . . . . . . . . . . . 36
Webview Software Update . . . . . . . . . . . . . . . . . . . . . . . 38
Media Review . . . . . . . . . . . . . . . . . . . . . . . . . . . . . . . . . 39
Using the Playlist Editor . . . . . . . . . . . . . . . . . . . . . . . . . 42
Using the Schedule Editor . . . . . . . . . . . . . . . . . . . . . . . 50
Using the Player Control Panel . . . . . . . . . . . . . . . . . . . 61
Diagnostics . . . . . . . . . . . . . . . . . . . . . . . . . . . . . . . . . . . 62
System Settings . . . . . . . . . . . . . . . . . . . . . . . . . . . . . . . . 71
HTTP Auto-Update Settings . . . . . . . . . . . . . . . . . . . . . 89
USB Devices . . . . . . . . . . . . . . . . . . . . . . . . . . . . . . . . . . 90
Multicast Settings . . . . . . . . . . . . . . . . . . . . . . . . . . . . . . 94
Smart Card Settings . . . . . . . . . . . . . . . . . . . . . . . . . . . . 96
Advanced Settings . . . . . . . . . . . . . . . . . . . . . . . . . . . . . 97
Networking . . . . . . . . . . . . . . . . . . . . . . . . . . . . . . . . . . . . 99
Overview . . . . . . . . . . . . . . . . . . . . . . . . . . . . . . . . . . . . . . . . 99
Getting Started . . . . . . . . . . . . . . . . . . . . . . . . . . . . . . . . . . 100
Media Messenger™ Software . . . . . . . . . . . . . . . . . . . . . . . 101
Product Features . . . . . . . . . . . . . . . . . . . . . . . . . . . . . . 101
Benefits . . . . . . . . . . . . . . . . . . . . . . . . . . . . . . . . . . . . . 101
Updating Video Playback . . . . . . . . . . . . . . . . . . . . . . . 103
Overview of the Update Process . . . . . . . . . . . . . . . . . . . . . 104
Content Log . . . . . . . . . . . . . . . . . . . . . . . . . . . . . . . . . 108
Automatic Updating . . . . . . . . . . . . . . . . . . . . . . . . . . . . . . 109
Media Update Disc Updating . . . . . . . . . . . . . . . . . . . . 109
Drop & Go Disc Updating . . . . . . . . . . . . . . . . . . . . . . 111
Page 11

3
Contents
FTP UPDATING . . . . . . . . . . . . . . . . . . . . . . . . . . . . . . . 113
M
ULTICAST UPDATING . . . . . . . . . . . . . . . . . . . . . . . . . 117
Manual Updating . . . . . . . . . . . . . . . . . . . . . . . . . . . . . . . . . 121
WebView Updating . . . . . . . . . . . . . . . . . . . . . . . . . . . 121
Standard CD/DVD Updating . . . . . . . . . . . . . . . . . . . . 121
Direct File Access Updating . . . . . . . . . . . . . . . . . . . . . 122
Log File Reporting . . . . . . . . . . . . . . . . . . . . . . . . . . . . . 125
Overview . . . . . . . . . . . . . . . . . . . . . . . . . . . . . . . . . . . . . . . 125
Run Logs . . . . . . . . . . . . . . . . . . . . . . . . . . . . . . . . . . . . . . . 126
Diagnostic Logs . . . . . . . . . . . . . . . . . . . . . . . . . . . . . . . . . 127
Log Formats . . . . . . . . . . . . . . . . . . . . . . . . . . . . . . . . . 128
Log Default Playlist . . . . . . . . . . . . . . . . . . . . . . . . . . . 128
Maximum Log File Size . . . . . . . . . . . . . . . . . . . . . . . . 129
Uploading Log Files . . . . . . . . . . . . . . . . . . . . . . . . . . . 129
External Control Commands 131
Overview . . . . . . . . . . . . . . . . . . . . . . . . . . . . . . . . . . . . . . . 131
Connecting via RS232 . . . . . . . . . . . . . . . . . . . . . . . . . 131
Connecting via TCP/IP . . . . . . . . . . . . . . . . . . . . . . . . . 132
Hyper Terminal Basics . . . . . . . . . . . . . . . . . . . . . . . . . 133
VCC Control Commands . . . . . . . . . . . . . . . . . . . . . . . . . . 134
Playlist Playback Commands . . . . . . . . . . . . . . . . . . . . 134
Playlistload . . . . . . . . . . . . . . . . . . . . . . . . . . . . . . . . . . 134
Playlistplay . . . . . . . . . . . . . . . . . . . . . . . . . . . . . . . . . . 135
mpgLoad . . . . . . . . . . . . . . . . . . . . . . . . . . . . . . . . . . . . 136
mpgLoadNext . . . . . . . . . . . . . . . . . . . . . . . . . . . . . . . . 137
mpgLoadDef . . . . . . . . . . . . . . . . . . . . . . . . . . . . . . . . . 138
mpgLoadNextDef . . . . . . . . . . . . . . . . . . . . . . . . . . . . . 139
mpgClearDef . . . . . . . . . . . . . . . . . . . . . . . . . . . . . . . . 140
mpgPlay . . . . . . . . . . . . . . . . . . . . . . . . . . . . . . . . . . . . 141
mpgStop . . . . . . . . . . . . . . . . . . . . . . . . . . . . . . . . . . . . 142
mpgPlayAll . . . . . . . . . . . . . . . . . . . . . . . . . . . . . . . . . . 143
mpgStopAll . . . . . . . . . . . . . . . . . . . . . . . . . . . . . . . . . . 144
mpgBlack . . . . . . . . . . . . . . . . . . . . . . . . . . . . . . . . . . . 145
Page 12

4
Contents
mpgUnblack . . . . . . . . . . . . . . . . . . . . . . . . . . . . . . . . . 146
Using Serial Commands To Create Playlists . . . . . . . . . . . 147
Firefly System Commands . . . . . . . . . . . . . . . . . . . . . . . . . 149
FireflyFtpUpdate . . . . . . . . . . . . . . . . . . . . . . . . . . . . . 149
FireflyRestart . . . . . . . . . . . . . . . . . . . . . . . . . . . . . . . . 149
Callback Commands . . . . . . . . . . . . . . . . . . . . . . . . . . . . . . 150
mpgCallback . . . . . . . . . . . . . . . . . . . . . . . . . . . . . . . . . 150
Audio and Video . . . . . . . . . . . . . . . . . . . . . . . . . . . . . . . . . 151
mpgSetVolumeLeftRight . . . . . . . . . . . . . . . . . . . . . . . 151
mpgMute . . . . . . . . . . . . . . . . . . . . . . . . . . . . . . . . . . . . 152
mpgUnMute . . . . . . . . . . . . . . . . . . . . . . . . . . . . . . . . . 153
On-Screen Display Commands . . . . . . . . . . . . . . . . . . . . . . 154
osdLoadBMP . . . . . . . . . . . . . . . . . . . . . . . . . . . . . . . . 154
osdShow . . . . . . . . . . . . . . . . . . . . . . . . . . . . . . . . . . . . 156
osdHide . . . . . . . . . . . . . . . . . . . . . . . . . . . . . . . . . . . . . 157
osdSetXYMix . . . . . . . . . . . . . . . . . . . . . . . . . . . . . . . . 158
Media Calls . . . . . . . . . . . . . . . . . . . . . . . . . . . . . . . . . . . . . 159
mpgDir . . . . . . . . . . . . . . . . . . . . . . . . . . . . . . . . . . . . . 159
mpgDelete . . . . . . . . . . . . . . . . . . . . . . . . . . . . . . . . . . . 159
Information Calls . . . . . . . . . . . . . . . . . . . . . . . . . . . . . . . . 160
infoGetFile . . . . . . . . . . . . . . . . . . . . . . . . . . . . . . . . . . 160
infoGetPlaylist . . . . . . . . . . . . . . . . . . . . . . . . . . . . . . . 161
infoGetSchedule . . . . . . . . . . . . . . . . . . . . . . . . . . . . . . 162
infoGetState . . . . . . . . . . . . . . . . . . . . . . . . . . . . . . . . . 163
Networking Commands . . . . . . . . . . . . . . . . . . . . . . . . . . . 164
FireflySetDefault . . . . . . . . . . . . . . . . . . . . . . . . . . . . . 164
FireflySetIpAddr . . . . . . . . . . . . . . . . . . . . . . . . . . . . . . 165
FireflySetGateway . . . . . . . . . . . . . . . . . . . . . . . . . . . . 166
FireflySetNetmask . . . . . . . . . . . . . . . . . . . . . . . . . . . . 167
FireflySetNetworkType . . . . . . . . . . . . . . . . . . . . . . . . 168
FireflySetWeb_Enable . . . . . . . . . . . . . . . . . . . . . . . . . 169
FireflyGetIpAddr . . . . . . . . . . . . . . . . . . . . . . . . . . . . . 169
FireflyGetGateway . . . . . . . . . . . . . . . . . . . . . . . . . . . . 170
FireflyGetNetmask . . . . . . . . . . . . . . . . . . . . . . . . . . . . 170
FireflyGetNetworkType . . . . . . . . . . . . . . . . . . . . . . . . 171
Page 13

5
Contents
FireflyGetWeb_Enable . . . . . . . . . . . . . . . . . . . . . . . . . 171
LDV Control Commands . . . . . . . . . . . . . . . . . . . . . . . . . . 172
Introduction . . . . . . . . . . . . . . . . . . . . . . . . . . . . . . . . . 172
COM Port Settings . . . . . . . . . . . . . . . . . . . . . . . . . . . . 172
Command Language Basics . . . . . . . . . . . . . . . . . . . . . 174
Error Codes . . . . . . . . . . . . . . . . . . . . . . . . . . . . . . . . . . 174
Command Syntax . . . . . . . . . . . . . . . . . . . . . . . . . . . . . 175
Address Arguments . . . . . . . . . . . . . . . . . . . . . . . . . . . 175
Command Summary . . . . . . . . . . . . . . . . . . . . . . . . . . . 176
Playback Commands . . . . . . . . . . . . . . . . . . . . . . . . . . 177
Play (PL) . . . . . . . . . . . . . . . . . . . . . . . . . . . .177
Load Playlist/Schedule (LD) . . . . . . . . . . . .179
Reject “Stop” (RJ) . . . . . . . . . . . . . . . . . . . .180
Pause (PA) . . . . . . . . . . . . . . . . . . . . . . . . . .181
Still (ST) . . . . . . . . . . . . . . . . . . . . . . . . . . . .182
Search (SE) . . . . . . . . . . . . . . . . . . . . . . . . . .183
Multi-Track Jump Forward (JF) . . . . . . . . . .184
Multi-Track Jump Reverse (JR) . . . . . . . . . .185
Display Control (DS) . . . . . . . . . . . . . . . . . .186
Frame Number Request (?F) . . . . . . . . . . . .187
Time Code Request (?T) . . . . . . . . . . . . . . . .188
Chapter Number Request (?C) . . . . . . . . . . .189
Player Active Mode Request (?P) . . . . . . . .190
Mantis Model Request (?X) . . . . . . . . . . . . .191
External Control Commands Quick Reference Guide: 192
Troubleshooting . . . . . . . . . . . . . . . . . . . . . . . . . . . . . . . 193
General Issues . . . . . . . . . . . . . . . . . . . . . . . . . . . . . . . . . . . 193
Restoration Mode . . . . . . . . . . . . . . . . . . . . . . . . . . . . . 193
No Power to the Mantis (No LCD light or fan noise) . 194
No Video Playback . . . . . . . . . . . . . . . . . . . . . . . . . . . . 195
No Video Playback on Digital RF (ATSC) Channel . . 196
Test File Does Not Play Properly On All Channels . . . 196
Test File Does Not Display On One Channel . . . . . . . . 196
Stuttering Files During Playback . . . . . . . . . . . . . . . . . 197
Page 14

6
Contents
Latent Images or Flashing During Playback . . . . . . . . 199
Some files in the playlist do not play . . . . . . . . . . . . . . 200
SMPTE time codes are not recognized properly . . . . . 200
File Related Problems . . . . . . . . . . . . . . . . . . . . . . . . . . . . . 201
File Copy Error Handling . . . . . . . . . . . . . . . . . . . . . . . 201
Serial Command Fails, Returning NAK . . . . . . . . . . . . 202
Update Fails . . . . . . . . . . . . . . . . . . . . . . . . . . . . . . . . . 202
Smart Card does not eject . . . . . . . . . . . . . . . . . . . . . . . 202
Preventing Cabling and Connection Problems . . . . . . . . . . 203
Front Panel Display Error Messages . . . . . . . . . . . . . . . . . . 204
Bad FPL/FSC . . . . . . . . . . . . . . . . . . . . . . . . . . . . . . . . 204
Bad FTP Dir . . . . . . . . . . . . . . . . . . . . . . . . . . . . . . . . . 204
Bad IP Address . . . . . . . . . . . . . . . . . . . . . . . . . . . . . . . 204
Bad User/Pass . . . . . . . . . . . . . . . . . . . . . . . . . . . . . . . . 204
Cant List Media . . . . . . . . . . . . . . . . . . . . . . . . . . . . . . 204
Cant List Scripts . . . . . . . . . . . . . . . . . . . . . . . . . . . . . . 204
Download Fail . . . . . . . . . . . . . . . . . . . . . . . . . . . . . . . 205
FTP Failed Networking Off . . . . . . . . . . . . . . . . . . . . . 205
Invalid FTP IP . . . . . . . . . . . . . . . . . . . . . . . . . . . . . . . 205
Missing MPEG/Overlay . . . . . . . . . . . . . . . . . . . . . . . . 205
No Directory . . . . . . . . . . . . . . . . . . . . . . . . . . . . . . . . . 205
No IP Address . . . . . . . . . . . . . . . . . . . . . . . . . . . . . . . . 205
No Local FPL/FSC . . . . . . . . . . . . . . . . . . . . . . . . . . . . 206
No Valid TAR/FPL . . . . . . . . . . . . . . . . . . . . . . . . . . . 206
Proxy Settings . . . . . . . . . . . . . . . . . . . . . . . . . . . . . . . . 206
Transfer Error . . . . . . . . . . . . . . . . . . . . . . . . . . . . . . . . 206
Returning Materials to Focus Enhancements
(VAR/Distributor) . . . . . . . . . . . . . . . . . . . . . . . . . . . . 207
Technical Specifications . . . . . . . . . . . . . . . . . . . . . . . . 209
Page 15

1
MANTIS MEDIA GATEWAY
™
QUICK START
Introduction
Thank you for purchasing the Mantis Media Gateway (MG).
Mantis media players are flexible and scalable digital media
delivery systems that are designed for enterprise-wide applications.
Bundled with Media Messenger
™
and WebView™ software,
Mantis media players deliver scheduled, live, or interactive
playback in almost any media format while supporting independent
output whether in high or standard definition or a combination of
both.
Media Messenger and Webview
The Mantis MG includes Media Messenger and WebView,
powerful applications for creating, scheduling, distributing,
managing, and auditing digital content throughout the enterprise.
Page 16

Mantis Media Gateway™ Quick Start
2
Mantis MG System
The basic Mantis MG system includes:
Features
❏ Two independent channels with a variety of media output
types,
❏ 32-bit accelerated graphics output, supporting Multi-
Zone™ functionality,
❏ Mantis has open slots allowing for future expansion,
❏ CD/DVD drive,
❏ 160 GB Hard drive for media and system log storage,
❏ Smart Card for configuration and security
Networking and Control
❏ 10/100 Mbps Ethernet
❏ SNMP, Satellite and terrestrial multicast support
❏ Content updating via FTP or HTTP (manual or automatic)
❏ TCP/IP or serial control with Visual Circuits protocol
❏ Media Messenger™ software for scheduling and content
distribution
❏ WebView™ browser-based user interface with WebView
User Manual (pdf) stored on Mantis
Audio
❏ Stereo or Dolby Digital™ via S/PDIF
❏ Stereo analog MPEG Layers 1, 2, 3
Video
❏ MPEG 1 and 2,
❏ NTSC/PAL transcoding
Page 17

Mantis Media Gateway™ Quick Start
3
Plug and Play
The Mantis comes loaded with sample videos that are useful as you
become familiar with the Mantis features and for diagnostic
purposes. Video playback is typically controlled through a
“playlist” that defines which videos are played, on which channels,
and in what order. Only one playlist can be active at any time,
though any number of playlists can be stored on the Mantis for
later use. Whenever the Mantis is turned on, the playlist that was
last in use reloads and playback begins automatically.
To quickly test the Mantis, plug it in, connect the cables, and turn
it on.
1. Connect the power cable to the back of the Mantis and plug it
in to a power source.
2. Connect video and audio cables to the backplane following the
appropriate Mantis connections guide on the following page.
3. Connect the video and audio cables from the Mantis to the
video and audio inputs on the video monitor(s) and audio
components.
4. Connect the Mantis to a network, see Configuring for a
Network on page 7.
5. At startup, the Mantis runs through a short series of selfdiagnostics before beginning automated playback.
Mantis Default Factory Settings
By default, the Mantis plays Component, 1080i and line-level audio
on all channels. If your application requires the Mantis to use a
different video standard and/or video output type, use the Front
Panel or WebView to change the system settings as required.
Consult the section on Video Settings on page 73 within the main
body of the user manual for more information about changing these
settings.
Page 18
Mantis Media Gateway™ Quick Start
4
Mantis MG Connections Guide
MG Video Output Configuration
The basic configuration of the Mantis MG is two standard/high
definition video channels, and three open expansion slots for future
use. The MG provides multiple types of video output
simultaneously, on a channel-by-channel basis. For example, it is
possible to configure the MG so that Channel 1 outputs to a
composite monitor, while Channel 2 goes to a component or RGB
monitor. For more information on configuring video output types
see the Video menu in System Settings, which is accessible from
the front panel or WebView: see
Video Settings on page 73.
Numbering of Channels and Expansion Card Slots
Manits expansion card slots are numbered 1 through 5, going from left
ot right. The Mantis assigns channel numbers to its Gemini card or
cards according to which expansion card slot the card is located.
The default configuration of the Mantis MG leaves card slot 1 open.
Gemini cards begin in slot two with that card being assigned the first
channel numbers. Channels on subsequent cards are numbered
sequentially.
Network
10 / 100
Serial
RS-232
Expansion Card Slots
1 2 3 4 5
USB
Mantis MG
Extensible Backplane
Page 19
Mantis Media Gateway™ Quick Start
5
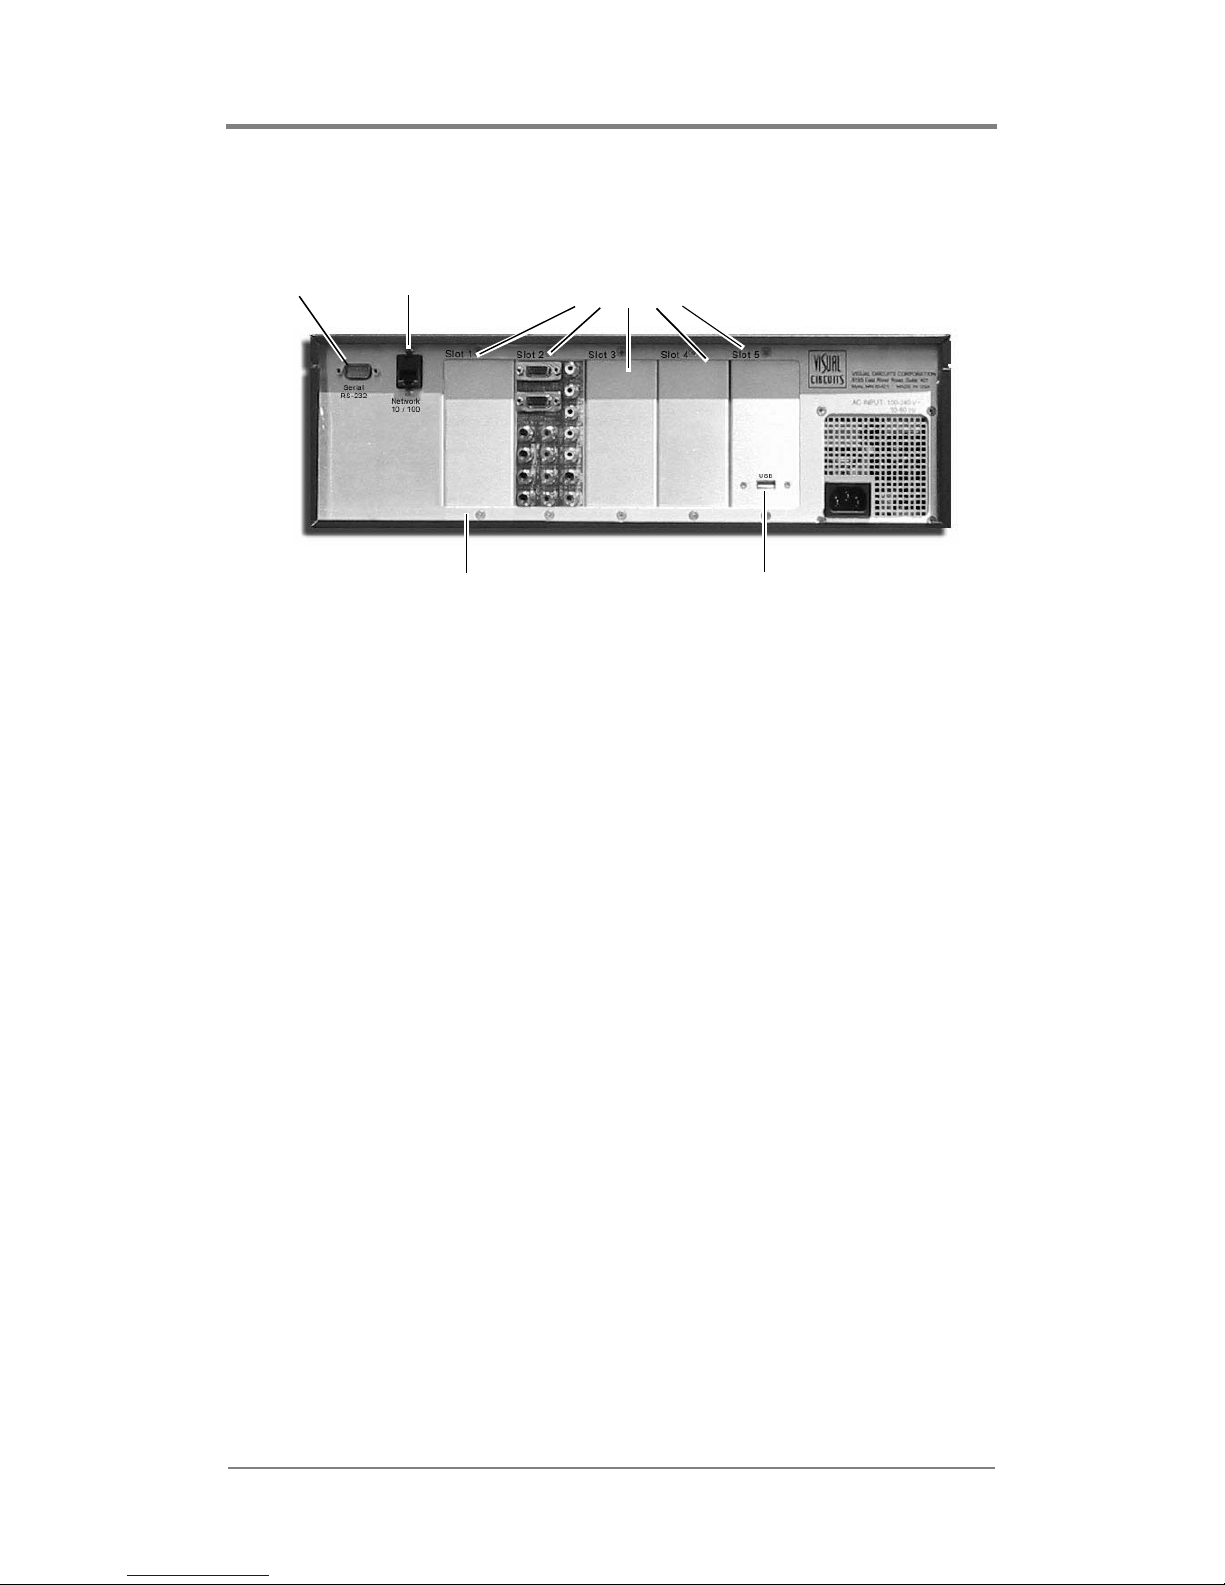
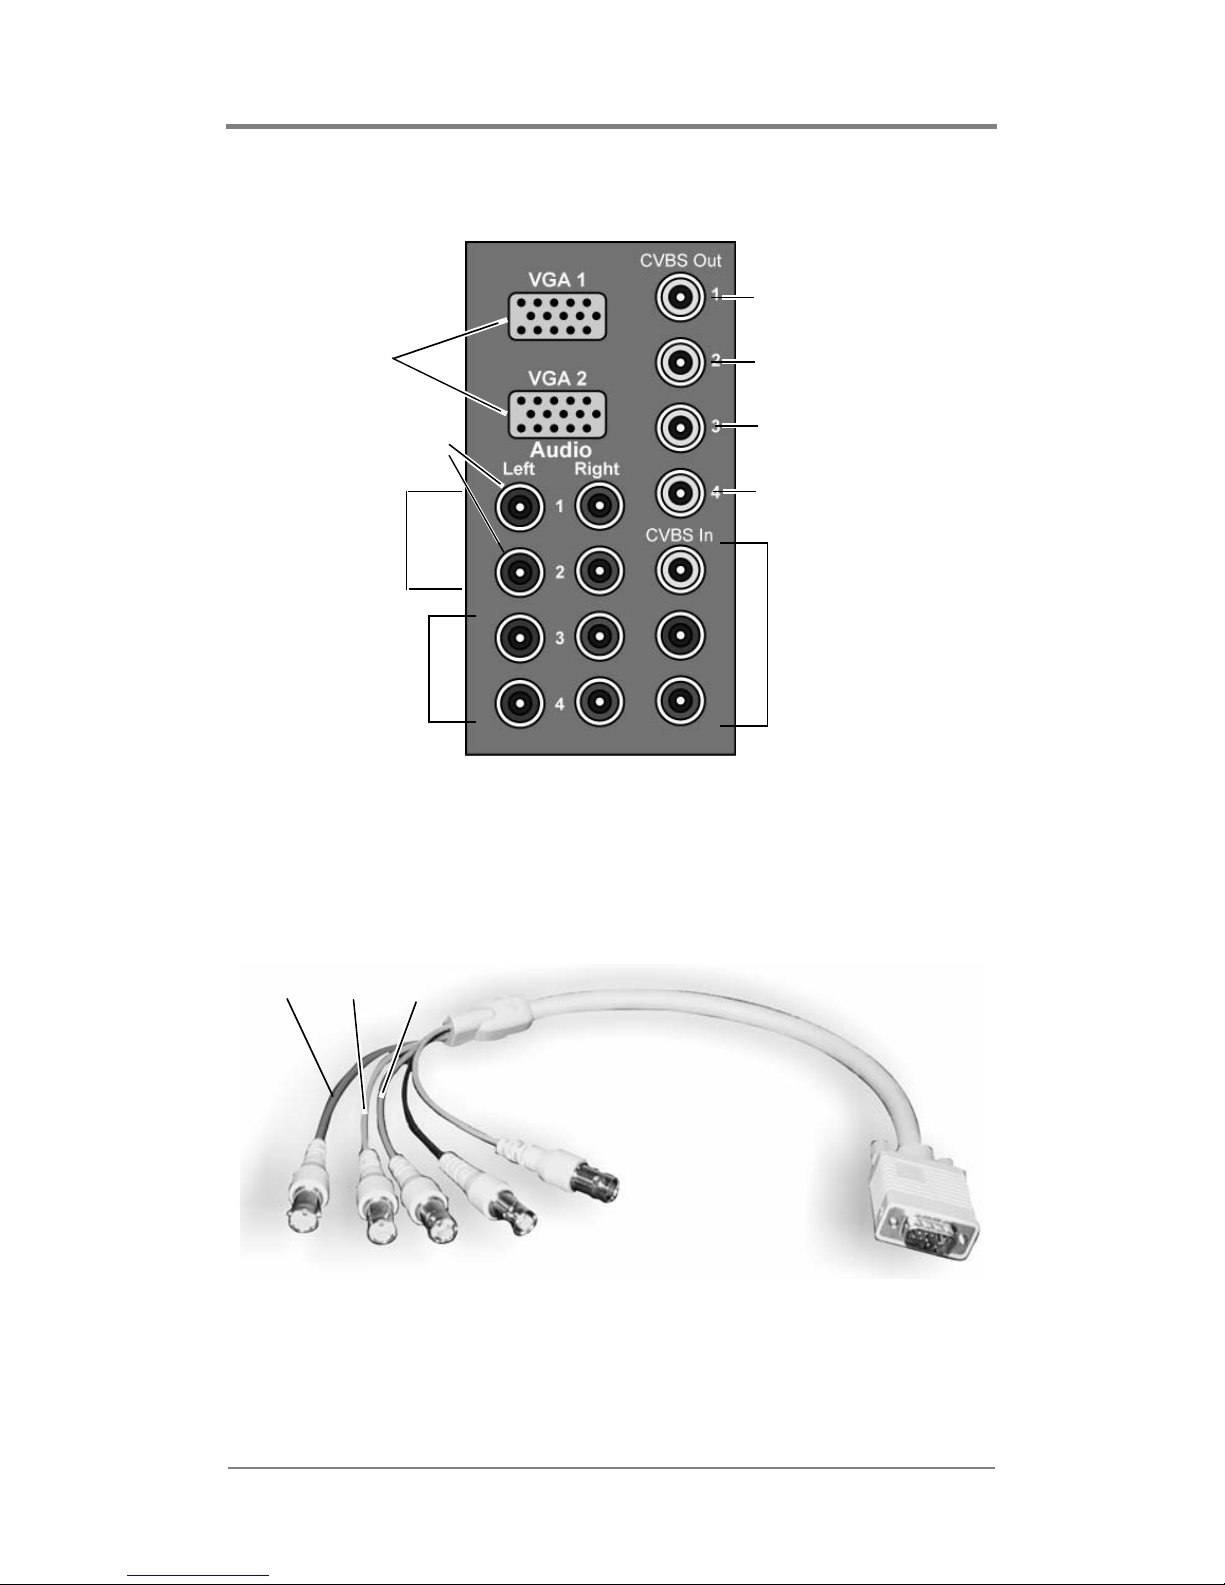
Video and Audio Connections
Figure 1. Mantis MG Backplane Video / Audio Connections
Video/VGA Cable
Figure 2. Vide/VGA Cable
CVBS
Reserved for future use.
Component
S-video
Analog
Audio Out
Left and Right
Connectors
Ch. 1
Ch. 2
Reserved for future use.
Reserved for future use.
Reserved for future
use.
S/PDIF
Left Connectors
Only
Pr Y Pb
Red Green Blue
Page 20

Mantis Media Gateway™ Quick Start
6
CVBS
Connect a composite cable to the corresponding Channel 1 or 2
connector. The Mantis MG uses RCA-M connectors.
Component, S-video
1. DB connector end to either VGA 1 or 2.
2. Connect the color coded cables to the appropriate connectors
on the display device.
Audio Connections
❏ To create an analog stereo audio connection for Channel 1,
connect a RCA-M phono-ended audio cable to the
corresponding Audio Outputs Left 1 and Right 1. Repeat
for Channel 2.
❏ To create a S/PDIF digital audio connection for Channel 1,
connect a RCA-M phono-ended audio cable to
corresponding Audio Output Left 1. Repeat for Channel 2.
Cable Component S-video
Red
Pr chroma
Green
Y lumina
Blue
Pb
Table 1: Mantis Cable Connections
Termination of Audio and Video Outputs
Do not double terminate audio or video outputs, this degrades
sound and picture quality.
Page 21
Mantis Media Gateway™ Quick Start
7
Configuring for a Network
Mantis default network settings are:
❏ IP Address: 10.0.0.1
❏ Network Mode: Static
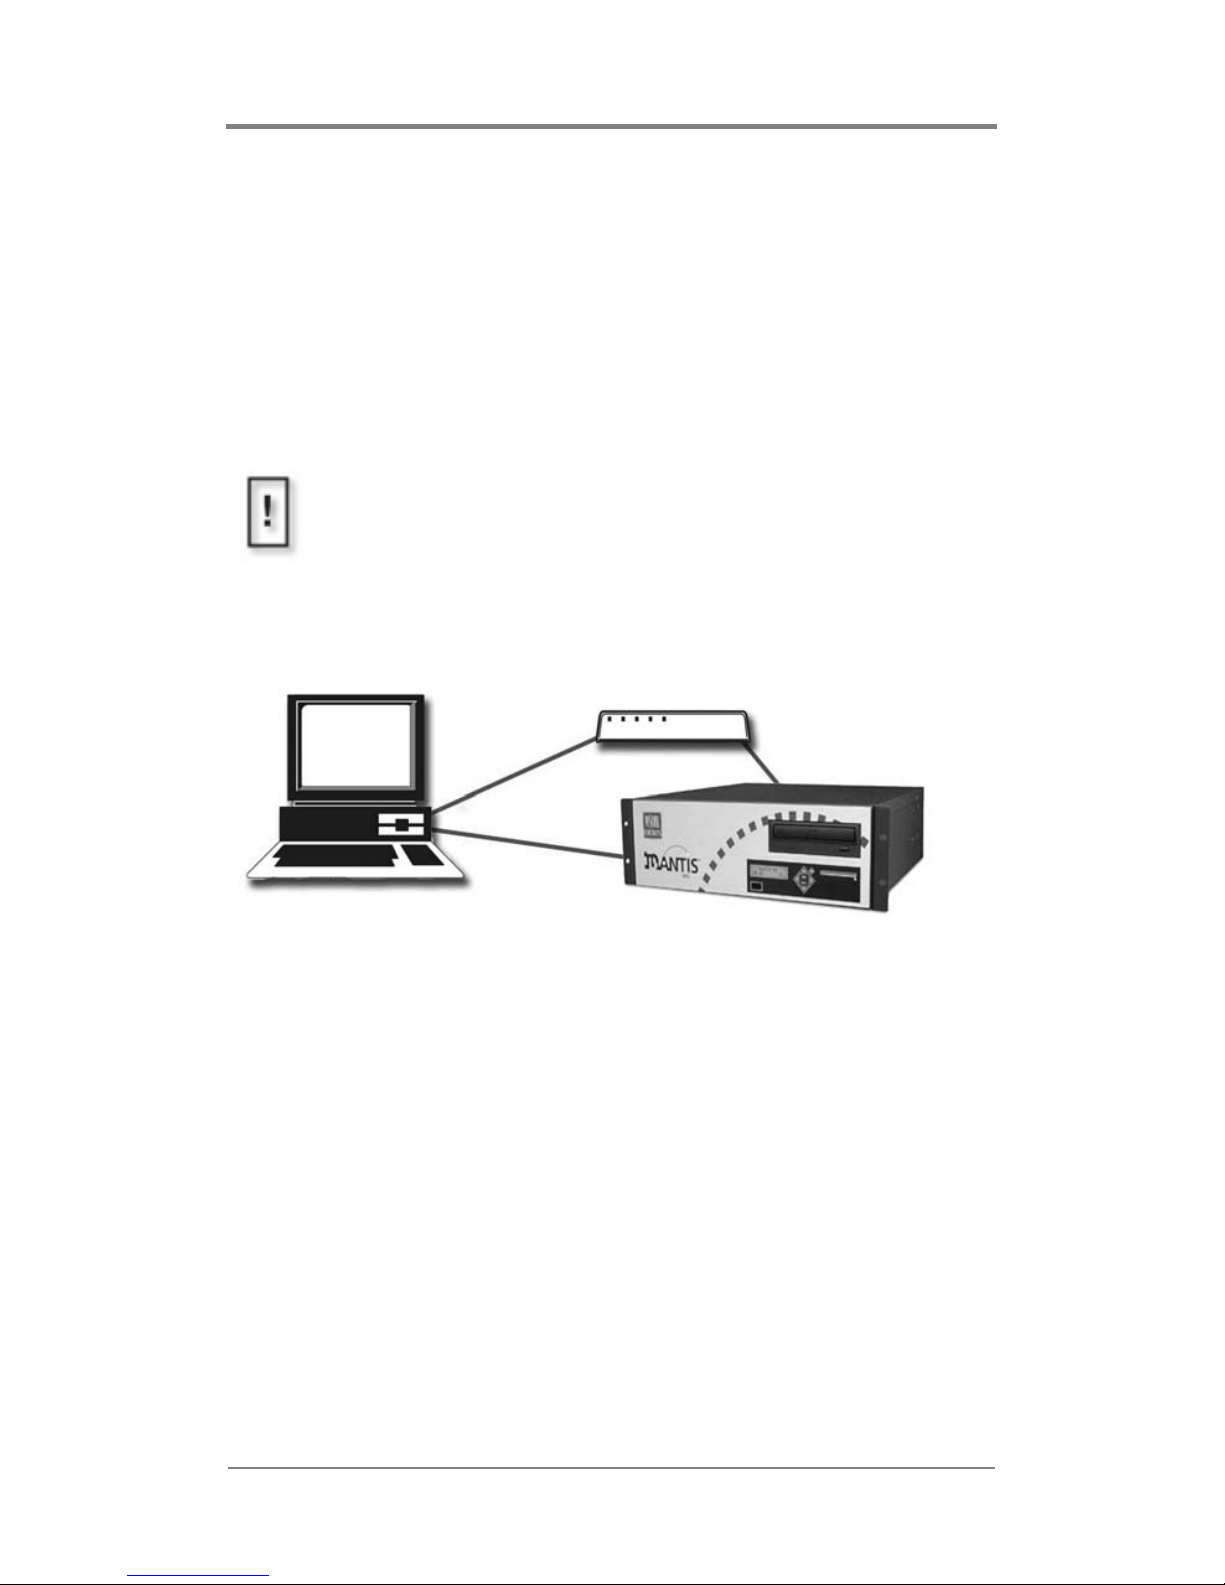
To initially change the Mantis network settings, it is necessary to
attach a computer directly to the Mantis.
Attaching a Laptop or PC
Ethernet
❏ Connect the computer directly to the Mantis using an
Ethernet crossover cable.
or
❏ Connect using standard Ethernet cables and a hub or switch.
Serial
Use a null modem cable (RS232, female DB-9 to female DB-9)
when connecting to the Mantis via the serial port.
Before beginning, verify that the computer and Mantis powered
off. When connections are completed, power on the devices.
Ethernet via Hub or Switch.
Ethernet
Cross-over Cable.
Page 22
Mantis Media Gateway™ Quick Start
8
Changing TCP/IP Settings
There are three methods for initially changing the Mantis TCP/IP
settings: Front Panel, WebView, Serial Commands.
Front Panel
The front panel of the Mantis has control buttons and a display,
similar to those of a VCR, that can set most of the Mantis features
and functions.
❏ For information about the control buttons and display, Front
Panel on page 8.
❏ For information about changing TCP/IP settings, see Step 1:
Connect to the Network on page 31.
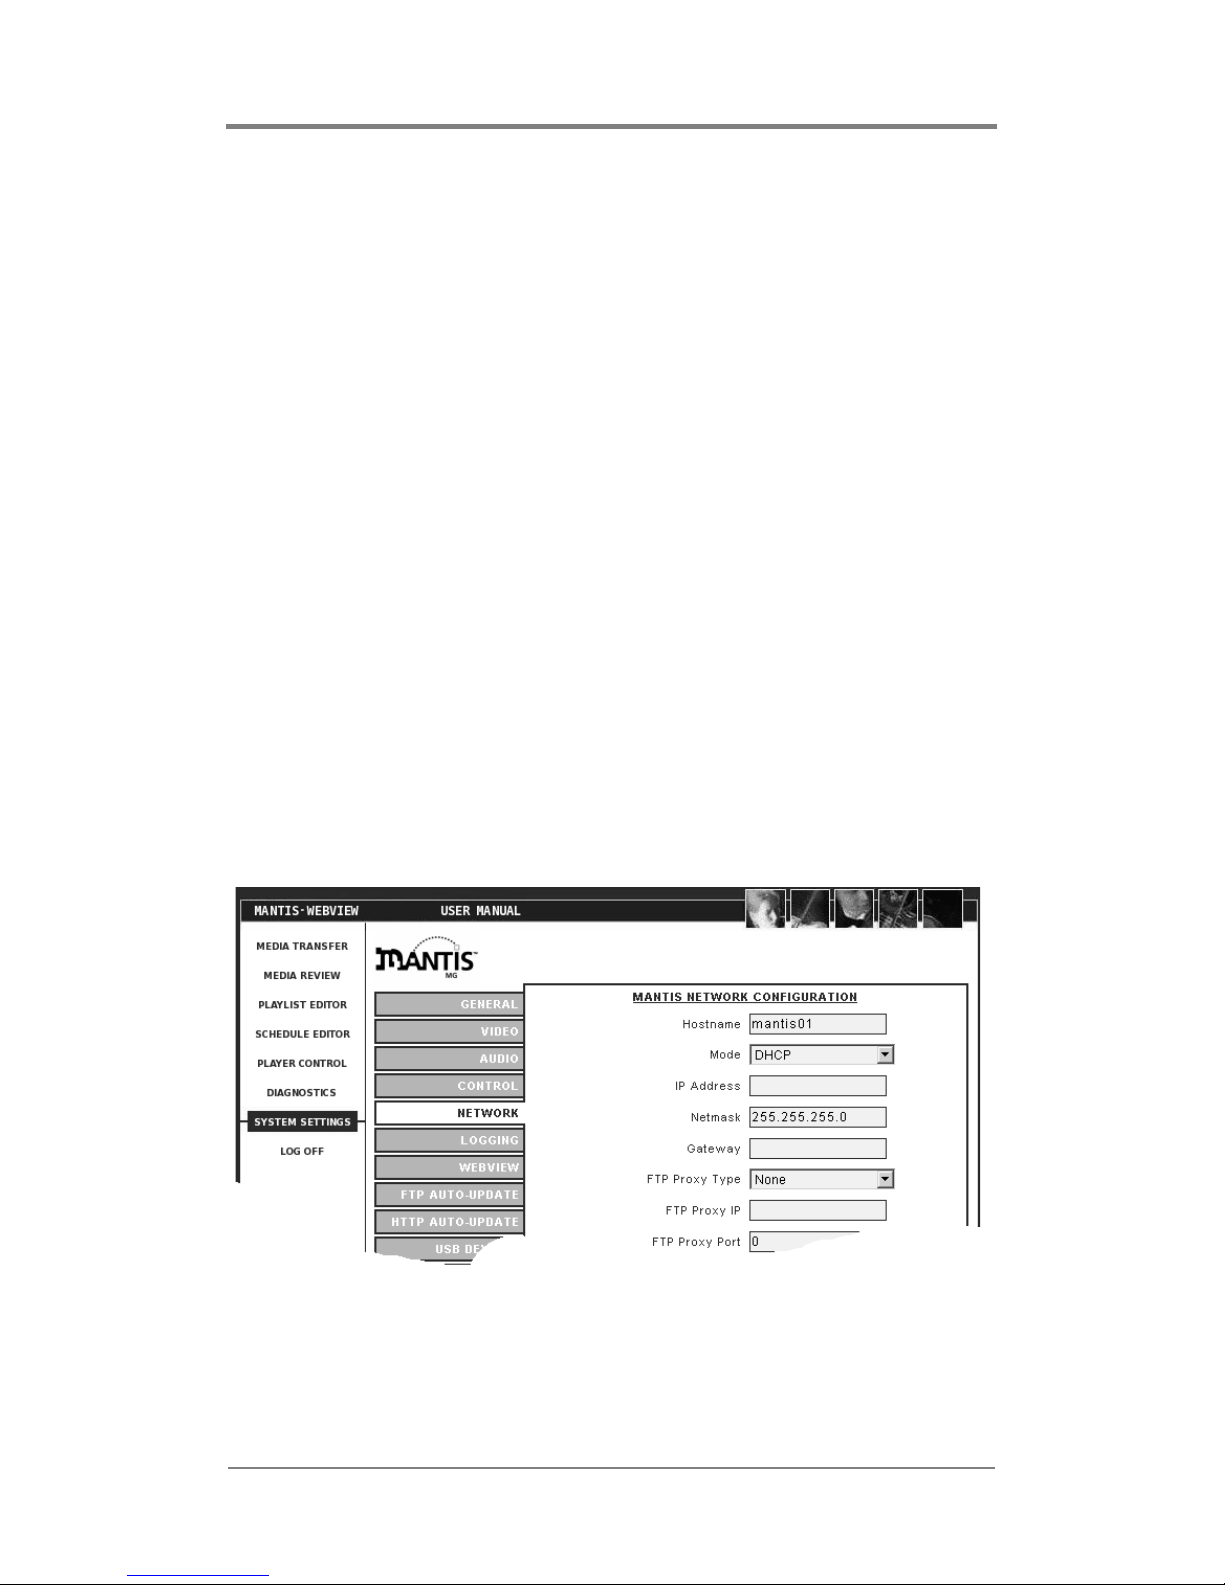
WebView via Ethernet Port
WebView is a browser-based, administration tool-kit that resides
on the Mantis, see .
1. Set the attached PC’s IP address to a number in the same range
as the Mantis, such as 10.0.1.2.
2. Open a browser and enter the default IP address 10.0.1.1 in the
address field.
10.0.1.1
0
Page 23

Mantis Media Gateway™ Quick Start
9
3. Access WebView using the default Mantis
Login: firefly
Password: 123456
4. Set the IP address and other TCP/IP parameters as required.
5. Click on Update Settings to save.
6. Click on Player Control.
7. Click on Restart Player.
This initializes the new settings.
External Control Commands
External control commands, see VCC Control Commands on
page 134, require that the computer has an ASCII generating
control program, such as Hyper Terminal. The parameters are:
❏ Serial port 1
❏ 9600 Bps
❏ Echo typed letters locally
Use the following Visual Circuits commands to configure the
Mantis.
FireflySetIpAddress
Syntax
fireflysetipaddr IP Address
FireflySetNetmask
Syntax
fireflysetnetmask netmask
FireflySetGateway
Syntax
fireflysetgateway gateway
FireflySetNetworkType
Syntax
fireflysetnetworktype 1 (DHCP) or 2 (Static)
Restarting the Mantis is only necessary when updating the
network settings in a DHCP environment, i.e. going from
Static to DHCP mode, changing the Host Name, etc.,
Page 24
Mantis Media Gateway™ Quick Start
10
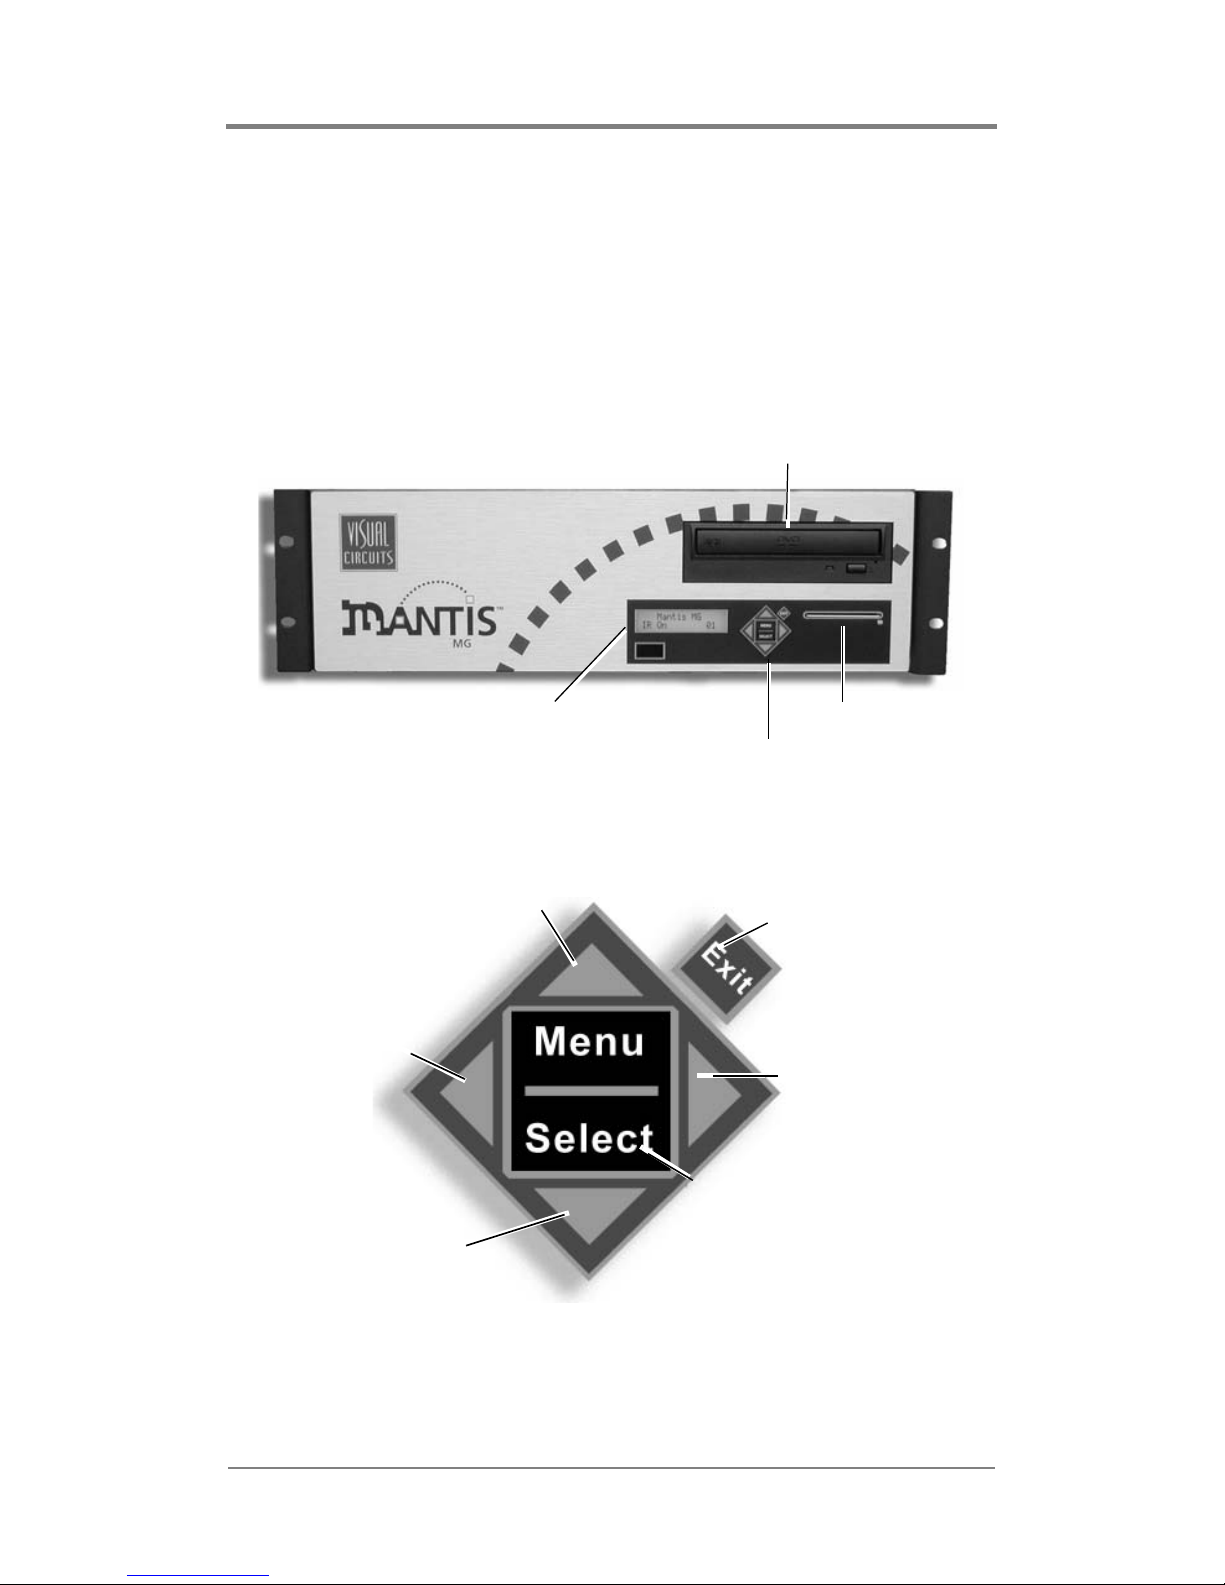
Front Panel
Display
Mantis media players are designed for remote operation with
unattended playback. However, the Mantis Front Panel and
Display permit changing settings directly on the device. Typically,
local access to the Mantis is for initial setup and installation.
Figure 3. Front View, Mantis MG
Menu Control Buttons
The Front Panel Buttons provide the standard type of controls
found on many DVD and VCR devices.
CD / DVD Drive
Smart Card Slot
Menu Control Buttons
Control Display
Exit from Menu.
Cancels current option
or entry and goes up on
e
level in Menu.
Move up through Menu
or entry options.
Move down through
Menu or entry options.
Move Right through
Menu options or curso
r
to right.
Access Menu.
Select current menu option or
entry.
Move Left
through Menu
options or cursor
to left.
Page 25
Mantis Media Gateway™ Quick Start
11
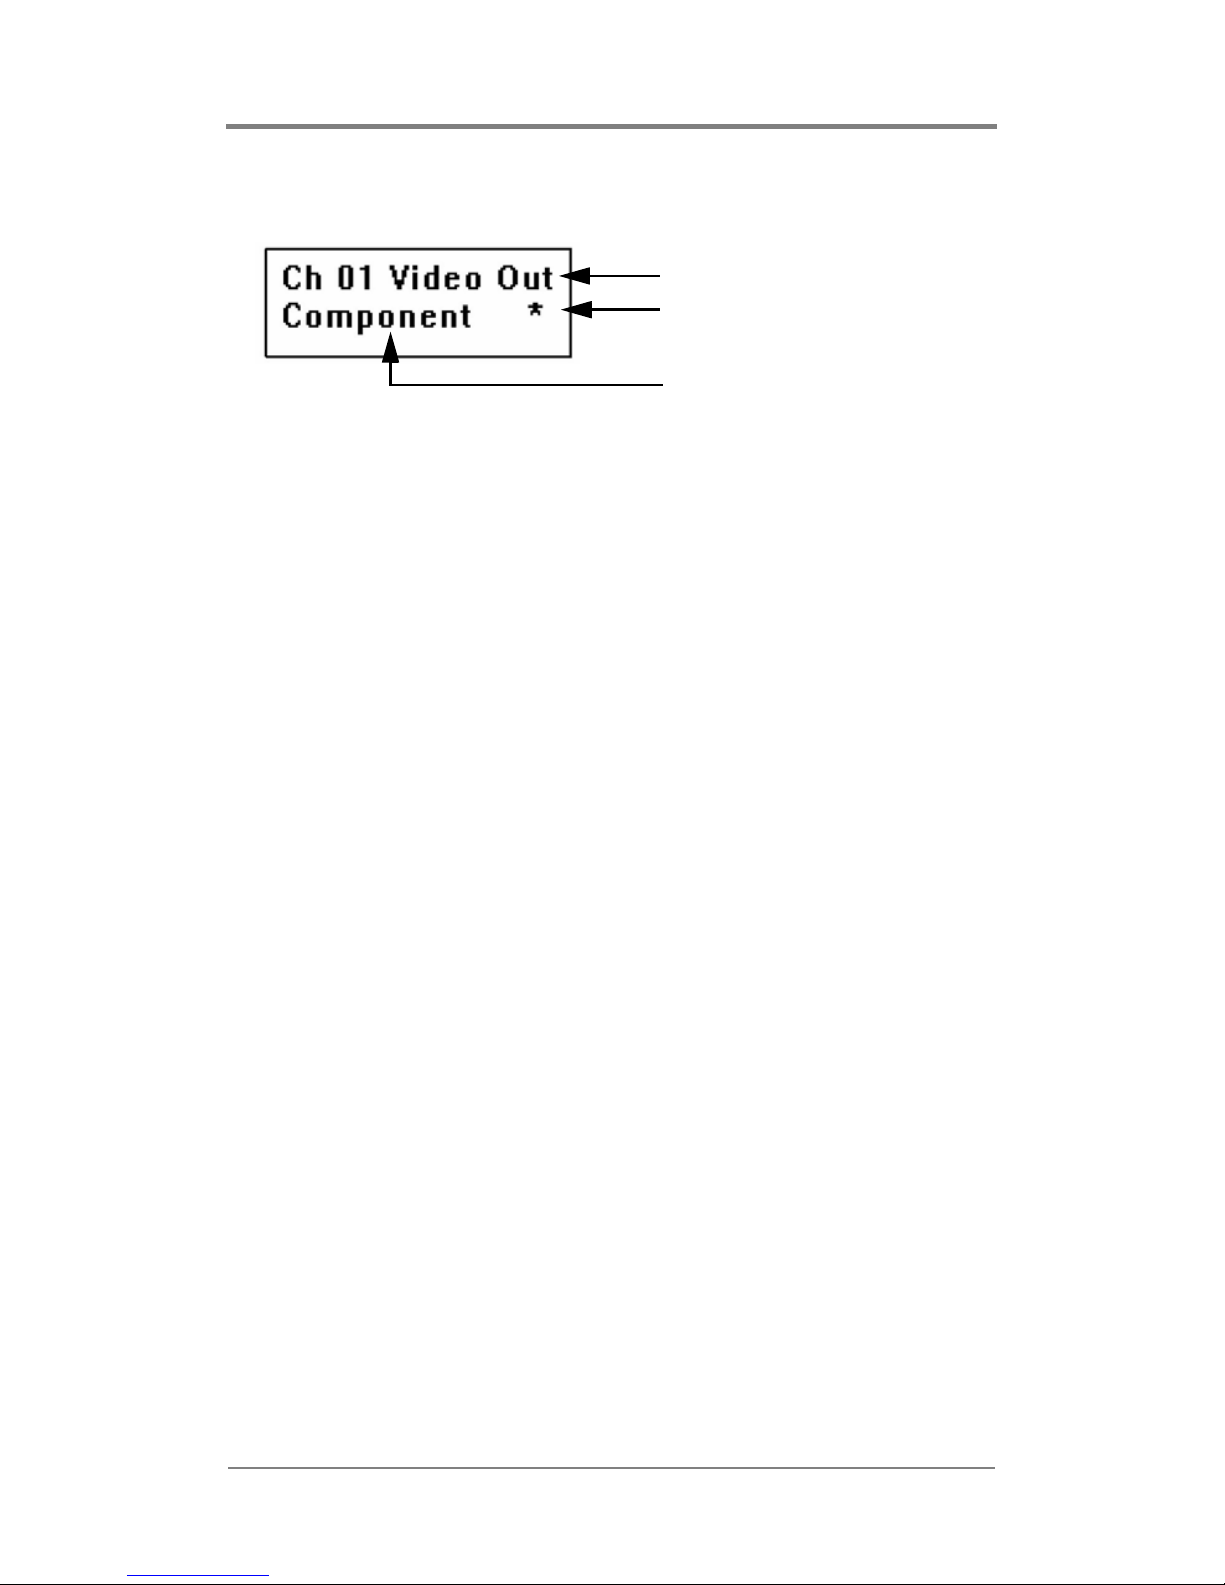
To access the menu system, press the MENU/SELECT button.
The second line of the display is also the only line that may be
edited. The asterisk symbol appears to the right of a menu option
when it is selected.
The Up Menu option allows jumping directly to the next higher
menu level. When
Up Menu is shown, press the MENU/SELECT and
you go up one menu level.
Changing System Settings
The Front Panel Display menu interface provides two methods for
changing system settings: changing a menu option choice and
changing a menu option value.
❏ A choice is an option selected from a fixed list presented by
the system.
❏ A value is a parameter that is set at the discretion of the
user, such as date/time, host name, or WebView user name.
See System Settings on page 71 for detailed descriptions of the
Mantis System Settings
Menu Category
Indicates Option Selected
Category Option
Page 26

12
Selecting a Menu Option
Use the Menu Control Buttons to view or change a menu option.
The example below illustrates how to set the video output
(resolution) on channel 2.
Use the Right Arrow to browse the
Player Settings list to locate the
desired option.
Press the Down Arrow to proceed to
the next level of selections.
Press Menu Select to set selection.
An asterisk (star) appears.
Use either the Exit or Up Arrow to return to a
higher level in the menu tree: 3 clicks advances to
top level, player status display.
Open the player menu tree by pressing
the Menu Select button.
IR (infra-red Remote Control)
The Mantis MG does not support IR Remote Control.
Please disregard messages about IR.
Page 27

Mantis Media Gateway™ Quick Start
13
Changing an Option Value
Using the Menu Control Buttons to change an option value is
similar to viewing or selecting the option. For example, to change
the date/time value:
Press the Down Arrow to proceed
to the next level of selections.
Open the player menu tree by pressing
the Menu Select button.
Use the Right Arrow to find the
Date/Time option.
Use the Up and Down Arrows to find
the correct number.
Use the Right Arrow to place the
cursor or the numeral needing
changing.
Use the Right Arrow to the next
numeral and change it.
When the date and time are correct,
press Menu Select to set them.
Use either the Exit or Up Arrow to return to a higher
level in the menu tree.
Page 28

14
Page 29

15
ENCODING REQUIREMENTS
AND RECOMMENDATIONS
Listed below are requirements and recommendations for both
Standard and High Definition encoding, that provide criteria to
create MPEG files compatible with the Mantis playback system.
Standard Definition (SD)
Encoding Requirements
1. Files must be one of the following types:
a. program stream MPEG2 or transport stream MPEG2
b. system stream MPEG1 of audio/video
c. elementary stream MPEG2
d. MPEG1 of video only
e. audio only
2. Use 4:2:0 encoding.
3. With MPEG-2, both audio and video fields must be encoded.
This is the normal default.
4. Audio only (Dolby Digital or MPEG Layer 2) files cannot be
mixed with files containing videos (MPEG, MPEG2 program
stream, video only).
5. Total output across all channels can not exceed 150 Mbps.
6. The presentation time stamp (PTS) values contained in the
audio and video streams in a file must be continuous and
increasing.
In particular, the PTS values should not reset to 0 at any point
in the file. The time between the first and last time stamps in a
file should reflect the actual duration of that file.
Do Not Use 4:2:2 encoding.
Page 30

Encoding Requirements and Recommendations
16
7. Files should be no less than 4 MB in size. If there are files are
smaller than 4 MB, use an editor to combine them into a larger
file that is at least 4 MB in size.
SD Encoding Recommendations
1. Resolution:
• 704 x 480 or 720 x 480 in NTSC
• 704 x 576 or 720 x 576 in PAL
2. Closed GOP (Group of Pictures) with an “I-frame” every 15
frames is recommended.
3. The recommended audio bit rate is 384 Kbps and a sampling
rate of 48 kHz.
Before encoding an entire project, play back the test files
using the original source tapes to confirm audio level. This
allows for calibration of the encoding system by obtaining a
standard audio level.
4. Program stream files should have one end code (00 00 01 b9)
at the very end of the file. While the Mantis can handle files
without end codes, it is a good encoding practice to include
one.
5. The bit rate can affect the size and transferability of the files.
Following are the recommended bit rates for various types of
video content:
Bit Rate Video Content
4 Mbps Good quality with low motion
6 Mbps Good quality with typical motion
8 Mbps Good quality with high motion
10 Mbps High quality with demanding content
Table 1. SD Bit Rate Encoding Recommendations
Page 31

Encoding Requirements and Recommendations
17
6. Although the Mantis can transcode NTSC and PAL, it is
recommended to encode to the video standard (NTSC or PAL)
that the Mantis is set to display.
7. When encoding files, annotate and store notes on the audio
levels of both the source tape and input settings of the encoder.
This permits verifying the audio levels of later encoding
sessions.
8. MPEG files are constructed from intertwined
(i.e. multiplexed) audio and video streams. If possible, the
length of the video and audio stream segments within the
MPEG files should be identical. Ending the audio segment at
a .5 second interval (i.e., at an “I-frame”) ensures identical
stream lengths and results in smooth and seamless looping
playback.
9. It is recommended that SMPTE tracks should be encoded as
hot, at approximately +6db.
This adjustment compensates for some SMPTE information
that may be lost during compression. Sample testing should be
done with all SMPTE tracks because not all encoders respond
in the same way.
10. For reference and calibration, encode into the MPEG files the
standard color bars and audio test tones along with the content
or source files. These encoded display test and audio tuning
files should be separate files, not headers or footers of the
presentation.
Even if encoding is done at the same production facility,
variances between sessions may occur and once MPEGs are
encoded, the audio level of a file cannot be changed unless
the file is re-encoded or a new audio track is mixed.
Thus, it is desirable to maintain a baseline audio level across
all files of a presentation whether at single or multiple
locations. If no encoding notes or data are available from
previously encoded files, compare the files. When possible,
measure the audio levels of the source tapes and of the
encoded files. At a minimum, listen to and compare the files.
Page 32

Encoding Requirements and Recommendations
18
11. To play back still images or computer-based graphics,
hardware-based encoding systems are preferred. However, if a
software encoder is needed, we recommend encoders such as
DVMPEG (www.darvision.com).
Multiplexing a blank audio track on all video-only MPEG files
is highly recommended.
Page 33

Encoding Requirements and Recommendations
19
High Definition (HD)
Encoding Requirements
Failure to follow the encoding guidelines may result in issues such
as uneven playback, blocky output, or frozen video.
1. The HD encoding format supports Transport Streams and
Program Stream MPEG 2 files of audio/video or video-only
files, or audio-only (Elementary Stream) files. All 18 of the
standard ATSC digital television formats are supported.
2. Audio compression formats:
Dolby Digital (AC3)
MPEG 1 2-channel layers I and II
MPEG 2 2-channel Layer II
3. Audio sampling rate of 48 kHz.
4. Frequency response is 20 Hz – 20 kHz +/- .5 db
5. Audio output level up to 4v p-p
6. Audio output impedance 620 Ohms
7. When creating a playlist of videos, all files to be played in a
single playlist must have a common Program Identification
(PID) for the audio stream, as well as a common PID for the
video stream. In addition to having the same PID, the files in
the same playlist should also have the same audio format as
well (example: either Dolby Surround, MPEG-2 or elementary
video only with no audio data).
8. The video and audio data streams in each file should be as
close to the same length as possible, exact length is preferred,
and beginning and ending at the same time stamps.
Page 34

Encoding Requirements and Recommendations
20
HD Encoding Recommendations
1. The recommended encoding bit rate is a minimum of 10 Mbps.
The standard broadcast rate is 19.4 Mbps. The maximum total
bit rate is 40 Mbps. The audio and video PES IDs (PIDS) can
be set in software for multi-stream applications.
2. When encoding it is recommended to:
Set Video PID: e0 (hex-decimal: 224)
Set Audio PID: c0 (hex-decimal: 192)
Standardizing all PIDs ensures that al files may be played back
to back with only minimal adjustments.
3. Audio/video streams cannot be mixed with video-only on the
same channel during playback. It is recommended to encode an
audio track with “tone” if there is no audio present on the
source tape. This will standardize all MPEG files and provide
easy future management of video content.
4. It is recommended that files be at least 30 seconds in length.
5. If files are to be used in cross-channel synchronization, it is
recommended that the files begin with 3-4 seconds of black at
the beginning to allow the files to sync up with each other.
Encoding Software
Use applications such as Pixel Tools (www.pixeltools.com.) and
VIDEO CLIPPRO (www.vitecmm.com) for post-production work.
These guidelines are meant to serve only as information for
professional video studios that do their own encoding.
Pixel Tools
This software creates a video-only transport stream from an AVI
file or an animation sequence of BMP, TGA or TIFF images.
❏ Pixel Tools can add an audio track with its transport
multiplexor and audio encoder.
Page 35

Encoding Requirements and Recommendations
21
Video Clippro
VIDEO CLIPPRO from Vitec Multimedia (www.vitecmm.com)
transcodes between program and transport streams. The
multiplexor on this program can also be used to include audio data
on files.
❏ Orient or rotate all files if the HD playback monitor is
running vertically as opposed to standard horizontal
positioning.
Focus Enhancements
Focus Enhancements does not provide technical support for parties
doing their own software encoding, nor provides technical support
for those using either Pixel Tools or VIDEO CLIPPRO.
Focus Enhancements does provide comprehensive encoding
services, including High Definition.
Please visit our website at www.visualcircuits.com or call
1-800-250-5533 for details.
Page 36

22
Page 37

23
SMART CARD
Overview
The Smart Card is a plastic card with an imbedded microchip that
contains data or code for use by an application.
Visual Circuits uses Smart Card technology to license optional
features for Mantis media players and to save their system setting
configurations.
Optional Features
Licensing via Smart Card permits the purchase and use of
individual Mantis features.
As new product enhancements and updates are released, they are
made available, as upgrades to the Smart Card.
Saving and Loading System Setting Configurations
The Smart Card facilitates easy setup and configuration of multiple
Mantis media players. Setup one Mantis and copy its system
settings configuration to the Smart Card. Then, insert the Smart
Card into another Mantis and load the data. The Mantis detects the
new system settings and changes any of its settings to match the
configuration stored on the Smart Card.
Optional Smart Card Features
Multicast
Additional Channels
3 or More
Table 1. Optional Mantis MG Features
Page 38

Smart Card
24
Using the Smart Card
The Smart Card reader slot is located directly below the DVD/CD
drive.
Inserting the Smart Card
To insert the Smart Card:
1. Orient the card so that the label is facing up and the arrow
points into the Smart Card reader slot.
2. Insert the card into the reader until the card is seated.
A green status light indicates that the card is installed correctly.
Smart Card Reader
Page 39

Smart Card
25
Saving a Configuration to
the Smart Card
To save a system settings configuration to the Smart Card, use
either the WebView or the front panel interface.
Using WebView
To save the current configuration of system settings to the Smart
Card:
1. Click on System Settings from the menu options on the left.
2. Click on the Smart Card tab.
3. Click on the Save Config button.
The Mantis saves its system settings to the Smart Card.
Using the Front Panel
To save the current configuration of system settings to the Smart
Card:
1. Press the MENU/SELECT button.
2. Use the Left and Right arrow buttons to locate the Mantis
Settings.
3. Press the Down arrow button to proceed to the Smart Card
options.
4. Use the Right arrow button to move to Save Config.
5. Press the MENU/SELECT button to save the configuration.
6. Use either the MENU/SELECT or Up arrow buttons to advance
upward through menu until at the top, system status, level.
Page 40

Smart Card
26
Loading a Configuration from
the Smart Card
To load a system settings configuration from the Smart Card use
either the WebView or the front panel user interface.
Using WebView
To load a system settings configuration from the Smart Card:
1. Click on System Settings from the menu options on the left.
2. Click on the Smart Card tab.
3. Click on the Load Config button.
The Mantis loads the configuration data from the Smart Card.
Using the Front Panel
To load the system settings configuration from the Smart Card:
1. Press the MENU/SELECT button.
2. Use the Left and Right arrow buttons to locate the Mantis
Settings.
3. Press the Down arrow button to proceed to the Smart Card
options.
4. Use the Right arrow button to move to Load Config.
5. Press the MENU/SELECT button to load and save the new
configuration.
6. Use either the MENU/SELECT or Up arrow buttons to advance
upward through men until at the top, system status, level.
Page 41

Smart Card
27
Eject the Smart Card
Use the front panel to remove the Smart Card from the Mantis.
Using the Front Panel
Press the EXIT button for five seconds and the Mantis ejects the
Smart Card.
If Smart Card Does Not Eject
In the event the Smart Card does not eject, refer to Smart Card
does not eject, page 202 in the Troubleshooting section for more
information.
Storing the Smart Card
The Smart Card is a digital medium storage device and as such
should be handled and stored using common ESD procedures.
If the Smart Card is inserted incorrectly and the green status
LED does not light, Press and hold the EXIT button on the
Mantis front panel for 5 seconds to eject it.
In the event a Mantis needs servicing, do not send its
corresponding Smart Card back with the unit.
Keep the Smart Card safely stored to avoid potential loss or
damage.
Page 42

28
Page 43

29
WEBVIEW
™
Overview
WebView™ is a web-based application that provides access to a
Mantis over a network using conventional web browser
technology. WebView is compatible with Microsoft Internet
Explorer
™
5.5 and later. While WebView may work with other
web browsers, Focus Enhancements does not guarantee full
compatibility.
WebView is a suite of content and device management tools:
1. Transfer Media page 36
Use this FTP application to move media content, playlists, and
schedules back and forth between the Mantis and the host
computer.
2. Media Review page 39
Use this file management application to review directory
contents, preview video and graphic content, and delete all
files stored on the Mantis.
3. Playlist Editor page 42
Use this editor to create and maintain video playlists. In
addition design playback by adding graphic overlays.
4. Schedule Editor page 50
Use this editor to create and maintain playlist playback
schedules. Control when, where, and how often a playlist runs.
5. Player Control page 61
Use this control to play, pause, stop files on a channel-bychannel basis. Select and play videos within a playlist.
Page 44

WEBVIEW
™
30
6. Diagnostics page 62
These pages provide statistics for a variety of system activities:
a. General
Includes revisions of hardware/software in use, currently
loaded playlist and schedule by channel, last updates,
number of system starts, and number of Watchdog restarts.
b. Video
Video data by channel that includes horizontal and vertical
size, video and audio bit rates, audio frequency, frame rate,
current frame, timecode, and file type.
c. Playback
Provides data flow information by channel, such as
interrupts, last sync, and disk and data underflows.
d. Logging
Mantis provides two types of logging: Run and Diagnostic.
These logging functions supply information collected by the
Mantis during its operations, including FTP/DVD updating
times with files and their sizes, records of files removed
during house-keeping operations, lists of any missing media
associated with active playlists, record of serial commands
received and sent, and an error summary.
7. System Settings
Use this page to view system and network settings.
Page 45

WEBVIEW
™
31
Accessing WebView
Step 1: Connect to the Network
Both the Mantis and the PC with the web browser must be on a
common network. For information specific to your network contact
your Network Administrator.
Security Warning
If using WebView over the Internet, the user’s network must
provide all the security: the Mantis does not include any special
security features.
Page 46

WEBVIEW
™
32
Step 2: Determine the IP Address of the
Mantis
After confirming network connections for both the Mantis and the
web browser computer, it is necessary to determine the IP address
or DNS name of the Mantis.
IP Address (static)
To obtain the IP address, use the Menu Control Buttons on the
Mantis front panel:
1. Press MENU/SELECT to display the main menu.
2. Press the Down arrow once to select Player Settings.
3. Use the RIGHT arrow to find Network.
4. Press the Down arrow once to proceed to the network settings
list.
5. Use the RIGHT arrow to find IP Address.
6. Press the Down arrow once to display the Mantis IP address.
7. Write down the address.
8. Press Exit several times until out of the menu.
Page 47

WEBVIEW
™
33
Dynamic IP Address (DNS and DHCP)
If the network uses dynamic IP addresses, determine the
address:
1. Press MENU/SELECT to display the main menu.
2. Use the DOWN arrow key to move to Player Settings.
3. Use the RIGHT arrow to move to Network.
4. Press the Down arrow to proceed to the network settings level.
5. Use the RIGHT arrow to move to Mode.
6. Press the Down arrow to go to mode level.
7. Use the Right arrow to select DHCP.
8. Press the Down arrow to display the dynamic IP address
assigned to the Mantis.
9. Record the IP address.
10. Press EXIT repeatedly until out of the menu system.
If the network employs DHCP it is not necessary to know
the IP address to access a particular device. Instead enter
the device host name: such as http://hostname or http://
hostname.yourdomain where hostname or
hostname.domain represents a specific name assigned to
the device when it was installed on the network.
Page 48

WEBVIEW
™
34
Step 3: Establish Communications with the
Mantis
Launch an Internet browser program and enter the IP address or
DNS name in the address field.
When contact is established, a login screen appears.
Figure 1. WebView Login Page
Step 4: Enter User Name and Password
Both the user name and password are case sensitive and require a
minimum of 6, but no more than 30, characters.
All Mantis ship from the factory with the default user name of
firefly and the default password 123456. If the defaults do not
work, contact your Network Administration for the correct
username and password.
Security Warning
Default user names and passwords are a favorite tool of hackers.
Because many people never change the default usernames and
passwords, they are given, it is easy for hackers to learn them and
then try them on every similar product they find.
Your first layer of security is always to change the default login
settings immediately.
Page 49

WEBVIEW
™
35
Using WebView
All WebView pages have a similar layout.
Figure 2. Typical WebView page layout
The default starting point in WebView is the Media Transfer page
as the default starting point,
page 36.
WebView User Manual (pdf)
(link to file stored on Mantis)
Visual Circuits Home Page
(requires access to WWW)
Main
Menu
Workspace
(changes according application in use)
Warning: Only Use WebView Main Menu Buttons
Do not use the Internet Explorer “History” function or its
Backward / Forward navigation buttons within WebView.
For WebView to refresh its displays with current data, it must
query the Mantis player. Using the Internet Explorer history or
navigation buttons pulls old data from the browser cache and
does not issue a fresh query for data to the Mantis. This can
cause inconsistent results.
Page 50

WEBVIEW
™
36
Transferring Media
Use this page to transfer media from the work computer or network
to the Mantis. Webview can transfer up to six media files at once.
Figure 3. WebView Media Transfer Page
1. Use the six browsing fields, Media 1 through 6, to locate and
identify the files to transfer.
The WebView browse function provides the ability to search
local and network hard drives for needed files.
Do Not Close or Change Web Pages while
Transferring Files
If you close or select another web page during a media transfer,
the transfer will terminate. If you would like to multi-task during a
transfer, you may open a new web browser and log in.
Page 51

WEBVIEW
™
37
2. After selecting the media files to transfer to the Mantis, click
the
Transfer Media button to start the transfer. Clicking the
Reset button clears all selections.
Mantis indicates that the file transfer is proceeding by
displaying an animated sequence of flashing circles in the
lower left portion of the page, where the Visual Circuits logo
normally appears. The length of time required for the transfer
depends on the size of the files and the transfer rate of the
network. Transfers can take several minutes.
3. After WebView has successfully transferred all of the selected
files, the Mantis displays a summary page showing a list of the
files uploaded.
Figure 4. WebView Media Transfer Summary Page
4. Return to the Media Transfer page and repeat the process if
there are more files to transfer.
Page 52

WEBVIEW
™
38
Graphic File Transfer and Conversion
The image formats that are compatible with WebView and Media
Messenger are .bmp, .gif, .jpg, .png, and .tga.
When WebView transfers an image file to the Mantis, it converts
the file to a standard 24-bit format and automatically determines
the correct image size for the selected output standard, for example
720 x 480 for NTSC. The Mantis stores the original image and
uses it as the thumbnail that is displayed in the various WebView
editing windows.
If extremely precise control of image size and color is required, it
is necessary to edit the file and convert it to the 24-bit bmp prior to
transferring it to the Mantis.
Webview Software Update
1. Download the Webview Update file (.upd) from Visual
Circuits web site and save it on the work computer. This file is
also available via CD.
2. Locate the UPD file using the Mantis Update field at the bottom
of the Media Transfer screen.
3. Click Mantis Update.
After the file transfers to the Mantis, the system immediately
begins to process the update. This takes approximately one
minute. The Mantis then automatically restarts.
4. Once the restart completes, verify that the system version has
changed. This indicates that the update is a success.
Image Resolution
The Mantis conversion of the graphic image does not change the
image resolution.
Page 53

WEBVIEW
™
39
Media Review
The WebView Media Review page, provides the ability to review
media and storage usage on the Mantis, preview video and graphic
overlay media, and delete media from the Mantis. By default, the
data displayed are: video, overlay, playlist, and schedule.
Figure 5. WebView Media Review Page
If an optional Smart Card application such as MultiCast is running,
its data appears on the Media Review page too.
Page 54

WEBVIEW
™
40
Viewing Media and Storage on the Mantis
Figure 6. Detail of Media Review Video and Overlay Pages
Use the Media Review page to view the video and graphics overlay
files and directory listings for video, graphics overlay, playlist, and
schedule files that are currently stored on the Mantis.
To re vi ew a file:
1. Select the tab that represents the file type.
2. Select the file from the list on the right.
The media review box on the left displays:
❏ Maximum storage capacity
❏ Storage Used and Free
❏ Filename with extension
❏ File size in MBs
❏ If the file is a video or an overlay, a thumbnail of the video
or image displays, along with the file size
❏ If an overlay is selected, its resolution is also shown
❏ There is a Delete button for removing files
Page 55

WEBVIEW
™
41
Thumbnail Videos
The first time a video displays in the preview area there is no
animated sequence available for preview playback. Click the
Preview Button to have the Mantis create a short animated
sequence using thumbnail stills from the video. This animation is
stored and retrieved automatically for future previews.
Once the thumbnail animation is created, the Preview Button
ceases to display for that specific media file,
Deleting Media from the Mantis
1. Select the proper tab: video, overlay, playlist or schedule.
2. Select the file(s) from the media list on the right.
To select several files at the same time, use the standard
Windows
Shift/Control method.
The media review box on the left displays the name of the file
and its size (in MBs).
In cases where several files are selected, all of the file names
appear along with a total of their combined sizes.
3. Click the Delete button.
In some cases, video and graphic overlay files may not display in
the preview window.
WARNING
Deleting Files While in Use by Current Playlist
This deletion process works for all media files stored on the
Mantis and it is possible to remove files required by the
current playlist.
If a file that is currently playing is deleted, it is allowed to finish
playing before the file is actually removed. The next time it is
called by the playlist it will be skipped.
There is no way to retrieve files once they are deleted.
Page 56
WEBVIEW
™
42
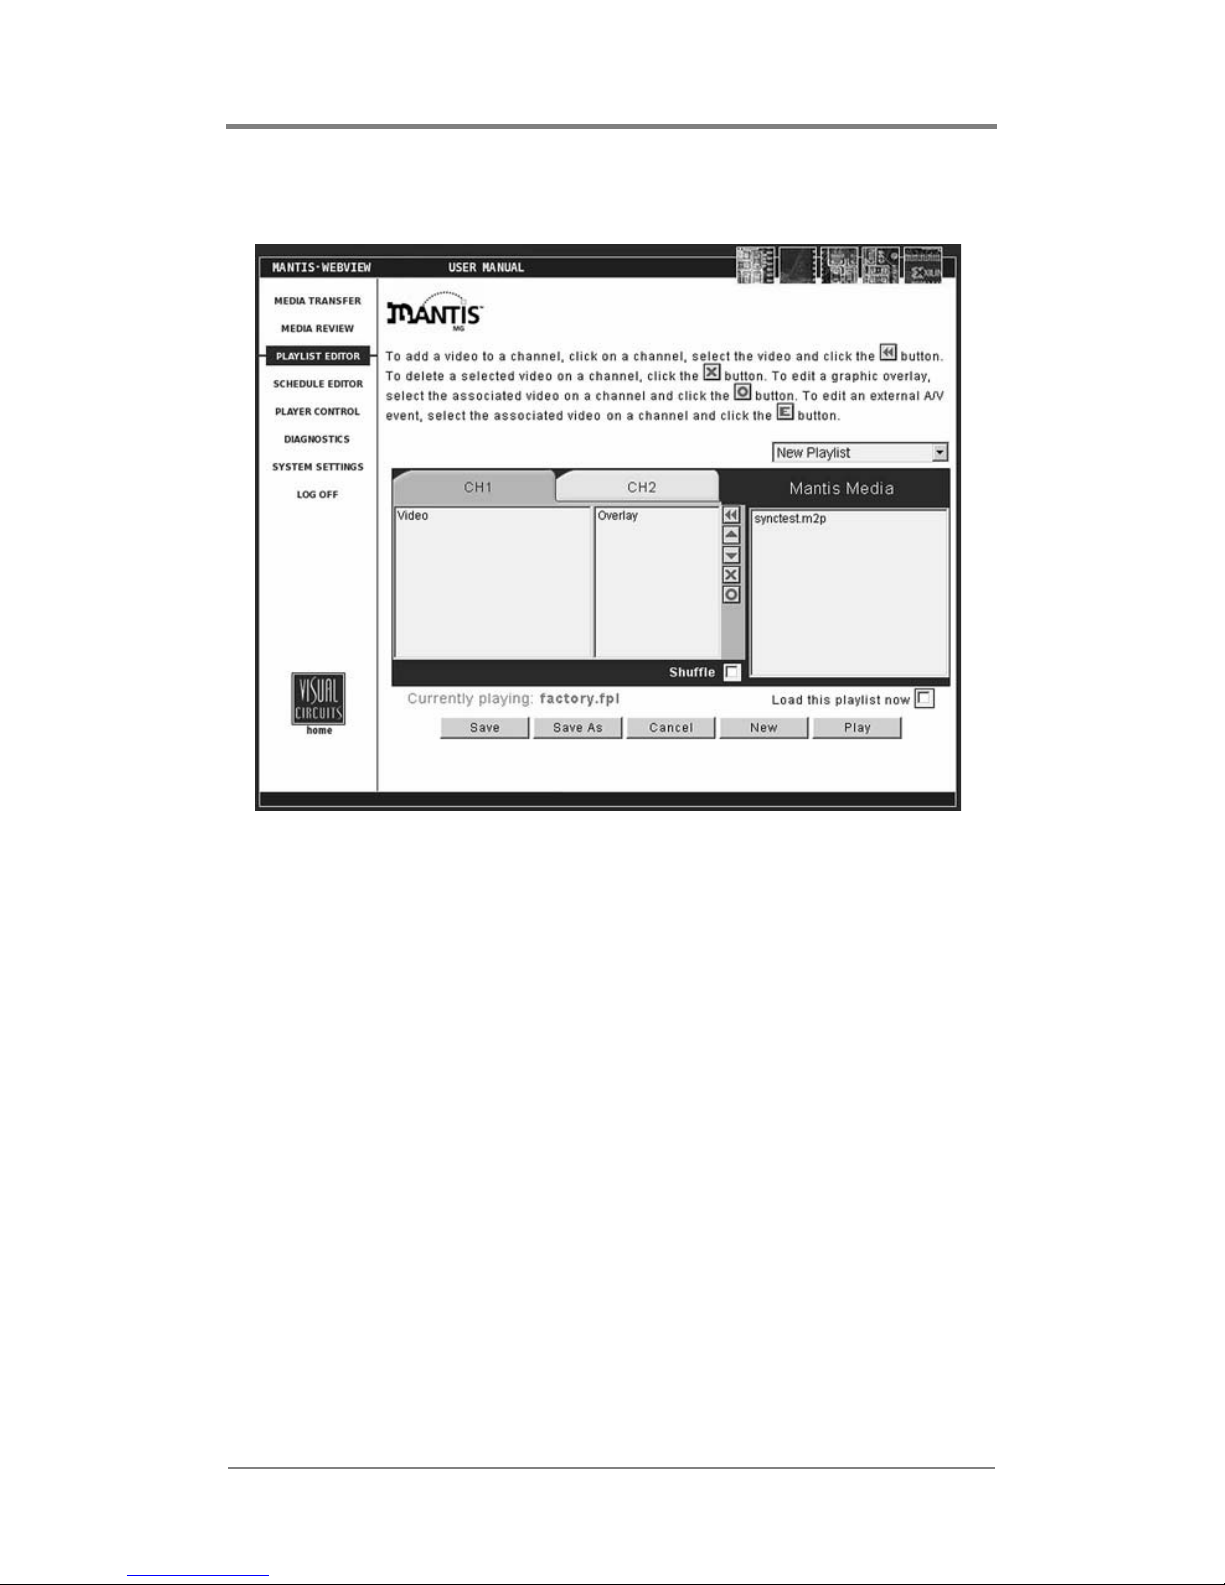
Using the Playlist Editor
Figure 7. WebView Playlist Editor Page
Use the Playlist Editor to create or modify a video playlist by:
❏ Arranging videos in a playback sequence
❏ Creating and positioning graphic overlays associated with
specific videos
The graphic overlay feature provides an effective way to display a
company logo, sale sign or other static image (.bmp, .jpg, .gif, .tga
or .png) over a video. Within the playlist, it is possible to assign a
graphic overlay to one, many, or all videos in the list.
Once created, a playlist is available for immediate playback or its
file can be stored for future use.
Page 57

WEBVIEW
™
43
Creating a New Playlist
There are two methods for creating a new playlist: by choosing
New Playlist from the Playlist drop down menu or by clicking on
the
New button in the lower right corner.
Adding Videos to a Playlist
To add video files to a playlist:
1. Select the channel tab to work with.
2. Browse the Mantis Media list to locate the video to add.
3. Select the video(s) and then click on the button located on
the center buttons panel.
Removing Videos from a Playlist
To remove video files from the playlist:
1. Select the video(s) in the Video listbox.
2. Click on the button located on the center buttons panel.
Add multiple videos using the Windows Shift/Control
method.
Newly added files appear at the bottom of the list for that
channel or, if a file is highlighted, below it.
Once listed, a video can be used multiple times on the same
or different channels.
Remove multiple video files using the Windows Shift/
Control method.
If a video is listed on several lists, removing it from one list
does not remove it from the others.
Page 58

WEBVIEW
™
44
Moving Videos Within a Playlist
To move a video up or down within a playlist:
1. From the Video list, select the video to move.
2. Click the to go up or the to go down within the
playlist.
3. Move the file to the desired location in the playlist.
Shuffling Video Playback on a Channel
The Shuffle feature offers the ability to playback a playlist’s videos
in random order.
❏ To turn Shuffle On, place a check mark in checkbox located
at the bottom right of the channel tab area. To turn Off,
remove the check mark.
❏ Shuffle is set on a channel-by-channel basis. Thus it is
possible to Shuffle videos on a single or multiple channels.
Adding Graphic Overlays to a Playlist
Adding a graphic overlay file to a playlist is similar to the process
for adding video files.
There are two ways to add a graphic overlay to a video.
The first method is:
1. Click on the video that is to have the overlay to associated with
it.
2. Locate and click on the graphic that is to be the overlay.
3. Click on the button to add the graphic as an overlay.
The graphic overlay appears in the Overlay list on the same line as
the video to which it is associated.
A graphic overlay is the attribute of a video, hence an overlay
can not be added to an empty channel.
A video can have only one graphic overlay. If a second graphic
is added, it replaces the first.
Page 59

WEBVIEW
™
45
To modify a graphic overlay’s properties, select either the video or
the graphic overlay and then click the
button. This displays
the Graphic Overlay Properties page, see the next section for more
details.
The second method permits reviewing end adjusting the graphic
overlay properties before saving it:
1. Click on the video that is to have the overlay to associated with
it.
2. Click on button to display the Graphic Overlay Properties
window.
3. Click on the Overlay Filename drop down menu to locate and
select the graphic that is to be the overlay from the Media list.
4. Review and/or adjust the overlay properties, see the next
section for details on this.
5. Click the OK button.
The graphic overlay now appears across from its associated video
in the Overlay list.
Working With Graphic Overlays in a Playlist
When WebView transfers an overlay image file to the Mantis, it
converts the file to a standard 24-bit format and automatically
determines the correct image size for the selected output standard,
for example 720 x 480 for NTSC. The Mantis stores the original
image and uses it as the thumbnail that is displayed in the various
WebView editing windows.
.
Image Resolution
The Mantis conversion of the graphic image does not change the
image resolution.
An alternative to the auto-formatting performed by the Mantis is
to create the image and convert it to the 24-bit file mentioned
above before transferring into the Mantis.
Page 60

WEBVIEW
™
46
.
Figure 8. Graphic Overlay Properties Page
The process for altering the characteristics of a specific graphic
overlay is as follows:
(Skip steps 1 and 2 if a graphic overlay is selected and the Graphic
Overlay Properties page is displayed).
6. Select the video that the graphic overlay is to be associated
with and click on the
button to display the Graphic Overlay
Properties page.
7. Click on the Overlay Filename drop down menu to locate and
select the graphic overlay from the Mantis Media list.
8. Select a level of transparency between 0 and 100%.
Transparency is the extent that the graphic overlay allows the
video beneath it to show through. Select between 0% (opaque)
to 100% (clear). The default is 0%.
9. If desired, adjust the Key Color.
Called Masking, Blocking, Cropping, or Keying Out, use the
Key Color to specify which color within the graphic becomes
invisible, and thus allows the video to show through. There are
three methods for selecting a color to key out.
❏ None - No color selected. This is the default setting.
Page 61

WEBVIEW
™
47
❏ Auto Key - Mantis assumes that the color in the upper left
corner of the graphic is the background color and selects it
to key out.
❏ RGB - Manually select the color to key out by entering its
RGB (Red, Green, Blue) values into the designated fields.
10. If desired, adjust the time (in seconds) at which the graphic
overlay fades in and/or out on the screen.
11. If desired, select the position on the screen to place the graphic
overlay, example, bottom-left.
12. If desired, use the check boxes on the right side of the screen.
The check boxes correspond to each of the graphic overlay
properties. These check boxes can be used to copy the
properties in their associated frames to all of the existing
graphic overlays across all channels in a playlist. For example,
to ensure that all existing graphic overlays for a given playlist
always appear in the lower right corner, set the screen position
attribute to right bottom and check the
Apply to All box to the
right of that frame. This may be done for some or all of the of a
graphic overlay’s properties.
13. Click the OK button to save the changes and to return to the
Playlist Editor screen.
Removing Residual Background Color
The best backgrounds to key out have a single, uniform
color with no pattern. If, after using Auto Key, there is still a
residual color, i.e. specks of the background remain, then
use RGB.
Fade Times and Apparent Fade Rates
A complete fade from solid to invisible goes through 16 levels
of transparency. An overlay’s apparent rate of fading depends
on its transparency. Example: two overlays, one solid and the
other 60% transparent fade are set to fade out in 5 seconds.
They do, but the solid appears to fade faster because it goes
through more levels of transparency.
Page 62

WEBVIEW
™
48
Saving a Playlist
When finished editing the playlist, save it by clicking either the
Save or Save As buttons at the bottom of the screen.
❏ Clicking Save overwrites the original playlist file using the
same filename.
❏ Clicking Save As provides the opportunity to save the
playlist with a new filename.
Figure 9. WebView SaveAs Dialog Box
❏ After entering the new filename.
❏ Click on the Rename check box.
❏ Click OK to save the renamed playlist and to return to the
Playlist Editor page.
❏ If there is a check mark in the Load this playlist now check
box , found below the Mantis Media list, the modified
playlist begins playing as soon as it is saved. The box is not
check marked, the playlist is saved, but playback does not
start until the playlist is later selected for playback.
Filename Conventions
The Mantis provides three interfaces, that allow the creation
and naming, or transferring of files: front panel controls,
WebView, and External Control Commands. To insure
compatibility between them, filenames must conform to the
following conventions:
- up to 214 alphanumeric characters (capitals and
lowercase) in length
- can include spaces dashes, and underscores
- can begin with either alpha or numerical character
Page 63

WEBVIEW
™
49
Playing a Playlist Quickly
To play a playlist at once, click the Play button, located in the
lower right portion of the Playlist Editor screen. This overwrites
the original playlist file using the same file name and begins
designated playback on the Mantis immediately.
Page 64

WEBVIEW
™
50
Using the Schedule Editor
The Schedule Editor has two workspaces; the Playlist Events
Editor and the Video Dates Editor. By default, the Playlist Events
Editor displays first.
Figure 10. Schedule Editor - Playlist Events Editor Page
Use the Playlist Events Editor to create or update a schedule by
defining which playlist or lists are in the schedule and setting the
playlist’s playback properties.
In addition, the Video Dates Editor permits the setting of specific
start and stop dates for individual videos in the playlist. The Video
Dates Editor is accessed via the Playlist Events Editor.
Do Not Include Empty Rows in the Playlist Events Editorr
When creating or editing a playlist, do not leave an empy row
between playlist names. Gaps between playlist names will result in
lost data when the file is saved.
Page 65

WEBVIEW
™
51
Creating a New Schedule
There are two ways to create a new schedule.
❏ Select New Schedule from the Schedule drop down menu
❏ Click on the New button in the lower right corner
The Playlist Events Editor provides options to:
❏ add an event to a schedule
❏ delete an event from a schedule
❏ edit an event within a schedule
In addition, by using the Video Dates Editor, it is possible to assign
date rules to individual videos.
Each of the major tasks in the Playlist Events list involve adjusting
the event property fields. The following table provides basic
overviews and examples for each of the event property fields:
Property Description
Playlist Name
Designates which playlist to play.
Example: “I want my product demonstration playlist selected
to play”.
Start Time
Designates time to start playing playlist.
Example: “I’d like to have my playlist start playing at 9:00”.
Stop Time
Designates time to stop playing playlist.
Example: “I’d like to have my playlist stop playing at 18:00”.
Days
Designates days of week to play playlist.
Example: “I’d like to have my playlist play only on Thursdays,
Fridays and Saturdays”
Interrupt
Option to cut off video playing in previous playlist instead of
waiting for video to finish playing.
Example: “I’d like to have the video in my sales promotion
playlist interrupt the video in my product demonstration
playlist”
Play Once
Option to play playlist exactly once and then return to
previously scheduled playlist.
Example: “I’d like to play my one hour specials playlist just
once during the business day”
Interval
Option to repeat a “play once” event periodically at a
specified interval.
Example: “I’d like to play my one hour specials playlist once
every 2 hours throughout the business day”
Table 1: Schedule Event Properties
Page 66
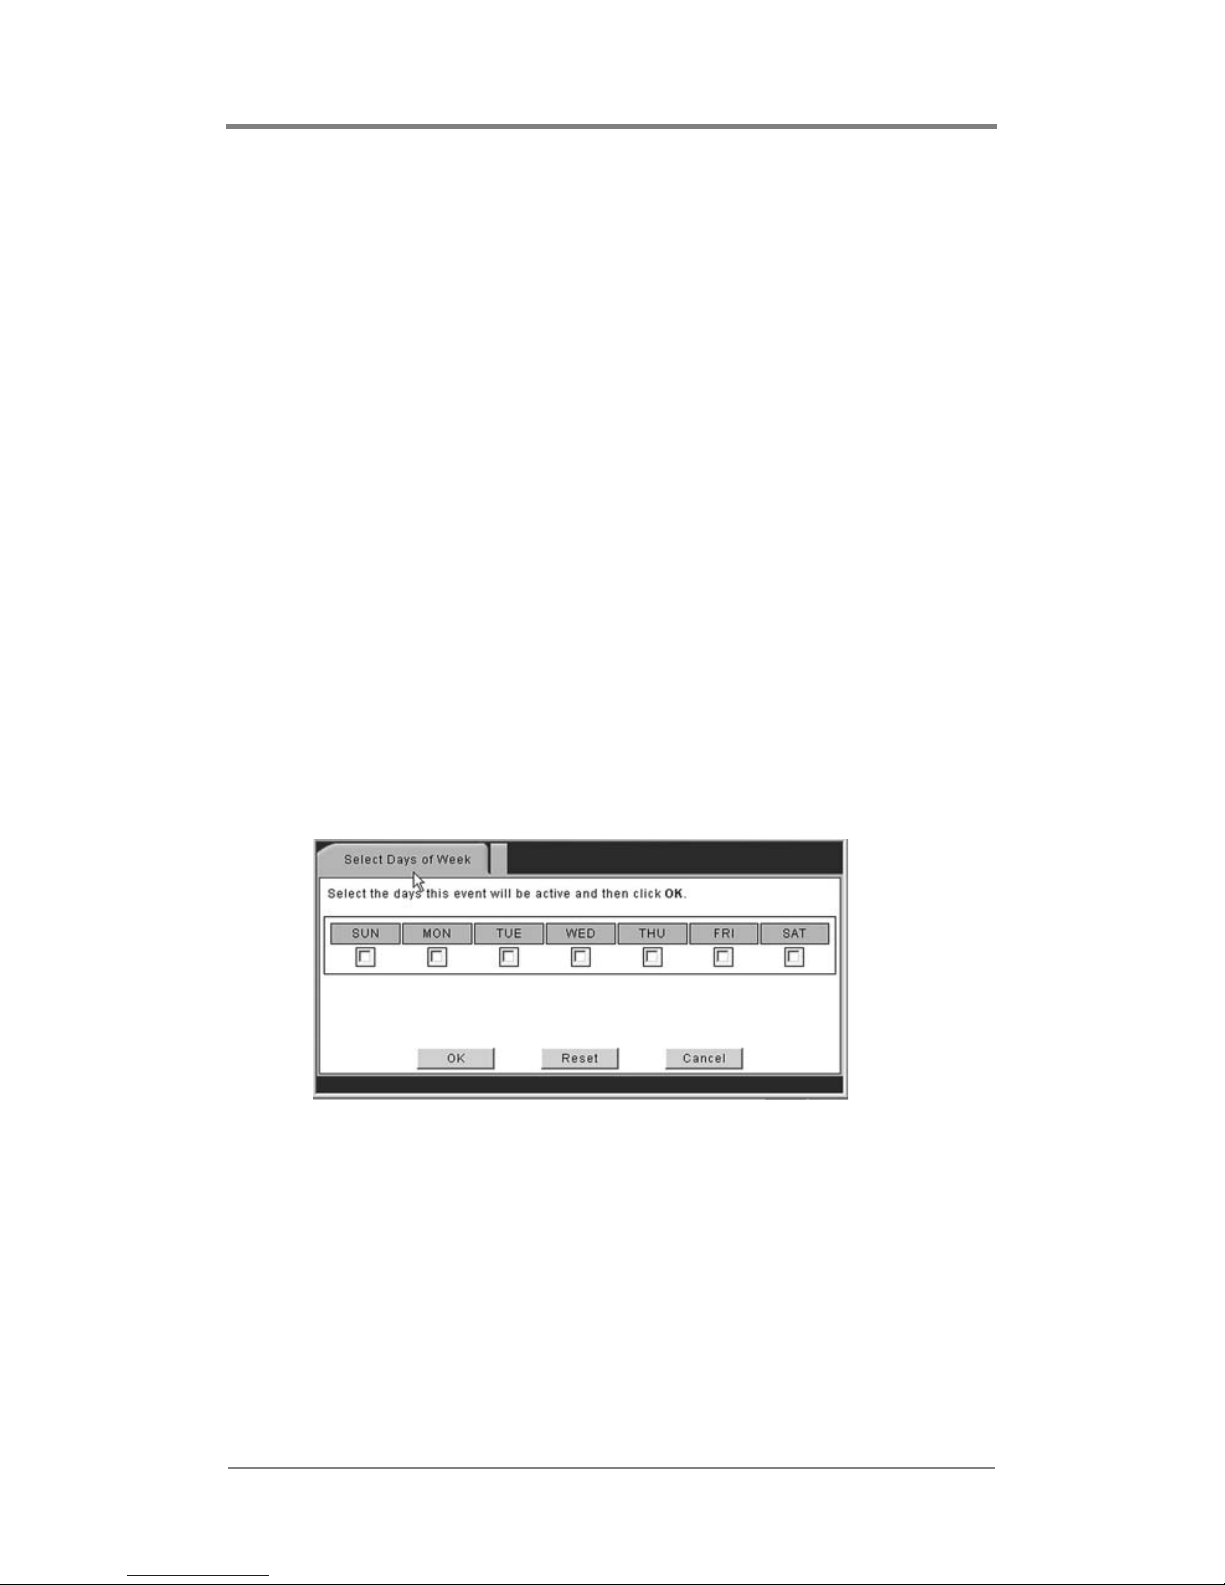
WEBVIEW
™
52
Adding or Editing an Event
The processes for adding or editing an event are similar with one
exception. Adding an event requires selecting a playlist not in the
schedule while editing requires working with an event listed in the
schedule.
To add an event to a schedule:
1. In the Playlist Name column, go to the first empty field.
2. Open the field’s drop down menu and select a playlist.
3. Edit the event properties as described below.
a. Playlist Name: Choose a playlist from the Select a Playlist
drop down menu.
b. Start Time: Set the specific start time for the playlist using
the number keys on your keyboard.
c. Stop Time: Set the specific stop time for the playlist using
the number keys on your keyboard.
d. Days: Click on any of the days to display the Days of the
Week
dialog box.
Figure 11. WebView Days of the Week Dialog Box
• Click on which days of the week the playlist is to play
on. A check mark in the box indicates the day is
selected.
• To clear all of the day selections, click the Reset button.
• When done, click the OK button to return to the
Schedule Editor screen.
Page 67

WEBVIEW
™
53
e. Interrupt: Click on the Interrupt check box to have the first
video in a playlist start playing precisely at its scheduled
time and interrupting whatever playlist and video that is
playing then. This feature is useful for time sensitive
playlists.
f. Play Once: Click on the Play Once check box to choose to
have a playlist played back only once: regardless of Start/
Stop time settings that would permit looping.
g. Interval: Use the number keys on the keyboard to enter a
periodic time interval (HH:MM). This is the length of time
between Play Once event for the playlist.
4. Assign specific start and stop playback dates to particular
videos in the playlist, see
Assigning Dates for Video Playback
on the next page.
5. When finished editing the schedule, save it using the
instructions found in
Saving a Schedule on page 57.
Page 68

WEBVIEW
™
54
Assigning Dates for Video Playback
Use the Video Dates Editor to designate the date(s) a particular
video is to play. Create a date rule for when a particular video is to
playback by selecting its start date, or end date, or both.
Figure 12. Schedule Editor - Video Dates Editor Page
Depending on the application, a video may use any or all of the
three date rules. The table below provides examples for using the
Video Dates Editor. .
Start Stop Description
03/01/05 --/--/-- Start date with no stop date.
Example: “I want my product demonstration video
available to playlists the day the product is released, but
no sooner than that”.
--/--/-- 03/01/05 No start date with stop date.
Example: “I want my new marketing campaign video
available to playlists from now until the end of the spring
months”
03/01/05 03/31/05 Both start date and stop date.
Example: “I’ want my March promotions video available to
playlists only during the month of March.
Table 2: Video Date Rule Examples
Drop down Menu
Playlist Events
Video Dates
Page 69

WEBVIEW
™
55
Add or Edit a Date Rule to a Video
1. In the Playlist Events workspace, select the playlist that
contains the video requiring date rule editing.
2. Select the Video Dates Editor from the drop down menu.
The process for adding or editing date rules is the same with
one exception. Adding rule first requires selecting a date not
already in the list. Editing an date rule requires the listed date
and modifying the rule.
3. From the Select a Video drop down menu, choose the video to
receive the date rule.
4. Set the appropriate start and/or stop dates. These dates must be
in numerical format.
5. Repeat steps 2 through 4 to add date rules to additional videos
if desired.
6. When the date rules are completed, save using the instructions
found in
Saving a Schedule on page 57.
Delete a Date Rule for a Video
1. From the Playlist Events workspace, select the playlist that
contains the video requiring date rule editing.
2. Select the Video Dates Editor from the drop down menu.
3. In the Video Name list, locate the video with the date rule to
delete.
4. Change the video to Select a Video from the Video Name drop
down menu. The date rules are deleted.
5. Repeat steps 2 and 3 to delete date rules for additional videos if
desired.
6. Save changes using the instructions found in Saving a Schedule
on page 57.
Page 70

WEBVIEW
™
56
Deleting an Event from a Schedule
To delete an event from a schedule, use the following steps:
1. Verify that the correct playlist is being edited.
2. Locate the event to delete.
3. Manually clear all of the event’s properties, including any date
rules set in the Video Dates Editor.
4. In the Playlist Name drop down menu, choose Select a Playlist.
When done, this will delete the playback event and its
associated properties from the schedule.
5. When finished editing the schedule, save it using the
instructions on the next page.
Page 71

WEBVIEW
™
57
Saving a Schedule
When finished editing the schedule, save it by clicking either the
Save or Save As buttons at the bottom of the screen.
1. Clicking Save overwrites the original schedule file using the
same file name.
2. Clicking Save As provides the opportunity to save the schedule
with a new filename, see
Filename Conventions on page 48.
Figure 13. WebView Save Schedule Dialog Box
3. After entering the filename, click OK to save the modified
schedule and to return to the Schedule Editor main page.
If there is a check mark in the Load schedule now checkbox,
found below the Mantis Media list, the modified schedule
begins playing as soon as it is saved. The box is not check
marked, the schedule is saved, but playback does not start until
the schedule is later selected for playback.
Saved Changes Take Effect Next Time Schedule Reloaded
When a schedule is saved, its playlists are saved in their entirety
within the schedule file. For playlist changes to take effect, the
schedule must be reloaded to the Mantis.
Page 72

WEBVIEW
™
58
Additional Saving and Loading Methods
Beyond the standard saving and loading methods directly to and
from the Mantis, there are two local options available: Save Local
and Load Local.
Save Local
This option saves a copy of the schedule file currently being edited
to the local work computer or network. This is feature permits
transferring files to other Mantis players doing backing ups.
To perform a local save:
1. Click on the Save Local button at the bottom of the Schedule
Editor screen.
An XML page appears displaying the file to be saved.
Figure 14. Example WebView XML Schedule Page
2. Click on Save at the bottom of the XML page.
A dialog box appears requesting information about where the
file is to be saved.
3. Proceed saving the file to desired location.
Add .fsc File Extension
When saving a schedule locally, it is necessary to add the
schedule file extension .fsc to the filename.
Page 73

WEBVIEW
™
59
Load Local
The Load Local button provides the capability to load a schedule
file from the local computer or network to the Mantis, rather than
one already stored on board. This is useful when a schedule is
stored on another computer or on removable media.
To perform a local load:
1. Click on the Load Local button at the bottom of the Schedule
Editor screen. The following dialog box will appears:
Figure 15. WebView Load Local Browse Dialog Box
2. Click the Browse button and locate the schedule file (.fsc) to be
loaded.
3. Select the file and click Open.
4. The schedule loads to the Mantis and its filename appears in
the Event field.
5. Click the OK.
The Schedule Editor main screen reappears with the schedule just
loaded open and ready for editing.
Page 74

WEBVIEW
™
60
Exiting the Schedule Editor
At any point while working in the Schedule Editor you may exit by
clicking on any of the menu navigation buttons on the left side of
the screen. However, any unsaved changes made will be lost.
Page 75

WEBVIEW
™
61
Using the Player Control Panel
The Player Control provides basic video player controls: Play,
Pause, and Stop and control the file currently playing: displayed on
the output window. These controls work on a channel-by-channel
basis. The controls Previous and Next provide for moving between
playlists immediately before and after the list that is playing.
Figure 16. WebView Player Control Panel
In addition to using the standard player controls, the Display
Position checkboxes permit displaying the position bar that shows
the current playback position within the file.
Page 76

WEBVIEW
™
62
Diagnostics
The Diagnostics pages supply technical statistics about the Mantis.
This is a tool to help the Visual Circuits technical support team
work with you over the phone, in the event of problems.
The default Diagnostics pages contains three default types of
information: General, Video, and Playback. When an optional
feature is installed, a diagnostic page for that feature appears too.
By default, clicking on the Diagnostics displays the Mantis
Diagnostics - General page. This page provides basic information
about the Mantis and the media playing on it.
Figure 17. WebView Diagnostics - General Page
The Diagnostics pages provide a snapshot of the system status
at the time the pages were entered. The pages do not automatically update the information unless you click on the Enable Auto
Refresh button.
Page 77

WEBVIEW
™
63
Diagnostics - General
Player version
Displays the version of the Mantis (incorporating both hardware and
software).
Current loaded schedule
Displays the file name of the currently loaded schedule (if applicable)
on the system.
Current loaded playlist
Displays the file name of the currently loaded playlist on the system.
Video loaded on Chan 1
Displays the file name of the currently loaded video on this channel.
Video loaded on Chan 2
Displays the file name of the currently loaded video on this channel.
Video loaded on Chan 3
Displays the file name of the currently loaded video on this channel.
Video loaded on Chan 4
Displays the file name of the currently loaded video on this channel.
Last CD/DVD Update
Displays the date and time of the last automated CD/DVD update that
employed an update packet, see
Automatic Updating on page 109.
There are two other methods for updating from a CD/DVD, copying a
media file and updating the software. Neither uses an update packet.
Last FTP Update
Displays the date and time of the last FTP update.
Last FTP Connect
Displays the date and time of the last FTP connect.
Watchdog Restarts
Displays the number of times the Watchdog system has restarted the
Mantis.
System Starts
Displays the number of times the Mantis has been started.
Page 78

WEBVIEW
™
64
Diagnostics - Video
Figure 18. WebView Diagnostics - Video Page
Channel
Displays the number of the channel monitored.
Horizontal Size
Width of image in pixels.
Vertical Size
Height of image in pixels.
Video Bitrate
Rate of video bits transfer (Kbps) at time of monitoring.
Audio Bitrate
Rate of audio bits (Kbps) transfer at time of monitoring.
Audio Frequency
Frequency of audio file.
Page 79

WEBVIEW
™
65
Frame Rate
Number of individual frames or images displayed per second.
Current Frame
The frame ID number for frame currently displayed.
Time Code
Date-time stamp for frame identified in Current Frame.
File Type
Format of file being shown, i.e. MPEG1, MPEG2.
Page 80

WEBVIEW
™
66
Diagnostics - Playback
Figure 19. WebView Diagnostics - Playback Page
Channel
The number of the channel monitored.
Interrupts
Number of times the playback was interrupted during the play period.
AV Syncs
Number of times the decoder has had to adjust the audio-video
synchronization during the playback period.
Last Sync
Timecode for the last time an AV synchronization occurred.
Video Data
The amount of video data, in bytes, stored on the chip.
Audio Data
The amount of audio data, in bytes, stored on the chip.
Page 81

WEBVIEW
™
67
Raw Data
Total amount of data, in bytes, stored on the chip.
Disk Underflow
Data flow from the disk is not sufficient to keep the read buffers full.
This may be caused by:
❏ Disk data transfer rate has been exceeded
❏ File error is generating improper read errors
❏ If the problem occurs with a non-Mantis hard drive, there may be
a bad or incorrect hard drive driver
❏ MPEG file encoded at too high a rate for application: see
Encoding Requirements and Recommendations on page 15
Data Underflow
The flow of data to the decoder cache has slowed and the decoder may
not be able to efficiently decode and transmit frames. Typically this can
be ignored unless playback is effected.
❏ One symptom is that the decoder is not incrementing by 1 per file.
If it is incrementing in the hundreds every few seconds there may
be a problem with the MPEG file.
❏ The problem is how the MPEG file was originally encoded.
When the Diagnostic Log is enabled, the Mantis automatically records
Data Underflow. Recording occurs at the end of each 24-hour period,
(23:59).
Page 82

WEBVIEW
™
68
Diagnostics - Logging
Logging provides a record of what played on each channel: videos
and their overlays, their starting dates/times, what percentage of
playback completed successfully and how long they played.
At the top of the Logging page, from the Select Logfile drop down
menu, select the log file to view.
Figure 20. WebView Diagnostics - Logging Page
The two buttons located at the bottom of the Logging page,
Refresh and Auto Refresh, permit setting the type of data refreshing
desired. Auto Refresh instructs the system automatically to update
the log file with current data at regular intervals.
Refer to Uploading Log Files on page 129 for information on
setting up the Mantis logfiles feature.
Once in the logfile viewer, the video playback data lists with one
video per line and sorts by playback time: using the Mantis internal
24-hour clock. Click on the <<Prev or Next>> links to move to the
previous or next pages respectively. In addition, to view playback
data for a certain time of day, enter either hours, minutes and/or
seconds in the time boxes and then clicking the
Go button.
Time
Displays the time of day the event was logged based on the Mantis
internal 24-hour clock.
Page 83

WEBVIEW
™
69
Chan
Displays the Mantis output channel number.
Filename
Displays the filename of the video.
Overlay
Displays the filename of the graphic overlay that was associated with
the video (if present).
Duration
Displays the total amount of time (HH: MM: SS) that a video played.
%
Displays the percentage played of the video.
Diagnostic Logs
Diagnostic logs can be used to view a record of all media update
procedures and system errors on a Mantis.
Information contained in the diagnostic log includes:
FTP/DVD Updating data
Tracks date, time of connection/disconnection, errors- yes/no, files,
sizes, percent transferred and FTP permission errors.
Storage Cleanup data
Records what media files have been deleted by the automatic storage
cleanup routine and includes filenames, sizes and dates.
Missing Elements Log
Records all missing media files referenced by an active playlist or
schedule and includes date, time and file element.
Error Summary data
Records important user player diagnostic information and includes the
number of system restarts, number of watchdog restarts, the player
version, etc.
Serial Commands
Records most incoming and outgoing external control commands.
Page 84

WEBVIEW
™
70
Figure 21. WebView Diagnostics - Logging Page
In the Diagnostic logfile viewer, the data is listed with one
diagnostic event per line and is sorted by playback time using the
Mantis internal 24-hour clock. Use the <<Prev or Next>> links to
move to the previous or next pages. To view diagnostic data for a
specific time of day, entering either hours, minutes and/or seconds
in the time boxes and click the
Go button.
Time
Displays the time of day the event was logged based on Mantis’s
internal 24-hour clock.
Source
Displays the source of the diagnostic event (playback, multicast,
system, etc.).
Event
Displays the diagnostic event.
Page 85

WEBVIEW
™
71
System Settings
The System Settings available in the WebView interface are
basically the same as those found in the On-Screen Display menu.
Within the System Settings menu, the following options are
available:
General Settings
Figure 22. WebView System Settings-General
Site ID
The Site ID uniquely identifies the Mantis as it updates via FTP or CD/
DVD-ROM. It is also used for Media Messenger software to enable
automated management of the Mantis player’s content, playlists and
schedule updates.
Date/Time
Sets the Mantis internal clock for date and time.
When a field is edited in any one of the following Settings
Categories, the text for that category will turn red until you
update the settings.
Page 86

WEBVIEW
™
72
Time Zone
Select the appropriate time zone in which the Mantis operates. The time
zone is measured in hours and minutes plus or minus Greenwich Mean
Time.
Version
The current version of the Mantis software.
Uptime
This value indicates how long the unit has been in operation since the
last power cycle.
Page 87

WEBVIEW
™
73
Video Settings
Figure 23. WebView System Settings-Video
Video (formatting options)
The Video drop down menu lists NTSC and PAL video standards
(regular and cropped) and a variety display resolution options.
Select the video formatting option channel:
Video Standards
NTSC PAL
NTSC cropped PAL cropped
Scan Method RGB Modes
800 x 600 x 60
480p 640 x 480 x 50 1024 x 768 x 60
576p 800 x 600 x 50 1280 x 1024 x 60
720p 1024 x 768 x 50 1600 x 1200 x 60
720p50 1152 x 864 x 50 800 x 600 x 75
1080i 1280 x 960x 50 1024 x 768 x 75
1080i50
1280 x 1024 x 50 1280 x 1024 x 75
p = progressive
i = interlaced
1600 x 1200 x 50 1600 x 1200 x 75
(width x height) pixels x (refresh rate) per sec.
Page 88

WEBVIEW
™
74
Ch Video Output
Selects the type of video output: Composite/S-video, RGB or
Component. Composite, RGB, and S-Video signals can be used
simultaneously.
Video Card Configuration
Figure 24. WebView System Settings - Video, Video Card
Configuration
NTSC and PAL Cropped
.When HD video plays on a non-HD display, a black border
appears around the image. Setting Video to a cropped option
expands the image to fill the screen. In the process, top and
bottom edges of the image is cut off and not displayed (cropping).
Video Output Types and Supported Video Standards
Composite and S-Video output only supports NTSC and PAL
Video Standards.
Component supports all video standards.
Page 89

WEBVIEW
™
75
Audio Settings
Figure 25. System Settings: Audio
Volume
This setting adjusts the volume level for audio playback. The default
volume setting is
10 on the 0-20 scale.
Ch Audio
This option selects between Dolby Digital (stereo S/PDIF) and PCM
analog output on a channel-by-channel basis. For MPEGs with standard
layer-2 audio, setting channel audio to
Dolby Digital, the default, turns
on both the S/PDIF and analog stereo outputs. In this configuration,
MPEGs containing AC3 audio play on the S/PDIF output only.
WebView and External Control Command Audio Settings
Audio level setting scales are different for WebView and the
External Control Commands. Unlike WebView’s 0-20 scale, the
external commands use a 0-255 level scale.
Page 90

WEBVIEW
™
76
Control Settings
Figure 26. System Settings: Control
Accept TCP/IP
In conjunction with RS232 serial communication, TCP/IP allows the
user to remotely operate the Mantis by sending operation commands
through a network or locally using an external PC or show controller,
see
External Control Commands on page 131).
Accept UDP
Enable or disable the User Datagram Protocol. As with Accept TCP/IP
caution is necessary in using this protocol.
For security reasons, “Accept TCP/IP” is factory defaulted to “No”.
Be aware that if you decide to use this feature over a large network
(namely the Internet), the potential for outside intervention
(hacking) is greatly increased because there is literally no security
(protection) on this port. Enabling this option will open port 2180.
Page 91

WEBVIEW
™
77
Auto Play
This option enables and disables the auto play feature: default is Off
(disabled).
When enabled, the Mantis at startup, automatically begins playing the
most recently loaded playlist/schedule.
To initiate playbacks manually:
❏ Disable auto play
❏ Start playback using either the external (serial/tcp)
commands, see , or go to
WebView > Player Control and
click on the
Play button for the appropriate channel
Baud Rate
Select an identical value to your external controller. The following
options are available: 1200, 4800, 9600, 38400 & 115200. It is
recommended starting with a baud rate of 9600 for the hyper terminal
connection.
Data Bits
Select an identical value to your external controller. The following
options are available: 5, 6, 7, & 8.
Parity
Select an identical value to your external controller. The following
options are available: None, Odd & Even.
Serial Echo
Enabling the serial echo permits the system to display manually input
data entered through the serial interface.
Page 92

WEBVIEW
™
78
Network Settings
Figure 27. System Settings: Network Configuration
Host Name
Choose a unique name that identifies each Mantis unit on the network.
Mode
DHCP (Dynamic Host Configuration Protocol) - A TCP/IP service
protocol that offers dynamic leased configuration of host IP addresses
and distributes other configuration parameters to eligible network
clients. DHCP provides safe, reliable, and simple TCP/IP network
configuration, prevents address conflicts, and helps conserve the use of
client IP addresses on the network. DHCP uses a client/server model
where the DHCP server maintains centralized management of IP
addresses that are used on the network. DHCP-supporting clients can
then request and obtain use of an IP address from a DHCP server as part
of their network start up process. See your Network Administrator for
further information.
STATIC - A fixed IP address, typically used in a local area network
(LAN). Requires fixed IP, subnet mask, and default gateway addresses.
For all other connections, type the IP address. See your Network
Administrator for further information.
Page 93

WEBVIEW
™
79
IP Address
A 32-bit address used to identify a node on an IP network. Each node
on the IP network must be assigned a unique IP address, which is made
up of a network identifier and a host identifier. This address is typically
represented in dotted-decimal notation, with the decimal value of each
octet separated by a period, for example, 192.168.7.27.
You can configure the IP address statically, or dynamically through
DHCP. See your Network Administrator for further information.
Netmask
Most TCP/IPT networks use subnets in order to effectively manage
routed IP addresses. For the range that you specified in From and To,
Windows 2000 calculates the closest matching subnet. The range of
addresses in the closest matching subnet may exceed the range that you
specified. Unless the addresses specified in From and To are subnet
boundaries, the range based on the calculated subnet will be larger than
the range that you specified. To avoid this, specify a range that falls on
subnet boundaries. For example, if you are using the 10.0.0.0 private
network ID for your intranet, a range that falls on subnet boundaries is
10.0.1.168 to 10.0.1.175. Or, if you are using the 192.168.0.0 private
network ID for your intranet, a range that falls on subnet boundaries is
192.168.1.0 to 192.168.1.255. See your Network Administrator for
further information.
Gateway
A service that allows the Mantis to connect to other servers. Creating a
gateway also allows client computers running only Microsoft client
software to access server resources through the gateway. See your
Network Administrator for further information.
FTP Proxy Type
Allows you to select the type of proxy (None, Socks4, Socks5, USER
usr@hst p, USER usr@hst:p, SITE usr@hst p, SITE usr@hst:p,
NetCache or NAT Firewall).
Note: The NAT Firewall setting will put the FTP client in passive
mode.
FTP Proxy Address
The IP address of the proxy server, if used.
FTP Proxy Port
The port assigned for FTP proxy use.
Page 94

WEBVIEW
™
80
HTTP Proxy Type
Allows you to select the type of proxy (None, Socks4, Socks5, USER
usr@hst p, USER usr@hst:p, SITE usr@hst p, SITE usr@hst:p,
NetCache or NAT Firewall).
Note: The NAT Firewall setting will put the FTP client in passive
mode.
HTTP Proxy Address
IP address of HTTP proxy server.
HTTP Proxy Port
Address of port.
Figure 28. System Settings: Network NTP Client Configuration,
Enable NTP (Network Time Protocol)
NTP must be enabled and set. At regular intervals, the NTP
synchronizes the internal clocks of all systems on a local network.
NTP Server
The IP address of the server providing NTP and that the Mantis must
time-sync with.
Dialup Connect
Default for dialup is Disabled.
Dialup Retries
The number of attempts to connect to the NTP server that the Mantis
may try.
NTP Sync Interval
The NTP synchronization interval is set in seconds, thus 300 equals 5
minutes.
Page 95

WEBVIEW
™
81
Figure 29. System Settings: Network SNMP Server Configuration
Enable SNMP (Simple Network Management Protocol)
The SNMP feature permits monitoring the Mantis via the network, as
well as retrieving and changing its settings. This is done through the use
of the Mantis MIB file.
Engine ID
A unique ID number, similar to siteID, assigned to the Mantis by a
SNMP trap daemon or server.
SNMP Network
Designates the IP address of the system(s) that are to monitor and
control the Mantis. Use standard dotted-decimal notation for all IP
settings. To allow an individual machine to control the Mantis, set to a
specific IP address, for example 192.168.0.100. To allow a group of
machines to control the Mantis, set the IP to a range, 192.168.0.0).
SNMP Netmask
Designates the Netmask information for the system(s) that are to
monitor and control the Mantis. For an individual controller, as
described above, set the netmask to 255.255.255.255. For multiple
controllers, as in the range example above, use 255.255.255.0.
Community
The SNMP Community name defines the relationship between an
SNMP server system, the Mantis, and the client systems. This acts as a
password to control the clients access to the Mantis.
Security Name
This is a SNMPv3 feature. Use this to set the security name for the
authentication and encryption for SNMP transmissions.
Page 96

WEBVIEW
™
82
Auth Passphrase
An SNMPv3 feature, it provides authentication but no encryption on
SNMP information.
Priv Passphrase
An SNMPv3 feature, it provides authentication and encryption on
SNMP information.
Figure 30. System Settings: Network SNMP Traps Configuration
Configuring the SNMP traps controls allows the Mantis to send
diagnostic messages to a SNMP trap daemon operating on a client
or a SNMP trap server. Mantis does not require a trap server to use
SNMP trapping, see Engine ID for details. The traps that may be
enabled are
❏ Software watchdog
Mantis sends the ID of the channel that had the watchdog
event
❏ Playlist content missing
Mantis sends the file
❏ Update content missing
Only available for Multicast
SNMP Trap Server
The IP address of the target SNMP client or SNMP trap server.
Page 97

WEBVIEW
™
83
SNMP Version
The currently installed version of SNMP.
Engine ID
This is a unique number generated by the SNMP trap daemon when
initially started and displayed in the SNMP Server field,
Engine ID, see
page 81.
Community
Acts as a password to control the clients access to the Mantis, see
preceding page for description.
Security Name
Use this to set the security name for the authentication and encryption
for SNMP transmissions.
Auth Passphrase
It provides authentication but no encryption on SNMP information.
Priv Passphrase
It provides authentication and encryption on SNMP information.
Software Watchdog ?
Enabling permits the Mantis to send watchdog events for all channels.
Playlist Content Missing ?
Enabling missing content allows Mantis to send message files with
details of missing content.
Update Content Missing ?
Available only for optional Multicast feature. Enabling sends file that
lists missing update content.
Sending Mantis SNMP Traps
It is necessary for the SNMP Traps - Engine ID field to contain a
unique ID number that the SNMP trap daemon recognizes as
belonging to a specific Mantis. The engine ID generated by the
daemon can be used or a network unique number can be
assigned by the user.
Page 98

WEBVIEW
™
84
Logging Settings
Figure 31. System Settings: Logging
Run Log
Turns On or Off the Run log which creates a record of which videos
played (with which graphic overlays, if applicable), starting at what
dates/times, playing back what percentage of the video and for how
long.
Diagnostic Log
Turns On or Off the Diagnostic log which makes a record of all media
update transactions and any system errors on a Mantis. For more
information about the Diagnostic Log,
Diagnostics - Logging on
page 68.
Page 99

WEBVIEW
™
85
Log Format
Sets the output format of the run log file to either CSV or XML.
Sample from a CSV format run log:
12-07-02 20:30:07,1,05saturn.mpg,3_ser220.BMP,1,00:01:01,100
Sample from a XML format run log:
<mpeg datetime=”12-07-02 20:32:57” chan=”1”
filename=”05saturn.mpg” overlay=”3_ser220.BMP” loop=”1”
duration=”00:01:01” percent=”100” />
The format of the diagnostic log is in a simple “time - event” per line
format.
Log Default Playlist
Permits whether or not the default playlist playback is included in the
playback log file data. Choosing
Yes includes the default playlist in the
playback data.
If you are not using the scheduling feature (single playlist mode), note
that the playlist will not be logged.
Max Log MBs
Sets the maximum size, MB, that a log file may become. The default
value is 10 MB. Keep this value relatively small if maintaining a large
amount of free space for videos and graphic overlays.
If there is not enough reserved space, the Mantis deletes the oldest
residing logs in order to make room for the new ones.
When the log files exceed the maximum amount of defined storage
space, an automatic cleanup process will delete the oldest file as
required to contain the total log file space under the set limits. In
addition, files are deleted after they are transferred to the FTP server or
downloaded from the Mantis player.
Upload Logs
Permits the uploading of log files to the logfiles directory on an FTP
server.
Once the log files are uploaded to the FTP server, they may be
downloaded to a range of storage options, such as a database.
After log files have been successfully uploaded to your FTP
server, they will be deleted from the Mantis.
Page 100

WEBVIEW
™
86
WebView Settings
Figure 32. System Settings: WebView
WebView Enable
This feature gives the user access to the Mantis over a network using a
conventional web browser (see
WebView™ on page 29).
File Access
Permits accessing the Mantis directly with an FTP client.
Username
Enter at least 6 (but no more than 15) alphanumeric characters here.
This field is case sensitive.
Password
Enter at least 6 (but no more than 15) alphanumeric characters. This
field is case sensitive.
The user name and password are used for both WebView and the
FTP server.
It is strongly recommended to change the user name and password from their original default values for system security
 Loading...